
ZGPO1PC - Barbecue ZANUSSI - Free user manual and instructions
Find the device manual for free ZGPO1PC ZANUSSI in PDF.


| Product Type | Gas Barbecue |
| Model | ZGPO1PC |
| Brand | Zanussi |
| Overall Dimensions (approx.) | 1200 x 600 x 1100 mm (with lid closed) |
| Cooking Area | Main grill: 450 x 350 mm; additional side burner: 250 mm diameter |
| Weight | Approx. 30 kg |
| Fuel Type | Liquefied propane gas (LPG) – butane also compatible |
| Number of Main Burners | 3 |
| Total Heat Output | Approx. 9.5 kW |
| Ignition | Piezo push‑button ignition on each burner |
| Grill Material | Porcelain‑enameled cast iron |
| Side Tables | Folding side tables (2) |
| Lid | Stainless steel lid with temperature gauge |
| Storage Cabinet | Enclosed cabinet with doors for gas bottle and accessories |
| Wheels | 4 swivel casters (2 with brakes) |
| Safety Features | Gas bottle restraint, flame failure safety device on main burners |
| Assembly | Requires assembly; included tools and instructions |
| Maintenance | Clean grates with warm soapy water; regularly check gas hoses |
| Spare Parts Availability | Yes – burners, grates, ignition parts, etc. (contact Zanussi support) |
| Warranty | 2 years (manufacturer warranty) |
Frequently Asked Questions - ZGPO1PC ZANUSSI
User questions about ZGPO1PC ZANUSSI
0 question about this device. Answer the ones you know or ask your own.
Ask a new question about this device
Download the instructions for your Barbecue in PDF format for free! Find your manual ZGPO1PC - ZANUSSI and take your electronic device back in hand. On this page are published all the documents necessary for the use of your device. ZGPO1PC by ZANUSSI.
USER MANUAL ZGPO1PC ZANUSSI
WARNING: PLEASE ENSURE YOU HAVE READ THROUGH THE SAFETY AND OPERATING INSTRUCTIONS BEFORE USE. PLEASE RETAIN INSTRUCTIONS FOR FUTURE REFERENCE

Please scan the QR code for step by step video assembly instructions. Alternatively, you can visit: zanussicomfortandoutdoors.com. From here, please select the product that you are looking to build and view the 'How To' video located at the bottom of the page.
ZANUSSI
ZGP01PC Gas Pizza Oven
Safety Instructions 3-6
Parts List & Feature Diagram 7
Pizza Oven Assembly 8-10
Using the Storage/Carry Bag 11
Attaching the Gas Cylinder 12-14
Lighting And Extinguishing Your Pizza Oven 15-16
Cooking With Your Pizza Oven 17-18
Cleaning and Care Instructions 19-20
Troubleshooting 21-22
Guarantee and Customer Services 23
SAFETY INSTRUCTIONS
WARNING: IMPORTANT SAFETY INSTRUCTIONS READ CAREFULLY AND KEEP FOR FUTURE REFERENCE
Before you start to build and use your pizza oven, please read these instructions thoroughly:
- Please dispose of all plastic bags carefully and keep them away from children.
- Check all the parts provided against the list in this instruction manual to make sure you have all of the parts listed. If not, contact your local store who will be able to help you.
•Take a few moments to familiarize yourself with the contents and before starting, check all holes are clear of any paint residue. - When you are ready to start, make sure that you have plenty of space and a clean dry area for assembly.
- Important - Whilst every care is taken in the manufacture of this product, care must be taken during assembly in case sharp edges are present.
- WARNING - Modification of the pizza oven may be dangerous, is not permitted, and will nullify any warranty.
- WARNING - Failure to follow the instructions in this manual could result in hazardous fire or explosion, serious injury or property damage.
Please read and follow this advice when cooking on your grill:
- ALWAYS wash your hands before or after handling uncooked meat and before eating.
• ALWAYS keep raw meat away from cooked meat and other foods.
- Before lighting your oven, ensure pizza oven grill surfaces and tools are clean and free of old food residues.
• DO NOT use the same utensils to handle cooked and uncooked foods.
- Ensure all meat is cooked thoroughly before eating.
- CAUTION - eating raw or undercooked meat can cause food poisoning (e.g. bacteria strains such as E.coli).
- To reduce the risk of undercooked meat, cut it open to ensure it is cooked all the way through internally before consuming.
- CAUTION - if meat has been cooked sufficiently the meat juices should be clear in colour and there should be no traces of pink/red juices or meat colouring.
- Pre-cooking of larger meat joints is recommended before finally cooking in your pizza oven.
•After cooking with your pizza oven always clean the grill cooking surfaces and utensils.
Safety Warnings:
- WARNING – This product can give off CARBON MONOXIDE when used, which is poisonous and can kill. DO NOT use a pizza oven indoors or either in a tent, caravan or awning.
- WARNING - Do not use indoors! OUTDOOR USE ONLY. Do not use the pizza oven in a confined and/or habitable space e.g. houses, tents, caravans, motor homes, boats. Danger of carbon monoxide poisoning fatality.
- DO NOT use this product as a furnace.
- Ensure that the product is positioned on a permanent, flat, level, heat resistant, non-flammable surface always away from flammable items, including wooden fences or overhanging trees.
•The appliance should be protected from direct draughts and shall be positioned or protected against direct penetration by any trickling water (e.g. rain). - Maintenance should only be carried out by a registered service engineer.
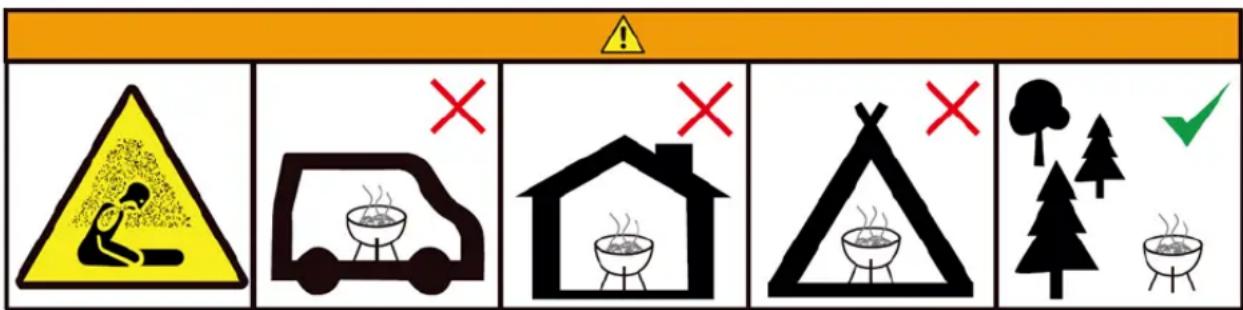
Carbon Monoxide
Poisoning Hazard
Do not use in
Motor Homes
Do Not Use
Indoors
Do Not Use in Tents
Use in open Spaces
- Ensure the product has a minimum of 1 meter overhead clearance and has a minimum of 1 meter clearance from other surrounding items.
- WARNING - Do not use spirit or petrol for lighting or relighting! Use only the gas from your appropriate canister.
• DO NOT handle or move the product whilst alight as it will become hot.
- NEVER leave a burning fire unattended.
- WARNING - Accessible parts may be very hot. Keep young children away.
- Keep children and pets at a safe distance from the product when in use.
- Before cooking for the first time, operate the pizza oven for about 15 minutes with the gas turned on LOW.
•Always use heat resistant gloves when handling the product. Do not touch any metal parts while the pizza oven is in use; only touch the pizza peel using the handle provided.
- Still be careful when using the handle to operate the pizza peel, as metal parts of the pizza peel are likely to become hot.
- Turn off the gas supply at the gas cylinder after use.
- Ensure that the pizza oven has cooled down completely before cleaning and storing
- To prolong the life of your pizza oven do not leave it outside unprotected, use a suitable pizza oven cover when not in use.
- DO NOT store or use flammable materials near this product.
- DO NOT use aerosols near this pizza oven.
•DO NOT use coal in this product.
- DO NOT attempt to move the product when it is hot or in use.
- The regulator and hose must be connected correctly to the appliance. A spanner must be used to tighten the nut onto the connection thread.
IF YOU SMELL GAS:
- Turn off the gas supply at the gas cylinder.
- Extinguish all naked flames; do not operate any electrical appliances.
- Ventilate the area.
- Check for leaks as detailed in this manual on page 15.
- If odour persists, contact your dealer or gas supplier immediately.
PRECAUTIONS:
- Leak test all connections after each cylinder refill or before each use.
- Never check for leaks with a match or open flame.
- Do not store or use gasoline or other flammable vapours and liquids in the vicinity of this or any other appliance.
- Any gas cylinder not connected for use shall not be stored in the vicinity of this or any other appliance.
Technical data
 0558-23 0558-23 | Outdoor Pizza OvenZGPO1PC(SRGG22003)UKCA PIN: 1336DO005 | ||||
| Country of Destination | ApplianceCategory | Type of Gas &Nominal Pressure | BurnerInjector Sizeø | Total NominalHeat Inputs(Hs) | |
| GB | 13+  | Butane at 28-30mbarPropane at 37mbar | 0.98 mm | 4.0kW | |
| G30: 291g/h; G31: 286g/h | |||||
 0063-23 0063-23 | PIN Number: 1336DO005 | ||||
| Country of Destination | ApplianceCategory | Type of Gas &Nominal Pressure | BurnerInjector Sizeø | Total NominalHeat Inputs(Hs) | |
| □BE □CH □CY □CZ□ES □FR ☑GB □GR□IE □IT □LU □LV□PT □SK □SI | 13+ | √ | Butane at 28-30mbarPropane at 37mbar | 0.98 mm | 4.0kW |
| G30: 291g/h; G31: 286g/h | |||||
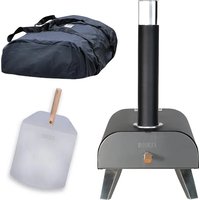
WHAT'S INCLUDED?
Here's everything you need

| PART DESCRIPTION QTY | |
| A Pizza oven body assembly 1 | |
| B Pizza stone 1 | |
| C Storage / carry bag 1 | |
| D Pizza peel 1 | |
| E Knob 1 |
PIZZA OVEN ASSEMBLY
STEP 1 – Unfolding the legs
- Make sure to remove all of the protective plastic from the appliance parts.
- With assistance, place the pizza oven body assembly (A) upside down on a soft, level surface.
- Then unfold both legs (which come pre-assembled), as illustrated in the diagram below.

PIZZA OVEN ASSEMBLY
STEP 2 – Attaching the knob
- Attach the knob (E) to the pizza oven body assembly (A), by inserting it into the control system.
- Ensure that the flat side on the shaft and inner part of the control system are aligned.
•This is located on the side of the body assembly, as illustrated in the diagram below.

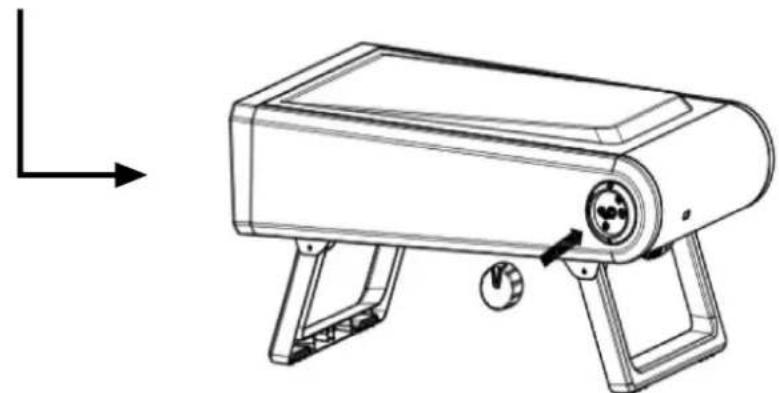

PIZZA OVEN ASSEMBLY STEP 3 – Inserting the pizza stone
- Slide the pizza stone (B) into the pizza oven body assembly (A) as illustrated in the diagram below.

USING THE STORAGE/CARRY BAG
For Your Pizza Oven
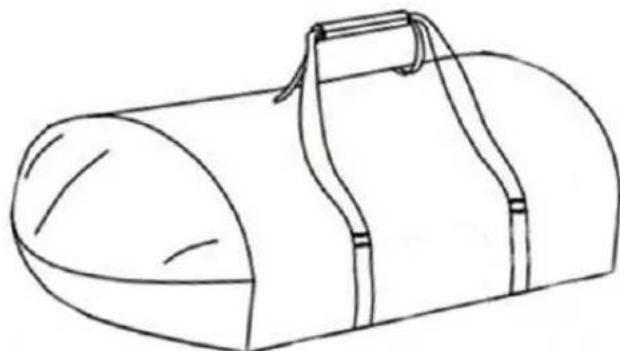
- The storage/carry bag (C) can be used to help easily store and transport the pizza oven, as long as the pizza oven is completely cool.
•The pizza oven and all accessories should only be stored and transported once cooled and cleaned; please see pages 19-20 for further cleaning instructions.
•To store the pizza oven, safely detach the gas supply as instructed on page 14, fold the legs flat, and place the pizza stone (B) and pizza peel (D) into the pizza oven body assembly (A).
- Carefully place the pizza oven body assembly (A) into the storage/carry bag (C) and secure using the zip.
- You are now able to use the carry handles on the storage/carry bag (C) to help transport and store the pizza oven.
ATTACHING THE GAS CYLINDER
To Your Pizza Oven
Read the following instructions carefully and be sure your gas pizza oven is properly installed, assembled and cared for:
- WARNING – Failure to follow these instructions may result in serious bodily injury and/or property damage.
- WARNING – The gas bottle must always be kept in an upright position.
- WARNING – If the appliance is not in use, the gas must be turned OFF at the supply cylinder.
- WARNING – The cylinder used must include a collar to protect the cylinder valve.
-
WARNING – The minimum distance for the appliance and the gas tank is 1 metre apart.
-
Your gas pizza oven can be used with gas cylinders between 11 kg and 15 kg.
•The maximum size of the gas cylinder should be: Dia. 320mm, Height: 600 mm. You can check with your local gas supplier to see if they have a suitable gas cylinder for your pizza oven.
•Always place the cylinder on flat level ground. - This appliance is only suitable for use with low-pressure butane or propane gas or LPG mixtures, fitted with the appropriate low-pressure regulator via a flexible hose.
- The hose should be secured to the regulator and the appliance with hose clips. Make sure the flexible hose could not come in contact with hot surfaces and avoid twisting.
- Use a suitable regulator that is certified to BSEN 12864 or EN 16129. Make sure the regulator and flexible hose comply with local code.
-
Please consult your LPG dealer for information regarding a suitable regulator for the gas cylinder.
-
Use only regulators and hoses approved for LP Gas at the pressures mentioned on the previous page. The life expectancy of the regulator is estimated as 2 years.
•The use of the wrong regulator or hose is unsafe; always check that you have the correct items before operating the appliance. - The hose used must conform to the relevant standard for the country of use.
- Worn or damaged hose must be replaced.
- Ensure that the hose is not obstructed, kinked, or in contact with any part of the appliance other than at its connection.
- Avoid twisting the flexible tube when the appliance is in use.
- The length of flexible hose shall not exceed 1.5m. In Finland, the length shall not exceed 1.2m.
- The hose should certified according to applicable EN Standard and comply with local code.
Storage of Appliance:
- Storage of an appliance indoors is only permissible if the cylinder is disconnected and removed from the appliance.
- When the appliance is not to be used for a period of time it should be stored in the storage/carry bag and/or original packaging and stored in a dry, dust free environment.
Gas Cylinder:
- The gas cylinder should not be dropped or handled roughly.
- If the appliance is not in use, the cylinder must be disconnected.
- Replace the protective cap on the cylinder after disconnecting the cylinder from the appliance.
- The gas cylinder must be sited outside the body of the appliance.
- Always connect or replace the cylinder in a well-ventilated area and away from any source of ignition, and never in the presence of a flame, spark or heat source.
- Cylinders must be stored outdoors in an upright position and out of the reach of children.
- The cylinder must never be stored where temperatures can reach over 50°C .
- Do not store the cylinder near flames, pilot lights or other sources of ignition.
- Do not smoke near the cylinder.
- Make sure that the gas cylinder compartment (if any) is not obstructed, and keep it ventilated and clean.
Connection to Your Appliance:
- Before connection, ensure that there is no debris caught in the head of the gas cylinder, regulator, burner and burner ports. Spiders and insects can nest within and clog the burner/venturi tube at the orifice, and a clogged burner can lead to a fire beneath the appliance.
- The connection on the oven is a push fit. To connect the hose to the oven, remove the cap and push the hose fully on and secure with a hose clip. Connecting the regulator to the gas bottle will require a spanner.
- If the hose is replaced it must be secured to the appliance and regulator connections with hose clips.
- Disconnect the regulator from the cylinder (according to the directions supplied with the regulator), when the appliance is not in use.
- The appliance must be used in a well ventilated area. Do not obstruct the flow of combustion air to the burner when the appliance is in use.
- WARNING - This gas pizza oven is designed for use outdoors, away from any flammable materials. It is important that there are no overhead obstructions and that there is a minimum distance of 1 m from the side or rear of the appliance.
- It is important that the ventilation openings of the appliance are not obstructed.
LIGHTING & EXTINGUISHING
Your Pizza Oven
- WARNING - Before use check for leaks. Never check for leaks with a naked flame, always use a soapy water solution.
- Before cooking for the first time, operate the pizza oven for about 15 minutes with the gas turned on LOW. This will “heat clean” the internal parts and dissipate odour from the painted finish.
To check for leaks:
- Make 2-3 fluid ounces of leak detecting solution by mixing 1 part washing up liquid with 3 parts water.
- Ensure the control valve is "OFF".
- Connect the regulator to the cylinder and ON/OFF valve to the burner, ensure the connections are secure then turn ON the gas.
- Brush the soapy solution onto the hose and all joints. If bubbles appear you have a leak, which must be rectified before use.
- Turn OFF the gas at the cylinder after testing.
- Retest after fixing the fault.
- If leakage is detected and cannot be rectified, do not attempt to cure the leakage, instead consult your gas dealer.
- If you smell gas (in the event of finding a gas leak), turn off the gas supply immediately at the gas cylinder valve, and ensure the control valve is "OFF".
STEP 1
Ensure good ventilation before lighting the burner. Before use, make sure the control knob is in the "OFF" position. Then push the control knob in and slowly turn it anti-clockwise to the "PREHEAT/HIGH" position until you hear a click and the burner ignites then continue to hold in the control knob for 5 seconds. As an alternative, you can also light the burner with a match by pushing the control knob in and continue doing so whilst turning it anti-clockwise to the
"PREHEAT/HIGH" position and a clicking sound is heard. Then put the lit match near the ports of the burner as shown in the diagram across; this will light the burner. If the burner has not lit after completing this step, wait 5 minutes and try again.


STEP 2
You can adjust the flame from HIGH to LOW by slowly turning the control knob anti-clockwise.
STEP 3
To turn off your pizza oven, it is best to turn off the gas cylinder first to allow the remaining gas in the hose to burn off; this will only take a couple of seconds. Then turn the control knob to the "PREHEAT/HIGH" position, then push the knob in and turn it clockwise to the "OFF" position.
STEP 4
Allow the pizza oven to fully cool before storing it away. It is recommended that heat proof gloves be used when handling particularly hot components.
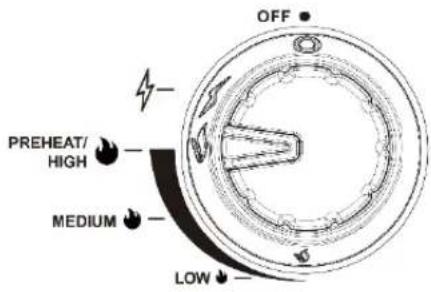
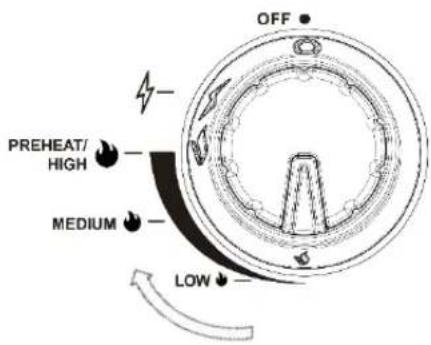
WARNING - If the burner fails to ignite, turn the control knob off (clockwise), and also turn the cylinder valve off. Wait five minutes before attempting to relight with the ignition sequence.
COOKING WITH YOUR PIZZA OVEN
Baking Pizza
- Using a small amount of 00 flour, dust your pizza peel (D) and your hands to avoid your pizza sticking.
- Hand stretch a ball of dough to a 9" circle and place the pizza dough onto the lightly floured pizza peel (D). Rolling out your dough can make it chewy, whilst hand stretching gives a crisp finish.
- Construct your pizza with your desired add-ons.
- Launch your pizza onto the pizza stone (B) using the pizza peel (D), and bake for about 15 seconds.
- After 15 seconds, rotate the pizza 90 degrees using the pizza peel (D) or other suitable heat resistant tools, and bake for another 15 seconds. Repeat the same process until the pizza is rotated and baked 360 degrees.
- Take out the pizza using the pizza peel (D). Now, enjoy your pizza!
Tips for launching your pizza:
- Use good quality 00 flour in your pizza dough recipe, and for dusting. This will give your dough the perfect texture.
- Get your peel, dough and ingredients to room temperature. Cold dough will spring back on itself and stick; warm dough will stretch too far and tear. If you stretch your pizza on a warm peel, the dough will start to sweat, which will cause it to stick.
- Flour your hands and the surface you are working on before you begin stretching.
- Check for holes in the pizza base before adding toppings – if sauce gets between the dough and peel, your dough will stick.
- Before you add any toppings - stop and shake the peel to check that your dough is moving freely. If it's stuck, pick it up and add more flour to the peel. You have to do this before you add toppings!
Please note: Food must be thoroughly cooked before if it consumed.
Please note: After the first round of baking is complete, if you want to continue to cook another pizza, please change the baking time to around 10 seconds between each rotation as the temperature inside the oven will have increased, and can reach up to 350 degrees.
COOKING WITH YOUR PIZZA OVEN
Cooking Steak
- Place the marinated steak onto the pizza stone (B).
- Cook for 20 seconds. After 20 seconds, rotate the steak 180 degrees using cooking tools, and cook for another 20 seconds.
- Then, flip over the steak and repeat above instructions for the other side of the steak.
- Completing step 2 and step 3 should take around 80 seconds, by which time you would have a medium steak.
- If you want medium to well-done steak, adjust each cooking time to 25 seconds, with a total cooking time of 100 seconds.
- Adjust the cooking time according to the actual temperature of the pizza oven and personal preferences.
You can use this pizza oven to cook more than pizza and steak. Please enjoy your cooking journey!
Please note: Cooking times may vary depending on personal preference.
Please note: Food must be thoroughly cooked before it is consumed.
CLEANING AND CARE INSTRUCTIONS
WARNING: Ensure the appliance is cold before cleaning, and that the fuel supply is turned OFF at the gas cylinder.
Cleaning:
- Once cool, the pizza peel (D) should be cleaned by soaking and washing in warm soapy water.
•The outside of the pizza oven can be wiped down with warm, soapy water and dried immediately. Make sure to avoid abrasive cleaning products or those with harsh chemicals.
•To clean the combustion chamber (where the food is placed inside) and pizza stone (B), run the pizza oven at top temperatures for 20 minutes to burn off any excess food, and then wipe down with kitchen paper once cooled.
- The pizza stone (B), is not dishwasher safe and should also not be cleaned with washing up liquid. It can however be rinsed with water if necessary. After cleaning the stone with water, the stone must be dried before it can be used again. This can be done in a conventional oven at 60°C (140°F) for 2 hours.
Care:
- Wait for the pizza oven to cool completely before moving.
- DO NOT use the stone over an open flame.
- Avoid extreme temperature change to the stone.
•DO NOT place frozen foods on a hot stone.
•The stone is fragile and can break if bumped or dropped.
- The stone is very hot during use and stays hot for a long time after use; DO NOT cool the stone with water.
- Ensure you keep your appliance area clear and free from combustible materials i.e. gasoline, and other flammable vapours and liquids.
- Don't obstruct the flow of combustion and ventilation air by keeping the ventilation opening(s) of the cylinder enclosure free and clear from debris.
- Check and clean the burner tubes for insects and insect nests. A clogged tube can lead to a fire beneath the appliance.
- Store your pizza oven out of direct sunlight and indoors where possible when storing for extended periods of time.
•The pizza oven should not be exposed to harsh weather conditions such as snow, heavy rain and strong winds.
- If your gas pizza oven uses a flexible hose to connect to the gas, check the rubber O-ring on the regulator end of the hose assembly at least once a year. If it appears worn or cracked, have it replaced.
- If you use a portable LPG gas cylinder, you will need to have the cylinder serviced or replaced every ten years. The date of the last service should be stamped on the neck of the bottle.
- A rain cover is also recommended to cover your gas pizza oven and maintain and protect from all weather conditions.
TROUBLESHOOTING
| PROBLEM POSSIBLE CAUSE PREVENTION/ SOLUTION | ||
| I can't light my pizza oven | ·There may be a gas leak in your hose.·Your gas cannister is not connected.·You have run out of gas. | ·Ensure that your propane/LPG tank is full.·Ensure that the connections to the gas cannister and regulator are sealed and secure.·Check for leaks in the gas hose using a leak spray or soapy water.·Push in and slowly turn the gas control knob anti-clockwise. Keep the knob pushed in for 5 sections after ignition·If your pizza oven is not igniting but gas is flowing, use a match to light the gas.·If the burners do not light, disconnect the regulator from the propane/LPG tank for at least 1 hour.·Reconnect and open up the gas for 30 seconds before attempting to ignite. |
| My pizza oven is making a roaring sound | ·The gas burner has not ignited correctly. | ·On rare occasions, you may hear a louder-than-normal roaring sound, switch off for 5 minutes then re-light. |
| I can smell gas | ·There may be a gas leak. | ·Turn off the gas supply by closing the valve on the propane/LPG tank.·Extinguish any open flame.·If the smell persists, keep a safe distance and contact your local fire department. |
| My pizza oven is running too hot | ·The pizza oven has been left running at top temperatures for extended periods without cooking. | ·You will know that it is too hot if your food is cooking too quickly and beginning to burn.·To solve this, reduce the output using the gas control knob.·If you are taking a break from cooking, lower the flame output using the gas control knob or switching off.·If your stone baking board is too hot, rest a cast iron dish on it for 30 seconds or so to absorb some of the heat. |
| My pizza oven isn't hot enough | ·Your propane/LPG bottle is empty.·You are using the wrong regulator.·You haven't preheated your pizza oven for long enough. | ·If the ambient temperature is low, add an extra 5-10 minutes to the preheat time.·Check that your propane/LPG bottle is full and that you are using the correct regulator.·Ensure that there are no leaks in the hose and that the connections between the regulator and propane/LPG tank are sealed. |
| My pizza isn't cooked through | ·The dough or toppings are too thick. | ·These pizzas will cook best when the toppings are light.·Follow the cooking instructions for pizza on page 19, and ensure that the dough is well spread out, and that the toppings are not overloaded. |
| My pizza stone looks dirty | ·Excess food may be left in your oven. | ·The pizza stone may change colour but this will not affect performance.·Excess food can be left to burn off under the high temperatures inside of the pizza oven. |
| My pizza is stuck to the peel | ·Your pizza dough is not at room temperature.·Your pizza dough is too wet.·Your dough has holes in it.·There is not enough flour on the peel. | ·Dough is easiest to stretch and slide off of the peel at room temperature. If you are cold proving dough, leave it for at least 5 hours at room temperature before beginning to stretch.·Add a generous sprinkling of flour to the dough and peel before beginning your stretch.·Ensure that there are no holes in the dough as the sauce can create a 'glue' effect between the dough and peel.·Before adding your toppings, give your peel a shake to ensure that the dough is moving freely. If not, pick up the dough and add more flour to the peel.·Do not leave your dough on the peel for a long time before cooking.·If the dough has become stuck, lift it at one side and give a gentle blow of air underneath: This will create a 'hovercraft' effect and your pizza should glide more easily from peel to stone. |
GUARANTEE AND CUSTOMER SERVICES
This product is guaranteed for 12 months from the date of the original purchase. If any defect arises due to faulty materials or workmanship, the faulty product must be returned to the place of purchase.
Refund or replacement is at the discretion of the retailer.
The following conditions apply:
- The product must be returned to the retailer with the original proof of purchase.
- The product must be installed and used in accordance with the instructions contained in this instruction guide and any other instructions for use which are supplied.
- It must be used for domestic purposes only and for its intended use.
- This guarantee does not cover wear and tear, damage, misuse or consumable parts.
This does not affect your statutory rights.
For Customer Services & Spare Parts please call: 0330 1230 597
Or visit us at zanussicomfortandoutdoors.com
ZANUSSI
ZANUSSI is a registered trademark used under license from AB Electrolux (publ). Made by Product Care Trading Limited, Wigan, WN2 4AY/ PCT (NI) Ltd, Belfast, BT5 5AD.
For Customer Services & Spare Parts please call: 0330 1230 597 Or visit us at zanussicomfortandoutdoors.com


The ‘wheelie bin’ symbol is known as the 'Crossed-out wheelie bin Symbol'. When this symbol is marked on a product/batteries, it means that the product/batteries should not be disposed of with your general household waste. Only discard electrical/electronic/battery items in separate collection schemes, which cater for the recovery and recycling of materials contained within. Your co-operation is vital to ensure the success of these schemes and for the protection of the environment. For your nearest disposal facility, visit www.recycle-more.co.uk or ask in store for details.
SEDEX – Connecting businesses and their global suppliers to share ethical data and enabling improvement in ethical performance. Visit www.sedex.org.uk for further information.
We reserve the right, due to possible changes to design, to alter the instruction manual without prior notice.

- ZANUSSI
- ZGP01PC GAS PIZZA OVEN
- SAFETY INSTRUCTIONS
- WARNING: IMPORTANT SAFETY INSTRUCTIONS READ CAREFULLY AND KEEP FOR FUTURE REFERENCE
- PLEASE READ AND FOLLOW THIS ADVICE WHEN COOKING ON YOUR GRILL
- SAFETY WARNINGS
- IF YOU SMELL GAS
- PRECAUTIONS
- WHAT'S INCLUDED
- HERE'S EVERYTHING YOU NEED
- PIZZA OVEN ASSEMBLY
- STEP 1 – UNFOLDING THE LEGS
- STEP 2 – ATTACHING THE KNOB
- PIZZA OVEN ASSEMBLY STEP 3 – INSERTING THE PIZZA STONE
- USING THE STORAGE/CARRY BAG
- FOR YOUR PIZZA OVEN
- ATTACHING THE GAS CYLINDER
- TO YOUR PIZZA OVEN
- STORAGE OF APPLIANCE
- GAS CYLINDER
- CONNECTION TO YOUR APPLIANCE
- LIGHTING & EXTINGUISHING
- YOUR PIZZA OVEN
- TO CHECK FOR LEAKS
- STEP 1
- STEP 2
- STEP 3
- STEP 4
- COOKING WITH YOUR PIZZA OVEN
- BAKING PIZZA
- TIPS FOR LAUNCHING YOUR PIZZA
- COOKING STEAK
- CLEANING AND CARE INSTRUCTIONS
- CLEANING
- CARE
- TROUBLESHOOTING
- GUARANTEE AND CUSTOMER SERVICES
- THE FOLLOWING CONDITIONS APPLY
Brand : ZANUSSI
Model : ZGPO1PC
Category : Barbecue