
PR4 - Rowing Machine PURE - Free user manual and instructions
Find the device manual for free PR4 PURE in PDF.


| Product Type | Magnetic Rowing Machine |
| Model | PR4 |
| Brand | Pure |
| Resistance Type | Magnetic with 16 levels |
| Maximum User Weight | 150 kg (330 lbs) |
| Display | LCD showing Time, Distance, Strokes, Calories, Pulse, Watt, SPM, Time/500m |
| Training Programs | Manual, Program (12 profiles), HRC (55/75/90/Target), Race, User-defined |
| Resistance Adjustment | Manual knob and electronic control via console |
| Heart Rate Monitoring | Compatible with chest belt (not included) |
| Power Supply | Adapter (included) |
| Foldable | Yes, for compact storage |
| Seat | Sliding with rollers on rail |
| Pedals | Adjustable with straps |
| Assembly Required | Yes, detailed step-by-step instructions provided |
| Dimensions (approx.) | 2000 x 500 x 1000 mm (L x W x H) |
| Net Weight (approx.) | 35 kg |
Frequently Asked Questions - PR4 PURE
User questions about PR4 PURE
0 question about this device. Answer the ones you know or ask your own.
Ask a new question about this device
Download the instructions for your Rowing Machine in PDF format for free! Find your manual PR4 - PURE and take your electronic device back in hand. On this page are published all the documents necessary for the use of your device. PR4 by PURE.
USER MANUAL PR4 PURE
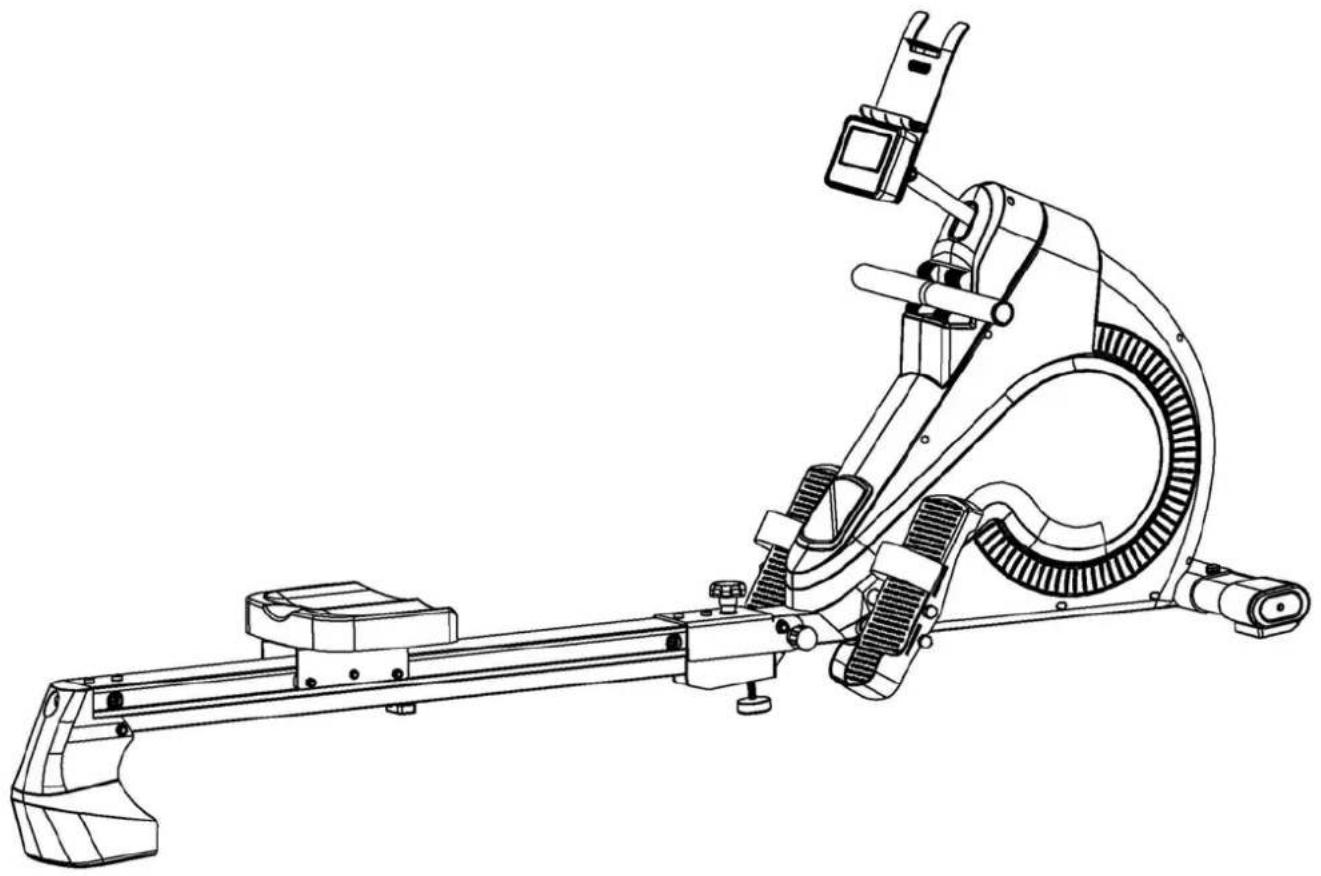
PURE DESIGN PR4 Rower
OWNER'S MANUAL
natural_image
Technical line drawing of a mechanical exercise machine (no text or symbols present)IMPORTANT!
Please read all instructions carefully before using this product.
Retain this manual for future reference.
The specifications of this product may vary slightly from the illustrations and are subject to change without notice.
IMPORTANT SAFETY NOTICE
Note the following precaution before assembling or operating the machine
1、Assemble the machine exactly as the descriptions in the instruction manual.
2、Check all the screws, nuts and other connections before using the machine for the first time and ensure that the trainer is in the safe condition.
3、 Set up the machine in a dry level place and leave it away from moisture and water.
4、Place a suitable base (e.g. rubber mat, wooden board etc.) beneath the machine in the area of assembly to avoid dirt and etc.
5、Before beginning training, remove all objects within a radius of 2 meters from the machine.
6、Do not use aggressive cleaning articles to clean the machine, only use the supplied tools or suitable tools of your own to assemble the machine or repair any parts of machine. Remove drops of sweat from the machine immediately after finishing training.
7、Your health can be affected by incorrect or excessive training. Consult a doctor before beginning the training program. He can define the maximum setting (Pulse. Watts. Duration of training etc) to which you may train yourself and can get precise information during training. This machine is not suitable for therapeutic purpose.
8、 Only do training on the machine when it is in correct working way. Use only original spare parts for any necessary repairs.
9、 This machine can be used for only one person's training at a time.
10、Wear training clothes and shoes that are suitable for fitness training with the machine. Your training shoes should be appropriate for the trainer.
11、If you have a feeling of dizziness, sickness or other abnormal symptoms, please stop training and consult a doctor immediately.
12、People such as children and handicapped persons should only use the machine in the presence of another person who can give aid and advice.
13、The power of the machine increases with increasing the speed, and the reverse. The machine is equipped with adjustable knob that can adjust the resistance.
14、The maximum user's weight is 150kg.
EXPLODED DIAGRAM
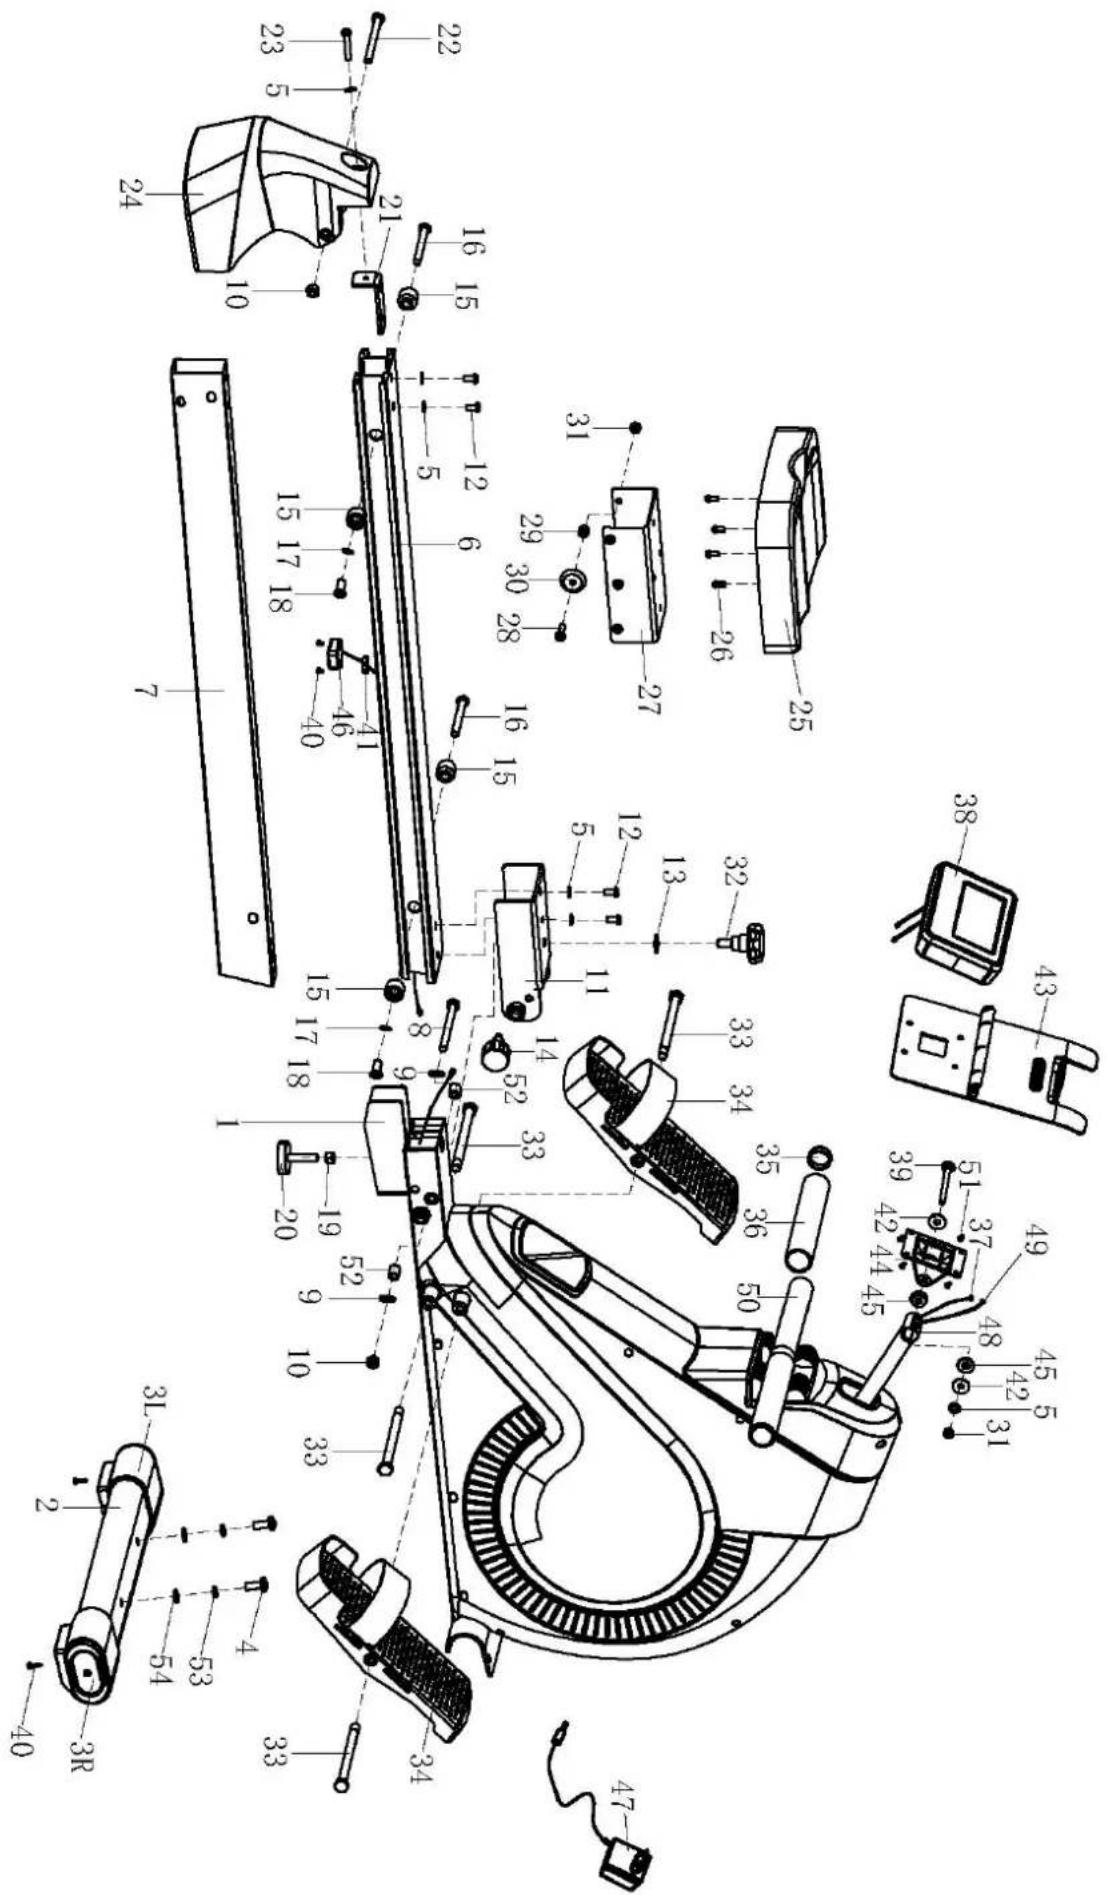
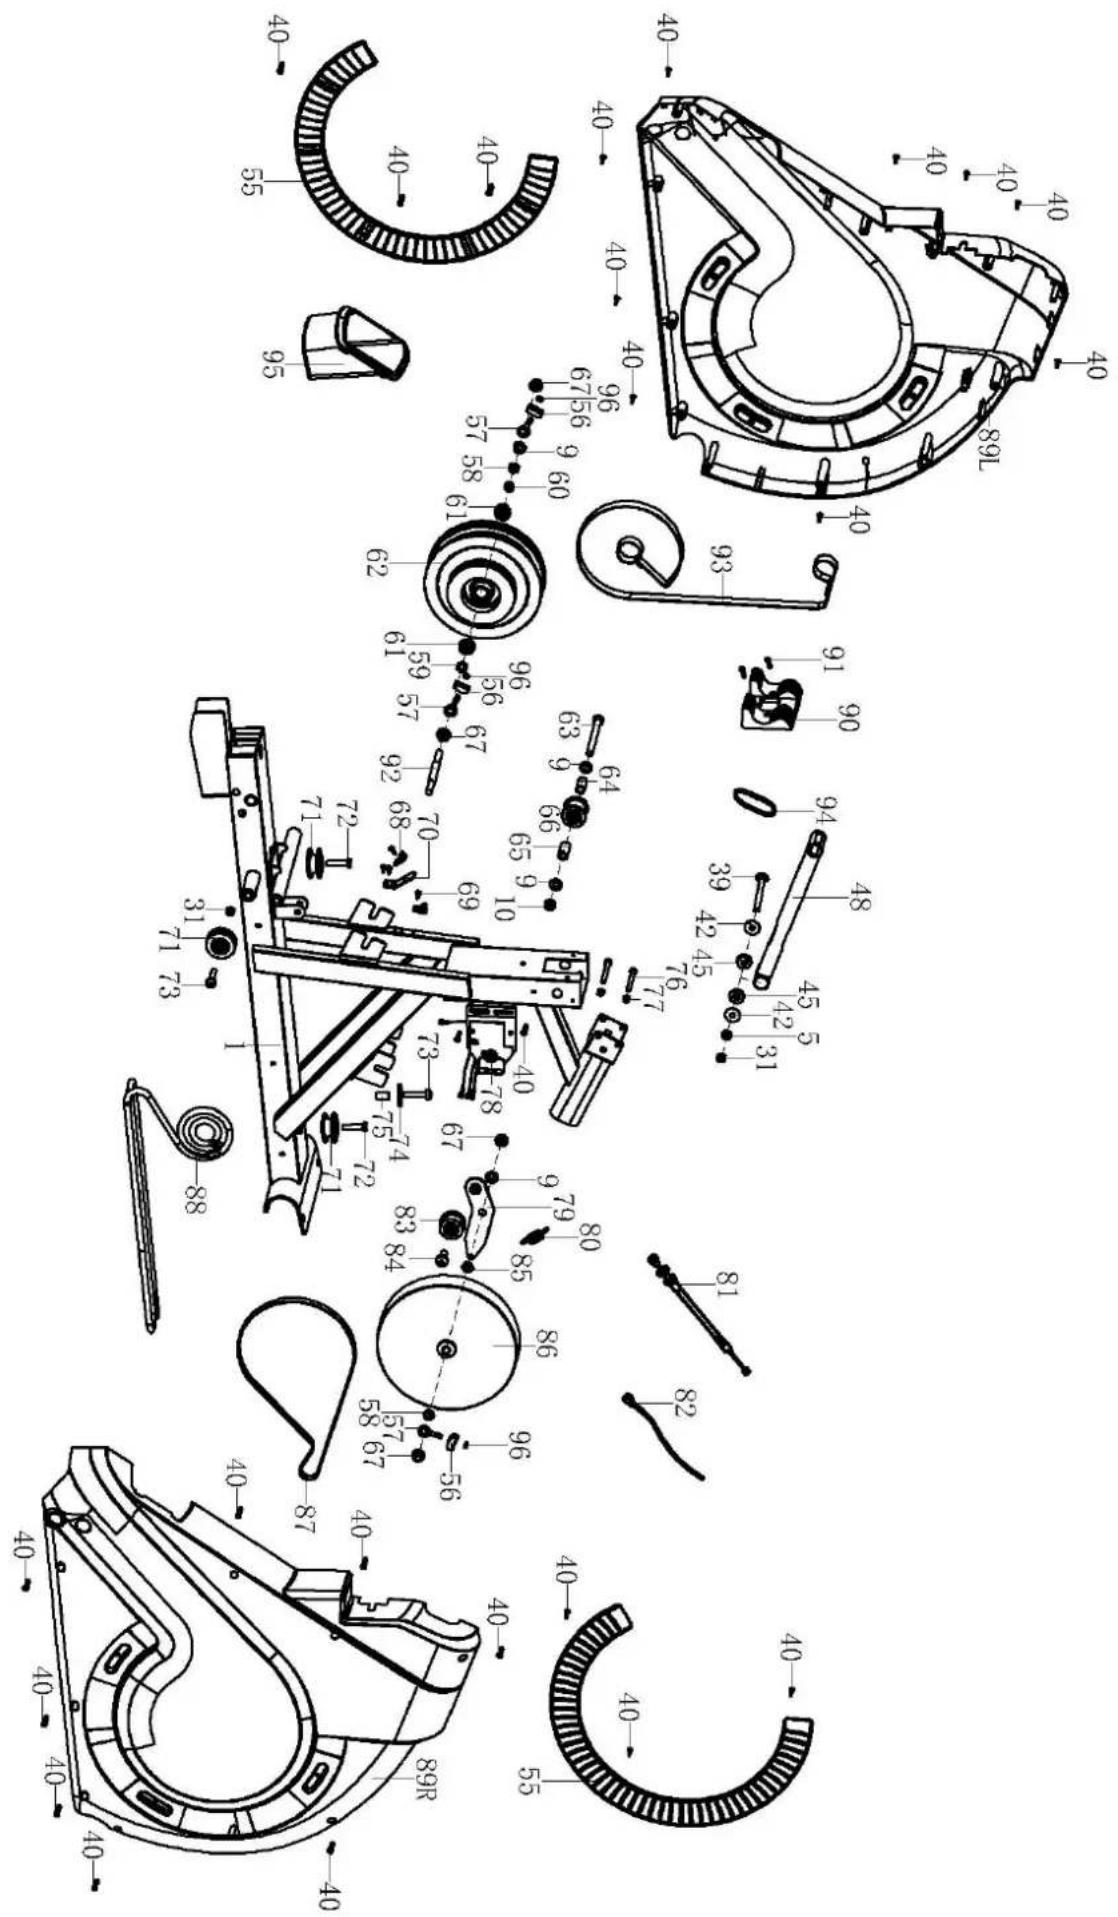
NOTE:
Most of the listed assembly hardware has been packaged separately, but some hardware items have been preinstalled in the identified assembly parts. In these instances, simply remove and reinstall the hardware as assembly is required.
Please reference the individual assembly steps and make note of all preinstalled hardware.
PARTS LIST
| No. | Description Qty No. Description Qty | ||||
| 1 | Main Frame 1 48 Swinging rod combination 1 | ||||
| 2 | Front bottom tube 1 49 Power wire 1 | ||||
| 3L/R | Front end cap | 2 | 50 | Handlebar | 1 |
| 4 | Inner hex bolt M10X25 | 2 51 | Cross screw | 4 | |
| 5 | Flat washer D8X1.5 | 7 | 52 | Alloy bushing | 2 |
| 6 | Guide rail | 1 53 | Spring washer D10 | 2 | |
| 7 | Lead rail tube | 1 | 54 | Washer D10*2 | 2 |
| 8 | Outer hex bolt M10X125 | 1 | 55 | Edgings | 2 |
| 9 | Flat washer D10X2 | 7 | 56 | U-Shape washer | 3 |
| 10 | Nylon nut M10 | 3 | 57 | Bolt | 3 |
| 11 | Connected U-shape plate | 1 | 58 | Nut M10*1 | 2 |
| 12 | Screw M8X20 | 4 | 59 | Outer hex bolt M10*1 | 1 |
| 13 | Flat washer D12X2.5 | 1 | 60 | Spacer Φ 10.2*Φ 15*6 | 1 |
| 14 | Spring knob | 1 | 61 | Bearing 6000 | 2 |
| 15 | Limiting base | 4 | 62 | Belt wheel | 1 |
| 16 | Axle for limiting base Φ10.9X80 | 2 | 63 | Outer hex bolt M10*112 | 1 |
| 17 | Flat washer D6XD16X1.2 | 2 | 64 | Spacer | 1 |
| 18 | Cross screw M6*15 | 2 | 65 | Spacer | 1 |
| 19 | Nut M10 | 1 | 66 | pulley | 1 |
| 20 | Adjustable knob | 1 | 67 | Flange nut M10*1 | 4 |
| 21 | L-shaped connected plate | 1 | 68 | Sensor | 2 |
| 22 | Inner hex bolt M10X110 | 1 | 69 | Screw ST4.2*12 | 4 |
| 23 | Inner hex bolt M8X45 | 1 | 70 | Fixed plate | 1 |
| 24 | Tail boom | 1 | 71 | pulley | 3 |
| 25 | Seat | 1 | 72 | Outer hex bolt M8*35 | 2 |
| 26 | Cross screw M6X20 | 4 | 73 | Inner hex bolt M18X40 | 2 |
| 27 | Glide saddle post | 1 | 74 | Flat washer φ8×φ38×2 | 1 |
| 28 | Screw M8X28 | 6 | 75 | Spacer Φ 8*Φ 12*21.5 | 1 |
| 29 | Spacer | 6 | 76 | Outer hex bolt M6*65 | 2 |
| 30 | Roller | 6 | 77 | Nylon nut M6 | 2 |
| 31 | Nylon nut M8 | 9 | 78 | Motor | 1 |
| 32 | Knob | 1 | 79 | Idler bracket | 1 |
| 33 | Long bolt Φ12.5X169 | 4 | 80 | Spring | 1 |
| 34 | Pedal | 2 | 81 | Tension cable | 1 |
| 35 | Round bushing | 2 | 82 | Power line | 1 |
| 36 | Foam grip | 2 | 83 | Idler | 1 |
| 37 | Sensor extended wire | 1 | 84 | Inner hex bolt M10*25 | 1 |
| 38 | Console 1 | 85 | Nut M10*1 | 1 | |
| 39 | square neck bolt M8X74 2 | 86 | Flywheel | 1 | |
| 40 | Screw ST4.2X18 23 | 87 | Belt | 1 | |
| 41 | Hole Plug 1 | 88 | Rope | 1 | |
| 42 | crash pad 1 4 | 89L/R | Chain cover | 2 | |
| 43 | IPAD holder 1 | 90 | rubber cushion | 1 | |
| 44 | Console bracket 1 | 91 | Screw M5*25 | 2 | |
| 45 | Alloy bushing 4 | 92 | Axle | 1 | |
| 46 | Receiver 1 | 93 | Tension belt | 1 | |
| 47 | Adaptor 1 | 94 | sealing ring | 1 | |
| 95 | Holder | 1 | |||
| 96 | Nylon nut M6 | 3 |
ASSEMBLY INSTRUCTION
Attention:
Please follow these assembly instructions step by step to assemble this magnetic rowing machine.
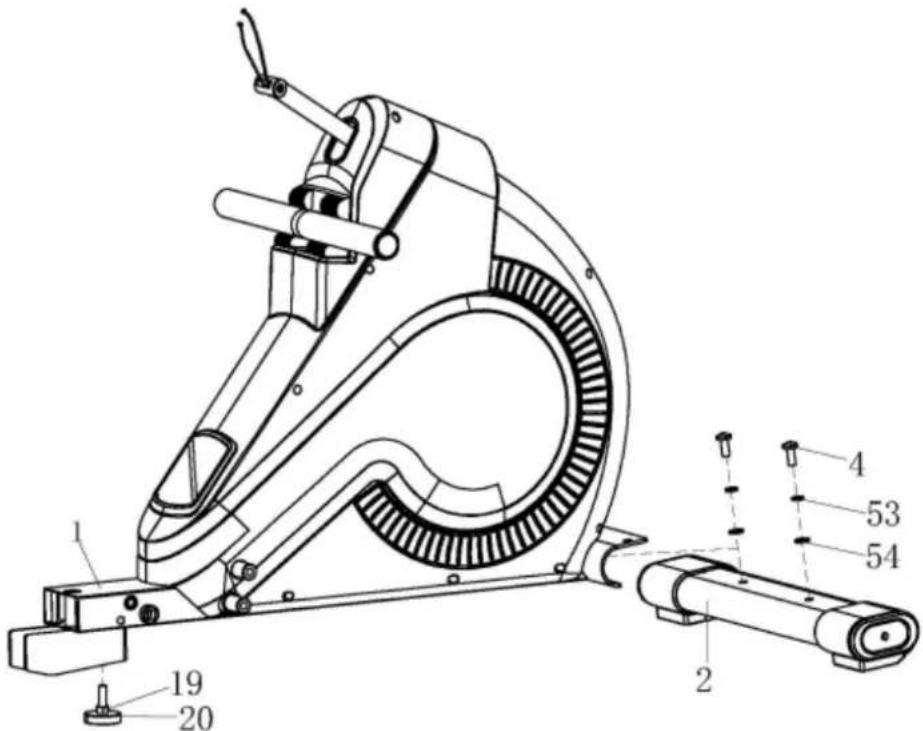
Step 1:
Fix the front bottom tube (2) on the main frame (1) with the inner hex bolts (4), spring washer (53) and flat washer (54) as shown .Attach the Adjustable knob (20), nut (19) on the main frame (1).
Step 2:
A: Fix the Connected U-shape plate (11) onto the guide rail (6) well with the Screw (12) and flat washer (5).
B: Connect the wire of Receiver (46) with Sensor extended wire (37), then fix the Connected U-shape plate (11) and the main frame (1) with outer hex bolt (8), flat washer (9), nylon nut (10) and spring knob (14) as shown.
C: Fix the main frame (1) and Connected U-shape plate (11) well with knob (32) and flat washer (13).
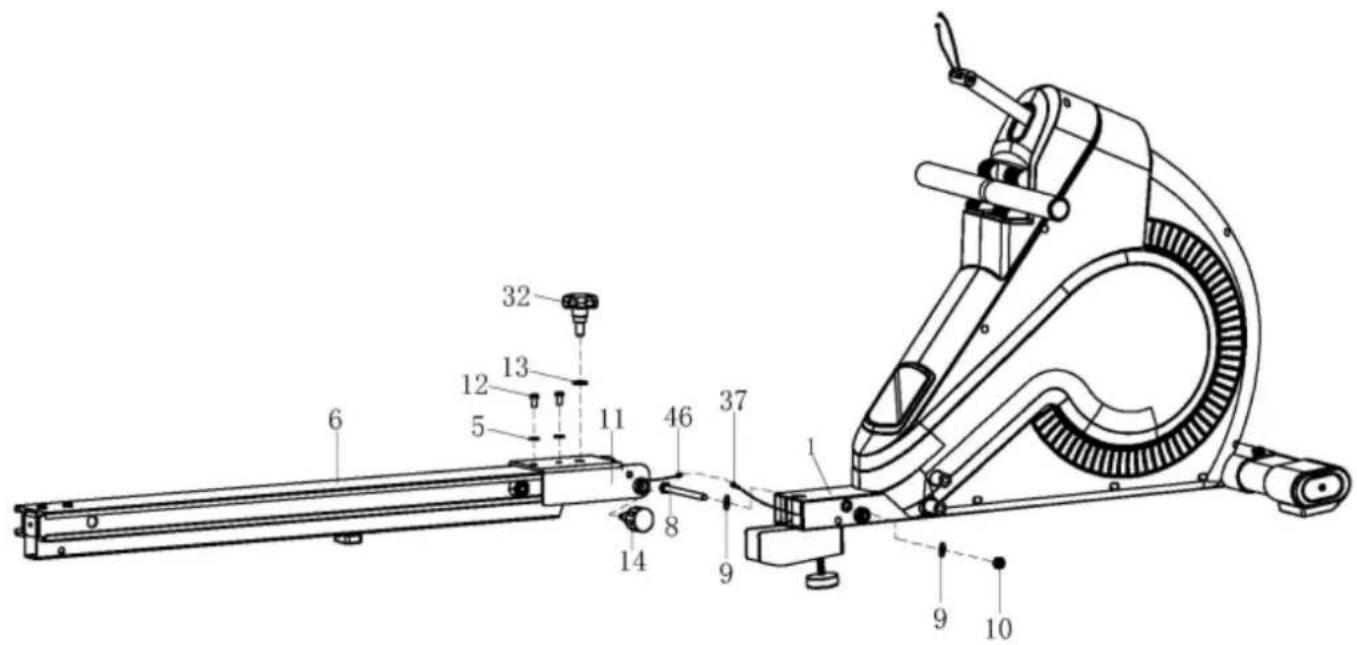
Step 3:
A: Firstly, removed the axle for the limiting base (16), limiting base (15), flat washer (17) and cross screw (18), then install the glide saddle post (27) onto the guide rail (6) like the arrow shown.
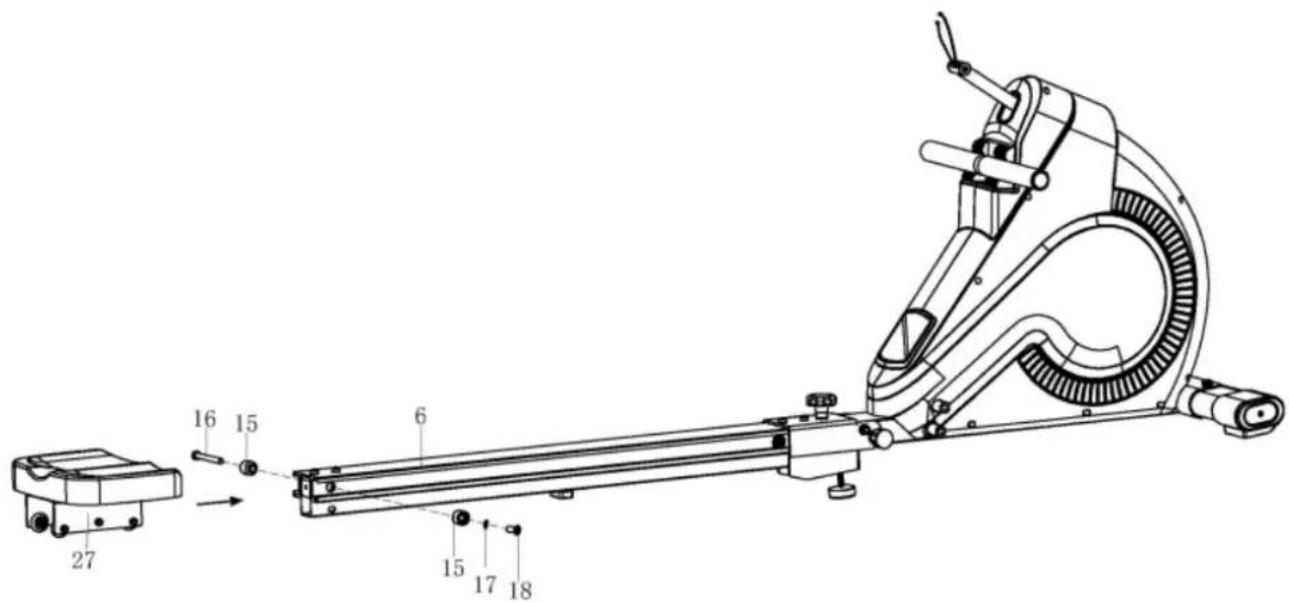
Step 4:
A: Lock the tail boom (24) to the guide rail (6) with inner hex bolt (22), nylon nut (10), inner hex bolt (23) and flat washer (5).
B: Fix the limiting base (15) to the guide rail (6) with axle for limiting base (16), flat washer (17) and cross screw (18).
C: Lock the pedal (34) to the main frame (1) with the Long bolt (33).
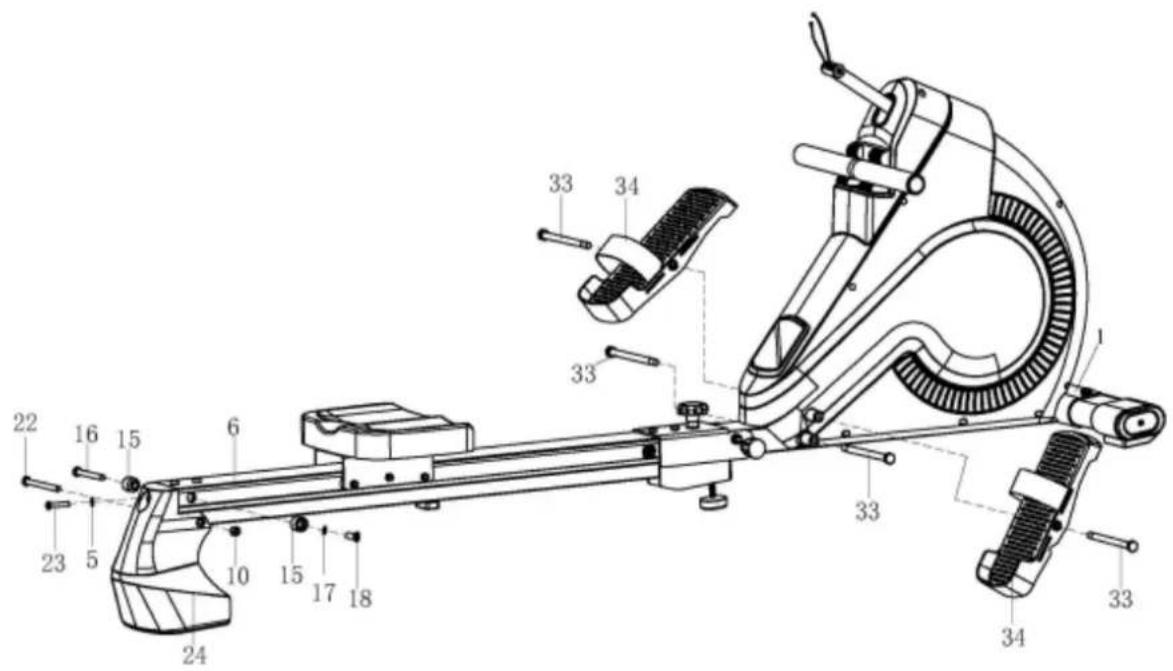
Step 5:
A: Put the motor wire (49) and sensor extended wire (37) through out the Console bracket(44), And then fit the Console bracket(44) and Swinging rod combination(48) well with bolt(39), crash pad 1(42), flat washer(5), nylon nut(31).
B: Connect the motor wire (49) and sensor extended wire (37) with the wire of console (38), then slip the wires into the cover of console, finally lock the console (38) and IPAD holder (43) to the Console bracket(44)with screw (51).
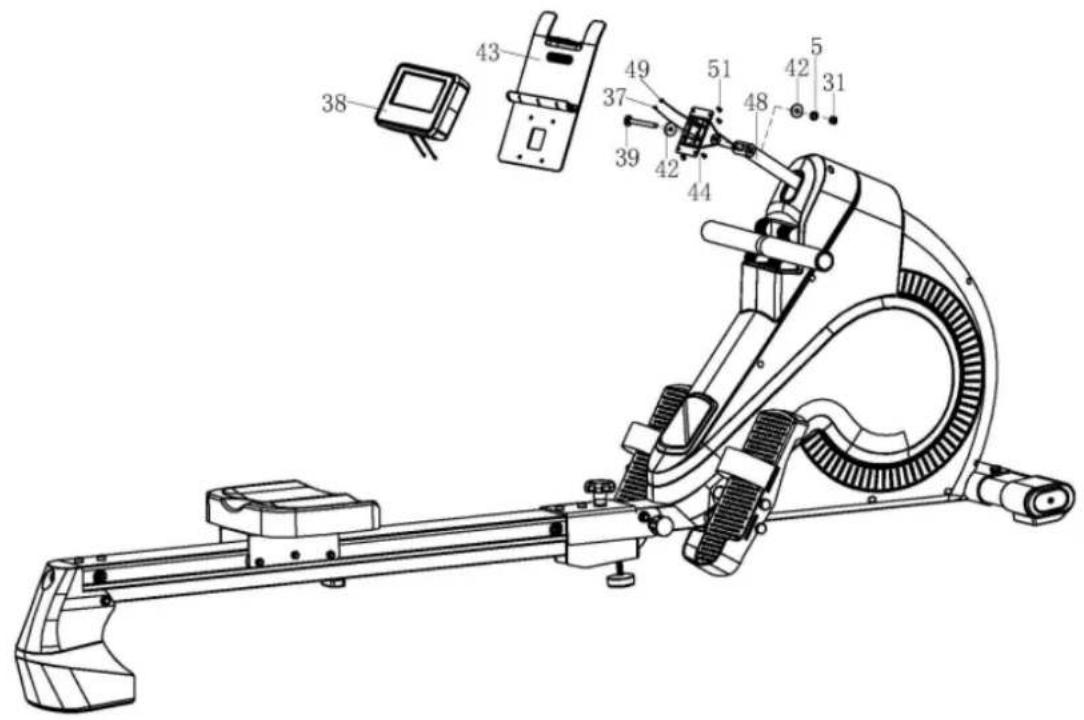
NOTE:
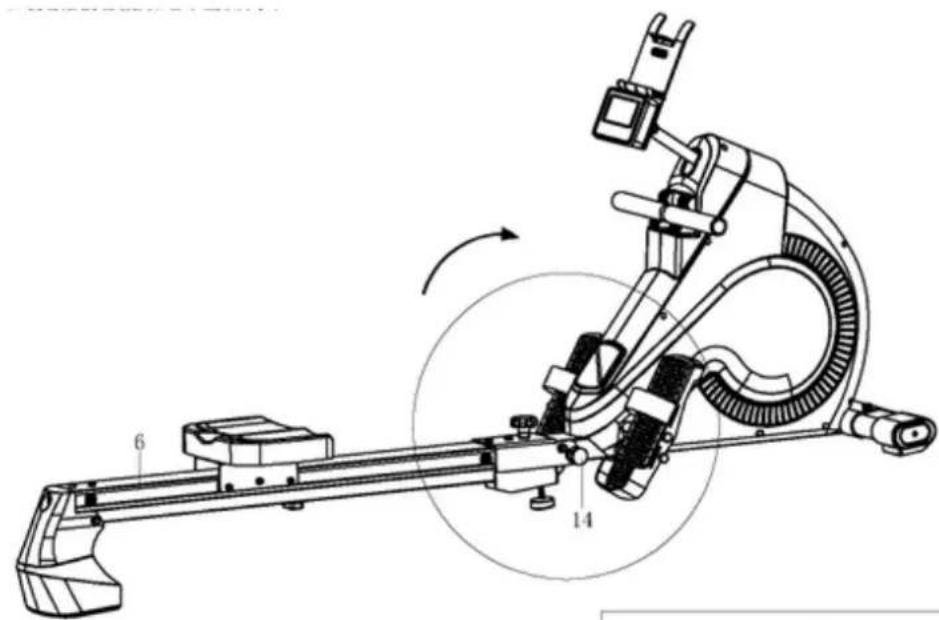
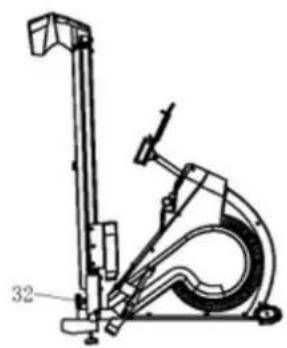
When you don't use this item, in order to put away better you can fold it like the following picture shown. When you do this please take care of your hands.
A: Take out the knob (32) in the anticlockwise direction from the products. And put the knob and washer (13) together.
B: Pull out the spring knob (14) and then you can fold guide rail (6) easily to the suitable position as shown in the following picture. Finally, tighten the guide rail with the spring knob (32).
NOTE: The Rowing machine should look like picture B when fully folded.
natural_image
Technical line drawing of a mechanical device with labeled parts (no text or symbols present)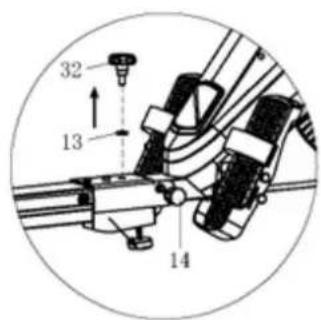
natural_image
Technical line drawing of a mechanical device with labeled part 32 (no text or symbols beyond label)B
METER INSTRUCTIONAL MANUAL
As soon as the computer is connected with power supply, an acoustic signal sounds and all of the displays are shown on LCD for 2 seconds.
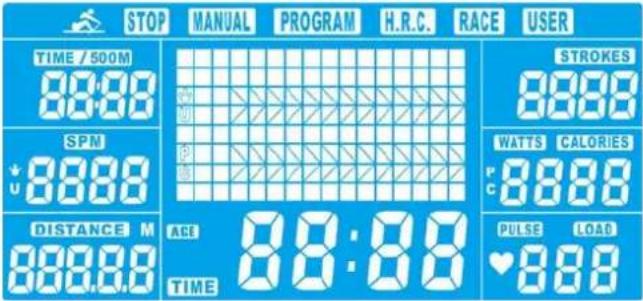
If no button are pressed and the pedals have not been moved for approx. 4 minutes, the computer will switch to power saving mode.
DISPLAY & BUTTON FUNCTIONS
| Training Values | Display Range Description/ Setting Range | |
| SPM 0~999 | -Strokes per minute | |
| TIME/500m 0.0 | ~ 99:00min. -User | exercising time displaying;-It will scan in every 6s and display the remain time to finish 500 meters rowing according to current speed. |
| METERS 0~999m | -Setting range 50~1000 | |
| CALORIES | 0 ~ 9999 Cal. | -Burned calories during rowing.-Setting range 0~9990 |
| STROKES | 0~9999 | -The movements when complete rowing.-Scan and calculate Total strokes in every 6 seconds. |
| PULSE | 30-240 BPM | 0-30~240Bpm |
| WATT | 0~999 | -Display user exercise power consumption. |
| BUTTON | FUNCTION |
| UP | - Increase resistance level- Function selection |
| DOWN | - Decrease resistance level- Function selection |
| ENTER | - Confirm setting or selection. |
| Reset | - Hold on pressing for 2 seconds, computer will reboot.- Reset all values to zero.- Reverse to main menu after finishing a workout. |
| Start/ Stop | - Start or Stop rowing training. |
| Recovery | - Track user Heart rate in recovery phase. |
Acoustic Signals
All settings made with the computer are confirmed with an acoustic signal:
1 shot beep = setting confirmed
2 shot beeps = It is impossible to make any settings
Training Data
The computer calculates and displays all values automatically according to user rowing status (see table).
Take note:
* If only a "P" is shown instead of pulse value, it is impossible to measure the HR. Wear the chest belt properly so that computer can detect your hear rate.
Starting exercise immediately (MANUAL)
Then MANUAL-->PROGRAM-->H.R.C.-->RACE-->USER is flashing with 1Hz. Press UP and DOWN to choose MANUAL and confirm by pressing ENTER. If you have previously selected a program or started your workout, press RESET to return to the starting display.
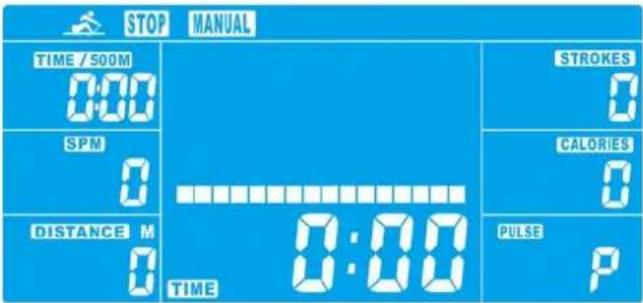
-Press START/STOP button to start workout immediately without entering further settings.
-Press UP and DOWN keys to input your personal settings and press ENTER to confirm. The following fields will flash in turn:
. Resistance level (1\~16)
. TIME (or METERS) (Time and Meters can't preset at the same time.)
.CALORIES
. PULSE
Use UP & DOWN to set values and confirm your selection by ENTER button.
Press START/STOP to start workout.
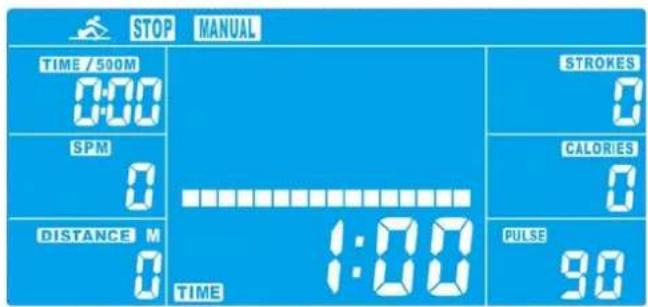
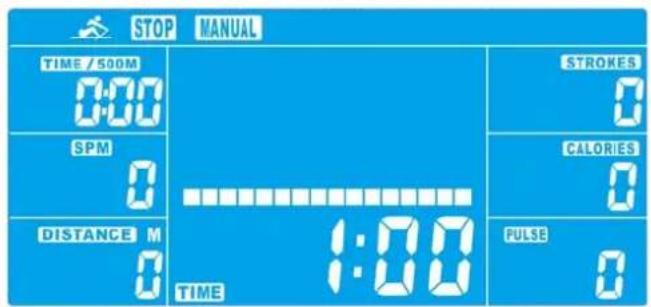
As soon as one of the set values reach the preset Target, the computer will alarm with Bi-bi sound and stop.
-You can adjust the level of resistance on the paddles while rowing by pressing UP and DOWN keys. The newly set level value will be shown in the profile(default value is Level 1).
-Press START/STOP to end exercising. All exercising value will remain.
-Press RESET to reverse to workout selection menu.
Selecting a Program to do training (PROGRAM)
-Press UP and DOWN keys to scan MANUAL→PROGRAM→H.R.C.→RACE→USER.
-Choose PROGRAM and press ENTER to confirm. The programs are preset with 12 profiles. Press UP and DOWN to select one from the 12 preset profiles. Set the desired session value and confirm by ENTER:
. Resistance level (1\~16)
. TIME
-Press STATR/STOP to start workout.
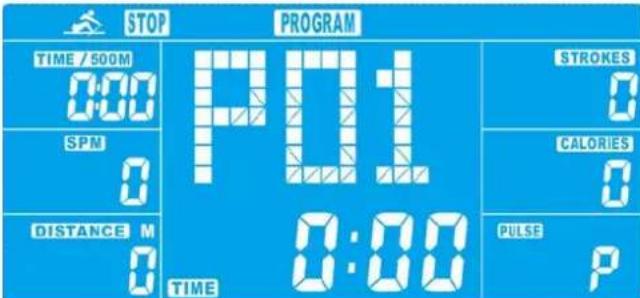
-You can adjust the level of resistance on the paddles while rowing by pressing UP and DOWN keys. The newly set level value will be shown in the profile(default value is Level 1).
-Program profiles:
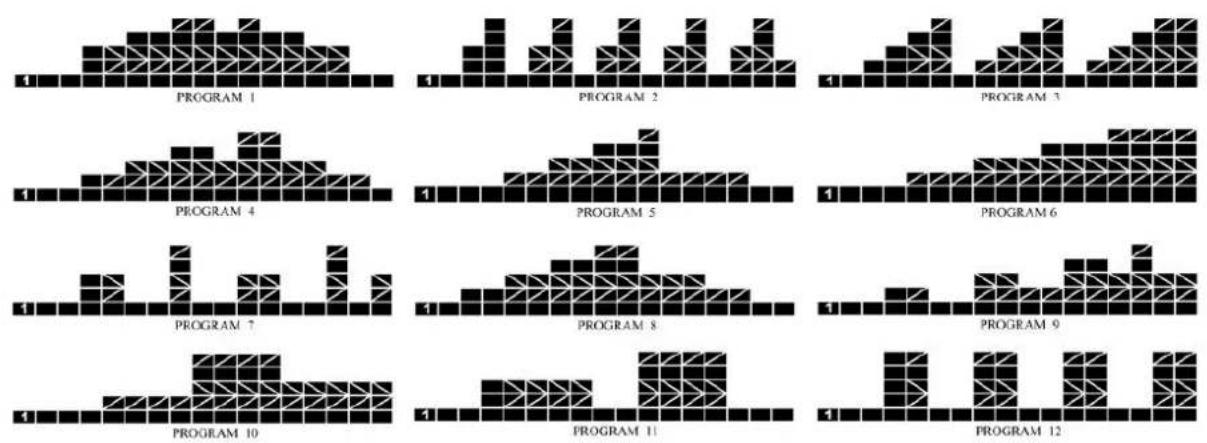
-Press START/STOP to end exercising. All exercising value will remain.
-Press RESET to reverse to workout selection menu.
Set program according to heart rate (H.R.C.)
In this program, the rower reacts to your pulse as measured by the chest belt.
In addition, simple graphics also show you whether you need to need to increase or decrease your stress Level. You can choose between:
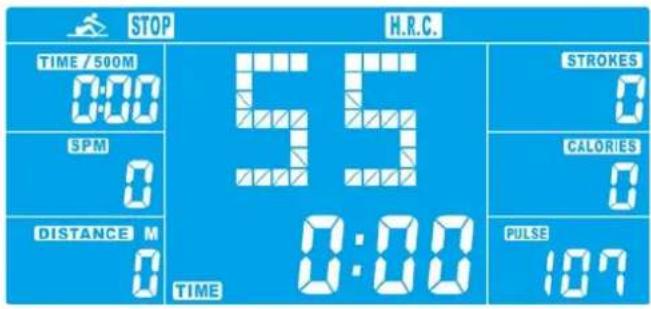
HRC55 Here you are rowing in the very efficient range of 55%, ideal for beginners and for general fat Burning.
HRC75 This range of 75% of the maximum pulse rate is suitable for experienced users and athletes.
HRC90 The anaerobic range of 90% of the maximum pulse rate is only suitable for competitive athletes and short sprint exercises.
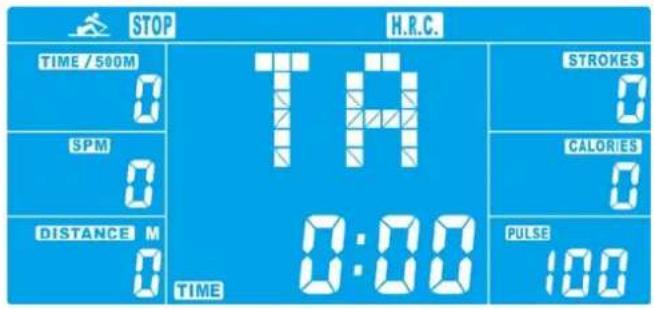
TAG The computer uses your Age to calculate a target pulse rate, which you can change as per your willing. Never select a target pulse that is higher than your age-determined maximum pulse rate.
-Press UP & DOWN to select H.R.C. and enter by pressing MODE. Choose HRC55-->HRC75-->HRC90->TARGET. With HRC55, HRC75, HRC90, the max. Heart rate will be calculated by the computer automatically.
-With the TARGET program, the preset value 100 will be shown. Press UP & DOWN buttons to set a value between 30\~240 and confirm by ENTER. The program has been saved.
-Set the desired session TIME with UP & DOWN buttons and press ENTER button to confirm.
-Press STATR/STOP to start workout.
For this program, it is necessary to wear the chest belt so that computer can detect and display your heart rate value.
Training with competition mode (RACE)
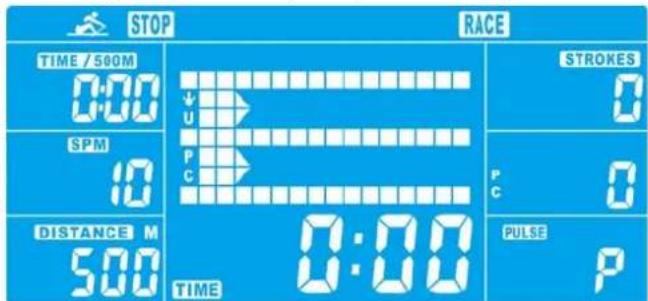
In this program, you can enjoy rowing just like an competition, while your rival is the computer.
-Press UP & DOWN to select RACE and press ENTER to confirm.
-Press UP & DOWN to set SPM confirm by pressing ENTER.
-Press UP and DOWN to select desired rowing METERS and confirm by ENTER.
-Press UP and DOWN to adjust paddle resistance level.
-Press STATR/STOP to start workout. Computer will display USER & PC workout status.
| STOP | RACE | ||
| SPM 20 | PC | ||
| STOP | RACE | ||
| SPM 20 | |||
| DISTANCE M 500 | |||
-Press UP and DOWN to adjust resistance level.
Either PC or User finish the set rowing distance first, computer will stop and show PC win or User win.
-Press START/STOP to end exercising. All exercising value will remain.
-Press RESET to reverse to workout selection menu.
User-defined profile (USER PROGRAM)
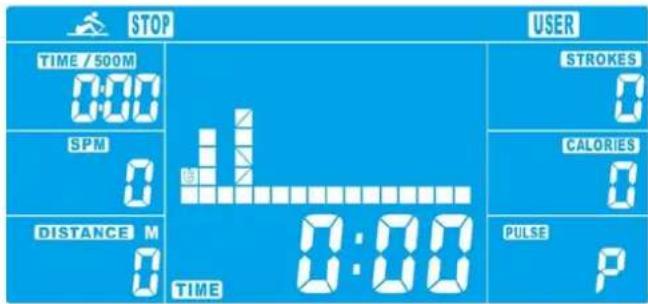
Here you can design your own profile with bars just like the preset program profiles.
-Press UP & DOWN to select USER PROGRAM and press ENTER to confirm. The first bar will be displayed.
-Press UP & DOWN to set resistance level and confirm by MODE button. The next bar will be displayed.
-Continue this process till set up 16 bars. The max. resistance level is 16. To finish your setting or quit setting, hold on pressing ENTER button.
-Set the desired session TIME with UP & DOWN buttons and press ENTER to confirm.
- Press STATR/STOP to start workout.
As soon as one of the set values reach the preset Target, the computer will alarm with Bi-bi sound and stop.
-You can adjust the level of resistance on the paddles while rowing by pressing UP and DOWN keys. The newly set level value will be shown in the profile(default value is Level 1).
-Press START/STOP to end exercising. All exercising value will remain.
-Press RESET to reverse to workout selection menu.
Recovery phase
It is recommended to end an intensive rowing session with a recovery phase. During this phase you should be able to relax and paddle without strong resistance until your pulse slows close to its usual rate.
-Press REVOCERY button and wear chest belt again. Then only TIME is showing with counting down from 60 seconds to 0, all other functions are not available.
Once the 60 seconds recovery phase is over, an evaluation of the achieved heart rate will be shown.
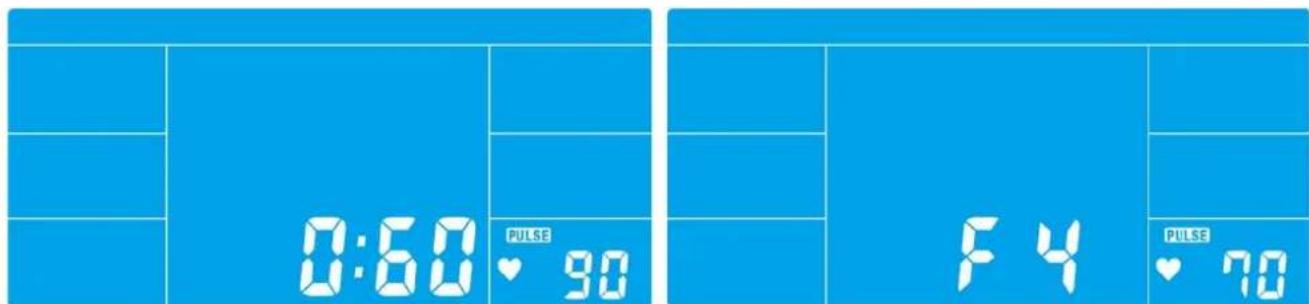
| 1.0 | OUTSTANDING |
| 1.0 < F < 2.0 | EXCELLENT |
| 2.0 < F < 2.9 | GOOD |
| 3.0 < F < 3.9 | FAIR |
| 4.0 < F < 5.9 | BELOW AVERAGE |
| 6.0 | POOR |
-If your heart rate is still very high after 60s (F is between 4 and 6), you could restart the recovery program to gradually slow your heart rate further.
Trouble shooting :
E-2 : Motor stroke over the normal range. Plug the adaptor again. Repowering on the console and the motor will back to the normal range.
E-7 : Check if cables were well connected or damaged.
PUREDESIGN
WaterRower
72 South Street Rydalmere NSW 2116
Phone: (02) 9898 1405
Email: dispatch@waterrower.com.au
- PURE DESIGN PR4 Rower
- IMPORTANT!
- IMPORTANT SAFETY NOTICE
- NOTE:
- ASSEMBLY INSTRUCTION
- Attention:
- Step 1:
- Step 2:
- Step 3:
- Step 4:
- Step 5:
- METER INSTRUCTIONAL MANUAL
- Acoustic Signals
- Training Data
- Starting exercise immediately (MANUAL)
- Selecting a Program to do training (PROGRAM)
- Set program according to heart rate (H.R.C.)
- Training with competition mode (RACE)
- User-defined profile (USER PROGRAM)
- Recovery phase
- Trouble shooting :
- PUREDESIGN
Brand : PURE
Model : PR4
Category : Rowing Machine