Debut S12EQ - Subwoofer ELAC - Free user manual and instructions
Find the device manual for free Debut S12EQ ELAC in PDF.

User questions about Debut S12EQ ELAC
0 question about this device. Answer the ones you know or ask your own.
Ask a new question about this device
Download the instructions for your Subwoofer in PDF format for free! Find your manual Debut S12EQ - ELAC and take your electronic device back in hand. On this page are published all the documents necessary for the use of your device. Debut S12EQ by ELAC.
USER MANUAL Debut S12EQ ELAC
natural_image
Line drawing of a rectangular electronic device with a circular top and base (no text or symbols)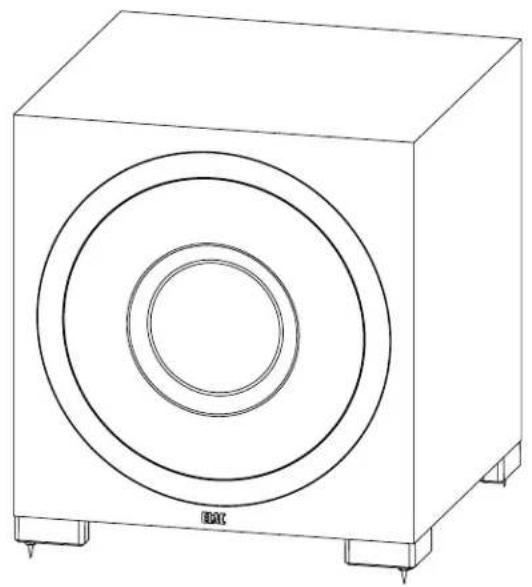
natural_image
Line drawing of a rectangular electronic device with concentric circular cutouts and mounting base (no text or symbols)S10EQ/S12EQ
Powered Subwoofer
OPERATING INSTRUCTIONS
Safety Instructions
1. General information
- Please read and follow these safety instructions.
- Keep them safe for future reference.
- Observe all warnings on the speaker and in the manual. Please check the speaker for damage before use. The speaker must be in perfect working condition. Damaged parts may lead to personal injury.
CAUTION! Subwoofers and active speakers may be heavy. Be careful when lifting them to prevent personal injury.
2. Use only as directed
- Connect the speaker(s) according to the instructions in the manual.
- Many ELAC speakers are equipped with spikes and/or anti-slip feet. They are explicitly provided for levelling the speaker. For levelling on an uneven floor, unscrew the spikes or anti-slip feet by 2-3 turns of thread. The speaker should always be in perfect vertical alignment: the stability of the speaker must not be compromised by using spikes or anti-slip feet as the speaker may tip-over.
3. Location
• Install the speakers on a level surface only
- When choosing the location of these speakers do not place them in locations that are:
• In direct sunlight
- Very humid
- Prone to vibrations
• Exceptionally hot or cold
- Near CRT Televisions (the speakers are not magnetically shielded and may cause color issues with a CRT based TV)
- Close to magnetic cards (Since the speakers are not magnetically shielded placing magnetic cards such as credit cards or commuter cards may cause them to fail).
WARNING! Please ensure the product is perfectly stable to avoid injury from tip-over. Please note, that stability can be increased by using spikes on carpeted surfaces. However, the mounting of spikes must be carried out carefully due to their very sharp ends which may cause injuries. The stability on slippery floors can be increased by using Velcro fastening tape or double-sided adhesive tape. Do not install the speaker near any heat sources such as radiators, heating valves, stoves, or other apparatus (including amplifiers) that produce heat, or in areas where there is a risk of explosion.
- Do not block any ventilation openings. Install in accordance with the manufacturer's instructions.
- Do not install the speaker in a closed rack or in a closed cupboard.
- Do not put burning candles on or near the speaker.
- Do not install the speaker near transformers because electromagnetic stray fields can cause hum noise on woofers.
- In combination with certain materials / lacquers / material surfaces, anti-slip feet or spike washers may cause colored imprints on the surfaces.
4. Overload
Extreme overload of the device due to very high volume may cause damage to individual components. Because of the possible danger, you should never leave loudspeakers under extreme overload conditions unattended.
5. Service
DANGER! Do not open the cabinet because of potentially hazardous voltages exist inside! Servicing to be carried out by qualified service personnel only.
Servicing is required when the loudspeaker has been damaged in any way, such as damage to the power supply cord or the plug, or when liquid has been spilled or objects have fallen into the loudspeaker, the speaker has been exposed to rain or moisture, does not operate normally, or has been dropped. To reduce the risk of electric shock, do not open the loudspeaker. Servicing to be carried out by qualified service personnel only.

6. Fuse links
Various faults in subwoofers or active speakers may cause the fuse to blow. If the fuse blows, only replace it with the correct fuse type and rating as shown on the rear of the loudspeaker on the fuse holder.
7. Cleaning
NOTE: Clean only with soft, smooth cloth or with dust brush. Do not use scouring agents, alcohol, benzene, furniture polish or other agents for cleaning! Modern furniture is often coated with multiple varnishes and plastics which can be treated with chemical agents. Some of these agents contain substances which degrade or soften the rubber feet. Therefore we advise you to place an anti -slip mat underneath the loudspeaker.
8. Volume
CAUTION! Continuous high volume may cause severe damage to your hearing. Please listen responsibly.
9. Disposal
The packaging is made from recyclable materials. Dispose of this in an environmentally friendly manner. At end of life do not dispose the speaker with the standard household waste. The speaker must be recycled in accordance with local legislation. Ask your local government for further information on recycling as the device contains valuable raw materials. Disable the speaker before disposal.
10. Power
This subwoofer is only intended to be connected to voltages that are listed on the rear panel of the cabinet. Connection to any other voltage may cause irreversible damage to the subwoofer and will void the warranty. Use of plug adapters is not recommended because they may allow connection to voltages other than those printed on the back of this subwoofer.
Philosophy
Thank you for purchasing this ELAC product.
Since the time we started (1926), ELAC has always striven to achieve the very best.
Your new ELAC speakers are built to the highest standards using high-quality components that are carefully constructed to deliver the best-in-class sound quality. They are developed by a passionate group of individuals whose soul purpose is to bring a new dimension of sound quality into your home. Enjoy!
Before Use
Avoid damage to the speakers and other components:
- Carefully unbox the subwoofer to avoid physical damage
- Ensure your equipment is turned off before connecting RCA cable
- Check to ensure power cable is pushed in and secured to avoid electrical shock and injury.
BASH Technology
The BASH® technology implemented in the amplifier module of the ELAC subwoofer features power reserves with typically much lower levels of distortion. This is achieved by using an audiophile class A/B power amplifier whose supply voltage is regulated by a class D amplifier circuit to prevent any unnecessary power losses and to approach the efficiency of a class D amplifier.
Since the audio signal is amplified in the analog domain, the high-frequency interference typical of class D amplifiers is minimized along with their problem where the switching speed of the transistors is limited leading to an increase of total harmonic distortion.
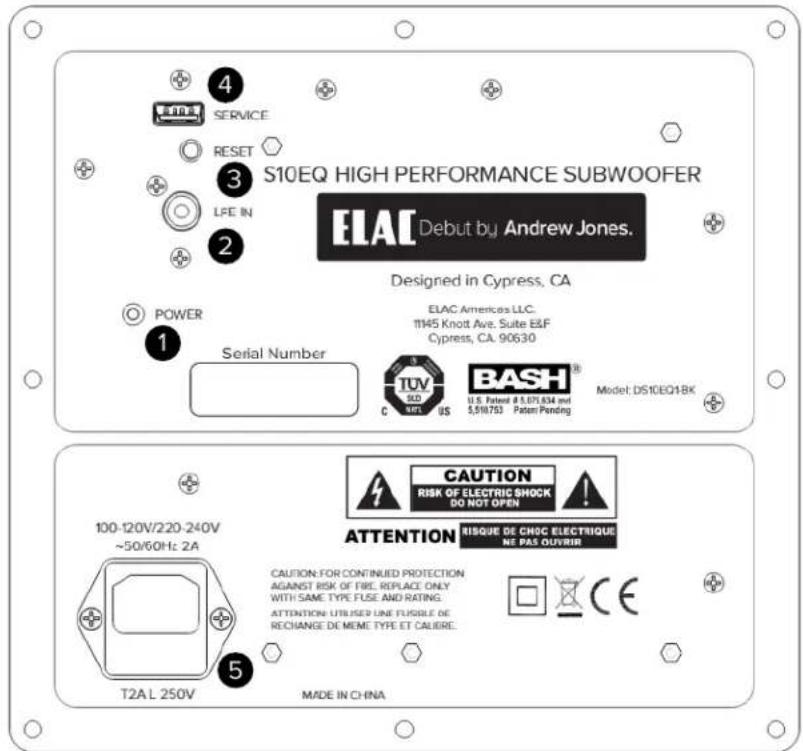
Controls and Indicators
- Power Indicator — This indicator will illuminate in blue signifying the subwoofer is powered on. There will be no illumination when the subwoofer is off or in standby mode.
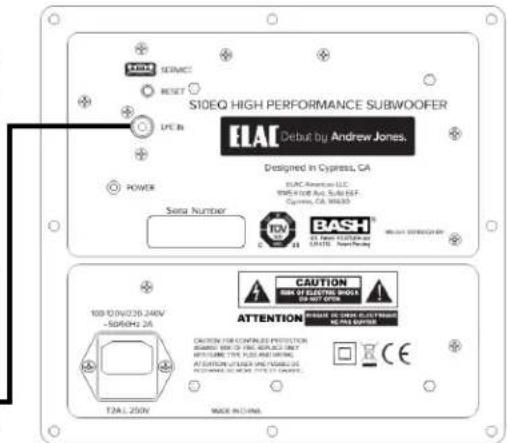
- Line In — The line level connection is used to connect the subwoofer to your pre-amp/AV receiver. Use an RCA cable (not included) to connect your AV Receiver with a single Subwoofer/LFE output to the LFE IN of the subwoofer.
- Reset — The reset button enables you to revert to the original default settings. To reset, press and hold the button for approximately 5 seconds until the light flashes, then let go. You will see that all settings within the app are back to the factory parameters.
- Service — This connection is used for servicing the subwoofer and is not used for normal operation.
- AC Inlet — This inlet is a standard IEC power jack. Use the supplied power cord to connect the subwoofer to an available AC outlet.
Connecting your Subwoofer
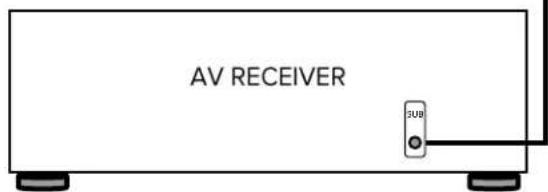
Connect the subwoofer to an AV Receiver or Pre-Amp with a dedicated subwoofer or LFE output using an RCA cable (not supplied) from the LFE/Subwoofer output on the AV Receiver/Pre-Amp to the LFE IN on the subwoofer (Fig 1).
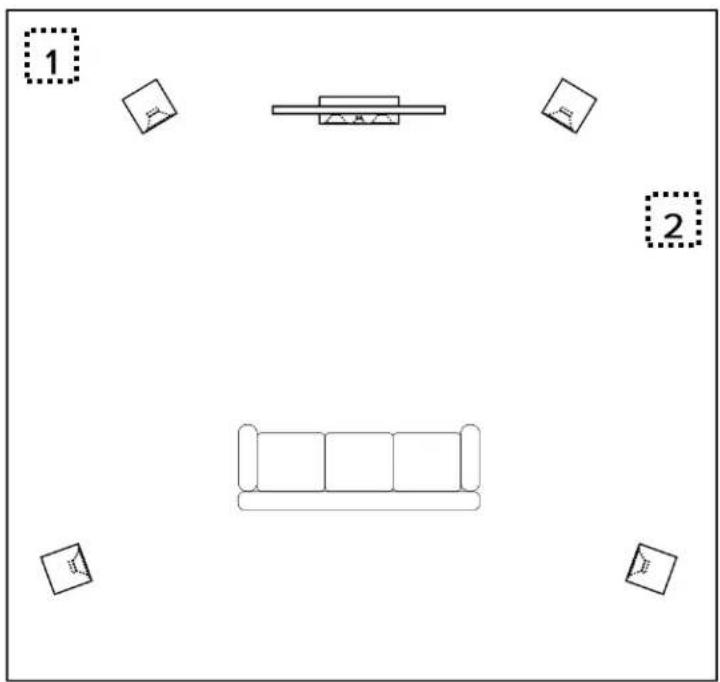
Subwoofer Placement
Finding the proper placement for your subwoofer can take some trial and error, however here are a few basic tips to get you started. In most cases the best position for the subwoofer is in the front corner (1) of the room. Placing a subwoofer in a corner excites most room modes and offers the best chance of avoiding a null area (a part of the room that experiences an acoustic reduction in bass).
If placing the subwoofer in the corners creates an abnormal amount of bass, you can try moving the subwoofer to one of the side walls (2) near the front of the room.
If possible the best option is to move the subwoofer around the room and find the location that sounds the best from your normal listening position. There are many test discs you can purchase that provide the correct test signals for helping find this optimum location.
Note: The PHASE and DELAY functions built into the subwoofer will also help if you experience any placement issues.
ELAC Subwoofer App
Your ELAC subwoofer incorporates an advanced, digital control system. Conventional analog rotary potentiometers and switches have been replaced by a digital signal processor (DSP), which enables you to adjust your subwoofer conveniently and accurately. All parameters such as volume, cut-off frequency, phase, etc., as well as the automatic calibration functions, can be adjusted with the help of a free custom smart device APP.
The digital control system also eliminates the possibility of unwanted changes to controls and settings.
Note: A Bluetooth 4.0 low-energy Android or iOS device is required to set up and operate this subwoofer.
If necessary, check the accompanying documentation for your mobile device or contact the manufacturer's support hotline.
Note: In case your mobile device needs a 4 digit code during the subwoofer-pairing procedure, please use "0000"

You can download the "ELAC SUB CONTROL" APP from the Apple® App Store® or Google® Play Store®.
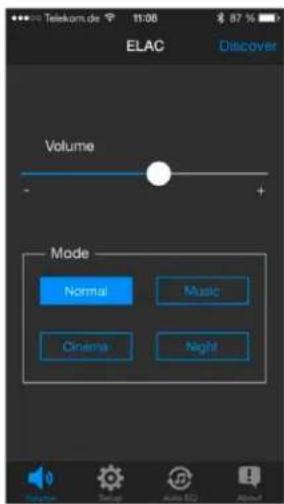
Volume / Mode
VOLUME: To set the output volume of the subwoofer, use the slider on the volume line to the desired output level. The output setting of the subwoofer should be balanced with the volume of your other Hi-Fi/surround speakers. Avoid setting the subwoofer output too high where it dominates the overall sound. Excessive bass results in a “muddy” and vague soundstage.
MODE: The subwoofer offers four sound presets, which can be selected using the "MODE" buttons. "NORMAL" is the linear basic setting that is suitable for most applications. "MUSIC" adds a subtle emphasis to the low bass range, while "CINEMA" slightly boosts the "dramatic" bass frequencies around 50 Hz. The "NIGHT" mode reduces the maximum volume so that you can still enjoy bass reinforcement when listening at night.
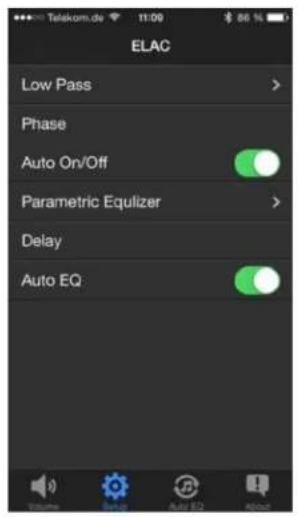
SET UP
SET UP: The set up mode provides seven parameters that you can choose from to tailor the sound quality to your preference.
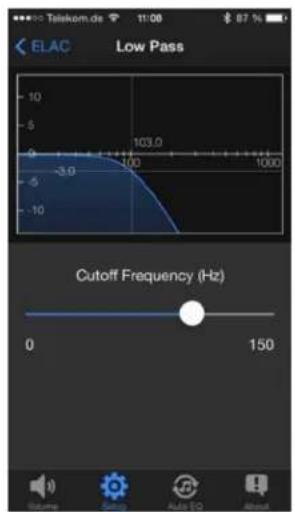
LOW PASS
The app allows you to set the frequency range the subwoofer will reproduce, providing a variable “cutoff frequency” range with a set “roll off” (attenuation rate). You can change the cutoff by sliding the circle along the frequency line. Choosing the cutoff parameter depends on the configuration of your respective loudspeakers, the placement of the subwoofer and speakers, and your audio preference. Below is a guide you can use for setting your subwoofer cutoff.
| Loudspeaker configuration | Cutoff frequency |
| Surround system with LFE channel | Max |
| Hi-Fi stereo system with small loudspeakers | 80 Hz – Max |
| Satellite/subwoofer system (stereo) | 80 Hz – 100 Hz |
| Hi-Fi stereo system with larger bookshelf | 50 Hz – 70 Hz |
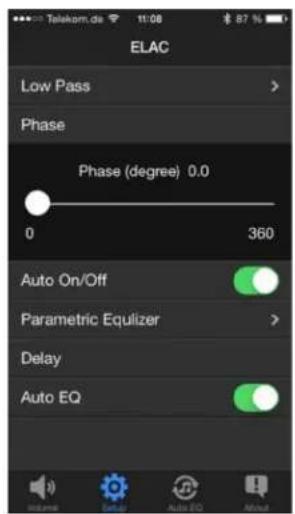
PHASE
Phase ensures the bass signals reproduced by the subwoofer blend seamlessly with the rest of your speakers. When the subwoofer and speakers in your system are playing in phase, bass reproduction across the entire bass frequency range sound uniform with “no holes” and no peaks that manifest themselves as a droning bass sound at specific frequencies.
Adjust the phase by listening to music with strong low frequency content, preferably music you are familiar with. Adjust the slider for the most audible transition from subwoofer to main speakers.
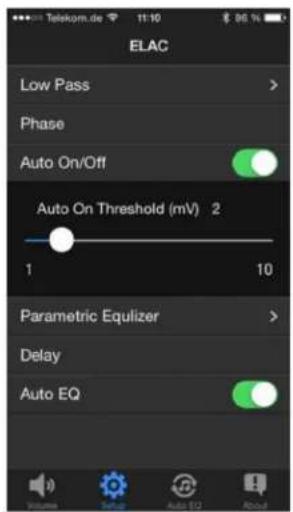
AUTO ON/OFF
This function automatically turns the subwoofer on and off. The default setting is auto on, which is in a power-saving standby mode that continuously monitors the inputs for any signals. The LED glows in a very dimly. When a bass signal is detected through the RCA input, power is automatically turned on with the LED indicator glows brightly. If no bass signal is detected within a 15 minute period, the subwoofer will return to standby mode.
Sensitivity of the auto-on function ("AUTO ON THRESHOLD") can be set from 1 – 10 mV. The correct sensitivity depends on the pre-amp/amplifier used but a value between 3 and 6 is generally suitable. If AUTO ON/OFF is deactivated, the subwoofer will be turned on permanently without a stand-by mode.
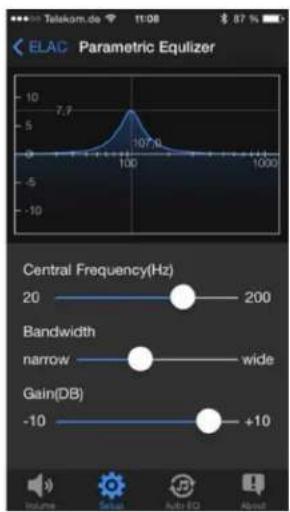
PARAMETRIC EQUALIZER
The parametric equalizer gives you the ability to adjust the audio output (within the subwoofer range) for your preference. The app lets you choose and adjust the center frequency, bandwidth, and gain.
The adjustments also enable attenuation and often eliminates unwanted resonance. To reduce unpleasant resonance, identify the frequency causing it by using a test disc with test tones in the bass frequency range. Start by playing the bass notes in sequence. When a bass note sounds unnaturally loud, this is the room resonance that you can “dampen” with the help of the equalizer. To do this, set the CENTRAL FREQUENCY control to the frequency determined by the test disc. Select a “NARROW” bandwidth and reduce the GAIN control until the bass note is reproduced with the same apparent loudness as the other frequencies. To selectively boost a particular frequency range, you should increase the bandwidth slightly (move the control towards “WIDE”) and then slowly adjust the GAIN, avoiding any unnatural “droning” effects.
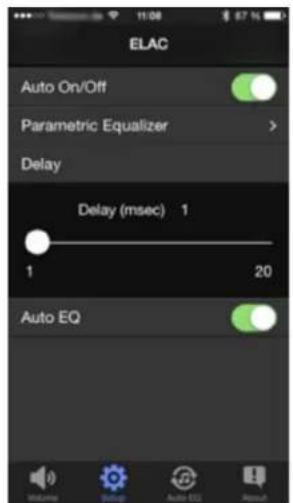
DELAY
The “DELAY” parameter enables you to delay playback of the subwoofer audio signal. This feature is particularly helpful when the subwoofer is placed in extremely close proximity to the listening position compared with the rest of your speakers. Increasing the delay time by 1 millisecond (“msec”) will have the same effect as moving the subwoofer approximately 13 inches (33 cm) further away from the listening position. Consequently, a setting of 20 milliseconds would be equivalent to increasing this distance by approximately 21.5 feet (6.6 meters). If you are using a surround-sound receiver or amplifier equipped with an automatic calibration function, its LFE output signal will automatically set the delay time internally so delay on the subwoofer should be set to minimum.

bar
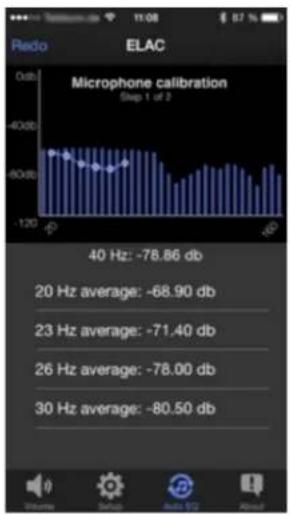
Radio ELAC | Frequency (Hz) | Value | | :--- | :--- | | 23 Hz | -56.27 | | 20 Hz average | -68.90 |AUTO EQ
Your subwoofer is equipped with a easy-to-use and highly sophisticated automatic calibration function. This activates the subwoofer via the APP and instructing it to play a measurement signal and uses the built-in microphone in your smartphone to ishow the recorded the measurement curve, within the range.
Automatic room calibration is performed in two steps. The first calibrates the measurement environment, i.e., the microphone and the sound reproduction chain. The second step measures the actual room frequency response.
Follow the instructions in the APP to carry out a successful measurement.
bar
| Frequency | Value | | --------- | --------- | | 40 Hz | -78.86 db | | 20 Hz | -68.90 db | | 23 Hz | -71.40 db | | 26 Hz | -78.00 db | | 30 Hz | -80.50 db |The auto eq measurement begins with you being asked to hold the smartphone close to the sound opening of the subwoofer. The measurement can then be started.
Once the calibration step is completed, the actual room measurement can be performed. Do this by holding your smartphone at the listening position and start step 2.
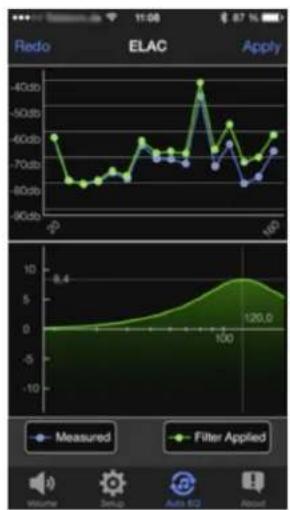
line
| Measurement Type | Value | | ---------------- | ----- | | Measured | 8.4 | | Filter Applied | 126.0 |After a successful measurement, the app provides visual parameters of the measured room along with the automatically calculated filter function.
Press "Apply" to use the filter data to compensate the frequency response.
Press "Redo" to start another measurement.
Once you have accepted the measurement with "Apply", the equalization curve is retained until it is overwritten by a new measurement. You can deactivate the automatically calculated frequency response compensation at any time by switching off the AUTO EQ function in the SETUP menu (see picture at point 2).
SPECIFICATIONS
| S10EQ S12EQ | ||
| Enclosure Type | Passive Radiator Passive Radiator | |
| Amplifier Type | BASH Tracking Bash Tracking | |
| Maximum Amplifier Power | 400 Watts Peak/200 Watts RMS 1000 Watts Peak/500 Watts RMS | |
| Frequency Response | 28Hz - 150Hz | 25Hz - 150Hz |
| Crossover Frequency | 50Hz - 150Hz | 50Hz - 150Hz |
| Driver | 10" High Excursion Doped Paper | 12" High Excursion Doped Paper |
| Cabinet | CARB2 Rated MDF CARB2 Rated MDF | |
| Port | N/A N/A | |
| Passive Radiator | 10" High Excursion Doped Paper | 12" High Excursion Doped Paper |
| Cabinet Finish | Black Brushed Vinyl Black Brushed Vinyl | |
| Dimension (WxHxD) | 13.5" x 13.5" x13.5" | 17" x 17" x17" |
| Net Weight | 31lbs Each 49.1lbs | |
| Standby Power Consumption .5 Watts .5 Watts | ||
ELAC Americas LLC.
North America Limited Liability Warranty
Powered Subwoofers
ELAC Americas LLC. warrants to the original purchaser that this product be free from defects and or workmanship for a period of 3 (Three) years on the cabinet and speaker driver and 1 (One) year on the amplifier from the original date of purchase. During this time period, repair or replacement of parts will be free of charge to the original owner (See below limitations). Shipping to and return from the repair center will be the responsibility of the original purchaser.
Limitations
- Warranty begins on the date of original purchase from an authorized ELAC Americas LLC dealer.
- Product is warranted only if used in home applications. Commercial use of this product is not warranted.
• Product that has been modified or altered in anyway will not be warranted.
• Product that has been abused or subjected to faulty equipment will not be warranted. - Products with defaced or removed serial numbers will not be warranted.
If service is required
In the event that service is required, please contact ELAC America at 714-252-8843 or at service@elac.com to arrange for service or replacement. You will be responsible to provide proof of purchase (Copy or original sales receipt). Shipping to and from our repair center will be the responsibility of the original purchaser.
Warranty Outside of North America
This warranty applies to products purchased in the United States and Canada. For warranty claims outside of North America please contact the local dealer/distributor in the country of purchase.
ELAC
The life of sound.
ELAC AMERICAS LLC.
11145 KNOTT AVE. SUITES E & F
CYPRESS, CA. 90630
