FUSION Supernova SN70 - Uncategorized GLP - Free user manual and instructions
Find the device manual for free FUSION Supernova SN70 GLP in PDF.


| Product Type | Moving head spot fixture |
| Dimensions (L x W x H) | 440 x 360 x 620 mm (17.3 x 14.2 x 24.4 in) |
| Weight | 24.5 kg (54.0 lbs) |
| Power Consumption | 1200 W |
| Light Source | 1500 W discharge lamp (MSR 1500 or equivalent) |
| Color Wheel | 15 dichroic colors + open, split colors |
| Gobo Wheel | 15 rotating gobos + open, interchangeable |
| Prism | 8-facet rotating prism |
| Dimming | 0-100% mechanical linear dimmer |
| Strobe | 1-25 Hz variable speed |
| Pan/Tilt | 540° pan, 270° tilt, 16-bit resolution |
| Control Protocol | DMX512 (26 or 30 channels) |
| IP Rating | IP20 (indoor use) |
| Cooling | Fan cooled, temperature controlled |
| Maintenance | Clean exterior with dry cloth; check fan filters monthly; replace lamp after 750 hours |
| Safety | Use safety cable; disconnect power before servicing; install by qualified personnel |
| Spare Parts Available | Lamp, gobos, color filters, ballast, fan, mainboard |
| Repairability | Modular design; replaceable subassemblies; authorized service centers |
| Operating Temperature | -10°C to 45°C (14°F to 113°F) |
| Included Accessories | Power cable, DMX cable, lamp, clamp, safety cable, manual |
Frequently Asked Questions - FUSION Supernova SN70 GLP
User questions about FUSION Supernova SN70 GLP
0 question about this device. Answer the ones you know or ask your own.
Ask a new question about this device
Download the instructions for your Uncategorized in PDF format for free! Find your manual FUSION Supernova SN70 - GLP and take your electronic device back in hand. On this page are published all the documents necessary for the use of your device. FUSION Supernova SN70 by GLP.
USER MANUAL FUSION Supernova SN70 GLP
natural_image
Line drawing of a Supernoya device with labeled components (no text or symbols beyond branding)SUPERNOVA
RGBW
USER MANUAL
SUPERNOVA
RGBW USER MANUAL
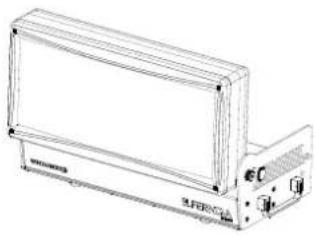
natural_image
Technical line drawing of a rectangular electronic device with a side panel and labeled ports (no text or symbols beyond labels)CONTENTS
Introduction 1
Safety Instructions....2
Delivery Contents ....3
Fixture Dimensions....3
Installations....4
Installation on the floor 4
Installation hanging....4
Safety attachment....4
Connections 5
Mains & DMX 5
DMX....6
Wireless DMX....6
Operations 7
TILT Index....7
Menu control 7
Output Mode 7
Menu map......8
Software updates....10
DMX Modes....11
Standard Mode 11
Advanced Mode....12
RGBW Mode....12
Compressed RGBW Mode.... 12
Pixel Mode 13
Services....14
Trouble Shooting....14
Maintenance....14
Appendix....I
Specifications....I
Exploded drawing....II
Spareparts....III
eventCON® IV
Colourwheel table......VI
Special control channel....VII
Shutter Channel Table......VIII
Shutter Duration Table......VIII
Shutter Flash Rate Table......VIII
Dimmer Curves.... IX
Patterns....X
Introduction
Thank you for your purchase and usage of the Ehrgeiz Supernova RGBW.
You have chosen a reliable product with outstanding features like the unique eventCON® connector system or the Tilt Index. The device is easy to use and is made of high quality components.
Every Ehrgeiz Product is checked before shipping to secure you are able to receive a great product without compromise. This is not a toy. Our ambitious aim is to get you a reliable working tool.
Safety Instructions
In General
In order to maintain the condition and to ensure a safe operation, it is important for all users to follow the safety instructions and warning notes written in this manual.
Do not operate the fixture with missing or damaged covers, shields or any optical component.
Please consider that unauthorized modifications to the device are forbidden due to safety reasons.
If the device is operated in any way that's not described in this manual, the product may suffer damage and the guarantee will become void. Furthermore, misuse may lead to dangers like short-circuit, burns, electric shock, burns due to ultraviolet radiation, lamp explosion, crash, etc.
IP65 protection rating
The fixture is protected against dust (first digit 6) and against low pressure jets of water from all directions (second digit 5).
Prevention from electrical shock
Make sure to ground (earth) the fixture electrically. (It's essential to connect the yellow/green conductor to earth)
Main Connection
Do not apply any AC mains power to the fixture at any other voltage than that specified.
Never let the eventCON® cable come into contact with other cables. Treat the eventCON® cable and all connections with the mains with particular caution.
Make sure the eventCON® cable is never crimped or damaged by sharp edges.
Rigging
Check that all external covers and rigging hardware are securely fastened.
When choosing the installation-location, please make sure that the fixture is not exposed to extreme heat. There should not be any cables lying around. You endanger your own and the safety of others.
Make sure that the area below the installation place is cordoned off when rigging, de-rigging or servicing the fixture.
If suspending from a rigging structure, fasten the fixture to a rigging clamp with an M10 bolt screwed into the threaded hole in the center of the base of the fixture. The bolt must be screwed at 20-25mm into the fixture. If the fixture is suspended by any other method, an M10 bolt must be screwed into this hole so that it is 20-25mm into the fixture.
Make sure all fixtures are operated and installed by qualified personnel with the relevant national certifications.
Install as described in this manual a secondary attachment such as a safety wire that is approved by an official body. The safety wire must comply with EN 60598-2-17 Section 17.6.6 and be capable of bearing a static suspended load ten times the weight of the fixture.
Positioning:
The fixture must be positioned at least 0.2m minimum distance to illuminate objects.
Keep all inflammable materials at least 0.2m from this fixture.
Allow to place the fixture on an inflammable surface.
The maximum ambient temperature of 45^ C may not be exceeded.
The exterior of this fixture can reach a very high temperature during operation. Avoid contact by persons and materials.
Maintenance:
This fixture is for professional use only. It is not for household use.
Always unplug the mains for any maintenance.
Risk of eye injury:
Do not stare directly into the light when it is switch on. Do not look at LEDs with magnifying glasses, telescopes, binoculars, or similar optical instruments that may concentrate the light output.
Delivery Contents
You received your Supernova RGBW with the following content
- Supernova RGBW 1372x Osram LED Flood / Blinder / Strobe
- eventCON® Input cable Input cable with Neutrik XLR and Schuko merging to Eventcon
Fixture Dimensions
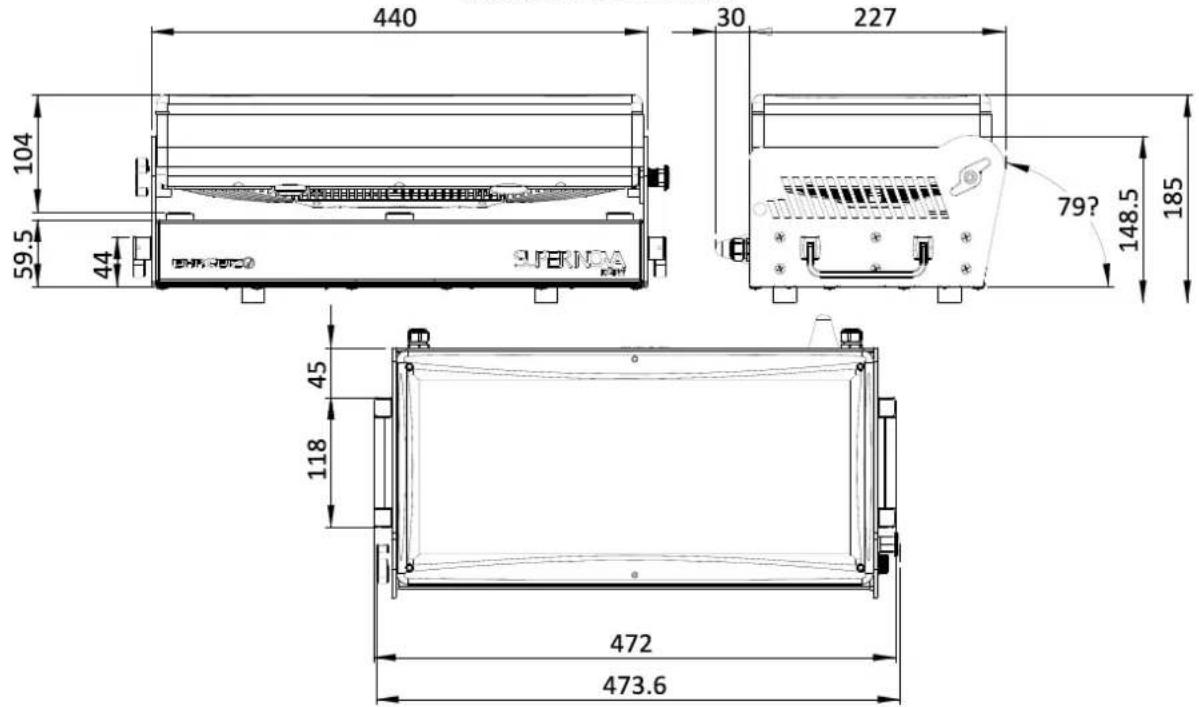
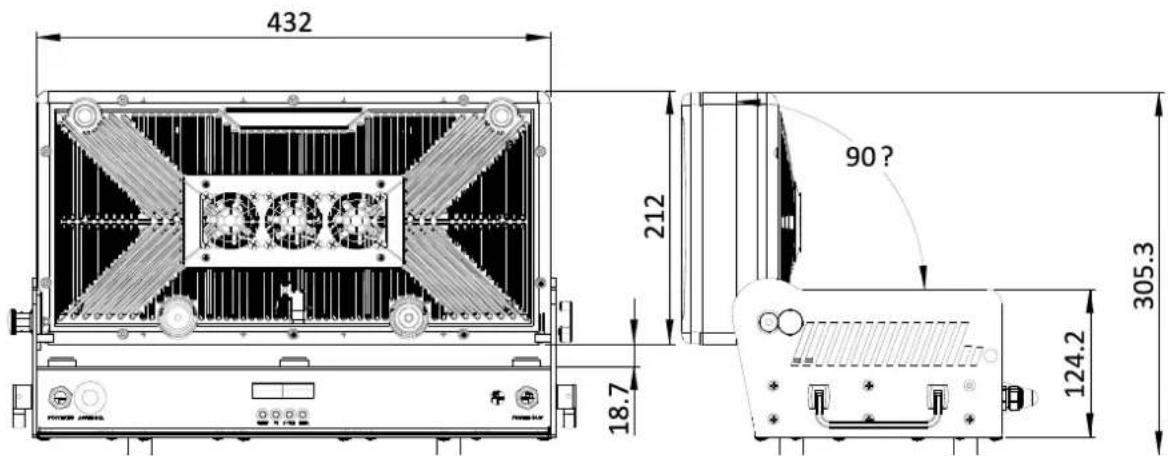
Dimensions in mm
Installations
Your Supernova RGBW can be installed in every kind of following positions. Please see the explanations and rely to the Instructions for a safe operation and secure handling.
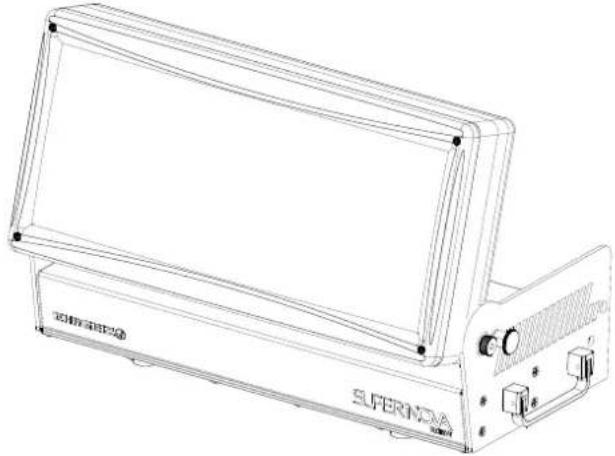
Installation on the floor
You could place the Supernova RGBW on the floor. Please make sure the surface is plane and the reliability of the floor is sufficient.
natural_image
Line drawing of a laboratory instrument with labeled components (no text or symbols beyond branding)Installation hanging
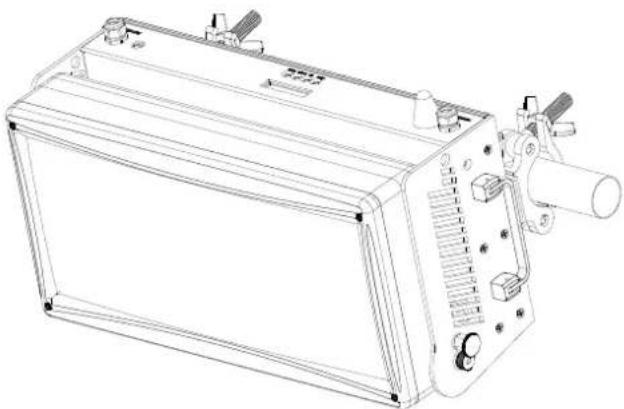
You can attach the Supernova RGBW to a Truss or Pipe facing down or to the side.
If you wish to install the fixture using a Clamp, make sure that the length of the M10 bolt does not exceed 25mm!
natural_image
Line drawing of a mechanical device with control panel and ports (no text or symbols)Safety attachment
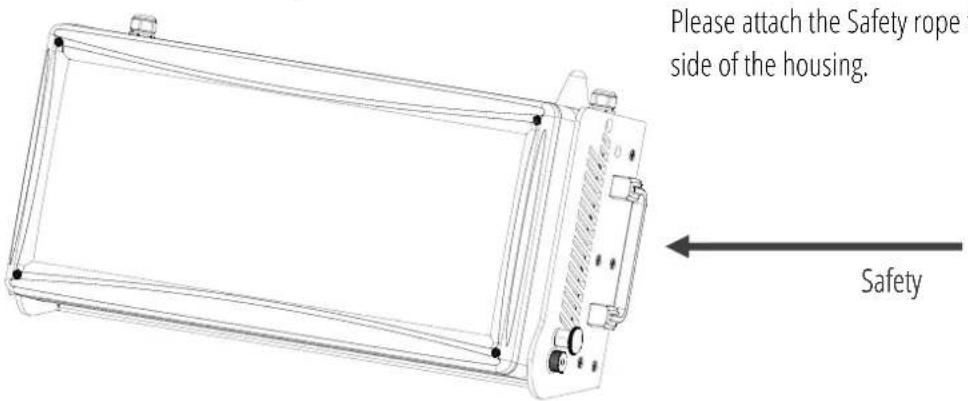
Please attach the Safety rope to one of the two handles on the side of the housing.
Connections
Mains & DMX
The eventCON® system is an innovative VDE certified connection System for professional use. It offers one connection for Power supply as well as the DMX signal. You will only be in need for one cable. You are able to loop through to the next device, while the Supernova RGBW offers you an input and output.
The connection of the Power supply has to be done by qualified personnel only. Do not connect the Supernova RGBW if you are not able to survey the consequences.
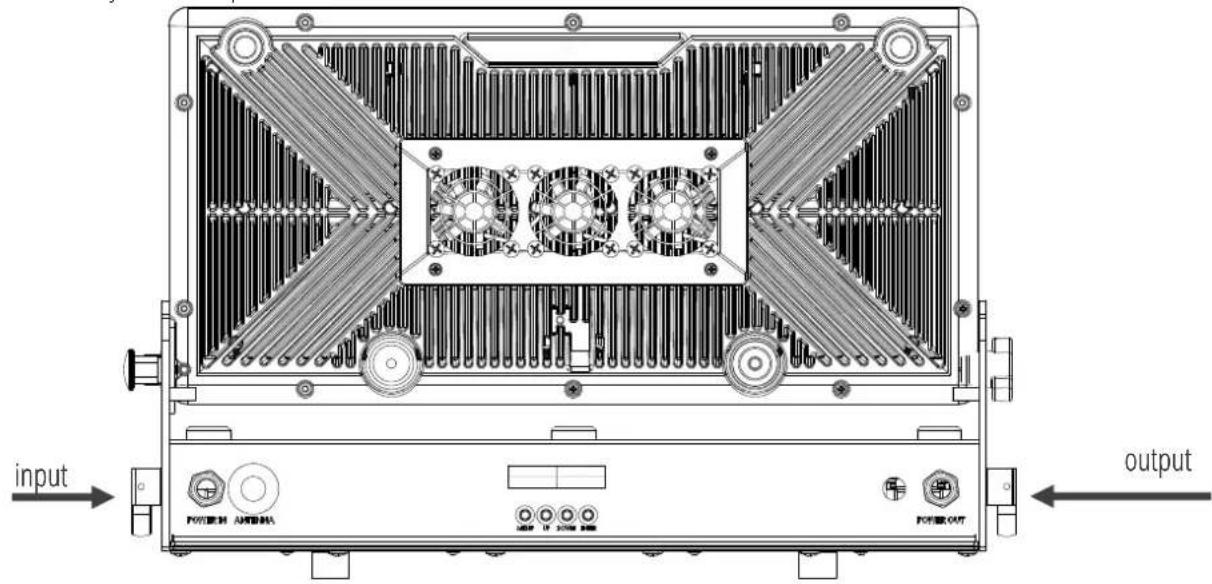
Do not try to connect another Type of Plug than an original eventCON®. Do not use any force to connect the eventCON® plug. You could use the outlet for connecting additional devices. The internal Power wiring is done with a cable cross section of 2,5mm².
The eventCON® System offers a big range of optional cables and mergers. For further information see Chapter eventCON® on Appendix page IV
DMX
We recommend the use of High quality XLR connectors like original NEUTRIK. Please use real DMX cable with a surge impedance of 110 Ω.
Please notice that the USITT DMX Standard does allow the use a max of 32 DMX fixtures in one line. You should terminate the signal by a 120 resistor.
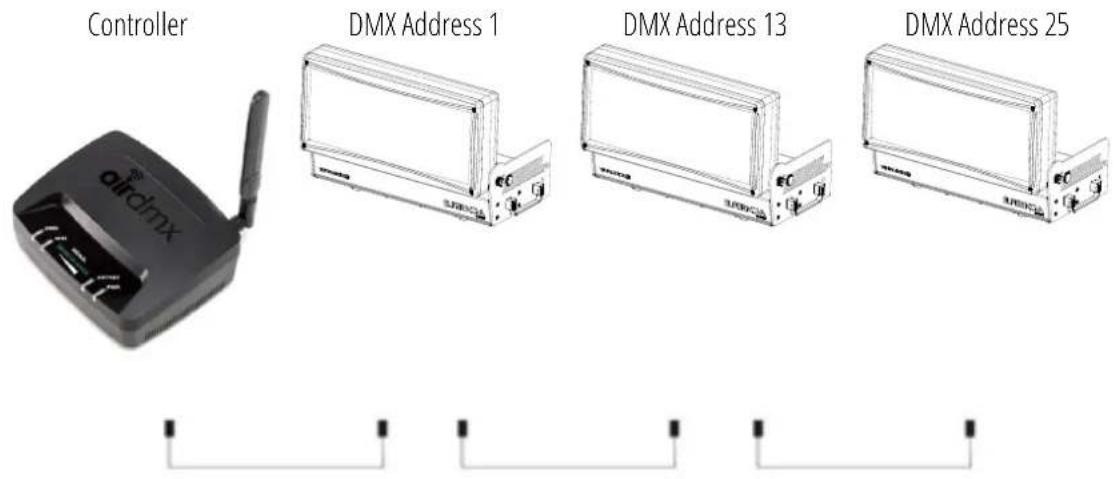
In the Standard mode the Supernova RGBW uses 12 DMX channels.
Connect the devices and increase the value of the DMX channel by 12 from one device to another
Wireless DMX
The Device is equipped with a Wireless DMX Input from Lumenradio. The receiver is also compatible with the Wireless Solution G3 protocol.
To establish a connection simply use the "Link" Option in the Supernova RGBW Menu and set your transmitter to the Link Mode. After both devices are linked you will be able to control the Supernova RGBW via Wireless DMX, as long as the W-DMX Mode is turned on in the Menu.
Operations
TILT Index
You can set up the TILT individually.
On most applications you will be able to use the TILT Index System on the Side of your Supernova RGBW. Open the screw on the one Side, pull out the Index Tilt bolt on the other side, then choose your desired Angle. Let the Bolt snap back in and fasten the wing screw again. This is an easy way to adjust a lot of devices to the same Angle in short time.
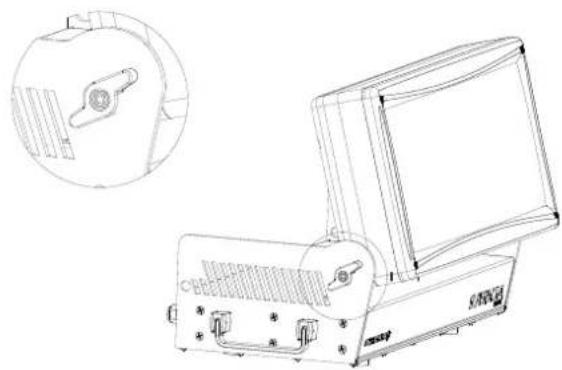
natural_image
Technical line drawing of a portable electronic device with a circular inset showing internal components (no text or symbols)Menu control
Your Supernova RGBW has an easy to read and setup display and Menu. It is programmed with a lot of built in functions as well as DMX Modes for different applications.
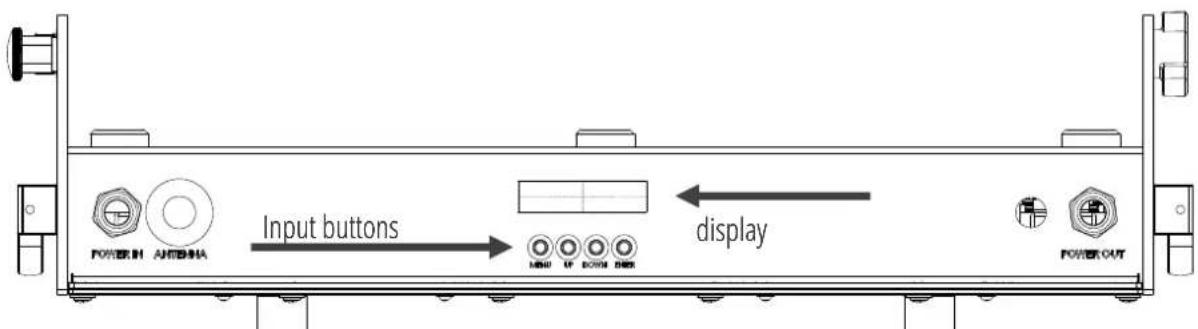
The Menu of the Supernova RGBW is very intuitive. You will find a menu map on the following pages. The four buttons are used to scroll the values, select a setting or hop back in the menu structure:
Go back in the menu structure or leave a value as it is
▶ Go forward in the menu structure or confirm the selected value
▲▼ Scroll up / down in the menu structure or scroll the selected value
Output Mode
You can choose the Output in the Menu or via DMX at the Control channel to choose either a better white or color performance. To give you an idea of which mode to choose, see the following chart:
| Mode | Standard | Color + | White + |
| Single color | 100 % | 200 % | 70 % |
| White | 100 % | 25 % | 125 % |
| RGB | 100 % | 200 % | 70 % |
| RGBW | 100 % | 60 % | 115 % |
Menu map
| Address | Address + / - | 1 - 512 | Choose your DMX address | ||
| Personality | DMX Mode | Standard | 14 Channels with most features | ||
| Advanced | 19 Channels with 16 bit dimming | ||||
| RGBW | 4 channels with RGBW control only | ||||
| Compressed RGBW | 7 channels with RGBW, dimmer, shutter, colourwheel | ||||
| Pixel | 24 channels with full control for every section | ||||
| Output Mode | Color+ | ||||
| White+ | Choose the output mode | ||||
| Standard | |||||
| Wireless DMX | Enable | No / Yes Enable / disable Wireless DMX | |||
| Link | No / Yes Link / Unlink to a Transmitter | ||||
| Remote DMX Addr. | Off / On | Enable the Remote DMX addressing | |||
| Dimmer curve | Linear | Set up the Dimmer Curve;see Appendix / page IX | |||
| Square Law | |||||
| Inverse Square | |||||
| Theatrical | |||||
| Dimmer Speed | Fast | Set up the speed of the dimmer | |||
| Smooth | |||||
| PWM Rate Setting | 1200 Hz | Choose the PWM rate | |||
| 2000 Hz | |||||
| 2400 Hz | |||||
| 6000 Hz | |||||
| 600 Hz | |||||
| Cooling Mode | Auto | Regulate the fan according the fixtures temp. | |||
| Standard | Medium Fan speed | ||||
| Silent | light output will lower if device get's too warm | ||||
| High Power | Fan always spins at highest level | ||||
| Mic enable | Disable / Enable | Enable the build in Mic | |||
| Mic sensitivity | Normal | Set the sensitivity for "Sound Active Mode" | |||
| High | |||||
| Low | |||||
| Reset via DMX | Off / On | Choose if device can be reset via DMX | |||
| Display Setting | Backlight | On / Off On / Off | |||
| Intensity Choose Intensity from 1 - 10 | |||||
| Shut-off Time set time when display turns off | |||||
| No Signal Flash | On / Off display flashes if no DMX input | ||||
| Temperature Unit | Celsius / Fahrenheit | choose the temperature unit | |||
| No DMX | Shutter Closed Hold | Set behavior for DMX signal loss | |||
| No DMX Fixture ID | Play Program 1 | Set behavior for DMX signal loss | |||
| Disable | Set the Fixture ID | ||||
| Set | 0 - 255 | ||||
| Personality | Lock | Off / On | ▶ Set a Password and Disable / Enable it | ||
| Set Password | 0000 - 9999 | ||||
| Boot Mode | DMX Mode | ▶ Set behavior at Startup;- DMX Mode: Device reacts to DMX input Signal- Program Play: Program 1 is played at startup- OBDCtrl: Playback Static State from On Board Control | |||
| Program Play | |||||
| On Board Ctrl | |||||
| Stand-Alone | Test Sequences | Off / On | ▶ Plays a Test sequence | ||
| Master/Slave | Alone | ▶ Set unit to Alone (No Master or Slave) | |||
| Master | ▶ Set unit to Master (in Program Mode) | ||||
| Slave | ▶ Set unit to slave (in Program Mode) | ||||
| On Board CTRL | Red | ▶ Set a static slate | |||
| Green | |||||
| Blue | |||||
| White | |||||
| Dimmer | |||||
| Color Macro | |||||
| Shutter | |||||
| Pattern | |||||
| Pattern Speed | |||||
| Reset All | |||||
| Save | |||||
| Load | |||||
| Program Edit | Program 1 | Prog 1 Max Step | Select Step | ▶ Select amount of Steps | |
| (01 - 30) | Capture DMX | ▶ Capture and Safe the actual DMX input | |||
| Hold Time | ▶ Select hold time in seconds(0 - 999) | ||||
| Fade Time | ▶ Select fade time in seconds(0 - 999) | ||||
| Program 2 | ▶ see above | ||||
| Program 3 | ▶ see above | ||||
| Program Play | Program 1 | No / Yes | ▶ Play Program 1 | ||
| Program 2 | No / Yes | ▶ Play Program 2 | |||
| Program 3 | No / Yes | ▶ Play Program 3 | |||
| Program All | No / Yes | ▶ Play Program 1, 2 & 3 in a Loop | |||
| Service | Reset | Reset All | No / Yes | ▶ Reset the device | |
| Calibrations | Color Offset | Red Offset | |||
| Green Offset | |||||
| Blue Offset | |||||
| White Offset | |||||
| Factory Default | Load | No / Yes | ▶ Set device back to factory defaults | ||
| Information | Fixture Time | Resettable | XXX hours | ▶ see the resettable fixture time |
| Total | XXX hours | ▶ see total working time of the device | ||
| Clear Resettable | Clear / Cancel | ▶ clear the resettable fixture time | ||
| Fixture Temp | Head LED | Actual | ▶ see temp. measured at LED's | |
| Max | ▶ see max. temp. Till last reset | |||
| Head Driver | Actual | ▶ see temp. measured at Driver Board | ||
| Max | ▶ see max. temp. Till last reset | |||
| Version | V. XXXX.XX | ▶ See the installed Firmware Version | ||
| Serial Number | XXXXXXXX | ▶ See the Serial Number off this device | ||
| DMX Live | Refresh Rate | XX Hz | ▶ See the refresh rate of the received DMX signal | |
| Control | Input value of channel chosen | |||
| CTO | ||||
| Color Wheel | ||||
| Red 1 | ||||
| Green 1 | ||||
| Blue 1 | ||||
| White 1 | ||||
| Dimmer | ||||
| Shutter | ||||
| Duration | ||||
| Flash Rate | ||||
Software updates
Your Supernova RGBW can be updated via the DMX connection, so no need to open it.
If you experience issues which could probably be solved by a Firmware Update, please contact your Ehrgeiz Dealer for further instructions.
DMX Modes
You can set up your Supernova RGBW in 5 different DMX Modes:
Standard Mode
Page 11; Uses 14 DMX channels
Advanced Mode
Page 12; Uses 19 DMX channels
RGBW Mode
Page 12; Uses 4 DMX channels
Compressed RGBW Mode
Page 12; Uses 7 DMX channels
Pixel Mode
Page 12; Uses 24 DMX channels
Standard Mode
| CH | Function |
| 1 | Dimmer |
| 2 | Shutter Duration (see Shutter duration chart / Appendix Page VIII) |
| 3 | Shutter Flash Rate (see Shutter flash rate chart / Appendix Page VIII) |
| 4 | Shutter effects (see Shutter effects chart / Appendix Page VIII) |
| 5 | Colour Wheel (see Colour Wheel chart / Appendix Page VI) |
| 6 | Red |
| 7 | Green |
| 8 | Blue |
| 9 | White |
| 10 | CTO |
| 11 | Pattern (see Pattern effects table / Appendix Page X) |
| 12 | Pattern Speed |
| 13 | Control (see Control channel table / Appendix Page VII) |
| 14 | Remote DMX adress |
Advanced Mode
| CH | Function |
| 1 | Dimmer |
| 2 | Dimmer fine |
| 3 | Shutter Duration (see Shutter duration chart / Appendix Page VIII) |
| 4 | Shutter Flash Rate (see Shutter flash rate chart / Appendix Page VIII) |
| 5 | Shutter effects (see Shutter effects chart / Appendix Page VIII) |
| 6 | Colour Wheel (see Colour Wheel chart / Appendix Page VI) |
| 7 | Red |
| 8 | Red fine |
| 9 | Green |
| 10 | Green fine |
| 11 | Blue |
| 12 | Blue fine |
| 13 | White |
| 14 | White fine |
| 15 | CTO |
| 16 | Pattern (see Pattern effects table / Appendix Page X) |
| 17 | Pattern Speed |
| 18 | Control (see Control channel table / Appendix Page VII) |
| 19 | Remote DMX adress |
RGBW Mode
| CH | Function |
| 1 | Red |
| 2 | Green |
| 3 | Blue |
| 4 | White |
Compressed RGBW Mode
| CH | Function |
| 1 | Colour Wheel (see Colour Wheel chart / Appendix Page VI) |
| 2 | Red |
| 3 | Green |
| 4 | Blue |
| 5 | White |
| 6 | Shuttereffects (see Shutter effects chart / Appendix Page VIII) |
| 7 | Dimmer |
Pixel Mode
| CH | Function |
| 1 | Dimmer |
| 2 | Shutter Duration (see Shutter duration chart / Appendix Page VIII) |
| 3 | Shutter Flash Rate (see Shutter flash rate chart / Appendix Page VIII) |
| 4 | Shutter effects (see Shutter effects chart / Appendix Page VIII) |
| 5 | Colour Wheel (see Colour Wheel chart / Appendix Page VI) |
| 6 | Red 1 |
| 7 | Green 1 |
| 8 | Blue 1 |
| 9 | White 1 |
| 10 | Red 2 |
| 11 | Green 2 |
| 12 | Blue 2 |
| 13 | White 2 |
| 14 | Red 3 |
| 15 | Green 3 |
| 16 | Blue 3 |
| 17 | White 3 |
| 18 | Red 4 |
| 19 | Green 4 |
| 20 | Blue 4 |
| 21 | White 4 |
| 22 | CTO |
| 23 | Control (see Control channel table / Appendix Page VII) |
| 24 | Remote DMX adress |
Services
Trouble Shooting
| Problem | Causes | Solutions |
| No Display / Not switched on | No power to fixture | Check AC mains power and connections |
| Inspect connections and cables. Correct poor connections. Repair or replace damaged cables | ||
| Check the power supply voltage. | ||
| Fixture does not respond to DMX correctly. | Incorrect fixture DMX addressing | Check the fixture is assign to correct DMX address (See Page 8) |
| Incorrect DMX mode | Check fixture is set to correct DMX mode (See Page 11) | |
| Fault on data link | check for the data link is correctly linked from the DMX source if all cables are in good condition | |
| Other device on DMX link defective. | Unplug eventCON® IN and OUT connectors and connect them directly together to bypass one fixture at a time until normal operation is regained | |
| Data transmission lines should be terminated. | Insert termination plug in OUTPUT of the last fixture on the link. | |
| LC-Display works but no light outputs can be generated. | Faulty DMX link | Run built-in test mode or static control mode to verify if LEDs are illuminated |
| Broken parts / wires / LEDs | Have fixtures serviced by an Ehrgeiz service technician | |
| Cooling Fan does not spin*. | Fixture is set to Auto cooling mode and fixture is still cool | Set the cooling mode to other modes other than Auto mode (See Menu Map on Page 8) |
| Set the fixture to generate light output, the fan will start to work when temperature reached 35 deg. Celsius (95 deg. Fahrenheit) | ||
| Broken Fans | Have the Fan replaced by an Ehrgeiz service technician |
Maintenance
There are no serviceable Part inside your Supernova RGBW. If problems occur contact your Ehrgeiz dealer or a qualified Ehrgeiz Service technician.
Use a slightly moist and smooth cloth to clean the device. Do not use any aggressive detergents.
If you want to replace the fuse make sure to use a fuse of the recommended type. Do not use any other kind of fuse as this might result in a damage of the device or even serious injuries of persons.
We are sure you will have a sophisticated experience with your Supernova RGBW.
Appendix
Light source
- 1372 x Osram® LED
• CRI min. 80
• Rated lumen output: 60.000 lm
• High Efficiency with typ. 96 lm/W
• LED life expectancy: approx. 50,000 hours
Optical system
- Beam angle 110^
- Even Flood effect
• High resolution dimmer 0-100% - Selectable dimmer curves
• Strobe with variable speed (max. 20 Hz) - Selectable PWM rate
• Pre-programmed random strobe & pulse effects - RGBW, 8 or 16 bit color mixing
- SteadyColor™ Dimming
• 4 controllable LED zones - Seamless CTO
• Virtual color wheel with 39 colours including whites (2700 K / 3200 K / 4200 K / 5600 K / 7200 K / 8000 K)
• Pattern effects with variable speed
Functions
Thermal
• Maximum ambient temperature: 45°C (113°F)
Control and programming
• Setting & addressing: 2 x 16 characters LC display & 4 buttons
- Protocol: USITT DMX-512
Specifications
• 3 DMX protocol modes
• 3-editable programs, each up to 30 steps
- Stand-alone mode
• Wireless DMX (Lumenradio CRMX)
- Firmware update via Update cable
- DMX In/Out: eventCon®
• Power In/Out: eventCon®
Electrical Specifications
• Electronic switching power supply with auto-sensing
• Input voltage: 100 - 240 V AC, 50 / 60 Hz
• Max. power consumption: 700 Watt
Mechanical Specification
• IP65 rating
• Height (LED module up): 307 mm (12.08")
• Height (LED module down): 185 mm (7.28")
• Width: 484 mm (19.05")
- Depth: 250 mm (9.84")
• Weight: 13.5 kg
Rigging
- Two M10 insert
• Four 1/4th turn mounting inserts for two omega bracket or 1 x Diagonal bracket - Two attachment points for safety wire (handles)
Included accessories
• Cable Merger eventCON® / Schuko + XLR-3
Available Accessoires
- 2 x Omega brackets
• 1 x Diagonal Omega bracket
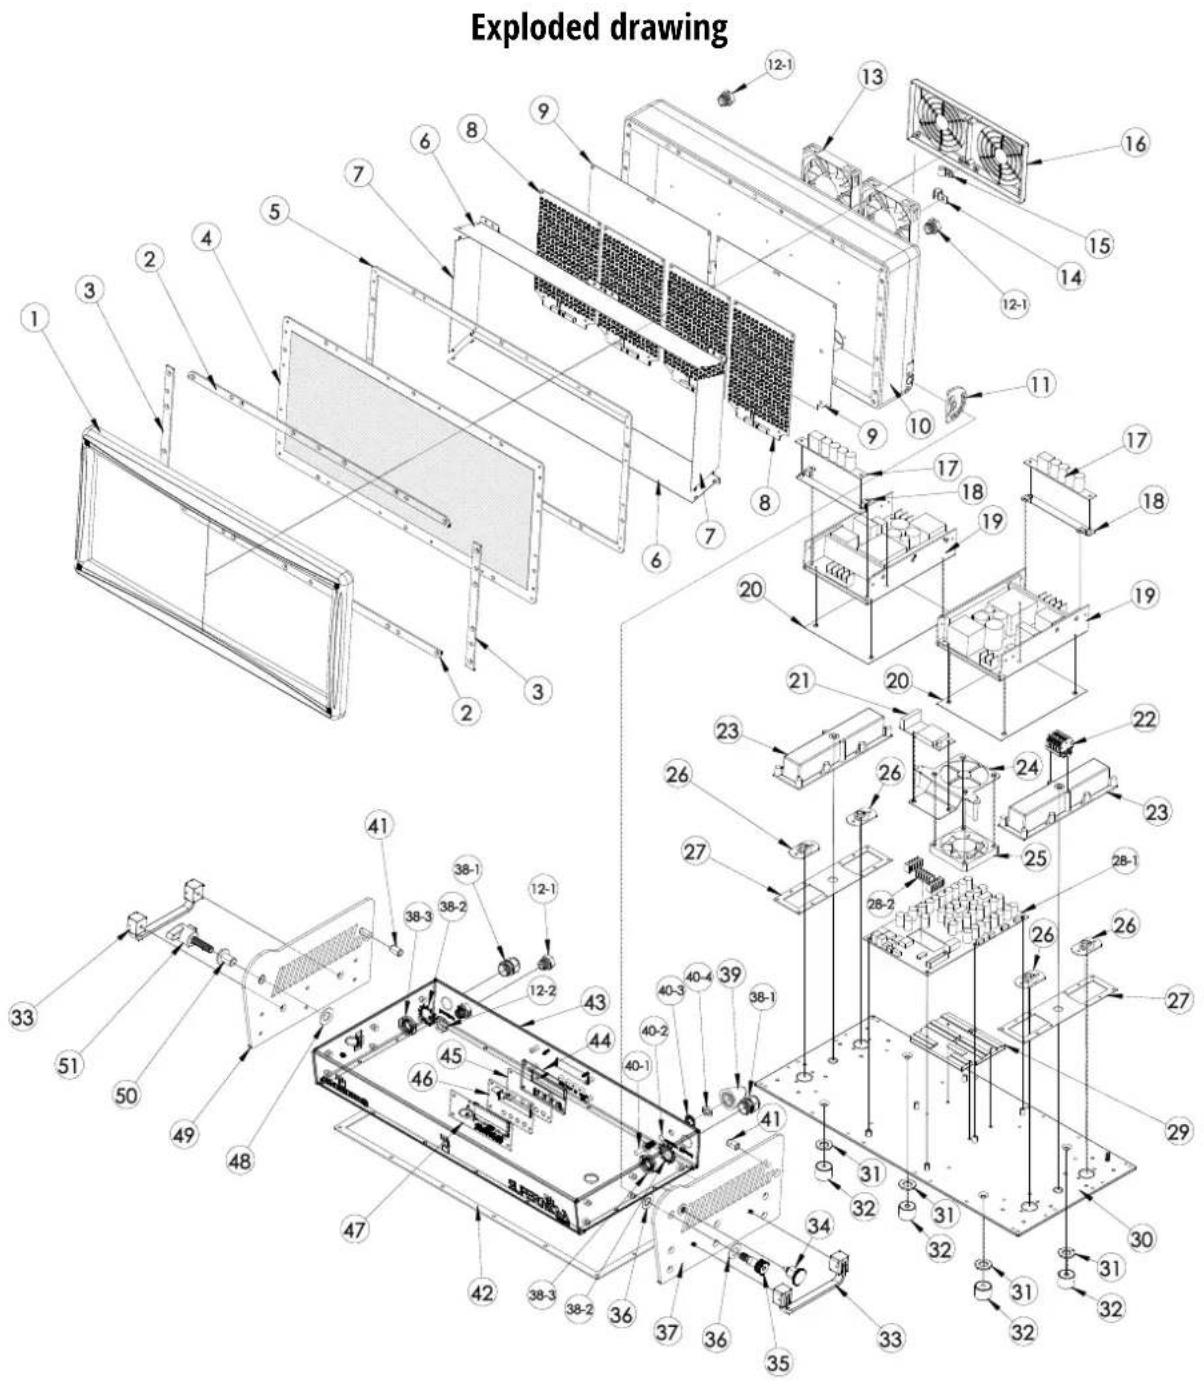
Spareparts
| # | Description (EN) | QTY | Item No. | # | Description (EN) | QTY | Item No. |
| 1 | Top Cover | 1 | 111102 | 27 | Waterproof Box Seal Packing | 2 | 111133 |
| 2 | Lens plate bracket A | 2 | 114186 | 28 | Supernova RGBW Main+Driver PCB | 1 | 113980 |
| 3 | Lens plate bracket B | 2 | 114187 | 29 | Heat sink for CTRL Board | 1 | 114194 |
| 4 | Top Protection Diffusor Plate | 1 | 200029 | 30 | Main Housing Bottom | 1 | 200040 |
| 5 | Top Waterproof Seal Ring | 1 | 111107 | 31 | Rubber ring | 4 | 114196 |
| 6 | Internal Reflector long | 2 | 200030 | 32 | Fixture Standing Feet | 4 | 111138 |
| 7 | Internal Reflector short | 2 | 200031 | 33 | Handle | 2 | 111119 |
| 8 | LED PCB for Supernova RGBW | 4 | 113607 | 34 | Indexed Plunger | 1 | 111117 |
| 9 | Heat Transfer Pad | 2 | 200032 | 35 | Screw ø1x16(M8) | 1 | 111116 |
| 10 | Top Heat Sink | 1 | 200033 | 36 | Plate Type Spring | 2 | 114197 |
| 11 | Angular Indexing Plate | 1 | 111108 | 37 | Housing part left | 1 | 200041 |
| 12 | Pressure valve | 3 | 106271 | 38 | Waterproof PG Glands | 2 | 106273 |
| 13 | Waterproof Brushless DC Fan | 1 | 200034 | 39 | Waterproof Cone Antenna | 1 | 114465 |
| 14 | Cable Guide Mount | 1 | 200035 | 40 | Cables for Antenna | 1 | 114200 |
| 15 | Cable Guide Loop | 1 | 200036 | 41 | Rubber Stop | 2 | 200042 |
| 16 | Fan Cover | 1 | 200037 | 42 | Waterproof Rubber Seal Base | 1 | 200043 |
| 17 | PSU Filter Module | 2 | 200038 | 43 | Housing Frame Base | 1 | 200044 |
| 18 | Mounting Bracket for PSU Filter Module | 2 | 200039 | 44 | Display Seal Packing | 1 | 111135 |
| 19 | Power supply Unit-S2V | 2 | 200025 | 45 | Transparent Window for Display | 1 | 111134 |
| 20 | Heat Dissipation Pad for Power Supply | 2 | 114191 | 46 | Display waterproof seal pressure plate | 1 | 114204 |
| 21 | Wireless DMX moduleOE-BRX1 RDM Receiver | 1 | 114190 | 47 | LCD Board V.01 | 1 | 105730 |
| 22 | Terminal Block | 1 | 111129 | 48 | Plate Type Spring B22108 | 1 | 200045 |
| 23 | Waterproof Box | 2 | 111132 | 49 | Housing part Right | 1 | 200046 |
| 24 | Internal Cooling Fan Bracket | 1 | 114192 | 50 | Conversion Shaft - M8 | 1 | 111123 |
| 25 | Internal Cooling Fan | 1 | 114193 | 51 | Rotary Knob | 1 | 111124 |
| 26 | 1/4 Turn fast lock mount | 4 | 111090 |
eventCON®
The eventCON is a new, innovative cable connector system, which combines power and DMX signal in one cable and one plug. This is the revolution of connection in lighting. The plug is IP67 certified and can be assembled in the customers need without losing the IP certification. The VDE certification attests the eventCON system a power current up to 16A.
Thanks to the future-oriented mechanism the plug just needs to be inserted into the connector and locks automatically. By turning the sleeve the connection is unlocked.
Innovative cablin solutions simplify the work in the event industry. In order that the eventCON system works with your classic fixtures we have developed adapter sets which connect classic XLR/Schuko/PowerCON with the eventCON system.
Technical Data:
| Contact durability | 1000 |
| Rated voltage (Power) / V | 250 |
| Rated voltage (Signal) / V | 30 |
| Rated impulse voltage / V | 2500 |
| Rated current (Power) / A | 16 |
| Rated current (Signal) / A | 2 |
| Cable cross-section (Power) / mm ^2 | 1,5 |
| Cable cross-section (Signal) / mm ^2 | 0,5 |
| Number of poles (Power) | 3 |
| Number of poles (Signal) | 3 |
| Environmental temperature / °C | 40 |
| Upper limiting temperature / °C | 105 |
| Lower limiting temperature /°C | -40 |
| Pollution degree | 3 |
| Insulating medium group | II |
| Protection class | IP67 |
| Support structure material | PA66 |
| Contact material | Copper base, gilded |
| Connection method | Solder connection |
| Connection type | Fee plug connector |
| Pull relief / mm | 7,5 – 9,5 |
Here is an extract of the available eventCON accessories:
Adapters & Extension

eventCON Adapter Power OUT
• Power OPEN to eventCON OUT

eventCON Adapter DMX OUT
• eventCON IN to XLR-3f OUT

eventCON Adapter Power OUT
• eventCON IN to power OPEN

eventCON Extension
• eventCON IN to eventCON OUT
Splitter & Merger

natural_image
Pure electrical connector diagram without any text, numbers, or symbolsInput Merger eventCON
• PD1F/PD1M separate 2 eventCON IN to 1 eventCON OUT

Output Splitter eventCON
• PD1M/XLR-3/Open eventCON IN to XLR-3 OUT & Power OPEN

natural_image
Pure electrical circuit lines without any symbolsInput Merger Schuko eventCON
• PD1F/XLR-3/Schuko 1 x XLR & 1 x Schuko IN to eventCON OUT
Cable & Plugs
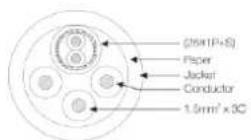
The eventCON cables have a diameter of 9.5mm
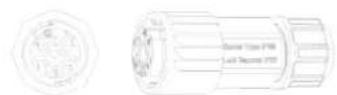
Pin Definition
Signal
1:GND
• 2: Data-
• 3: Data+
Power
L: Line
N: Neutral
⊕:PE
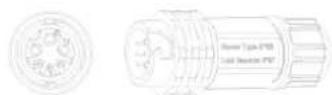
Pin Definition
Signal
1:GND
• 2: Data- • 3: Data+
Power
L: Line
N: Neutral
:PE
Please consider to your own safety:
Only qualified electricians are allowed to wire the eventCON system or solder plugs onto the eventCON
cable. Please contact your local dealer for further information if necessary.
Colourwheel table
| Value | Function |
| 0 - 5 | No Function, RGBW Colour mixing |
| 6 - 10 | LEE 790-Moroccan Pink |
| 11 - 15 | LEE 157-Pink |
| 16 - 20 | LEE 332-Special Rose Pink |
| 21 - 25 | LEE 328-Follies Pink |
| 26 - 30 | LEE 345-Fuchsia Pink |
| 31 - 35 | LEE 194-Surprise Pink |
| 36 - 40 | LEE 181-Congo Blue |
| 41 - 45 | LEE 071-Tokyo Blue |
| 46 - 50 | LEE 120-Deep Blue |
| 51 - 55 | LEE 079-Just Blue |
| 56 - 60 | LEE 132-Medium Blue |
| 61 - 65 | LEE 200-Double CT Blue |
| 66 - 70 | LEE 161-Slate Blue |
| 71 - 75 | LEE 201-Full CT Blue |
| 76 - 80 | LEE 202-Half CT Blue |
| 81 - 85 | LEE 117-Steel Blue |
| 86 - 90 | LEE 353-Lighter Blue |
| 91 - 95 | LEE 118-Light Blue |
| 96 - 100 | LEE 116-Medium Blue Green |
| 101 - 105 | LEE 124-Dark Green |
| 106 - 110 | LEE 139-Primary Green |
| 111 - 115 | LEE 089-Moss Green |
| 116 - 120 | LEE 122-Fern Green |
| 121 - 125 | LEE 738-JAS Green |
| 126 - 130 | LEE 088-Lime Green |
| 131 - 135 | LEE 100-Spring Yellow |
| 136 - 140 | LEE 104-Deep Amber |
| 141 - 145 | LEE 179-Chrome Orange |
| 146 - 150 | LEE 105-Orange |
| 151 - 155 | LEE 021-Gold Amber |
| 156 - 160 | LEE 778-Mellennium Gold |
| 161 - 165 | LEE 135-Deep Golden Amber |
| 166 - 170 | LEE 164-Flame Red |
| Colourwheel rotation effects | |
| 171 - 185 | Coulourwheel rotation forward (fast - slow) |
| 186 - 190 | Coulourwheel rotation stop |
| 191 - 205 | Coulourwheel rotation backward (fast - slow) |
| 206 - 210 | Coulourwheel rotation stop |
| Random colours | |
| 211 - 225 | Fast - slow |
| White hue | |
| 226 - 230 | Warmwhite - 2700K |
| 231 - 235 | Warmwhite - 3200K |
| 236 - 240 | Neutralwhite - 4200K |
| 241 - 245 | Coldwhite - 5600K |
| 246 - 250 | Coldwhite - 7200K |
| 251 - 255 | Coldwhite - 8000K |
Special control channel
| Value | Function |
| 0-10 | Reserved |
| 11-15 | Cooling mode: Auto |
| 16-20 | Cooling mode: Silent |
| 21-25 | Cooling mode: Standard |
| 25-30 | Cooling mode: High Power |
| 31-35 | Reserved |
| 36-40 | Remote DMX Address-Low (001-256) |
| 41-45 | Reserved |
| 46-50 | Remote DMX Address-High (257-512) |
| 51-55 | Reserved |
| 56-60 | Dimmer Speed: Smooth |
| 61-65 | Dimmer Speed: Fast |
| 66-70 | Reserved |
| 71-75 | Dimmer Curve: Linear |
| 76-80 | Dimmer Curve: Threatrical |
| 81-85 | Dimmer Curve: Square Law |
| 86-90 | Dimmer Curve: Inverse Square Law |
| 91-95 | Reserved |
| 96-100 | No DMX: Hold |
| 101-105 | No DMX: Shutter Closed |
| 106-110 | No DMX: Play Program 1 |
| 111-140 | Reserved |
| 141-145 | DMX Mode: Standard |
| 146-150 | DMX Mode: Advanced |
| 151-155 | DMX Mode: RGBW |
| 156-160 | DMX Mode: Pixel |
| 161-165 | Output Mode: Standard |
| 166-170 | Output Mode: Color+ |
| 171-175 | Output Mode: White+ |
| 176-180 | Fixture Reset |
| 181-185 | Display Backlight: On |
| 186-190 | Display Backlight: Off |
| 191-200 | Reserved |
| 201-205 | PWM Rate: 600 Hz |
| 206-210 | PWM Rate: 1200 Hz |
| 211-215 | PWM Rate: 2000 Hz |
| 216-220 | PWM Rate: 2400 Hz |
| 221-225 | PWM Rate: 6000 Hz |
| 226-230 | Reserved |
| 231-235 | Boot Mode: Auto |
| 236-240 | Boot Mode: DMX Mode |
| 241-245 | Boot Mode: Program Play |
| 246-250 | Boot Mode: Static Mode |
| 251-255 | Reserved |
Shutter Channel Table
| Value | Function |
| 0 – 15 | Shutter Closed |
| 16-47 | Random Strobe (slow – fast) |
| 48-79 | Ramp Up (slow – fast) |
| 80-111 | Ramp Down (slow – fast) |
| 112-143 | Ramp UP & down (slow – fast) |
| 144-199 | Strobe Pause 5s – 1s (slow – fast) |
| 200-239 | Strobe 1Hz – 20 Hz (slow – fast) |
| 240-255 | Shutter Open |
Shutter Duration Table
| Value | Function |
| 0 – 5 | Default duration (50 ms) |
| 6 - 250 | Duration slow to fast |
| 251 - 255 | Blinder Mode (intensity temporarily doubled) |
Shutter Flash Rate Table
| Value | Function |
| 0 – 5 | Shutter Closed |
| 6 - 10 | Single flash |
| 11 - 250 | Strobe slow to Fast (0.5 – 25 Hz) |
| 251 – 255 | Shutter Open |
Dimmer Curves

natural_image
Simple diagonal line drawn on a Cartesian coordinate system with x and y axes (no labels or data points)Linear
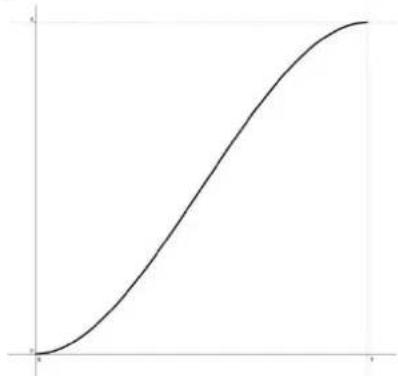
line
| x | y | |---|---| | 0 | 0 | | 1 | 1 | | 2 | 3 | | 3 | 5 | | 4 | 7 | | 5 | 9 | | 6 | 11 | | 7 | 13 | | 8 | 15 | | 9 | 17 | | 10 | 19 | | 11 | 21 | | 12 | 23 | | 13 | 25 | | 14 | 27 | | 15 | 29 | | 16 | 31 | | 17 | 33 | | 18 | 35 | | 19 | 37 | | 20 | 39 | | 21 | 41 | | 22 | 43 | | 23 | 45 | | 24 | 47 | | 25 | 49 | | 26 | 51 | | 27 | 53 | | 28 | 55 | | 29 | 57 | | 30 | 59 | | 31 | 61 | | 32 | 63 | | 33 | 65 | | 34 | 67 | | 35 | 69 | | 36 | 71 | | 37 | 73 | | 38 | 75 | | 39 | 77 | | 40 | 79 | | 41 | 81 | | 42 | 83 | | 43 | 85 | | 44 | 87 | | 45 | 89 | | 46 | 91 | | 47 | 93 | | 48 | 95 | | 49 | 97 | | 50 | 99 | | 51 | 101 | | 52 | 103 | | 53 | 105 | | 54 | 107 | | 55 | 109 | | 56 | 111 | | 57 | 113 | | 58 | 115 | | 59 | 117 | | 60 | 119 | | 61 | 121 | | 62 | 123 | | 63 | 125 | | 64 | 127 | | 65 | 129 | | 66 | 131 | | 67 | 133 | | 68 | 135 | | 69 | 137 | | 70 | 139 | | 71 | 141 | | 72 | 143 | | 73 | 145 | | 74 | 147 | | 75 | 149 | | 76 | 151 | | 77 | 153 | | 78 | 155 | | 79 | 157 | | 80 | 159 | | 81 | 161 | | 82 | 163 | | 83 | 165 | | 84 | 167 | | 85 | 169 | | 86 | 171 | | 87 | 173 | | 88 | 175 | | 89 | 177 | | 90 | 179 | | 91 | 181 | | 92 | 183 | | 93 | 185 | | 94 | 187 | | 95 | 189 | | 96 | 191 | | 97 | 193 | | 98 | 195 | | 99 | 197 | |100 |199 |Theatrical
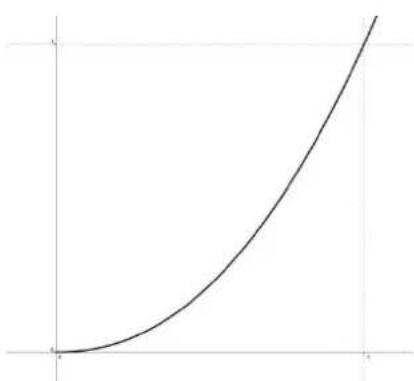
line
| x | y | |---|---| | 0 | 0 | | 1 | 0.25 | | 2 | 0.5 | | 3 | 0.75 | | 4 | 1.0 | | 5 | 1.25 |Square
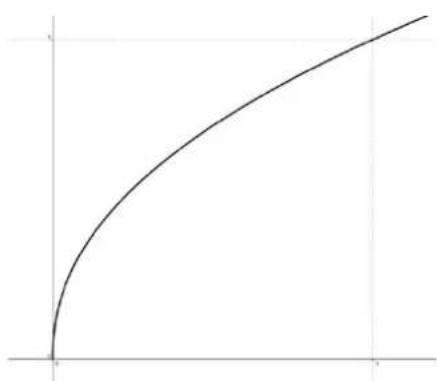
line
| x | y | |---|---| | 0 | 0 | | 1 | 1 | | 2 | 2 | | 3 | 3 | | 4 | 4 | | 5 | 5 |Inverse square
Patterns
Supernova RGBW Animation Pattern
DMX 000 - 020 = Static
DMX 021 - 075 = Chase Animation - works with Pattern speed table
DMX 076 - 130 = Fade Animation - works with Pattern speed table
Static
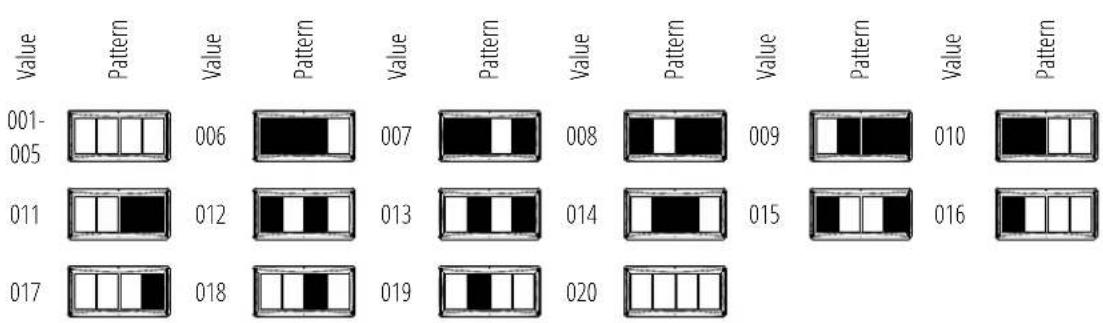
bar
| Value | Pattern | Value | Pattern | Value | Pattern | Value | Pattern | Value | Pattern | Value | Pattern | |---|---|---|---|---|---|---|---|---|---|---|---| | 001-005 | □ | 006 | ■ | 007 | ■ | 008 | ■ | 009 | □ | 010 | ■ | | 011 | □ | 012 | ■ | 013 | ■ | 014 | ■ | 015 | □ | 016 | ■ | | 017 | □ | 018 | ■ | 019 | ■ | 020 | ■ | | | | |Animated
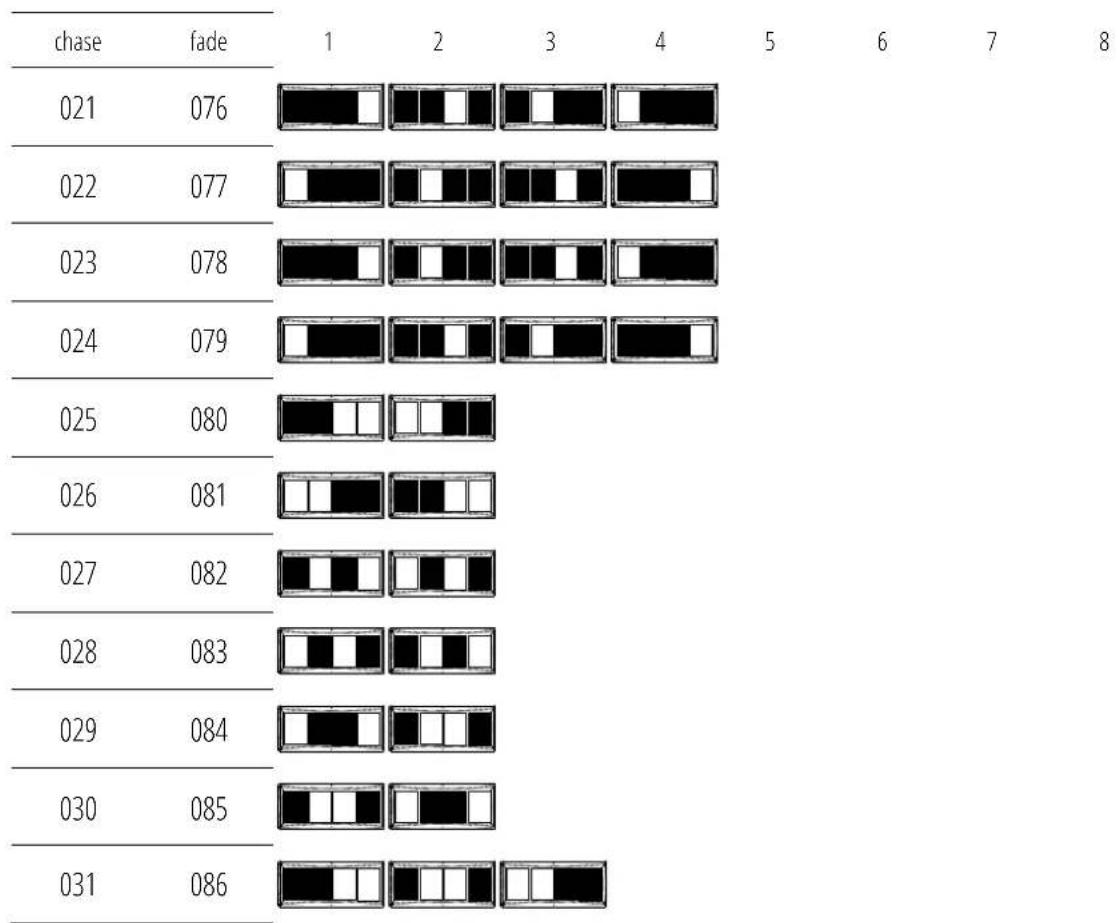
bar
| | chase | fade | |---|---|---| | 021 | 1 | 076 | | 022 | 2 | 077 | | 023 | 3 | 078 | | 024 | 4 | 079 | | 025 | 5 | 080 | | 026 | 6 | 081 | | 027 | 7 | 082 | | 028 | 8 | 083 | | 029 | 9 | 084 | | 030 | 10 | 085 | | 031 | 11 | 086 |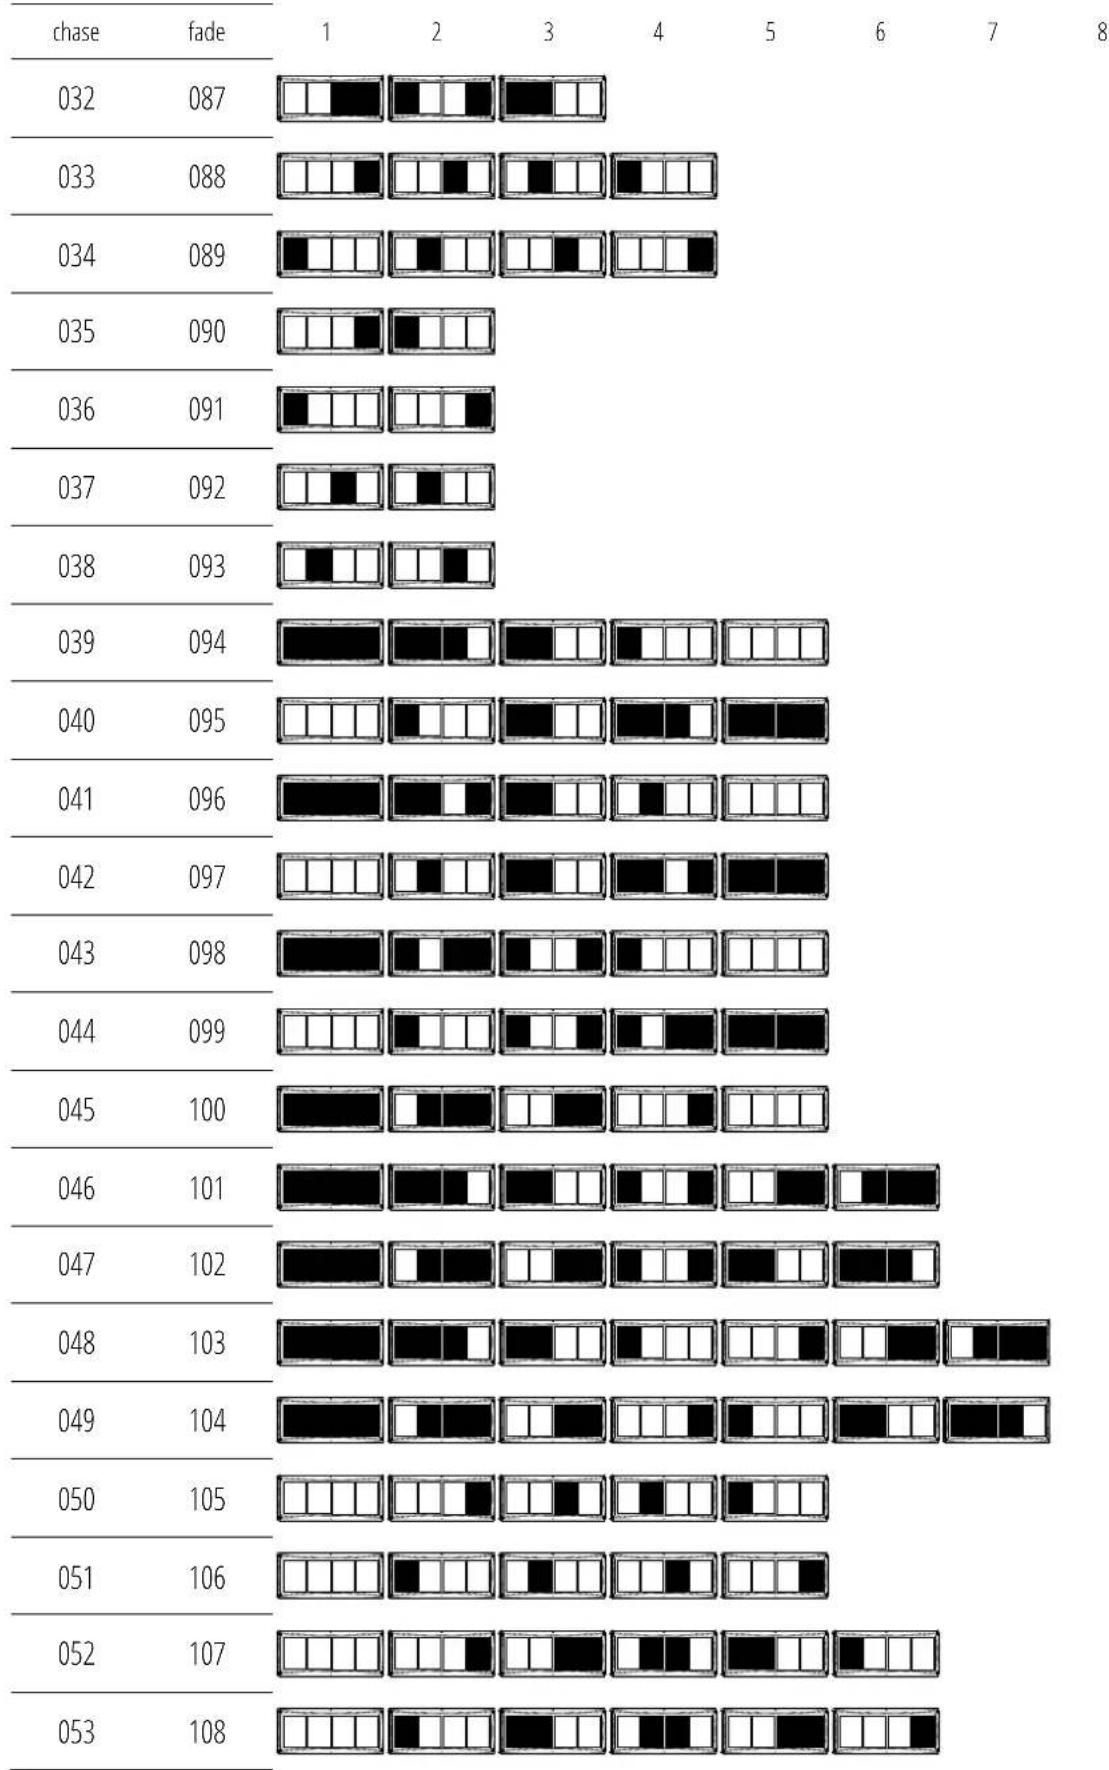
| chase | fade | 1 | 2 | 3 | 4 | 5 | 6 | 7 | 8 |
| 054 | 109 | ||||||||
| 055 | 110 | ||||||||
| 056 | 111 | ||||||||
| 057 | 112 | ||||||||
| 058 | 113 | ||||||||
| 059 | 114 | ||||||||
| 060 | 115 | ||||||||
| 061 | 116 | ||||||||
| 062 | 117 | ||||||||
| 063 | 118 | ||||||||
| 064 | 119 | ||||||||
| 065 | 120 | ||||||||
| 066 | 121 | ||||||||
| 067 | 122 | ||||||||
| 068 | 123 | ||||||||
| 069 | 124 | ||||||||
| 070 | 125 | ||||||||
| 071 | 126 | ||||||||
| 072 | 127 | ||||||||
| 073 | 128 | ||||||||
| 074 | 129 | ||||||||
| 075 | 130 | ||||||||

EHRGEIZ

- SUPERNOVA
- USER MANUAL
- RGBW USER MANUAL
- CONTENTS
- Introduction
- Safety Instructions
- Delivery Contents
- Installations
- Installation hanging
- Connections
- Mains & DMX
- DMX
- Wireless DMX
- Operations
- TILT Index
- Menu control
- Output Mode
- Software updates
- DMX Modes
- Services
- Maintenance
- Appendix
- Light source
- Optical system
- Functions
- Thermal
- Control and programming
- Specifications
- Electrical Specifications
- Mechanical Specification
- Rigging
- Included accessories
- eventCON®
- Pin Definition
- Patterns
Brand : GLP
Model : FUSION Supernova SN70
Category : Uncategorized