
NK36CB665W - Range hood SAMSUNG - Free user manual and instructions
Find the device manual for free NK36CB665W SAMSUNG in PDF.


| Product Type | Range Hood |
| Brand | Samsung |
| Model | NK36CB665W |
| Mounting Type | Wall-Mounted Canopy |
| Width | 36 inches |
| Depth | 19.7 inches |
| Height (Adjustable) | 24 - 42 inches |
| Weight | 33.1 lbs |
| Power Supply | 120V, 60Hz |
| Fan Speeds | 4 speeds |
| Maximum Airflow | 600 CFM |
| Noise Level (Max Speed) | 62 dB |
| Filter Type | Stainless steel baffle filters (dishwasher safe) |
| Grease Removal Efficiency | >90% |
| Lighting | LED strip, 2 x 3W |
| Control Type | Touch controls |
| Ducting Size | 6-inch round duct |
| Recirculation Capability | Yes (with optional charcoal filters) |
| Energy Star Certified | Yes |
| Warranty | 2 years parts and labor |
| Included Accessories | Charcoal filters for recirculation |
Frequently Asked Questions - NK36CB665W SAMSUNG
User questions about NK36CB665W SAMSUNG
0 question about this device. Answer the ones you know or ask your own.
Ask a new question about this device
Download the instructions for your Range hood in PDF format for free! Find your manual NK36CB665W - SAMSUNG and take your electronic device back in hand. On this page are published all the documents necessary for the use of your device. NK36CB665W by SAMSUNG.
USER MANUAL NK36CB665W SAMSUNG
Important Safety Instructions 3
| Installation | 6 |
Installation Requirements 8
| General Specifications | 8 |
| Mounting Height 8 | |
| Venting Methods | 9 |
| Parts List | 9 |
| Sub-Parts List | 10 |
| Additional Purchase Accessories 10 | |
| Needed Parts list (Not Supplied) 10 | |
| Installation Clearances | 10 |
| Making a hole in the furniture | 11 |
Installation 12
| Setting the Location | 12 |
| Connecting the Vent System | 12 |
| Installing the Range Hood | 13 |
| Installing the Venting Type | 13 |
| Connect the filter support cable | 14 |
| Installing the Recirculation Kit | 15 |
| Installation of the charcoal filter kit | 16 |
Using the Range Hood 18
| Button panel | 18 |
| Turning the Range Hood On or Off | 18 |
| Changing the operation mode | 18 |
| Max mode | 19 |
| Using the lighting | 19 |
| Wi-Fi On/Off | 19 |
| Automatic operation to prevent range hood overheating | 19 |
| Entering AP (Access Point) | 20 |
| Delay off | 20 |
| Error indication | 21 |
| Bixby | 21 |
| Amazon Alexa & Google Assistant 21 | |
| Installation Guide 21 |
Cleaning and Maintenance 22
| Cleaning the range hood 22 |
| Cleaning the Filters 22 |
| Replacing the LED Lamp 22 |
SmartThings app 23
| Open Source Announcement 24 | |
| Troubleshooting 25 | |
| General | 25 |
| Hood Operation 25 | |
| Information codes 25 | |
Technical specifications 26
Important Safety Instructions
Symbols used in this manual
WARNING
Hazards or unsafe practices that may result in severe personal injury or death.
CAUTION
Hazards or unsafe practices that may result in electric shock, personal injury, or property damage.
NOTE
Useful tips and instructions
These warning icons and symbols are here to prevent injury to you and others.
Please follow them explicitly. After reading this section, keep it in a safe place for future reference.
Closely follow the instructions set out in this manual. All responsibility, for any eventual inconveniences, damages or fires caused by not complying with the instructions in this manual, is declined. This appliance is intended to be used in household and similar application such as: - staff kitchen areas in shop, offices and other working environments; - farm houses; - by clients in hotels, motels and other residential type environments; - bed and breakfast type environments.
The hood can look different to that illustrated in the drawings in this booklet.
The instructions for use, maintenance and installation, however, remain the same.
- It is important to conserve this booklet for consultation at any moment. In the case of sale, cession or move, make sure it is together with the product.
- Read the instructions carefully: there is important information about installation, use and safety.
- Do not carry out electrical or mechanical variations on the product or on the discharge conduits.
- Before proceeding with the installation of the appliance verify that there are no damaged all components. Otherwise contact your dealer and do not proceed with the installation.
CAUTION
- Before any cleaning or maintenance operation, disconnect hood from the mains by removing the plug or disconnecting the mains electrical supply.
• Always wear work gloves for all installation and maintenance operations. - This appliance can be used by children aged from 8 years and above and persons with reduced physical, sensory or mental capabilities or lack of experience and knowledge if they have been given supervision or instruction concerning use of the appliance in a safe way and understand the hazards involved.
• Children shall not play with the appliance. - Cleaning and user maintenance shall not be made by children without supervision.
- The premises where the appliance is installed must be sufficiently ventilated, when the kitchen hood is used together with other gas combustion devices or other fuels.
Important Safety Instructions
- The hood must be regularly cleaned on both the inside and outside (AT LEAST ONCE A MONTH).
- This must be completed in accordance with the maintenance instructions provided. Failure to follow the instructions provided regarding the cleaning of the hood and filters will lead to the risk of fires.
- Do not flamed under the range hood.
- Do not remove filters during cooking.
- For lamp replacement use only lamp type indicated in the Maintenance/Replacing lamps section of this manual.
The use of exposed flames is detrimental to the filters and may cause a fire risk, and must therefore be avoided in all circumstances.
Any frying must be done with care in order to make sure that the oil does not overheat and ignite.
CAUTION
Accessible parts of the hood may become hot when used with cooking appliances.
- Do not connect the appliance to the mains until the installation is fully complete.
- With regards to the technical and safety measures to be adopted for fume discharging it is important to closely follow the regulations provided by the local authorities.
- The air must not be discharged into a flue that is used for exhausting fumes from appliance burning gas or other fuels.
CAUTION
- This appliance is not intended for use by persons (including children) with reduced physical, sensory or mental capabilities, or lack of experience and knowledge, unless they have been given supervision or instruction concerning use of the appliance by a person responsible for their safety. Children should be supervised to ensure that they do not play with the appliance.
- Children less than 8 years of age shall be kept away unless continuously supervised.
WARNING
Failure to install the screws or fixing device in accordance with these instructions may result in electrical hazards.
- Do not use or leave the hood without the lamp correctly mounted due to the possible risk of electric shocks.
- Never use the hood without effectively mounted grids.
- The hood must NEVER be used as a support surface unless specifically indicated.
- Use only the fixing screws supplied with the product for installation or, if not supplied, purchase the correct screws type.
- Use the correct length for the screws which are identified in the Installation Guide.
- In case of doubt, consult an authorized service assistance center or similar qualified person.
WARNING
Do not use with a programmer, timer, separate remote control system or any other device that switches on automatically.
WARNING
Only allow children to use the oven without supervision when adequate instructions have been given so that the child is able to use the oven in a safe way and understands the hazards of improper use.
WARNING
If the supply cord is damaged, it must be replaced by the manufacturer, its service agent or similarly qualified persons in order to avoid a hazard.
▲ WARNING
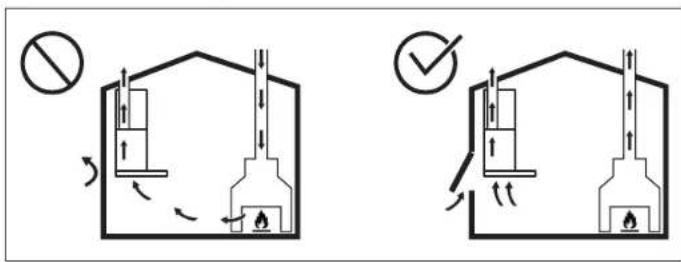
The room must be properly ventilated when the cooker hood is used at the same time as combustion devices(e.g. a chimney), gas or otherwise. For example in doors, windows, incoming/exhaust air wall boxes or by other should be used to prevent sealing when using the hood. and when the cooker hood is used together with other devices, the negative pressure of the room must not exceed 4 Pa (4 x 10⁻⁵ bar). Otherwise, there is a risk that toxic gases burned in the chimney will flow into the living space.
WARNING
Range hoods and other cooking fume extractors may adversely affect the safe operation of appliances burning gas or other fuels (including those in other rooms) due to back flow of combustion gases. These gases can potentially result in carbon monoxide poisoning. After installation of a range hood or other cooking fume extractor, the operation of flued gas appliances should be tested by a competent person to ensure that back flow of combustion gases does not occur.
Important Safety Instructions
▲ WARNING
- This appliance is marked according to the European directive 2012/19/EC - UK SI 2013 No.3113 on Waste Electrical and Electronic Equipment (WEEE).
- By ensuring this product is disposed of correctly, you will help prevent potential negative consequences for the environment and human health, which could otherwise be caused by inappropriate waste handling of this product.
- The symbol on the product, or on the documents accompanying the product, indicates that this appliance may not be treated as household waste. Instead it should be taken to the appropriate collection point for the recycling of electrical and electronic equipment. Disposal must be carried out in accordance with local environmental regulations for waste disposal.
- For further detailed information regarding the process, collection and recycling of this product, please contact the appropriate department of your local authorities or the local department for household waste or the shop where you purchased this product.
Appliance designed, tested and manufactured according to:
• Safety: EN/IEC 60335-1; EN/IEC 60335-2-31, EN/IEC 62233.
- Performance: EN/IEC 61591; ISO 5167-1; ISO 5167-3; ISO 5168; EN/IEC 60704-1; EN/IEC 60704-2-13; EN/IEC 60704-3; ISO 3741; EN 50564; IEC 62301.
- EMC: EN 55014-1; CISPR 14-1; EN 55014-2; CISPR 14-2; EN/IEC 61000-3-2; EN/IEC 61000-3-3. Suggestions for a correct
use in order to reduce the environmental impact: Switch ON the hood at minimum speed when you start cooking and kept it running for few minutes after cooking is finished. Increase the speed only in case of large amount of smoke and vapor and use boost speed(s) only in extreme situations. Replace the charcoal filter(s) when necessary to maintain a good odor reduction efficiency. Clean the grease filter(s) when necessary to maintain a good grease filter efficiency. Use the maximum diameter of the ducting system indicated in this manual to optimize efficiency and minimize noise.
- For information on Samsung's environmental commitments and product specific regulatory obligations e.g. REACH, WEEE, Batteries, visit : samsung.com/uk/aboutsamsung/samsungelectronics/corporate citizenship/data_corner.html
Installation
The minimum distance between the supporting surface for the cooking equipment on the hob and the lowest part of the range hood must be not less than 60 cm from electric cookers and gas or mixed cookers. If the instructions for installation for the gas hob specify a greater distance, this must be adhered to. * Please check local regulation before installation.
Electrical connection
CAUTION
The mains power supply must correspond to the rating indicated on the plate situated inside the hood. If provided with a plug connect the hood to a socket in compliance with current regulations and positioned in an accessible area, after installation. If it not fitted with a plug (direct mains connection) or if the plug is not located in an accessible area, after installation, apply a double pole switch in accordance with standards which assures the complete disconnection of the mains under conditions relating to over-current category III, in accordance with installation instructions.
WARNING
Before re-connecting the hood circuit to the mains supply and checking the efficient function, always check that the mains cable is correctly assembled.
Venting Requirements (ducted models only)
- The vent system must terminate outdoors.
- Do not terminate the vent system in an attic or other enclosed area.
- Do not use a 10.2 cm laundry-type wall cap.
- Only use metal vents. Plastic vents are not recommended.
- The length of the vent system and the number of elbows should be kept to a minimum to provide efficient performance.
For the most efficient and quietest operation:
- Use no more than three 90irc elbows.
- Make sure there is a minimum of 60 cm of straight vent between the elbows if more than one elbow is used.
- Do not install two elbows together.
- Use clamps to seal all joints in the vent system.
- The vent system must have a damper.
- Use caulking to seal the exterior wall or roof opening around the cap.
- The size of the vent should be uniform.
Venting Methods
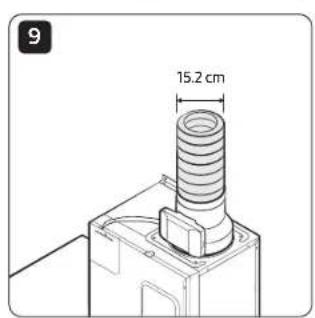
To use the hood's top outlet to vent your hood, a 15.2 cm round vent system is required. To use the hood's rear outlet, a 8.25 x 25.4 cm rectangular vent system is required. Neither of these vent systems are included and must be purchased separately.
Mounting Height
Select a mounting height between a minimum of 60 cm for an electric cooking surface and a gas cooking surface.
For Non-Vented (recirculating) Installations
If it is not possible to vent cooking fumes and vapors to the outside, the hood can be used in the non-vented (recirculating) version, fitting a charcoal filter and a plastic grid. Fumes and vapors are recycled through the recirculation grid.
Installation Requirements
General Specifications


Min 101.6 cm Max 180.6 cm


Min 106.0 cm Max 184.0 cm
Mounting Height

CAUTION
- Be sure to check the mounting height before installing the product.
- The mounting height is measured from the top of the range to the upper cabinets. The mounting height for an electric cooking surface is measured from its glass cooktop as shown in the image on the left. For a gas cooking surface, the mounting height is measured from the top of the burning grates as shown in the image on the right.

Parts List

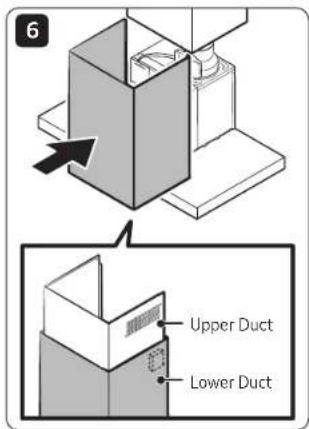
Upper Duct Cover (1) Lower Duct Cover (1) 5 mm Magnet (2)

Filter Support Cable * (2)
* To reduce the risk of the filter dropping, assemble the filter support cable to the filter.
Installation Requirements
Sub-Parts List

6 × 130 mm
Screw Anchor (2)

22 mm Washer (4)

6 × 30 mm
Screw Anchor (7)

4 × 10 mm
Hood Fixing Screw (10)
NOTE
Install the product by using the included accessories and materials appropriately and according to the installation environment and conditions.
Additional Purchase Accessories
| Model NK36CB665W** | |
| Recirculation Kit NK-AR7000WB/SA | |
| Charcoal Filter Kit NK-AF7000WB/SA | |
| Hood Extension Kit NK-AE6000W*/SA | |
Needed Parts list (Not Supplied)
- Gloves
- Safety Glasses
- Pencil
• Measuring Tape or Ruler - Tape to installation Template
- Spirit Level
• Phillips Screwdrivers
• Electric Drill and 0.6 cm drill bits - Pliers
- 15,2 cm Flexible Duct
- Duct Clamps
- Duct Sealing Tape
- Knife
• Caulking Gun and compound
• Jigsaw, Grinder
Installation Clearances
Upper furniture Dimension


Required Hood installation Height

Making a hole in the furniture
Duct hole guide_Op.1
Cabinet floor drilling work: hood exhaust outlet (damper) cutting work
Rear (Wall) Furniture's Center Line
Max 0.5 cm
Duct
Hole
Min
22.0 cm
Min 2.0 cm
Front
Min 16.0 cm
Max 17.0 cm
CAUTION
- Cut the cabinet in a way that does not interfere with the damper outlet.
- After assembling the duct cover, make sure that the cut surface of the cabinet is not exposed. (The hole size must be smaller than the duct cover.)
• Vacuum the sawdust to prevent it from blowing away.
• Make sure the cabinets are not damaged. - Before cutting the cabinet, explain to the customer that the cabinet needs to be cut, and then obtain consent before proceeding.
Method and sequence of cutting the upper cabinets
- Refer to the cutting dimensions above and mark the lines to be cut on the cabinet.
- Use a jigsaw to cut the upper cabinets. When cutting, use a vacuum cleaner to minimize the amount of dust.
Installation Tool Jigsaw
Duct hole guide_Op.2
Cabinet floor drilling work: hood exhaust outlet (damper) cutting work
Rear (Wall) Furniture's Center Line
Cutting Area
Front 34.0 cm
CAUTION
- Cut the cabinet in a way that does not interfere with the damper outlet.
• Vacuum the sawdust to prevent it from blowing away. - Make sure the cabinets are not damaged.
- Before cutting the cabinet, explain to the customer that the cabinet needs to be cut, and then obtain consent before proceeding.
Method and sequence of cutting the upper cabinets
- Refer to the cutting dimensions above and mark the lines to be cut on the cabinet.
- Use a jigsaw to cut the upper cabinets. When cutting, use a vacuum cleaner to minimize the amount of dust.
Installation Tool Jigsaw, Grinder
Installation
Setting the Location


Connecting the Vent System

natural_image
Diagram of a mechanical component with arrows indicating rotation or assembly (no text or symbols)
natural_image
Diagram of a mechanical component with a downward arrow indicating assembly or force (no text or symbols present)
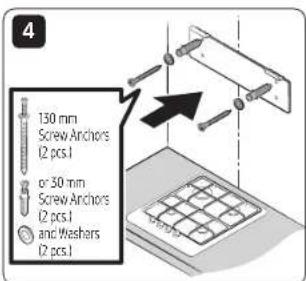
Installing the Range Hood


CAUTION
• Install the upper duct closely to the ceiling and upper cabinets.
- Be careful not to let the upper duct come into contact with the upper cabinet door.
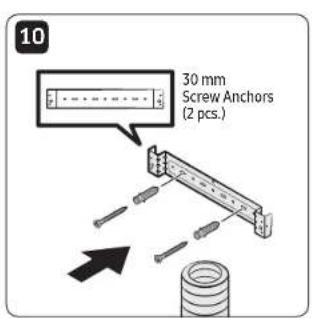
Installing the Venting Type

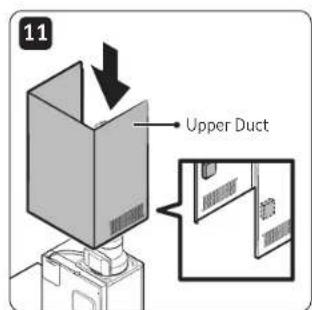

NOTE
Magnets are included in the accessory box.
Installation
natural_image
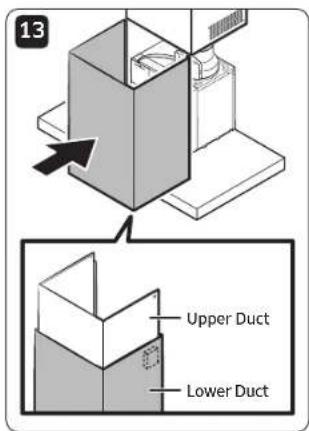
Diagram of a ceiling-mounted device with two curved arrows indicating rotation or movement (no text or symbols)NOTE
The magnet must be attached to the upper line of the lower duct.

natural_image
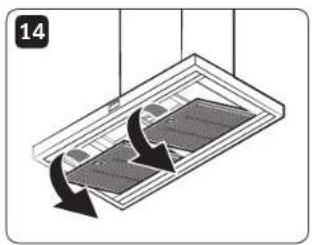
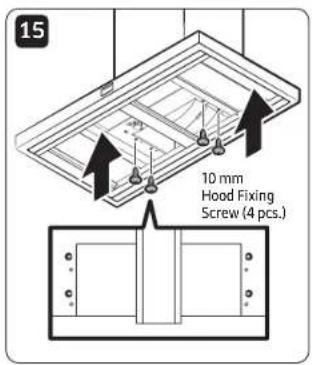
Diagram of a mechanical or architectural component with curved arrows indicating motion, no text or symbols presentConnect the filter support cable


Installing the Recirculation Kit
NOTE
Same process until No. 10


- Assemble the air deflector with the duct cover mounting bracket with the four assembly screws provided with the Recirculation Kit.
NOTE
- Use of recirculation type hoods in closed spaces may cause poor ventilation performance.
-
Please ventilate the room by opening the windows while operating the device.
-
Measure from the bottom of the deflector to the bottom of the hood outlet.
- Cut the duct to the measured size "X."
- Remove the deflector.
- Slide the duct onto the bottom of the deflector.
- Place the assembled deflector and duct over the exhaust outlet from the hood.
- Reassemble the air deflector to the duct cover mounting bracket with the four assembly screws.
- Seal the connections with tape.

flowchart
graph TD
    A["Box with two rectangular strips and one circular arrow labeled '3'"] --> B["Box with a closed rectangle and one rectangular strip inside"]

NOTE
Magnets are included in the accessory box.

Installation

natural_image
Diagram of a device with arrows indicating rotation or movement, no text or symbols presentNOTE
The magnet must be attached to the upper line of the lower duct.

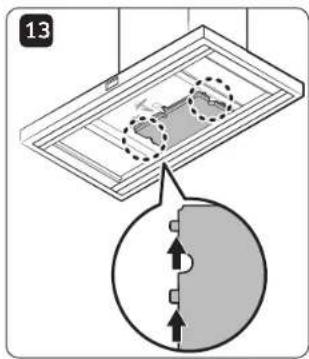
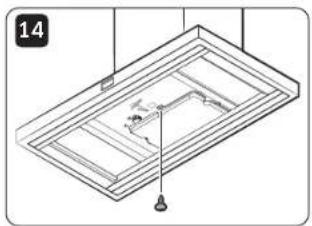
Installation of the charcoal filter kit

natural_image
Diagram of a ceiling fixture with a magnified inset showing internal components (no text or symbols)
natural_image
Isometric diagram of a ceiling-mounted device with a handle and control panel (no text or symbols)
natural_image
Isometric line drawing of a ceiling-mounted room with a central rack and hanging fixture (no text or symbols)
natural_image
Isometric line drawing of a rectangular frame with internal structure and a hanging pin (no text or symbols)


natural_image
Diagram of a ceiling-mounted device with directional arrows indicating airflow or movement (no text or symbols)WARNING
Be sure to use an outlet with a ground terminal for safety. This can prevent the risk of electric shock, fire, or malfunction. If the outlet does not have a ground terminal, purchase a separate grounding wire and connect it to the grounding line.
CAUTION
Do not ground on gas pipes, water pipes, telephone lines, etc.
NOTE
Be sure to install a short-circuit breaker where there is a risk of a short circuit.
Using the Range Hood
Button panel

01 Power button
- Short press: Turns the device ON/OFF.
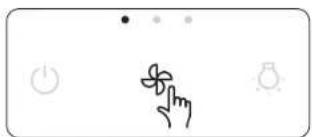
02 Mode button
- Short press: Changes the operation mode. (Low → Medium - High Max) - Operate the MAX mode for 7.5 minutes and then change to High mode.
- 5 second press: Deactivates/activates the Wi-Fi - Delay off mode can be activated on the SmartThings app. - Filter usage time can be checked on the SmartThings app. - The range hood can be operated through automations with registered Samsung products on the SmartThings app.
03 Light button
- Short press: Changes the light mode (High → Low - Off) - 5 second press: Activates/deactivates the AP
Turning the Range Hood On or Off

natural_image
Simple line drawing of a hand pointing at a flower and sun (no text or symbols)The device turns on with a chime sound, and starts operation in Low mode.
Changing the operation mode
natural_image
Simple line drawing of a flower with a leaf, pointing at a button (no text or symbols)Change the device operation mode as necessary.
- Press the button to select the operation mode to use. - Each time you press the button, the mode changes in the following order: Low → Medium → High → Max - Operate the MAX mode for 7.5 minutes and then change to High mode.

natural_image
Simple diagram with icons for power, battery, fan, and sun (no text or labels)
natural_image
Simple diagram with three circular icons and a central flower-like symbol, no text or labels present.
natural_image
Simple diagram with three icons: power button, fan symbol, and sun icon (no text or labels)Max mode

natural_image
Simple line drawing of a flower with a finger pointing at it, surrounded by control buttons (no text or symbols)Max mode is a function that allows powerful exhaust for a short time.
- Press the 🎨 button for 3 times.
- Max mode is operated. Max mode (Max 780 CMH) is available.
- LEDs on the 🎨 button are sequentially filled while the Max mode is on.
- Operate the MAX mode for 7.5 minutes and then change to High mode.

natural_image
Simple electrical control panel icons including power, switch, fan, and sun (no text or labels)
natural_image
Simple diagram with three icons: power button, fan symbol, and sun icon (no text or labels)
natural_image
Simple diagram with three icons: power switch, flower symbol, and sun (no text or labels)Using the lighting
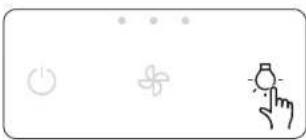
natural_image
Simple diagram with icons including a power button, flower, and lightbulb with finger pointing at it (no text or symbols)Adjusting the lighting level of the product.
- Press the Button briefly to select the desired lighting step. - It repeats in the order of High→Low→Off.
Wi-Fi On/Off

natural_image
Simple line drawing of a hand pointing at a flower, with sun and Wi-Fi icons nearby (no text or symbols)This feature turns the product's Wi-Fi on or off.
- Press the 🎨 button for 5 seconds. Press the 🎨 button again for 5 seconds to turn on Wi-Fi.
Automatic operation to prevent range hood overheating

natural_image
Simple diagram with three icons: power button, fan, and sun (no text or labels)This feature prevents overheating when the hood is turned off.
- When the hood temperature rises, the middle LED on the mode button blinks, and it operates in Medium mode.
- If the hood temperature stabilizes or the button is pressed, the hood is turned off.

natural_image
Simple diagram with icons for power, fan, and sun (no text or labels)
natural_image
Simple line drawing of a hand pointing at a light bulb, with three simple icons above (flower, sun, and leaf) — no text or symbols present.Using the Range Hood
Entering AP (Access Point)

- Press the 🔔 button for 5 seconds as instructed in the app.

natural_image
Three simple icons: a flower, a sun, and a Wi-Fi symbol, arranged horizontally (no text or labels)- When in AP mode, the 📋 icon blinks. Please proceed with the connection according to the mobile guide.

natural_image
Simple icon set with three symbols: a fan, a sun, and Wi-Fi, arranged horizontally (no text or labels)- When the connection is completed, 📞 icon remains on.
Delay off

natural_image
Simple line drawing of a hand pointing at three icons: a sun, a flower, and a light bulb (no text or symbols)Delay off is a function that vents the remaining pollutants in the kitchen after cooking and operates after the hood is turned off.
- If you set the delay off function in the SmartThings app and turn off the working hood, the delay off function will work.
- LEDs on the 🧑 button are turned on sequentially while the delay off function is in operation.
- The unit will operate for 3 minutes in Low mode and then turns off automatically.

natural_image
Pure electrical control icons without any text or symbolsNOTE
Delay off mode can be used only when the hood is connected to the SmartThings app.

natural_image
Simple diagram with three icons: power button, flower, and sun (no text or labels)
natural_image
Pure electrical control icons without any text or symbolsError indication

natural_image
Simple diagram with three icons: power button, fan, and sun (no text or labels)- When a product error occurs, all LEDs on the button blink.
- Errors and actions can be found in the SmartThings app.
- If the problem persists, disconnect the power plug for at least 30 seconds, cool the product sufficiently, and restart it.
If this problem is not solved, contact a Samsung Electronics Service Center.
NOTE
Check error code function can be used only when the hood is connected to the SmartThings app.
Bixby
- Bixby is the name of Samsung's artificial intelligence solution which makes it possible to control the product through voice.
- To use the voice recognition function, you need to connect the SmartThings app and the product on your smartphone.
- For models that do not directly recognize voice after connecting with the app, some functions can be controlled through Bixby on Samsung smartphones.
Amazon Alexa & Google Assistant
Samsung smart home appliances are supported by SmartThings skills in Alexa and Actions in Google Assistant.
Installation Guide
Here's how to link a SmartThings account with Amazon Alexa or Google Assistant. The SmartThings app and Alexa app (or Google Assistant app) should be installed on your phone.
- Setup supported devices in SmartThings
- After device setup, tap 'Voice assistant' and link your Samsung account to Amazon Alexa.
- Check if the devices are visible on Amazon Alexa app. Then account linking is complete. (Check the devices are visible and set the location (home and room) of devices in the Google Home app. Then account linking is complete.)
Cleaning and Maintenance
Cleaning the range hood
Wipe the front of the product with a soft cloth soaked in neutral liquid detergent.

CAUTION
- Do not use rough materials such as sponges.
- Do not use baking soda, percarbonate, citric acid, abrasives, alcohol, etc. The surface coating may be damaged or discolored.
- When cleaning, always wear gloves for safety.
- Be sure to turn off the power when cleaning the hood.
- There is a risk of fire if it is not cleaned according to the user manual.

WARNING
Do cleaning fan, filter and grease laden surfaces frequently. Be careful when using cleaning agents.
Cleaning the Filters
- Please remove the filter at the bottom of the hood.
When separating the filter, use both hands to separate it carefully so that it does not drop. - Soak the filter in lukewarm water with neutral detergent for about 10 minutes, then rinse it with water and clean it.

CAUTION

CAUTION
Do not use a scrubber to clean the filter.
- When cleaning is complete, reassemble the filter in the reverse order of disassembly.

NOTE
Put the filter into the dishwasher and clean it conveniently with a standard wash cycle.

CAUTION
- Filters should be cleaned by hand with neutral detergent once a month, and if washed with a dishwasher, they should be washed for only a short time at a low temperature.
- Filters may discolor during cleaning, but this does not affect performance.
- Do not spray water directly on the filter while mounted on the hood. There is a risk of electric shock and fire.
- The front of the filter is made of stainless steel. Please be careful with it.
- Be sure to wear gloves because the edge of the filter can be sharp and cause injury.
Replacing the LED Lamp
This product is equipped with a dedicated LED lamp. If you need a replacement, please contact the service center. It must be replaced by a professional repairman, its service agent or similarly qualified persons in order to avoid a hazard.
SmartThings app
To use the SmartThings app, connect the product to the network in the sequence described below. The images shown may differ depending on your smartphone model, OS version, and manufacturer. You can only set up the Wi-Fi access point when connecting the product to a Wi-Fi network. Once the product is connected, you can use the SmartThings app via Wi-Fi, 3G, LTE, 5G or other wireless networks. If the Wi-Fi disconnects, please follow the instructions in the Samsung SmartThings app via your mobile device or tablet. You can easily install the SmartThings app or use the product with your smartphone by scanning the QR code on the attached label.
① Checking the power connections
Check if the power is connected to the product and the access point.
② Setting up and connecting to a Wi-Fi access point using your smartphone
-
To connect the product to a Wi-Fi network, turn on Wi-Fi in "Settings > Wi-Fi", and then select the access point that you wish to connect to.
-
Only alphanumeric characters are supported for wireless access point names (SSIDs). If an SSID has a special character, rename it before connecting to it.
- This product supports only 2.4 GHz Wi-Fi.


- Turning off "Switch to Mobile Data" in "Settings > Wi-Fi" on Your Smartphone
- If "Switch to mobile data" or "Adaptive Wi-Fi" is turned on, you cannot connect to the network. Be sure to turn off these functions before connecting to the network.
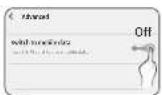
NOTE
The setup may differ depending on your smartphone model, OS version, and manufacturer.
- Checking Internet Connectivity
• After connecting to Wi-Fi, check that your smartphone is connected to the Internet.
NOTE
A firewall may prevent your smartphone from connecting to the Internet. Contact your Internet service provider for troubleshooting.
③ Downloading the SmartThings app and registering your Samsung account
-
Downloading the SmartThings app
-
Search for "SmartThings" in the Play Store or App Store, and download the SmartThings app to your smartphone.
- If the SmartThings app is already installed on your smartphone, update it to the latest version.

SmartThings (Samsung Connect) Samsung Electronics Co., Ltd.
NOTE
- The SmartThings app supports Android 7.0 or later (with at least 2 GB RAM) and iOS 12.0 or later. The app is optimized for iPhone 6s or later and Samsung smartphones (Galaxy S and Note series). The updates of the SmartThings app or the functions supported by it may be discontinued for the previously supported OS versions due to issues like usability and security.
-
The SmartThings app may change without prior notice to improve product usability and performance.
-
Registering your Samsung account
- A Samsung account is required to use the SmartThings app. To create a Samsung account and log in to your account, follow the instructions displayed on the SmartThings app.. You do not need to install an additional app.
NOTE
- If you already have a Samsung account, log in to the account. If you have a smartphone that is a Samsung device and you have a Samsung account, your smartphone is automatically logged in to your account.
- If you log in from a smartphone produced for another country, you need to log in with its country code when you create your Samsung account, and the SmartThings app may not be usable on some smartphones.
SmartThings app
4 Connecting the SmartThings app to your product
- Selecting the product that you want to connect.
1) Start the SmartThings app about one minute after turning on the hood.
2) After the SmartThings app is started, select "ADD NOW" when a pop-up window saying that a product is found appears.

3) If the pop-up window does not appear, select "+," and then "Add Device."
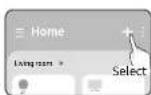
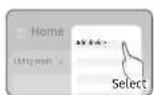
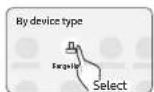
You can add a product you want to connect to by selecting it manually or by selecting "Scan."
- Select manually: Range Hood > Samsung
- Scan: [Range Hood] Samsung

-
Connecting the SmartThings app to your product
-
Follow the instructions displayed on the SmartThings app to connect to your product.
- For information on how to use the SmartThings app, select the How To menu in the app.
NOTE
- If any pop-up-window appears on the top of the smartphone while connecting to your product, do not select it.
- If a pop-up window saying that the device is already registered appears while connecting to your product, get permission using "REQUEST PERMISSION" from a user already connected to the product, or create a new account using "REGISTER MY ACCOUNT" to independently connect to the product.
-
If a Samsung account-related country error occurs while connecting to your product, log out of your current Samsung account, log in to your previous Samsung account, and then delete all devices that have been previously connected. Then, log in to your current Samsung account again and configure the settings.
-
If a failure message appears while adding a device, see "Setting up and connecting to a Wi-Fi access point using your smartphone" on page 23. The connection may fail temporarily due to an installation location problem with the access point or other problems.
- If the word "AP" does not disappear from the display, unplug the power and plug it in again.
- For the security protocols for wireless/wired access points, WPA-PSK and WPA2-PSK are recommended. For the authentication method, AES is recommended. New Wi-Fi authentication specifications and non-standard WiFi authentication methods are not supported.
- The product supports the IEEE802.11 b/g/n (2.4 GHz) communication protocol. (Samsung recommends IEEE802.11n.)
- If your Internet service provider has permanently registered the MAC address (a unique identification number) of your PC or modem, you may not be able to connect your product to the Internet. Contact your Internet service provider and ask how to connect devices other than your PC (such as a Range Hood) to the Internet.
Open Source Announcement
The software included in this product contains open source software. You may obtain the complete corresponding source code for a period of three years after the last shipment of this product by contacting our support team via http:// opensource.samsung.com (please use the "Inquiry" menu).
It is also possible to obtain the complete corresponding source code in a physical medium, such as CD-ROM. A minimal payment will be required.
The following URL http://opensource.samsung.com/opensource/SMART_
AT_051/seq/0 leads to the open source license information as related to this product. This offer is valid to anyone in receipt of this information.

Troubleshooting
If you suspect there is a failure while using the product, check the following before requesting service from the service center. When you request service, you will be charged for the visit and diagnosing the symptoms even if the product is not broken.
CAUTION
If you require repairs, disconnect the power cord immediately and contact the service center.
- Model number and serial number (find by removing the filter, listed inside product)
• Product warranty details - Explanation of the problem
General
| Problem Cause Action | ||
| It's not working. | Is the power being supplied like normal? | Please check if there is a power outage. |
| Please unplug and plug in the power cord. | ||
| Is there any moisture on the exterior of the product? | Please remove moisture from the product. | |
| Are there any foreign substances on the exterior of the product? | Please wipe off the foreign substance. | |
Hood Operation
| Problem Cause Action | ||
| The hood's mode changes automatically. | Is it working in smart mode? | Smart mode automatically operates in the High, Medium, and Low modes depending on the air quality. |
| The hood's wind strength is weak. | Is there a lot of foreign matter in the filter? | Wipe off the filter with a neutral detergent in lukewarm water. |
Information codes
| Code Description Action | ||
| C121 | Temperature sensor is not working | Press the POWER button to restart the product.If the problem persists, disconnect the power plug for more than 30 seconds.Allow the product to cool and restart it.If it is not resolved, please contact a Samsung Electronics Service Center. |
| C154 | Main PBA communication is not working with Inverter PBA | |
| C162 | Only occurs when EEPROM Read or Write is not working. | |
| C163 | If you need to check the option code | |
| C203 | Inverter PBA communication is not working with Main PBA | |
| C446 | BLDC Motor or Inverter PBA is not working | Press the POWER button to restart the product.If the problem persists, disconnect the power plug for more than 30 seconds.Allow the product to cool and restart it.If it is not resolved, please contact a Samsung Electronics Service Center. |
| C447 | ||
| C455 | ||
| C478 | ||
| C486 | ||
| C489 | ||
| C493 | ||
| C496 | ||
| C499 | ||
| C654 | Electric Damper is not working | Reconnect Electric damper and check any foreign matter is on the damper. |
Mechanical specifications
| Model NK36CB665W**SA | ||
| Product Weight (kg) 16.2 | ||
| Rated Voltage (V) 240 | ||
| Frequency (Hz) 50 | ||
| Dimensions (W x H x D) (mm) | Main Unit 898 x 646 ~ 1066 x 500 | |
| Extension 898 x 1016 ~ 1840 x 500 | ||
| Lamp Load Power (W) 8 | ||
| Total Load Power (W) 160 | ||
| Set Maximum Air Volume (m3/h)(IEC 61591) | 780 | |
| Motor Maximum Air Volume (m3/h) 1070 | ||
| Noise Level (dB) (IEC 60704-2-13) 68 | ||

NOTE
Hereby, Samsung declares that this radio equipment is in compliance with Directive 2014/53/EU and with the relevant statutory requirements in the UK. The full text of the EU declaration of conformity and the UK declaration of conformity is available at the following internet address: The official Declaration of conformity may be found at http://www.samsung.com. go to Support > Search Product Support and enter the model name.
Memo
SAMSUNG
QUESTIONS OR COMMENTS?
| COUNTRY / LOCATION | CALL WEBSITE | |
| CHINA | 400-810-5858 (B2C)400-910-5858 (VIP)400-610-5858 (B2B) | www.samsung.com/cn/support |
| TAIWAN | 0800-32-9999 (All Product)0809-00-5237 (B2B / Dealer) | www.samsung.com/tw/support |
| HONG KONG | 3698 4698 (All Product)3698 4688 (B2B) | www.samsung.com/hk/support(Chinese)www.samsung.com/hk_en/support(English) |
| MACAU 0800 333 | www.samsung.com/hk/support(Chinese)www.samsung.com/hk_en/support(English) | |
| SINGAPORE | 1800 7267864 | 1800-SAMSUNG (Other) | www.samsung.com/sg/support |
| AUSTRALIA 1300 362 603 (Other) www.samsung.com/au/support | ||
| NEW ZEALAND | 0800 726 786 (All Product) www.samsung.com/nz/support | |
| VIETNAM |  | www.samsung.com/vn/support |
| THAILAND | Hotline no : 12821800-29-3232 (Toll. free for all product) | www.samsung.com/th/support |
| COUNTRY / LOCATION | CALL WEBSITE | |
| MYANMAR +95-1-2399-888 www.samsung.com/mm/support | ||
| CAMBODIA 1800-20-3232 (Toll free) www.samsung.com/th/support | ||
| LAOS +856-214-17333 www.samsung.com/th/support | ||
| MALAYSIA | 1800-88-9999 (OTH)+603-7713 7420 (Overseas contact) | www.samsung.com/my/support |
| INDONESIA | 021-5699-77770800-112-8888 (All Product, Toll Free)0800-112-7777 (All Product, Toll Free) | www.samsung.com/id/support |
| PHILIPPINES | All Products:1-800-10-7267864 [PLDT-Toll Free]1-800-8-7267864 [Globe-Toll Free]84222111 [Landline] | www.samsung.com/ph/support |
| JAPAN 0120-363-905 www.samsung.com/jp/support | ||
| INDIA | 1800 5 SAMSUNG(1800 5 7267864) (Toll-Free)1800 40 SAMSUNG(1800 40 7267864) (Toll-Free) | www.samsung.com/in/support |
| NEPAL | 16600172667 (Toll Free for NTC Only)9801572667 (Toll Free for Ncell users) | www.samsung.com/in/support |
| BANGLADESH | 08000-300-300 (Toll free)09612-300-300 | www.samsung.com/bd/support |
| SRI LANKA | 011 SAMSUNG (011 7267864) | www.samsung.com/in/support |

DG68-01579C-00

- Important Safety Instructions
- Symbols used in this manual
- WARNING
- CAUTION
- NOTE
- ▲ WARNING
- Installation
- Electrical connection
- Venting Requirements (ducted models only)
- Venting Methods
- Mounting Height
- For Non-Vented (recirculating) Installations
- Installation Requirements
- Sub-Parts List
- Additional Purchase Accessories
- Needed Parts list (Not Supplied)
- Installation Clearances
- Upper furniture Dimension
- Required Hood installation Height
- Making a hole in the furniture
- Method and sequence of cutting the upper cabinets
- Installing the Recirculation Kit
- Using the Range Hood
- Power button
- Mode button
- Light button
- Change the device operation mode as necessary.
- Max mode
- Using the lighting
- Wi-Fi On/Off
- Automatic operation to prevent range hood overheating
- Error indication
- Bixby
- Amazon Alexa & Google Assistant
- Installation Guide
- Cleaning and Maintenance
- Cleaning the range hood
- Cleaning the Filters
- Replacing the LED Lamp
- SmartThings app
- ③ Downloading the SmartThings app and registering your Samsung account
- Connecting the SmartThings app to your product
- Open Source Announcement
- Troubleshooting
- Mechanical specifications
- SAMSUNG
Brand : SAMSUNG
Model : NK36CB665W
Category : Range hood