AU1910DD - Dehumidifier Ausclimate - Free user manual and instructions
Find the device manual for free AU1910DD Ausclimate in PDF.


| Product Type | Desiccant Dehumidifier |
| Model | AU1910DD |
| Brand | Ausclimate |
| Dehumidifying Capacity | 10 litres/day (20°C, 60% RH) |
| Water Tank Capacity | 3 litres |
| Dimensions (W x D x H) | 317 x 213 x 499 mm |
| Net Weight | 6.8 kg |
| Power Supply | AC 220-240V, 50Hz |
| Power Input | Low 420W / High 730W |
| Operating Temperature Range | 1°C – 40°C |
| Noise Level | Low 38 dBA / High 49 dBA |
| Filter Type | Nano-silver anti-bacterial, washable pre-filter |
| Desiccant Material | Zeolite |
| Drain Hose Length | 1.2 m (included) |
| Timer | 2, 4, 8 or 12 hours |
| Air Swing (Louver) | 3-stage automatic (Up, Front, Wide) up to 150° |
| Dry Modes | Auto (50-55% RH), Low, High (40-45% RH) |
| Laundry Modes | Saving (warm temperatures) and Turbo (cool temperatures) |
| Auto Restart After Power Cut | Yes |
| Safety Features | 2-minute fan run after shutdown to protect internal heater, auto shutoff when bucket full or misaligned |
| Maintenance | Clean filter monthly; empty and clean water bucket as needed; store upright in cool, dry place |
| Repairability | Repairs by qualified technician only; filter and bucket replaceable |
Frequently Asked Questions - AU1910DD Ausclimate
User questions about AU1910DD Ausclimate
0 question about this device. Answer the ones you know or ask your own.
Ask a new question about this device
Download the instructions for your Dehumidifier in PDF format for free! Find your manual AU1910DD - Ausclimate and take your electronic device back in hand. On this page are published all the documents necessary for the use of your device. AU1910DD by Ausclimate.
USER MANUAL AU1910DD Ausclimate
Ausclimate Cool Seasons Premium 10L
Desiccant Dehumidifier
Model: AU1910DD

natural_image
Line drawing of a rectangular electronic device with a lid and base, showing no text or symbols.Please read this user manual before operating
PLEASE READ ALL INSTRUCTIONS CAREFULLY BEFORE OPERATING.
WARNING - This appliance is intended for use in a domestic or office environment only. Any other use is not recommended by the manufacturer and may cause fire, electrical shocks or other injury to person or property.
When using electrical appliances, basic safety precautions should always be followed:
- Do not operate the unit with a damaged power supply cord or power plug, or after it malfunctions or has been dropped or damaged in any way. If the supply cord or plug is damaged, it must be replaced by the manufacturer, the distributor, its service agent or similarly authorised qualified persons in order to avoid a hazard.
- This unit should always be kept in an upright position to avoid any damage. Place the unit on a flat stable surface.
- Check the household voltage to ensure it matches the unit's rated specification before operating.
- Operate this unit in an ambient temperature between 1^ C and 40^ C.
- Ensure that the air inlets and outlets are not blocked or covered.
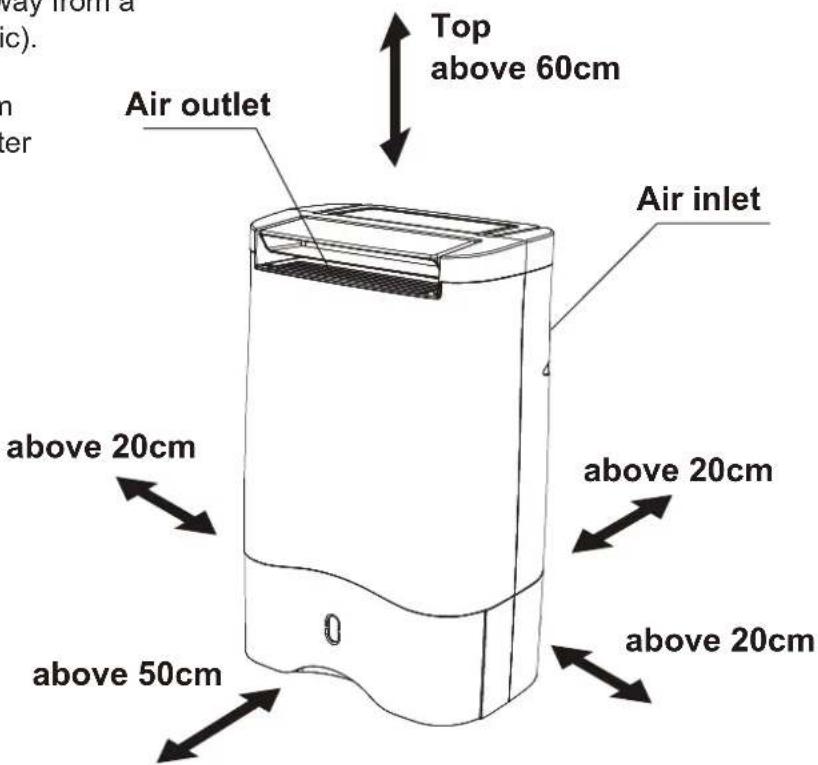
- Do not place the unit too close to curtains or other furnishings - min 20cm.
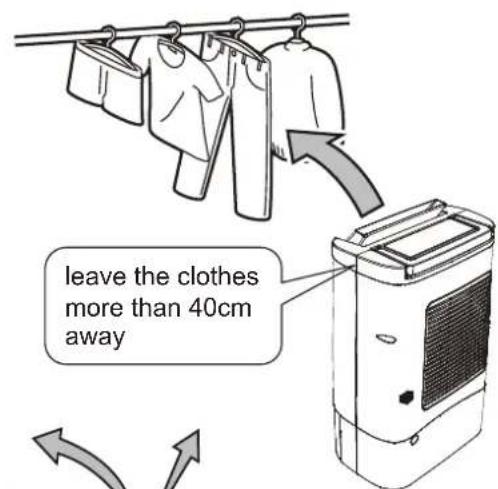
- When using the "LAUNDRY MODE" to speed up the drying of wet clothes in the room, please keep the clothing at a safe distance from the unit to prevent water from dripping onto the unit.
- Never place anything on top of the unit and do not cover with any kind of material while in use.
- This product is intended for domestic and office use ONLY and not for commercial, industrial or outdoor use.
- To protect against electrical shocks, do not immerse unit, power cord or power plug in water, or spray with liquids.
- Never unplug the power cord without pressing the "ON/OFF" key to "OFF" first, as this could damage the unit.
- Always unplug the unit when not in use or moving it to a new location. To disconnect from the power supply, grip the plug to pull from the power socket. Never pull by the cord.
- Always empty the water tank before storing the unit away.
- Close supervision is necessary when any appliance is used near children and pets.
- Do not run power cord under carpet, or cover the power cord with rugs or runners. Arrange the power cord away from areas where it may be tripped over.
- Never operate or store the unit in direct sunlight.
- If authorised by the distributor, repairs may be undertaken by a qualified service technician. Repairs carried out by unqualified people may cause damage to the unit, damage to property or injury to persons and void the warranty.
- Where possible, don't use an extension power lead as the cable may overheat and cause a risk of fire. Only use an extension lead after ensuring it is in perfect condition.
- Do not use the unit without the air filter and make sure that the filter is kept clean to avoid malfunction and invalidating the warranty.
This appliance is not intended for use by persons (including children) with reduced physical, sensory or mental capabilities, or lack of experience and knowledge unless they have been given supervision or instruction concerning use of the appliance by a person responsible for their safety. Children should be supervised to ensure that they do not play with the appliance.
SAVE AND READ THESE IMPORTANT SAFETY INSTRUCTIONS
FEATURES
• (Non) Compressor dehumidifier \~ uses desiccant rotor technology
- Environmentally friendly with no harmful gasses & quiet operation
- Moisture removal \~ 10 litres/day (20°C, 60% RH)
• Water tank capacity \~ 3 litres
• Nano-silver embedded in the air filter
\~ kills bacteria on contact improving the quality of air in your home or office
\~ Anti-bacterial nano-silver embedded in each filter string
\~ Over 99% anti-bacteria performance
\~ The filter may be cleaned by use of vacuum cleaner
\~ The filter may also be washed by water and still retain performance
- Laundry mode \~ includes power saving setting for warm
temperatures & turbo setting for winter
- Up to 12-hour timer \~ for added convenience
- Temperature range for use \~ 1°C - 40°C
• Light & portable with carry handle - Removable water bucket with handle
• Auto restart after power cut
\~ Once the power is restored after a power failure, the appliance will continue to operate at the selected settings prior to the power failure.
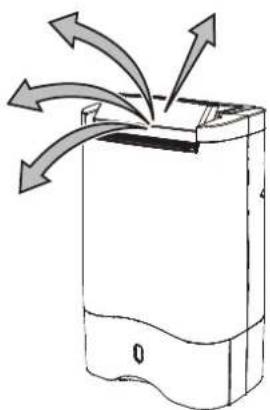
• Automatic louver wide range (max 150°)
\~ 3-stage automatic air swing to meet your needs.
natural_image
Diagram of a device with arrows indicating airflow or movement, no text or symbols present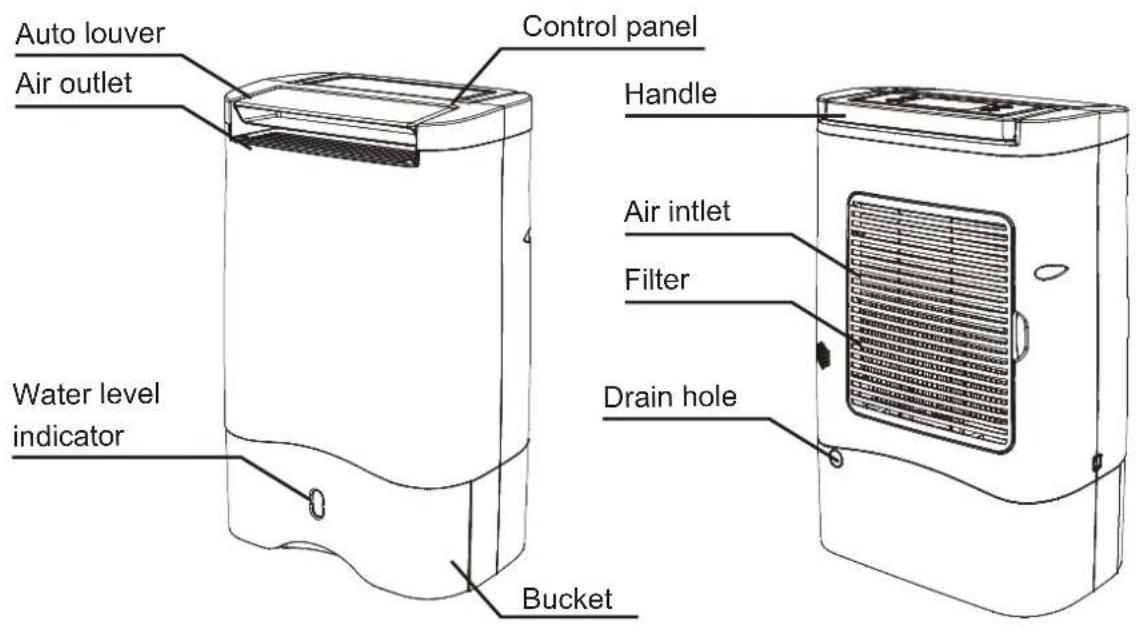
THE CONTROL PANEL
UNIT SETUP
- Place the unit in an upright position on a stable, flat surface.
- Ensure the unit is a safe distance away from a wall or furniture (see the right graphic).
- Keep clothes at a safe distance from air outlet of the unit and prevent water dripping into the unit.
● Where to position your dehumidifier?
For best results position the dehumidifier somewhere central, such as the middle of the room or a hallway. Do not position in front of a radiator or in direct sunlight.
TO OPERATE SAFELY

ON and OFF
Connect the power plug to the appropriate electrical socket outlet. Press the ON/OFF button to turn the unit ON. Press the ON/OFF button again to turn the unit OFF.
Note: In the event of a power failure
Once the power is restored after a power failure, the unit will continue to operate at the selected settings prior to the power failure. This includes the drying mode, swing function and time remaining in timer mode.
Note: After turning the appliance OFF
After turning the unit OFF using the ON/OFF button, the fan will continue to run for a two-minute period. This is a normal procedure and helps to cool & protect the internal components. During this two-minute period, DO NOT remove the power plug from the power socket outlet; wait for the fan to stop running.

DRY MODE
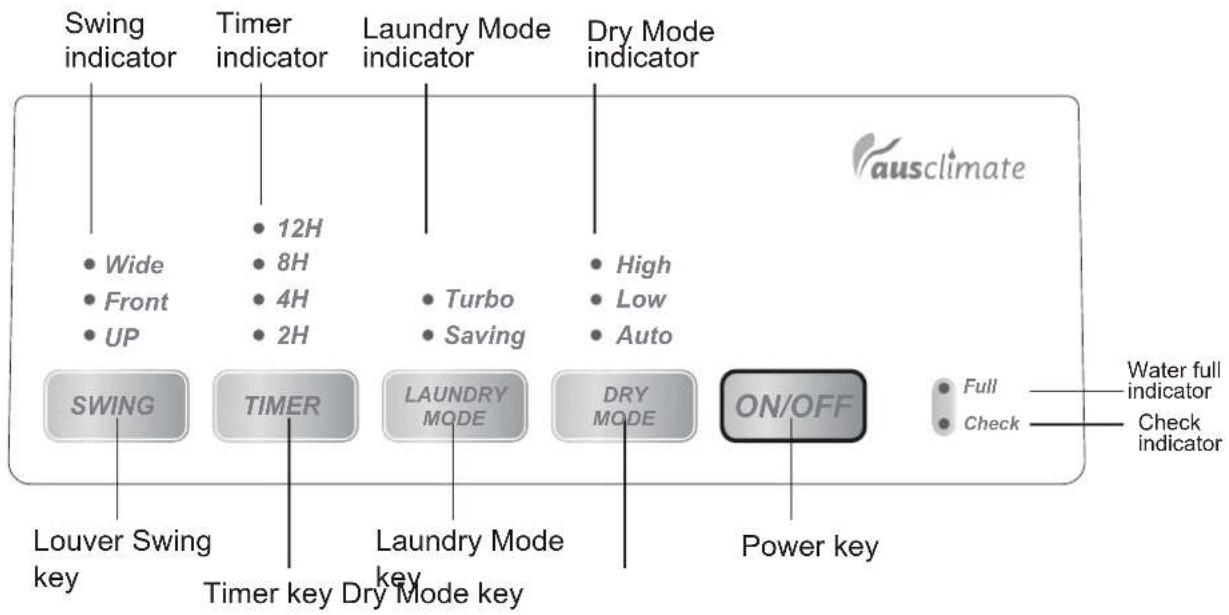
- Press the "DRY MODE" key for dehumidification (general drying of your home or office).

flowchart
graph LR
    A["AUTO LOW HIGH"] --> B["Next Step"]
| MODE | DESCRIPTION |
| AUTO | To keep the room at a comfortable relative humidity (RH) levelThe unit automatically keeps room humidity around 50~55%RH with automatic high or low fan speed. |
| LOW | To run low fan speedThe unit automatically keeps room humidity around 50~55%RH with low fan speed and low heater. |
| HIGH | Super dry mode to prevent damp, condensation & mouldThe unit automatically keeps room humidity around 40~45%RH to achieve quicker and efficient drying with high fan speed and high heater. |
Note: There may be times when the fan speeds are the same for AUTO and LOW. AUTO itself is not a fan speed but a target relative humidity set point that uses either the low or high fan speeds to reach its target of 50-55%RH. If the relative humidity of the room is close to or within this range, then switching between LOW and AUTO will make no difference to the fan speed.
LAUNDRY MODE
- Press the "LAUNDRY MODE" key for drying clothes.
| MODE | DESCRIPTION |
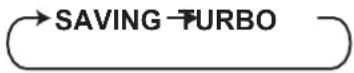
| SAVING | Suitable for warmer temperatures to save powerThe unit automatically provides high speed warm dry air to assist in clothes drying with lower power, potentially achieving room humidity levels of 50%~55%RH. |
| TURBO | Suitable in cooler winter temperatures to dry clothes fasterThe unit automatically provides high speed warm dry air to assist in clothes drying with higher power, potentially achieving room humidity levels of 35%~40%RH. |
AUTO SWING LOUVER
- Press the "SWING" Key to select the preferred air louver angle.

flowchart
graph LR
    A["UP FRONT"] --> B["WIDE"]
    B --> C["HOLD (LED OFF)"]
| MODE | DESCRIPTION | |
| UP | The automatic louver swings in an upward range of approx. 100^ . | 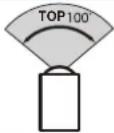 |
| FRONT | The automatic louver swings in a front range of approx. 50^ . | 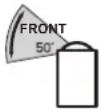 |
| WIDE | The automatic louver swings in a wide range of approx. 150^ . |  |
| HOLD | The automatic louver stops swinging when you press "SWING" key - turns the LED light off. | |
The louver modes are useful for speeding up the drying of washing, wardrobes and walls because it directs the airflow towards the surface of these areas - water molecules will be forced out faster.
TIMER
- Press the "TIMER" key to select your desired running time (2, 4, 8 or 12 hours).
The unit will automatically switch off at the end of the selected time period.
As the time counts down the LED lights (8, 4 or 2 hours) will indicate the time remaining.
- When no "TIMER" is set (the LED light is off), the unit will run continuously unless the bucket is already full.

flowchart
graph LR
    A["2hrs"] --> B["4hrs"]
    B --> C["8hrs 12hrs"]
    C --> D["continuous (LED OFF)"]
The Timer mode is useful if you want to dry a load of washing in ‘Turbo’ laundry mode and you know that it will take say, 4 hours and you wish to just run the unit at full power for that time period.
TO EMPTY THE WATER BUCKET
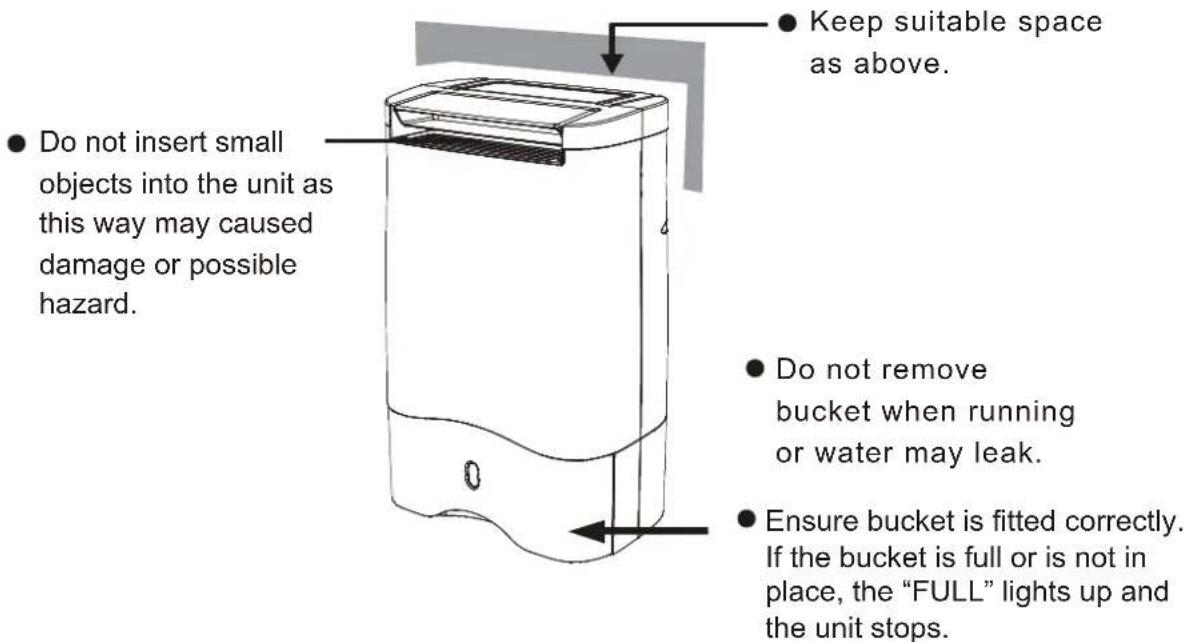
- When the water bucket is full, the "FULL" LED lights up and the unit stops in a few minutes.
- Do not move the unit or remove the water bucket if the machine is still operating. Water may leak and cause damage to the unit or cause an electric shock.
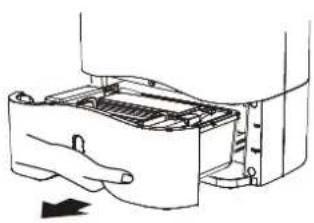
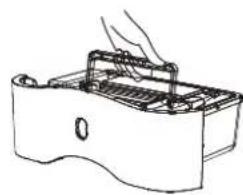
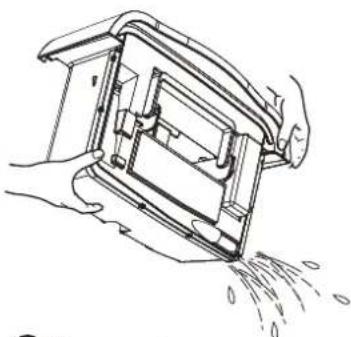
- To remove the water bucket, pull it out by gripping the bottom of the bucket, and lift carefully.
- Remove the cover of water bucket first, then pour the water away. Clean the bucket and return the cover and the bucket to the correct position.
natural_image
Diagram of a hand pressing down on a mechanical component with arrows indicating motion (no text or symbols)A Pull bucket out
natural_image
Line drawing of a hand holding a tray with a handle, inside a container (no text or symbols)B Lift by the handle
natural_image
Line drawing of hands cleaning a mechanical component with spray particles (no text or symbols)© Pour water away
natural_image
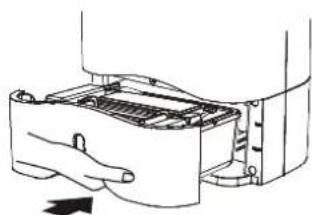
Diagram of a hand pressing down on a device component (no text or symbols visible)- Clean the water bucket with clean water if needed. Do not use solvents, abrasive materials or hot water.
- Do not remove or damage the float in the bucket, or the unit cannot work correctly.
- The bucket cover must be correctly fitted into position.
- The "FULL" LED lights up if the bucket is not correctly fitted into position.
TO DRAIN WATER
You may use 2 methods to remove the collected water: water bucket or drain hose.
A drain hose with an inner diameter of 12mm is quite suitable for continuous drainage (1.2M drain hose is included):
- Use a screwdriver to remove the 'knockout' at the back of the unit. Attach the tubing to the connector through the hole.
- The drain hose should lead downwards away from the unit, with no sharp bends to ensure uninterrupted drainage.

natural_image
Pure technical line drawing of a mechanical component without any text, numbers, or symbolsCleaning the unit
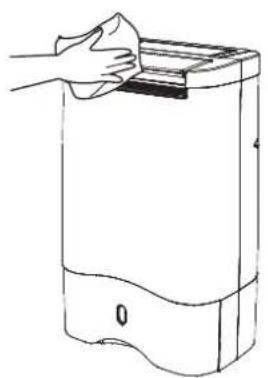
- Turn off the unit, wait for the fan to stop and unplug from the power socket.
- Clean the surface with a soft damp cloth.
- Dry thoroughly with a towel after cleaning.
- To avoid damage, do not wash or splash the unit with water, or let water drip into the air inlet or air outlet.
natural_image
Line drawing of a hand cleaning a rectangular device with a handle (no text or symbols)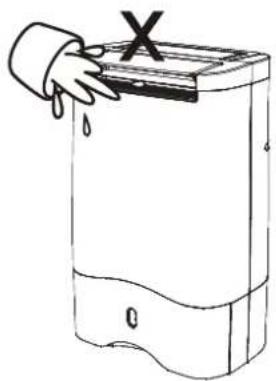
natural_image
Simple line drawing of a hand cleaning a rectangular device with a handle and drop, no text or symbols present.Cleaning the nano-silver air filter
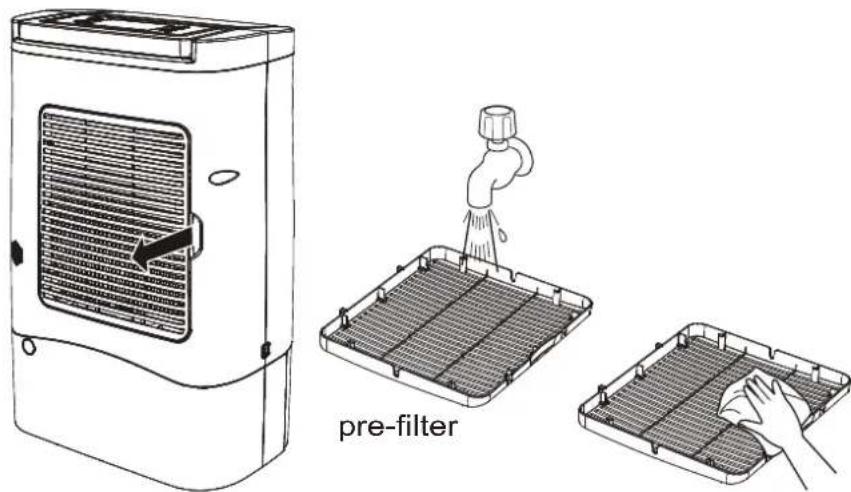
If the filter is covered with dust, the airflow and the performance of the unit will be affected. It is recommended to check and clean the pre-filter every month or as required.
- Turn off the unit and remove the filter from the unit.
- The pre-filter can be washed and wiped gently.
- Replace the filter in position.
Before placing into storage
- Turn off the unit, wait for it to stop and unplug from the power socket.
- Clean and dry the bucket, as well as the filter and the rest of the unit.
- Clean the filter and the unit. Cover the unit to prevent it from gathering dust.
- Store upright in a cool dry place.
- Do not expose to direct sunlight.
Check the following before contacting technical support:
| Problem Cause Solution | ||
| The unit does not operate. | The power is not connected. Insert power plug into the power socket. | |
| Power cord or power plug may be damaged. | Inspect power cord and power plug for damage. If damaged, do not use - contact the retailer or distributor for advice. | |
| The device does not dehumidify. | The water container is full. Empty the water from the container. | |
| The water bucket has not been replaced correctly. | Return the water bucket into the correct position. | |
| The air filter is clogged. Clean the air filter. | ||
| The temperature in the room where the dehumidifier is operating is too low. | The machine does not dehumidify below 1°C. Note: at such low temperatures, the moisture in the room will be very low anyway. | |
| The relative humidity in the room where the dehumidifier is operating is too low. | The unit dries down to the target relative humidity, then goes into ‘fan only’ mode until the relative humidity goes above the set point again. | |
| The unit is not drying quickly enough. | The unit may have already reduced the humidity in the room to one of the targets of 50-55%. | Set the DRY MODE to ‘High’ or run LAUNDRY MODE, which may further reduce the humidity to 35-40% relative humidity. |
| The unit works, but reduces the relative humidity insufficiently / there is little water in the water tank. | The room/house is too large. This dehumidifier can dry to about a medium 3 or 4 bedroom house. | We recommend using a dehumidifier with a greater capacity, or ‘compressor’ dehumidifier. |
| There are too many sources of moisture: showers, washing, clothes-drying and cooking all puts moisture into the air. Un-flued gas heating can also add too much moisture into the air for a dehumidifier to remove. | We recommend using a dehumidifier with a greater capacity, or ‘compressor’ dehumidifier.Consider using a different heat source to an un-flued gas heater. | |
| The air filter is blocked - the reduced air flow is effecting performance. | Clean the air filter. | |
| Unit is blowing out warm air. | Air is passed over a heating element within the unit, prior to being blown into the room. This is part of the dehumidification process. | This is normal, a dehumidifier is not an air cooler. |
| The unit is noisy. | The air filter is blocked or the unit is on an uneven surface. | Clean the filter and or put the unit on a flat surface. A dehumidifier will also be noisier on wooden floors than carpet. |
| The fan still runs after I have turned the unit off. | The fan is cooling the internal heater. | This is normal. The fan will run for about 2 minutes after you press the power button off. Wait for the fan to stop, then turn the unit off at the wall. |
| The “Check” LED is illuminated. | The unit may not be working properly. | Clean the filter and leave to stand for 20 minutes. Ensure that the dehumidifier is not in front of a hot radiator. If the problem remains, then please contact the retailer or distributor. |
| There is an odour coming from the unit. | The zeolite desiccant material may be returning various household odours back into the room during the dehumidification process. | This odour is not harmful to humans or pets. It will not last long and is not a sign of a fault. |
| Model AU1910DD | |
| Power supply AC 220-240V, 50Hz | |
| Power input Low 420watts / High 730watts | |
| Dehumidifying capacity 10 litres/day (20°C@60%RH) | |
| Recommended room size 50m ^2 or 125m ^3 | |
| Capacity water container 3 litres | |
| Operating range 1 – 40°C | |
| Dimensions (w x d x h) 317(w) x 213(d) x H499(h)mm | |
| Noise levels Low 38, High 49 dBA | |
| Power control Easy soft touch | |
| Desiccant | Zeolite |
| Drain hose | 1.2M provided |
| Net weight | 6.8kgs |

healthy indoor climate solutions
www.ausclimate.com.au
For all after-sales enquiries and warranty details please visit our website for contact information, or call 1800 122 100

- Ausclimate Cool Seasons Premium 10L
- Desiccant Dehumidifier
- Model: AU1910DD
- PLEASE READ ALL INSTRUCTIONS CAREFULLY BEFORE OPERATING.
- SAVE AND READ THESE IMPORTANT SAFETY INSTRUCTIONS
- FEATURES
- THE CONTROL PANEL
- UNIT SETUP
- TO OPERATE SAFELY
- ON and OFF
- Note: In the event of a power failure
- Note: After turning the appliance OFF
- DRY MODE
- LAUNDRY MODE
- AUTO SWING LOUVER
- TIMER
- TO EMPTY THE WATER BUCKET
- TO DRAIN WATER
- Cleaning the unit
- Cleaning the nano-silver air filter
- Before placing into storage
Brand : Ausclimate
Model : AU1910DD
Category : Dehumidifier