
Cool Seasons 10L - Dehumidifier Ausclimate - Free user manual and instructions
Find the device manual for free Cool Seasons 10L Ausclimate in PDF.


| Product Type | Dehumidifier |
| Brand | Ausclimate |
| Model | Cool Seasons 10L (ACD200) |
| Moisture Removal | 8 L/day at 20°C / 60% RH |
| Water Tank Capacity | 2.0 L |
| Power Supply | 220-240 V ~ 50 Hz |
| Power Consumption | 610 W |
| Refrigerant | R290 (estimated based on typical dehumidifiers) |
| Humidity Setting | 40% to 80% RH in 5% increments or Continuous mode (CO) |
| Fan Speeds | 3 speeds (Level 1, 2, 3) plus Auto |
| Timer | 1-8 hours countdown, set in 1-hour increments |
| Ionizer | Yes, releases negative ions for air purification |
| Swing Function | Yes, louvre oscillation |
| Silent Operation | Yes, beep sounds can be disabled (except alerts) |
| Memory Function | Remembers previous settings when power is connected but off (except child lock and timer) |
| WiFi Control | Yes, via Ausclimate app (2.4 GHz required) |
| Continuous Drainage | Yes, compatible with 10 mm inner diameter hose (not supplied) |
| Water Full Indicator | Yes, visual and audible alarm (10 beeps) |
| Air Filter | Washable, accessible via rear inlet grill |
| Safety Features | Resettable thermal link and thermal fuse; anti-tip? (not specified) |
| Operating Temperature Range | 5°C to 35°C |
| Recommended Clearances | 1 m from front and rear, 200 mm from sides |
| Warranty | 2 years (extendable to 4 years by registration) |
| Country of Origin | China |
Frequently Asked Questions - Cool Seasons 10L Ausclimate
User questions about Cool Seasons 10L Ausclimate
0 question about this device. Answer the ones you know or ask your own.
Ask a new question about this device
Download the instructions for your Dehumidifier in PDF format for free! Find your manual Cool Seasons 10L - Ausclimate and take your electronic device back in hand. On this page are published all the documents necessary for the use of your device. Cool Seasons 10L by Ausclimate.
USER MANUAL Cool Seasons 10L Ausclimate
natural_image
White and gray electronic device casing with a hatched panel and ventilation slots (no visible text or symbols)General Care and Safety Guide
YOUR SAFETY IS IMPORTANT TO US. PLEASE ENSURE YOU TAKE NOTE OF THE INSTRUCTIONS AND WARNINGS OUTLINED IN THIS MANUAL.
CAUTION: In order to avoid a hazard due to inadvertent resetting of the thermal cut-out, this appliance must not be supplied through an external switching device, such as a timer, or connected to a circuit that is regularly switched on and off by the utility.
- This appliance is not intended for use by persons (including children) with reduced physical, sensory or mental capabilities or lack of experience and knowledge, unless they are supervised or have been given instruction concerning the use of the appliance by a person responsible for their safety.
- Children should be supervised to ensure that they do not play with the appliance.
- If the supply cord is damaged, it must be replaced by the manufacturer, its service agent or similarly qualified persons in order to avoid a hazard.
WARNING: You must not cover this appliance. Covering this appliance presents fire risk and will activate the safety fuse; permanently disabling the unit.
WARNING: Do not use this appliance in small rooms when they are occupied by persons not capable of leaving the room on their own, unless constant supervision is provided.
WARNING: To reduce the risk of fire, keep textiles, curtains, or any flammable material a minimum distance of 1 metre from the air outlet.
- Use only the voltage specified on the rating label of the appliance.
- Keep all objects at least 1 metre from the front, sides and rear of the appliance.
- This appliance is intended for household use only and not for commercial or industrial use.
- Indoor use only.
- Use this appliance only as described in this manual. Any other use is not recommended by the manufacturer and may cause fire, electric shock or injury.
- Do not use the appliance if it has been dropped or damaged.
- The common cause of overheating is deposits of dust or fluff in the appliance. Ensure these deposits are removed regularly by unplugging the appliance and vacuum cleaning the air vents and grills.
General Care and Safety Guide
• Never use the appliance to dry clothes.
• Always unplug appliance when not in use.
- When the appliance has been unpacked, check it for transport damage and ensure all parts have been delivered. If parts are missing or the appliance has been damaged, contact the Customer Services Team.
- Do not use if there are visible signs of damage to the appliance.
- Do not connect the appliance to mains supply until completely assembled and adjusted.
- Ensure hands are dry before handling the plug or main unit.
- Ensure appliance is on a flat, stable, heat-resistant surface.
- Do not operate with cord set coiled up as a heat build up is likely, which could be sufficient to become a hazard.
- Carry out regular checks of the supply cord to ensure no damage is evident
- Do not operate this appliance with a damaged cord, plug or after the appliance malfunctions or has been dropped or damaged in any manner. Take to a qualified electrical person for examination, electrical service or repair.
- Do not twist, kink or wrap the cord around the appliance, as this may cause the insulation to weaken and split. Always ensure that all cord has been removed from any cord storage area and is unrolled before use.
- It is recommended that this appliance is plugged directly into the wall socket. Power boards are not rated to supply power to high wattage appliances.
- A correctly specified, undamaged extension cord may be used with this appliance provided it is used in a safe manner.
- Do not remove plug from power socket until the appliance has been switched off.
- Do not remove plug from power socket by pulling cord; always grip plug.
- Do not place cord under carpet or cover with rugs or furniture. Arrange the cord so it cannot be tripped over.
- Don't place appliance on bedding or on thick & long carpet where the openings may get blocked.
- Switch off and use handle provided when moving
- Do not place appliance close to radiant heat source.
- Do not insert or allow foreign objects to enter any ventilation or exhaust opening, as this may cause an electric shock, fire or damage to the appliance.
- Do not sit on the appliance.
- Do not use abrasive cleaning products on this appliance. Clean with a damp cloth (not wet) rinsed in hot soapy water only. Always remove plug from the mains supply before cleaning.
- Do not operate in areas where petrol, paint or other flammable liquids are used or stored.
- Do not use this appliance in the immediate surrounds of a bath, a shower, or a swimming pool or other liquids.
General Care and Safety Guide
• The appliance must not be immersed in any liquids.
• There are no user serviceable parts installed in the unit.
- Do not place the unit in wardrobes or other enclosed spaces as this may cause fire hazards.
- This unit is not supposed to be used in or around locations where foodstuffs, works of art or delicate articles of science, etc. are stored.
- If your appliance does not work, or is not working properly, contact the place of purchase or the Customer Services Team.
ausclimate
DO NOT COVER
MODEL: ACD200
SUPPLY: 220-240VAC 50Hz
WATTAGE: 610W
MOISTURE REMOVAL: 8L/day (20°C/60%RH)
TANK CAPACITY: 2.0L
APPROVAL: SGS-250150-E
MADE IN CHINA
QC PASSED: PO#-WWYY
CUSTOMER SUPPORT
NEW ZEALAND PH: 0800 232 633
AUSTRALIA PH: 1300 465 324
Operating Your Dehumidifier
Always choose a safe location for the dehumidifier, keeping in mind the safety precautions outlined. Ensure all packaging has been removed from the unit before use. Please follow the below instructions.
WARNING: In order to avoid overheating or fire, do not cover the dehumidifier.
WARNING: Keep all objects at least 1 metre from the front and rear and 200mm from the sides of the appliance.
WARNING: Do not use this dehumidifier with a programmer, separate timer, remote-control system or any other device that switches the dehumidifier on automatically, since a fire risk exists if the dehumidifier is covered or positioned incorrectly.
Ensure dehumidifier is on a flat, stable, heat-resistant surface.
Once the dehumidifier is in a safe operating position and all switches are in the off position, insert the power plug into the mains outlet and switch on.
CAUTION: Ensure the power cord is not tight because if pulled it may partially pull the plug from the socket. A partially inserted plug will overheat the plug and socket and could result in fire.
Leave the appliance to stand for one hour after transport or after the unit has been on its side before connecting it to the mains supply to let the refrigerant settle.
Ensure all external windows and doors are closed before turning on the unit.
Ensure that the water container is positioned correctly.
Operating Your Dehumidifier
DEHUMIDIFIER CONTROL PANEL


natural_image
Row of circular icons with basic symbols (power, leaf, clock, water drop) without any text or labelsOn/Off Switches the power On or Off
Swing Switches the swing function On or Off
Speed Adjusts the air speed setting
Ionizer Selects the negative ion release function
Timer Set the countdown timer
Humidity Adjusts the humidity range
OPERATING INSTRUCTIONS
The Power indicator light will turn on when the unit is plugged in regardless of whether the unit is operating or not.
POWER
Press the On/Off button once to the unit on; the machine will start up and the louvres will open. Press it again to turn the unit off.
SWING
Press the swing button to turn on or off the swing function.
FAN SPEED
Press the Speed button to set the desired fan speed. It can be adjusted between level 1, level 2, level 3 or Auto level.
HUMIDITY SETTING
Press the Humidity button to set the desired humidity level in the room. This can be set from 40% to 80% with 5% intervals, or CO which is Continuous Operation.
When the ambient humidity reaches the set level, the fan will work for 3 minutes every 30 minutes.
Operating Your Dehumidifier
COUNTDOWN TIMER
Press the Timer button to program how long before the unit turns off, up to 8 hours. Each press of the button will increase the time by 1 hour and the timer symbol will be displayed on the screen. Once the time has elapsed, the dehumidifier will turn off. If you want to cancel the timer programming, press the TIMER button until the display reads 00.
Note: The programmed time will be cancelled if you turn the dehumidifier off manually. The programmed time remains unchanged if the machine stops due to water full.
IONIZER FUNCTION
Your dehumidifier is equipped with an ionizer that helps purify the air in addition to reducing humidity. Press the Ionizer button to activate this function. You can turn it off at any time by pressing the button again.
The ionizer works by releasing negatively charged ions into the air, which attract and bind to dust, allergens, smoke, and other airborne particles. As these particles become heavier, they are more likely to fall to the ground or stick to nearby surfaces, effectively removing them from the air you breathe.
SILENT OPERATION
Press and hold the timer button and the swing button at the same time for 3 seconds to turn the beeping sounds on or off. Please note, the alert sounds will still be active whilst in Silent operation.
MEMORISE FUNCTION
The unit will memorise previous settings when the power plug is connected but the power is off (excluding child lock and timer).
The unit will operate at default settings when the power plug is disconnected.
WATER FULL INDICATOR
When the water tank is full, the dehumidifying operation will stop automatically and the unit will beep 10 to alert the user that the water tank need to be emptied. The display will show the water tank and the light indicator will flash red.
Operating Your Dehumidifier
EMPTYING THE WATER TANK
When the water tank full indicator light comes on, the water tank must be removed, emptied and reinstalled before the unit will operate again. The appliance will stop dehumidifying.
DO NOT move the appliance while the tank is full as this may lead to water spillage and create a potential hazard.
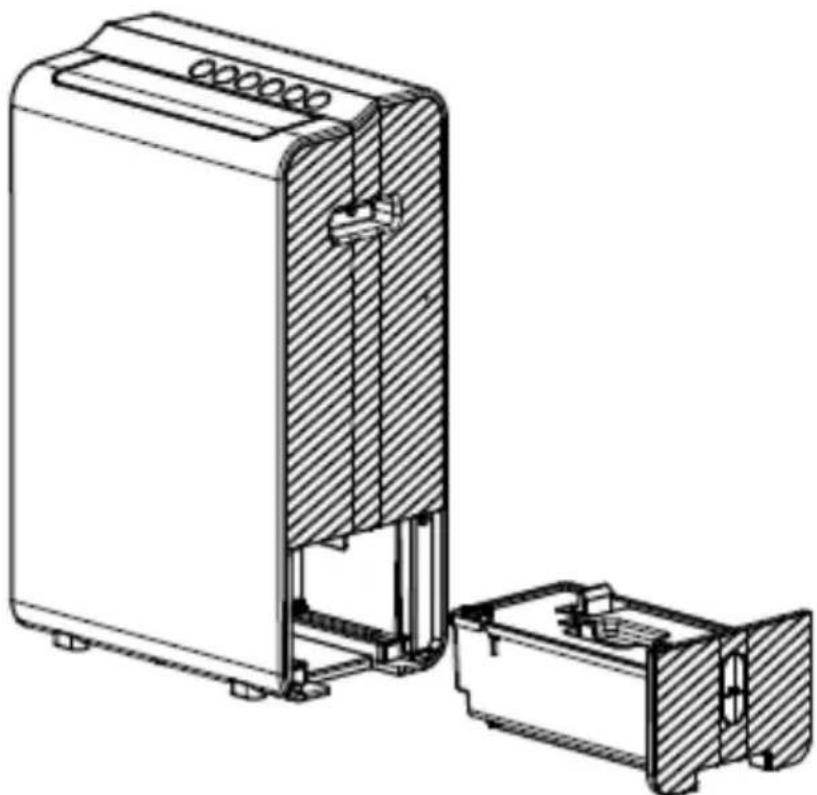
To remove the water tank, grip the tank firmly and pull outwards.
Carefully tip the water down a drain and then reposition the tank back in the unit
If the drainage tank is dirty, wash it with cold or lukewarm water. Do not use detergent, scouring pads, chemically treated dust cloths, petrol, thinners or other solvents, as these can scratch and damage the tank and cause water leakage
natural_image
Technical line drawing of a device with internal components and housing (no text or symbols)Do not remove the float from the water tank.
The water full sensor will no longer be able to detect the water level correctly without the float and water may leak from the water tank.
Operating Your Dehumidifier
CONTINUOUS WATER DRAINAGE
It is possible to connect a drainage tube with an inner diameter of 10mm (not supplied) to the appliance for permanent water drainage.
If this option is desired, you will need to purchase a suitable PVC tube from your local hardware retailer (Ausclimate does not hold tubes as spare parts).
- Connect the drainage hose to the drain spout.
- Place the end of the drainage hose in a drainage outlet. Ensure that the end of the hose is lower than the drain opening, otherwise the water will not drain and flooding may occur.
- Also ensure the water tank is positioned in the unit otherwise the continuous drainage will not operate. It will also catch any overflow.
NOTE: When you no longer wish to use the permanent water drainage, disconnect the drainage tube from the device and water will be collected in tank again.
CLEANING THE AIR FILTER
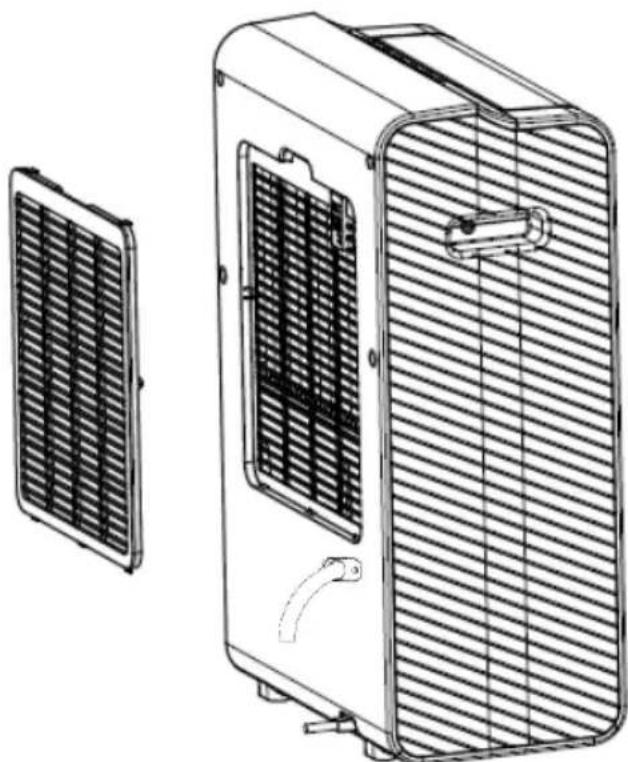
Open the inlet grill and remove the air filter.
Run a vacuum cleaner lightly over the surface of the air filter to remove dirt.
If the air filter is exceptionally dirty, wash it with warm water and a mild cleanser and dry thoroughly.
Once completely dry, insert the filter back into the inlet grill and place the inlet grill into the back of the appliance.
natural_image
Technical line drawing of a dual-panel air conditioner unit with ventilation grilles and cooling fins (no text or symbols)WiFi – Downloading and Setting Up APP
This APP is supported only on 2.4GHz Wi-Fi channels. Please ensure your phone is 2.4GHz capable
Note this device will only work within your home WIFI system. This does not operate on 3G or 4G internet connections. You will need a connection to your home Wi-Fi.

Download Ausclimate mobile APP
- Open the APP Store or Google Play on your mobile phone.
- Open 'Search' and enter 'Ausclimate'
- Click 'GET' and begin to download and install.
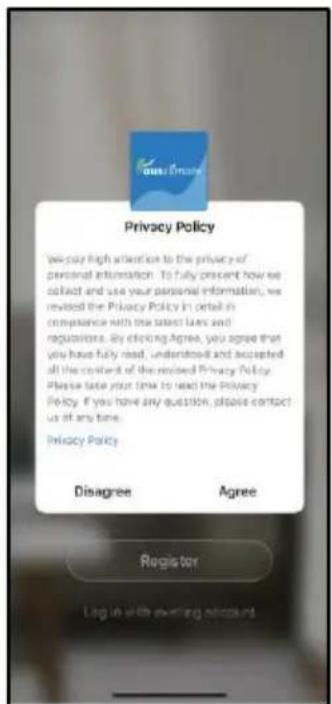
Once downloaded to your phone open the APP
- Tap REGISTER near the bottom of the screen.
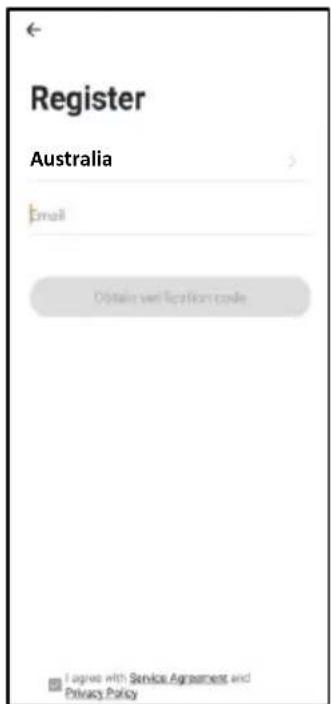
• Read and agree to the Privacy Policy. - Add your email address.
- Tap 'Obtain verification code'
You will then receive an email with a verification code.
- Enter the verification code from your email.
- Create a password.
- Then tap confirm.
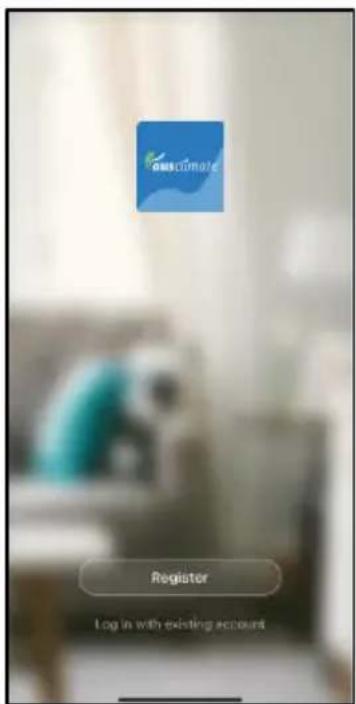
If you haven't received a verification code via email, tap the resend button and when the verification code is received follow above steps.
Your APP is now registered and ready for pairing to your device.
Pairing APP to Device
The website link below provides details for pairing this appliance with the Ausclimate App. Either scan the QR code below or enter the website into your browser.


Need Help?
Pairing Mode
To connect to the Ausclimate app, you must ensure that your device is in pairing mode, which is when the Wi-Fi icon flashes.
If you want to enable Wi-Fi mode, then:
■ Turn on the dehumidifier
- Hold the "Swing" button for around 3 seconds or until the Wi-Fi icon flashes.
Quick Connection
Turn your phone's Bluetooth ON.
■ Ensure your device is in Pairing Mode (see instructions above)
- Tap the + on the top right corner to navigate to the main device screen.
- Tap 'Auto Scan' – your device will appear. Tap the device and follow the instructions.
■ If Quick Connection does not work, follow the manual via the QR Code above.
Care and Maintenance
SAFETY DEVICES
This appliance has two protection devices:
- Resettable Thermal Link - this will automatically disconnect the power to the appliance at a pre-set overheat temperature. After cooling down it will reset and power on again. If this occurs, investigate what is causing the appliance to overheat.
- Thermal Fuse - this disconnects the appliance permanently in case of overheating. (It is non resettable).
CARE AND CLEANING
- The dehumidifier requires regular cleaning to ensure trouble free operation:
- Unplug the dehumidifier from the mains supply before cleaning.
- Ensure that the dehumidifier has been allowed to cool down completely before cleaning.
- The common cause of overheating is deposits of dust or fluff in the appliance. Ensure these deposits are removed regularly by unplugging the appliance and vacuum cleaning the air vents and grills.
- Use a damp cloth (not wet) to wipe the exterior of the dehumidifier to remove dust and dirt.
- Never use solutions such as petrol, thinners or polishing agents.
- Ensure the dehumidifier is dry before plugging back into the mains supply.
PROOF OF PURCHASE
To receive warranty retain receipt as proof of purchase. (Refer to back of booklet).
ausclimate
SUPPORT AND TECHNICAL ADVICE
Ausclimate – New Zealand
Monday – Friday 8am-5pm
Phone +64 (0)9 917 4000
Phone 0800 232 633
Ausclimate – Australia
Monday – Friday 8am-5pm
Phone 1800 122 100
TROUBLESHOOTING
| Problem Possible Cause Solution | ||
| The unit doesn't operate | Has the power cord been disconnected? | Plug the power cord into the outlet. |
| Is the tank full indication lamp blinking? (The tank is full or in a wrong position.) | Empty the water in the drainage tank and then reposition the tank. | |
| Is the temperature of the room above 35°C or below 5°C? | The protection device is activated and the unit cannot be started. | |
| The dehumidifying function doesn't work | Is the air filter clogged? | Clean the air filter as instructed under "Cleaning the dehumidifier". |
| Is the intake duct or discharge duct obstructed? | Remove the obstruction from the discharge duct or intake duct. | |
| No air is discharged | Is the air filter clogged? | Clean the air filter as instructed under "Cleaning the dehumidifier". |
| Operation is noisy | Is the unit tilted or unsteady? | Move the unit to a stable, sturdy location. |
| Is the air filter clogged? | Clean the air filter as instructed under "Cleaning the dehumidifier". | |
ausclimate

SCAN HERE FOR HELP
www.ausclimate.com.au www.ausclimate.co.nz
ausclimate
Two Year Warranty
Thank you for purchasing this Ausclimate product. Your product is warranted against faults and manufacture when used in normal domestic use for a period of two years. In non-domestic use Ausclimate limits the voluntary warranty to three months.
Ausclimate present consumers with the option of extending their warranty by a further two years to a total warranty period of four years, if the unit is registered on the Ausclimate website.
Ausclimate undertake to repair or replace this product at no charge if found to be defective due to a manufacturing fault during the warranty period.
This warranty excludes damage caused by misuse, neglect, shipping accident, incorrect installation, or work carried out by anyone other than a qualified electrical service technician.
PLEASE KEEP YOUR RECEIPT AS THIS WILL HELP VERIFY YOUR WARRANTY.
The benefits given to you by this warranty are in addition to other rights and remedies available to you under law in relation to the goods or services to which this warranty relates.
In Australia, our goods come with guarantees that cannot be excluded under the Australian Consumer Law. You are entitled to a replacement or refund for a major failure and compensation for any other reasonably foreseeable loss or damage. You are also entitled to have the goods repaired or replaced if the goods fail to be of acceptable quality and the failure does not amount to a major failure.
In New Zealand this warranty is additional to the conditions and guarantees of the Consumers Guarantee Act (1993).
Ausclimate – New Zealand
CDB Media Ltd.
PO Box 100-707
N.S.M.C
Auckland
Phone 0800 232 633
www.ausclimate.co.nz
Ausclimate – Australia
CDB Goldair Australia Pty
PO Box 574
South Morang
Victoria, 3752
Phone 1800 122 100
www.ausclimate.com.au
Ausclimate Two Year Warranty (IMPORTANT: Please complete and retain this warranty card)
Name
Address
Place Of Purchase Date Of Purchase
Name Of Product Model Number
Attach a copy of the purchase receipt to this warranty card
- General Care and Safety Guide
- YOUR SAFETY IS IMPORTANT TO US. PLEASE ENSURE YOU TAKE NOTE OF THE INSTRUCTIONS AND WARNINGS OUTLINED IN THIS MANUAL.
- ausclimate
- DO NOT COVER
- Operating Your Dehumidifier
- DEHUMIDIFIER CONTROL PANEL
- OPERATING INSTRUCTIONS
- POWER
- SWING
- FAN SPEED
- HUMIDITY SETTING
- COUNTDOWN TIMER
- IONIZER FUNCTION
- SILENT OPERATION
- MEMORISE FUNCTION
- WATER FULL INDICATOR
- EMPTYING THE WATER TANK
- Do not remove the float from the water tank.
- CONTINUOUS WATER DRAINAGE
- CLEANING THE AIR FILTER
- WiFi – Downloading and Setting Up APP
- Pairing APP to Device
- Pairing Mode
- Quick Connection
- Care and Maintenance
- SAFETY DEVICES
- CARE AND CLEANING
- PROOF OF PURCHASE
- SUPPORT AND TECHNICAL ADVICE
- TROUBLESHOOTING
- Two Year Warranty
Brand : Ausclimate
Model : Cool Seasons 10L
Category : Dehumidifier