
LCLG006 - Digital signage LG - Free user manual and instructions
Find the device manual for free LCLG006 LG in PDF.


| Product Type | Digital Signage (LCD Monitor) |
| Model | LCLG006 |
| Brand | LG |
| Display Resolution (Max) | 3840 x 2160 @ 60 Hz (HDMI/DP/OPS) |
| Recommended Resolution | 3840 x 2160 @ 30 Hz |
| Input Ports | HDMI IN, DP IN, OPS, LAN IN/OUT (RJ45), RS-232C IN/OUT, USB 2.0 IN, AC IN |
| Power Requirements | AC 100-240V, 50/60 Hz, 1.6 A |
| Power Consumption (On Mode) | 50 W (Max, without OPS) |
| Sleep Mode Power | ≤ 1 W |
| Off Mode Power | ≤ 1 W |
| Dimensions (W x D x H) | 443 mm x 307.5 mm x 63 mm (17.4 x 12.1 x 2.5 inches) |
| Weight | 4.9 kg (10.8 lbs) |
| Operating Temperature | 0°C to 40°C (32°F to 104°F) |
| Operating Humidity | 10% to 80% |
| Storage Temperature | -20°C to 60°C (-4°F to 140°F) |
| Storage Humidity | 5% to 85% |
| Operating System | webOS 4.0 |
| Key Features | Content Manager, Video Wall, Scheduling, Fail Over, Status Mailing, Sync Mode, Multi Screen (PIP/PBP), Screen Rotation, ISM Method (anti-burn-in), UHD Deep Color, RS-232C daisy chain |
| Connectivity | Wired LAN (RJ45), Wi-Fi (via optional dongle), Bluetooth (for sound), RS-232C, USB 2.0 |
| Certifications | Class A (CISPR 32), HDMI, HDCP, HEVC Advance |
| Cleaning Instructions | Unplug power, use soft dry cloth; avoid liquids, chemicals, abrasives. For front frame, dampen cloth slightly and wipe in one direction. |
Frequently Asked Questions - LCLG006 LG
User questions about LCLG006 LG
0 question about this device. Answer the ones you know or ask your own.
Ask a new question about this device
Download the instructions for your Digital signage in PDF format for free! Find your manual LCLG006 - LG and take your electronic device back in hand. On this page are published all the documents necessary for the use of your device. LCLG006 by LG.
USER MANUAL LCLG006 LG
Please read this manual carefully before operating your set and retain it for future reference.
LCLG006
TABLE OF CONTENTS
SAFETY PRECAUTIONS ......3
- Precautions for the AC Adapter and Power.... 4
- Precautions for Moving the Product......6
- Precautions for Installing the Product......7
- Precautions for Cleaning the Product ...... 9
- Precautions for Using the Product......10
- Product Disposal....11
LICENSES......12
ASSEMBLING AND
PREPARING 13
- Parts and Buttons 14
- Rack Installation (Optional).... 15
- Connecting to LCLG006 with LAN Cable...16
USING LCLG006 17
- Connecting to PC.... 17
- Connecting to External Devices....18
CONNECT A USB DEVICE ..... 19
TROUBLESHOOTING......21
PRODUCT SPECIFICATIONS...23
WARNING - This equipment is compliant with Class A of CISPR 32. In a residential environment this equipment may cause radio interference.
SAFETY PRECAUTIONS
The safety precautions are intended to prevent unexpected danger or harm by helping the user to use the product safely and for its intended purpose.

WARNING
If you ignore the warning message, you may be seriously injured or there is a possibility of accident or death.

CAUTION
If you ignore the caution message, you may be slightly injured or the product may be damaged.

WARNING
Indoor Use Only.
Precautions for the AC Adapter and Power

WARNING
- Use only the power cord or AC adapter provided or approved by LG Electronics, Inc. If you use another power cord, make sure that it is certified by the national standards. If the power cable is faulty in any way, please contact the manufacturer or the nearest authorized service center for a replacement.
- Operate the display only from a power source(i.e. voltage) indicated in the product specification.
- Otherwise the product can be damaged, fire can occur or you may be electrocuted. If you are not sure what type of power supply you have, consult a certified installation company.
• Make sure the power cord connect to a properly grounded outlet. - If you do not you may be electrocuted or injured or the product can be damaged.
- Insert the power plug or AC adapter firmly so it cannot come loose.
- Poor connection may cause a fire or electric shock.
- In the presence of thunder and lightning, never touch the power cord and signal cable because it can be very dangerous.
- It can cause electric shock.
- Be careful not to step or place heavy objects (electronic appliances, clothing, etc.) on the power cord or AC adapter. Additionally, do not bend or pull out the power cord or AC adapter with excessive force.
- Damaged power cords may cause a fire or electric shock.
- Do not connect power cord or AC adapter damaged with sharp objects to power outlet.
- You may be electrocuted.
- Do not insert a conductor (like a metal chopstick) into one end of the power cord while the other end is connected to the input terminal on the wall. Additionally, do not touch the power cord right after it is unplugged.
- You may be electrocuted.
- Do not use with a multi-outlet connected by many electrical product and heating devices. Use an exclusive multi-outlet with a grounding terminal.
-
A fire can break out due to overheating.
-
If water or any foreign substance goes inside the product, disconnect the power cord immediately and contact the service center.
- Otherwise, this may cause a fire or electric shock due to damage to the product.
- Keep the power cord or AC adapter away from any heating devices.
- The cord coating may melt and cause fire or electric shock.
- Never disassemble, repair or modify the power cord or AC adapter.
- This may cause a fire or electric shock.
- The main cutoff device is the power cord. Please make sure the product is installed near the wall outlet and that it is easily accessible.
- As long as this unit is connected to the AC wall outlet, it is not disconnected from the AC power source even if the unit is turned off.
• Power consumption will be '0' only when the power plug is unplugged. - Use the appliance coupler as the disconnect device.
CAUTION
- If the outlet pins of the power plug or AC adapter is covered with dust, be sure to wipe them and keep them clean.
- Overheating due to layers of dust may cause a fire or electric shock.
- If the outlet pins of the power plug or AC adapter is covered with water be sure to wipe them and keep them clean. Additionally, Do not touch the power plug or AC adapter with wet hands.
- This may cause an electric shock.
- Do not turn the product on or off by plugging in or unplugging the power plug from the power outlet. Do not use the power socket as a switch.
- This may cause an electric shock or product malfunction.
- Do not unplug the power cord while the product is in use.
- Electrical shock can damage the product.
Precautions for Moving the Product

WARNING
- Contact the service center before moving the product.
- It may cause electric shock and damage the product.
- Make sure the product is turned off, unplugged, and all cables have been removed before the product is moved.
- You may be electrocuted or the product can be damaged.
- When moving the product, do not shock or cause an impact on the front panel.
- You may be electrocuted or the product can be damaged.
- Use the correct number of people according to the weight of the product. (Under 25 kg (55.1 lbs) per person use lifting equipment when exceeding 100 kg (220.4 lbs))
- If use the damaged product again, contact the service center because it can cause electric shock or fire.
- Do not hold it upside down while holding only the stand. (It is for stand supported models only.)
- This may cause stand warping, panel damage and other types of product damage.

CAUTION
- Do not dispose of the product-packing box. Use it when moving by putting the product in the box to carry it.
Precautions for Installing the Product

WARNING
- Contact the service center before installing the product.
- It can cause electric shock and damage the product.
- Do not drop an object on or impact on the product. Keep out of reach of children and do not place toys or objects near the product to prevent throwing things on the product screen.
- It can cause injury to human, problem to product and damage the display.
- Do not put heavy objects on, or hang from, the product.
- If the product collapses or is dropped, you may be injured.
- Do not touch the surface of the product if it overheats.
- It can cause injury to human.
• Install the product firmly fixed on a floor, wall, etc. to prepare against external impact such as wind and earthquake.
- You must refer to the manual provided.
• Prevent Children from climbing or hanging on the product.
- If the product collapses or is dropped, you may be injured.
- Do not install it where there are heating devices such as electrical heaters or lighting equipment.
- Fire, electrical shock, malfunction may occur.
- Do not install this product by yourself as you may injure yourself or cause damage to the product. Please contact service engineer authorized by service center.
- Do not install this product on a wall if it could be exposed to oil or oil mist.
- This may damage the product and cause it to fall.
- Do not leave the power or signal cable, etc. on the pathway.
- This could cause a trip or fall, which could cause an electrical shock, fire, product breakdown, or injury.
- Do not let the product drop when connecting it to an external device connected with a short cable.
- This may cause injury and damage to the product.
- If you dropped the product or the case is broken, turn off the product and unplug the power cord and contact the service center.
- If you continue to use without taking proper measures, electrical shock or fire can occur.
• Install the product in a dry place where it is not near dust and water. Avoid high temperatures and humidity.
- This may cause electrical shock, fire or product damage.
- Safely install the product in a place that can hold the weight of the product.
- A lack of strength may cause the product to fall.
• Take a comfortable and natural position to relax the muscles when working with a product.

CAUTION
• Install the product where no Electromagnetic Interference occurs.
- If you install the product in a place that does not meet the recommended conditions, this may cause serious damage to the product's picture quality, life cycle, and appearance. Please check with service engineer before installing. Please do not install the product in places such as where there is an abundance of fine dust or oil mist, chemical substances are used, exposed to direct sunlight, the temperature is very high or low, the humidity is very high.
- Make sure the product is well ventilated by Installing at a distance (100 mm (3.9 inches) or more) from the wall.
- If you install the product too close to the wall, it may be deformed or fire can break out due to internal heat buildup.
- Do not cover the product with a tablecloth or a curtain or other materials (e.g. plastic) while plugged in. Do not block the ventilation hole of the product.
- The product can be deformed or fire can break out due to overheating inside the product.
- Do not install the product in an area with poor ventilation (e.g. on a bookshelf, in a closet) or outside and avoid placing on cushions or carpets.
- The product could catch fire due to overheating inside the product.
• Install the product on a flat and stable place that is large enough to support the product.
- If the product is dropped, you may be injured or the product may be broken.
- When installing the product on a shelf or cabinet, make sure that the bottom end of the product is not protruding forward.
- The product may fall due to unbalanced center of gravity, which may cause personal injury or damage to the product. Be sure to use cabinets or shelves that fit your product.
Precautions for Cleaning the Product

WARNING
- Keep the product clean at all times.
- If you don't clean the unit for a long time and it becomes covered in dust, it can cause fire or product damage.
- When you need to clean the inside of the product, you must contact the service center.
- Otherwise, cleaning without support may cause a fire, electric shock, or damage to the product.
- When cleaning the product, unplug the power cord and wipe gently with a soft cloth to prevent scratching.
- An electric shock may occur or damage to the screen if its scratched.
- When you want to clean the front frame, spray water onto a soft cloth 2 to 4 times and wipe in one direction only.
- Too much moisture may cause staining.
- Do not physically come in contact with the screen of the LED Package.
- This may cause damage to the product.
• To clean the product, use an air gun to lightly remove dust from the front frame and the screen. - If there are foreign substances in between the LEDs on the screen, it may cause a defect on the screen.

CAUTION
- When cleaning the product or the screen, unplug the power cord and wipe it gently with a soft cloth. Do not spray water or other liquids directly on the product. Especially, do not clean your product with chemicals including glass cleaner, any type of air freshener, insecticide, lubricants, wax (car, industrial), abrasive, thinner, benzene, alcohol, etc., which can damage the product or its panel.
- This may result in fire, electric shock or product damage (deformation, corrosion or breakage).
Precautions for Using the Product

WARNING
- Do not use the product in any environment with excessively high temperatures or humidity.
- If you use the product for a long period of time, take a rest from time to time to protect your vision.
- Extended viewing could result in impaired vision.
- Listening at high volume or using for a long time can cause damage to your hearing.
- In the event that liquid or a foreign object falls into the product, please switch it off and unplug it from the wall outlet and contact the service center.
- Otherwise, the product may cause fire or electric shock.
- In the event that no image appears on the screen or no sound is heard, stop using the product. Switch it off immediately, unplug it from the power outlet and contact the service center.
- Otherwise, the product may cause fire or electric shock.
- Do not drop an object or impact on the product or screen.
- It can cause injury to human, problem to product and damage the screen.
- If you can smell smoke or other odors or hear a strange sound, unplug the power cord and contact the service center.
- If you continue to use the product without taking proper measures, it may cause electrical shock or fire.
- Do not attempt to disassemble, repair or modify the product yourself. Please contact service center if you need to repair it.
- Fire or electric shock can occur.
- Do not place objects filled with liquids such as vases, cups etc. on or over the product to prevent liquid from entering the product.
- Failure to do so may result in fire, electric shock, malfunction or deformation.
- Do not push hard on or scratch the product's surface with your hands or sharp objects, such as nails, pencils or pens.
Do not shock or scratch the front and sides of the screen with metallic objects. - This may damage the products and cause it to malfunction.
-
Do not touch the product if it has been exposed to sunlight or an intense light because it could be hot.
-
Do not use high voltage electrical goods near the product (e.g., a bug zapper).
- This may result in product malfunction if it receives an electrical shock.
• If there is a gas leak, do not touch the outlet, and open the windows for ventilation. - Otherwise, the product may cause fire or electric shock.
- If you dropped the product or the case is broken, turn off the product and unplug the power cord.
- If you continue to use without taking proper measures, electrical shock or fire can occur. Contact the service center.
- Keep small accessories out of the reach of children.
- If a child swallows it, consult a doctor immediately.
- Keep out of reach of children from the product. Also, do not throw toys or objects to the product or screen.
- It can cause injury to human, problem to product and damage the screen.
- All the power sources must be disconnected by removing the power cables to remove all power from the unit.
CAUTION
- This panel is an advanced product that contains millions of pixels. You may occasionally see pixel spots when viewing the screen. Since these deactivated pixels are not a defect, the performance and reliability of the product is not affected.
- Do not put or store inflammable substances near the product.
- There is a danger of explosion or fire.
- Keep the proper distance from the product.
- It can cause damage to your vision if you look at the product too closely.
- Set the appropriate resolution and frequency by products.
- It can cause damage to your vision.
• Take a regular break when working with the product for a long time.
Product Disposal
- Do not dispose of this product with general household waste.
- Disposal of this product must be carried out in accordance to the regulations of your local authority.
LICENSES
Supported licenses may differ by model. Visit www.lg.com for more information on licenses.

The terms HDMI, HDMI High-Definition Multimedia Interface, and the HDMI Logo are trademarks or registered trademarks of HDMI Licensing Administrator, Inc.

ASSEMBLING AND PREPARING

CAUTION
• Always use genuine components to ensure safety and durability of the product.
- The product warranty will not cover damage or injury caused by the use of unauthorized components.
• Replacing the batteries with the wrong type may result in explosion.
- Batteries that have reached end-of-life should be disposed in an appropriate manner.

NOTE
• The accessories provided with your product may vary depending on the model.
- Product specifications or contents in this manual may be changed without prior notice due to upgrade of product functions.
- The warranty will not cover any damage caused by using the product in an excessively dusty environment.
• SuperSign Software & Manual
- Visithttp://partner.lge.com to download the latest SuperSign software and manual.
Parts and Buttons
The illustrations may differ depending on the model.
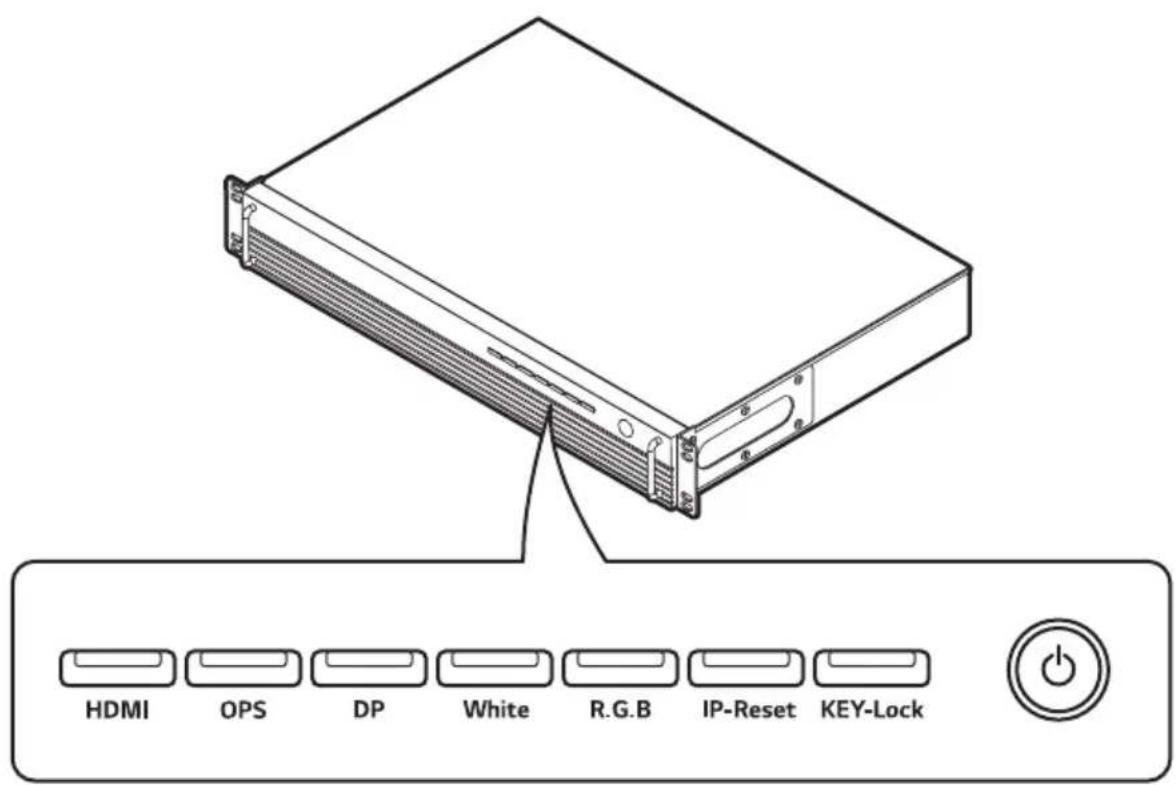
| Explanation | |
| Turns the power on and off. | |
| HDMI | Switches to HDMI input. |
| OPS | Switches to OPS input. |
| DP | Switches to DP input. |
| White | Accesses/Exits White Pattern. |
| R.G.B | Consecutively accesses/exits R/G/B Pattern. |
| IP-Reset | Press and hold for 3 seconds or more to set the IP address to 192.168.0.101. |
| KEY-Lock | Press and hold for 3 seconds or more to access/exit Key Lock. |
NOTE
- If you press White or R.G.B to access the corresponding pattern, HDMI/OPS/DP screen will not be available. If you want to switch to the external input screen, repeatedly press the button until you exit from the pattern.
Rack Installation (Optional)
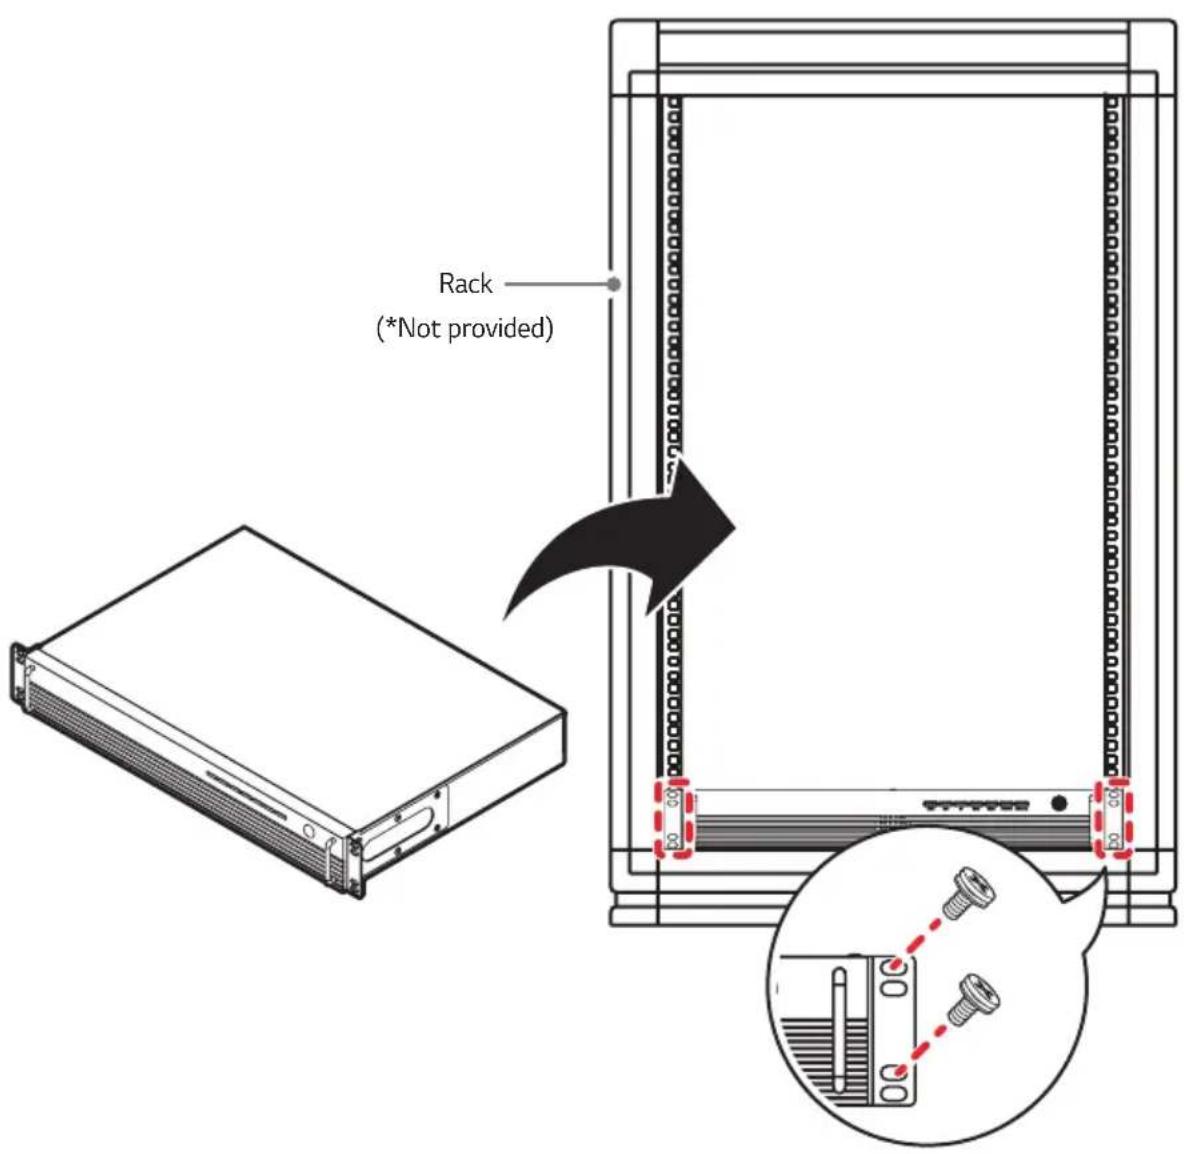

NOTE
• Use the bolts included in the rack to fasten the product.
Connecting to LCLG006 with LAN Cable
Connect the LAN cable with the set.
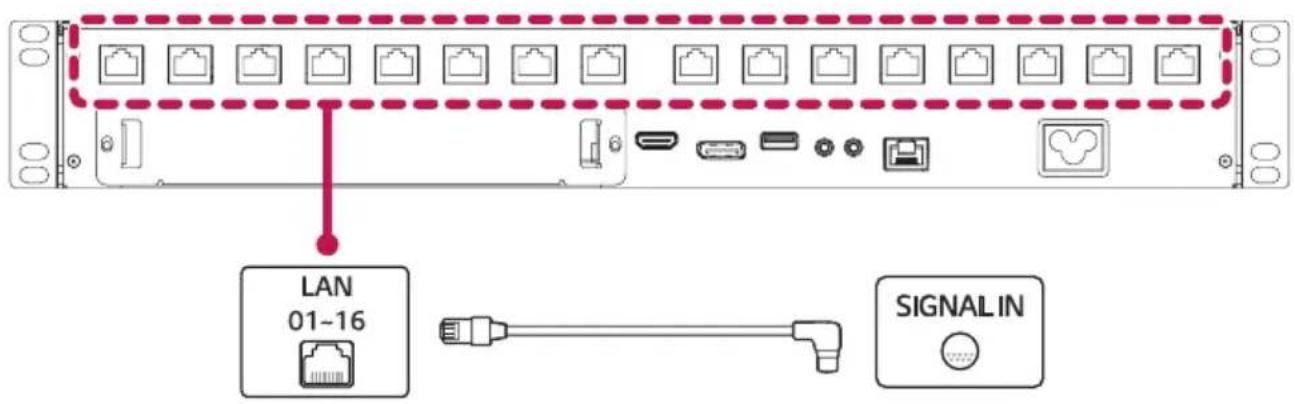

CAUTION
- Check the direction so that the LAN cable is not damaged.
- Inserting the LAN cable with excessive force may damage the contact point.
USING LCLG006
Connecting to PC
The LCLG006 model itself does not have any screen.
You may see the screen through the LAS* 's models.
LCLG006 supports the Plug and Play ^1) feature.
^1) Play feature that enables a PC to recognize devices attached by the user without device configuration or user intervention when powering up.
Connecting to External Devices
Connect a HD receiver, DVD, or VCR player to the product and select an appropriate input mode.
For the best picture quality, use a HDMI cable to connect the product to external devices.
NOTE
• For the best image quality using a HDMI connection is recommended.
• To comply with the specifications of the product, use a shielded interface HDMI cable with a ferrite core.
- Fasten the cables with cable ties to minimize electromagnetic interference.
• Use a High-Speed HDM™ cable.
• If you want to use HDMI-PC mode, you must set your input to PC mode.
• You may experience compatibility issues if you use a HDMI cable to connect to a PC.
- Use a certified cable that displays the HDMI logo. The screen may not appear or a connection error could occur if a non-certified cable is used.
• Recommended HDMI Cable Types
- High-Speed HDMI ^® /™ Cable
- High-Speed HDMI ^® /™ Ethernet Cable
CAUTION
- Connect the signal input cable and check whether it is inserted properly into the connector.
- If you are using a DP to HDMI dongle, use products that have been verified by graphics card manufacturers.
- If you are connecting the graphics card to multiple-channel ports, use the same DP to HDMI dongle model.
CONNECT A USB DEVICE
Connect a USB storage device, such as a USB flash memory to the display device to use multimedia features.
CAUTION
- Do not turn the Device off or remove the USB storage device when the multimedia screen is activated. This may cause the loss of a file or damage to a USB storage device.
- Back up your files saved on a USB storage device frequently, as you may lose or damage the files and this may be not covered by the warranty.
• Devices using a power source such as a USB HDD are not supported.
• For USB 3.0 devices, compatibility is not guaranteed.
Tips for Using USB Devices
• Only USB storage devices are recognized.
• A USB storage device using an automatic recognition program may not be recognized.
• A USB storage device which uses its own driver may not be recognized.
• The recognition speed of a USB storage device may depend on each device.
- Please do not turn off the display or unplug the USB device when the connected USB storage device is working. When such a device is suddenly disconnected or unplugged, the stored files or the USB storage device may be damaged.
- Please do not connect USB storage devices which were artificially created on the PC. The device may cause the product to malfunction or fail to play.
- Storage devices formatted with utility programs that are not supported by Windows may not be recognized.
- Please connect power to a USB storage device (over 0.5 A) which requires an external power supply. Otherwise, the device may not be recognized.
- Please connect a USB storage device with the cable offered by the device maker.
• Some USB storage devices may not be supported or operated smoothly.
- The file arrangement method for USB storage devices is similar to that of Windows, and file names can be recognized up to 100 English characters.
- Be sure to back up important files since data stored in a USB memory device may be damaged. We will not be responsible for any data loss.
- If your USB storage device has multiple partitions, or if you use a USB multi-card reader, you can use up to four partitions or USB memory devices.
- If a USB storage device is connected to a USB multi-card reader, its volume data may not be detected.
• If the USB storage device does not work properly, remove it and connect it again.
• The speed at which a USB storage device is detected differs from device to device.
• The recommended capacity is 32 GB or less for a USB memory drive.
• Any device with more than the recommended capacity may not work properly.
• USB storage devices (USB 2.0 or below) are also supported.
• The exFAT file system may not work properly for USB storage devices.
TROUBLESHOOTING
No image is displayed.
| Problem Solution | |
| Is the power cord connected to the product? | • Check if the power cord is correctly plugged into the power outlet. |
The 'Unknown Product' message appears when the product is connected.
| Problem Solution | |
| Did you install the driver? · Check if the | function is supported by referring to the graphics card user manual. |
The screen image looks abnormal.
| Problem Solution | |
| Is the screen position wrong? | · Check if the graphics card resolution and frequency are supported by the product. If the frequency is out of range, set to the recommended resolution in the “Display” settings in Control Panel. |
| The screen is displayed abnormally. | · The proper input source is not connected to the port. Connect a cable that matches the input source signal. |
The display colour is abnormal.
| Problem Solution | |
| Screen has poor colour resolution (16 colours). | Set the colour depth to more than 24 bits (true colour). To do this, select (Control Panel) –(Display) (Setting) (Colour Palette) on Windows. (May differ depending on your operating system (OS).) |
| Screen colour is unstable or mono-coloured. | Check the connection status of the signal cable. Or, re-insert the PC graphics card. |
The operation does not work normally.
| Problem Solution | |
| The power suddenly turned off.• Is the Timer set?• Check the power control settings. Power supply is interrupted. | |
PRODUCT SPECIFICATIONS
Without prior notice, all product information and specifications contained in this manual are subject to change to improve the performance of the product.
The \~symbol means alternating current, and the symbol means direct current.
| Video Signal | Max Resolution | HDMI/ DisplayPort/ OPS: 3840 x 2160 @ 60 Hz- This may not be supported on some OS or graphics card types. |
| Recommended Resolution | HDMI/ DisplayPort/ OPS: 3840 x 2160 @ 30 Hz- This may not be supported on some OS or graphics card types. | |
| Horizontal Frequency HDMI/ DisplayPort/ OPS: 30 kHz to 135 kHz | ||
| Vertical Frequency HDMI/ DisplayPort/ OPS: 30 Hz to 60.31 Hz | ||
| Synchronization Separate Sync / Digital | ||
| Input/Output Ports | LAN IN, RS-232C IN/OUT, HDMI IN, DP IN, USB 2.0 IN, OPS, AC IN, LAN-01 - LAN-16 | |
| Power | Rated Voltage AC 100-240 V - 50/60 Hz 1.6 A | |
| Power Consumption | On Mode (Without OPS): 50 W (Max)Sleep Mode (DisplayPort/HDMI/OPS): ≤ 1 WOff Mode: ≤ 1 W | |
| Embedded Battery Applied | ||
| Environmental Conditions | Operating Temperature 0 °C to 40 °C (32 °F to 104 °F) | |
| Operating Humidity 10 % to 80 % | ||
| Storage Temperature -20 °C to 60 °C (-4 °F to 140 °F) | ||
| Storage Humidity 5 % to 85 % | ||
| Dimensions (Width x Depth x Height) / Weight | 443 mm x 307.5 mm x 63 mm / 4.9 kg(17.4 inches x 12.1 inches x 2.4 inches / 10.8 lbs) | |
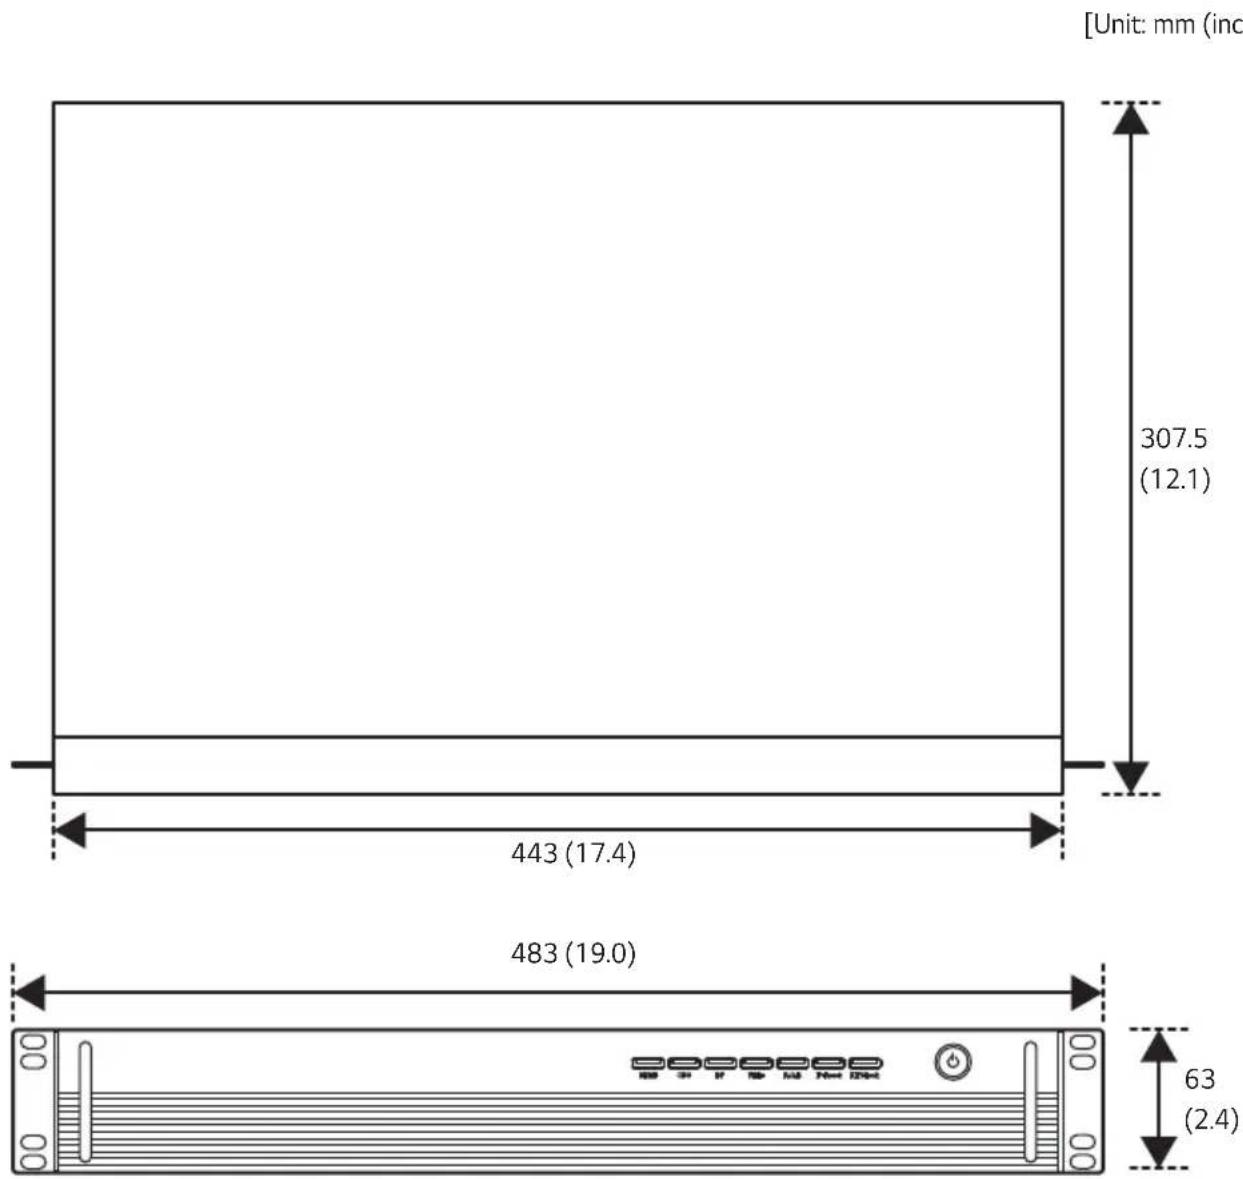
[Unit: mm (inches)]
HDMI/DisplayPort/OPS (PC) Support Mode
| Resolution Horizontal Frequency (kHz) Vertical Frequency (Hz) | |
| 800 x 600 37.879 60.317 | |
| 1024 x 768 48.363 60.0 | |
| 1280 x 720 44.772 59.855 | |
| 1280 x 1024 63.981 60.02 | |
| 1680 x 1050 65.290 59.954 | |
| 1920 x 1080 67.5 60 | |
| 3840 x 2160 67.5 30 | |
| 3840 x 2160 135 60 | |
HDMI/DisplayPort/OPS (DTV) Support Mode
| Resolution Horizontal Frequency (kHz) Vertical Frequency (Hz) | ||
| 480/60p 31.5 60 | ||
| 576/50p 31.25 50 | ||
| 720/50p 37.5 50 | ||
| 720/60p | 45 | 60 |
| 1080/50i | 28.1 50 | |
| 1080/60i | 33.75 60 | |
| 1080/50p | 56.25 50 | |
| 1080/60p | 67.432 59.94 | |
| 1080/60p 67.5 60 | ||
| 2160/30p 67.5 30 | ||
| 2160/50p | 112.5 50 | |
| 2160/60p | 135 60 | |
NOTE
• Resolutions available for the Input Label option in HDMI/ DisplayPort/ OPS input modes.
- PC resolutions: 800 x 600 / 60 Hz, 1280 x 720 / 60 Hz, 1920 x 1080 / 60 Hz, 3840 x 2160 / 60 Hz
- DTV resolutions: 480p, 720p, 1080p, 2160p
- Horizontal Frequency: The horizontal interval is the time taken to display one horizontal line. When one horizontal line is divided by the horizontal interval, the number of horizontal lines displayed every second is the horizontal frequency. The unit is kHz.
- Vertical Frequency: The monitor screen functions by the screen image changing dozens of times every second like a fluorescent lamp. The vertical frequency or refresh rate is the number of image displays per second. The unit is Hz.

The model and serial number of the product are located on the back and on one side of the product. Record them below in case you ever need service.
MODEL
SERIAL NO.
Supplier's Declaration of Conformity
Trade Name LG
Responsible
Address 1000 Sylvan Ave Englewood
Cliffs, NJ 07632
Telephone (201)266-2215
Temporary noise is normal when powering ON or OFF this device.
USER MANUAL
LG Digital
Signage
(MONITOR SIGNAGE)
Please read this manual carefully before operation and retain it for future reference.
webOS 4.0
CONTENTS
SETTINGS 4
- Home....4
Global Buttons
Dashboard
[Content Manager]
- Ez Setting 5
[Video Wall]
[On/Off Scheduler]
[SI Server Setting]
[Server Setting]
[Fail Over]
[Status Mailing]
[Play via URL]
[Setting Data Cloning]
[Sync Mode]
[Signage 365 Care]
[Multi Screen]
- General 13
[Language]
[System Information]
[Set ID]
[Time Setting]
[Power]
[Network]
[Safety Mode]
[Expert Controls]
- Display 26
[Picture Mode]
[Aspect Ratio]
[Rotation]
[Expert Controls]
Video Output Resolution
- Sound....33
[Sound Mode]
[Sound Out]
[Audio Out]
[AV Sync Adjustment]
[Digital Audio Input]
- Admin....36
[Lock Mode]
[Change Password]
[Enterprise Settings]
[Factory Reset]
CONTENT MANAGER 38
- Web Login....38
- Content Manager ....38
[Player]
[Scheduler]
[Template]
- Group Manager 2.0....45
- ScreenShare....48
- LG Presenter....49
Connect
Screen Share
Handover
MANAGEMENT TOOLS......53
- Admin....53
- Picture ID....54
TO CONTROL AN EXTERNAL PC USING TOUCH SCREEN .... 55
- Connecting to a PC....55
- Prioritized Tasks on the Touch Screen....55
SMART CALIBRATION 56
- How to Run....56
[Manual Calibration]
IR CODE 58
CONTROLLING MULTIPLE PRODUCTS......60
- Connecting cables....60
- Communication Parameter ....61
- Command Reference List....62
- Transmission/Reception Protocol....66
To obtain the source code under GPL, LGPL, MPL, and other open source licenses, that is contained in this product, please visit http://opensource.lge.com.
In addition to the source code, all referred license terms, warranty disclaimers and copyright notices are available for download. LG Electronics will also provide open source code to you on CD-ROM for a charge covering the cost of performing such distribution (such as the cost of media, shipping, and handling) upon email request to opensource@lge.com. This offer is valid for a period of three years after our last shipment of this product. This offer is valid to anyone in receipt of this information.
NOTE
- Software-related content may be changed without prior notice due to upgrades of the product functions.
- Some features described in the User Manual may not be supported in certain models and countries.
• SNMP 2.0 is supported.
SETTINGS
Home
Global Buttons
• [MOBILE URL]: Provides information necessary to access the monitor set through an external device's browser. With this feature, you can view QR code and URL information. In addition, by accessing the URL, you can also run Content Manager and Group Manager 2.0, and Control Manager. (This featured is optimized for Google Chrome.)
• [Input]: Navigate to the external input selection screen
• [Setting]: Navigate to the Settings screen
Dashboard
- This feature displays key information about your Signage monitor in the center of the home screen. In the Dashboard, you can manually change settings by selecting the corresponding items.
NOTE
• If the dashboard is locked, the focus does not move.
[Content Manager]
- [Player]: Play a variety of content including images, videos, and SuperSign content.
- [Scheduler]: Manage schedules for content that will be played at different times.
- [Template]: You can create your own content using templates and media files.
• [Group Manager 2.0]: Distribute content schedules and setting data to the connected device.
Ez Setting
[Video Wall]
SETTINGS / ⚙→[Ez Setting] [Video Wall]
Set Video Wall options to create a wide visual canvas.
• [Tile Mode]: Turn [Tile Mode] on or off.
- [Tile Mode Settings]: Display a single integrated screen on multiple Signage monitors.
- [Natural Mode]: Display the image excluding the area that overlaps with the monitor's bezel so that the image displayed has a more natural feel to it.
• [Frame Control]: Adjust the sets that run [Scan Inversion] and frame deviation.
- When running [Scan Inversion], please run [Frame Control] for the sets that do not run [Scan Inversion].
- [Scan Inversion]: Reduce screen deviation between adjoining video walls by changing screen scanning method.
• [White Balance]: Configure white balance settings (White Pattern, R/G/B-Gain, and Luminance).
• [Reset]: Reset to initial settings.
- [Reboot to Apply]: Reboot the set to configure a changed Frame Control/Scan Inversion value.
NOTE
- When Tile Mode is enabled, automatically set [Frame Control] for odd numbered rows and [Scan Inversion] for even numbered rows.
[On/Off Scheduler]
SETTINGS / ⚙→[Ez Setting] [On/Off Scheduler]
Set a schedule to use your signage by time and day of the week.
• [On/Off Time Setting]: Set on/off times for each day of the week.
• [Holiday Setting]: Set holidays by date and by day of the week.
[SI Server Setting]
SETTINGS / ⚙→[Ez Setting] [SI Server Setting] [SHServer Setting]
Set up to connect your signage to an external SI server. Set up a server environment for SI app installation.
SETTINGS / ⚙→[Ez Setting] [SI Server Setting] [Developer Mode & Beanviser]
This feature provides great convenience to the app developers.
Set up to install and activate the Developer mode and BEANVISER app.
NOTE
- To use these features, an account (ID/PASSWORD) for webOS Signage developer website (http://webossignage.developer.lge.com/) is required.
[Server Setting]
SETTINGS / ⚙→[Ez Setting] [Server Setting]
Set up to connect your signage to a SuperSign server.
CMS Server
- Control Server
[Fail Over]
SETTINGS / ⚙→[Ez Setting] [Fail Over]
Set the priority of the input devices when a fault occurs. Automatically play the content stored in the device or run the set app.
• [On/Off]: Turns [Fail Over] on or off.
- [Input Priority]: Set the priority of input sources for fail over.
- [Backup via storage]: When there is no input signal, this feature automatically plays the content stored in the device or runs the set app. When set to [On], [Auto], [Manual], [SuperSign Contents] items are activated.
- [Auto]: When the automatic input switches due to taking screenshots of an image or video that is playing at regular intervals, this feature will play back the file. (OLED model is not supported.)
- Capture time Interval: The time interval can be set to 30 min, 1 hour, 2 hours and 3 hours.
- [Manual]: When the automatic input switches due to the image and video file being uploaded, the feature will play back the file.
- [Backup media select]: Using the settings button, you can upload a single file in the internal / external memory.
- [Preview]: You can preview the uploaded file.
- [SuperSign Contents]: When the automatic input switches, this feature will play the file(s) distributed in SuperSign CMS.
• [reset]: Reset to initial settings.
[Status Mailing]
SETTINGS / ⚙→[Ez Setting] [Status Mailing]
This feature configures the system so that the status of the device is assessed and then notified to the administrator by e-mail.
• [On/Off]: Turns [Status Mailing] on or off.
- [Mailing Option], [Scheduling]: Sets the email sending interval.
- [User E-mail Address]: Set the user email address of the sender.
- [Sending Server(SMTP)]: Set the address of the SMTP server.
• [ID]: Enter the account ID of the sender.
• [Password]: Enter the password for the sender's account.
• [Receiver E-mail Address]: Set the email address of the recipient.
- [Send message]: Immediately assess the status of the device and deliver the information to the specified email address.
• [reset]: Reset to initial settings.
![LG LCLG006 - [Status Mailing] - 1](/content/2026/05/943604/images/9c52cfeff05cb0d5787efc8a33812a217575915b49455c02439f407d894894cf.jpg)
NOTE
• If the status regarding any of the following items changes or becomes abnormal, a status message can be sent.
- 1. Temp. Sensor: If the set reaches a dangerous temperature, its current temperature is recorded, and an email containing such information is sent.
- 2. Temp. Sensor Validation: An email is sent if there is no temperature sensor connected, if the communication status of the temperature sensor is unknown, or if the information provided by the chip provider is abnormal.
- 3. LAN Status, WiFi Status: An email is sent when the network's connection status is changed. The maximum number of network status changes that can be saved is limited to 50. The saved value is reset once the power turns off
- 4. No Signal Check: Checks whether there is a signal. If there are no signals for more than 10 seconds, an email is sent.
- 5. Schedule Play Status: An email is sent if content cannot be played between the scheduled start time and end time in either Content Management Schedule status or SuperSign Content status. However, this does not apply when terminated using the remote control.
- 6. Fail Over Status: An email is sent if input switching occurred due to an error. (Excludes input switching initiated by the user (RC, RS232C, SuperSign))
• Only SMTP ports 25, 465, and 587 are supported.
- The occurrence of internal input switches, excluding external input switches (RC, RS232C, SuperSign), are considered as Fail Over Status.
- One email containing the "Failover status : Failover" message is sent when switching to Fail Over Status, and the following status emails sent regularly or upon status changes contain the message "Failover status : None".
[Play via URL]
SETTINGS / ⚙→[Ez Setting] [Play via URL]
Play content you want to play automatically through the built-in web browser.
• [URL Loader]: Turns [Play via URL] on or off.
• [Set URL]: Enter the URL address to display automatically.
• [Preview]: Preview your desired website by accessing the specified URL.
• [Save]: Save the specified URL.
- [Reboot to Apply]: Restarts the monitor set after saving the specified URL.
• [Reset]: Reset to initial settings.
NOTE
- This feature does not apply when [Screen Rotation] is enabled, and using this feature disables [Preview].
- If [Time Setting] is not set to [Set Automatically], website navigation may be difficult.
- SETTING [General]→ [Time Setting ] [Set Automatically]
[Setting Data Cloning]
SETTINGS / ⚙→[Ez Setting] [Settings Data Cloning]
This feature is used to copy and import the settings of the device to other devices.
• [Export Setting Data]: Export the settings of the device to another device.
- [Import Setting Data]: Import the settings of another device into the device.
[Sync Mode]
SETTINGS / [Ez Setting] [Sync Mode]
Sync up time and content among multiple signage.
• [RS-232C Sync]: Sync up multiple signage connected by RS-232C.
• [Network contents sync]: Sync up multiple signage connected to the same network.
[Signage 365 Care]
SETTINGS / ⚙→[Ez Setting] [Signage 365 Care]
You can install the Signage 365 Care (fault diagnosis) solution for fault diagnosis and prediction service.
• [Install]: Installs the Signage 365 Care solution.
1) [ENTER ACCOUNT NUMBER]: Enters the 6-digit account number to install the Signage 365 Care solution.
- Account Number: The number assigned when the Signage 365 Care solution is registered. When the account number is entered, the account name corresponding to the number is obtained.
2) [CONFIRM ACCOUNT NUMBER]: Displays the account number and the account name corresponding to the account number and validates the account number.
- If the account number is registered, the account name corresponding to the account number is displayed, and you can continue to install the Signage 365 Care solution.
- If the account number is not registered, "Unknown" is displayed as the account name, and you cannot continue to install the solution.
- [Enable]/[Disable]: Sets whether to Enable/Disable the Signage 365 Care solution.
- [Account]: Displays user's currently connected account number and name.
• [Version]: Displays the version of the Signage 365 Care solution.
• [Check for Update]: Checks for available updates in the server.
- [Update]: Updates the Signage 365 Care solution to the latest version.
• [Server Status]: Displays the status of connection between the set and server.
- [Connected]: Displayed when the set and server are connected.
- [Not Connected]: Displayed when the set and server are disconnected.
- [Waiting for Approval]: Displayed when the server is waiting for approval.
- [Rejected]: Displayed when the server rejected the connection.
• [Reset]: Deletes the installed Signage 365 Care solution.
[Multi Screen]
SETTINGS / ⚙→[Ez Setting] [Multi Screen]
This feature allows you to view multiple external inputs and videos on a single screen.
PIP Mode PBP Mode
![LG LCLG006 - [Multi Screen] - 1](/content/2026/05/943604/images/1543c251f080ea7eb7a6c940f5625d03698af861bfb97fcdab94e3efbc3a7c7f.jpg)
natural_image
Illustration of a black penguin standing on a grassy hill with a palm tree and ocean nearby, no text or symbols present.![LG LCLG006 - [Multi Screen] - 2](/content/2026/05/943604/images/0f5305e069cbde1f09732d7de9b3b9c713b93e9929500c22c1ca5f209f161ee9.jpg)
natural_image
Two-panel illustration: left shows a black bird standing on a green hill with a small boat; right shows a black whale on an island with a palm tree and a small red star (no text or symbols)3-Screen Split Mode 4-Screen Split Mode
![LG LCLG006 - [Multi Screen] - 3](/content/2026/05/943604/images/6ecadd2b0e3d908a6ee90cf4d13a188a85b82c73cab179fc43f612a5bcc4c1dd.jpg)
natural_image
Three-panel illustration showing a desert landscape with mountains, a palm tree on a island, and a penguin in the night sky (no text or symbols)![LG LCLG006 - [Multi Screen] - 4](/content/2026/05/943604/images/bf292796a496398637907101ab1b954713111fd1d0c19dc177d2e91bba9fae5b.jpg)
natural_image
Four-panel illustration showing birds in different settings: night sky, palm tree, island, and megaphone (no text or symbols)2-Screen Split Mode (1:1)
![LG LCLG006 - [Multi Screen] - 5](/content/2026/05/943604/images/225dcab9593c7ed80230e610b0d55af45b7030cef5a54e561a34a8a7c4007487.jpg)
natural_image
Illustration of two cartoon animals: one standing on a green hill and another floating on a yellow island with a red star (no text or symbols)3-Screen Split Mode (1:1:1)
![LG LCLG006 - [Multi Screen] - 6](/content/2026/05/943604/images/d25e734a44a212ad1573d560ad5160f481842893c6e618052c1eb8e6ac19fb0f.jpg)
natural_image
Three-panel illustration showing penguins on different landscapes: green hills, a whale on a island, and a dark blue sea with stars (no text or symbols)3-Screen Split Mode (1:2:1)
![LG LCLG006 - [Multi Screen] - 7](/content/2026/05/943604/images/a2f6b42567bc9801a2af919544472edfce15bb4e1b8e48166688dc440d8a6909.jpg)
natural_image
Three-panel illustration showing a penguin on a floating island, with mountains and sky in the background (no text or symbols)4-Screen Split Mode (1:1:1:1)
![LG LCLG006 - [Multi Screen] - 8](/content/2026/05/943604/images/b2f2798f43733d7222716746555a4dad5a3fb96611efddfe05a01205e5055c74.jpg)
natural_image
Four-panel illustration showing a penguin on a island, palm tree, starry night sky, and megaphone (no text or symbols)![LG LCLG006 - [Multi Screen] - 9](/content/2026/05/943604/images/281ad940c38e8b785528d98c1735d4738de78821e7c1c2746a4c18ba46ba274f.jpg)
NOTE
• In multi-screen mode, the DP daisy chain feature is not supported.
• The available number/shape of split screens may vary depending on the model.
Selecting Screen Layout
When you enter multi-screen mode without having set any screen layout, the screen layout selection menu appears. When the screen layout selection menu is not displayed on the screen, go to the screen layout menu bar by pressing the up arrow key on your remote control and select your desired screen layout. If you want to close the screen layout menu, press the back key.
Closing Screen Layout Menu
From the screen layout menu, press the up arrow key on the remote control to go to the screen layout menu bar and select it or press the back key to close the screen layout menu.
Changing Screen Input
Press the button on the top right of each split screen to select the desired input.
NOTE
- Inputs which have already been selected for other split screens cannot be selected again. To select them, press the RESET button to reset the inputs for all screens first.
- The PIP mode works only when External Input Rotation is set to Off and Screen Rotation is set to Off or 180.
- In the PIP mode, supported resolutions for subscreen are as follows: Other resolutions are not supported. - 1680 x 1050 / 1920 x 1080
• Interlaced formats are not supported. E.g. 1080i
• This applies to both AV/Media. - Models with 4-screen split mode support external input resolution of 3840 × 2160 on PIP Sub screens.
Playing Videos on Split Screens
Press the button on the upper right of each split screen, select Video File, and then select a storage device to view the list of videos in the selected device. Next, select your desired video from the list to play it.
NOTE
- Videos created with HEVC, MPEG-2, H.264, or VP9 codecs can be played on split screens. When using PIP mode, the following combinations cannot be used.
| Main Sub | |
| HEVC HEVC | |
| H.264 HEVC | |
| MPEG2 HEVC | |
| VP9 VP9 | |
| H.264 4K MPEG2 | |
| H.264 4K VP9 |
• The limitations of 3 and 4-screen split are as below.
| When Using 4K It supports only up to 2 videos.A combination of max. 4K @ 60 fps + 2K @ 60 fps is available.However, H.264 4K supports max. 30 fps. | ||
| When Using Only 2K | 60fps | You can combine up to 1 MPEG2, 2 H.264, and 4 other codecs. |
| 30fps | You can combine up to 2 MPEG2 and 4 other codecs. | |
- Recommended Framerate: 24, 25, 30, 60 (including 23.9, 24.9, 29.9, 59.9) We do not guarantee performance when you play contents with other framerates.
General
[Language]
SETTINGS / ⚙→[General] [language]
You can select the menu language to be displayed on the screen.
• [Menu Language]: Sets the language of your Signage monitor.
- [Keyboard Language]: Sets the language of the keyboard displayed on the screen.
[System Information]
SETTINGS / ⚙→[General] [System Information]
This feature displays information such as the device name, software version, and storage space.
[Set ID]
SETTINGS / ⚙→[General] [Set ID]
- [Set ID] (1-1000): Assigns a unique Set ID number to each product when several products are connected via RS-232C. Assign numbers ranging from 1 to 1000 and exit the option. You can control each product separately by using the Set ID you assigned to each product.
- [Auto Set ID]: Automatically assigns a unique Set ID number to each product when several products are connected for display.
• [Reset Set ID]: Reset the Set ID of the product to 1.
[Time Setting]
SETTINGS / ⚙→[General] [Time Setting]
This feature enables you to view and change the time and date on the device.
• [Set Automatically]: Set [Time] and [Date].
- [Daylight Saving Time]: Set the start and end times for Daylight Saving Time. The DST start/end times function only when you set them more than one day apart from each other.
• [NTP Server Setting]: Allows you to set other NTP servers other than the basic NTP server.
• [Time Zone]: Allows you to change the time zone based on continent, country/region, city or user settings.
[Power]
SETTINGS / ⚙→[General] [Power]
Power-related feature settings
[No Signal Power Off (15 Min)]
Set whether to use the 15 Min Auto Off feature.
• You can set this option to [On] or [Off].
- If you set this feature to [On], the product turns off after it's remained in No Signal status for 15 minutes.
- If you set this feature to [Off], the 15 Min Force Off feature is disabled.
- It is recommended that you set this feature to [Off] if you intend to use the product for long periods of time as the feature turns the power of the product off.
[No IR Power Off (4hour)]
Set whether to use 4 Hours Off feature.
• You can set this option to [On] or [Off].
- If you set this feature to [On] the product turns off if there is no input from the remote control for 4 hours.
- If you set this feature to [Off], the 4 Hours Off feature is disabled.
- It is recommended that you set this feature to [Off] if you intend to use the product for long periods of time as the feature turns the power of the product off.
[DPM]
Set the Display Power Management (DPM) mode.
- If this feature is not set to [Off], the monitor will enter DPM mode when there is no input signal.
• If you set this feature to [Off], [DPM] is disabled.
[DPM Wake Up Control]
Turns on the set according to the digital signal processing of the connected DVI-D/HDMI port.
- When set to [Clock], the set only checks for digital clock signals and turns on once it finds the clock signal.
- When set to [Clock+DATA], the set turns on if the digital clock and data signals are both input.
[PM Mode]
• [Power Off (Default)]: Set the normal DC off mode.
- [Screen Off]: Switches to [Screen Off] status when entering DPM, Auto Power Off (15 min, 4 hours), or Abnormal Shut Down mode.
- [Screen Off Always]: Switches to [Screen Off] status when entering DPM, Auto Power Off (15 min, 4 hours), Off Time Scheduling, or Abnormal Shut Down mode, or when there is input from the remote control's Power button or the monitor's Off button.
- [Screen Off & Backlight On]: Partially turns on the backlight to keep the display at a proper temperature when in Screen Off status.
![LG LCLG006 - [PM Mode] - 1](/content/2026/05/943604/images/9504d552fb1bdcdae429c1757eb673e413e914ad9495dc560c4691d87fe12028.jpg)
NOTE
- In order for the screen to switch from [Screen Off] to On status, there must be input from the remote control's Power or Input button, or the monitor's On button.
[Power On Delay](0-250)
- This feature prevents overload by implementing a power-on delay when multiple monitor sets turn on.
- You can set the delay interval in the range of 0 to 250 seconds.
[Power On Status]
- Select the operating status of the monitor when the main power has turned on.
- You can choose from among [PWR (Power On)], [STD (Standby)], [and LST (Last Status)].
- [PWR (Power On)] keep the monitor powered on when the main power has turned on.
- [STD (Standby)] switch the monitor to Standby status when the main power has turned on.
• [LST (Last Status)] switches the monitor back to its previous status.
[Wake On LAN]
• Set whether to use [Wake On LAN].
- You can set the feature to On or Off for each wired/wireless network.
- [Wired]: When set to [On], the [Wake On LAN] feature is enabled, letting you turn the product on remotely through a wired network.
- [Wireless]: When set to [On], the [Wake On LAN] feature is enabled, letting you turn the product on remotely through a wireless network.
[Power Indicator]
- This function enables you to change the [Power Indicator] settings.
- Setting to [On] will turn on [Power Indicator].
- Setting to [Off] will turn off [Power Indicator].
- Regardless of [On] or [Off] settings in [Power Indicator], [Power Indicator] will be turned on for approximately 15 seconds.
[Power On/Off History]
Display the device's power on/off history.
[Network]
SETTINGS / ⚙→[General] [Network]
[Wired Connection (Ethernet)]
- Wired Connection: Connects the monitor to a local area network (LAN) via the LAN port and configures wired network settings. Only wired network connections are supported. After setting up a physical connection, the display will automatically connect without any adjustments on most networks. A small number of networks may require the display settings to be adjusted. For detailed information, contact your Internet provider or consult your router manual.
[Wi-Fi Connection]
If you have set your monitor up for a wireless network, you can view and connect to available wireless Internet networks.
- [Add a Hidden Wireless Network]: You can add a wireless network by manually typing in its name.
- [Connect via WPS PBC]: Press the button on the wireless router that supports PBC to easily connect to the router.
- [Connect via WPS PIN]: Enter the PIN number in the web page of the PIN-supporting wireless router to connect to the router in a simple manner.
- [Advanced Wi-Fi Settings]: You can change the settings of the connected wireless network.
NOTE
- On models that support Wi-Fi dongles, the Wireless Network Connection menu is enabled only when a Wi-Fi dongle is connected.
- When connected to a network that supports IPv6, you can select IPv4 / IPv6 in the wired / wireless network connection. But, IPv6 connection only supports automatic connection.
[LAN Daisy Chain]
• LAN Daisy Chain forms a daisy chain of LAN ports so that even if you connect only one monitor set to a network, the other sets in the daisy chain are connected to the network.
• However, the first monitor set in the daisy chain must be connected to the network through a port that is not used for the daisy chain connection.
[SoftAP]
If you set up a SoftAP, you can connect many devices via a Wi-Fi connection without a wireless router and use wireless Internet.
- The SoftAP and ScreenShare features cannot be used at the same time.
- On models that support Wi-Fi dongles, the SoftAP menu is enabled only when a Wi-Fi dongle is connected to the product.
• Wi-Fi Channel: You can directly select a Wi-Fi channel.
- SoftAp Access Information
- SSID: A unique identifier necessary to make a wireless Internet connection
- Security Key: Security key: The security key you enter to connect to the desired wireless network
- Connected Devices Count: lumber of connected devices: Shows the number of devices currently connected to your Signage device via a Wi-Fi connection. Up to 10 devices are supported.
[UPnP]
Open and block UDP port 1900, which is used for UPnP.
- The default setting is [On]. Setting this feature to [Off] blocks UDP port 1900, making the UPnP function unavailable.
- If you set this feature to [Off], Sync Mode's "Network" option will be deactivated. When the value for Sync Mode is "Network," the value switches to "Off," deactivating the "Network" option.
- If you change the UPnP value, the change will not be applied before a [reboot].
- If you set UPnP to [Off], you cannot use Group Manager 2.0 properly.
[Ping Test]
Check your network status with the ping test.
[Port Control]
Unused ports can be blocked for network security.
NOTE
- A reboot is recommended for the settings to be applied properly.
Tips for Network Settings
- Use a standard LAN cable (Cat5 or higher with an RJ45 connector) with this display.
- Many network connection problems during set up can often be fixed by re-setting the router or modem. After connecting the display to the home network, quickly power off and/or disconnect the power cable of the home network router or cable modem, Then power on and/or connect the power cable again.
- Depending on the Internet service provider (ISP), the number of devices that can receive INTERNET service may be limited by the applicable terms of service. For details, contact your ISP.
- LG is not responsible for any malfunction of the display or Internet connection failures due to communication errors/malfunctions associated with your Internet connection or other connected equipment.
- LG is not responsible for problems within your INTERNET connection.
- You may experience undesired results if the network connection speed does not meet the requirements of the content being accessed.
- Some INTERNET connection operations may not be possible due to certain restrictions set by the Internet service provider (ISP) supplying your Internet connection.
- Any fees charged by an ISP including, without limitation, connection charges are your responsibility.
NOTE
- If you want to access the Internet directly on your display, the INTERNET connection should always be on.
- If you cannot access the Internet, check the network conditions from a PC on your network.
- When you use Network Setting, check the LAN cable or check if DHCP in the router is turned on.
- If you do not complete the network settings, the network may not function correctly.
CAUTION
- Do not connect a modular phone cable to the LAN port.
- Since there are various connection methods, please follow the specifications of your telecommunication carrier or INTERNET service provider.
• Network setting menu will not be available until the display connected to physical network.
Tips for When Configuring Wireless Network Settings
- The wireless network may be affected by interference from a device that uses 2.4 GHz frequency, such as a wireless telephone, Bluetooth device or microwave. Interference may also be caused by a device that uses 5 GHz frequency such as Wi-Fi devices.
- The wireless network service may run slowly depending on the surrounding wireless environment.
- Some devices may have a network traffic jam if any local home networks are turned on.
- To connect to a wireless router, a router that supports wireless connection is necessary; the wireless connection function of the corresponding router must also be activated. Ask the router manufacturer whether the router supports wireless connection.
- To connect to a wireless router, verify the SSID and security settings of the wireless router. Please refer to the user guide of the corresponding router regarding SSID and security settings of the wireless router.
- The monitor may not work properly if network devices (wire/wireless router or hub, etc.) are incorrectly set up. Be sure to install the devices correctly by referring to their user guides before configuring the network connection.
- The connection method may vary according to the manufacturer of the wireless router.
[Safety Mode]
SETTINGS / ⚙→[General] [Safety Mode]
Set to this function for safe performance.
[ISM Method]
If a still image is displayed on the screen for an extended period of time, image sticking can occur. The ISM method is a feature that prevents image sticking.
[Mode]
- Sets the [ISM Method] mode.
• [Off]: Disable the Brightness Control function. - [Orbiter]: To prevent afterimage on the screen, the screen location moves by 4 pixels in a regular order. (This item is inactivated when the current input is No Signal.) (It only supports the models for exterior use.)
- [White Wash]: Displays a white pattern to remove image sticking.
- [User Image]: Plays your photos or movies using a USB storage device.
- [User Video]: Plays your photos or movies using a USB storage device.
Repeat Daily
• [Off, Just 1 Time]: Select this mode and click Complete to run the ISM function immediately.
- [On]: Performs the ISM function for the amount of time set in duration if the still image is maintained for the period set in standby.
- [On, with moving detection]: It only applies in the [Orbiter] mode. When the still image remains for the [StandBy] time, the afterimage prevention function works for the [Duration] time.
- [On, without moving detection]: It only applies in the [Orbiter] mode. When you tap the [DONE] button, the afterimage prevention function immediately applies and operates continuously.
- [Schedule]: Enable the ISM feature from start time to end time on the set day.
[StandBy]
• You can set the period between 1 and 24 hours.
- This option is available only when [Repeat] is set to [Schedule].
- The ISM function is performed if the still image is maintained for the set period.
[Duration]
- You can select from among 1 - 10 min / 20 min / 30 min / 60 min / 90 min / 120 min / 180 min / 240 min.
- This option is available only when [Repeat] is set to [Schedule].
• The ISM function is performed for the set time.
[Select Day]
• You can set the date.
- This option is available only when [Repeat] is set to [Schedule].
[Start Time]
- Set the Start time.
- This option is available only when [Repeat] is set to [Schedule].
• You cannot set the same time for Start time and End time.
[End Time]
- Set the End time.
- This option is available only when [Repeat] is set to [Schedule].
• You cannot set the same time for Start time and End time.
[Action Cycle]
You can select from among 1 - 10 min / 20 min / 30 min / 60 min / 90 min / 120 min / 180 min / 240 min.
• This option is only available when [Orbiter] is selected.
• [Orbiter]: The screen location moves at every set interval.
[User Image Download]
- In order to download an image, there must be an image file in "ISM" folder on your USB storage device.
- Delete the existing images stored on internal memory before downloading a new image file.
• Supported image file formats: BMP, JPG, JPEG and PNG - You can download up to 4 images. (The maximum resolution is 1920 × 1080 .)
- If a bar image is deleted or does not exist, the default image is used. (The default image is a white background)
• This option is only available when [User Image] is selected.
[User Video Download]
- In order to download a video, there must be a video file in the "ISM" folder on your USB storage device.
- Delete the existing contents stored on the internal memory before downloading a new video file.
- Supported video file formats: "MP4", "AVI", "FLV", "MKV", "MPEG", "TS"
• You can download only 1 video. - If a video is deleted or does not exist, the default video is used. (The default video is a white background image)
• This option is only available when [User Image] is selected.
\* How to reset or delete User Image / User Video
- Reset using SETT[AGSn] [Factory Reset]
- Open the Player app > Click "Delete" button at the top right of the screen > Delete downloaded image / video
[Screen Fault Detection]
- The screen fault detection feature determines whether there is an abnormality at the end of screen; R, G, and B OSDs are created in the upper left-hand corner of the panel at intervals of about one second, and then a pixel sensor checks the area.
- Setting to [On] enables the screen fault detection feature.
- Setting to [Off] disables the screen fault detection feature.
[Expert Controls]
SETTINGS / ⚙→[General] [Expert Controls]
[Beacon]
- This option enables BLE Beacon, one of Bluetooth 4.0's features.
- Beacon Mode (On/Off Toggle): enables the Beacon feature.
• The LG Beacon/iBeacon/Eddystone Type Beacon features are supported.
- iBeacon
- Beacon UUID (hex): Set the UUID.
-
Field1: 4byte hex value (8 digits)
-
Field2: 2byte hex value (4 digits)
-
Field3: 2byte hex value (4 digits)
-
Field4: 2byte hex value (4 digits)
-
Field5: 6byte hex value (12 digits)
- Major (0–65535): Sets the Major value.
- Minor (0–65535): Sets the Minor value.
- Eddystone
- Frame: Frame: Set UUID or URL.
• 1. Setting the URL method
- Beacon UUID (hex): Set the UUID.
1 - Field1: 10byte hex value (20 digits)
2 - Field2: 6byte hex value (12 digits)
• 2. Setting the URL method
- URL Prefix: URL Prefix: Sets the prefix of the URL.
- URL Suffix: URL Suffix: Set the suffix of the URL.
- Play via URL URL: Enter the part of the URL that excludes the prefix and suffix.
- URL string length is limited to 15 characters.
- [Check] button: The button used to complete and apply the Beacon settings.
NOTE
- Some models do not support background screening services in iOS.
- A reboot is recommended for the settings to be applied properly.
- The UUID value is hexadecimal and the exact number of digits must be entered.
• The distance to Beacon may vary depending on the device. - The distance to Beacon may vary depending on the application used in the device.
- The Beacon function is affected by radio waves because it employs the Bluetooth Low Energy (BLE) technology. It may not function properly if the frequency range is not around 2.4GHz.
- When you set iBeacon, LG Beacon will be set to be the same as the value of iBeacon field. But the LG Beacon setting item won't be provided separately.
[Control Interface]
• [PC/OPS Power Control]: Enable you to control the power of PC or OPS as you turn the display on and off.
- [Disable]: Disable [PC/OPS Power Control].
- [Sync(On)]: Set the PC/OPS power to be turned on when the display is turned on.
- [Sync(On/Off)]: Set the PC/OPS power to be turned on when the display is turned on and set the PC/OPS power to be turned off when the display is turned off.
• [Control Interface Selection]: Select the serial communication path between the display and the connected devices.
- [Display]: Serial communication is available via a display RS-232C IN terminal.
- [OPS]: Serial communication is available with the OPS installed in the display.
- [HDBaseT]: Serial communication is available with the display via HDBaseT equipment.
NOTE
- Depending on the model, it can be displayed as [PC/OPS Control].
- Depending on the supported interface, the sub-menu of [Control Interface Selection] may be different.
- The PC products that support the power control are MP500/MP700, and you have to purchase them separately if necessary.
- If you change [Control Interface Selection], the [RS-232C Sync] feature of [Sync Mode] may be restricted.
[Background Image]
This feature enables you to set the default background image.
- [Booting Logo Image]: Change the logo image that appears when the device boots up. If you set this option to Off, no logo image appears when the device boots up. Download or initialize an image file on the storage device.
- [No Signal Image]: Change the image that appears when there is no signal. If you set this option to Off, no image appears when there is no signal. Download or initialize an image file on the storage device.
NOTE
- To download an image, an image file must exist in a folder named "LG_MONITOR" or "lg_monitor" in the external memory (USB).
• Supported image file formats: "BMP", "JPG"
[Input Manager]
You can set the PC or DTV label for each external input.
[SIMPLINK Setup]
- When the [SIMPLINK Setup] is set to [On], you can use the SIMPLINK provided by LG Signage.
- [Device ID]: Set the ID of the device connected via CEC wiring. You can choose a value between [All] and [E].
- [StandBy]: Sets the scenarios for sending and receiving the Standby command. Detailed scenarios are as follows:
| Transmission Reception | ||
| All 0 0 | ||
| Send Only 0 X | ||
| Receive Only X 0 |
[Crestron]
- This function enables synchronization with applications provided by Crestron.
- Server. Server: This menu sets the server's IP address for the network connection with the server (equipment provided by Crestron).
- Port (1024\~65535): This menu sets the port for the network connection with the server. The default port number is 41794.
- IP ID (3-254): This menu sets a unique ID for synchronizing with the application.
[USB2 to HDBaseT]
This function transfers the data received from the USB2 terminal of the display to HDBaseT.
- [On]: Transfer the data of the device connected to USB2 to the HDBaseT equipment.
• [Off]: Receive the data of the HDBaseT equipment to Signage.
![LG LCLG006 - [USB2 to HDBaseT] - 1](/content/2026/05/943604/images/41c0891f5ba4c565b8222ced7354f526b94447a5d5cb64fb9b3cfd6d7e436a26.jpg)
NOTE
- The HDBaseT function will be temporarily interrupted when the setting is changed.
Display
[Picture Mode]
SETTINGS / [Display] [Picture Mode]
[Mode]
This feature enables you to choose the optimal picture mode for your installation environment.
• [Mall/QSR], [Transportation], [Education], [Gov./Corp.]: Display the picture optimally for your installation environment.
• [Normal]: Display the picture at normal contrast, brightness, and sharpness.
• [APS]: Adjust the screen brightness to reduce power consumption.
- [Expert], [Calibration]: Allow an expert, or anyone who loves picture quality, to manually tune to the best picture quality.
• [Hospital]: An image setting mode optimized for medical images.
NOTE
- The type of [Picture Mode] you can select may vary depending on the model or input signal.
- [Expert] is an option that allows a picture quality expert to fine-tune the picture quality using a specific image. Thus, it may not be effective for a normal picture.
[HDR]
This feature enables you to choose the optimal picture mode for your installation environment.
• [Mall/QSR]: sharpens the image by increasing the contrast, brightness and sharpness.
- [General]: In a normal viewing environment, it opens a screen that can properly show the expressiveness and brightness of HDR.
• [Gov./Corp.]: The screen appears brighter and clearer than of the General screen.
• [Education]: Suitable picture for gameplay.
[Customize]
- [Backlight]: Adjust the brightness of the screen by adjusting the brightness of the backlight. The closer the value is to 100, the brighter the screen is.
• [OLED Light]: Adjusts the brightness of the LED panel to control the brightness of the screen. - [LED Light]: Adjust screen brightness by tuning the LED Light. Higher values increase brightness.
- [Contrast]: Adjust the difference between the light and dark areas of the picture. The closer the value is to 100, the greater the difference is.
- [Brightness]: Adjust the overall brightness of the screen. The closer the value is to 100, the brighter the screen is.
- [Sharpness]: Adjust the sharpness of the edges of objects. The closer the value is to 50, the clearer and the sharper the edge becomes.
• [Color]: Soften or deepen the tints on the screen. The closer the value is to 100, the deeper the colors become. - [Tint]: Adjust the balance between red and green levels displayed on the screen. The closer to Red 50, the redder the color will be. The closer to Green 50, the greener the color will be.
- [Color Temperature]: The higher you set the color temperature, the cooler the colors on the screen will feel. The lower you set the color temperature, the warmer the colors on the screen will feel.
• [Expert Controls]: Customize the advanced options. - [Dynamic Contrast]: Optimize the difference between the light and dark parts of the screen according to the brightness of the image.
- [Super Resolution]: Sharpen the areas of the screen that are blurry or barely distinguishable.
- [Color Gamut]: Select the range of colors available.
- [Dynamic Color]: Adjust the tint and saturation of the image for a more vivid and lively display.
- [Color Filter]: Accurately adjust color and tint by filtering a specific color area of RGB space.
- [Preferred Color]: Adjust the skin tint, grass tint, and sky tint to your preference.
- [Gamma]: Adjust gamma settings to compensate for the brightness of the input signal.
- [White Balance]: Adjust the overall color fidelity of the screen to your liking. In Expert mode, you can fine-tune the picture using the Method/Pattern options.
- [Color Management System]: Experts use the color management system when they adjust the colors by using the test pattern. The color management system allows you to make an adjustment by selecting from among 6 different color spaces (Red/Yellow/Blue/Cyan/Magenta/Green) without affecting other colors. In a normal picture, you may not notice the color changes you have made.
• [Dynamic tone mapping]: Suitable contrast settings based on image brightness of the HDR content.
• [Picture Option]: Customize the picture options.
- [Noise Reduction]: Remove randomly popping dots to make the picture look clearer.
- [MPEG Noise Reduction]: Reduce the noise generated in the process of creating a digital video signal.
- [Black Level]: Adjust the brightness and contrast of the screen by adjusting the black level of the screen. (Recommended settings based on input signals: Backlight 0 - 255 High, RGB 16 - 235: Low, YCbCr: Low)
- [Real Cinema]: Optimize the video image for a cinematic look.
- [Motion Eye Care]: Reduce eye fatigue by adjusting brightness levels and lessening blurriness based on the displayed image.
- [LED Local Dimming]: Make the light areas of the screen lighter and the dark areas darker for maximum contrast. Setting this feature to Off may increase the monitor's power consumption.
- [TruMotion]: Reduce image shaking and image sticking that can occur with /moving images. (If you set the [External Input Rotation], this feature is unavailable.)
- [Apply to all inputs]: Copies the current value of the detailed setting menu to the entire input, and applies only to the selected picture mode.
- [Reset]: Reset the picture settings. Because the picture settings are reset according to the monitor's picture mode, please select the picture mode before resetting the picture settings.
[Aspect Ratio]
SETTINGS / ⚙→[Display] [Aspect Ratio]
This feature enables you to change the picture size to view the picture at its optimal resolution.
• [Full Wide]: Stretch the picture to fill the screen.
• [Original]: Display the picture at its original resolution.
[Rotation]
SETTINGS / ⚙→[Display] [Rotation]
[Screen Rotation]
• This feature rotates the screen clockwise.
• You can set this feature to Off/90/180/270.
- When set to off, this feature is deactivated.
- It is recommended that you use content designed to be used in Portrait mode.
- When the screen rotation is enabled, the PIP mode of the multi-screen is unavailable.
![LG LCLG006 - [Screen Rotation] - 1](/content/2026/05/943604/images/b97c64ebe4b558d32fed93b7e02b2fbaa933919b9b4bb610bb567015bcb1c9ce.jpg)
NOTE
- Depending on the model, the automatic screen rotation feature may not be supported.
[External Input Rotation]
• This feature rotates the screen clockwise.
• You can set this feature to Off/90/180/270.
- When this feature is set to On (90 or 270 degrees), as for ARC, the picture is resized to be [Full Wide].
- If [External Input Rotation] is enabled during WiDi operation, the position of the mouse cursor may not be displayed accurately.
- Please note that the degradation of picture quality that occurs when you have enabled [External Input Rotation] during the use of external input has nothing to do with the product itself.
- When External Input Rotation is set to On, Multi Screen's PIP mode is disabled.
- If External Input Rotation is enabled on models that support touch, touch may not work properly.
[Expert Controls]
SETTINGS / ⚙→[Display] [Expert Controls]
[UHD Deep Color]
If you connect an HDMI, DP, or OPS device to one of the Deep Color adjustable ports, you can select between UHD Deep Color On (6G) or Off (3G) in the UHD Deep Color settings menu.
If a compatibility issue occurs with a graphics card when the Deep Color option is set to On at 3840 x 2160 @ 60 Hz, set the Deep Color option back to Off.
- HDMI, DP, and OPS specifications may vary depending on the input port. Check the specifications of each device before connecting.
- HDMI input port 2 is best suited for high definition videos that are 4K@60 Hz (4:4:4, 4:2:2). However, video or audio may not be supported depending on the specifications of the external device. If this is the case, please connect the device to a different HDMI port.
• This feature may not be available on some models.
[OLED Panel Settings]
- [Clear Panel Noise]: Correct issues that may arise on the screen when it is turned on for a long period of time.
- [Screen Protection Mode Setting]: This feature analyzes the characteristics of the image from the external input to prevent afterimages on the screen.
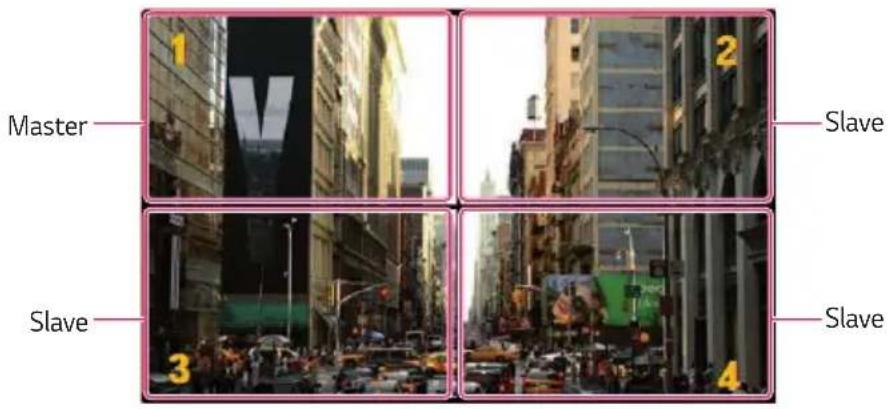
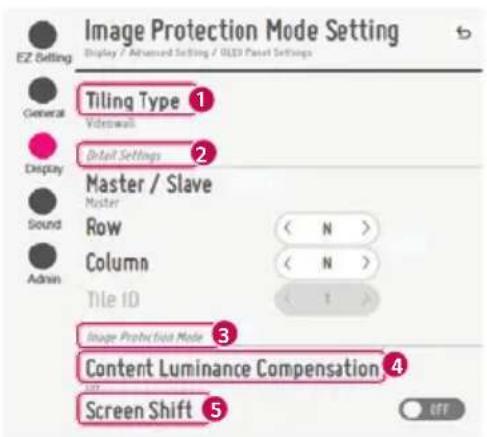
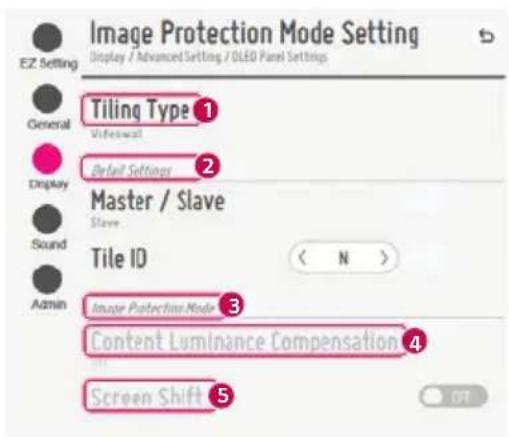
When Master is selected When Slave is selected
| No. | Item Description | |
| 1 | [Tiling Type] Select and set the mode according to the installation type of your Signage.Stand-alone: Select and use this mode when you use only one unit.Video Wall: Select and use this mode when using two or more multi-screen configurations. This mode requires advanced settings. | |
| 2 | [Detail Settings] Select Master or Slave.When Master is selected: Enter the number of rows and columns for the entire multi-screen.When Slave is selected: Enter the multi-tile ID number for the individual set. | |
| 3 | [Screen Protection Mode] | This feature enables you to set the content correction level and to set whether to use the Screen Switch feature.[Content Luminance Compensation]: Select a high or low correction level to use.[Screen Shift]: Set whether to use the Screen Switch feature. |
![LG LCLG006 - [OLED Panel Settings] - 4](/content/2026/05/943604/images/4e18637690570387e9f4053660fcac76129d4739fdaf588093e0c8d619703196.jpg)
NOTE
- The [Screen Protection Mode] function is supported for external input images.
- The [Screen Protection Mode] function is not enabled for playing images in USB devices.
- The [Screen Protection Mode] function is not enabled when interlaces signals are input.
- [Screen Protection Mode] does not work with the functions [TruMotion] / [Noise Reduction] / [MPEG Noise Reduction].
- To enable the functions [TruMotion] / [Noise Reduction] / [MPEG Noise Reduction] in the DTV input mode, ensure that the [Screen Protection Mode] menu is set to (Off).
- It is recommended to use contents with 10 minutes of playback time. (The [Screen Protection Mode] function may not work smoothly for the content with the duration longer than 10 minutes.)
- For the [Screen Protection Mode] feature to work normally, the Dithering feature should be turned OFF on the external input player or the graphics chip/card you are using.
- To enable the [Screen Protection Mode] feature in Video Wall, the screens must be connected to the same network through a LAN.
However, some operations may not be available when the screens are connected to [LAN Daisy Chain]. In this case, we recommend using a router or network switch.
- If some of the settings are changed while the [Screen Protection Mode Setting] is all set and the feature is running, the feature will be enabled next time the power is turned on.
- To enable the [Screen Protection Mode] function, it needs time to recognize the pattern of the content. (The time may vary depending on the duration of the content.)
- The [Screen Shift] feature is supported only for the stand-alone configuration or for use in a single DP daisy chain. That is, if [Tile Mode] is enabled, the [Screen Shift] feature only works properly when the values of [Row] and [Column] in [Tile Mode Setting] are the same as those of [Row] and [Column] in [Detail Settings].
[Energy Saving]
- [Smart Energy Saving]: Automatically adjust the brightness of the screen according to the brightness of the picture to save energy.
- [On]: Enable the Smart Energy Saving feature.
- [Off]: Disable the Smart Energy Saving feature.
- [Brightness Control]: Adjust the brightness of the screen to save energy.
- [Auto:] Automatically adjust the brightness of the screen according to ambient light.
- [Off]: Disable energy saving.
- Minimum/Medium/Maximum: Use energy saving according to the energy saving level set for the monitor.
• [Brightness Scheduling]: Adjust the backlight at specified times.
- You can set this feature to [On/Off].
- Add schedule by setting the schedule time and backlight / all red light value.
- If the current time has not been set, [Brightness Scheduling] is disabled.
- You can add up to six schedules, and they are sorted in ascending order by time.
- You can edit a schedule by selecting it from the list and pressing the [OK] button.
[HDMI IT Content]
Set the HDMI IT Contents function.
• [Off]: Disable the HDMI IT Contents function.
• [On]: Enable the HDMI IT Contents function.
This feature automatically changes the monitor's picture mode based on HDMI Contents information when an HDMI signal is entered.
Even if the monitor's picture mode has been changed by the HDMI IT Contents feature, you can change the picture mode again manually.
As this has a higher priority than the picture mode set by the user, the existing picture mode may be changed when the HDMI signal changes.
[LED Local Dimming]
Make the light areas of the screen lighter and the dark areas darker for maximum contrast.
Video Output Resolution
SETTINGS / ⚙→[Display] [Video Output Resolution]
You can set the resolution of webOS BOX.
Sound
[Sound Mode]
SETTINGS / ⚙→[Sound] [Sound Mode]
[Sound Mode]
The best sound quality will be selected automatically depending on the video type currently being watched.
• [Standard]: This sound mode works well for content of all types.
• [Cinema]: Optimize sound for watching movies.
• [Clear Voice III] Enhance voices so they can be heard more clearly.
• [Sports]: Optimize sound for watching sports.
• [Music]: Optimize sound for listening to music.
• [Game]: Optimize sound for playing video games.
[Balance]
• [Balance]: Adjust the output volume for the left speaker and the right speaker.
[Equalizer]
• [Equalizer]: Manually adjust sound by using the equalizer.
[Reset]
• [Reset]: Resets sound settings.
[Sound Out]
SETTINGS / ⚙→[Sound] [Sound Out]
- [Internal Speaker] / [External Speaker]: You can output audio either through your Signage monitor's internal speaker or through an external speaker connected to it.
- [SIMPLINK External Speaker]: This function connects Home Theater device by SIMPLINK. When it is set to Home Theater device input, it outputs voice through the connected device. This option is activated when SIMPLINK has been set to On.
- [LG Sound Sync / Bluetooth]: Enables you to connect Bluetooth audio devices or Bluetooth headsets wirelessly to your monitor so that you can enjoy richer audio conveniently.
NOTE
- Some recently connected devices may automatically attempt to reconnect to the Signage monitor when it is turned on.
- It is recommended that you set LG audio devices that support LG Sound Sync to LG TV mode or LG Sound Sync mode before connecting.
- Press Device Selection to view the devices that are or that can be connected and connect other devices.
- You can use the signage remote control to adjust the volume of the connected device.
- If the audio device fails to connect, check that it is switched on and available for connection.
- Depending on the type of the Bluetooth device, the device may not connect correctly or an abnormal behavior may occur such as unsynchronized video and audio.
• Sound may stutter or sound quality may be reduced if:
- The Bluetooth device is too far from the Signage monitor.
- There is an obstructing object between the Bluetooth device and the Signage monitor.
- The Bluetooth device is used together with radio equipment such as a microwave oven or wireless LAN.
[Audio Out]
SETTINGS / ⚙→[Sound] [Audio Out]
• [Off]: Disables the use of [Audio Out]. (No audio outputted.)
- [Variable]: You can specify an output range for the external audio device connected to the monitor and adjust the volume within the range. You can change the volume of an external audio device within the range of 0 to 100 (the same as the Signage speaker volume). However, there may be a difference in the actual volume level outputted.
• [Fixed]: Sets a fixed audio output level for the external audio device.
- If there is no external input, no external audio is outputted.
- The variable audio output level 100 is the same as the fixed audio output level.
[AV Sync Adjustment]
SETTINGS / [Sound] [AV Sync Adjustment]
This feature adjusts audio timing to synchronize video and audio.
- [External Speaker] (0\~15): Adjust the sync between video and audio coming from external speakers, such as those connected to the digital audio output port, LG audio equipment, or headphones. The larger the number is, the slower the voice output is than the default value.
- [Internal Speaker] (0\~15): Adjust the sync of sound from the internal speakers. The larger the number is, the slower the voice output is than the default value.
- [Bypass]: Output the broadcast signals or the sound from external devices without any audio delay. Audio may be outputted earlier than video due to the processing time for video that is inputted into the monitor.
[Digital Audio Input]
SETTINGS / ⚙→[Sound] [Digital Audio Input]
This feature enables you to choose an input source for audio output.
- [Digital]: Output the audio contained in the digital signal inputted from the connected digital input source (HDMI, DISPLAYPORT, or OPS).
- [Analog]: Output audio from the digital input source (HDMI, DISPLAYPORT, or OPS) connected to the monitor through the Audio In port.
Admin
[Lock Mode]
SETTINGS / ⚙→[Admin] [lock Mode]
[Home Dashboard Lock]
When you set the Home Dashboard Lock, you can limit the change in the settings of the Home Dashboard.
[USB Lock]
This feature enables you to configure the USB lock feature so that settings or content cannot be changed.
[OSD Lock]
This feature enables you to configure the OSD lock feature so that settings or content cannot be changed.
- Press and hold the Settings key for at least 10 seconds and enter password to access the settings menu in OSD Lock.
[IR Operation Lock]
- If you set this feature to [Off (Normal)], you can use your remote control.
- If you set this feature to [On (Power Key Only)], you can only use the power key.
- If you set this feature to [On (Block All)], you cannot use your remote control. (However, Power On feature is available.)
[Local Key Lock]
This feature enables you to configure the Local Key Operation Lock feature so that settings or content cannot be changed.
- If you set this feature to [Off (Normal)], you can use the local keys on the monitor.
- If you set this feature to [On (Power Key Only)], you can only use the power key. (When you use a joystick, press and hold a local key to turn on/off the monitor.)
- If you set this feature to [On (Block All)], you cannot use the local keys. (However, Power On feature is available.)
[Wi-Fi Lock]
This feature enables you to turn the Wi-Fi feature on or off.
[Screen Share Lock]
This feature enables you to turn the Screen Share feature on or off.
If the Screen Share Lock value is changed, the function is not applied without a reboot.
[Change Password]
This feature enables you to set the password you use to enter the Installation menu. (The default password: 000000)
1 Enter your current password.
2 Enter a new 6-digit password.
3 Enter the same password again in the Confirm Password field for confirmation.
[Enterprise Settings]
- Enter your company account code to apply the corresponding enterprise settings.
- When your code has been entered, the monitor set gets reset, thereby applying the corresponding enterprise settings.
- This feature does not get activated if a code has already been entered.
[Factory Reset]
Initializes all settings in [Setting] and files from the internal storage.
The exceptions are RGB gain value of [Calibration] mode, Video Wall and [Server Setting] items of [Ez Setting], and [Set ID] items of [General].
![LG LCLG006 - [Factory Reset] - 1](/content/2026/05/943604/images/0068ec955031403c2671344e96863c3e1132e10782e1aa8b8734491c7138d830.jpg)
NOTE
- It keeps the existing settings because the Off / On button in the User menu only affects the active / inactive status of the submenu.
CONTENT MANAGER
Web Login
• Different features are supported depending on the product.
This Signage product comes with a feature that enables you to access it on your PC or mobile device.
- Content Manager, Group Manager 2.0, Control Manager, Log Out, Change Password menus are provided.
• URL: https://set ip:443
• The default password: 00000000

CAUTION
- Supported resolutions (this program is optimized for the following resolutions):
- PC: 1920 x 1080 / 1280 x 1080
- Mobile: 360 x 640(1440 x 2560, 1080 x 1920), DPR
- Supported browsers (this program is optimized for the following browsers):
- Chrome 56 or later (recommended)
Content Manager
[Player]
HOME / ↗ → (Player)
The Content Manager app's player feature enables you to play/manage contents of video, image, template, SuperSign and playlist in an integrated way. (The OLED models do not support the playback and management of image content and template content.)
[Continuous Play]
1 Select your desired type of content from the tab on the left and then select your desired content.
2 Click [Play] in the upper right-hand corner of the screen and enjoy the content you have selected.
[Export]
1 Select your desired type of content from the tab on the left and click [Export] in the upper right-hand corner of the screen.
2 Select the content you wish to export.
3 Click [Copy]/[Orbiter] in the upper right-hand corner of the screen and select the device to which you wish to export the content. (If a content file stored on the target device has been selected, the processing of the content file is skipped.)
4 You can see that the content has been moved/copied to the device.
[Delete]
1 Select your desired type of content from the tab on the left and click [Delete] in the upper right-hand corner of the screen.
2 Select the content you wish to delete.
3 Click [Delete] in the upper right-hand corner of the screen.
4 You can see that the content has been deleted.
[Filter / Sort]
1 Click [Filter / Sort] in the upper right-hand corner of the screen.
2 1) Choose your desired sort criterion to sort content files either by file name or in the order they have been played (the most recently played file shown at the top of the list).
2) It is possible to only view the content stored on your desired device by filtering content files by device.
3) It is possible to only view the content of your desired type by filtering content files by content type.
[Create Playlist]
When creating a playlist, you cannot include characters that cannot be used in file names on Windows — such as \, /;, *,?, ", <,>, and | — in the names of the files in the playlist. In addition, if the playlist contains content files whose names include such characters, you cannot move or copy the playlist.
1 Select the [Playlist] tap from the tab on the left and click [Create Playlist] in the upper right-hand of the screen.
2 Select the content you wish to add to the playlist and click [NEXT] in the upper right-hand of the screen.
3 Set a play time for each piece of content (applicable only for photo and template content), as well as other items such as Conversion Effect, Ratio, and Auto Playback, and then click [DONE] button in the upper right-hand corner of the screen.
4 You can see a new [Playlist] has been created.
[Distribution]
1 Click [Distribute] in the upper right-hand corner of the screen.
2 Go to the Group Manager app to distribute the created playlists.
![LG LCLG006 - [Distribution] - 1](/content/2026/05/943604/images/c9c729979622aef736f66468d91979cdf59fa9821503837af3d8000b1a80c672.jpg)
NOTE
- The Distribute button shows only when playlist is selected as media type.
[Scheduler]
HOME / ↑ → (Scheduler)
The Content Manager app's scheduler feature enables certain content to be played at a scheduled time through a playlist or external input.
[Creating a Schedule]
1 Click [New Schedule] in the upper right-hand corner of the screen.
2 Choose between [Playlist] and [Input Source].
3 1) If you have selected [Playlist], select the playlist you wish to schedule the playback of.
2) If you have selected [Input Source], select the external input source you wish to schedule the playback of.
4 Enter schedule information and create a new schedule. (When creating a schedule, you cannot include characters that cannot be used in file names on Windows — such as \, /:, *,?, ", <,>, and | — in the name of the schedule file. In addition, if the playlist linked to the schedule contains content files whose names include such characters, you cannot move or copy the playlist.)
5 Watch the playlist or external input you selected play back at its scheduled time.
[Importing a Schedule]
1 Click [Import] in the upper right-hand corner of the screen.
2 Select the external storage device from which you wish to import a schedule.
3 Select the schedule you wish to import to your monitor. (You can only choose a single schedule.)
4 Click [Select] in the upper right-hand corner of the screen.
5 Check that the schedule has been imported to the monitor's internal storage memory.
[Exporting a Schedule]
1 Click [Export] in the upper right-hand corner of the screen.
2 Select the external storage device to which you wish to export a schedule.
3 Select the schedule you wish to export from your monitor. (You can choose multiple schedules.)
4 Click [Select] in the upper right-hand corner of the screen.
5 Check that the schedule has been exported to the external storage device you selected.
[Delete Schedule]
1 Click [DELETE] in the upper right-hand corner of the screen.
2 Select the schedules you wish to delete.
3 Click [DELETE].
4 Check that the schedules have been deleted.
[Calendar View]
1 When you have registered schedules, click [Calendar View].
2 You can see that the schedules registered are displayed in the form of a timetable.
[Distribute]
1 Click [Distribute] in the upper right-hand corner of the screen.
2 Go to the Group Manager app to distribute the created schedules.
![LG LCLG006 - [Distribute] - 1](/content/2026/05/943604/images/87f368f056bf9f1b388f868204b479f837045680ebb07f96e6ad4c97955834ad.jpg)
NOTE
- If the schedule creation time overlaps, the previously created schedule is deleted.
- When a schedule that has not been set repeatedly is completed, the schedule is automatically deleted.
- Schedule does not work while Scheduling list app is running.
[Template]
HOME / ↗ → (Template)
The Content Manager app's editor feature enables you to add your desired templates.
1 Select the template of your desired format. (You can choose between Landscape mode and Portrait mode.)
2 Modify the template's text.
2-1. Apply your desired font style (Size, Weight, Underline, Italic)
3 Modify the media file.
3-1. Select and apply the rate you want.
4 Save the template by clicking [Save] in the top right-hand corner of the screen.
5 Check that the template you saved is shown in the template list.
Supported Photo & Video Files

NOTE
- Subtitles are not supported.
• The photo feature is not supported in OLED model.
Supported video codecs
| Extension Codec | ||
| .asf, .wmv Video VC-1 | Advanced Profile (except for WMVA), VC-1 Simple and Main Profiles | |
| Audio WMA Standard (excluding WMA v1/WMA Speech) | ||
| .avi Video Xvid (excluding 3 warp-point GMC), H.264/AVC, Motion Jpeg, MPEG-4 | ||
| Audio MPEG-1 Layer I, II, MPEG-1 Layer III (MP3), Dolby Digital, LPCM, ADPCM, DTS | ||
| .mp4, .m4v, .mov Video H.264/AVC, MPEG-4, HEVC | ||
| Audio Dolby Digital, Dolby Digital Plus, AAC, MPEG-1 Layer III (MP3) | ||
| .3gp | Video H.264/AVC, MPEG-4 | |
| .3g2 | Audio AAC, AMR-NB, AMR-WB | |
| .mkv Video MPEG-2, MPEG-4, H.264/AVC, VP8, VP9, HEVC | ||
| Audio Dolby Digital, Dolby Digital Plus, AAC, PCM, DTS, MPEG-1 Layer I, II, MPEG-1 Layer III (MP3) | ||
| .ts, .trp, .tp, .mts Video H.264/AVC, MPEG-2, HEVC | ||
| Audio MPEG-1 Layer I, II, MPEG-1 Layer III (MP3), Dolby Digital, Dolby Digital Plus, AAC, PCM | ||
| .mpg, .mpeg, .dat Video MPEG-1, MPEG-2 | ||
| Audio MPEG-1 Layer I, II, MPEG-1 Layer III (MP3) | ||
| .vob Video MPEG-1, MPEG-2 | ||
| Audio Dolby Digital, MPEG-1 Layer I, II, DVD-LPCM | ||
| Maximum transmit ratio | |
| Full HD movie H.264 1920 | x 1080@60P BP/MP/HP@L4.2 40MbpsHEVC 1920 x 1080@60P Main/Main10@L4.1 40Mbps |
| ULTRA HD movie(UHD models only.) | H.264 3840 x 2160@30P BP/MP/HP@L5.1 50MbpsHEVC 3840 x 2160@60P Main/Main10@L5.1 60Mbps |
Supported Photo File Formats
| File type Format Resolution | |
| .jpeg, .jpg, .jpe | JPEGMinimum: Min: 64 x 64Maximum: Normal Type: 15360 (W) x 8640 (H)Progressive Type: 1920 (W) x 1440 (H) |
| .png PNGMinimum: Min: 64 x 64Maximum: 5760 (W) x 5760 (H) | |
| .bmp BMPMinimum: Min: 64 x 64Maximum: 1920 (W) x 1080 (H) |
Tips for using USB storage devices
• Only USB storage devices are recognized.
• USB storage devices connected to the monitor through a USB hub may not work properly.
- USB storage devices that use an automatic recognition program may not be recognized.
• USB storage devices that use their own drivers may not be recognized.
- The recognition speed of a USB storage device may depend on each device.
- Please do not turn off the display or unplug the USB device when the connected USB storage device is working. When the device is suddenly separated or unplugged, the stored files or the USB storage device may be damaged.
- Please do not connect the USB storage device which was artificially maneuvered on the PC. The device may cause the product to malfunction or fail to be played. Remember to only use USB storage devices that store normal music, image, and/or movie files.
• Storage devices formatted with utility programs that are not supported by Windows may not be recognized.
- Please connect power to a USB storage device (over 0.5 A) which requires an external power supply. Otherwise, the device may not be recognized.
- Please connect a USB storage device with the cable offered by the device maker.
- Some USB storage devices may not be supported or operated smoothly.
- File alignment methods of the USB storage device is similar to Windows XP and filenames can include up to 100 English characters.
- Be sure to back up important files since data stored in a USB memory device may be damaged. We will not be responsible for any data loss.
- If the USB HDD does not have an external power source, the USB device may not be detected. So make sure to connect it to an external power source.
- Please use a power adapter for an external power source. No USB cable is provided for an external power source.
- If your USB storage device has multiple partitions, or if you use a USB multi-card reader, you can use up to four partitions or USB memory devices.
- If a USB storage device is connected to a USB multi-card reader, its volume data may not be detected.
- If the USB storage device does not work properly, remove it and connect it again.
- The speed at which a USB storage device is detected differs from device to device.
- If the USB storage device is connected in Standby Mode, a specific hard disk will automatically be loaded when the display is turned on.
- The recommended capacity is 1 TB or less for a USB external hard disk and 32 GB or less for USB memory.
- Any device with more than the recommended capacity may not work properly.
- If a USB external hard disk with an energy saving feature does not work, turn the hard disk off and on again to make it work properly.
- USB storage devices (USB 2.0 or below) are also supported. However, they may not work properly in the videos list.
- A maximum of 999 folders or files can be recognized under one folder.
- When distributing contents to USB while playing a video in UHD resolution, the video might experience temporary stuttering.
- USB storage devices supported by a mobile device may not be recognized.
Group Manager 2.0
This feature enables you to group together multiple monitor sets on a single network into the same group and to distribute content (schedules and playlists) or copy setting data on a group basis. This feature has two modes, Master and Slave, and it can access the browser on your PC or mobile device.
[Master]
- Add, edit, and delete group.
- Clone your device's settings data.
- Distribute [Schedule] and [Playlists] on a group basis.
- All monitor sets initially come in Master mode.
[Slave]
- Play [Schedule] and [Playlists] distributed in Master mode.
- Remove monitor sets for their groups.
- Monitor sets that have been added to a group are automatically switched to Slave mode. Conversely, when a monitor set has been deleted from a group, it is automatically initialized and switched to Master mode.
- If a new Slave has been added to an existing group, or if the [Data Cloning] or the distribution of [schedule]/[Playlist] has not been properly performed, the [Data Cloning] or [SYNCHRONIZE] button will be activated.
- You can duplicate the master device's setting data to the group by using [Data Cloning].
- You can re-download the content distributed to the group by using [Synchronize].
[GROUP MANAGEMENT]
- Creating a New Group
- Click [Add New Group].
- Enter a group name.
- Click [Add Device], select the devices you wish to add to the group, and add them.
- Click [Done], and you will see that a new group has been created.
- Editing a Group
- Click the group you wish to edit.
- Add a new device by using [Add Device].
- Delete a device by using [Delete Device].
- Check whether the devices in the group are connected to a network by using [Device Check].
- If there are any sets of devices in the group that are not [Data Cloning] or content synchronized, [Data Cloning] or [Synchronize] button will be activated.
- You can re-copy the master device's setting data to the group by using [Data Cloning].
- You can re-distribute the content distributed to the group by using [Synchronize].
- Deleting a Group
- Click [Delete Group].
- Select the group you wish to delete and click [Delete].
- Check that the group you selected has been deleted.
- ALL DEVICES VIEW: All Devices View: This page enables you to manage all slave monitor sets that are connected to the same network.
- Click [All Devices View].
- Click [Reset Device Mode].
- Select the slave monitor set whose device mode you wish to change and click [Reset].
[Setting Data Cloning]
1 Select your desired group and click Clone.
2 Check that the data have been copied on the slave sets.
[Content Distribute]
1 Select the type of content you wish to distribute (Schedules or Playlists).
2 Select the content you wish to distribute.
3 Select the group to which you wish to distribute the content and click [Distribute].
4 Run the Content Manager app on the slave sets and check that the content has been distributed.
How to Use
• Monitor: Run, add, delete or edit app on the home screen.
- Mobile: Mobile devices: Run the app in the Launcher bar or access the app from a mobile device using the QR code or URL provided.
CAUTION
• You can create up to 25 groups.
• You can add up to 12 slave devices to a group.
- You can distribute the schedules stored on external devices after executing Content Manager's import operation.
- Make sure to delete all schedules stored on the slave sets before distributing any schedules.
- A list of devices you can add to your desired group appears only when the following conditions have been met:
- The devices you wish to add must be on the same network as the master device.
- The devices you wish to add must be in Master mode, and they must not belong to any existing group.
- The UPnP feature must be enabled (go to [General] > [Network] > UPnP and set it to [On]).
- It may not work properly in wireless network environments. It is recommended you use a wired network.
- Run the initial settings for Slave function when deleting the group.
ScreenShare
This feature allows the screen of a user's device such as a mobile or PC Windows to be shared with a display using a wireless connection such as WiDi or Miracast.
How to Use [ScreenShare]
![LG LCLG006 - How to Use [ScreenShare] - 1](/content/2026/05/943604/images/b0157aabaf93a1d2bfb6ff3d94a891f801299626f2867b4cafdac4b43a14ea88.jpg)
1 Connect according to the instructions provided by the guide that can be accessed through the CONNECTION GUIDE button in the upper right.
2 Once the connection is established, Screen Share between the user device and the monitor is enabled.
NOTE
Configuring WiDi (Wireless Display)
WiDi, which is short for Wireless Display, is a system that wirelessly transmits video and audio files from a laptop that supports Intel WiDi to the display.
This is available only in certain input modes (Composite/Component/RGB/HDMI/DP/OPS/DVI-D).
Other than these modes, LG Signage cannot be detected by your PC.
1 Connect your laptop to AP. (This feature can be used without an AP, but it is recommended that you connect to it for optimal performance.) Go to "PC Settings"→"PC and Devices"→Devices" on your laptop.
2 Click "Add Device" in the top center of the screen, and then you will see a list of nearby WiDi-capable LG Signage monitors. From the list of detected Signage monitors, select one you wish to connect to and click Connect.
3 The screen of your laptop screen appears on the screen of the Signage monitor within 10 seconds. The wireless environment may affect the screen from displaying. If the connection is poor, the Intel WiDi connection may be lost.
- For more information on how to use Intel WiDi, visit http://intel.com/go/widi.
- This feature only works properly with WiDi 3.5 or later versions.
• This feature only works on Windows 8.1 or later
LG Presenter
This feature is to display the PC (Windows or Mac OS) screen on the Signage monitor with wired/wireless connection to the PC. To use this feature, you need to install LG Presenter PC Client ("Client") on the PC.
You can use LG Presenter in the following ways.
- Connect: Enter the PIN code to connect your Signage device to the Client.
- Screen Share: Share the PC screen of the connected Client with your Signage device.
- Hand over. If a Client is already connected and another Client needs to share screen, you can request for a hand over to the connected Client to get permission to share screen.
- Settings: You can see the information of the Client or change the language used by the Client.

NOTE
• This feature may not be available on some models.
• Only sharing PC screen is supported and not voice sharing.
Connect
On Signage
INPUT / → [LG Presenter]
On PC
1 Go to www.lge.com/LGP to download the Client.
2 Install and run the downloaded Client.
3 Enter the username you want and press the button.
4 When the list of Signage devices found in the network appears, select the one you want to connect to.
5 Enter the PIN code you see on your Signage device into the PIN code field on the Client.
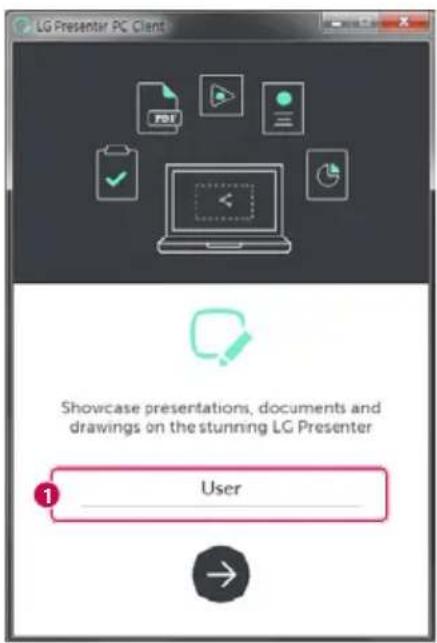
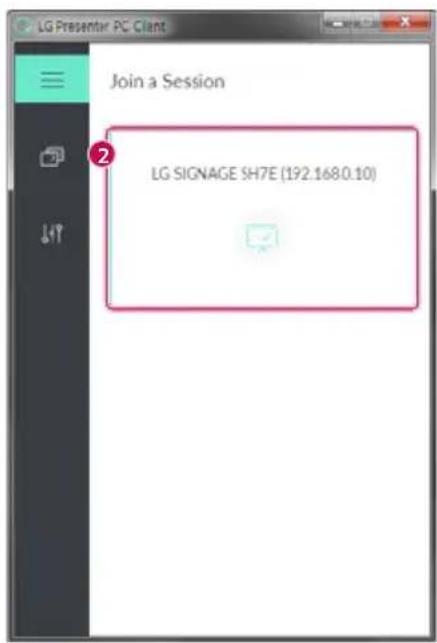
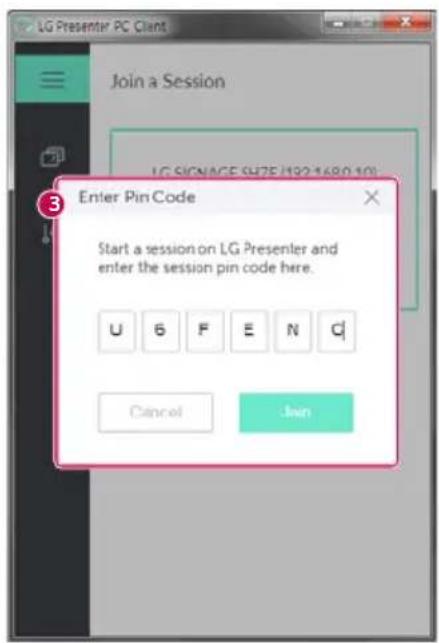
| No. | Item Description | |
| 1 | Name User Name | |
| 2 | List of devices It shows the list of Signage devices available to connect. | |
| 3 | Pin Code To connect to the Signage device, enter the PIN code shown the Signage device. |

CAUTION
• The Signage device and the PC must be on the same network.
- When the UPnP setting is off on your Signage device, Client cannot find the Signage device.
Screen Share
1 Select the screen you want to share and press the Share button.
2 To leave Screen Share, press the Stop button.
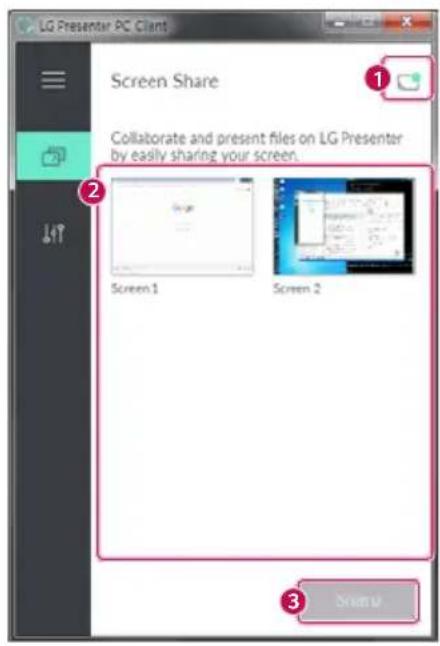
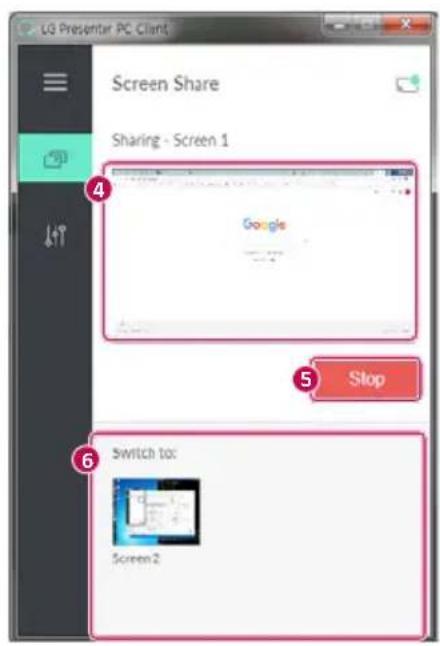
| No. | Item Description | |
| 1 | Connection status It shows the currently connected user's name and you can also disconnect here. | |
| 2 | Screen list It shows the list of PC screens available to share. | |
| 3 | [Share] Press this button to start Screen Share. | |
| 4 | Thumbnail It shows a thumbnail of the screen currently shared. | |
| 5 | [Stop] Stops Screen Share. | |
| 6 | Switch screen It switches between screens to share. | |

CAUTION
- if Screen Share does not work or won't connect to the Signage device, check the firewall settings on your PC.
Handover
PC1: The PC where the client currently connected to your Signage device is running.
PC2: The PC you want to connect to the Signage device connected to PC1
On PC2
1 Run the Client and search for the Signage device on the same network.
2 From the list of the Signage devices found, select the one connected to PC1.
On PC1
1 When the hand over request pop-up appears on PC2, select whether to approve or deny the request.
2 If you approve the request for hand over, the Signage device will be disconnected, and the Client on PC2 will be connected to the Signage device.
3 If you deny the request for hand over, the Signage device will remain connected, so you can continue to use the features of LG Presenter.
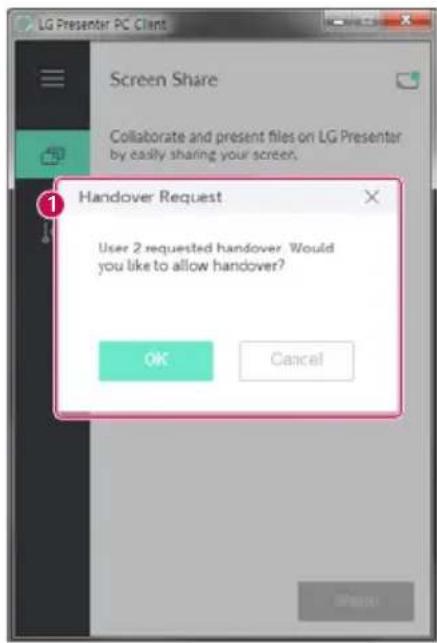
| No. Item Description | ||
| 1 | Request for Handover | When there is a Client currently connected to your Signage device and the Client from another PC requests to connect to the same Signage device, you can determine whether to approve the request. |
MANAGEMENT TOOLS
Admin
Control and check the status of the display through the Web browser.
This function is available for PCs and mobile devices.
Different features are supported depending on the product.
Function
- [Dashboard]: Display a summary of the product's status and provides links to each page.
- [Display & sound]: Provides features such as Screen Brightness, Sound, Input, and Reboot.
- [Time Setting]: Enable/disable Set Automatically feature and displays/changes the time set for the product.
• [Network]: Set the name and IP address of your Signage monitor.
• [Tile Mode]: Display the tile mode settings of the product. - [Fail Over]: Turns the Fail Over feature on or off and sets related items.
• [Play via URL]: Turn Play via URL on or off and set URLs.
• [S/W Update]: Update the firmware of the product.
• [Charts]: Output the product's status information such as its temperature and fan status.
• [Log]: Output product malfunction records. - [System Information]: Output information such as the product's software version and model name.
Picture ID
[Picture ID] is used to change the settings of a specific set (display) using a single IR receiver for multi-vision. Communication is possible between a monitor with an IR receiver and other monitors using RS-232C cables. Each monitor is identified by a Set ID. Setting [Picture ID] allows you to only use the remote control with monitors with a [Set ID] that matches the [Picture ID].
1 Assign [Set ID] to the installed monitors as shown below:
![IR & Light Sensor RS-232C Cable Picture ID On [2]](/content/2026/05/943604/images/93623c1ca92a01a4cfd5155fb6f27a7fb5ba2531d76637971ac5a385c2350293.jpg)
2 Press the red [Picture ID] [On] button on the remote control.
3 Make sure that the Picture ID you set is identical to the [Set ID] of the monitory you wish to control.
- A set with a [Set ID] that is different from the [Picture ID] cannot be controlled by IR signals.
NOTE
- If [Picture ID] has been set to 2, only the upper right monitor, which has a [Set ID] of 2, can be controlled by IR signals.
- If you press the green [Picture ID] [Off] button on your remote control, the [Picture ID] for all monitors are turned off. If you then press any button on the remote control, all monitors can be controlled by IR signals regardless of their [Set ID]'s.
TO CONTROL AN EXTERNAL PC USING TOUCH SCREEN
• This only applies to certain models.
Connecting to a PC
Connecting this product to a PC with a USB cable (Type A to Type B) allows you to control the connected PC by touching the screen of the product.
For a PC that supports USB-C, use a USB-C cable to connect this product to the PC and control the PC using the touch screen.
You can control the installed OPS by touching the screen of the product even with the OPS installed.
Prioritized Tasks on the Touch Screen
| Priority | States Operation Conditions | Device performing the task when the screen is touched | |
| 1 | External input rotation set to 90°/180°/270°Menu, App, dashboard, etc. displayedPop-up message displayed | Only one of the states is shown | Screen of the product |
| 2 | Equipped with OPSExternal input configured for OPS | All states are shown OPS | |
| 3 | Connected to a PC with a USB-C cableExternal input configured for USB-C | All states are shown | PC connected with USB-C |
| 4 | External input configured (except for OPS/USB-C)PC connected to the front of the product with a touch cable | All states are shown | PC connected to the front of the product with a touch cable |
| 5 | External input configured (except for OPS/USB-C)PC connected to the rear of the product with a touch cable | All states are shown | PC connected to the rear of the product with a touch cable |

NOTE
- When connecting to an external PC and using it with a touch screen, it may take a while to recognize your touch on the touch screen device upon switching the connection for the touch function between external PCs.
SMART CALIBRATION
How to Run
W.BAL→[Smart Calibration]
1 Set the Set ID of each set.
2 Select the [Picture Mode] to execute Smart Calibration.
After selecting the [Calibration] mode, you can set [Color Temperature].
- [Optimal Target]: Set the optimal color value of the installed set as the target. - Please set the target to 3,000K in the broadcasting station environment.
3 With [START SMART CALIBRATION], you can correct the color/brightness.
4 If you set the [Schedule Setting] menu, calibration is performed automatically on a regular basis.
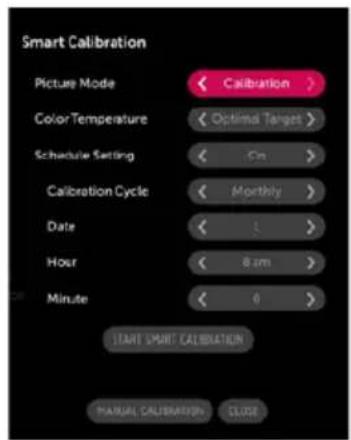
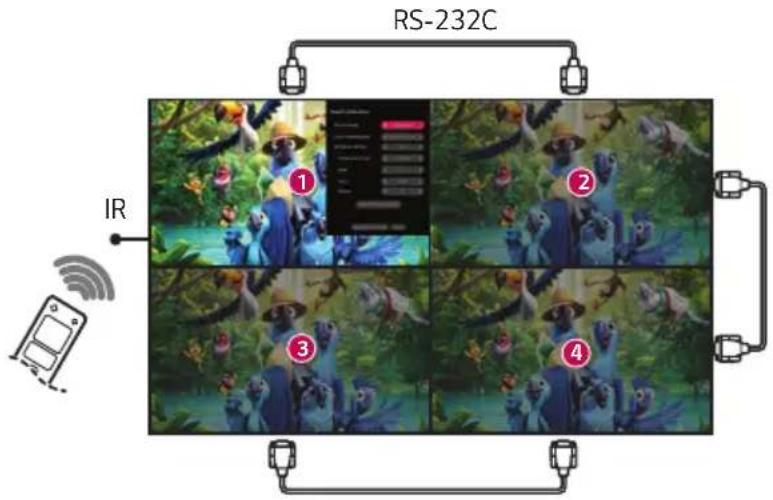
[Manual Calibration]
You can manually adjust the color of the selected location.
• [Screen Split]: Set the manual adjustment area.
• [Calibration Position]: Select the manual adjustment location.
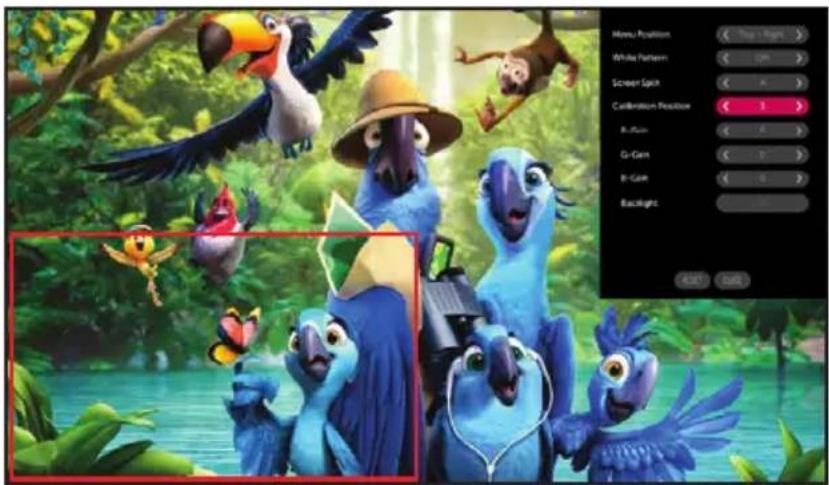
Screen Split: 4, Calibration Position: 3
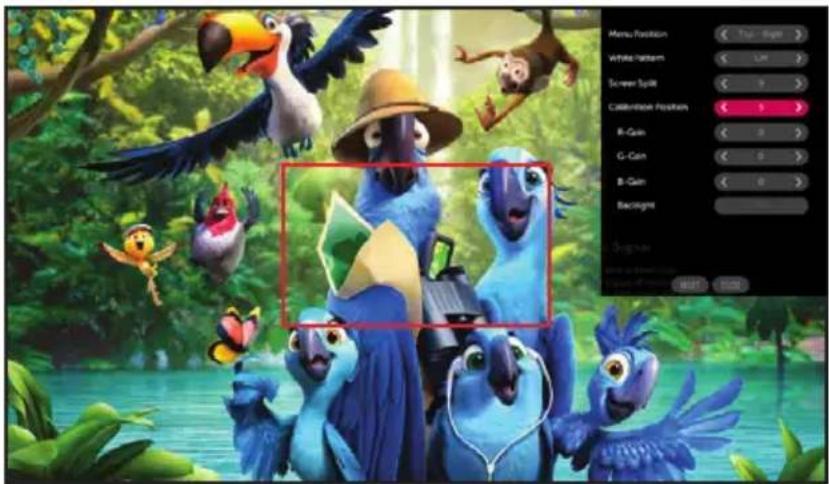
Screen Split: 9, Calibration Position: 5
IR CODE
- All models do not support the HDMI/USB function.
• Some key codes may not be supported depending on the model.
| Code (Hex) Function Remarks | ||
| 08 | (Power) | Remote control button |
| C4 MONITOR ON Remote control button | ||
| C5 MONITOR OFF Remote control button | ||
| 95 (Energy Saving) Remote control button | ||
| OB INPUT (Select input) Remote control button | ||
| 10 Number Key 0 | Remote control button | |
| 11 Number Key 1 Remote control button | ||
| 12 Number Key 2 | Remote control button | |
| 13 Number Key 3 | Remote control button | |
| 14 Number Key 4 Remote control button | ||
| 15 Number Key 5 Remote control button | ||
| 16 Number Key 6 | Remote control button | |
| 17 Number Key 7 Remote control button | ||
| 18 Number Key 8 Remote control button | ||
| 19 Number Key 9 Remote control button | ||
| 02 | (Vol +) | Remote control button |
| 03 | (Vol -) | Remote control button |
| E0 Brightness (Page Up) | Remote control button | |
| E1 Brightness (Page Down) | Remote control button | |
| DC (3D) Remote control button | 3D | |
| 32 1/a/A Remote control button | ||
| 2F | CLEAR | Remote control button |
| 7E | Simplink | Remote control button |
| 79 ARC (Mark/Aspect Ratio) | Remote control button | |
| 4D PSM (Picture Mode) | Remote control button | |
| 09 | (MUTE) | Remote control button |
| 43 | (Settings/Menu) | Remote control button |
| 99 Auto Configuration | Remote control button | |
| 40 | (Up) | Remote control button |
| 41 | (Down) | Remote control button |
| 06 | (Right) | Remote control button |
| 07 | (Left) | Remote control button |
| 44 | (OK) | Remote control button |
| 28 | (BACK) | Remote control button |
| Code (Hex) Function Remarks | ||
| 7B Tile Remote control button | ||
| 5B | Exit Remote control button | |
| 72 | Picture ID On (red) Remote control button | |
| 71 | Picture ID Off (green) Remote control button | |
| 63 | Yellow Remote control button | |
| 61 Blue Remote control button | ||
| 5F | W.Bal Remote control button | |
| 3F | (S.Menu) Remote control button | |
| 7C | (Home) Remote control button | |
| 97 Swap Remote control button | ||
| 96 Mirror Remote control button | ||
CONTROLLING MULTIPLE PRODUCTS
• This only applies to certain models.
Use this method to connect several products to a single PC. You can control several products at a time by connecting them to a single PC.
In the Option menu, the Set ID must be between 1 and 1000 without being duplicated.
Connecting cables
• Images may differ according to the model.
Connect the RS-232C cable as shown in the picture.
The RS-232C protocol is used for communication between the PC and product. You can turn the product on/off, select an input source and adjust the OSD menu from your PC.
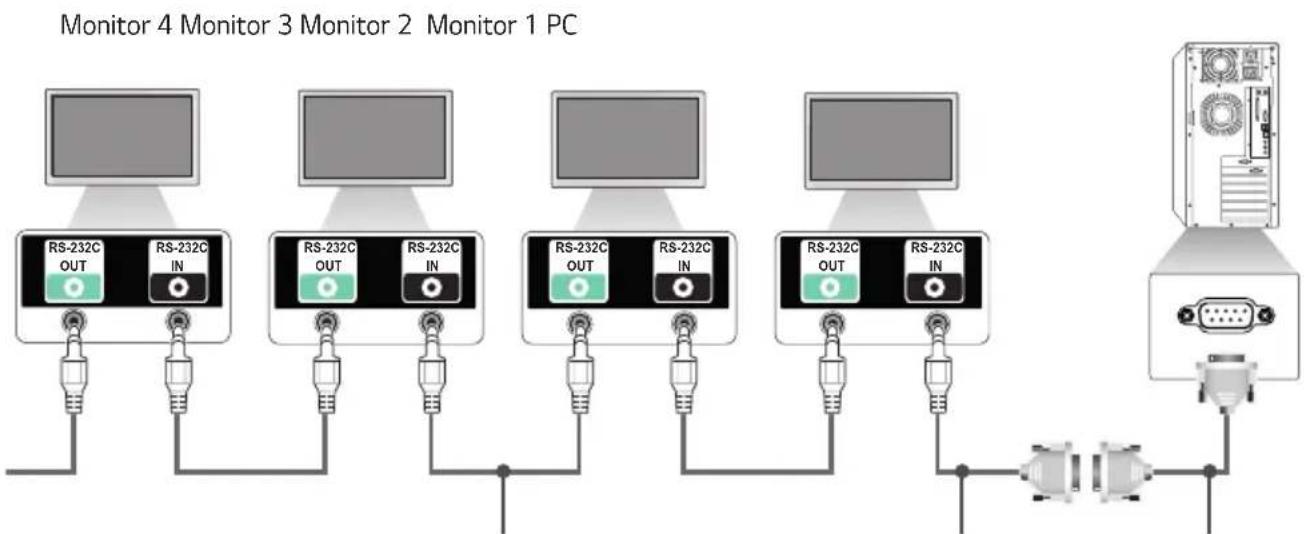
flowchart
graph TD
    A["Monitor 4 Monitor 3 Monitor 2 Monitor 1 PC"] --> B["RS-232C OUT"]
    A --> C["RS-232C IN"]
    B --> D["Analog port"]
    C --> D
    D --> E["Analog port"]
    F["Monitor 4 Monitor 3 Monitor 2 Monitor 1 PC"] --> G["RS-232C OUT"]
    F --> H["RS-232C IN"]
    G --> I["Analog port"]
    H --> I
    I --> J["Analog port"]
    K["Monitor 4 Monitor 3 Monitor 2 Monitor 1 PC"] --> L["RS-232C OUT"]
    K --> M["RS-232C IN"]
    L --> N["Analog port"]
    M --> N
    N --> O["Analog port"]
    P["Monitor 4 Monitor 3 Monitor 2 Monitor 1 PC"] --> Q["RS-232C OUT"]
    P --> R["RS-232C IN"]
4P Cable (sold separately) RS-232C Gender RS-232C Cable
(sold separately)
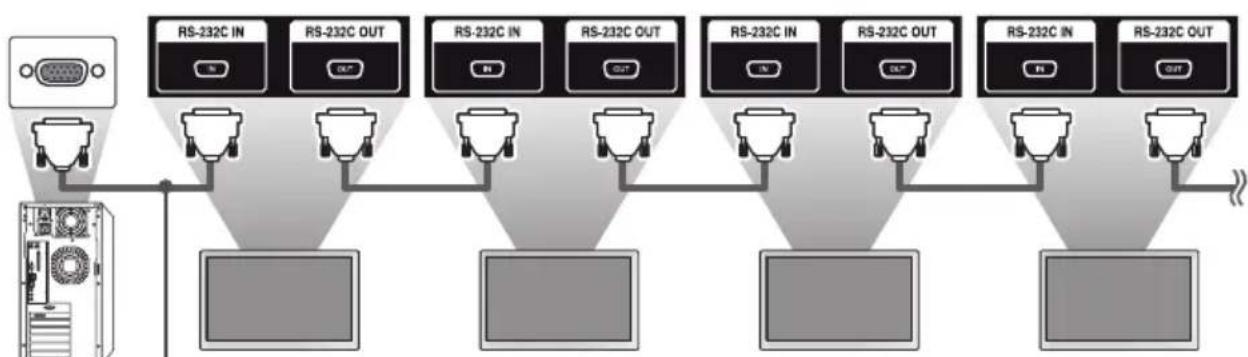
flowchart
graph TD
    A["Computer Interface"] --> B["RS-232C IN"]
    A --> C["RS-232C OUT"]
    B --> D["Computer Interface"]
    C --> D
    D --> E["RS-232C IN"]
    D --> F["RS-232C OUT"]
    E --> G["Computer Interface"]
    F --> G
    G --> H["RS-232C IN"]
    G --> I["RS-232C OUT"]
    H --> J["Computer Interface"]
    I --> J
    J --> K["RS-232C IN"]
    J --> L["RS-232C OUT"]
PC Monitor 1 Monitor 2 Monitor 3 Monitor 4
RS-232C Cable (sold separately)
Communication Parameter
Baud Rate: 9600 BPS
Data Length: 8 bits
Parity Bit: None
Stop Bit: 1 bit
Flow Control: None
Communication Code: ASCII
NOTE
- When using 3-wire connections (non-standard), an IR daisy chain cannot be used.
- Be sure to only use the provided gender to connect properly.
- When you have daisy-chained multiple Signage products to control them simultaneously, if you attempt to turn on/off the master device in a continuous manner, some products may not turn on. In this case, you can turn those monitors on by pressing the MONITOR ON button, not the Power button.
(Power)
MONITOR ON
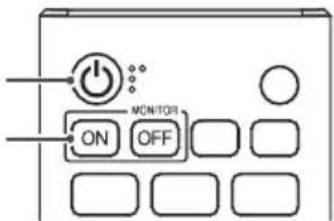
Command Reference List
| Command | Data (Hexadecimal) | |||
| 1 | 2 | |||
| 01 [Power] k a 00 to 02 | ||||
| 02 Select Input x b See Select Input | ||||
| 03 [Aspect Ratio] k c See [Aspect Ratio] | ||||
| 04 [Brightness Control] j q 00 to 04 | ||||
| 05 [Picture Mode] d x See [Picture Mode] | ||||
| 06 [Contrast] k g 00 to 64 | ||||
| 07 [Brightness] k h 00 to 64 | ||||
| 08 [Sharpness] | k k 00 to | 32 | ||
| 09 [Color] | k i | 00 to 64 | ||
| 10 [Tint] | k j | 00 to 64 | ||
| 11 [Color Temperature] x u 70 to D2 | ||||
| 12 [Balance] | k | t 00 to 64 | ||
| 13 [Sound Mode] | d y See [Sound Mode] | |||
| 14 [Mute on] | k e 00 to | 01 | ||
| 15 Volume Control | k | f 00 to 64 | ||
| 16 | [Current Time] 1 (year/month/ day) | f | a See [Current Time] 1 | |
| 17 | [Current Time] 2 (hour/minute/ second) | f | x See [Current Time] 2 | |
| 18 [No Signal Power Off (15 Min)] | f | g 00 to 01 | ||
| 19 [No IR Power Off (4hour)] | m | n 00 to 01 | ||
| 20 [Language] | f | i See [Language] | ||
| 21 Default Settings | f | k 00 - 02 | ||
| 22 | Current Temperature | d | n | FF |
| 23 [Key] | m | c See [Key] | ||
| 24 Time Elapsed | d l | FF | ||
| 25 Check product serial number | f | y FF | ||
| 26 [S | software Version] f z FF | |||
| 27 [ | White Balance] Red Gain j m 00 to FE | |||
| 28 [ | White Balance] Green Gain j n 00 to FE | |||
| 29 [ | White Balance] Blue Gain j o 00 to FE | |||
| 30 [ | White Balance] Red Offset s x 00 to 7F | |||
| 31 [ | White Balance] Green Offset s y 00 to 7F | |||
| 32 [ | White Balance] Blue Offset | s z 00 to | 7F | |
| 33 [ | Backlight] | m | g 00 to 64 | |
| 34 [ | Screen Off] | k d 00 to | 01 | |
| 35 [ | Tile Mode] | d d 00 to | FF | |
| 36 Check [ | Tile Mode] | d z FF | ||
| 37 [ | Tile ID] | d i See [Tile ID] | ||
| 38 [ | Natural Mode] | d j 00 to | 01 | |
| 39 [ | DPM] | f | j See [DPM] | |
| 40 Remote Control/Local Key Lock | k | m 00 to 01 | ||
| 41 [ | Power On Delay] | f h 00 to | FA | |
| 42 Select [ | Fail Over] Mode | m i 00 to | 02 | |
| 43 Select [ | Fail Over] Input | m j See Select [ | Fail Over] Input | |
| 44 Remote Control Key Lock | t p 00 to | 02 | ||
| 45 Local Key Lock | t o 00 to | 02 | ||
| 46 [ | Status Check] | s v See [ | Status Check] | |
| 47 [ | Daylight Saving Time] | s d See [ | Daylight Saving Time] | |
| 48 [ | PM Mode] | s n, 0c | 00 to 04 | |
| 49 [ | ISM Method] | j p See [ | ISM Method] | |
| 50 [ | Network Setting] | s | n, 80(81)(82) See [ | Network Setting] |
| 51 [Power On Status] t r 00 to 02 | ||||
| 52 Wired [Wake On LAN] f w 00 to 01 | ||||
| 53 [Screen Rotation] t h 00 to 03 | ||||
| 54 [Time Sync] s n, 16 00 to 01 | ||||
| 55 [Contents Sync] t g 00 to 01 | ||||
| 56 [LAN Daisy Chain] | s n, 84 00 | to 01 | ||
| 57 [External Input Rotation] | s n, 85 00 | to 03 | ||
| 58 [Beacon] | s n, 88 00 | to 01 | ||
| 59 [Brightness Scheduling] Mode s | m 00 | to 01 | ||
| 60 [Brightness Scheduling] | s s See [Brightness Scheduling] | |||
| 61 [Multi Screen] Mode & Input | x c See [Multi-screen] Mode & | Input | ||
| 62 See [Aspect Ratio] | x | d See [Aspect Ratio] | ||
| 63 [Screen Off] (Multi screen) | x | e See [SCREEN OFF] (Multi screen) | ||
| 64 [Screen Off Always] | s | n, 0d 00 | to 01 | |
| 65 Stop Video | k | x 00 | to 01 | |
| 66 Wireless [Wake On LAN] | s n, 90 00 | to 01 | ||
| 67 [OSD Lock] | k l | 00 to 01 | ||
| 68 [HDMI IT Content] s n, 99 00 to 01 | ||||
| 69 | [Holiday Setting] | s | n, 9b | See [Holiday Setting] |
| 70 [UPnP] | s | n, 9c 00 | to 01 | |
| 71 | [Home Dashboard Lock] | s | n, 9d | 00 to 01 |
| 72 [USB Lock] | s | n, 9e 00 | to 01 | |
| 73 [Wi-Fi Lock] | s | n, 9f 00 | to 01 | |
| 74 [Screen Share Lock] | s | n, a0 00 | to 01 | |
| 75 | [Backup via Storage] | s | n, a1 | See [Backup via Storage] |
| 76 [Digital Audio Input] s n, a2 00 to 01 | ||||
| 77 [Booting Logo Image] s n, a3 00 to 01 | ||||
| 78 [SoftAP] s n, a4 00 to 01 | ||||
| 79 [Natural Size] s n, a5 00 to 64 | ||||
| 80 Play Saved Internal Media s n, a8 See Playback of Saved Internal Media | ||||
| 81 [No Signal Image] s n, a9 00 to 01 | ||||
| 82 [Audio Out] s n, aa 00 to 02 | ||||
| 83 [DPM Wake Up Control] s n, 0b | 00 to 01 | |||
| 84 Check [Fan] Failure | d | w | FF | |
| 85 [Apply to all inputs] | s | n, 52 | 01 | |
| 86 | [Timer Power On] | f | d | See [Timer Power On] |
| 87 | [Timer Power Off] | f | e | See [Timer Power Off] |
| 88 | Novastar Control | s | n,b8 | See Novastar Control |
| 89 | [Transfer Control] | s | n,cb | See Transfer Control |
| 90 Multichannel | s n,76 | 01 to 09 | ||
| 91 Change Setid | j | x | See Change Setid | |
| 92 [Gamma] | s | n,ad | 00 to 03 | |
| 93 [Black Level] | s | n,ae | 00 to 02 | |
| 94 | [UHD Deep Color] | s | n,af | See [UHD Deep Color] |
| 95 [Sync Mode] | s | n,b0 | 00 to 01 | |
| 96 | [Input Manager] | s | n,b1 | See [Input Manager] |
| 97 | [PC/OPS Power Control] | s | n,8b | 00 to 02 |
| 98 [LED Local Dimming] | s | n,c1 | 00 to 01 | |
| 99 | [Scan Inversion] | s | n,87 | 00 to 01 |
| 100 | [Frame Control] | s | n,b7 | 00 to 01 |
| 101 | [Average Picture Level Auto Control] | s | n,be | 00 to 01 |
| 102 | Read Brightness Value | m | u | FF |
| 103 | [Screen Fault Detection] | t | z | 00 to 01 |
| 104 | [Stereo Mode] | s | n,c2 | 00 to 02 |
| 105 | [HDR Picture Mode] | s | n,c4 | See [HDR Picture Mode] |
| 106 | [Dynamic Tone Mapping] | s | n,c5 | 00 to 01 |
| 107 | [LED Local Dimming] | s | n,c6 | 00 to 03 |
| 108 | [USB2 to HDBaseT] | s | n,c3 | 00 to 01 |
| 109 | [Change Password] | s | n,a7 | See [Change Password] |
* Note Commands may not work when there is no external input used.
* Some commands may not be supported on some models.
Transmission/Reception Protocol
Transmission
(Command1)(Command2)( ) (Set ID)( ) (Data)(Cr)
* (Command1): This command is used to identify between the adjustment setting or the user adjustment modes.
* (Command2): This command is used to control the monitor.
* (Set ID): Used for selecting a set you want to control. A unique Set ID can be assigned to each set ranging from 1 to 1000 (01H to FFH) under Settings in the OSD menu. Selecting '00H' for Set ID allows the simultaneous control of all connected monitors. (The maximum value may differ depending on the model.)
* (Data): Transmits command data. Data count may increase depending on the command.
* (Cr): Carriage Return. This parameter corresponds to '0 x 0D' in ASCII code.
* ( ): White Space. This parameter corresponds to '0 x 20' in ASCII code.
Acknowledgment
(Command2)( ) (Set ID)( )(OK/NG)(Data)(x)
* The product transmits an ACK (acknowledgment) based on this format when receiving normal data. At this point, if the data is FF, it indicates the present status data. If the data is in data write mode, it returns the data of the PC computer.
* If a command is sent with Set ID '00' (=0 x 00), the data is reflected to all monitors and they do not send an acknowledgment (ACK).
* If you send "FF" as the value of the data in control mode via RS-232C, you can check the value currently set for the relevant feature (not applicable to some features).
* Some commands may not be supported on some models.
01. [Power] (Command: k a)
Controls the power on/off status of the monitor.
Transmission
(k)(a)( )(Set ID)( )(Data)(Cr)
Data00:[Off]
01:[On]
02:Restart
Acknowledgment
(a)( )(Set ID)( )(OK/NG)(Data)(x)
* The Acknowledgment signal is returned properly only when the monitor is fully powered on.
* There may be a delay between the Transmission and Acknowledgment signals.
* This feature may not be available for all models.
02. Select Input (Command: x b)
Selects an input signal.
Transmission
(x)(b)( ) (Set ID)( ) (Data)(Cr)
Data 20: AV
40: COMPONENT
60: RGB
70: DVI-D (PC)
80: DVI-D (DTV)
90: HDMI1 (DTV)
A0: HDMI1 (PC)
91: HDMI2 (DTV)
A1: HDMI2 (PC)
92: OPS/HDMI3/DVI-D (DTV)
A2: OPS/HDMI3/DVI-D (PC)
95: OPS/DVI-D (DTV)
A5: OPS/DVI-D (PC)
96: HDMI3/DVI-D (DTV)
A6: HDMI3/DVI-D (PC)
97: HDMI3/HDMI2/DVI-D (DTV)
A7: HDMI3/HDMI2/DVI-D (PC)
98: OPS (DTV)
A8: OPS (PC)
99: HDMI2/OPS (DTV)
A9: HDMI2/OPS (PC)
C0: DISPLAYPORT (DTV)
DO: DISPLAYPORT (PC)
C1: DISPLAYPORT/USB-C (DTV)
D1: DISPLAYPORT/USB-C (PC)
C2: HDMI3 (DTV)
D2: HDMI3 (PC)
C3: HDBaseT (DTV)
D3: HDBaseT (PC)
E0: SuperSign webOS Player
E1: Others
E2: Multi Screen
E3: Play via URL
Acknowledgment
(b)( ) (Set ID)( )(OK/NG)(Data)(x)
* Some input signals may not be available for all models.
* If it is not distributed from SuperSign W, WebOS Player returns NG.
03. [Aspect Ratio] (Command: k c)
Adjusts the aspect ratio of your monitor.
Transmission
(k)(c)( ) (Set ID)( ) (Data)(Cr)
Data 02: [Full Screen]
06:[Original]
Acknowledgment
(c)( )(Set ID)( )(OK/NG)(Data)(x)
* The aspect ratio may differ depending on the model's input configuration.
04. [Brightness] (Command: j q)
Sets the brightness of your monitor.
Transmission
(j)(q)( ) (Set ID)( ) (Data)(Cr)
Data00:[Off]
01:[Minimum]
02:[Medium]
03:[Maximum]
04:[Auto]
Acknowledgment
(q)( ) (Set ID)( )(OK/NG)(Data)(x)
* This feature may not be available for all models.
05. [Picture Mode] (Command: d x)
Selects a picture mode.
Transmission
* Some picture modes may not be available for all models.
06. [Contrast] (Command: k g)
Adjusts the screen contrast.
Transmission
(k)(g)( ) (Set ID)( ) (Data)(Cr)
Data 00-64: Contrast 0-100
Acknowledgment
(g)( ) (Set ID)( )(OK/NG)(Data)(x)
07. [Brightness] (Command: k h)
Adjusts the screen brightness.
Transmission
(k)(h)( ) (Set ID)( ) (Data)(Cr)
Data 00-64: Brightness 0-100
Acknowledgment
(h)( ) (Set ID)( )(OK/NG)(Data)(x)
08. [Sharpness] (Command: k k)
Adjusts the screen sharpness.
Transmission
(k)(k)( ) (Set ID)( ) (Data)(Cr)
Data 00-32: Sharpness 0-50
Acknowledgment
(k)( ) (Set ID)( )(OK/NG)(Data)(x)
09. [Color] (Command: k i)
Adjusts the screen colors.
Transmission
(k)(i)( ) (Set ID)( ) (Data)(Cr)
Data 00-64: Color 0-100
Acknowledgment
(i)( ) (Set ID)( )(OK/NG)(Data)(x)
10. [Tint] (Command: k j)
Adjusts the screen tints.
Transmission
(k)(j)(Set ID)(Data)(Cr)
Data 00-64: Tint Red 50-Green 50
Acknowledgment
(j)( ) (Set ID)( )(OK/NG)(Data)(x)
11. [Color Temperature] (Command: x u)
Adjusts the screen color temperature.
Transmission
(x)(u)( ) (Set ID)( ) (Data)(Cr)
Data70-D2:3200K-13000K
Acknowledgment
(u)( )(Set ID)( )(OK/NG)(Data)(x)
12. [Balance] (Command: k t)
Adjusts the sound balance.
Transmission
(k)(t)( ) (Set ID)( ) (Data)(Cr)
Data 00-64: Left 50-Right 50
Acknowledgment
(t)( )(Set ID)( )(OK/NG)(Data)(x)
* This feature may not be available for all models.
13. [Sound Mode] (Command: d y)
Selects a sound mode.
Transmission
(d)(y)( ) (Set ID)( ) (Data)(Cr)
Data01:[Standard]
02:[Music]
03:[Cinema]
04:[Sports]
05:[Game]
07: [News (Clear Voice III)]
Acknowledgment
(y)( )(Set ID)( )(OK/NG)(Data)(x)
* This feature may not be available for all models.
14. [Mute on] (Command: k e)
Mutes/unmutes audio.
Transmission
(k)(e)( ) (Set ID)( ) (Data)(Cr)
Data 00: [Mute] (Volume off)
01: Mute off (Volume on)
Acknowledgment
(e)( )(Set ID)( )(OK/NG)(Data)(x)
* This feature may not be available for all models.
15. Volume Control (Command: k f)
Adjusts the playback volume.
Transmission
(k)(f)( ) (Set ID)( ) (Data)(Cr)
Data 00-64: Volume 0-100
Acknowledgment
(f)( )(Set ID)( )(OK/NG)(Data)(x)
* This feature may not be available for all models.
16. [Current Time] 1 (year/month/day) (Command: f a)
Sets the Clock 1 (year/month/day) values and Auto Time.
Transmission
1. (f)(a)( ) (Set ID)( ) (Data1)( ) (Data2)( ) (Data3)(Cr)
2. (f)(a)( ) (Set ID)( ) (0)(0)( ) (Data1)(Cr)
1. When setting Clock 1 (year/month/day)
Data1 00-: 2010 -
Data2 01-0C: January - December
Data301-1F:1-31
* The minimum and maximum values for Data1 differ depending on the product's release year.
* Enter "fa [Set ID] ff" to view Clock 1 (year/month/day) settings.
2. When Setting Auto Time
Data100:[Auto]
01:[Manual]
* To view the set value of the Auto time, enter "fa [Set ID] 00 ff".
Acknowledgment
1. (a)()(Set ID)()(OK/NG)(Data1)(Data2)(Data3)(x)
2. (a)()(Set ID)()(OK/NG)(0)(0)(Data1)(x)
17. [Current Time] 2 (hour/minute/second) (Command: f x)
Sets the Clock 2 values (hour/minute/second).
Transmission
(f)(x)( ) (Set ID)( ) (Data1)( ) (Data2)( ) (Data3)(Cr)
Data1 00-17: 00-23 hours
Data2 00-3B: 00 - 59 minutes
Data3 00-3B: 00-59 seconds
* Enter "fx [Set ID] ff" to view the Time 2 (hour/minute/second) settings.
* This feature is only available when Clock 1 (year/month/day) has been set.
Acknowledgment
(x)( )(Set ID)( )(OK/NG)(Data1)(Data2)(Data3)(x)
18. [No Signal Power Off(15Min)] (Command: f g)
Sets the monitor to enter Automatic Standby mode if there is no signal for 15 minutes.
Transmission
(f)(g)( ) (Set ID)( ) (Data)(Cr)
Data00:[Off]
01:[On]
Acknowledgment
(g)( ) (Set ID)( )(OK/NG)(Data)(x)
19. [No IR Power Off] (Command: m n)
Activates Auto Power Off when there is no IR signal for 4 hours.
Transmission
(m)(n)( ) (Set ID)( ) (Data)(Cr)
Data00:[Off]
01:[On]
Acknowledgment
(n)( ) (Set ID)( )(OK/NG)(Data)(x)
20. [Language] (Command: f i)
Sets the OSD language.
Transmission
(f)(i)( ) (Set ID)( ) (Data)(Cr)
Data00:Czech
01:Danish
02:German
03:English
04: Spanish (Europe)
05:Greek
06:French
07:Italian
08:Dutch
09:Norwegian
OA:Portuguese
OB: Portuguese (Brazil)
OC:Russian
OD:Finnish
OE:Swedish
OF:Korean
10: Chinese (Mandarin)
11:Japanese
12: Chinese (Cantonese)
13:Arabic
14:Turkish
Acknowledgment
(i)( )(Set ID)( )(OK/NG)(Data)(x)
* Some languages may not be available for all models.
21. [Default] Settings (Command: f k)
Executes Reset.
(Initialize Screen can only be executed in RGB input mode.)
Transmission
(f)(k)( ) (Set ID)( ) (Data)(Cr)
Data 00: [Picture Reset]
02: [Reset to Initial Settings]
Acknowledgment
(k)( )(Set ID)( )(OK/NG)(Data)(x)
* This feature may not be available for all models.
22. Current Temperature (Command: d n)
Checks the current temperature of the product.
Transmission
* The temperature is displayed in hexadecimal.
23. [Key] (Command: m c)
Sends a key code for the IR remote control.
Transmission
(m)(c)( ) (Set ID)( ) (Data)(Cr)
Data IR_KEY_CODE
Acknowledgment
(c)( ) (Set ID)( )(OK/NG)(Data)(x)
* For key codes, see IR Codes.
* Some key codes may not be supported depending on the model.
24. Time Elapsed (Command: d l)
Displays the time that has elapsed after your monitor has turned on.
Transmission
(d)(l)( )(Set ID)( )(Data)(Cr)
Data FF: Read status
Acknowledgment
(l)( )(Set ID)( )(OK/NG)(Data)
* The data received is displayed in hexadecimal.
25. Product Serial Number Check (Command: f y)
Checks the serial number of the product.
Transmission
(f)(y)( )(Set ID)( )(Data)(Cr)
Data FF: Check product serial
Acknowledgment
(y)( )(Set ID)( )(OK/NG)(Data)
* Data is in ASCII format.
26. [Software Version] (Command: f z)
Checks the software version of the product.
Transmission
(f)(z)( ) (Set ID)( ) (Data)(Cr)
Data FF: Check the software version
Acknowledgment
(z)( )(Set ID)( )(OK/NG)(Data)(x)
27. [White Balance] Red Gain (Command: j m)
Adjusts the red gain value for white balance.
Transmission
(j)(m)( ) (Set ID)( ) (Data)(Cr)
Data 00-FE: Red Gain 0-254
FF: Checks red gain value
Acknowledgment
(m)( )(Set ID)( )(OK/NG)(Data)(x)
28. [White Balance] Green Gain (Command: j n)
Adjusts the green gain value for white balance.
Transmission
(j)(n)( ) (Set ID)( ) (Data)(Cr)
Data 00-FE: Green Gain 0-254
FF: Checks green gain value
Acknowledgment
(n)( )(Set ID)( )(OK/NG)(Data)(x)
29. [White Balance] Blue Gain (Command: j o)
Adjusts the blue gain value for white balance.
Transmission
(j)(o)( )(Set ID)( )(Data)(Cr)
Data 00-FE: Blue Gain 0-254
FF: Checks blue gain value
Acknowledgment
(o)( )(Set ID)( )(OK/NG)(Data)(x)
30. [White Balance] Red Offset (Command: s x)
Adjusts the red offset value for white balance.
Transmission
(s)(x)( ) (Set ID)( ) (Data)(Cr)
Data 00-7F: Red Offset 0-127
FF: Checks red offset value
Acknowledgment
(x)( )(Set ID)( )(OK/NG)(Data)(x)
31. [White Balance] Green Offset (Command: s y)
Adjusts the green offset value for white balance.
Transmission
(s)(y)( ) (Set ID)( ) (Data)(Cr)
Data 00-7F: Green Offset 0-127
FF: Checks green offset value
Acknowledgment
(y)( ) (Set ID)( )(OK/NG)(Data)(x)
32. [White Balance] Blue Offset (Command: s z)
Adjusts the blue offset value for white balance.
Transmission
(s)(z)( ) (Set ID)( ) (Data)(Cr)
Data 00-7F: Blue Offset 0-127
FF: Checks blue offset value
Acknowledgment
(z)( ) (Set ID)( )(OK/NG)(Data)(x)
33. [Backlight] (Command: m g)
Adjusts the backlight brightness.
Transmission
(m)(g)( ) (Set ID)( ) (Data)(Cr)
Data 00-64: Backlight 0-100
Acknowledgment
(g)( )(set ID)(OK/NG)(Data)(x)
34. [SCREEN OFF] (Command: k d)
Turns off/off the screen.
Transmission
(k)(d)( ) (Set ID)( ) (Data)(Cr)
Data 00: Screen On
01: Screen Off
Acknowledgment
(d)( )(Set ID)( )(OK/NG)(Data)(x)
* This feature may not be available for all models.
35. [Tile Mode] (Command: d d)
Sets a tile mode and values for the tile rows and columns.
Transmission
* 00, 01, 10, and 11 mean that the tile mode is off.
* The maximum value may differ depending on the model.
Acknowledgment
(d)( )(Set ID)( )(OK/NG)(Data)(x)
* This feature may not be available for all models.
* If you change the values on a Video Wall model, please reboot for it to work normally.
36. [Tile Mode] Check (Command: d z)
Checks the tile mode.
Transmission
(d)(z)( ) (Set ID)( ) (Data)(Cr)
Data FF: Check Tile Mode
Acknowledgment
(z)( )(Set ID)( )(OK/NG)(Data1)(Data2)(Data3)(x)
Data1 00: Tile Mode off
01: Tile Mode on
Data200-OF:Tilecolumn
Data300-OF:Tilerow
* This feature may not be available for all models.
37. [Tile ID] (Command: d i)
Sets the tile ID value of the product.
Transmission
(d)(i)( )(Set ID)( )(Data)(Cr)
Data 01-E1: Tile ID 1-225
FF: Checks the Tile ID
* The data value cannot exceed the value of row x column.
Acknowledgment
(i)( )(Set ID)( )(OK/NG)(Data)(x)
* If you enter a value that exceeds the value of row x column for the Data parameter (except for 0xFF), Ack becomes NG.
* This feature may not be available for all models.
* If you change the values on a Video Wall model, please reboot for it to work normally.
38. [Natural Mode] (In Tile Mode) (Command: d j)
To display the image naturally, the part of the image that would normally be displayed in the gap between the monitors is omitted.
Transmission
(d)(j)( ) (Set ID)( ) (Data)(Cr)
Data00:[Off]
01:[On]
Acknowledgment
(j)( )(Set ID)( )(OK/NG)(Data)(x)
* This feature may not be available for all models.
39. [DPM] (Command: f j)
Sets the DPM(Display Power Management) function.
Transmission
(f)(j)(Set ID)(Data)(Cr)
Data00:[Off]
04: 1 minute
05: 3 minutes
06: 5 minutes
07: 10 minutes
Acknowledgment
(j)( )(Set ID)( )(OK/NG)(Data)(x)
* This feature may not be available for all models.
40. Remote Control/Local Key Operation Lock (Command: k m)
Adjusts the remote control/local key (front) lock.
Transmission
(k)(m)( )(Set ID)( )(Data)(Cr)
Data 00: [Off] (Lock Off)
01: [On] (Lock On)
* When the monitor is turned off, the power key works even in On (01) mode.
Acknowledgment
(m)( )(Set ID)( )(OK/NG)(Data)(x)
* This feature may not be available for all models.
41. [Power On Delay] (Command: f h)
Sets the schedule delay for when the power turns on. (Unit: seconds)
Transmission
(f)(h)( )(Set ID)( )(Data)(Cr)
Data 00-FA: Min 0- Max 250 (sec)
Acknowledgment
(h)( )(Set ID)( )(OK/NG)(Data)(x)
* The maximum value may differ depending on the model.
42. [Fail Over] Mode (Command: m i)
Selects a sound mode.
Transmission
(m)(i)( ) (Set ID)( ) (Data)(Cr)
Data00:[Off]
01:[Auto]
02: [User Setting]
Acknowledgment
(i)( ) (Set ID)( )(OK/NG)(Data)(x)
43. [Fail Over] Input Select (Command: m j)
Selects an input source for fail over. (This feature is only available when Fail Over is set to Custom.)
Transmission
(m)(j)(Set ID)(Data1)(Data2)(Data3)(Data4) ... () (DataN)(Cr)
Data1-N (Input priority 1-N)
60: RGB
70: DVI-D
90: HDMI1
91: HDMI2
92: OPS/HDMI3/DVI-D
95: OPS/DVI-D
96: HDMI3/DVI-D
97: HDMI3/HDMI2/DVI-D
98: OPS
99: HDMI2/OPS
C0: DISPLAYPORT
C1: DISPLAYPORT/USB-C
C2: HDMI3
C3: HDBaseT
Acknowledgment
(j)( )(SetID)( )(OK/NG)(Data1)(Data2)(Data3)(Data4) ... (DataN)(x)
* Some input signals may not be available for all models.
* The data number (N) may vary depending on the model. (The data number depends on the number of supported input signals.)
* This feature operates as the last input, and supports data in DTV format.
44. Remote Control Key Lock (Command: t p)
Configures the settings of the product's remote control key.
Transmission
(t)(p)( ) (Set ID)( ) (Data)(Cr)
Data 00: Unlocks all keys
01: Locks all keys except Power key
02: Locks all keys
Acknowledgment
(p)( )(Set ID)( )(OK/NG)(Data)(x)
* When the monitor is turned off, the power key works even in the locks on all of the keys (02) mode.
45. [Local Key Operation Lock] (Command: t o)
Configures the local key operation settings of the product.
Transmission
(t)(o)( ) (Set ID)( ) (Data)(Cr)
Data 00: Unlocks all keys
01: Locks all keys except Power key
02: Locks all keys
Acknowledgment
(o)( ) (Set ID)( )(OK/NG)(Data)(x)
* When the monitor is turned off, the power key works even in the locks on all of the keys (02) mode.
* This feature may not be available for all models.
46. Status Check (Command: s v)
Checks the current signal of the product.
Transmission
(s)(v)( ) (Set ID)( ) (Data)( ) (FF)(Cr)
Data 02: Check whether there is a signal
03: The monitor is currently in PM Mode
07: Checks whether the Top, Bottom and Main temperature sensors are functioning normally.
09: Fan Speed
10: RGB Sensing OK/NG (screen fault detection)
16: Check the humidity value
17: Check the value of the intensity of illumination
18: Check the status value of the slope of the product
Acknowledgment
(v)( ) (Set ID)( ) (OK/NG) (Data) (Data1) (x)
Data 02 (when a signal is found)
Data1 00: No signal
01: Signal present
Data 03 (when the monitor is currently in PM mode)
Data1 00: Screen is on
01: Screen is off
02: Screen Off Always is activated
03: Sustain Aspect Ratio is activated
04: Screen Off & Backlight On is activated
Data 07 (when checking whether the Top, Bottom and Main temperature sensors are working properly)
Data1 00: All temperature sensors are faulty
01: Top normal, Bottom faulty, Main faulty
02: Top faulty, Bottom normal, Main faulty
03: Top normal, Bottom normal, Main faulty
04: Top faulty, Bottom faulty, Main normal
05: Top normal, Bottom faulty, Main normal
06: Top faulty, Bottom normal, Main normal
07: All temperature sensors are normal
Data 10 (when executing Screen Fault Detection)
Data 1 00: Screen Fault Detection result NG
07: Screen Fault Detection result OK
* When screen Fault Detection is set to Off or not supported, execution results are rendered "NG."
Data 16 (for checking the humidity value)
Data 1 0\~100: Reads the %RH value of the current humidity (indicated as a Hex value).
Data 17 (for checking the value of the intensity of illumination)
Data 1 1\~1000: Reads the Lux value of the current intensity of illumination (indicated as a Hex value).
Data 18 (for checking the status value of the slope of the product)
Data 1 00: 0 degrees
01: 90 degrees
02: 180 degrees
03: 270 degrees
04: Fallen forward
05: Fallen backward
Data 09 (when checking the fan speed)
Acknowledgement
(v)( ) (Set ID)( )(OK/NG)(Data)(Data1_1)(Data1_2)
...(DataN_1)(DataN_2)(x)
Data1_1:00-ff: First fan speed top 1 Byte
Data1_2: 00-ff: First fan speed bottom 1 Byte
DataN_1: 00-ff: Nth fan speed top 1 Byte
DataN_2: 00\~ff: Nth fan speed bottom 1 Byte
Fan Speed: Hex 0\~2008, Decimal 0\~8200
* The data number (N) may vary depending on the model.
* This feature may not be available for all models.
47. [Daylight Saving Time] (Command: s d)
Sets Daylight Savings Time.
Transmission
(s)(d)( ) (Set ID)( ) (Data1)( ) (Data2)( )
(Data3)( ) (Data4)( ) (Data5)( )(Cr)
Data1 00: Off (Data2-5: FF)
01:StartTime
02:EndTime
Data2 01\~0C: January - December
Data3 01-06: Week 1 - 6
* The maximum value of [Data3] may vary depending on the date.
Data4 00-06: (Sunday - Saturday)
Data5 00-17: 00 - 23 hours
* If you wish to read the start/end times, enter FF for parameters [Data2] through [Data5].
(Example 1: sd 01 01 ff ff ff ff - Checks the start time.
Example 2: sd 01 02 ff ff ff ff - Checks the end time.)
* This feature only works when Clock 1 (year/month/day) and Clock 2 (hour/minute/second) have been set.
Acknowledgment
* This feature may not be available for all models.
48. [PM Mode] (Command: s n, 0c)
Sets the PM mode.
Transmission
(s)(n)( ) (Set ID)( ) (0c)( ) (Data)(Cr)
Data 00: [Power Off] (Basic)
01: [Sustain Aspect Ratio]
02: [Screen Off]
03: [Screen Off Always]
04: [Screen Off & Backlight On]
Acknowledgment
(n)( )(Set ID)( )(OK/NG)(0c)(Data)(x)
* This feature may not be available for all models.
49. [ISM Method] (Command: j p)
Selects an ISM method.
Transmission
(j)(p)( ) (Set ID)( ) (Data)(Cr)
Data 04: [White Wash]
08:[Off]
90:[UserImage]
91: [User Video]
Acknowledgment
(p)( ) (Set ID)( )(OK/NG)(Data)(x)
* This feature may not be available for all models.
50. [Network Setting] (Command: s n, 80 or 81 or 82)
Configures network and DNS settings.
Transmission
(s)(n)( ) (Set ID)( ) (Data1)( ) (Data2)( )
(Data3)( ) (Data4)( ) (Data5)(Cr)
Data1 80: Configures/views the temporary IP mode (Auto/Manual), subnet mask, and gateway.
81: Configures/views the temporary DNS address.
82: Saves temporary settings and views information about the current network.
* If Data1 is 80,
Data200:Auto
01:Manual
FF: Views the temporary IP mode (Auto/Manual), subnet mask, and gateway.
* If Data2 is 01 (Manual),
Data3 Manual IP address
Data4 Subnet mask address
Data5 Gateway address
* If Data1 is 81,
Data2 DNS address
FF: Displays the temporary DNS address.
* If Data1 is 82,
Data2 80: Applies the temporary IP mode (Auto/Manual), subnet mask, and gateway.
81: Applies the temporary DNS address
FF: Information on the current network (IP, subnet gateway and DNS)
* An example of settings,
-
Auto: sn 01 80 00
-
Manual: sn 01 80 01 010177223241 255255254000 010177222001(IP:10.177.223.241, subnet: 255.255.254.0, gateway: 10.177.222.1)
-
Network read: sn 01 80 ff
-
DNS setting: sn 01 81 156147035018 (DNS: 156.147.35.18)
-
Applying the settings: sn 01 82 80 (applies the saved IP mode (auto/manual), subnet mask, and gateway), sn 01 82 81 (applies the saved DSN)
* Each IP address contains 12 decimal digits.
Acknowledgment
(n)( )(Set ID)( )(OK/NG)(Data1)(Data)(x)
* This feature is available only for wired networks.
* This feature may not be available for all models.
51. [Power On Status] (Command: t r)
Sets the Power On status of the monitor.
Transmission
(t)(r)( ) (Set ID)( ) (Data)(Cr)
Data 00: [LST(Last Status)]
01:[STD(Standby)]
02: [PWR(Power On)]
Acknowledgment
(r)( ) (Set ID)( ) (OK/NG) (Data)(x)
52. Wired [Wake On LAN] (Command: f w)
Selects a Wired Wake On LAN option.
Transmission
(f)(w)( ) (Set ID)( ) (Data)(Cr)
Data00:[Off]
01:[On]
Acknowledgment
(w)( ) (Set ID)( )(OK/NG)(Data)(x)
53. [OSD Rotation] (Command: t h)
Sets the Screen Rotation feature.
Transmission
(t)(h)( ) (Set ID)( ) (Data) (Cr)
Data00:[Off]
01: 90 degrees
02: 270 degrees
03: 180 degrees
Acknowledgment
(h)( )(Set ID)( )(OK/NG)(Data)(x)
* This feature may not be available for all models.
54. [Time Sync] (Command: s n, 16)
Sets Time Sync.
Transmission
(s)(n)( ) (Set ID)( ) (1)(6)( ) (Data)(Cr)
Data00:[Off]
01:[On]
* This feature only works when the monitor is in Master mode.
* This feature does not work if the current time is not set.
Acknowledgment
(n)( ) (Set ID)( ) (OK/NG)(1)(6)(Data)(x)
* This feature may not be available for all models.
55. [Contents Sync] (Command: t g)
Sets Content Sync.
Transmission
(t)(g)( ) (Set ID)( ) (Data)(Cr)
Data00:[Off]
01:[On]
Acknowledgment
(g)( ) (Set ID)( )(OK/NG)(Data)(x)
* This feature may not be available for all models.
56. [LAN Daisy Chain] (Command: s n, 84)
Turns on/off LAN Daisy Chain.
Transmission
(s)(n)( ) (Set ID)( ) (8)(4)( ) (Data)(Cr)
Data00:[Off]
01:[On]
Acknowledgment
(n)( ) (Set ID)( ) (OK/NG)(8)(4)(Data)(x)
* This feature may not be available for all models.
57. [External Input Rotation] (Command: s n, 85)
Sets the External Input Rotation feature.
Transmission
(s)(n)( ) (Set ID)( ) (8)(5)( ) (Data)(Cr)
Data00:[Off]
01: 90 degrees
02: 270 degrees
03: 180 degrees
Acknowledgment
(n)( ) (Set ID)( )(OK/NG)(8)(5)(Data)(x)
* This feature may not be available for all models.
58. [Beacon] (Command: s n, 88)
Turns on/off Beacon.
Transmission
(s)(n)( ) (Set ID)( )(8)(8)( ) (Data)(Cr)
Data00:[Off]
01:[On]
Acknowledgment
(n)( ) (Set ID)( ) (OK/NG)(8)(8)(Data)(x)
* This feature may not be available for all models.
59. [Brightness Scheduling] Mode (Command: s m)
Selects a Brightness Scheduling mode.
Transmission
(s)(m)( ) (Set ID)( ) (Data)(Cr)
Data00:[Off]
01:[On]
Acknowledgment
(m)( ) (Set ID)( )(OK/NG)(Data)(x)
* This feature does not work if the current time is not set.
* This feature may not be available for all models.
60. [Brightness Scheduling] (Command: s s)
Sets Brightness Scheduling.
Transmission
(s)(s)( ) (Set ID)( ) (Data1)( ) (Data2)( ) (Data3)(Cr)
Data1
F1: Reads the 1st Brightness Scheduling's data
F2: Reads the 2nd Brightness Scheduling's data
F3: Reads the 3rd Brightness Scheduling's data
F4: Reads the 4th Brightness Scheduling's data
F5: Reads the 5th Brightness Scheduling's data
F6: Reads the 6th Brightness Scheduling's data
-
FF: Reads all stored lists
-
e1 to e6 (Deletes one index), e0 (Deletes all indexes)
E0: Deletes all Brightness Schedulings
E1: Deletes the 1st Brightness Scheduling
E2: Deletes the 2nd Brightness Scheduling
E3: Deletes the 3rd Brightness Scheduling
E4: Deletes the 4th Brightness Scheduling
E5: Deletes the 5th Brightness Scheduling
E6: Deletes the 6th Brightness Scheduling
4.00-17:00 - 23 hours
Data2 00-3B: 00 - 59 minutes
Data3 00-64: Backlight 0 - 100
* To read or delete a list of quick brightness controls you have set, [Data2][Data3] must be set to FF.
* If you want to read a complete list of quick brightness controls you have set through FF, do not enter any values in [Data2][Data3].
* When retrieving all items of the set Brightness Scheduling list through FF, OK will be acknowledged (ACK) even if there is no saved list.
Example 1: ss 01 f1 ff ff - Reads the 1st index data from the quick brightness control.
Example 2: ss 01 ff – Reads all index data from the quick brightness control.
Example 3: ss 01 e1 ff ff - Deletes the 1st index data from the quick brightness control.
Example 4: ss 01 07 1E 46 - Adds a schedule whose time is 07:30 and whose backlight is 70.
Acknowledgment
(s)( )(Set ID)( )(OK/NG)(Data1)(Data2)(Data3)(x)
* This feature may not be available for all models.
61. [Multi Screen] Mode & Input (Command: x c)
Saves and controls Multi Screen modes and inputs.
Transmission (x)(c)( )(Set ID)( )(Data1)( )(Data2)( )(Data3)( )(Data4) ( )(Data5)( )(Cr) Data1 (Sets MultiScreen mode) 10:PIP 22:PBP2 23:PBP3 24:PBP4 25: PBP3 (1:2:1) Data2 (Sets the Main input of Multi screen) Data3 (Sets the Sub1 input of Multi screen) Data4 (Sets the Sub2 input of Multi screen) Data5 (Sets the Sub3 input of Multi screen) 80: DVI-D 90: HDMI1 91: HDMI2 92: OPS/HDMI3/DVI-D 95: OPS/DVI-D 96: HDMI3/DVI-D 97: HDMI3/HDMI2/DVI-D 98: OPS 99: HDMI2/OPS C0: DISPLAYPORT C1: DISPLAYPORT/USB-C C2: HDMI3 C3: HDBaseT Acknowledgment (c)( )(Set ID)( )(OK/NG)( )(Data1)(Data2)(Data3) (Data4)(Data5)(x)
* This feature may not be available for all models.
* Only the input modes supported by the model works.
* This feature operates as the last input, and supports data in DTV format.
62. [Aspect Ratio] (Multi screen) (Command: x d)
Controls the aspect ratio of Multi Screen.
Transmission (x)(d)( )(Set ID)( )(Data1)( )(Data2)(Cr) Data1 01: Controls the Main input 02: Controls the Sub1 input 03: Controls the Sub2 input 04: Controls the Sub3 input Data2 00: Full Screen 01:Original
Acknowledgment (d)( ) (Set ID)( ) (OK/NG)(Data1)(Data2)(x)
* This feature may not be available for all models.
63. [SCREEN OFF] (Multi screen) (Command: x e)
Turns on/off each screen in the Multi Screen.
Transmission (x)(e)( )(Set ID)( )(Data1)( )(Data2)(Cr) Data1 01: Controls the Main input 02: Controls the Sub1 input 03: Controls the Sub2 input 04: Controls the Sub3 input Data2 00: Screen On 01: Screen Off
* This feature only works when the Multi Screen app is running.
* This feature does not work when there is no signal.
Acknowledgment (e)( )(Set ID)( )(OK/NG)(Data1)(Data2)(x)
* This feature may not be available for all models.
64. [Screen Off Always] (Command: s n, 0d)
If you activate the Screen Off Always feature, the monitor enters Screen Off mode regardless of whether or not you have activated PM mode.
Transmission (s)(n)( ) (Set ID)( ) (0)(d)( ) (Data)(Cr) Data00:[Off] 01:[On]
Acknowledgment (n)( )(Set ID)( )(OK/NG)(0)(d)(Data)(x)
* This feature may not be available for all models.
65. Stop Video (Command: k x)
Controls Stop Video.
Transmission
(k)(x)( ) (Set ID)( ) (Data)(Cr)
Data 00: The Stop Video feature is on.
01: The Stop Video feature is off.
* This feature only works in single input mode.
Acknowledgment
(x)( )(Set ID)( )(OK/NG)(Data)(x)
* This feature may not be available for all models.
66. Wireless [Wake On LAN] (Command: s n, 90)
Sets the Wireless Wake-on-LAN feature.
Transmission
(s)(n)( ) (Set ID)( )(9)(0)( ) (Data)(Cr)
Data00:[Off]
01:[On]
Acknowledgment
(n)( ) (Set ID)( )(OK/NG)(9)(0)(Data)(x)
* This feature may not be available for all models.
67. [OSD Lock] (Command: k l)
Sets OSD Lock.
Transmission
(k)(l)( ) (Set ID)( ) (Data)(Cr)
Data 00: OSD Lock
01: Unlock OSD Lock
Acknowledgment
(I)( ) (Set ID)( )(OK/NG)(Data)(x)
68. [HDMI IT Content] (Command: s n, 99)
Automatically sets the picture mode based on HDMI data.
Transmission
(s)(n)( ) (Set ID)( ) (9)(9)( ) (Data)(Cr)
Data00:[Off]
01:[On]
Acknowledgment
(n)( ) (Set ID)( )(OK/NG)(9)(9)(Data)(x)
* This feature may not be available for all models.
69. [Holiday Setting] (Command: s n, 9b)
Sets holidays.
Transmission
- (s)(n)( ) (Set ID)( )(9)(b)( )
(Data1)( ) (Data2)( ) (Data3)( )
(Data4)( ) (Data5)( ) (Data6)(Cr)
-
(s)(n)( ) (Set ID)( ) (9)(b)( ) (Data1)( ) (Data2)(Cr)
-
(s)(n)( ) (Set ID)( ) (9)(b)( ) (Data1)(Cr)
-
Setting a Holiday
Data1 Start year
00-:2010-
Data2 Start month
01 - 0c: January - December
Data3 Start date
01 - 1F: 01-31
Data4 For how long from the start year/month/date
01-07: For 1 to 7 days
Data5 Repetition
00:None
01: Every month
02: Every Year
Data6 Repeats the schedule on a date/day-of-the-week basis.
01: On a date basis.
02: On a day-of-the-week basis.
* The minimum and maximum values for Data1 differ depending on the product's release year.
* You can input a value for [Data 6] only when a value has already been set for [Data 5] (every year or every month).
- Checking a Schedule
Data1 Select the desired schedule.
F1: Reads the 1st schedule
F2: Reads the 2nd schedule
F3: Reads the 3rd schedule
F4: Reads the 4th schedule
F5: Reads the 5th schedule
F6: Reads the 6th schedule
F7: Reads the 7th schedule
Data2
FF
3. Deleting a Schedule
E0: Deletes all holiday schedules
E1: Deletes the 1st holiday schedule
E2: Deletes the 2nd holiday schedule
E3: Deletes the 3rd holiday schedule
E4: Deletes the 4th holiday schedule
E5: Deletes the 5th holiday schedule
E6: Deletes the 6th holiday schedule
E7: Deletes the 7th holiday schedule
* This feature does not work if the current time is not set.
Acknowledgment
- (n)( ) (Set ID)( ) (OK/NG)(9)(b)
(Data1)(Data2)(Data3)(Data4)(Data5)(Data6)(x) - (n)( ) (Set ID)( ) (OK/NG)(9)(b)(f)(1\~7)
(Data1)(Data2)(Data3)(Data4)(Data5)(Data6)(x) - (n)( ) (Set ID)( ) (OK/NG)(9)(b)(Data1)(x)
* This feature may not be available for all models.
70. [ISM Method] (Command: s n, 9c)
Sets UPnP.mode.
Transmission
(s)(n)( ) (Set ID)( ) (9)(c)( ) (Data)(Cr)
Data00:[Off]
01:[On]
Acknowledgment
(n)( ) (Set ID)( )(OK/NG)(9)(c)(Data)(x)
* This feature may not be available for all models.
* Changing UPnP mode results in a reboot.
71. [Home Dashboard Lock] (Command: s n, 9d)
Sets Home Dashboard Lock.
Transmission
(s)(n)( ) (Set ID)( ) (9)(d)( ) (Data)(Cr)
Data 00: Home Dashboard Unlock
01: Home Dashboard Lock
Acknowledgment
(n)( ) (Set ID)( )(OK/NG)(9)(d)(Data)(x)
* This feature may not be available for all models.
72. [USB Lock] (Command: s n, 9e)
Sets USB Lock.
Transmission
(s)(n)( ) (Set ID)( )(9)(e)( ) (Data)(Cr)
Data 00: USB Unlock
01: USB Lock
Acknowledgment
(n)( ) (Set ID)( )(OK/NG)(9)(e)(Data)(x)
* This feature may not be available for all models.
73. [Wi-Fi Lock] (Command: s n, 9f)
Sets Wi-Fi Lock.
Transmission
(s)(n)( ) (Set ID)( ) (9)(f)( ) (Data)(Cr)
Data 00: Wi-Fi Unlock
01: Wi-Fi Lock
Acknowledgment
(n)( ) (Set ID)( )(OK/NG)(9)(f)(Data)(x)
* This feature may not be available for all models.
74. [Screen Share Lock] (Command: s n, a0)
Sets Screen Share Lock.
Transmission
(s)(n)( ) (Set ID)( ) (a)(0)( ) (Data)(Cr)
Data 00: Screen Share Unlock
01: Screen Share Lock
Acknowledgment
(n)( ) (Set ID)( )(OK/NG)(a)(0)(Data)(x)
* This feature may not be available for all models.
75. See [Backup via Storage] (Command: s n, a1)
Sets Backup via Storage.
Transmission
-
(s)(n)( ) (Set ID)( ) (a)(1)( ) (Data1)(Cr)
-
(s)(n)( ) (Set ID)( ) (a)(1)( ) (Data1) (Data2) (Cr)
-
Disabling Backup via Storage.
Data100:Off
- Setting Backup via Storage to Auto
Data101:Auto
Data2 01: 30 minute
02: End time
03: End time
04: End time
- Setting Backup via Storage to Manual
Data102:Manual
- Setting Backup via Storage to SuperSign Content
Data1 03: SuperSign Contents
- Set to SI App / Play via URL
Data 1 04: [SI App / Play via URL]
Acknowledgment
-
(n)( ) (Set ID)( ) (OK/NG)(a)(1) (Data1)(x)
-
(n)( ) (Set ID)( ) (OK/NG)(a)(1)(Data1)(Data2)(x)
* This feature may not be available for all models.
76. [Digital Audio Input] (Command: s n, a2)
Sets Digital Audio Input.
Transmission
(s)(n)( )(Set ID)( )(a)(2)( )(Data)(Cr)
Data00:Digital
01:Analog
Acknowledgment
(n)( )(Set ID)( )(OK/NG)(a)(2)(Data)(
* This feature may not be available for all models.
77. [Booting Logo Image] (Command: s n, a3)
Sets Booting Logo Image.
Transmission
(s)(n)( )(Set ID)( )(a)(3)( )(Data)(Cr)
Data00:[Off]
01:[On]
Acknowledgment (n)( )(Set ID)( )(OK/NG)(a)(3)(Data)(x) * This feature may not be available for all models.
78. [SoftAP] (Command: s n, a4)
Sets SoftAP Mode.
Transmission
(s)(n)( )(Set ID)( )(a)(4)( )(Data)(Cr)
Data00:[Off]
01:[On]
Acknowledgment (n)( )(Set ID)( )(OK/NG)(a)(4)(Data)(x) * This feature may not be available for all models.
79. [Natural Size] (Command: s n, a5)
Sets the Natural Size feature.
Transmission
(s)(n)( )(Set ID)( )(a)(5)( )(Data)(Cr)
Data 00-64: Natural Size 0 - 100
Acknowledgment
(n)( )(Set ID)( )(OK/NG)(a)(5)(Data)(x)
* This feature may not be available for all models.
80. Play Saved Internal Media (Command: s n, a8)
Plays media files saved on internal storage. Internal storage media: videos and images stored on the monitor's internal storage after being exported via Contents Management Player.
* Not applicable: Template content, SuperSign content, and playlist content.
Transmission
(s)(n)( )(Set ID)( )(a)(8)( )(Data)(Cr)
Data01:Play
Acknowledgment
(n)( )(Set ID)( )(OK/NG)(a)(8)( )(Data
* This feature may not be available for all models.
81. [No Signal Image] (Command: s n, a9)
Sets the No Signal Image feature.
Transmission
(s)(n)( ) (Set ID)( ) (a)(9)( ) (Data)(Cr)
Data00:[Off]
01:[On]
Acknowledgment
(n)( ) (Set ID)( )(OK/NG)(a)(9)(Data)(x)
* This feature may not be available for all models.
82. [Audio Out] (Command: s n, aa)
Sets Audio Out to Off/Variable/Fixed.
Transmission
(s)(n)( ) (Set ID)( ) (a)(a)( ) (Data)(Cr)
Data00:[Off]
01:[Variable]
02:[Fixed]
Acknowledgment
(n)( ) (Set ID)( )(OK/NG)(a)(a)(Data)(x)
* This feature may not be available for all models.
83. [DPM Wake Up Control] (Command: s n, Ob)
Controls the DPM Wake Up Control settings.
Transmission
(s)(n)( ) (Set ID)( ) (0)(b)( ) (Data)(Cr)
Data00:[Clock]
01:[Clock+DATA]
Acknowledgment
(n)( ) (Set ID)( )(OK/NG)(0)(b)(Data)(x)
* This feature may not be available for all models.
84. [Fan] Failure Check (Command: d w)
Data1 00: Fan failure
01: Fan normal
Data2 00: 0 faults (Fan Normal)
01: 1 fault
02: 2 faults
03: 3 faults
04: 4 faults
05: 5 faults
06: 6 faults
07: 7 faults
08: 8 faults
09: 9 faults
OA: 10 faults
* This feature may not be available for all models.
85. [Apply to all inputs] (Command: n, 52)
Apply the video mode and low value of the current input to the same video value of all inputs.
Transmission
(s)(n)( ) (Set ID)( ) (5)(2)( ) (Data)(Cr)
Data01:Apply
Acknowledgment
(n)( ) (Set ID)( ) (OK/NG)(5)(2)(Data)(x)
* This feature may not be available for all models.
* Other commands do not work for a certain time after applying.
86. [Timer Power On] Scheduling (Command: f d)
Sets On Timer settings.
Transmission
(f)(d)(Set ID)(Data1)(Data2)(Data3)(Cr)
Data1
- f1h to f7h (data reading)
F1: Reads the 1st Timer Power On's data
F2: Reads the 2nd Timer Power On's data
F3: Reads the 3rd Timer Power On's data
F4: Reads the 4thTimer Power On's data
F5: Reads the 5th Timer Power On's data
F6: Reads the 6th Timer Power On's data
F7: Reads the 7th Timer Power On's data
- e1h to e7h (Deletes one index), e0h (Deletes all indexes)
E0: Delete all Timer Power On's
E1: Delete the 1st Timer Power On
E2: Delete the 2nd Timer Power On
E3: Delete the 3rd Timer Power On
E4: Delete the 4th Timer Power On
E5: Delete the 5th Timer Power On
E6: Delete the 6th Timer Power On
E7: Delete the 7th Timer Power On
- 01h to 0ch (Timer Power On days setting)
02: Repeat Daily
03: Repeat from Monday to Friday
04: Repeat from Monday to Saturday
05: Repeat from Saturday to Sunday
06: Repeat on Sunday
07: Repeat on Monday
08: Repeat on Tuesday
09: Repeat on Wednesday
OA: Repeat on Thursday
OB: Repeat on Friday
OC: Repeat on Saturday
Data2 00-17: 00 - 23 hours
Data3 00-3B: 00 - 59 minutes
* To read or delete a Timer Power On you have set, [Data2] [Data3] must be set to FFH.
Example 1: fd 01 f1 ff ff - Reads the 1st index data in Timer Power On.
Example 2: fd 01 e1 ff ff - Reads the 1st index data in Timer Power On.
Example 3: fd 01 04 02 03 - Sets the Timer Power On as Monday - Saturday 02:03.
* This feature only works when Clock 1 (year/month/day) and Clock 2 (hour/minute/second) have been set.
Acknowledgment
(d)( ) (Set ID)( ) (OK/NG) (Data1) (Data2) (Data3) (x)
87. [Time to OFF] Scheduling (Command: f e)
Sets Off Timer settings.
Transmission
(f)(e)( ) (Set ID)( ) (Data1)( ) (Data2)( ) (Data3)(Cr)
Data1
- f1h to f7h (data reading)
F1: Reads the 1st Timer Power Off's data
F2: Reads the 2nd Timer Power Off's data
F3: Reads the 3rd Timer Power Off's data
F4: Reads the 4th Timer Power Off's data
F5: Reads the 5th Timer Power Off's data
F6: Reads the 6th Timer Power Off's data
F7: Reads the 7th Timer Power Off's data
- e1h to e7h (Deletes one index), e0h (Deletes all indexes)
E0: Delete all Timer Power Off's
E1: Delete the 1st Timer Power Off
E2: Delete the 2nd Timer Power Off
E3: Delete the 3rd Timer Power Off
E4: Delete the 4th Timer Power Off
E5: Delete the 5th Timer Power Off
E6: Delete the 6th Timer Power Off
E7: Delete the 7th Timer Power Off
- 01h to 0ch (Timer Power Off days setting)
02: Repeat Daily
03: Repeat from Monday to Friday
04: Repeat from Monday to Saturday
05: Repeat from Saturday to Sunday
06: Repeat on Sunday
07: Repeat on Monday
08: Repeat on Tuesday
09: Repeat on Wednesday
OA: Repeat on Thursday
OB: Repeat on Friday
OC: Repeat on Saturday
Data2 00-17: 00 - 23 hours
Data3 00-3B: 00 - 59 minutes
* To read or delete a Timer Power Off you have set, [Data2] [Data3] must be set to FFH.
Example 1: fe 01 f1 ff ff - Reads the 1st index data in Timer Power Off.
Example 2: fe 01 e1 ff ff - Reads the 1st index data in Timer Power Off.
Example 3: fe 01 04 02 03 - Sets the Timer Power Off as Monday - Saturday 02:03.
* This feature only works when Clock 1 (year/month/day) and Clock 2 (hour/minute/second) have been set.
Acknowledgment
(e)( ) (Set ID)( ) (OK/NG) (Data1) (Data2) (Data3) (x)
88. Novastar Control (Command: s n, b8)
It controls the Novastar device.
Transmission
(s)(n)( ) (Set ID)( ) (b)(8)( ) (Data1) (Data2) (Cr)
Data1 00: novastar power
01: novastar brightness
Data2
- For power
0 x 00: Off
0 x 01: On
- For brightness
0 x ff: Read
0 x 00 \~ 0 x fe: write the corresponding value
Acknowledgment
(n)( ) (Set ID)( ) (OK/NG)(b)(8)(Data1)(Data2)(x)
* This feature may not be available for all models.
* Other commands do not work for a certain time after applying.
89. [Transfer Control] (Command: s n, cb)
It transfers the command to RS232C out.
Transmission
(s)(n)( ) (Set ID)( ) (c)(b)( ) (Data)(Cr)
Data Data that goes out to RS232C out
Acknowledgment
(n)( ) (Set ID)( )(OK/NG)(c)(b)(Data)(x)
Data Response value of Data transferred to RS232C out
* This feature may not be available for all models.
* Other commands do not work for a certain time after applying.
90. Multichannel (Command: s n, 76)
It changes the channel.
Transmission
(s)(n)( ) (Set ID)( ) (7)(6)( ) (Data)(Cr)
Data 01 - 09: Channel to switch to
Acknowledgment
(n)( ) (Set ID)( ) (OK/NG)(7)(6)(Data)(x)
* This feature may not be available for all models.
91. Change Setid (Command: j x)
Changes and checks Setid.
- When it is a general LED model
Transmission
(j)(x)( ) (Set ID)( ) (Data1)( ) (Data2)(Cr)
Data1 Data2 : 00 01 \~ 03 e8 (1\~1000)
Acknowledgment
(x)( ) (Set ID)( ) (OK/NG) (Data1) (Data2) (x)
- When it is another model (read only)
Transmission
(j)(x)( ) (Set ID)( ) (Data)(Cr)
Data FF: Check the value of Setid
The returned value is indicated as a value of hexadecimal numbers corresponding to the ASCII code value.
(Return when Setid is 1: x 01 OK31x
Return when Setid is 1000: x 3e8 OK31303030x)
Acknowledgment
(x)( )(Set ID)( )(OK/NG)(Data)(x)
* It works even if the Setid does not match.
92. [Gamma] (Command: s n, ad)
Sets Gamma Mode.
Transmission
(s)(n)( ) (Set ID)( ) (a)(d)( ) (Data)(Cr)
Data00:low
01:medium
02:High1
03:High2
Acknowledgment
(n)( ) (Set ID)( ) (OK/NG)(a)(d)(Data)(x)
* This feature may not be available for all models.
93. [Black Level] (Command: s n, ae)
It sets the Black Level mode.
Transmission
(s)(n)( ) (Set ID)( ) (a)(e)( ) (Data)(Cr)
Data00:Low
01:High
02:Auto
Acknowledgment
(n)( )(Set ID)( )(OK/NG)(a)(e)(Data)(x)
* This feature may not be available for all models.
94. [UHD Deep Color] (Command: s n, af)
It sets the UHD Deep Color mode for each input.
Transmission
(s)(n)( )(Set ID)( )(a)(f)( )(Data1)( )(Data2)(Cr)
Data1 70: DVI-D
90: HDMI1
91: HDMI2
92: OPS/HDMI3/DVI-D
95: OPS/DVI-D
96: HDMI3/DVI-D
97: HDMI3/HDMI2/DVI-D
98: OPS
99: HDMI2/OPS
C0: DISPLAYPORT
C1: DISPLAYPORT/USB-C
C2: HDMI3
C3: HDBaseT
Data200:[Off]
01:[On]
Acknowledgment
(n)( )(Set ID)( )(OK/NG)(a)(f)(Data1)(Data2)(x)
* This feature may not be available for all models.
96. [Input Manager] (Command: s n, b1)
It sets labels by input.
Transmission
(s)(n)( )(Set ID)( )(b)(1)( )(Data1)( )(Data2)(Cr)
Data1 90: HDMI1
91: HDMI2
92: OPS/HDMI3/DVI-D
95: OPS/DVI-D
96: HDMI3/DVI-D
97: HDMI3/HDMI2/DVI-D
98: OPS
99: HDMI2/OPS
C0: DISPLAYPORT
C1: DISPLAYPORT/USB-C
C2: HDMI3
C3: HDBaseT
Data200:DTV
01:PC
Acknowledgment
(n)( )(Set ID)( )(OK/NG)(b)(1)(Data1)(Data2)(x)
* This feature may not be available for all models.
95. [Sync Mode] (Command: s n, b0)
Sets Sync Mode.
Transmission
(s)(n)( ) (Set ID)( ) (b)(0)( ) (Data)(Cr)
Data 00: [Slave Mode]
01: [Master Mode]
Acknowledgment
(n)( )(Set ID)( )(OK/NG)(b)(0)(Data)(x)
* This feature may not be available for all models.
97. [PC/OPS Power Control] (Command: s n, 8b)
It sets the OPS/PC Power Control mode.
Transmission
(s)(n)( )(Set ID)( )(8)(b)( )(Data)(Cr)
Data00:[Disable]
01:[Sync(On)]
02:[Sync(On/Off)]
Acknowledgment
(n)( )(Set ID)( )(OK/NG)(8)(b)(Data)(x)
* This feature may not be available for all models.
98. [LED Local Dimming] (Command: s n, c1)
It sets [LED Local Dimming].
(A feature to set the LED Local Dimming in a sub-item under [Settings] → [Display] [Expert Controls])

Transmission
(s)(n)( )(Set ID)( )(c)(1)( )(Data)(Cr)
Data00:[Off]
01:[On]

Acknowledgment
(n)( )(Set ID)( )(OK/NG)(c)(1)(Data)(x)
* This feature may not be available for all models.
99. [Scan Inversion] (Command: s n, 87)
It controls the on/off status of Scan Inversion.
Transmission
(s)(n)( ) (Set ID)( ) (8)(7)( ) (Data)(Cr)
Data00:Off
01:On
Acknowledgment
(n)( ) (Set ID)( )(OK/NG)(8)(7)(Data)(x)
* This feature may not be available for all models.
* If you change the values on a Video Wall model, please reboot for it to work normally.
100. [Frame Control] (Command: s n, b7)
It controls the Frame Control.
Transmission
(s)(n)( ) (Set ID)( ) (b)(7)( ) (Data)(Cr)
Data00:Off
01:On
Acknowledgment
(n)( ) (Set ID)( )(OK/NG)(b)(7)(Data)(x)
* This feature may not be available for all models.
* If you change the values on a Video Wall model, please reboot for it to work normally.
101. [Average Picture Level Auto Control] (Command: s n, be)
Sets Average Picture Level Auto Control.
Transmission
(s)(n)( ) (Set ID)( ) (b)(e)( ) (Data)(Cr)
Data 00: [Off]
01: [On]
Acknowledgment
(n)( ) (Set ID)( )(OK/NG)(b)(e)(Data)(x)
* This feature may not be available for all models.
102. Read Brightness Value (Command: m u)
Checks the brightness value.
Transmission
(m)(u)( ) (Set ID)( )(FF)(Cr)
Acknowledgment
(u)()(SetID()(OK/NG)(Data1)(Data2)(Data3)(Data4)
(Data5)(Data6)(Data7)(x)
Data 1 00\~64: Backlight PWM figure 0-100
Data 2 00\~ff: The upper 1-byte of the value measured by the CA210.
Data 3 00\~ff: The lower 1-byte of the value measured by the CA210.
The CA210 measurement is Hex: 0000\~ffff, Decimal: 0 - 65535
Data 4 00\~ff: The upper 1-byte of the value measured by BLU 1 Sensor.
Data 5 00\~ff: The lower 1-byte of the value measured by BLU 1 Sensor
Data 6 00\~ff: The upper 1-byte of the value measured by BLU 2 Sensor
Data 7 00\~ff: The lower 1-byte of the value measured by BLU 2 Sensor
The BLU measurement is Hex: 0000\~ffff, Decimal: 0 - 65535
* The CA210 measurement is entered as "Calibration" when the product is released from the factory. It is Default 0 before the calibration.
* This feature may not be available for all models.
103. [Screen Fault Detection] (Command: t z)
Sets the Screen Fault Detection feature.
Transmission
(t)(z)( ) (Set ID)( ) (Data)(Cr)
Data 00: [Off]
01: [On]
Acknowledgment
(z)( )(Set ID)( )(OK/NG)(Data)(x)
* This feature may not be available for all models.
104. [Stereo Mode] (Command: s n, c2)
Controls Stereo Mode.
Transmission
(s)(n)( ) (Set ID)( ) (c)(2)( ) (Data)(Cr)
Data 00: Left/Right
01: Left/Left
02: Right/Right
Acknowledgment
(n)( ) (Set ID)( ) (OK/NG)(c)(2)(Data)(x)
* This feature may not be available for all models.
105. [HDR Picture Mode] (Command: s n, c4)
Selects a HDR Picture Mode.
Transmission
(s)(n)( ) (Set ID)( ) (c)(4)( ) (Data)(Cr)
Data 00: Mall/QSR
01: General
02: Gov./Corp.
04: Education
Acknowledgment
(n)( ) (Set ID)( ) (OK/NG)(c)(4)(Data)(x)
* Depending on the model, some picture modes may not be supported.
* It works only when the HDR content is running.
106. [Dynamic Tone Mapping] (Command: s n, c5)
Selects Dynamic Tone Mapping
Transmission
(s)(n)( ) (Set ID)( ) (c)(5)( ) (Data)(Cr)
Data 00: [Off]
01: [On]
Acknowledgment
(n)( ) (Set ID)( ) (OK/NG)(c)(5)(Data)(x)
* Depending on the model, some picture modes may not be supported.
* It works only when the HDR content is running.
107. [LED Local Dimming] (Command: s n, c6)
Sets the LED Local Dimming.
(A feature to set the LED Local Dimming in a sub-item under [Settings] → [Display] [Picture Mode] [Picture Options])
Transmission
(s)(n)( ) (Set ID)( )(c)(6)( ) (Data)(Cr)
Data 00: [Off]
01: [low]
02: [Medium]
03: [High]
Acknowledgment
(n)( ) (Set ID)( ) (OK/NG)(c)(6)(Data)(x)
* This feature may not be available for all models.
108. [USB2 to HDBaseT] (Command: s n, c3)
Sets USB2 to HDBaseT.
Transmission
(s)(n)( ) (Set ID)( ) (c)(3)( ) (Data)(Cr)
Data 00: [Off]
01: [On]
Acknowledgment
(n)( ) (Set ID)( ) (OK/NG)(c)(3)(Data)(x)
* This feature may not be available for all models.
109. [Change Password] (Command: s n, a7)
Changes password.
Transmission
(s)(n)( ) (Set ID)( ) (a)(7)( ) (Data1)(Data2)(Data3)
(Data4)(Data5)(Data6)( ) (Data7)(Data8)(Data9)
(Data10)(Data11)(Data12)(Cr)
Data 1-6:0-9(Previously set password)
Data 7-12:0-9(New password)
Acknowledgement
(n)( ) (Set ID)( ) (OK/NG)(a)(7)( ) (Data1)(Data2)(Data3)
(Data4)(Data5)(Data6)( ) (Data7)(Data8)(Data9)
(Data10)(Data11)(Data12)(x)
* This feature may not be available for all models.
![LG LCLG006 - [Change Password] (Command: s n, a7) - 1](/content/2026/05/943604/images/27a15c67d2253308be586ea5a8fcfa808c84b10ab10c6a1455a0ee9a9f5bcc45.jpg)
LG
Life's Good
- TABLE OF CONTENTS
- SAFETY PRECAUTIONS ......3
- LICENSES......12
- ASSEMBLING AND
- PREPARING 13
- USING LCLG006 17
- CONNECT A USB DEVICE ..... 19
- TROUBLESHOOTING......21
- PRODUCT SPECIFICATIONS...23
- SAFETY PRECAUTIONS
- WARNING
- CAUTION
- Precautions for the AC Adapter and Power
- Precautions for Moving the Product
- Precautions for Installing the Product
- Precautions for Cleaning the Product
- Precautions for Using the Product
- Product Disposal
- LICENSES
- ASSEMBLING AND PREPARING
- NOTE
- Parts and Buttons
- Rack Installation (Optional)
- Connecting to LCLG006 with LAN Cable
- USING LCLG006
- Connecting to PC
- Connecting to External Devices
- CONNECT A USB DEVICE
- Tips for Using USB Devices
- TROUBLESHOOTING
- PRODUCT SPECIFICATIONS
- Supplier's Declaration of Conformity
- USER MANUAL
- LG Digital
- Signage
- (MONITOR SIGNAGE)
- CONTENTS
- SETTINGS 4
- CONTENT MANAGER 38
- MANAGEMENT TOOLS......53
- TO CONTROL AN EXTERNAL PC USING TOUCH SCREEN .... 55
- SMART CALIBRATION 56
- IR CODE 58
- CONTROLLING MULTIPLE PRODUCTS......60
- SETTINGS
- Home
- Global Buttons
- Dashboard
- [Content Manager]
- Ez Setting
- [Video Wall]
- [On/Off Scheduler]
- [SI Server Setting]
- [Server Setting]
- [Fail Over]
- [Status Mailing]
- [Play via URL]
- [Setting Data Cloning]
- [Sync Mode]
- [Signage 365 Care]
- [Multi Screen]
- Selecting Screen Layout
- Closing Screen Layout Menu
- Changing Screen Input
- Playing Videos on Split Screens
- General
- [Language]
- [System Information]
- [Set ID]
- [Time Setting]
- [Power]
- [No Signal Power Off (15 Min)]
- [No IR Power Off (4hour)]
- [DPM]
- [DPM Wake Up Control]
- [PM Mode]
- [Power On Delay](0-250)
- [Power On Status]
- [Wake On LAN]
- [Power Indicator]
- [Power On/Off History]
- [Network]
- [Wired Connection (Ethernet)]
- [Wi-Fi Connection]
- [LAN Daisy Chain]
- [SoftAP]
- [UPnP]
- [Ping Test]
- [Port Control]
- Tips for Network Settings
- Tips for When Configuring Wireless Network Settings
- [Safety Mode]
- [ISM Method]
- [Mode]
- Repeat Daily
- [StandBy]
- [Duration]
- [Select Day]
- [Start Time]
- [End Time]
- [Action Cycle]
- [User Image Download]
- [User Video Download]
- \* How to reset or delete User Image / User Video
- [Screen Fault Detection]
- [Expert Controls]
- [Beacon]
- [Control Interface]
- [Background Image]
- [Input Manager]
- [SIMPLINK Setup]
- [Crestron]
- [USB2 to HDBaseT]
- Display
- [Picture Mode]
- [HDR]
- [Customize]
- [Aspect Ratio]
- [Rotation]
- [Screen Rotation]
- [External Input Rotation]
- [UHD Deep Color]
- [OLED Panel Settings]
- [Energy Saving]
- [HDMI IT Content]
- [LED Local Dimming]
- Video Output Resolution
- Sound
- [Sound Mode]
- [Balance]
- [Equalizer]
- [Reset]
- [Sound Out]
- SETTINGS / ⚙→[Sound] [Sound Out]
- [Audio Out]
- [AV Sync Adjustment]
- [Digital Audio Input]
- Admin
- [Lock Mode]
- [Home Dashboard Lock]
- [USB Lock]
- [OSD Lock]
- [IR Operation Lock]
- [Local Key Lock]
- [Wi-Fi Lock]
- [Screen Share Lock]
- [Change Password]
- [Enterprise Settings]
- [Factory Reset]
- CONTENT MANAGER
- Web Login
- [Player]
- [Continuous Play]
- [Export]
- [Delete]
- [Filter / Sort]
- [Create Playlist]
- [Distribution]
- [Scheduler]
- HOME / ↑ → (Scheduler)
- [Creating a Schedule]
- [Importing a Schedule]
- [Exporting a Schedule]
- [Delete Schedule]
- [Calendar View]
- [Distribute]
- [Template]
- HOME / ↗ → (Template)
- Supported Photo & Video Files
- Tips for using USB storage devices
- Group Manager 2.0
- [Master]
- [Slave]
- [GROUP MANAGEMENT]
- [Content Distribute]
- How to Use
- ScreenShare
- How to Use [ScreenShare]
- Configuring WiDi (Wireless Display)
- LG Presenter
- Connect
- On Signage
- On PC
- Screen Share
- Handover
- On PC2
- On PC1
- MANAGEMENT TOOLS
- Function
- Picture ID
- TO CONTROL AN EXTERNAL PC USING TOUCH SCREEN
- Connecting to a PC
- SMART CALIBRATION
- How to Run
- [Manual Calibration]
- IR CODE
- CONTROLLING MULTIPLE PRODUCTS
- Connecting cables
- Communication Parameter
- Transmission/Reception Protocol
- Transmission
- Acknowledgment
- [Power] (Command: k a)
- Select Input (Command: x b)
- [Aspect Ratio] (Command: k c)
- [Brightness] (Command: j q)
- [Picture Mode] (Command: d x)
- [Contrast] (Command: k g)
- [Brightness] (Command: k h)
- [Sharpness] (Command: k k)
- [Color] (Command: k i)
- [Tint] (Command: k j)
- [Color Temperature] (Command: x u)
- [Balance] (Command: k t)
- [Sound Mode] (Command: d y)
- [Mute on] (Command: k e)
- Volume Control (Command: k f)
- [Current Time] 1 (year/month/day) (Command: f a)
- [Current Time] 2 (hour/minute/second) (Command: f x)
- [No Signal Power Off(15Min)] (Command: f g)
- [No IR Power Off] (Command: m n)
- [Language] (Command: f i)
- [Default] Settings (Command: f k)
- Current Temperature (Command: d n)
- [Key] (Command: m c)
- Time Elapsed (Command: d l)
- Product Serial Number Check (Command: f y)
- [Software Version] (Command: f z)
- [White Balance] Red Gain (Command: j m)
- [White Balance] Green Gain (Command: j n)
- [White Balance] Blue Gain (Command: j o)
- [White Balance] Red Offset (Command: s x)
- [White Balance] Green Offset (Command: s y)
- [White Balance] Blue Offset (Command: s z)
- [Backlight] (Command: m g)
- [SCREEN OFF] (Command: k d)
- [Tile Mode] (Command: d d)
- [Tile Mode] Check (Command: d z)
- [Tile ID] (Command: d i)
- [Natural Mode] (In Tile Mode) (Command: d j)
- [DPM] (Command: f j)
- Remote Control/Local Key Operation Lock (Command: k m)
- [Power On Delay] (Command: f h)
- [Fail Over] Mode (Command: m i)
- [Fail Over] Input Select (Command: m j)
- Remote Control Key Lock (Command: t p)
- [Local Key Operation Lock] (Command: t o)
- Status Check (Command: s v)
- Acknowledgement
- [Daylight Saving Time] (Command: s d)
- [PM Mode] (Command: s n, 0c)
- [ISM Method] (Command: j p)
- [Network Setting] (Command: s n, 80 or 81 or 82)
- [Power On Status] (Command: t r)
- Wired [Wake On LAN] (Command: f w)
- [OSD Rotation] (Command: t h)
- [Time Sync] (Command: s n, 16)
- [Contents Sync] (Command: t g)
- [LAN Daisy Chain] (Command: s n, 84)
- [External Input Rotation] (Command: s n, 85)
- [Beacon] (Command: s n, 88)
- [Brightness Scheduling] Mode (Command: s m)
- [Brightness Scheduling] (Command: s s)
- [Multi Screen] Mode & Input (Command: x c)
- [Aspect Ratio] (Multi screen) (Command: x d)
- [SCREEN OFF] (Multi screen) (Command: x e)
- [Screen Off Always] (Command: s n, 0d)
- Stop Video (Command: k x)
- Wireless [Wake On LAN] (Command: s n, 90)
- [OSD Lock] (Command: k l)
- [HDMI IT Content] (Command: s n, 99)
- [Holiday Setting] (Command: s n, 9b)
- Deleting a Schedule
- [ISM Method] (Command: s n, 9c)
- [Home Dashboard Lock] (Command: s n, 9d)
- [USB Lock] (Command: s n, 9e)
- [Wi-Fi Lock] (Command: s n, 9f)
- [Screen Share Lock] (Command: s n, a0)
- See [Backup via Storage] (Command: s n, a1)
- [Digital Audio Input] (Command: s n, a2)
- [Booting Logo Image] (Command: s n, a3)
- [SoftAP] (Command: s n, a4)
- [Natural Size] (Command: s n, a5)
- Play Saved Internal Media (Command: s n, a8)
- [No Signal Image] (Command: s n, a9)
- [Audio Out] (Command: s n, aa)
- [DPM Wake Up Control] (Command: s n, Ob)
- [Fan] Failure Check (Command: d w)
- [Apply to all inputs] (Command: n, 52)
- [Timer Power On] Scheduling (Command: f d)
- [Time to OFF] Scheduling (Command: f e)
- Novastar Control (Command: s n, b8)
- [Transfer Control] (Command: s n, cb)
- Multichannel (Command: s n, 76)
- Change Setid (Command: j x)
- [Gamma] (Command: s n, ad)
- [Black Level] (Command: s n, ae)
- [UHD Deep Color] (Command: s n, af)
- [Input Manager] (Command: s n, b1)
- [Sync Mode] (Command: s n, b0)
- [PC/OPS Power Control] (Command: s n, 8b)
- [LED Local Dimming] (Command: s n, c1)
- [Scan Inversion] (Command: s n, 87)
- [Frame Control] (Command: s n, b7)
- [Average Picture Level Auto Control] (Command: s n, be)
- Read Brightness Value (Command: m u)
- [Screen Fault Detection] (Command: t z)
- [Stereo Mode] (Command: s n, c2)
- [HDR Picture Mode] (Command: s n, c4)
- [Dynamic Tone Mapping] (Command: s n, c5)
- [LED Local Dimming] (Command: s n, c6)
- [USB2 to HDBaseT] (Command: s n, c3)
- [Change Password] (Command: s n, a7)
Brand : LG
Model : LCLG006
Category : Digital signage