
SC-1300AU6DWW - Dishwasher Seiki - Free user manual and instructions
Find the device manual for free SC-1300AU6DWW Seiki in PDF.


| Product Type | Dishwasher |
| Model | SC-1300AU6DWW |
| Brand | Seiki |
| Dimensions (W x D x H) | 598 x 598 x 845 mm |
| Net Weight | 42 kg |
| Gross Weight | 46 kg |
| Power Supply | 220-240 V ~ 50 Hz |
| Rated Power | 1920 W |
| Place Settings | 13 |
| Water Pressure Range | 30 kPa – 1000 kPa |
| Programs | ECO, Intensive, Glass, Hybrid, Prewash, Speed, Super, Hygiene |
| Energy Consumption (ECO) | 0.751 kWh |
| Water Consumption (ECO) | 8.8 L |
| Noise Level | Not specified (estimated typical: 44-50 dB) |
| Soft Water System | Yes (9 levels, adjustable) |
| Rinse Aid Dispenser | Yes (9 levels, adjustable) |
| Child Lock | Yes |
| Delay Timer | Yes (1-24 hours) |
| Dual Wash Function | Yes |
| Machine Care Program | Yes |
| Adjustable Upper Rack | Yes |
| Filter Type | Removable 3-part filter assembly |
| Spray Arms | Lower, middle, and top impeller |
| Installation Types | Freestanding or built-in |
| Warranty Contact | info@ayonz.com |
Frequently Asked Questions - SC-1300AU6DWW Seiki
User questions about SC-1300AU6DWW Seiki
0 question about this device. Answer the ones you know or ask your own.
Ask a new question about this device
Download the instructions for your Dishwasher in PDF format for free! Find your manual SC-1300AU6DWW - Seiki and take your electronic device back in hand. On this page are published all the documents necessary for the use of your device. SC-1300AU6DWW by Seiki.
USER MANUAL SC-1300AU6DWW Seiki
natural_image
Front view of a white SEIKI washing machine with digital display and control buttons (no visible text or symbols on the device itself)INSTRUCTION MANUAL
Please read this manual carefully before using, and keep it for future reference.
CONTENTS
| General | Safety | 4 | ||
| Product | Overview | 9 | ||
| Getting | Started | 14 | ||
| Installation | 15 | |||
| Operations | 22 | |||
| Cleaning | and | Maintenance | ||
| FAQs | 37 | |||
| Specifications | 42 |
IMPORTANT INFORMATION
Read this manual thoroughly before you start using the appliance.
The safety precautions instructions reduces the risk of fire, electric shock and injury when correctly complied to.
Please follow all instructions and take notice of all warnings.
Pay close attention to messages that follow this safety alert symbol or the words DANGER, WARNING or CAUTION. These words will be used to alert you of potential hazards that and injure you and others. Following these instruction will tell you how to reduce the chance of injury and the possible dangers if instructions aren't followed.

WARNING
This symbol indicates when there is a serious risk of injury if you do not pay attention to the warnings.

CAUTION
This symbol indicates when to be careful to avoid a serious risk of injury to oneself or damage to property.
ELECTRICAL SAFETY
- Voltage: Plug the appliance to a 220-240V, 50Hz, properly earthed power outlet, it must be in good working order.
- Power connection: Do not use an adaptor or an extension cord. Plug the power plug directly into a separate power point that cannot be accidentally turned off, and that is easily accessible so you can switch it off if needed.
- Power cord: Do not kink or damage the power supply cord. Make sure it is behind the appliance so no one can step on or place anything on the power supply cord or against it. A damaged power plug may overheat and cause a fire.
- Damaged cord: Do not use a cord that shows cracks or damage. Any damage to the cord may cause a short circuit, fire and/or electric shock. Contact our support centre on info@ayonz.com for advice
- Disconnection: Never pull the power cord to unplug appliance. Grip the plug and pull straight out from the power point.
- Electrical work: If the installation of this appliance requires any electrical work, make sure it is carried out by an electrician.
GENERAL SAFETY INSTRUCTIONS (Cont.)
To reduce risk of fire, electric shock or injury, always follow these basic precautions and accident prevention measures when using this appliance, including the below:
NOTE: This appliance should be installed by an authorized technician else warranty will be void.
INSTALLATION
- The product is heavy, be careful when moving it. To avoid back or other injury, have 2 people lift or mechanical aid when installing.
- When unboxing, thoroughly inspect the appliance carefully for any damage. If there is any damage, do not install the appliance. Contact our support centre on info@ayonz.com for advice.
- While installing the appliance make sure that the power cord is not bent or flattened.
- Make sure to remove all packaging materials such as foams and tapes before installing the appliance.
- Make sure if the machine is to be placed on carpet that the ventilation openings in the base are not obstructed
• Install the appliance on a flat level and stable ground.
WARNING
- Make sure that transport packaging is removed from the rear of the appliance. Do not overload the appliance with too many dish.
- Appliance must not be installed behind a lockable door, a sliding door or a door with a hinge on the opposite side to that of the appliance, in such a way that a full opening of the appliance door is restricted.
GENERAL SAFETY INSTRUCTIONS (Cont.)
USAGE CONDITIONS AND RESTRICTIONS
- Supervision over children is to ensure that they do not play with the appliance. Never allow them to use, play with or crawl inside the appliance. Cleaning and maintenance must not be done by children.
- This appliance is not to be used by persons (including children) with reduced physical, sensory or mental capabilities, or lack of experience and knowledge, unless they are being supervised or been given instructions on how to use of the appliance in a safe way and understand the hazards with using this appliance incorrectly. Children being supervised not to play with the appliance
- Only for indoor domestic use only. It is not to be used for industrial or commercial use.
- Do not use this product for anything other than its intended purpose, and only use it as described in this manual. Do not attempt to alter or modify this appliance.
- In the process of a hot wash, the door window can become hot. Make sure not to touch it or that no children or pets come into contact with the door window.
- Make sure that there is no hard, sharp objects such as coins, safety pins, bra wires, nails or screws can cause damage to the appliance.
- Damage or malfunction caused from foreign objects is not covered by your warranty to the appliance.
- Do not operate this appliance outdoors.
- Incorrect use can result in property damage, injury or death. We assume no liability for misuse of the appliance or noncompliance with these instructions.
- Do not block any ventilation openings. Ensure that vents are not covered by anything.
- Do not use this product for anything other than its intended purpose, and only use it as described in this manual. Do not attempt to alter or modify this appliance.
- This appliance is intended to be used in household and similar applications such as:
- Staff kitchen areas in shops, offices and other working environments;
- Farm houses;
- By clients in hotels, motels and other residential type environments;
- Ded and breakfast type environments;
- Areas for communal use in blocks of flats or in launderettes.
- Staff kitchen areas in shops, offices and other working environments; - Farm houses; - By clients in hotels, motels and other residential type environments; - Ded and breakfast type environments; - Areas for communal use in blocks of flats or in launderettes.
GENERAL SAFETY INSTRUCTIONS (Cont.)
- Only load items that are suitable for the appliance.
- Do not place any open source flames on the appliance such as candles, etc..
- The door/window will be hot after a long cycle, be sure not to touch the window and to keep children away from the appliance.
- The appliance must not be supplied through an external switching device, such as a timer, or connected to a circuit that is regularly switched on and off by a utility.
- Incorrect use can result in property damage, injury or death. We assume no liability for misuse of the appliance or noncompliance with these instructions.
CLEANING AND MAINTENANCE
- Before cleaning or maintenance, always unplug the appliance from the power socket. Make sure you pull by the plug, not the cord as this can damage the power cord and cause a hazard.
- Only the filter requires regular cleaning, everything else is non user-serviceable parts. Do not try to repair, disassemble or modify the appliance.
- Check and clean the lint filter on a regular basis
- Service: Never try to repair, modify or replace any part of the appliance, unless this manual says you can do so. All other servicing is to be done by a qualified technician, or contact our support centre on info@ayonz.com for advice.
GENERAL SAFETY INSTRUCTIONS (Cont.)
CAUTION
- Do not use the appliance if industrial chemicals have been used for cleaning.
- Do not place any objects on the top of this machine.
- If this machine will be idle for an extended period of time, such as during holidays, please turn off the faucet and unplug this machine.
- Do not use liquid detergent or bleach (e.g. chlorine bleach or oxygen bleach) to wipe or smear the surface of this machine. Otherwise, the surface of this machine may be corroded, discolored or damaged.
- Do not touch the water discharged from the appliance as it may be hot.
- if the drain and inlet pipes are frozen in winter, please thaw them before use.
- Do not put your hands, feet or metal objects under or behind this machine.
- Do not place the drain hose under the appliance during installation.
- There is no need to pre-rinse iteams under running water, and this unnecessarily increases water and energy consumption.
- Washing in a dishwasher generally uses less water and energy than washing by hand.
WARNING:
Never stop a dishwasher before the end of the drying cycle unless all items are quickly removed and spread out so that the heat is dissipated.

WARNING: Risk of fire
This symbol alerts you to take care as oil-affected items can ignite, especially when exposed to heat, such as in a dishwasher. The items become warm, causing an oxidation reaction in the oil. Oxidation causes heat. If the heat cannot escape, the items can become hot enough to catch fire. Piling, stacking or storing oil-affected items can prevent heat from escaping and so it will create a fire hazard.
PRODUCT OVERVIEW
EXTERIOR TRIM PARTS
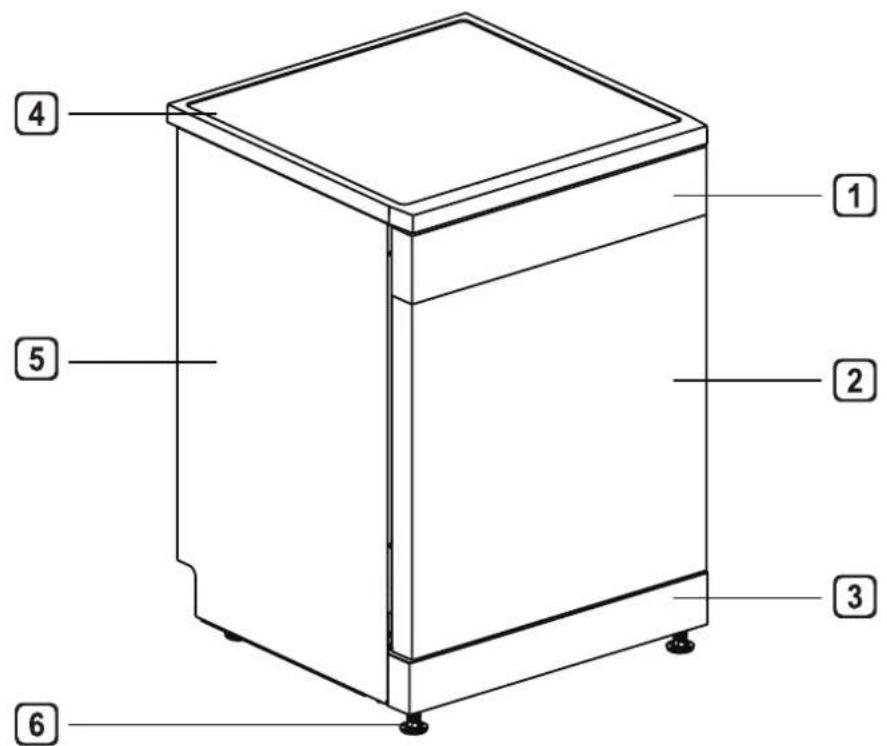
- Control Panel
- Door
- Kick-proof plate
- Top Cover
- Side Plate
- Feets
PRODUCT OVERVIEW (Cont.)
INTERIOR TRIM PARTS
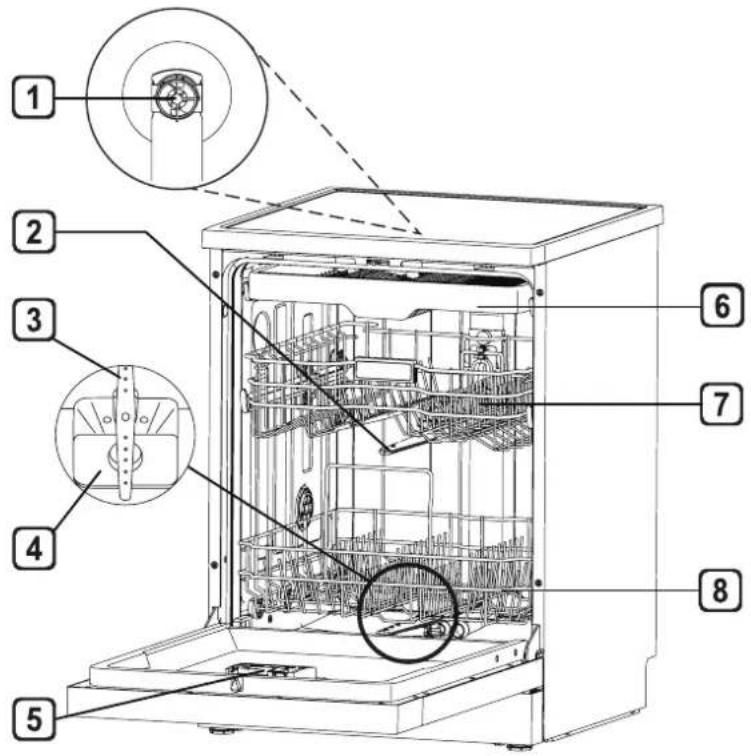
- Top wash impeller
- Middle spray arm
- Lower spray arm
- Filter assembly
-
Detergent and Rinse aid dispenser
-
Cultery rack
- Upper dish rack
- Lower dish rack
NOTE
- Place the cutlery basket in the lower dish rack. For best performance, please install along the middle, as shown in the picture of interior trim parts.
- Please remove all packaging materials from the outside and inside of the dishwasher before installing.

natural_image
Technical line drawing of a mechanical assembly with internal components and a magnified inset showing a component detail (no text or symbols)PRODUCT OVERVIEW (Cont.)
CONTROL PANEL

-
ON/OFF: Turn ON/OFF the power supply. Press this button to cut off the power supply after the program is completed.
-
START/PAUSE: Press this button to start the operation. Press this button to pause during operation, and press it again to continue the operation. Long Press for 3 seconds to cancel the program and drain water.
-
PROGRAM: Press this button to select the program you want.
- Delay Timer: Press this button to set the delay time. This function can delay the start time of the program selected. Each time you press this button, the delay time will increase by one hour. The setting range of delay time is 1-24 hours, and the single adjustment range is 1 hour. You may press it to cancel after 24 hours. During the delay time, you may cancel the delay time by opening the door and long pressing the Delay timer button. At this time, it will return to the state of no delay timer selected. The delay time shown on the panel is the time when the program finishes.
- Machine Care: This function is used to clean the inside of the dishwasher and eliminate residual dirt, odor, white spots and other dirt. You care not required to place tableware in the machine when using this function.
- Dual wash: It is used to operate the machine without loading it completely. With dual wash function you can save both water and power while using the lower and upper baskets of the machine. Special cleaning for selected areas. (Upper dish rack area or lower dish rack area).
PRODUCT OVERVIEW (Cont.)
4. DISPLAY:
Rinse Aid Indicator: this icon will light up when the liquid level of rinse aid is low, it will turn off automatically when the rinse aid is replenished or the liquid level is set to 0.
8:88 Digital display: the digital display on the control panel shows the estimated program time. When the program and the option are selected, the display will show the estimated total time to be consumed by the program running. During operation, the display shows the remaining estimated running time.
Dual wash indicator: the icon will flash when the DUAL WASH function is selected.
Child lock indicator: While the program is running, you may press and hold the Program and Delay timer for 3 second to activate or deactivate the child lock. Child lock can prevent settings from being changed during operation. All buttons on the control panel except fo the ON/OFF button will be locked by selecting this function. This function does not lock the door.
Abnormal water inlet indicator: This icon will keep flashin when the water inlet is abnormal (e.g. Closed faucet or water outage).
Salt indicator: This icon will light up when salt is insufficient, it will turn off automatically when the salt is replenished. Since different salt brands in the market have different particle sizes and since the water hardness may vary, dissolution of the salt in water may take a couple of hours. Therefore, salt indicator remains on for a while ater adding salt into the machine.
Delay timer indicator: The display will show the delay time in the unit of hour if you select the delay timer.
PRODUCT OVERVIEW (Cont.)
Program Table
All the optional programs are listed in the program table below.
| Program | Dirt level | *Water consumption(I) | **Time (min) | Temperature (°C) | *Energy consumption (kWh) | |
| 13 place settings | 13 place settings | 13 place settings | ||||
| ***ECO 50°C | The most economical washing program for cleaning moderately dirty daily tableware. | Mode-rate | 8.8 | 295 | 50 | 0.751 |
| Intensive 65°C | Suitable for dishes, pots and pans with heavy stains. | Severe | 14.2 | 120 | 65 | 1.08 |
| Glass 40°C | Special program for gently cleaning delicate glassware. | Slight | 10.7 | 135 | 40 | 0.96 |
| Hybrid 60°C | Suitable for cleaning common sticky, charred, dried food residues containing starch or protein. | All | 14.2 | 105 | 60 | 1.04 |
| Prewash 45°C | Suitable for removing residues from dirty dishes waiting in the machine for several days, so as to prevent odor accumulation. | — | 3.7 | 20 | 45 | 0.28 |
| Speed 55°C | Suitable for cleaning the slightly sticky fresh food residues. | Slight | 7.2 | 60 | 55 | 0.67 |
| Super 60°C | Suitable for cleaning the slightly sticky fresh food residues at the fastest speed. | Slight | 7.2 | 29 | 60 | 0.66 |
| Hygiene 70°C | Special program for cleaning some dry and solid common food residues and wear-resistant articles to be cleaned. | Slight | 10.7 | 90 | 70 | 1.07 |
NOTE: The actual water consumption and energy consumption may vary with the dirt level and water hardness.
The actual running time and program time displayed may vary with the options selected for the program, dirt level, water temperature and water hardness. Therefore, the display time and the actual running time may be different.
Select the ECO programme for energy-saving dishwashing. This programme is the most efficient in terms of its combined energy and water consumption for cleaning dishes with a normal level of soiling.
GETTING STARTED
Before installing your appliance, read all safety instructions in this manual, especially the sections on electrical safety and installation.
UNPACKING
- When unpacking the appliance, be sure to keep all the packaging materials until you have made sure your new appliance is undamaged and in good working order. Plastic can be a suffocation hazard for babies and young children, make sure the materials are out of their reach.
TRANSPORTATION
- CAUTION: VERY HEAVY! Be sure to team lift the appliance with someone or mechanical aid is required when moving the appliance. Keep the appliance upright as possible when moving the appliance.
INSTALLATION
SELECT A PROPER POSITION
1. Freestanding installation mode:
Please install the dishwasher on a flat and stable ground. if the dishwasher in a cornerm at least 50mm between the dishwasher and the adjacent wall shall be reserved to ensure that there is enough space for the dishwasher to open and close, and reinforce it with wooden strips.

Please place the dishwasher on a firm and flat ground.
Do not install the dishwasher on an elevated surface.
2. Embedded installation mode:
Please install the dishwasher on a flat and stable ground. Prepare notches on both sides for hoses and cables. (approx. 100 mm x 75 mm). The notch should be as close to the sink as possible in order to facilitate the connection of the water inlet pipe and drain pipe. In order to ensure smooth drainage, the installation position of the dishwasher shall not be more than 1m away from the water tank. Please make necessary height adjustments before pushing the dishwasher into the installation position.
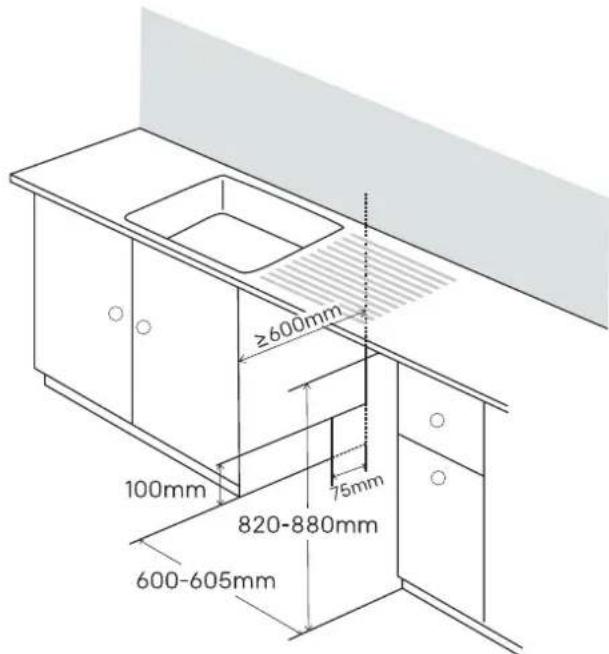
The bare wood around this machine shall be sealed with waterproof paint or sealant to prevent it from expanding in case of water.
Push the dishwasher into the cabinet of open space and make sure that the drain hose at the rear of the dishwasher and in the cabinet are not knotted or stretched. Install the dishwasher in a flat place. Do not place anything between the ground and the machine foot.
INSTALLATION (Cont.)
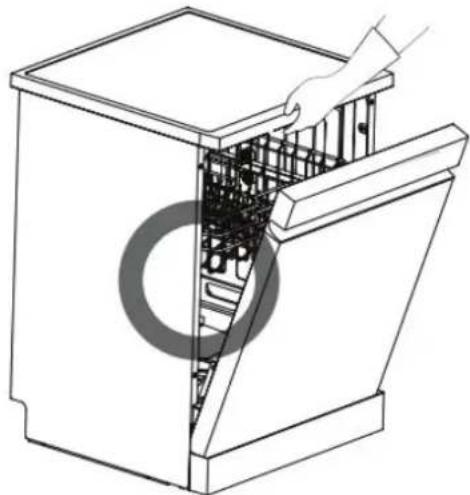
Open the door and grasp the front opening on the top of the main frame and liner to move or lift the dishwaster.
natural_image
Line drawing of a hand inserting into a mechanical device into a front panel (no text or symbols)CAUTION
Do not push the dishwasher door with your knees.
Do not use the handle to pull or lift the dishwasher, so as not to damage the door and hinge.


Remove the top cover
If the opening height is less than 850mm, please follow the instructions below.
-
Use tools to press the two locating pins of the top cover.
-
Lift the top cover and remove it.

natural_image
Technical line drawing of a structural frame with arches and supports (no text or symbols)INSTALLATION (Cont.)
Level the Dishwasher
Please level the dishwasher to avoid unnecessary leakage and poor washing effect.
Check whether the dishwasher has been leveled properly after installation.
If the dishwasher shakes when the diagonal presses the top cover of the dishwasher, the foot should be adjusted again.
Warning
Failure to level the dishwasher properly may result in water leaks, difficulty in door closing or noise. If the cabinet opening is narrower than the recommended size, the dishwasher must be carefully leveled and aligned; otherwise it will lead to water leak in the front of the dishwasher, difficult to close the door or impossible to operate. Any friction sound or jamming feeling when opening the door indicates that the dishwasher is not leveled properly.
Adjust the feet
The feet should be adjusted as needed until the dishwasher is completely flat. The feet are adjusted clockwise to raise and counterclockwise to lower. This applies to fore-and-aft, side to side, and diagonal adjustments.

natural_image
Line drawing of a mechanical component with a screwdriver inserted, no text or symbols presentINSTALLATION (Cont.)
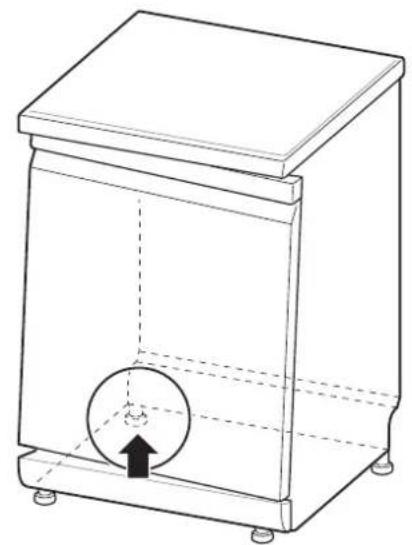
The door tilts to the right
- Unscrew (counterclockwise) the left rear foot and level it.
- Check the opening action of the door and repeat it if necessary until the door can be opened and closed normally.
natural_image
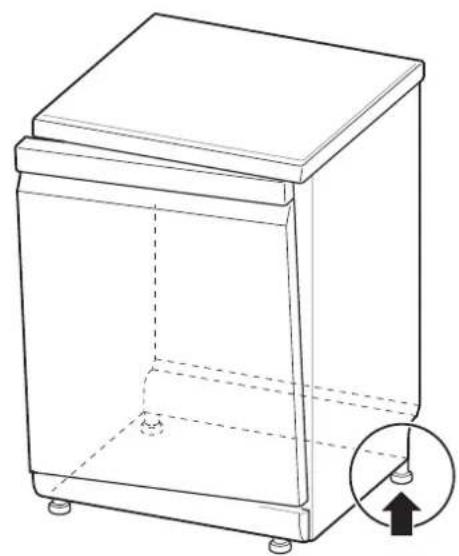
Line drawing of a mechanical cabinet with a circular component and an upward arrow indicating motion (no text or symbols)The door tilts to the left
- Unscrew (counterclockwise) the right rear foot and level it.
- Check the opening action of the door and repeat it if necessary until the door can be opened and closed normally.
natural_image
Line drawing of a rectangular trash bin with a circular inset showing an upward arrow (no text or symbols)INSTALLATION (Cont.)
Connect the Drain Hose
If the end of the drain hose does not match the kitchen drain pipe, please use a heat-resistant and detergent-resistant drain extension (not provided). These are available from local pipeline suppliers.
Connect the sewer pipe
Please check the sewer pipe during the first installation. If the sewer pipe under the sink cannot discharge water normally, E2 error may occur.
CAUTION
Carefully pass the drain hose through the hole on the cabinet. The hole on the cabinet may have sharp edges, which will damage the hose. Sharp edges should be filed down to ensure that they do not damage the drain or inlet pipe.
One of the following methods can be used to prevent siphon effect:
- When the drain hose is connected to the sewer pipe, it must be arched upward and fixed on the lower surface of the kitchen table.
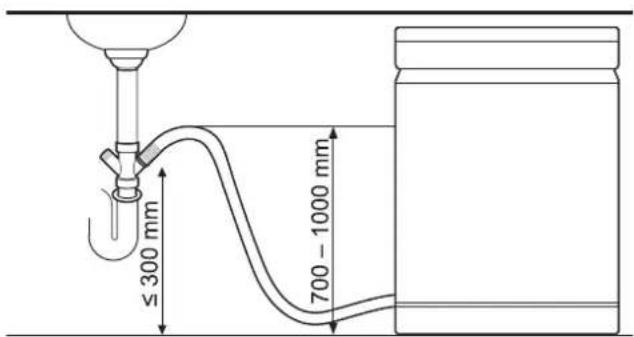
- When the drain hose is connected to a separate riser 1, it must be ensured that the connector 2 is air tight. Otherwise, it may cause odor leakage. The riser diameter shall be at least 40mm.

INSTALLATION (Cont.)
Connect to Water Supply Pipe and Power Supply Connect the water inlet pipe to the faucet
The gasket shall be connected to the water inlet. Please use the new inlet pipe attached. In order to ensure the quality, all dishwashers have been injected with water for testing before leaving the factory. Therefore, there may be water in the dishwasher, which is a normal phenomenon.
Inlet connection
- The water supply pressure shall be between 30kPa and 1,000kPa.
- Do not wear the thread when connecting the water inlet pipe with the valve.
- If the water supply pressure exceeds 1,000kPa, please install a pressure reducing device.
- Turn on the faucet and check the connector for leakage.
- Inspect pipes regularly, and change them if necessary.
- Ensure that the pipes are not damaged or intertwined.
Connection between water inlet pipe and faucet
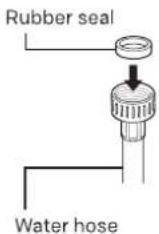
- Check the rubber seal on both sides of the hose. Insert the rubber seal into the threaded joint of each hose to prevent leakage.
- Turn on the faucet to flush the foreign matters (dirt, sand or sawdust) in the water pipe after connecting the water inlet hose to the faucet. Drain the water into a bucket and check the water temperature.

natural_image
Simple line drawing of a water tap with a bowl (no text or symbols)- Connect the water supply hose to the faucet by hand, and then tighten it for 2/3 turn with pliers.
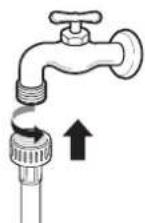
- Connect the hose to the water inlet valve tightly by hand, and then tighten it for 2/3 turn with pliers.

- Turn on the faucet to check leakage. In case of water leakage, please check steps 1-4.
INSTALLATION (Cont.)
Connect the power supply
Please connect this machine to a grounding socket according to the current electrical wiring specifications and protect it with a circuit breaker or time-delay fuse of at least 15 Amps. The two-wire system with grounding must be adopted for wiring. Do not put the power cord behind this machine, but connect the plug within 1.2m of the side.
WARNING
For the sake of personal safety, please remove the fuse, disconnect the circuit breaker or turn off the power plug before installation.
Do not use extension cords or duplex adapter.
The plug must be inserted into a suitable socket, which should be properly installed and grounded in accordance with all local rules and regulations.
This machine can only be maintained by qualified maintenance personnel. Repair by personnel without relevant experience may cause personal injury or serious failure.
Please connect it to a rated, protected and appropriately sized power circuit to avoid electrical overload.
Final Installation
Please check whether the dishwasher is installed properly.
- Turn on the power supply.
- Turn on the water supply.
- Ensure that the machine door can be opened and closed smoothly.
Please level the dishwasher again, if necessary.
Please ensure that the dish rack is leveled if the door cannot be closed.
The picture below shows the inclined dish rack.
Please ensure that all packaging materials have been removed.
- Check the drain and inlet pipes for leaks.

natural_image
Technical line drawing of a mechanical assembly with a circular symbol overlay (no text or labels)OPERATION
Loading
- Load only items suitable for the dishwasher.
- Remove solid, charred debris from the dishes before loading them into the dishwasher.
- Place items with deep tray at an angle to help water loss and speed up the drying process.
- Do not load any thermolabile or metal decorated items into the dishwasher.
Quick start
-
Load the dishes into the dishwasher Scrape off excess food, bones, and any other hard and insoluble residues from the dishes. Pull out each dish rack and load the dishes according to the instructions in this manual.
-
Check the detergent Add the recommended amount of detergent to the dispenser and close the cover according to the instructions in this manual. If you need prewash, the groove on the top of the cover should also be filled with detergent.
-
Close the machine door
-
Turn on the dishwasher Press the "On/Off" button to turn on the display panel.
-
Check the rinse aid If the rinse aid level in the dishwasher is low, the rinse aid icon will flash. Please add rinse aid to improve drying performance.
-
Select the program and option Select the most appropriate program and option. Please refer to the program guide in this manual. The display will show the estimated time of the program and the selected option.
-
Operate the dishwasher Close the machine door first, and then press the start button to operate the dishwasher. If the door is opened during the program running, the dishwasher will stop. In such case, you may close the door to restore the program.
-
Finish After the program is completed, a prompt tone will be played, and the machine will turn off automatically after a few minutes.
CAUTION
- Do not open the door during operation or immediately after the washing program as steam accumulation may cause burns when the door is opened.
OPERATION (Cont.)
Before Use
Soft water system
This machine is equipped with a soft water system, which can lower the hardness of inlet water. This system softens the water supply to a certain extent, so that tableware can be washed as per quality requirements.
If the soft water system is not required, this machine can be used without dishwashing salt, but the hardness level needs to be set to HO so that the corresponding icon will not be on all the time.
In order to achieve a satisfactory washing effect, this machine needs soft water, otherwise water stains will remain on the tableware and inside the dishwasher. If the hardness of tap water exceeds a certain level, it must be softened, i.e. decalcified, by adding dishwashing salt to the water softener inside the dishwasher. The amount of salt required is set according to the hardness of the tap water.
Check the water hardness
- Check the local water hardness. The water company can help you check it.
- Set the softening system level of the dishwasher according to the hardness level of water.
Set the soft water system
Adjust the settings according to the hardness level of the water used in the water supply. The water softener has 9 adjustment levels, and the dishwasher has been set to the water hardness level of H5 when leaving the factory.
- Ensure that the dishwasher has been turned off, and press the “Dual Wash” and “Machine Care” buttons for 3s to set the program.
- Press the "Dual Wash" button.Dispaly the current setting.
- Press the "Machine Care" button and set the expected value. The set value range is H0-H8.
- After completing the required water softener settings, press the "On/Off" button to shut down and save the settings.
OPERATION (Cont.)
Dishwasher salt - This is to help prevent limescale build up
The dishwasher's salt chamber must be filled before starting the washing program. In case of insufficient salt, the salt icon on the display will light up unless the hardness level is set to HO.
After loading the dishwashing salt, the washing program must be started immediately to remove the salt and salt water around the inner cylinder and prevent corrosion.
- Take out the lower dish rack and add softening salt.
- Turn the cover of the water softener counterclockwise to open it.
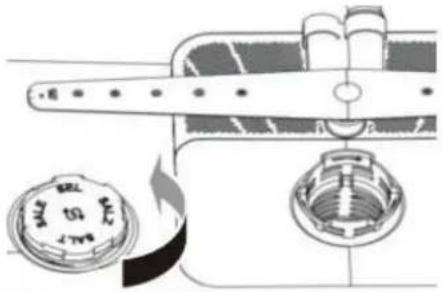
- If you intend to use the hard water softener system before using this machine for the first time, you must use the salt funnel to add not more than 650g of salt to the salt chamber of this machine.

natural_image
Illustration of a hand pouring liquid into a container on a stove (no text or symbols visible)-
Fill the salt chamber of this machine with water only before the first use.
-
Tighten the cover again.
-
Run the rinse program without tableware.
CAUTION
Do not pour any detergent into the water softener to avoid failure.
Clean the salt particles around the water softener cover. Otherwise, the salt solution may corrode the dishwasher and dishes.
Align the cover horizontally and rotate it clockwise for sealing properly. Loosened cover may cause the salt solution to leak from the softener, return to the inner tank and cause corrosion.
After adding dishwashing salt, the washing program should run without tableware. If not, any spilled salt may cause rust or damage to the dishwasher.
OPERATION (Cont.)
Add detergent to the dispenser
The amount of detergent required depends on the size and dirt level of the tableware.
Please put the detergent into the detergent compartment before starting any program.
- Press the button on the dispenser cover to open it.

- Add tableware detergent to the main washing compartment until the liquid level is between the tick mark 15 and tick mark 25.
- Fill to more than tick mark 25 in case of hard water or heavily soiled tableware.
- Fill to tick mark 15 in case of soft water or slightly soiled tableware.

- Push on the detergent cover and slide it in


natural_image
Line drawing of a hand inserting a small electronic device into a mobile phone (no text or symbols)- If you need pre-wash, please fill the recessed pre-wash compartment on the cover with detergent.

natural_image
Line drawing of a hand inserting a device into a device panel (no text or symbols)OPERATION (Cont.)
Warning:
Dishwasher detergents and rinse aid contain the same chemicals as all other household detergents. Therefore, they must be kept out of the reach of children.
Use dishwasher detergent only. Improper detergent may cause the dishwasher to fill with foam during operation. Too much foam may mitigate the washing performance and may cause the dishwasher to leak.
Do not pull up the dispenser to close the dishwasher door to avoid damaging the dispenser.
Note
You may check whether the detergent is completely washed off after the washing program is completed.
Some dishwasher detergent tablets may get stuck in the dispenser due to their large size. Before starting the program, you may place the tablets at the bottom of the washing bucket next to the filter.
Too much detergent will leave a film on the tableware and in the dishwasher, resulting in poor washing effect.
If the liquid rinse aid is used, the water can be drained from the dishes after final rinsing, so as to improve drying performance.
Do not use detergent tablets to shorten the washing cycle. Tablets may not be dissolved completely, resulting in residual detergent on tableware and poor cleaning efficiency.
The rinse aid can help remove spots, residues and white films caused by hard water. But it cannot help remove excess detergent residues.
Warning:
Some dishwasher detergents are strongly alkaline. They can be extremely dangerous if swallowed. Avoid contact with the skin and eyes and keep children away from the dishwasher when the door is open. Check that the detergent receptacle is empty after completion of the wash cycle.
OPERATION (Cont.)
Add rinse aid in the dispenser
When more rinse aid is required, the rinse aid indicator will appear on the display. It is suggested to use rinse aid to remove water stains on the dishes and improve drying performance.
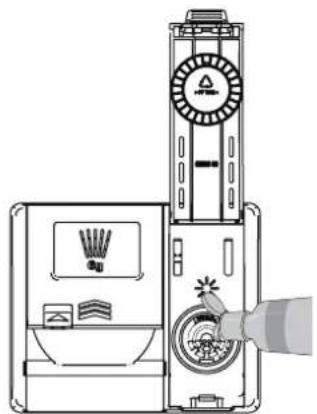
- Lift the clamshell-style cover and open the rinse aid box cover.

- Add liquid rinse aid to the maximum filling level. The rinse aid should be precipitated in the dispenser during filling; otherwise bubbles may lead to poor drying performance. Do not overfill the dispenser.
natural_image
Line drawing of a vintage minibus with a hand operating the counter and a circular dial indicator (no text or symbols)- Close the cover to lock the dispenser. In the final rinsing cycle, the rinse aid will be dispensed automatically.

OPERATION (Cont.)
Adjust the rinse aid dispenser
The dispenser has 9 adjustment levels. The rinse aid dispenser has been set to level d3 when it leaves factory. You may check and change this setting using the buttons on the control panel.
- Ensure that the dishwasher has been turned off.
- Press "Dual Wash" and "Machine Care" simultaneously to enter the operation setting procedure, and press "Intensive" to check the current settings.
- Press "Machine Care" to change the settings of rinse aid dispenser. Level d0 to d8 can be gradually set by pressing this button.
- After completing the required rinse aid dispenser settings, press the "On/Off" button to shut down and save the settings.
Note:
If you use hard water and find calcium accumulation on the tableware, please set the level to high.
Too low level of the rinse aid dispenser will lead to spots and stripes on the dishes and poor drying performance.
Too high level will lead to foaming, resulting in poor washing effect.
Replenish the rinse aid
The refilling frequency of the dispenser depends on the frequency of dishwashing and the rinse aid setting.
When more rinse aid is required, the rinse aid icon will flash, unless the rinse aid dispenser is set to level d0.
OPERATION (Cont.)
Loading into the Dishwasher
Please always follow the following instructions in order to achieve effective washing effect.
Remove large food particles, including bones, from dishes before loading.
Soak the dishes containing burnt food before putting them into the dishwasher.
Put deep pots or plates upside down.
Ensure that all items do not touch each other.
Tableware with excessive width should be placed at an angle so that the water can flow out freely.
The tableware cannot be placed with the mouth upward.
Tableware with excessive height cannot be Tableware with excessive height cannot be placed in the corner of dish rack.
Ensure that small items will not fall off the rack, so small items such as the lid should be placed in the cutlery basket.
The interior of small tableware is not easy to be sprayed and cleaned, resulting in poor washing effect. It is not suggested to clean small tableware in the dishwasher.

natural_image
Three abstract line drawings: a no-smoking circle, a folded paper or plastic sheet, and a folded paper (no text or symbols)Items unsuitable for dishwasher
• Copper or anodized alumina.
- Hand-painted silver leaf or gold leaf pottery.
• Wood or bone treated utensils.
- Iron or non rust proof utensils.
- Plastic items unsuitable for the dishwasher.
- Expensive utensils, such as silverware and plates with gold rings.
- Fragile items such as crystal glasses.
CAUTION
- Do not put pots or pans with plastic handles into the dishwasher as the handles may deteriorate due to heat and detergent.
- Waterproof or durable lipstick stains on eyeglasses may not be removed during washing.
- Some foods may contain natural dyes, such as carrots, tomatoes and ketchup. If a large amount of these foods come into contact with the pottery in the dishwasher, these dyes will discolor the plastic items in the dishwasher. However, such discoloration will not affect the stability of plastic items. Cleaning silver tableware may also cause discoloration of plastic items.
OPERATION (Cont.)
Loading into the Lower Dish Rack
Instructions for loading into the lower dish rack:
- The plate should be upright and face the center of the rack, and the pot, pan and large plate must be inverted.
- Load dishes, plates, soup bowls and the like between the fork teeth.
- Ensure that the pan handle and other large items do not interfere with the rotation of the spray arm.
- Small items such as cups, wine glasses or small plates cannot be placed on the lower rack, but on the upper rack.
- Ensure that large items do not interfere with the rotation of the spray arm and do not prevent the detergent dispenser from opening.
- Very dirty tableware (pots and pans) should be placed on the lower rack for a better washing effect because of strong spraying water power.
Loading into the Upper Dish Rack
Instructions for loading into the upper dish rack:
- Place the cup and glass in the row between the rack teeth. Placing them on the rack will cause damage and water stains.
- Do not let the goblet touch other items to avoid fragmentation.
- Place the tableware with the open end facing down for easy cleaning and drying.
- Do not stack tableware together.
- Cups, glasses and bowls must be upside down.
- Additional cups or tableware can be placed on the folding cup holder (for some models).
- Ensure that the tableware will not interfere with the rotation of the spray arm above and below the upper rack.
- When loading larger items into the upper rack, such as wine glasses or higher cups, the plate rack, if any, may need to be removed.
OPERATION (Cont.)
Upper dish rack with adjustable height
The height adjustment mechanism of the upper dish rack is specially designed for you. By adjusting the height, you can create a large space in the lower or upper part of the machine according to your needs, or lower the height when your rack is empty or loaded.
Lower the dish rack:
Pull the upper dish rack out of the guide rail, and then clip the guide rail between the second and third rows of rollers of the dish rack.

natural_image
Technical line drawing of a vehicle chassis frame with internal components and wheels (no text or symbols)Lift the dish rack:
Pull the upper dish rack out of the guide rail, and then clip the guide rail between the first and second rows of rollers of the dish rack.
Warning
Please ensure that there is no tableware on the dish rack before adjustment. Otherwise, the tableware may be damaged or you may be injured.
Note
Please ensure that both sides of the upper rack are at the same height before pushing the rack into the dishwasher. If the height of both sides is different, the dishwasher door will not close and the middle spray arm cannot be connected to the water inlet.
After adjusting the height, please check whether the spray arm can rotate freely. Please check whether the spray arm does not interfere with the items on the lower dish rack.
OPERATION (Cont.)
Loading into Cutlery Rack
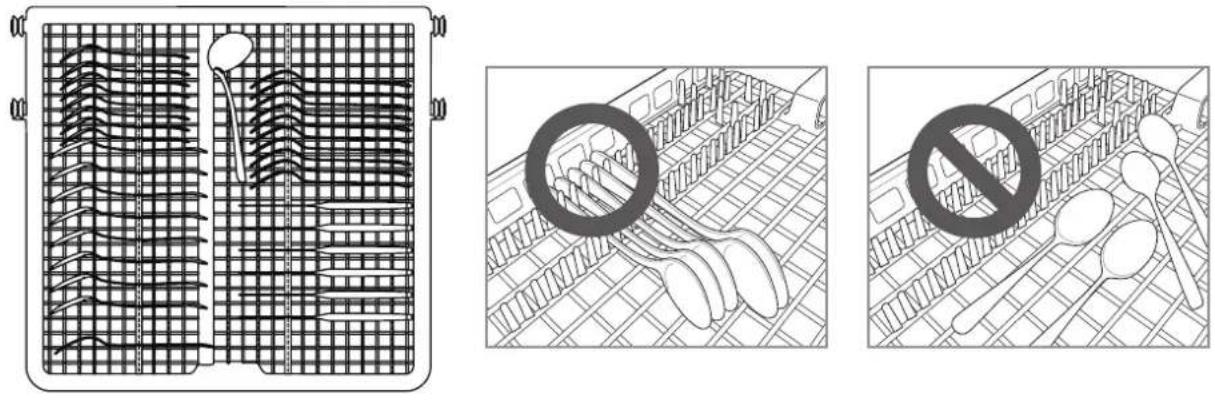
The cutlery rack is best suited for flatware and most cooking or serving utensils. The separators on the cutlery racks help keep flatware separated to avoid damage and improve cleaning.
Note: For best cleaning performance, place flatware in the silverware baskets. Heavily soiled utensils or items with baked on foods should be placed in the middle rack or spoon basket for best performance.
Remove the Cutlery Rack
- The entire cutlery rack can be removed if more space is needed on the upper rack for larger items.
- The entire cutlery rack can be removed if more space is needed on the upper rack for larger items.
- Pull the rack out to the end of the rails. Then, lift the front of the rack so that the rollers clear the stop on the end of the rail. The rack can now be slid forward and removed from the rails.

natural_image
Technical line drawing of a mechanical lever mechanism (no text or symbols)Warning
- Be careful when loading and unloading items with sharp edges. Load sharp knives with the blade down to reduce the risk of injury.
CLEANING AND MAINTENANCE
In order to maintain performance and prevent failures, it is important to regularly check the outside and inside of the dishwasher (including the filter and spray arm).
WARNING:
- Do not use benzene or thinner when cleaning the outside and inside of the dishwasher to prevent fire or explosion.
- Please wear gloves and/or protective clothing to prevent injury during machine care and maintenance or cleaning.
WARNING:
- If the dishwasher is idle for a long time, please run the “Machine Care” program without detergent to refresh the interior. After the program finishes, you may clean the inside and outside of the dishwasher according to the maintenance instructions.
- If you are absent for a long time in warm season, please close the water valve and disconnect the power cord, or turn off the circuit breaker, and clean the filter, inner tank and dispenser to prevent odor.
- If you are absent for a long time in cold season and there is a possibility of freezing temperature, please take anti-freezing measures for the water inlet pipe and the dishwasher itself. These measures must be taken by qualified maintenance personnel.
CLEANING AND MAINTENANCE (Cont.)
EXTERNAL CLEANING
In most cases, the external surface of the dishwasher can be cleaned with a soft wet cloth or sponge and then wiped dry with a soft cloth. If the dishwasher is provided with the stainless steel housing, you may use stainless steel cleaner.
CAUTION
Any edible oil splashed on the external surface of this product should be wiped out immediately. Do not use cleaners that may contain alcohol, thinner, bleach, benzene, flammable liquids or abrasives to clean the external surface of this product to avoid discoloration or damage.
INTERNAL CLEANING
Please regularly clean the internal surface of the dishwasher with a soft wet cloth or sponge to remove food and dirt particles.
To remove white spots and odors inside the dishwasher, please run an empty program without detergent, pour a cup of white vinegar in the safety glass or bowl of the dishwasher and put it on the upper rack. (Vinegar is an acid that may damage electrical appliances if used frequently.)
CAUTION
Any edible oil splashed on the external surface of this product should be wiped out immediately. Do not use cleaners that may contain alcohol, thinner, bleach, benzene, flammable liquids or abrasives to clean the external surface of this product to avoid discoloration or damage.
CLEANING AND MAINTENANCE (Cont.)
FILTER CLEANING
-
Remove the lower dish rack and fix the bottom spray arm.
-
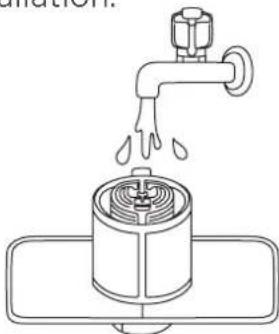
Rotate the filter cup counterclockwise and take out the filter assembly consisting of the filter cup 1, metal filter screen 2 and micro filter 3.
After removing the filter assembly, check and remove all foreign matter (if necessary).

- Clean each filter with running water and a soft brush. Reassemble the filter assembly before reinstallation.
natural_image
Line drawing of a faucet with water droplets falling from the drain, above a control panel (no text or symbols)- Reinstall the filter assembly and fix them clockwise by rotating the filter cup until it clicks into place.

natural_image
Diagram of a mechanical device with internal components and directional arrows indicating motion (no text or symbols)WARNING
Beware of sharp edges when cleaning metal filters.
Remove food residues from the filter to prevent odorous bacteria and possible drainage problems.
NOTE:
Please clean the filter after each load for the best washing results. If food residues remain in the filter, they may produce peculiar smell.
Clean the filter with a soft brush at least once a month.
Clean the filter with non-abrasive materials and warm water.
Ensure that the filter is assembled properly before starting the program. Rotate firmly until there is a click sound during assembly.
CLEANING AND MAINTENANCE (Cont.)
SPRAY ARM CLEANING
If the spray arm hole is blocked by any food residue, the tableware may not be cleaned well due to improper water spray.
It is suggested that the spray arm be cleaned every two weeks.
Lower spray arm cleaning
-
Ensure that spray holes are not blocked by food particles.
-
Remove the food residue blocking the spray arm hole with a pin or any sharp
tool.

natural_image
Line drawing of a hand holding a cylindrical object with numbered pins, against a plain background (no text or symbols)Middle spray arm cleaning
-
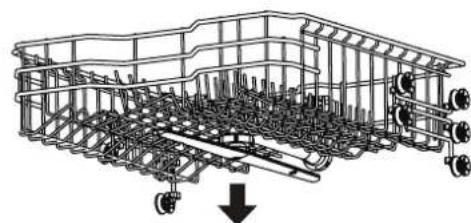
Pull the upper dish rack forward and ensure that spray holes are not blocked by food particles.
-
Before cleaning, rotate the nut at the bottom of the spray arm counterclockwise and pull it down to remove the middle spray arm.
-
Remove food particles by flushing or shaking the spray arm.
-
Remove the food residue blocking the spray arm hole with a pin or any sharp tool.
-
Clean the spray arm hole with running water after removing the food residue.
-
Reinstall the middle spray arm in place after cleaning. Turn the nut clockwise to ensure that the nut locks the spray arm to its original position.
-
After assembly, check whether the spray arm rotates freely.
natural_image
Technical line drawing of a mechanical assembly with gears and shafts, showing internal components and a downward arrow (no text or symbols)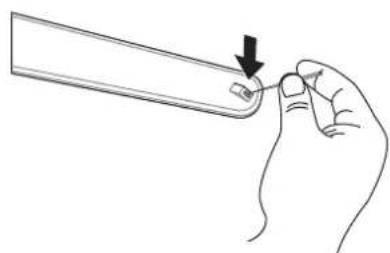
natural_image
Line drawing of a hand holding a pen or tool with a black arrow pointing to the tip (no text or symbols)
natural_image
Technical line drawing of a mechanical assembly with gears and wheels (no text or symbols)FAQs
Please be sure to contact our call centre on info@ayonz.com if you cannot identify the issue with the below information.
Q: Does this dishwasher need rinse aid?
A: It is strongly suggested that rinse aid be used to enhance the drying performance of the dishwasher. If not, water may remain on the dishes and machine liner. Rinse aid helps ensure that most of the water is removed from the dishes at the end of rinsing, and the load is ready for the drying cycle.
Q: Why is there a muddy white film on my tableware after washing?
A: It is usually caused by the reaction of minerals in the water with dishwasher detergent. Do not use too much detergent. For the recommended amount of detergent, please refer to “Add detergent to the dispenser” section. This machine consumes less water than a traditional dishwasher, so adding rinse aid will help wash off the film.
Q: How do I remove the white film on the machine liner?
A: Put 3 tablespoons (40 g) of citric acid powder in the main detergent compartment. Run the “Machine Care” program once without detergent.
Q: Why do I hear the dishwasher whistling?
A: It is important to determine the duration of noise and the time when it occurs (which part of the cycle). You can hear whistle when water is sucked into the dishwasher. This is normal. If the water pressure is too high, the sound will be louder. Therefore, if the noise is too loud, you may need to adjust the water valve to reduce the pressure.
Q: Can this machine perform a "drain only" cycle?
A: To drain the accumulated water, you may press and hold the Start/Pause button for 3s, and the program will reset for drainage. Once the dishwasher is drained, the power supply will turn off.
Q: What is child lock? How is it activated?
A: Child lock is a function that prevents the control from being changed during the program running. It will not prevent the door from being opened or the machine from being turned off. To enable or disable it, you may press and hold both "Program" and "Delay timer" buttons for 3s.
Q: Should I wash the dishes before loading them into the dishwasher?
A: No. The dishwasher can clean the dishes without pre-washing.
FAQS
SELF-INSPECTION
This machine is equipped with an automatic error monitoring system to detect and diagnose problems in the early stage. If your dishwasher does not work properly or does not work at all, please check it according to the following instructions before seeking service.
| Fault | Possible reason and solution |
| The dishwasher does not work. | The start button is not pressed.Press the start button. |
| The door is not fully closed.Ensure the door is fully closed and locked. | |
| The power supply or power cord is not connected.Connect the power supply or power cord correctly. | |
| Fuse blown or circuit breaker tripped.Replace the fuse or reset the circuit breaker. | |
| The child lock is activated.Disable the child lock. | |
| Odor | The previous program is stopped before finishing and the residual water remains in the dishwasher.Ensure there is no tableware in the dishwasher, turn on the power, select the program cancellation option to remove residual water, and then run "Intensive" program with detergent. |
| There is food at the bottom of the dishwasher or in the filter.Clean the filter and interior of dishwasher according to the "Maintenance" section of this user manual. | |
| Unwashed dishes remain in the dishwasher for a long time.Put a cup of white vinegar into a glass or bowl safely placed on the upper dish rack. (Vinegar is an acid that may damage electrical appliances if used frequently.) | |
| Water remains on the machine liner after washing | The drain hose is knotted or blocked.Adjust the hose or remove the blockage. |
| Food residue remains on the dishes. | Improper program selected.Select the correct program according to the dirt level and the type of tableware to be cleaned. |
| No detergent is used.Use the recommended detergent. | |
| Low water inlet pressure.The water pressure should be 0.03 - 1MPa. | |
| The spray hole on the spray arm is blocked.Clean the spray arm. | |
| Improper loading of tableware.Ensure that the tableware does not hinder the rotation of the spray arm or interfere with the dispenser. | |
| The filter is blocked.Clean the filter. |
FAQs
| Fault | Possible reason and solution |
| Turbidity on glassware. | Too much detergent is mixed with hard water.● Use less detergent and rinse aid. |
| Black or gray marks on the dishes. | Aluminum products rub the dishes during washing.● Readjust the arrangement of dishes. |
| Yellow or brown film on the inner surface of the dishwasher. | Coffee or tea stains.● Use decontaminant to remove stains. |
| Spots on the dishes. | Overload● Do not overload your dishwasher. |
| Improper placement of tableware.● Please refer to the "Operation" section. | |
| Low water pressure.● The water pressure should be 0.03 - 1.0 MPa. | |
| Insufficient detergent.● Add the recommended amount of detergent. Please refer to the "Operation" section. | |
| The rinse aid dispenser is empty.● Refill the rinse aid dispenser. | |
| Hard water is accumulated in the liner.● Remove all tableware and cutlery basket from the dishwasher. Only dish racks are left in the dishwasher. For the best results, please take 3 tablespoons (40g) of citric acid powder (available from most grocery stores or online shops) and put the power in the main washing compartment. If citric acid powder is unavailable, you may pour about 1 cup (200-300 ml) of white vinegar into a shallow bowl and put this bowl on the upper dish rack, and then run the "Machine Care" program without detergent. | |
| Noise | A certain level of noise during operation is normal.● Open the detergent cover.● The drainage pump works when draining. |
| The dishwasher is not leveled.● Adjust the foot. | |
| The spray arm hits the dishes.● Readjust the arrangement of dishes. | |
| The dishes are not dry. | Empty the dispenser.● Check and refill the dispenser (if it is empty). |
| The light is off. | The power supply is not connected.● Connect the power supply. |
| The spray arm does not rotate smoothly. | The spray hole on the spray arm is blocked by food particles.● Clean the spray arm. |
| The upper dish rack is bent. | Improper adjustment of dish rack.● Please refer to the "Upper dish rack with adjustable height" section. |
FAQS
| Fault | Possible reason and solution |
| The door cannot be closed fully. | Improper installation of dish rack.● Push the door handle to close the door properly until you hear a click sound. |
| Water leakage at front side. | The dishwasher is not leveled properly.● Check whether the machine is leveled from side to side and from front to back. Please refer to the leveling instructions in the "Installation" section. |
| The wrong detergent is used.● If excessive foaming leads to water leakage, let the foam fade away for 24 hours, and then clean the interior of dishwasher with milk. | |
| d0, d1, d2, d3, d4, d5, d6, d7, or d8 on the display | Select the rinse aid level setting mode.● This is not an error code. This code indicates the current rinse aid level. For more information, please refer to the "Add rinse aid" section. |
FAQS
Error Code
| Fault | Possible reason and solution |
| E1 | Problems in water inlet.● Check whether the water inlet hose is blocked, knotted or frozen.● Check the water supply. |
| E2 | Drainage problems.● Check whether the drain hose is blocked, knotted or frozen. |
| The air gap is blocked.● Clean the air gap or dispose of it. | |
| The filter is blocked.● Clean the filter. | |
| E3 | Abnormal heating alarm.● Please unplug and seek after-sales service. |
| E4 | Water leakage.● Turn off the water supply of the dishwasher and seek after-sales service.● The dishwasher stops running, an alarm sounds and the drain pump works intermittently. |
| E5 | Temperature sensor failure.● Please unplug and seek after-sales service. |
| E6 | Communication circuit failure.● Please unplug and seek after-sales service. |
| E7 | Excessive water supply failure.● Please unplug and seek after-sales service. |
| E9 | Shunt valve failure.● Please unplug and seek after-sales service. |
| E11 | Low power alarm.● Please unplug and seek after-sales service. |
| E12 | High power alarm.● Please unplug and seek after-sales service. |
SPECIFICATIONS
| Power Supply 220-240V ~ 50Hz | |
| Rated Power 1920W | |
| Dimensions 598 x 598 x 845 mm (W x D x H) | |
| Weight | Net: 42 kg |
| Gross: 46 kg |
SEIKI | SHOME
CUSTOMER HELPLINE:
info@ayonz.com
02 8279 8606
DISTRIBUTED BY:
Ayonz Pty Ltd


- INSTRUCTION MANUAL
- CONTENTS
- IMPORTANT INFORMATION
- WARNING
- CAUTION
- ELECTRICAL SAFETY
- GENERAL SAFETY INSTRUCTIONS (Cont.)
- INSTALLATION
- USAGE CONDITIONS AND RESTRICTIONS
- CLEANING AND MAINTENANCE
- WARNING:
- PRODUCT OVERVIEW
- EXTERIOR TRIM PARTS
- PRODUCT OVERVIEW (Cont.)
- INTERIOR TRIM PARTS
- NOTE
- CONTROL PANEL
- DISPLAY:
- Program Table
- GETTING STARTED
- UNPACKING
- TRANSPORTATION
- SELECT A PROPER POSITION
- Freestanding installation mode:
- Embedded installation mode:
- INSTALLATION (Cont.)
- Remove the top cover
- Level the Dishwasher
- Adjust the feet
- The door tilts to the right
- The door tilts to the left
- Connect the Drain Hose
- Connect the sewer pipe
- Connect to Water Supply Pipe and Power Supply Connect the water inlet pipe to the faucet
- Inlet connection
- Connection between water inlet pipe and faucet
- Connect the power supply
- Final Installation
- OPERATION
- Loading
- Quick start
- OPERATION (Cont.)
- Before Use
- Soft water system
- Check the water hardness
- Set the soft water system
- Add detergent to the dispenser
- Add rinse aid in the dispenser
- Adjust the rinse aid dispenser
- Note:
- Replenish the rinse aid
- Loading into the Dishwasher
- Items unsuitable for dishwasher
- Loading into the Lower Dish Rack
- Loading into the Upper Dish Rack
- Upper dish rack with adjustable height
- Lower the dish rack:
- Lift the dish rack:
- Loading into Cutlery Rack
- Remove the Cutlery Rack
- CLEANING AND MAINTENANCE (Cont.)
- EXTERNAL CLEANING
- INTERNAL CLEANING
- FILTER CLEANING
- SPRAY ARM CLEANING
- Lower spray arm cleaning
- Middle spray arm cleaning
- FAQs
- SELF-INSPECTION
- SEIKI | SHOME
Brand : Seiki
Model : SC-1300AU6DWW
Category : Dishwasher