
SC-1200AU6DWP - Dishwasher Seiki - Free user manual and instructions
Find the device manual for free SC-1200AU6DWP Seiki in PDF.


| Product Type | Built-in Dishwasher |
| Width | 60 cm |
| Height | 85 cm (adjustable) |
| Depth | 60 cm |
| Weight | 45 kg |
| Power Supply | 220-240 V, 50 Hz, 10 A |
| Energy Rating | A+ |
| Water Consumption | 9.5 L per cycle |
| Energy Consumption | 0.95 kWh per cycle |
| Noise Level | 44 dBA |
| Number of Place Settings | 12 |
| Programs | 6 (Eco, Intensive, Normal, Quick, Glass, Rinse) |
| Third Rack | Yes (cutlery tray) |
| Control Type | Electronic push buttons + LED display |
| Salt and Rinse Aid Indicators | Yes (LED) |
| Delay Start | Up to 24 hours |
| Child Lock | Yes |
| Self-Cleaning Filter | Yes (automatic cleaning cycle) |
| Hose Length (inlet) | 1.5 m |
| Hose Length (drain) | 1.5 m |
| Spare Parts Availability | Spray arms, filters, racks, salt cap (via authorized service) |
Frequently Asked Questions - SC-1200AU6DWP Seiki
User questions about SC-1200AU6DWP Seiki
0 question about this device. Answer the ones you know or ask your own.
Ask a new question about this device
Download the instructions for your Dishwasher in PDF format for free! Find your manual SC-1200AU6DWP - Seiki and take your electronic device back in hand. On this page are published all the documents necessary for the use of your device. SC-1200AU6DWP by Seiki.
USER MANUAL SC-1200AU6DWP Seiki
12 Place Settings Dishwasher - White

natural_image
Front view of a white SEIKI washing machine (no visible text or symbols on the appliance body)INSTRUCTION MANUAL
MODEL: SC-1200AU6DWP
CONTENTS
| General Safety | 4 |
| Product Overview | 8 |
| Getting Started | 10 |
| Starting a Wash Program | 13 |
| Instructions | 14 |
| Loading the upper basket | 15 |
| Loading the lower basket | 16 |
| Detergents | 18 |
| Adding Detergents | 19 |
| Rinse Aid Dispenser | 20 |
| Starting the Dishwasher | 22 |
| FAQs | 23 |
| Useful Information | 24 |
| Specifications | 27 |
| Customer Helpline | 28 |
GENERAL SAFETY
IMPORTANT INFORMATION
Read this manual thoroughly before you start using the Dishwasher.
The safety precautions instructions reduces the risk of fire, electric shock and injury when correctly complied to.
Please follow all instructions and take notice of all warnings.
Pay close attention to messages that follow this safety alert symbol or the words DANGER, WARNING or CAUTION. These words will be used to alert you of potential hazards that and injure you and others. Following these instruction will tell you how to reduce the chance of injury and the possible dangers if instructions aren't followed.
ELECTRICAL SAFETY
- Voltage: Plug the appliance to a 220-240V, 50Hz, properly earthed power outlet, it must be in good working order.
- Power connection: Do not use an adaptor or an extension cord.
Plug the power plug directly into a separate power point that cannot be accidentally turned off, and that is easily accessible so you can switch it off if needed.
- Power cord: Do not kink or damage the power supply cord. Make sure it is behind the appliance so no one can step on or place anything on the power supply cord or against it. A damaged power plug may overheat and cause a fire.
- Damaged cord: Do not use a cord that shows cracks or damage. Any damage to the cord may cause a short circuit, fire and/or electric shock. Contact our support centre on 1300 296 699 for advice
- Disconnection: Never pull the power cord to unplug appliance. Grip the plug and pull straight out from the power point.
- Electrical work: If the installation of this appliance requires any electrical work, make sure it is carried out by an electrician.
GENERAL SAFETY INSTRUCTIONS (Cont.)
To reduce risk of fire, electric shock or injury, always follow these basic precautions and accident prevention measures when using this appliance, including the below:
NOTE: This appliance should be installed by an authorised technician else warranty will be void.
INSTALLATION
- The product is heavy, be careful when moving it. To avoid back or other injury, have 2 people lift or mechanical aid when installing.
- When unboxing, thoroughly inspect the appliance carefully for any damage. If there is any damage, do not install the appliance. Contact our support centre on 1300 296 699 for advice.
- While installing the appliance make sure that the power cord is not bent or flattened.
- Be sure to only use new hose sets when connecting the dishwasher. Do not re-use old hoses.
- Install dishwasher on a flat level and stable ground. Please avoid placing appliance on top of carpet.
GENERAL SAFETY INSTRUCTIONS (Cont.)
USAGE CONDITIONS AND RESTRICTIONS
- Supervision over children is to ensure that they do not play with the appliance. Never allow them to use, play with or crawl inside the appliance. Cleaning and maintenance must not be done by children.
- This appliance is not to be used by persons (including children) with reduced physical, sensory or mental capabilities, or lack of experience and knowledge, unless they are being supervised or been given instructions on how to use of the appliance in a safe way and understand the hazards with using this appliance incorrectly.
- Only for indoor domestic use only, such as in households, kitchen areas in shops, offices and in other working environments, use by clients in hotels, motels, bed and breakfast establishments and in catering and similar non-retail applications. It is not to be used for industrial or commercial use.
- Do not use this product for anything other than its intended purpose, and only use it as described in this manual. Do not attempt to alter or modify this appliance.
- Do not sit or stand on the door or racks of the dishwasher, or use it other than its intended purpose.
- If heating element of the dishwasher is exposed, please do not touch it during or immediately after use.
- Open the door carefully if the dishwasher is in use, there is a chance of water escaping.
- Do not leave the door open as this could present a tripping hazard.
-
Do not overload the dishwasher, it has a maximum of 12 place settings.
• To make sure the dishwasher is safely operated please follow the below rules: -
Place sharp items so they are not able to damage the door seal.
- WARNING: Knives and other utensils with sharp points must be loaded in the basket with their points facing down or in a horizontal position.
- Place plastic items so they do not come into contact with heating element. (only wash plastic items that are dishwasher safe).
- Do not obstruct any ventilation openings with carpet.
- Be sure to only use detergent and rinse additives that are only to be used with automatic diswashers and keep them out of reach of children.
Note: Do not use liquid detergent, soap or laundry detergent in this dishwasher.
- Incorrect use can result in property damage, injury or death. We assume no liability for misuse of the appliance or noncompliance with these instructions.
GENERAL SAFETY INSTRUCTIONS (Cont.)
CLEANING AND MAINTENANCE
- Service: Never try to repair, modify or replace any part of the appliance, unless this manual says you can do so. All other servicing is to be done by a qualified technician, or contact our support centre on 1300 296 699 for advice.
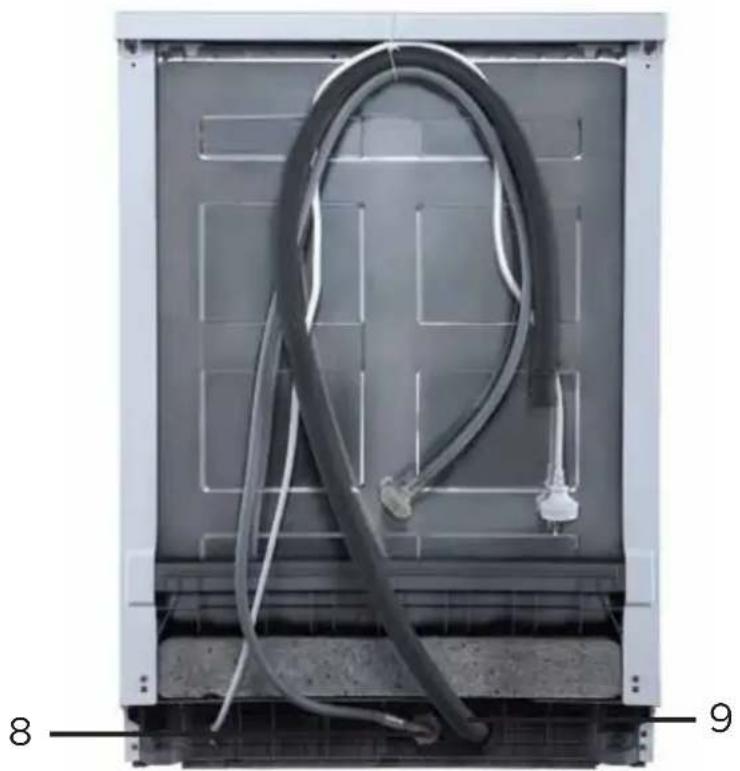
PRODUCT OVERVIEW

- Upper Basket
- Inner Pipe
- Lower Basket
- Dispenser
- Cup Shelf
- Spray Arms
- Filter Assembly
- Inlet Pipe Connector
- Drain Pipe
natural_image
Interior view of a refrigerator with visible wiring and connectors (no text or symbols)PRODUCT OVERVIEW (Cont.)
CONTROL PANEL

- On/Off Button: Turn on/off the power supply
- Delay button: Press button to add delay time.
- Extra Drying Button: Extra Drying function to only be used with Intensive, Heavy, ECO, Glass and 90min functions.
- Power Indicator: Indicate when power is on.
- Delay Indicators: Show the delay time options.
- Extra Drying Indicators: Will highlight when in Extra Drying Mode.
- Rinse Aid Indicator: When the dispenser needs to be refilled.
- Program Ending Indicator: Highlights when program is finished.
- Half Load Functions: To use half-load function, it can only be used when have half load (6 place settings dishware). this function will help with water and energy consumption. (It can only be used with Intensive, Heavy, ECO, Glass and 90min).
- Program Button: Repeatedly press this button to select desired program.
- Start/Pause: To start the selected washing program or pause while in operation
- Halfload Indicator: Indicates when Halfload function is active.
- Program Indicators: Indicates which program is selected and in use.
Accessories:
- Inlet hose (installed on the machine);
- Drain pipe (installed on the machine);
- Upper and lower basket;
- Cutlery basket;
- User manual;
- Warning card;
GETTING STARTED
Before installing your appliance, read all safety instructions in this manual, especially the sections on electrical safety and installation.
The minimum measurements needed for this dishwasher installation are as below:
MINIMUM MEASUREMENTS
Width: 598mm
Depth: 610mm
Height: 845mm
Depth: 1175mm (open Door)
POSITIONING THE APPLIANCE
- This dishwasher is freestanding. Position it close to an existing water inlet and drain connection and be sure that there is a power supply nearby.
- The back of the appliance should lean against the wall behind. The sides along any adjacent walls. The appliance can be recessed under a single benchtop.
- Make sure water hoses or power cables arent underneath the appliance.
LEVELLING THE APPLIANCE
- Make sure to position the dishwasher on a level and stable ground. If the floor is uneven you can adjust the feet by twisting it as if to screw in the feet to the product, either clockwise or counter-clockwise to adjust the feet up or down until appliance is completely level. (the maximum height adjustment is 20mm)
WATER CONNECTION
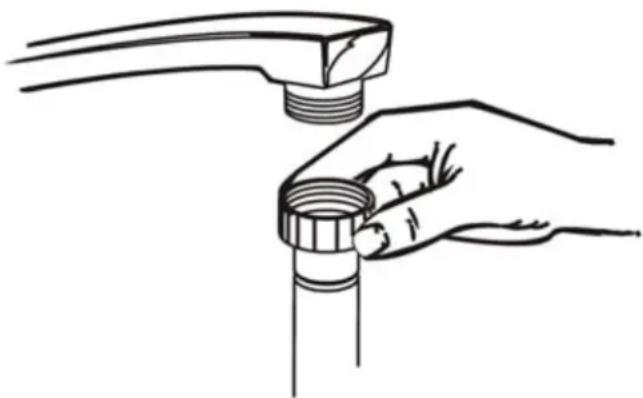
Connect the water supply hose to a threaded 3/4" connector.
During operation, the dishwasher will heat up the appliance to the required temperature so please be sure that the hose it not kinked or squashed and tightly fastened in place. If the hose is new or has not been used be sure to let the water run for a little bit to clear the hose of any impurities.
natural_image
Line drawing of hands holding a pipe fitting with a handle (no text or symbols)WATER PRESSURE
Minimum inlet water pressure is 0.04MPa Maximum inlet water pressure is 1.0MPa
NOTE:
The new hose-sets supplied with the appliance are to be used and that old hose-sets should not be reused.
GETTING STARTED (Cont.)
DRAIN HOSE CONNECTION
The drain pipe hose can go into a drain pipe with a diameter of 40mm (Option B), or let it run into the sink. Make sure to avoid bending or crimping the hose (Option A). The top of the hose is not to exceed 1000mm.

ELECTRICAL CONNECTION
To connect the dishwasher, insert the plug into a correctly earthed power socket. If the socket is not appropriate for the plug, replace rather than use an adaptor (with a qualified electrician), the likes of such devices such as adaptors can cause overheating and burns.
WARNING:
- Do not use an extension cord or adaptor.
- Do not bend the power cord and do not place appliance on top of cord.
- Do not modify the plug provided. If it does not fit into the power socket have a suitable outlet installed by a qualified electrician.
GETTING STARTED (Cont.)
EARTHING
This dishwasher must be earthed. In the unlikely event of malfunction or breakdown, earthing will reduce risk of electric shock by providing a path of least resistance for the electric current.
WARNING:
- Make sure the outlet is properly earthed to the ground. Please consult a qualified electrician or a service representative if you are not sure.
- Do not cut or remove the third grounding prong from the power plug
BEFORE FIRST USE
Now that your dishwasher has been installed, before using it for the first time please check the following points for safe and efficient use:
- It is level and installed correctly.
- The inlet valve open
- That the hose connections are tightly secured and no leakage.
• Electrical cord tightly connected. - Power switched on at power socket.
- Inlet and all hoses free of knots and kinks.
- Packaging material all removed from appliance.
- All documentation stored for easy access.
STARTING A WASH PROGRAM
WASH AND PROGRAM CYCLES
| PROGRAM | INFO | DESCRIPTION | DETERGENT PRE/MAIN | RUNNING TIME (MIN) | ENERGY (Kwh) | WATER (L) | RINSE AID |
| INTENSIVE | For the heaviest soiled loads, such as pots, pans, casserole dishes and dishes that have been sitting with dried food on them for a while. | Pre-wash(50°C)Wash (60 °C)RinseRinseRinse(65°C)Drying | 25g | 170 | 1.6 | 18.5 | ● |
| HEAVY | For heavily soiled loads, such as pots, plates, glasses and lightly soiled pans. | Pre-wash(45 °C)Wash (55 °C)RinseRinse (65°C)Drying | 25g | 160 | 1.4 | 15 | ● |
| ECO* | For normally soiled loads, such as pots, plates, glasses and lightly soiled pans. standard daily cycle. | Pre-washWash (45 °C)Rinse(50°C)Drying | 25g | 185 | 0.72 | 10.7 | ● |
| GLASS | For lightly soiled loads, such as glasses, crystal and fine china. | Pre-washwash(42°C)RinseRinse(60°C)Drying | 25g | 125 | 0.9 | 14.5 | ● |
| 90 MIN | For lightly soiled crockery and glass. | Wash(65°C)RinseRinse (65°C)Drying | 30g | 90 | 1.2 | 11.5 | ● |
| RAPID | A shorter wash for lightly soiled loads that do not need drying. | Wash (40 °C)RinseRinse (45 °C) | 25g | 30 | 0.6 | 11.5 |
NOTE: Open the door slightly (50mm) to assist in drying after every wash.
* This program was used for testing the appliance to the Australian Standard AS/NZS 2007.1 with 12 place settings, Rinse aid settings on 6 and the upper basket with the upper set of wheels on the rail support.
INSTRUCTIONS
LOADING THE DISHWASHER
For best performance, follow bellow guidelines:
ATTENTION: BEFORE LOADING BASKETS
Its not necessary to rinse all dishes before putting into dishwasher, though we suggest you scrape off any large amounts of leftover food and soften remnants of burnt food in pots and pans to ensure cleaning efficiency.
Place objects in the dishwasher in the following way:
- Hollow items such as cups, glasses and pots should be upside down when placed into the dishwasher.
- Curved items should be placed on its slide, so that water can run off it.
- Utensils are to be stacked securely so they do not tip over.
- All utensils and dishes are to be placed so that the spray arms can rotate freely during washing.
- Very small items should not be washed in the dishwasher as they can fall and obstruct moving parts.
- To avoid damage to glasses they must not touch.
WARNING: Bladed knives stored upright is a potential hazard. Always position sharp items faced down or in a horizontal position in the upper basket.
- Do not overload your dishwasher. It will hold a maximum of 12 standard place settings. This is important for better washing results and lowers energy consumption.
NOT SUITABLE FOR THE DISHWASHER
- Cutlery with wooden, china or mother-of-pearl handles
- Plastic items that are not heat resistant
- Older cutlery with glued parts that are not heat resistant
• Bonded cutlery items or dishes - Pewter or copper items
- Lead crystal glass
• Steel items subject to corrosion (Rusting) - Wooden Platters
LIMITED SUITABILITY
- Items made of silver and aluminium tend to discolour from machine washing.
- Glazed patterns may fade with frequent machine washing.
INSTRUCTIONS (Cont.)
LOADING THE UPPER BASKET
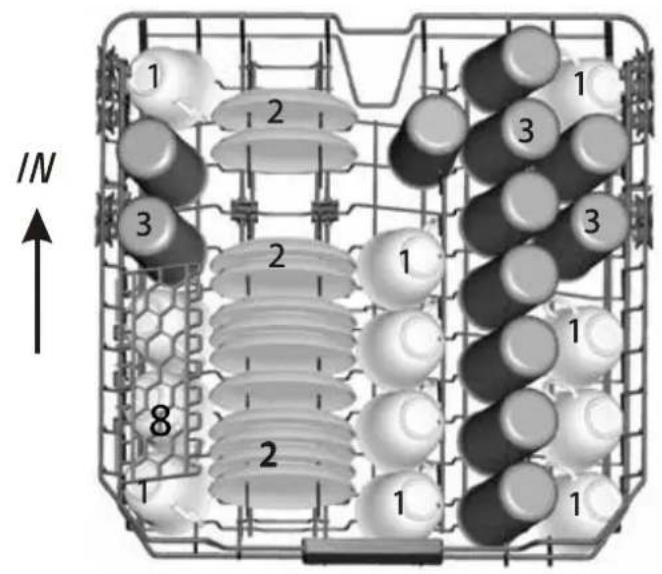
The upper basket is designed to hold more delicate and lighter dishware such as glasses, coffee and tea cups and saucers, as well as plates, small bowls and shallow pans. (position the dishes and cookware so that they will not get moved by the spray of water)

ADJUSTING THE UPPER BASKET
The height of the upper basket can be adjusted in order to create more space for large utensils both for the upper/lower basket. The height of the upper basket can be adjusted by placing the wheels on different height on the rails. Long items, serving cutlery, salad servers and knives should be placed on the shelf so that they do not obstruct the roatation of the spray arms.
Lower position Upper position

natural_image
Industrial machinery setup with multiple cylindrical components and piping (no visible text or symbols)
natural_image
Industrial equipment structure with white metal frame and multiple circular components (no visible text or symbols)Wheels
INSTRUCTIONS (Cont.)
LOADING THE LOWER BASKET
Larger items such as pots, pans, lids, serving dishes and bowls should be placed into the lower basket of the dishwasher. (example of just pots below)


FOLDING THE SPIKES OF LOWER BASKET
For better stackins of pots and pans, fold down all the spikes which are used to stacking plates and bowls down. Allowing more room to place pots if need be.

natural_image
Hand holding a wireframe object on a grid surface, no text or symbols visibleINSTRUCTIONS (Cont.)
CUTLERY BASKET
All cutlery should be placed in the cutlery basket with the handles at the bottom. If the rack has side baskets, the spoons should be loaded separately into the appropriate slots, especially long utensils should be placed in the horizontal position at the front of the upper basket as shown in the picture.

natural_image
3D rendering of a black plastic cage with internal compartments and a handle (no text or symbols)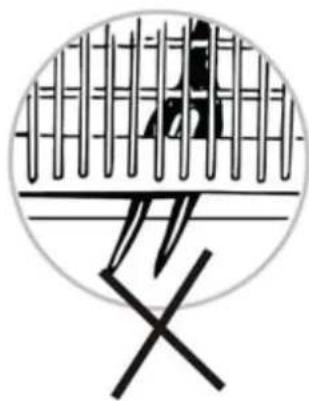
natural_image
Simple line drawing of a chair with a fence and tie, no text or symbols presentWARNING
- Do not let any items extend through the bottom.
• Always load sharp utensils with the sharp point down.
INSTRUCTIONS (Cont.)
DISHWASHER DETERGENT
WARNING:
- Only use detergent that are meant to be used for dishwashers
- Only add the detergent just before starting the dishwasher so it doesnt become damp, if becomes damp this will stop it from dissolving properly.
- Be sure to always supervise and that no children can reach detergent when door is open. Best when adding detergent, make sure its just before you start dishwasher and you close the door straight away.
- Detergent is corrosive, Be sure that no children are in reach of it.
- WARNING: Some dishwasher detergents are strongly alkaline. They can be extremely dangerous if swallowed. Avoid contact with the skin and eyes and keep children away from the dishwasher when the door is open. Check that the detergent receptacle is empty after completion of wash cycle.
CONCENTRATED DETERGENTS
Based on their chemical composition, detergents and can be split in two basic types: Conventional and Alkaline Detergents.
The use of “Normal” washing programs in combination with concentrated detergents reduces pollution and is good at cleaning your dishes. These wash programs are specifically matched to the dirt-dissolving properties of the enzymes of the concentrated detergent. For this reason, “Normal” wash programs in which concentrated detergents are use can achieve the same results that can otherwise only be achieved using “Intensive” programs.
DETERGENT TABLETS
Detergent tablets of different brands dissolve at different speeds. Some detergents can't dissolve and develop their full cleaning power during short programs. Therefore please use long programs when using detergent tablets to ensure the complete removal of detergent residuals.
INSTRUCTIONS (Cont.)
ADDING DETERGENT


A: For main wash detergent
B: For Pre-Wash detergent
Fill the detergent dispenser with detergent. The marking indicates the dosing levels as illustrated on the right

natural_image
Top-down view of a rectangular plastic container with a small box on top (no visible text or symbols)Please observe the manufacturers dosing and storage recommendations as stated on the detergent packaging.
Be sure to close the lid and press until it locks in place.
If the dishes are heavily soiled, place an additional detergent dose in the pre-wash detergent chamber. This detergent will take effect during the pre-wash phase.
NOTE:
- If the lid is closed, push the latch to open.
• Always add the detergent just before starting each wash cycle. - Only use branded detergent and rinse aid for dishwasher.
- You see information about the amount of detergent for a single program on page 13.
INSTRUCTIONS (Cont.)
RINSE AID DISPENSER
The rinse aid is released during the final rinse to prevent water from forming droplets on your dishes, which can leave spots and streaks. It also improves drying by allowing water to roll off the dishes. Your dishwasher is designed to use liquid rinse aids. The rinse aid dispenser is located inside the door next to the detergent dispenser.
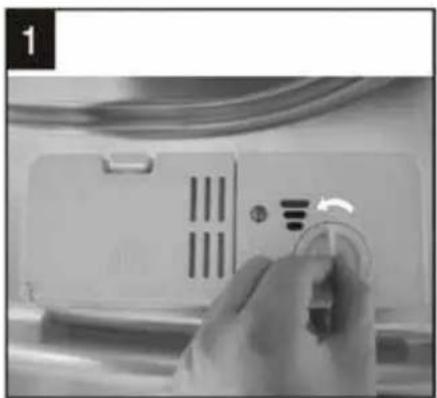
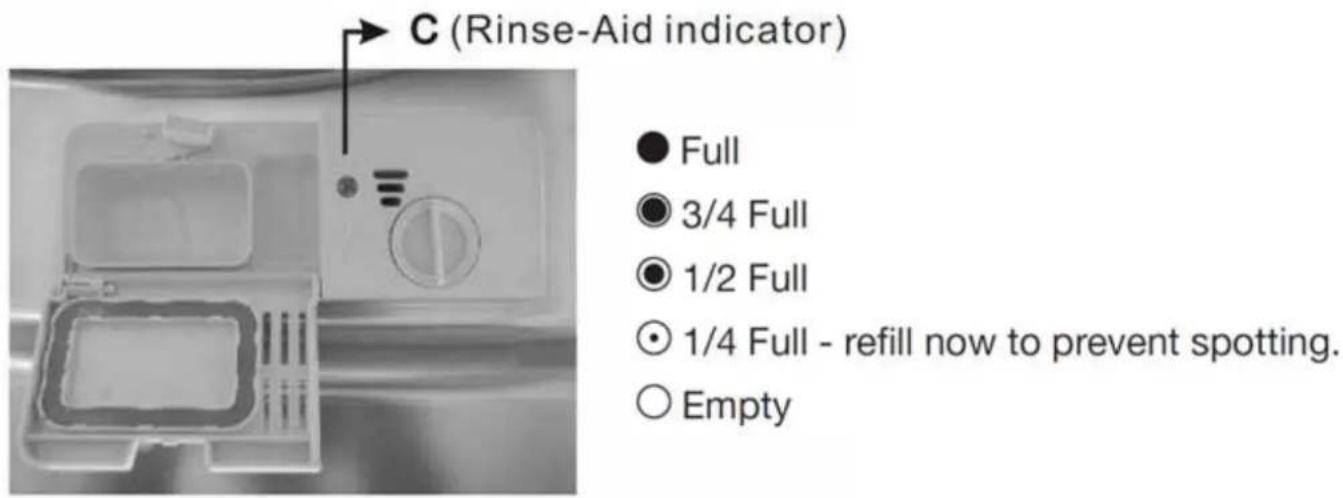
To fill the dispenser, open the cap and pour the rinse aid into the dispenser until the level indator turns completely black. The volume of the rinse aid container is about 110ml.
CAUTION
Only use branded rinse aid for this dishwasher. Never fill the rinse aid dispenser with any other substances (e.g. Dishwasher cleaning agent, liquid detergent). This will damage the appliance.
FILLING THE RINSE AID DISPENSER
The rinse aid dispenser is located next to the detergent dispenser. It holds about 110mL. To fill the dispenser, open the cap and pour the rinse aid into the dispenser.
Pour the rinse aid until the indicator turns completely black, please take care not to over fill it.
natural_image
Hand holding a circular device with a knob, next to a white appliance with ventilation slots (no visible text or symbols)
natural_image
Close-up of a kitchen sink with a plastic bag partially visible, no text or symbols present.
natural_image
Close-up of a hand holding a cable with a plastic cover, next to a white electronic device (no visible text or symbols)CAUTION
Clean up any rinse aid spilled while filling with an absorbent cloth or paper towel to avoid foaming during the next wash. Do not forget to replace the cap before closing the dishwasher door.
INSTRUCTIONS (Cont.)
WHEN TO REFILL RINSE AID DISPENSER
Fill the rinse aid dispenser when the light on the control panel comes on. When the rinse indicator is full, the whole indicator will be dark. As the rinse aid is used, the size of the dark dot decreases as indicated below.
ADJUSTING THE RINSE AID DISPENSER
The rinse aid has 6 settings, always start with the dispenser set on "4". If spots and poor drying are a problem, increase the amount of rinse aid dispensed by removing the the dispenser lid and rotating the dial to "5". If the next dishes are still not drying properly then you can increase the dial even higher.
Note: Increase the dose if there are drops of water or lime spots on the dishes after washing. Reduce it if there are sticky whitish stains on your dishes.

INSTRUCTIONS (Cont.)
STARTING THE DISHWASHER
- Open the dishwasher and draw out the lower and upper basket and load in the dishes. Push them back in.
- When you finished loading the dishes, open up the detergent dispenser and add in your detergent. Refer to pages 19 & 20 for more information of adding detergent and Rinse aid dispensers.
- Once you have added your detergent and loaded the dishwasher. Close the door and be sure that it clicks in so that its closed correctly. Press the ON/OFF button on the dishwasher panel.
- Press the PROGRAM button repeatedly and select the desired wash program. Refer to page 13 for wash programs.
- Press the START/PAUSE button to start the program. When the program has completed washing your dishes. Press the ON/OFF button to turn off the dishwasher.
FORGOT TO ADD A DISH
A forgotten dish can be added at any time before the detergent cup opens.
- Press the START/PAUSE button to stop the washing.
- When the spray arms stop spinning, open the door a little bit, best to add dishes in on upper basket. (opening the door all the way will cause water to leak as you are pausing mid-wash).
- Add in your forgotten dish
- Close the door and press START/PAUSE button. The dishwasher will continue to run after 10 seconds.
AT THE END OF A WASH CYCLE
When the program wash cycle has finished, the buzzer on the dishwasher will sound for 8 seconds, then stop. Press the ON/OFF button to turn off the dishwasher before accessing the dishwasher.
- Wait a few minutes before opening the dishwasher to avoid scalding hot dishes and utensils as they will still be hot from the washing cycle you just completed.
- Open the door carefully a little bit and let the dishes cool before removing the dishes, this way the dishes will be cool when removing and will dry better.
- Empty the lower basket first to avoid dripping water from the top basket down onto the dishes on the bottom.
Problem Possible Cause
| The dishwasher does not run | The fuse is blown or circuit breaker is activated | Replace the fuse or reset circuit breaker. Remove any other appliances sharing the same circuit with the dishwasher. |
| The power supply is not turned on. | Make sure the dishwasher is powered on and the door is closed securely. Make sure the power cord is properly plugged into the wall socket. | |
| Water Pressure is low | Check that the water supply is connected properly and the water is turned on. | |
| Knocking noise in the wash cabinet | A Spray arm is knocking against an item in the basket. | Interrupt the program by pressing START/ PAUSE button and rearrange the items which are obstructing the rotating spray arm. |
| Rattling noise in the wash cabinet | Items in the crockery are loose in the wash cabinet. | Interrupt the program by pressing START/ PAUSE button and rearrange items in the crockery. |
| Knocking noise in the water pipes | This may be caused by on-site installation or the cross-section of the piping. | This has no influence on the dishwasher functions itself, if in doubt please contact a qualified plumber. |
| Suds in the tub | Improper detergent | Use only the special dishwasher detergent to avoid suds. If this occurs, add 3 Litres of cold water into the tub, close the door until it clicks shut, select any cycle and the first step of a cycle will drain out the water. Stop the cycle and open the door after water has been drained to see if the suds have disappeared. |
| Dishes are not dried properly | Rinse aid dispenser is empty | Make sure the rinse air dispenser is not empty. |
| Improper loading | load the dishwasher as suggested in the manual | |
| Wrong program selected | If you have selected a short program, the rinse temperature is lower which reduces cleaning performance as hotter temperatures are required for optimum cleaning. |
USEFUL INFORMATION
ERROR CODES
When some malfunctions occur, the appliance will display error codes to warn you:
| CODES MEANINGS CAUSES | ||
| The Rapid Light will Flicker Longer inlet time | Tap is not open enough, or water intake is restricted. | |
| The Rapid and 90min light flicker | Not reaching the setting temperature | Malfunction in the heating element. |
| The glass light is flickering Overflow | Some element of dishw | asher leaks. |
WARNING
- If the dishwasher overflows, make sure to turn off the main water supply before making a service call.
- If there is water in the base, be sure to remove it before restarting the dishwasher.
CLEANING AND MAINTENANCE
The filter prevents remnants of food or other objects from getting inside the pump. The residues may block the filter, in this case they must be removed.
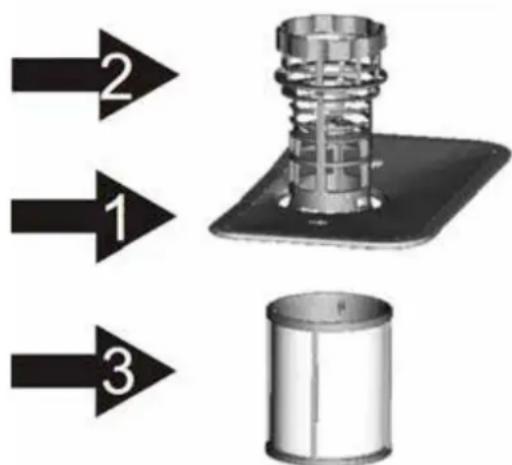
The filter system consists of a coarse filter, a flat (main filter) and a micro filter.
1. MAIN FILTER
Food and soil particles are trapped in this filter are pulverised by a special jet on the lower spray arm and washed down into the drain.
2. COARSE FILTER
Larger items, such as pieces of bones or glass that could block the drain are trapped in the coarse filter. To remove the items caught, gently squeeze the tap on the top of this filter and lift it out.
3. FINE FILTER
This filter holds soil and food residues in the sump area and prevents it from being redeposited on the dishes during a cycle.
NOTE
For the best performance of the dishwasher, the filters should be cleaned at least once a week and have the residues removed that may clog the filters.
USEFUL INFORMATION (Cont.)
REMOVING THE FILTER SYSTEM
To remove the filter assembly to clean please follow the below instructions:
1

natural_image
3D rendering of a mechanical component with curved arms and a central hub, labeled 'Open' (no other text or symbols)STEP 1
Turn the filter anti-clockwise direction.
2

natural_image
Mechanical assembly diagram showing a motor or conveyor system with a central hub and directional arrow (no text or symbols)STEP 2
Lift the filter up
NOTES
By unscrewing the coarse filter, you can remove the filter system. Remove any food remnants and clean the filters under running water.
CAUTION
- When cleaning the filters take care not to damage or distort the shape of it.
- Never use the dishwasher without the filters. Improper replacement of the filters may reduce the washing performance and damage dishes and utensils.
SPECIFICATIONS
| Height 845mm | |
| Width 598mm | |
| Depth 610mm | |
| Water Pressure 0.04-1.0 MPa | |
| Power Supply 220-240V ~ 50Hz | |
| Capacity 12 Place settings | |
| Rated Power 1760-2100W |
SEIKI™
CUSTOMER HELPLINE:
info@ayonz.com
DISTRIBUTED BY:
Ayonz Pty Ltd


- Place Settings Dishwasher - White
- INSTRUCTION MANUAL
- CONTENTS
- GENERAL SAFETY
- IMPORTANT INFORMATION
- ELECTRICAL SAFETY
- GENERAL SAFETY INSTRUCTIONS (Cont.)
- INSTALLATION
- USAGE CONDITIONS AND RESTRICTIONS
- CLEANING AND MAINTENANCE
- PRODUCT OVERVIEW
- PRODUCT OVERVIEW (Cont.)
- CONTROL PANEL
- Accessories:
- GETTING STARTED
- MINIMUM MEASUREMENTS
- POSITIONING THE APPLIANCE
- LEVELLING THE APPLIANCE
- WATER CONNECTION
- WATER PRESSURE
- NOTE:
- GETTING STARTED (Cont.)
- DRAIN HOSE CONNECTION
- ELECTRICAL CONNECTION
- WARNING:
- EARTHING
- BEFORE FIRST USE
- STARTING A WASH PROGRAM
- INSTRUCTIONS
- LOADING THE DISHWASHER
- ATTENTION: BEFORE LOADING BASKETS
- Place objects in the dishwasher in the following way:
- NOT SUITABLE FOR THE DISHWASHER
- LIMITED SUITABILITY
- INSTRUCTIONS (Cont.)
- LOADING THE UPPER BASKET
- ADJUSTING THE UPPER BASKET
- Lower position Upper position
- LOADING THE LOWER BASKET
- FOLDING THE SPIKES OF LOWER BASKET
- CUTLERY BASKET
- WARNING
- DISHWASHER DETERGENT
- CONCENTRATED DETERGENTS
- DETERGENT TABLETS
- ADDING DETERGENT
- RINSE AID DISPENSER
- CAUTION
- FILLING THE RINSE AID DISPENSER
- WHEN TO REFILL RINSE AID DISPENSER
- ADJUSTING THE RINSE AID DISPENSER
- STARTING THE DISHWASHER
- FORGOT TO ADD A DISH
- AT THE END OF A WASH CYCLE
- USEFUL INFORMATION
- ERROR CODES
- MAIN FILTER
- COARSE FILTER
- FINE FILTER
- NOTE
- USEFUL INFORMATION (Cont.)
- REMOVING THE FILTER SYSTEM
- STEP 1
- STEP 2
- NOTES
- SEIKI™
Brand : Seiki
Model : SC-1200AU6DWP
Category : Dishwasher