CPDuo Pro - Dash cam Rexing - Free user manual and instructions
Find the device manual for free CPDuo Pro Rexing in PDF.


User questions about CPDuo Pro Rexing
0 question about this device. Answer the ones you know or ask your own.
Ask a new question about this device
Download the instructions for your Dash cam in PDF format for free! Find your manual CPDuo Pro - Rexing and take your electronic device back in hand. On this page are published all the documents necessary for the use of your device. CPDuo Pro by Rexing.
USER MANUAL CPDuo Pro Rexing
The information in this manual is subject to change without notice.
www.rexingusa.com
REV012024
Overview
Thank you for choosing REXING!
We hope you love your new products as much as we do. If you need assistance, or have any suggestions to improve it, please contact us.

care@rexingusa.com

(877) 740-8004
Our support team will respond to you as soon as possible.
Always a surprise with Rexing
Check us out here.
- https://www.facebook.com/rexingusa/
- https://www.instagram.com/rexingdashcam/
- https://www.rexingusa.com/support/registration/





Site


Product Support

Activate Your
18-Month Warranty
& Choose Your
Free Gift!
Activate within 30 days of purchase to claim your free gift and extended limited 12-month warranty to 18 months.
Scan the QR to Activate & Select Your Free Gift


https://www.rexingusa.com/productreg/
Table of Contents
What's in the box?
Product Overview 5
User Interface 6
Installation - 7
CarPlay 11
Android Auto 14
AirPlay 17
Android Cast 19
BT Music 21
Wi-Fi Video 22
Dash Cam 24
Locked Files 25
Audio output 26
Playback 29
Device Settings 31
Screen Brightness 36
Split screen mode 37
Reverse Parking Assistance 39
Time lapse video (Optional item) 40
Troubleshooting 41
Product specifications 43
Warranty and Support 46
What's in the box?
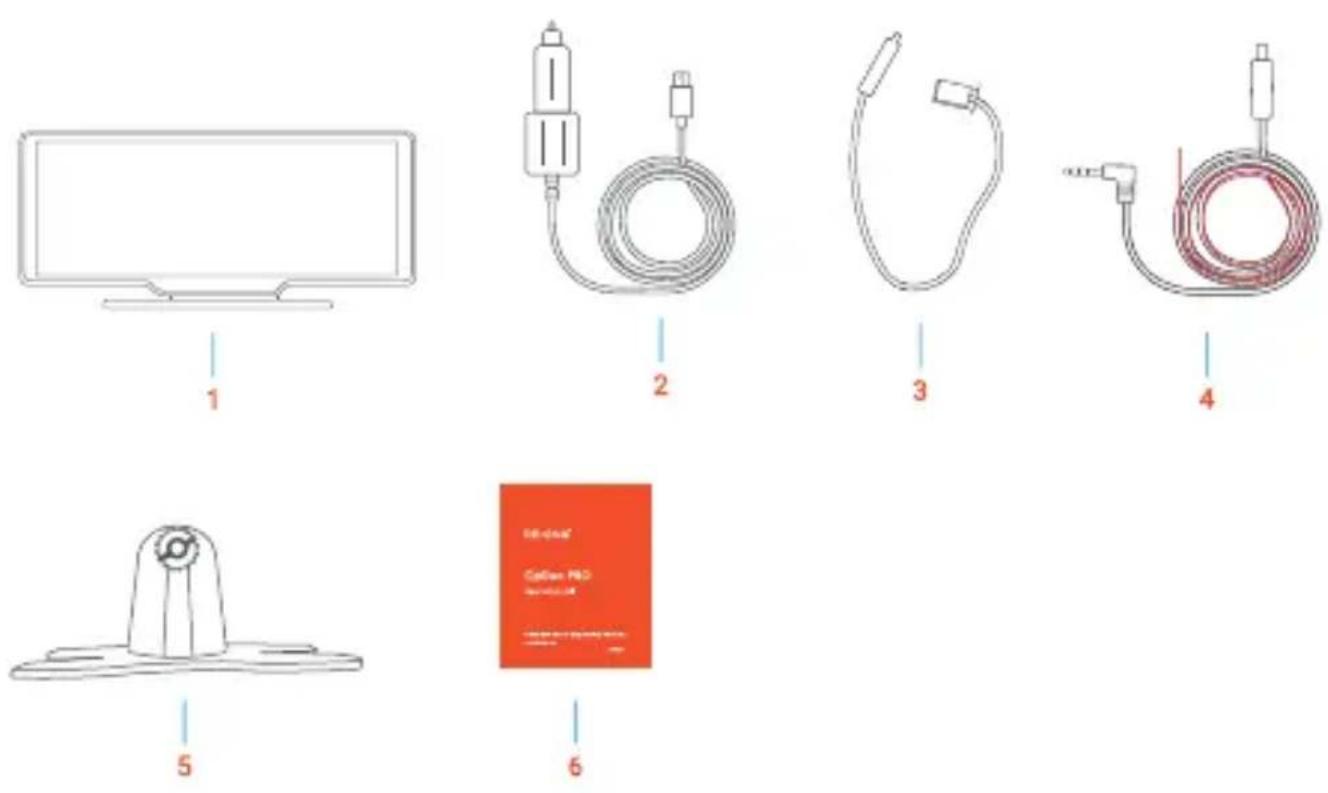
1. Device
10.26 inch high-definition display (1600X600) / touch control / Bluetooth / WIFI / Audio Output / Type C interface power supply
2. Power Cable
Type C power cable / 12V-24V / 3A current / integrated line / cigarette lighter
3. Rear Camera
- Rear Camera Cable
- Dashboard Mount
- User Manual
Product Overview
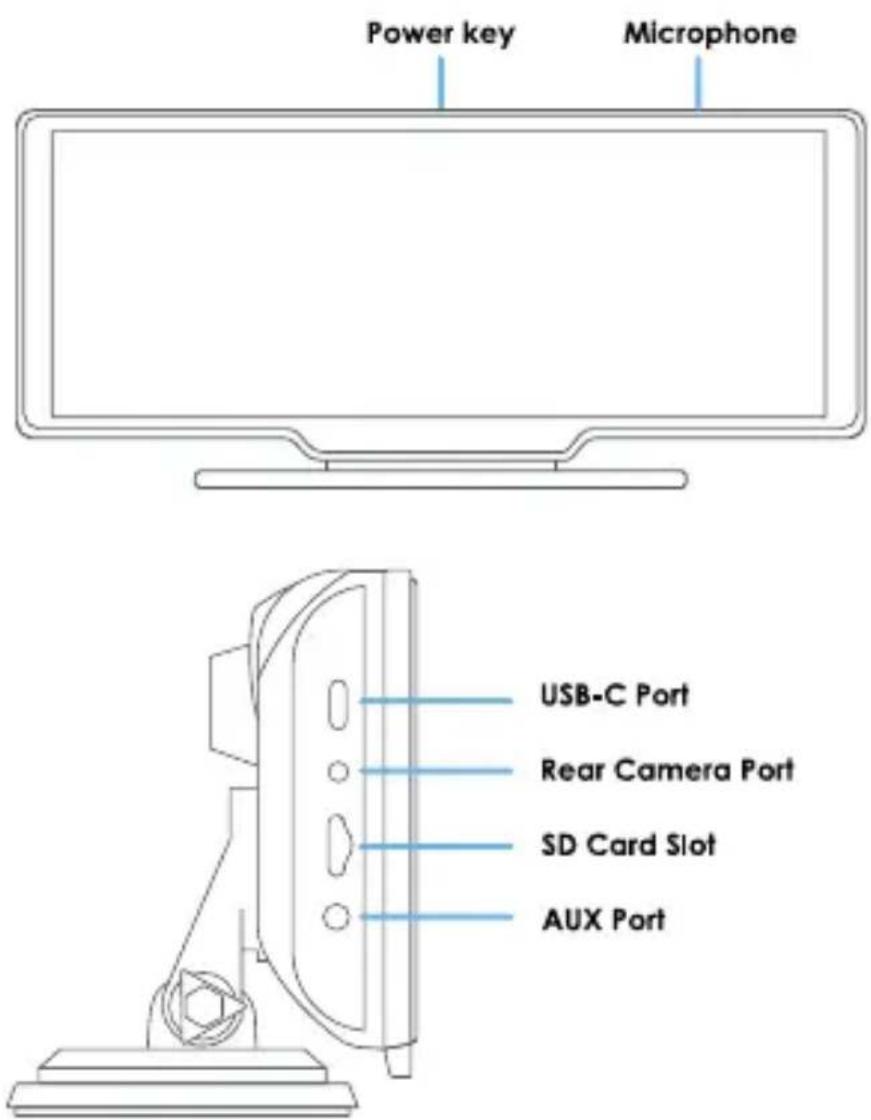
The CPDuo Pro features two-wide angle cameras to capture and transmit video of the surrounding area from the front + rear view.
Drivers can see obstacles and pedestrians around the vehicle intuitively, and effectively reduce the occurrence of scraping, collision, collapse and other accidents.
User Interface
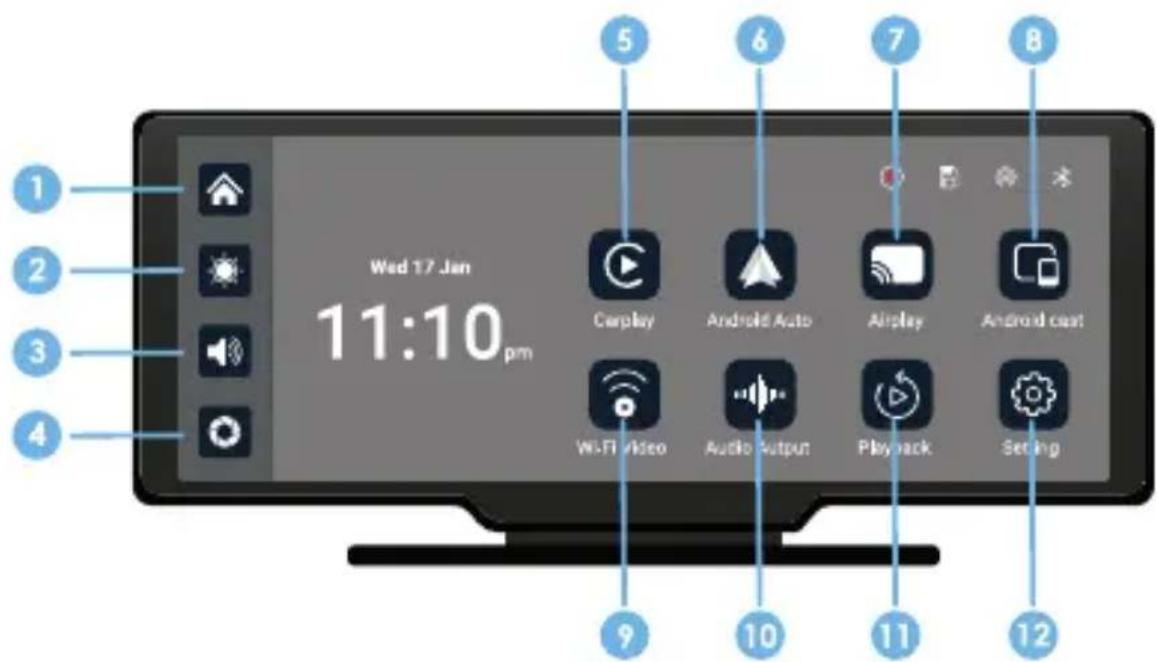
Home button: Click to return to the main interface of the smart screen
2 Brightness button: Click to adjust the brightness of the screen
3 Volume: Click to adjust the volume
4 Camera: Click to view the camera screen
5 CarPlay: dedicated car screen projection program for Apple mobile
6 Andorid Auto: a dedicated car screen projection program for Android phones
7 Airplay: iPhone mirroring screen projection
8 Android Cast: Android phone mirroring and casting
9 Wi-Fi Video: Click to enter the connection interface, the mobile phone can view the recorded files in real time.
10 Android Cast: Click to select the sound playing mode
11 Playback: Click to view recorded videos
12 Settings: Click to enter the function setting interface
Installation
Step 1. Install the RoadMate CPDuo Pro
1.1 Prepare the Mounting Position:
Clean the dashboard: Ensure the area where you'll mount the camera is clean and free from dirt, oil, or debris. Use a mild cleaner to wipe the surface and dry it thoroughly.
1.2 Mount the Camera:
Positioning: Align the camera to get the desired angle and view of the rear. Rear dash cams come with adhesive mounts or brackets for attachment.
Secure: Use the adhesive or mounting bracket to securely attach the camera to the chosen spot. Ensure it's firmly fixed to avoid any movement or displacement.
Step 2. Install the Memory Card
The Rexing CPDuo Pro accepts Class 10/UHS-3 or higher Micro SD memory cards up to 256GB. You will need to insert a memory card before begin recording.
Before inserting or removing a memory card, first ensure you've powered down the device. Gently push the memory card in until you hear a click, and allow the spring release to push the card out.
Step 3. Power on the Camera and Format the Memory Card
Power the camera by connecting the charger to the car cigarette lighter and camera. Before you start using a new memory card, you MUST format the card within the camera using the format function. Always backup important data stored on the memory card before formatting.
To format the memory card, make sure you have inserted your memory card, then turn on the device by connecting to a power source. Press OK to stop recording. Then toggle to the format settings and confirm the selection. You may now disconnect from power. The camera will shut down after 3 seconds. The camera should begin recording automatically the next time it is powered on.
Step 4. Mounting the Rear Camera and Wiring the Cables
4.1 Choose the Installation Location:
Near the License Plate: Mounting the camera near the license plate offers a clear rear view and ensures coverage of the back area.
4.2 Connect the Extension Cable:
Connect one end of the extension cable to the power input and video output ports on the rear dash cam.
4.3 Route the Extension Cable:
Securely route the extension cable along the interior of the vehicle, making sure to avoid any moving parts or obstructing airbags. Use cable clips or ties to secure the cable in place.
4.4 Connect to the Main Unit:
Connect the other end of the extension cable to the power input and video input ports on the main unit or display screen.
4.5 Secure Loose Wires:
Use cable clips or ties to secure any loose wiring to prevent them from hanging or interfering with other vehicle components.
Step 5. Power on the Device
Power on the rear camera and main unit to test the connection. Ensure that both power and video signals are transmitted correctly.
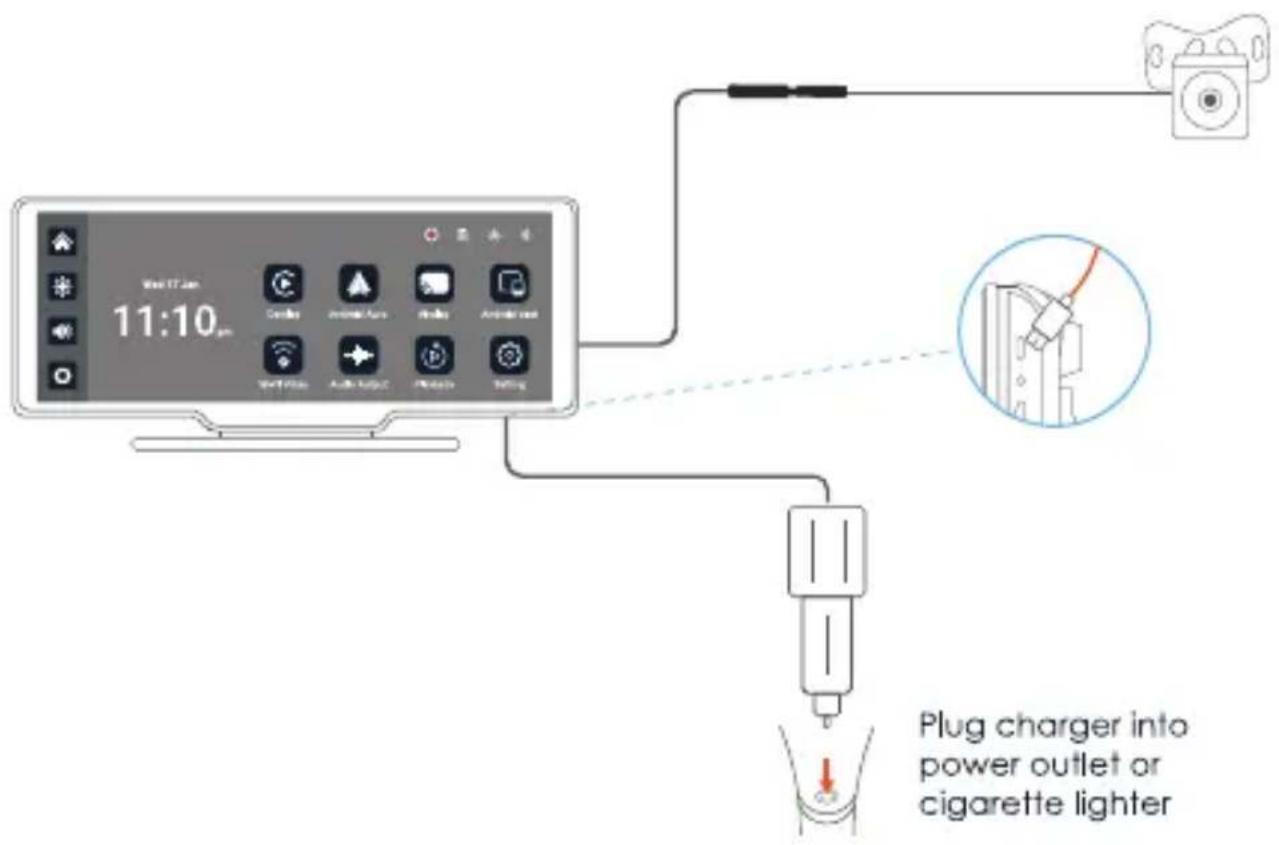
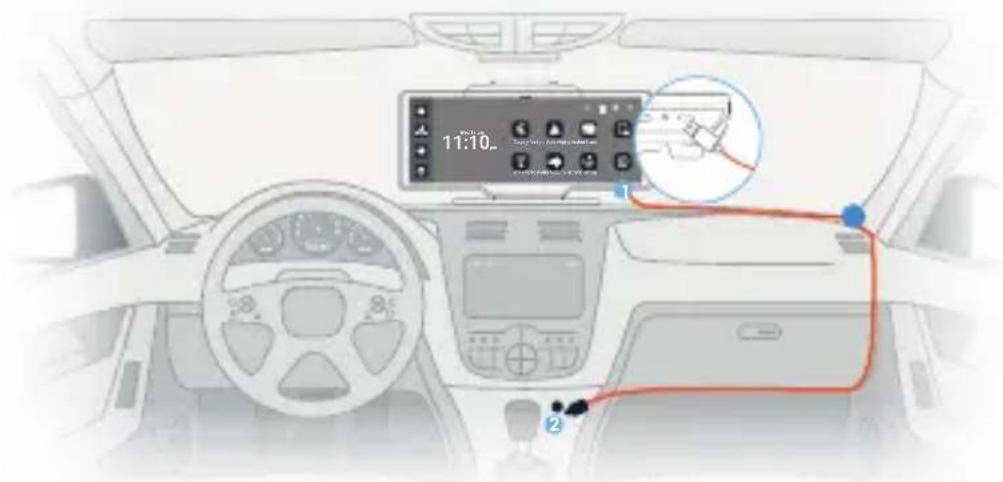
1 Type C Port
2 Cigarette lighter
To supply power, connect the 1 Type-C end of the power cable to the main device, and then insert the 2 cigarette lighter plug into the appropriate socket inside your vehicle.
Note:
Please use the charger provided with the Rexing unit. Using an unauthorized charger may easily damage the device or cause injuries due to insufficient voltage and excessive heat. Additionally, the FM transmission function may not work properly.
SD Card Requirements
The quality of the SD card has a significant impact on the stability of video recording. To record safely, please use a MicroSDXC card that has at least 32GB and up-to 256GB storage w/ Speed Class10. It's important to use SD cards from major brands such as Rexing, SanDisk, Kingston, Toshiba, and Samsung.
CarPlay
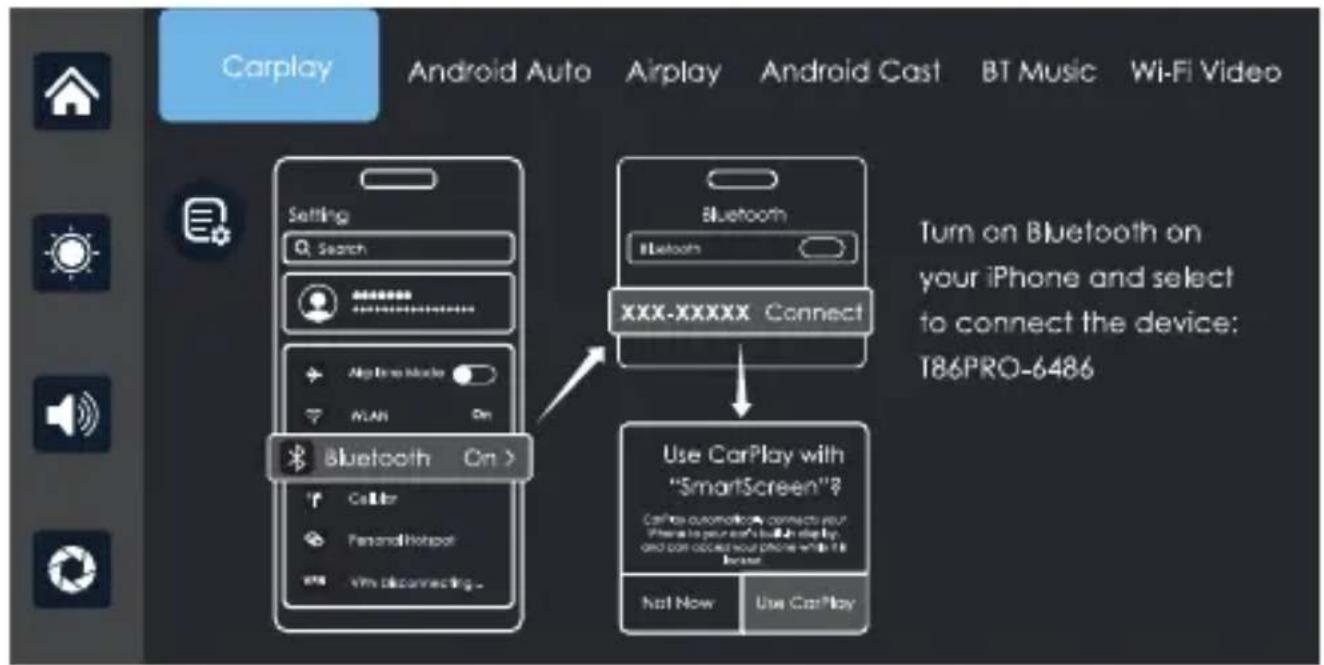
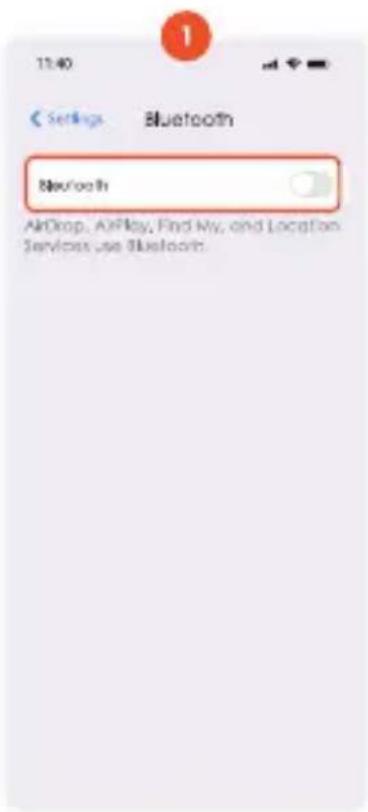
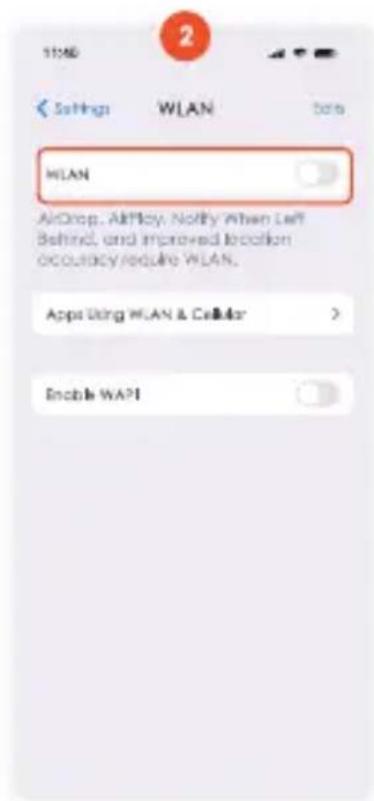
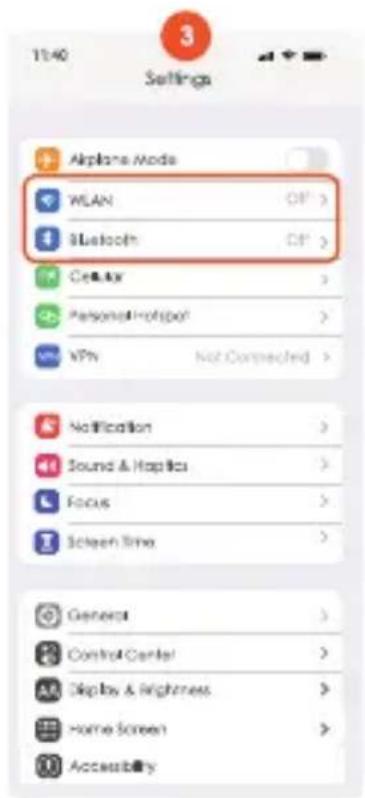
Select 'CarPlay' and connect your iPhone. Make sure Bluetooth and Wi-Fi are turned-on. Connect to Bluetooth name: T86PRO-XXXX. Once Bluetooth has successfully connected, you can then proceed to connect to CarPlay, future connection will be automatically connect to the last paired phone.
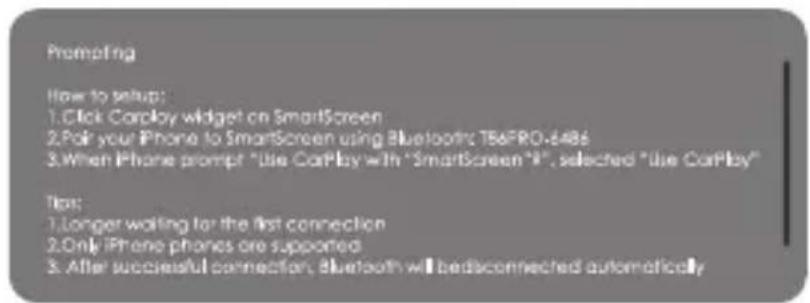

Click the Details button for detailed connection steps and connection FAQs.
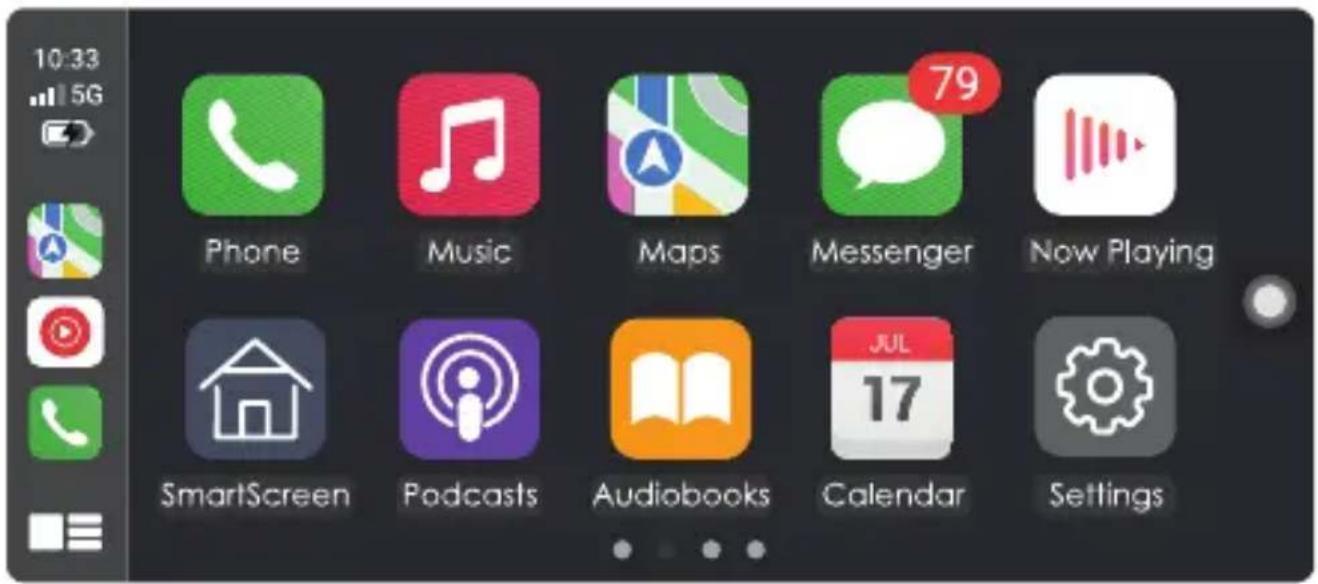
Click Assistive Touch to display the shortcut menu: Home, Record, Volume, Brightness
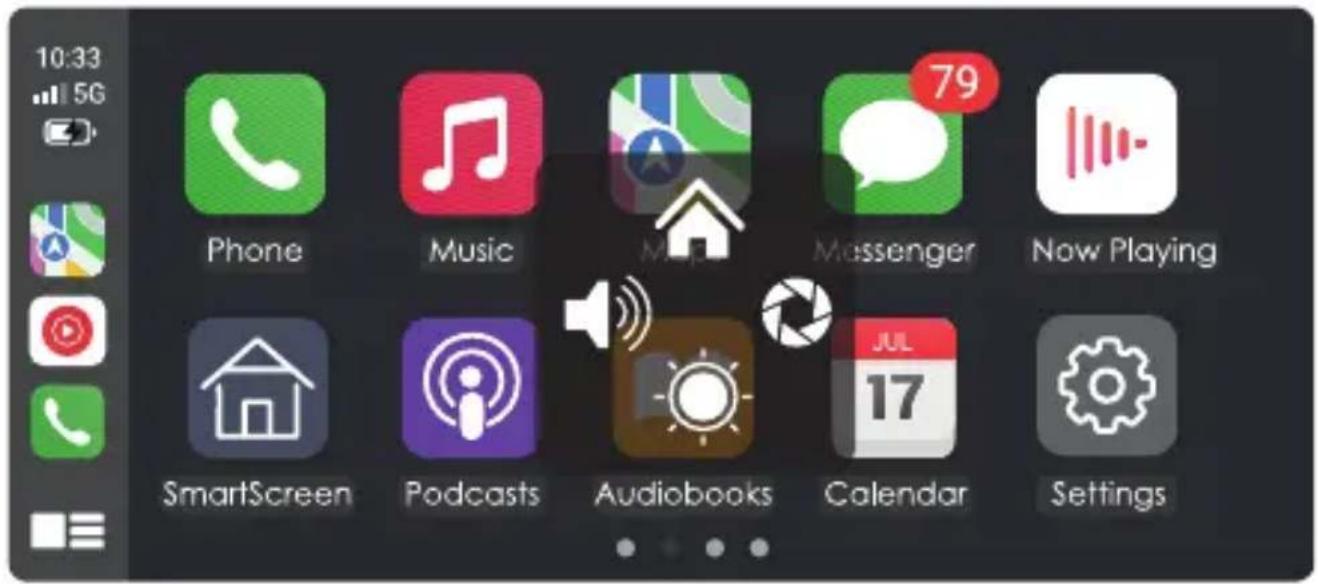
CarPlay only supports Apple devices.
To disconnect from CarPlay, turn-off Wi-Fi and Bluetooth from your iPhone.
Android Auto
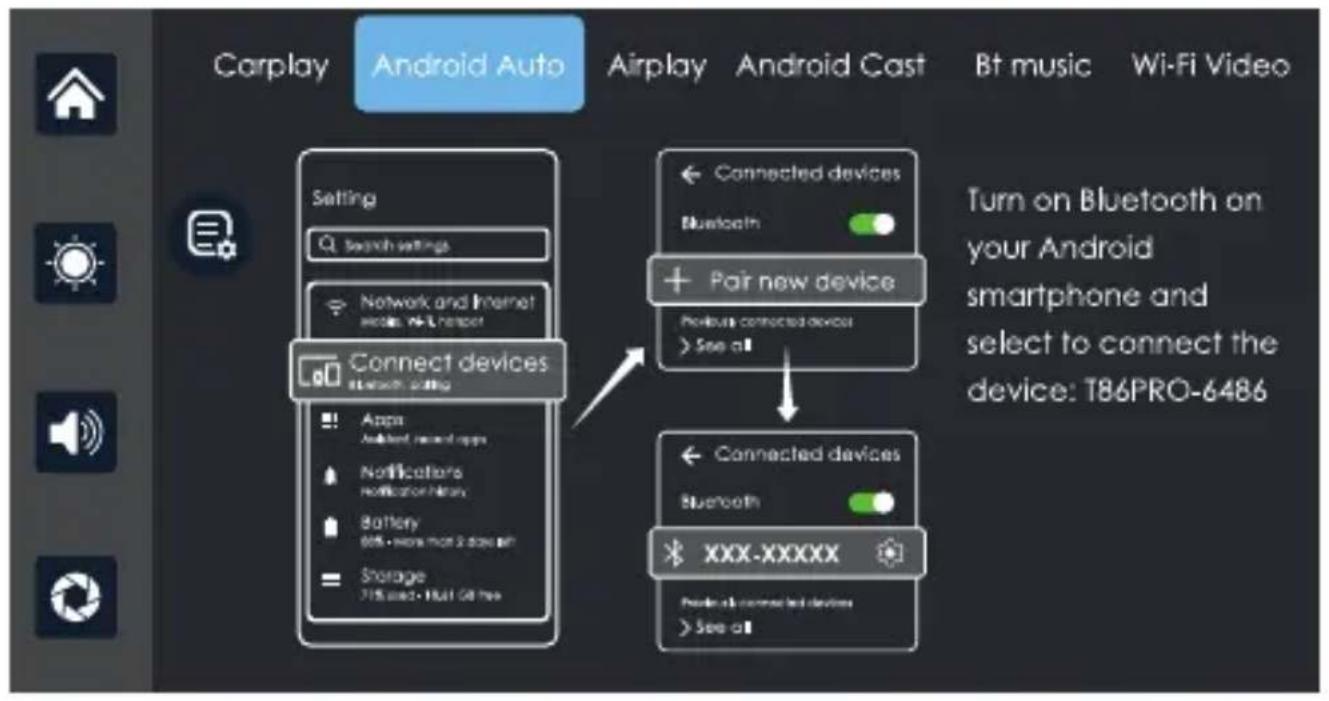
Select 'Android Auto' and connect your Android. Make sure Bluetooth and Wi-Fi are turned-on. Connect to Bluetooth name: T86PRO-XXXX. Once Bluetooth has successfully connected, you can then proceed to connect to Android Auto, future connection will be automatically connect to the last paired phone.

Click the Details button for detailed connection steps and connection FAQs.
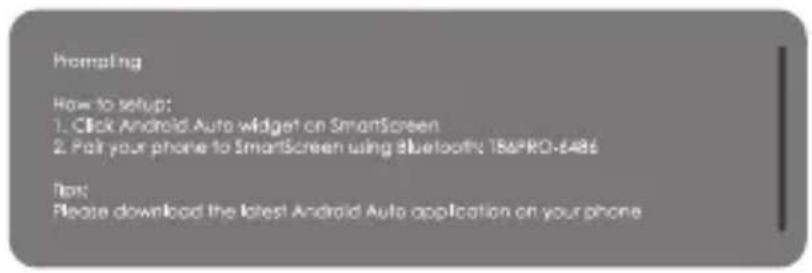
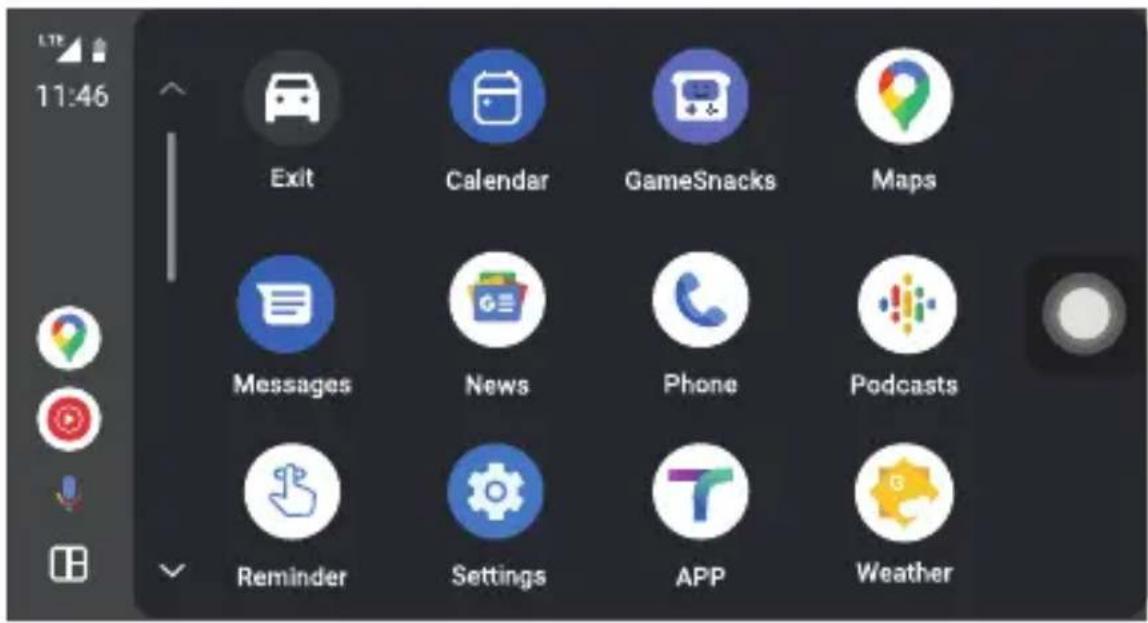
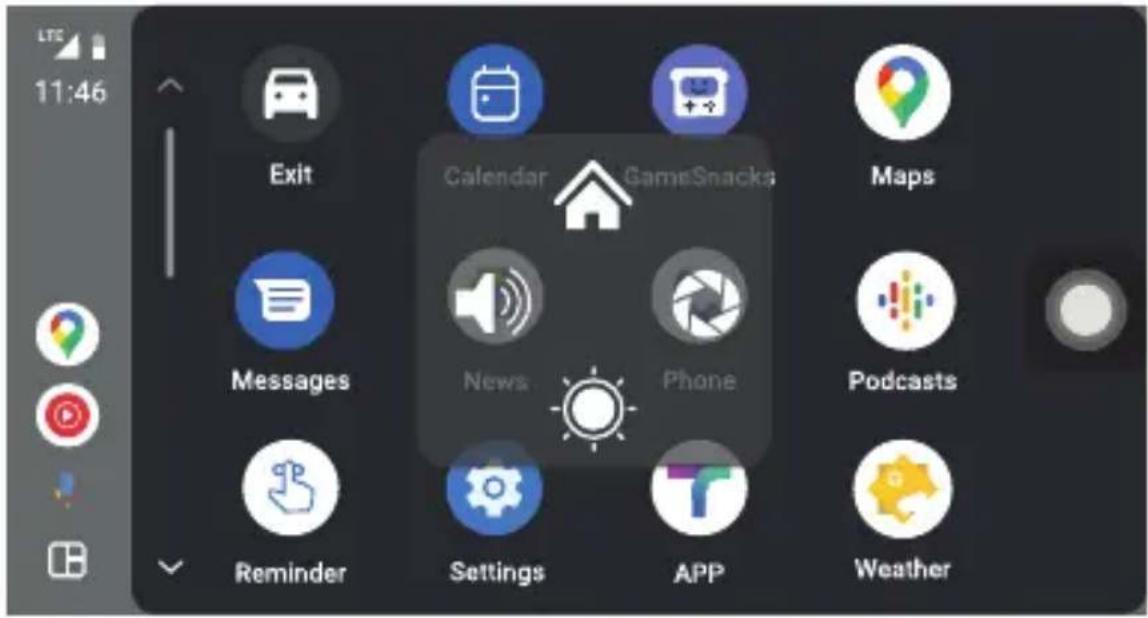
Click Assistive Touch to display the shortcut menu: [Back to Home], [Record Video Screen], [Volume Adjustment], [Brightness Adjustment].
Android Auto only supports Android devices.
To disconnect from Android Auto, turn-off Wi-Fi and Bluetooth from your Android.
10:44

Connections

Wi-Fi

Bluetooth

NFC and contactless payments

Airplane mode

Data usage
SIM card manager
Mobile Hotspot and Tethering
More connection settings
Looking for something else?
Samsung Cloud Location
AirPlay
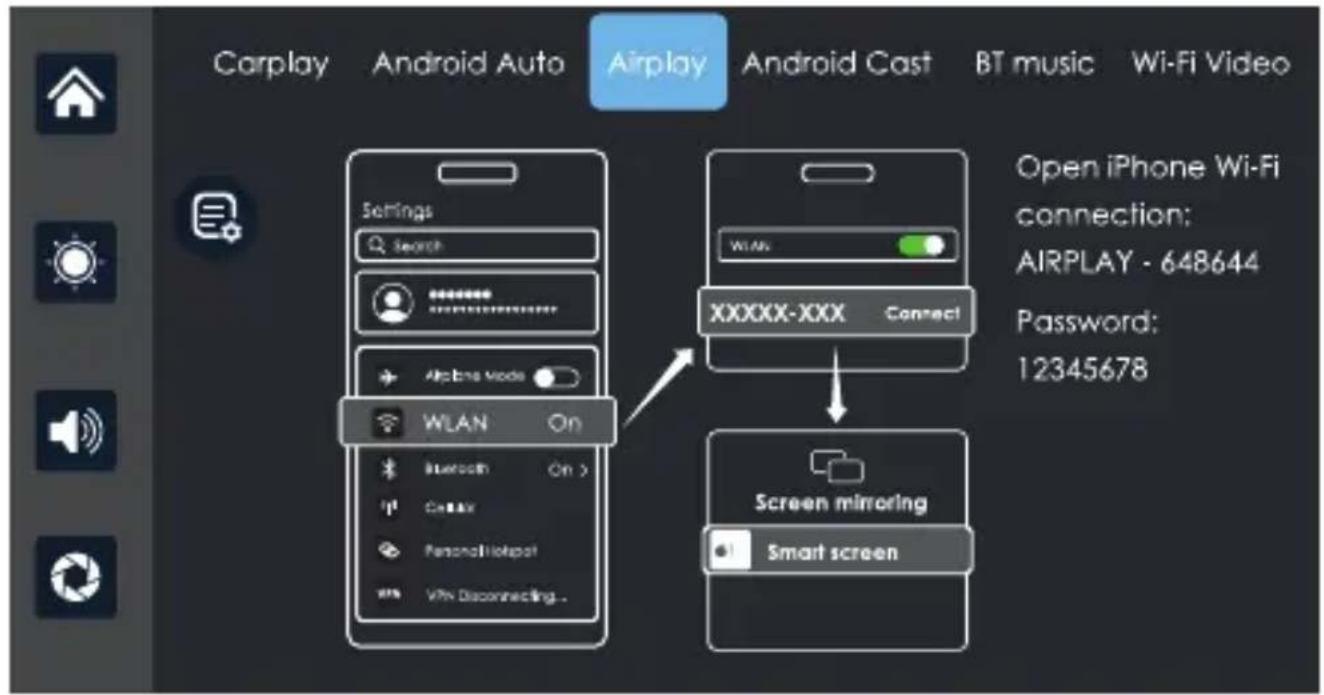
Using AirPlay, you can wirelessly stream video, audio, and pictures from your iPhone to your car's entertainment system. Unlike Bluetooth, AirPlay operates over Wi-Fi for a more reliable connection.
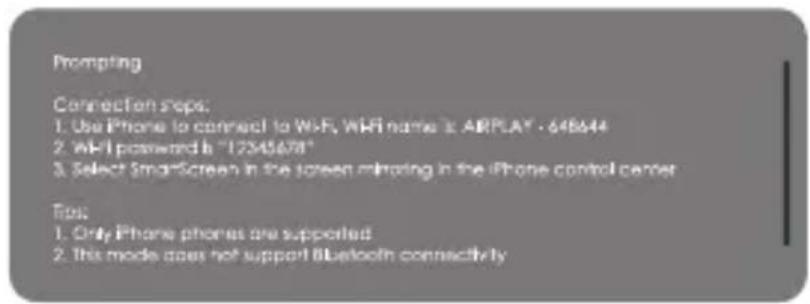

Click the Details button for detailed connection steps and connection FAQs.
- Requires an iPhone to connect to Wi-Fi
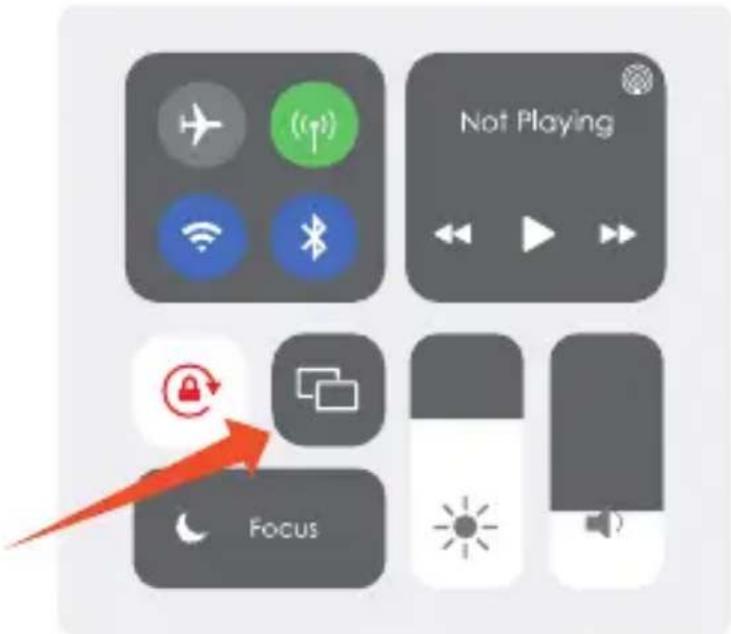
- Select SmartScreen in Screen Mirroring in the iPhone Control Center
Note:
AirPlay only supports Apple devices.
Android Cast
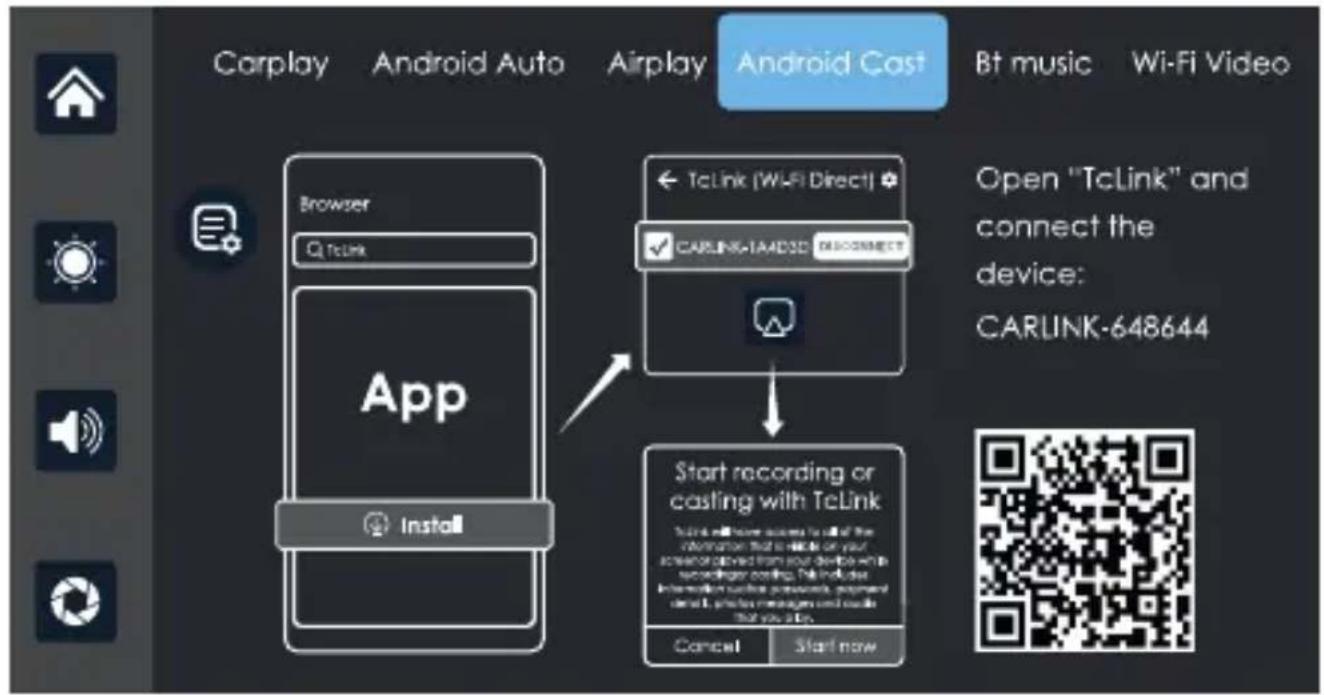
Using Android Auto, you can wirelessly stream video, audio, and pictures from your iPhone to your car's entertainment system. Unlike Bluetooth, Android Auto operates over Wi-Fi for a more reliable connection.
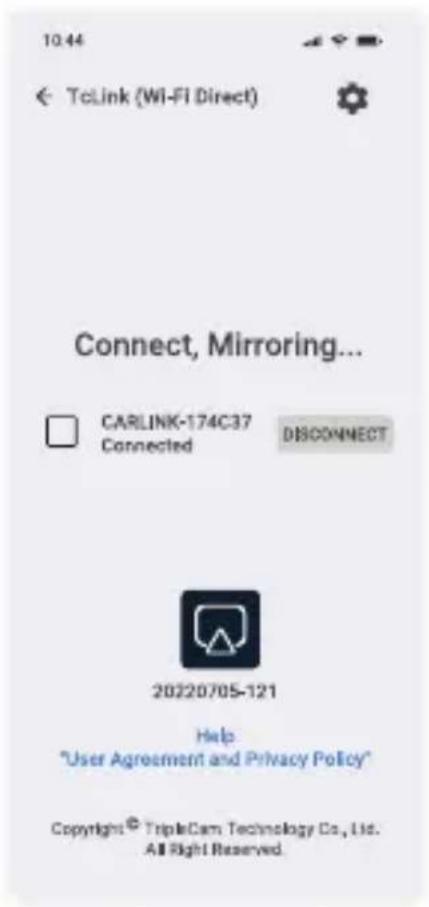
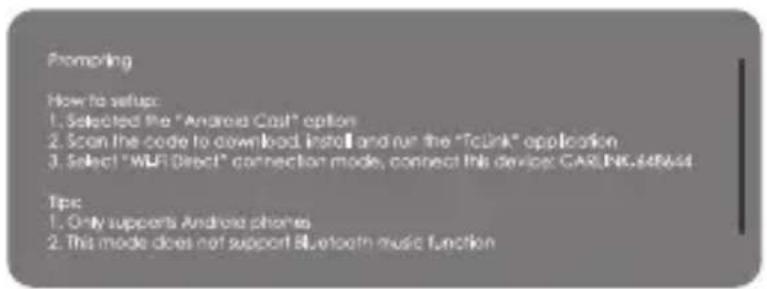

Click the Details button for detailed connection steps and connection FAQs.
Note:
Android Cast only supports Android devices that have "Wi-Fi Direct"
BT Music
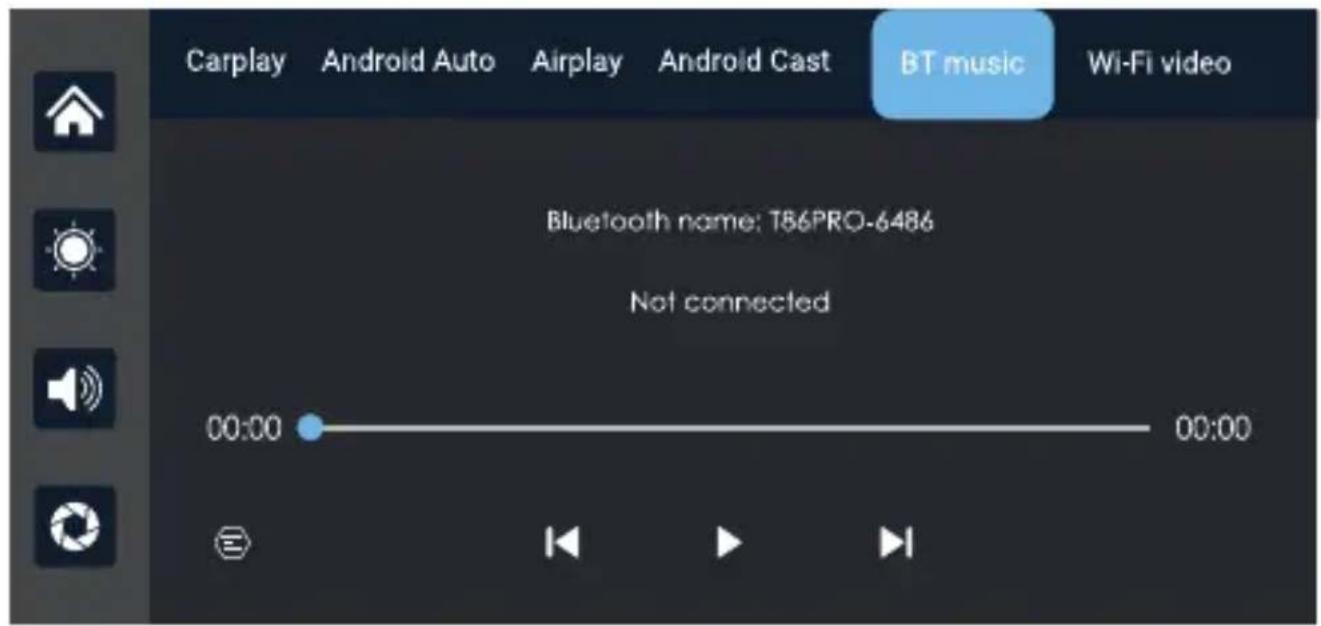
First, activate the Wi-Fi and Bluetooth on your phone. Next, select the [BT Music] option. The Smart Screen will automatically enable Bluetooth, and its name will appear in the upper left corner. Connect your phone to the Smart Screen via Bluetooth to start playing music

natural_image
Three white play button icons on a dark blue background (no text or symbols)The buttons correspond to "previous song", "play/pause" and "next song"
Click on the Lyrics button 📋 to display the lyrics.
Note:
Some music streaming apps may not support the display lyrics function
Wi-Fi Video
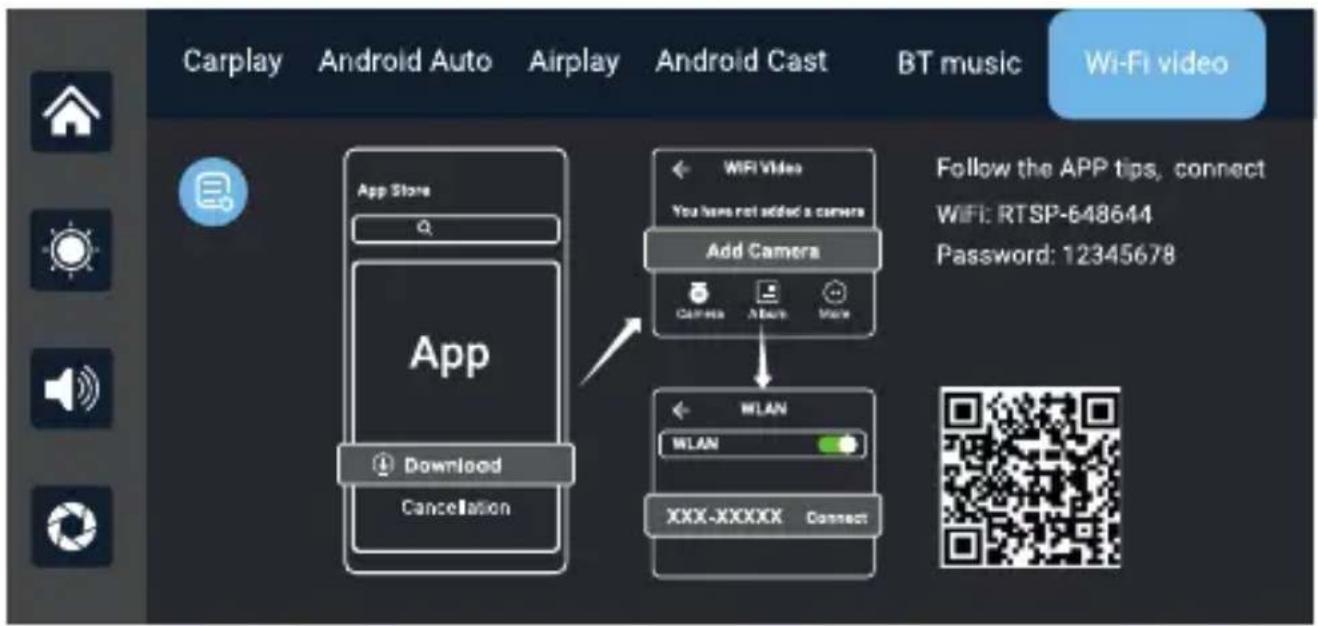
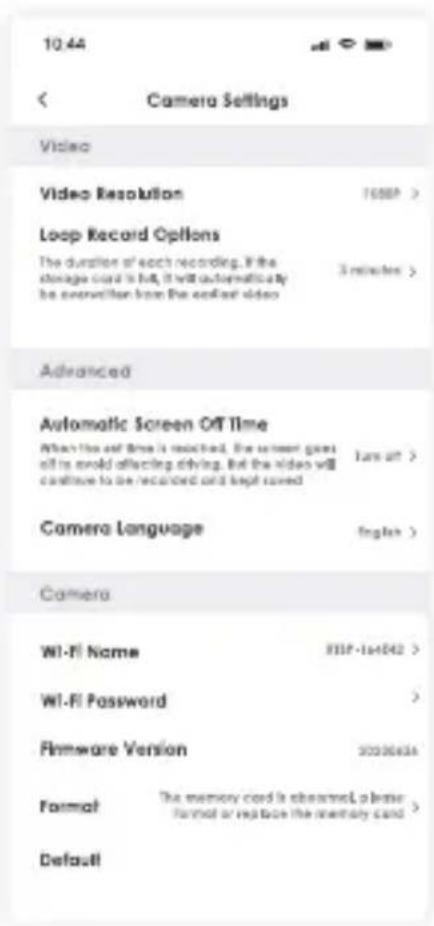
Scan the QR code to download the 'Viidure' application on your smartphone, as shown in the figure above.
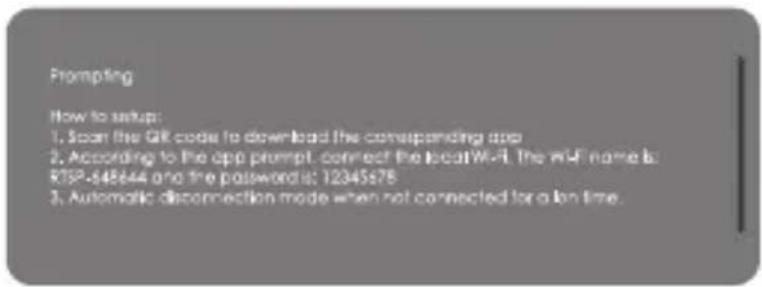

Click the Details button for detailed connection steps and FAQs.
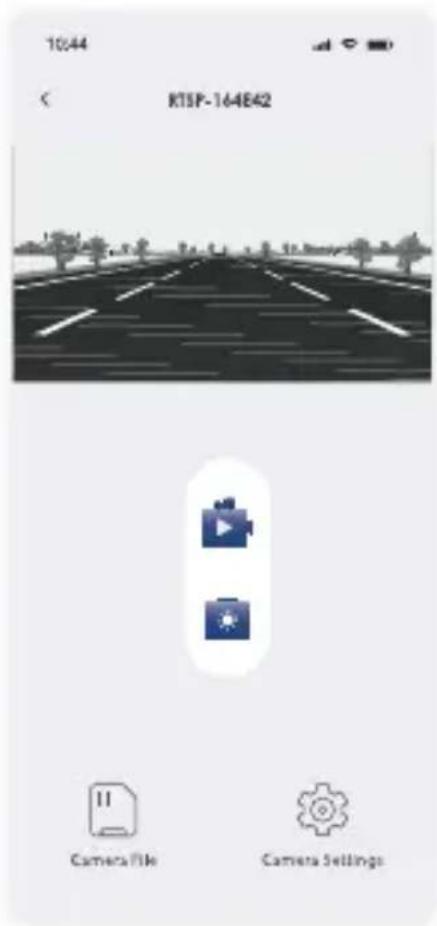
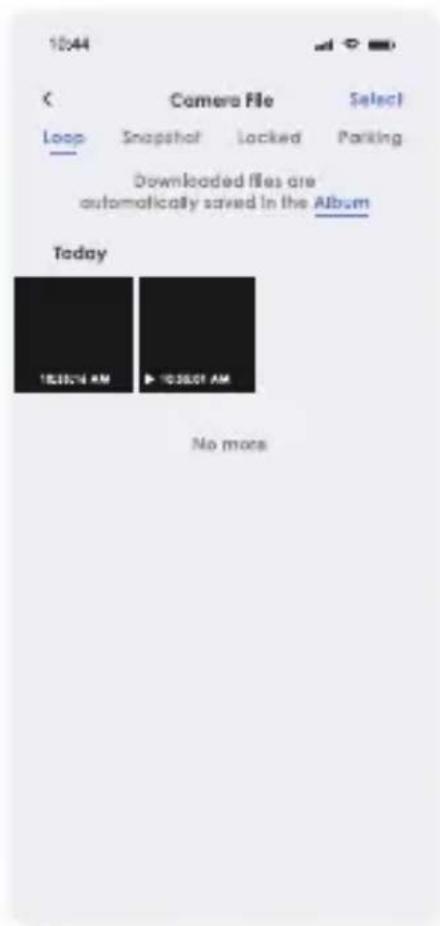
Once downloaded, open the app and follow the prompts to connect your smartphone to adapter Wi-Fi name: RTSP-XXXXXX, as shown above.
Note:
To disconnect from 'Wi-Fi Video,' turn off Wi-Fi from your smartphone.
Dash Cam
natural_image
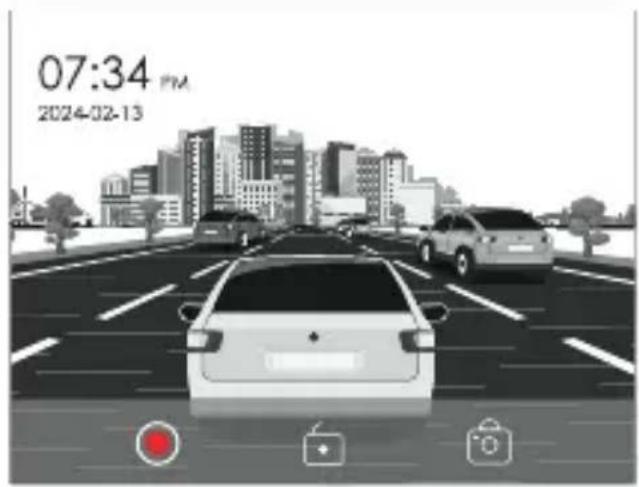
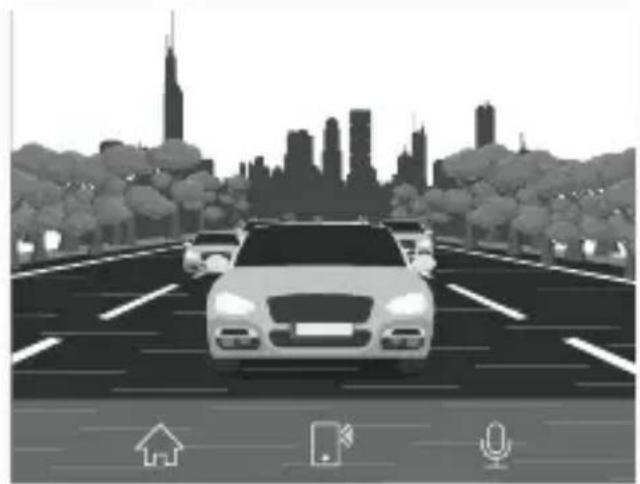
Black-and-white illustration of a car driving on a multi-lane road with city skyline and location icons (no text or symbols)As depicted in the figure, the main page does not display the camera image. To view the camera image, you need to click the 'DVR' button. Upon inserting the card, the system will automatically enter recording mode.

natural_image
Vertical sequence of black square icons representing basic objects like camera, folder, home, and microphone (no text or symbols)Start recording and click Close recording again
Lock the video for a few minutes and the data will not be deleted
Click to take a photo with one click
Click to return to the main interface
Click to quickly return to the mobile Internet interface
Turn recording sound on or off
Locked Files
If too many videos are locked, the first locked video will be overwritten.
The number of videos that can be locked depends on the capacity of the SD memory card. 32G SD memory card can lock 40 videos, when locking the 41st video, the 41st video will overwrite the first one and the 42nd video will overwrite the second one.
64G SD memory card can store 80 locked videos, 128G SD memory card can store 160 locked videos, 256G SD memory card can store 320 locked videos.
The SD card supports a minimum of 32GB and a maximum of 256GB!
Audio output
Select 'Audio Output' to enter the audio menu.
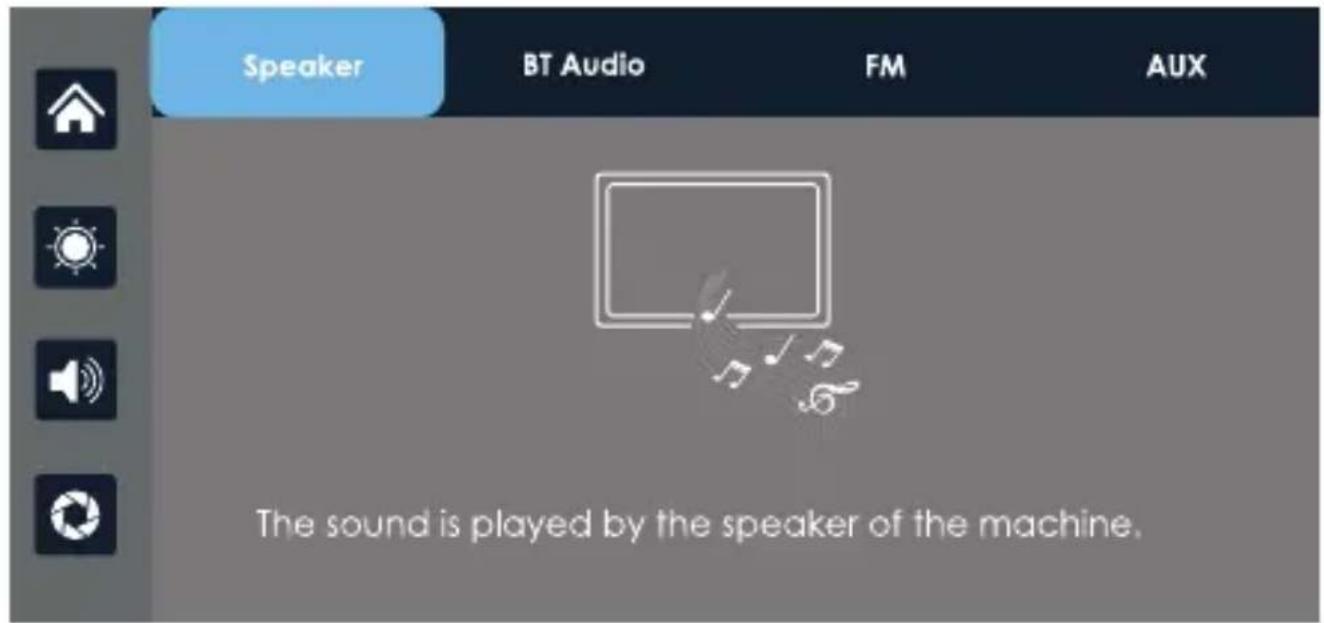
Speaker
Sound is played through the adapter speakers.
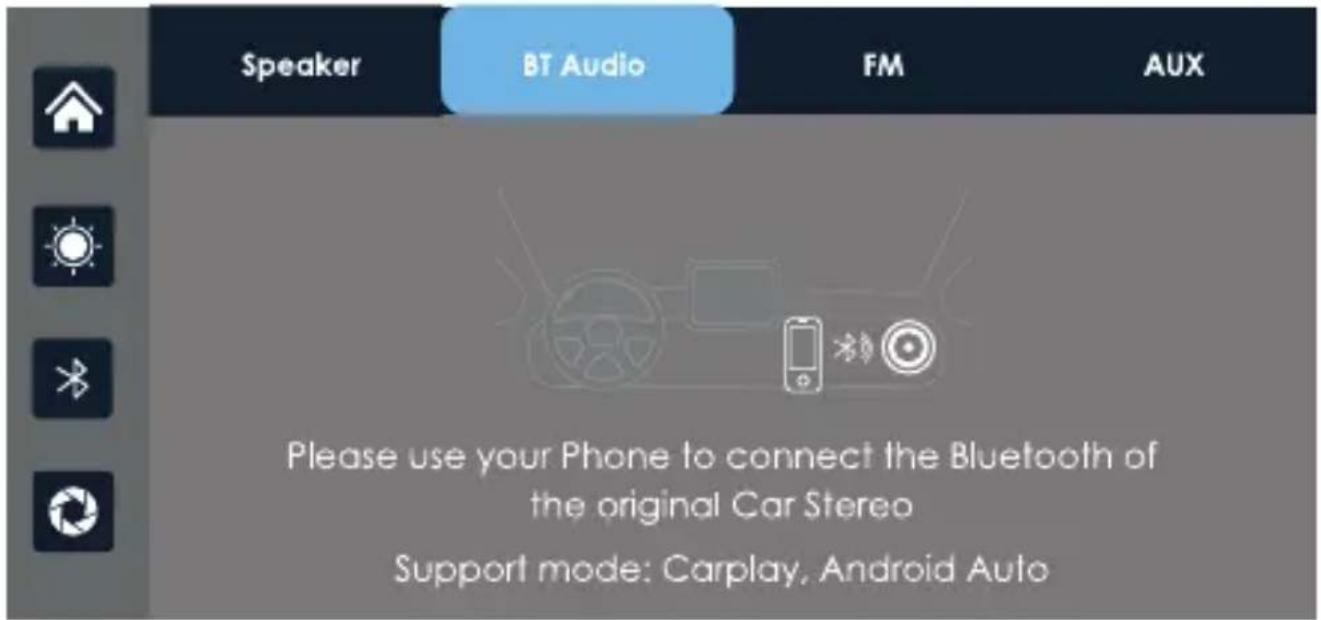
BT Auto
Select this mode and connect to CarPlay or Android Auto to mirror your screen. Connect your phone via Bluetooth to the car's original system. Once connected, all device audio will play through the car's speakers via Bluetooth.
Once connected, the Bluetooth icon ⚙ will show and volume must be adjusted through the vehicle's system controls.
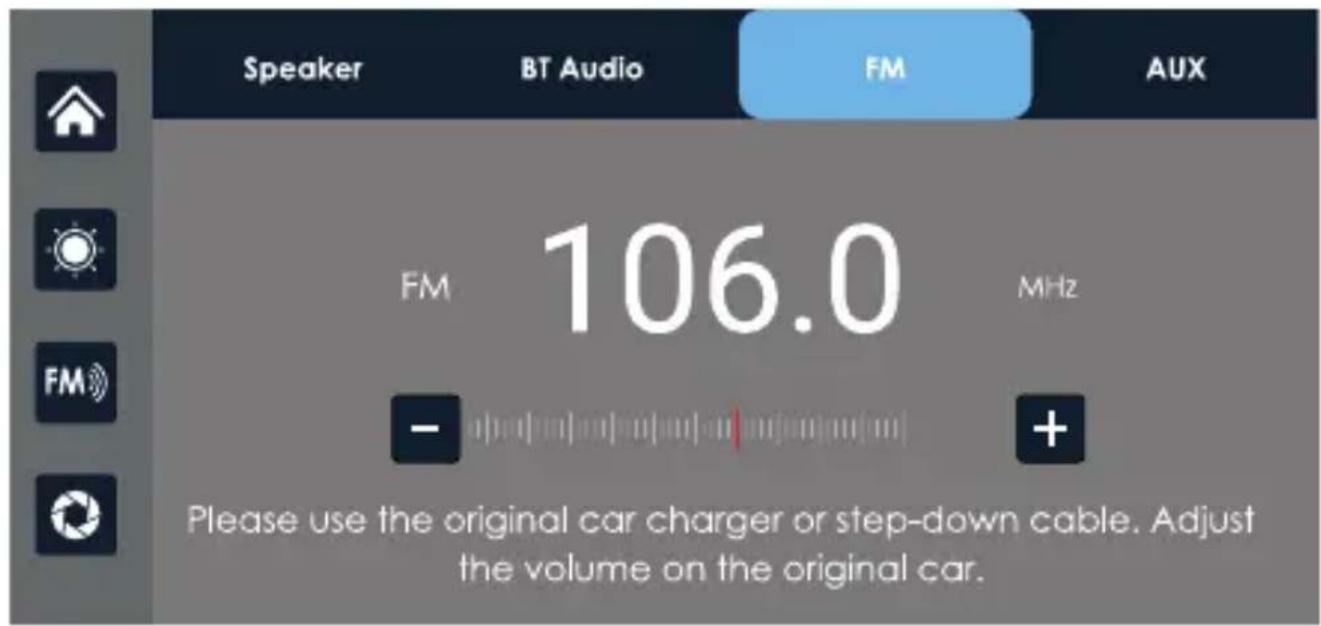
FM
After selecting this mode, FM transmission activates by default. Tune the device to an unoccupied FM channel, such as FM 106.0 MHz, and match the car radio to FM 106.0 MHz. Once connected, all device audio will be transmitted to the car speakers via FM
Once connected, the FM icon FM will show and volume must be adjusted through the vehicle's system controls.
Note:
Please use the included power cord to ensure a stable connection. ONLY use power cords that match the manufacturers specifications.
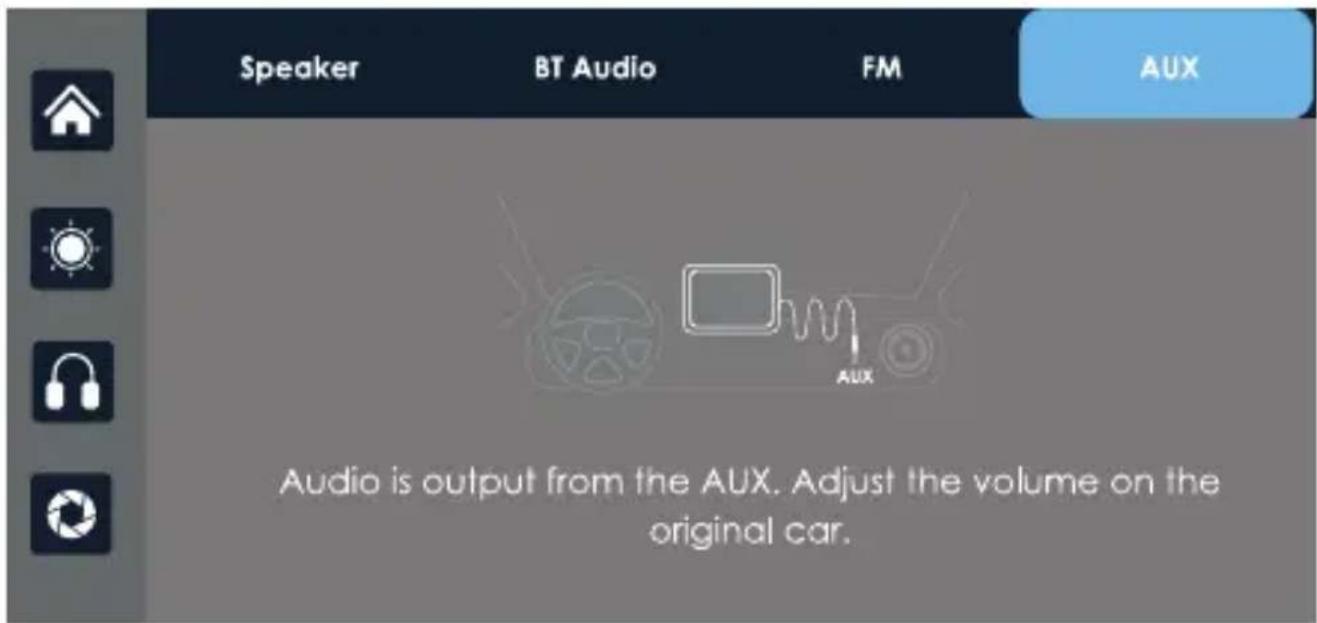
AUX
After selecting this mode, AUX output activates automatically. Connect the smart screen to the car using an AUX cable. Once connected, all device audio will play through the car's speakers via the AUX cable.
Once connected, the AUX icon will show and volume must be adjusted through the vehicle's system controls.
Playback
As shown in the above figure, click the [Playback] button to view the recorded video.
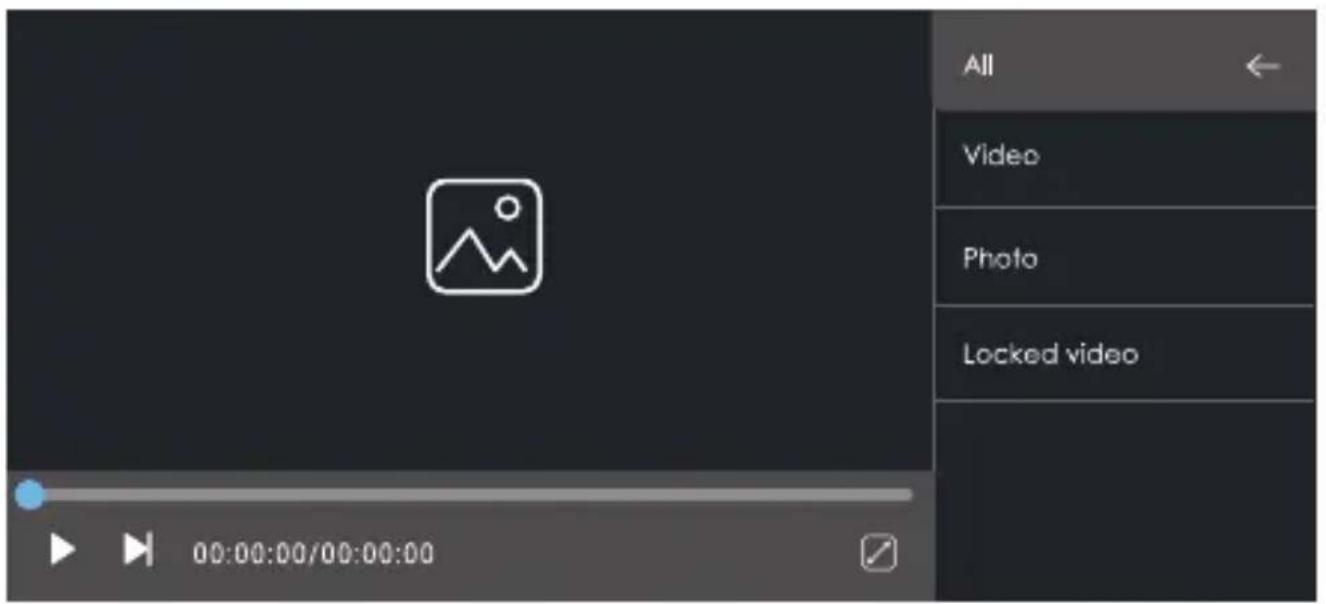
You can select the [Video], [Photo], [Locked Video] folder, and then click the Select button on the right side of the file to delete, lock or unlock the video.
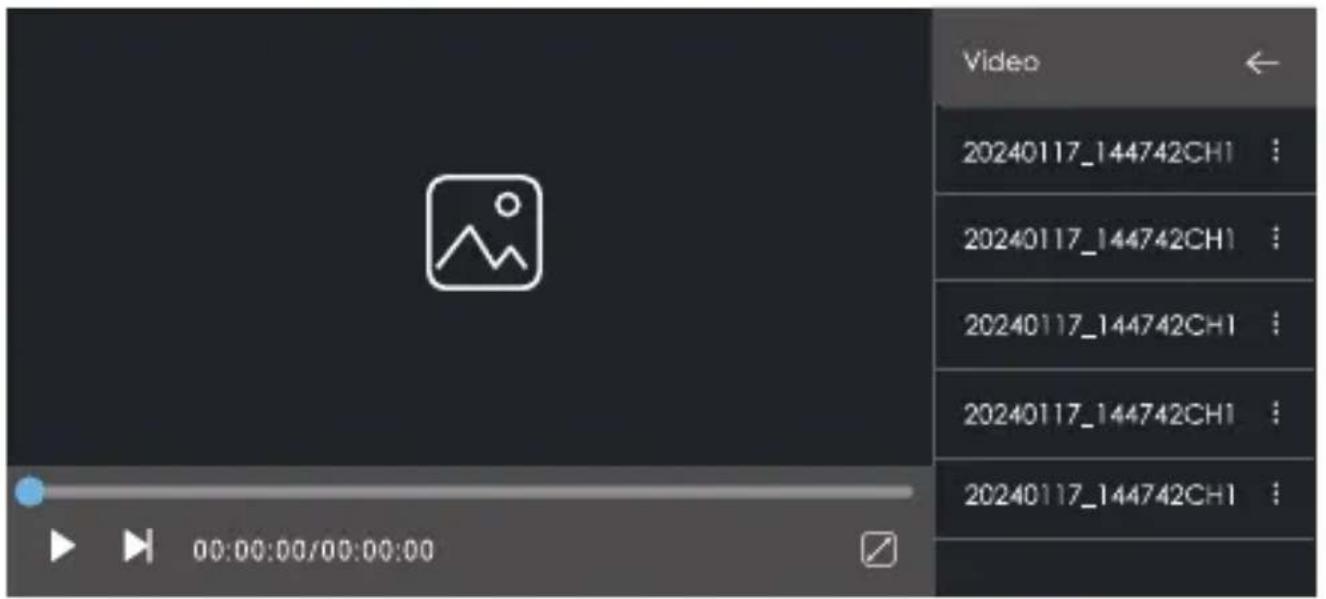
Prompting
Please select an action


Click to play or pause the video

Click to switch to the next video or photo

Click the "Full Screen" button to play the video in full screen.

Click to return to the previous screen
Device Settings
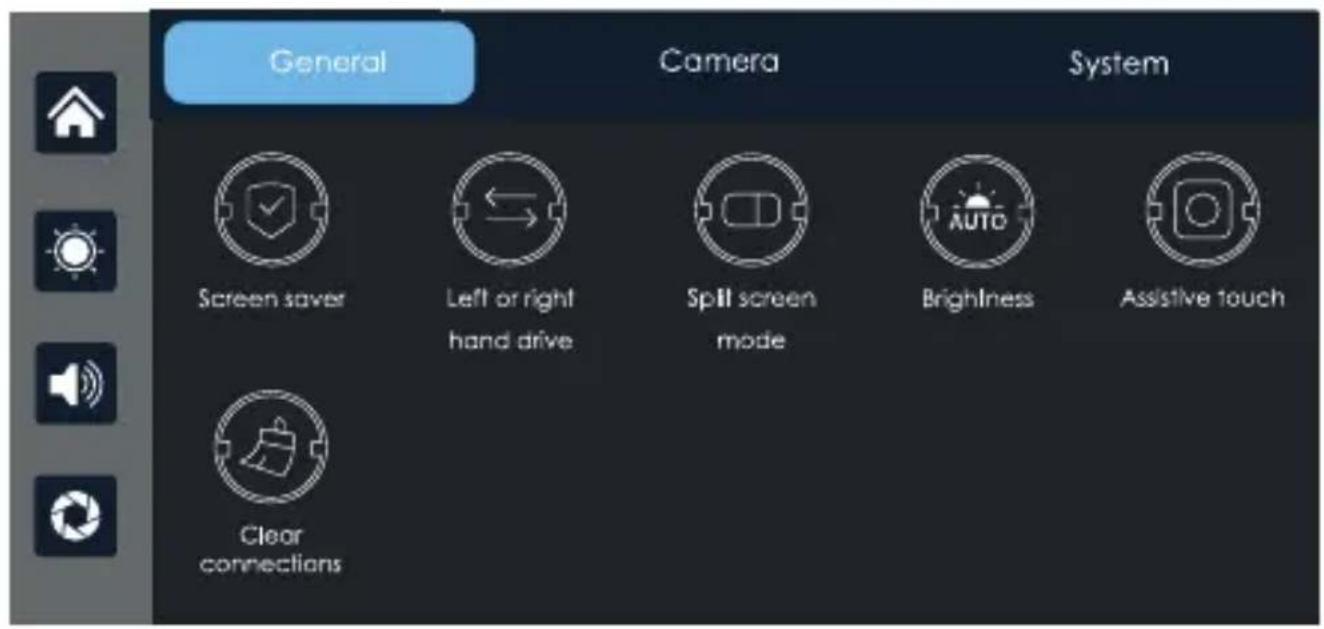

Click [Screen saver] to enter settings: screensaver can be set as: Turn off / 10 seconds / 30 seconds / 1 minute.
After setting for 10 seconds or 30 seconds, if the system does not operate for the corresponding time, the screen will automatically turn off. After entering the screensaver, press the power button again to turn on the screen.
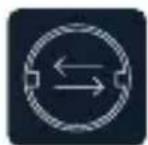
Click on [left or right hand drive] to enter the settings:
You can choose between left-hand or right-hand drive, and the shortcut menu bar in Carplay.
Select left rudder on the left, select right rudder on the right

[Split screen mode] see details below.

[Brightness] see details below.

[Assistive touch] It's a hover window button in your phone's screen casting mode, you can choose to turn it off or on.

If the customer has changed mobile phones, click to clear the connection records of all previous mobile phones.

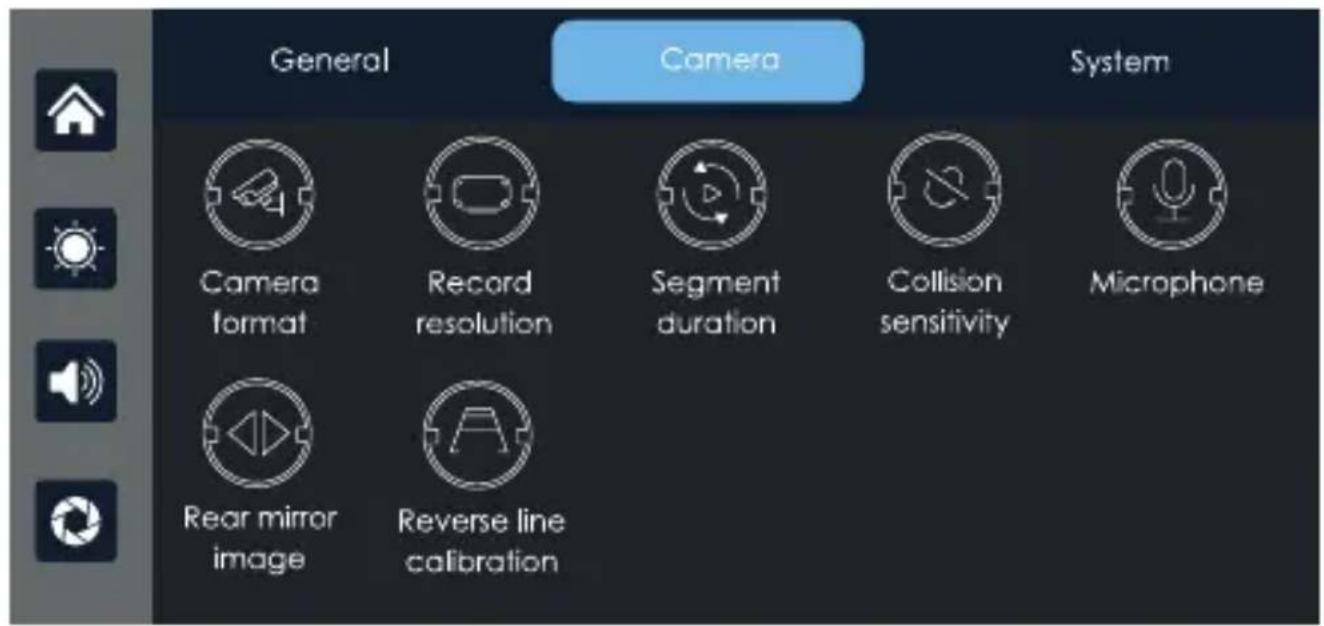
Click on [Camera Format] to input settings: 720P / 720N / 1080P / 1080N
Two systems, choose a standard camera system.
Note
Selecting an unrelated camera system will result in abnormal display and video images. If the camera display screen or color is abnormal, please check if the corresponding camera system has been selected.

Click to enter the [Record resolution] settings: 720P / 1080P / 2.5K / 4K (different models, options will be somewhat different, subject to the actual object)

Click [Segment duration] to enter the setting of the video segmentation time:
Video segmentation time is optional: 1 minutes / 3 minutes / 5 minutes.
The system defaults to 3 minutes.

Click on [Collision Sensitivity] to enter the settings:
You can choose high / medium / low / off
When the sensitivity is turned on and the vehicle collides, the machine will automatically lock the video being recorded to ensure that it will not be overwritten or deleted by the loop recording.

Click [Microphone] to enter the settings:
You can choose to close or open.

Click on [Rear mirror image] to enter the settings: you can choose to turn it off or on.
This option makes it easier for customers to flexibly install cameras.

See the instructions below.
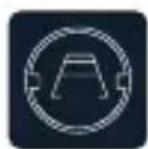
[Reverse line calibration] Please refer to the instructions below the form.

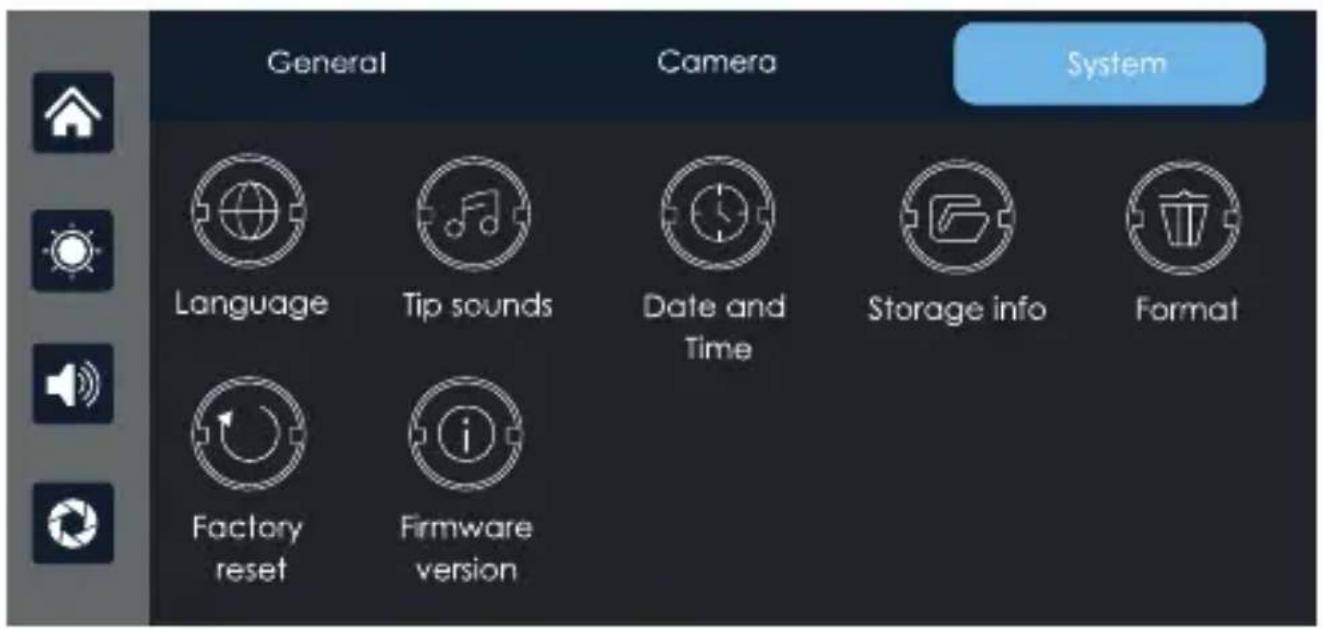
Click on [Language] to enter the settings: Language can be set: Simplified Chinese / Traditional Chinese / English / Russian / Spanish / French / German / Japanese / Korean / Italian / Portuguese

Click on the [Tip sound] to enter the settings: you can choose to turn it off or on.
After selecting off, the power on sound effect and touch and button sound effects will be turned off.
(Different models may have different options, subject to the actual product)

Click on [Date and Time] to enter the settings:
Set up separately: year / month / day / time / minute / second / 12H system / 24H system

Click [Storage info] to enter the menu: You can view the information of the SD card. The former item indicates the remaining available capacity, and the former item indicates the total capacity.

Click [Format] to enter the settings:
This option formats all data information inserted.
It is recommended to manually form format the first insert SD card to ensure sufficient card capacity.
Note
It is recommended that users manually format the SD card regularly.

Click [Factory reset] to enter the settings:
Restore factory settings, and the system will restore all settings to their original state.

Click on [Firmware version] to enter the menu:
This option allows you to see the current basic version for easy confirmation.
Screen Brightness
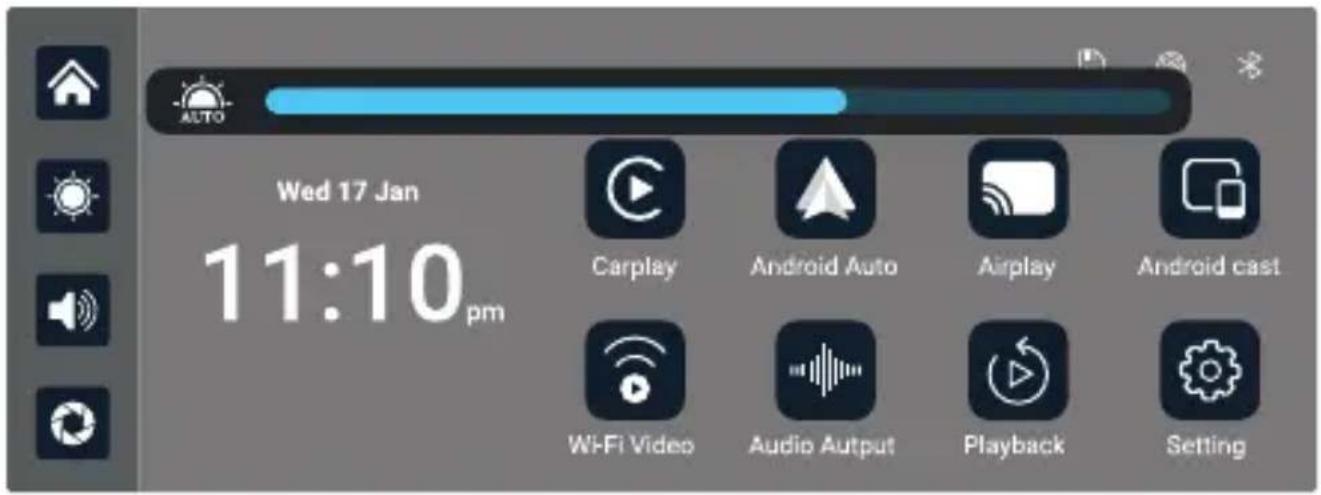
A built-in light sensor on the machine's lower left automatically adjusts the screen brightness based on surrounding light, enhancing comfort. Manual brightness adjustment is disabled in auto-brightness mode.
Click the 🙏 button on the sidebar, and then click 🙏 to turn off the automatic brightness adjustment function.
Tap to switch to auto-brightness mode.
Split screen mode
Click to select Full screen mode / Split screen mode
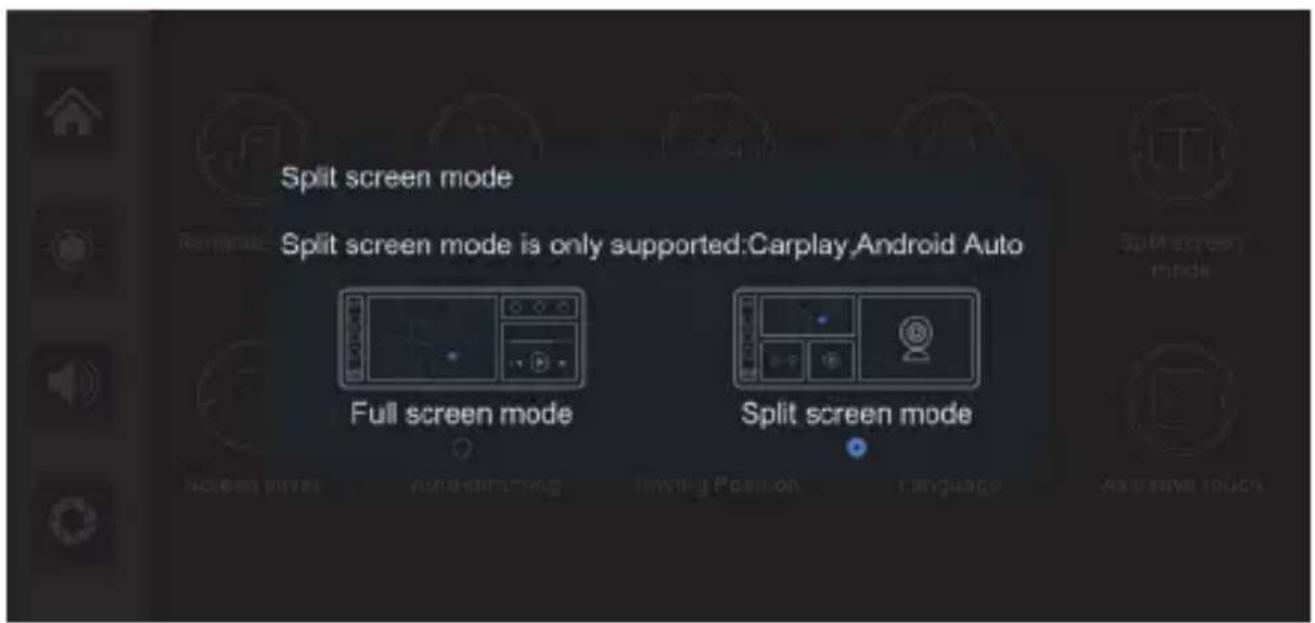
After selecting the Split screen mode, half of the screen displays the CarPlay/Andorid Auto interface and half of the screen displays the front road camera view when using the CarPlay/Andorid Auto mode with cell phone connectivity.
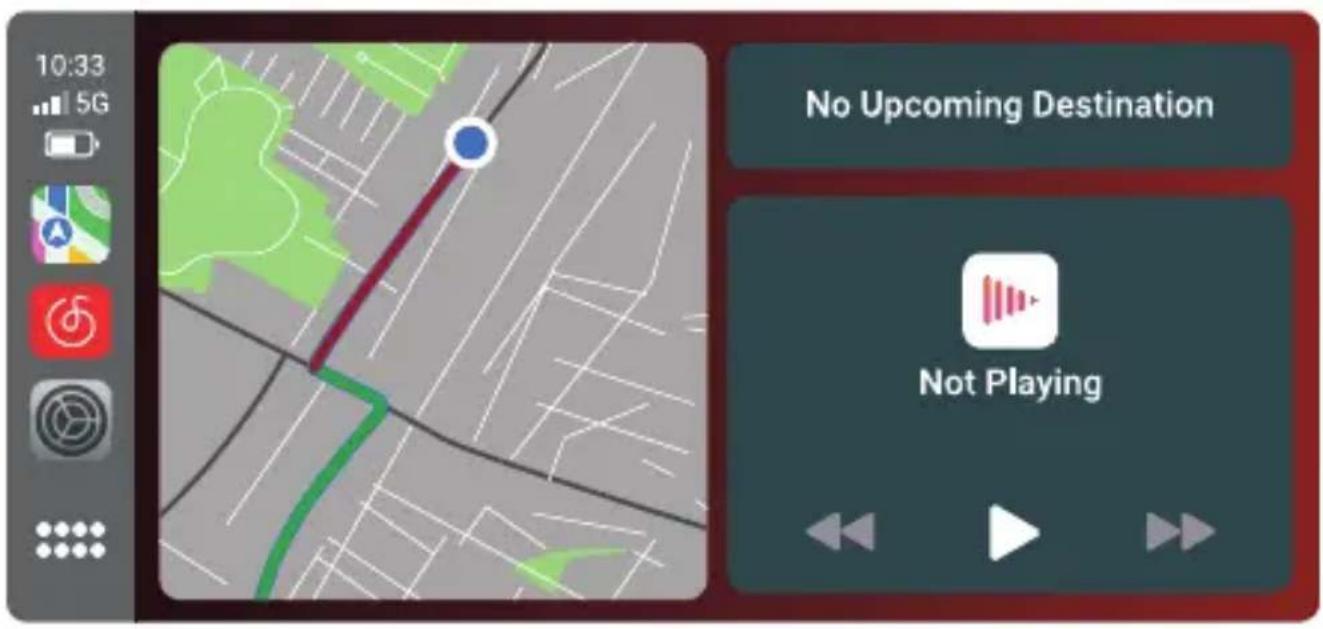
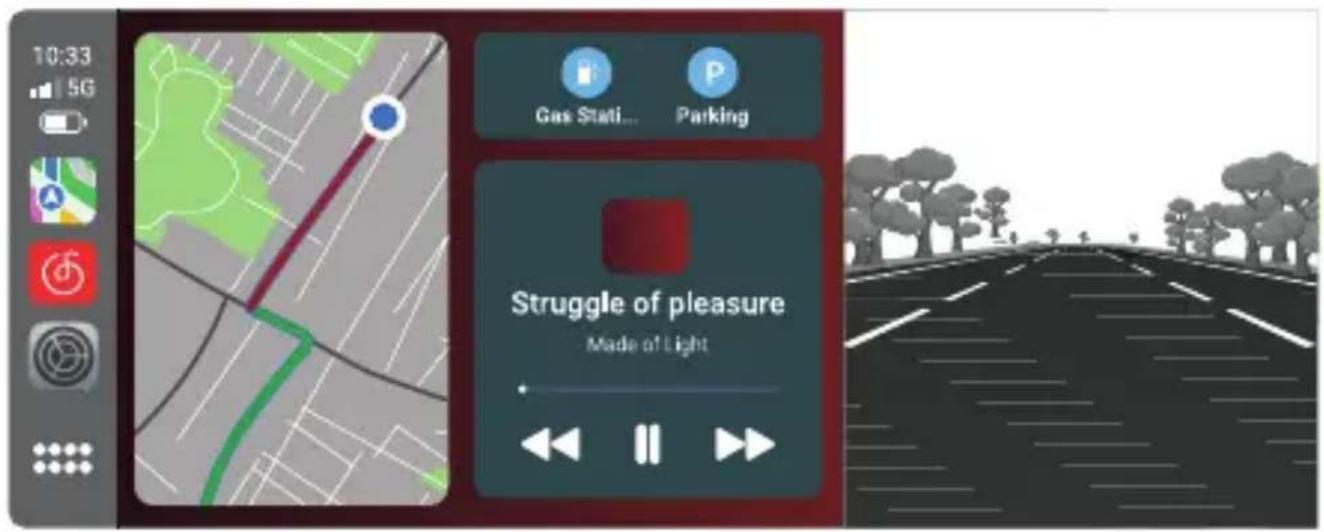
This feature is only available in CarPlay / Andorid Auto mode.
Reverse Parking Assistance
Click on Reverse line calibration to enter the settings:
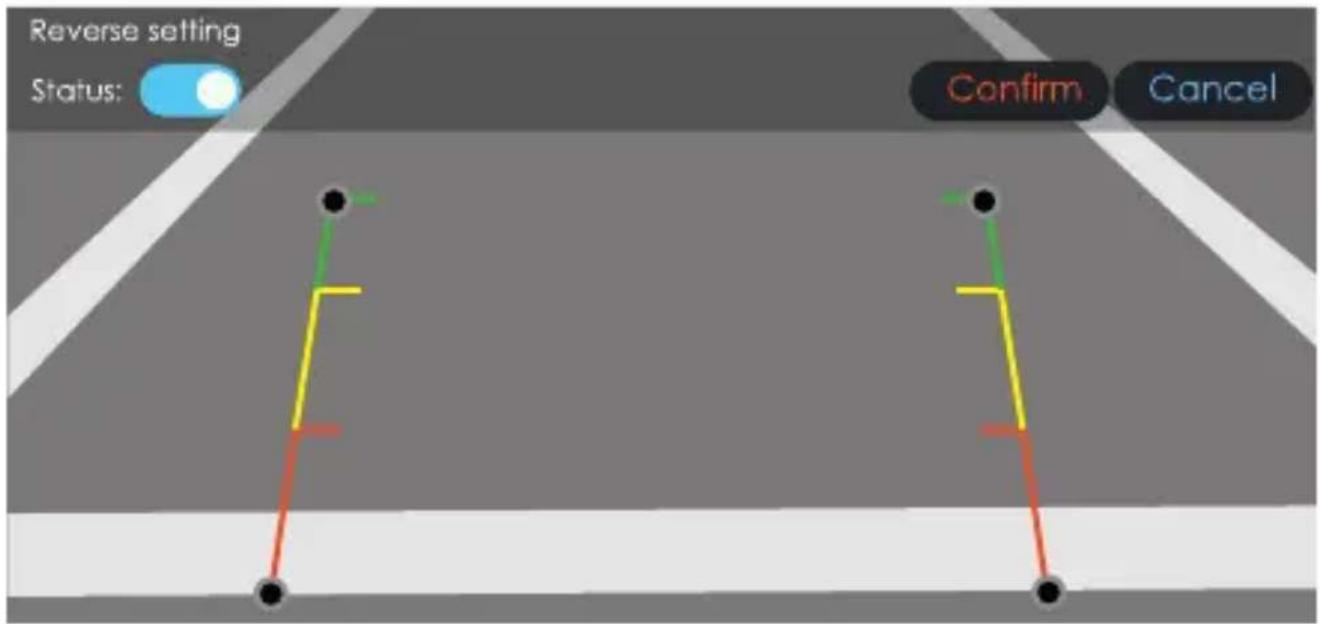
Park the car in the middle of the parking space.
You can choose whether to turn the reverse line feature off or on.
Manually drag the left, adjust the position of the reversing assist line up, left and right, so that the reverse assist line is horizontal to the parking line on the left of the ground.
Drag the ⬆ at the bottom to adjust the position of the reverse line to the left and right.
After adjusting the reversing line, click confirm to save the calibration.
Time lapse video (Optional item)
Click "Time-lapse Recording" option in the settings, you can choose "Off", "2 hours", "8 hours", "12 hours", "24 hours" (default off). After selecting the monitoring time as 12 hours or 24 hours, when the car is turned off (ACC disconnected), the system will turn off the screen after a five-second countdown to reduce power consumption and enter Parking mode.
The system cannot do anything at this point unless the car is re-ignitioned (ACC powered). Manually touch the screen to light up the screen display, the system will prompt "parking monitoring, shut down later".
In the settings, if the "time-lapse video" function is selected to "off", after the car is turned off (ACC is disconnected), the system will enter the normal shutdown process, and will not enter the parking monitoring function;
"Time-lapse video" is continuous shooting at the speed of one frame per second, taking up very little space. But then it will play at 30 frames per second, so there will be a 30 times faster visual effect.
Note:
And this function needs to be connected to a normal power supply in order to use it normally!
Troubleshooting
| Number | Problem | Solution |
| 1 | Unable to start | 1. Check whether the power cord is damaged or aged.2. Check whether the fuse of the power cord is disconnected or burnt out |
| 2 | No touch phenomenon | 1. Touch is invalid during power-on, wait for normal power-on before operation.2. Check whether the touch is damaged, do not touch the screen with sharp objects, it is easy to scratch and damage. |
| 3 | No image from camera | 1. Use only after using the manufacturer's matching camera2. The camera connector is nor loose. |
| 4 | High temperature lag phenomenon of the match | The normal operating temperature of CPDuo Pro is -4°F to 149°F. If the temperature exceeds the limit, disconnect the power. Wait until the temperature of the CPDuo Pro falls below 149°F before turning the power back on to begin operation. |
| 5 | Carplay cannot connect | 1. The first connection takes a little longer.2. Only iPhone supports Carplay3. Check that the Wi-Fi and Bluetooth functions of the mobile phone are normal4. Enter Settings - General - Carplay vehicle, delete all records and reconnect.5. Restart the iPhone and reconnect it.6. Turn on the Siri function on your phone. |
| 6 | Android Auto cannot connect | 1. Only Android phones are supported.2. Update Auto and related applications on mobile phones to the latest version.3. Do not enable VPN on the mobile phone.4. Check that the Wi-Fi and Bluetooth function of the mobile phone are normal.5. Restart the Android phone and connect it again. |
| 7 | Wi-Fi Video cannot connect | 1. Try to upgrade the version of the application.2. Check if the SD card of the machine exists.3. Check if the machine's mode has been switched to Wi-Fi video mode. |
Reminder: Please ensure that there is no obstruction between the mobile phone and the device, and the Wi-Fi/Bluetooth signal communication is smooth, otherwise the product functions cannot be used smoothly.
Product Specifications
| Project | Function introduction | Performance indicators |
| System | Language | Simplified Chinese / Traditional Chinese / English / Russian / Spanish / French / German / Japanese / Korean |
| Interface | Graphical menu operation | |
| Mode of operation | Touch | |
| Video input | Video input | 2 channels FHD video input |
| Video mode | Default boot recording, no missing seconds | |
| The video format | 4K H.264 video, 2 channels of video saved separately | |
| Video display | Real-time display | 10.26-inch high-definition IPS screen, 1600X600 |
| The native playback | Local play, anytime to view | |
| The screen saver | Screen savers can be set to: off / 10 seconds / 30 seconds / 1 minute | |
| Reverse display | Reverse display | Automatically switches to the rear view |
| Astern line adjustment | Adjust the reversing line for various models | |
| Smart connected | Wi-Fi | Supports CarPlay / Andorid Auto / Airplay / Android Cast / WiFi Video |
| The video store | SD card | CLASS10 U1 : 32GB minimum and 256GB maximum |
| Audio part | The microphone | Support microphone recording, menu can be set to turn off |
| Power part | The power input | The step-down line supports a wide voltage range of 12-24V, and has car-grade anti-surge, anti-reverse connection and other power protection. |
| Power consumption | Two-way video | Less than 10W (screen display, 2-channel camera recording) |
| Other | Working temperature | -4~149°F |
| The video time | Video recording duration can be set | |
| Rear camera mirroring | Rear camera screen support mirroring display, menu can be set up | |
| Model | CPDuo Pro | |
| Master control | High performance SOC | |
| Wireless function | CarPlay / Android Auto / AirPlay / Android Cast Wi-Fi Video | |
| Screen | 10.26 inch high-definition IPS screen, 1600*600 | |
| Storage | 32G ≤ SD ≤ 256G (Class 10) | |
| Wireless module | Wi-Fi / Bluetooth / Audio output | |
| Camera | Front and rear cameras | |
| Audio output | Speaker, BT Audio, FM, AUX | |
| Video | TS streaming | |
| Working voltage | 12V-24V | |
| Power | Less than 10W | |
| Size | 10.23 * 5.23 * 2.59 inch | |
| Weight | 0.77 lbs | |
| Material quality | ABS/PC |
Warranty & Support
Warranty
The Rexing CPDuo Pro comes with a full 12-month warranty. If you register your product on our official site
(https://www.rexingusa.com/support/registration), you can extend the warranty to 18 months.
Support
If you have any questions regarding your product, please do not hesitate to contact us at care@rexingusa.com, or call us at (877) 740-8004. Queries are typically answered within 12-24 hours.
Your opinion matters
Rexing is firmly committed to always improving our products, services, and user experience. If you have any thoughts on how we can do even better, we welcome your constructive feedback and suggestions.
Connect with us today at care@rexingusa.com
Thank you for choosing Rexing!
FCC ID:2AW5W-W1
This device complies with part 15 of the FCC Rules. Operation is subject to the following two conditions: (1) This device may not cause harmful interference, and (2) this device must accept any interference received, including interference that may cause undesired operation.
Changes or modifications not expressly approved by the party responsible for compliance could void the user's authority to operate this equipment.
REXING®




MADE IN CHINA
- Overview
- Thank you for choosing REXING!
- Check us out here.
- 18-Month Warranty
- Free Gift!
- Table of Contents
- What's in the box?
- Product Overview 5
- Product specifications 43
- Warranty and Support 46
- Device
- Power Cable
- Rear Camera
- Product Overview
- Installation
- Step 1. Install the RoadMate CPDuo Pro
- Prepare the Mounting Position:
- Mount the Camera:
- Step 2. Install the Memory Card
- Step 3. Power on the Camera and Format the Memory Card
- Step 4. Mounting the Rear Camera and Wiring the Cables
- Choose the Installation Location:
- Connect the Extension Cable:
- Route the Extension Cable:
- Connect to the Main Unit:
- Secure Loose Wires:
- Step 5. Power on the Device
- Note:
- SD Card Requirements
- CarPlay only supports Apple devices.
- Android Auto
- Android Auto only supports Android devices.
- AirPlay
- Android Cast
- BT Music
- Wi-Fi Video
- Dash Cam
- Locked Files
- Audio output
- Speaker
- BT Auto
- FM
- AUX
- Playback
- Device Settings
- Note
- Screen Brightness
- Split screen mode
- Reverse Parking Assistance
- Time lapse video (Optional item)
- Warranty & Support
- Warranty
- Support
- Your opinion matters
- FCC ID:2AW5W-W1
Brand : Rexing
Model : CPDuo Pro
Category : Dash cam