
DT200LT - Switch INTERMATIC - Free user manual and instructions
Find the device manual for free DT200LT INTERMATIC in PDF.


| Product Type | Digital Landscape Timer |
| Brand | Intermatic |
| Model | DT200LT |
| Input Voltage | 120 VAC, 60 Hz |
| Output Rating | 15 A Resistive, 12 A Inductive, 1000 W, 1/2 HP at 120 VAC |
| Maximum Load | 1200 W for low voltage transformers |
| Power Consumption | 2.5 W max |
| Operating Temperature | -40°F to 122°F (-40°C to 50°C) |
| Battery Type | 2 x LR44 (1.5 V) alkaline |
| Battery Backup Duration | Up to 3 months without power |
| Number of Outlets | 2 grounded outlets |
| Programming Options | Pre-programmed dawn/dusk or custom ON/OFF times |
| Override Function | Manual ON/OFF button to override until next event |
| Daylight Saving Time Support | US/CAN, Mexico, or OFF |
| Location Setting | State and section for dawn/dusk calculation |
| Low Battery Indicator | Display icon |
| Reset Function | Factory reset via button and paperclip |
| Safety Features | Battery compartment lock, coin cell warning, not for receptacles |
| Warranty | Limited warranty; claim online at intermatic.com |
Frequently Asked Questions - DT200LT INTERMATIC
User questions about DT200LT INTERMATIC
0 question about this device. Answer the ones you know or ask your own.
Ask a new question about this device
Download the instructions for your Switch in PDF format for free! Find your manual DT200LT - INTERMATIC and take your electronic device back in hand. On this page are published all the documents necessary for the use of your device. DT200LT by INTERMATIC.
USER MANUAL DT200LT INTERMATIC
Digital Landscape Timer
MODEL DT200LT
for use in Low Voltage Transformers up to 1200 W
SAFETY SECTION
WARNING
Risk of Fire or Electrical Shock
- Do Not use the timer to control devices that could have dangerous consequences due to inaccurate timing, such as sun lamps, saunas, heaters, crock pots, etc.
- Unplug the timer before replacing batteries.
- Do Not use to control receptacles.
• Installation should be in accordance with national and local electrical code requirements.
NOTICE
- Dispose of product per local regulations for disposal of used batteries.
WARNING
- Ingestion Warning: This product contains a button cell or coin battery.
• DEATH or serious injury can occur if ingested. - A swallowed button cell or coin battery can cause Internal Chemical Burns in as little as 2 hours.
- KEEP new and used batteries OUT OF REACH of CHILDREN
- Seek immediate medical attention if a battery is suspected to be swallowed or inserted inside any part of the body.

- Remove and immediately recycle or dispose of used batteries according to local regulations and keep away from children. Do NOT dispose of batteries in household trash or incinerate.
- Even used batteries may cause severe injury or death.
- Replace only with LR44 (1.5 V) Batteries.
- Call a local poison control center for treatment information.
• Non-rechargeable batteries are not to be recharged. - Do not force discharge, recharge, disassemble, heat above (manufacturer's specified temperature rating) or incinerate. Doing so may result in injury due to venting, leakage or explosion resulting in chemical burns.
- Ensure the batteries are installed correctly according to polarity (+ and -).”
- Do not mix old and new batteries, different brands or types of batteries, such as alkaline, carbon-zinc, or rechargeable batteries.
- Remove and immediately recycle or dispose of batteries from equipment not used for an extended period of time according to local regulations.
- Always completely secure the battery compartment. If the battery compartment does not close securely, stop using the product, remove the batteries, and keep them away from children.
PRODUCT DESCRIPTION
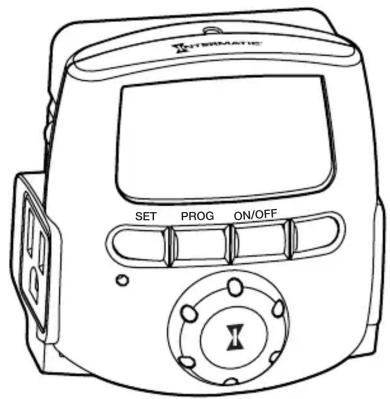
The Intermatic DT200LT Digital Landscape Timer is a simple-to-use landscape timer to be used with low voltage transformers up to 1200 W in order to control landscape lighting. This timer supports pre-programmed dawn/dusk times or one set of custom ON/OFF times.
Specifications
Output
• 15 A Resistive, 120 VAC
• 12 A Inductive, 120 VAC
- 1000 W, 120 VAC
• 1/2 HP, 120 VAC
TIMER OVERVIEW
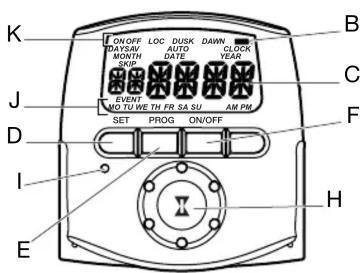
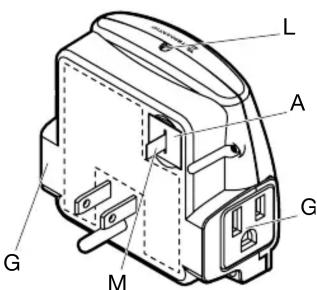
| Item Description Item Descrip | |
| A | Battery Holder |
| B | Low Battery Indicator |
| C | Time of Day Display |
| D | SET Button |
| E | PROG Button |
| F | ON/OFF Button |
| G | Grounded Outlet (2) |
| on | |
| H | Selector Knob |
| I | Reset Button |
| J | Day of the Week Display |
| K | Mode Display |
| L | ON/OFF Indicator Light |
| M | Battery Pull Tab |
Input
• 120 VAC, 60 Hz, 2.5W max
Operating Temperature
- -40°F to 122°F (-40°C to 50°C), for 1200 W, 120 VAC
Batteries
- Two LR44 batteries that keep time and settings for up to three months without power
Overview
Upon first use, you must enable the battery and then set the Time, Date, and Location.
Enabling the Battery
- Remove the pull tab (M) from the battery holder, if present. See FIG. 1.
- When the display shows 12:00 AM, the timer is ready for initial set up. See FIG. 2. If 12:00 AM does not display, perform a Factory Reset or see the Troubleshooting section.
Note: The timer may be set while unplugged. The display turns OFF after 1 minute of inactivity to save battery. Press any button to turn the display back ON.
Setting the Time, Date, and Location
Upon initial use, you can easily program these timer settings in succession by completing the steps in this section.
- Turn the selector knob (H) to select the correct hour of the day. Press SET (D). Repeat to select the minute of the day. See FIG. 2.
- Turn the selector knob (H) to select the correct YEAR. Press SET (D). See FIG. 3.
- Turn the selector knob (H) to select the correct MONTH. Press SET (D). See FIG. 3.
- Turn the selector knob (H) to select the correct DATE. Press SET (D). See FIG. 3.
- Turn the selector knob (H) to select the correct Daylight Savings Time setting. The options are OFF, US/CAN, and Mex.
a. If in Hawaii or Arizona, select OFF. Press SET (D).
b. If you live in a part of Mexico that observes US/Canada Daylight Savings Time, select US/CAN. Press SET (D).
- Turn the selector knob (H) to select the state you are in. Press SET (D). See FIG. 4.
- Turn the selector knob (H) to select the section of the state you are in. Press SET (D). See FIG. 4.
- Turn the selector knob (H) to select the time zone you are in. Press SET (D). See FIG. 5.
- Turn the selector knob (H) to adjust the DAWN offset time (+/- 15, 30, 45 or 60 minute increments). Press SET (D). Offset is the amount of minutes you want the lights to come on before (-) or after (+) DAWN or DUSK. Repeat for the DUSK offset time. See FIG. 6.
- Press SET (D) to finish setting up the timer.
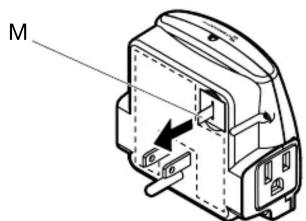
FIG 1. Removing the Pull Tab
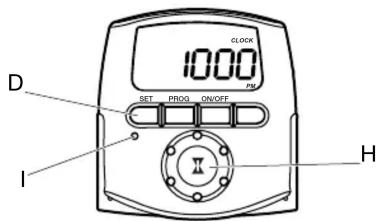
FIG 2. Setting the Time
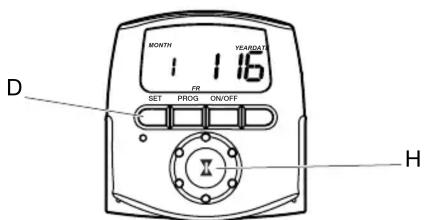
FIG 3. Setting the Date
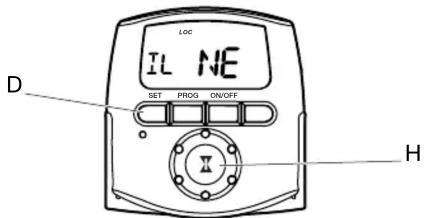
FIG 4. Setting the State
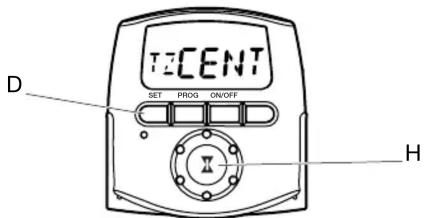
FIG 5. Setting the Time Zone
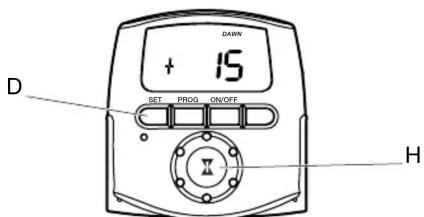
FIG 6. Setting the DAWN/DUSK Offset Time
Changing Configuration Settings for Time, Date and Location
- Press SET (D).
- Follow steps 1 through 9 under Setting Time, Date, and Location.
- Press PROG (E), to return to main screen.
PROGRAMMING
This timer comes pre-programmed to turn ON at dusk and OFF at dawn. If you wish to adjust this time to another ON/OFF time, complete the programming steps in this section. This timer only holds one set of ON/OFF times (either the pre-programmed Dawn/Dusk times or the custom times you program using the steps in this section).
Changing the Pre-Programmed Dusk (ON) Time
To change the DUSK time to another ON time:
- Press PROG (E) twice.
- Turn the selector knob (H) until a time appears on the screen. Press PROG (E).
- Turn the selector knob (H) to select the correct ON hour. Press PROG (E).
- Turn the selector knob (H) for the correct ON minute. Press SET (D). See FIG. 7.
Changing the Pre-Programmed Dawn (OFF) Time
To change the dawn time to another OFF time:
- Press PROG (E).
- Turn the selector knob (H) until OFF is in the top left corner of the screen. Press PROG (E).
- Turn the selector knob (H) so that a time appears on the screen. Press PROG (E).
- Turn the selector knob (H) to select the correct OFF hour. Press PROG (E).
- Turn the selector knob (H) to select the correct OFF minute. Press SET (D). See FIG. 8.
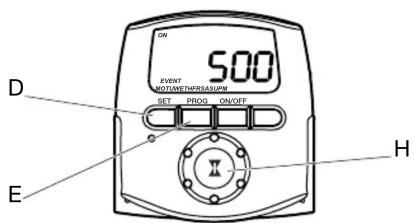
FIG 7. Changing the Dusk (ON) Time
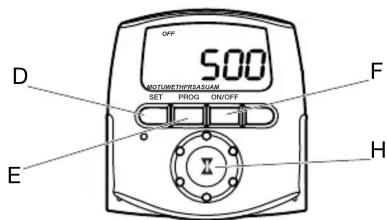
FIG 8. Changing the Dawn (OFF) Time
PERFORMING A FACTORY RESET
To clear any programming or reset the timer at any time, perform these steps:
- Press and continue to hold the ON/OFF button (F).
- Using a paperclip, press and release the RESET button (I).
- Keep holding the ON/OFF button (F) until 'CLR' appears on the screen, then release.
- When you see 12:00 AM displayed, your timer is ready for programming. See FIG. 9.
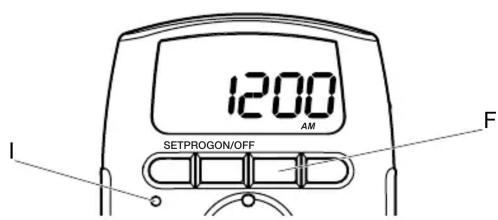
FIG 9. Performing a Factory Reset
OPTIONAL – Overriding the Programmed ON/OFF Times
Press the ON/OFF (F) button to override the pre-programmed ON/OFF time until the next ON/OFF time occurs.
OPERATION
Operating the Timer
Plug the timer into an outlet. Ensure the ON/OFF indicator (L) is illuminated. This indicates that the timer is ready and operational. Plug your landscape lighting or low voltage transformer into one of the outlets (G) on the timer.
Battery Maintenance
Low voltage is indicated by the low battery indicator (B) on the display.
- The timer requires two LR44 batteries that keep time and settings for up to three months without power.
- Replace batteries as soon as possible after the low battery indicator appears.
- Change batteries within one minute of unplugging to keep settings.
- Unplug the timer before replacing batteries.
- To remove the batteries, carefully pry the battery holder up with a small flat screwdriver. Install the new batteries as shown in Fig. 10. Firmly place the battery holder into the switch.
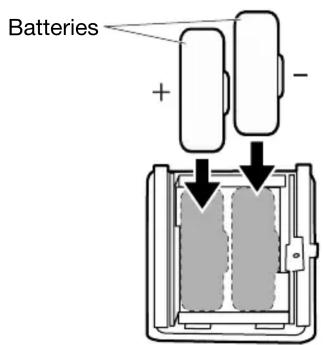
FIG. 10 Replacing the Batteries
LIMITED WARRANTY
This warranty service is available by either (a) returning the product to the point of purchase or (b) by completing a warranty claim online at www.intermatic.com. You are required to provide a receipt, the model number and/or serial number when exercising this limited warranty. This warranty is made by: Intermatic Incorporated, 1950 Innovation Way, Suite 300, Libertyville, IL 60048. For warranty service go to: http://www.Intermatic.com or call 815-675-7000.
TROUBLESHOOTING GUIDE
| Problem Probable Cause Solution | ||
| The battery symbol always shows in the upper right of the display when plugged in or no display at all when unplugged and buttons are pressed.Please note that the battery display takes 1 minute to recognize installed or removed batteries. | The batteries are either:LowNot installedNot installed correctlyStill have the pull tabPoor contact in the battery holder | Remove the pull tab, if present.Verify the battery polarity per the outline on the inside or “+/-” on the outside of the battery holder.Bend the contacts of the battery holder to touch the batteries firmly.Replace both batteries. Use two type LR44 or A76. |
| The timer switches at the incorrect times or skips some of the programmed times. | Programmed schedule(s) are incorrect. Press PROG to review the settings and revise them as necessary. See the instructions included with this manual. | |
| The lights or controlled devices do not match the programmed ON/OFF status immediately after setting the time or programming a schedule. | The timer does not “catch up” automatically to the programmed load state. The status of the timer will remain as is until it comes to the next programmed ON/OFF time. | After programming your events or the time, push the ON/OFF button to change the load state, if necessary. |
| The timer shows ON but the light or other controlled device is off. | The light or controlled device itself may be switched off or the light bulb may be burned out. | Make sure the light or controlled device is switched on and plugged in or replace the light bulb. |
- Digital Landscape Timer
- WARNING
- Risk of Fire or Electrical Shock
- NOTICE
- PRODUCT DESCRIPTION
- Specifications
- Output
- TIMER OVERVIEW
- Input
- Operating Temperature
- Batteries
- Overview
- Enabling the Battery
- Setting the Time, Date, and Location
- Changing Configuration Settings for Time, Date and Location
- PROGRAMMING
- Changing the Pre-Programmed Dusk (ON) Time
- Changing the Pre-Programmed Dawn (OFF) Time
- PERFORMING A FACTORY RESET
- OPTIONAL – Overriding the Programmed ON/OFF Times
- OPERATION
- Operating the Timer
- Battery Maintenance
- LIMITED WARRANTY
- TROUBLESHOOTING GUIDE
Brand : INTERMATIC
Model : DT200LT
Category : Switch