
PC4MT5 - Multitool Powerblade - Free user manual and instructions
Find the device manual for free PC4MT5 Powerblade in PDF.


User questions about PC4MT5 Powerblade
0 question about this device. Answer the ones you know or ask your own.
Ask a new question about this device
Download the instructions for your Multitool in PDF format for free! Find your manual PC4MT5 - Powerblade and take your electronic device back in hand. On this page are published all the documents necessary for the use of your device. PC4MT5 by Powerblade.
USER MANUAL PC4MT5 Powerblade
natural_image
Illustration of a pair of hair tools with black and blue components, no text or symbols present2in1 Pole Saw + Hedge Trimmer
User Manual
[Revision 1.0]
READ THIS MANUAL CAREFULLY BEFORE USE – FAILURE TO DO SO MAY RESULT IN INJURY, PROPERTY DAMAGE AND MAY VOID WARRANTY. • KEEP THIS MANUAL FOR FUTURE REFERENCE. • Products covered by this manual may vary in appearance, assembly, inclusions, specifications, description, and packaging.
THE BATTERY MAY HAVE SOME CHARGE ON ARRIVAL, IT IS IMPORTANT HOWEVER THAT THE BATTERY IS CHARGED PRIOR TO USE.
Safety
Safety messages are designed to alert you to possible dangers or hazards that could cause death, injury or equipment or property damage if not understood or followed. Safety messages have the following symbols:

You WILL be KILLED or SERIOUSLY INJURED if you do not follow instructions.
It is vital that you read and understand this user manual before using the product, including safety warnings, and any assembly and operating instructions. Keep the manual for future reference.
Safety precautions and recommendations detailed here must be fully understood and followed to reduce the risk of injury, fire, explosion, electrical hazard, and/or property damage.
Safety information presented here is generic in nature – some advice may not be applicable to every product. The term "equipment" refers to the product, be it electrical mains powered, battery powered or combustion engine powered.
- Before Use - If you are not familiar with the safe operation/handling of the equipment or are in any way unsure of any aspect of suitability or correct use for your application, you should complete training conducted by a person or organization qualified in safe use and operation of this equipment, including fuel/electrical handling and safety.
- Do NOT operate the equipment in flammable or explosive environments, such as in the presence of flammable liquids, gases, or dust. The equipment may create sparks or heat that may ignite flammable substances.
- Keep clear of moving parts.
• Equipment may be a potential source of electric shock or injury if misused. - Do NOT operate the equipment if it is damaged, malfunctioning or is in an excessively worn state.
- Do NOT allow others to use the equipment unless they have read this manual and are adequately trained.
- Keep packaging away from children - risk of suffocation! Operators must use the equipment correctly. When using the equipment, consider conditions and pay due care to persons and property.
General Work Area Safety
• Work areas should be clean and well it.
- Do not operate the equipment if bystanders, animals etc are within operating range of the equipment or the general work area.
- If devices are provided for connecting dust extraction / collection facilities, ensure these are connected and used properly. Dust collection can reduce dust-related hazards.

You CAN be KILLED or SERIOUSLY INJURED if you do not follow instructions.
General Personal Safety
- Wear appropriate protective equipment when operating, servicing, or when in the operating area of the equipment to help protect from eye and ear injury, poisoning, burns, cutting and crush injuries. Protective equipment such as safety goggles, respirators, non-slip safety footwear, hard hat, hearing protection etc should be used for appropriate equipment / conditions. Other people nearby should also wear appropriate personal protective equipment. Do not wear loose clothing or jewellery, which can be caught in moving parts. Keep hair and clothing away from the equipment.
- Stay alert and use common sense when operating the equipment. Do not overreach. Always maintain secure footing and balance.
- Do not use the equipment if tired or under the influence of drugs, alcohol, or medication.
- This equipment is not intended for use by persons with reduced physical, sensory, or mental capabilities.
General Fuel Safety
- Petrol/fuel/gasoline is extremely flammable – keep clear of naked flames or other ignition sources.
- Do not spill fuel. If you spill fuel, wipe it off the equipment immediately – if fuel gets on your clothing, change clothing.
- Do NOT smoke near fuel or when refuelling.
• Always shut off the engine before refuelling. - Do NOT refuel a hot engine.
- Open the fuel cap carefully to allow any pressure build-up in the tank to release slowly.
• Always refuel in well-ventilated areas. - Always check for fuel leakage. If fuel leakage is found, do not start, or run the engine until all leaks are fixed.
General Carbon-Monoxide Safety
- Using a combustion engine indoors CAN KILL IN MINUTES. Engine exhaust contains carbon-monoxide – a poison you cannot smell or see.
- Use combustion engines OUTSIDE only, and far away from windows, doors, and vents.

You CAN be INJURED if you do not follow instructions or equipment damage may occur.
General Equipment Use and Care
- Keep packaging away from children and pets, potential risk of suffocation or choking.
- The equipment is designed for domestic use only.
- Handle the equipment safely and carefully.
- Before use, inspect the equipment for misalignment or binding of moving parts, loose components, damage, or any other condition that may affect its operation. If damaged, have the equipment repaired by an authorised service centre or technician before use.
- Prevent unintentional starting of the equipment - ensure equipment and power switches are in the OFF position before connecting or moving equipment. Do not carry equipment with hands or fingers touching any controls. Remove any tools or other items that are not a part of the equipment from it before starting or switching on.
- Do not force the equipment. Use the correct equipment for your application. Equipment will perform better and be safer when used within its design and usage parameters.
- Use the equipment and accessories etc. in accordance with these instructions, considering working conditions and the work to be performed. Using the equipment for operations different from those intended could result in hazardous situations.
- Always keep equipment components (engines, hoses, handles, controls, frames, housings, guards etc) and accessories (cutting tools, nozzles, bits etc) properly maintained. Keep the equipment clean and, where applicable, properly lubricated.
- Store the equipment out of reach of children or untrained persons. To avoid burns or fire hazards, let the equipment cool completely before transporting or storing. Never place or store the equipment near flammable materials, combustible gases, or liquids etc.
- The equipment is not weather-proof, and should not be stored in direct sunlight, at high ambient temperatures or locations that are damp or humid.
- Do not clean equipment with solvents, flammable liquids, or harsh abrasives.
- For specific equipment safety use and care, see Equipment Safety.
General Electrical Safety
- Inspect electrical equipment, extension cords, power bars, and electrical fittings for damage or wear before each use. Repair or replace damaged equipment immediately.
- Ensure all power sources conform to equipment voltage requirements and are disconnected before connecting or disconnecting equipment.
- When wiring electrically powered equipment, follow all electrical and safety codes.
• Always use a Residual Current Device (RCD) (GFCI) / Earth Leakage Circuit Breaker / Safety Switch when operating this item (electrical items only). - High voltage / high current power lines may be present. Use extreme caution to avoid contact or interference with power lines. Electrical shock can be fatal.
General Electrical Safety
- Electrically grounded equipment must have an approved cord and plug and be connected to a grounded electrical outlet.
- Do NOT bypass the ON/OFF switch and operate equipment by connecting and disconnecting the electrical cord.
- Do NOT use equipment that has exposed wiring, damaged switches, covers or guards.
- Do NOT use electrical equipment in wet conditions or in damp locations.
- Do NOT use electrical cords to lift, move or carry equipment.
- Do NOT coil or knot electrical cords, and ensure electrical cords are not trip hazards.
General Service Information
- The equipment must be serviced or repaired at authorised service centres by qualified personnel only.
- Replacement parts must be original equipment manufacturer (OEM) to ensure equipment safety is maintained.
- Do NOT attempt any maintenance or repair work not described in this manual.
- After use, the equipment and components may still be hot – allow the equipment to cool and disconnect spark plugs and/or electrical power sources and/or batteries from it before adjusting, changing accessories, or performing repair or maintenance.
- Do NOT adjust while the equipment is running.
- Perform service-related activities in suitable conditions, such as a workshop.
- Replace worn, damaged or missing warning/safety labels immediately.
Child Choking Hazard!

- WARNING: CHOKING HAZARD - CHILDREN UNDER 8 YRS. CAN CHOKE OR SUFFOCATE ON SMALL PARTS. ADULT SUPERVISION REQUIRED.
- Carefully inspect anything a baby or child could gain access to, including this product & packaging.
- Dangers include anything of a size that could become stuck or lodged in a baby or child's airway.
• Dangers include things like raw, hard fruit and vegetable pieces, large pieces of meat, bones or sausage skins, popcorn, nuts,
hard lollies and corn chips, small magnets and batteries, coins, beads, marbles and small uninflated balloons, broken toys and smaller toys, buttons, keys, and coins. But there are also many more.
- Pay particular attention to accessories, nuts, bolts, screws, washers, caps, covers, loose parts, parts that could be removed or break off, pieces of packaging, staples, tape etc.
- In the case of any doubt, secure the item of concern in an appropriate manner, or completely remove the possibility of access by a baby or child.
HAZARDOUS COMPONENTS!
- BE AWARE THAT THE EQUIPMENT MAY INCLUDE HAZARDOUS COMPONENTS, SUCH AS BLADES, HOT SURFACES AND MOVING PARTS.
• MOVING BLADES CAN CAUSE SERIOUS INJURY AND EVEN DEATH IF USED IMPROPERLY OR WITHOUT SUFFICIENT PPE. - DO NOT USE THIS EQUIPMENT ON UNEVEN SURFACES AND ALWAYS MAINTAIN GOOD BALANCE WHEN USING THIS EQUIPMENT. FAILURE TO DO SO MAY CAUSE SERIOUS INJURY.
- MAINTAIN A SECURE GRIP OF THE TRIGGER ASSEMBLY AT ALL TIMES.
Pole Saw
Intended Use
- This product is intended for outdoor use only. For safety reasons, the product must be adequately controlled by using two-handed operation.
- The product is designed for cutting and pruning small limbs and branches with a diameter less than or equal to the bar length and located high in the tree while the operator maintains a steady footing on the ground. The product is designed to be extended to a maximum length of 3 metres. Do not exceed this working length.
- It is not intended for use while climbing or as a conventional chainsaw for close-quarter limbing and pruning of material at ground level.
General Safety Warnings
- WARNING: READ ALL SAFETY WARNINGS AND INSTRUCTIONS. FAILURE TO FOLLOW THE WARNINGS AND INSTRUCTIONS MAY RESULT IN ELECTRIC SHOCK, FIRE, AND/OR SERIOUS INJURY.
- Save all warnings and instructions for future reference. The term "power tool" in the warnings refers to your mains-operated (corded) power tool or battery-operated (cordless) power tool.
Work Area Safety
- Keep the work area clean and well-lit. Cluttered or dark areas invite accidents.
- Do not operate power tools in explosive atmospheres, such as in the presence of flammable liquids, gases, or dust. Power tools create sparks that may ignite the dust or fumes.
- Keep children and bystanders away while operating a power tool. Distractions can cause you to lose control.
Electrical Safety
- Power tool plugs must match the outlet. Never modify the plug in any way. Do not use any adapter plugs with earthed (grounded) power tools. Unmodified plugs and matching outlets reduce the risk of electric shock.
- Avoid body contact with earthed or grounded surfaces, such as pipes, radiators, ranges, and refrigerators. There is an increased risk of electric shock if your body is earthed or grounded.
- Do not expose power tools to rain or wet conditions. Water entering a power tool increases the risk of electric shock.
- Do not abuse the cord. Never use the cord for carrying, pulling, or unplugging the power tool. Keep the cord away from heat, oil, sharp edges, or moving parts. Damaged or entangled cords increase the risk of electric shock.
- When operating a power tool outdoors, use an extension cord suitable for outdoor use. Using a cord suitable for outdoor use reduces the risk of electric shock.
- If operating a power tool in a damp location is unavoidable, use a residual current device (RCD) protected supply. The use of an RCD reduces the risk of electric shock.
Personal Safety
- Stay alert, watch what you are doing, and use common sense when operating a power tool. Do not use a power tool while you are tired or under the influence of drugs, alcohol, or medication. A moment of inattention while operating power tools may result in serious personal injury.
- Use personal protective equipment. Always wear eye protection. Protective equipment such as a dust mask, non-skid safety shoes, a hard hat, or hearing protection used in appropriate conditions will reduce personal injuries.
- Prevent unintentional starting. Ensure the switch is in the off-position before connecting to a power source and/or battery pack, picking up, or carrying the tool. Carrying power tools with your finger on the switch or energising power tools that have the switch on invites accidents.
- Remove any adjusting key or wrench before turning the power tool on. A wrench or key left attached to a rotating part of the power tool may result in personal injury.
- Do not overreach. Keep proper footing and balance at all times. This enables better control of the power tool in unexpected situations.
- Dress properly. Do not wear loose clothing or jewellery. Keep your hair, clothing, and gloves away from moving parts. Loose clothes, jewellery, or long hair can be caught in moving parts.
- If devices are provided for the connection of dust extraction and collection facilities, ensure these are connected and properly used. The use of dust collection can reduce dust-related hazards.
Power Tool Use and Care
- Do not force the power tool. Use the correct power tool for your application. The correct power tool will do the job better and more safely at the rate for which it was designed.
- Do not use the power tool if the switch does not turn it on and off. Any power tool that cannot be controlled with the switch is dangerous and must be repaired.
- Disconnect the plug from the power source and/or remove the battery pack from the power tool before making any adjustments, changing accessories, or storing power tools. Such preventive safety measures reduce the risk of starting the power tool accidentally.
- Store idle power tools out of the reach of children and do not allow persons unfamiliar with the power tool or these instructions to operate the power tool. Power tools are dangerous in the hands of untrained users.
- Maintain power tools. Check for misalignment or binding of moving parts, breakage of parts, and any other condition that may affect the power tool's operation. If damaged, have the power tool repaired before use. Many accidents are caused by poorly maintained power tools.
- Keep cutting tools sharp and clean. Properly maintained cutting tools with sharp cutting edges are less likely to bind and are easier to control.
- Use the power tool, accessories, and tool bits, etc., in accordance with these instructions, taking into account the working conditions and the work to be performed. Use of the power tool for operations different from those intended could result in a hazardous situation.
Service
- Have your power tool serviced by a qualified repair person using only identical replacement parts. This will ensure that the safety of the power tool is maintained.
Additional General Safety Warnings
- Some regions have regulations that restrict the use of the product. Check with your local authority for advice.
- Never allow children or people unfamiliar with the instructions to use the product. Local regulations may restrict the age of the operator.
- Ensure before each use that all controls and safety devices function correctly. Do not use the product if the "off" switch does not stop the motor.
- Wear full eye and hearing protection, strong sturdy gloves, as well as head protection while operating the product; use a face mask if the operation is dusty.
- Do not wear loose-fitting clothing, short trousers, or jewellery of any kind.
- Secure long hair so it is above shoulder level to prevent entanglement in moving parts.
- Beware of thrown, flying, or falling objects; keep all bystanders, children, and animals at least 15 metres away from the work area.
- Do not operate in poor lighting. The operator requires a clear view of the work area to identify potential hazards.
- Use of hearing protection reduces the ability to hear warnings (shouts or alarms). The operator must pay extra attention to what is going on in the working area.
- Operating similar tools nearby increases both the risk of hearing injury and the potential for other persons to enter your working area.
- Keep firm footing and balance. Do not overreach. Overreaching can result in loss of balance and can increase the risk of kickback.
- Keep all parts of your body away from any moving parts.
- Inspect the product before each use. Check for the correct operation of all controls. Check for loose fasteners, and make sure all guards and handles are properly and securely attached. Replace any damaged parts before use.
2in1 Pole Saw + Hedge Trimmer
- Do not modify the machine in any way or use parts and accessories that are not recommended by the manufacturer.
- Do not allow familiarity with the product to make you careless. A careless fraction of a second is sufficient to inflict serious injury.
- Keep handles and grasping surfaces dry, clean, and free from oil and grease. Slippery handles and grasping surfaces do not allow for safe handling and control of the tool in unexpected situations.
- Only use a weatherproof extension cord. Check the extension cord before every use for damage. Always uncoil the extension cord during use because coiled cords can overheat. Damaged extension cords should not be repaired; they should be replaced with an equivalent type.
- WARNING: IF THE PRODUCT IS DROPPED, SUFFERS HEAVY IMPACT, OR BEGINS TO VIBRATE ABNORMALLY, IMMEDIATELY STOP USING THE PRODUCT AND INSPECT IT FOR DAMAGE OR IDENTIFY THE CAUSE OF THE VIBRATION. ANY DAMAGE SHOULD BE PROPERLY REPAIRED OR REPLACED BY AN AUTHORISED SERVICE CENTRE.
Pruner Safety Warnings
- Do not use the product when there is a possibility of a thunderstorm or lightning. Store the product safely indoors.
- Ensure all guards and handles are properly fitted and are in good condition.
- Do not start using the product until you have a clear work area, secure footing, and a planned retreat path away from the falling branches or limbs.
- Beware of the emission of lubricant mist and sawdust. Wear a mask or respirator if required.
- During operation, hold the product with both hands. Use one hand to firmly grasp the front hand grip. Use the other hand to grasp the rear handle and operate the trigger release and on/off trigger.
- Hold the power tool by insulated gripping surfaces only, as the chain may contact hidden wiring. Chains contacting a "live" wire may make exposed metal parts of the power tool "live" and could give the operator an electric shock.
- Do not modify the product in any way or use it to power any attachments or devices not recommended by the manufacturer.
- Your product comes with a harness. You must use it while operating the product. It will assist you in controlling the drop of the product after the cut is completed. It will also help support the weight of the product during use and while moving between pruning positions.
- Identify the quick release mechanism and practice using it before you start using the product. Its correct use may prevent serious injury in the case of an emergency. Never wear additional clothing over the harness or otherwise restrict access to the quick release mechanism.
- Before starting the product, make sure the chain is not contacting any object.
- An incorrectly tensioned chain can jump off the guide bar and could result in serious injury. Check before each use and frequently, especially with a new chain.
- To reduce the risk of injury associated with contacting moving parts, always stop the product, disconnect it from the mains, and make sure all moving parts have come to a stop before:
• cleaning or clearing a blockage
• leaving the product unattended
• installing or removing attachments
- checking, conducting maintenance, or working on the product
- Kickback may occur when the nose or tip of the guide bar touches an object, or when the wood closes in and pinches the chain in the cut. Tip contact in some cases may cause a sudden reverse reaction, kicking the guide bar up and back towards the operator. Pinching the chain along the top of the guide bar may push the guide bar rapidly back towards the operator. Either of these reactions may cause you to lose control of the product, which could result in serious personal injury. Do not rely exclusively on the safety devices built into the product. As a product user, you should take several steps to keep your cutting jobs free from accident or injury. Kickback is the result of tool misuse and/or incorrect operating procedures or conditions and can be avoided by taking the following precautions:
- Make sure that the area in which you are cutting is free from obstructions. Do not let the nose of the guide bar contact a branch, limb, or any other obstruction while you are operating the product.
- Maintain a firm grip with both hands on the machine and position your body and arm to allow you to resist kickback forces. Kickback forces can be controlled by the operator if proper precautions are taken. Do not let go of the product.
- Do not overreach. This helps prevent unintended tip contact and enables better control of the product in unexpected situations.
- Only use replacement bars and chains specified by the manufacturer. Incorrect replacement bars and chains may cause chain breakage and/or kickback.
- Sharpening the chain safely is a skilled task. Therefore, the manufacturer strongly recommends that a worn or dull chain is replaced with a new one, available from your authorised RYOBI service centre. The part number is available in the product specification table in this manual.
- Do not use on a ladder or unstable support. Always cut with both feet on solid ground to prevent being pulled off balance.
• To protect yourself from electrocution, do not operate within 10 metres of overhead electrical lines. - Beware of falling branches or those which rebound after hitting the ground.
- Use extreme caution when cutting small-sized brush and saplings because slender material may catch the chain and be whipped towards you or pull you off balance.
- When cutting a limb that is under tension, be alert for spring back so that you will not be struck when tension in the wood fibres is released.
- If the cutting performance deteriorates over time, check if the chain teeth are sharp and clean. If necessary, replace the original chain (and bar) as recommended by the manufacturer.
- If the chain and bar become pinched or trapped in branches too high to reach, seek advice from a professional tree service specialist about safe removal of the cutting means.
- WARNING: CHECK THAT ALL THE SHAFT COUPLINGS ON THE EXTENSION POLE AND TOOL ARE SECURELY FASTENED BEFORE EACH USE AND AT FREQUENT INTERVALS.
Personal Protective Equipment
Good quality personal protective equipment, as used by professionals, will help to reduce the risk of injury to the operator. The following items should be used when operating your product:
- Safety helmet: Should comply with EN 397 and be CE marked.
- Hearing protection: Should comply with EN 352-1 and be CE marked.
- Eye and face protection: Should be CE marked and comply with EN 166 (for safety glasses) or EN 1731 (for mesh visors).
- Gloves: Should comply with EN 381-7 and be CE marked.
- Footwear: Should comply with EN 20345 and be CE marked.
Additional Battery Safety Warnings
- WARNING: TO REDUCE THE RISK OF FIRE, PERSONAL INJURY, AND PRODUCT DAMAGE DUE TO A SHORT CIRCUIT, NEVER IMMERSE YOUR TOOL, BATTERY PACK, OR CHARGER IN FLUID OR ALLOW A FLUID TO FLOW INSIDE THEM. CORROSIVE OR CONDUCTIVE FLUIDS, SUCH AS SEAWATER, CERTAIN INDUSTRIAL CHEMICALS, BLEACH, OR BLEACH-CONTAINING PRODUCTS, ETC., CAN CAUSE A SHORT CIRCUIT.
Operation
- Study the condition of the tree and branches before starting work. If there are signs of damage, rot, or decay, do not attempt to prune yourself. Damaged or rotten branches are highly unstable. Seek the services of a professional tree surgeon.
- Never stand under the branch to be pruned.
- Pruned branches do not always fall cleanly to the ground. They are easily caught and deflected by other foliage. Ensure that a safety zone at least twice the length of the branch to be cut is available and maintained during your pruning. If this is not possible, seek the services of a professional tree surgeon.
- Ensure that the falling branch is not a danger to yourself, bystanders, or property, including utility cables.
- Never operate the product with the pole at an angle greater than 60^ from the horizontal.
- Never operate the product with the cutting means closer than 10 metres from overhead power lines.
- Do not force the product; let the chain do the work at its own speed.
- Do not try to cut the branch too close to the tree trunk. Leave about 15 cm from the trunk to the cut.
- Rest the saw bar on the branch to be pruned and push the saw gently forwards so that the ribbed bumper also contacts the branch. This will aid stability, cutting, and provide cleaner cuts.
- Small and thin branches that are not heavy can be cut with one cut using the bottom of the saw bar.
- Branches with larger diameters and that are heavier may break or split during the cut, so the user must make a first cut from under the branch using the top of the saw bar. The first cut should be approximately one-third of the way through the branch.
- Consider pruning large branches in manageable sections rather than as a whole.
- Never try to restart a previous cut with the chain and bar in the earlier cut. Always start a new cut. This will reduce the risk of kickback and potential injury.
Transportation and Storage
- Stop the product, remove the battery pack, and allow it to cool before storing or transporting.
- Clean all foreign materials from the product. Store it in a cool, dry, and well-ventilated place that is inaccessible to children. Keep away from corrosive agents, such as garden chemicals and de-icing salts. Do not store outdoors.
- Cover the saw bar with the scabbard before storing or transporting the product.
- When storing the product for a long period of time (one month or longer), ensure the chain is lightly lubricated to prevent rust. The manufacturer recommends the use of RYOBI bar and chain lubricant, which is available at your RYOBI authorised service centre.
- For transportation, secure the product against movement or falling to prevent injury to persons or damage to the product.
Transporting Lithium Batteries
- Transport the battery in accordance with local and national provisions and regulations.
- Follow all special requirements on packaging and labelling when transporting batteries by a third party. Ensure that no batteries can come in contact with other batteries or conductive materials while in transport by protecting exposed connectors with insulating, non-conductive caps or tape. Do not transport batteries that are cracked or leaking. Check with the forwarding company for further advice.
Maintenance
- WARNING: USE ONLY ORIGINAL MANUFACTURER'S REPLACEMENT PARTS, ACCESSORIES, AND ATTACHMENTS. FAILURE TO DO SO CAN CAUSE POSSIBLE INJURY, POOR PERFORMANCE, AND MAY VOID YOUR WARRANTY.
- WARNING: SERVICING REQUIRES EXTREME CARE AND KNOWLEDGE AND SHOULD BE PERFORMED ONLY BY A QUALIFIED SERVICE TECHNICIAN. FOR SERVICE, WE SUGGEST YOU BRING THE PRODUCT TO YOUR NEAREST AUTHORISED SERVICE CENTRE. WHEN SERVICING, USE ONLY IDENTICAL REPLACEMENT PARTS.
- WARNING: THE CHAIN IS VERY SHARP. TO PREVENT PERSONAL INJURY, EXERCISE EXTREME CAUTION WHEN CLEANING, FITTING, OR REMOVING THE CHAIN SCABBARD. ALWAYS WEAR PROTECTIVE GLOVES WHEN PERFORMING MAINTENANCE ON THE CHAIN.
- WARNING: IMPROPER CHAIN MAINTENANCE INCREASES THE POTENTIAL OF KICKBACK. FAILURE TO REPLACE OR REPAIR A DAMAGED CHAIN CAN CAUSE SERIOUS INJURY.
- Switch off and remove the battery pack before conducting any maintenance or cleaning work.
- You may only make adjustments or repairs described in this manual. For other repairs, contact the authorised service agent.
2in1 Pole Saw + Hedge Trimmer
- Follow instructions for lubricating and checking and adjusting chain tension.
• After each use, clean the body and handles of the product with a soft, dry cloth. - Check all nuts, bolts, and screws at frequent intervals for proper tightness to ensure the product is in safe working condition. Any part that is damaged should be properly repaired or replaced by an authorised service centre.
Maintenance Schedule
- The bar may be reversed to distribute wear for maximum life. The bar should be cleaned every day of use and checked for wear and damage.
• Daily Check:
• Bar lubrication: Before each use
- Chain tension: Before each use and frequently
- Chain sharpness: Before each use, visual check
- For damaged parts: Before each use
- For loose fasteners: Before each use
Residual Risks
Even when the product is used as prescribed, it is still impossible to completely eliminate certain residual risk factors. The following hazards may arise during use, and the operator should pay special attention to avoid them:
- Injury caused by vibration:
• Always use the right tool for the job. Use designated handles and restrict working time and exposure. - Injury caused by noise:
- Exposure to noise can cause hearing injury. Wear ear protection and limit exposure.
- Injury from contact with the exposed saw teeth of the chain
- Injury caused by kickback or sudden and unforeseen movement of the guide bar
- Injury caused by ejected parts of the chain
- Injury caused by thrown-off parts of the workpiece (wood chips and splinters)
• Injury caused by dust and particles - Injury caused by skin contact with the lubricant or oil
- Risk Reduction
It has been reported that vibrations from handheld tools may contribute to a condition called Raynaud's Syndrome in certain individuals. Symptoms may include tingling, numbness, and blanching of the fingers, usually apparent upon exposure to cold. Hereditary factors, exposure to cold and dampness, diet, smoking, and work practices are all thought to contribute to the development of these symptoms. There are measures that can be taken by the operator to possibly reduce the effects of vibration:
- Keep your body warm in cold weather. When operating the unit, wear gloves to keep the hands and wrists warm. It is reported that cold weather is a major factor contributing to Raynaud's Syndrome.
• After each period of operation, exercise to increase blood circulation.
• Take frequent work breaks. Limit the amount of exposure per day. - If you experience any of the symptoms of this condition, immediately discontinue use and see your doctor about these symptoms.
WARNING: INJURIES MAY BE CAUSED, OR AGGRAVATED, BY PROLONGED USE OF A TOOL. WHEN USING ANY TOOL FOR PROLONGED PERIODS, ENSURE YOU TAKE REGULAR BREAKS.
Environmental Protection
Recycle raw materials instead of disposing of them as waste. The machine, accessories, and packaging should be sorted for environment-friendly recycling.
General Chainsaw Safety Warnings
- Keep all parts of your body away from the chain when the chainsaw is operating. Before you start the chainsaw, make sure the chain is not in contact with anything. A moment of inattention while operating chainsaws may cause entanglement of your clothing or body with the chain.
- Always hold the chainsaw with your right hand on the rear handle and your left hand on the front handle. Holding the chainsaw with a reversed hand configuration increases the risk of personal injury and should never be done.
- Hold the chainsaw by insulated gripping surfaces only, because the chain may contact hidden wiring. Chains contacting a "live" wire may make exposed metal parts of the chainsaw "live" and could give the operator an electric shock.
- Wear eye protection. Further protective equipment for hearing, head, hands, legs, and feet is recommended. Adequate protective equipment will reduce personal injury from flying debris or accidental contact with the chain.
- Do not operate a chainsaw in a tree, on a ladder, from a rooftop, or from any unstable support. Operation of a chainsaw in this manner could result in serious personal injury.
- Always maintain proper footing and operate the chainsaw only when standing on a fixed, secure, and level surface. Slippery or unstable surfaces may cause a loss of balance or control of the chainsaw.
- When cutting a limb that is under tension, be alert for spring back. When the tension in the wood fibres is released, the spring-loaded limb may strike the operator and/or throw the chainsaw out of control.
- Use extreme caution when cutting brush and saplings. The slender material may catch the chain and be whipped towards you or pull you off balance.
- Carry the chainsaw by the front handle with the chainsaw switched off and away from your body. When transporting or storing the chainsaw, always fit the guide bar cover. Proper handling of the chainsaw will reduce the likelihood of accidental contact with the moving chain.
2in1 Pole Saw + Hedge Trimmer
- Follow instructions for lubricating, chain tensioning, and changing the bar and chain. An improperly tensioned or lubricated chain may either break or increase the chance of kickback.
- Cut wood only. Do not use the chainsaw for purposes not intended. For example, do not use the chainsaw for cutting metal, plastic, masonry, or non-wood building materials. Use of the chainsaw for operations different from those intended could result in a hazardous situation.
- Do not attempt to fell a tree until you have an understanding of the risks and how to avoid them. Serious injury could occur to the operator or bystanders while felling a tree.
- This chainsaw is not intended for tree felling. Use of the chainsaw for operations different from those intended could result in serious injury to the operator or bystanders.
Noise
- Tested to fulfil all relevant provisions of Noise Emission Directive 2000/14/EC amended by 2005/88/EC:
• Guaranteed Sound Power Level (LWA): 99.0 dB(A)
NOTE: The declared noise emission value(s) may also be used in a preliminary assessment of exposure.
- NOTE: The declared noise emission value(s) has been measured in accordance with a standard test method and may be used for comparing one tool with another.
Vibration
• The vibration total value (tri-axial vector sum) determined according to EN 62841-1, EN 62841-4-2, EN ISO 11680-1:
- Vibration emission (ah): < 2.5 m/s^2 or less Uncertainty (K): 1.5 m/s^2 .
- NOTE: The declared vibration total value(s) has been measured in accordance with a standard test method and may be used for comparing one tool with another.
NOTE: The declared vibration total value(s) may also be used in a preliminary assessment of exposure.
Hedge Trimmer
Intended Use
- The cordless pole hedge trimmer is intended only for outdoor use in dry and well-illuminated conditions. The product is designed for home or domestic use. It is intended to cut and trim hedges, shrubs, and similar vegetation. The product is not intended for cutting hedges, shrubs, or similar vegetation with diameters greater than its cutting capacity.
- Do not use the product for any other purpose.
General Product Safety Warnings
- WARNING: ONLY USE THE AUTHORISED BATTERY CARTRIDGES AND CHARGERS. USE OF ANY OTHER BATTERY CARTRIDGES AND CHARGERS MAY CAUSE INJURY AND/OR FIRE.
- WARNING: DO NOT USE A CORDED POWER SUPPLY SUCH AS A BATTERY ADAPTER OR PORTABLE POWER PACK WITH THIS MACHINE. THE CABLE OF SUCH POWER SUPPLY MAY HINDER THE OPERATION AND RESULT IN PERSONAL INJURY.
- WARNING: READ ALL SAFETY WARNINGS, INSTRUCTIONS, ILLUSTRATIONS, AND SPECIFICATIONS PROVIDED WITH THIS POWER TOOL. FAILURE TO FOLLOW ALL INSTRUCTIONS LISTED BELOW MAY RESULT IN ELECTRIC SHOCK, FIRE, AND/OR SERIOUS INJURY.
- Save all warnings and instructions for future reference.
- The term "power tool" in the warnings refers to your mains-operated (corded) product or battery-operated (cordless) product.
Work Area Safety
- Keep work area clean and well lit. Cluttered or dark areas invite accidents.
- Do not operate power tools in explosive atmospheres, such as in the presence of flammable liquids, gases, or dust. Power tools create sparks which may ignite the dust or fumes.
- Keep children and bystanders away while operating a power tool. Distractions can cause you to lose control.
Electrical Safety
- Power tool plugs must match the outlet. Never modify the plug in any way. Do not use any adapter plugs with earthed (grounded) power tools. Unmodified plugs and matching outlets will reduce the risk of electric shock.
- Avoid body contact with earthed or grounded surfaces, such as pipes, radiators, ranges, and refrigerators. There is an increased risk of electric shock if your body is earthed or grounded.
- Do not expose power tools to rain or wet conditions. Water entering a power tool will increase the risk of electric shock.
- Do not abuse the cord. Never use the cord for carrying, pulling, or unplugging the power tool. Keep the cord away from heat, oil, sharp edges, or moving parts. Damaged or entangled cords increase the risk of electric shock.
- When operating a power tool outdoors, use an extension cord suitable for outdoor use. Use of a cord suitable for outdoor use reduces the risk of electric shock.
- If operating a power tool in a damp location is unavoidable, use a residual current device (RCD) protected supply. Use of an RCD reduces the risk of electric shock.
Personal Safety
- Stay alert, watch what you are doing, and use common sense when operating a power tool. Do not use a power tool while you are tired or under the influence of drugs, alcohol, or medication. A moment of inattention while operating power tools may result in serious personal injury.
2in1 Pole Saw + Hedge Trimmer
- Use personal protective equipment. Always wear eye protection. Protective equipment such as a dust mask, non-skid safety shoes, hard hat, or hearing protection used for appropriate conditions will reduce personal injuries.
- Prevent unintentional starting. Ensure the switch is in the off-position before connecting to the power source and/or battery pack, picking up, or carrying the tool. Carrying power tools with your finger on the switch or energising power tools that have the switch on invites accidents.
- Remove any adjusting key or wrench before turning the power tool on. A wrench or a key left attached to a rotating part of the power tool may result in personal injury.
- Do not overreach. Keep proper footing and balance at all times. This enables better control of the power tool in unexpected situations.
- Dress properly. Do not wear loose clothing or jewellery. Keep your hair and clothing away from moving parts. Loose clothes, jewellery, or long hair can be caught in moving parts.
- If devices are provided for the connection of dust extraction and collection facilities, ensure these are connected and properly used. Use of dust collection can reduce dust-related hazards.
- Do not let familiarity gained from frequent use of tools allow you to become complacent and ignore tool safety principles. A careless action can cause severe injury within a fraction of a second.
Power Tool Use and Care
- Do not force the power tool. Use the correct power tool for your application. The correct power tool will do the job better and safer at the rate for which it was designed.
- Do not use the power tool if the switch does not turn it on and off. Any power tool that cannot be controlled with the switch is dangerous and must be repaired.
- Disconnect the plug from the power source and/or remove the battery pack, if detachable, from the power tool before making any adjustments, changing accessories, or storing power tools. Such preventive safety measures reduce the risk of starting the power tool accidentally.
- Store idle power tools out of the reach of children and do not allow persons unfamiliar with the power tool or these instructions to operate the power tool. Power tools are dangerous in the hands of untrained users.
- Maintain power tools and accessories. Check for misalignment or binding of moving parts, breakage of parts, and any other condition that may affect the power tool's operation. If damaged, have the power tool repaired before use. Many accidents are caused by poorly maintained power tools.
- Keep cutting tools sharp and clean. Properly maintained cutting tools with sharp cutting edges are less likely to bind and are easier to control.
- Use the power tool, accessories, and tool bits, etc., in accordance with these instructions, taking into account the working conditions and the work to be performed. Using the power tool for operations different from those intended could result in a hazardous situation.
- Keep handles and grasping surfaces dry, clean, and free from oil and grease. Slippery handles and grasping surfaces do not allow for safe handling and control of the tool in unexpected situations.
Battery Tool Use and Care
- Recharge only with the charger specified by the manufacturer. A charger that is suitable for one type of battery pack may create a risk of fire when used with another battery pack.
- Use power tools only with specifically designated battery packs. Use of any other battery packs may create a risk of injury and fire.
- When the battery pack is not in use, keep it away from other metal objects, like paper clips, coins, keys, nails, screws, or other small metal objects, that can make a connection from one terminal to another. Shorting the battery terminals together may cause burns or a fire.
- Under abusive conditions, liquid may be ejected from the battery; avoid contact. If contact accidentally occurs, flush with water. If liquid contacts eyes, additionally seek medical help. Liquid ejected from the battery may cause irritation or burns.
- Do not use a battery pack or tool that is damaged or modified. Damaged or modified batteries may exhibit unpredictable behaviour resulting in fire, explosion, or risk of injury.
- Do not expose a battery pack or tool to fire or excessive temperature. Exposure to fire or temperatures above 130°C may cause an explosion.
- Follow all charging instructions and do not charge the battery pack or tool outside the temperature range specified in the instructions. Charging improperly or at temperatures outside the specified range may damage the battery and increase the risk of fire.
Service
- Have your power tool serviced by a qualified repair person using only identical replacement parts. This will ensure that the safety of the power tool is maintained.
- Never service damaged battery packs. Service of battery packs should only be performed by the manufacturer or authorised service providers.
Pole Hedge Trimmer Safety Warnings
- Do not use the pole hedge trimmer in bad weather conditions, especially when there is a risk of lightning. This decreases the risk of being struck by lightning.
- Keep all power cords and cables away from the cutting area. Power cords or cables may be hidden in hedges or bushes and can be accidentally cut by the blade.
- Wear ear protection. Adequate protective equipment will reduce the risk of hearing loss.
- Hold the pole hedge trimmer by insulated gripping surfaces only, because the blade may contact hidden wiring. Blades contacting a "live" wire may make exposed metal parts of the pole hedge trimmer "live" and could give the operator an electric shock.
- Keep all parts of the body away from the blade. Do not remove cut material or hold material to be cut when blades are moving. Blades continue to move after the switch is turned off. A moment of inattention while operating the pole hedge trimmer may result in serious personal injury.
- When clearing jammed material or servicing the pole hedge trimmer, make sure all power switches are off and the battery pack is removed or disconnected. Unexpected actuation of the pole hedge trimmer while clearing jammed material or servicing may result in serious personal injury.
- Carry the pole hedge trimmer by the handle with the blade stopped, taking care not to operate any power switch. Proper carrying of the pole hedge trimmer will decrease the risk of inadvertent starting and resultant personal injury from the blades.
2in1 Pole Saw + Hedge Trimmer
- When transporting or storing the pole hedge trimmer, always use the blade cover. Proper handling of the pole hedge trimmer will decrease the risk of personal injury from the blades.
Additional Safety Warnings
- Check the hedges and bushes for foreign objects, such as wire fences and hidden wiring.
- While operating the product, always hold it firmly with both hands by the two handles.
- Use the product only at ground level and not on any other unstable support.
- Inspect the product before each use. Check for loose fasteners, etc. Make sure that all guards and handles are properly and securely attached. Replace any damaged parts before use. Check for battery pack leaks.
- Do not operate the product in poor lighting. The operator requires a clear view of the work area to identify potential hazards.
- The use of hearing protection reduces the ability to hear warnings (shouts or alarms). The operator must pay extra attention to what is going on in the working area.
- Turn off the product, remove the battery pack, and allow both to cool down. Make sure that all moving parts have come to a complete stop:
• before adjusting the working position of the cutting means
- before servicing
• before clearing a blockage
• before checking, cleaning, or working on the product
• before changing accessories
• before performing maintenance
- before checking for damage after striking a foreign object
• before leaving the product unattended
• whenever the product starts to vibrate abnormally
- Do not force the product through heavy shrubbery. This can cause the blades to bind and slow down. If the blades slow down, reduce the pace.
- If the product is dropped, suffers heavy impact, or begins to vibrate abnormally, immediately turn off the product and inspect it for damage or identify the cause of the vibration. Any damage should be properly repaired or replaced by an authorised service centre.
- Do not wear multiple belts or shoulder harnesses.
- Operate the product only in temperatures between -10^ and 40^ .
- Store the product in a location where the ambient temperature is between 0^ and 40^ .
- Injuries may be caused or aggravated by prolonged use of the product. When using any product for prolonged periods, ensure to take regular breaks.
Additional Battery Safety Warnings
- To reduce the risk of fire, personal injury, and product damage due to a short circuit, never immerse the tool, battery pack, or charger in fluid or allow fluid to flow inside them. Corrosive or conductive fluids, such as seawater, certain industrial chemicals, and bleach or bleach-containing products, etc., can cause a short circuit.
- Charge the battery pack in a location where the ambient temperature is between 5^ and 35^ .
- Store the battery pack in a location where the ambient temperature is between 0^ and 40^ .
- Use the battery pack in a location where the ambient temperature is between -10^ and 40^ .
Transportation and Storage
- Turn off the product, remove the battery pack, and allow both to cool down before storing or transporting.
- Remove all foreign materials from the product. Store the product in a cool, dry, and well-ventilated area that is inaccessible to children. For extra safety, store the battery pack separately from the product. Keep the product away from corrosive agents, such as garden chemicals and de-icing salts. Do not store the product outdoors.
- Fit the blade cover before storing the product or during transportation.
- For transportation, secure the product against movement or falling to prevent injury to persons or damage to the product.
Transporting Lithium Batteries
- Transport the battery in accordance with local and national provisions and regulations.
- Follow all special requirements on packaging and labelling when transporting batteries by a third party. Ensure that no batteries come into contact with other batteries or conductive materials while in transport by protecting exposed connectors with insulating, non-conductive caps or tape. Do not transport batteries that are cracked or leaking. Check with the forwarding company for further advice.
Maintenance
- Use only original manufacturer's replacement parts, accessories, and attachments. Failure to do so can cause possible injury, contribute to poor performance, and may void your warranty.
- Servicing requires extreme care and knowledge and should be performed only by a qualified service technician. Have the product serviced by an authorised service centre only.
- The blades are extremely sharp. To prevent personal injury, exercise extreme caution when cleaning, lubricating, fitting, or removing the blade cover.
- Remove the battery pack before adjusting, maintaining, or cleaning the product.
- You may make adjustments and repairs described in this manual. For other repairs, have the product serviced by an authorised service centre only.
2in1 Pole Saw + Hedge Trimmer
• After each use, clean the plastic parts with a soft, dry cloth.
- After each use, clean debris from the blades with a stiff brush, and then carefully apply a rust preventative lubricant before refitting the blade protector. The manufacturer recommends using rust preventative lubricant spray to apply an even distribution and reduce the risk of personal injury from contact with the blades. For information about a suitable spray product, check with an authorised service centre.
- Check all nuts, bolts, and screws at frequent intervals for proper tightness to ensure that the product is in safe working condition. Any part that is damaged should be properly repaired or replaced by an authorised service centre.
Protecting the Environment
- Separate Collection. Products and batteries marked with this symbol must not be disposed of with normal household waste.
- Products and batteries contain materials that can be recovered or recycled, reducing the demand for raw materials. Please recycle electrical products and batteries according to local provisions.
Safety Symbols
The product may have safety warning labels attached to it, explained below. Understand the symbols on your product and their meanings. If any stickers become unreadable, unattached etc., replace them.
 Flammable Material HazardFlammable liquids, gases, or substances etc may present.Avoid ignition sources and open flames. Danger of fire. Flammable Material HazardFlammable liquids, gases, or substances etc may present.Avoid ignition sources and open flames. Danger of fire. |  Read User ManualRead and fully understand product safety warnings, operation, procedures etc before using the product. Read User ManualRead and fully understand product safety warnings, operation, procedures etc before using the product. |  Use Hand ProtectionWear appropriate hand protection and take due care as the product or use of the product may present hand hazards. Use Hand ProtectionWear appropriate hand protection and take due care as the product or use of the product may present hand hazards. |  Exhaust FumesCarbon-Monoxide HazardDo not use the product in confined areas or without adequate ventilation. Carbon-monoxide poisoning can be fatal. Exhaust FumesCarbon-Monoxide HazardDo not use the product in confined areas or without adequate ventilation. Carbon-monoxide poisoning can be fatal. |
 Electrocution / Electrical Shock HazardHigh voltage or high current electricity may be present or required by the product. Take due care when handling electrical products, cables, plugs and leads. Electrical shock can be fatal. Electrocution / Electrical Shock HazardHigh voltage or high current electricity may be present or required by the product. Take due care when handling electrical products, cables, plugs and leads. Electrical shock can be fatal. |  Toxic Fumes / Dust HazardUsing the product or by-products from use may produce fumes, smoke or particles that could be harmful if inhaled. Wear appropriate breathing protection and have adequate ventilation. Toxic Fumes / Dust HazardUsing the product or by-products from use may produce fumes, smoke or particles that could be harmful if inhaled. Wear appropriate breathing protection and have adequate ventilation. |  Explosive Material HazardCombustible liquids, gases, or substances etc may be present.Avoid ignition sources and open flames. Danger of explosion. Explosive Material HazardCombustible liquids, gases, or substances etc may be present.Avoid ignition sources and open flames. Danger of explosion. |  Cutting / Amputation HazardThe product may have blades, edges or mechanical devices that can cause severe cut injury to fingers, limbs etc. Take due care when handling and using the product. Cutting / Amputation HazardThe product may have blades, edges or mechanical devices that can cause severe cut injury to fingers, limbs etc. Take due care when handling and using the product. |
 Crush HazardThe product may have blades, edges or mechanical devices that can cause severe crush injury to fingers, limbs etc. Take due care when handling and using the product. Crush HazardThe product may have blades, edges or mechanical devices that can cause severe crush injury to fingers, limbs etc. Take due care when handling and using the product. |  Single Operator OnlyThe product must be operated by a single person only. More than one person operating the product may introduce additional hazards. Single Operator OnlyThe product must be operated by a single person only. More than one person operating the product may introduce additional hazards. |  Use Face ProtectionWear appropriate full-face protection and take due care as the product or use of the product may present face and eye hazards. Use Face ProtectionWear appropriate full-face protection and take due care as the product or use of the product may present face and eye hazards. |  Use Foot ProtectionWear appropriate foot protection and take due care as the product or use of the product may present foot hazards. Use Foot ProtectionWear appropriate foot protection and take due care as the product or use of the product may present foot hazards. |
 Use Eye / Ear / Head ProtectionWear appropriate eye and / or ear and / or head protection and take due care as the product or use of the product may present eye, hearing, and head hazards. Use Eye / Ear / Head ProtectionWear appropriate eye and / or ear and / or head protection and take due care as the product or use of the product may present eye, hearing, and head hazards. |  Running HazardDo not run on or near the product as doing so may present a fall hazard. Running HazardDo not run on or near the product as doing so may present a fall hazard. |  Diving HazardDo not dive into the product as doing so may present a neck / head injury hazard. Diving HazardDo not dive into the product as doing so may present a neck / head injury hazard. |  Adult Supervision RequiredAlways supervise children and other users of a product to prevent drowning or injury. Adult Supervision RequiredAlways supervise children and other users of a product to prevent drowning or injury. |
 Skin Penetration / Puncture HazardThe product may produce pressure, emit liquids or objects that can cause severe injury to fingers, limbs, blood etc. Take due care when handling and using the product. Skin Penetration / Puncture HazardThe product may produce pressure, emit liquids or objects that can cause severe injury to fingers, limbs, blood etc. Take due care when handling and using the product. |  Hot Surface HazardBe aware that the product may produce high temperatures and hot surfaces that can cause burn injuries. Hot Surface HazardBe aware that the product may produce high temperatures and hot surfaces that can cause burn injuries. |  Flying Debris HazardBe aware that the product or use of the product may present hazards produced by flying debris. Wear appropriate clothing and protective devices. Flying Debris HazardBe aware that the product or use of the product may present hazards produced by flying debris. Wear appropriate clothing and protective devices. |  Moving Parts HazardBe aware that the product contains or uses mechanical devices that move or rotate. Always wait for moving parts to stop fully before handling the product, adjusting, maintenance etc. Moving Parts HazardBe aware that the product contains or uses mechanical devices that move or rotate. Always wait for moving parts to stop fully before handling the product, adjusting, maintenance etc. |
 Carbon-Monoxide HazardDo not use the product in confined areas or without adequate ventilation. Carbon-monoxide poisoning can be fatal. Carbon-Monoxide HazardDo not use the product in confined areas or without adequate ventilation. Carbon-monoxide poisoning can be fatal. |  Pull HazardBe aware that the product contains or uses mechanical devices that can pull in objects and can cause severe injury to fingers, limbs etc. Take due care when handling and using the product. Pull HazardBe aware that the product contains or uses mechanical devices that can pull in objects and can cause severe injury to fingers, limbs etc. Take due care when handling and using the product. |  Slope / Fall Injury HazardBe aware that using the product on sloping surfaces or in slippery conditions may present additional dangers from falls and contact with blades, moving parts, hot surfaces etc. Slope / Fall Injury HazardBe aware that using the product on sloping surfaces or in slippery conditions may present additional dangers from falls and contact with blades, moving parts, hot surfaces etc. |  "Slam Dunk" WarningDo NOT attempt "slam dunk" manoeuvres as this may result in severe injury due to falling, product breakage or collapse etc. "Slam Dunk" WarningDo NOT attempt "slam dunk" manoeuvres as this may result in severe injury due to falling, product breakage or collapse etc. |
 Electrocution / Electrical Shock Hazard - OutdoorHigh voltage or high current electricity may be present or required by the product. Do NOT use in rain, damp, or wet conditions. Electrical shock can be fatal. Electrocution / Electrical Shock Hazard - OutdoorHigh voltage or high current electricity may be present or required by the product. Do NOT use in rain, damp, or wet conditions. Electrical shock can be fatal. |  Electrocution / Electrical Shock Hazard - DisconnectHigh voltage or high current electricity may be present or required by the product. Always disconnect the product from the electrical supply before handling the product, adjusting, maintenance etc. Electrocution / Electrical Shock Hazard - DisconnectHigh voltage or high current electricity may be present or required by the product. Always disconnect the product from the electrical supply before handling the product, adjusting, maintenance etc. |  Power Line Electrocution HazardHigh voltage / high current power lines may be present. Use extreme caution to avoid contact or interference with power lines.Electrical shock can be fatal. Power Line Electrocution HazardHigh voltage / high current power lines may be present. Use extreme caution to avoid contact or interference with power lines.Electrical shock can be fatal. |  "Kick-Back" HazardHigh level of "kick-back" hazard that can cause the machine to suddenly rotate towards operator.Kick-back injury can be fatal. "Kick-Back" HazardHigh level of "kick-back" hazard that can cause the machine to suddenly rotate towards operator.Kick-back injury can be fatal. |
 Winch Operator Position HazardDo NOT stand between winch and load. Do NOT use winch to move people. Winch Operator Position HazardDo NOT stand between winch and load. Do NOT use winch to move people. |  Winch Lift HazardDo NOT LIFT load vertically. Use machine to PULL only. Winch Lift HazardDo NOT LIFT load vertically. Use machine to PULL only. |  Cable HazardEnsure that load bearing cable is not kinked or knotted. Cable HazardEnsure that load bearing cable is not kinked or knotted. |  Winch Cable HazardEnsure that there is a minimum number of cable coils on winching mechanism. Winch Cable HazardEnsure that there is a minimum number of cable coils on winching mechanism. |
 Winch Hook HazardCarry hook to load – do NOT throw or run. Winch Hook HazardCarry hook to load – do NOT throw or run. |  Flash / Blinding HazardWear appropriate eye protection for welding. Direct exposure to weld arcs may cause permanent eye injury. Flash / Blinding HazardWear appropriate eye protection for welding. Direct exposure to weld arcs may cause permanent eye injury. |  Laser HazardLaser may be in use – do NOT look directly at laser or allow others to. Laser HazardLaser may be in use – do NOT look directly at laser or allow others to. |  Choking HazardChildren under 8 yrs. Can choke or suffocate on small parts. Adult supervision required. Choking HazardChildren under 8 yrs. Can choke or suffocate on small parts. Adult supervision required. |
Table of Contents
Safety 2
Safety Symbols....12
Parts Identification: Pole Saw....16
Parts Identification: Hedge Trimmer 18
Assembly: Pole Saw....19
Unpacking....19
Assembling the Guide Bar and Chain ....19
Tensioning the Chain....21
Connecting the Poles....22
Assembly: Hedge Trimmer 24
Attaching the Poles....24
Attach Shoulder Strap....25
Adjusting the Pivoting Head 25
Installing or Removing the Battery Pack....26
Operation: Pole Saw....27
Application 27
To Attach/Detach Battery Pack ....27
Filling the Oil Tank with Bar and Chain Lubricant ....28
Starting/Stopping the Pole Saw....29
Cutting 31
Limbing and Pruning....32
Operation: Hedge Trimmer 34
Applications 34
Holding the Pole Hedge Trimmer 34
Starting and Stopping the Pole Hedge Trimmer....35
Trimming Hedges 35
Application Advice ....36
Charging the Battery 37
Lithium Battery Care and Maintenance.... 39
Top 3 Battery Care Requirements....39
Maintenance: Pole Saw 41
Cleaning....41
Replacing the Bar and Chain....41
Adjusting the Chain Tension....42
Chain Maintenance....43
How to Sharpen the Cutters ....44
Top-Plate Sharpening Angles....46
Side-Plate Angle 46
2in1 Pole Saw + Hedge Trimmer
Depth-Gauge Clearance 47
Guide Bar Maintenance 47
Transportation....48
Storage 48
Maintenance: Hedge Trimmer 49
Cleaning....49
Sharpening the Cutting Blade....49
Lubricating the Blade 49
Transporting and Storing 50
Troubleshooting: Pole Saw....51
Troubleshooting: Hedge Trimmer 52
Specifications 53
Parts Identification: Pole Saw

2in1 Pole Saw + Hedge Trimmer
- Trigger Switch: Turns the pole saw on and off.
- Lock-off Button: Helps to prevent accidental or unauthorised activation of the trigger switch. It must be depressed before the trigger switch can be activated.
• Oil Tank Cap: Seals the oil tank.
• Oil-Inspection Window: Provides a view of the oil level in the oil tank.
• Guide Bar: Supports and guides the chain. - Chain Sheath: The chain sheath prevents the operator from coming into contact with the sharp chain blades when the tool is not in use. It also helps protect the chain blades from being nicked or damaged when the tool is being transported or stored.
- Chain: A loop of chain with cutting teeth that cut the wood when driven by the power head and supported by the guide bar.
• Assist Foam Handle: Provides easy control of the pole saw during cutting.
• Rear Handle: Ergonomic handle improves comfort and grip.
• Threaded Sleeve: Ensures a reliable connection between the front, rear, and extension aluminium poles.
• Shoulder Strap: Allows you to carry out your job safely and ergonomically. - Chain-Tensioning Adjusting Sleeve: Permits precise adjustment of chain tension. The ergonomic handle improves comfort and grip.
- Side Cover: Covers the chain sprocket and secures the guide bar.
- Locking Knob: Locks/unlocks the side cover.
Parts Identification: Hedge Trimmer

Assembly: Pole Saw
WARNING: To prevent accidental starting, which could cause serious personal injury, always remove the battery pack from the tool when assembling parts, making adjustments, cleaning, or when the tool is not in use.
WARNING: If any parts are damaged or missing, do not operate this product until the parts are replaced. Using this product with damaged or missing parts could result in serious personal injury.
WARNING: Do not attempt to modify this tool or create accessories that are not recommended for use with this tool. Any such alteration or modification is considered misuse and could result in a hazardous condition, potentially leading to serious injury.
Unpacking
• This product requires assembly.
- Carefully remove the product and any accessories from the packaging. Ensure that all items listed on the box are included.
- Inspect the tool carefully to ensure that no damage occurred during shipping.
- Do not discard the packaging material until you have thoroughly inspected and satisfactorily tested the tool.
• If any parts are damaged or missing, please return the product to the place of purchase.
Assembling the Guide Bar and Chain
- Remove the battery.
- Place the pole saw on its side on a firm, flat surface, ensuring the side cover is facing upwards.
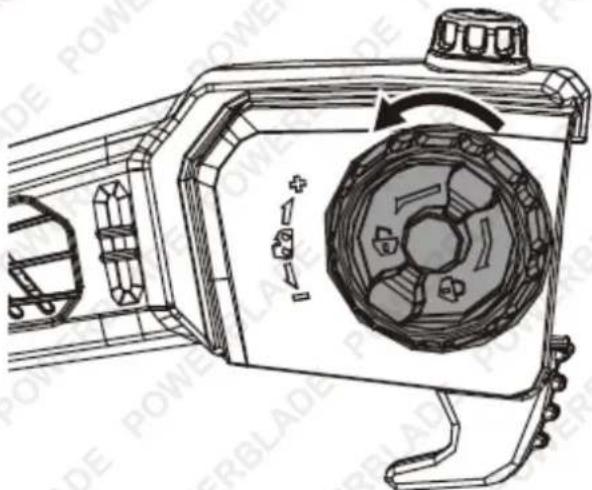
- Wear gloves. Remove the side cover by turning the locking knob anti-clockwise (Fig. 2a).
- Lay the chain in a loop on a flat surface and straighten any kinks (Fig. 2b).
- Position the chain drive links into the guide bar groove. Ensure that the cutter direction arrows on the chain align with the rotation direction arrow on the guide bar. Position the chain so there is a loop at the back of the guide bar, as shown (Fig. 2c).
Fig. 2a
natural_image
Technical line drawing of a mechanical device with internal components and a central fan (no text or symbols)Fig. 2b

Fig. 2c

- Holding the chain in position on the guide bar, place the guide bar and chain, with the bar metal plate facing upwards, into the mounting surface of the housing. At the same time, guide the loop around the drive sprocket (Fig. 2d). Ensure that the cutter direction arrows on the chain align with the rotation direction arrow on the guide.
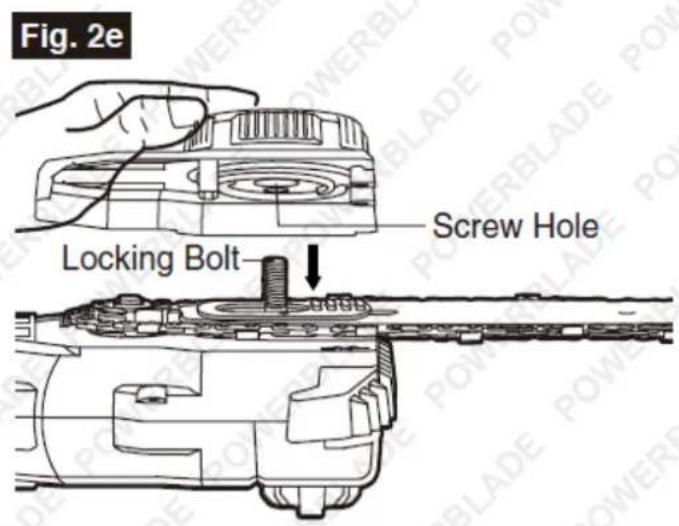
- Attach the side cover to the housing so that the screw hole of the locking knob aligns with the locking bolt in the housing (Fig. 2e). Simultaneously, ensure that the rotation direction arrow on the side cover aligns with the rotation direction arrow on the housing. Lightly tighten the locking knob clockwise. The bar must remain free to move for tension adjustment.
Note: Do not fully tighten the locking knob until after you have adjusted the chain tension (see the following section, "Tensioning the chain").

Tensioning the Chain
CAUTION: The chain must be properly tensioned before use.
- Lift the tip of the guide bar and keep it slightly raised as you adjust the tension. Ensure that the guide bar can still move; loosen the locking knob slightly if necessary.
- Loosen the locking knob of the side cover a few turns (Fig. 3a).

- Adjust the chain tension using the chain-tension adjusting sleeve, following the chain-tension adjusting mark on the side cover. Turning the sleeve clockwise increases the chain tension. Turning it anti-clockwise decreases the chain tension (Fig. 3b).

- Check the chain tension by pulling upwards on the chain with one hand against the weight of the product. The correct tension is achieved when the chain can be lifted by approximately 5/64" (2 mm) from the guide bar in the centre (Fig. 3c).
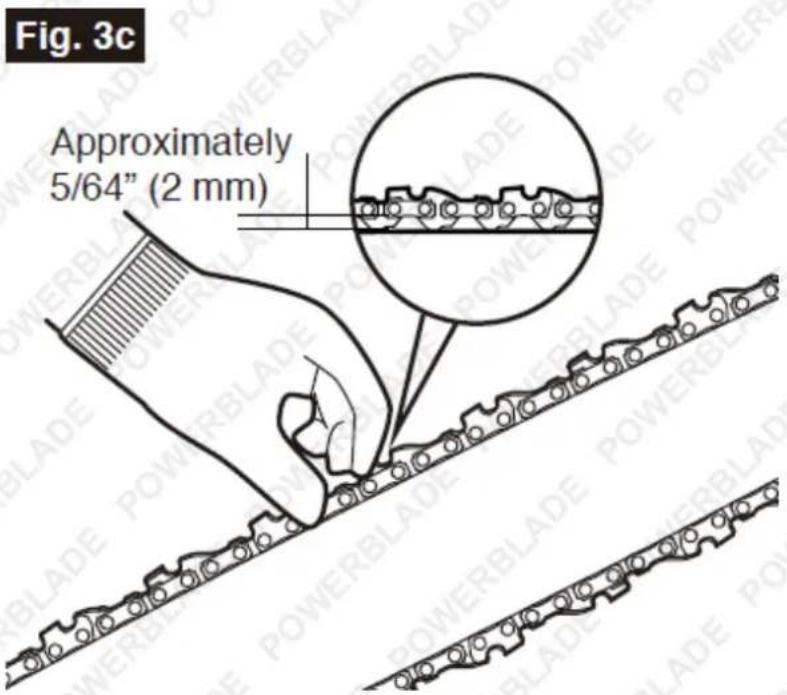
- Re-adjust the tension as described above if you find that the chain is too loose or tight.
- Pull the chain along the upper side of the guide bar by hand (wearing protective gloves) from one end to the other several times. The chain should feel tight but still move freely.
- Firmly tighten the locking knob to secure the guide bar.
Connecting the Poles
Attaching Without the Extension Pole (Fig. 4a)
Fig. 4a

- Remove the battery pack.
- Align the rib on the front pole with the arrow slot on the rear pole and push the front pole into the rear pole.
- Rotate the threaded sleeve in the direction marked on it to securely fasten it onto the threaded connector.
- Pull on the front pole to verify that it is securely locked in place.
Attaching the Extension Pole (Fig. 4b)
Fig. 4b

The extension pole increases the cutting range. It should be connected between the front pole and the rear pole.
Follow the previous instructions to connect the front pole to one end of the extension pole, and then connect the rear pole to the other end of the extension pole in the same way.
NOTICE: Do not use the screw sleeve as a handle during operation. Only hold the screw sleeve during transportation.
WARNING: Ensure that the threaded sleeves are fully tightened before operating the tool. Check them periodically for tightness during use to avoid serious personal injury.
Attaching the Shoulder Strap (Fig. 5)
Fig. 5

A shoulder strap is supplied with the pole hedge trimmer. Attach the hook on the adjustable end of the shoulder strap to the lower body loop.
Assembly: Hedge Trimmer
REMOVE BATTERY FROM TOOL.
Attaching the Poles
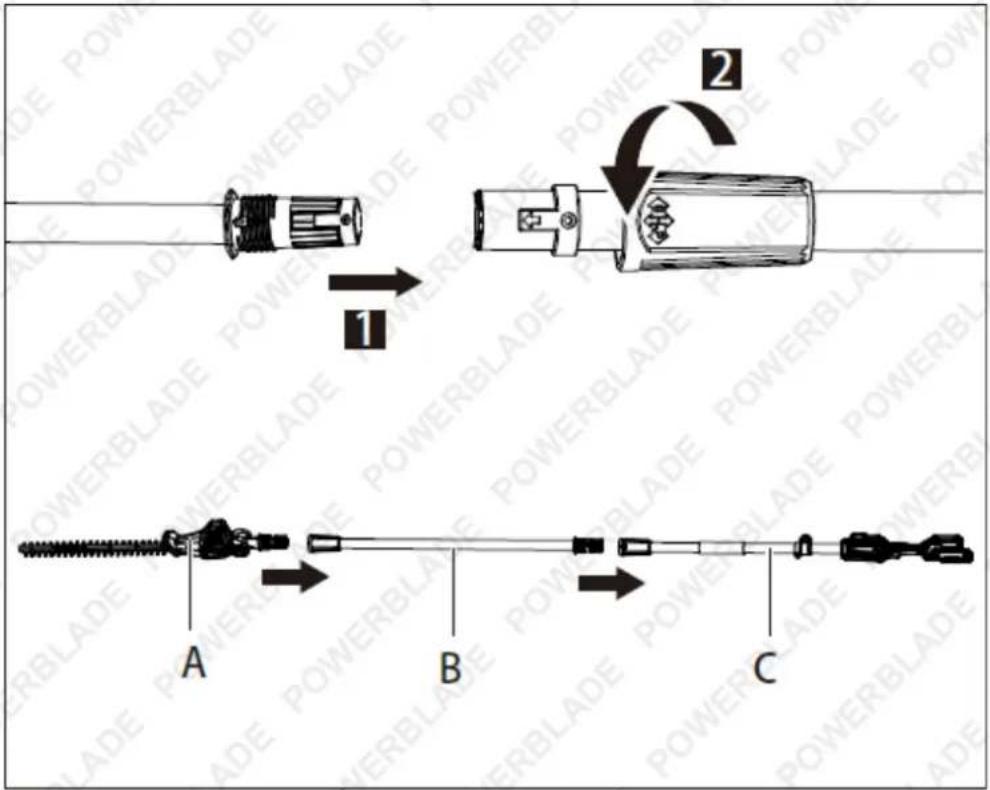
Fit the front pole (A) to the rear pole (C) and tighten them together with the threaded sleeve by rotating it. Make sure that both parts are properly fitted.
If a larger cutting height is needed, fit the front pole (A) together with one end of the extension pole (B). Tighten them together with the threaded sleeve by rotating it. Make sure that both parts are properly fitted. Then repeat this process to attach the other end of the extension pole (B) to the rear pole (C).
Attach Shoulder Strap
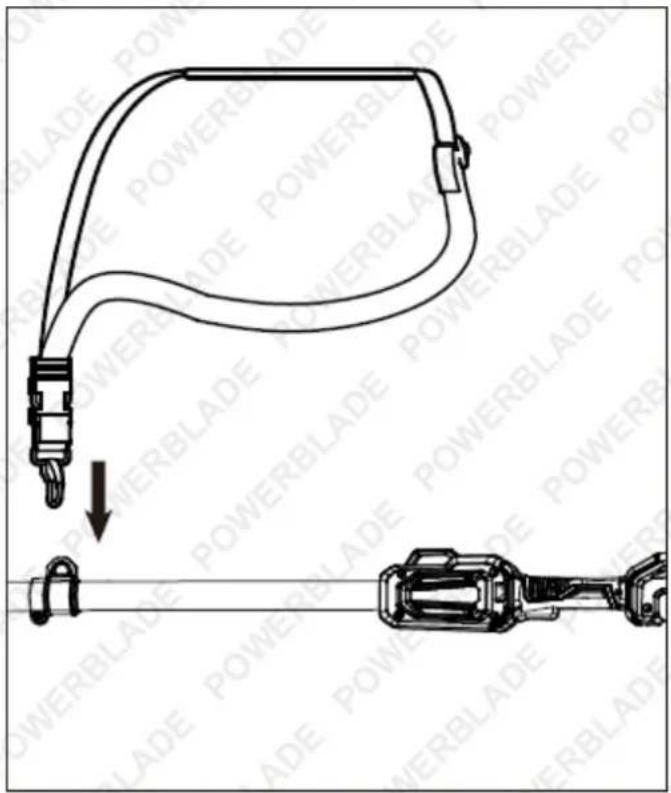
A shoulder strap is supplied with the pole hedge trimmer. Attach the hook on the adjustable end of the shoulder strap to the lower body loop.
Adjusting the Pivoting Head
2in1 Pole Saw + Hedge Trimmer
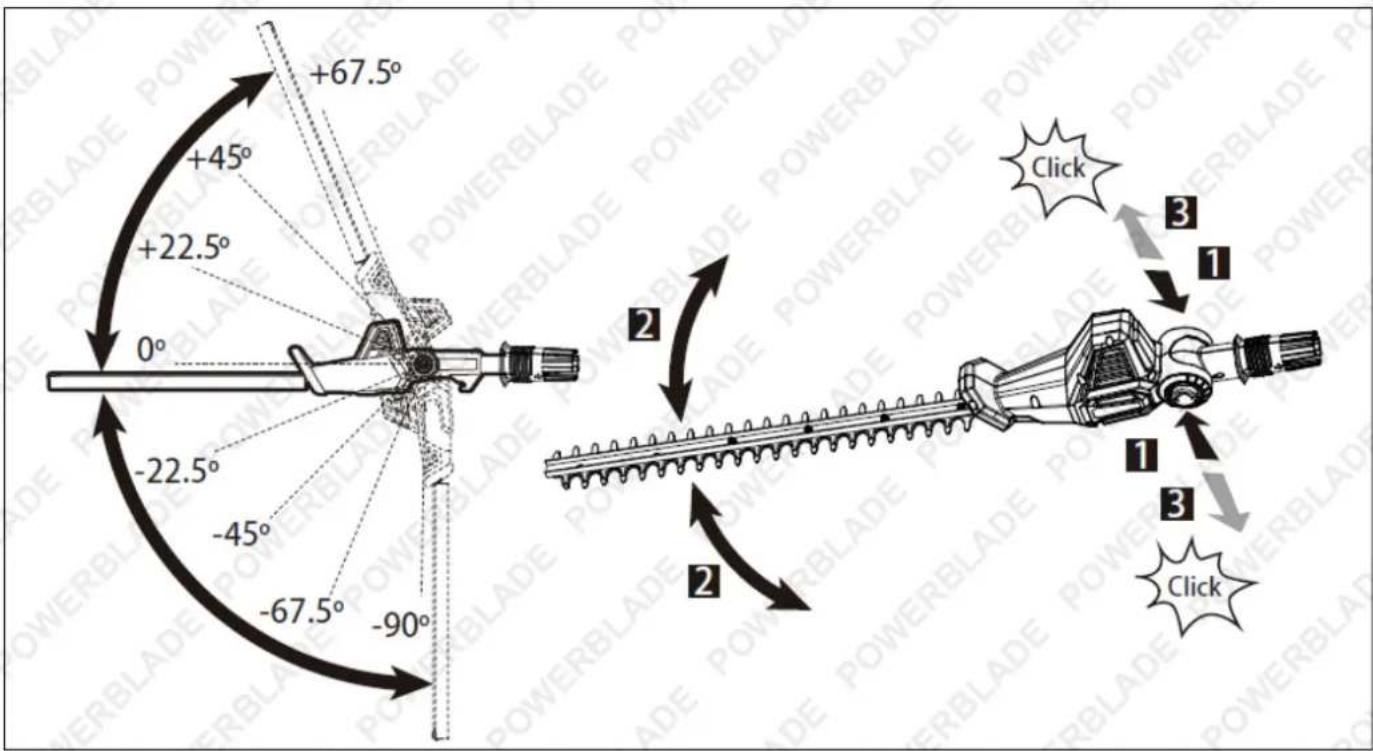
- Press the two pivoting-head release buttons simultaneously.
- Turn the pivoting head to the desired position by moving the pivoting head up or down.
- Release the pivoting-head release buttons and make sure that the pivoting head is properly locked.
The pivoting head (D) can be positioned at one of 8 different angles.
WARNING: Always ensure that the tool is switched off and the battery is disconnected before adjusting, adding accessories, or checking a function on the tool.
Installing or Removing the Battery Pack
Important! The battery pack is not fully charged when purchased. Before using the tool for the first time, charge the battery pack. Make sure to read all safety precautions and follow the instructions in the Charging Battery section.
WARNING: Always ensure that the tool is switched off before inserting or removing the battery pack.
-
To install the battery pack, slide the battery pack into the end of the tool housing all the way until it locks in place with a click, as shown on the right. Lightly pull on the battery to ensure it is locked into place and will not accidentally fall out of the tool.
-
To remove the battery pack, pull the battery pack away from the tool while depressing the battery locking tab.
Important! DO NOT remove the blade assembly unless it needs sharpening, straightening, or replacing. Take it to a qualified person for repair.

natural_image
Technical line drawing of a mechanical component with two connectors and a downward arrow indicating motion (no text or symbols)Operation: Pole Saw
WARNING: To reduce the risk of fire, personal injury, and product damage due to a short circuit, never immerse your tool, battery pack, or charger in fluid or allow a fluid to flow inside them. Corrosive or conductive fluids, such as seawater, certain industrial chemicals, and bleach or bleach-containing products, etc., can cause a short circuit.
WARNING: Do not use any attachments or accessories not recommended by the manufacturer of this product. The use of attachments or accessories not recommended can result in serious personal injury.
WARNING: Do not attempt to modify this tool or the battery pack or create accessories not recommended for use with this tool. Any such alteration or modification is misuse and could result in a hazardous condition leading to potentially serious injury.
WARNING: To prevent accidental starting that could cause serious personal injury, always remove the battery pack from the tool when assembling parts, making adjustments, cleaning, or when not in use.
WARNING: Do not allow familiarity with this product to make you careless. Remember that a careless fraction of a second is sufficient to inflict serious injury.
WARNING: Always wear eye protection with side shields marked to comply with ANSI Z87.1, along with hearing protection. Failure to do so could result in objects being thrown into your eyes and other potentially serious injuries.
NOTICE: Please refer to the battery and charger manuals for detailed operating information.
Application
This pole saw is intended to be used for limbing and pruning trees.
To Attach/Detach Battery Pack
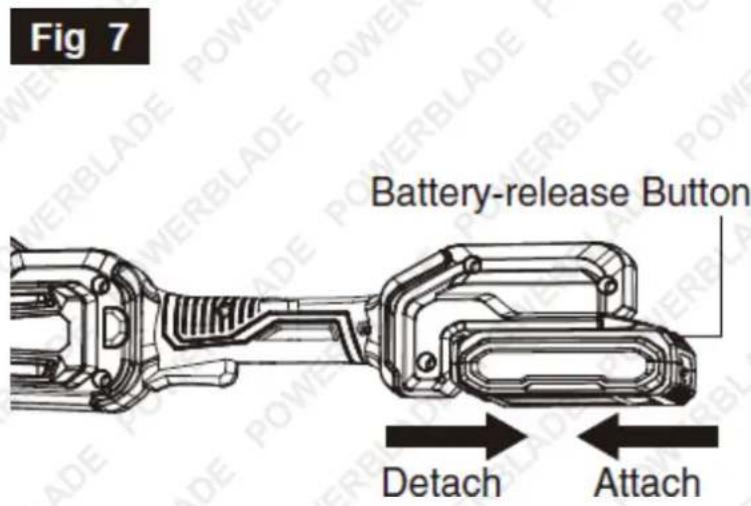
WARNING: Battery tools are always in operating condition. Therefore, remove the battery pack when assembling parts, making adjustments, cleaning, when the tool is not in use, or when carrying it at your side. Removing the battery pack will prevent accidental starting that could cause serious personal injury.
To attach the battery pack:
Align the raised rib on the battery pack with the grooves in the tool, and then slide the battery pack onto the tool.
To detach the battery pack:
- Depress the battery-release button, located on the front of the battery pack, to release the battery pack.
- Pull the battery pack out and remove it from the tool.
NOTICE: When placing the battery pack on the tool, ensure that the raised rib on the battery pack aligns with the groove on the tool and that the latches snap into place properly. Improper attachment of the battery pack can cause damage to internal components.
Filling the Oil Tank with Bar and Chain Lubricant
WARNING: Do not smoke or bring any fire or flame near the oil or the pole saw. Oil may spill and cause a fire.
WARNING: To prevent accidental starting that could cause serious personal injury, always remove the battery pack from the tool before filling the tank with oil.
NOTICE: The pole saw is not filled with oil at the time of purchase. It is essential to fill the tank with oil before use. Operating the pole saw without chain oil or when the oil level is below the minimum mark will result in damage to the pole saw. Chain life and cutting capacity depend on optimum lubrication. The chain is automatically lubricated with chain oil during operation.
- Remove the battery pack from the pole saw.
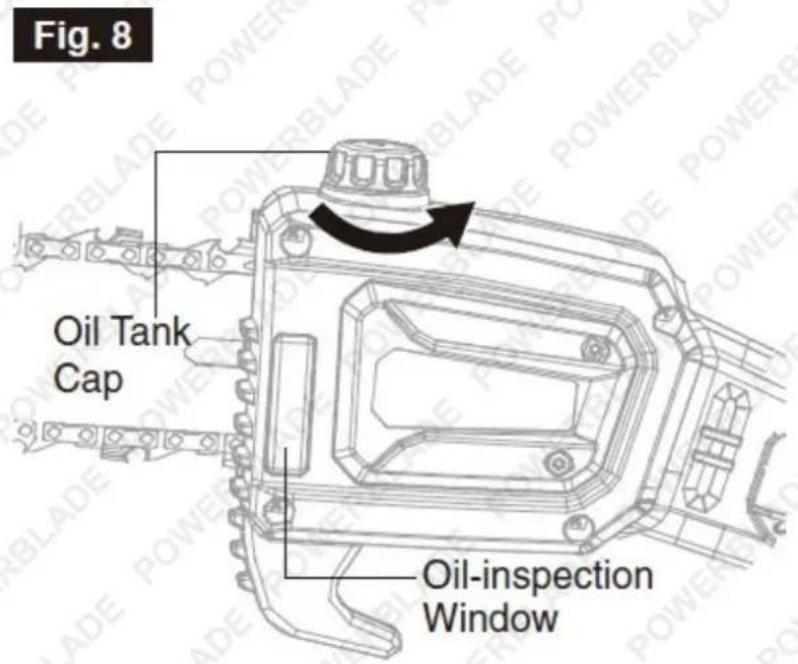
- Clean the oil tank cap and the area around it to ensure that no dirt falls into the oil tank.
- Position the pole saw on its side on a firm, flat surface, so that the tank cap is facing upwards. Rotate the oil tank cap anti-clockwise to remove it (Fig. 8).
-
Carefully pour the bar and chain oil into the tank. Be careful not to let the oil spill from the opening. Do not overfill and leave approximately 3/8" (10 mm) space between the oil level and the inside edge of the tank to allow for expansion. Wipe off any excess oil.
-
Replace and fasten the cap.
NOTICE:
- We recommend using environmentally-friendly biodegradable chain oil specifically intended for use with pole saws.
- Never use oil or other lubricants not specifically designed for use on the bar and chain. This can lead to a clogged oil system, which may cause premature wear of the bar and chain.
- Check the oil level frequently and fill when the oil level falls below the minimum line. Never operate the pole saw if the oil is not visible.
- Do not use dirty, used, or otherwise contaminated oil. Damage may occur to the bar or chain.
- It is normal for oil to seep from the saw when it is not in use. To prevent seepage, empty the oil tank after each use, and then run the saw for one minute. When storing the tool for a long period, ensure the chain is lightly lubricated. This will prevent rust on the chain and bar sprocket.
- To preserve natural resources, please recycle or dispose of oil properly. Consult your local waste authority for information regarding available recycling and disposal options.
Starting/Stopping the Pole Saw
Before Starting the Pole Saw:
DANGER: Never cut near power lines, electric cords, or other electrical sources. If the bar and chain jams on any electrical cord or line, DO NOT TOUCH THE BAR, CHAIN, OR THE ALUMINIUM POLE! They can become electrically live and may be very dangerous. Continue to hold the pole saw by the insulated rear handle or lay it down and away from you in a safe manner. Disconnect the electrical service to the damaged line or cord before attempting to free the bar and chain from the line or cord. Contact with the bar, chain, other conductive parts of the pole saw, or live electric cords or lines will result in death by electrocution or serious injury.
WARNING: Do not use any attachments or accessories not recommended by the manufacturer of this product. The use of attachments or accessories not recommended can result in serious personal injury.
Before each use, inspect the entire product for damaged, missing, or loose parts such as screws, nuts, bolts, caps, etc. Tighten all fasteners and caps securely, and do not operate this product until all missing or damaged parts are replaced.
- Remove the battery pack.
- Ensure that the chain is properly mounted and correctly tensioned.
- Check the tension of the locking knob of the side cover before use. If it is loose, securely tighten it.
- Check the oil level and fill the tank as needed. Make sure the chain is well lubricated.
- Check the sharpness of the cutting teeth on the chain.
- Hold the pole saw with both hands: with the right hand on the rear handle and the left hand on the assist handle.
- Make sure that you have secure and balanced footing. Watch out for obstacles such as tree stumps, roots, and ditches, which could cause you to trip or stumble.
- Ensure the chain is not touching the ground or any other objects.
- Make sure that the object being cut does not exceed the usable cutting length of the pole saw. The tip of the guide bar should always extend at least 2" (50 mm) beyond the outline of the wood log.
To Start the Pole Saw (Fig. 9)
Fig. 9

- Install the battery pack.
- Make sure there are no objects or obstructions that could come into contact with the bar and chain in the immediate vicinity.
- Firmly grasp the assist foam handle with one hand and the rear handle with the other hand.
- Press and hold the lock-off button, then squeeze the trigger switch to start the saw. Release the lock-off button and continue squeezing the trigger for ongoing operation.
WARNING: Do not attempt to start the saw when the chain is in a cut or in contact with any surface.
To Stop the Pole Saw
Move the pole saw away from the cutting area, and then release the trigger switch to stop the pole saw.
WARNING: Always remove the battery pack from the pole saw during work breaks and after finishing work.
Cutting
Basic Cutting (Fig. 10a & 10b)
NOTICE: Practise cutting a few small logs using the following technique to get the “feel” of using your saw before you begin a major sawing operation. Follow the steps below to prevent damage to tree or shrub bark. Do not use a back-and-forth sawing motion.

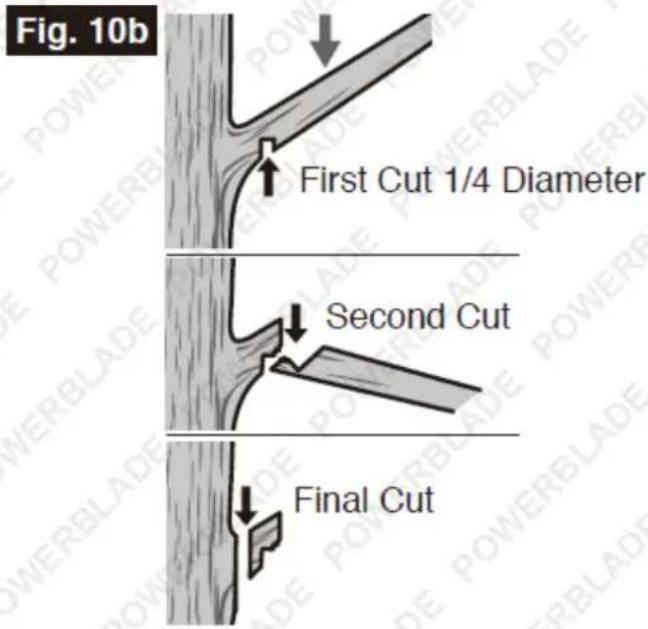
- Make a shallow first cut (1/4 of the limb diameter) on the underside of the limb, close to the main limb or trunk.
- Make a second cut from the top side of the limb, outboard from the first cut. Continue the second cut through the limb until the limb separates from the tree. Be prepared to balance the weight of the tool when the limb falls.
- Make the final cut close to the trunk.
NOTICE: For the second and final cuts (from the top of the limb or branch), hold the bucking spikes against the limb being cut (Fig. 10c). This will help to steady the limb and make it easier to cut. Allow the chain to cut for you; exert only light, downward pressure. Forcing the cut can result in damage to the bar, chain, or motor.
Fig. 10c

- Release the trigger switch as soon as the cut is completed.
NOTICE: Failure to follow proper cutting procedures will result in the bar and chain binding and becoming pinched or trapped in the limb. If this should happen:
Stop the motor and remove the battery pack.
If the limb can be reached from the ground, lift the limb while holding the saw. This should release the "pinch" and free the saw.
If the saw is still trapped, call a professional for assistance.
Limbing and Pruning

This pole saw is designed for trimming small branches and limbs up to 6.9" (175 mm) in diameter. For best results, observe the following precautions:
Plan the cut carefully. Be aware of the direction in which the branch will fall.
WARNING:
- Branches may fall in unexpected directions. Do not stand directly under the branch being cut.
- The most typical cutting application is to position the pole saw at an angle of 60^ or less, depending on the specific situation. As the angle of the pole-saw shaft to the ground increases, the difficulty of making the first cut (from the underside of the limb) increases.
- Remove long branches in several stages.
• Cut lower branches first to allow the top branches more room to fall.
• Work slowly, keeping both hands on the saw with a firm grip. Maintain secure footing and balance. - Keep the tree between you and the chain while limbing. Cut from the side of the tree opposite the branch you are cutting.
- Do not cut from a ladder; this is extremely dangerous. Leave such operations to professionals.
- Do not make a flush cut next to the main limb or trunk until you have removed much of the limb to reduce the weight. Following proper cutting procedures will prevent stripping the bark from the main trunk or limb.
• Do not use the pole saw for felling or bucking.
• To prevent electrocution, do not operate within 50 ft. (15 m) of overhead electrical lines. - Keep bystanders at least 50 ft. (15 m) away.
Operation: Hedge Trimmer
WARNING! TO AVOID PERSONAL INJURY: Handle the blade with care. Do not place your fingers or hand between the notches in the blade or in any position where they could get pinched or cut. Never service the blade or hedge trimmer unless the battery pack is removed. Do not use if the blade assembly is damaged or bent. Take it to a qualified person to straighten, replace, or sharpen. Always keep both hands on the hedge trimmer handles to prevent your hand from touching the blade.
Applications
You may use this product for the purposes listed below:
• Trimming hedges, shrubs, and bushes with branch diameters less than 16 mm.
Before each use, inspect the entire product for damaged, missing, or loose parts such as screws, nuts, bolts, caps, etc. Securely tighten all fasteners and caps, and do not operate this product until all missing or damaged parts are replaced.
Holding the Pole Hedge Trimmer
The unit has both a front and rear handle. With the blade directed away from you, hold the unit by both handles. The switch in the front handle can be activated on any of the three sides, giving you many choices for a comfortable grip when performing cutting operations.
WARNING: Always keep both hands on the hedge trimmer handles. Never hold shrubs with one hand while operating the hedge trimmer with the other hand. Failure to heed this warning may result in serious injury.
Starting and Stopping the Pole Hedge Trimmer
The pole hedge trimmer has an on/off switch, and a lock-off safety button used together to prevent accidental start-ups.

- Press the lock-off safety switch.
- Pull the trigger switch - switch off the tool by releasing the trigger switch.
Note: When operating the tool, firmly grasp the front handle with one hand and the rear handle with the other hand and take a secure stance. Guide the tool ahead of you.
Trimming Hedges
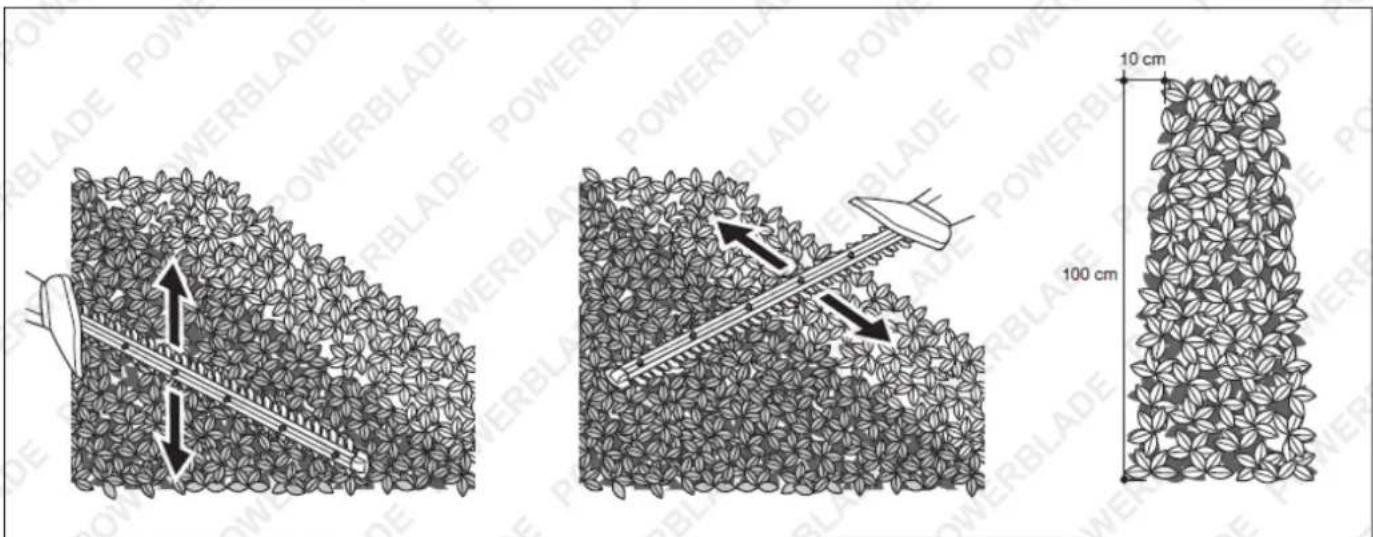
- Trim the sides of the hedge first (from the bottom upwards), then cut the top.
- Trim the side of a hedge in such a way that it will be slightly narrower at the top.
• Use a hand saw or pruning shears to cut thicker branches.
Application Advice
• For trimming a hedge at a uniform height level:
- Fasten a piece of string along the length of the hedge at the desired height. - Trim the hedge just above this string.
• Recommended cutting/trimming times (Australia):
– Trim hedges with deciduous leaves in late autumn (April-May) and late winter (August).
- Trim evergreen hedges in late spring (November) and early autumn (March).
- Trim conifers and other fast-growing shrubs every 6 weeks from early spring (September) until late summer (February).
IMPORTANT NOTES!
- Be certain the threaded sleeves of the poles are fully tightened before operating the tool. Check it periodically for tightness during use to avoid serious personal injury.
- Ensure the pivoting head is properly locked before operating the tool.
• Start trimming only when the motor is running. - Do not overload the tool by cutting stems larger than 16 mm in thickness.
- Do not operate within 15 m of overhead electrical lines.
- Do not use the hedge trimmer near power lines, fencing, posts, buildings, or other immovable objects.
- Move the tool away from the cutting area before switching off.
• After switching off the tool, the blades continue to move for a few seconds.
Charging the Battery
USE THE BATTERY CHARGER ONLY WITH AUTHORISED 20V LITHIUM-ION BATTERIES.
Battery packs are shipped in a low charge condition to prevent possible issues. Therefore, you should charge them prior to use.
NOTE: Batteries will not reach full charge the first time they are charged. Allow several cycles (operating the tool followed by recharging the batteries) for them to fully charge.
To Charge
- Use this battery charger only with authorised 20V Lithium-ion batteries.
- Ensure the power supply is normal house voltage, 220-240 volts, 50 Hz, AC only.
- Connect the charger to the power supply. The light will be GREEN, indicating that the power is on.
- Slide the battery pack into the charger.
- Press down on the battery pack to ensure the contacts on the battery pack engage properly with the charger contacts.
- The charger light will illuminate. A constant RED light indicates the battery is charging. A constant GREEN light indicates the battery is fully charged.
- A minimum charge time of 80 minutes is required to recharge a completely discharged battery pack.
- The battery pack will become slightly warm to the touch while charging. This is normal and does not indicate a problem.
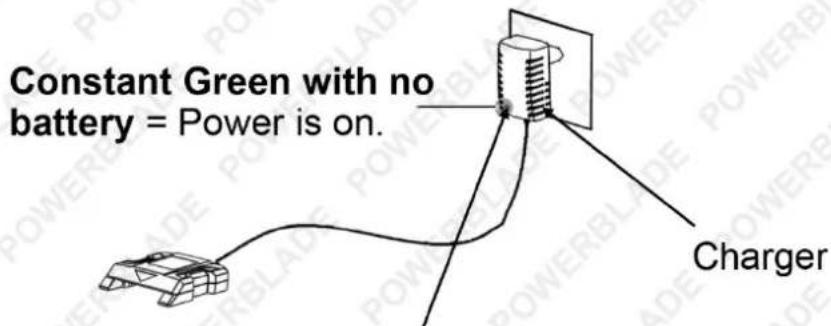
Constant Red = Battery is charging
Constant Green = Battery is fully charged.

natural_image
Line drawing of a portable electronic device with no visible text or symbols2.0Ah Battery Pack

natural_image
Line drawing of a portable electronic device with ports and buttons (no text or symbols)4.0Ah Battery Pack
- DO NOT place the charger in an area of extreme heat or cold. It will work best at normal room temperature.
-
- When the battery is fully charged, unplug the charger from the power supply and remove the battery pack.
Battery Capacity
By pressing the button, the LED display shows the battery capacity.

| LED lights | Battery status |
| All LED are on | Full charged (70-100%) |
| LED 1, 2 are on | Battery is 35%-70% charged |
| LED 1 is on | Battery is depleted (0%-35%). Charge the battery. |
LED Function of Charger
The LED will light up to indicate the status of the charger and battery pack:
• One constant green LED with no battery installed = Power is on.
• One constant red LED = Battery pack is charging.
• One constant green LED = Battery pack is fully charged.
Important Information for Recharging Hot Batteries
When using a tool continuously, the battery pack may become hot. You should allow a hot battery pack to cool down for approximately 30 minutes before attempting to recharge it.
NOTE: If the charger does not charge your battery pack under normal circumstances, please contact the manufacturer or an authorised service centre.
Lithium Battery Care and Maintenance
Top 3 Battery Care Requirements
- Charge battery before first use. The battery may arrive with some charge, regardless of this the battery must be charged for 1.5 hours on the initial charge and 1.5 hours for each subsequent charge.
- Charge battery immediately when it is depleted. Do not store a depleted battery. This will permanently impact the life of the battery. If the battery is going to be stored for a period of time, fully charge the battery before storing.
- Disconnect battery when not in use. To prolong the life of a battery, disconnect it from the unit when not in use. Disconnect chargers from the battery once charged.

To ensure the battery maintains optimum performance, follow the guidelines outlined below.
• For best results, charge batteries in temperatures between 10°C and 30°C
- When battery is charged, disconnect the charger from the power supply and remove the battery from the charger.
- If a battery is stored or otherwise unused for an extended period, and the battery has no charge remaining when you check it, consider it to be damaged. Do not attempt to recharge it or to use it. Replace it with a new battery.
• Use only with the battery charger specified by the manufacturer.
- Ensure that the battery charger electrical cord is not subjected to damage or stress. Do not operate the battery charger if it has a damaged electrical cord or plug.
- Do not use the charger in wet areas or expose it to rain or water.
- The typical estimated life of a Lithium-Ion battery is about two to three years or 300 to 500 charge cycles, whichever occurs first. One charge cycle is a period of use from fully charged, to fully discharged, and fully recharged again.
- Explosion hazard – protect the battery against heat, for example, direct sunlight and fire. Do not store batteries in vehicles or locations subject to heat.
- Batteries can explode in the presence of an ignition source, such as a pilot light. To reduce the risk of serious personal injury, never use any cordless product in the presence of open flame. Exploding batteries can propel debris and chemicals.
- Do not open the battery – danger of short-circuiting and/or explosion.
- Do not attempt to destroy or disassemble the battery pack or remove any of its components.
- Do not touch the battery terminals with metal objects and/or body parts as short-circuit and/or personal injury may result.
- Explosion hazard – do not open and/or short-circuit the battery.
- Poison hazard – battery leakage (liquid ejection). Under extreme conditions, liquid may be ejected from the battery – avoid contact. If contact accidentally occurs, immediately seek medical attention, and flush with water. If liquid contacts eyes, immediately seek medical attention, flush with clean water for at least 10 minutes. Liquid ejected from the battery may cause irritation or burns.
- Dispose of non-serviceable batteries in an environmentally responsible manner and according to local regulations.
Failure to adhere to the requirements above may result in the battery becoming inoperative or battery life being reduced. In extreme cases or abuse, battery overheating, or fire may result.
DANGER - BATTERY CHARGING, USE AND STORAGE
Like mobile phones, laptops, cordless vacuum cleaners etc, this product may contain or be related to a lithium ion battery pack (lithium ion batteries and lithium ion battery related items only). Lithium ion batteries allow fast charging and high capacities, however care must be taken to reduce chances of a fault, and increase safety in case a fault occurs. Catastrophic incidents involving lithium ion batteries have a tendency to result in large amounts of smoke and fire. Be sure to follow the points below to reduce the likelihood of danger whenever you use, charge or store any lithium ion battery.
- Never charge a battery that has been damaged or subjected to a forceful impact.
- Never charge a battery that has been exposed to moisture or water.
- Never charge a battery with a charger that wasn't supplied with the battery.
- Never use a battery in a device that it wasn't specifically designed for.
- Never use a battery with a modified or damaged device.
- Never modify the battery, product, charger, circuitry or wiring.
- Never charge a battery in an exit path that may be used by people to leave a room or building in case of an emergency, for example, the hallway or foyer of a residence.
- Never charge a battery in an area or building that doesn't have the recommended number of working smoke detectors that have been tested in accordance with local guidelines.
- Never charge a battery when the battery or charger is displaying a problem or charging incorrectly.
- Always charge batteries on a non-combustible surface, for example, on a concrete floor.
- Always charge batteries at least 3m away from anything combustible, such as floors, wall surfaces, furniture, storage shelves etc.
- Always charge batteries in an open area (outside if possible) ensuring the battery and charger are away from moisture and water.
- Always disconnect batteries from the charger after charging.
- Always remove or disconnect batteries from the device/product when not in use.
- Always ensure batteries are charged under adult supervision. Do not charge unattended. Do not charge batteries while no one is home or while people are sleeping.
- Keep batteries away from heat and moisture.
- Damaged batteries should be disposed of through your local e-waste collection service.
- Avoid mixing and matching chargers. Unplug products when fully charged, and charge batteries in a cool, dry place away from combustible materials like beds, lounges, or carpet.
- During charging and use, check your lithium-ion batteries for overheating, signs of swelling, leaking, or venting gas. Immediately stop using your product if these signs are present.
- Allow batteries to cool after use and before charging.
Maintenance: Pole Saw
WARNING: To avoid serious personal injury, remove the battery pack from the pole saw before inspecting, cleaning, or performing maintenance. A battery-operated tool with the battery pack inserted is always on and can start accidentally.
WARNING: When servicing, use only identical replacement parts. The use of any other parts could create a hazard or cause product damage. Periodically inspect the entire product for damaged, missing, or loose parts such as screws, nuts, bolts, caps, etc. Tighten all fasteners and caps securely, and do not operate this product until all missing or damaged parts are replaced. Please contact customer service or an authorised service centre for assistance.
WARNING: Always wear safety goggles or safety glasses with side shields during power tool operation or when blowing dust. If the operation is dusty, also wear a dust mask.
WARNING: When cleaning the pole saw, DO NOT immerse it in water or other liquids.
WARNING: Do not at any time allow brake fluids, petrol, petroleum-based products, penetrating oils, etc., to come into contact with plastic parts. Chemicals can damage, weaken, or destroy plastic, which may result in serious personal injury.
Cleaning
- After each use, clean debris from the chain and guide bar with a soft brush. Wipe the pole saw surface with a clean cloth moistened with a mild soap solution.
- Remove the side cover, and then use a soft brush to remove debris from the guide bar, chain, sprocket, and side cover.
• Always clean out wood chips, sawdust, and dirt from the guide bar groove when replacing the chain.
Replacing the Bar and Chain
WARNING: Before performing any maintenance, ensure that the battery pack is removed. Failure to heed this warning could result in serious personal injury.
WARNING: Always wear gloves when handling the bar and chain; these components are sharp and may contain burrs.
WARNING: Never touch or adjust the chain while the motor is running. The chain is very sharp.
NOTICE: When replacing the guide bar and chain, always use the specified bar and chain combination listed in the section: "Recommended Bar and Chain for this Pole Saw".


- Remove the battery and allow the saw to cool. Ensure the oil-tank cap is snug to prevent oil leakage.
- Position the pole saw on its side on a firm, flat surface, with the side cover facing upwards.
- Wear gloves. Remove the side cover by turning the locking knob anti-clockwise (Fig. 12a). Clean the side cover with a dry cloth.
- Remove the bar and chain from the mounting surface on the housing. Remove the worn chain from the bar.
- Remove the metal plate from the chain bar by loosening the screw with a Phillips screwdriver (not included).
- Mount the metal plate onto the new guide bar by fastening the screw with a Phillips screwdriver (not included) (Fig. 12b).
- Install the new guide bar and chain, following the section: "Assembling the Guide Bar and Chain".
NOTICE: This is a good time to inspect the drive sprocket for excessive wear or damage.
Adjusting the Chain Tension
WARNING: Always check the saw-chain tension before use, after the first cuts, and regularly during use. Upon initial operation, new chains can lengthen considerably. This is normal during the break-in period, and the interval between future adjustments will lengthen quickly.
Always maintain proper chain tension! A loose chain increases the risk of kickback! A loose chain may jump out of the guide bar groove, which may injure the operator and damage the chain. A loose chain will cause rapid wear to the chain, the guide bar, and the sprocket.
Tensioning the chain too tightly will overload the motor and cause damage, while insufficient tension can cause the chain to derail. A correctly tightened chain provides the best cutting characteristics and prolonged working life. The chain's lifespan mainly depends on sufficient lubrication and correct tensioning.
- Stop the motor and remove the battery pack before adjusting the chain tension.
- Loosen the locking knob of the side cover a few turns.
- Turn the chain-tension adjusting knob to adjust the chain tension. See the section: "Replacing the Bar and Chain" in this manual for additional information.
A cold chain is correctly tensioned when there is no slack on the underside of the guide bar, and the chain is snug but can be turned by hand without binding. The chain must be re-tensioned whenever the flats on the drive links do not sit in the bar groove.
During normal saw operation, the temperature of the chain will increase. The drive links of a correctly tensioned warm chain will hang approximately 3/64 in. (1.3 mm) out of the bar groove (Fig. 13).

Approximately 3/64" (1.3mm)
NOTICE: New chains tend to stretch; check chain tension frequently and tension as required.
NOTICE: A chain tensioned while it is warm may be too tight upon cooling. Check the cold tension before next use.
Chain Maintenance
WARNING: Remove the battery pack before performing any maintenance. Failure to heed this warning could result in serious personal injury.
WARNING: Always wear gloves when handling the chain. These components are sharp and may contain burrs.
Use only low-kickback chains on this saw. This fast-cutting chain will provide kickback reduction when properly maintained.
A properly sharpened chain cuts through wood effortlessly, even with very little pressure. Never use a dull or damaged chain. A dull chain cutter leads to increased physical strain, increased vibration load, unsatisfactory cutting results, and increased wear.
For smooth and fast cutting, the chain needs to be maintained properly. The chain requires sharpening when the wood chips are small and powdery, the chain must be forced through the wood during cutting, or the chain cuts to one side. During maintenance of your chain, consider the following:
- Improper filing angle of the side plate can increase the risk of severe kickback.
- Raker (depth gauge) clearance: If too low, it increases the potential for kickback. If not low enough, it decreases cutting ability.
- If cutter teeth have hit hard objects, such as nails and stones, or have been abraded by mud or sand on the wood, have the chain sharpened by a qualified service technician.
NOTICE: Inspect the drive sprocket for wear or damage when replacing the chain. If signs of wear or damage are present in the areas indicated, have the drive sprocket replaced by a qualified service technician.
How to Sharpen the Cutters
Be careful to file all cutters (Fig. 14) to the specified angles and to the same length, as fast cutting can only be achieved when all cutters are uniform.
Fig.14
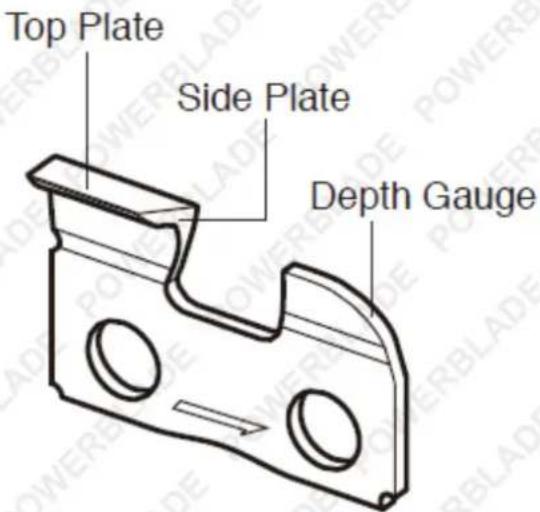
- Remove the battery pack. Wear gloves for protection.
- Properly tension the chain before sharpening. Refer to the section: "Adjusting the Chain Tension" earlier in this manual.
- Use a 5/32" (4.0 mm) diameter round file and holder (available separately). Perform all of your filing at the middle position of the guide bar.
-
Keep the file level with the top plate of the tooth. Do not let the file dip or rock.
-
Maintain a correct sharpening angle of 30^ between the file and the chain (see Figs. 15 and 16). Always use a file holder (available separately) when sharpening chains by hand. File holders have markings for the sharpening angle.
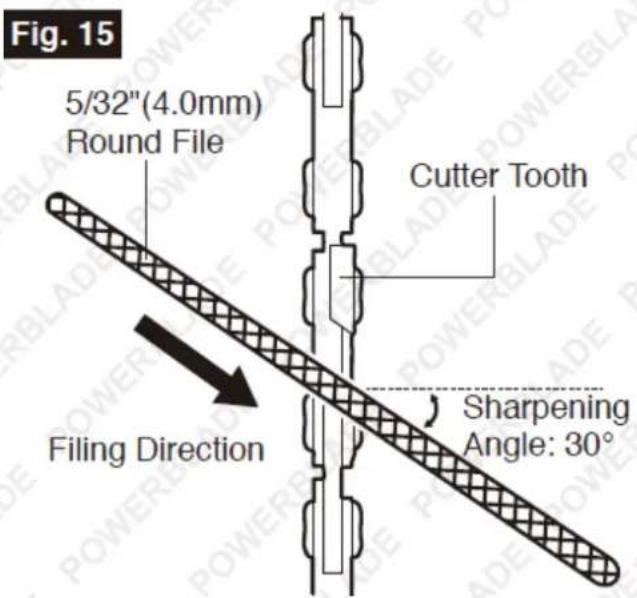

- Using light but firm pressure, perform a stroke towards the front corner of the tooth. Lift the file away from the steel on each return stroke.
- Make a few firm strokes on every tooth. File all left-hand cutters in one direction. Then move to the other side and file the right-hand cutters in the opposite direction. Occasionally remove filings from the file with a wire brush (Fig. 17).
Fig. 17

WARNING: A dull or improperly sharpened chain can cause excessive motor speed during cutting, which may result in severe motor damage.
WARNING: Improper chain sharpening increases the potential of kickback.
WARNING: Failure to replace or repair a damaged chain can cause serious injury.
Top-Plate Sharpening Angles
Fig. 18
Top Plate Sharpening Angles
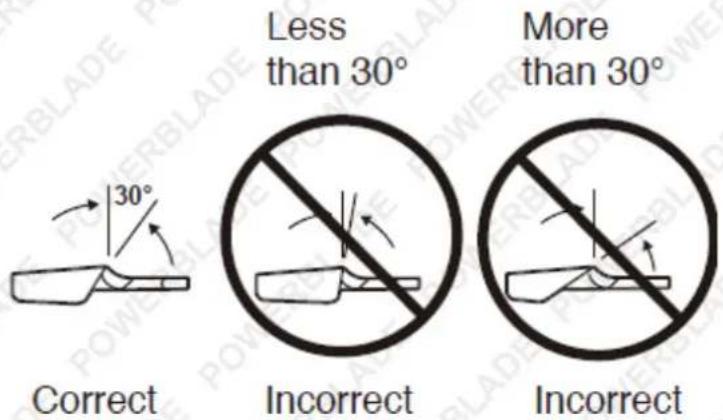
- CORRECT 30° – This optimal angle can be achieved only when the specified files and proper settings are used. File holders are marked with guide marks to align the file correctly to produce the correct top plate angle.
- LESS THAN 30^ – The tooth is too dull for cutting.
- MORE THAN 30^ – The edge of the cutting tooth is feathered and dulls quickly.
Side-Plate Angle
Fig. 19
Side Plate Angle
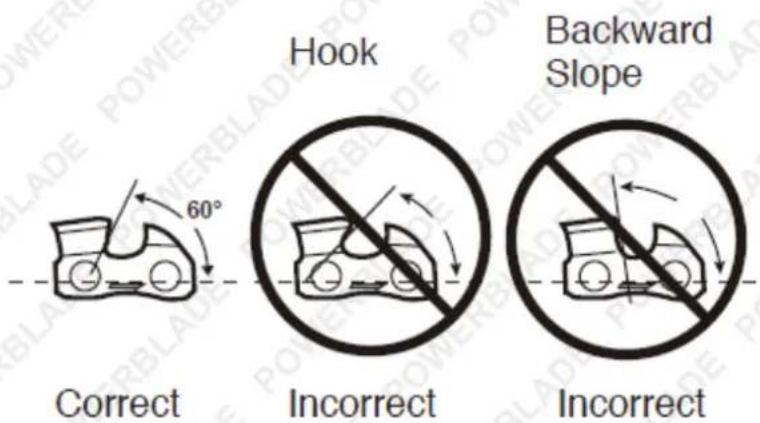
- CORRECT 60° – The optimal angle can be produced automatically if the correct diameter file is used in the file holder.
- HOOK – "Grabs" and dulls quickly. Increases the potential of KICKBACK. This results from using a file with a diameter that is too small, or a file held too low.
- BACKWARD SLOPE – Requires too much feed pressure and causes excessive wear to the bar and chain. This results from using a file with a diameter that is too large, or a file held too high.
Depth-Gauge Clearance
Fig. 20

Fig. 21

- The depth gauge should be maintained at a clearance of 0.025 in. (0.6 mm), as shown in Fig. 20. Use a depth-gauge tool (available separately) to check the depth-gauge clearances.
- Check the depth-gauge clearance every time the chain is filed. Use a flat file and a depth-gauge jointer (both available separately) to lower all gauges uniformly (Fig. 21). Depth-gauge jointers are available in 0.020 in. to 0.035 in. (0.5 mm to 0.9 mm). Use a 0.025 in. (0.6 mm) depth-gauge jointer.
Guide Bar Maintenance

The bar should be cleaned every day of use and checked for wear and damage. Feathering or burring of the bar rails is a normal process of bar wear. Such faults should be smoothed with a file as soon as they occur.
2in1 Pole Saw + Hedge Trimmer
A bar with any of the following faults should be replaced:
- Wear inside the bar rails that permits the chain to lay over sideways.
- Bent guide bar.
• Cracked or broken rails. - Spread rails.
The guide bar has a sprocket at its tip. The sprocket must be lubricated weekly with a grease syringe to extend the guide-bar life. Use a grease syringe to lubricate weekly with chain oil via the lubricating hole. Turn the guide bar and check that the lubrication holes and chain groove are free from impurities.
Transportation
- Switch the product off and remove the battery pack.
- Clean the product.
- Attach the chain sheath to the guide bar and chain.
- Always carry the product by its handle.
- Protect the product from any heavy impact or strong vibrations that may occur during transportation in vehicles.
- Secure the product to prevent it from slipping or falling over.
Storage
- Switch the product off and remove the battery packs.
- Clean the product.
- Before storing the tool, wipe off the chain with an oil-soaked rag to prevent corrosion.
- Attach the chain sheath to the guide bar and chain.
- Clean the product and empty the oil tank.
- Store the product and its accessories in a dark, dry, frost-free, well-ventilated place. The ideal storage temperature is at room temperature.
- Always store the product in a place that is inaccessible to children.
- Keep away from corrosive agents such as garden chemicals and de-icing salts.
Maintenance: Hedge Trimmer
Cleaning
Avoid using solvents when cleaning plastic parts. Most plastics are susceptible to damage from various types of commercial solvents and may be damaged by their use. Use clean cloths to remove dirt, dust, oil, grease, etc.
WARNING: Do not at any time let brake fluids, petrol, petroleum-based products, penetrating oils, etc., come into contact with plastic parts. Chemicals can damage, weaken, or destroy plastic, which may result in serious personal injury.
Electric tools used on fibreglass material, wallboard, speckling compounds, or plaster are subject to accelerated wear and possible premature failure because the fibreglass chips and grindings are highly abrasive to bearings, brushes, commutators, etc. Consequently, we do not recommend using this tool for extended work on these types of materials. However, if you do work with any of these materials, it is extremely important to clean the tool using compressed air.
Sharpening the Cutting Blade
- Start and stop your hedge trimmer until the cutter blade and the guard are slightly offset. This will allow clearance for the file between cutter teeth and guard teeth.
- Remove the battery pack from your hedge trimmer.
- Clamp the blade assembly in a vise and file the exposed cutting surface of each blade tooth. Remove as little material as possible. Be sure to retain the original angle of each tooth when filing.
- Remove the hedge trimmer from the vise; restart it and stop it to expose the unsharpened edges of the blade teeth.
- Remove the battery pack and repeat the sharpening procedure above.
Lubricating the Blade
For best operation and longer blade life, lubricate the hedge trimmer blade with lightweight machine oil before and after each use.
- Remove the battery pack from the hedge trimmer.
- Lay the hedge trimmer on a flat surface. Apply some lightweight machine oil along the edge of the top blade. If you will be using the hedge trimmer for an extended period, it is advisable to stop, remove the battery, and oil the blade during use.
Note: Do not oil the blade while the hedge trimmer is running.
Transporting and Storing
- Always place the blade cover on the blade before storing or transporting the hedge trimmer. Use caution to avoid the sharp teeth of the blade.
- Clean the hedge trimmer thoroughly before storing.
- Store the hedge trimmer indoors, in a dry place that is inaccessible to children.
- Keep away from corrosive agents such as garden chemicals and de-icing salts.
WARNING: Blades are sharp. When handling the blade assembly, wear non-slip, heavy-duty, protective gloves. Do not place your hand or fingers between blades or in any position where they could get pinched or cut. NEVER touch blades or service the unit with the battery pack installed.
Troubleshooting: Pole Saw
| Problem | Cause | Remedy |
| Motor does not run | The battery pack is not attached to the pole saw. | Attach the battery pack to the pole saw. |
| There is no electrical contact between the saw and battery pack. | Remove the battery pack, check contacts and reinstall the battery pack. | |
| The battery pack is depleted. Charge the battery pack. | ||
| The battery pack or pole saw is too hot. | Allow the battery pack or pole saw to cool. | |
| The lock-off button is not depressed before pressing the trigger switch. | Press down the lock-off button and hold it, then depress the trigger switch to turn on the pole saw. | |
| Chain is bound in the wood. | Release the trigger switch; remove the chain and guide bar from the wood, then restart the pole saw. | |
| Debris in bar groove. | With the saw turned off, press the chain against the wood, move the pole saw back and forth to discharge the debris. | |
| Debris in side cover. | Remove the battery pack, then remove the side cover and clean out the debris. | |
| Motor runs, but chain does not rotate | Chain does not engage drive sprocket. | Reinstall the chain, making sure that the drive links on the chain are fully seated on the sprocket. |
| Pole saw does not cut properly | Insufficient chain tension. | Readjust the chain tension, following the section: "Adjusting the Chain Tension". |
| Dull chain. | Sharpen the chain cutters, following the section: "How to Sharpen the Cutters". | |
| Chain installed backwards. | Reinstall the chain, following the section: "Replacing the Bar and Chain". | |
| Worn chain. | Replace the chain, following the section: "Replacing the Bar and Chain". | |
| Dry or excessively stretched chain. | Check the oil level. Refill the oil tank if necessary. | |
| Chain not in bar groove | Reinstall the chain, following the section: "Replacing the Bar and Chain". | |
| Bar and chain running hot and smoking | Check chain tension for over-tightened condition. | Re-tension the chain; see the section: "Adjusting the Chain Tension". |
| Chain oil tank is empty. Fill the bar and chain lubricant. | ||
| Debris in guide bar groove. Clear the debris in the groove. | ||
Troubleshooting: Hedge Trimmer
| Problem | Possible Cause | Solution |
| Motor fails to start when switch is depressed. | Battery is not secure. | To secure the battery pack, make sure the latches on the top of the battery pack snap into place. |
| Battery is not charged. | Charge the battery pack according to the instructions included with your model. | |
| Motor runs but cutting blades do not move. | Hedge trimmer damaged. | Call for authorised technical service.Do not use hedge trimmer. |
| Hedge trimmer smokes during operation. | Hedge trimmer damaged. | Call for authorised technical service.Do not use hedge trimmer. |
| Motor hums, blades do not move. | Debris or other material may be jamming the blades. | Remove battery, clear debris blockage from blades. |
Specifications
| Model PC4MT5 | |
| Power Type Battery | |
| Battery Type Lithium Ion | |
| Battery Voltage 20V | |
| Battery Capacity 2.0Ah | |
| Runtime | Up to 25 mins (Chainsaw) / Up to 40 mins (Hedge Trimmer) |
| Motor Speed | 3200RPM (Chainsaw) / 1300RPM (Hedge Trimmer) |
| Bar Length 8 Inch | |
| Oil Pot Capacity 75ml | |
| Auto-Lubrication | Yes |
| Throttle Control Handle | Rubber Over Moulded |
| Charger 240V | |
| Charge Time | 90mins |
| Maximum Reach 350cm | |
| Power Plug | Australian Standard |
Note: Requires minimal assembly

Some experts believe that the incorrect or prolonged use of almost any product may cause serious injury or death. To help reduce your risk of serious injury or death, refer to the information below. For more information, see www.datastreamserver.com/safety
- Consult all documentation, packaging, and product labelling before use. Note that some products feature documentation available online. It is recommended to print and retain the documentation.
■ Before each use, check the product for loose/broken/damaged/missing parts, wear, or leaks (if applicable). Never use a product with loose/broken/damaged/missing parts, wear, or leaks.
■ Products must be inspected and serviced (if applicable) by a qualified technician every 6 months. This is based on average residential use by persons of average size and strength, and on a property of average metropolitan size. Use beyond these recommendations may require more frequent inspections/servicing.
■ Ensure that all users of the product have completed a suitable industry recognised training course before being allowed access to the product.
The product has been supplied by a general merchandise retailer that may not be familiar with your specific application or description of application. Be sure to attain third-party approval from a qualified specialist for your application before use, regardless of any assurances from the retailer or its representatives.
This product is not intended for use where fail-safe operation is required. As with any product (for example, automobile, computer, toaster), there is the possibility of technical issues that may require the repair or replacement of parts, or the product itself. If the possibility of such failure and the associated time it may take to rectify could in any way inconvenience the user, business, or employee, or financially affect the user, business, or employee, then the product is not suitable for your requirements. This product is not intended for use where incorrect operation or a failure of any kind, including but not limited to, a condition requiring product return, replacement, parts replacement, or service by a technician may cause financial loss, loss of employee time or an inconvenience requiring compensation.
If this product has been purchased in error when considering the information presented here, contact the retailer directly for details of their returns policy, if required.

edisons
.com.au
© PowerBlade. All rights reserved. No part of this document, including descriptive content, concepts, ideas, diagrams, or images may be reproduced or transmitted in any form or by any means, electronic or mechanical, including photocopying, scanning, or recording, or any information storage and retrieval system, without express permission or consent from the publisher.


- 2in1 Pole Saw + Hedge Trimmer
- User Manual
- Safety
- General Work Area Safety
- General Personal Safety
- General Fuel Safety
- General Carbon-Monoxide Safety
- General Equipment Use and Care
- General Electrical Safety
- General Service Information
- Child Choking Hazard!
- HAZARDOUS COMPONENTS!
- Pole Saw
- Intended Use
- General Safety Warnings
- Work Area Safety
- Electrical Safety
- Personal Safety
- Power Tool Use and Care
- Service
- Additional General Safety Warnings
- Pruner Safety Warnings
- Personal Protective Equipment
- Additional Battery Safety Warnings
- Operation
- Transportation and Storage
- Transporting Lithium Batteries
- Maintenance
- Maintenance Schedule
- Residual Risks
- Environmental Protection
- General Chainsaw Safety Warnings
- Noise
- Vibration
- Hedge Trimmer
- General Product Safety Warnings
- Battery Tool Use and Care
- Pole Hedge Trimmer Safety Warnings
- Additional Safety Warnings
- Protecting the Environment
- Safety Symbols
- Table of Contents
- Safety 2
- Parts Identification: Pole Saw....16
- Parts Identification: Hedge Trimmer 18
- Assembly: Pole Saw....19
- Assembly: Hedge Trimmer 24
- Operation: Pole Saw....27
- Operation: Hedge Trimmer 34
- Charging the Battery 37
- Lithium Battery Care and Maintenance.... 39
- Maintenance: Pole Saw 41
- Assembly: Pole Saw
- Unpacking
- Assembling the Guide Bar and Chain
- Tensioning the Chain
- CAUTION: The chain must be properly tensioned before use.
- Connecting the Poles
- Attaching the Extension Pole (Fig. 4b)
- Attaching the Shoulder Strap (Fig. 5)
- Assembly: Hedge Trimmer
- Attaching the Poles
- Attach Shoulder Strap
- Adjusting the Pivoting Head
- Installing or Removing the Battery Pack
- Operation: Pole Saw
- Application
- To Attach/Detach Battery Pack
- To attach the battery pack:
- To detach the battery pack:
- Filling the Oil Tank with Bar and Chain Lubricant
- NOTICE:
- Starting/Stopping the Pole Saw
- Before Starting the Pole Saw:
- To Start the Pole Saw (Fig. 9)
- To Stop the Pole Saw
- Cutting
- Basic Cutting (Fig. 10a & 10b)
- Limbing and Pruning
- WARNING:
- Operation: Hedge Trimmer
- Applications
- Holding the Pole Hedge Trimmer
- Starting and Stopping the Pole Hedge Trimmer
- Trimming Hedges
- Application Advice
- IMPORTANT NOTES!
- Charging the Battery
- USE THE BATTERY CHARGER ONLY WITH AUTHORISED 20V LITHIUM-ION BATTERIES.
- To Charge
- Battery Capacity
- LED Function of Charger
- Important Information for Recharging Hot Batteries
- Lithium Battery Care and Maintenance
- Top 3 Battery Care Requirements
- DANGER - BATTERY CHARGING, USE AND STORAGE
- Maintenance: Pole Saw
- Cleaning
- Replacing the Bar and Chain
- Adjusting the Chain Tension
- Chain Maintenance
- How to Sharpen the Cutters
- Top-Plate Sharpening Angles
- Side-Plate Angle
- Depth-Gauge Clearance
- Guide Bar Maintenance
- Transportation
- Storage
- Maintenance: Hedge Trimmer
- Sharpening the Cutting Blade
- Lubricating the Blade
- Transporting and Storing
- Some experts believe that the incorrect or prolonged use of almost any product may cause serious injury or death. To help reduce your risk of serious injury or death, refer to the information below. For more information, see www.datastreamserver.com/safety
- edisons
Brand : Powerblade
Model : PC4MT5
Category : Multitool