ICF-2000 - Phone Planet - Free user manual and instructions
Find the device manual for free ICF-2000 Planet in PDF.


| Product Type | Cordless Phone |
| Dimensions (Base) | 210 x 170 x 80 mm |
| Weight (Handset + Base) | 0.6 kg |
| Power Supply | Handset: 4 x 1.2V NiMH rechargeable batteries; Base: AC 220-240V adapter |
| Standby Time | Up to 200 hours |
| Talk Time | Up to 10 hours |
| Range (Outdoor) | Up to 300 meters |
| Caller ID | Yes, 50-name memory |
| Phonebook | 100 entries |
| Speakerphone | Yes, hands-free |
| Display | Backlit LCD |
| Ringtones | 10 polyphonic |
| Redial | Last 10 numbers |
| Wall Mountable | Yes |
| Hearing Aid Compatible | Yes |
| Safety | Use only approved batteries; do not expose to water |
| Maintenance | Clean with dry cloth; no abrasive cleaners |
| Spare Parts | Batteries, AC adapter, handset cord |
| Repairability | Contact authorized service center |
Frequently Asked Questions - ICF-2000 Planet
User questions about ICF-2000 Planet
0 question about this device. Answer the ones you know or ask your own.
Ask a new question about this device
Download the instructions for your Phone in PDF format for free! Find your manual ICF-2000 - Planet and take your electronic device back in hand. On this page are published all the documents necessary for the use of your device. ICF-2000 by Planet.
USER MANUAL ICF-2000 Planet
natural_image
Black OPPO phone with attached handset and cord, displaying a digital screen showing app icons (no readable text or symbols on device body)User's Manual
7" Smart Media Android SIP Conference Phone with Full HD Camera and Touch Screen
ICF-2000

natural_image
Group of five business professionals in a meeting around a conference table, reviewing documents and water bottles (no visible text or symbols)Copyright
Copyright (C) 2024 PLANET Technology Corp. All rights reserved.
The products and programs described in this User's Manual are licensed products of PLANET Technology. This User's Manual contains proprietary information protected by copyright, and this User's Manual and all accompanying hardware, software, and documentation are copyrighted.
No part of this User's Manual may be copied, photocopied, reproduced, translated, or reduced to any electronic medium or machine-readable form by any means by electronic or mechanical including photocopying, recording, or information storage and retrieval systems, for any purpose other than the purchaser's personal use, and without the prior written permission of PLANET Technology.
Disclaimer
PLANET Technology does not warrant that the hardware will work properly in all environments and applications, and makes no warranty and representation, either implied or expressed, with respect to the quality, performance, merchantability, or fitness for a particular purpose.
PLANET has made every effort to ensure that this User's Manual is accurate; PLANET disclaims liability for any inaccuracies or omissions that may have occurred.
Information in this User's Manual is subject to change without notice and does not represent a commitment on the part of PLANET. PLANET assumes no responsibility for any inaccuracies that may be contained in this User's Manual. PLANET makes no commitment to update or keep current the information in this User's Manual, and reserves the right to make improvements to this User's Manual and/or to the products described in this User's Manual, at any time without notice.
If User finds information in this manual that is incorrect, misleading, or incomplete, we would appreciate User comments and suggestions.
CE Mark Warning
This is a class B device. In a domestic environment, this product may cause radio interference, in which case the user may be required to take adequate measures.
Energy Saving Note of the Device
This power required device does not support Standby mode operation. For energy saving, please remove the DC-plug or push the hardware Power Switch to OFF position to disconnect the device from the power circuit.
Without removing the DC-plug or switching off the device, the device will still consume power from the power circuit. In view of Saving the Energy and reducing the unnecessary power consumption, it is strongly suggested to switch off or remove the DC-plug from the device if this device is not intended to be active.
WEEE Warning

To avoid the potential effects on the environment and human health as a result of the presence of hazardous substances in electrical and electronic equipment, end users of electrical and electronic equipment should understand the meaning of the crossed-out wheeled bin symbol. Do not dispose of WEEE as unsorted municipal waste and have to collect such WEEE separately.
Trademarks
The PLANET logo is a trademark of PLANET Technology. This documentation may refer to numerous hardware and software products by their trade names. In most, if not all cases, their respective companies claim these designations as trademarks or registered trademarks.
Revision
User's Manual of PLANET High Definition Color Touch Screen Smart Media Android SIP Conference Phone
Model: ICF-2000
Rev: 1.0 (2024, November)
Part No. EM-ICF-2000_v1.0
Directory
1. Overview....9
1.1 Packing Contents....9
1.2 Product Description....9
1.3 Product Features 13
1.4 Product Specifications 14
2. Install Guide 17
2.1 Installing the phone.... 17
2.1.1 Desktop.... 17
2.1.2 Wall mounting.... 18
2.2 Connecting to the phone....19
3. Introduction to the User 21
3.1 Instructions of Keypads....21
3.1.1 Instructions of the ICF-2000 Keypads 21
3.2 Icon Introduction 22
3.3 LED Definition 24
3.4 Using Handset, Hands-free Speaker and Headphone 24
3.5 Touch Screen Instructions 25
3.6 Idle Screen 26
3.7 Phone Status.... 27
3.8 Application Instruction 29
4. Web Management 31
4.1 Web Login 31
4.1.1 Login Prompt 31
4.1.2 Change of Password 31
4.2 Network Configurations.... 32
4.3 SIP Configurations 33
5. Basic Function 35
5.1 Making Phone Calls 35
5.2 Answering Calls 37
5.2.1 Talking 38
5.2.2 Making/Receiving the Second Call 39
5.3 End of the Call 40
5.4 Video Call 41
5.5 Redial 42
5.6 Dial-up Query 43
5.7 Auto-Answering 43
5.8 Call Back 45
5.9 Mute 46
5.9.1 Mute the Call 46
5.9.2 Ringing Mute 46
5.10 Call Hold/Resume 47
5.11 DND 48
5.12 Call Forward.... 51
5.13 Call Transfer.... 54
5.13.1 Blind Transfer 54
5.13.2 Semi-Attended Transfer 55
5.13.3 Attended Transfer.... 55
5.14 Call Waiting 56
5.15 Conference.... 58
5.15.1 Local Conference 58
5.15.2 Video Conference....62
5.15.3 Network Conference....63
5.16 Call Park 64
5.17 Pick Up....65
5.18 Anonymous Call 66
5.18.1 Anonymous Call 66
5.18.2 Ban Anonymous Call 67
5.19 Hotline 68
6. Advanced Function 70
6.1 BLF (Busy Lamp Field) 70
6.1.1 Configure the BLF Functionality 70
6.1.2 Use the BLF Function 72
6.2 BLF List 73
6.3 Record....74
6.3.1 Local Record 74
6.3.2 Server Record 75
6.3.3 SIP Info Record 75
6.4 Agent....76
6.5 Intercom 78
6.6 MCAST....79
6.7 SCA ( Shared Call Appearance ) 80
6.8 Message....84
6.8.1 SMS....84
6.8.2 MWI (Message Waiting Indicator) 85
6.9 SIP Hotspot 87
7. Phone Settings....89
7.1 Basic Settings 89
7.1.1 Language....89
7.1.2 Time & Date 90
7.1.3 Screen 92
7.1.3.1 Brightness and backlight 92
7.1.3.2 Screen Saver 93
7.1.4 Ring 94
7.1.5 Voice Volume 94
7.1.6 Reboot 94
7.2 Phone book....95
7.2.1 Local contact 95
7.2.1.1 Add / Edit / Delete Contact 96
7.2.1.2 Add / Edit / Delete Group....97
7.2.2 Blocked list 98
7.2.3 Cloud Phone Book....99
7.2.3.1 Configure Cloud Phone book....99
7.2.3.2 Downloading Cloud Phone book....100
7.3 Call Log....101
7.4 Function Key 102
7.5 Wi-Fi....103
7.6 Headset....105
7.6.1 Wired Headset.... 105
7.7 Advanced 106
7.7.1 Line Configurations.... 106
7.7.2 Network Settings 107
7.7.2.1 Network Settings....107
7.7.2.2 QoS & VLAN 108
7.7.2.3 Web Server Type 109
7.7.3 Set The Secret Key 109
7.7.4 Maintenance 110
7.7.5 Firmware Upgrade 113
7.7.6 Factory Reset 115
8. Web Configurations.... 116
8.1 Web Page Authentication 116
8.2 System >> Information.... 116
8.3 System >> Account.... 116
8.4 System >> Configurations.... 116
8.5 System >> Upgrade 117
8.6 System >> Auto Provision.... 117
8.7 System >> Tools 117
8.8 System >> Reboot Phone 117
9. Network >> Basic 118
9.1 Network >> Service Port 118
9.2 Network >> Advanced.... 118
9.3 Line >> SIP 119
9.4 Line >> SIP Hotspot 123
9.5 Line >> Dial Plan....124
9.6 Line >> Action Plan.... 127
9.7 Line >> Basic Settings 128
9.8 Line>>RTCP-XR 128
9.9 Phone settings >> Features.... 129
9.10 Phone settings >> Media Settings 133
9.11 Phone settings >> MCAST 134
9.12 Phone settings >> Action 134
9.13 Phone settings >> Time/Date 137
9.14 Phone settings >> Tone.... 138
9.15 Phone settings >> Advanced.... 138
9.16 Phonebook >> Contact 139
9.17 Phonebook >> Cloud phonebook 139
9.18 Phonebook >> Call List.... 140
9.19 Phonebook >> Web Dial 140
9.20 Phonebook >> Advanced.... 141
9.21 Call Logs 141
9.22 Function Key >> Function Key.... 141
9.23 Function Key >> Softkey 142
9.24 Function Key >> Advanced.... 143
9.25 Application>>Manage Recording.... 143
9.26 Security >> Web Filter 144
9.27 Security >> Trust Certificates.... 145
9.28 Security >> Device Certificates.... 145
9.29 Security >> Firewall 146
9.30 Device Log >> Device Log 147
10. Trouble Shooting 148
10.1 Get Device System Information 148
10.2 Reboot Device 148
10.3 Reset Device to Factory Default 148
10.4 Screenshot.... 149
10.5 Network Packets Capture 150
10.6 Export Debug Data 151
10.7 Common Trouble Cases 152
Safety Instructions
Please read the following safety notices before installing or using this unit. They are crucial for the safe and reliable operation of the device.
- Please use the external power supply that is included in the package. Other power supply may cause damage to the phone and affect the behavior or induce noise.
- Before using the external power supply in the package, please check the home power voltage. Inaccurate power voltage may cause fire and damage.
- Please do not damage the power cord. If power cord or plug is impaired, do not use it because it may cause fire or electric shock.
● Do not drop, knock or shake the phone. Rough handling can break internal circuit boards.
● This phone is designed for indoor environment. Do not install the device in places where there is direct sunlight. Also do not put the device on carpets or cushions. It may cause fire or breakdown.
● Avoid exposure the phone to high temperature or below 0°C or high humidity.
● Avoid wetting the unit with any liquid. - Do not attempt to open it. Non-expert handling of the device could damage it. Consult your authorized dealer for help, or else it may cause fire, electric shock and breakdown.
- Do not use harsh chemicals, cleaning solvents, or strong detergents to clean it. Wipe it with a soft cloth that has been slightly dampened in a mild soap and water solution.
● When lightning, do not touch power plug, it may cause an electric shock. - Do not install this phone in an ill-ventilated place. You are in a situation that could cause bodily injury. Before you work on any equipment, be aware of the hazards involved with electrical circuitry and be familiar with standard practices for preventing accidents.
1. Overview
1.1 Packing Contents
VERIFY THE CONTENTS INSIDE THE PACKAGE BOX
The package should contain the following items plus ICF-2000.
| ICF-2000 | Quick Installation Guide | Handset |
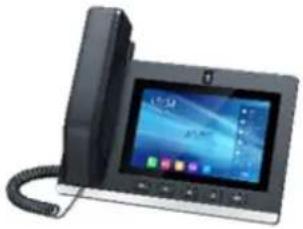 |  |  |
| Handset Cord | Stand | RJ45 Cable |
 | 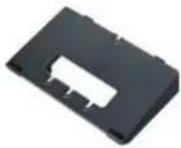 | 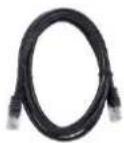 |
If any item is missing or damaged, please contact the seller immediately.
1.2 Product Description
Video Conference Phone with 7-inch Touch Screen
As a high-end enterprise SIP conference phone with Android OS, PLANET ICF-2000 provides a more intelligent and smoother touch operation experience for the users.
The ICF-2000 is a 7-inch high definition color touch screen SIP conference phone with a built-in 5MP camera. This latest innovative advanced color IP multimedia phone creates an immersive, face-to-face experience over the network. Through the powerful combination of Android OS technologies and design, it supports a greater compatibility and more powerful functions. Its large display and movable icons on interface provide the direct access to frequently-used functions and intelligent touch full keypad with ease of use. Its high resolution makes video conferencing very practical, comfortable and high-quality.
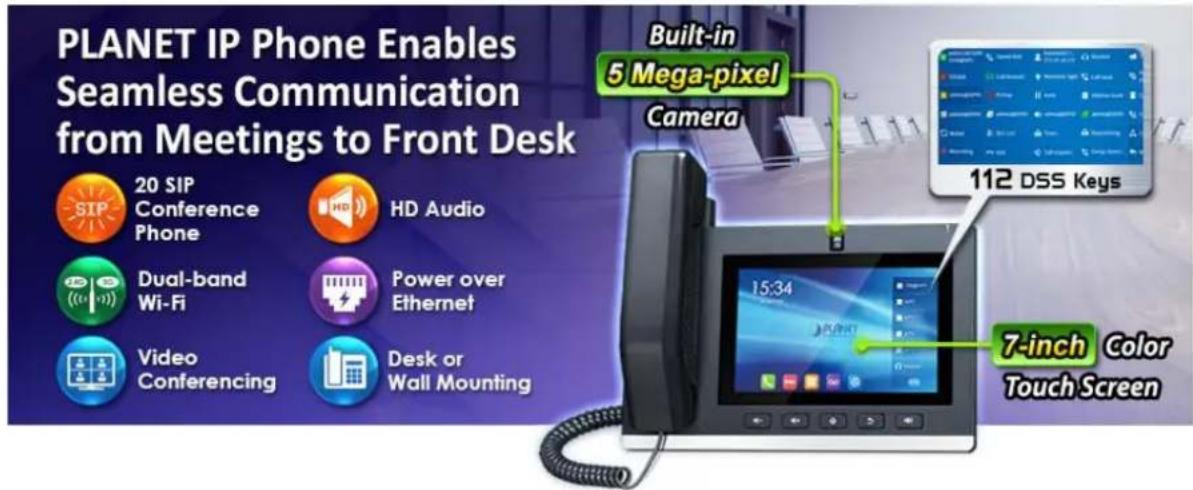
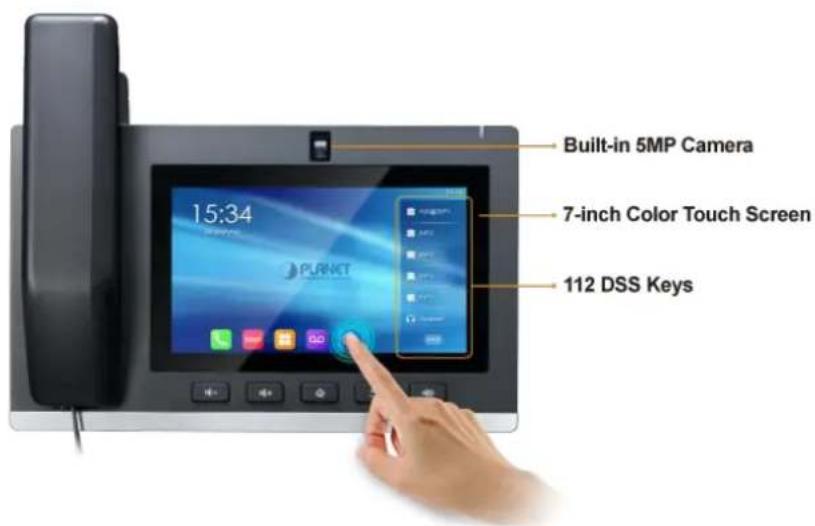
Up to 20 SIP lines with 112 one-touch DSS keys on the 7-inch color touch screen, along with built-in 2.4GHz/5GHz wireless, the ICF-2000 simplifies daily communication. Furthermore, the ICF-2000 features a rotating knob that allows the camera angle to be adjusted up or down, accommodating different installation heights. It also comes with a camera privacy cover to protect user privacy. Equipped with a built-in 5MP camera, it supports 3-party video/audio mixed conferencing and 10-party audio conferencing, delivering an exceptional audio and video experience for group meetings.
New Level of Customization by Touch Screen with Multiple Function Keys
The Customizable DSS Keys feature allows users to assign commonly-used functions to designated keys, providing an easy way to streamline daily tasks. Whether it's accessing important settings, dialing frequent contacts, or activating specific phone features, users can create personalized shortcuts that cater to their unique workflow. With a Touch Screen and Multiple Function Keys, productivity is significantly enhanced. This customizable interface is ideal for executives or busy professionals, making communication smoother and more efficient, allowing them to focus on what matters most. This level of customization empowers users to optimize their communication processes and improve daily operational efficiency in business environments.
Bundled with audio and video applications, the ICF-2000 is an easy-to-use business video phone. It allows intuitive navigation like Android 9.0 OS smart phone to operate every function correctly. With its brilliant user experience and rich business features, it can help you make decisions faster, improve customer intimacy, scale scarce resources, and speed products to market. SOHOs, enterprises, organizations, etc. are already using it to control costs, and reinventing the SIP conference phone by merging voice, video and collaboration into one device. This highly-scalable solution is suitable for enterprise mass deployment, and in no time, everyone in the organization will immediately see the benefits of increased productivity and convenient collaboration.
HD Touch Screen Android IP Phone
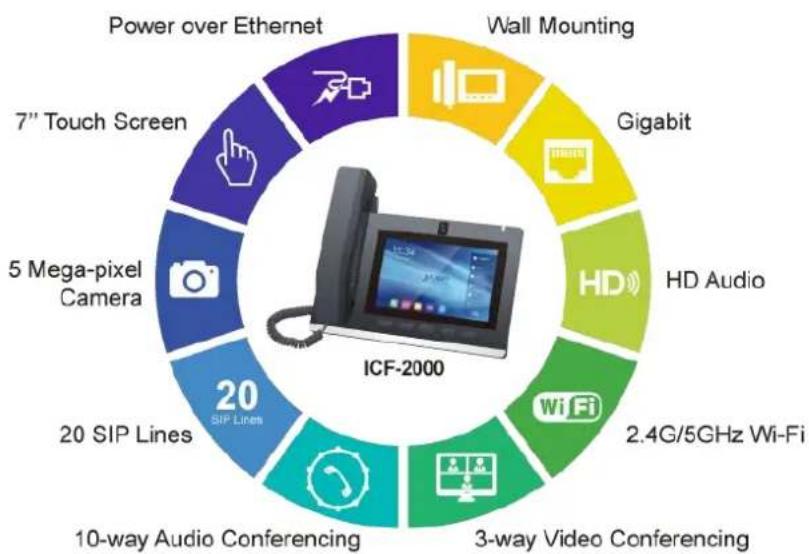
pie
ICF-2000 | Device | Value | |---|---| | Wall Mounting | 15 | | Gigabit | 12 | | HD Audio | 14 | | 2.4G/5GHz Wi-Fi | 13 | | 3-way Video Conferencing | 16 | | 10-way Audio Conferencing | 17 | | 20 SIP Lines | 20 | | 5 Mega-pixel Camera | 22 | | 7" Touch Screen | 23 | | Power over Ethernet | 24 |High-quality G.722 HD and Opus Audio Codes
The ICF-2000 delivers high-quality audio with Harman Kardon speaker, wideband G.722 HD and opus audio codec. Both the hardware and software HD functions (HD speaker and G.722 audio codec) are the next generation of voice quality for telephony audio, making the quality of voice better than that (toll quality) of the standard digital telephony and come close to that of a room conversation. HD voice is transmitted in the audio frequency range of 50Hz to 7kHz or higher over telephone lines, resulting in higher quality voice and clearer communication. The ICF-2000 keeps bringing the most premium sound for the users.




Secure, High-quality VoIP Communication
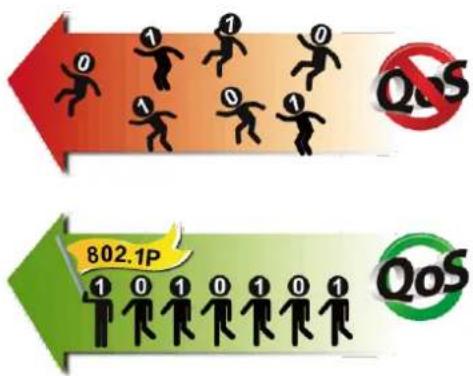
The ICF-2000 can effortlessly deliver secure toll voice quality by utilizing cutting-edge QoS (Quality of Service) and 802.1p VLAN tagging. Using voice and data, VLAN can easily separate the data and voice, thus maintaining the best quality.
Installation Options and Applications
The ICF-2000 offers two installation options: desktop and wall mounting. Equipped with an adjustable camera, it can conduct video calls with the access control system. Users can view the access point's video feed on their phone screens, enabling remote door unlocking and other applications.
Standard Compliance and Enhanced Voice Security
The ICF-2000 supports IETE Session Initiation Protocol 2.0 (RFC 3261) with Transport Layer Security for easy integration with general voice over IP system. Meanwhile, it provides OpenVPN to enhance voice security. A VPN is created by establishing a virtual point-to-point connection. The SIP conference phone is able to broadly interoperate with equipment provided by VoIP infrastructure providers, thus enabling them to provide their customers with better multimedia exchange services.
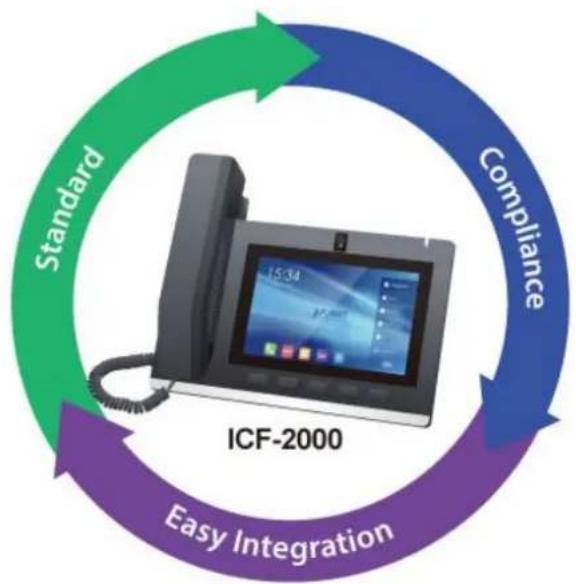
flowchart
graph TD
    A["Standard"] --> B["Compliance"]
    B --> C["Easy Integration"]
    C --> A
    style A fill:#99ccff,stroke:#333
    style B fill:#66ccff,stroke:#333
    style C fill:#99ccff,stroke:#333
    note1["ICF-2000"] --> A
    note1 --> B
    note1 --> C
1.3 Product Features
Highlights
■ 7-inch color touch screen with Android OS
■ 5MP camera with 1080p@30fps H.264 video call
■ IETE SIP compliant with Transport Layer Security
■ Up to 20 SIP lines with 112 one-touch DSS keys
■ Dual Gigabit and IEEE 802.3at PoE+ compliant
■ Built-in 2.4G/5GHz Dual-Band Wi-Fi
■ Wideband G.722 HD and Opus audio codec with handset and hands-free function
■ Supports bracket installation for desktop or wall mounting.
➤ Audio and Video Features
■ 1080p@30fps HD H.264 video call
■ Audio codec: Opus, G.722, G.711a/u, G.729, G.729A, G.729B, G.729AB, iLBC
■ DTMF: In-band, Out-of-band (RFC 2833) and SIP info
■ Full-duplex hands-free speakerphone with AEC
■ Noise reduction (NR) and packet loss concealment (PLC)
➢ Phone and Call Control Features
■ Up to 3-party video/audio mixed conferencing and 10-party audio conferencing
■ Direct IP call without SIP proxy or IP PBX
■ Caller ID display, speed dial, do not disturb (DND)
■ One-touch speed dial, hotline, black/white list call filter
■ Local phonebook (2000 entries), remote phonebook (XML/LDAP, 2000 entries)
■ Call logs (In/out/missed, 1000 entries)
Network and Management
■ Integrated web server provides web-based administration and configuration
■ Telephone keypad configuration via display menu/navigation
■ OpenVPN, VLAN and QoS support
■ Auto-provisioning via FTP, TFTP, HTTP/HTTPS, DHCP OPT66, SIP PNP, TR-069
1.4 Product Specifications
| Product | ICF-2000 |
| Interface | |
| Lines (Direct Numbers) | 20 SIP lines |
| Display and Indicators | 112 one-touch DSS keys on 7-inch (1024 x 600) color touch screen4-point multi-touch surfaceScreensaver and wallpaperLED indicators for call status and message waiting notificationsIntuitive user interface with icons and soft keysMultilingual user interfaceCaller ID with name, number and photo |
| Feature Keys | 5 keys, including1 x Home key1 x Return key2 x Volume Control keys – Up and Down1 x Hands-free key |
| Network Interfaces | Dual-port Gigabit Ethernet:Network x 1 (802.3at PoE enabled)PC x 1 (Bridged Network)Built-in Wi-Fi (2.4GHz/5Gz) |
| Camera | Pixels: 5 megapixelsVideo Codec: H.264Video Call Resolution: 1080p@30fps |
| Connectors | RJ9 Port x 2: Handset x 1, Headset x 1Safety keyhole x 1 |
| Android Bundled Applications | |
| Operating System | Android 9.0 OS with higher security and better compatibilityFiles, Calendar, Gallery, Browser, Email, Calculator, Notepad,Sound Recorder, Clock, Video, MusicThird-party Android application support |
| Network and Provisioning | |
| Network | IP Mode:IPv4IP Configuration: Static / DHCPNetwork Access Control: 802.1xVPN: OpenVPN (Requires third-party app support)VLAN, LLDP, CDP, QoS |
| Protocols | SIP2.0 over UDP/TCP/TLS, DNS A/SRV/NAPTR, RTP/RTCP/SRTP,STUN, DHCP, CDP, LLDP, 802.1x, OpenVPN (Requires third-party appsupport), SNTP, FTP/TFTP, HTTP/HTTPS, TR-069 |
| Deployment & Maintenance | Auto-provisioning via FTP, TFTP, HTTP/HTTPS, DHCP OPT66, SIP PNF TR-069Web management portal, TelnetEncrypted configuration files download with AESWeb upgrade, factory reset dataThe third-party communication app |
| Features | |
| Audio Features | HD voice microphone/speaker (handset/hands-free, 0 ~ 7KHz frequency response)Wideband ADC/DAC 16KHz samplingNarrowband codec: G.711a/u, G.729, G.729A, G.729B, G.729AB, iLBCWideband codec: G.722, OpusFull-duplex acoustic echo canceller (AEC)Noise reduction (NR)Packet loss concealment (PLC)Dynamic adaptive jitter bufferDTMF: In-band, out-of-band, DTMF-relay (RFC2833), SIP Info |
| Video Features | Video decoding: H.264Video call resolution: QVGA/CIF/VGA/4CIF/720P/1080PImage format: JPEG/PNG/BMPVideo format: MP4Bandwidth selection: 64kbps~4MbpsFrame rate selection: 5~30fpsVideo from remote site can be displayed in full screen3-way video conferencingSelf-view (local video preview)Built-in camera: 5 megapixels, adjustable video angle. |
| Phone Features | Local Phonebook (2000 entries)Remote Phonebook (XML/LDAP, 2000 entries)Intelligent Search for Contacts and Call LogCall logs (In/out/missed, 1000 entries)Black/White List Call FilterScreen saverMessage Waiting Indication (MWI)Programmable DSS/Soft keysNetwork Time SynchronizationBuilt-in 2.4GHz/5GHz dual-band Wi-FiSupport RecordingAction URL / Active URIUaCSTAAudio/Video RecordingSIP HotspotGroup BroadcastingAction PlanGroup listening and Group BroadcastingAction PlanGroup listening |
| Call Features | Call out / Answer / RejectMute / Unmute (Microphone)Call Hold / ResumeCall WaitingIntercomCaller ID DisplaySpeed DialAnonymous Call (Hide Caller ID)Call Forwarding (Always/Busy/No Answer)Call Transfer (Attended/Unattended)Call Parking/Pick-up (Depending on server)RedialDo-Not-DisturbAuto-AnsweringVoice Message (On IP PBX or SIP server)3-party video/audio mixed conferencing10-party audio conferencingHot LineHot deskingBLF (busy lamp field) |
| Environment | |
| Power Requirements | IEEE 802.3af/at PoE, 48~54V DC (Network port)12V DC (optional external power supply) |
| Power Consumption | PoE: 3.52~10.76WAdapter: 2.38~8.6W |
| Operating Temperature | 0 ~ 45 degrees C |
| Operating Humidity | 10 ~ 95% (non-condensing) |
| Weight | 760 g |
| Dimensions (W x D x H) | Desktop Stand (Angle 1): 265 x 172.1 x 145.2 mmDesktop Stand (Angle 2): 265 x 161.7 x 154.5 mmWall Mount: 265 x 78.6 x 184 mmWithout Stand: 264.97 x 70.58 x 216.71 mm |
| Emission | CE, FCC, RoHS |
2. Install Guide
2.1 Installing the phone
2.1.1 Desktop
Attach the stand to the holes on the back of the phone to prop it up on the desk.
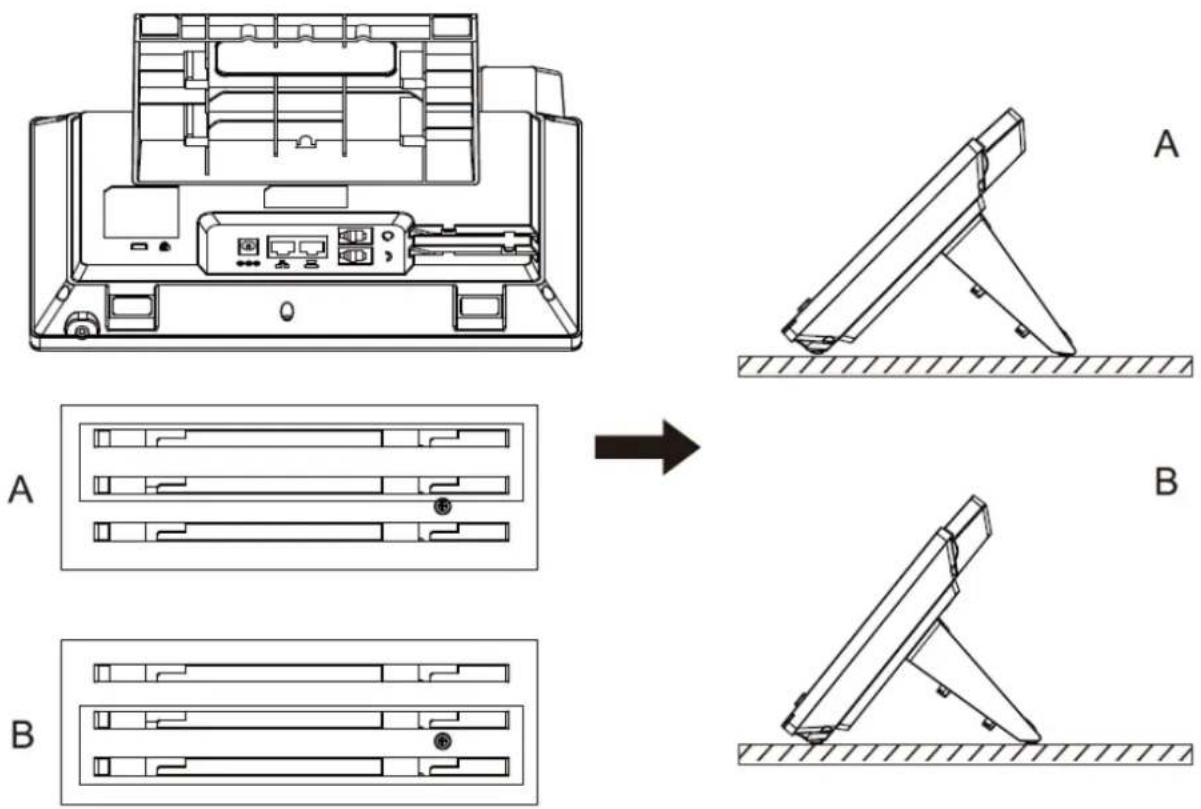
Picture: Desktop phone installation
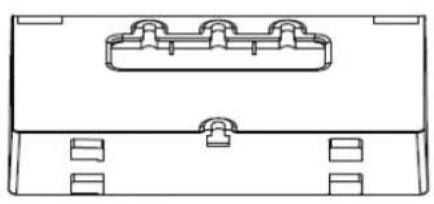
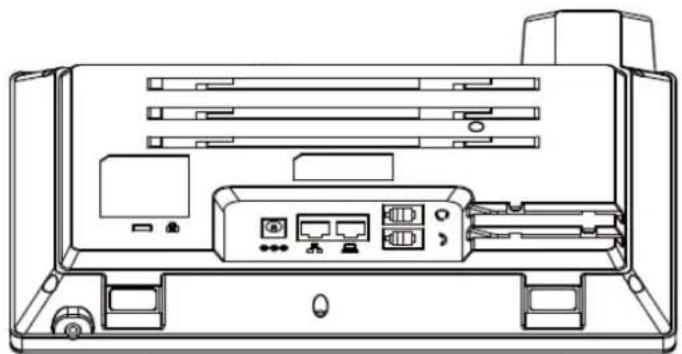
2.1.2 Wall mounting
Attach the stand to the holes on the back of the phone as if it were secured to the back of the device. Get a couple of hooks and hammer them into a wall. Then hang the phone on the wall with the help of the hooks.
natural_image
Technical line drawing of a mechanical component with three ports and mounting holes (no text or symbols)
natural_image
Line drawing of an open printer internal structure (no text or symbols)
natural_image
Diagram of a mechanical bracket with a downward arrow indicating force or direction (no text or symbols present)Picture : Wall-mount installation
Please connect power adapter, network, PC, handset, and headphone to the corresponding ports as described in the diagram below.
2.2 Connecting to the phone
Step 1. Connect to the corresponding ports as described in the diagram below.
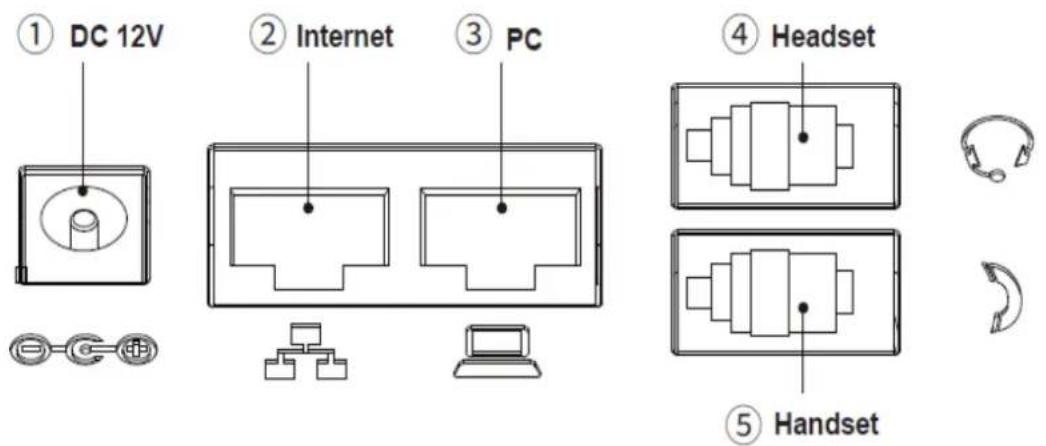
Picture : Connecting to the device
Table - Hardware Interface Description
| Index | Description |
| 1 | Power port: Connected with a 12V DC, 1A adapter. |
| 2 | Internet port: Connect to the Internet.(The Internet port supports PoE, allowing it to connect to an IEEE802.3at PSE device, such as 802.3at injector, hub or 802.3at PoE switch.) |
| 3 | PC port: Connect to the computer. |
| 4 | Headset port: Connected with an RJ9 cable for headset use. |
| 5 | Handset port: Connected with an RJ9 cable for IP phone handset use. |

- Please ensure that you connect the headset and microphone to the corresponding ports to avoid causing it not to work.
- When using RJ9 headsets, please pay attention to the following pinout to ensure functionality and stable audio quality and signal.
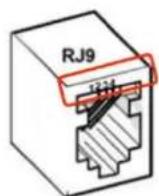
Headset pinout:
-
MIC-
-
SPK+
-
SPK-
-
MIC+
Step 2. Camera information
Turn the knob to adjust the camera angle. The knob can rotate 15 degrees.

natural_image
Technical line drawing of a rectangular electronic device with internal components and an upward arrow indicating motion (no text or symbols)Step 3. Computer Network Setup
Set your computer's IP address to 192.168.0.x, where x is a number between 2 and 254 (except 1 where is being used for the phone by default). If you don't know how to do this, please ask your network administrator.
Step 4. Login Prompt
Use Web browser (Internet Explorer 8.0 or above) to connect to 192.168.0.1 (Type this address in the address bar of Web browser.)
You'll be prompted to input user name and password: admin and 123
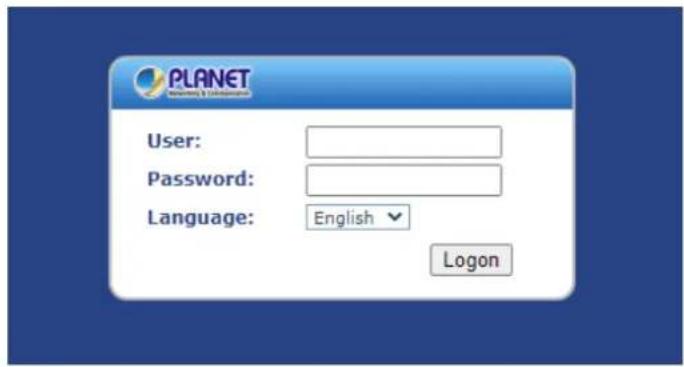
Step 5. Change of Password
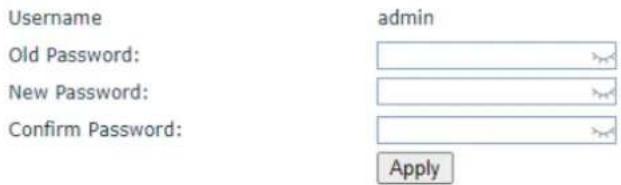
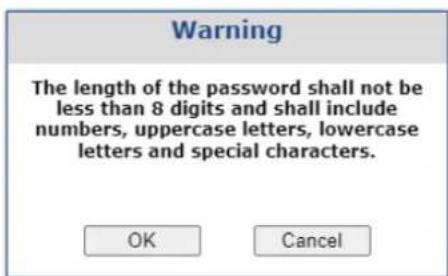
After logging in, you will be prompted to change the initial password to a permanent one.
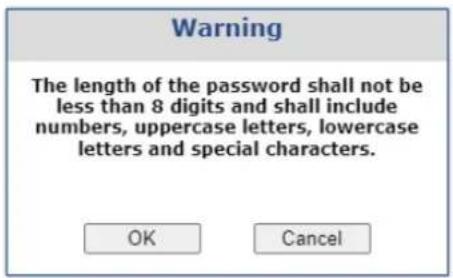
The length of the password should not be less than 8 digits and should include numerals, uppercase and letters, and special characters.
Change Web Authentication Password
3. Introduction to the User
3.1 Instructions of Keypads
3.1.1 Instructions of the ICF-2000 Keypads
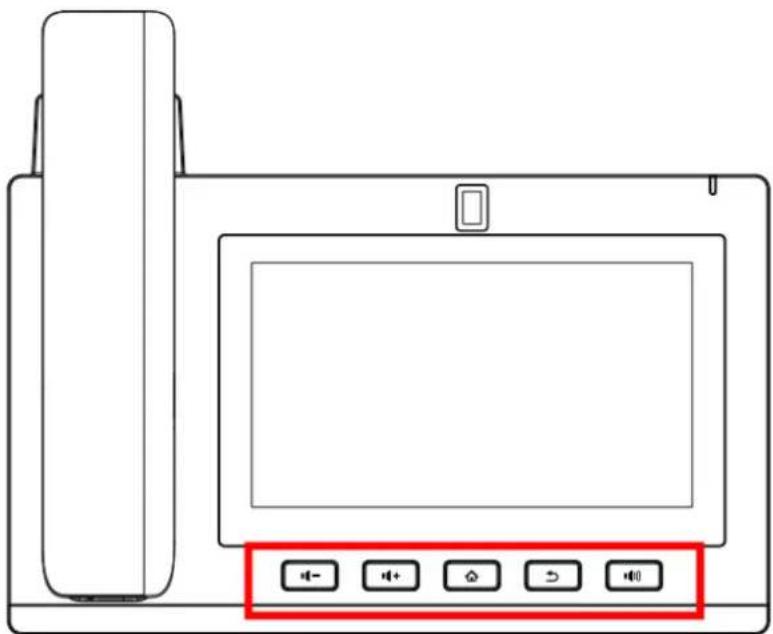
Picture - Instructions of keypad
The above diagram shows the keypad layout of the device. Each key provides its own specific function. User should refer to the illustration in this section about the usage of each key and the description in this document about each function.
Key features
| Features | Description |
 | Message waiting indicator |
 | Home key: Return to standby home page |
 | Return key: Return to the previous menu or page |
 | The ringer volume can be increased or decreased according to your acceptable volume when using an earpiece, headset or hands-free phone. |
 | Hands-free key is to activate or deactivate hands-free mode |
3.2 Icon Introduction
Table -- Status Prompt and Notification Icons
| Icons | Description | Icons | Description |
 | Call Hold |  | The Voice encryption of calling |
 | Network Disconnected |  | Connecting WIFI |
 | SMS |  | SIP Hotspot |
| [SBHD] | Call forward activated |  | DND |
 | Auto-answering activated |  | Miss Call log |
 | Hands-free (HF) Mode | [187A] | Unread voice message |
 | Headphone (HP) Mode |  | WAN VLAN |
 | Handset (HS) Mode |  | Enable Restricted Incoming List |
 | Mute Microphone |  | Enable Allowed Incoming List |
 | HD Audio |  | Enable Restricted Outgoing List |
Table- DSS Key Icons
 | Line |  | Intercom |
 | BLF |  | MWI |
 | Speed Dial |  | Key Event/Power Light |
 | Call Park |  | Key Event/Prefix |
| [22ST] | Call Forward |  | Key Event/Hot Desking |
  | Key Event/DND | [YDZS] | Key Event/Agent |
 | Key Event/Call Hold |  | Key Event/End |
 | Key Event/Call Transfer |  | Key Event/Disposition |
 | Key Event/Phonebook |  | Key Event/Escalate |
 | Key Event/Redial |  | Key Event/Trace |
 | Key Event/Pickup |  | Key Event/Handsfree |
 | Key Event/Join |  | Key Event/Answer Key |
 | Key Event/Auto Redial On |  | Key Event/Private Hold |
| [WSZ7] | Key Event/Auto Redial Off |  | Local Contact & LDAPContact & XML Contact & Broadsoft Contact |
 | Key Event/Call Forward |  | Record |
 | Key Event/Call Logs |  | Auto Headset |
 | Key Event/Flash |  | URL & Action URL |
 | Key Event/ |  | DTMF |
 | Key Event/Headset |  | BLF List |
 | Key Event/Release |  | Multicast |
 | Key Event/Lock Phone |  | Unfold |
 | Key Event/SMS |  | Collapse |
 | Key Event/Call Back | ||
 | Key Event/Hide DTMF |
3.3 LED Definition
Table - DSS Key LED State
| Type | LED Light | LED State |
| Line Key | Grey | Line inactive |
| Green On | Line ready (Registered) | |
| Green Blinking | Ringing | |
| Red Blinking | Line is trying to register | |
| Red Blinking | Line error (Registration failure) | |
| Red On | Dialing/Line in use (Talking) | |
| Yellow Blinking | Call holding | |
| BLF | Green On | Subscription number is idle. |
| Red On | Subscription number is busy. | |
| Red On | Subscription number is dialing. | |
| Grey | Subscription number is unavailable. | |
| Presence | Green On | Subscription number is idle. |
| Red On | Subscription number is busy. | |
| Red On | Subscription number is dialing. | |
| Grey | Subscription number is unavailable. | |
| DND | Red On | Enable DND |
| White | Disable DND | |
| MWI | Red corner with numbers | New voice message waiting |
| Grey | No new voice message |
3.4 Using Handset, Hands-free Speaker and Headphone
■ Using Handset
To talk over handset, user should lift the handset off the device and dial the number, or dial the number first, then lift the handset and the number will be dialed. User can switch audio channel to handset by lifting the handset when audio channel is opened in speaker or headphone.
■ Using Hands-free Speaker
To talk over hands-free speaker, user should press the hands-free button then dial the number, or dial the number first and then press the hands-free button. User can switch audio channel to the speaker from handset by pressing the hands-free button when audio channel is opened in handset.
■ Using Headphone
To use the headphone, by default, user should press the headset button which is defined by DSS key to turn on the headphone. Similar to handset and hands-free speaker, user can dial the number before or after the headphone is turned on.
■ Using Line Keys (Defined by DSS Key)
User can use the line key to make or answer a call on specific line. If the handset is lifted, the audio channel will be routed to the handset. Otherwise, the audio channel will be routed to the hands-free speaker or headphone.
3.5 Touch Screen Instructions
The device can be configured and operated by touching the screen.
Click
The device can enter the setting and operation interface by clicking on any interface.
The device supports multi-touch.
■ Long Press
Long-press the app icon on the standby home page, you can adjust the app location or choose to delete.
Long-press the application icon in the menu interface to drag it to the main page.
■ Slide
The device supports sliding up and down.
Slide down the standby home page to view the network connection information, date time and other information of the device; slide up to exit the above information interface.
Right slide can expand DSSkey, full screen display custom shortcut key information; slide left to exit the above interface.
Drag
Long-press the application icon in any interface, and you can drag it to any place.
3.6 Idle Screen
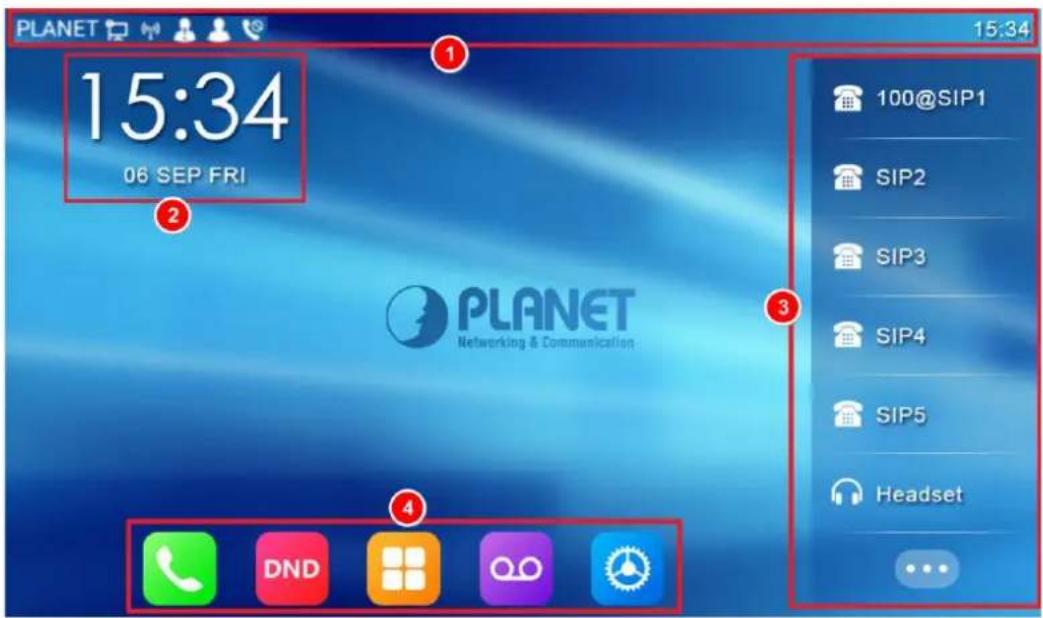
Picture - default home screen
The image above shows the default standby screen, which is the user interface in the most of the time.
① The status bar displays the equipment status, information and notification of dynamic messages (such as voice message, missed call, automatic response, do not disturb, locking status, network connection status, etc.).
② Displays the time and date, which can be changed by setting the time zone, etc.
③ Programmable function keys that allows users to customize DSS keys such BLF, headset, line keys, etc.
④ Application keys allow users to operate the phone through the application.
3.7 Phone Status
The phone status includes the following information about the phone:
| Common: | Phone modelSoftware versionIP addressMAC addressWi-Fi MAC address |
| Network Status : | VLAN IDIPv4 or IPv6 statusIP AddressNetwork Mode |
| The Phone Device Information : | Mac AddressPhone ModeHardware Version numberSoftware Version numberPhone Storage (RAM and ROM)System Running Time |
| SIP Account Information : | SIP AccountSIP Account Status (registered / uncommitted / trying / time out) |
| TR069 Connection Status | (Displays only in the phone interface state)The user can view the phone status through the phone interface and the web interface. |
| Phone interface: | When the phone is in the standby mode, press [Phone Settings] >>[Common] and select the option to view the corresponding information, as shown in the figure: |
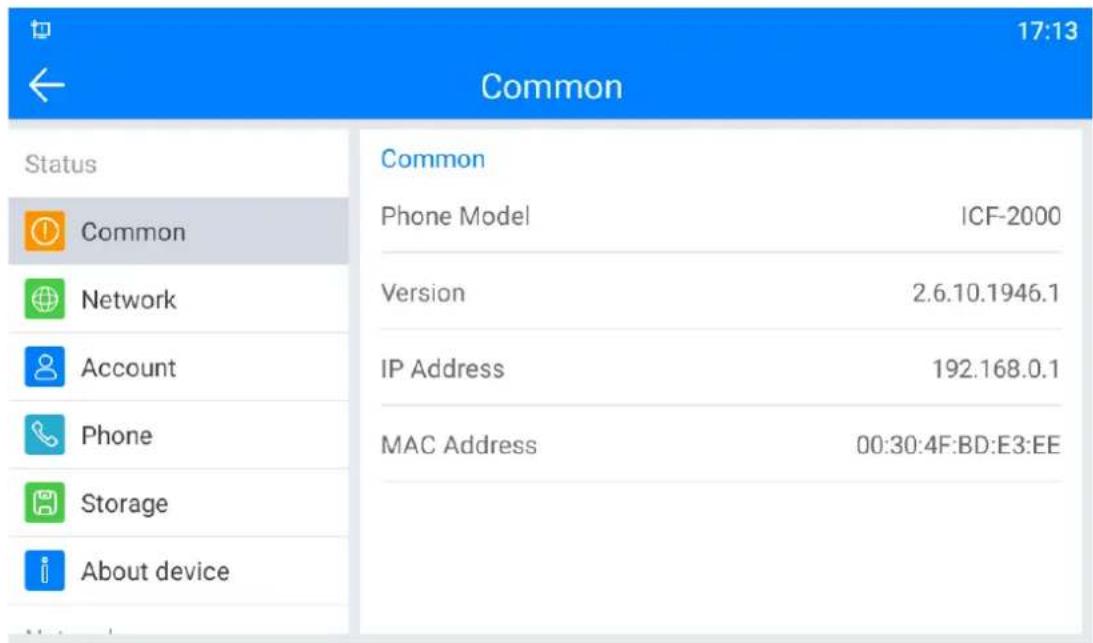
Picture - Phone status
- Web interface: Refer to 4. Web management to log in to the phone page, enter the [System] >> [Information] page, and check the phone status, as shown in the figure:
![PLANET Revolving & Communications ICF-2000 Information Account Configurations Upgrade Auto Provision Tools Reboot Phone System Network Line Phone settings Phonebook Call logs Function Key Application Security Device Log System Information ? Model: [CF-2000] Hardware: 1.0 Software: 2.6.10.1946.1 Uptime: 00 : 47 : 42 Last uptime: 00 : 00 : 00 MEMInfo: ROM: 1.83(GB)/8.00(GB) RAM: 1.46(GB)/2.00(GB) System time: 17:14 30 OCT WED (SYS) Network ? WAN Network mode: Static IP MAC: 00:30:4f:bd:e3:ee IPv4 IP: 192.168.0.1 Subnet mask: 255.255.255.0 Default gateway: 192.168.0.254 SIP Accounts ? Line 1 N/A Inactive Line 2 N/A Inactive NOTE Description: It shows some basic information of the phone, including model, hardware and software version, running time, network status, account registration status, etc.](/content/2026/05/943202/images/d7821bcb4cd5c4a5ea20454b8d85508b16500a955e5ef58c26a944d34f548bd6.jpg)
Picture - Web phone status
3.8 Application Instruction
Table - Application instructions
 Dialer Dialer | Click this icon to enter the pre-dial number interface, and then dial the corresponding operation through the screen or keyboard. |
 Email Email | It has the function of sending and receiving email. After configuring the account, it can send and receive directly on the phone. Contacts for this account are automatically synchronized to the mailbox account. |
 SMS SMS | Supports SMS writing, reading and sending functions |
 Phone Settings Phone Settings | It contains system information, network setting, account setting, call setting, etc.You can make corresponding settings under the corresponding menu. |
 Calculator Calculator | Scientific calculator that allows users to quickly process data. |
 Notepad Notepad | Notes and records -- Allows users to easily note events, wirth electronic post-it notes that can be viewed at any time. |
 Contacts Contacts | Supports search, add, delete, edit contacts and other functions. |
 Browser Browser | Supports access to various websites. |
 Sound Recorder Sound Recorder | Supports both call and non-call recording, with export functionality. |
 Calendar Calendar | Display and view dates, create activity reminders, etc. |
 Settings Settings | There are four big options, including basic settings, call settings, advanced settings and about the phone. You can make the corresponding adjustments under each menu, which follow the default settings of the Android system. |
 Clock Clock | Can configure alarm clock, time, stopwatch, countdownTime - supports global time zone selection. |
 Video Video | Only supports MP4 format video playback. |
 Call Log Call Log | Access to call records to view all call records. You can also view all incoming calls, outgoing calls and missed calls by using the option key. |
 Gallery Gallery | Supports Bmp, Jpeg, Png image preview and save. |
 Files Files | Save all downloaded files. |
 Music Music | Music player that can import recording and music play. |
 Explorer Explorer | View system related files. |
 DND DND | Enable or disable and the Do Not Disturb configuration. |
 MWI MWI | When the answering machine is activated, the call will be automatically forwarded to the voicemail. |
 Application Application | Click this icon to enter the application list screen |
4. Web Management
The phone can be configured and managed through its web interface. To access it, the user needs to enter the phone's IP address into a web browser. The IP address can be found by navigating to [Phone Settings] > [Status] > [Common] on the phone.
4.1 Web Login
4.1.1 Login Prompt
Use Web browser (Google Chrome or Microsoft Edge) to connect to 192.168.0.1 (Type this address in the address bar of the Web browser.)
You'll be prompted to input user name and password: admin and 123
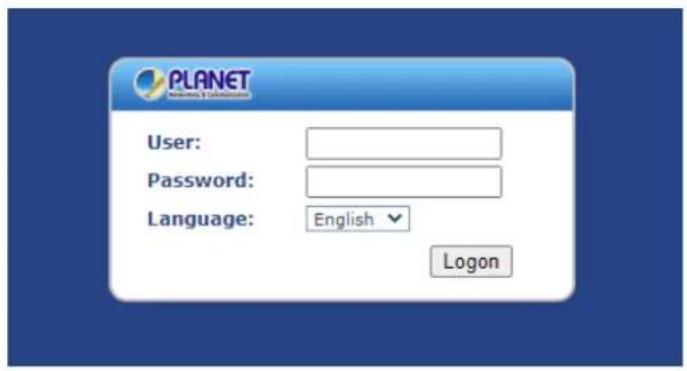
Picture - Landing page
4.1.2 Change of Password
After logging in, you will be prompted to change the initial password to a permanent one.
The length of the password should not be less than 8 digits and should include numerals, uppercase and letters, and special characters.
Change Web Authentication Password
Username
Old Password:
New Password:
Confirm Password:
admin
Apply
4.2 Network Configurations
The device supports two kinds of network connection modes: wired and wireless. This section covers the wired network connection. For the wireless network connection.
The device relies on an IP network connection to provide services. Unlike the traditional phone system based on the circuit switched wire technology, IP devices are connected to each other over the network and exchange data in packets, based on their respective IP addresses.
To enable this phone, you must first correctly configure the network configuration. To configure the network, users need to find the phone function menu button [Phone Settings] >> [Network] >> [Ethernet].
The default password for advanced settings is "123".

If user sees a 'WAN Disconnected' icon flashing in the middle of screen, it means the network cable is not correctly connected to the device's network port. Please check whether the cable is connected correctly to the device and to the network switch, router, or modem.
The device supports three types of networks, IPv4, IPv6, and IPv4 and IPv6. There are two common IP configuration modes about IPv4
- Dynamic Host Configuration Protocol (DHCP) – This is the automatic configuration mode by getting network configurations from a DHCP server. Users need not to configure any parameters manually. All configuration parameters will be getting from DHCP server and applied to the device. This is recommended for most users.
- Static IP Configuration – This option allows user to configure each IP parameter manually, including IP Address, Subnet Mask, Default Gateway, and DNS servers. This is usually used in an office environment or by power users.
The device is in default mode if configured in DHCP mode.
There are three common IP configuration modes about IPv6:
- DHCP – This is the automatic configuration mode by getting network configurations from a DHCP server. Users need not to configure any parameters manually. All configuration parameters will be getting from DHCP server and applied to the device. This is recommended for most users.
- Static IP configuration -- This option allows users to manually configure each IP parameter, including IP address, mask, gateway, and primary and secondary domains. This usually applies to some professional network user environments.
4.3 SIP Configurations
A line must be configured properly to be able to provide telephony service. The line configuration is like a virtualized SIM card. Just like a SIM card on a mobile phone, it stores the service provider and the account information used for registration and authentication. When the device is applied with the configuration, it will register the device to the service provider with the server's address and user's authentication as stored in the configurations.
The user can conduct line configuration on the interface of the phone or the webpage, and input the corresponding information at the registered address, registered user name, registered password and SIP user, display name and registered port respectively, which are provided by the SIP server administrator.
Phone interface: To manually configure a line, the user can press the line key for a long time, or press the button in the function menu [Phone Settings] >> [Account] >> [Line] configuration; click "OK" to save the configuration.

User must enter the correct PIN code to be able to go to advanced settings to edit line configuration. (The default PIN is 123.)
The parameters and screens are listed in the pictures below.
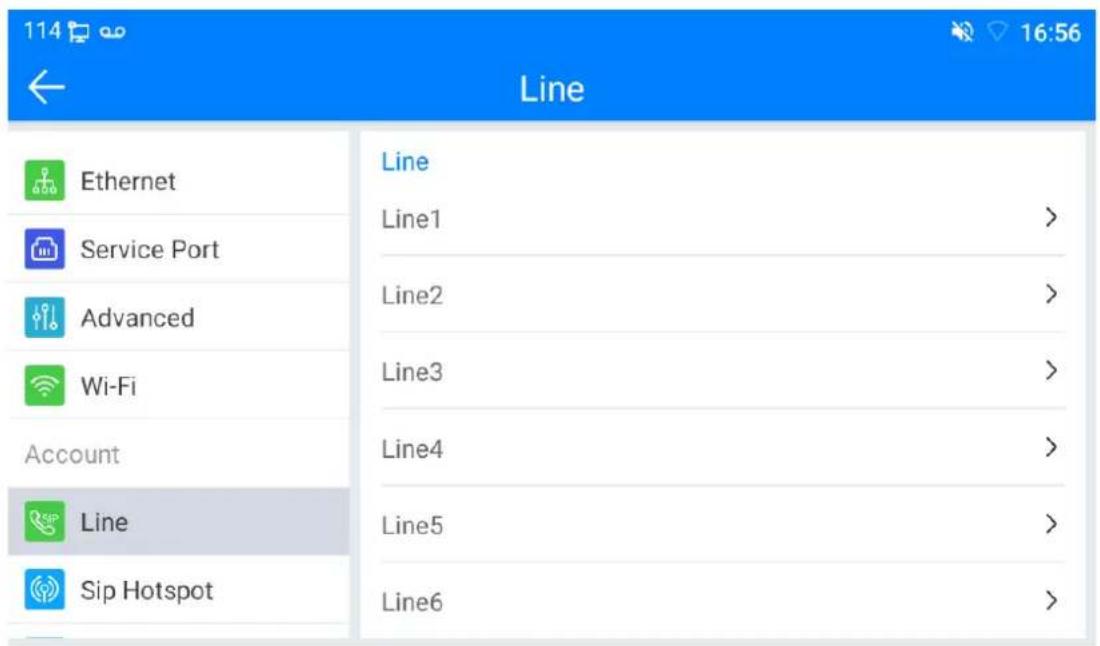
Picture - Phone line SIP address and account information
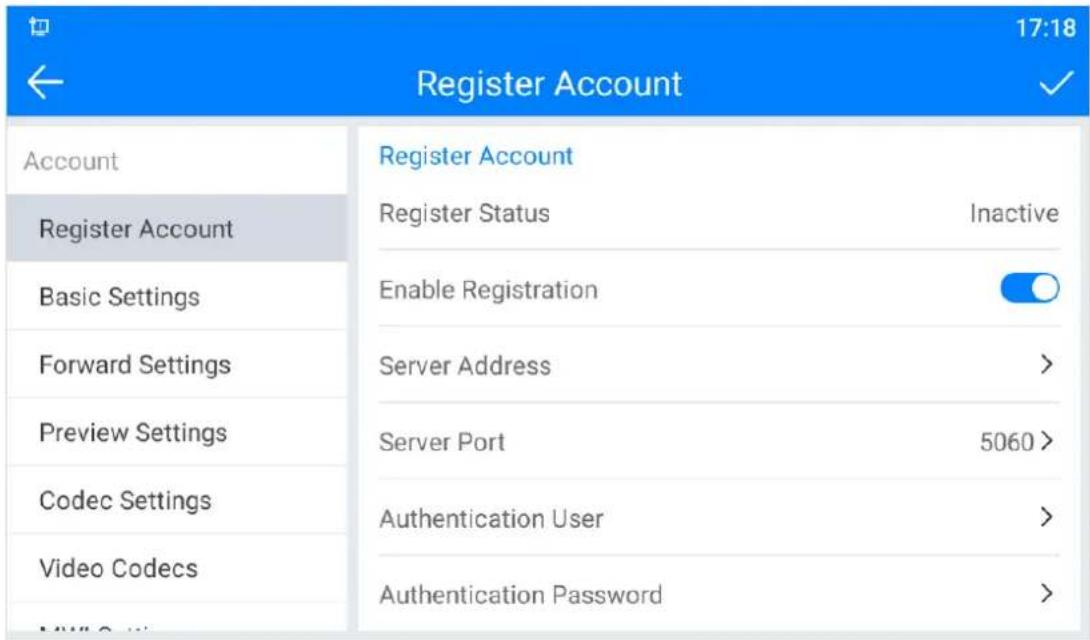
Picture - Phone display name and port
- Web interface: After logging in to the phone page, enter [Line] >> [SIP] and select SIP Line for configuration, and click apply to complete registration after configuration, as shown below:
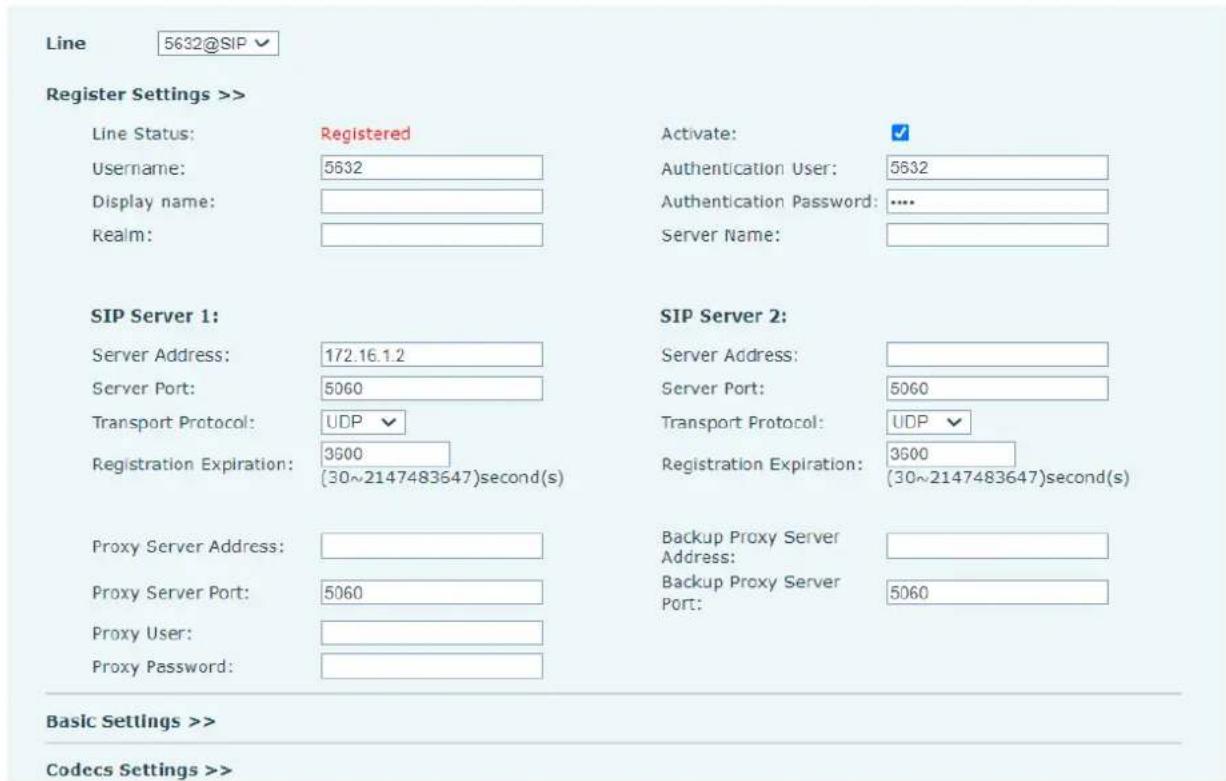
Picture - Web SIP registration
5. Basic Function
5.1 Making Phone Calls
■ Default Line
The device provides twenty line services. If both lines are configured, user can make or receive phone calls on either line. If default line is configured by user, there will be a default line to be used for making outgoing call which is indicated on the top left corner. To change the default line, user can press left/right navigator buttons to switch between two lines.
To enable or disable default line, user can press [Menu] >> [Features] >> [Basic] >> [General] >> [Default Line] or configure from Web Interface (Web / Phone/ Features / Basic Settings).
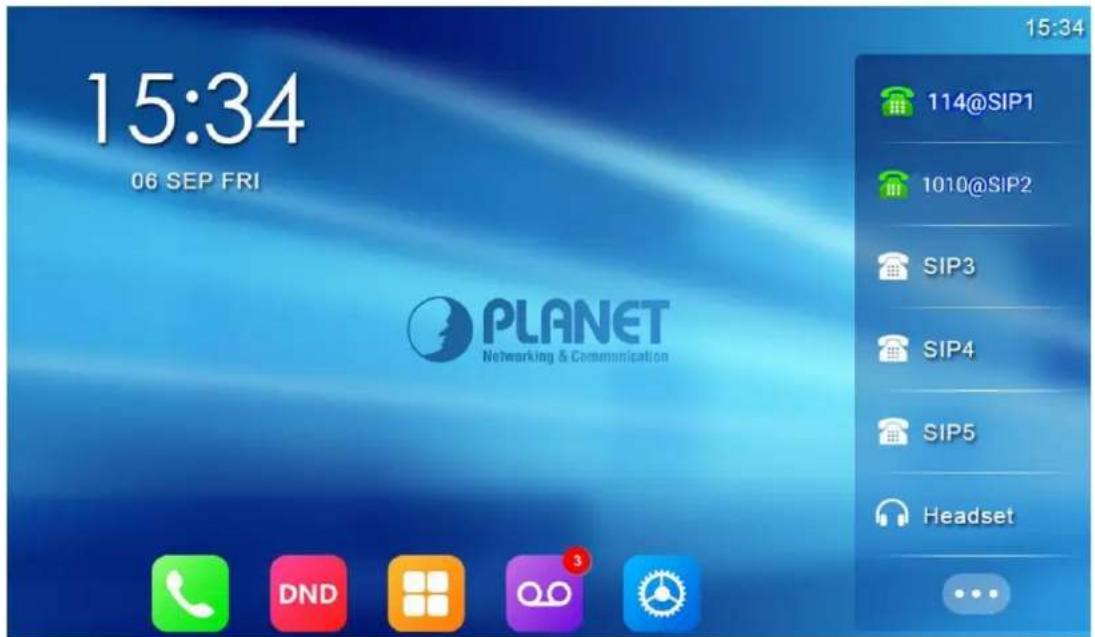
Picture - Default line
■ Dialing Methods
User can dial a number by,
- Entering the number directly
- Selecting a phone number from phonebook contacts
- Selecting a phone number from cloud phonebook contacts
- Selecting a phone number from call logs
● Redialing the last dialed number
■ Dial Number, then Open Audio
To make a phone call, user can firstly dial a number by one of the above methods. When the dialed number is completed, user can press [Dial] button on the soft-menu, or press hand-free button to turn on the speaker or headphone, or lift the handset to call out with the current line, or user can press line key (Configured by DSS Keys) to call out with specified line.
■ Open Audio, then Dial the Number
Another alternative is the traditional way to firstly open the audio channel by lifting the handset, turning on the hands-free speaker or headphone by pressing hands-free button, or line key, and then dial the number with one of the above methods. When dialing the number, user can press the [Dial] button or then [OK] button to call out, or the number will be dialed out automatically after timeout.
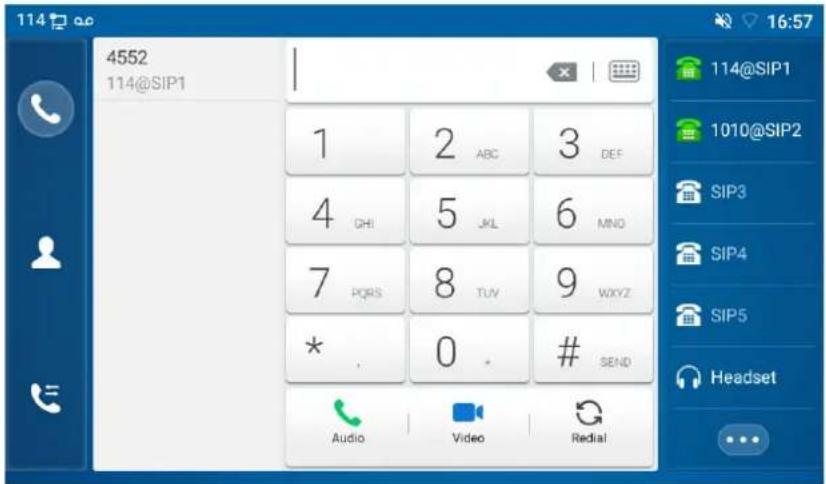
Picture - Open the voice channel and dial the number
■ Cancel Call
While calling the number, user can press to end the audio channel by putting back the handset or pressing the hands-free button to drop the call.
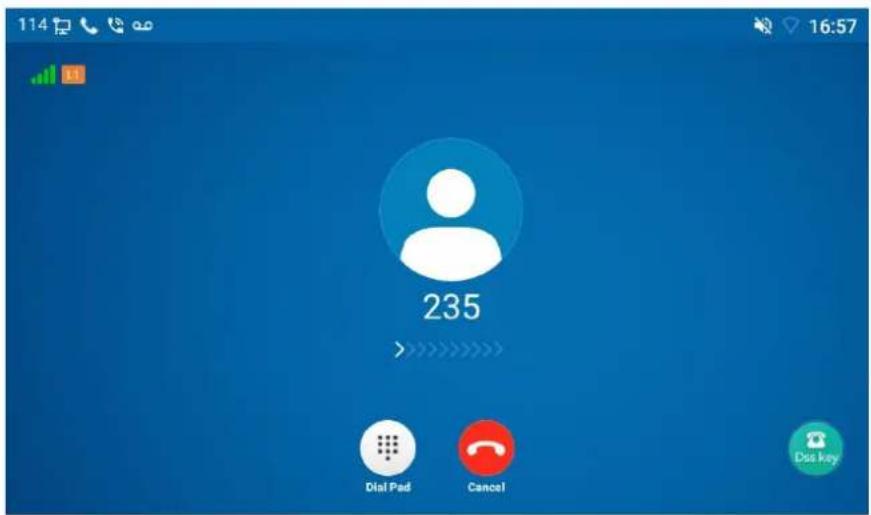
Picture - Call number
5.2 Answering Calls
When the phone is idle and there is a call, the user will see the call reminder screen as shown below.
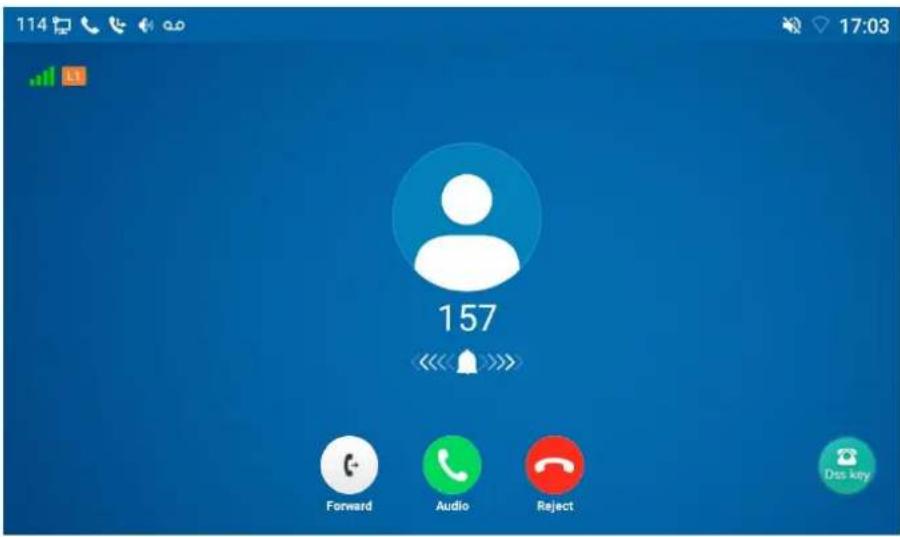
Picture - Answering calls
User can answer the call by lifting the handset, open headphone or speaker phone by pressing the hands-free button, or the [Answer] button. To divert the incoming call, user should press [Divert] button. To reject the incoming call, user should press the [Reject] button.
5.2.1 Talking
When the call is connected, user will see a talking mode screen as shown in the following figure.
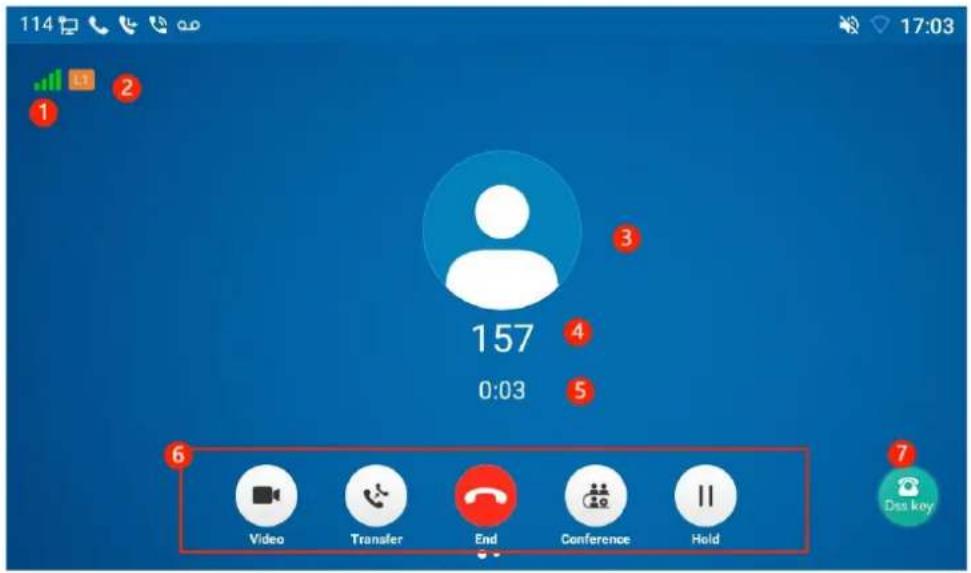
Picture - Talking interface
Table - Talking mode
| Number | Name | Description |
| 1 | Voice Quality | The voice quality of the current call is related to the network and other factors. |
| 2 | HD voice | Call using HD audio codec. |
| 3 | User avatar | User can customize the selection of Avatar pictures. |
| 4 | Calls to end | The name or number of the person on the other end of the call. |
| 5 | Call duration | The duration of a call after it has been established. |
| 6 | Softkey Page | Swipe to the right to view the softkey key on the second page. |
| 7 | DSSKEY | Click to expand the dsskey list. |
5.2.2 Making/Receiving the Second Call
The device can support up to two concurrent calls. When there is already a call established, user can still answer another incoming call on either lines or make a second call on either lines.
■ The Second Incoming Call
When there is another incoming call during talking a phone call, this call will be waiting for user to answer it. User will see the call message in the middle of current screen. The device will not be ringing but playing call waiting tone in the audio channel of the current call and the LED will be flashing in green. User can accept or reject the call as the same as normal incoming call. When the waiting call is answered, the first call will be put on hold automatically.
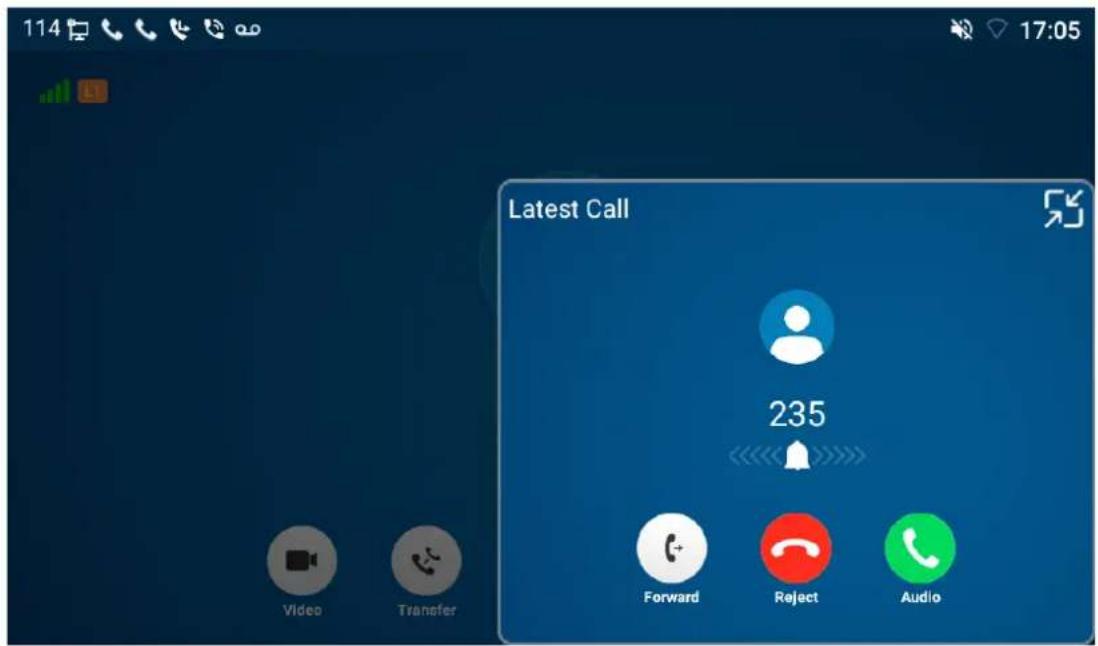
Picture - The second call interface
■ Second Outgoing Call
To make a second call, user may press [Xfer] / [Conf] button to make a new call on the default line or press the line key to make new call on specific line. Then dial the number the same way as making a phone call. Another alternative for making a second call is to press DSS Keys to dial out from the configured Keys (BLF/Speed Dial). When the user is making a second call with the above methods, the first call could be placed on hold manually first or will be put on hold automatically at second dial.
■ Switching between Two Calls
When there are two calls established, user will see a dual calls screen as shown in the following picture.
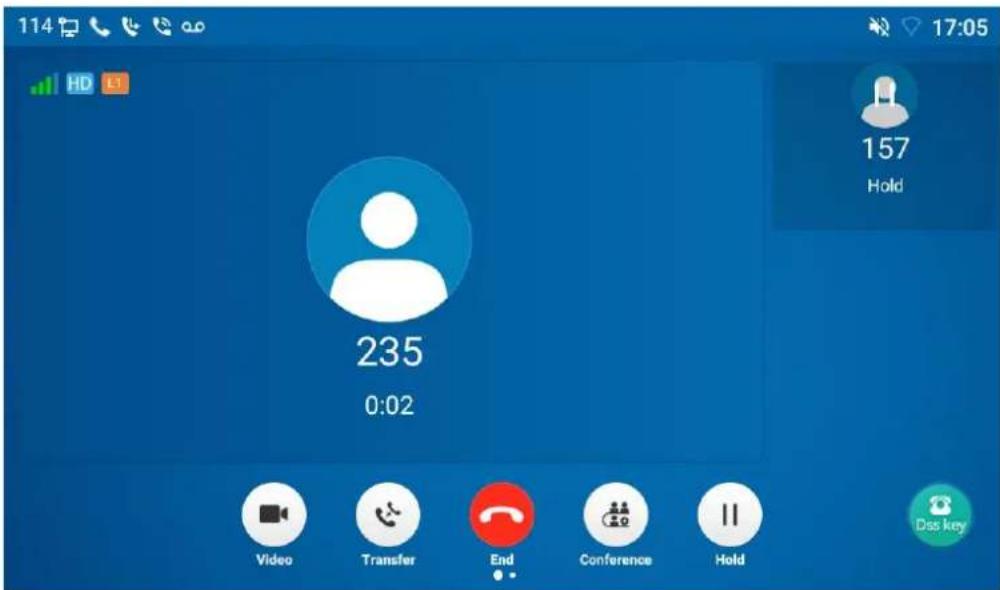
Picture – Two-way calling
Users can switch cards by touching them with their fingers; Switch calls by clicking on the avatar Hold image or pressing the 'Resume' button below.
■ Ending One Call
User may hang up the current talking call by closing the audio channel or press the [End] button. The device will return to single call mode in holding state.
5.3 End of the Call
After the user finishes the call, the user can put the handle back on the phone, press the hands-free button or Softkey [End] key to close the voice channel and end the call.

When the call is on hold, the user must press the [resume] resume key to return to the call state and end the call.
5.4 Video Call
The ICF-2000 supports a variety of video formats -- CIF, VGA, 4CIF and 1080p.
The device only supports video decoding, but users can initiate video calls.
- The default dialing mode is video. When the device dials, it uses video mode to call out by default. If the end device supports sending video, both sides establish video call.
● The default dialing mode is voice. The above operation establishes voice call.
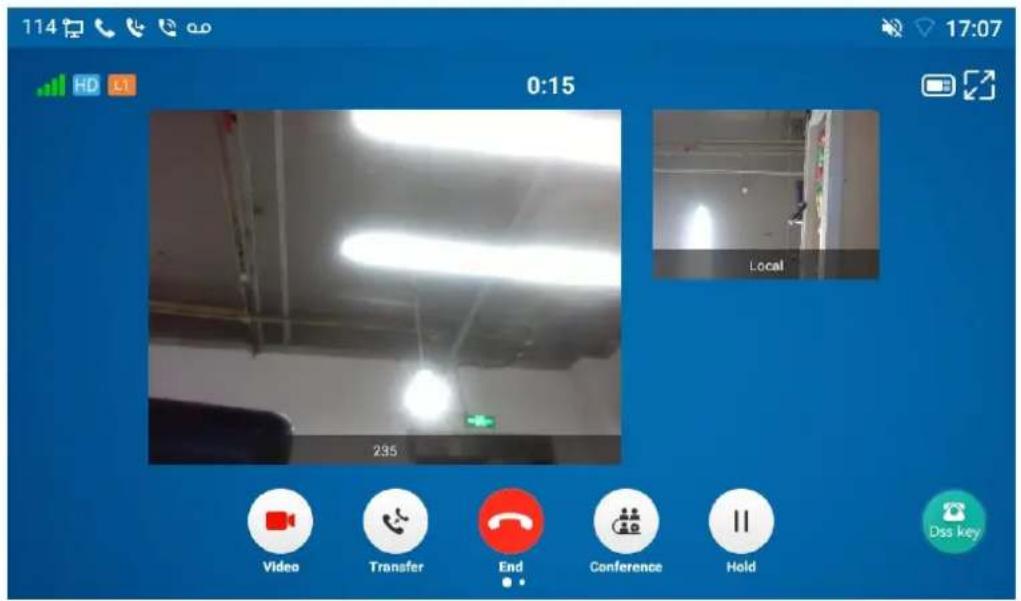
Picture - Video interface
Web interface: Enter [Phone Settings] >> [Features] >> [Basic Settings], and choose to configure the "Default Dial Mode" and "Default Ans Mode".
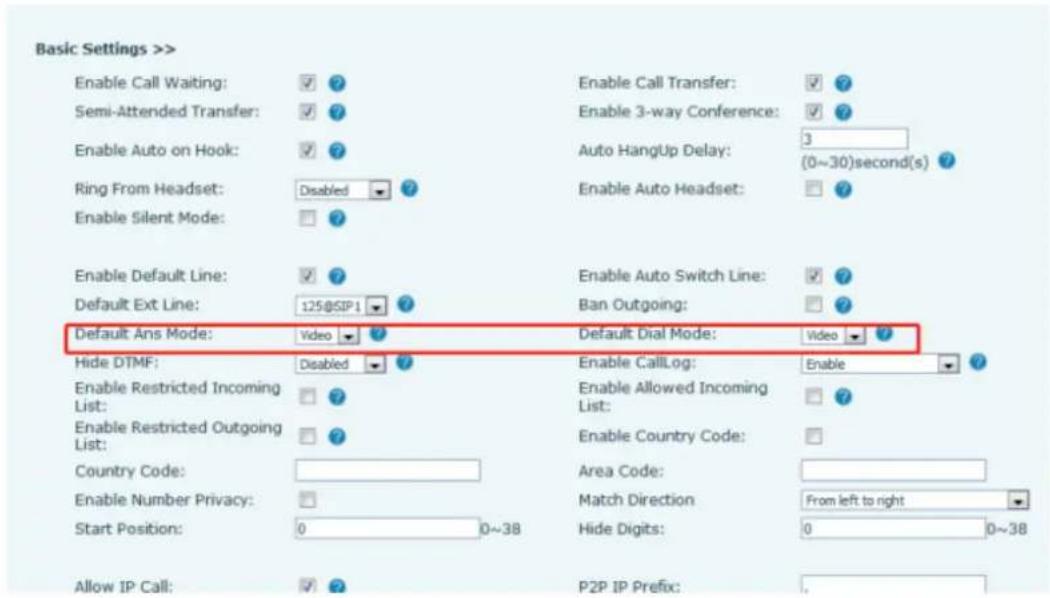
Picture - Video Settings
5.5 Redial
Redial the last outgoing number:
Before entering the number, press the redial key, and the phone will call out the number on the dial.
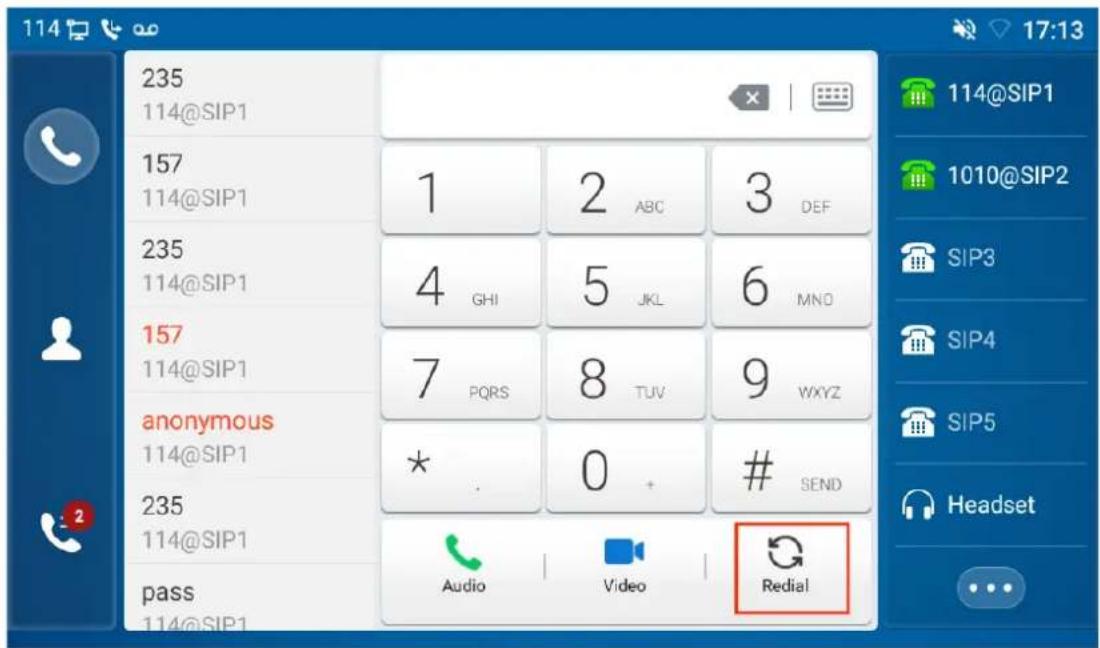
Picture - Video Settings
Press the redial key to enter the call record:
Log in to the phone page, enter [Phone Settings] >> [Features] >> [Redial Settings], check redial to enter the call record. Press the redial button when in standby to enter the call record page, and press again to call out the currently located number.
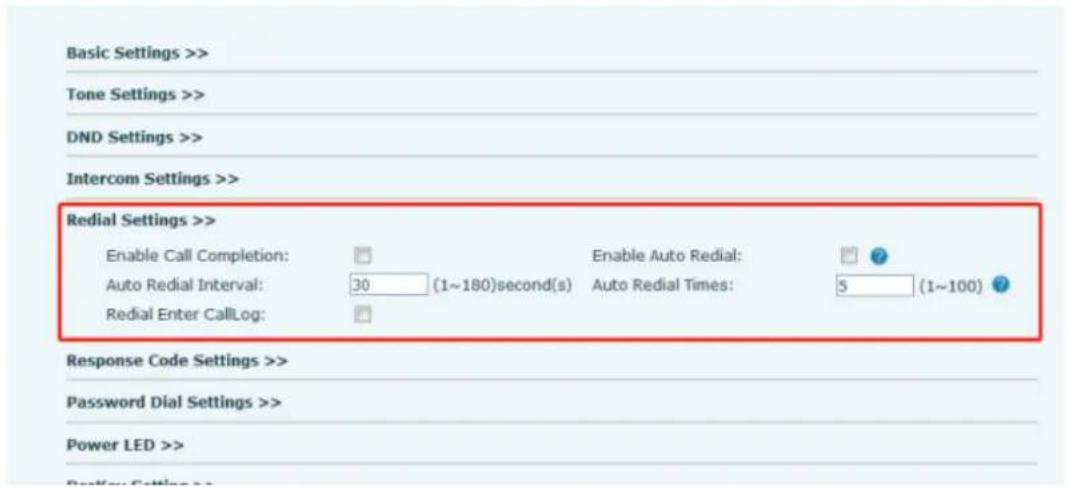
Picture - Redial Setting
5.6 Dial-up Query
The phone is set by default to enable the dial-up query function. When dialing, if two or more numbers are entered, the interface will automatically match the dialed numbers with call records and contacts in the number list. Use the navigation up/down keys to select a number, then press the call key to dial, or wait for a timeout to proceed.
5.7 Auto-Answering
User may enable auto-answering feature on the device and any incoming call will be automatically answered (excluding call waiting). The auto-answering can be enabled on a per-line basis.
The user can start the automatic answer function in the telephone interface or the webpage interface.
- Phone interface :
Press the [Phone Settings] >> [Account] >> [Line] button;
Press the button to select the line and enter the [Basic Settings]. Click on/off the auto answering option and set the auto answering time. The default is 5 seconds.
The icon in the upper left corner of the screen indicates that auto answer is enabled.
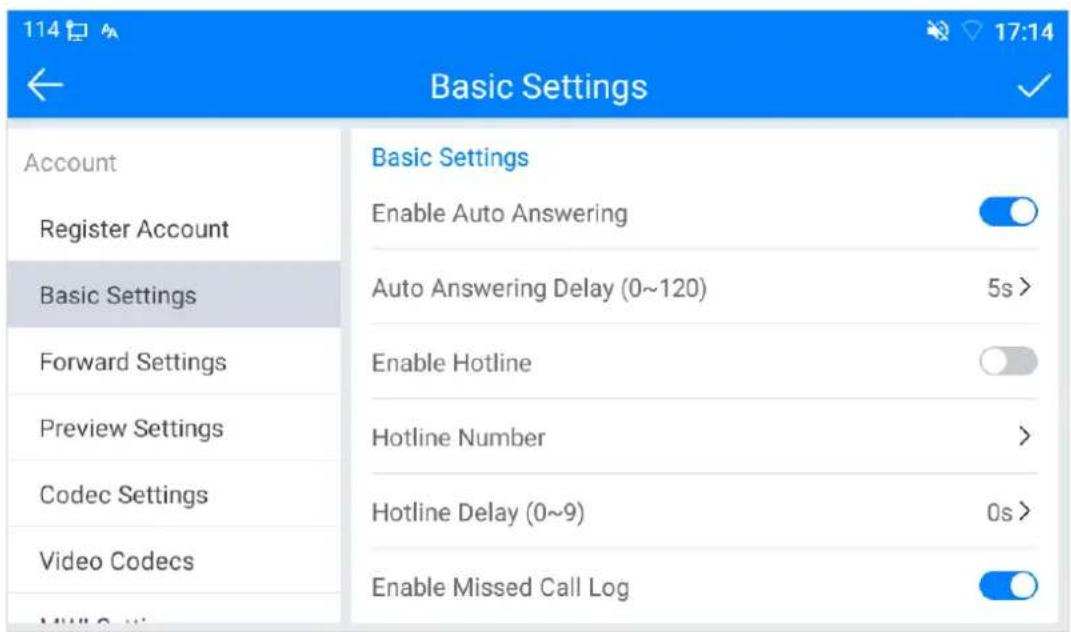
Picture - Line 1 enables auto-answering
Web interface :
Log in to the phone page to enter [Line] >> [SIP], select [SIP] >> [Basic settings], and start auto-answering, and click apply after setting the automatic answering time.
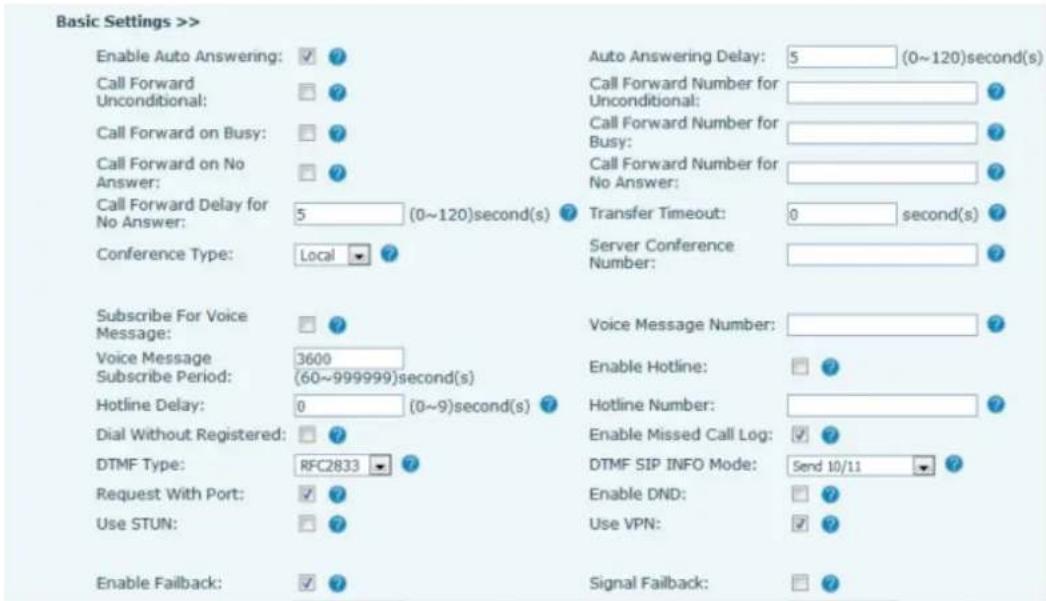
Picture - Web page to start auto-answering
5.8 Call Back
The user can dial back the last call. If there is no call history, press the [Callback] button and the phone will say "can't process".
- Set the callback key through the phone interface:
In standby mode, click the unfold button and long-press the function key to be set. It will automatically enter the configuration interface. Select "key event" under Type and select "callback" under Subtype to set the callback key name in the title input box. Press the [√] button to save.
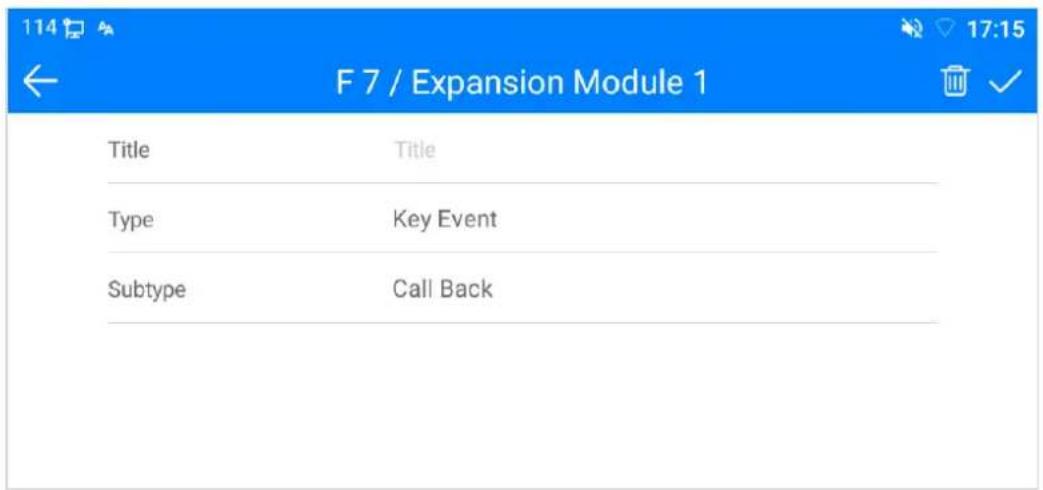
Picture - Set the callback key on the phone
- Set the callback key through the web interface:
Log in to the phone page to enter the [Function Key] >> [Function Key] page to select the function key, set the type as the function Key, and set the subtype as the callback, as shown in the figure below:
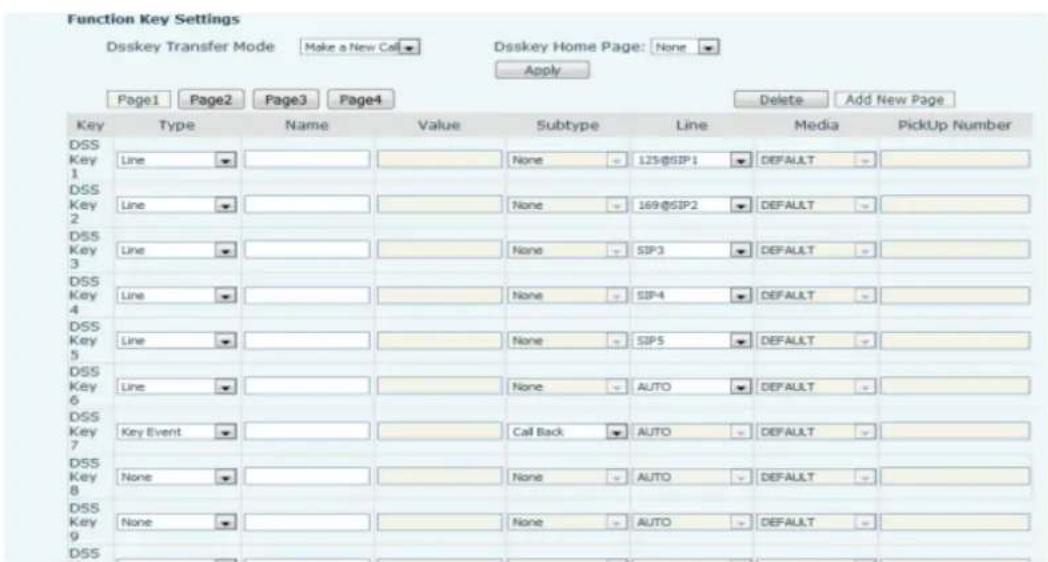
Picture - Set the callback key on the web page
5.9 Mute
You can turn on mute mode during a call and turn off the microphone so that the local voice is not heard. Normally, mute mode will be automatically turned off at the end of a call. You can also turn on mute on any screen (such as the free screen) and mute the ringtone automatically when there is an incoming call.
Mute mode can be turned on in all call modes (handset, headphones or hands-free).
5.9.1 Mute the Call
- During a call, press the mute button below 🚗 to mute the sound and the mute icon will turn red The mute icon is displayed in the upper left corner of the call interface, as shown in the figure:
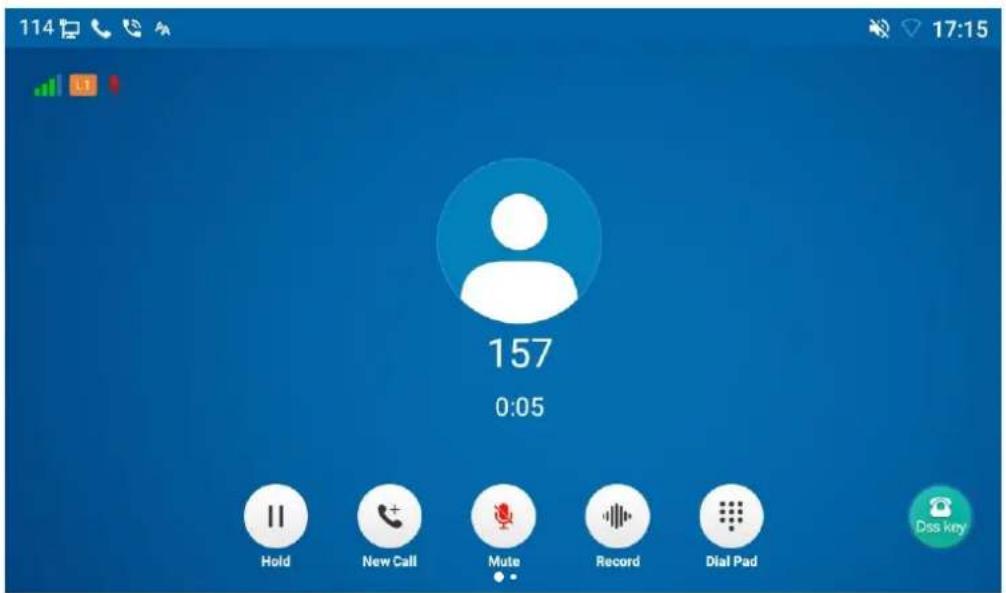
Picture - Mute the call
- Cancel mute: Press 📁 to cancel mute on the phone again. The mute icon is no longer displayed in the call screen. The red light is off by the mute button.
5.9.2 Ringing Mute
- Turn on ringing mute: When the phone is in standby, press "Volume -" to reduce the volume to 0
The ringtone mute icon is displayed in the upper right corner of the phone. When there is an incoming call, the phone displays the incoming call interface but will not ring.
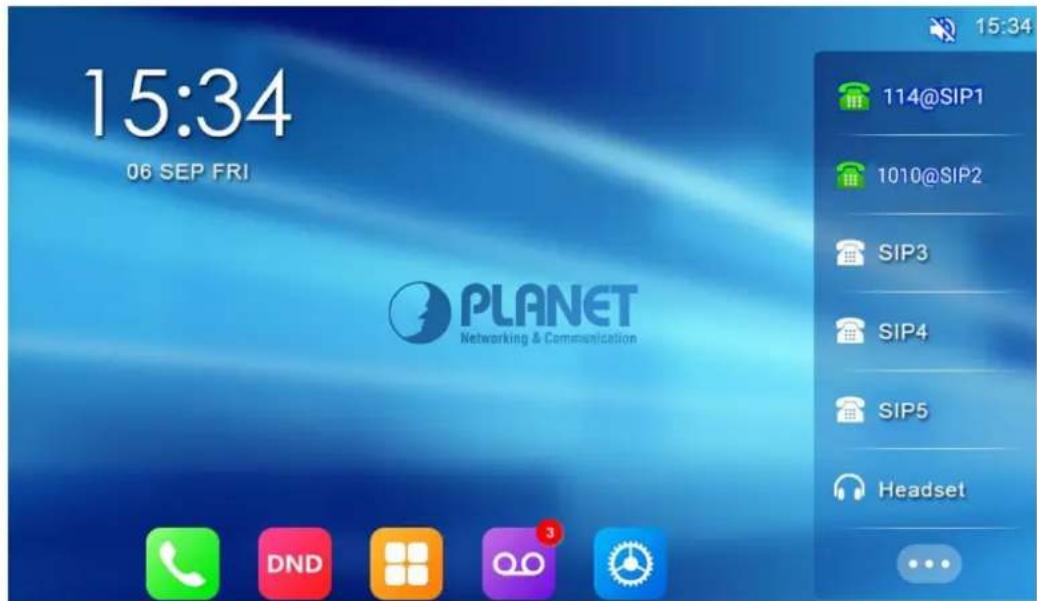
Picture - Ringing mute
- Cancel ring tone mute: On the standby or incoming call screen, press the volume up ^1+ bottom to cancel ring tone mute. It will no longer show mute icon in the upper right corner after canceling

The phone mute icon is off.
5.10 Call Hold/Resume
The user can press the [Hold] button to maintain the current call, and this button will become the [Resume] button. The user can press the "resume" button to restore the call.
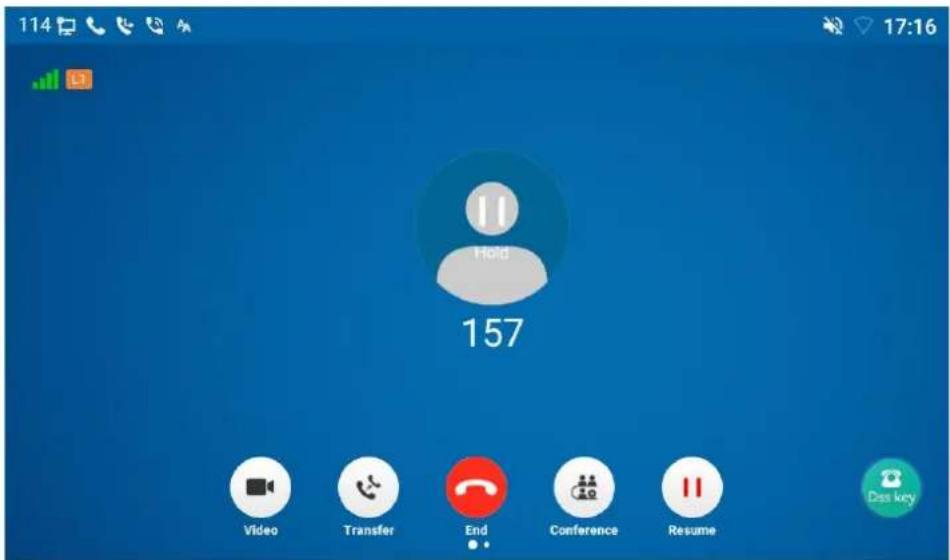
Picture - Call hold interface
5.11 DND
User may enable Do-Not-Disturb (DND) feature on the device to reject incoming calls (including call waiting). The DND can be enabled on a per-line basis.
Enable/Disable DND for all lines. Methods are as follows:
● Phone interface (Default standby mode):
1) Press the [DND] button to enter the DND setting interface. Select the line or phone to enable DND. The icon will become red. The phone status prompt bar will display the DND icon.
2) Press the [DND] button to enter the DND setting interface and disable DND. The icon will be become blue and the DND icon will disappear from the phone status prompt bar.
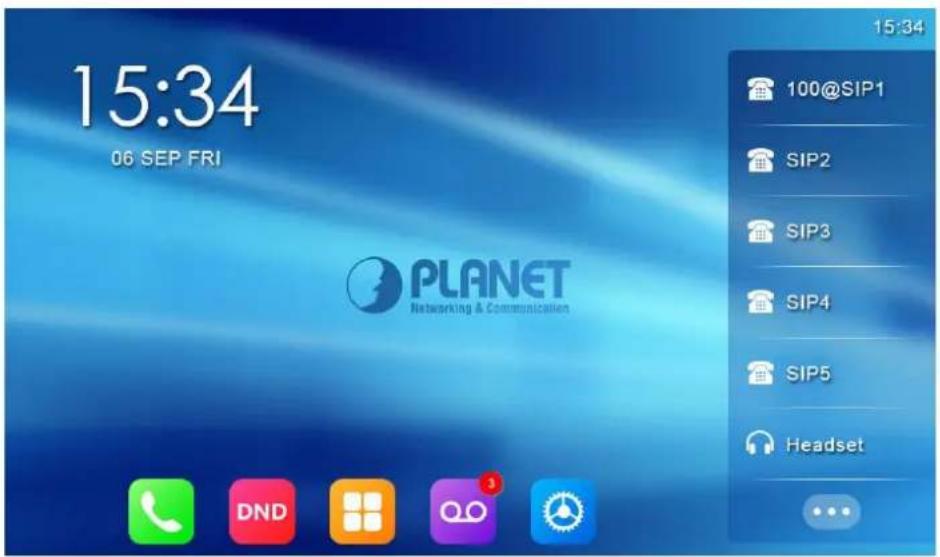
Picture - Enable DND
To enable and disable the uninterrupted function on a specific line,
1) Press [Phone Settings] >> [Call] >> [DND] button to enter the [DND] editing interface.
2) Use the left/right navigation button to select the line to be adjusted. Choose the desired DND mode and state, and then press the [OK] button to save.
3) The DND icon will turn red, indicating that the selected SIP line has successfully enabled the "Do Not Disturb" mode.
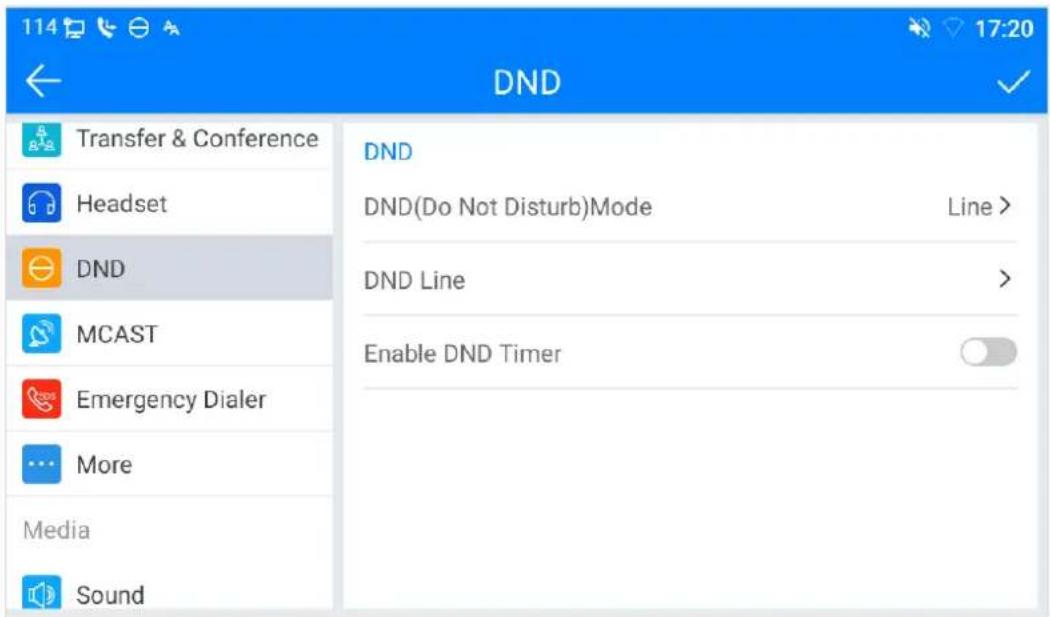
Picture - DND setting interface
The user can also use the DND timer. Once set, the DND function will automatically activate within the specified time range, and the DND icon will turn red during that period.
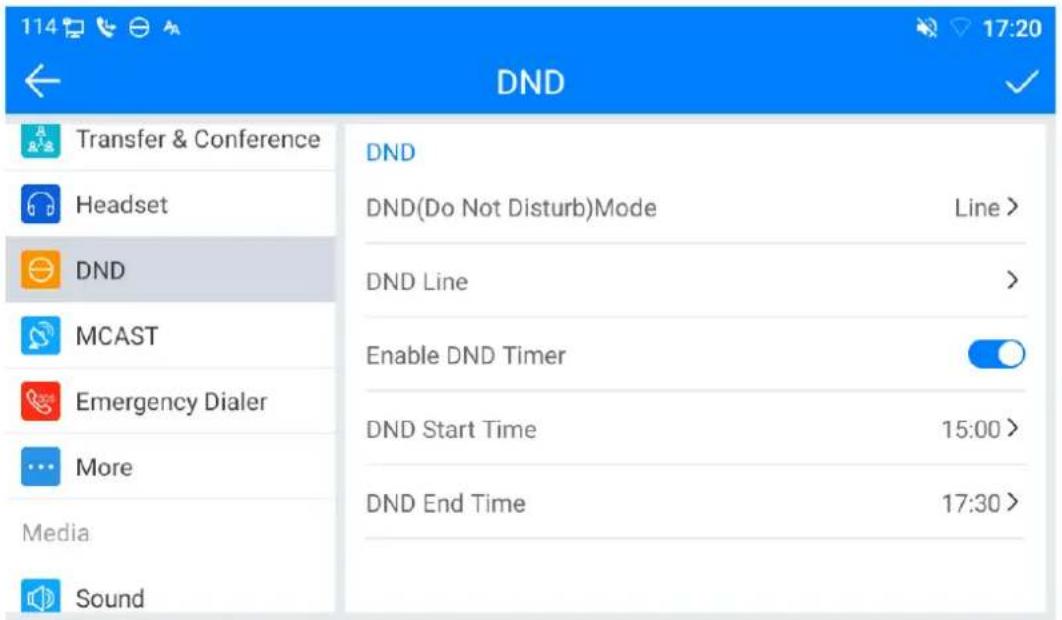
Picture - DND timer
- Web interface : Enter [Phone setting] >> [Features] >> [DND settings]. Set the DND type (off, phone, line), and the DND timing function.
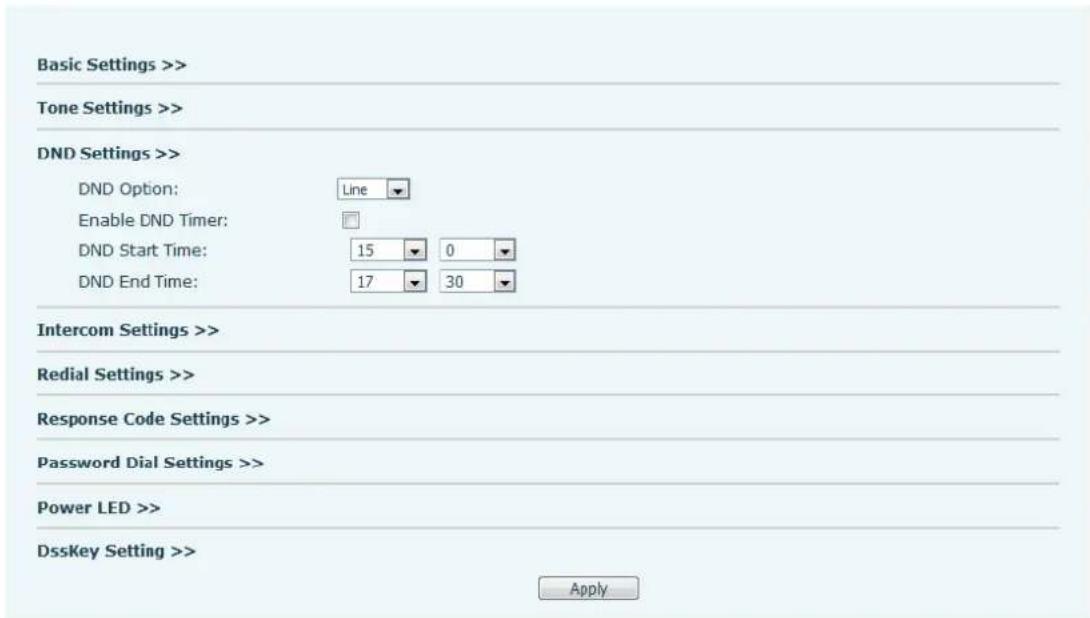
Picture - DND settings
The user turns on the DND for a specific route on the web page: Enter [Line] >> [SIP], select a [Line] >> [Basic settings], and enable DND.
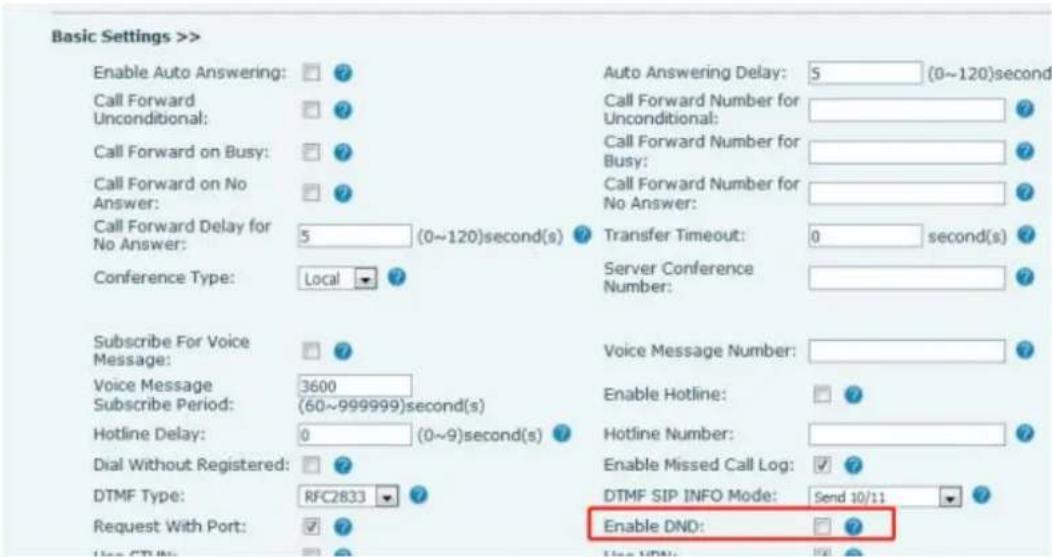
Picture - Line DND
5.12 Call Forward
Call forward is also known as 'Call Divert' which is to divert the incoming call to a specific number based on the conditions and configurations. User can configure the call forward settings of each line.
There are three types:
● Unconditional Call Forward – Forward any incoming call to the configured number.
- Call Forward on Busy – When user is busy, the incoming call will be forwarded to the configured number.
- Call Forward on No Answer – When user does not answer the incoming call after the configured delay time, the incoming call will be forwarded to the configured number.
● Phone interface: Default standby mode
1) Press the [Application] >> [Phone Settings] >> [Account] >> [Line] button, and click any line to set up forward settings.
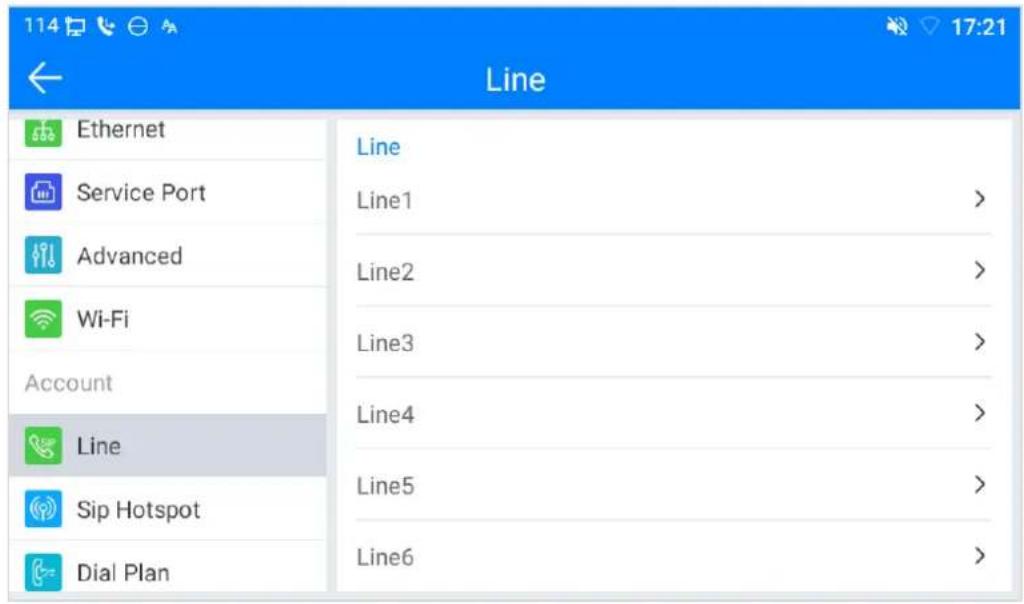
Picture - Select the line to set up call forwarding
2) Select the line to be set and enter the call forward settings interface
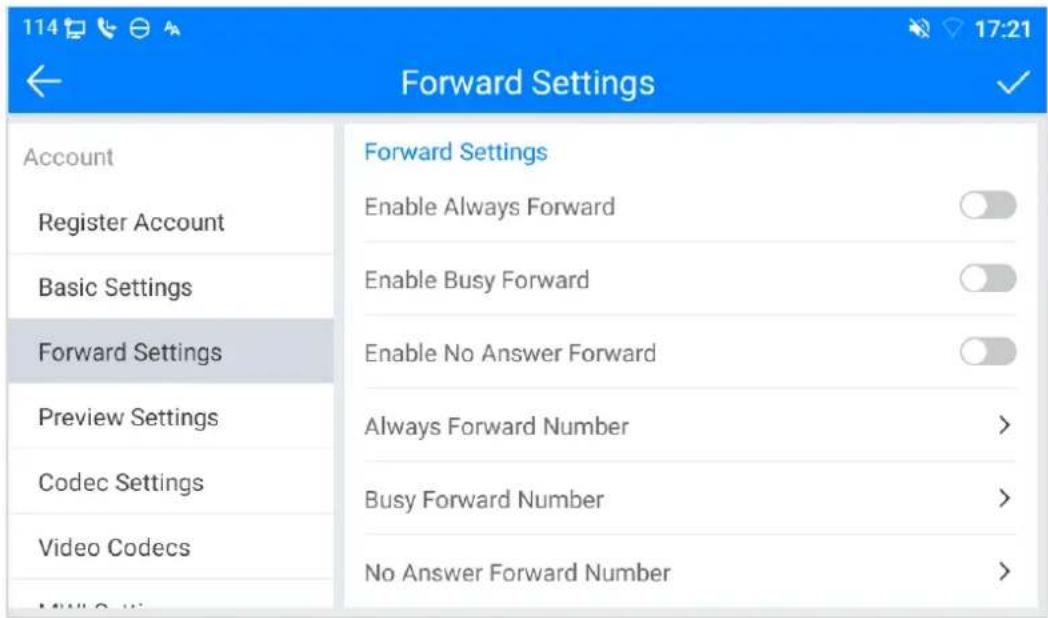
Picture - Select call forward type
3) Click the slide button to select on/off.
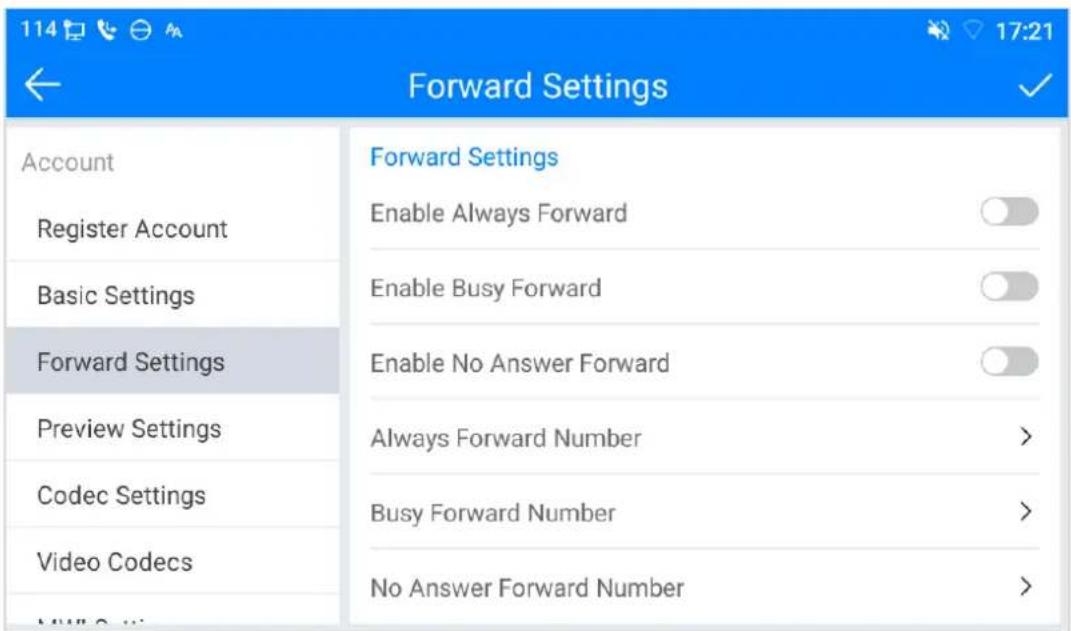
Picture – Enable the call forwarding and configure the call forwarding number
4) Configure parameters by clicking Settings and enter the required information. When finished, press the [√] button to save the changes.
- Web interface: Enter [Line] >> [SIP], Select a [Line] >> [Basic settings], and set the type, number and time of forwarding.
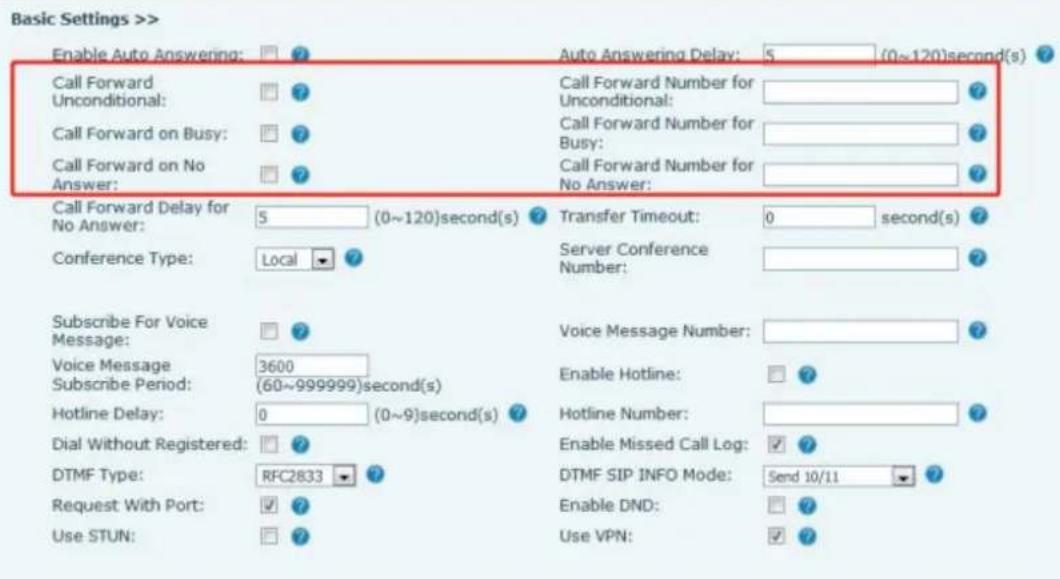
Picture - Set call forward
5.13 Call Transfer
When the user is talking with a remote party and wish to transfer the call to another remote party, there are three ways to transfer the call, blind transfer, attended transfer and semi-attended transfer.
- Blind transfer: Do not need to negotiate with the other side; directly transfer the call to the other side.
- Semi-attended transfer: When you hear the ring back, transfer the call to the other party.
- Attended transfer: When the caller answers the call, transfer the call to the caller.
5.13.1 Blind Transfer
During the call, the user presses the function menu button [Transfer]. Enter the number to transfer or press the contact button or the history button to select the number. Press the transfer key again to complete the transfer to the third party. Once the third party's phone rings, the transfer will be confirmed, and the call will automatically end.
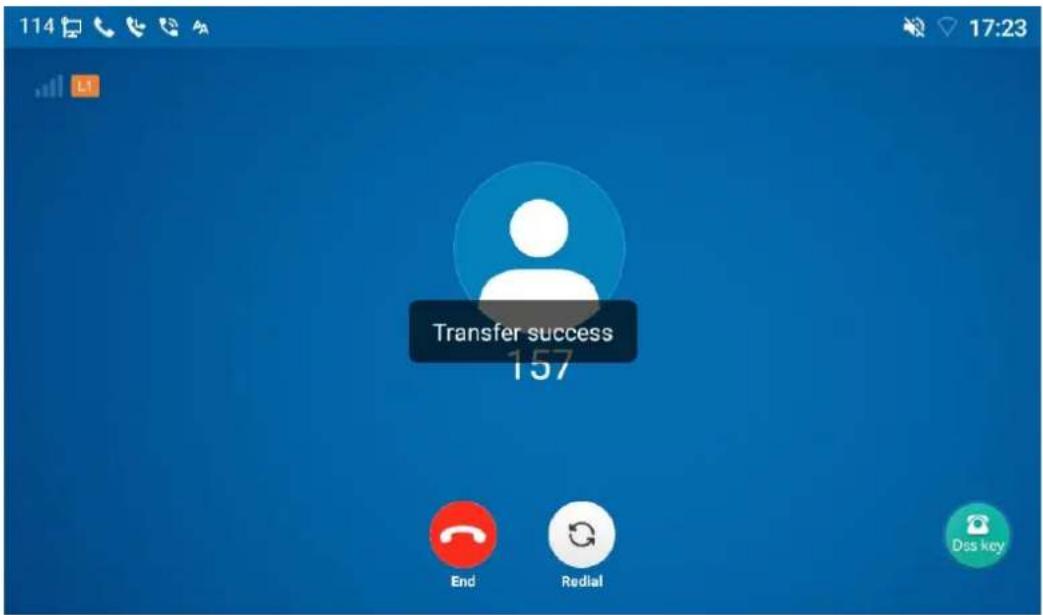
Picture - Transfer interface
5.13.2 Semi-Attended Transfer
During the call, the user presses the function menu button [transfer] on the phone to input the number to be transferred or press the contact button or the historical record button to select the number, and then press the call button. If the third party does not answer, press the transfer on the call interface to complete the semi-attended transfer or press the end button to cancel the transfer.
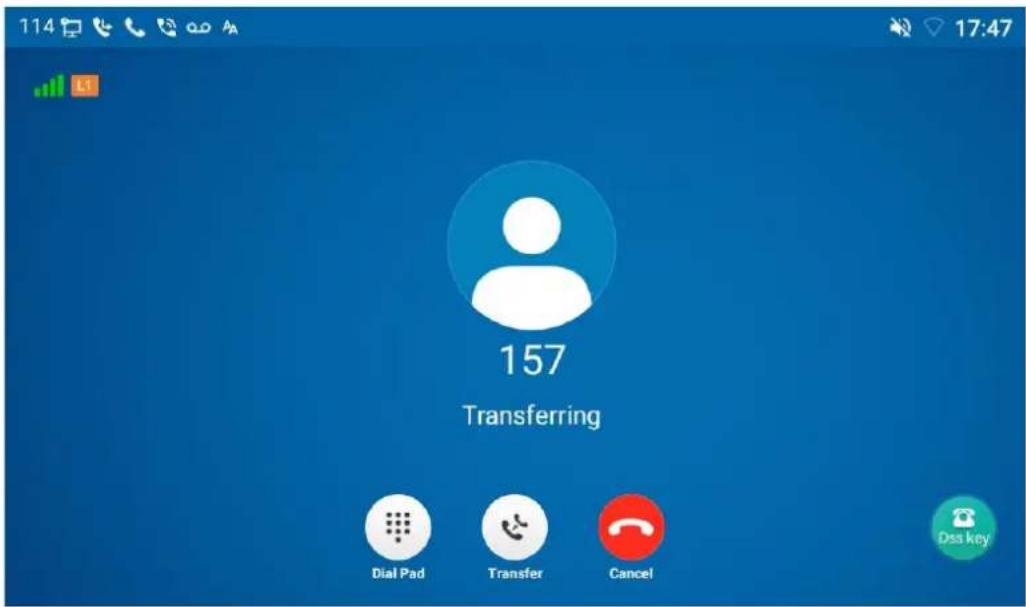
Picture - Semi-Attended transfer
5.13.3 Attended Transfer
Attended transfer is also known as "courtesy mode", which is to transfer the call by calling the other party and waiting for the other party to answer the call. Calling is the same procedure. In the dual call mode, press the "transfer" button to transfer the first call to the second call.
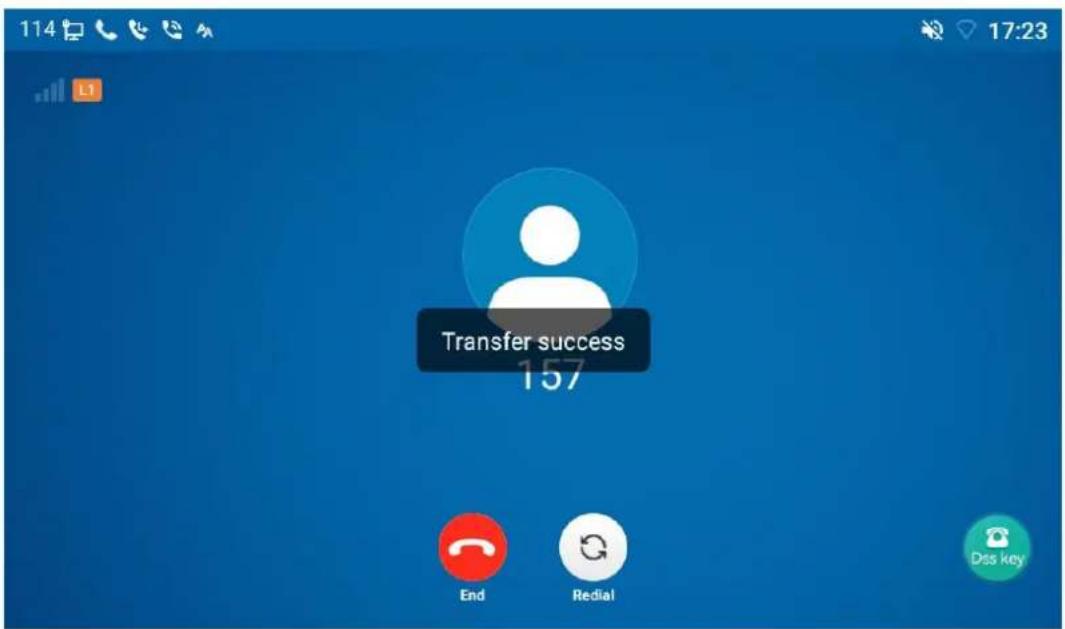
Picture - Attended transfer
5.14 Call Waiting
- Enable call waiting: New calls can be accepted during a call.
● Disable call waiting: New calls will be automatically rejected and a busy tone will be prompted.
● Enable call waiting tone: When you receive a new call on the line, the tone will beep.
The user can enable/disable the call waiting function in the phone interface and the web interface.
- Phone interface: Press [Phone Settings] >> [Call] >> [Call], enable/disable call waiting and call waiting tone.
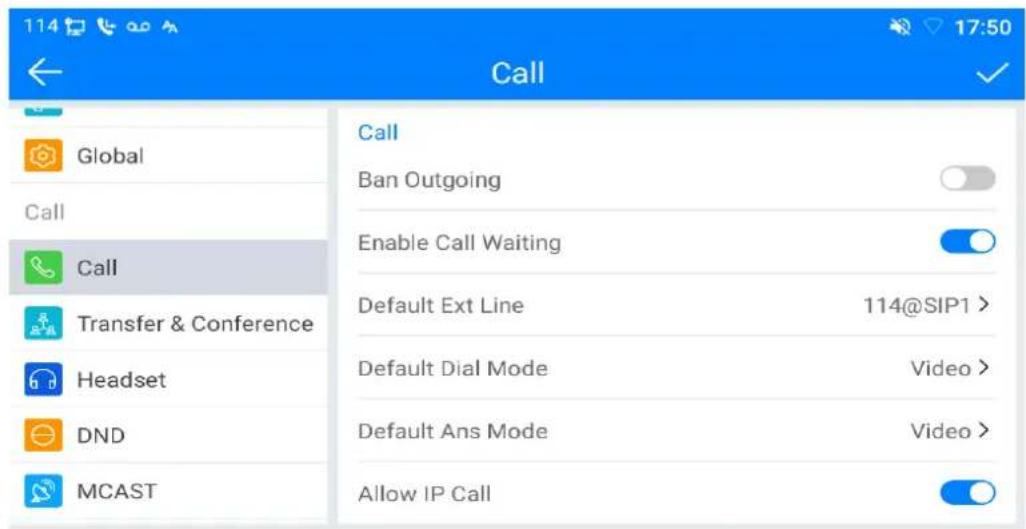
Picture - Call waiting setting
- Web interface: Enter [Phone Settings] >> [Features] >> [Basic Settings], enable/disable call waiting and call waiting tone.
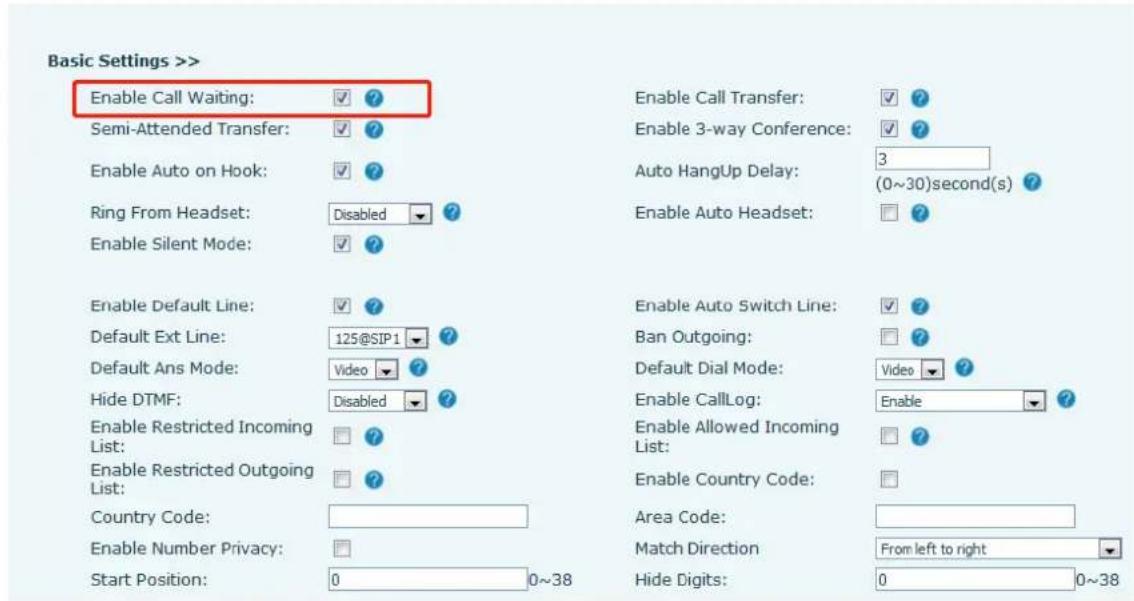
Picture - Web call waiting setting
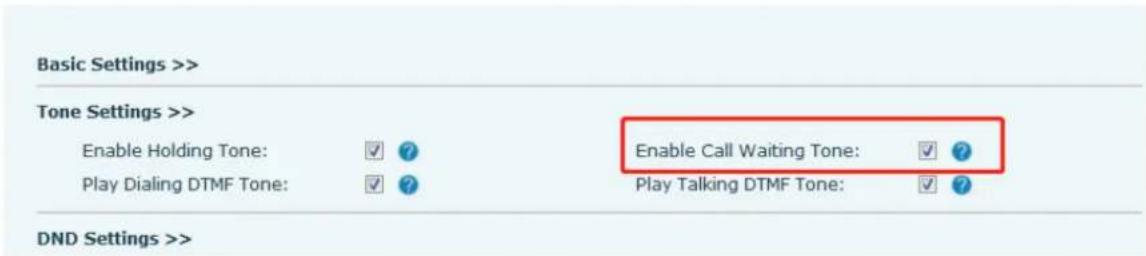
Picture - Web call waiting tone setting
5.15 Conference
5.15.1 Local Conference
To conduct local conference, the user needs to log in to the webpage and enter [Line] >> [SIP] >> [Basic settings]. The meeting mode is set as local (the default is local mode), as shown in the figure:
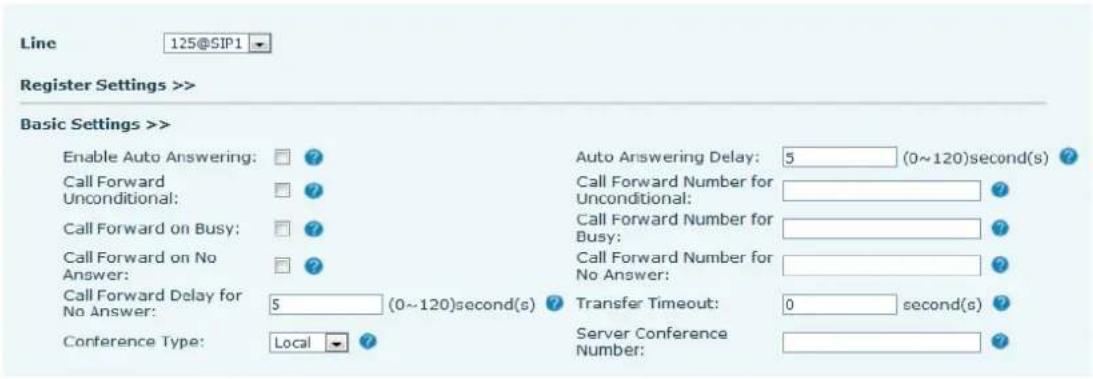
Picture - Local conference setting
Two ways to create a local conference:
1) The device has two channels of communication. Press the conference button on the call interface. When selecting the conference number, select the other number that already exists.
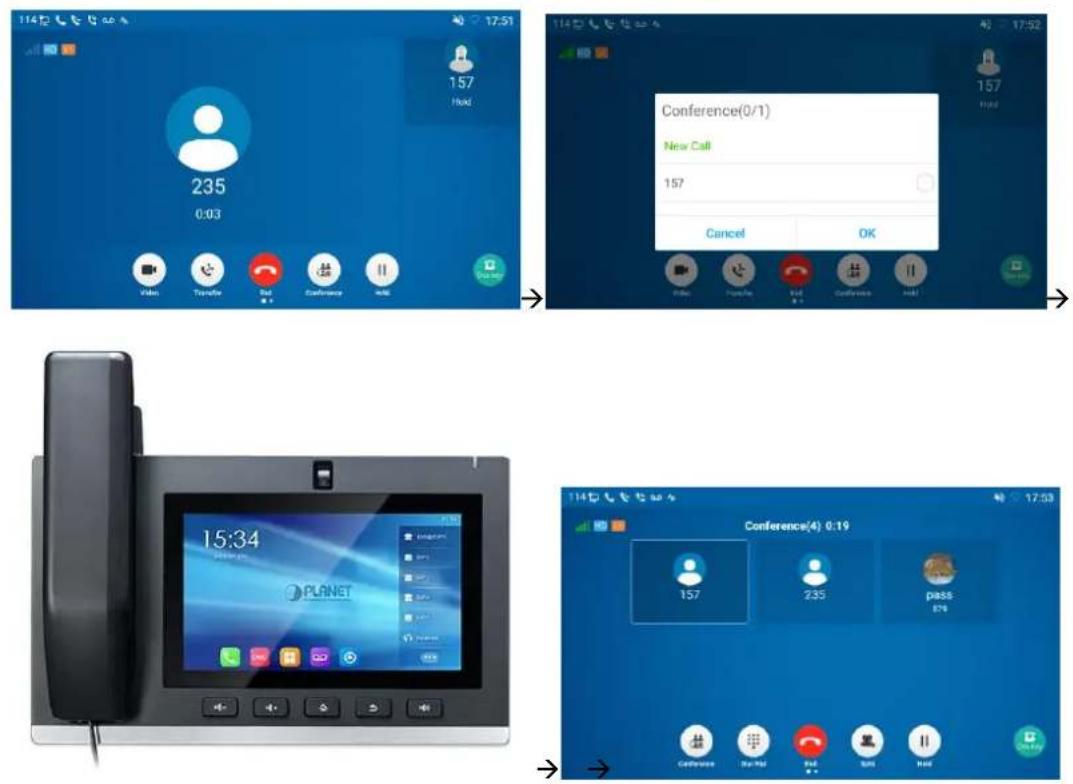
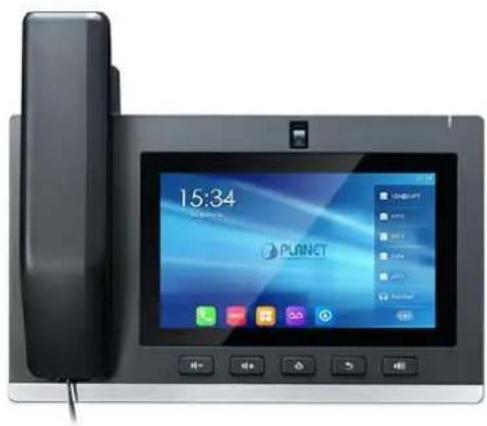
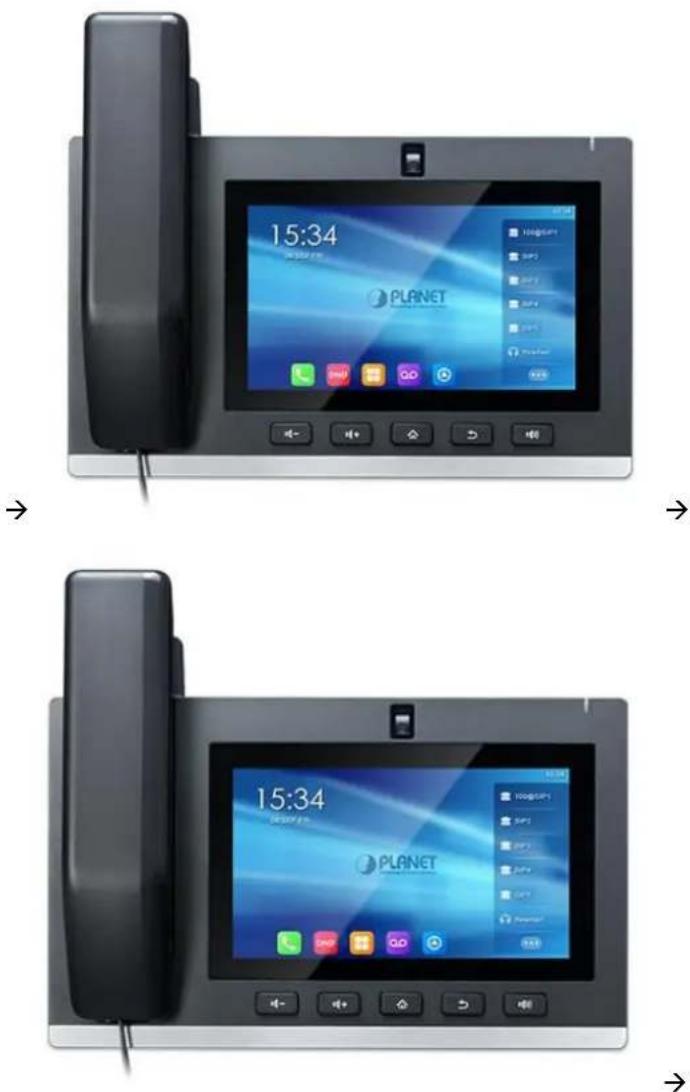
natural_image
Front view of a modern digital device with a landline telephone and a central screen showing app icons (no readable text or symbols on the device body)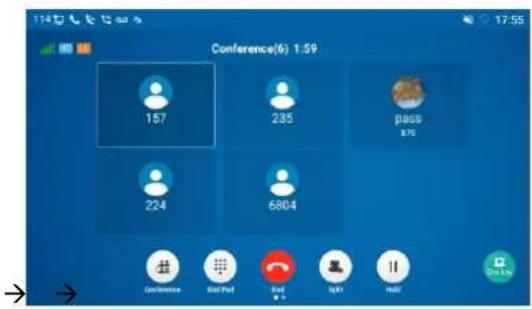
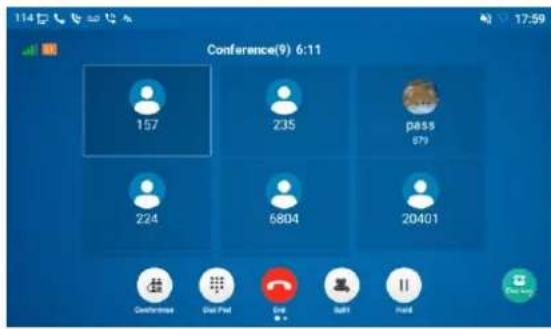
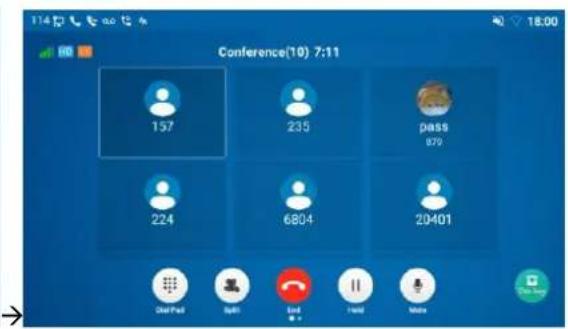
Picture 1 - Local conference (1)
3) If the device has a call all the way, press the conference key in the call interface, enter the number to join the meeting and press the call. After the third party answers the call, press the conference button again to initiate the local tripartite conference.
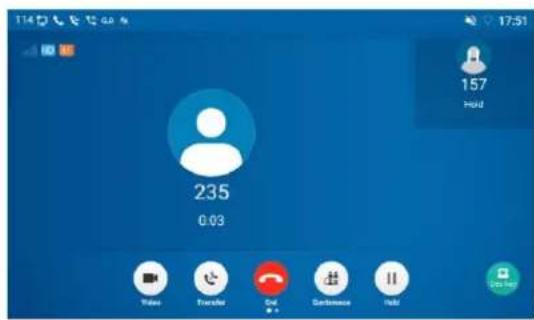
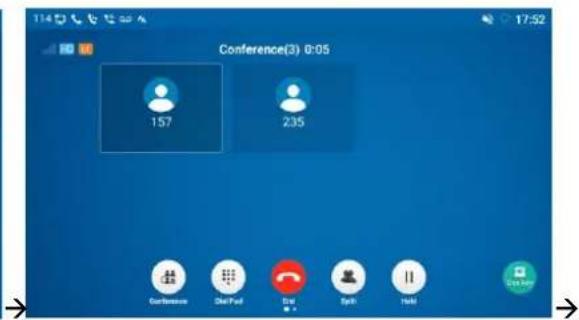
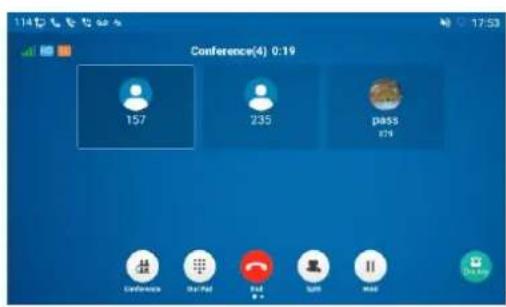
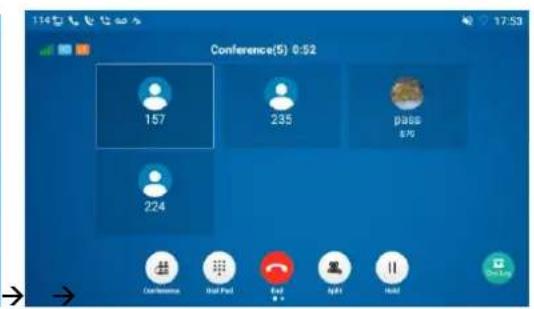
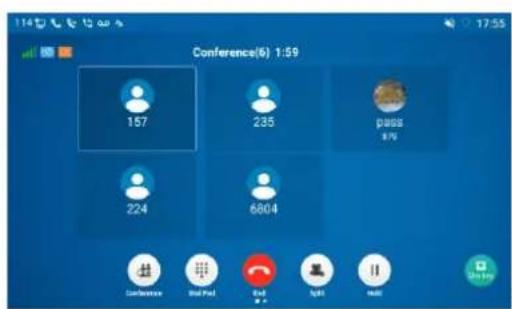
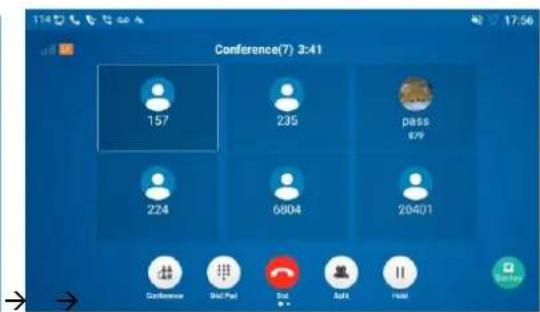
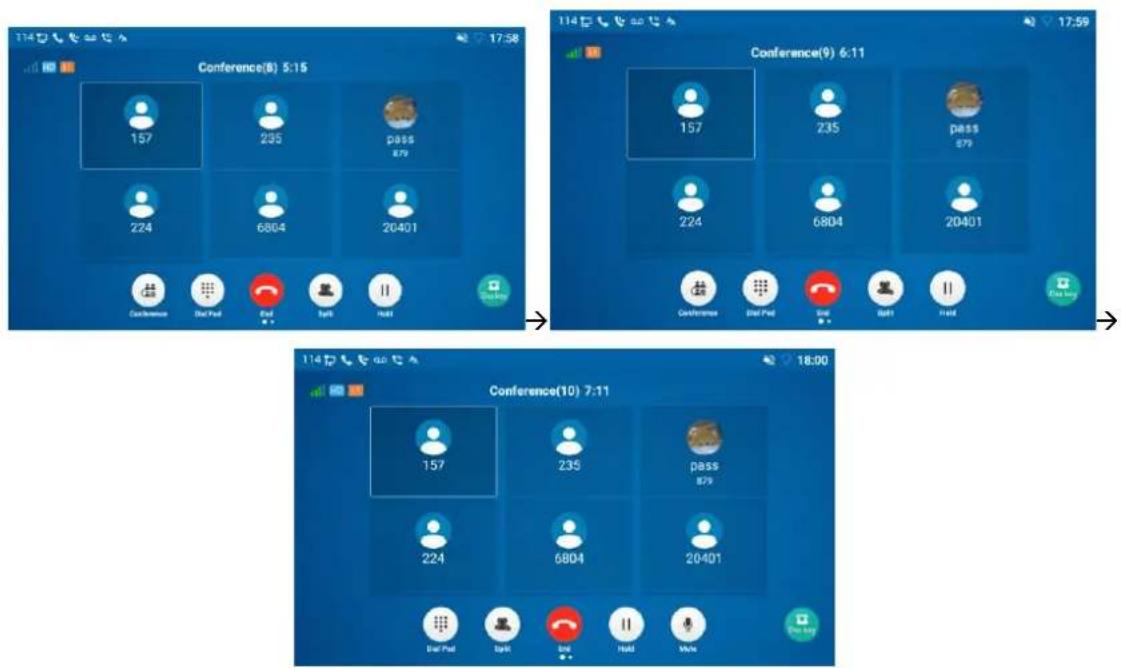
Picture - Local conference (2)
Note: During the conference, press the split button to split the conference and press the end button to end the call.
5.15.2 Video Conference
The method of creating a local third-party video conference is similar to that of a third-party voice conference:
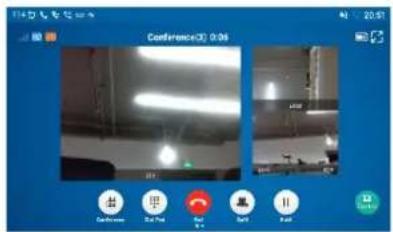
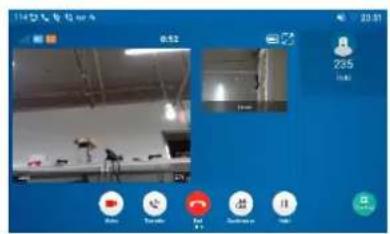
1) The device already has two video calls. Press the conference button on the call interface, and when selecting a conference number, select another existing number. Press the confirm button to initiate a tripartite video conference.
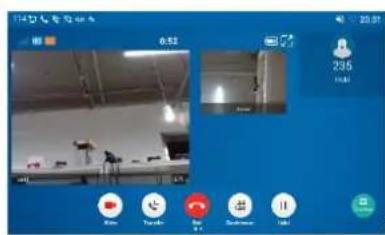
Picture - Video conference (2)
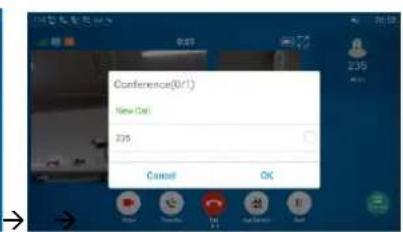
2) The device already has a video call. Press the conference button on the call interface, enter the number you want to join the conference, and then press the video call button. After receiving the call from the peer, press the meeting button again to establish a local tripartite meeting
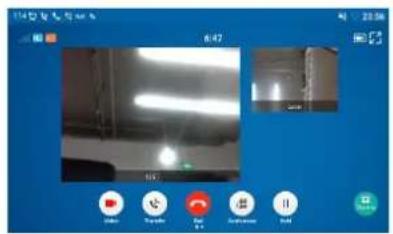
→
→
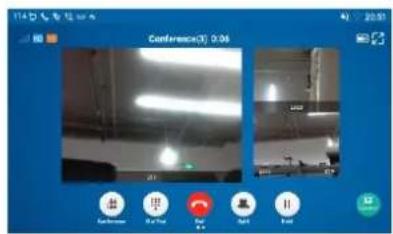
Picture - Video conference (2)
5.15.3 Network Conference
Users need server support for network conference.
Log in to the web page to enter [Line] >> [SIP] >> [Basic settings]. Set the conference mode as server mode (default is local mode), and set the server conference room number (please consult your system administrator), as shown in the figure :
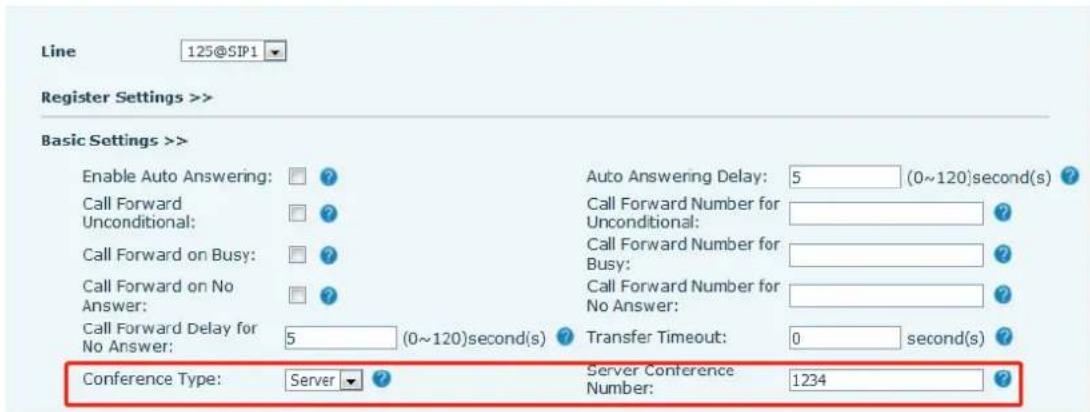
Picture - Network conference
Methods to join a network conference:
- Call the numbers of network conference and when they enter the password, it will enter the conference room.
- The two phones have established common calls. Press the conference button to invite new members to the conference. Follow the voice prompt to operate.
Note: The upper limit of the number of participants in the network conference varies according to the server.
5.16 Call Park
Note: Call Park requires server support. Consult your system administrator for support.
When you are on the call and need to temporarily park it, you can press the configured park button to hold the call. Once the call is parked successfully, you can resume the call by pressing the park button on another device.
Set up the call park button:
- Phone interface: In the standby mode, click the unfold button and long-press an editable key to enter the function key settings. Set key type to memory key, and select the subtype as call park. Enter the server's Call Park number in the value field, then assign the corresponding SIP line.
- Web interface: Log in to the phone page to enter the [Function Key] >> [Function Key]. Select a DSS key and set the key type to memory key and choose the subtype as call park. Enter the server's Call Park number and assign the corresponding SIP line.
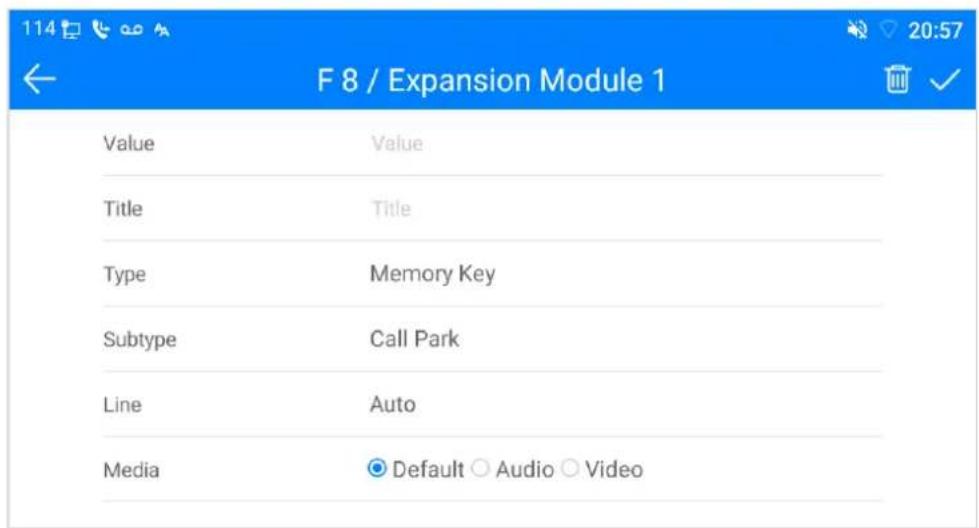
Picture - Phone set Call Park
| Key | Type | Name | Value | Subtype | Line | Media | PickUp Number |
| DSS | |||||||
| Key 1 | Line | None | 125@SIP1 | DEFAULT | |||
| DSS | |||||||
| Key 2 | Line | None | 169@SIP2 | DEFAULT | |||
| DSS | |||||||
| Key 3 | Line | None | SIP3 | DEFAULT | |||
| DSS | |||||||
| Key 4 | Line | None | SIP4 | DEFAULT | |||
| DSS | |||||||
| Key 5 | Line | None | SIP5 | DEFAULT | |||
| DSS | |||||||
| Key 6 | Line | None | AUTO | DEFAULT | |||
| DSS | |||||||
| Key 7 | Memory Key | Call Park | AUTO | DEFAULT |
Picture – Web set Call Park
5.17 Pick Up
Note: Pick-up requires server support. Consult your system administrator for support.
You can use the Pick Up function to answer incoming calls from other users. The phone can pick up incoming calls by configuring DSS key for BLF and setting the Pick Up code.
In standby mode, click the "unfold" button and long-press an editable key to enter the interface of the function key setting. Set the function key type to memory key and the subtype to BLF/NEW CALL. Set the corresponding SIP line and fill in the grab number.
- Configure the line and set the function key type as memory key and subtype as BLF/NEW CALL, and input the subscription number and pick up code
- When another phone calls the subscription number, the opposite will start ringing.
- Press the DSS key to pick up the call.
- Once the call is picked up, the caller can speak to the recipient.
Web interface: Log in to the phone webpage to enter the [Function Key] >> [Function Key]. Select a DSS key and set the memory key type as memory key, the subtype as BLF/NEW CALL, and set the corresponding SIP line and pick up codes.
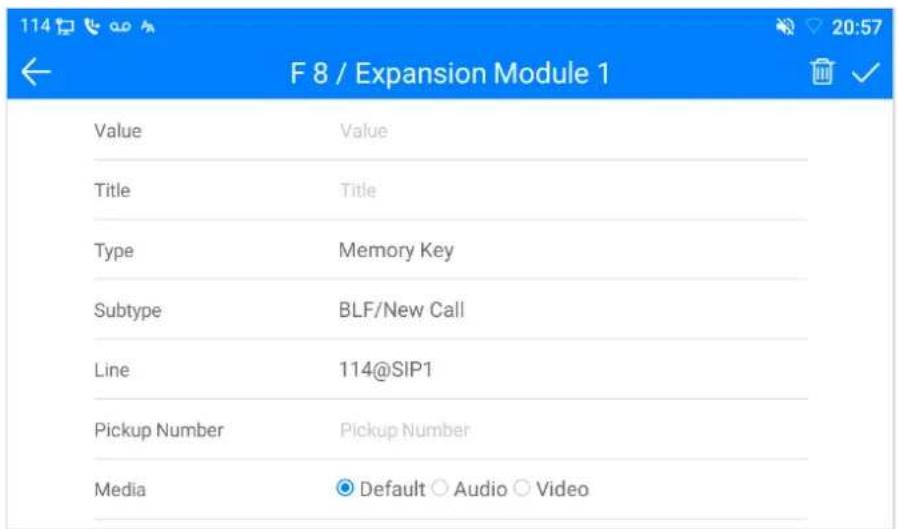
Picture - Phone pick up setting
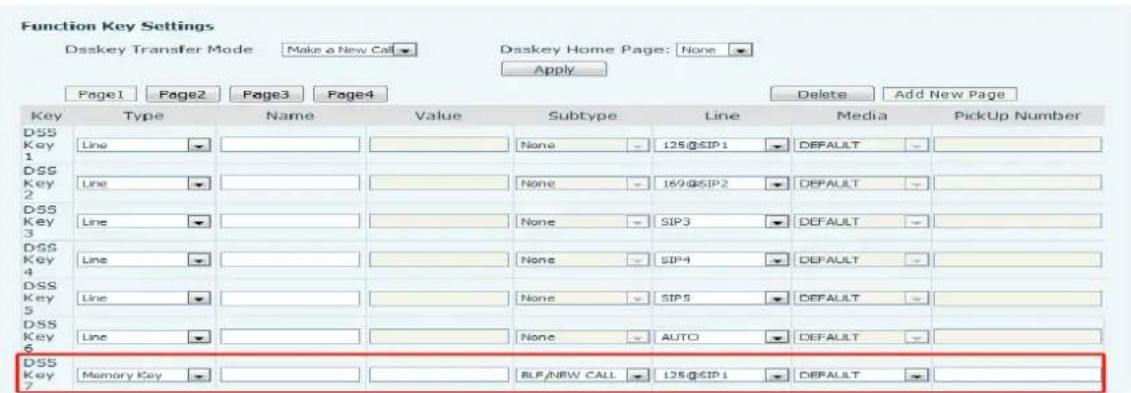
Picture - Web pick up setting
5.18 Anonymous Call
5.18.1 Anonymous Call
The phone can set up anonymous calls to hide the calling number and the calling name.
- You can see anonymity in the context of [Phone Settings] >> [Account] >> [Line] >> [Advanced Settings] >> [Anonymous call edition].
- By default, the anonymous call option is set to off.
- RFC3323 or RFC3325 can be chosen to enable anonymous calling.
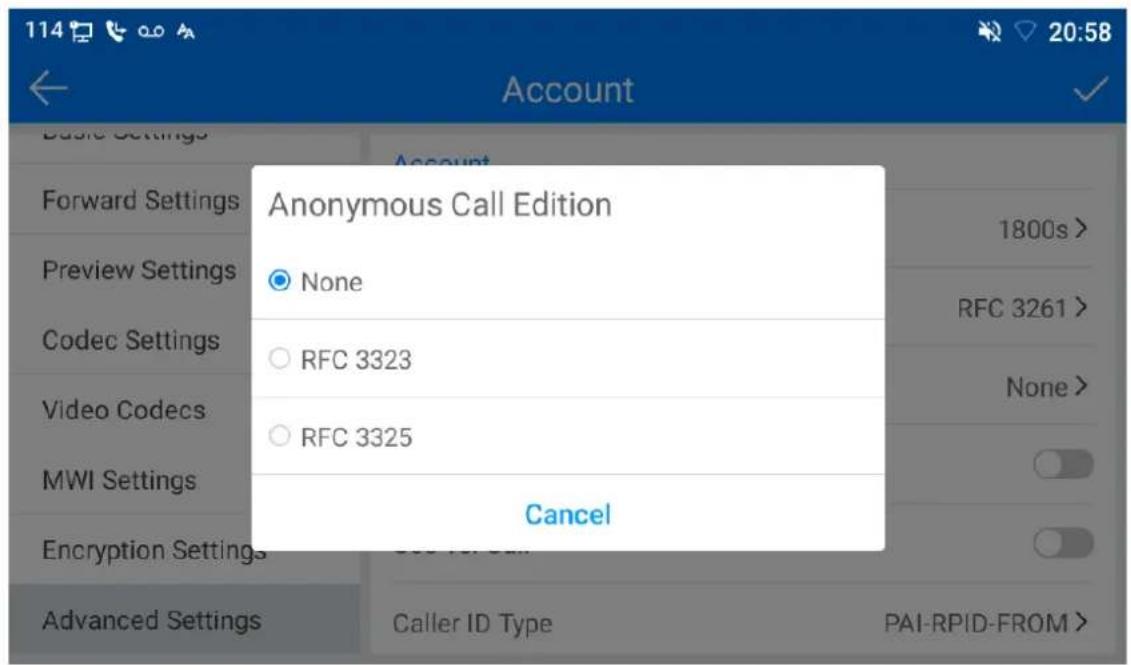
Picture - Enable anonymous call
- Navigate to [Line] >> [SIP] >> [Advanced Settings] to open anonymous calls via Internet interface.
- The anonymous call setting is specific to the SIP line. For example, changes made on the SIP1 page will only apply to the SIP1 line.
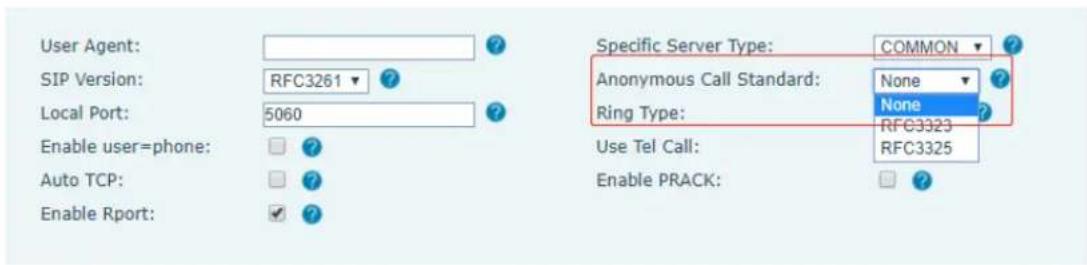
Picture - Enable Anonymous web page call
The following is a transcript of an anonymous call received by the phone.
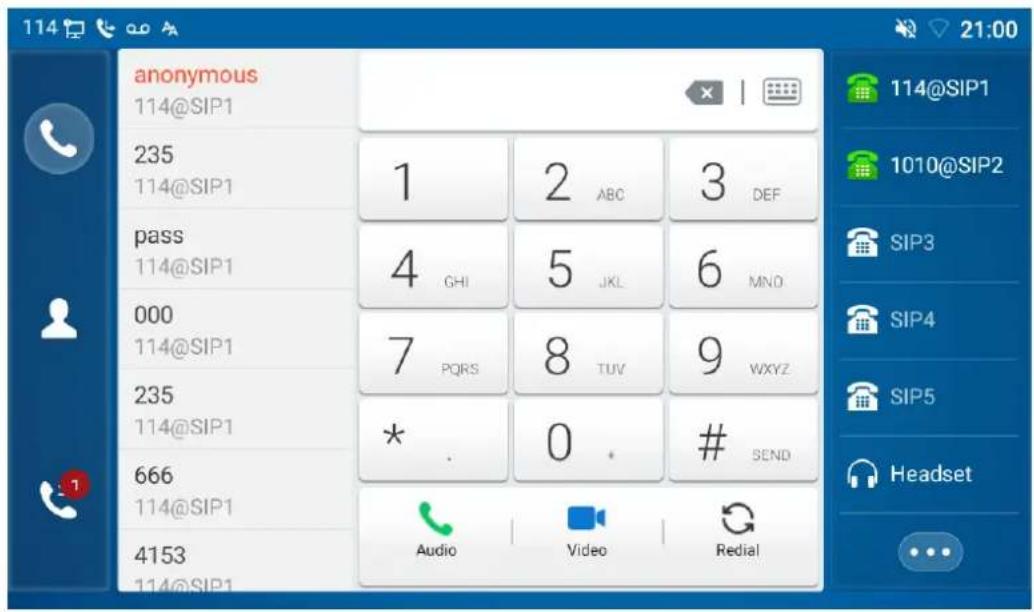
Picture - Anonymous call log
5.18.2 Ban Anonymous Call
The device can be set to prohibit anonymous calls, that is, anonymous calls to the number will be directly rejected.
- Navigate to [Phone Settings] >> [Account] >> [Line] >> [Advanced Settings] >> [Ban anonymous call], which can be enabled and disabled.
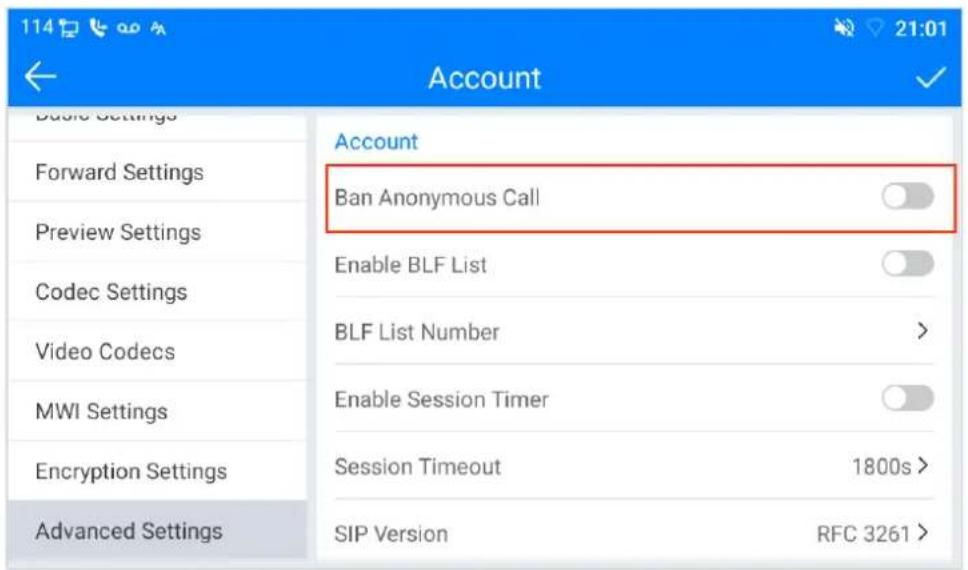
Picture - Anonymous calls are not allowed on the phone
- On the web page, enter [Line] >> [SIP] >> [Advanced Settings] to disable anonymous calls.
- The setting to disable anonymous calls is specific to each SIP line. For example, changes made on the SIP1 page will only affect the SIP1 line.
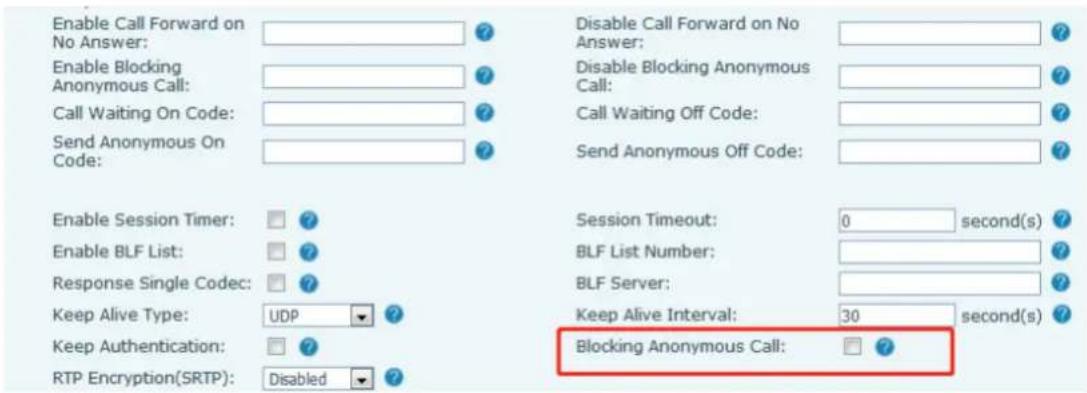
Picture - Page Settings blocking anonymous call
5.19 Hotline
The device supports hotline dialing. After setting up the hotline dialing, directly pick up the handset, hands-free, headset, etc., and the phone will automatically call according to the hotline delay time.
● Enter [Phone Settings] >> [Account] >> [Line] >> [Basic Settings].
- Then set the hotline for each SIP line, which is off by default.
- Open the hotline, set the hotline number and set the delay time of the hotline.
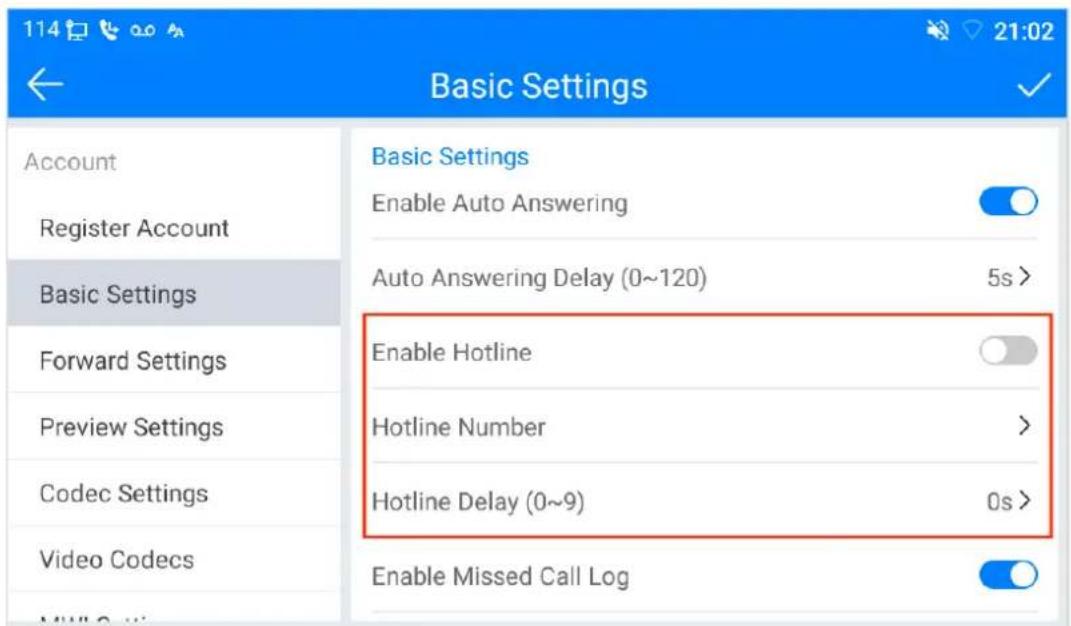
Picture - Phone hotline setting interface
- On the website, enter [Line] >> [SIP] >> [Basic Settings], to set up a hotline.
- The setup hotline also corresponds to the SIP line, that is, the hotline set in the SIP1 webpage can only be activated in the SIP1 line.
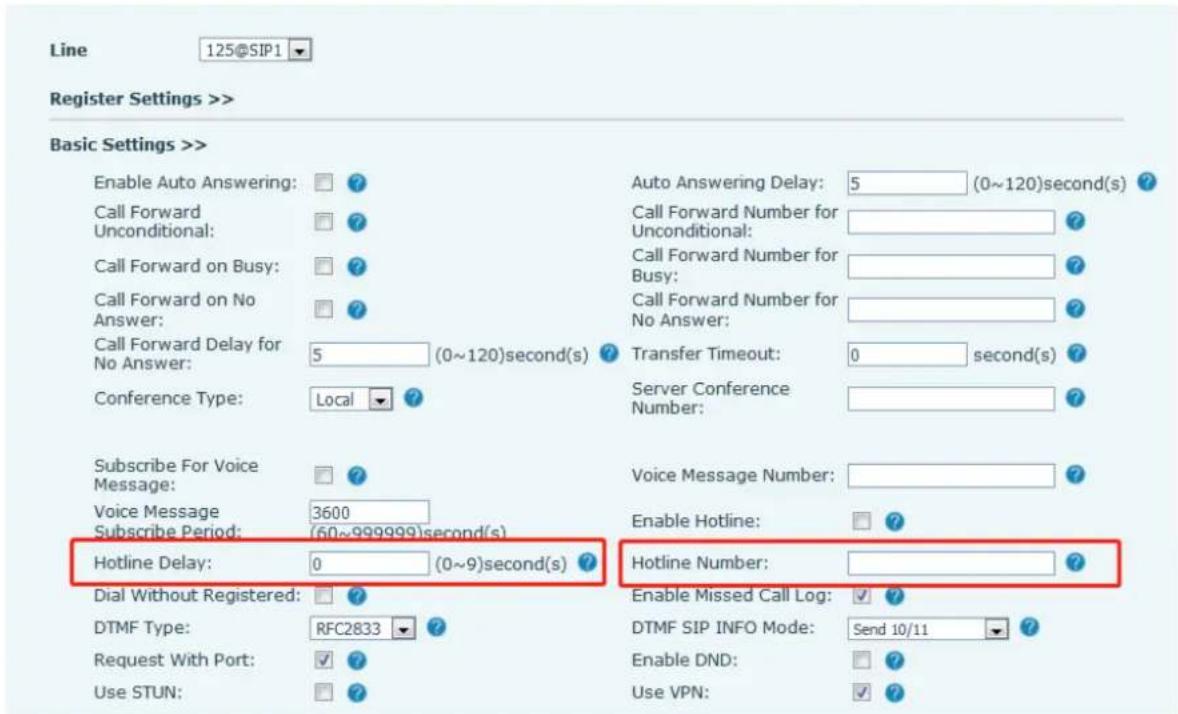
Picture - Hotline set up on webpage
6. Advanced Function
6.1 BLF (Busy Lamp Field)
6.1.1 Configure the BLF Functionality
- Page interface: log in to the phone page, enter [Function key] >> [Function key] and select a DSS key to set the function key type as memory key, choose the subtype among BLF/NEW CALL, BLF/BXFER, BLF/AXFER and BLF/CONF, set BLF/DTMF value as the number which is subscribed, and set the corresponding SIP line.
The Pickup Number (for call pickup) is provided by the server. For further details on using the Pickup feature.
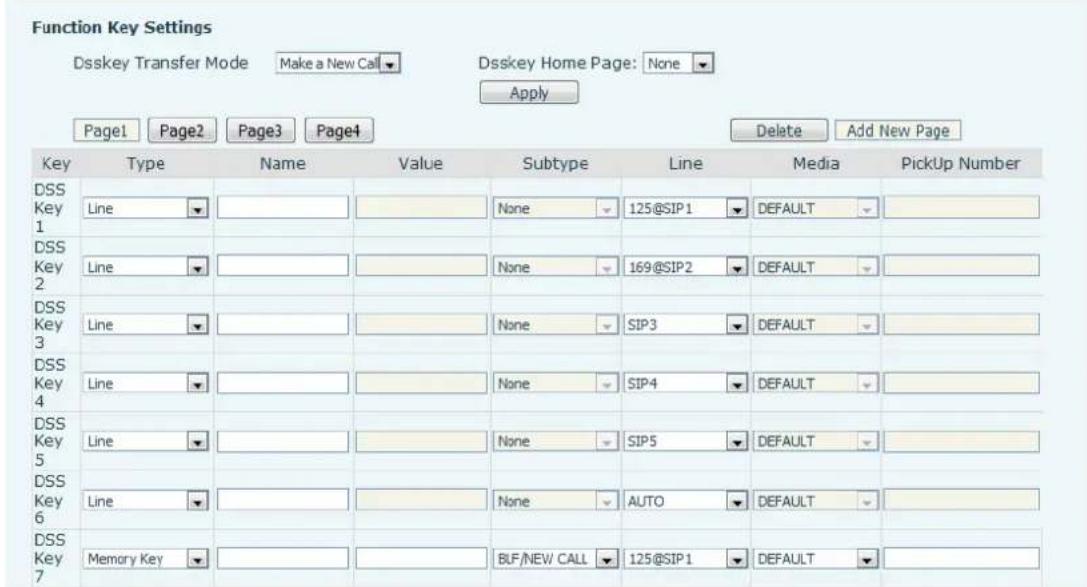
Picture - Web page configuration BLF function key
- Phone interface: Click unfold and long-press a function key to enter the function key settings interface, set the key type to memory, and choose the subtype from BLF/NEW CALL, BLF/BXFER, BLF/AXFER, BLF/CONF, and BLF/DTMF. Set the Value to the Subscription Number (provided by the server) and assign the corresponding SIP line.
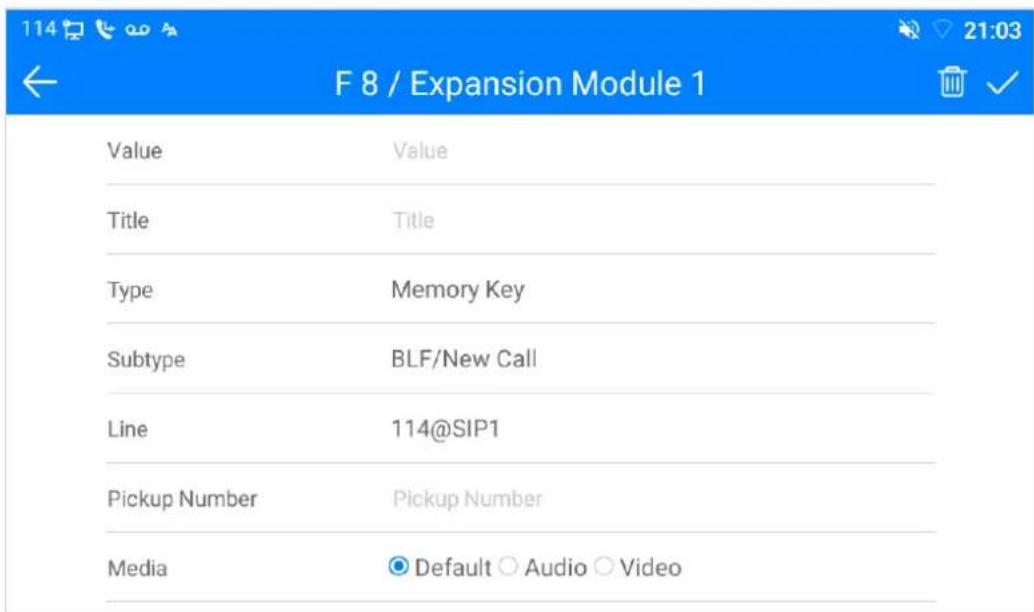
Picture - Phone configuration BLF function key
Table - BLF Function key subtype parameter list
| Subtype | Standby is described | Calling is described |
| BLF/NEW CALL | Pressing the BLF key while standby to dial the subscriber number. | When you press this BLF key while talking to another user, you create a new call along with the subscribed number. |
| BLF/BXFER | Pressing the BLF key while standby to dial the subscriber number. | When you press this BLF key while talking to another user, you blind transfer the call to the subscribed number. |
| BLF/AXFER | Pressing the BLF key while standby to dial the subscriber number. | When you press this BLF key while talking to another user, you attended-transfer the call to the subscribed number. |
| BLF/ Conference | Pressing the BLF key while standby to dial the subscriber number. | When you press this BLF key while talking to another user, you invite the subscriber number to join the meeting. |
| BLF/DTMF | Pressing the BLF key while standby to dial the subscriber number. | When the BLF key is pressed while talking to another user, the phone automatically sends the DTMF corresponding to the BLF key number. |
6.1.2 Use the BLF Function
The BLF, also known as a "busy light field," notifies the user of the status of the subscribed object and is used by the server to pick up the call. BLF helps you monitor the other person's status (idle, ringing, talking, off).
BLF function :
● Monitor the status of subscribed phones.
- Call the subscribed number.
● Transfer calls to the subscribed number.
● Pick up incoming calls from subscribed number.
1) Monitoring the status of subscribed phones.
When the subscription of the number of the state (idle, ringing, talking) is changed, the function key state of LED lights will have corresponding change.
2) Calling the subscribed number.
When the phone is in the standby mode, press the configured BLF key to call out the subscribed number.
3) Transferring calls to the subscribed number.
The BLF key can be used for blind rotation, attention-rotation and semi-attention-rotation of the current call, and also can invite the subscribed number to join the call and send DTMF, etc.
4) Picking up incoming calls from subscribed phones.
When configuring BLF function key, configure the pickup number. When the subscribed number's telephone rings, the BLF LED will flash red. At this point, press the BLF button to answer the incoming call from the subscribed number.
6.2 BLF List
BLF List Key is to put the number to be subscribed into a group on the server side, and the phone uses the URL of this group to make unified subscription. The specific information, number, name and status of each number can be resolved based on notification sent from the server. The unoccupied Memory Key is then set to the BLF List Key. If the state of the subscription object changes later, the corresponding LED light state will be changed.
Configure BLF List function: Log in to the phone page to enter the [Line] >> [SIP] >> [Advanced settings] and open the BLF List, and configure the BLF List number.
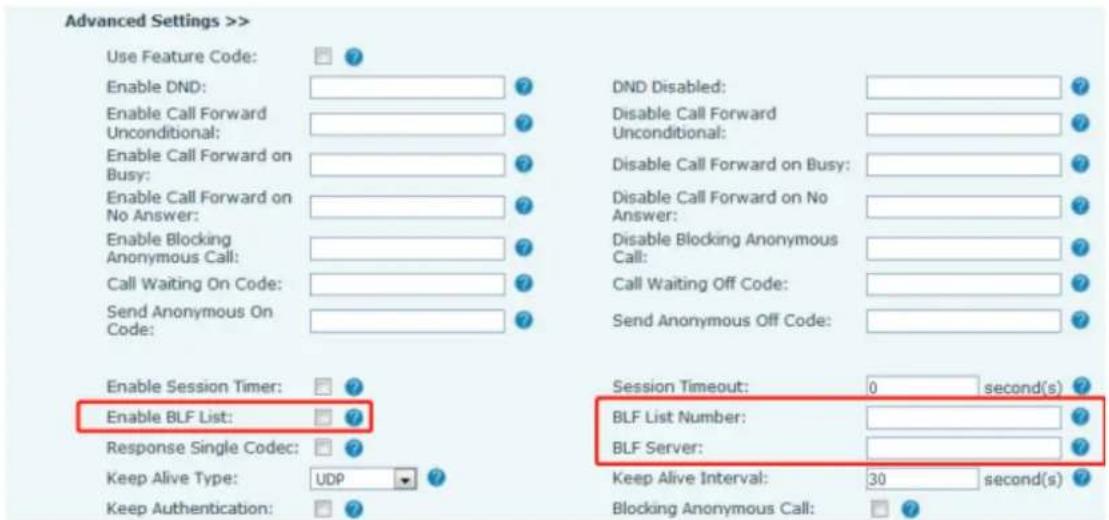
Picture - Configure the BLF List functionality
Use the BLF List function: When the configuration is completed, the phone will automatically subscribe to the contents of the BLF List group. Users can monitor, call and transfer the corresponding number by pressing the BLF List key.
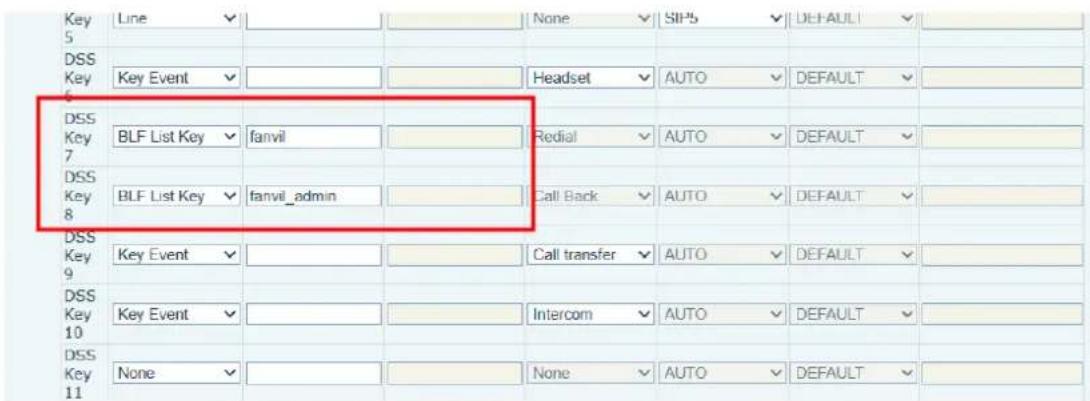
Picture - BLF List number display
6.3 Record
The device supports recording during a call.
6.3.1 Local Record
When using local recording, it is necessary to start recording on the phone page [Application] >> [Manage recording], select the local type and set the voice coding. The webpage is as follows:
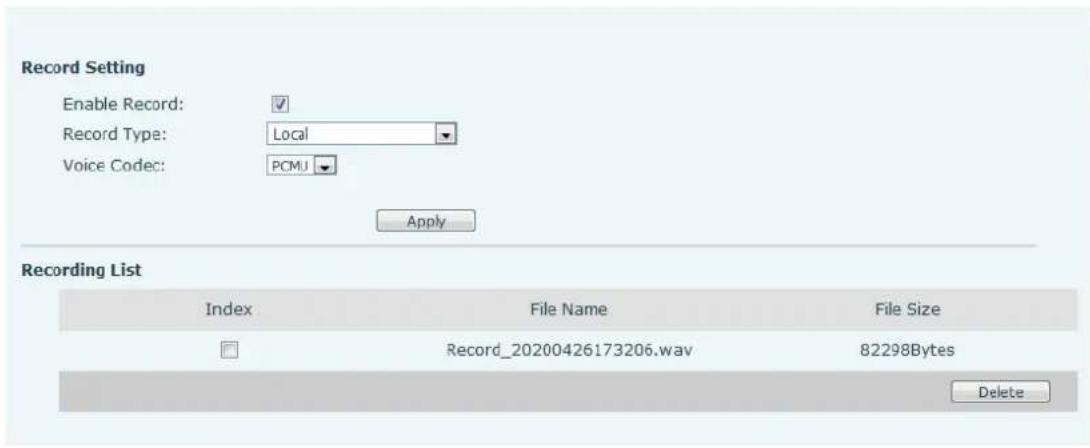
Picture - Web local recording
Local recording steps:
- Open the recording on the web page, and set the recording type as local recording.
- Set DSS key type as key event and type as record in the phone/web interface.
- Set up one line call and press the recording key (set DSS key).
● End the recording. End the call.
View local recording:
● Enter [Application] >> [Sound Recorder]
- Enter view the recording file.
- Or enter the webpage [Application] under the [Manage recording] to view the recording file.
Listen to the record:
● Enter [Application] >> [Sound Recorder].
- Enter view the recording file.
- Select the recording file that you want to listen to, and click listen to the recording.
6.3.2 Server Record
When using the network server to record, it is necessary to open the recording in the phone web page [Application] >> [Manage recording]. The type is selected as network, and the address and port of the recording server are filled in and the voice coding is selected. The web is as follows:
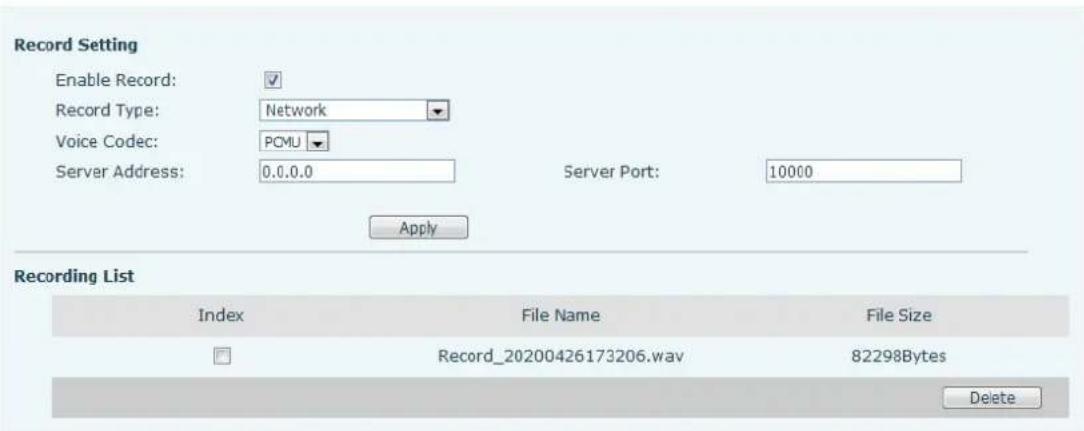
Picture - Web server recording

Please refer to the documentation for specific usage: Call Recording Configuration and Use Description.
6.3.3 SIP Info Record
The phone is registered with a server that supports SIP INFO recording. After registering the account, check the recording module of [Application] >> [Manage recording] to open the Record Settings, and the recording type is SIP INFO.
Please refer to the documentation for specific usage: Call Recording Configuration and Use Description
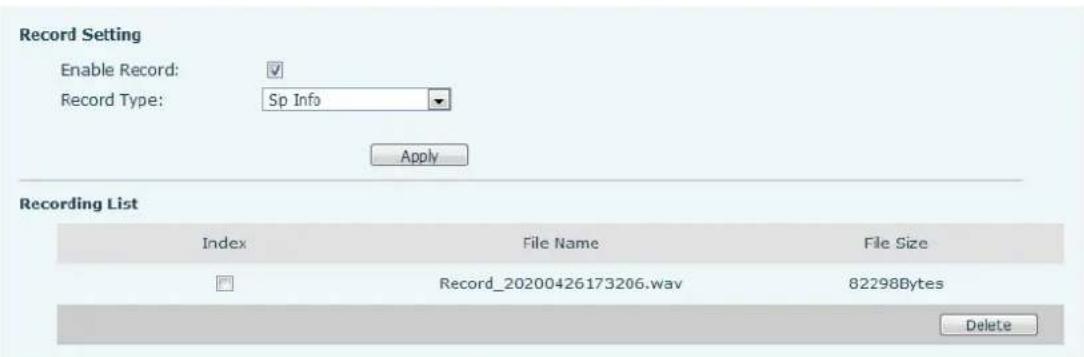
Picture - Web SIP info recording
6.4 Agent
Agent (Agent function) of the phone can be realized: When multiple people use a device for Agent services at different times, he or she can quickly register his or her SIP account on the same server. The Agent functions of the phone can be divided into Normal and Hotel Guest. The Hotel Guest mode requires server support.
Normal Mode:
Configure agent function: Set a DSS key as agent, press the function key or enter the [Phone Settings] >> [Call] >> [More] >> [Agent] to enter the agent page. The SIP server needs to be configured before the account can be configured.
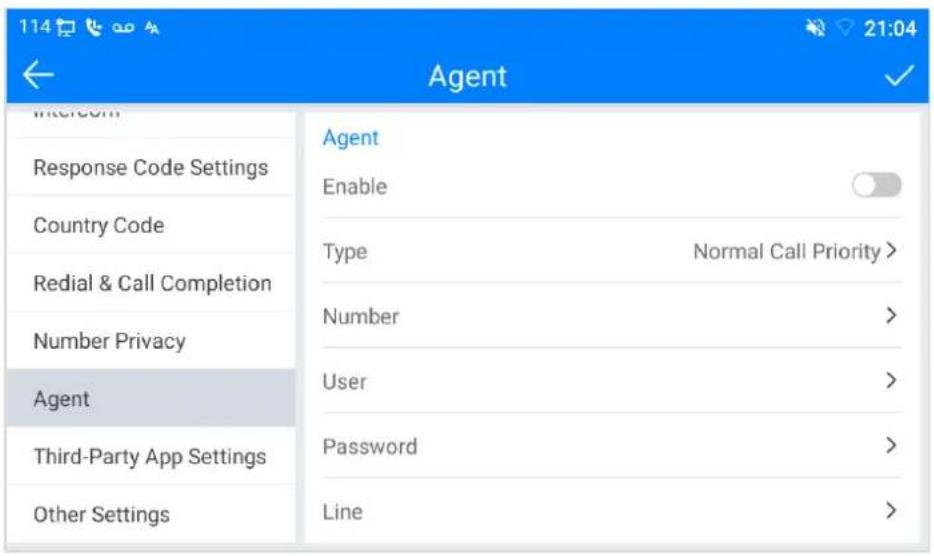
Picture - Configure the agent account in normal mode
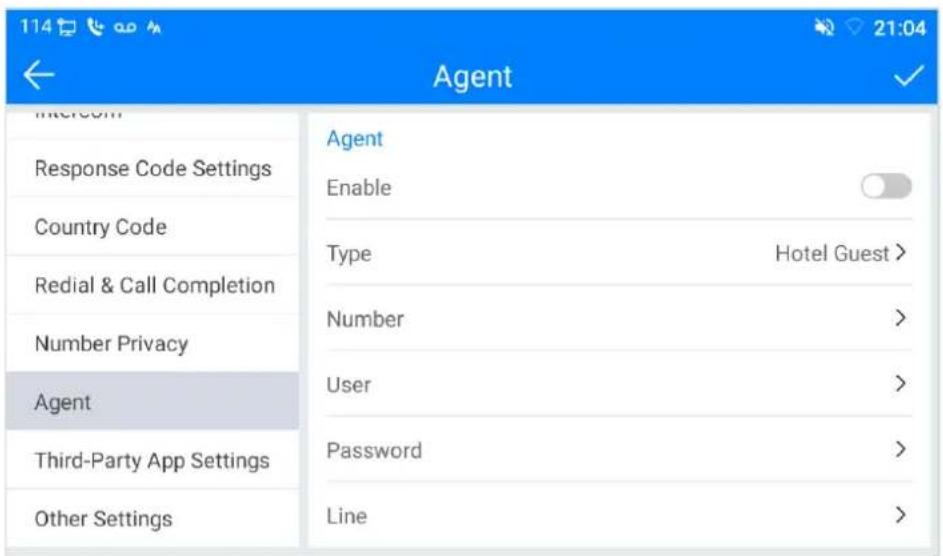
Picture - Configure the proxy account-hotel Guest mode
Table - Agency mode
| Parameter | Description |
| Normal mode | |
| Number | Set the proxy account number. |
| User | Set the proxy account number to verify the user name. |
| Password | Set the proxy account number to verify the password. |
| Line | Select the SIP line. |
| CallLog | Users can choose to save all types, or delete. |
| Hotel Guest mode | |
| Number | Set the proxy account number. |
| Password | Set the proxy account number to verify the password. |
| Line | Select the SIP line. |
| CallLog | Users can choose to save all types, or delete. |
| Status | The user can select the status of the number, the optional status is: login, logout, invalid, valid, SMS. |
Using agent functions:
1) When the phone has been configured on SIP server, fill in the correct number and user name password, click login and then the phone can be registered to the SIP server;
2) After registration, click logout and the phone can delete the user name and password, and log out of the SIP account.
3) Click Unregister and the phone retains the user name and password, and logs out of the SIP account.
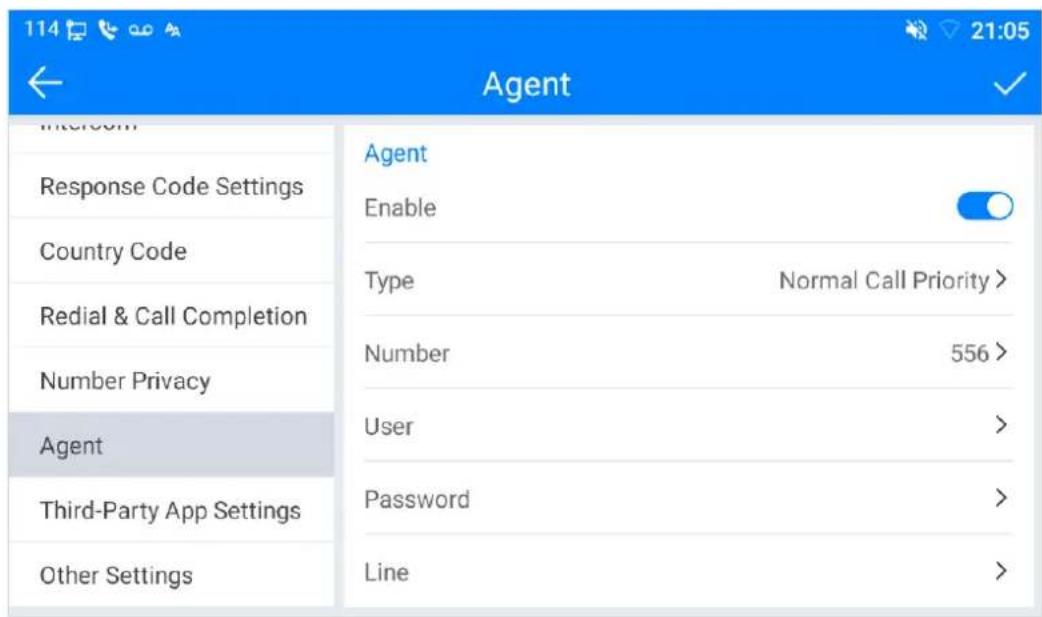
Picture - Agent logon page
6.5 Intercom
When the Intercom is enabled, it can automatically receive calls from the intercom.
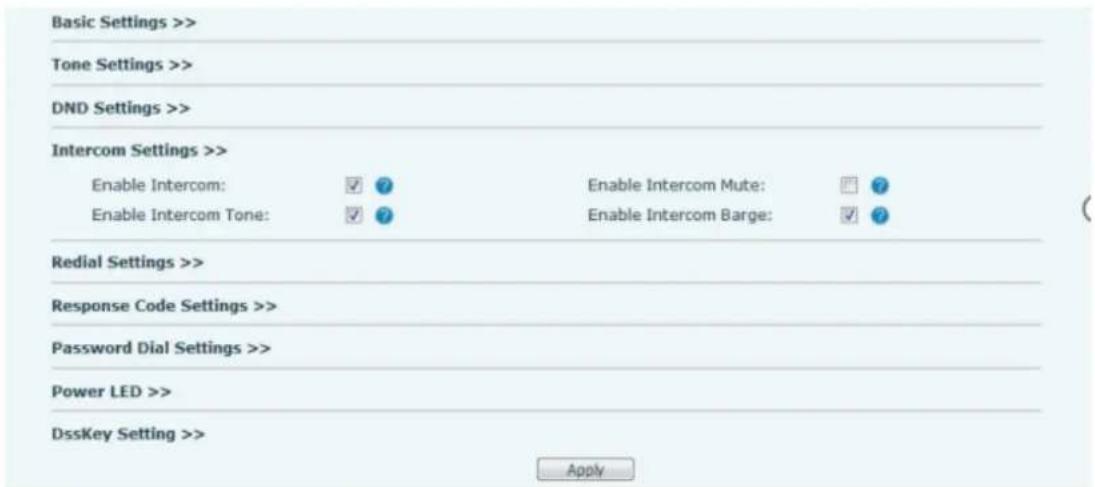
Picture - Web Intercom configure
Table - Intercom configure
| Parameter | Description |
| Enable Intercom | When intercom is enabled, the device will accept the incoming call request with a SIP header of Alert-Info instruction to automatically answer the call after specific delay. |
| Enable Intercom Mute | Enable mute mode during the intercom call |
| Enable Intercom Tone | If the incoming call is intercom call, the phone plays the intercom tone |
| Enable Intercom Barge | Enable Intercom Barge by selecting it; the phone auto answers the intercom call during a call. If the current call is intercom call, t phone will reject the second intercom call |
6.6 MCAST
This feature allows user to make some kind of broadcast call to people who are in multicast group. User can configure a multicast DSS Key on the phone, which allows user to send a Real-time Transport Protocol (RTP) stream to the pre-configured multicast address without involving SIP signaling. You can also configure the phone to receive an RTP stream from pre-configured multicast listening address without involving SIP signaling. You can specify up to 10 multicast listening addresses.
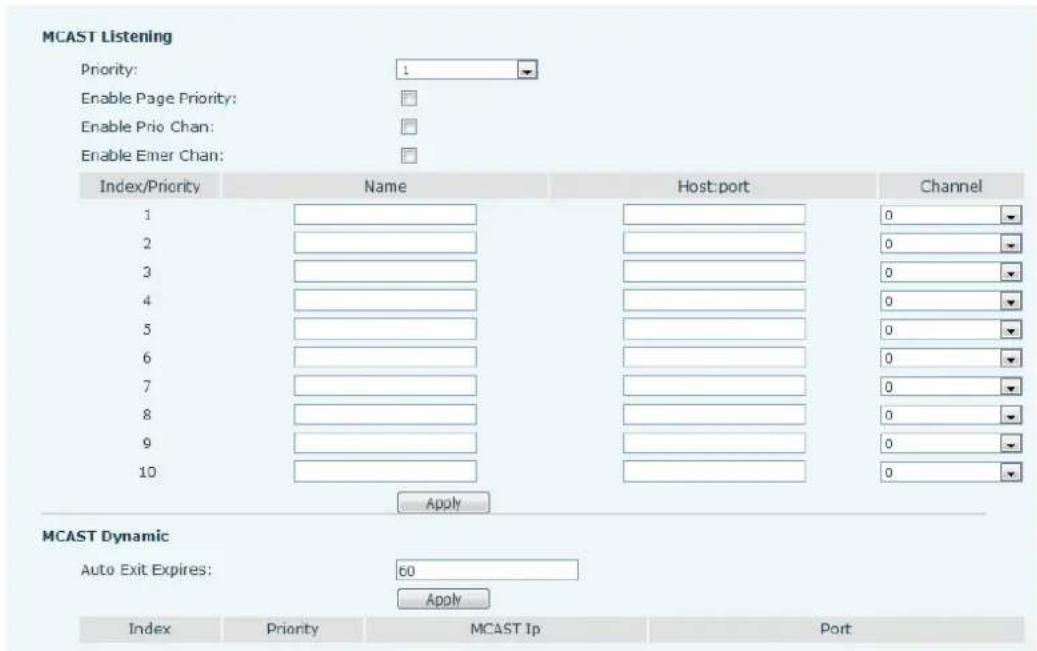
Picture - Multicast Settings Page
Table - MCAST Parameters on Web
| Parameters | Description |
| Normal Call Priority | Define the priority of the active call, 1 is the highest priority, 10 is lowest. |
| Enable Page Priority | The voice call in progress takes precedence over all incoming pagir calls. |
| Name | Listened multicast server name |
| Host: port | Listened multicast server's multicast IP address and port. |
Multicast :
- Go to web page of [Function Key] >> [Function Key], select the type to multicast, set the multicast address, and select the codec.
- Click Apply.
- Set up the name, host and port of the receiving multicast on the web page of [Phone Settings] >> [MCAST].
- Press the DSSKEY of Multicast Key which you set.
● Receiver will receive multicast call and play multicast automatically.
6.7 SCA (Shared Call Appearance)
Users need the support of server end to use SCA function.
1) Configure on Phone
- When registering with the BroadSoft server, a PLANET Phone can register the account created previously on multiple terminals.
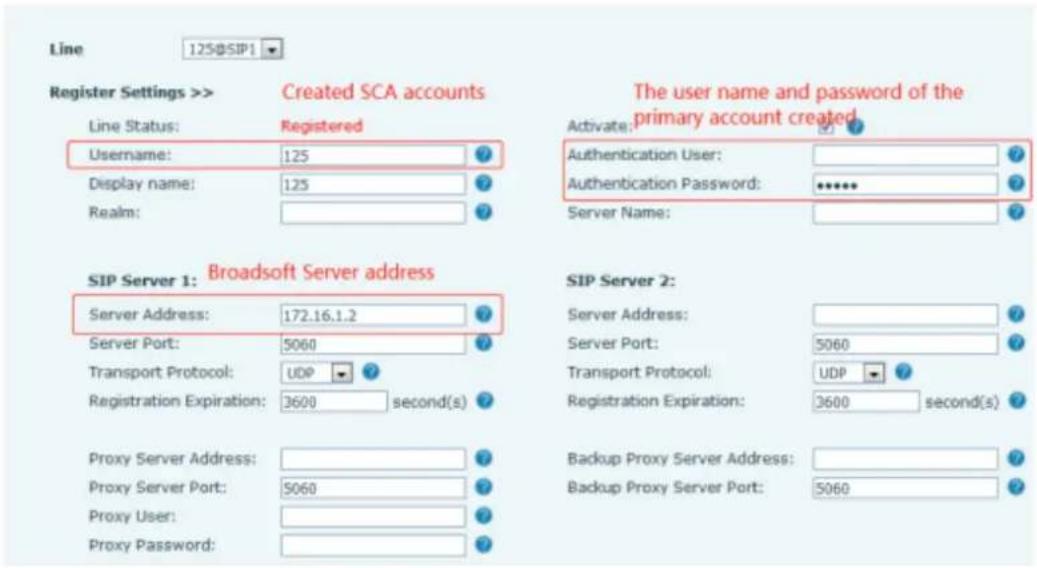
Picture - Register BroadSoft account
- After the phone registers on the BroadSoft server, a server type needs to be set. Specifically, log in to the web page of the phone, choose [Line] >> [SIP] >> [Advanced Settings] and set Specific Server Type to BroadSoft, as shown in the following figure.
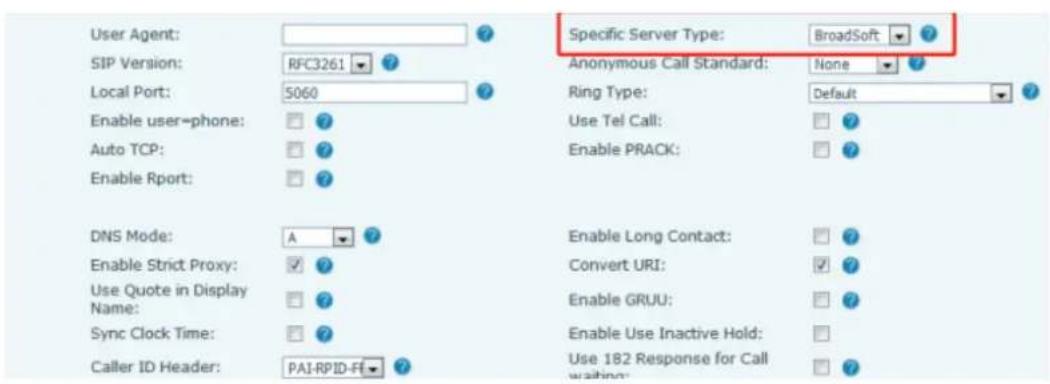
Picture - Set BroadSoft server
- If a PLANET phone needs to use the SCA function, enable it for the phone set. Specifically, log in to the webpage of the phone set, choose [Line] >> [SIP] >> [Advanced Settings], and select Enable SCA. If SCA is not enabled, the registered line is private line.
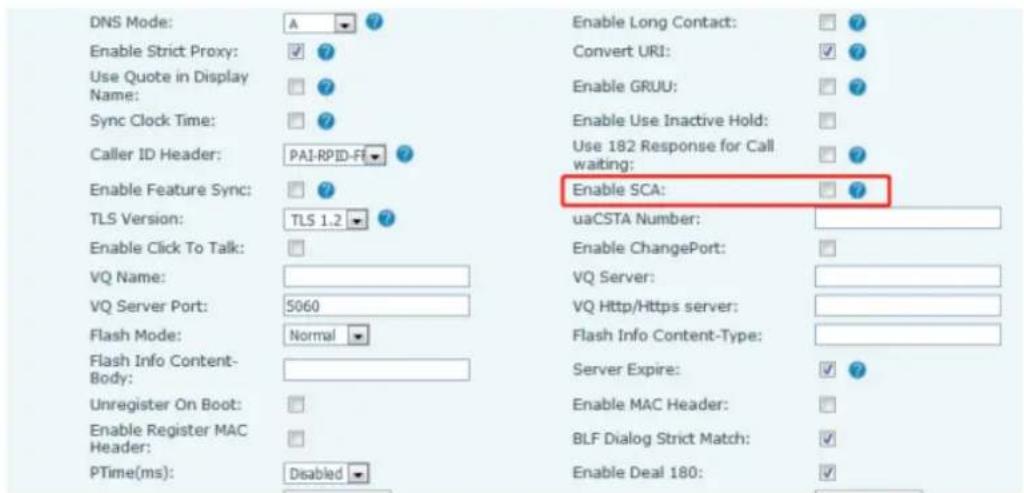
Picture - Enable SCA
- After an account is configured and successfully registered, you can configure DSS Keys as the lines which can enable Shared Call Appearances on the Function Key page to facilitate viewing the call status of the group. Each line key represents a call appearance.
- To facilitate private hold, configure keys whose DSS Key is Private Hold on the Function Key page. Pay attention that the public hold key is the softkey [Hold] key during a call.
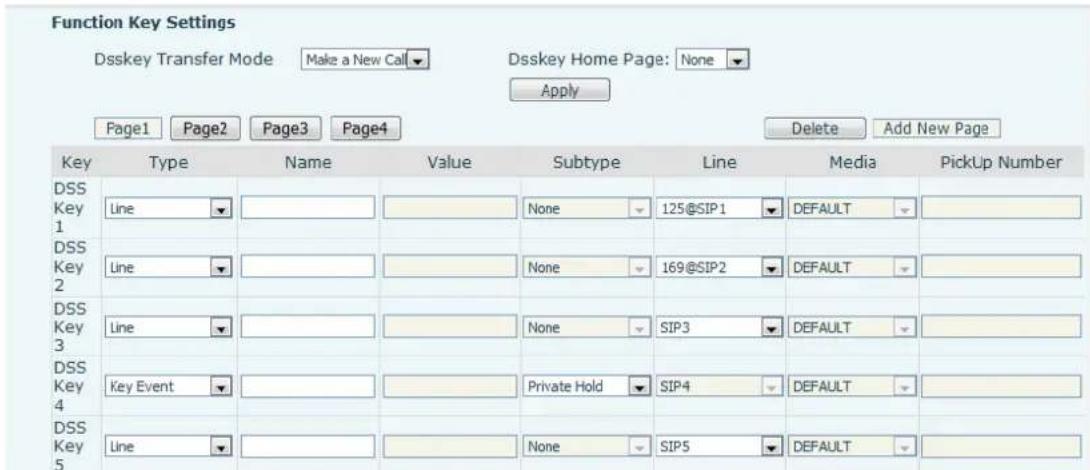
Picture - Set Private Hold Function Key
- After each phone registered with the BroadSoft server is configured as above, the SCA function can be used.
2) LED Status
To facilitate viewing the call status of a group, configure lines whose DSS Key is SCA. The following table describes the LEDs of lines in different states
Table - LED Status of SCA
| State & Direction | Local Light | Remote Light |
| Idle | Off | Off |
| Seized | Steady green | Steady red |
| Progressing (outgoing call) | Steady green | Steady red |
| Alerting (incoming call) | Fast blinking green | Fast blinking green |
| Active | Steady green | Steady red |
| Public Held (hold) | Slow blinking green | Slow blinking red |
| Held-private (private hold) | Slow blinking yellow | Steady red |
| Bridge-active (Barge-in) | Steady green | Steady red |
| Bridge-held | Steady green | Steady red |
3) Shared Call Appearance(SCA)
The following lists a couple of instances to facilitate understanding.
In the following scenarios, the manager and secretary register the same SCA account and the account is configured based on the preceding steps.
Scenario 1: When this account receives an incoming call, the phone sets of both the manager and the secretary will receive the call and ring. If the manager is busy, the manager can reject the call and the manager's phone set stops ringing but the secretary's phone set keeps ringing until the secretary rejects/answers the call or the call times out.
Scenario 2: When this account receives an incoming call, if the secretary answers the call first and the manager is required to answer the call, the secretary can press the Public Hold key to hold this call and notify the manager. The manager can press the line key corresponding to the SCA to answer the call.
Scenario 3: The manager is in an important call with a customer and needs to leave for a while. If the manager does not want others to retrieve this call, the manager can press the Private Hold key.
Scenario 4: The manager is in a call with a customer and requires the secretary to join the call to make records. The secretary can press the corresponding SCA line key to barge in this call.
6.8 Message
6.8.1 SMS
If the service of the line supports the function of the short message, when the other end sends a text message to the number, the user will receive the notification of the short message and display the icon of the new SMS on the standby screen interface.
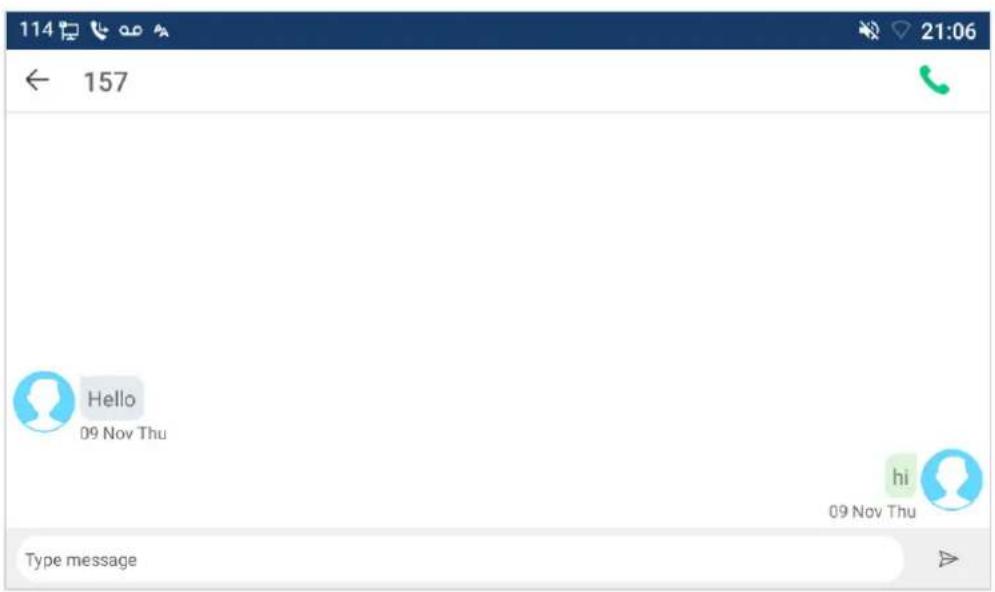
Picture - SMS icon
Send messages:
- Go to [Application] >> [SMS].
- Users can create new messages, select lines and send numbers.
● After editing is complete, click Send.
View SMS:
● Use the navigation keys to select the standby icon [message]
● After selecting, press the navigation key [OK] to enter the SMS inbox interface.
- Select the unread message and press [OK] to read the unread message.
Reply to SMS:
- Use the navigation keys to select the standby icon [Message].
● After selecting, press the navigation key [OK] to enter the SMS inbox interface.
Select the message you want to reply to, select Softkey [Reply], edit it, and click Send..
6.8.2 MWI (Message Waiting Indicator)
If the service of the lines supports voice message feature, when the user is not available to answer the call, the caller can leave a voice message on the server to the user. User will receive voice message notification from the server and device will prompt a voice message waiting icon on the standby screen.
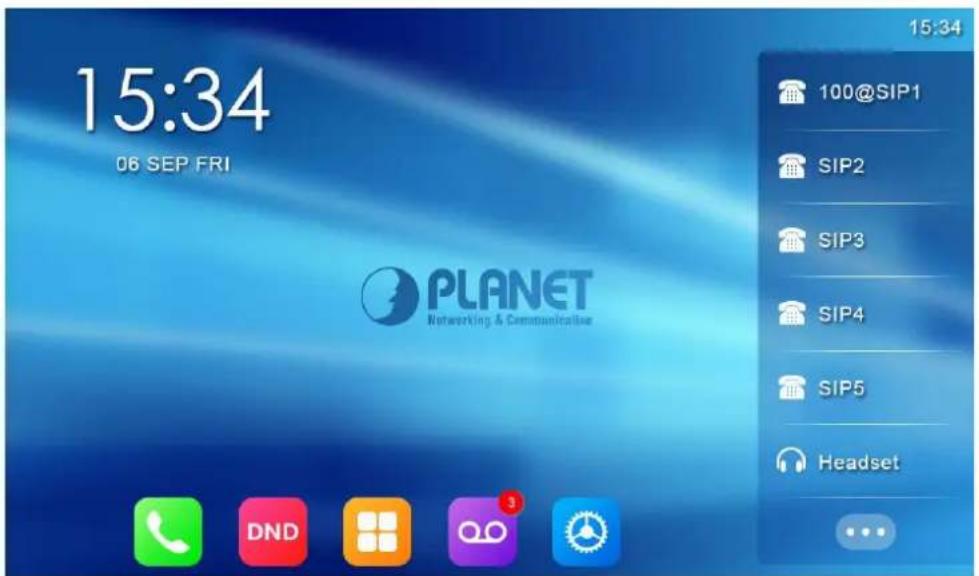
Picture - New Voice Message Notification
To listen to a voice message, the user must first configure the voicemail number. After the voicemail number is configured, the user can retrieve the voicemail of the default line.
When the phone is in the default standby state,
● The voicemail icon displays the number of unread voicemail messages.
- Click the icon to view the total number of voicemail messages, or listen to the messages directly in the voicemail interface
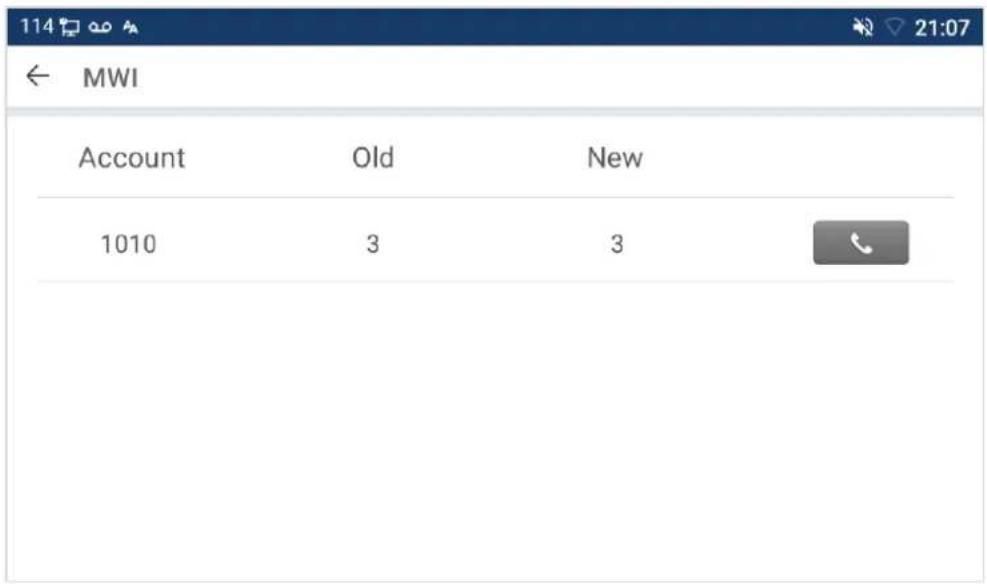
Picture - Voice message interface
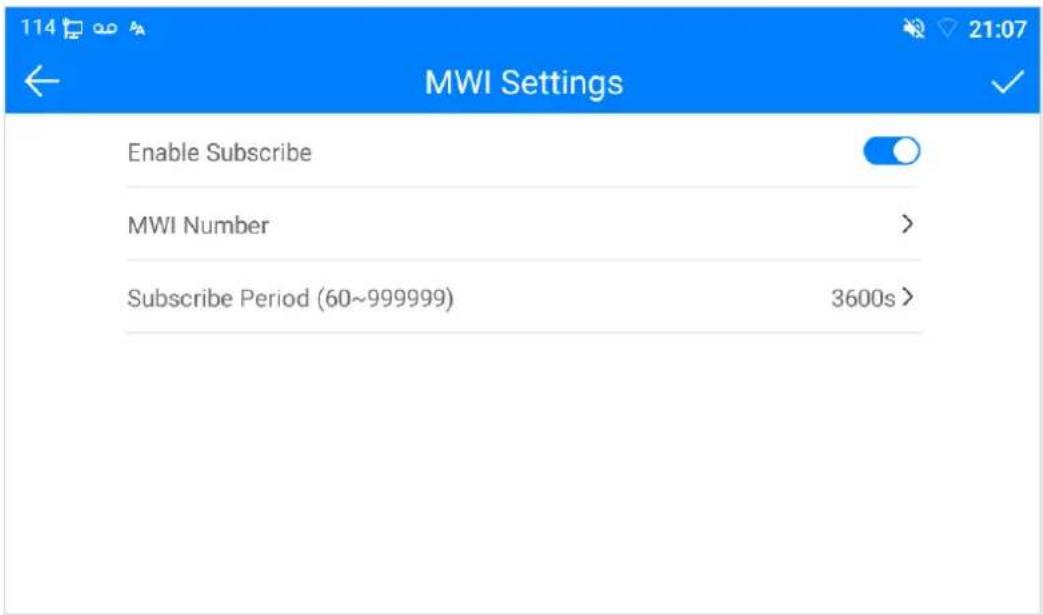
Picture - Configure voicemail number
6.9 SIP Hotspot
SIP hotspot is a simple but practical function. With simple configurations, the SIP hotspot function can implement group ringing. SIP accounts can be expanded.
Set a phone as a SIP hotspot and other phones (B and C) as SIP hotspot clients. When somebody calls phone A, phones A, B, and C will all ring. When any phone answers the call, other phones will stop ringing. The call can be answered by only one phone. When B or C initiates a call, the SIP number registered by phone A is the calling number.
To set a SIP hotspot, register at least one SIP account.
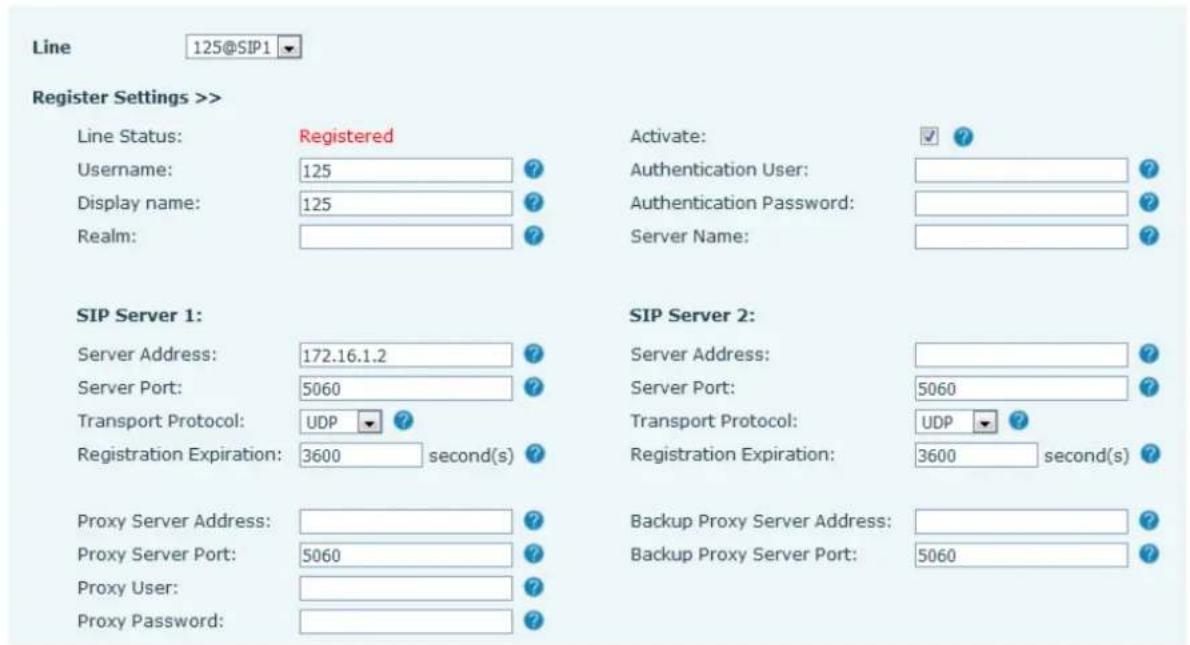
Picture - Register SIP account
Table - SIP hotspot Parameters
| Parameters | Description |
| Device Table | If your phone is set to “SIP hotspot server”, Device Table will display as Client Device Table which is connected to your phone.If your phone is set to “SIP hotspot client”, Device Table will display as Server Device Table which you can connect to. |
| SIP hotspot | |
| Enable hotspot | Set it to be Enable to enable the feature. |
| Mode | Choose hotspot, phone will be a “SIP hotspot server”; Choose Client, phone will be a “SIP hotspot Client” |
| Monitor Type | Either the Multicast or Broadcast is ok. If you want to limit the broadcast packets, you’d better use broadcast. But, if client choose broadcast, the SIP hotspot phone must be broadcast. |
| Monitor Address | The address of broadcast, hotspot server and hotspot client must be the same. |
| Remote Port | Type the Remote port number. |
Configure SIP hotspot server:
| Client Table | |||
| IP | MAC | Alias | Line |
| 172.16.7.181 | 0c:38:3e:23:b5:9f | 1 | 1 |
| SIP Hotspot Settings | |||
| Enable Hotspot: | Enabled | ? | |
| Mode: | Hotspot | ? | |
| Monitor Type: | Broadcast | ? | |
| Monitor Address: | 224.0.2.0 | ? | |
| Local Port: | 16300 | ? | |
| Name: | SIP Hotspot | ? | |
| Line Settings | |||
| Line 1: | Enabled | ||
| Line 2: | Enabled | ||
| Line 3: | Enabled | ||
| Line 4: | Enabled | ||
| Line 5: | Enabled | ||
| Line 6: | Enabled | ||
Picture - SIP hotspot server configuration
Configure SIP hotspot client:
As a SIP hotspot client, no SIP account needs to be set. The Phone set will automatically obtain and be configured a SIP account. On the SIP Hotspot tab page, set Mode to Client. The values of other options are the same as those of the hotspot.
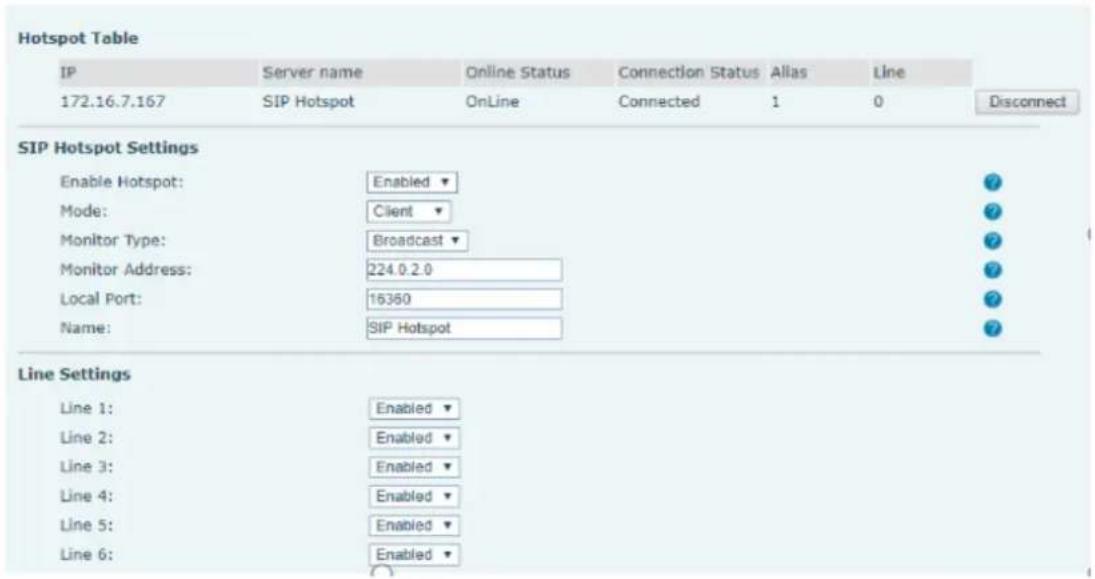
Picture - SIP hotspot client configuration
As the hotspot server, the default extension number is 0. When the phone is used as the client, the extension number is increased from 1. You can view the extension number through the [SIP Hotspot] page.
Call extension number:
● The hotspot server and the client can dial each other through the extension number.
● For example, extension 1 dials extension 0.
7. Phone Settings
7.1 Basic Settings
7.1.1 Language
The user can set the phone language through the phone interface and web interface.
- Phone interface: After resetting the factory settings, the user needs to set the language; when setting the language during standby, go to [Phone Settings] >> [System] >> [Language&input] Settings, as shown in the figure.
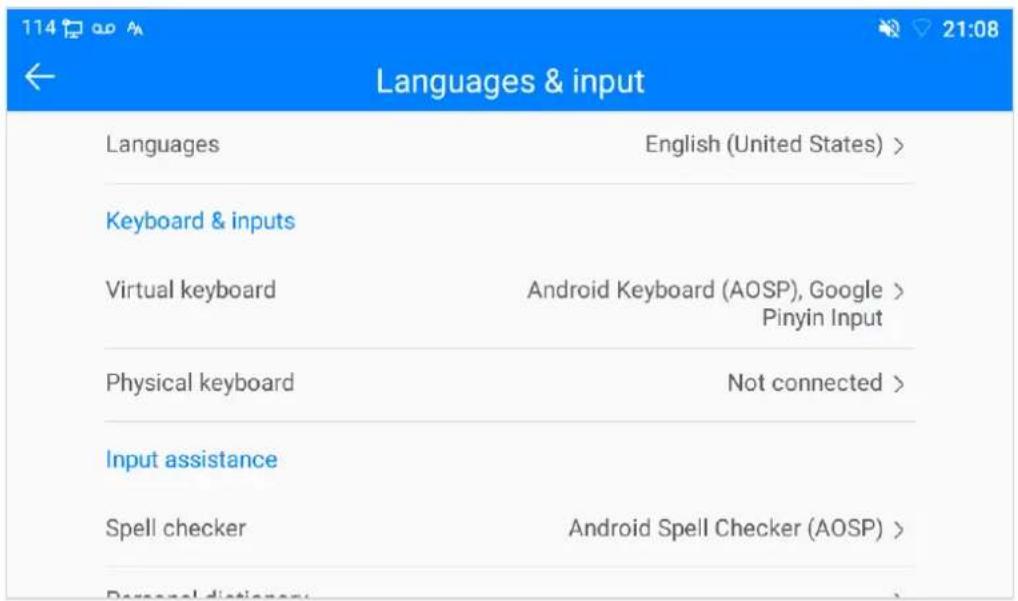
Picture - Phone language setting
- Web interface: Log in to the phone webpage and set the language in the drop-down box at the top right corner of the page, as shown in the figure:
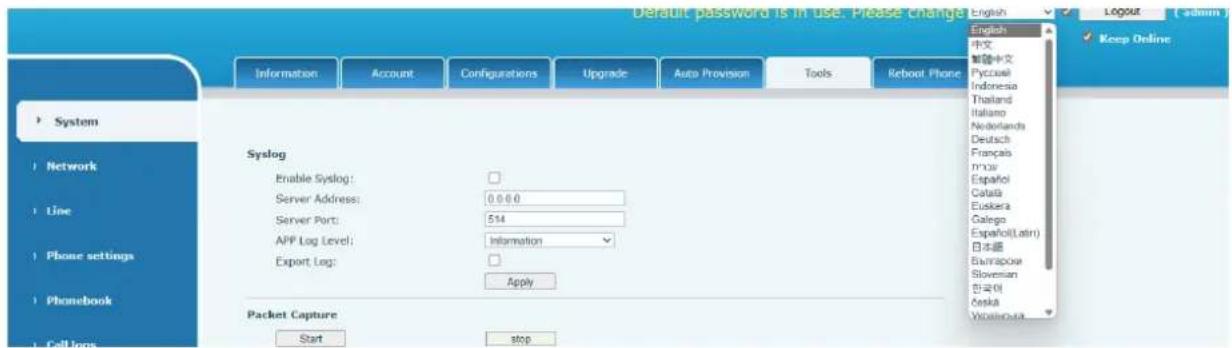
Picture - Language setting on Web page
- The function box on the right side of the web interface language setting box is "Synchronize language to phone"; if selected, the phone language will be synchronized with the webpage language. If it is not selected, it will not be synchronized.
7.1.2 Time & Date
Users can set the phone time through the phone interface and web interface.
- Phone end: When the phone is in the default standby state, press the [Phone Settings] >> [System] >> [Time & Date], use the up/down navigation button to edit parameters, press the [OK] to save after completion, as shown in the figure:
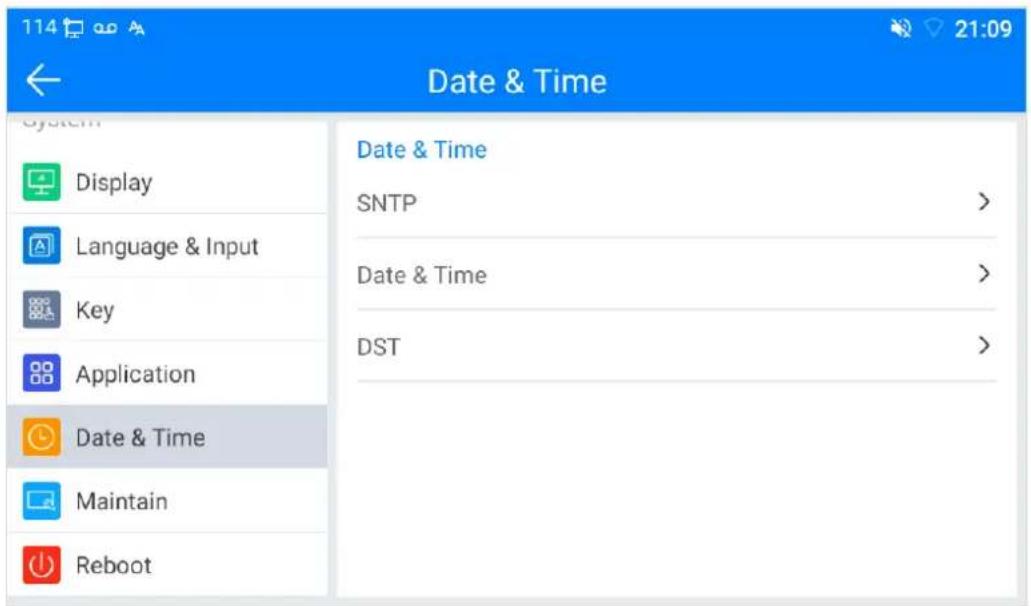
Picture - Set time & date on phone
- Web end: Log in to the phone webpage and enter [Phone Settings] >> [Time/Date], as shown in the figure:
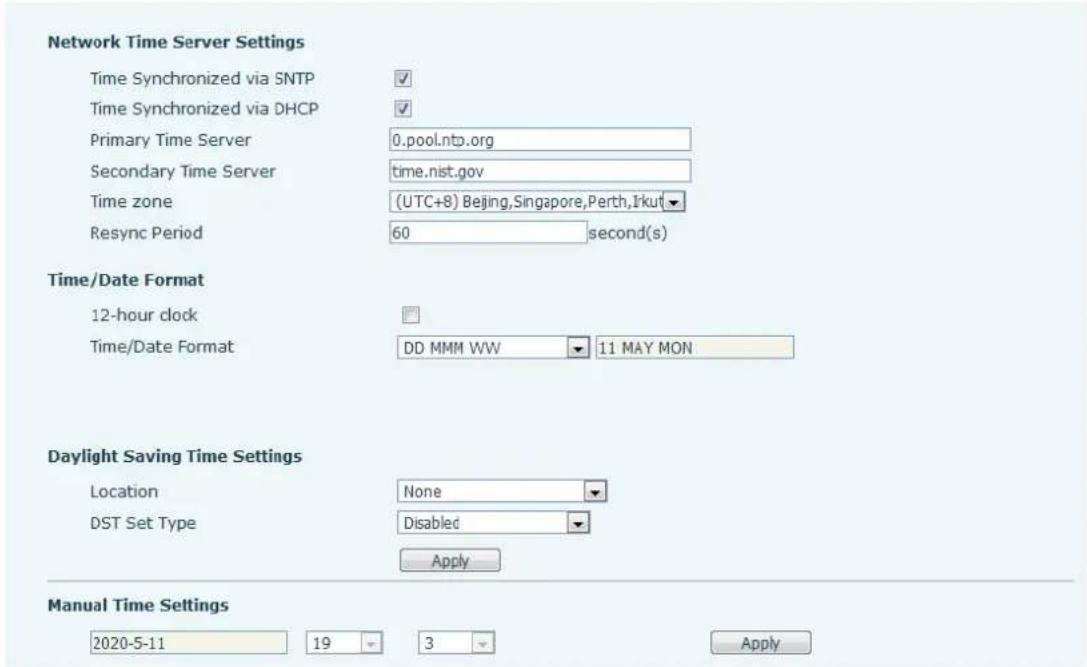
Picture - Set time & date on webpage
Table - Time Settings Parameters
| Parameters | Description |
| Mode | Auto/ManualAuto: Enable network time synchronization via SNTP protocol, default enabled.Manual: User can modify data manually. |
| SNTP Server | SNTP server address |
| Time zone | Select the time zone |
| Time format | Select time format from one of the following dates:■ 1 JAN, MON■ 1 January, Monday■ JAN 1, MON■ January 1, Monday■ MON, 1 JAN■ Monday, 1 January■ MON, JAN 1■ Monday, January 1■ DD-MM-YY■ DD-MM-YYYY■ MM-DD-YY■ MM-DD-YYYY■ YY-MM-DD■ YYYY-MM-DD |
| Separator | Choose the separator between year and month and day |
| 12-Hour Clock | Display the clock in 12-hour format |
| Daylight Savings Time | Enable or Disable the Daylight Savings Time |
7.1.3 Screen
The user can adjust the brightness of phone screen in LCD in two ways.
- Slide down the outgoing status bar page in standby mode. Slide down again to adjust phone brightness conveniently.
- Enter the [Settings] >> [System] >> [Display], and then adjust the brightness.
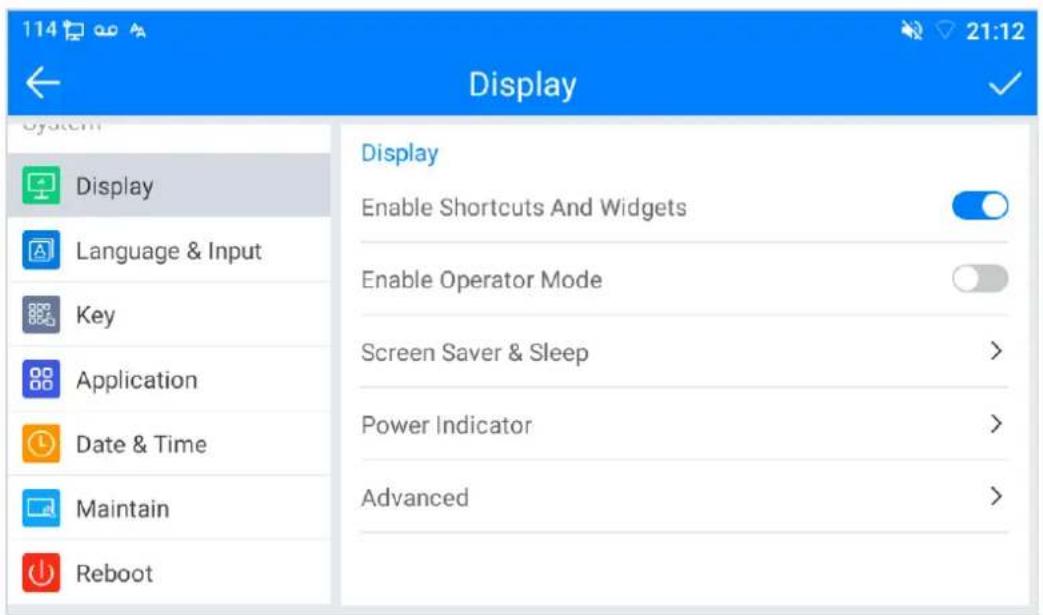
Picture - Set screen parameters on phone
7.1.3.1 Brightness and backlight
Phone interface:
1) in standby mode, slide from the top edge of the screen to enter the status bar; Sliding down again makes it easy to set the brightness of the device.
2) the phone enters >> [setting] >> [display], which can adjust the brightness and change the wallpaper.
7.1.3.2 Screen Saver
- When the phone is in default standby state, press the function menu [Phone settings] >> [System] >> [Display] >> [Screen Security] to enable the screen protection, as shown in the figure below:
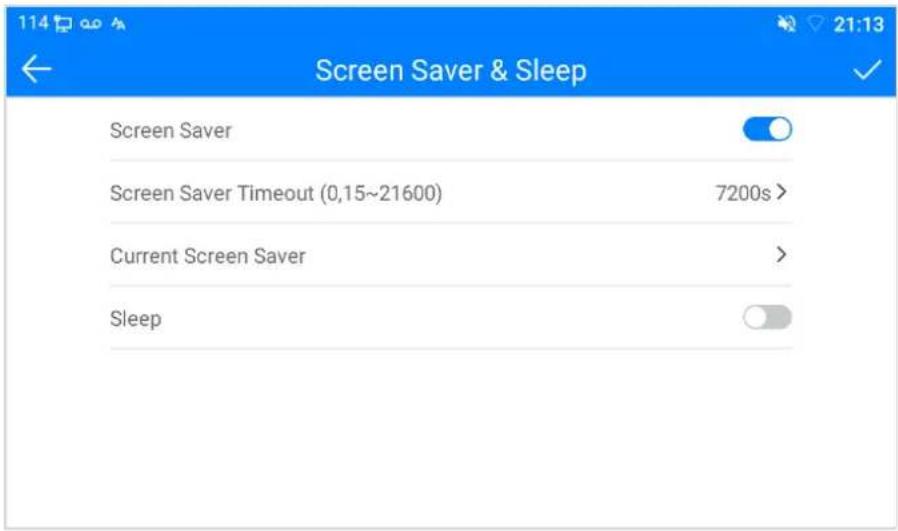

Picture - Phone screen saver
7.1.4 Ring
When the device is in the default standby mode,
● Enter [Phone Settings] >> [Media] >> [Sound] item till you find [Tone] item.
● Enter [Sound] >> [Tone] set promote tone
● The prompt tone contains Settings such as caller ring, notification ring, touch prompt tone, etc.
7.1.5 Voice Volume
When the device is in the default standby mode,
● Enter [Phone Settings] >> [Media] >> [Sound] item till you find [Volume] item.
● Enter [Sound] >> [Volume] set promote tone.
● The prompt tone contains Settings such as caller ring, notification ring, touch prompt tone, etc.
7.1.6 Reboot
When the device is in the default standby mode,
● Enter [Phone Settings] >> [System] >> [Reboot] item.
- Click [Reboot] to indicate whether to restart the phone.
- Press [OK] to restart the phone or press [Cancel] to exit the prompt box to return to the configuration interface.
7.2 Phone book
7.2.1 Local contact
Users can save contact information in their phone book and directly dial the contact's phone number in the phone book. Users can open their phone book by pressing the function menu button 'Contact' on the default main interface.
By default, the phone book is empty, and users can add manually or add contacts to the phone book from the call log (or cloud phone book).

The device can save up to total 2000 contact records.
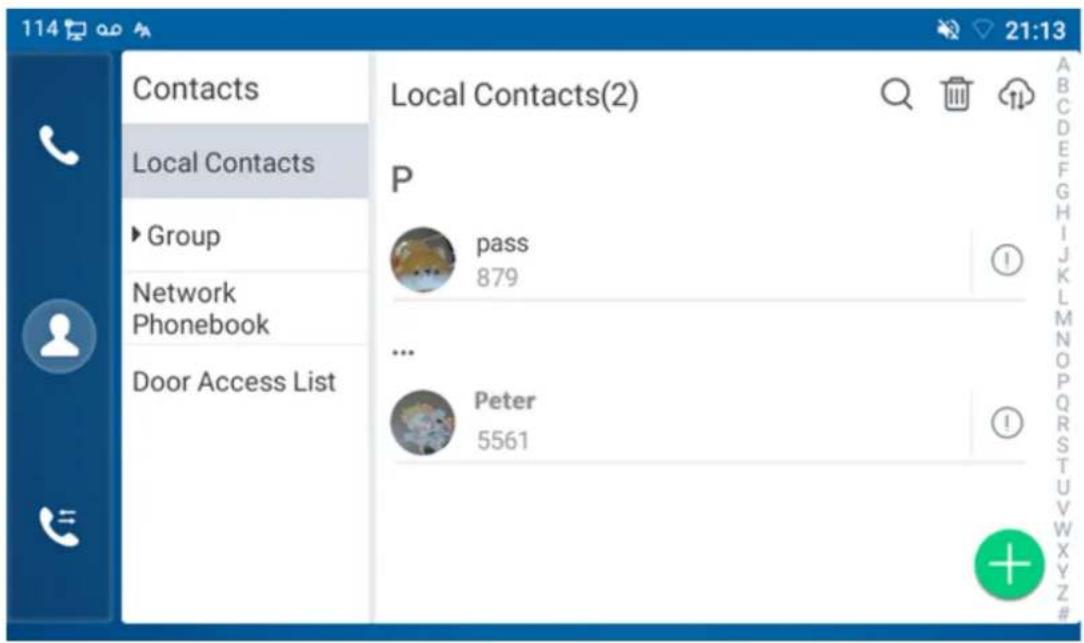
Picture - Local Phone book
The existing records of the contact person will be sorted alphabetically. Users can browse by sliding up and down. The current record indicator tells the user the specific location of the currently located contact. Users can click on the details icon on the right side of the corresponding contact to view their information.
7.2.1.1 Add / Edit / Delete Contact
Add a contact, click to enter the contact interface, select the first icon (contact icon, selected by default) and add the following contact information.
- Contact Name
- Tel. Number
- Mobile Number
- Other Number
- Line
- Ring Tone
- Contact Group
- Photo
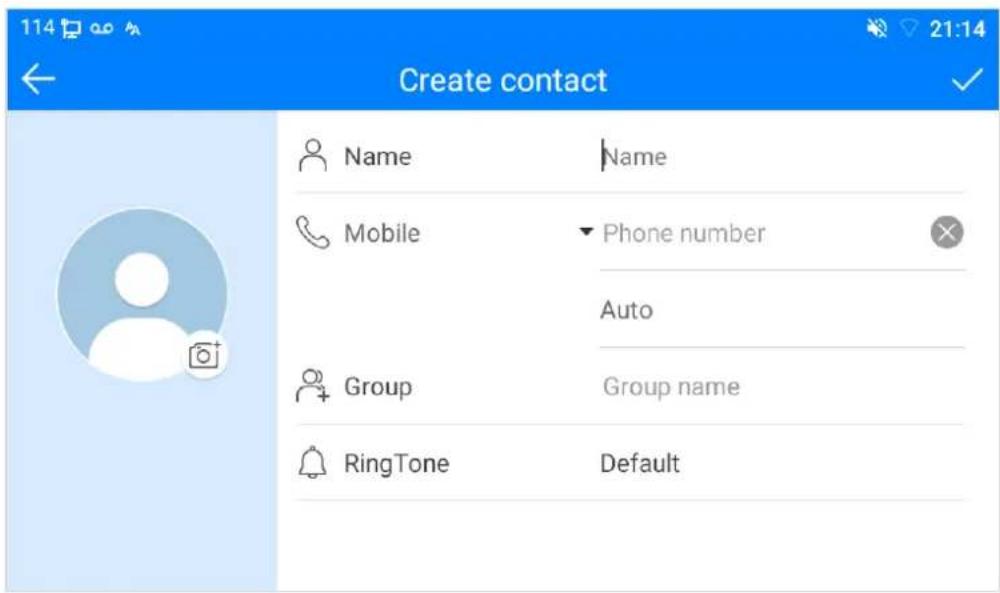
Picture - Add New Contact
User can edit a contact by pressing [Option] >> [Edit] button.
To delete a contact, user should move the record indicator to the position of the contact to be deleted, press [Option] >> [Delete] button and confirm with [OK].
7.2.1.2 Add / Edit / Delete Group
By default, the group list is empty. Users can create their own group, edit group names, add or remove contacts from the group, and delete groups.
- Add group. In the contact list interface, press the "group" icon to switch to the group list. Click add button again to enter the page of creating groups.
- Delete groups, under groups list.
● To edit the group, press edit.
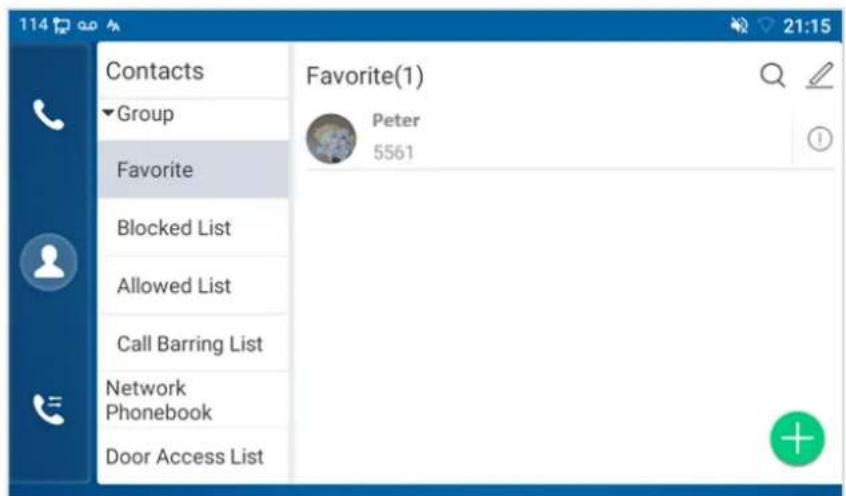
Picture - Group List
7.2.2 Blocked list
The device supports Blocked List, such as the number added to the Blocked List, the number of calls directly refused to the end, the end of the phone shows no incoming calls. (Blocked List Numbers can be called out normally)
- There are multiple ways to add a number to Blacklist on the device. It can be added directly on [Contacts] icon >> [Group] icon >> [Blacklist].
- Select any number in the phone book (both local and network) for configuration addition.
- Select any number in the call log for configuration addition.
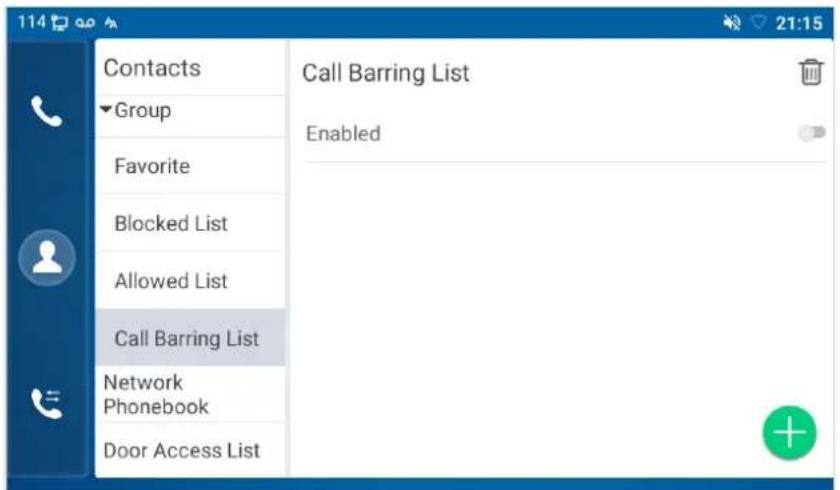
Picture - Add Blocked List
- There are various ways to add number to the blacklist on web page, which can be added in the [Phone book] >> [Call list] >> [Restricted Incoming Calls].
- Select any number in the phone book (both local and network) for configuration addition.
- Select any number in the call log for configuration addition.

Picture - Web Blacklist
7.2.3 Cloud Phone Book
7.2.3.1 Configure Cloud Phone book
Cloud phonebook allows user to configure the device by downloading a phonebook from a cloud server. This is convenient for office users to use the phonebook from a single source and save the effort to create and maintain the contact list individually. It is also a useful tool to synchronize his/her phonebook from a personal mobile phone to the device with PLANET Cloud Phonebook Service and App which is to be provided publicly soon.

The cloud phonebook is ONLY temporarily downloaded to the device each time when it is opened on the device to ensure the user get the latest phonebook. However, the downloading may take a couple seconds depending on the network condition. Therefore, it is highly recommended for the users to save important contacts from cloud to local phonebook for saving download time.
Open cloud phonebook list, press [Application] >> [Contacts] icon >> [Network PhoneBook] in phonebook screen.

The first configuration on cloud phone should be completed on Web page by selecting [PhoneBook] >> [Cloud Contacts]. The setting of addition/deletion on device could be done after the first setting on Web page.
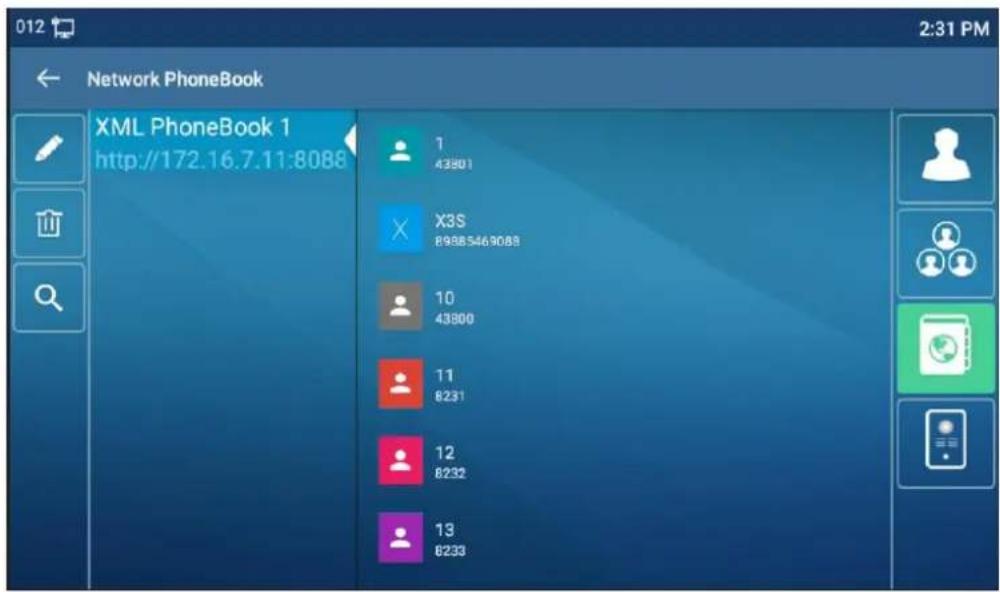
Picture - Cloud phone book list
7.2.3.2 Downloading Cloud Phone book
In cloud phone book screen, user can open a cloud phone book by pressing the network phonebook. The device will start downloading the phone book. The user will be prompted with a warning message if the download fails,
Once the cloud phone book is downloaded completely, the user can browse the contact list and dial the contact number same as in local phonebook.
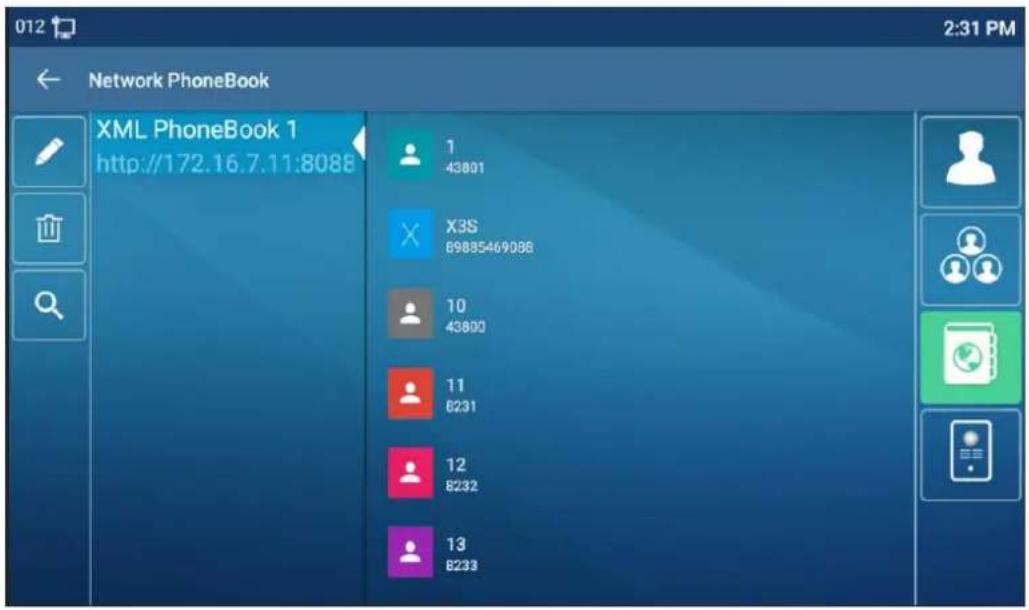
Picture - Browsing Contacts in Cloud Phone book
7.3 Call Log
The phone can store up to 1000 call records. Users can press' Call Records' to open the call records and query the records of all incoming, outgoing, and missed calls.
In the call record screen interface, users can swipe up and down to browse call records.
Each call record will display 'Call Type', 'Caller Number/Name', and 'Call Time'. Users can further check the details of the call record by pressing the details icon on the right side of the call record and clicking on the corresponding call record to dial, or add the number from the call record to the phone book by
pressing [Details] > [Upper right+icon].
Users can select call records to delete by pressing the [Delete] icon (multiple call records can be selected for batch deletion), or select the selection box in the upper left to delete all call records.
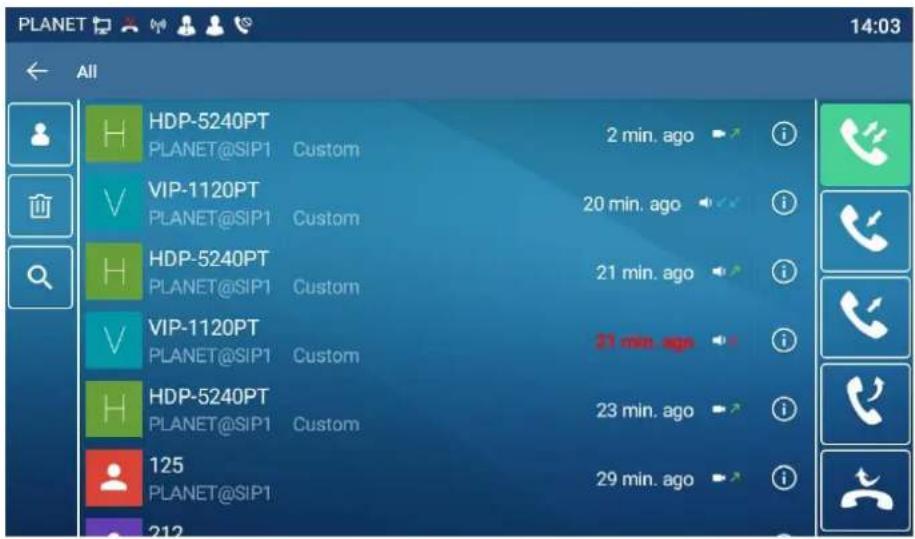
Picture - Call Log
Users can also filter the call records of specific call types to narrow down the scope of search records, and select a call record type by left and right navigation keys.
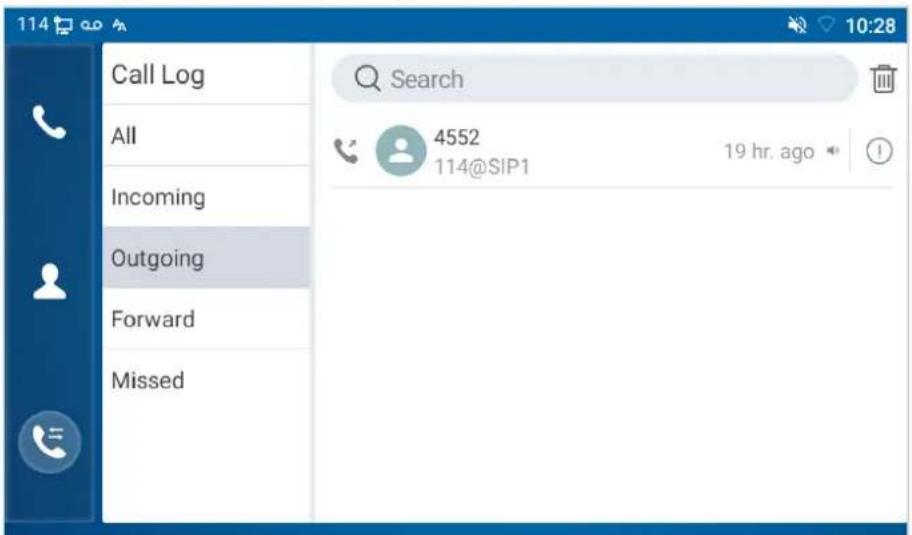
Picture - Filter call record types
7.4 Function Key
- Function key Settings:
- It shows 6 DSSKEY keys in standby mode on the Screen, each of which can be customized (expansion keys are not supported). After expansion, there will be 23 Function DSSkey, a total of four pages. Users can customize and configure each DSSKEY key on each page.
Users can add/delete DSSkey pages through the webpage, and can use the page switch key to switch DSSkey pages. In addition, users can also long press each shortcut key, modify the corresponding key settings.
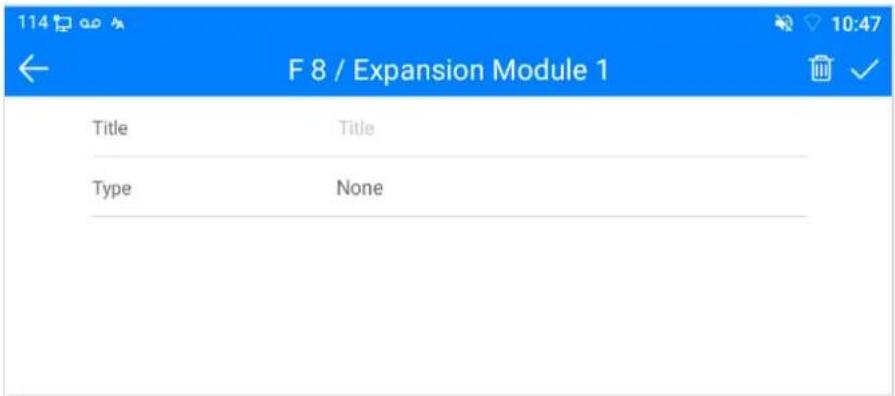
Picture - DSS LCD Screen Configuration
The DSS Key could be configured as followings,
◆ Memory Key
■ Speed Dial/Intercom/BLF/Presence/Call Park/Call Forward (to someone)
◆ Line
Key Event
■ MWI/DND/Hold/Transfer/Phonebook/Redial/Pickup/Call Forward (to specified line)/Headset/SMS/Release
DTMF
Action URL
◆ BLF List Key
◆ MCAST Paging
◆ MCAST Listening
Action URL
XML Browser
Moreover, user also can add the user-defined title for the DSS Keys, which is configured as Memory Key / Line / URL / MCAST Paging / Prefix.

User-defined title is up to 10 characters.
7.5 Wi-Fi
The device supports wireless Internet access and has built-in Wi-Fi without external devices.
When the device is in the default standby mode,
Press [Application] till you find the [Settings]>> [Network &Internet].
- Enter [Wi-Fi] item.
● Enable the Wi-Fi to search the current wireless network automatically. - Select to the available network, enter the user name and password to connect successfully.
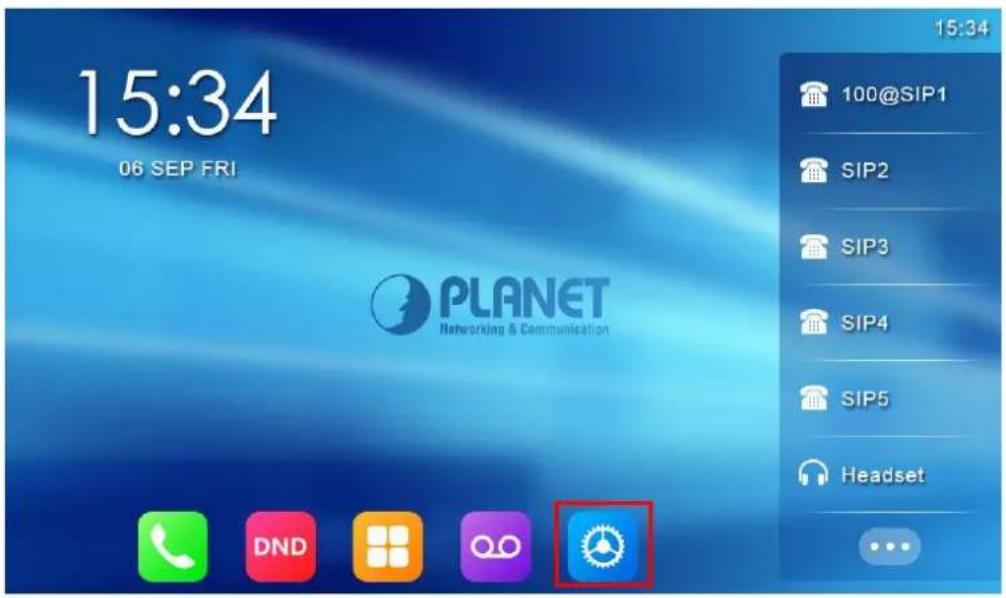
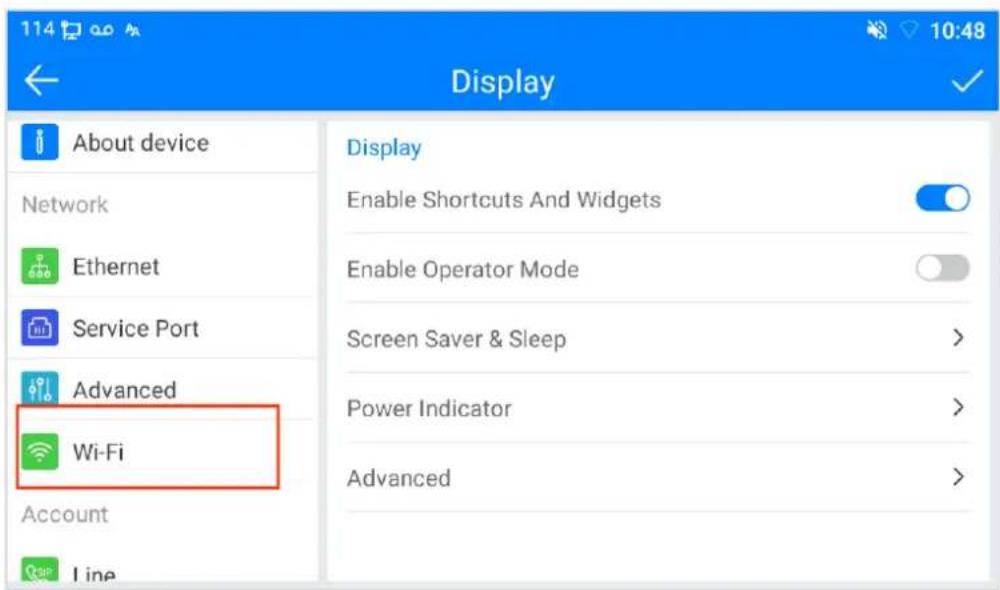
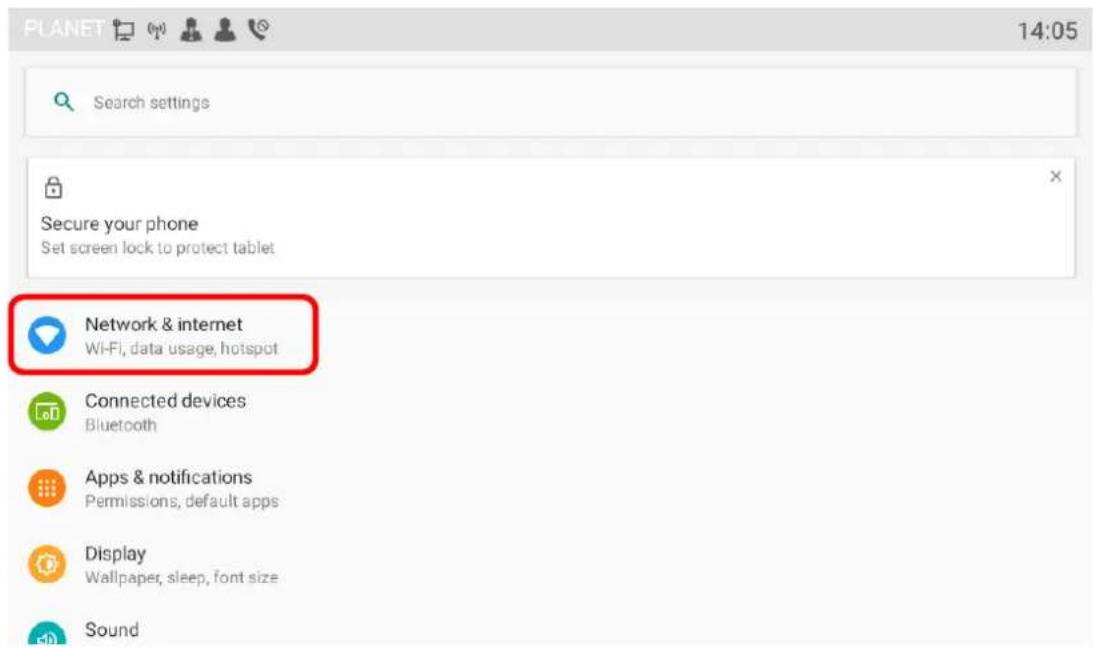
Picture - WIFI settings
- You can also directly enter the configuration by dragging down the status bar and long pressing the Wi Fi icon above the status bar.
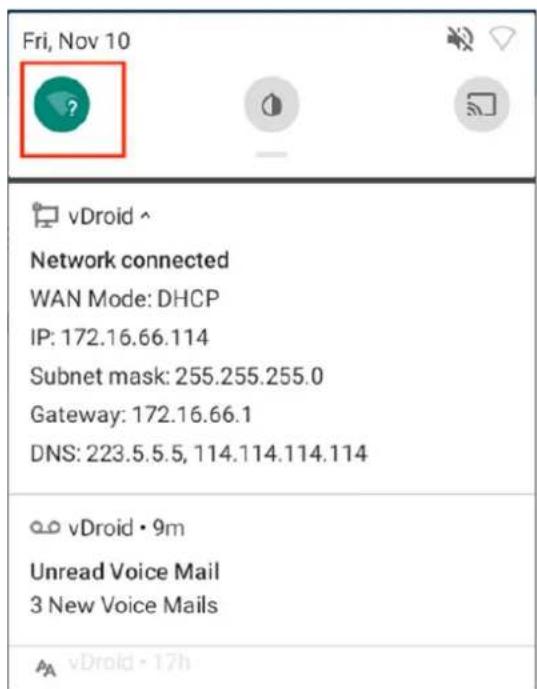
7.6 Headset
7.6.1 Wired Headset
- The device supports wired Headset with RJ9 interface, which can play incoming call sound and talk with Headset.
● After the phone is connected to the headset, the default DSS key of headset will be green light which indicates that the headset can be used normally. - On the webpage [Phone settings] >> [Features], you can set the headset answering function, and the ring tone for headset.
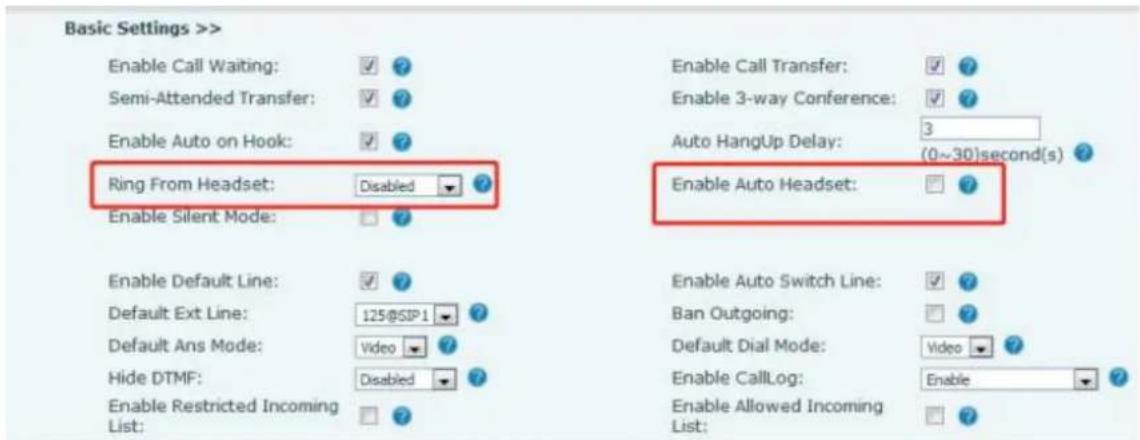
Picture - Headset function settings
7.7 Advanced
7.7.1 Line Configurations
Phone access [Phone settings] >> [Account] >> [Line], select [Register Account] to configure the SIP line on the phone.

To enter the phone account registration, a password is required, and the default password is "admin"
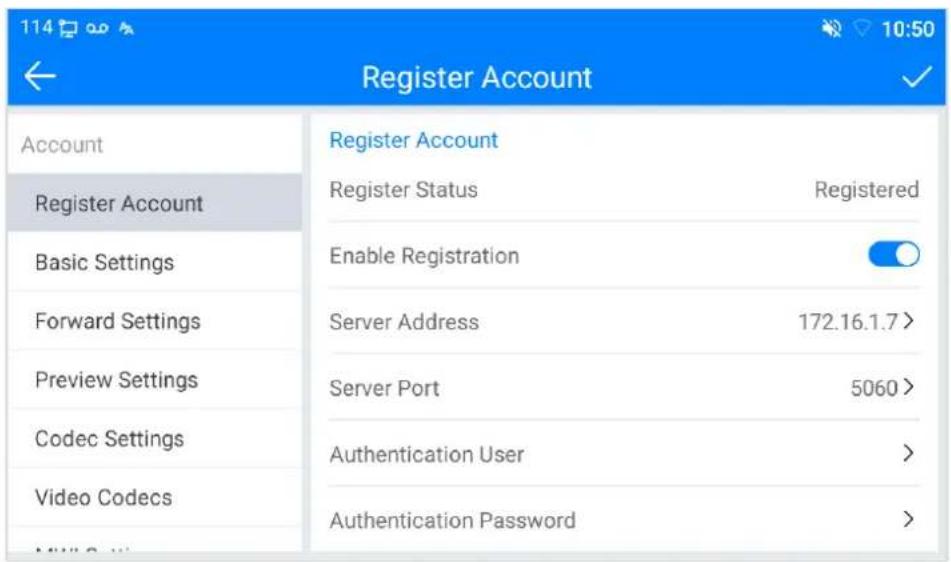
Picture - SIP address and account information
For users who want to configure more options, user should use web management portal to modify or [More Register Settings] in accounts on the individual line to configure those options.
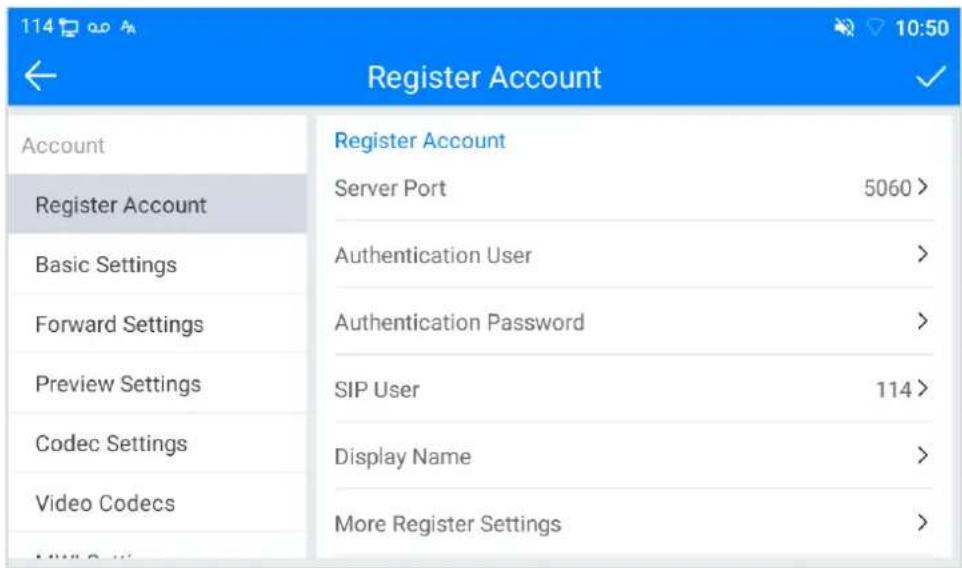
Picture - Configure Advanced Line Options
7.7.2 Network Settings
7.7.2.1 Network Settings
Phone access [Phone Settings] >> [Network] >> [Ethernet], you can configure the SIP line on the phone.
There are 2 connection mode options: DHCP and Static IP.
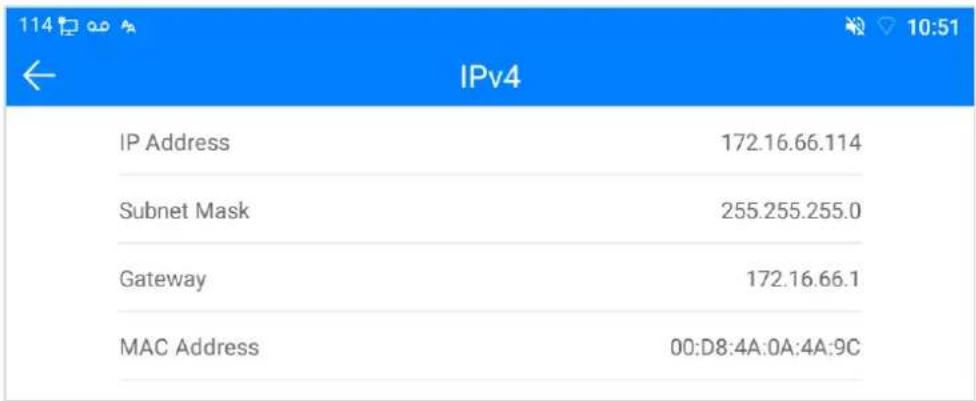
Picture - DHCP network mode
When using DHCP mode, phone will get the IP address from DHCP server (router).
- Obtain DNS Server automatically: It is enabled as default. "Enable" means phone will get DNS address from DHCP server and "disable" means not.
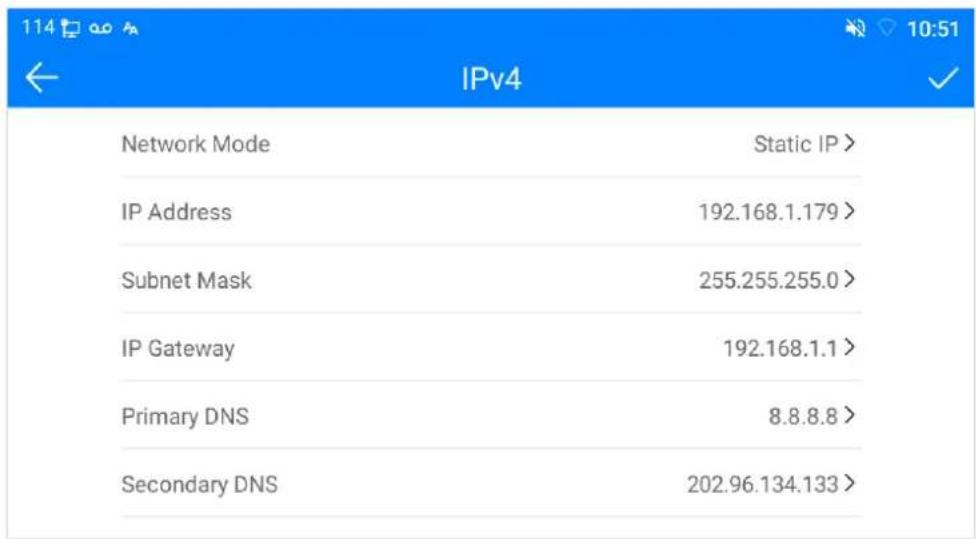
Picture - Static IP network mode
When using Static IP mode, user must configure the IP address manually.
IP Address: Phone IP address.
- Subnet Mask: sub mask of your LAN.
● IP Gateway: The gateway IP address. Phone could access the other network via it.
● Primary DNS: Primary DNS address. The default is 8.8.8.8, Google DNS server address.
● Secondary DNS: Secondary DNS. When primary DNS is not available, it will work.
7.7.2.2 QoS & VLAN
Access [ Phone Settings] >> [Network] >> [ Advance]
LLDP
Link Layer Discovery Protocol. LLDP is a vendor independent link layer protocol used by network devices for advertising their identity, capabilities to neighbors on a LAN segment.
Phone could use LLDP to find the VLAN switch or other VLAN devices and use LLDP to learn feature to apply the VLAN ID from VLAN switch to phone its self.
CDP
Cisco Discovery Protocol. CDP is a not-for-profit charity that runs the global disclosure system for investors, companies, cities, states and regions to manage their environmental impacts. According to the CDP, Cisco devices could share the OS version, IP address, hardware version and so on.
Table - QoS & VLAN
| Parameters | Description |
| LLDP setting | |
| Report | Enable LLDP |
| Interval | LLDP requests interval time |
| Learning | apply the learned VLAN ID to the phone configuration |
| QoS | |
| QoS Mode | configure SIP DSCP and audio DSCP |
| WAN VLAN | |
| WAN VLAN | WAN port VLAN configuration |
| LAN VLAN | |
| LAN VLAN | LAN port VLAN configuration |
| CDP | |
| CDP | CDP enable/disable, CDP interval time |
7.7.2.3 Web Server Type
Access [Phone Settings] >> [Network] >> [Service Port] to configure the Web Server mode.
Configure the Web Server mode to be HTTP or HTTPS and will be activated after the reboot. Then user could use http/https protocol to access pone web page.
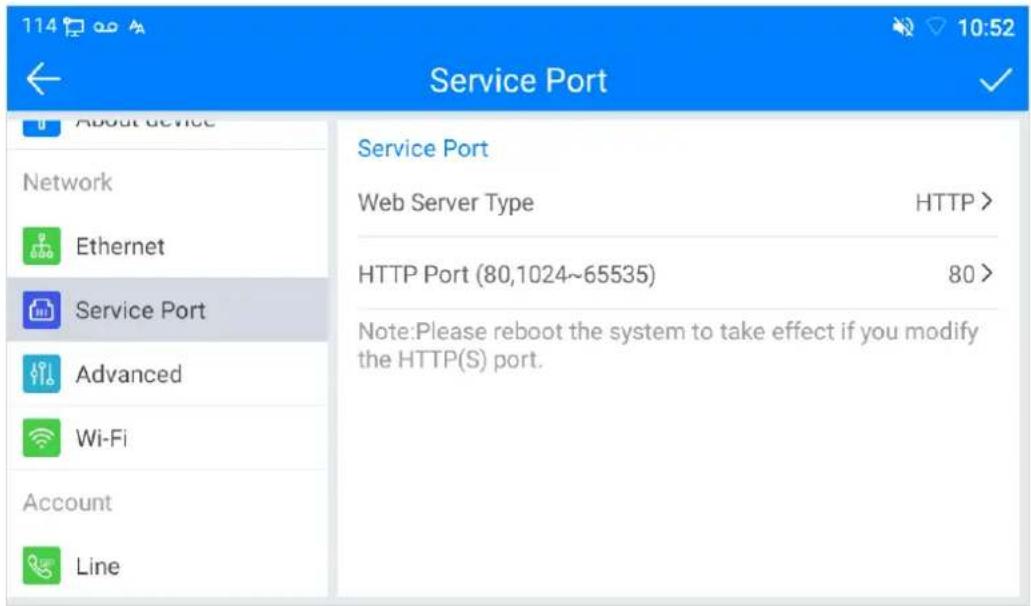
Picture - The phone configures the web server type
7.7.3 Set The Secret Key
When the device is in the default standby mode,
- Select [Phone Settings] >> [System] >> [Password]
- Click [Password] to change password.
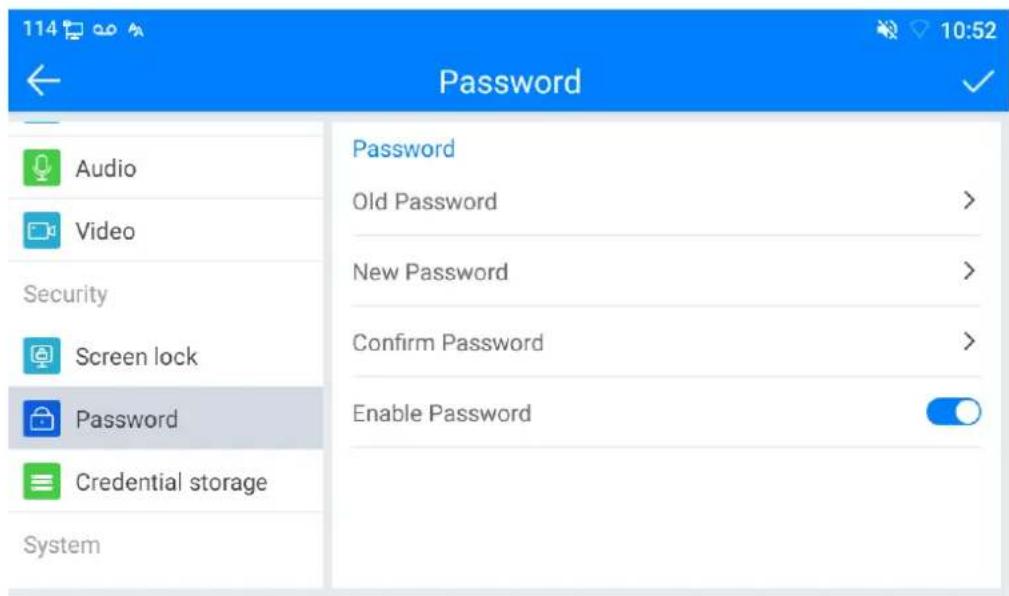
Picture - Menu password and Settings
7.7.4 Maintenance
Phone Webpage: Login and go to [System] >> [Auto provision].
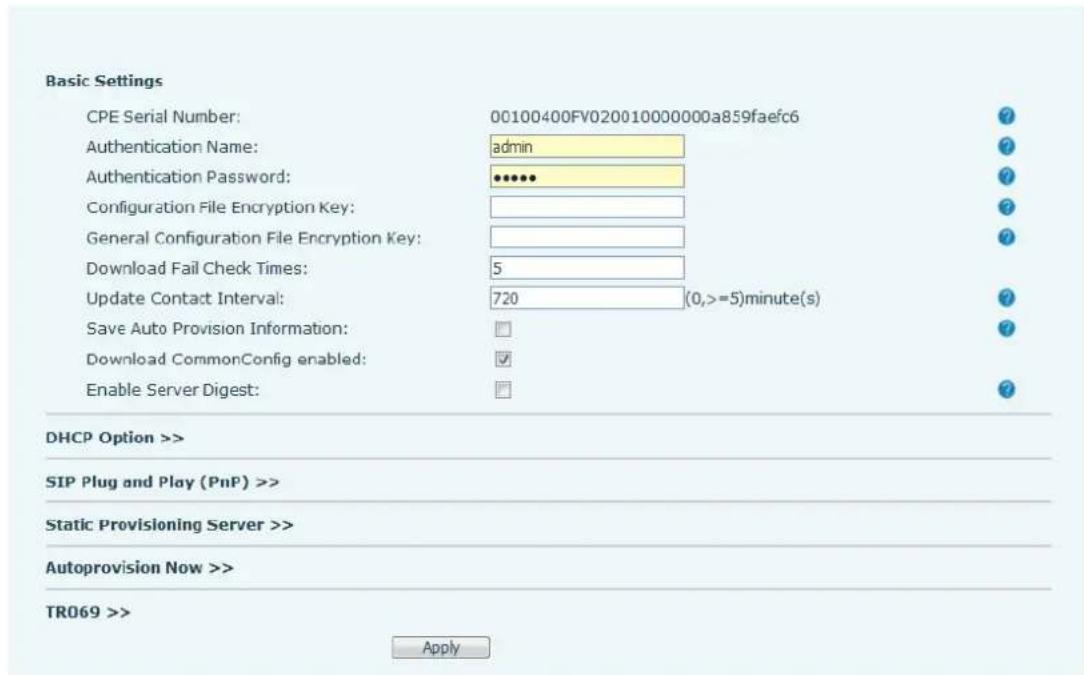
Picture - Page auto provision Settings
LCD : Enter [Phone Settings] >> [System] >> [Maintain] >> [Auto Provision].
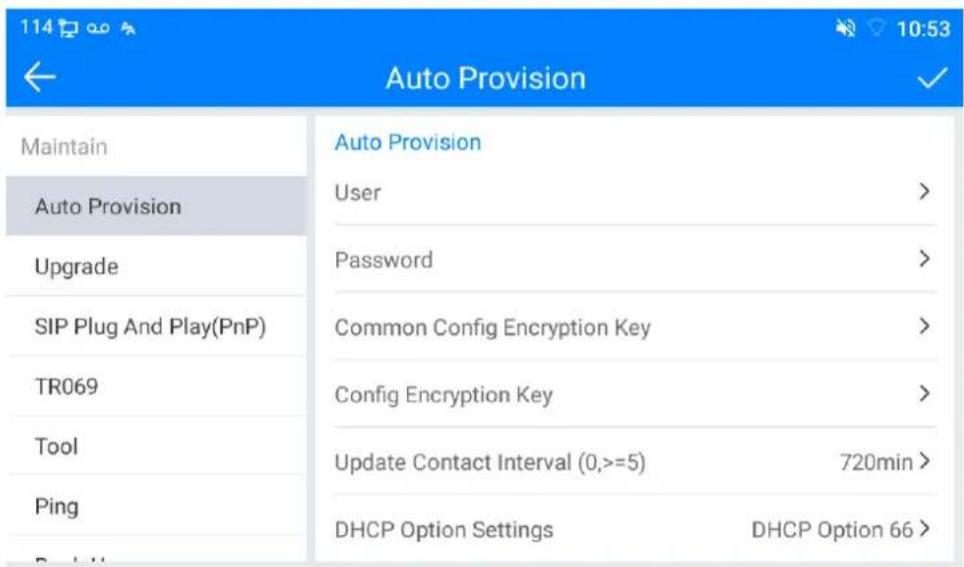
Picture - Phone auto provision settings
The devices support SIP PnP, DHCP options, Static provision, TR069. If all of the 4 methods are enabled, when the terminal starts, the configuration obtained first will be used for automatic deployment according to the order of obtaining the configuration.
Transferring protocol: FTP、TFTP、HTTP、HTTPS
Table - Auto Provision
| Parameters | Description |
| Basic settings | |
| CPE Serial Number | Display the device SN |
| Authentication Name | The user name of provision server |
| Authentication Password | The password of provision server |
| Configuration File Encryption Key | If the device configuration file is encrypted, user should add the encryption key here |
| General Configuration File Encryption Key | If the common configuration file is encrypted, user should add the encryption key here |
| Download Fail Check Times | If there download is failed, phone will retry with the configured times. |
| Update Contact Interval | Phone will update the phonebook with the configured interval time. If it is 0, the feature is disabled. |
| Save Auto Provision Information | Save the HTTP/HTTPS/FTP user name and password. If the provision URL is kept, the information will be kept. |
| Download Common Config enabled | Whether phone will download the common configuration file. |
| Enable Server Digest | When the feature is enable, if the configuration of server is changed, phone will download and update. |
| DHCP Option | |
| Option Value | Configure DHCP option, DHCP option supports DHCP custom option | DHCP option 66 | DHCP option 43, 3 methods to get the provision URL. The default is Option 66. |
| Custom Option Value | Custom Option value is allowed from 128 to 254. The option value must be same as server define. |
| Enable DHCP Option 120 | Use Option120 to get the SIP server address from DHCP server. |
| SIP Plug and Play (PnP) | |
| Enable SIP PnP | Whether enable PnP or not. If PnP is enable, phone will send a SIP SUBSCRIBE message with broadcast method. Any server can support the feature will respond and send a Notify with URL to phone. Phone could get the configuration file with the URL. |
| Server Address | Broadcast address. As default, it is 224.0.0.0. |
| Server Port | PnP port |
| Transport Protocol | PnP protocol, TCP or UDP. |
| Update Interval | PnP message interval. |
| Static Provisioning Server | |
| Server Address | Provisioning server address. Support both IP address and domain address. |
| Configuration File Name | The configuration file name. If it is empty, phone will request the common file and device file which is named as its MAC address. The file name could be a common name, mac.cfg,input.cfg.The file format supports CFG/TXT/XML. |
| Protocol Type | Transferring protocol type, supports FTP、TFTP、HTTP and HTTPS |
| Update Interval | Configuration file update interval time. As default it is 1, means phone will check the update every 1 hour. |
| Update Mode | Provision Mode.1. Disabled.2. Update after reboot.3. Update after interval. |
| TR069 | |
| Enable TR069 | Enable TR069 after selection |
| ACS Server Type | There are 2 options Serve type, common and CTC. |
| ACS Server URL | ACS server address |
| ACS User | ACS server username (up to is 59 character) |
| ACS Password | ACS server password (up to is 59 character) |
| Enable TR069 Warning Tone | If TR069 is enabled, there will be a prompt tone when connecting. |
| TLS Version | TLS version (TLS 1.0, TLS 1.1, TLS 1.2) |
| INFORM Sending Period | INFORM signal interval time. It ranges from 1s to 999s |
| STUN Server Address | Configure STUN server address |
| STUN Enable | To enable STUN server for TR069 |
7.7.5 Firmware Upgrade
- Web page: Login phone web page and go to [System] >> [Upgrade].
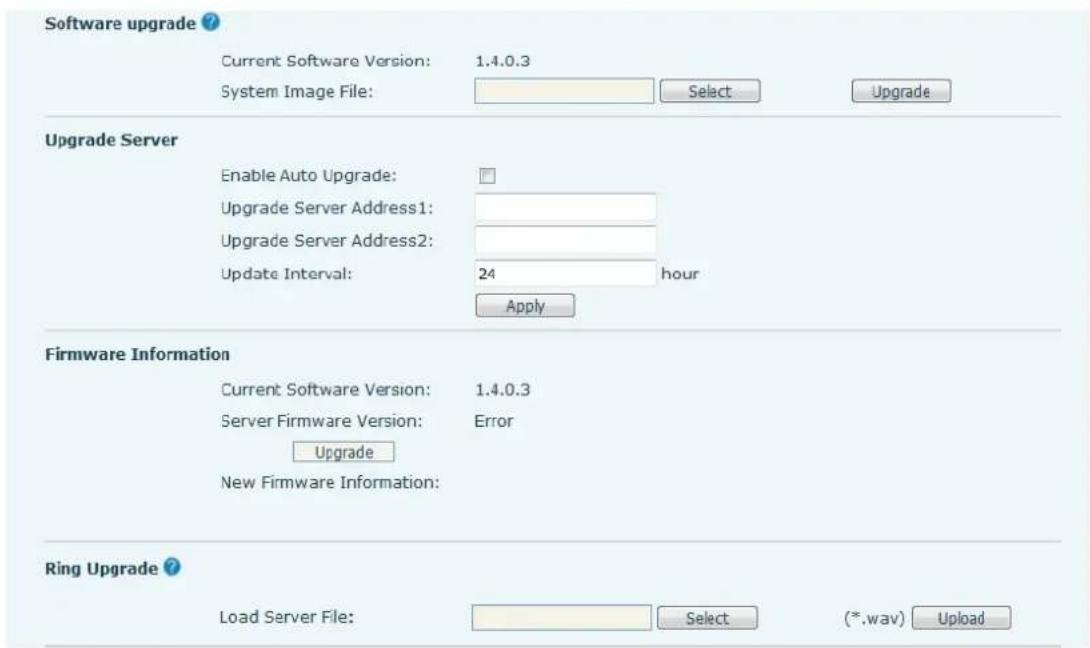
Picture - Web page firmware upgrade
- LCD interface: Go to [Menu] >> [Maintain] >> [Upgrade] (Future features)
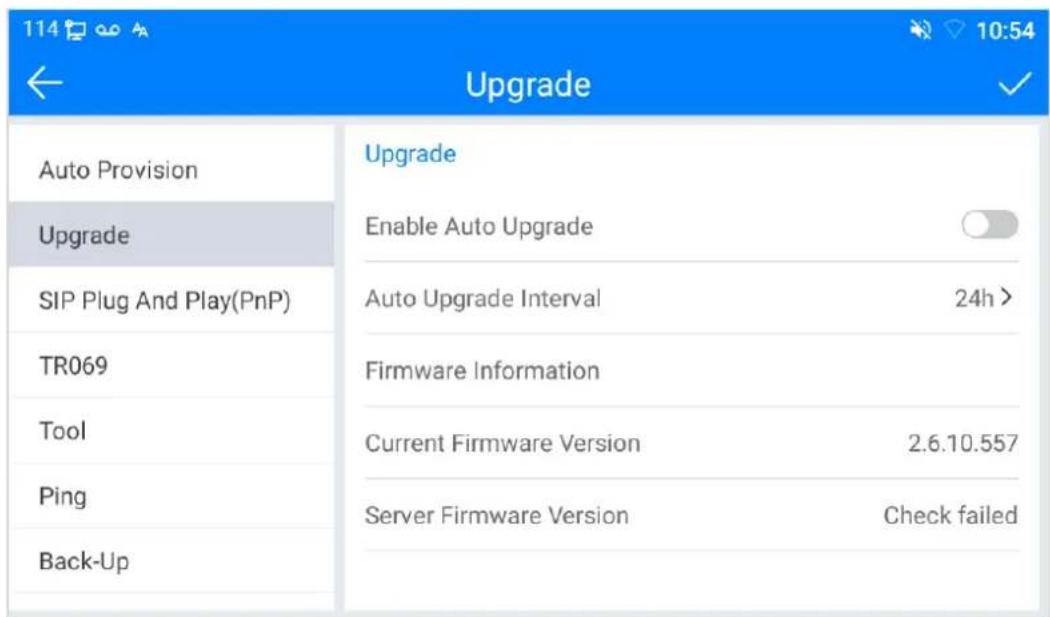
Picture - Firmware upgrade information display
Table - Firmware upgrade
| Parameter | Description |
| Upgrade server | |
| Enable Auto Upgrade | Enable automatic upgrade, If there is a new version txt and new software firmware on the server, phone will show prompt upgrade message after Update Interval. |
| Upgrade Server Address1 | Set available upgrade server address. |
| Upgrade Server Address 2 | Set available upgrade server address. |
| Update Interval | Set Update Interval. |
| Firmware Information | |
| Current Software Version | It will show Current Software Version. |
| Server Firmware Version | It will show Server Firmware Version. |
| [Upgrade] button | If there is a new version txt and new software firmware on the server, the page will display version information and upgrade button will become available; Click [Upgrade] button to upgrade the new firmware. |
| New version description information | When there is a corresponding TXT file and version on the server side, the TXT and version information will be displayed under the new version description information. |
- The file requested from the server is a TXT file called vendor_model_hw1_0.txt.Hw followed by the hardware version number, it will be written as hw1_0 if no difference on hardware. All Spaces in the filename are replaced by underline.
For example, the txt file name requested by the phone is voip_ICF-2000_hw1_0.txt
- The URL requested by the phone is HTTP:// server address/vendor_Model_hw10
- .txt : The new version and the requested file should be placed in the download directory of the HTTP server.
- TXT file format must be UTF-8
- vendor_model_hw10.TXT The file format is as follows :
Version=1.6.3 #Software version
Firmware=xxx/xxx.z #URL
BuildTime=2018.09.11 20:00
Info=TXT

Xxxxx //Release Note
Xxxxx
● After the interval of update cycle arrives, if the server has available files and versions, the phone will prompt as shown below. Click [view] to check the version information and upgrade
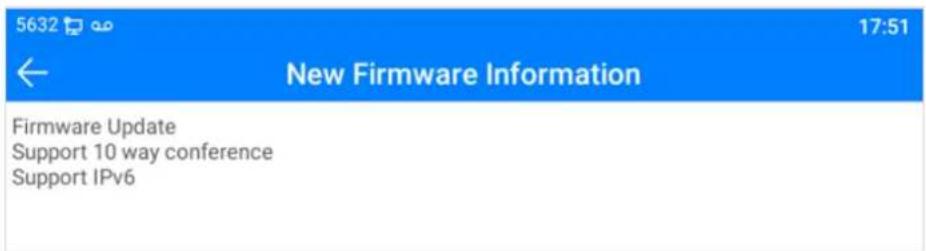
Picture - Firmware upgrade
7.7.6 Factory Reset
The phone is in default standby mode.
- Press [Phone Settings] to find [System]>> [Maintain]>> [Phone Reset].
- Press the [Reset] button to select the file to be cleared.
Press [√] to clear after completion. When you select clear configuration file and clear all, the phone will restart automatically after clearing.
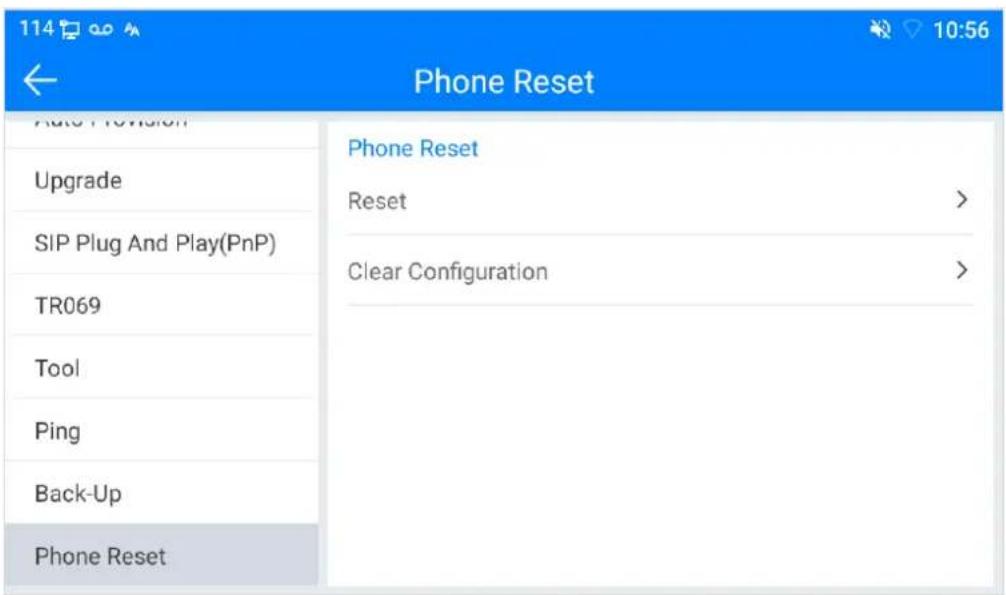
Picture - Reset to default
8. Web Configurations
8.1 Web Page Authentication
The user can log into the web page of the phone to manage the user's phone information and operate the phone. Users must provide the correct user name and password to log in.
8.2 System >> Information
User can get the system information of the device in this page including,
■ Model
■ Hardware Version
■ Software Version
■ Uptime
And summarization of network status,
■ Network Mode
■ MAC Address
IP
■ Subnet Mask
■ Default Gateway
Besides, summarization of SIP account status,
■ SIP User
■ SIP account status (Registered / Unapplied / Trying / Timeout)
8.3 System >> Account
On this page the user can change the password for the login page.
Users with administrator rights can also add or delete users, manage users, and set permissions and passwords for new users.
8.4 System >> Configurations
On this page, users with administrator privileges can view, export, or import the phone configuration, or restore the phone to factory Settings.
■ Clear Configurations
Select the module in the configuration file to clear.
SIP: account configuration.
AUTOPROVISION: automatically upgrades the configuration
TR069:TR069 related configuration
MMI: MMI module, including authentication user information, web access protocol, etc.
DSS Key: DSS Key configuration
■ Clear Tables
Select the local data table to be cleared, all selected by default.
■ Reset Phone
The phone data will be cleared, including configuration and database tables.
8.5 System >> Upgrade
Upgrade the phone software version, customized ringtone, background, DSS Key icon, etc., can also be upgraded to delete the file. Ring tone support “.wav” format.
8.6 System >> Auto Provision
The Auto Provision settings help IT manager or service provider to easily deploy and manage the devices in mass volume.
8.7 System >> Tools
Tools provided in this page help users to identify issues at trouble shooting.
8.8 System >> Reboot Phone
This page can restart the phone.
9. Network >> Basic
This page allows users to configure network connection types and parameters.
9.1 Network >> Service Port
This page provides settings for Web page login protocol, protocol port settings and RTP port.
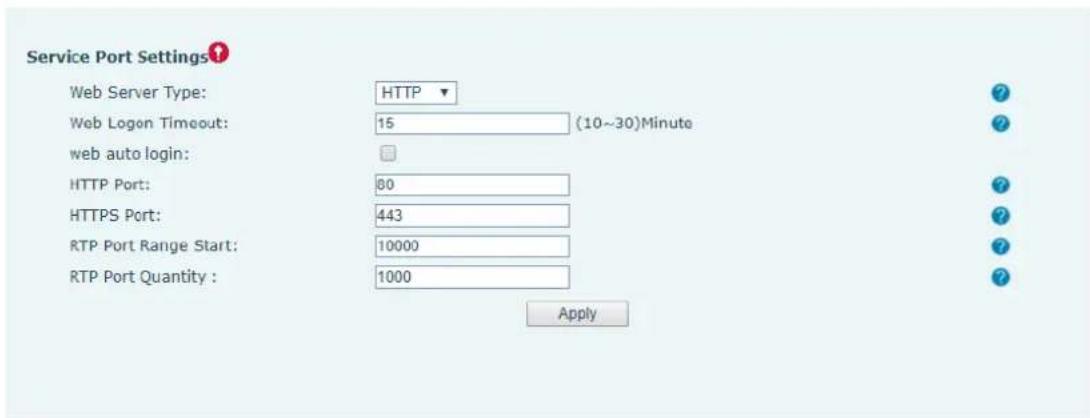
Picture - Service Port Settings
Table - Service port
| Parameter | Description |
| Web Server Type | Reboot to take effect after settings. Optionally, the web page login is HTTP/HTTPS. |
| Web Logon Timeout | Default as 15 minutes, the timeout will automatically exit the login page, need to login again. |
| Web auto login | After the timeout does not need to enter a user name password, will automatically login to the web page. |
| HTTP Port | The default is 80. If you want system security, you can set ports other than 80.Such as :8080, webpage login: HTTP://ip:8080 |
| HTTPS Port | The default is 443, the same as the HTTP port. |
| RTP Port Range Start | The value range is 1025 to 65535. The value of RTP port starts from the initial value set. For each call, the value of voice and video port is added 2. |
| RTP Port Quantity | Number of calls. |
9.2 Network >> Advanced
Advanced network Settings are typically configured by the IT administrator to improve the quality of the phone service.
9.3 Line >> SIP
Configure the Line service configuration on this page.
Table - Line configuration on the web page
| Parameters | Description |
| Register Settings | |
| Line Status | Display the current line status at page loading. To get the up to date line status, user has to refresh the page manually. |
| Activate | Whether the service of the line is activated |
| Username | Enter the username of the service account. |
| Authentication User | Enter the authentication user of the service account |
| Display Name | Enter the display name to be sent in a call request. |
| Authentication Password | Enter the authentication password of the service account |
| Realm | Enter the SIP domain if requested by the service provider |
| Server Name | Input server name. |
| SIP Server 1 | |
| Server Address | Enter the IP or FQDN address of the SIP server |
| Server Port | Enter the SIP server port, default is 5060 |
| Transport Protocol | Set up the SIP transport line using TCP or UDP or TLS. |
| Registration Expiration | Set SIP expiration date. |
| SIP Server 2 | |
| Server Address | Enter the IP or FQDN address of the SIP server |
| Server Port | Enter the SIP server port, default is 5060 |
| Transport Protocol | Set up the SIP transport line using TCP or UDP or TLS. |
| Registration Expiration | Set SIP expiration date. |
| SIP Proxy Server Address | Enter the IP or FQDN address of the SIP proxy server. |
| Proxy Server Port | Enter the SIP proxy server port, default is 5060. |
| Proxy User | Enter the SIP proxy user. |
| Proxy Password | Enter the SIP proxy password. |
| Backup Proxy Server Address | Enter the IP or FQDN address of the backup proxy server. |
| Backup Proxy Server Port | Enter the backup proxy server port, default is 5060. |
| Basic Settings | |
| Enable Auto Answering | Enable auto-answering, the incoming calls will be answered automatically after the delay time |
| Auto Answering Delay | Set the delay for incoming call before the system automatically answered it |
| Call Forward Unconditional | Enable unconditional call forward, all incoming calls will be forwarded to the number specified in the next field |
| Call Forward Number for Unconditional | Set the number of unconditional call forward |
| Call Forward on Busy | Enable call forward on busy, when the phone is busy, anyincoming call will be forwarded to the number specified in the next field. |
| Call Forward Number for Busy | Set the number of call forward on busy . |
| Call Forward on No Answer | Enable call forward on no answer, when an incoming call is not answered within the configured delay time, the call will be forwarded to the number specified in the next field. |
| Call Forward Number for No Answer | Set the number of call forward on no answer. |
| Call Forward Delay for No Answer | Set the delay time of not answered call before being forwarded. |
| Transfer Timeout | Set the timeout of call transfer process. |
| Conference Type | Set the type of call conference, Local=set up call conference by the device itself, maximum supports two remote parties, Server=set up call conference by dialing to a conference room on the server |
| Server Conference Number | Set the conference room number when conference type is set to be Server |
| Subscribe For Voice Message | Enable the device to subscribe a voice message waiting notification, if enabled, the device will receive notification from the server if there is voice message waiting on the server |
| Voice Message Number | Set the number for retrieving voice message |
| Voice Message Subscribe Period | Set the interval of voice message notification subscription |
| Enable Hotline | Enable hotline configuration, the device will dial to the specific number immediately at audio channel opened by off-hook handset or turn on hands-free speaker or headphone |
| Hotline Delay | Set the delay for hotline before the system automatically dialed it |
| Hotline Number | Set the hotline dialing number |
| Dial Without Registered | Set call out by proxy without registration |
| Enable Missed Call Log | If enabled, the phone will save missed calls into the call history record. |
| DTMF Type | Set the DTMF type to be used for the line |
| DTMF SIP INFO Mode | Set the SIP INFO mode to send ‘*’ and ‘#’ or ‘10’ and ‘11’ |
| Enable DND | Enable Do-not-disturb, any incoming call to this line will be rejected automatically |
| Subscribe For Voice Message | Enable the device to subscribe a voice message waiting notification, if enabled, the device will receive notification from the server if there is voice message waiting on the server |
| Use VPN | Set the line to use VPN restrict route |
| Use STUN | Set the line to use STUN for NAT traversal |
| Enable Failback | Whether to switch to the primary server when it is available. |
| Failback Interval | A Register message is used to periodically detect the time interval for the availability of the main Proxy. |
| Signal Failback | Multiple proxy cases, whether to allow the invite/registerrequest to also execute failback. |
| Signal Retry Counts | The number of attempts that the SIP Request considers proxy unavailable under multiple proxy scenarios. |
| Codecs Settings | Set the priority and availability of the codecs by adding or remove them from the list. |
| Video Codecs | Select video code to preview video. |
| Advanced Settings | |
| Use Feature Code | When this setting is enabled, the features in this section will not be handled by the device itself but by the server instead. In order to control the enabling of the features, the device will send feature code to the server by dialing the number specified in each feature code field. |
| Enable DND | Set the feature code to dial to the server |
| Disable DND | Set the feature code to dial to the server |
| Enable Call Forward Unconditional | Set the feature code to dial to the server |
| Disable Call Forward Unconditional | Set the feature code to dial to the server |
| Enable Call Forward on Busy | Set the feature code to dial to the server |
| Disable Call Forward on Busy | Set the feature code to dial to the server |
| Enable Call Forward on No Answer | Set the feature code to dial to the server |
| Disable Call Forward on No Answer | Set the feature code to dial to the server |
| Enable Blocking Anonymous Call | Set the feature code to dial to the server |
| Disable Blocking Anonymous Call | Set the feature code to dial to the server |
| Call Waiting On Code | Set the feature code to dial to the server |
| Call Waiting Off Code | Set the feature code to dial to the server |
| Send Anonymous On Code | Set the feature code to dial to the server |
| Send Anonymous Off Code | Set the feature code to dial to the server |
| SIP Encryption | Enable SIP encryption such that SIP transmission will be encrypted |
| RTP Encryption | Enable RTP encryption such that RTP transmission will be encrypted |
| Enable Session Timer | Set the line to enable call ending by session timer refreshment. The call session will be ended if there is not new session timer event update received after the timeout period |
| Session Timeout | Set the session timer timeout period |
| Enable BLF List | Enable/Disable BLF List |
| BLF List Number | BLF List allows one BLF key to monitor the status of a group. Multiple BLF lists are supported. |
| Response Single Codec | If setting enabled, the device will use single codec in response to an incoming call request |
| BLF Server | The registered server will receive the subscription package from ordinary application of BLF phone.Please enter the BLF server, if the sever does not support subscription package, the registered server and subscription server will be separated. |
| Keep Alive Type | Set the line to use dummy UDP or SIP OPTION packet to keep NAT pinhole opened |
| Keep Alive Interval | Set the keep alive packet transmitting interval |
| Keep Authentication | Keep the authentication parameters from previous authentication |
| Blocking Anonymous Call | Reject any incoming call without presenting caller ID |
| User Agent | Set the user agent, the default is Model with Software Version. |
| Specific Server Type | Set the line to collaborate with specific server type |
| SIP Version | Set the SIP version |
| Anonymous Call Standard | Set the standard to be used for anonymous |
| Local Port | Set the local port |
| Ring Type | Set the ring tone type for the line |
| Enable user=phone | Sets user=phone in SIP messages. |
| Use Tel Call | Set use tel call |
| Auto TCP | Using TCP protocol to guarantee usability of transport for SIP messages above 1500 bytes |
| Enable Rport | Set the line to add rport in SIP headers |
| Enable PRACK | Set the line to support PRACK SIP message |
| DNS Mode | Select DNS mode, A, SRV, NAPTR |
| Enable Long Contact | Allow more parameters in contact field per RFC 3840 |
| Enable Strict Proxy | Enables the use of strict routing. When the phone receives packets from the server , it will use the source IP address, not the address in via field. |
| Convert URI | Convert not digit and alphabet characters to %hh hex code |
| Use Quote in Display Name | Whether to add quote in display name, i.e. "PLANET" vs PLANET |
| Enable GRUU | Support Globally Routable User-Agent URI (GRUU) |
| Sync Clock Time | Time Sync with server |
| Enable Inactive Hold | With the post-call hold capture package enabled, you can see that in the INVITE package, SDP is inactive. |
| Caller ID Header | Set the Caller ID Header |
| Use 182 Response for Call waiting | Set the device to use 182 response code at call waiting response |
| Enable Feature Sync | Feature Sync with server |
| Enable SCA | Enable/Disable SCA (Shared Call Appearance ) |
| CallPark Number | Set the CallPark number. |
| Server Expire | Set the timeout to use the server. |
| TLS Version | Choose TLS Version. |
| uaCSTA Number | Set uaCSTA Number. |
| Enable Click To Talk | With the use of special server, click to call out directly after enabling. |
| Enable Chgport | Whether port updates are enabled. |
| VQ Name | Open the VQ name for VQ RTCP-XR. |
| VQ Server | Open VQ server address for VQ RTCP-XR. |
| VQ Port | Open VQ port for VQ RTCP-XR. |
| VQ HTTP/HTTPS Server | Enable VQ server selection for VQ RTCP-XR. |
| Flash mode | Chose Flash mode , normal or SIP info. |
| Flash Info Content-Type | Set the SIP info content type. |
| Flash Info Content-Body | Set the SIP info content body. |
| PickUp Number | Set the scramble number when the Pickup is enabled. |
| JoinCall Number | Set JoinCall Number. |
| Intercom Number | Set Intercom Number. |
| Unregister On Boot | Whether to enable logout function. |
| Enable MAC Header | Whether to open the registration of SIP package with user agent with MAC or not. |
| Enable Register MAC Header | Whether to open the registration is user agent with MAC or not. |
| BLF Dialog Strict Match | Whether to enable accurate matching of BLF sessions. |
| PTime(ms) | Set whether to bring ptime field, default no. |
| SIP Global Settings | |
| Strict Branch | Set up to strictly match the Branch field. |
| Enable Group | Set open group. |
| Enable RFC4475 | Set to enable RFC4475. |
| Enable Strict UA Match | Enable strict UA matching. |
| Registration Failure Retry Time | Set the registration failure retry time. |
| Local SIP Port | Modify the phone SIP port. |
| Enable uaCSTA | Set to enable the uaCSTA function. |
9.4 Line >> SIP Hotspot
Please refer to 6.9 SIP Hotspot.
9.5 Line >> Dial Plan
Basic Settings
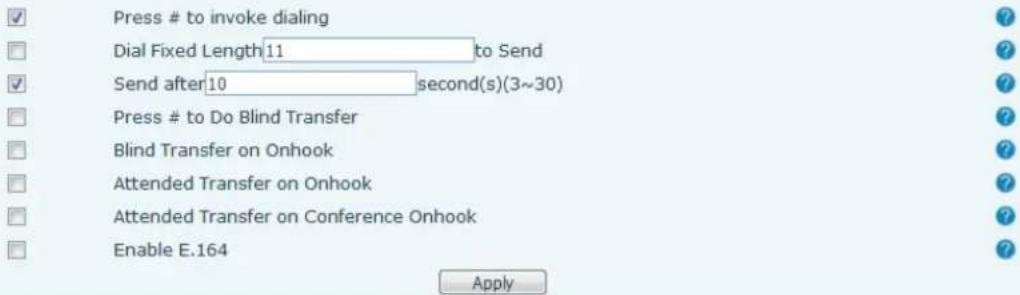
Picture - Dial plan settings
Table - Phone 7 dialing methods
| Parameters | Description |
| Press # to invoke dialing | The user dials the other party's number and then adds the # number to dial out; |
| Dial Fixed Length | The number entered by the user is automatically dialed out when it reaches a fixed length |
| Timeout dial | The system dials automatically after timeout |
| Press # to Do Blind Transfer | The user enters the number to be transferred and then presses the "#" key to transfer the current call to a third party |
| Blind Transfer on Onhook | After the user enters the number, hang up the handle or turn off the hands-free function to transfer the current call to a third party. |
| Attended Transfer on Onhook | Hang up the handle or press the hands-free button to realize the function of attention-transfer, which can transfer the current call to a third party. |
| Attended Transfer on Conference Onhook | During a three-way call, hang up the handle and the remaining two parties remain on the call. |
| Enable E.164 | Please refer to e. 164 standard specification |
Add dialing rules:
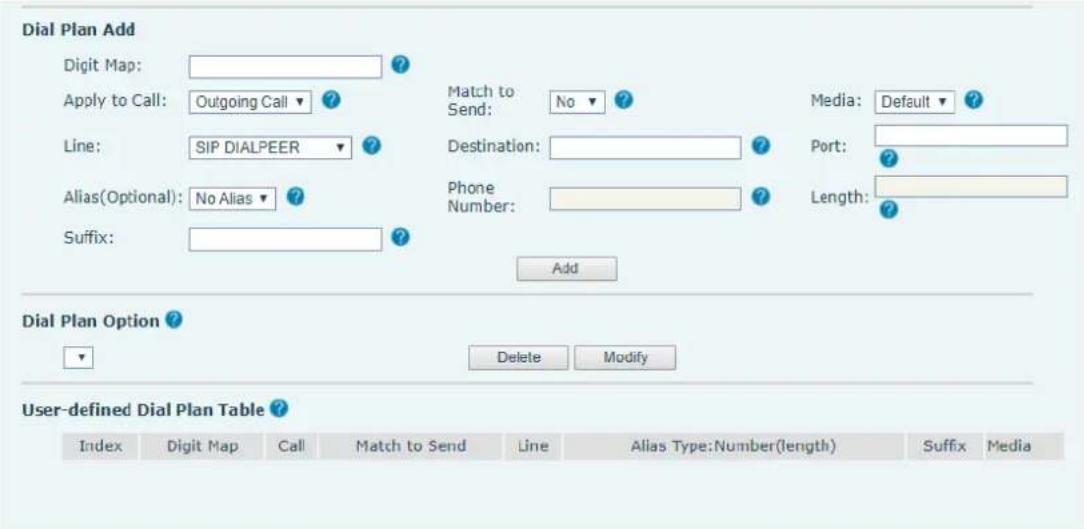
Picture - Custom setting of dial - up rules
Table - Dial - up rule configuration table
| Parameters | Description |
| Dial rule | There are two types of matching: Full Matching or Prefix Matching. In Full matching, the entire phone number is entered and then mapped per the Dial Peer rules.In prefix matching, only part of the number is entered followed by T. The mapping with then take place whenever these digits are dialed. Prefix mode supports a maximum of 30 digits. |
| Note: Two different special characters are used.x -- Matches any single digit that is dialed.[ ] -- Specifies a range of numbers to be matched. It may be a range, a list of ranges separated by commas, or a list of digits. | |
| Destination | Set Destination address. This is for IP direct. |
| Port | Set the Signal port, and the default is 5060 for SIP. |
| Alias | Set the Alias. This is the text to be added, replaced or deleted. It is an optional item. |
| Note: There are four types of aliases.all: xxx - xxx will replace the phone number.add: xxx - xxx will be dialed before any phone number.del -The characters will be deleted from the phone number.rep: xxx - xxx will be substituted for the specified characters. | |
| Suffix | Characters to be added at the end of the phone number. It is an optional item. |
| Length | Set the number of characters to be deleted. For example, if this is set to 3, the phone will delete the first 3 digits of the phone number. It is an optional item. |
This feature allows the user to create rules to make dialing easier. There are several different options for dialing rules. The examples below will show how this can be used.
Example 1: All Substitution -- Assume that it is desired to place a direct IP call to IP address 172.168.2.208. Using this feature, 123 can be substituted for 172.168.2.208.
| Index | Digit Map | Call | Match to Send | Line | Alias Type:Number(length) | Suffix | Media |
| 1 | "123" | Out | No | SIP DIALPEER(172.16.1.15:5560) | Default |
Picture - Dial rules table (1)
Example 2: Partial Substitution -- To dial a long distance call to Beijing requires dialing area code 010 before the local phone number. Using this feature 1 can be substituted for 010. For example, to call 62213123 would only require dialing 162213123 instead of 01062213123.
| User-defined Dial Plan Table ? | |||||||
| Index | Digit Map | Call | Match to Send | Line | Alias Type:Number(length) | Suffix | Media |
| 1 | "1T" | Out | No | Fanvil@SIP1 | rep:010(1) | Default | |
Picture - Dial rules table (2)
Example 3: Addition -- Two examples are shown. In the first case, it is assumed that 0 must be dialed before any 11 digit number beginning with 13. In the second case, it is assumed that 0 must be dialed before any 11 digit number beginning with 135, 136, 137, 138, or 139. Two different special characters are used.
x -- Matches any single digit that is dialed.
[] -- Specifies a range of numbers to be matched. It may be a range, a list of ranges separated by commas, or a list of digits.
9.6 Line >> Action Plan
Action plan: a technical implementation defined and designed for remote control and behavior linkage between terminal equipment and other equipment. That is, when an event occurs on the terminal, the terminal can execute an action, which is completed according to a plan rule.
Log in to the phone web, visit [Line] >[Action plan], and configure action plan rules.
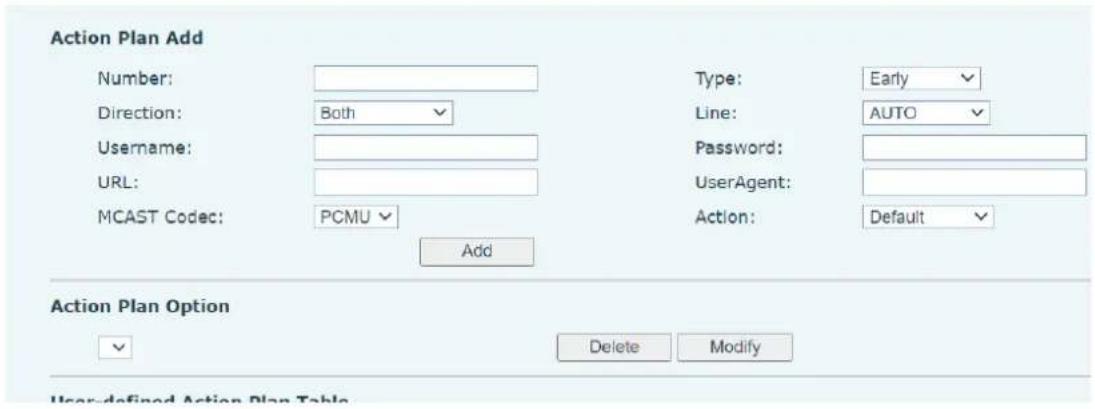
Picture - Action Plan
Table - IP camera
| Parameter | Description |
| Action | Default: when the rule is triggered, the phone displays video or converts multicast according to the RTSP URL or multicast address port set by the website.Video: when the rule is triggered, the phone accesses the RTSP URL configured by the URL to display the video.MCAST-XFER: when the rule is triggered, the phone converts the incoming call or multicast into multicast and sends it to the set multicast address port.Record: the phone automatically turns on the recording function when the rule is triggered.Mute: the phone will mute automatically when the rule is triggered.Answer: when the rule is triggered, the phone automatically answers the incoming call. |
| Number | Auxiliary phone number |
| Type | Early: trigger execution before call establishment-connected: trigger execution after call establishment. |
| Direction | For call mode, incoming/outgoing call |
| Line | Set up outgoing lines. |
| Username | Bind the user name of the IP camera. |
| Password | Bind IP camera password. |
| URL | Video streaming information or MCAST IP address. |
| User Agent | Set user agent information |
9.7 Line >> Basic Settings
Set up the register global configuration.
Table - Set the line global configuration on the web page
| Parameters | Description |
| STUN Settings | |
| Server Address | Set the STUN server address |
| Server Port | Set the STUN server port, default is 3478 |
| Binding Period | Set the STUN binding period which can be used to keep the NAT pinhole opened. |
| SIP Waiting Time | Set the timeout of STUN binding before sending SIP messages |
| Certification File | |
| TLS Certification File | Upload or delete the TLS certification file used for encrypted SIP transmission. |
9.8 Line>>RTCP-XR
| Parameters | Description |
| VQ RTCP-XR Settings | |
| VQ RTCP-XR Session Report: | Enable VQ RTCP-XR Session Report. |
| VQ RTCP-XR Interval Report | Set the Interval of Session Report. |
| Period for Interval Report | Valid values range from 5 to 99,the defualt value is 60. |
| Warning threshold for Moslq | Valid values range from 15 to 40,the defualt value is 25. |
| Critical threshold for Moslq | Valid values range from 15 to 40,the defualt value is 25. |
| Warning threshold for Delay | Valid values range from 10 to 2000,the defualt value is 150. |
| Critical threshold for Delay(10~2000) | Valid values range from 10 to 2000,the defualt value is 200. |
| Display Report options on phone | It is enabled by default. |
| Display Report options on Web | It is enabled by default. |
9.9 Phone settings >> Features
Configuration phone features.
Table - General function Settings
| Parameters | Description |
| Basic Settings | |
| Enable Call Waiting | Enable this setting to allow user to take second incoming call during an established call. Default enabled. |
| Enable Call Transfer | Enable Call Transfer. |
| Semi-Attended Transfer | Enable Semi-Attended Transfer by selecting it |
| Enable 3-Way Conference | Enable 3-way conference by selecting it |
| Enable Auto Onhook | The phone will hang up and return to the idle automatically at hands-free mode |
| Auto Onhook Time | Specify Auto Onhook time, the phone will hang up and return to the idle automatically after Auto Hand down time at hands-free mode, and play dial tone Auto Onhook time at handset mode |
| Ring for Headset | Enable Ring for Handset by selecting it, the phone plays ring tone from handset. |
| Auto Headset | Enable this feature, headset plugged in the phone, user press ‘answer’ key or line key to answer a call with the headset automatically. |
| Enable Silent Mode | When enabled, the phone is muted, there is no ringing when calls, you can use the volume keys and mute key to unmute. |
| Disable Mute for Ring | When it is enabled, you can’t mute the phone |
| Enable Default Line | If enabled, user can assign default SIP line for dialing out rather than SIP1. |
| Enable Auto Switch Line | Enable phone to select an available SIP line as default automatically |
| Default Ext Line | Select the default line to use for outgoing calls |
| Ban Outgoing | If you select Ban Outgoing to enable it, and you cannot dial out any number. |
| Hide DTMF | Configure the hide DTMF mode. |
| Enable CallLog | Select whether to save the call log. |
| Enable Restricted Incoming List | Whether to enable restricted call list. |
| Enable Allowed Incoming List | Whether to enable the allowed call list. |
| Enable Restricted Outgoing List | Whether to enable the restricted allocation list. |
| Enable Country Code | Whether the country code is enabled. |
| Country Code | Fill in the country code. |
| Area Code | Fill in the area code. |
| Enable Number Privacy | Whether to enable number privacy. |
| Match Direction | Matching direction, there are two kinds of rules from right to left and from left to right. |
| Start Position | Open number privacy after the start of the hidden location. |
| Hide Digits | Turn on number privacy to hide the number of digits. |
| Allow IP Call | If enabled, user can dial out with IP address |
| P2P IP Prefix | Prefix a point-to-point IP call. |
| Caller Name Priority | Change caller ID display priority. |
| Emergency Call Number | |
| Search path | Select the search path. |
| LDAP Search | Select from with one LDAP for search |
| Emergency Call Number | Configure the Emergency Call Number. Despite the keyboard is locked, you can dial the emergency call number |
| Restrict Active URI Source IP | Set the device to accept Active URI command from specific IP address. More details please refer to this link |
| Push XML Server | Configure the Push XML Server, when phone receives request, it will determine whether to display corresponding content on the phone which sent by the specified server or not. |
| Enable Pre-Dial | Disable this feature, user enter number will open audio channel automatically.Enable the feature, user enter the number without opening audio channel. |
| Enable Multi Line | If enabled, up to 10 simultaneous calls can exist on the phone, and if disabled, up to 2 simultaneous calls can exist on the phone. |
| Line Display Format | Custom line format : SIPn/SIPn : xxx/xxx@SIPn |
| Contact As White List Type | NONE/BOTH/DND White List/FWD White List |
| Block XML When Call | Disable XML push on call. |
| SIP notify | When enabled, the phone displays the information when it receives the relevant notify content. |
| Tone Settings | |
| Enable Holding Tone | When turned on, a tone plays when the call is held |
| Enable Call Waiting Tone | When turned on, a tone plays when call waiting |
| Play Dialing DTMF Tone | Play DTMF tone on the device when user pressed a phone digits at dialing, default enabled. |
| Play Talking DTMF Tone | Play DTMF tone on the device when user pressed a phone digits during taking, default enabled. |
| DND Settings | |
| DND Option | Select to take effect on the line or on the phone or close. |
| Enable DND Timer | Enable DND Timer, If enabled, the DND is automatically turned on from the start time to the off time. |
| DND Start Time | Set DND Start Time |
| DND End Time | Set DND End Time |
| Intercom Settings | |
| Enable Intercom | When intercom is enabled, the device will accept the incoming call request with a SIP header of Alert-Info instruction to automatically answer the call after specific delay. |
| Enable Intercom Mute | Enable mute mode during the intercom call |
| Enable Intercom Tone | If the incoming call is intercom call, the phone plays the intercom tone |
| Enable Intercom Barge | Enable Intercom Barge by selecting it, the phone auto answers the intercom call during a call. If the current call is intercom call, the phone will reject the second intercom call |
| Response Code Settings | |
| DND Response Code | Set the SIP response code on call rejection on DND |
| Busy Response Code | Set the SIP response code on line busy |
| Reject Response Code | Set the SIP response code on call rejection |
| Password Dial Settings | |
| Enable Password Dial | Enable Password Dial by selecting it, When number entered is beginning with the password prefix, the following N numbers after the password prefix will be hidden as *, N stands for the value which you enter in the Password Length field. For example: you set the password prefix is 3, enter the Password Length is 2 then you enter the number 34567, it will display 3**67 on the phone. |
| Encryption Number Length | Configure the Encryption Number length |
| Password Dial Prefix | Configure the prefix of the password call number |
| Power LED | |
| Common | Standby power lamp state, off when off, open is always bright red. Off by default. |
| SMS/MWI | The status of power lamp when there is unread sho message/voice message, including off/on/slow flash/quick flash, default slow flash. |
| Missed | The state of the power lamp when there is a missed call, including off/on/slow flash/quick flash, the default slow flash. |
| Talk/Dial | In the talk/dial state, the power lamp state, off is off, on is always red bright, the default is off. |
| Ringing | Power lamp status when there is an incoming call, including off/on/slow flash/quick flash, default flash. |
| Mute | Power lamp status in mute mode, including off/on/slowflash/quick flash, off by default. |
| Hold/Held | The power lamp state, including off/on/slow flash/quick flash, is turned off by default when left/retained. |
| Notification Popups | |
| Display Other Popup | When the handle is not hung back after opening, registration fails, IP acquisition fails, Tr069 connection fails and other abnormalities, there will be popup prompt when it is opened; otherwise, there will be no prompt when it is closed, and it will be opened by default. |
9.10 Phone settings >> Media Settings
Change voice Settings.
Table - Voice settings
| Parameter | Description |
| Codecs Settings | Select enable or disable voice encoding:G.711A/U,G.722,G.729, G.726-16,G726-24,G726-32,G.726-40,ILBC,opus |
| Video codec | |
| Video codec | Select to enable video encoding:H264 |
| Media Setting | |
| DTMF Payload Type | Enter the DTMF payload type, the value must be 96~127. |
| Headset Mic Gain | Set the earphone's radio volume gain to fit different models of earphones. |
| Opus preload type | Set Opus load type, range 96~127. |
| OPUS Sample Rate | Set Opus sampling rate, including opus-nb (8KHz) and opus-wb (16KHz). |
| ILBC Payload Type | Set the ILBC Payload Type, the value must be 96~127. |
| ILBC Payload Length | Set the ILBC Payload Length |
| Onhook Time | Configure a minimum response time, which defaults to 200ms |
| Enable the patting spring to generate Flash | Whether to turn on the plug spring to generate Flash |
| Video bit rate | Set the bit rate of video:64kbps, 192kbps, 256kbps, 384kbps, 512kbps, 768kbps, 1Mbps, 1.6Mbps, 2Mbps, 3Mbps, 4Mbps |
| Video frame rate | Set the video frame rate : 5fps, 10fps, 15fps, 20fps, 25fps, 30fps |
| Video resolution | Set Video resolution : CIF,VGA,4CIF,720P |
| H.264Payload Type | Set the H264 Payload Type, the value must b 96~127. |
| Display splicing frame | Whether to start displaying splicing frames |
| RTP Control Protocol(RTCP) Settings | |
| CNAME user | Set CNAME user |
| CNAME host | Set CNAME host |
| RTP Settings | |
| RTP keep alive | Hold the call and send the packet after 30s |
| Alert Info Ring Settings | |
| Value | Set the value to specify the ring type. |
| Ring Type | Type1-Type9 |
9.11 Phone settings >> MCAST
This feature allows user to make some kind of broadcast call to people who are in multicast group. User can configure a multicast DSS Key on the phone, which allows user to send a Real Time Transport Protocol (RTP) stream to the pre-configured multicast address without involving SIP signaling. You can also configure the phone to receive an RTP stream from pre-configured multicast listening address without involving SIP signaling. You can specify up to 10 multicast listening addresses.
Table - Multicast parameters
| Parameters | Description |
| Normal Call Priority | Define the priority of the active call, 1 is the highest priority, 10 is the lowest. |
| Enable Page Priority | The voice call in progress shall take precedence over all incoming paging calls. |
| Name | Listened multicast server name |
| Host: port | Listened multicast server's multicast IP address and port. |
9.12 Phone settings >> Action
Action URL List
| Event | Description |
| Setup Completed | The telephone set is started successfully. |
| Registration Succeeded | An account is registered successfully. |
| Registration Disabled | Account registration is canceled. |
| Registration Failed | Account registration fails. |
| Phone Off Hooked | The telephone set is hooked off. |
| Phone On Hooked | The telephone set is hooked on. |
| Incoming call | A new incoming call is received. |
| Outgoing call | An outgoing call is made. |
| Call established | A call is connected. |
| Call terminated | A call is terminated. |
| DND Enabled | Do Not Disturb (DND) is enabled. |
| DND Disabled | DND is disabled. |
| Unconditional Call Forward Enabled | Unconditional call forwarding is enabled. |
| Unconditional Call Forward Disabled | Unconditional call forwarding is disabled. |
| Call Forward on Busy Enabled | Call forwarding on busy is enabled. |
| Call Forward on Busy Disabled | Call forwarding on busy is disabled. |
| Call Forward on No Answer Enabled | Call forwarding on no answer is enabled. |
| Call Forward on No Answer Disabled | Call forwarding on no answer is disabled. |
| Call transfer | Call transfer. |
| Unattended Call Transfer | Unattended call transfer. |
| Attended Call Transfer | Attended cal transfer. |
| Call hold | Call hold. |
| Call resume | Call hold is canceled. |
| Mute | A call is muted. |
| Unmute | A call is unmuted. |
| Missed calls | Missed calls are listed. |
| IP Changed | The IP address of the telephone set is changed. |
| Idle To Busy | The telephone set switches from the standby screen to other screens. |
| Busy To Idle | The telephone set switches from other screens to the standby screen. |
| MWI | Message. |
| SMS | SMS message. |
| Start reboot | The telephone set is restarted. |
Variable List
| Variable | Description |
| mac | Device MAC address. |
| ip | Current available IP address. |
| -model | Model of the telephone set. |
| firmware | Software version. |
| active_uri | Session Initiation Protocol (SIP) URI of the current active account, which is valid in incoming calls, outgoing calls, and conversations |
| active_user | User account of the SIP URI of the current active account, which is valid in incoming calls, outgoing calls, and conversations |
| active_host | Server of the SIP URI of the current active account, which is valid in incoming calls, outgoing calls, and conversations |
| local | local SIP URI (valid in incoming calls, outgoing calls, and conversations) |
| remote | remote SIP URI (valid in incoming calls, outgoing calls, and conversations) |
| display_local | Local display name (phone number displayed if no display name is set) (valid in incoming and outgoing calls) |
| display_remote | remote display name (phone number displayed if no display name is set) (valid in incoming and outgoing calls) |
| call_id | Call ID (valid in incoming calls, outgoing calls, and conversations) |
| duration | Call duration (valid when a conversation ends) |
| date_time | Acquisition time |
| memory_free | Memory |
| flash_free | Flash memory (not implemented yet) |
| ;line | Call line (valid in incoming calls, outgoing calls, conversations, and registration) |
| local_user | Local users in a conversation (valid in incoming calls, outgoing calls, and conversations) |
| local_server | Server used in a SIP call (valid in incoming calls, outgoing calls, and conversations) |
| local_domain | Domain of a SIP cal (valid in incoming calls, outgoing calls, and conversations) |
| local_number | Local phone number during a call (valid in incoming calls, outgoing calls, and conversations) |
| local_displayname | Display name of the local phone number during a call (valid in incoming calls, outgoing calls, and conversations) |
| remote_number | Remote phone number during a call (valid in incoming calls, outgoing calls, conversations, and unanswered incoming calls) |
| remote_displayname | Display name of the remote phone number during a call (valid in incoming calls, outgoing calls, and conversations) |

Action urls are used for IPPBX systems to submit phone events. Please refer PLANET Action URL for details.
9.13 Phone settings >> Time/Date
The user can configure the time Settings of the phone on this page.
Table – Time & Date settings
| Parameters | Description |
| Network Time Server Settings | |
| Time Synchronized via SNTP | Enable time-sync through SNTP protocol |
| Time Synchronized via DHCP | Enable time-sync through DHCP protocol |
| Primary Time Server | Set primary time server address |
| Secondary Time Server | Set secondary time server address, when primary server is not reachable, the device will try to connect to secondary time server to get time synchronization. |
| Time Zone | Select the time zone |
| Resync Period | Time of re-synchronization with time server |
| 12-Hour Clock | Set the time display in 12-hour mode |
| Date Format | Select the time/date display format |
| Daylight Saving Time Settings | |
| Local | Choose your local, phone will set daylight saving time automatically based on the local |
| DST Set Type | Choose DST Set Type, if Manual, you need to set the start time and end time. |
| Fixed Type | Daylight saving time rules are based on specific dates or relative rule dates for conversion. Display in read-only mode in automatic mode. |
| Offset | The offset minutes when DST started |
| Month Start | The DST start month |
| Week Start | The DST start week |
| Weekday Start | The DST start weekday |
| Hour Start | The DST start hour |
| Minute Start | The DST start minute |
| Month End | The DST end month |
| Week End | The DST end week |
| Weekday End | The DST end weekday |
| Hour End | The DST end hour |
| Minute End | The DST end minute |
| Manual Time Settings | You can set your time manually |
9.14 Phone settings >> Tone
This page allows users to configure a phone prompt.
You can either select the country area or customize the area. If the area is selected, it will bring out the following information directly. If you choose to customize the area, you can modify the button tone, call back tone and other information.
Tone Settings
| Select Your Tone: | United States | ? |
| Dial Tone: | 350+440/0 | ? |
| Ring Back Tone: | 440+480/2000,0/4000 | ? |
| Busy Tone: | 480+620/500,0/500 | ? |
| Congestion Tone: | ? | |
| Call waiting Tone: | 440/300,0/10000,440/300,0/10000,0/0 | ? |
| Holding Tone: | ? | |
| Error Tone: | ? | |
| Stutter Tone: | ? | |
| Information Tone: | ? | |
| Dial Recall Tone: | 350+440/100,0/100,350+440/100,0/100,350+440/100,0/100,350+440/0 | ? |
| Message Tone: | ? | |
| Howler Tone: | ? | |
| Number Unobtainable Tone: | 400/500,0/6000 | ? |
| Warning Tone: | 1400/500,0/0 | ? |
| Record Tone: | 440/500,0/5000 | ? |
| Auto Answer Tone: | ? |
Picture - Tone settings on the web
9.15 Phone settings >> Advanced
User can configure the advanced configuration settings in this page.
- Screen Configuration.
■ Enable Screen Saver
- LCD Menu Password Settings.
The password is admin by default.
- Keyboard Lock Settings.
- Configure Greeting Words
The greeting message will display on the top left corner of the LCD when the device is idle, which is limited to 12 characters. The default chars are 'VOIP PHONE'.
9.16 Phonebook >> Contact
User can add, delete, or edit contacts in the phonebook in this page. User can browse the phonebook and sorting it by name, phones, or filter them out by group.
To add a new contact, user should enter contact's information and press "Add" button to add it.
To edit a contact, click on the checkbox in front of the contact, the contact information will be copied to the contact edit boxes, press "Modify" button after finished editing.
To delete one or multiple contacts, check on the checkbox in front of the contacts wished to be deleted and click the "Delete" button, or click the "Clear" button with selecting any contacts to clear the phonebook.
User can also add multiple contacts into a group by selecting the group in the dropdown options in front of "Add to Group" button at the bottom of the contact list, selecting contacts with checkbox and click "Add to Group" to add selected contacts into the group.
Similarly, user can select multiple users and add them into blacklist by click "Add to Blacklist" button.
9.17 Phonebook >> Cloud phonebook
Cloud Phonebook
User can configure up to 8 cloud phonebooks. Each cloud phonebook must be configured with an URL where an XML phonebook is stored. The URL may be based on HTTP/HTTPS or FTP protocol with or without authentication. If authentication is required, user must configure the username and password.
To configure a cloud phonebook, the following information should be entered,
☐ Phonebook name (must)
☐ Phonebook URL (must)
□ Access username (optional)
□ Access password (optional)
LDAP Settings
The cloud phonebook allows user to retrieve contact list from a LDAP Server through LDAP protocols. User must configure the LDAP Server information and Search Base to be able to use it on the device.
If the LDAP server requests an authentication, user should also provide username and password.
To configure a LDAP phonebook, the following information should be entered,
□ Display Title (must)
LDAP Server Address (must)
☐ LDAP Server Port (must)
Search Base (must)
□ Access username (optional)
□ Access password (optional)

Note
Refer to the LDAP technical documentation before creating the LDAP phonebook and phonebook server.
Web page preview
Phone page supports preview of Internet phone directory and contacts
● After setting up the XML Voip directory or LDAP,
- Select [Phone book] >> [Cloud phone book] >> [Cloud phone book] to select the type.
- Click the set XML/LDAP to download the contact for browsing.
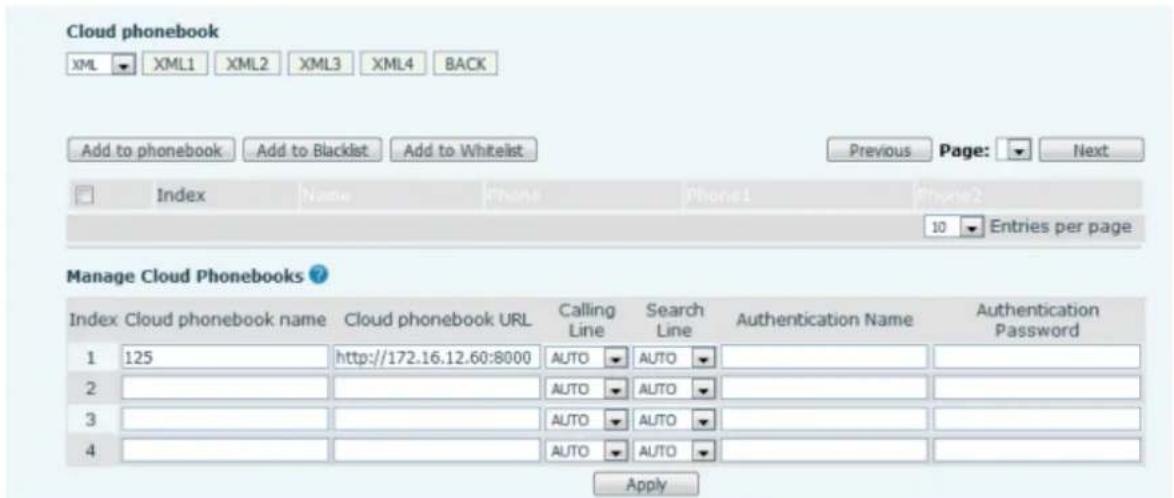
Picture - Web cloud phone book Settings
9.18 Phonebook >> Call List
■ Restricted Incoming Calls :
It is similar like a Blocked List. Add the number to the Blocked List, and the user will no longer receive calls from the stored number until the user removes it from the list.
Users can add specific Numbers to the Blocked List or add specific prefixes to the Blocked List to block calls with all Numbers with this prefix.
■ Allowed Incoming Calls :
When DND is enabled, the incoming call number can still be called.
■ Restricted Outgoing Calls :
Adds a number that restricts outgoing calls and cannot be called until the number is removed from the table.
9.19 Phonebook >> Web Dial
Use web pages for call, reply, and hang up operations.
9.20 Phonebook >> Advanced
Users can export the local phone book in XML, CSV, and VCF format and save it on the local computer. Users can also import contacts into the phone book in XML, CSV, and VCF formats.

If the user imports the same phone book repeatedly, the same contact will be ignored. If the name is the same but the number is different, the contact is created again.
Users can delete groups or add new groups on this page. Deleting a contact group will not delete contacts in that group.
9.21 Call Logs
The user can browse the complete call record in this page. The call record can be sorted by time, call number, contact name or line, and the call record can be screened by call record type (incoming call, outgoing call, missed call, forward call).
The user can also save the number in the call record to his/her phone book or add it to the Blocked List/Allowed List.
Users can also dial the web page by clicking on the number in the call log. Users can also download call records conditionally and save them locally.
9.22 Function Key >> Function Key
● Function Key Configuration :
One-key transfer Settings: establish new call, blind transfer, attention-transfer, one-key three-party, Play DTMF.
DSS Key home page: None/Page1/Page2/Page3/Page4
Table - Function Key configuration
| Parameters | Description |
| Memory Key | BLF (NEW CALL/BXFE /AXFER): It is used to prompt user the state of the subscribe extension, and it can also pick up the subscribed number, which help user monitor the state of subscribe extension (idle, ringing, a call). There are 3 types for one-touch BLF transfer method.p.s. User should enter the pick-up number for specific BLF key to fulfill the pick-operation.Presence: Compared to BLF, the Presence is also able to view whether the user is online.Note: You cannot subscribe the same number for BLF and Presence at the same timeSpeed Dial: You can call the number directly which you set. This feature is convenient for you to dial the number which you frequently dialed.Intercom: This feature allows the operator or the secretary to connect the phone quickly it is widely used in office environments. |
| Line | It can be configured as a Line Key. User is able to make a call by pressing Line Key. |
| Key Event | User can select a key event as a shortcut to trigger.For example: MWI / DND / Release / Headset / Hold / etc. |
| DTMF | It allows user to dial or edit dial number easily. |
| URL | Open the specific URL directly. |
| Multicast | Configure the multicast address and audio codec. User presses the key to initiate the multicast. |
| Action URL | The user can use a specific URL to make basic calls to the phone. |
| XML browser | Users can set the DSS Key for specific URL download and other operations. |
The device provides 112 user-defined shortcuts that users can configure on a web page.
9.23 Function Key >> Softkey
The User Settings mode and display style, display page.
Table - Softkey configuration
| Parameter | Description |
| Softkey Mode | |
| Softkey mode | Disabled and More, Default is Disabled |
| Softkey Style | |
| Softkey display style | Softkey Exit on Left or Right |
| Screen | |
| Call Dialer | Redial/2aB/Delete/Exit/Call Back/Dial/Join/MWI/Local Contacts/Pickup/CallLog/Missed/Clear/In/Dialed/Pause/Next line/Prev line/Headset/Audio/Video/Remote XML/DSS Key |
| Conference | Hold/Split/End/Release/Mute/DSS Key/Headset |
| Desktop | CallLog/Menu/Local Contacts/DND/Prev Account/Next Account/Blacklist/Call Back/CallForward/Locked/Memo/ Missed/MWI/Dialed/Reboot/Redial/Remote XML/SMS/ Headset/Status/DSS Key/In |
| Divert Dialed | Redial/2aB/Delete/Exit/Forward/Local Contacts/CallLog /Clear/Missed/Dialed/Headset/Video/Audio/Remote XML /DSS Key |
| Ending | Redial/End/Headset/Release/DSS Key |
| Predictive Dialer | Dial/2aB/Delete/Exit/Call Back/Local Contacts/Redial /Pickup/MWI/Join/CallLog/Release/Missed/Pause/Dialed/ Headset/Video/Audio/Remote XML/DSS Key/In/Next line /Prev line |
| Ringing | Answer/Forward/Reject/Mute/Release/Headset/Video/Audio/DSS key |
| Talking | Hold/Transfer/Conference/End/Mute/Release/New Call/Local Contacts/Listen/CallLog/Next call/Prev call/Private/Headset/Video/Audio/DSS Key |
| Transfer Alerting | End/Transfer/Headset/Release/DSS Key |
| Transfer Dialer | Redial/Delete/Exit/2aB/Dial/Local Contacts/Transfer/CallLog/Clear/Missed/Dialed/Pause/Headset/Video/Audio/RemoteXML/DSS Key |
| Trying | End/Release/Headset/DSS Key |
| Waiting | Hold/Transfer/Conference/End/Answer/Forward/Mute/Next call/New call/Prev call/Reject/Release/Headset/Listen/Video/Audio/DSS Key |
9.24 Function Key >> Advanced
■ Global key Settings
The default configuration is empty, and the global memory key function can be configured.
The configured memory key has a call path. If the global configuration is maintained, pressing the memory key again will maintain the call path. If the same configuration hung up, press the memory key again will hang up this road call.
■ Programmable key Settings
Please refer to the 9.23 Table Softkey configuration.
■ IP Camera List

Picture - IP Camera List
9.25 Application>>Manage Recording
See 6.3.1 Record for details of recording.
9.26 Security >> Web Filter
The user can set up a configuration management phone that allows only machines with a certain network segment IP access.
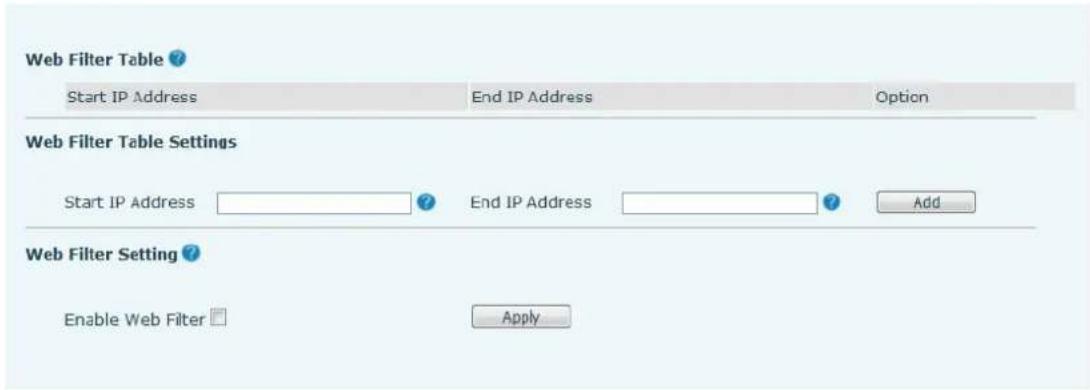
Picture - Web Filter settings

Picture - Web Filter Table
Add and remove IP segments that are accessible; Configure the starting IP address within the start IP, end the IP address within the end IP, and click [Add] to submit to take effect. A large network segment can be set, or it can be divided into several network segments to add. When deleting, select the initial IP of the network segment to be deleted from the drop-down menu, and then click [Delete] to take effect.
Enable web page filtering: configure enable/disable web page access filtering; Click the "apply" button to take effect.
Note: if the device you are accessing is in the same network segment as the phone, please do not configure the filter segment of the web page to be outside your own network segment; otherwise you will not be able to log in the web page.
9.27 Security >> Trust Certificates
Set whether to open license certificate and general name validation, select certificate module.
You can upload and delete uploaded certificates.
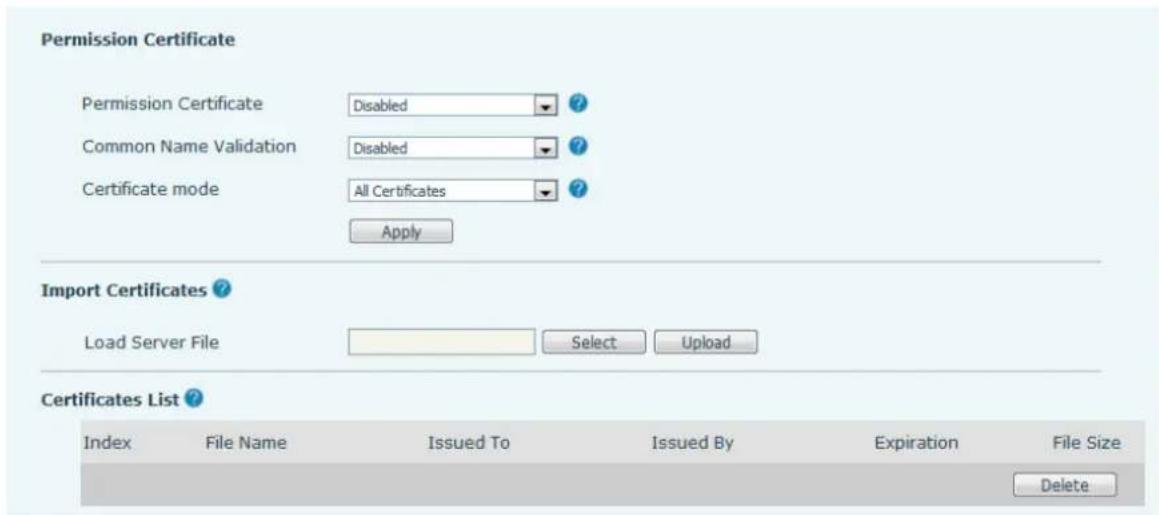
Picture - Certificate of settings
9.28 Security >> Device Certificates
Select the device certificate as the default and custom certificate.
You can upload and delete uploaded certificates.
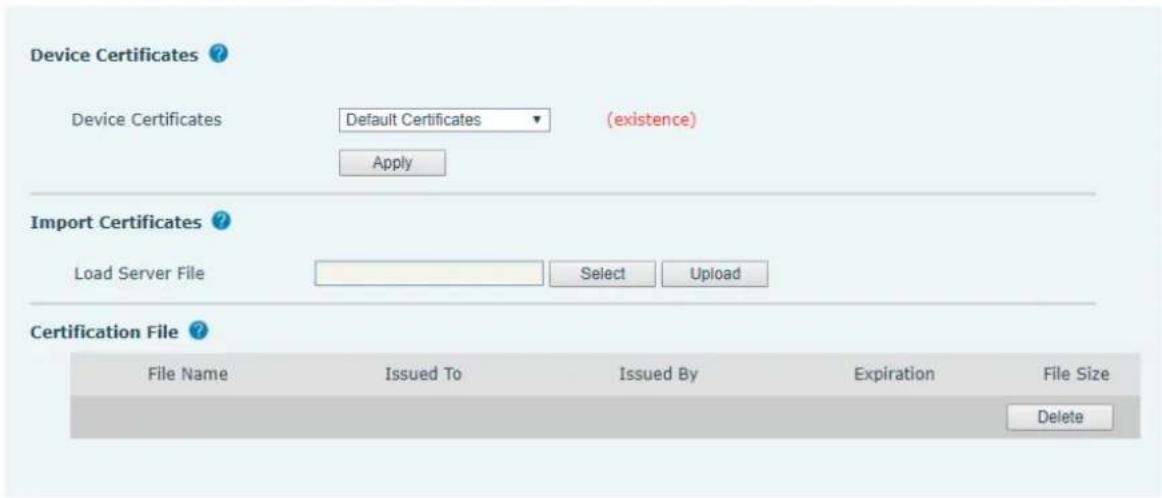
Picture - Device certificate setting
9.29 Security >> Firewall
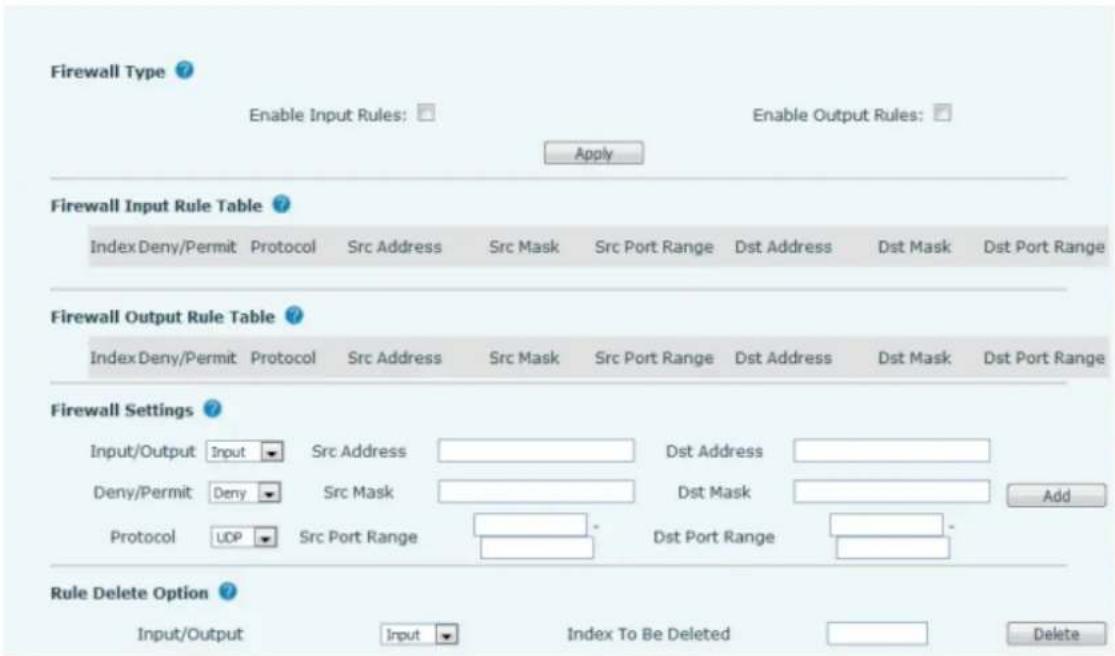
Picture - Network firewall Settings
Through this page can set whether to enable the input, output firewall, at the same time can set the firewall input and output rules, using these Settings can prevent some malicious network access, or restrict internal users access to some resources of the external network, improve security.
Firewall rule set is a simple firewall module. This feature supports two types of rules: input rules and output rules. Each rule is assigned an ordinal number, allowing up to 10 for each rule.
Considering the complexity of firewall Settings, the following is an example to illustrate:
Table - Network Firewall
| Parameter | Description |
| Enable Input Rules | Indicates that the input rule application is enabled. |
| Enable Output Rules | Indicates that the output rule application is enabled. |
| Input/Output | To select whether the currently added rule is an input or output rule. |
| Deny/Permit | To select whether the current rule configuration is disabled or allowed; |
| Protocol | There are four types of filtering protocols: TCP | UDP | ICMP | IP. |
| Src Port Range | Filter port range |
| Src Address | Source address can be host address, network address, or all addresses 0.0.0.0; It can also be a network address similar to *.*.*.0, such as: 192.168.1.0. |
| Dst Address | The destination address can be either the specific IP address or the full address 0.0.0.0; It can also be a network address similar to *.*.*.0, such as: 192.168.1.0. |
| Src Mask | Is the source address mask. When configured as 255.255.255.255, it means that the host is specific. When set as 255.255.255.0, it means that a network segment is filtered. |
| Dst Mask | Is the destination address mask. When configured as 255.255.255.255, it means the specific host. When set as 255.255.255.0, it means that a network segment is filtered. |
After setting, click [Add] and a new item will be added in the firewall input rule, as shown in the figure below:
| Firewall Input Rule Table ? | ||||||||
| Index Deny/Permit | Protocol | Src Address | Src Mask | Src Port Range | Dst Address | Dst Mask | Dst Port Range | |
| 1 | deny | udp | 192.168.1.0 | 192.168.1.154 | 0-9 | 255.255.255.0 | 255.255.255.0 | 0-9 |
Picture - Firewall Input rule table
Then select and click the button [Apply].
In this way, when the device is running: ping 192.168.1.118, the packet cannot be sent to 192.168.1.118 because the output rule is forbidden. However, other IP of the ping 192.168.1.0 network segment can still receive the response packet from the destination host normally.

Picture - Delete firewall rules
Select the list you want to delete and click [Delete] to delete the selected list.
9.30 Device Log >> Device Log
You can grab the device log, and when you encounter an abnormal problem, you can send the log to the technician to locate the problem. See 10.6 Export Debug Data.
10. Trouble Shooting
When the phone is not in normal use, the user can try the following methods to restore normal operation of the phone or collect relevant information and send a problem report to PLANET technical support mailbox.
10.1 Get Device System Information
Users can get information by pressing the [Menu] >> [Status] option in the phone.
The following information will be provided:
The network information
Equipment information (model, software and hardware version), etc.
10.2 Reboot Device
Users can reboot the device from soft-menu, [Menu] >> [Phone settings] >> [System], and press [Reboot], Or, simply remove the power supply and restore it again.
10.3 Reset Device to Factory Default
Reset Device to Factory Default will erase all user's configuration, preference, database and profiles on the device and restore the device back to the state as factory default.
To perform a factory default reset, user should press [Menu] >> [phone setting] >> [maintain], and then input the password to enter the interface. Then choose [Phone Reset] and press [Reset]. The device will be rebooted into a clean factory default state.
10.4 Screenshot
If there is a problem with the phone, the screenshot can help the technician locate the function and identify the problem. In order to obtain screen shots, log in the phone webpage [System] >> [Tools], and you can capture the pictures of the main screen (you can capture them in the interface with problems).
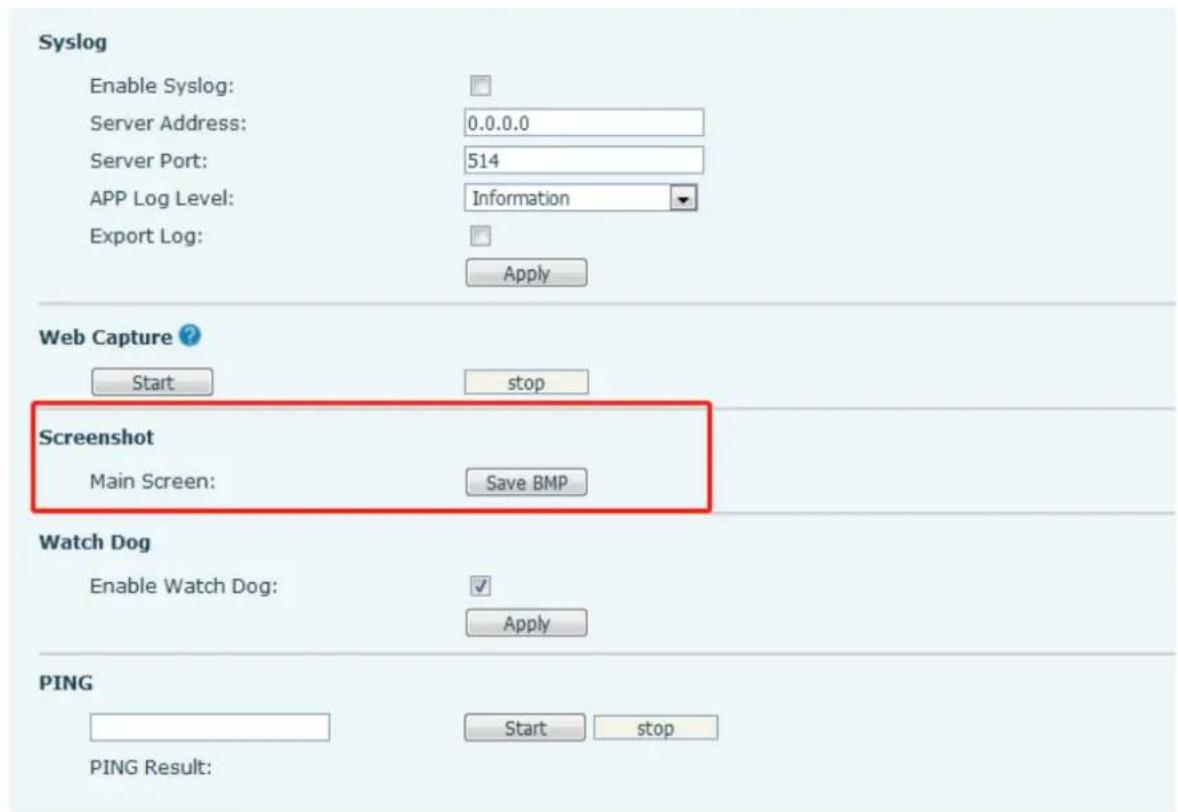
Picture – Screenshot
10.5 Network Packets Capture
Sometimes it is helpful to dump the network packets of the device for issue identification. To get the packets dump of the device, user needs to log in the device web portal, open page [System] >> [Tools] and click [Start] in "Network Packets Capture" section. A pop-up message will be prompt to ask user to save the capture file. User then should perform relevant operations such as activate/deactivate line or making phone calls and click [Stop] button in the web page when operation finished. The network packets of the device during the period have been dumped to the saved file.
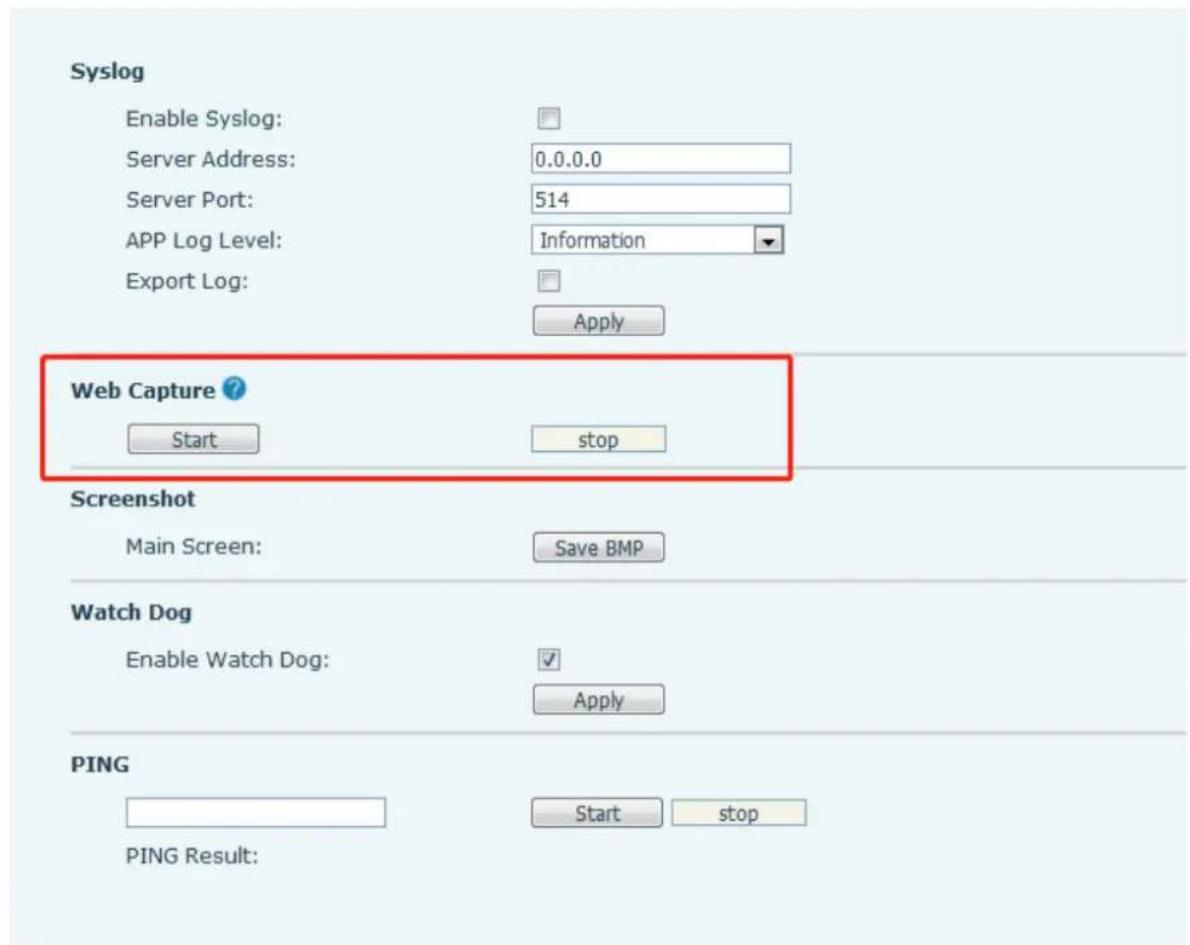
Picture - Web capture
User may examine the packets with a packet analyzer or send it to PLANET support mailbox.
10.6 Export Debug Data
When encountering abnormal problems, log information is helpful. Users can export debugging information with one click on the web page. After a while, send the exported compressed package to the technical support mailbox and describe the problem in detail.
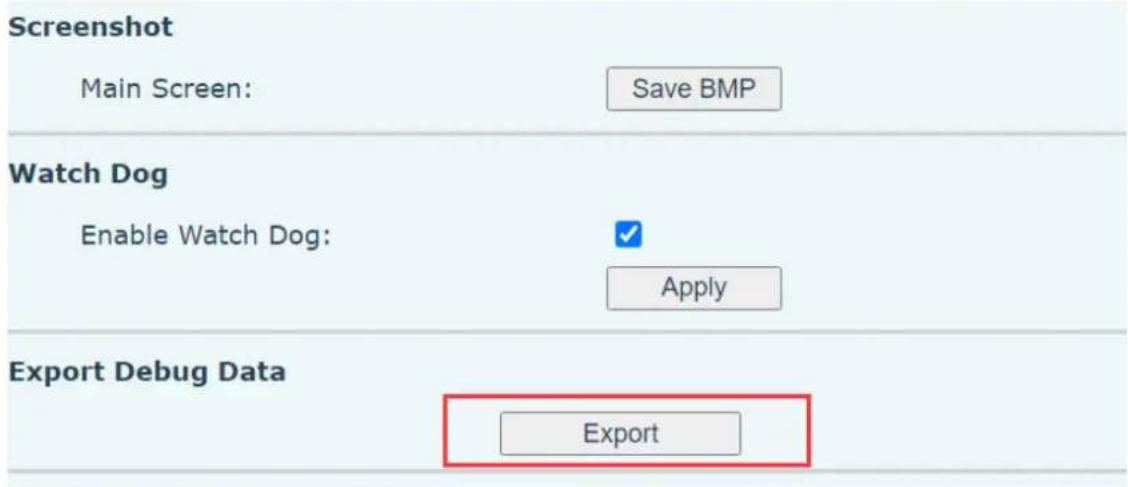
Picture - Export Debug Data
10.7 Common Trouble Cases
Table - Trouble Cases
| Trouble Case | Solution |
| Device could not boot up | 1. The device is powered by external power supply via power adapter or PoE switch. Please use standard power adapter provided to PLANET or PoE switch met with the specification requirements and check if device is well connected to power source.2. If you saw “POST MODE” on the device screen, the device system image has been damaged. Please contact location technical support to help you restore the phone system. |
| Device could not register to a service provider | 1. Please check if device is well connected to the network. The network Ethernet cable should be connected to the [Network] port NOT the [PC] port. If the cable is not well connected to the network icon [WAN disconnected] will be flashing in the middle of the screen.2. Please check if the device has an IP address. Check the system information, if the IP displays “Negotiating...”, the device does not have an IP address. Please check if the network configurations is correct.3. If network connection is fine, please check again your line configurations. If all configurations are correct, please kindly contact your service provider to get support, or follow the instructions in “10.5 Network Packet Capture” to get the network packet capture of registration process and send it to PLANET support to analyze the issue. |
| No Audio or Poor Audio in Handset | 1. Please check if Handset is connected to the correct Handset ( ) port NOT Headphone ( ) port.2. The network bandwidth and delay may be not suitable for audio call at the moment. |
| Poor Audio or Low Volume in Headphone | 1. There are two Headphone wire sequence in the market. Please use the Headphone provided by PLANET, or consult PLANET the wire sequence if you wish to use a third-party headphone.2. The network bandwidth and delay may be not suitable for audio call at the moment. |
| Audio is chopping at far-end in Hands-free speaker mode | This is usually due to loud volume feedback from speaker to microphone. Please lower down the speaker volume a little bit, the chopping will be gone. |
- User's Manual
- 7" Smart Media Android SIP Conference Phone with Full HD Camera and Touch Screen
- Copyright
- Disclaimer
- CE Mark Warning
- Energy Saving Note of the Device
- WEEE Warning
- Trademarks
- Revision
- Directory
- Overview....9
- Install Guide 17
- Introduction to the User 21
- Web Management 31
- Basic Function 35
- Advanced Function 70
- Phone Settings....89
- Web Configurations.... 116
- Network >> Basic 118
- Trouble Shooting 148
- Safety Instructions
- Overview
- Packing Contents
- Product Description
- New Level of Customization by Touch Screen with Multiple Function Keys
- High-quality G.722 HD and Opus Audio Codes
- Secure, High-quality VoIP Communication
- Installation Options and Applications
- Standard Compliance and Enhanced Voice Security
- Product Features
- Highlights
- ➤ Audio and Video Features
- ➢ Phone and Call Control Features
- Network and Management
- Install Guide
- Installing the phone
- Desktop
- Wall mounting
- Connecting to the phone
- Step 2. Camera information
- Step 3. Computer Network Setup
- Step 4. Login Prompt
- Step 5. Change of Password
- Introduction to the User
- Instructions of Keypads
- Instructions of the ICF-2000 Keypads
- Icon Introduction
- LED Definition
- Using Handset, Hands-free Speaker and Headphone
- ■ Using Handset
- ■ Using Hands-free Speaker
- ■ Using Headphone
- ■ Using Line Keys (Defined by DSS Key)
- Touch Screen Instructions
- Click
- ■ Long Press
- ■ Slide
- Drag
- Idle Screen
- Phone Status
- Application Instruction
- Web Management
- Web Login
- Login Prompt
- Change of Password
- Change Web Authentication Password
- Network Configurations
- SIP Configurations
- Basic Function
- Making Phone Calls
- ■ Default Line
- ■ Dialing Methods
- ■ Dial Number, then Open Audio
- ■ Open Audio, then Dial the Number
- ■ Cancel Call
- Answering Calls
- Talking
- Making/Receiving the Second Call
- ■ The Second Incoming Call
- ■ Second Outgoing Call
- ■ Switching between Two Calls
- ■ Ending One Call
- End of the Call
- Video Call
- Redial
- SEND
- Dial-up Query
- Auto-Answering
- - Phone interface :
- Web interface :
- Call Back
- Mute
- Mute the Call
- Ringing Mute
- Call Hold/Resume
- DND
- Call Forward
- 2) Select the line to be set and enter the call forward settings interface
- 3) Click the slide button to select on/off.
- Call Transfer
- Blind Transfer
- Semi-Attended Transfer
- Attended Transfer
- Call Waiting
- Conference
- Local Conference
- Video Conference
- Network Conference
- Call Park
- Pick Up
- Anonymous Call
- Anonymous Call
- Ban Anonymous Call
- Hotline
- Advanced Function
- BLF (Busy Lamp Field)
- Configure the BLF Functionality
- Use the BLF Function
- BLF function :
- BLF List
- Record
- Local Record
- Server Record
- SIP Info Record
- Agent
- Normal Mode:
- Intercom
- MCAST
- Multicast :
- SCA (Shared Call Appearance)
- 2) LED Status
- 3) Shared Call Appearance(SCA)
- Message
- SMS
- Send messages:
- View SMS:
- Reply to SMS:
- MWI (Message Waiting Indicator)
- SIP Hotspot
- Phone Settings
- Basic Settings
- Language
- Time & Date
- Screen
- Brightness and backlight
- Phone interface:
- Screen Saver
- Ring
- Voice Volume
- Reboot
- Phone book
- Local contact
- Add / Edit / Delete Contact
- Add / Edit / Delete Group
- Blocked list
- Cloud Phone Book
- Configure Cloud Phone book
- Downloading Cloud Phone book
- Call Log
- Function Key
- Wi-Fi
- Headset
- Wired Headset
- Advanced
- Line Configurations
- Network Settings
- Network Settings
- QoS & VLAN
- LLDP
- CDP
- Web Server Type
- Set The Secret Key
- Maintenance
- Firmware Upgrade
- Factory Reset
- Web Configurations
- Web Page Authentication
- System >> Information
- System >> Account
- System >> Configurations
- ■ Clear Configurations
- ■ Clear Tables
- ■ Reset Phone
- System >> Upgrade
- System >> Auto Provision
- System >> Tools
- System >> Reboot Phone
- Network >> Basic
- Network >> Service Port
- Network >> Advanced
- Line >> SIP
- Line >> SIP Hotspot
- Line >> Dial Plan
- Basic Settings
- Line >> Action Plan
- Line >> Basic Settings
- Line>>RTCP-XR
- Phone settings >> Features
- Phone settings >> Media Settings
- Phone settings >> MCAST
- Phone settings >> Action
- Phone settings >> Time/Date
- Phone settings >> Tone
- Phone settings >> Advanced
- Phonebook >> Contact
- Phonebook >> Cloud phonebook
- Cloud Phonebook
- LDAP Settings
- Web page preview
- Phonebook >> Call List
- Phonebook >> Web Dial
- Phonebook >> Advanced
- Call Logs
- Function Key >> Function Key
- Function Key >> Softkey
- Function Key >> Advanced
- ■ Global key Settings
- ■ Programmable key Settings
- ■ IP Camera List
- Application>>Manage Recording
- Security >> Web Filter
- Security >> Trust Certificates
- Security >> Device Certificates
- Security >> Firewall
- Device Log >> Device Log
- Trouble Shooting
- Get Device System Information
- Reboot Device
- Reset Device to Factory Default
- Screenshot
- Network Packets Capture
- Export Debug Data
- Common Trouble Cases
Brand : Planet
Model : ICF-2000
Category : Phone