AUF140UR4RMPA1 - Air-conditioner HISENSE - Free user manual and instructions
Find the device manual for free AUF140UR4RMPA1 HISENSE in PDF.

User questions about AUF140UR4RMPA1 HISENSE
0 question about this device. Answer the ones you know or ask your own.
Ask a new question about this device
Download the instructions for your Air-conditioner in PDF format for free! Find your manual AUF140UR4RMPA1 - HISENSE and take your electronic device back in hand. On this page are published all the documents necessary for the use of your device. AUF140UR4RMPA1 by HISENSE.
USER MANUAL AUF140UR4RMPA1 HISENSE
USE AND INSTALLATION INSTRUCTIONS
Thank you very much for purchasing this Air Conditioner. Please read this use and installation instructions carefully before installing and using this appliance and keep this manual for future reference.
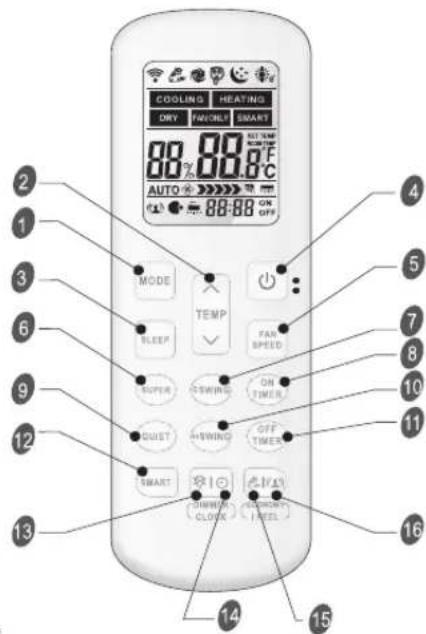
Remote controller Instructions
(R2-01)
Remote controller 1
Operation instructions
Operation modes 3
Airflow direction control 4
SMART mode 5
SUPER mode 7
QUIET mode 7
TIMER mode 8
ECONOMY mode 8
IFEEL mode 9
DIMMER button 9
CLOCK button 9
SLEEP mode 10
8°C HEAT mode 10
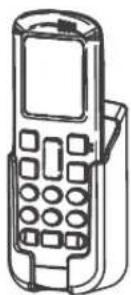
Remote controller
The remote controller transmits signals to the system.
1 MODE
Press this button to select the operation mode.
3 SLEEP
Used to set or cancel Sleep Mode operation.
6 SUPER
Used to start or stop the fast cooling/heating. (Fast cooling operates at high fan speed with 16°C(61°F) set temp automatically; Fast heating operates at auto fan speed with 30°C(86°F) set temp automatically)
8 ON TIMER
Used to set or cancel the timer operation.
9 QUIET
Used to set or cancel Quiet Mode operation.
11 OFF TIMER
Used to set or cancel the timer operation.
12 SMART(invalid for multi system) Used to enter fuzzy logic operation directly when the unit is on.
When the Remote controller is in standby, and the mode is in Cooling or Dry, press this button about 5 seconds to enter the auto-clean mode and then the indicator "☐" will display on LCD. Press SMART or POWER or MODE button or enter the auto-clean mode more than 30 minutes will escape from auto-clean mode.and then the indicator "☐" will disappeared.
13 DIMMER
When you press this button, all the display of indoor unit will be closed. Press any button to resume display.
14 CLOCK
Used to set the current time.
Indication symbols on LCD:
text_image
COOLING HEATING DRY SWITCH SMART 80% 80% 8°C AUTO ON OFF MODE TEMP SLEEP FAN SPEED SUPER SWITCH ON TIME SWIFT SWING OFF TIME SMART SWITCH CLOSE SWITCH (FEEL) 12 13 14 15 16 17 18 19 20 21 22 23 24 25 26 27 28 29 30 31 32 33 34 35 36 37 38 39 40 41 42 43 44 4515 ECONOMY
Used to set or cancel Economy Mode operation.
2+7 8°C HEAT(optional)
Used to start or stop 8°C HEAT mode.
② TEMP
Used to adjust the room temperature and the timer, also real time.
4 POWER
The appliance will be started when it is energized or will be stopped when it is in operation, if you press this button.
5 FAN SPEED
Used to select fan speed in sequence auto, higher, high, medium, low and lower.
7 ⇌ SWI
Used to stop or start vertical adjustment louver swinging and set the desired up/down airflow direction.
10 SWI
Used to stop or start Horizontal adjustment louver swinging and set the desired left/right airflow direction.
16 IFEEL
Press to set IFEEL Mode operation. In IFEEL mode, the Air Conditioner operates basis temperature sensor fitted in remote instead of machine, Advice to use IFEEL mode and the remote put where the indoor unit receive signal easily. Press this button above 5 seconds, start or stop IFEEL mode.

text_image
COOLING Cooling indicator DRY Dry indicator FAN ONLY Fan only indicator HEATING Heating indicator SMART Smart indicator Auto Auto fan speed Higher fan speed High fan speed Medium fan speed Low fan speed Lower fan speed Quiet indicator Economy indicator Super indicator Sleep indicator IFEEL Display temperature ON Display set timer Auto-clean indicator OFF Display current time 8°C Heat indicatorNote: Each mode and relevant function will be further specified in following pages.
Remote controller
Remote controller
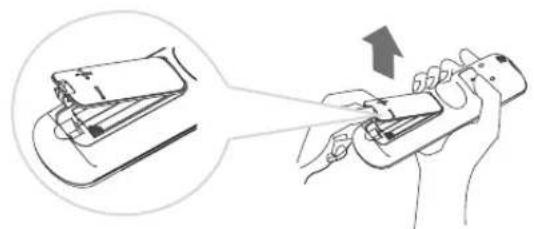
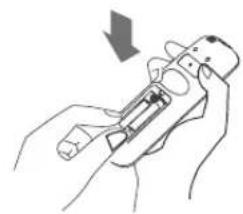
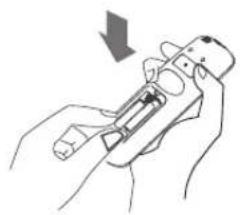
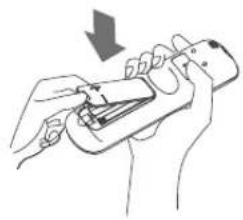
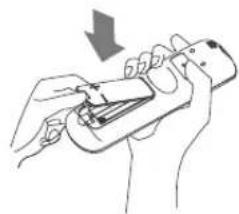
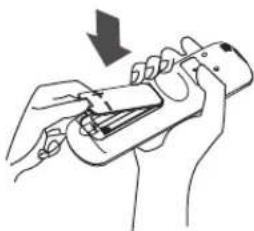
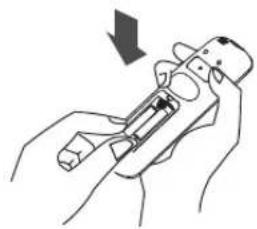
◆ How to Insert the Batteries
- Pry open the battery cover according to the arrow direction.
- Insert new batteries making sure that the (+) and (-) of battery are matched correctly.
- Reattach the cover by pressing it back into position.
natural_image
Illustration of a hand holding a smartphone with a device being processed, showing motion and shipment (no text or symbols)1
natural_image
Illustration of hands holding a device with a downward arrow indicating motion (no text or symbols)2

natural_image
Line drawing of hands using a handheld device to adjust or install a component (no text or symbols visible)3
Note:
- Use 2 LR03 AAA(1.5volt) batteries. Do not use rechargeable batteries. Replace batteries with new ones of the same type when the display becomes dim.
◆ Storage and Tips for Using the Remote Controller
The remote controller may be stored mounted on a wall with a holder.
Note: The remote controller holder is an optional part.
Note: The shape may differ from that of the remote controller holder you have selected.
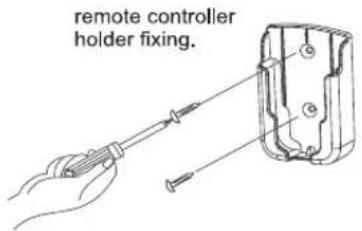
text_image
remote controller holder fixing.
remote controller mounting.
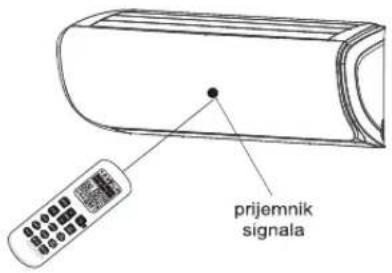
◆ How to Use
To operate the room air conditioner, aim the remote controller to the signal receptor. The remote controller will operate the air conditioner at a distance of up to 7m when pointing at signal receptor of indoor unit.
CAUTIONS
For appropriate signal transmission between remote controller and indoor unit, keep the signal receiver away from the following items:
- Direct sunlight or other strong lights or heat
- Flat panel television screen or other electrical appliances that react to the remote controller
Additionally, the air conditioner will not operate if curtains, doors or other materials block the signals from the remote controller to the indoor unit. If the signal may not be transmitted properly, either move these materials or consult your local dealer.
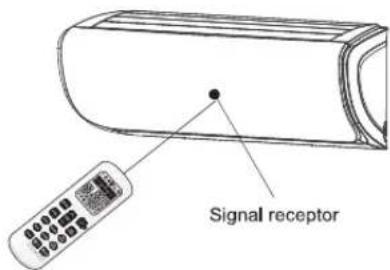
text_image
Signal receptorOperation instructions
Operation modes
- Selecting mode
Press MODE button once by once
Result: The operation modes changed in sequence:

flowchart
graph LR
    A["PRESS MODE"] --> B["COOLING → DRY → FAN ONLY → HEATING"]
    B --> C["23 °C AUTO 🎯"]
Heating mode is NOT available for cooling only air conditioner.
◆ FAN mode
Press FAN SPEED button once by once
Result: The fan speed is changed in sequence:

flowchart
graph LR
    A["Press"] --> B["FAN SPEED"]
    B --> C["Auto → Higher → High → Medium → Low → Lower"]
    C --> D["COOLING"]
    C --> E["HEATING"]
    C --> F["DRY"]
    C --> G["FANONLY"]
    C --> H["SMART"]
At "FAN ONLY" mode, only "Auto" is not available. At "DRY" mode, Fan speed is set at "AUTO" automatically, "FAN SPEED" button is ineffective in this case. Some models, such as commercial air conditioner products, only have the third gear speed.

flowchart
graph LR
    A["Auto"] --> B["High"]
    B --> C["Medium"]
    C --> D["Low"]
    D --> E["Low"]
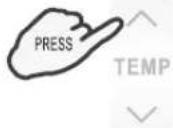
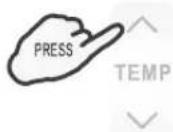
Setting temperature
Press ▲ button once TEMP
Result: Raise temperature setting by 1°C or 1°F
Press TEMP button once
Result: Lower temperature setting by 1°C or 1°F
!
| Range of available set temperature | |
| *HEATING, COOLING | 16°C~30°C (61°F~86°F) |
| DRY | ±7 deg C |
| FAN ONLY | unable to set |
*Note: Press and hold "MODE" button and "✓" button together for 2 seconds will alternate the temperature display between the °C and °F scale. *Note: Heating mode is NOT available for cooling only models. *Note: At "Dry" mode, a decrease or rise of up to 7°C can be set with Remote controller if you still feel uncomfortable.
Operation instructions
♦ Turning on
Press

button.
Result : The RUN indicator of the indoor unit lights up.
SWING, SMART, SUPER, QUIET, TIMER, ECONOMY, IFEEL, DIMMER, CLOCK, SLEEP and 8°C HEAT operation modes will be specified in the following pages.
- Changing modes during operation, sometimes the unit does not response at once. Wait 3 minutes.
- During heating operation, air flow is not discharged at the beginning. After 2–5 minutes, the air flow will be discharged until temperature of indoor heat exchanger rises.
- Wait 3 minutes before restarting the appliance.
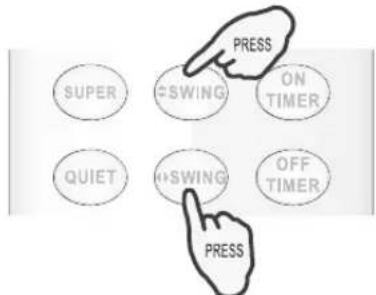
Airflow direction control
Vertical airflow(Horizontal airflow) is automatically adjusted to a certain angle in accordance with the operation mode after turning on the unit.
| Operation mode | Direction of airflow |
| COOLING, DRY | horizontal |
| *HEATING, FAN ONLY | downward |
text_image
PRESS SUPER SWING ON TIMER QUIET SWING OFF TIMER PRESSThe direction of airflow can be also adjusted to your own requirement by pressing the "PSWING" buttons of the remote controller.
*Heating mode is only available for heat pump models.
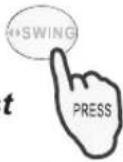
♦ Vertical airflow control (with the remote controller)
Using remote controller to set various angles of flow or specific angle as you like.
Press "SWING" button once.
Result : The vertical adjustment louver will swing up and down automatically.

Press "SWING" button again.
Result: The louvers swing to a suitable angle as desired.

♦ Horizontal airflow control (with the remote controller)
Using remote controller to set various angles of flow or specific angle as you like.
Press " [SWING]" button once.
Result : The horizontal adjustment louver will swing left and right automatically.

Operation instructions
Press " [SWING]" button again.
Result : The louvers swing to a suitable angle as desired.
NOTE: If the unit doesn't have four ways airflow function, you can adjust horizontal airflow by yourself.(invalid for some models)
A Do not turn the vertical adjustment louvers manually, otherwise malfunction may occur. If that happens, turn off the unit first and cut off the power supply, then restore power supply again.
B It is better not to let the vertical adjustment louver tilt downward for a long time at COOLING or DRY mode to prevent condensed water from dripping.
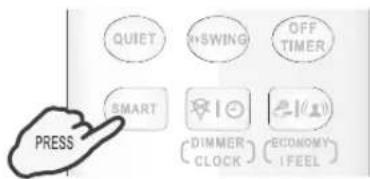
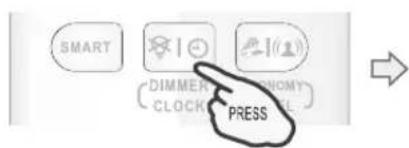
SMART mode(invalid for multi system)
◆ How to set SMART mode?
Press the SMART button.
Result: Enters SMART mode(fuzzy logic operation) directly only when the unit is on. Temperature and fan speed are automatically set based on the actual room temperature.
text_image
QUIET SWING OFF TIMER SMART DIMMER CLOCK ECONOMY IFEEL PRESSFor the split-type models, such as wall-mounted air conditioners and some floor-standing air conditioners, their operation mode and set temperature should be determined based on the indoor temperature.
Operation mode and temperature are determined by indoor temperature
| Indoor temperature | Operation mode | Target temperature |
| 21°C(70°F) or below | HEATING | 22°C(72°F) |
| 21°C-23°C(70°F-73°F) | FAN ONLY | |
| 23°C-26°C(73°F-79°F) | DRY | Room temperature decrease 2°C(2°F) after operate for 3 minutes |
| Over 26°C(79°F) | COOLING | 26°C(79°F) |
Cooling only models
| Indoor temperature | Operation mode | Target temperature |
| 23°C(73°F) or below | FAN ONLY | |
| 23°C-26°C(73°F-79°F) | DRY | Room temperature decrease 2°C(2°F) after operate for 3 minutes |
| Over 26°C(79°F) | COOLING | 26°C(79°F) |
For commercial air conditioner products, such as cassette type air conditioners, duct type air conditioners, ceiling & floor air conditioners and some floor-standing air conditioners, their operation mode should be determined based on the difference between the indoor temperature and set temperature.
Operation instructions
The operation mode is determined by the difference between the indoor temperature and set temperature.
Heat pump models
| Indoor temperature | Operation mode | Target temperature |
| Below T-3°C (3°F) | HEATING | T |
| T-3°C≤ T_indoor ≤T+3°C (3°F) | FAN ONLY | T |
| Over T+3°C (3°F) | COOLING | T |
Cooling only models
| Indoor temperature | Operation mode | Target temperature |
| T+3°C (3°F) or below | FAN ONLY | T |
| Over T+3°C (3°F) | COOLING | T |
SMART button is ineffective in SUPER mode.
ECONOMY button is ineffective in SMART mode.
Press MODE button cancel SMART mode.
Note: Temperature, airflow and direction are controlled automatically in SMART mode. However, For the on/off, you can choose from -2 to 2 (for some models you can choose from -7 to 7), for the inverter you can choose from -7 to 7. if you still feel uncomfortable.
◆ What you can do in SMART mode?
| Your feeling | Button | Adjust |
| Uncomfortable because of unsuitable air flow volume. |  | Indoor fan speed alternates among Auto, Higher, High, Medium, Low and Lower each time this button is pressed. |
| Uncomfortable because of unsuitable flow direction. |   | Press it once, the vertical adjustment louver(horizontal adjustment louver) swings to change vertical airflow direction(horizontal airflow direction). Press it again, swings stops. |
◆ How to cancel the SMART mode?
Press the MODE button.
Result: The SMART mode will be cancelled.
text_image
PRESS MODE TEMP FAN SPEEDOperation instructions
SUPER mode
SUPER mode is used to start or stop fast cooling or heating only when the unit is on.
SUPER mode can be set when the appliance is in operation or energized.
In SUPER mode, you can set temperature, airflow direction or timer
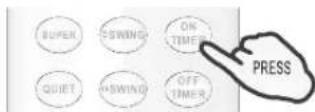
How to set SUPER mode?
Press SUPER button at the cool,dry and fan only mode.
Result: At high fan speed, the set temperature automatically to 16^ C( 61^ F).
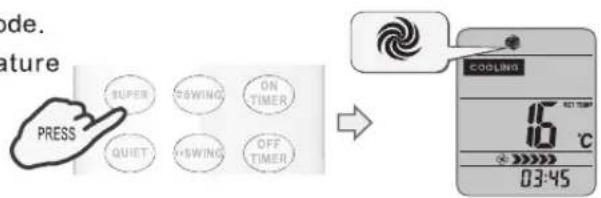
text_image
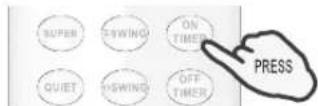
MODE. Feature PRESS SUPER SWING ON TIMER QUIET SWING OFF TIMER COOLING 16 °C 03:45Press SUPER button at the heat mode.
Result: At auto fan speed, the set ter automatically to 30°C(86°F).
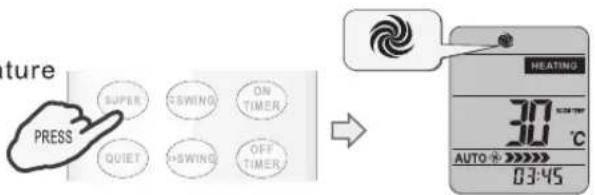
text_image
Future PRESS SUPER CSWING ON TIMER QUIET CSWING OFF TIMER HEATING 30 °C AUTO ★ ★★★★ 03:45◆ How to cancel SUPER mode?
Press SUPER, MODE, FAN SPEED, ON/OFF, QUIET or SLEEP button.
Result: The display return to the original mode. Escape from SUPER mode.
SMART button is not available in SUPER mode.
ECONOMY button is not available in SUPER mode.
The Appliance will continue working in SUPER mode for 15 minutes, if you don't escape from it by pressing any of the buttons mentioned above.
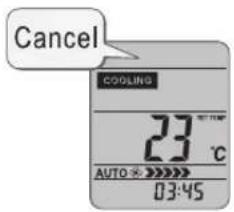
QUIET mode
In this mode, the air conditioner will work with low noise performance by low compressor frequency and low fan speed. This mode is only available for inverter models.
Note: Press MODE, FAN SPEED, SMART, SUPER, ECONOMY or ON/OFF button cancel QUIET mode.
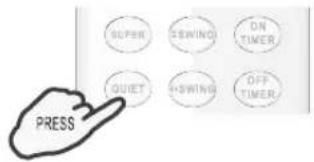
text_image
SUPER SEWIND ON TIMER QUIET RSWING OFF TIMER PRESSOperation instructions
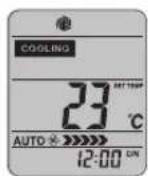
Timer mode
It is convenient to set the timer on with ON TIMER buttons when you go out in the morning to achieve a comfortable room temperature at the time you get home. You can also set timer off at night to enjoy a good sleep.
◆ How to set ON TIMER ?
- Press ON TIMER button.
Result : "12:00 ON" flashes on the LCD.
←
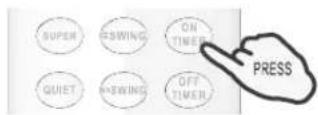
- Press the ^ or √ button.
Result : Once to increase or decrease the time setting by 1 minute. One and a half seconds to increase or decrease the time setting by 10 minute. For a longer time to increase or decrease the time by 1 hour.
- When your desired time displayed on LCD, press the ON TIMER button and confirm it.
Result: A "beep" can be heard.
"ON" stops flashing.
The TIMER indicator on the indoor unit lights up.(invalid for some models)
- After the set timer displayed for 5 seconds the clock will be displayed on the LCD of the remote controller instead of set timer.
◆ How to cancel ON TIMER?
Press the ON TIMER button.
Result: A "beep" can be heard and the indicator disappears, the time on mode has been canceled.
Note: It is similar to set OFF TIMER, you can make the appliance switch off automatically at your desired time.
ECONOMY mode
In this mode, the air conditioner will bring you energy saving performance by lower running currency.
ECONOMY button is ineffective in SUPER and SMART mode.
Press ON/OFF, MODE, TEMP ∧, TEMP ∨, FAN SPEED, SLEEP, QUIET or ECONOMY button cancel ECONOMY mode.
text_image
QUIET SHIFTING OFF TIMER SMART DIMMER CLOCK IFEEEL PRESSOperation instructions
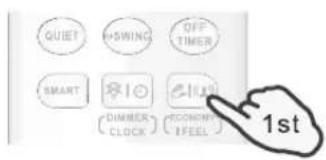
IFEEL mode
The temperature sensor built in remote controller is activated. It can sense its surrounding temperature, and transmit the signal back the unit, the unit can adjust the temperature so as to provide maximum comfort.
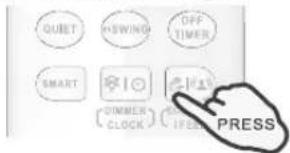
◆ How to set IFEEL mode ?
Press the

button for about 5 seconds once.
Result : The transmit signal in the display will appear, the IFEEL function will be started.
text_image
QUIET +SWING OFF TIMER SMART DIMMER CLOCK CONON TFEEL 1stNote:
The default setting is IFEEL inactiving.
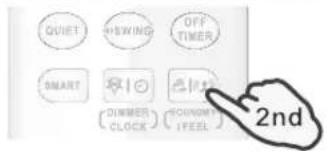
◆ How to cancel IFEEL mode?
Press the

button for about 5 seconds once again.
Result : IFEEL function will be shunted off.
text_image
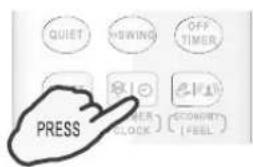
QUIET +SWING OFF TIMER SMART DINNERS CLOCK COCONUT I FEEL 2ndDIMMER button
◆ How to set the DIMMER ?
Press the DIMMER button to turn off the light and the display in the unit.
Note:
When the light is off, receive signal will turn on the light again.
text_image
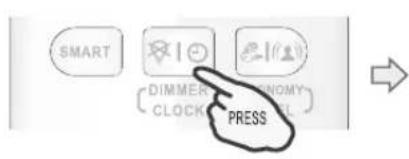
QUIST WARNING OFF TIMER PRESS RISK RISKER BLOCK ECONOMY [PEEL]CLOCK button
How to adjust the real time?
- Press

button for about 5 seconds once.
Result :
The time flashes on the LCD.
text_image
SMART DIMMER CLOCK PRESS
2. Press ∧ and ∨ buttons.
Result :
Once to increase or decrease the time setting by 1 minute.
One and a half seconds to increase or decrease the time setting by 10 minute.
For a longer time to increase or decrease the time by 1 hour.
3. Press 1 button once again.
Result :
The real time is set.
text_image
SMART DIMMER CLOCK PRESSE OK OK OK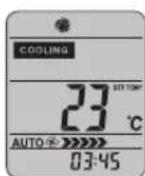
Operation instructions
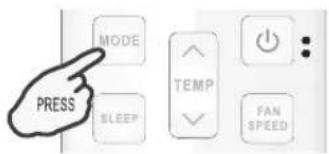
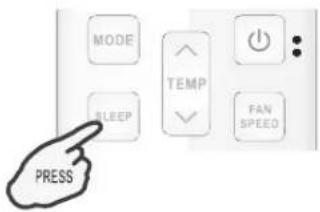
SLEEP mode
SLEEP mode can be set in COOLING, HEATING or DRYING mode.
This function gives you a more comfortable environment for sleep.
- The appliance will stop operation automatically after operating for 8 hours.
- Fan speed is automatically set at low speed.
◆ How to set SLEEP mode ?
Each time

button is pressed.
Result :
SLEEP function will be started.
text_image
MODE TEMP SLEEP FAN SPEED PRESSSLEEP mode :
- Set temperature will rise by 2^(2^) at most if the appliance operates in cooling mode for 2 hours constantly, then keeps steady.
- Set temperature will decrease by 2^(2^) at most if the appliance operates in heating mode for 2 hours constantly, then keeps steady.
Note: In cooling mode, if room temperature is 26^ C(79°F) or above, set temperature will not change. Note: Heating is NOT available for cooling only air conditioner.
◆ How to cancel SLEEP mode?
Press any button, except SLEEP button.
Result: The display return to the original mode. Escape from SLEEP mode.

text_image
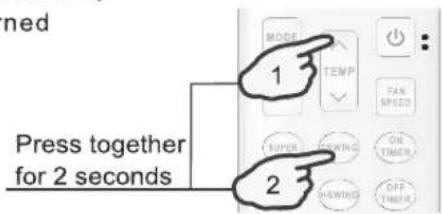
MODE SLEEP TEMP FAN SPEED PRESS8°C HEAT mode(optional)
◆ How to set 8°C HEAT?
In HEATING mode, Press SWING and TEMP buttons together for 2 seconds to start 8°C HEAT mode. In 8°C HEAT mode, the fan speed is set at "AUTO" automatically. The icon will appear on the LCD.
If pressing any button, other than ON TIMER, OFF TIMER, CLOCK, DIMMER, IFEEL and SWING, 8°C HEAT function will be turned off. And the icon 📂 will disappear.
text_image
n 1 2 Press together for 2 secondsNote :
In 8°C HEAT mode, the default temperature is set 8°C. 8°C HEAT mode can be set only when the air conditioner works in HEATING mode.
Hisense
UPUTSTVO ZA UPOTREBU DALJINSKOG UPRAVLJAČA
Zahvaljujemo na kupovini ovog klima uređaja. Molimo da pre postavljanja i upotrebe uređaja pažljivo pročitate ovo uputstvo za postavljanje i upotrebu, kao i da ga sačuvate za buduću upotrebu.
natural_image
Illustration of a hand using a handheld device to lift a device, with an inset showing the same device (no text or symbols present)Napomena:
natural_image
Illustration of hands holding a device with a downward arrow indicating action (no text or symbols)2
natural_image
Illustration of hands using a handheld device to adjust or install a device (no text or symbols visible)3
- Koristite dve baterije LR03 AAA(1,5 V). Nemojte da koristite baterije koje se pune. Kad displej postane zatamnjen, zamenite stare baterije novim baterijama istog tipa.
natural_image
Line drawing of a mobile phone with keypad and front panel (no text or symbols)◆ Upotreba
Za upravljanje klima uređajem, usmerite daljinski upravljač na signalni prijemnik. Daljinskim upravljačem upravljate klima uređajem na udaljenosti od 7 m dok je usmeren na signalni prijemnik unutrašnje jedinice.
△ MERE OPREZA
Da bi prenos signala između daljinskog upravljača i unutrašnje jedinice bio pravilan, držite prijemnik signala ne sme da bude u blizini:
- neposredne sunčeve svetlosti ili druge jake svetlosti ili toplote - TV-ekrana ili drugih električnih uređaja koji reaguju na daljinski upravljač
Osim toga, klima uređaj neće raditi ako zavese, vrata ili drugi materijali blokiraju signale daljinskog upravljača prema unutrašnjoj jedinici. Ako se signal ne može pravilno preneti, udaljite te materijale ili zatražite savet od lokalnog prodavca.
text_image
prijemnik signalaRežimi rada
Izbor režima rada
Pritiskajte na taster MODE
text_image
COOLING HEATING SKY FASCALY SWAPT 88% 88.8°C AUTO ON OFF 88-88 ON MODE TEMP SLEEP FAN SUPPORT ON SHORT ON SHORT ON SHORT ON SHORT ON SHORT ON SHORT ON SHORT ON SHORT ON SHORT ON SHORT ON SHORT ON SHORT ON SHORT ON SHORT ON SHORT ON SHORT ON SHORT ON SHORT ON SHORT ON SHORT ON SHORT ON SHORT ON SHORT ON SHORT ON SHORT ON SHORT ON SHORT ON SHORT ON SHORT ON SHORT ON SHORT ON SHORT ON SHORT ON SHORT IN SHORT IN SHORT IN SHORT IN SHORT IN SHORT IN SHORT IN SHORT IN SHORT IN SHORT IN SHORT IN SHORT IN SHORT IN SHORT IN SHORT IN SHORT IN SHORT IN SHORT IN SHORT IN SHORT IN SHORT IN SHORT IN SHORT IN SHORT IN SHORT IN SHORT IN SHORT IN SHORT IN SHORT IN SHORT IN SHORT IN SHORT IN SHORT IN SHORT IN
CLOCK
Koristi se za podešavanje točnog vremena.

ECONOMY
natural_image
Illustration of a hand using a spray gun to adjust a device (no text or symbols present)1

natural_image
Illustration of a hand holding a device with a downward arrow indicating motion (no text or symbols)2
natural_image
Line drawing of a hand holding a handheld device with a downward arrow indicating action (no text or symbols)3
Napomena:
- Koristite 2 LR03 AAA (1,5 V) baterije. Nemojte koristiti punjive baterije. Baterije zamijenite novima istog tipa kad se pokazivač zatamni.
natural_image
Illustration of a hand holding a pen or tool, with an inset showing a battery being inserted (no text or symbols present)1

natural_image
Illustration of hands using a handheld device to adjust or install a component (no text or symbols visible)2
natural_image
Illustration of hands using a handheld device to adjust or install a component (no text or symbols visible)3
Opomba:
- Uporabite dve bateriji LR03 AAA(1.5 V). Ne uporabljajte polnilnih baterij. Ko prikaz postane zatemnjen, zamenjajte bateriji z novimi istega tipa.
natural_image
Line drawing of a vintage mobile phone with keypad and front panel (no text or symbols)◆ Uporaba
text_image
MODE PRITISN SLEEP TEMP FAN SPEEDNačin SUPER
text_image
MODE TEMP SLEEP FAN SPEED PRESSNačin SPANJE:
Nastavljena temperatura se dvigne največ za 2 °C (2°F), če naprava deluje v načinu hlajenja neprekinjeno 2 uri, potem se ne spreminja.
Nastavljena temperatura se zniža največ za 2 °C (2°F), će naprava deluje v načinu ogrevanja neprekinjeno 2 uri, potem se ne spreminja.
Opomba: Ogrevanje NI na voljo pri klimatskih napravah, namenjenih samo hlajenju.
Preklic funkcije SPANJE
Pritisnite katero koli tipko razen tipke SPANJE.
text_image
MODE TEMP SLEEP FAN SPEED PRESSThank you very much for purchasing this Air Conditioner. Please read this instructions carefully before using this appliance and keep this manual for future reference.
natural_image
Illustration of a hand using a handheld device to lift a battery, with an arrow indicating the process (no text or symbols present)1
natural_image
Illustration of hands using a tool to adjust or install a mechanical component (no text or symbols visible)2

natural_image
Illustration of hands using a handheld device to adjust or install a component (no text or symbols visible)3
Забелешка:
text_image
MODE PRESS SLEEP TEMP FAN SPEEDtext_image
QUIET SWING OFF TIMER SMART DIMMER CLOCK ECONOMY I FEEL 2ndtext_image
MODE SLEEP TEMP FAN SPEED PRESStext_image
MODE SLEEP TEMP FAN SPEED PRESStext_image
Diagram illustrating three-step battery shipment process with labeled steps 1, 2, and 3Shënim:
text_image
remote controller holder fixing. → remote controller mounting.• Si ta përdorni
text_image
Signal receptortext_image
MODE TEMP SLEEP FAN SPEED PRESSModaliteti 8 ^0 C HEAT (opsional)
text_image
Press together for 2 secondsShënim:
Hisense (Guangdong) Air Conditioning Co., Ltd.
No.8 Hisense Road, Advanced Manufacturing Jiangsha Demonstration Park, Jiangmen City, Guangdong Province, P.R.China
EMAIL: service@hisense.com
(These instructions shall also be available in an alternative format, e.g. ask a copy from the dealers).