
ATV24HDW-0224 - Television Bauhn - Free user manual and instructions
Find the device manual for free ATV24HDW-0224 Bauhn in PDF.


User questions about ATV24HDW-0224 Bauhn
0 question about this device. Answer the ones you know or ask your own.
Ask a new question about this device
Download the instructions for your Television in PDF format for free! Find your manual ATV24HDW-0224 - Bauhn and take your electronic device back in hand. On this page are published all the documents necessary for the use of your device. ATV24HDW-0224 by Bauhn.
USER MANUAL ATV24HDW-0224 Bauhn
powered by WebOS Hub
MODEL: ATV24HDW-0224

User Manual

AFTER SALES SUPPORT

AUS
1300
002 534

tempo.org/support
MODEL: ATV24HDW-0224 PRODUCT CODE: 715116 02/2024
WELCOME
Congratulations on your purchase!
This manual tells you all you need to know about using your new BAUHN® product.
Please take special note of any important safety and usage information presented with the ⚠ symbol.
All products brought to you by BAUHN ® are manufactured to the highest standards of performance and safety and, as part of our philosophy of customer service and satisfaction, are backed by our comprehensive 1 Year Warranty.
Domestic use only: This product is intended for indoor domestic use only. It is not suitable for commercial, industrial or outdoor use. Do not use this product for anything other that its intended purpose, and only use it as described in this manual.
We hope you will enjoy using your purchase for many years to come.
CONTENTS
Welcome 2
Unpack and Prepare 4
What's in the box 4
Important Tips 5
Attaching the stand 6
Wall-mounting the TV 7
Connect to power 8
Connect to 12V power source 8
Connect your antenna 8
Controls and Connections 9
Get to know your TV 9
Buttons on the TV 9
Ports on the TV 10
Remote Control 12
Setup 12
Using the Remote Control 13
Buttons on the Remote 14
On-Screen Set Up 16
LG ThinQ App 17
Advanced Controls
(TV Setting Menus) 18
Picture 19
Sound 21
General 23
Support 29
High Dynamic Range (HDR) 30
Smart TV 31
Web Browser 32
Bluetooth Audio Out To
Compatible Devices 33
TV Guide 34
Using the TV Scheduler 34
USB Mode 35
Set up 35
Troubleshooting 36
Specifications 39
Compliance and
Responsible Disposal 40
Unpack and Prepare
What's in the Box
Before installing your new TV, check you have everything needed.
In the box you will find:
A. 24" HD Smart TV
B. Remote Control
C. AAA Batteries
D. 12V Adaptor
E. AV Cable
F. TV Stands
G. Screws for TV Stands
H. Warning Sheet
I. TV Toppling Safety Message
J. Quick Start Guide
K. Warranty Certificate
L. General Safety Warnings
M. User Manual

You will need:
• Phillips-head screwdriver (for stand installation)
- Someone to help you lift and install your TV
• Antenna cable (to watch live TV)
• Broadband internet connection (to use smart apps)
Important Tips
- Place the TV on a level surface.
- Place the TV away from any source that may generate heat or vibrations.
- Make sure there is enough space around vents for airflow.
• The remote control works up to 5 metres away from the TV. - Unplug the TV before cleaning it.
- Clean using a dry cloth only - do not use water or chemicals.
- Use only the power supply provided.
- It is highly recommended to use safety straps for securing the TV in place.
- Keep liquid, children and pets away from the TV at all times.
Attaching the Stand

!
- Unplug the TV from the power outlet before installing or removing the stand.
- Only touch the frame, not the screen.
- It is highly recommended to use safety straps for securing the TV.
Unless you are wall-mounting the TV, you will need to attach its stand/legs.
- Lay the TV face-down on a soft, flat surface (like the sofa, or a towel on a table) larger than the TV itself.
- Match stands to the installation points on the underside of the TV.
- Attach the stands to the TV at the installation points using the screws provided. (Grab a screwdriver for this bit). Make sure the legs are facing away from each other (not leaning inwards).
Wall-Mounting the TV

- Unplug the TV from the power outlet before wall-mounting.
- Contact a professional for assistance with wall-mounting the TV.

Back of the TV

Required
• VESA Mounting Bracket
- 4 x M4*10mm screws (or longer as required)
The TV comes with holes on the back panel for use with wall-mounting brackets (bracket not included).
Use four standard M4*10mm screws (or longer, depending on the mounting bracket) to wall-mount this TV (screws are not included).

The screws in the package are for securing the TV stand only. If you are wall-mounting the TV, consult a qualified installer for advice on bracket support and wall support.
Connect to Power
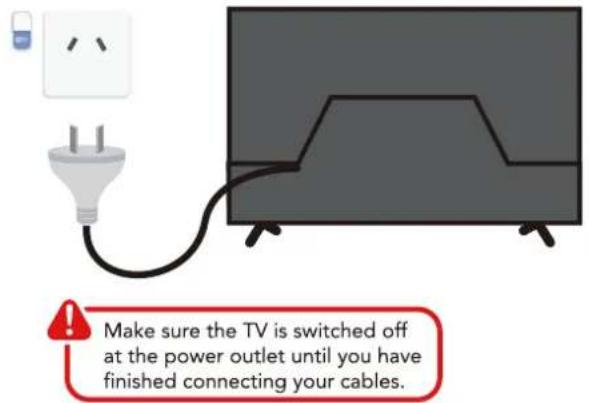
Connect to 12V
Power Source

Connect your Antenna
Free-to-air TV in HD (High Definition)
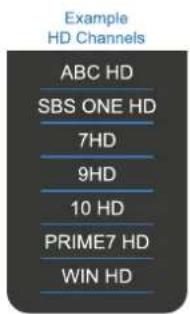
High Definition (HD) channels provide the best viewing quality and are available with a digital antenna connection.

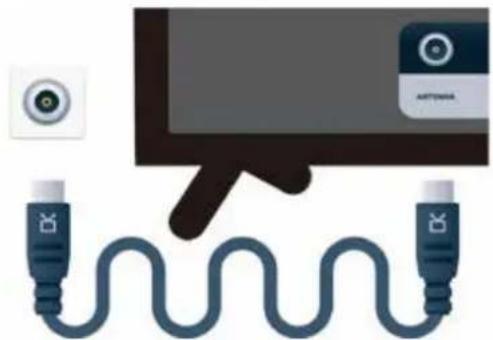
Antenna cable not included.
Controls and Connections
Get to Know your TV

Buttons on the TV

- VOL + / VOL - : increase/decrease volume level.
- CH + / CH - : select the next/previous channel.
- MENU: enter the settings menu.
- SOURCE: change input source.
- STANDBY: switch the TV on or to standby.
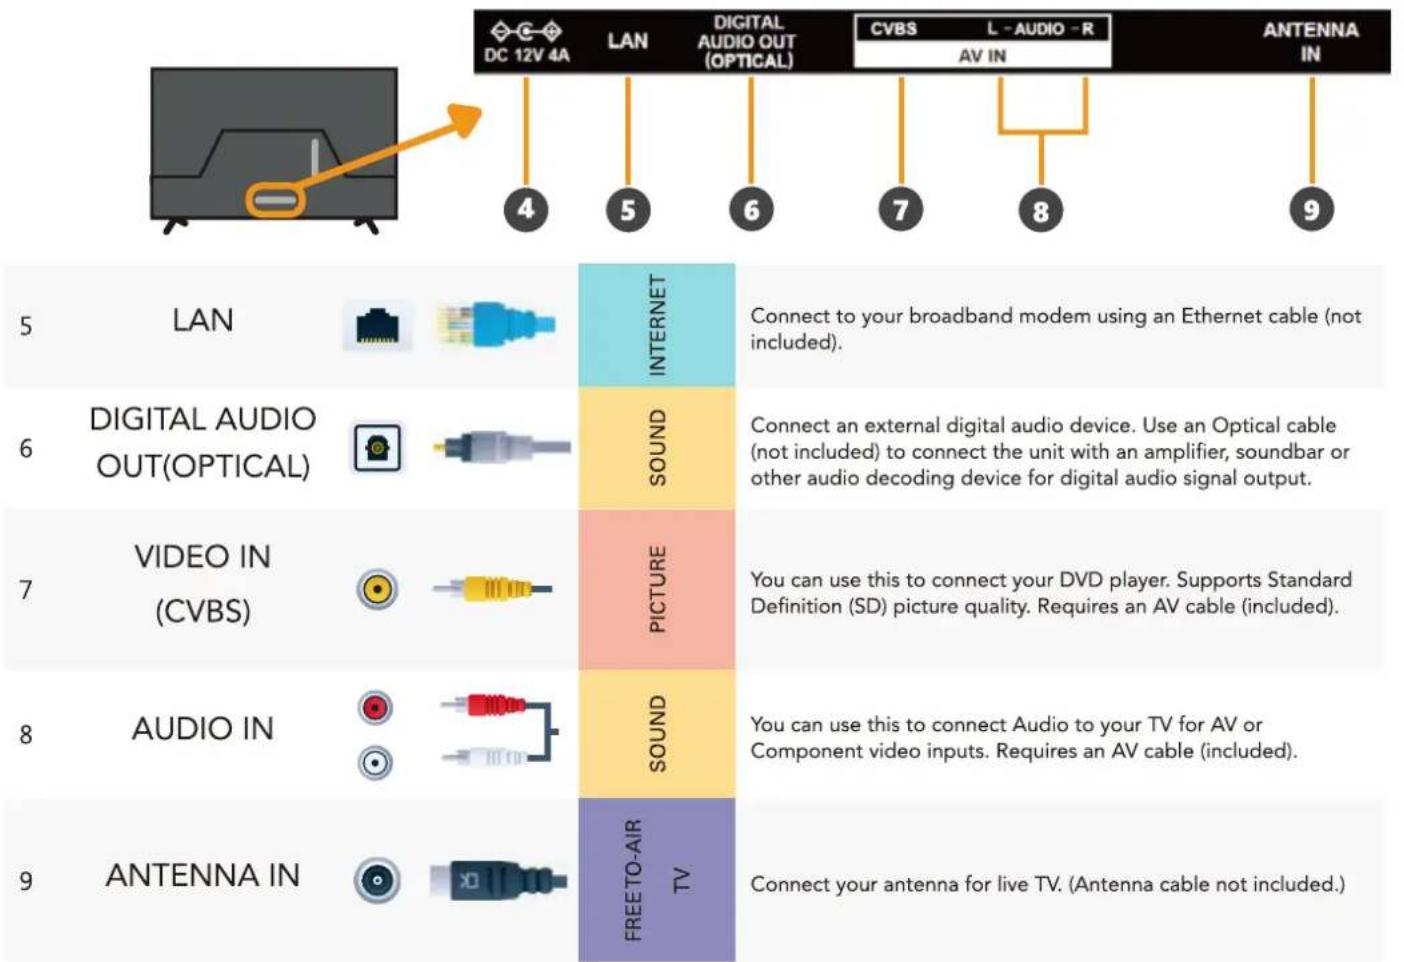
Ports on the TV
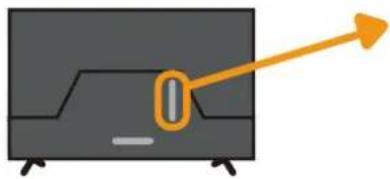

| 1 | HDMI IN Use a high-speed HDMI cable for best picture and sound quality. | SOUND | PICTURE | COMPUTER | All-digital connection between the TV and any HDMI device. Supports HD. Requires a HDMI cable (not included). |
| 2 | USB | STORAGE | Play media files stored on your USB storage device (supported file codecs and extensions may vary). | ||
| 3 | Headphone Jack | SOUND | Connect to your headphones, amplifier or audio device, using an AUX cable (not included). | ||
| 4 | 12V Power | POWER | You can connect the supplied 12V adaptor to this socket and the car's cigarette lighter socket. | ||
Remote Control
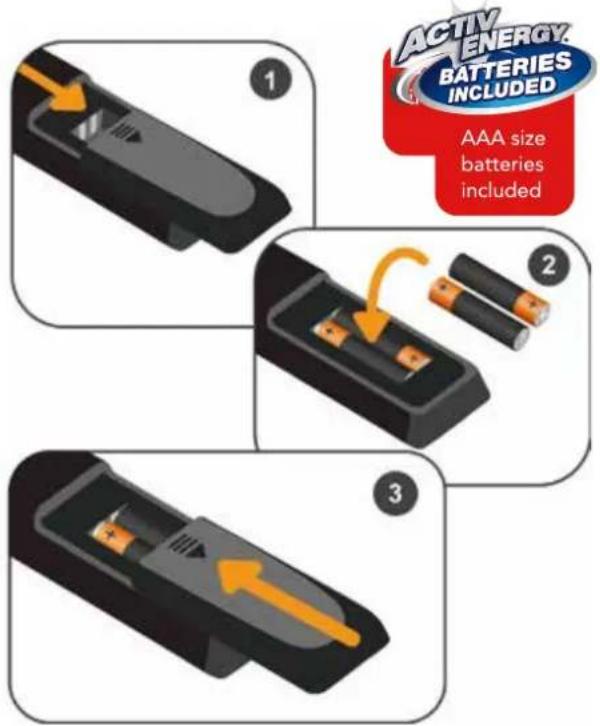
Illustration is for reference only.
Setup
Insert two AAA size batteries according to the polarity markings (+ / -) inside the compartment. Make sure the batteries are correctly aligned and properly pushed into place.
!
Precautions When Using Batteries
- Do not use old and new batteries together.
- Do not use different types of batteries (e.g. Manganese and Alkaline batteries) together.
- Remove the batteries from the remote if you do not intend to use it for a long time.
- When discarding used batteries, follow any guidelines for recycling and disposal of batteries that apply in your local area.
- Keep batteries away from children and pets.
- Never throw batteries into a fire or expose them to extreme heat.
Using the Remote Control
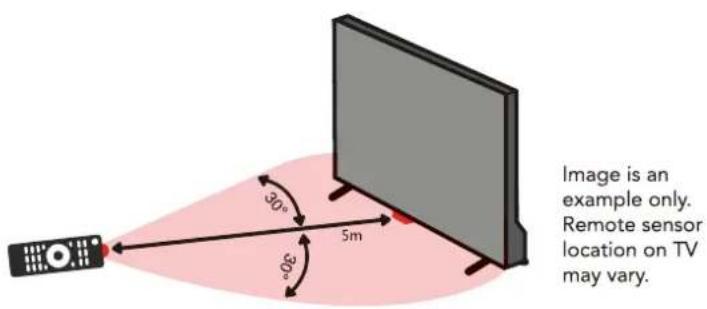
To use the remote, point it towards the remote sensor at the front of the TV. The remote will not operate if its path is blocked.
The remote has a range of up to about 5 metres from the TV at an angle of up to 30 degrees to either side of the sensor, as illustrated below.

Remote Hints and Tips
- Do not drop, step on or otherwise impact the remote control. This may damage the parts or lead to malfunction.
- Do not place objects between the remote control and the remote sensor.
- Do not use this remote control while simultaneously operating a remote control for other devices.
BUTTONS ON THE REMOTE
(ON): Switch the TV to On or Standby
Q (SEARCH): Search for content in the content store/web
CC/SUB: Enable/disable subtitles
NUMBER BUTTONS: Key in a TV channel number
-/LIST: Display channel list
0/QUICK ACCESS: Press and hold to view quick access edit screen
FAV: Display the favourite programs in DTV mode
+ VOL — : Increase/decrease volume
GUIDE: Launch the TV Guide (DTV)

TV: Switch to TV mode
(SOURCE): Select the input source
: Access TV settings menu
• • • : Display additional buttons/settings
^ CH PAGE ▼: Go to the next or previous program
(MUTE) : Mute or restore sound

* This feature is not supported on this TV.
On-Screen Set Up

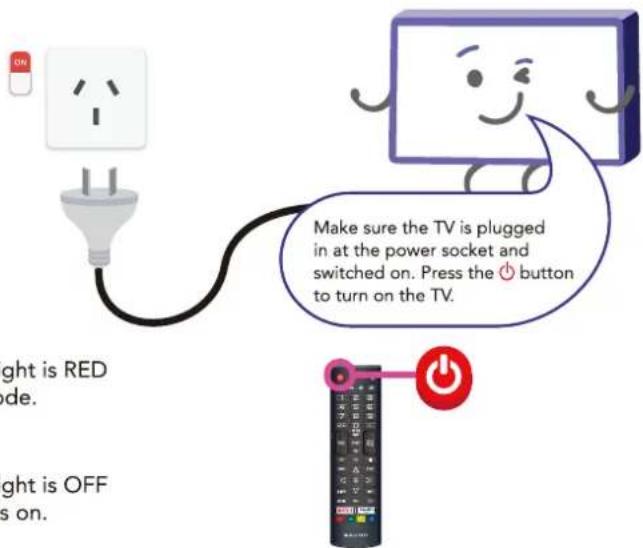
Make sure equipment is properly connected (as shown on pages 10-11) before connecting the TV to power.

On/Standby light is RED in standby mode.
On/Standby light is OFF when the TV is on.
First Time Setup Menu
When you turn the TV on for the first time, the First Time Setup Menu will appear.
Follow the prompts using the ▲ / ▼ / ◀ / ▶ / OK buttons to select your preferences. You will be guided through:
-
Select Installation Method 2. Language and Location Settings 3. Internet Connection
-
Terms & Conditions 5. User Analysis 6. The Way to Watch TV (Select TV Only)
-
TV Type (Stand or Wall-Mounted) 8. Programme Tuning
-
LG Account (Sign in with TV Remote or Skip)
If you make an error, you can update your preferences in the settings menu later.
16 | ON-SCREEN SET UP
3. Internet Connection
If you are using a wired network, connect an ethernet cable to the TV. The TV will automatically connect to the Internet.
If you are using a wireless connection, select 'Wi-Fi Network'. The TV will scan for nearby wireless networks. Make sure that the TV is within the range of your wireless modem/router, and you have your Wi-Fi password handy. Select your network, enter network password using the on-screen keyboard and select ENTER. Press OK to connect.
Or, you can connect to the internet later by going to the User Menu settings.
LG ThinQ App
You can use the LG ThinQ app to control key TV functions instead of the remote control.
Note: you need an Android device running Android 4.3 or higher to use the app.
- On your smart phone, search and download the LQ ThinQ app from the Play Store/App store (alternatively, scan the QR code below):

For Android

For iOS
- After app has downloaded and installed, open up the app. Ensure that both your smart phone and TV are using the same Wi-Fi network.
- Select TV and it will automatically search for nearby TV.
- A PIN will appear on your TV screen, enter the PIN on your smart phone tap "Done."
You can now use the app to control key TV functions.
Advanced Controls (TV Setting Menus)
Menu Navigation Buttons
Press the ⏻ then Ⓗ button to display the TV settings menu. See the guide below for all the other buttons you'll need to use to adjust and change your settings.
Function
Remote Button
Display the quick menu

Display the main menu

then

Enter a sub menu

Adjust a value

Return to the previous menu
BACK
Exit a menu
EXIT
Picture

To access picture settings, navigate from ⏻ > Ⓑ BUTTON > Picture
Picture Mode
Vivid : Enhanced brightness with lower contrast, colour depth and edges for standing out in very bright places such as storefronts.
Standard : Standard settings.
APS : Settings are optimised to reduce power consumption
Cinema : Settings are optimised for watching movies.
Cricket : Settings are optimised for watching sports.
Aspect Ratio Settings
- User Selection: select the aspect ratio: 16:9/Original/4:3/Vertical Zoom/4-Way-Zoom)
- Just Scan: turn just scan to auto/on/off.
Note: the options may differ between input sources.
Advanced Settings
| Option | Description |
| Brightness | Adjust screen brightness |
| Colour | Adjust colour of picture |
| Clarity | Adjust clarity of picture |
| Apply to all inputs | Applying the current picture settings to all inputs |
| Reset | Reset picture mode settings to factory default. |
Sound

To access sound settings, navigate from ⏻ > Ⓞ BUTTON > Sound
Option
Description
Sound Mode
Standard
Cinema
Clear Voice
Cricket
Music
Sound Out
Select sound output.
Option
Description
Use TV Speaker
Sound is played through the TV's speakers.
Use Wired Speaker
Sound is played through wired speakers connected to the TV.
Use Wireless Speaker
Sound is played through the wireless speakers paired with the TV.
Use External Speakers with TV Speaker
Sound is played through both the external speakers and the TV's speakers.
Advanced Settings
| Option | Description |
| Balance | Adjust audio output between left and right speakers. |
| Equalizer | Adjust selected frequencies. These options are available when sound mode is set to standard |
| Apply to all inputs | Select to apply settings to all inputs. |
| Reset | Reset sound settings to factory default. |
| Installation Type | Optimises sound based on whether TV is wall mounted or on stands. |
| Automatic Volume Adjustment | Turn on and each programme's volume will be adjusted automatically to the same level. |
| DTV Audio Setting | Select DTV audio: Options: MPEG, Dolby Digital, Dolby Digital Plus, HE-AAC, Auto |
| Match Screen and Sound | Options: TV speaker delay, Bypass |
| Select HDMI Audio Input Format | Set audio for each HDMI input. Options: Bitstream, PCM |
| LG Sound Sync | Connect the LG Sound Sync device to the optical port and set sound out to optical. With this feature on, you can adjust the volume of the connected LG Sound Sync device using the remote. |
| Digital Sound Out | Set digital sound output mode. Options: PCM, Auto, Pass Through |
| eARC Support | Select eARC support. |
General

To access general settings, navigate from ⏻ > Ⓞ BUTTON > General
AI Service > AI Recommendation
| Option | Description |
| Smart Tips | Suggests the TV features or settings based on the context. |
| Next Picks | At the end of a program, recommend content to you according to your viewing history and popular trends. |
| Reset Usage Data | Delete viewing and usage data TV has collected to provide you customised services. |
Game Optimiser
- Sets up features for an immersive experience when you play with a video game console.
Programmes
| Option | Description |
| Programme Tuning | Tune and save available programmes. |
| Programme Manager | Go to programme manager to edit all programmes. |
| HbbTV | Turn Hybrid Broadcast Broadband TV (HbbTV) on/off. |
Devices
| Option | Description |
| TV Management | View information about your TV device and change device related settings. |
| External Devices | Configure various external devices that can be used by connecting to the TV. You can also delete the connection history between external devices and the TV. |
| HDMI Settings | Change the settings of external input devices connected through HDMI. |
Network
See below.
Wired Connection (Ethernet)
If the router connected to the network supports DHCP feature, the TV will automatically connect to the network. If it does not automatically connect, select Edit to manually setup the connection.
Wi-Fi Connection
If you have set up the TV for a wireless network, you can check and connect to the available wireless Internet networks.
| Option | Description |
| Add a Hidden Wireless Network | Directly enter a network's name to add the network. |
| Connect via WPS PBC. | Connect through Wi-Fi Protected Setup-Push Button Configuration. |
| Connect via WPS PIN. | Connected to an access point using Wi-Fi Protected Setup PIN |
| Advanced Wi-Fi Settings | View connection information such as IP address and so on. |
System
See below.
Language
| Option | Description |
| Menu Language | Select on screen display language. |
| Primary Audio Language | Select primary audio language. Default will be used for programmes that do not support multiple languages. |
| Secondary Audio Language | Select secondary audio language. Default will be used for programmes that do not support multiple languages. |
| Keyboard Languages | Select on screen keyboard language. |
| Primary Teletext Language | Select primary teletext language. |
| Secondary Teletext Language | Select secondary teletext language. |
Location
| Option | Description |
| Broadcast Country | Select the TVs broadcast country. |
| Postcode | Enter your postcode to set the TVs broadcast location. |
| Services Country | Set country manually.Note: setting the country manually must be done when not connected to a network. |

Setting the country manually must be done when not connected to a network.
Time & Timer
| Option | Description |
| Set Automatically | Use network provided time. |
| Time Zone | Adjust the time zone. |
| Timers | Sleep Timer: select the desired Auto Sleep (Standby) duration.Power On Timer: set the power on timerPower Off Timer: set the power off timerAuto Power Off after 4 hours: when turned on, the TV will turn off if no buttons are pressed for 4 hours. |
Safety
| Option | Description |
| General Switch | Turn on to enable lock function. |
| TV Rating Locks | Restrict watching programmes based on rating. |
| Programme Locks | Select the programmes to lock. |
| Application Locks | Select the applications to lock. |
| Input Locks | Select the inputs to lock. |

Factory Password: 0000
Master Password: 0313
Reset TV password. Factory password is "0000". To reset your password:
Press the ⏻ button on the remote control.
Reset Password
• Select the ALL SETTINGS icon, then System > Safety
- Press CH ▲, CH ▲, CH ▼ and CH ▲ on the remote control, and the master password window will appear.
- Enter "0313" and press Enter. The password is now reset.
LG Account
Setup an account to use the services.
Additional Settings
See below.
Notifications
- Check alarm messages about the user settings or TV status.
Home Settings
Option
Description
Home Auto Launch
Set Home to launch automatically when TV is turned on.
Home Promotion
Turn advertisements on the Home screen on/off.
Standby Light
- Turn standby light on/off.
Pointer Options
- Adjust remote's cursor speed and appearance.
Advertisement
- Turn on and the TV will help in limiting the number of times the same ad is played (some countries may not support this setting.)
Settings Help
- Turn settings help on/off.
Set ID
- Set the TV Device ID (1-99).
Reset To Initial Settings
- Reset to factory default settings.
Support!
To access support settings, navigate from ⏻ > Ⓞ BUTTON > Support
Option
Description
Software Update
Check for system software updates and update if desired.
User Guide
View User Guide and enter submenu.
Privacy & Terms
View Privacy and Terms conditions.
High Dynamic Range (HDR)
About the HDR feature
High Dynamic Range (HDR) is a picture feature on your TV that attempts to mimic the way visuals are perceived in real life by the human eye.
By using this feature, the TV can reproduce greater dynamic range of luminosity by capturing and then combining several different exposures.
HDR promises better picture quality thanks to brighter, more realistic highlights, more realistic colour and other improvements.
It delivers the look that the filmmakers intended to achieve, showing the hidden areas of dark shadows and sunlight with full clarity, colour and detail.
HDR on your TV
HDR is supported in HDMI and USB input sources.
Note: this option is only available if the input signal supports HDR.
Smart TV
Before you start using apps, your TV must be connected to the internet.
The speed of your internet connection determines the quality of your audio/video experience when you watch streaming content.
Accessing internet content may count towards your download limit and may incur fees from third parties such as your internet service provider (ISP).

Services Country
If you don't set the country automatically, you can set manually. You must set the country manually when not connected to a network. The TV will recommend and display the applications for the selected country.
Function
Remote Button
Display the Home/App screen

Select different Apps

Open your desired App
◎ BUTTON
NETFLIX
Netflix is a streaming service that offers unlimited viewing of a wide variety of award-winning TV shows, movies and documentaries.
A paid subscription is required.
This TV can play Netflix content in HD resolution, however the playback resolution may vary depending on your subscription level and your network speed.
Streaming Netflix content will count towards the data usage of your broadband plan.
Web Browser
Using the web browser, you can surf the Internet on the TV similar to how you would do on a PC. NOTE: Use a wired or wireless keyboard and mouse (not provided) for an easier web browsing experience.
From the Home page, select a recommended or bookmarked site and press the Ⓒ BUTTON to visit the site.
You can enter the web address using the on-screen keyboard, remote keyboard or connected wireless keyboard.
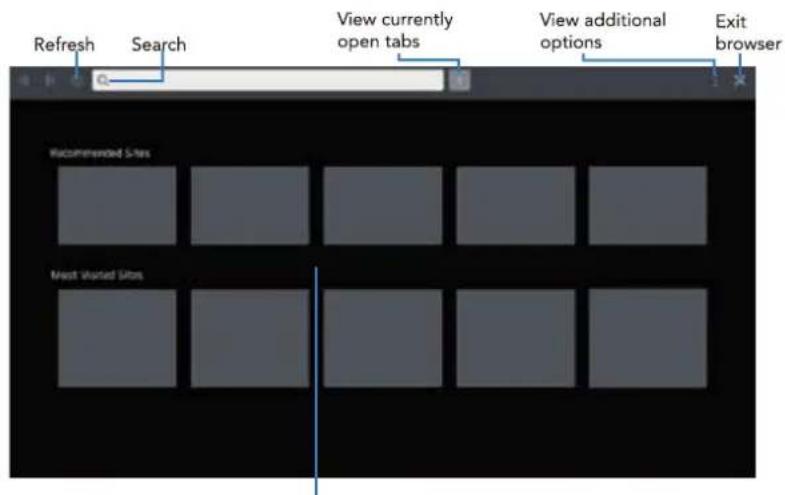
View recommended and most visited sites.
Select the 'Settings' icon to access the browser menu settings.
Press EXIT to exit the web browser.
On-screen keyboard
Use ▲/▼/◄/► buttons and press the Ⓞ BUTTON button to enter the character.
BLUETOOTH AUDIO OUT TO COMPATIBLE DEVICES
Bluetooth Device
The TV has built-in Bluetooth to stream audio to compatible Bluetooth devices.
- Go to the Bluetooth menu on your TV.
- On the list of available devices, select your desired Bluetooth audio device and select pair.
• Audio from the TV will now be streamed to the selected Bluetooth device.
Mobile Device
Listen to your TV's sound through the mobile device registered on the LG ThinQ app.
• Run the ThinQ app on your mobile device.
- Enable sharing between the TV and your mobile device.
• Sound out will be changed to your mobile device's speaker.
Bluetooth®
The Bluetooth ® word mark and logos are registered trademarks owned by Bluetooth SIG, Inc., and any use of such marks by Hands (IP) Holdings Pty Ltd is under license. Other trademarks and trade names are those of their respective owners.
TV Guide
TV Guide Functions
| Function | Remote Button |
| Switch between TV Guide/ Channel List/Schedule List | ◀/▶ |
| View program information, schedule for reminder. Press and hold to search this TV program's related content | ◎ BUTTON |
| Exit TV Guide menu | EXIT |
Using the TV Scheduler
- Press the —/ LIST button on the remote, and select "TV Scheduler" on the TV screen.
• : set new reminder.
• : display the scheduler options and delete the schedulers.
USB Mode


Set up
Insert your USB into a USB port on the TV.
Press the 🔒 button to select 'USB' mode.
Function Remote Button
Choose a Source or File

Choose media categories
Options: All/Photo/Video/Music

Start playing your media

Display more settings during media file playback

Return to previous screen
BACK
Exit media mode
EXIT

You can only play Photos in the Photo category, and Music in the Music category. Make sure you select the correct category for the file you wish to play.
Troubleshooting
If you experience problems with your TV, check below for advice. If you don't find a solution here, contact After Sales Support on 1300 002 534
| Problem | Solution |
| The remote control does not work | Make sure that the batteries are installed with their poles (+/−) in the correct direction.Remove any obstacles between the remote control and remote control sensor on the TV.Check if the power indicator at the bottom of the TV blinks when you press the remote's power button.If it does not, replace the remote control's batteries.Try pointing the remote directly at the remote control sensor from 1.5-1.8m away. |
| The TV won't turn on | Make sure that the AC power cord is securely plugged into the wall outlet.Check the wall outlet is turned on and the power indicator at the bottom of the TV is lit.If using a multi-outlet, check if it is working properly. To check whether a power strip is working properly, plug the TV's power plug directly to a wall outlet and observe its operation.Try to power on using the power button on the TV. |
| There is no picture/sound or distorted picture/sound in DTV mode | Ensure the antenna cable is securely connected to the TV and to the wall outlet.Ensure the input source is set to DTV.If "No Signal" is displayed, run Menu > General > Programmes > Programme Tuning > Auto TuningIf some channels are missing, run Menu > General > Programmes > Programme Tuning > Manual TuningTry a different antenna cable or another TV if possible.Move the TV away from electronic equipment or devices that could cause interference.Adjust the antenna position.If the picture appears fuzzy or blurry, select High Definition (HD) channels or programs. |
36 | TROUBLESHOOTING
| Problem | Solution |
| There is no picture/sound or distorted picture/sound from an external device | Ensure that connection to the device is correct and that all cables are fully inserted.Remove and reconnect all cables connected to the TV and the external devices. Try new cables if possible.Restart the connected devices by unplugging each device's power cord and then plugging it in again.If "No Signal" is displayed on the TV, ensure that the correct input source has been selected. |
| There is no/distorted sound | Ensure the volume is not muted. If it is, press the VOL+ button to restore the sound.If earphones are connected, unplug them.Ensure that connection to the external audio device is correct and that all cables are fully inserted.Ensure correct input source and audio settings have been selected on the external audio device.Move the TV away from electronic equipment or devices that could cause interference.When using an external audio device via a HDMI cable, ensure that the device supports HDMI-ARC and, if applicable, the ARC setting is turned On (refer to the connection guide in the user manual of the connected device).When using an external audio device via an optical cable, check that the Menu > Sound > Sound Out > Use Wired Speaker > Select Optical Out Device and then Menu > Sound > Advanced Settings > Digital Sound Output is set to PCM. |
| The smart apps are not working properly | Ensure the TV is connected to the Internet.Ensure the TV has a high-speed internet connection to get the best-streaming picture resolution.An unstable internet connection may cause delays or interruptions. In addition, applications may terminate automatically depending on the network environment. If this occurs, check your internet connection and try again. |
| There is no/intermittent internet | When using Wi-Fi, make sure the Wi-Fi password is entered correctly.Turn off the access point. Wait for 2 minutes and then turn them back on.Ensure that there are no obstacles between the TV and the access point. (The Wi-Fi strength can be decreased by appliances, cordless phones, stone walls/fireplaces, etc.) Reduce interference by not using or turning off other wireless devices.If the Wi-Fi connection fails, connect the TV to the access point via a LAN cable. If the TV can connect via the wired connection, there might be a problem with the Wi-Fi access point. In this case, try using a different access point.When using a LAN cable, use one rated CAT 5 or higher. Make sure it is plugged in at both ends.When using a static IP, ensure network addresses are entered correctly.If the problem persists, contact your Internet Service Provider or modem manufacturer. |
| USB storage device is not recognised or media files don't play properly | This TV has been tested with the majority of Flash memory-based devices and hard disks (media players with HDD) on the market however, it may not be compatible with certain devices.If the external hard drive has its own power adaptor, use it.Only use a USB storage device formatted in a FAT32 file system provided with the Windows operating system. If it is formatted by a different utility program that is not supported by Windows, it may not be recognised.The TV may not be able to recognise a USB device or read the files if it is connected with a USB extension cable.The files that use an unsupported codec or container will not play on the TV.Some files may not play correctly if there is an error in the content or container.Certain files, depending on how they are encoded, may not play on the TV. |
SPECIFICATIONS
| Active screen size (diagonal) | 60cm | |
| Resolution | 1366 x 768 | |
| Refresh rate | 60Hz | |
| Aspect ratio | 16:9 | |
| Multimedia playback formats (USB mode) | Music | MP3, WAV, FLAC |
| Photo | JPG, BMP, PNG | |
| USB output | DC 5V 500mA | |
| Power source | AC 100-240V, 50/60HzDC 12V, 4A | |
| Power consumption | Max. 48W | |
| Dimensions (W x D x H) | With stand: 550 x 169 x 362 mm | |
| Without stand: 550 x 75 x 327 mm | ||
| Weight | Net | 2.4 kg |
| Gross | 3.5 kg | |
For Technical and Warranty Support
1300 002 534
tempo.org/support
Distributed by Tempo (Aust) Pty Ltd,
PO Box 132, Frenchs Forest NSW 1640
COMPLIANCE AND RESPONSIBLE DISPOSAL

Packaging
The packaging of your product has been selected from environmentally friendly materials and can usually be recycled. Please ensure these are disposed of correctly. Plastic wrapping can be a suffocation hazard for babies and young children, please ensure all packaging materials are out of reach and are safely disposed of. Please recycle these materials rather than throwing them away.

Product
At the end of its working life, do not throw this product out with your household rubbish.
An environmentally friendly method of disposal will ensure that valuable raw materials can be recycled. Electrical and electronic items contain materials and substances which, if handled or disposed of incorrectly, could potentially be hazardous to the environment and human health.


National Television and Computer Recycling Scheme
The careful disposal of e-waste is important because many televisions and computers contain materials which are hazardous to people and the environment. There are no fees for householders or small businesses disposing of e-waste at a scheme collection service.
Individuals can contact their local council for information on local e-waste management services, find scheme services listed on Planet Ark's website at www.recyclingnearyou.com.au, or call Planet Ark on 1300 733 712.
Compliance
This product complies with the Australian Safety Standard AS/NZS 62368.1 to ensure the safety of the product.

BAUHN®
Warranty Information
The product is guaranteed to be free from defects in workmanship and parts for a period of 12 months from the date of purchase. Defects that occur within this warranty period, under normal use and care, will be repaired, replaced or refunded at our discretion, solely at our option with no charge for parts and labour. The benefits conferred by this warranty are in addition to all rights and remedies in respect of the product that the consumer has under the Competition and Consumer Act 2010 and similar state and territory laws.
Our goods come with guarantees that cannot be excluded under the Australian Consumer Law. You are entitled to a replacement or refund for a major failure and to compensation for any other reasonably foreseeable loss or damage. You are also entitled to have the goods repaired or replaced if the goods fail to be of acceptable quality and the failure does not amount to a major failure.

BAUHN®
Repair and Refurbished Goods or Parts Notice
Unfortunately, sometimes faulty products are manufactured, which need to be returned to the supplier for repair.
Please be aware that if your product is capable of retaining user-generated data (such as files stored on a computer hard drive, telephone numbers stored on a mobile telephone, songs stored on a portable media player, games saved on a games console or files stored on a USB memory stick) during the process of repair, some or all of your stored data may be lost. We recommend you save this data elsewhere prior to sending the product for repair.
You should also be aware that rather than repairing goods, we may replace them with refurbished goods of the same type or use refurbished parts in the repair process.
Please be assured though, refurbished parts or replacements are only used where they meet ALDI's stringent quality specifications.
If at any time you feel your repair is being handled unsatisfactorily, you may escalate your complaint. Please telephone us on 1300 002 534 or write to us at:
Tempo (Aust) Pty Ltd ABN 70 106 100 252
PO Box 132, Frenchs Forest, NSW 1640
Telephone: 1300 002 534 (Aust) Fax: (02) 8977 3765
Tempo Help Desk: 1300 002 534 (Aust)
(Operating Hours: Mon-Fri 8:30am-6pm; Sat 9am-6pm AEST)
Email: tempo.org/support
NOTES
Online support
Visit bauhn.com.au for software updates to keep your TV up-to-date, as well as the latest User Manual for information on the updated features.
Warranty returns
Should you for any reason need to return this product for a warranty claim, make sure to include all accessories with the product.
Product does not work?
If you encounter problems with this product, or if it fails to perform to your expectations, please contact our After Sales Support Centre on 1300 002 534.

ALDI guarantees that our products are developed to our stringent quality specifications. If you are not entirely satisfied with this product, please return it to your nearest ALDI store within 60 days from the date of purchase for a full refund or replacement, or take advantage of our after sales support by calling the supplier's Customer Service Hotline.



- WELCOME
- CONTENTS
- UNPACK AND PREPARE
- WHAT'S IN THE BOX
- IMPORTANT TIPS
- ATTACHING THE STAND
- WALL-MOUNTING THE TV
- REQUIRED
- CONNECT YOUR ANTENNA
- CONTROLS AND CONNECTIONS
- REMOTE CONTROL
- SETUP
- PRECAUTIONS WHEN USING BATTERIES
- USING THE REMOTE CONTROL
- REMOTE HINTS AND TIPS
- BUTTONS ON THE REMOTE
- ON-SCREEN SET UP
- FIRST TIME SETUP MENU
- INTERNET CONNECTION
- LG THINQ APP
- ADVANCED CONTROLS (TV SETTING MENUS)
- PICTURE
- PICTURE MODE
- ASPECT RATIO SETTINGS
- SOUND
- SOUND OUT
- GENERAL
- GAME OPTIMISER
- NETWORK
- WIRED CONNECTION (ETHERNET)
- WI-FI CONNECTION
- SYSTEM
- RESET PASSWORD
- LG ACCOUNT
- ADDITIONAL SETTINGS
- NOTIFICATIONS
- HOME SETTINGS
- STANDBY LIGHT
- ADVERTISEMENT
- SETTINGS HELP
- SET ID
- RESET TO INITIAL SETTINGS
- SUPPORT
- HIGH DYNAMIC RANGE (HDR)
- ABOUT THE HDR FEATURE
- HDR ON YOUR TV
- SMART TV
- NETFLIX
- WEB BROWSER
- BLUETOOTH AUDIO OUT TO COMPATIBLE DEVICES
- BLUETOOTH DEVICE
- MOBILE DEVICE
- BLUETOOTH®
- TV GUIDE
- USING THE TV SCHEDULER
- USB MODE
- SET UP
- TROUBLESHOOTING
- SPECIFICATIONS
- COMPLIANCE AND RESPONSIBLE DISPOSAL
- PACKAGING
- PRODUCT
- NATIONAL TELEVISION AND COMPUTER RECYCLING SCHEME
- COMPLIANCE
- BAUHN®
- WARRANTY INFORMATION
- REPAIR AND REFURBISHED GOODS OR PARTS NOTICE
- ONLINE SUPPORT
- WARRANTY RETURNS
- PRODUCT DOES NOT WORK
Brand : Bauhn
Model : ATV24HDW-0224
Category : Television