VRN-DD7HB - Uncategorized Soundstream - Free user manual and instructions
Find the device manual for free VRN-DD7HB Soundstream in PDF.


| Product Type | 2 DIN In-Dash Multimedia Receiver with Dual Displays |
| Model | VRN-DD7HB |
| Brand | Soundstream |
| Display Size (Top Panel) | 7" TFT LCD |
| Display Size (Bottom Panel) | 6.95" TFT LCD |
| Resolution | 800 x 480 pixels |
| Aspect Ratio | 4:3 / 16:9 selectable |
| Brightness | 460 cd/m² |
| Contrast Ratio | 500:1 |
| Dimensions (W x D x H) | 178 x 170 x 100 mm |
| Weight | 1.5 kg |
| Power Supply | 11-16V DC, negative ground |
| Current Consumption | Max 10 A |
| Max Power Output | 4 x 50W (max) |
| Compatible Disc Formats | DVD, VCD, CD, MP3, MP4, JPEG, CD-R/RW, DVD±R/±RW |
| Radio Bands | FM (18 presets), AM (12 presets) |
| Bluetooth | Hands-free calling, A2DP music streaming |
| GPS Navigation | Built-in (requires SD card with maps) |
| USB Interface | USB 2.0, supports MP3, WMA, MPEG1/2, AVI |
| Audio Inputs | AUX (front), AV-IN (rear) |
| Video Outputs | 2 RCA outputs (V-OUT1, V-OUT2) |
| Rear View Camera Input | Yes, automatic activation when reversing |
| Equalizer | Presets: USER, JAZZ, CLASSIC, POP, ROCK, BEAT, FLAT |
| Safety Feature | Video playback blocked unless parking brake engaged |
| Remote Control | IR remote included |
| Microphone | Built-in for Bluetooth calls |
Frequently Asked Questions - VRN-DD7HB Soundstream
User questions about VRN-DD7HB Soundstream
0 question about this device. Answer the ones you know or ask your own.
Ask a new question about this device
Download the instructions for your Uncategorized in PDF format for free! Find your manual VRN-DD7HB - Soundstream and take your electronic device back in hand. On this page are published all the documents necessary for the use of your device. VRN-DD7HB by Soundstream.
USER MANUAL VRN-DD7HB Soundstream
2 DIN 6.95" with 7" TFT LCD Monitor DVD/CD/MP3/MP4 Player AM/FM Radio Support Bluetooth Support Navigation Supportt USB PhoneLink

300W 4CH

Bluetooth
GPS


natural_image
Front view of a white car silhouette (no text or symbols)WARNING!
To promote safety, certain functions are disabled unless the parking brake is on.
The Unit is designed to detect parked status and must be connected to the power supply side of the parking brake switch. Improper connection or use of his connection may violate applicable law and may result in serious injury or damage.
To avoid the risk of damage and injury and the potential violation of applicable laws, this unit is not for use with a video screen that is visible to the driver.
■ To avoid the risk of accident and the potential violation of applicable laws, the front Video image feature should never be used while the vehicle is being driven. Also, other video displays should not be in a location where it is a visible distraction to the driver. In some countries or states the viewing of images on a display inside a vehicle even by persons other than the driver may be illegal. Where such regulations apply, they must be obeyed and this unit's DVD features should not be used.
■ Please remember to wear your seat belt at all times while operating your vehicle. If you are ever in an accident, your injuries can be considerably more severe if your seat belt is not properly buckled.
■ The supplier waves any and all liability when these warnings are not followed.
OPERATION PRECAUTIONS
■ Only connect to a 12V DC battery and negative grounding.
■ Avoid placing the product in direct sunlight, in areas with high levels of dust, high temperatures (over 40°C) or high humidity (over 90%). In case of high temperatures, cool down the car interior by means of ventilation or air-conditioning.
■ Operate in well ventilated areas.
- Do not turn on or off the product in short intervals. When turning the unit off, wait for at least 10 seconds prior to turning the unit on again. Do not operate the player with scratched, bended or broken discs and when a disc is not loaded properly, do not force it into the player.
■ Do not watch video playback while driving which will cause serious danger and risks of traffic accident. It may violate the laws and regulations.(There may be exceptional case, i.e., using rear view camera and navigation system)
■ Do not install the unit where the operation for safety driving is restrained.
■ Do not disassembly the unit by yourself, if need repairing, please take the unit to the after service center.
■ Do not open and close the monitor manually, it may damage the monitor tilt system.
■ Do not touch the LCD screen by hard objects, it may damage or give scratch to the LCD screen.
■ If the back of monitor touches dashboard or air-conditioner inlet etc after open the monitor, then setup TILT level in monitor TILT menu to prevent damage from repeat touching.
■ Car parking under direct sunlight may increase the temperature inside the car and the unit may not be in proper operation, please try it again after the temperature returns to normal.
■ Do not replace the fuse on the power cable without professional guidance, using improper fuse may cause damage to the unit or even cause burn the unit.
■ Do not use irregular shaped Disk.
■ IR remote control operation may be hindered by monitor when the monitor is opened, thus please use the remote control at the similar level of remote control receiver.
■ Do not install the unit where the cooling fan is blocked.
Content
WARNING! 2
OPERATION PRECAUTIONS....2
CONTENTS ....3
ACCESSORIES....4
INSTALLATION / UN-INSTALLATION ....5
WIRING CONNECTIONS 5
PANEL....7
REMOTE CONTROL....8
MAIN MENU....9
•RADIO PLAYER....11
- USB INTERFACE OPERATION....12
- SETTING CONTROL....13
Audio Setting....13
General Setting....13
Radio Setting....14
Display Setting....14
DVD Ratio Setting....14
Bluetooth Setting....14
System Information....14
•GPS SECTION....15
•MOBILE PHONE LINK SCETION....22
- BLUETOOTH SCETION....2 2
•AV-IN MODE....24
•R-CAMERA MODE....24
- OTHER FUNCTIONS....24
NOTES ON DISC....25
TROUBLESHOOTING....26
TROUBLESHOOTING....27
TECHNICAL SPECIFICATIONS....28
BLUETOOTH CONNECTION ATTENTION INSTRUCTIONS....29
Package contains the following accessories for installation and operation of the unit.
| (1) Washer, Spring Washer, M5 Nut 1 each |  | 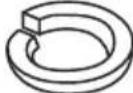 | 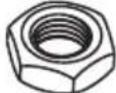 | |
| (2) Mounting Strap 1 |  | |||
| (3) Bolt 1 |  | |||
| (4) Screw 4 |  | |||
| (5) Mounting Collar 1 | 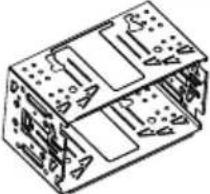 | |||
| (6) Release Key 2 |  | |||
| (7) Screw 1 | 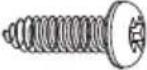 | |||
| (8) Rubber Cushion 1 |  | |||
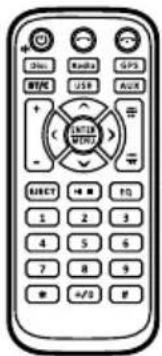
Remote Control
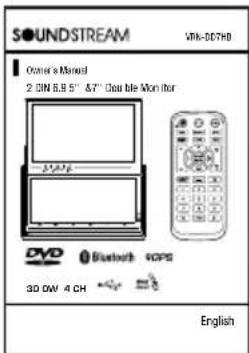
User Manual Warranty card GPS cable
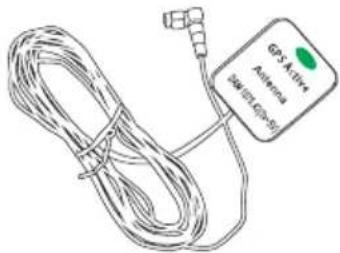
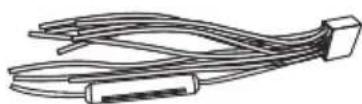
Power cable Trim ring Micro SD card (Map)
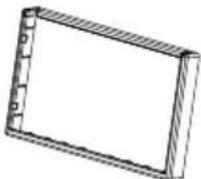
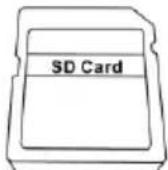
Note: Product image may vary from the actual delivery.
INSTALLATION / UN-INSTALLATION
Note
Before starting installation of the unit, make sure the wiring is connected properly.
Use only the parts provided with the unit to ensure proper installation.
The use of unauthorized parts may cause malfunction.
Install the unit where it does not get in the driver's way and will not injure the passenger in case there is a sudden stop, like an emergency stop.
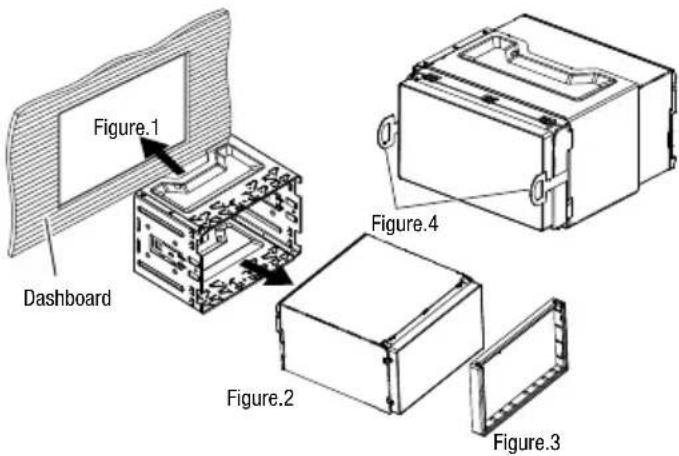
INSTALLATION (Figure 1)
■ Insert the unit into dash-board hole and fix it
■ If necessary, place the mount strap at the rear of the unit and fix it with provided washer as figure 2.
■ Push the unit into the Half Sleeve until you hear a click sound
■ Place Trim Ring over the unit and installation is completed as figure 3. (Some vehicle may not need Trim Ring).
UN-INSTALLATION
■ Insert the supplied extraction keys into the unit and pull the unit out with keeping the extraction keys. (as Figure. 4)
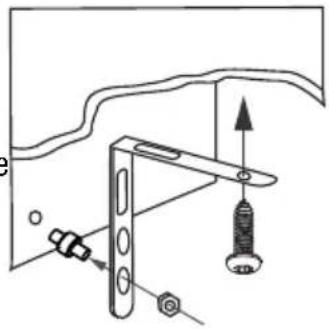
Mounting Strap
A mounting strap id often included with new stereos. For most installations, it is not necessary part of the installation process. However, It can be useful to help support the stereo in yr dash; it also helps reduce vibration. One end of mounting strap attaches (with a screw) to the rear of the stereo.
The other end attaches to an existing bolt or screw behind the dash. Just bend the shape as necessary to enable mounting.
natural_image
Technical diagram of a mechanical assembly with a screw and pin, no text or symbols presentWIRING CONNECTIONS
Make sure you have good chassis ground. A good ground connection will eliminate most electrical noise problems. A good chassis ground requires a tight connection to the vehicle's metal chassis. The area around the ground connection should be clean, bare metal without rust, paint, plastic, dust, or dirt for a good electrical connection.
Caution: Do not interchange the connection of the wiring!!!
For some car models you may need to modify wiring of the supplied power cord. Contact your authorized car dealer before installing this unit.
Using the power connector
Cut the connector; connect the colored leads of the power cord to the car battery as shown in the color code table below for speaker and power cable connections.
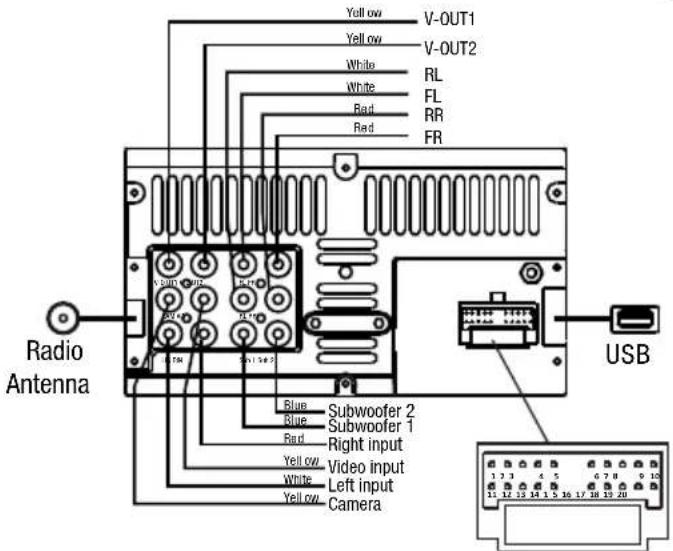
Power Connector
POWER CONNECTOR
1 FL+(White)
6 IR(Green)
11 FR+(Grey)
2 FL-(White/Black)
7 SWC 2(White/Blue)
12 FR-(Grey/Black)
3 RL+(Green)
8 SWC 1(White)
13 RR+(Purple)
4 FR-(Green/Black)
9 Camera(Brown)
14 RR-(Purple/Black)
5 ACC 12V+(Red)
15 Ground- (Black)
10 Parking Brake(Pink)
NOTE: Never connect cable to the system while it is connected to the battery power. Whenever the unit is disconnected from the battery, the preset memory will be erased and the unit will go back to its factory defaults.
When the brown cable for steering wheel control connected to the steering wheel, we can use the steering wheel to control some unit.
ASWC Connections
To use an external universal SWC module, connect only IR (Green) to the output of the module.
Note: To watch video the parking wire should be connected to break signal. 2 cables are connected to a Hands-Free device (not included).
Parking wire
Note: The parking wire is connected with brake signal; for safety, the programs can be seen on the monitor after braking the car..
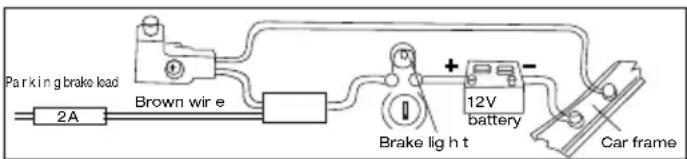
Connecting the reversing line to taillight on the car
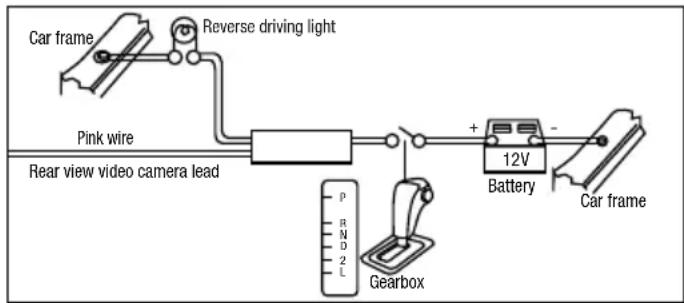
flowchart
graph LR
    A["Car frame"] --> B["Reverse driving light"]
    B --> C["Pink wire"]
    C --> D["Rear view video camera lead"]
    D --> E["+"]
    E --> F["Battery"]
    F --> G["Car frame"]
    H["Gearbox"] --> I["P R N D 2 L"]
After connecting, when you start up the reverse gear, the unit will receive the picture from car rear view camera.
Note:
■ Only use groundless loudspeakers.
■ Use only loudspeakers of minimum 40Watt, using fewer watts may result in damaging your loudspeakers at higher volumes.
■ Use 4\~8 Ω (Ohm impedance) loudspeakers only; using higher or lesser impedance may damage the unit.
■ Do not use 3-cable loudspeakers and do not connect the loudspeakers minus to the car
(GND). The unit is using a BTL circuit and each loudspeaker must be connected with insulated cables according to the diagram.
■ Loudspeaker cables and/or optional external power amplifiers must always be about 30cm away from the antenna and/or antenna extension parts.
Connect the speakers according the following diagram, incorrect connections will damage the unit or your loudspeakers
Speaker Connection
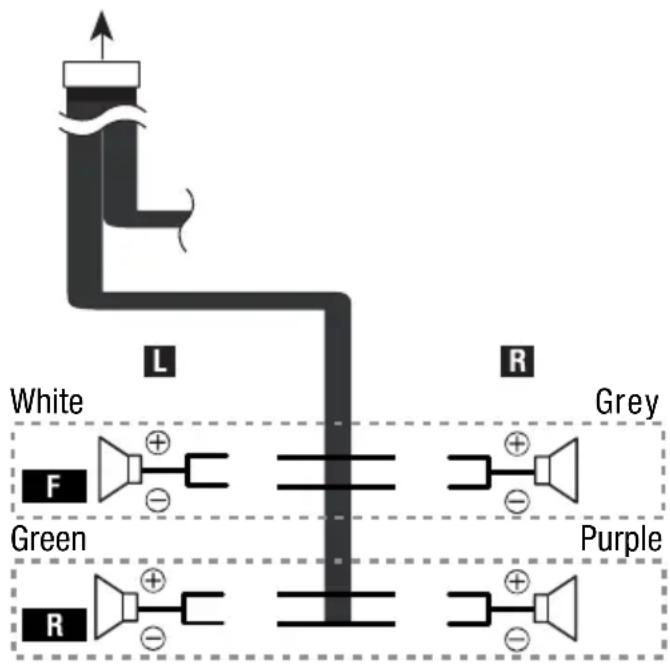
flowchart
graph TD
    A["White"] --> B["L"]
    B --> C["R"]
    C --> D["Grey"]
    D --> E["Green"]
    E --> F["Purple"]
    F --> G["R"]
    G --> H["Green"]
    style A fill:#f9f,stroke:#333
    style B fill:#ccf,stroke:#333
    style C fill:#cfc,stroke:#333
    style D fill:#fcc,stroke:#333
    style E fill:#cff,stroke:#333
    style F fill:#ffc,stroke:#333
    style G fill:#cfc,stroke:#333
    style H fill:#fcc,stroke:#333
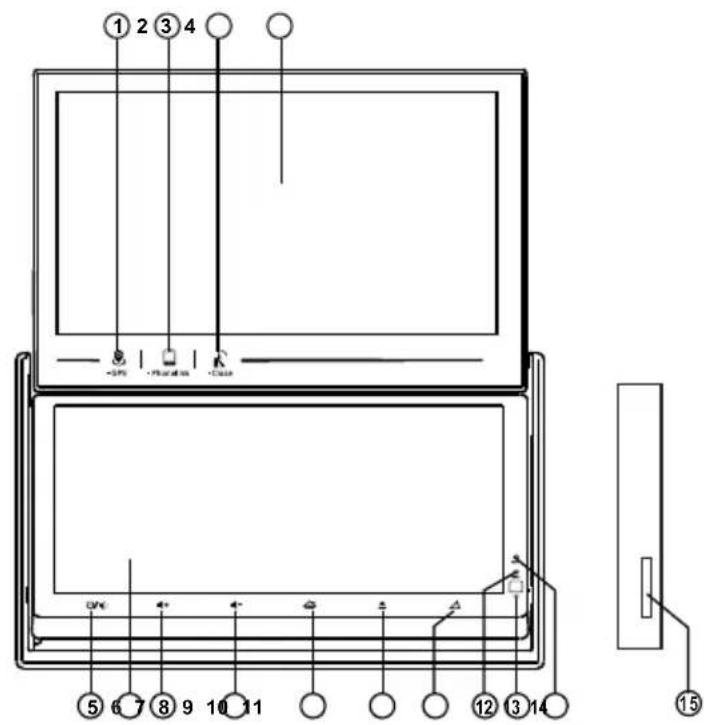
| 1 | GPS ButtonTouch this Button, go to GPS mode |
| 2 | Phone Link ButtonTouch this Button, go to Phone Link mode |
| 3 | Top Panel Close/ Adjustment ButtonCondition: Top panel openedTouch this button: Close top panelTouch and hold this button for 3 seconds:Adjust angle of top panel (Angle1 → Angle2 → Angle3 → Angle4) |
| 4 | Top PanelTop panel 7" display |
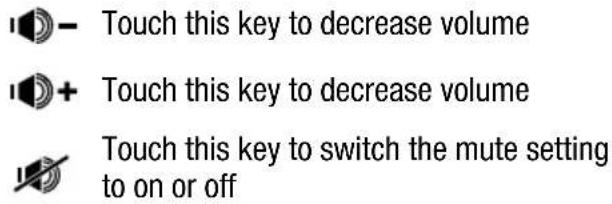
| 5 | Power Button/MuteTouch this button to turn on or mute the volume output, touch it again to resume volumeTouch and hold this button for 3 seconds to turn off the head unit |
| 6 | Bottom PanelBottom Panel 6.95" display |
| 7 | Vol-Touch this button to decrease volume |
| 8 | Vol+Press this button to increase volume |
| 9 | Home ButtonTouch this button to go back to main menu of bottom panel |
| 10 | Eject ButtonTouch this button to eject a disc. If the disc is not removed for about 10 seconds after eject, the disc is reinserted automatically. |
| 11 | Panel Open/ Adjustment ButtonCondition: top panel closed.Touch this button: Open top panelTouch and hold this button for 3 seconds:Adjust angle of bottom panel (Angle1 → Angle2 → Angle3 → Angle4 → Angle5 → Angle6)Condition: Top panel openedTouch this button: No FunctionTouch and hold this button for 3 seconds:Adjust angle of bottom panel (Angle3 → Angle4 → Angle5 → Angle6) |
| 12 | Reset ButtonPress it with a thin, sharp object. The unit will then be reset to factory default settings. |
| 13 | IR Sensor of RemoteIR remote control signal receiving window. Max distance is 6-8 meters, 45 degree angle. |
| 14 | MicBuild in Microphone for Bluetooth phone calling. |
| 15 | Micro SD Card SlotMicro SD card slot for GPS map. |
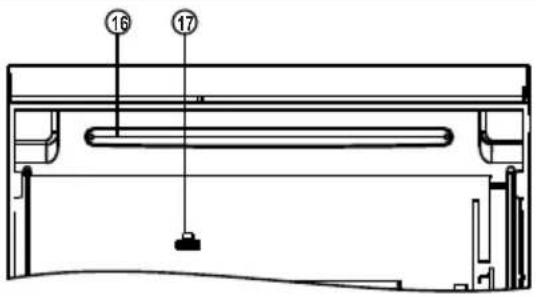 | |
| 16 | Disc SlotInsert & Eject disc |
| 17 | Reset ButtonReset the Unit. |
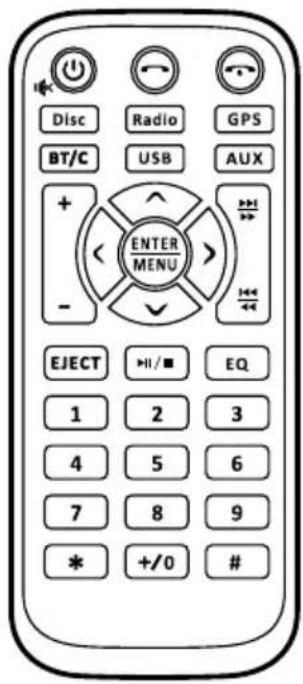
REMOTE CONTROL
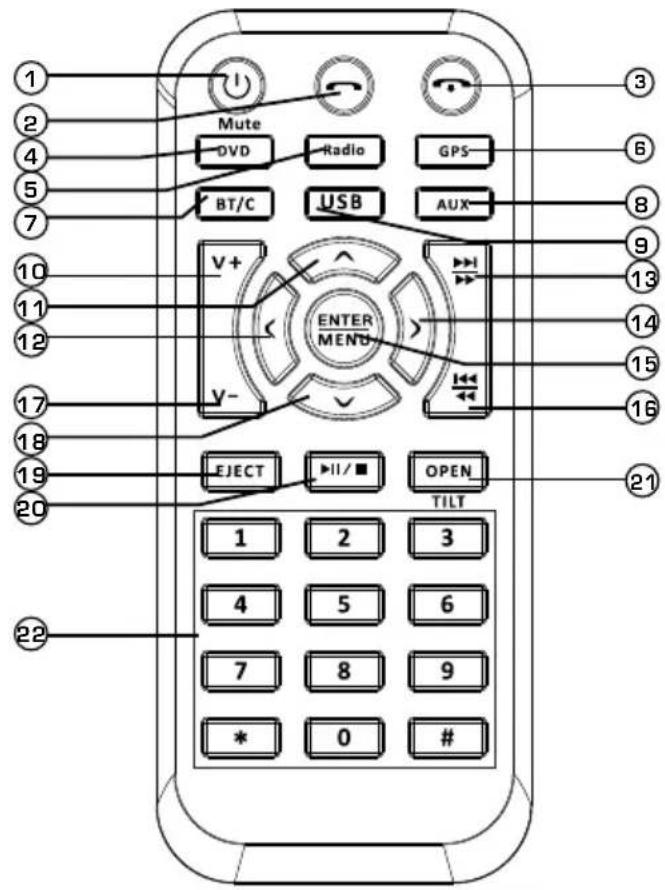
| 1 | POWER / MUTEPress and hold to power it on or off. Short press this button to mute the volume output, press it again to resume volume. |
| 2 | DIAL/ ANSWER button (Only for Bluetooth)Press to make a call after inputted a phone number or answer an incoming call. |
| 3 | REJECT / HANG UP button (Only for Bluetooth)Press to reject a coming call or hang up while calling. |
| 4 | DVD buttonPress it to DVD mode. |
| 5 | RADIO buttonPress it to Radio mode. |
| 6 | GPS buttonPress it to GPS mode.(Only for AVN model) |
| 7 | BLUETOOTH buttonPress it to Bluetooth mode. |
| 8 | AUX/AV IN buttonPress it to AUX IN or AV IN mode. |
| 9 | USBPress it to USB mode. |
| 10 | VOL+ buttonPress to increase volume level. |
| 11 | Cursor ▲buttonsUse the ▲buttons to select the menu item, the title track or to show next frame. |
| 12 | Cursor <buttonsUse the <buttons to select the menu item, The title tracks it or to show next frame. |
| 13 | ▶▶ / buttonIn DVD mode, Press ▶▶ button to skip to the next track, press and hold button for two seconds to activate fast forward(FF) in a track.In RADIO mode, press ▶to start manual searching button Frequency up. |
| 14 | Cursor >buttonsUse the >buttons to select the menu item, the title tracks it or to show next frame. |
| 15 | MENU/ENTER buttonPress it to confirm selection, Press and hold show main menu.. |
| 16 | ◀◀/ buttonIn DVD mode, Press button to skip to the previous track. Press and hold ◀◀◀button for two seconds to activate fast reverse(REW) in a track.In RADIO mode, press and hold ◀◀ start manual searching button Frequency down. |
| 17 | VOL- buttonPress to decrease volume level. |
| 18 | Cursor √buttonsUse the √ buttons to select the menu item. The title tracks it or to show next frame. |
| 19 | EJECT buttonPress it to eject the disc. |
| 20 | PLAY/PAUSE/STOP buttonIn DVD mode, press it to stop playback, press again to resume |
REMOTE CONTROL
OPEN/TILT Button Press this Button to open and close the TFT monitor. WARNING: Do not obstruct the monitor while in the opening or closing cycle, this may cause damage to the monitor mechanism and is NOT covered under warranty. Press and hold for 2 second to adjust the Monitor tilt angle: TILT ANGLE 1 => TILT ANGLE 2 => TILT ANGLE 3 => TILT ANGLE 4.
Digit 0-9 * # buttons In radio mode, select 1-6 the desired band; In DVD mode, select track. In Bluetooth mode, 0-9 * # enter the phone number or input password.
REMOVE BATTERY
Note:
■ The distance may vary according to the brightness of ambient light.
■ If the remote is not used for an extended period of time, remove the battery to prevent possible damage from battery leakage and corrosion.
■ Do not place any objects between the remote control unit and the sensor on the unit.
■ Do not drop the remote control onto the floor; it will damage it beyond repair.
■ Do not use the remote control unit, while simultaneously operating the remote control unit of any other equipment; they may interfere resulting in improper operation.
■ Dispose empty batteries in accordance with your local governmental regulations.
■ Do not short-circuit, disassemble, heat or dispose of fire or flames the battery.
- Keep the battery out of reach of children, should the battery be swallowed, immediately consult a doctor.
MAIN MENU
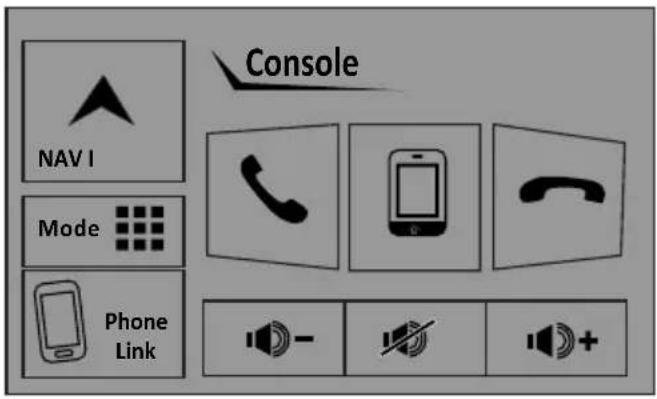
The best way to discover the program is to explore each screen in detail, and to find out how to move from one to another. Read this chapter for a guided tour. Unit starts by displaying the Main menu. This is the root of the screen hierarchy, and you can simply access all features by tapping on the touch screen buttons.
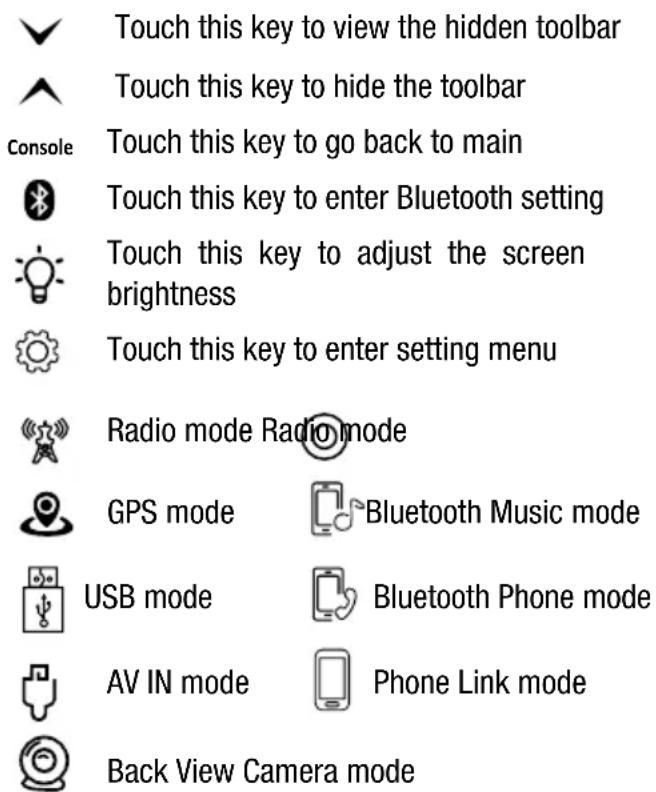
Touch the icons to enter a desired mode.
Bottom Panel
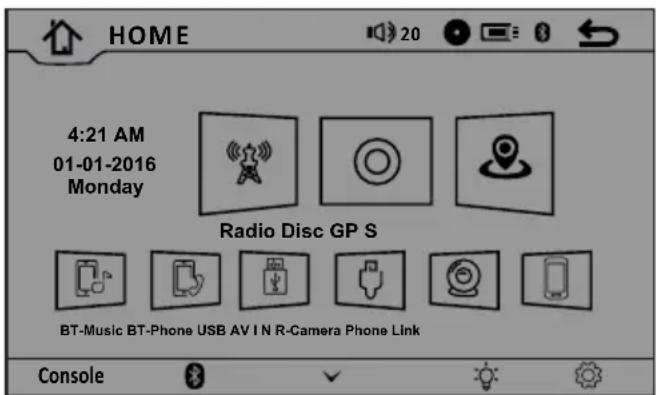
Bottom Panel

GPS mode
Touch this key to select a desired mode Mode ■■■ on bottom panel (Disc → USB → AV IN → BT-Phone → Radio)
Phone Link mode
Touch this key to answer a call

Touch this key to end / reject the call

Touch this key to transfer a call from Bluetooth mode to phone, and vice versa
NOTE: The unit can be operated under the following conditions
If top panel is open, operations of GPS mode and Phone Link mode will switch to top panel automatically.
(1) GPS mode only operates on top panel. Operations on bottom panel remain unchanged.
(2) Top panel shown either GPS mode or Phone Link mode. Operations on bottom panel remain unchanged.
(3) In USB mode, it is invalid to enter Phone Link mode, and vice versa.
(4) Phone Link mode only operates on top panel. Operations on bottom panel remain unchanged.be swallowed, immediately consult a doctor.
| Bottom Panel | |||||||||||
| Top Panel close condition | Mode R | Radio Disc | GPS | BT Music | BT Phone | USB AV | IN | R- Camera | Phone Link | ||
| √ | √ | √ | √ | √ | √ | √ | √ | ||||
| Bottom Panel | ||||||||||
| Top Panel Open condition | Mode R | Radio Disc | GPS | BT Music | BT Phone | USB AV | IN | R- Camera | Phone Link | |
| GPS | √ | √ | (1) | √ | √ | √ | √ | √ | X (2) | |
| Phone Link | √ | √ | X (2) | √ | √ | X (3) | √ | √ | (4) | |

To start Radio, tap Radio icon on main menu screen.
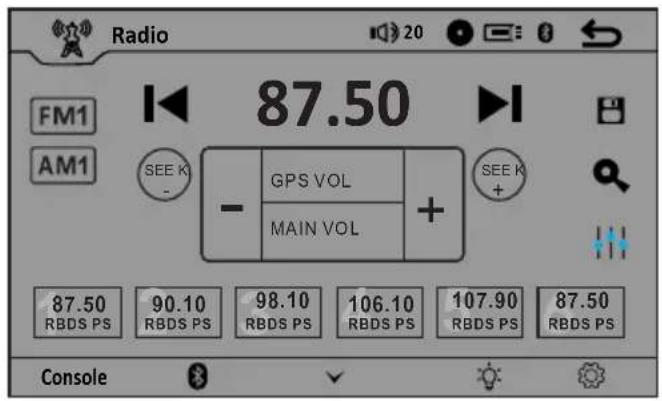

Return button

Touch this button can choose FM1, FM2, FM3

Touch this button can choose AM1, AM2

Touch this button can scan the stations from 1-6, touch and hold it to save the stations with good reception automatically and scan each station for about 5 seconds.

Touch this button to select program type

Touch this button to select station backward manually

Touch this button to select station forward manually

Touch this button to adjust the EQ, it can choose USER → JAZZ → CLASSIC → POP → ROCK → BEAT → FLAT

Touch this button to search backward stations

Touch this button to search forward stations

1-6 preset selection
Note: When a radio signal is not received, the default for ST / MO function, once received radio function au tom ati call y converted to ST

To start DVD Player, tap DVD button on main menu screen
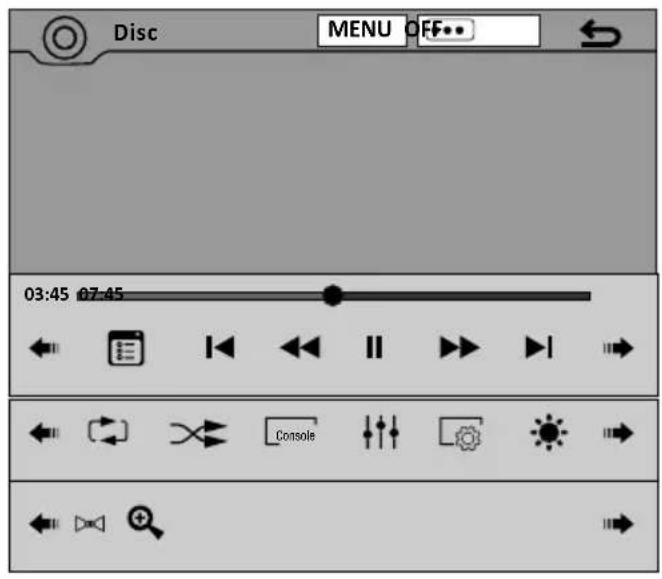

Touch it to return to DVD menu
Touch it to select Subtitle

Return button

Touch it to go to previous page or next page of control bar in DVD mode

Touch it to select previous or next track
Touch it to start fast rewind or fast forward. Press one of the keys again to change the spooling speed (FFx2 → FFx4 → FFx8 → FFx20). Press the PLAY key to regain normal playback

Pause playback. Press it again to continue playback.

Touch it to choose Repeat OFF → CHAPTER → TITLE → REP ALL

Touch it to switch Random on or off.

Touch it to go back to main menu of top panel. Operations on bottom panel remain unchanged. No function when top panel is closed.

Touch it to adjust the EQ, it can choose USER → JAZZ → CLASSIC → POP → ROCK → BEAT → FLAT

Touch it to enter DVD ratio setting

Touch it to adjust the screen brightness (1/4 2/4 3/4 4/4)

Touch it to select the Audio CH

Touch it to zoom in/out (OFF → ZOOM 2 → ZOOM 3 → ZOOM 4 → ZOOM 1/2 → ZOOM 1/3 → ZOOM 1/4
Note:
- DVD Player will automatically start playing when you insert any DVD disc.
- Warning displays if the vehicle is moving for driver's safety.
- DVD Player will not only play video, but also picture and music files as well.
File Management
DVD mode plays files in a)Disc b)USB c) Memory card

To play MP3/ MP4 files from a USB flash memory, insert a USB flash memory into the USB port on the back of the unit and then tap USB button on main menu screen.
When a USB is played, the screen will show following interface. Touch the source key you want to select; the unit will play MP3/ MP4/ JPEG files automatically.
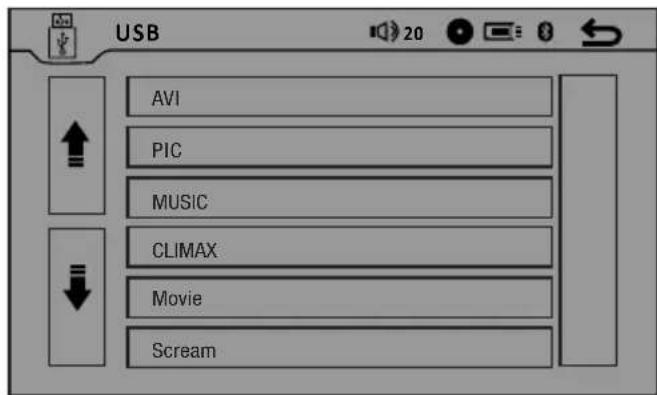

Touch to view any hidden items

Return button.
When play the picture, the UI will display as below:
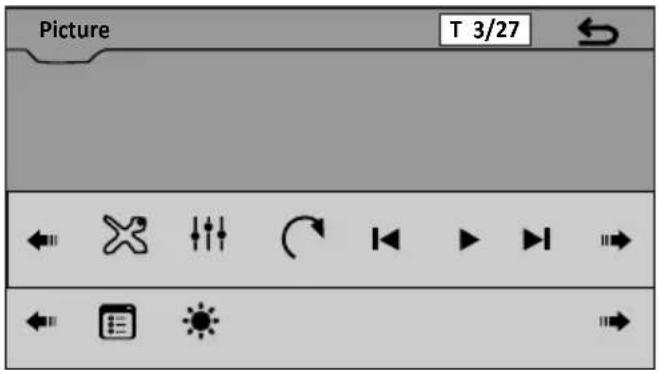
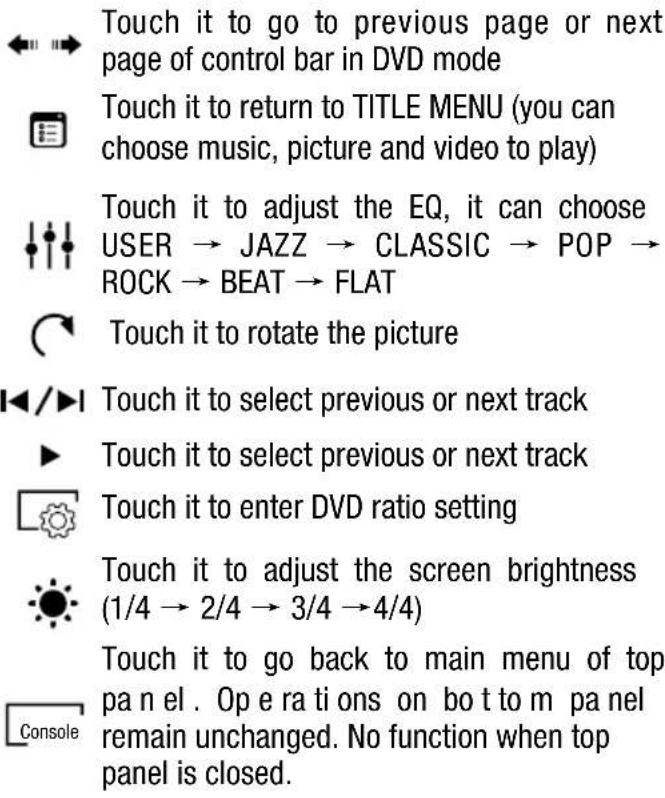
When play the music, the UI will display as below:
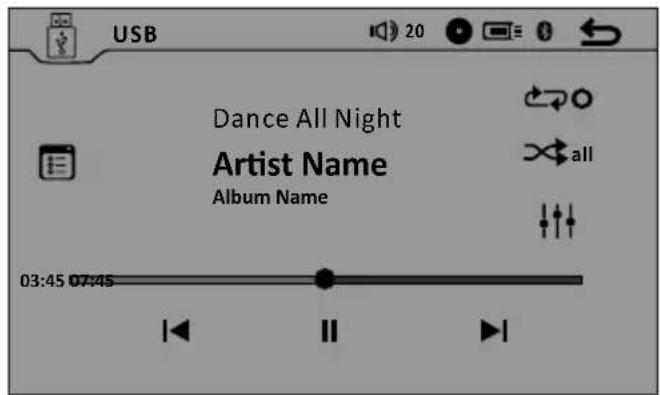
ICON Operation

Touch it to return to TITLE MENU (you can choose music, picture and video to play)

Touch it to select previous or next track

Touch it to select previous or next track

Touch it to select Repeat Off → Repeat 1 → Repeat Folder.

Touch it switch Random on or off

Touch it to adjust the EQ, it can choose USER → JAZZ → CLASSIC → POP → ROCK → BEAT → FLAT
When play the video, the UI will be display as below:
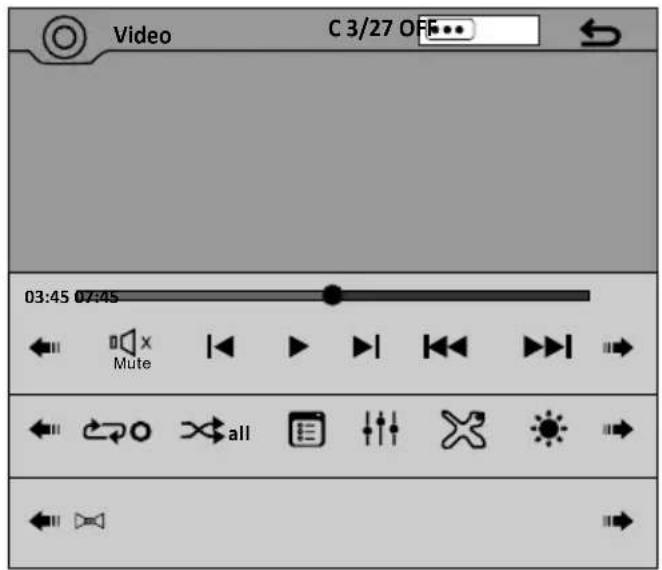
Touch it to select Subtitle

Return button.

Touch it to return to TITLE MENU (you can choose music, picture and video to play)

Touch it to select previous or next track

Touch it to start fast rewind or fast forward. Press one of the keys again to change the spooling speed (FFx2 → FFx4 → FFx8 → FFx16). Press the PLAY key to regain normal playback

Pause play back. Press it again to continue playback.

Touch it to select Repeat Off → Repeat 1 → Repeat Folder.

Touch it to switch Random on or off

Touch it to adjust the EQ, it can choose USER → JAZZ → CLASSIC → POP → ROCK → BEAT → FLAT

Touch it to enter DVD ratio setting

Touch it to adjust the screen brightness (1/4 → 2/4 → 3/4 → 4/4)

Touch it to select the Audio CH
SETTING CONTROL
Your device has default system settings. You can customize the settings to suit your personal needs. Once you change settings, your new settings will remain until you change it again.

To start SETTING, touch ▲ key to view the hidden toolbar and then tap SETUP icon to enter setting menu.
Audio Setting
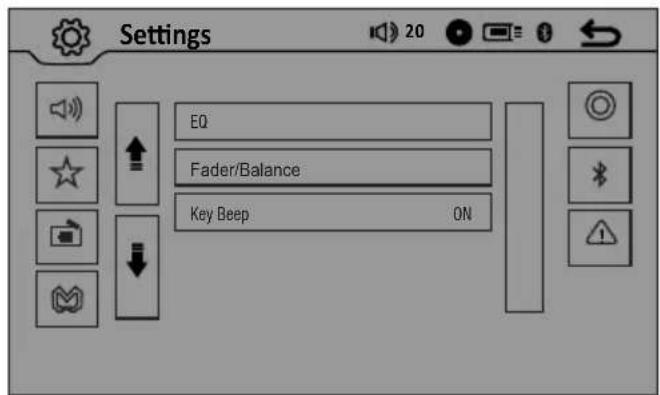
EQ: Press it to choose the EQ (USER → JAZZ → CLASSIC → POP → ROCK → BEAT → FLAT)
Fader/Balance: Press it to adjust the Fader & Balance
Key Beep: Press it to Turn on or Turn off the touch key beep sound
General Setting
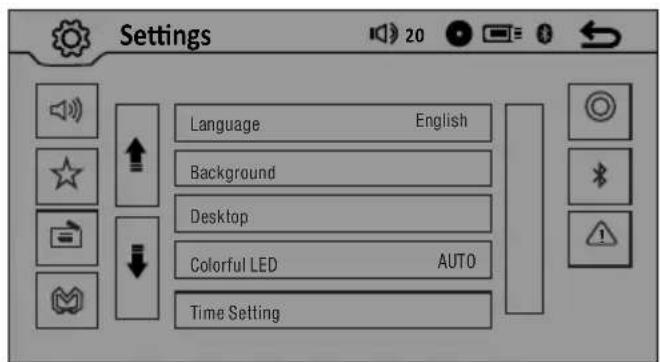
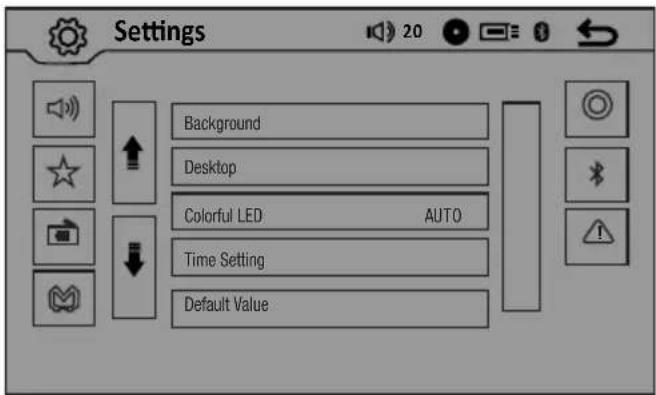
Language: Press it choose English or Español
Back g round: Press it to choose different background picture
Desktop: Press it to change the desktop design
Background: Press it to choose different background picture
Time Setting : Press it to setting the time, date, time zone
Default Value: Press it to choose the default setting
Radio Setting
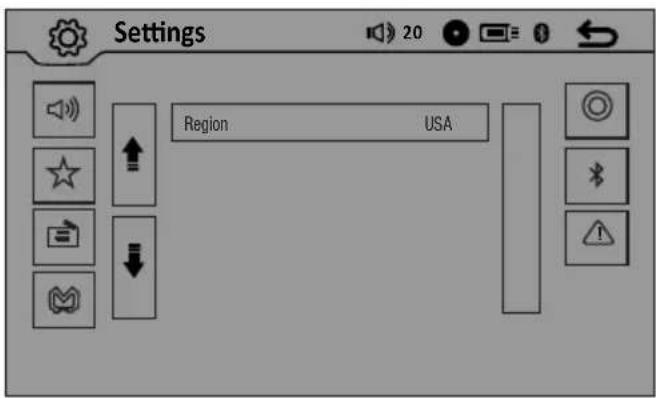
Region: Select the radio region
Display Setting
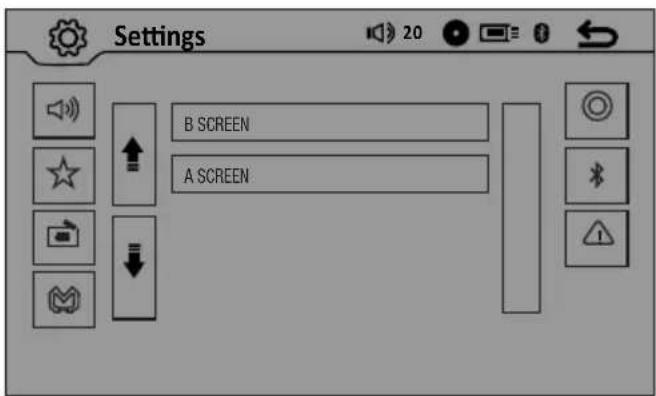
Top Panel: Adjust the color / brightness / contrast / tint display of top panel
Bottom Panel: Adjust the color / brightness / contrast / tint display of top panel
DVD Ratio Setting
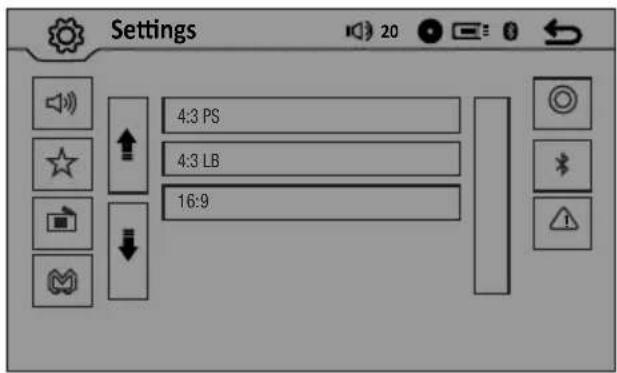
Press it to choose DVD Ratio (4:3 PS / 4:3 LB / 16:9)
Bluetooth Setting
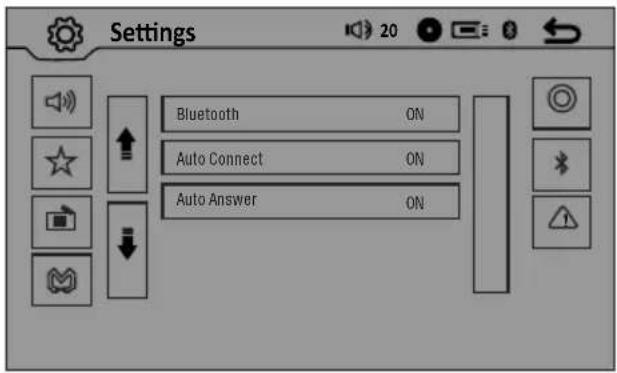
Bluetooth: Turn on or off the Bluetooth
Auto Connect: Turn on or off the Auto connect
Auto Answer: Turn on or off the Auto Answer
System Information
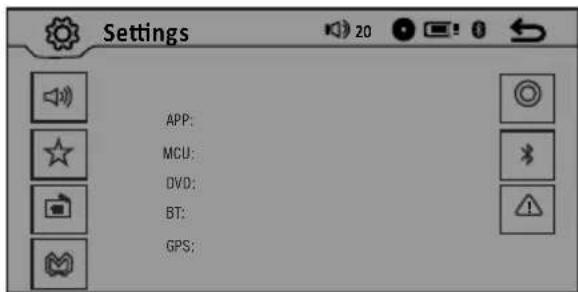
Display the system information
GPS SCETION
To start GPS mode, please insert SD card in GPS slot on the front panel. Choose Navigation path and touch the Enter icon to enter the GPS (Navi path choose only for first using). You can choose road and run GPS.
Navigation setup
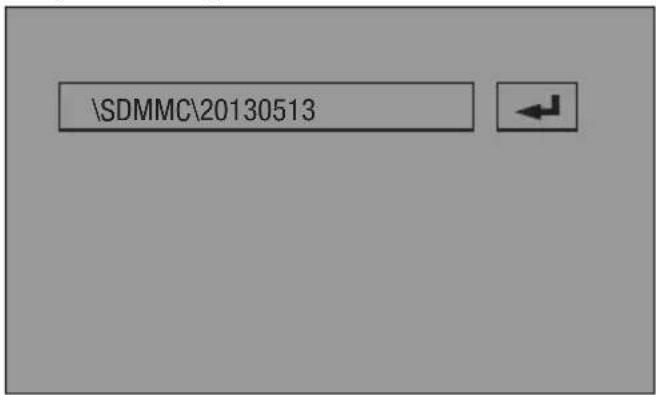
Enter to GPS
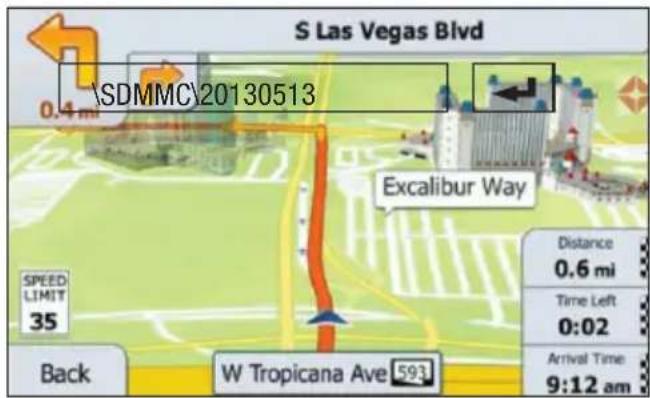
- Getting started
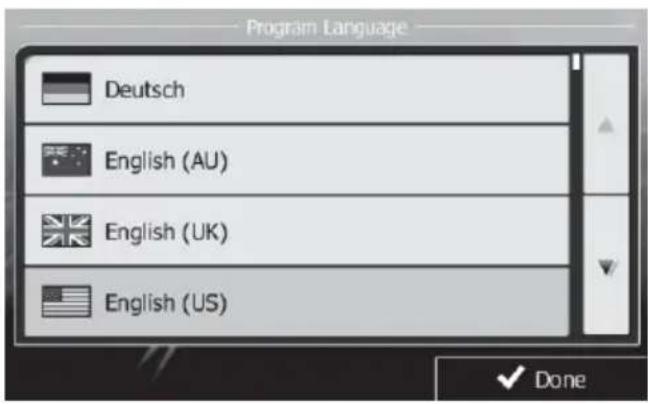
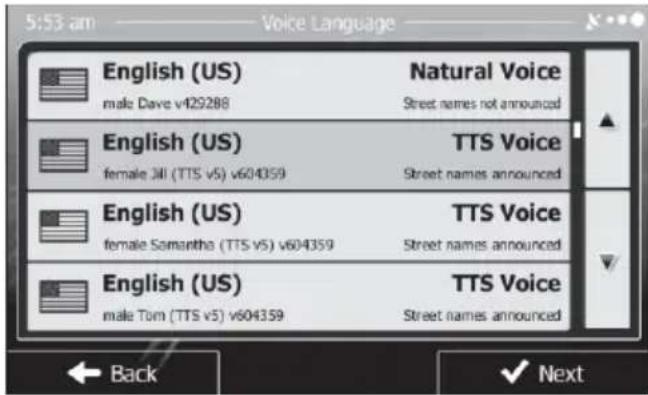
When using the navigation software for the first time, an initial setup process starts automatically. Do as follows:
Select the program language. If your preferred language does not appear on the screen, tap ▼ or ▲ drag the list up or down with your finger to view all available languages. Tap English to select your preferred language. Tap √ Done to confirm your selection, and proceed to the next page.
Read the Software and Database End User License Agreement, and tap ☑ Accept if you agree with the terms of use.
You are now asked whether you allow the software to collect usage information and GPS logs that may be used for improving the application and the quality and coverage of maps. Tap Yes to allow the anonymous statistics or disable this function.
The Configuration wizard starts. Tap √ Next to continue.
Select the voice guidance language profile. If your preferred language does not appear on the screen, scroll the list for other available profiles. Tap any item in the list for a short voice sample. Tap ☑ Next to confirm your selection, and proceed to the next page.
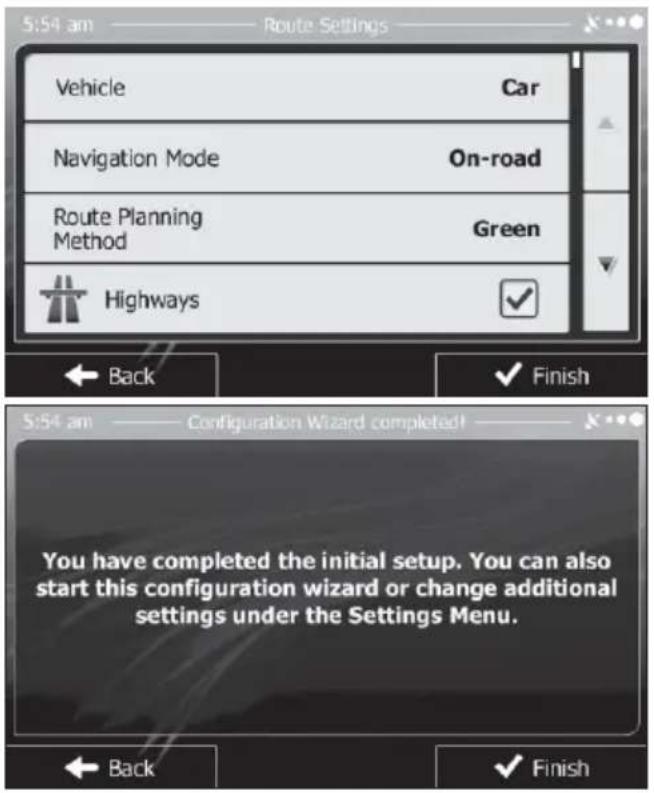
Set your preferred time format and units. Tap √ Next to confirm your preferences.
Set your preferred route planning options. Tap √ Next to confirm your preferences.
The initial setup is now complete. Tap application starts.
2. Navigation menu
Startup screen: the Navigation menu
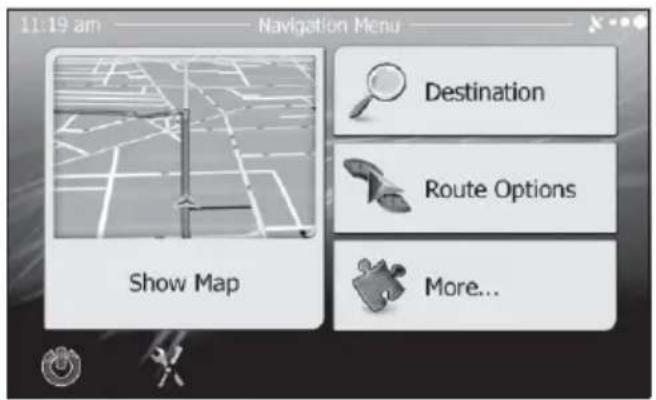
After the initial setup, and whenever the software is started, the Navigation menu appears. You have the following options:
Tap Destination to select your destination by entering an address or selecting a place of interest, a location on the map or one of your Favorite destinations. You can also look up your recent destinations from the Smart History or by entering its coordinate.
Tap Route Options to display the route parameters. You can view the route in its full length on the map. You can also perform route-related actions such as editing or canceling your route, setting a start point for the route, picking route alternatives, avoiding parts of the route, simulating navigation or adding the destination to your Favorites.
Tap More... to simulate demo routes or to run some additional applications.
Tap 📄 to customize the way the navigation software works.
Tap Show Map to start navigating on the map.
3. Destination menu
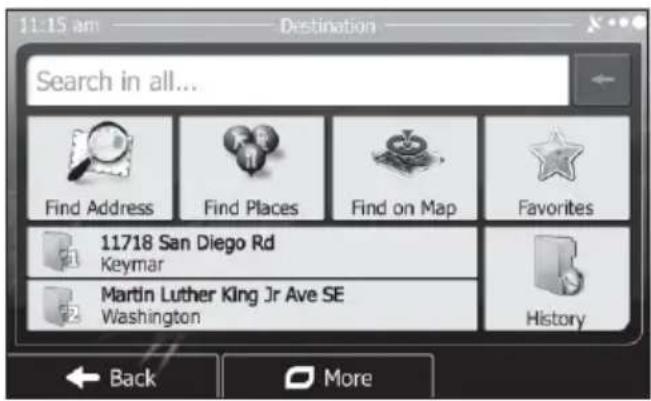
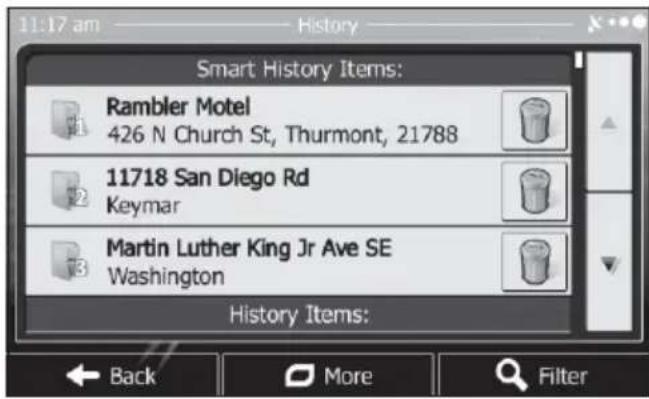
In the Navigation menu Destination. The Destination menu provides you with the following options:
Tap find Address specify an address as your destination options:
Tap find Places to select a place of interest as your destination
Tap Find on Map to navigate to a location selected on the map.
Tap Favourites to choose from the list of your favorite destinations.
Tap or to navigate to the recent destination that is shown on the button.
Tap 📄 to choose from the list of all recent destinations.
Tap More for other search methods.
4. Navigating to an address
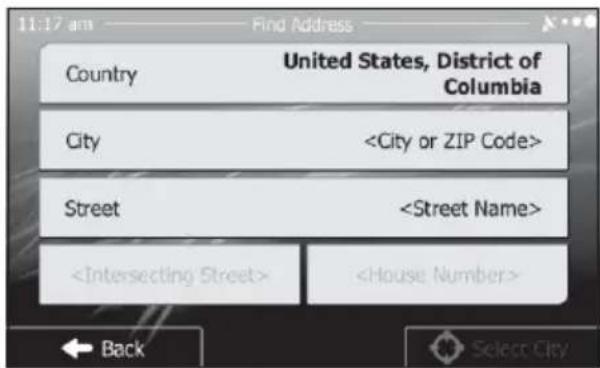
In the Navigation menu, tap Destination then
tap Find Address. In the US, the screen proposes only the country while in other countries you can see the city or town where you are located
If needed, change the country or the state. Tap the button showing the name of the country.
- Use the keyboard to enter the name of the country or the state.
- After entering a couple of characters, the list of countries and states that match the entered string appears. Together with the country, you can select the state, or select the name of the country where it stands without a state to search for an address in all its states.
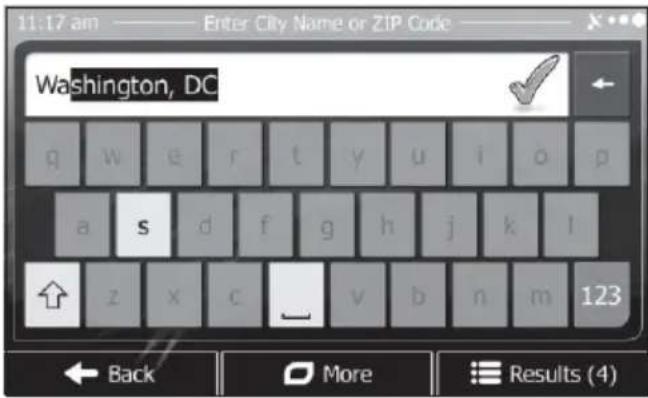
Outside the United States, the current city/town is displayed. This field is empty when you are in the US. Tap the button and use the keyboard to enter a part of the city/town name. As you enter letters, the most likely city/town name is always shown in the input field. You have the following options:
Tap ☑ to select the city/town that is offered in the input field.
Tap Results to browse the list of city/town names matching your input. Select a city/town from the list.
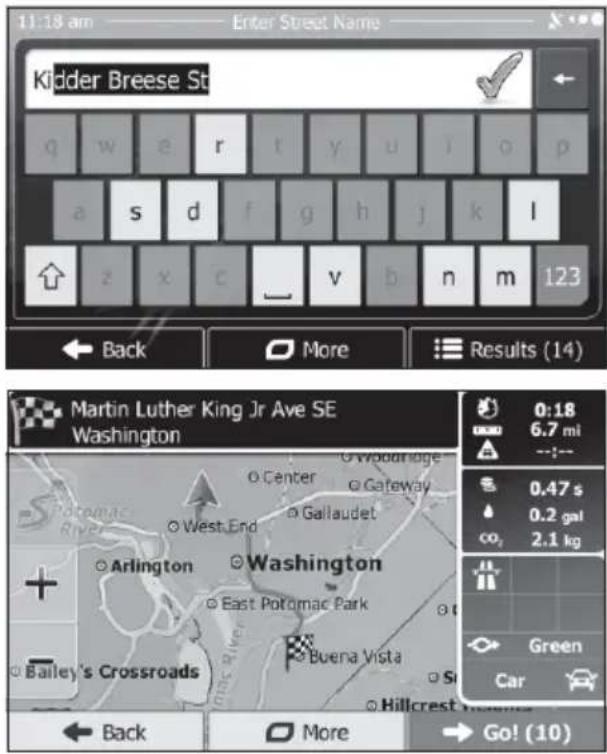
Enter the street name:
Tap
Tap to select the street that is offered in the
input field or tap 📄 Results to browse the list of all streets matching your input. Select a street from the list.
Enter the house number:
Tap
Tap √ Done to finish entering the address.
The map appears with the selected destination in the middle.
Tap Next another map location if necessary, then tap to confirm the destination.
After a short summary of the route parameters, the map appears showing the entire route. Wait for a few seconds or tap → Go! and start navigating.
5. Quick Find
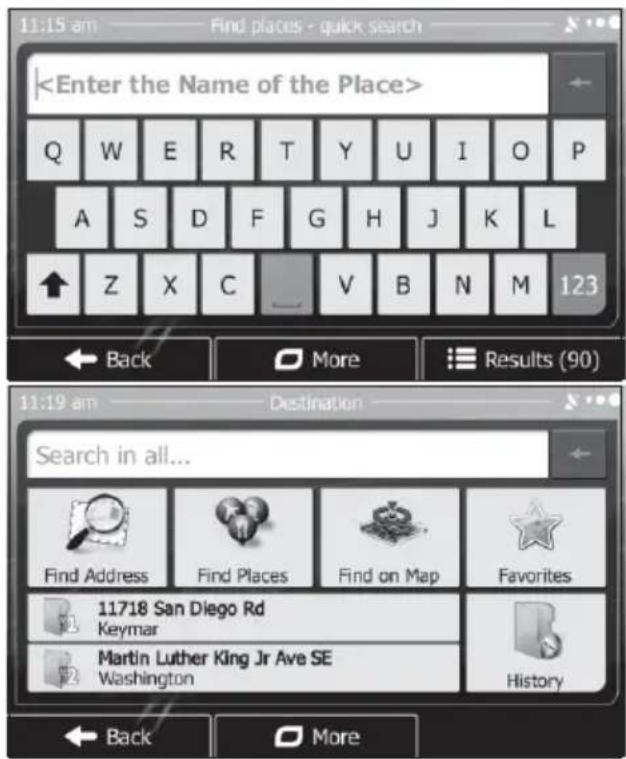
With the help of Quick Find, you can search for a location near to a known Place of Interest. Search for the Place by its name first and then find your destination on the map. Do as follows (starting from the Navigation menu):
Tap Destination Tap Search in all..
Start entering the name of the Place of Interest on the virtual keyboard. After entering some letters, tap 📄 Results , and select the Place from the list of matching place names.
Scroll down the list if necessary, highlight the desired Place and tap Select
Check the details of the Place, and then
tap Select
An overview map is displayed with the selected Place in the middle.
Browse the map, and tap the map location that you want as your destination.
Tap Select
After a short summary of the route parameters, the map appears with the selected destination in the middle. The route is automatically calculated. The red Cursor appears where you tap the map.
6. Navigating to a place of interest
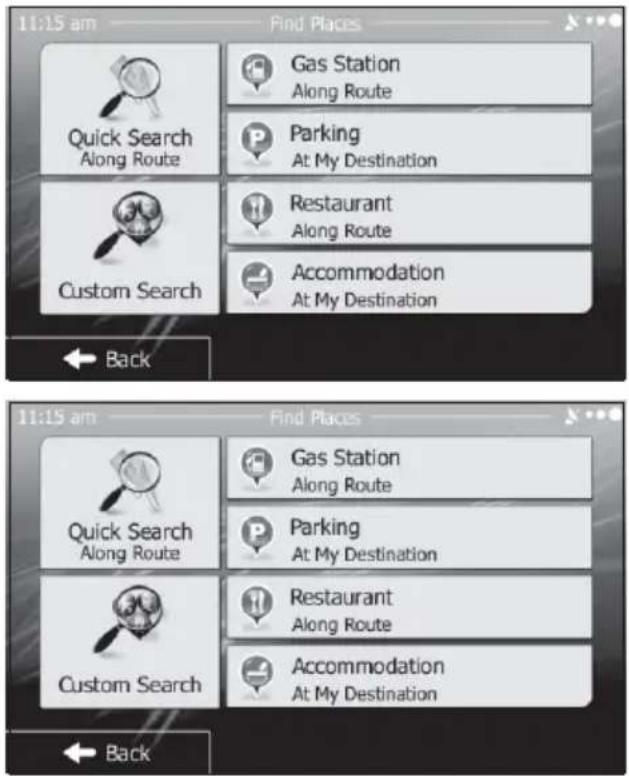
On the Map screen, tap Destination to return to the Navigation menu. In the Navigation menu,
Tap Find Places . You are offered the following preset
search categories:
Tap ☐ Project Station to get a list of gas stations along the route or if it is not available, around your current position or your last known position.
Tap Parking to get a list of parking lots near the destination or if it is not available, around your current position or your last known position.
Tap to get a list of restaurants along the route, around your current position or your last known position.
Tap Accommodation to get a list of accommodations near the destination, around your current position or your last known position.
You can also tap entering its name and search for a place by
If none of the above is appropriate, tap to Custom Search
find a place of interest at the following locations:
Tap Around Here to search around the current position or if it is not available, around the last know position
Tap In a Town to search for a place within a selected city or town.
Tap Around Destination to search for a place around the destination of the active route
Tap Along Route to search along the active route, and not around a given point.
This is useful when you search for a later stopover that results in a minimal detour only, such as searching for upcoming gas stations or restaurants.
7. An example of navigating to a place of interest
Example: To find a park around your destination, do as follows (starting from the Navigation menu):
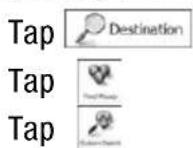
Tap
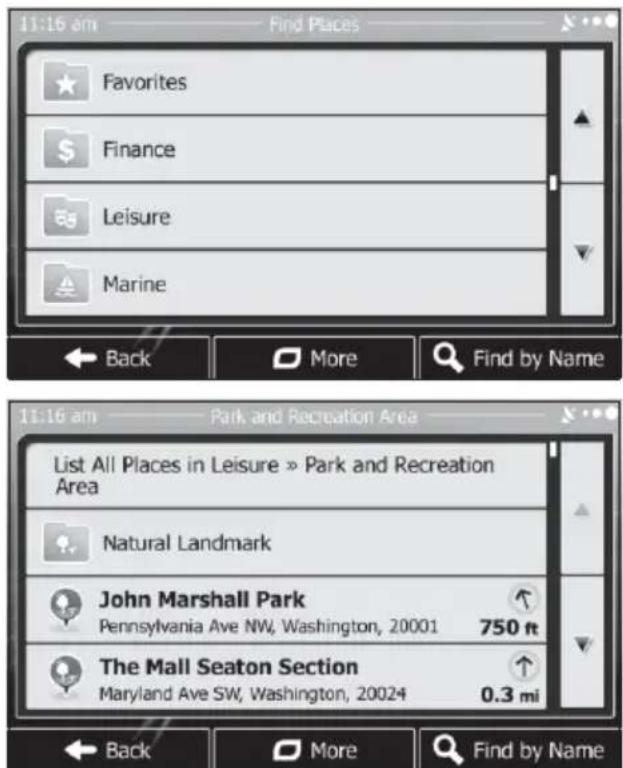
The list of place categories appears. Tap or slide your finger to browse the list, and tap
Tap List All Places to browse the whole category, or tap Park and Recreation Area to. narrow down your arch.
Tap any of the list items.
Check the details and the location of the place, and then tap → Next
After a short summary of the route parameters, the map appears showing the entire route. Wait for a few seconds or tap → Go! and start navigating.
8. The Map screen
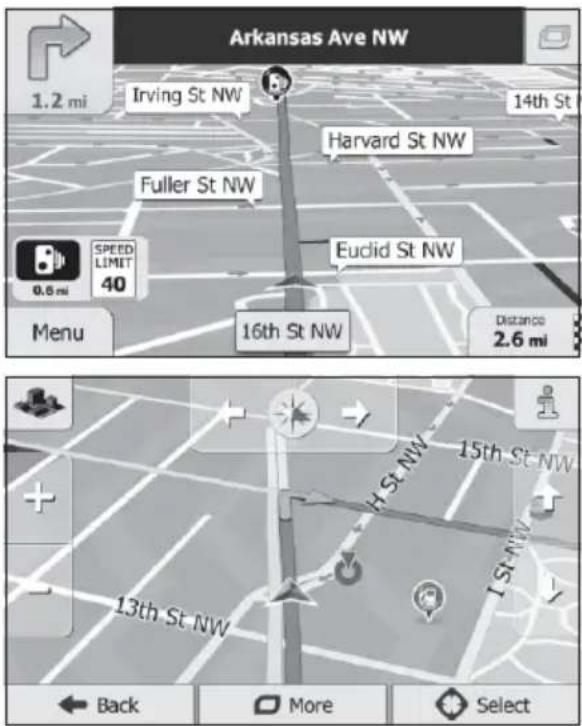
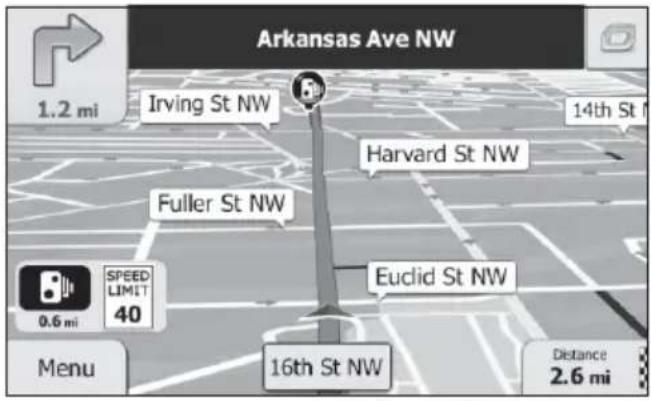
The Map screen is the most important and frequently used screen of the software. The Vehimarker (a blue arrow by default) represents your current position, and the orange line shows the recommended route. There are screen buttons and data fields on the screen to help you navigate. During navigation, the screen shows route information.
At the top of the screen, you see your heading and the house numbers on left and right if you have not selected a route destination. When navigating a route, you see the next maneuver and the next street/road on your route. Tap either of them to open the route itinerary.
Tap to open the Quick menu with a selection of functions that are useful during navigation.
Tap the map anywhere to explore the map around your current position.
Additional map control buttons appear.
Tap Distance 16.9 km to open three data fields on the map. Tap any of them to suppress the others. The default values for navigation (you can change them in Map settings):
the remaining distance to the destination, the remaining time of the trip, and the estimated time of the arrival at the destination.
Tap Menu to open the Navigation menu.
9. More menu
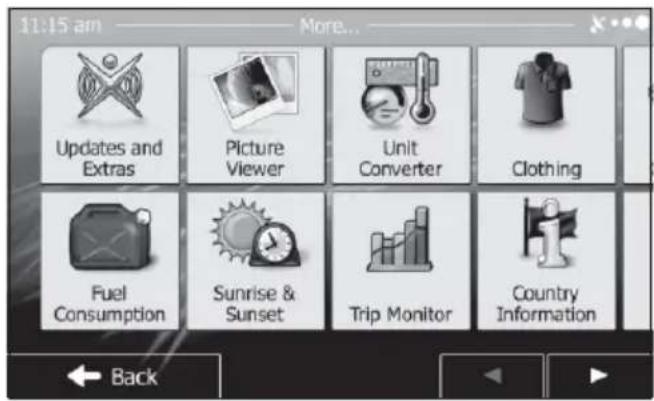
The More menu provides you with various additional applications. In the Navigation menu, tap More...
Visit www.naviextras.com to get additional content, such as new maps or 3D landmarks and useful applications.
Access the Picture Viewer.
GPS SCETION

Access the clothing size converter
Access the fuel consumption monitor.
Access sunrise and sunset times.
Access your saved trip and track logs.
Access country information, such as speed limit, maximum blood alcohol level or compulsory equipment.
10. Setting menu
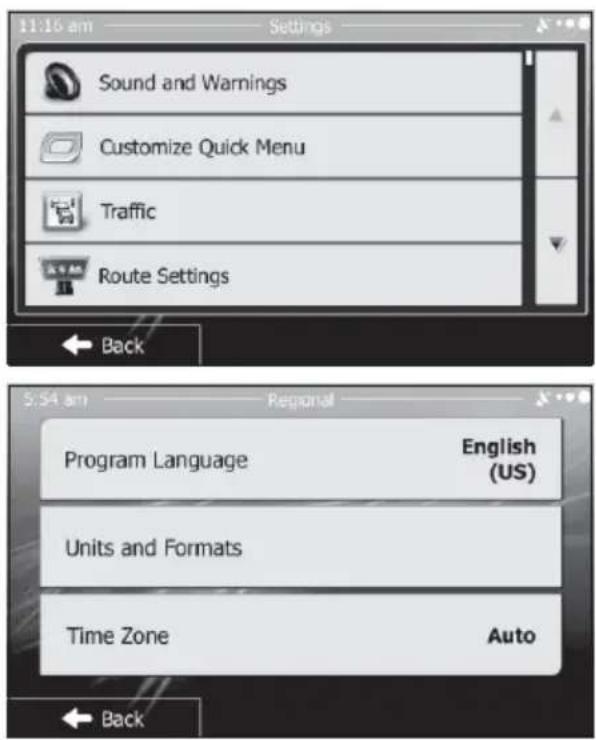
In the Navigation menu, tap 📄. The Settings menu provides you with the following options (scroll the list to see all):
Adjust the different sound volumes, change the voice guidance profile, or enable and set up warnings.
Change the function buttons in the Quick menu of the Map screen.
Select the type of vehicle you are driving, the road types used in route planning, and the route planning method.
If more drivers use PDN-621HBfor navigating, their settings can be remembered by using one of the user profiles.
Adjust map related settings: change the daytime and night color schemes, change the default zoom level, switch between 2D and 3D map, suppress buildings or change the Vehimarker.
Adjust how the software helps you navigate with different kinds of route related information on the Map screen.
Turn the menu animations on or off, select a different skin for the application, or adjust the display backlight.
Change the program language, the time format, units or the time zone.
Turn the automatic trip or track log saving on or off, check the current size of the trip database.
The application collects usage information and GPS logs that may be used for improving the application and the quality and coverage of maps. Here you can enable or disable collecting these logs.
Modify the basic software parameters set during the initial setup process.
Note: Mobile phone link function can only be available:
■ Used for Android system phone. Do not support iphone till now.
- Set your phone's "USB debug mode" is opened.
■ Connect the Bluetooth with Head unit.
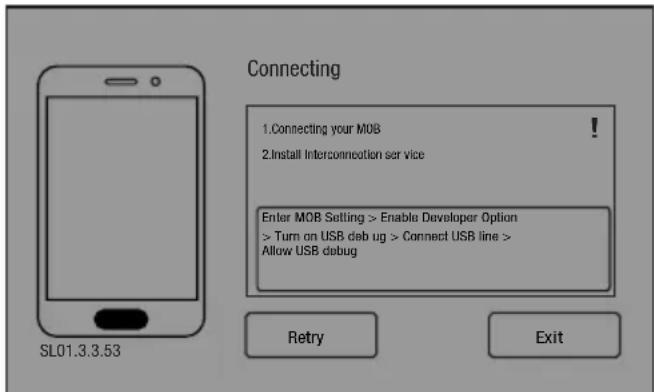
When start to operate phone link function, firstly set the phone to USB debug mode; connect the USB cable with mobile phone; then confirm your phone has already connected with unit via Bluetooth and then tap Phone Link icon on the main menu enter to Phone link mode.
And you can see below menu, and the unit will automatically connect your mobile phone (MOB), and install a APP into your mobile, after finished
those 2 step, then, unit will be indicated your phone menu in the unit and you can control the phone through the unit.
If you want to enjoy your music from all speakers, please enter into the Bluetooth Music mode in bottom panel.
BULETOOTH SCETION
Warning: Driving and having a Telephone conversation at the same time is dangerous, please park your car before having a telephone conversation. The supplier waves any and all liability when this warning is not followed.

To enter Bluetooth mode, you can tap BT-Phone icon on Main menu or long press the mute/Bluetooth button on the Remote Control or press mode button on remote or on front panel.
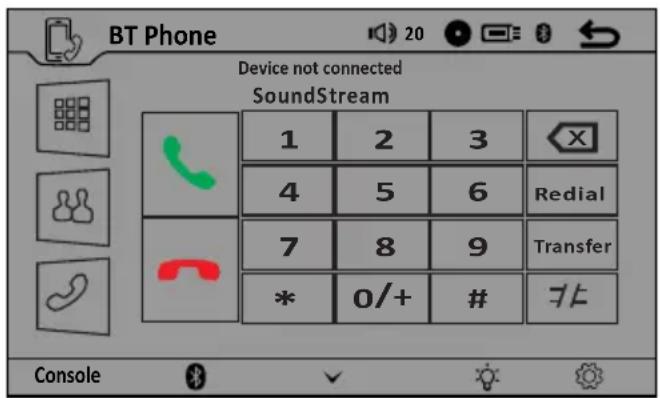

Tap Dial button to enter call mode.

Tap this button can see phonebook.

Tap this button can see missed, received and dialed calls.

Tap this button Making and accept calling.

Tap this button to hang up the call.
Pairing Mode
At the first time when using BLUETOOTH, you need to pair the mobile phone first. When a phone has not been paired with the unit, the BT icon and pairing mark will blink continually on the panel.
When the unit have connect with phone, the BT icon will turn on and the Mobile phone name (if available) will be displayed on the panel.
According to mobile pairing device manual, after searching new device (SoundStream), select it, input password "0000" and confirm ok, device paring is finished.
The text 'Enter Number' will shows on the panel after the pairing is completed. It means device is connected and ready for BLUETOOTH communication.
Auto-connect – Disconnect
When power on the unit, the last paired phone will be connected to the device via Bluetooth automatically, after searching about one minute, if the device cannot find the paired phone, it will stop searching. When in standby mode (unconnected), long press Bluetooth button on remote control to active auto-connect function and the device will search the last paired phone.
If you want to disconnect the Bluetooth connection, turn off the Bluetooth on the phone.
1. DIAL BUTTON
Tap on Dial button to enter call mode.
In Call mode, the unit can be used as your phone. Making and receiving calls are possible with BLUETOOTH. Simply tap phone
number and tap 📞 button to make a call,
and tap 📞 button to hang up.
1.) Tap ✗ button shortly to delete a wrong digit, or press Reject/INT button on remote to delete all the numbers at once.
2) Tap 📋 button, the device automatically
makes a call to the latest call in its call log.
NOTE: the phonebook only supports Western Characters. Any difference in character will be shown such as “+,* or #”
2. Bluetooth Phone Book
The unit can download the data from phone automatically when the pairing between a phone and the unit be completed.
The unit displays the data which have been downloading from a phone. Select a number and tap SEND button to make a calling. Press the PB-DOWN button, phonebook will be updated and downloaded with new phonebook.
3. Calling History
Tap HISTORY button to see history mode. The unit can download automatically at the data from the mobile phone.
Dialed / Recrived / Missed calls are saved in history mode. Tap up/down arrow load previous / next history record.
4. Bluetooth- Music
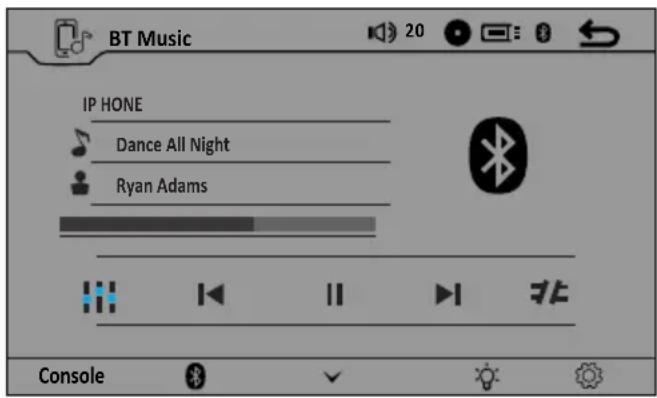
You can select the function with the key for previous, play or pause, stop and next.
A2DP (Advanced Audio Distribution Profile) Music Player
A2DP is a function which can receive the audio fr equ en cy s ig na l from t he m ob il e p h on e, amplified by the car audio and played out by the car speakers.
Notice: your mobile phone need to support A2DP.
Tap the buttons on the screen as shown, or press corresponding buttons (PAUSE/PLAY, STOP, PREVIOUS/NEXT) on remote control to play, pause, play previous, or next music file.
OTHER MODE

To start AV-IN Mode, tap on AV IN button from main menu screen.
Connect the external audio/video signal source to this unit. Select AV-IN mode in the main menu and. TFT display as below:
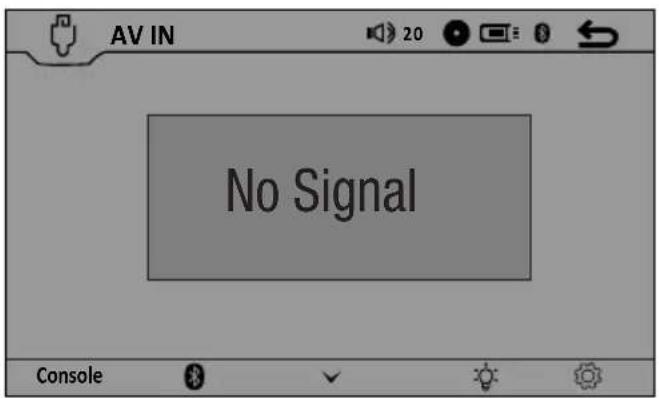

To start Back View Camera mode, tap on R-Camera button from main menu screen.
This unit is equipped with back view camera output. The camera is used to observe the situation behind the vehicle when you are backing the car.
Please connect your back view camera with the back car video input. And connect the reverse wire for back a car with the rear gear light. Rear view camera picture will be enabled when you are backing the car.
Note: If the Rear view camera is not connected, the TFT displays as below.
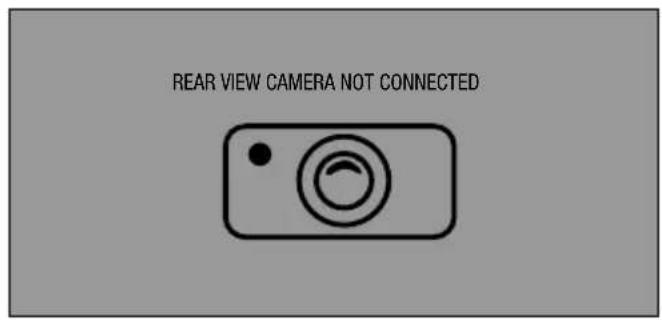
OTHER FUNCTIONS
Independent Volume Adjustment
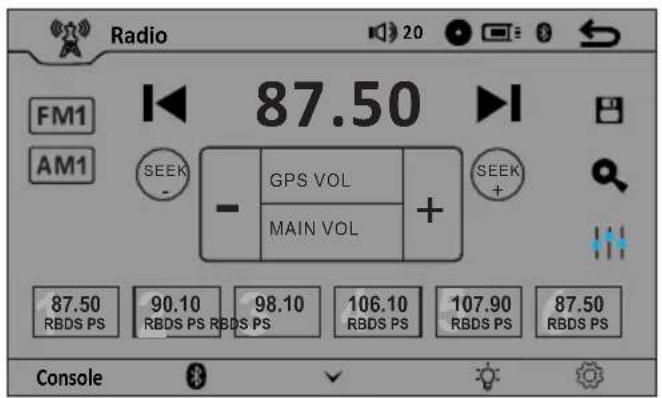
You can choose the "GPS & Phone VOL" or "MEDIA VOL" to adjust the volume from top panel or bottom panel independently.
Condition 1: Top panel is opened:
Top panel: GPS / Phone Link mode
Bottom panel: Radio / Disc / BT-Music / BT Music / USB / AV IN mode
Touch "Vol-" or "Vol+" and select "GPS & Phone VOL", then press and hold "-" or "+" to adjust the volume from top panel
Touch "Vol-" or "Vol+" and select "MEDIA
VOL", then press and hold "-" or "+" to adjust the volume from bottom panel
Parking
When the car is stopped and the parking brake is working, the screen can display the video image, otherwise the screen can't display the video image
NOTES ON DISC
■ Only use groundless loudspeakers.
■ Use only loudspeakers of minimal 40Watt, using fewer watts may result in damaging your loud speakers at higher volumes.
■ Use 4\~8 Ω (Ohm impedance) loudspeakers only; using higher or lesser impedance may damage the unit.
■ Do not use 3-cable loudspeakers and do not connect the loudspeakers minus to the car body. (GND).
■ Using a BTL circuit and each loudspeaker must be connected with insulated cables according to the diagram.
external power amplifiers must always be about 30cm. away from the antenna and/or antenna extension parts.
■ If want to display for 7" TFT, parking wire must be connected to ground.
■ Loudspeaker cables and/or option a cloth.
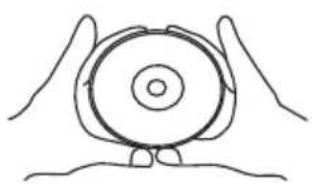
Handing discs.
Handing
when holding with both hands
when holding with one hand
natural_image
Simple line drawing of two hands holding a circular object with concentric rings (no text or symbols)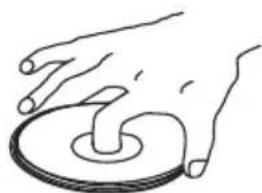
natural_image
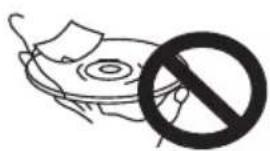
Line drawing of a hand pressing down on a circular object (no text or symbols)■ Do not use damaged (cracked or warped) discs.
■ Do not scratch the signal surface or let it get dirty.
■ Do not attach paper or seats to discs. The player may be damaged if here is any exposed glue, etc., on discs.
■ For rental discs in particular, extra labels are often attached to the discs.
■ Check carefully for any exposed glue before using such discs.
natural_image
Simple line drawing of a hand holding a device with a prohibition symbol (no text or labels)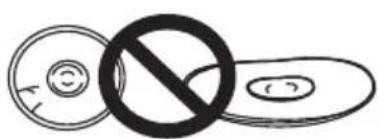
Storing discs
Always place discs in their case and store them vertically.
Avoid storing discs in hot or humid places, places exposed to direct sunlight and places in which temperature is extremely low.
Read and cautions included with the discs carefully.
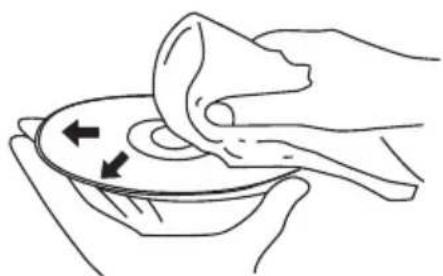
Cleaning discs
Fingerprints of dust on discs may reduce sound or picture quality. Remove them by gently wiping the disc from the center toward the edges using a soft
natural_image
Line drawing of hands holding a bowl with a cloth, showing a hand pressing down (no text or symbols)■ Do not use benzene, thinner or other volatile chemicals.
■ Do not use record spray or antistatic spray either.
■ We recommend using the separately sold cleaning set to clean discs.
■ For touch dirt, apply some water to a soft cloth, wring out thoroughly wipe off the dirt, then wipe the disc with a dry cloth.
Irregular shaped discs
Irregular sh aped discs (heart-sh aped discs, hexagonal discs, etc.) Can not be played on this payer. Doing so could damage the player Never use such discs.

| General CD | Symptom | Cause | Remedy |
| GeneralPower does not turn on.(No sound is produced.) | Fuse is blown | Replace with fuse of the same amperage. If the fuse blows again, consult your store of purchase | |
| In correct wiring | Consult your local retailer. | ||
| No sound output when operating the unit with amplifiers or power antenna attached. | Power antennal lead is shorted to ground excessive current is required or remote on the amplifiers or power antenna. | 1. Turn off the unit.2. Remove all wires attached to the power antenna lead. Check each wire for a possible short to ground using an ohm meter.3. Turn on the unit.4. Reconnect each amplifier remote wire to the power antenna lead one by one. If the amplifiers turn off before all wires are attached, use an external replay to provide remote-on voltage (excessive current required). | |
| Nothing happens when buttons are pressed. Display is not Accurate. | The microprocessor has malfunctioned due to noise, etc. | Turn off the power, Then press the [no open] button and remove the DCP. Press the reset button for about 2 seconds with a thin rod. | |
| Panel or main unit Connectors are dirty | Wipe the dirt off with a soft cloth moistened with cleaning alcohol. | ||
| Sound is bad directly after power is turned on. | Compact disc is dirtyCompact disc is heavily scratched or warped | Clean the compact disc without scratchesReplace with a compact disc without scratches. | |
| Sound is bad directly after power is turned on. | Water droplets may form on the internal lens when the car is parked in a humid place | Let it dry for about 1 hour with the power on. | |
| Symptom Cause | Remedy | ||
| NO POWER | THE CAR IGNITION IS NOT ON. | IF THE POWER SUPPLY IS PROPERLY CONNECTED TO THE CARACCESSORY SWITCH THE IGNITION KEY TO “ACC”. | |
| THE FUSE IS BLOWN. | REPLACE THE FUSE. | ||
| DISC CANNOT BE LOADED. | PRESENCE OF DISC INSIDE THE PLAYER | REMOVE THE DISC IN THE PLAYER THEN PUT A NEW UPWARD. | |
| DISC CANNOT BE READ. | INSERTING THE DISC IN UPSIDE DOWN. | INSERT THE COMPACT DISC WITH THE LABEL FACING UPWARD. | |
| COMPACT DISC IS EXTREMELY DIRTY OR DEFECTIVE. | CLEAN THE DISC OR TRY TO PLAY A NEW ONE. | ||
| TEMPERATURE INSIDE THE CAR IS TOO HIGH. | COOL OFF UNTIL THE AMBIENT TEMPERATURE RETURNS TONORMAL. | ||
| NO SOUND | VOLUME IS IN MINIMUM WIRING IS NOT PROPERLY CONNECTED. | ADJUST VOLUME TO A DESIRED LEVEL.CHECK WIRING CONNECTION. | |
| THE OPERATION KEYS DO NOT WORK. | THE BUILT-IN MICROCOMPUTER IS NOT FRONT PANEL IS NOT PROPERLY FIX INTO ITS PLACE. | PRESS THE POWER BUTTON FOR ABOUT 10 SECONDS TO RESET THE UNIT. | |
| SOUND SKIPS. | THE INSTALLATION ANGLE IS MORE THAN 30 DEGREES.NOT OPERATING PROPERLY DUE TO NOISE.THE DISC IS EXTREMELY DIRTY OR DEFECTIVE. | ADJUST THE INSTALLATION ANGLE TO LESS THAN 30 DEGREES.CLEAN THE COMPACT DISC/TRY TO PLAY A NEW ONE. | |
| THE RADIO DOES NOT WORK, THE RADIO STATION AUTOMATIC SELECTION DOES NOT WORK. | THE ANTENNA CABLE IS NOT CONNECTED THE SIGNALS ARE TOO WEAK. | INSERT THE ANTENNA CABLE FIRMLY SELECT A STATION MANUALLY. | |
TECHNICAL SPECIFICATIONS
General
Power supply: 11\~16V DC
Current consumption: max. 10 A
Maximum power output: 4 x 50W channels (max)
Compatible formats: DVD/VCD//MP3/MP4/VIDEO/CDDA/PICTURE CDCD-
R/-RW/DVD±R/±RW PLAYBACK
Dimensions (W x D x H) / weight: 178*170*100 mm/1.5 kg
Working temperature range: Working temperature range:
ESP function: 10 sec. for Audio CD, 120 sec. for MP3
TFT display
Screen size: 6.2 inch
Resolution: 800*480 pixel
Aspect ratio: 4:3/16:9
Brightness: 460 cd/m²
Contrast ratio: 500:1
FM Stereo Radio
Frequency range(Europe Area): 87.5 – 108MHz(Step 50KHz)
Frequency range(U.S.A Area): 87.5 - 107.9MHz(Step 200KHz)
Frequency range( South America Area): 87.5 – 107.9MHz(Step 100KHz)
Frequency range(Russian Area): 87.5 – 108MHz(Step 50KHz)
65-74MHz(Step 30KHz)
Frequency range(Asia Area): 87.5 - 108MHz(Step 100KHz)
Preset memory stations: 18
AM/MW Radio
Frequency range(Europe Area): 522kHz - 1620 KHz(Step 9KHz)
Frequency range(U.S.A Area): 530kHz - 1710 KHz(Step 10KHz)
Frequency range( South America Area): 530kHz - 1710 KHz(Step 10KHz)
Frequency range(Russian Area): 522kHz - 1620 KHz(Step 9KHz)
Frequency range(Asia Area): 531kHz - 1602 KHz(Step 10KHz)
Preset memory stations: 12
Audio specification
Frequency response: 20 Hz-20 KHz
USB interface
USB type USB 2.0 full speed
Support format mp3 , wma, mpeg1, mpeg2, avi
Specifications are subject to change without notice. Mass and dimension are approximate.
!!ATTENTION INSTALLER!!
Bluetooth Connection Instructions
- To enter Bluetooth mode, you can tap Bluetooth icon on Main menu or long press the "mute"/"Bluetooth" button on the Remote Control, or press "mode" button on remote or on front panel to select bluetooth mode.
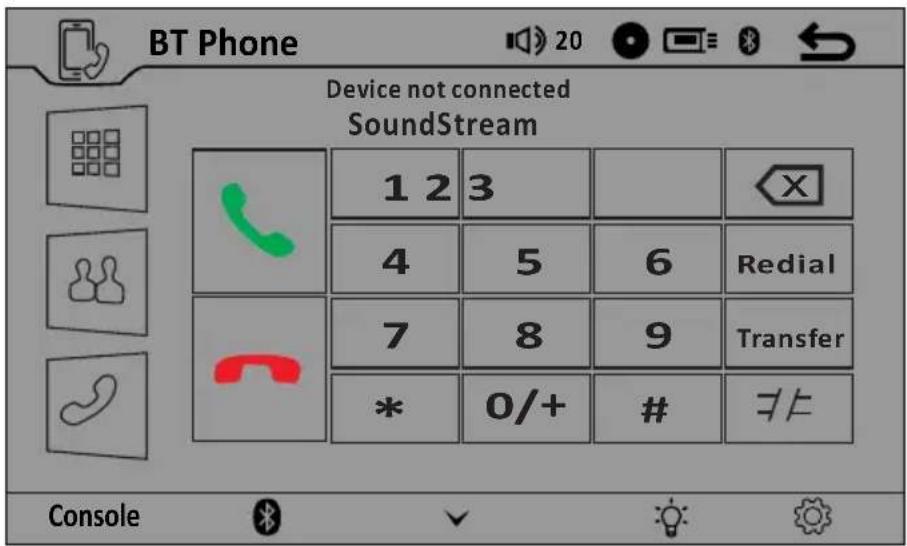
- At the 1st time when using BLUETOOTH, you need to pair the mobile phone first.
- Place your Bluetooth Enabled cell phone in pairing mode.
- Connect your phone to the radio, using the pass code 0000
Video File Conversion 101
File compression seems to be name of the game to see who can fit the most music and video onto today media deices. Unfortunately with so many compression formats and codecs, it becomes virtually impossibly for your head unit to support the multitude of song and video file types. To overcome the confusion of what video formats are compatible with this head unit, we suggest using a file converter to align the stars and change the many video file types you have to one standard.
Surely there are many file conversion apps available on the line, but CNet seems to be a reliable source and has a good file conversion app available. Check out:
http://download.cnet.com/Free -AVI -Video -Converter/3000 -2194 4-75685273.html
Drop by our website for the link instead of typing a millionletters and symbols into your web browser?
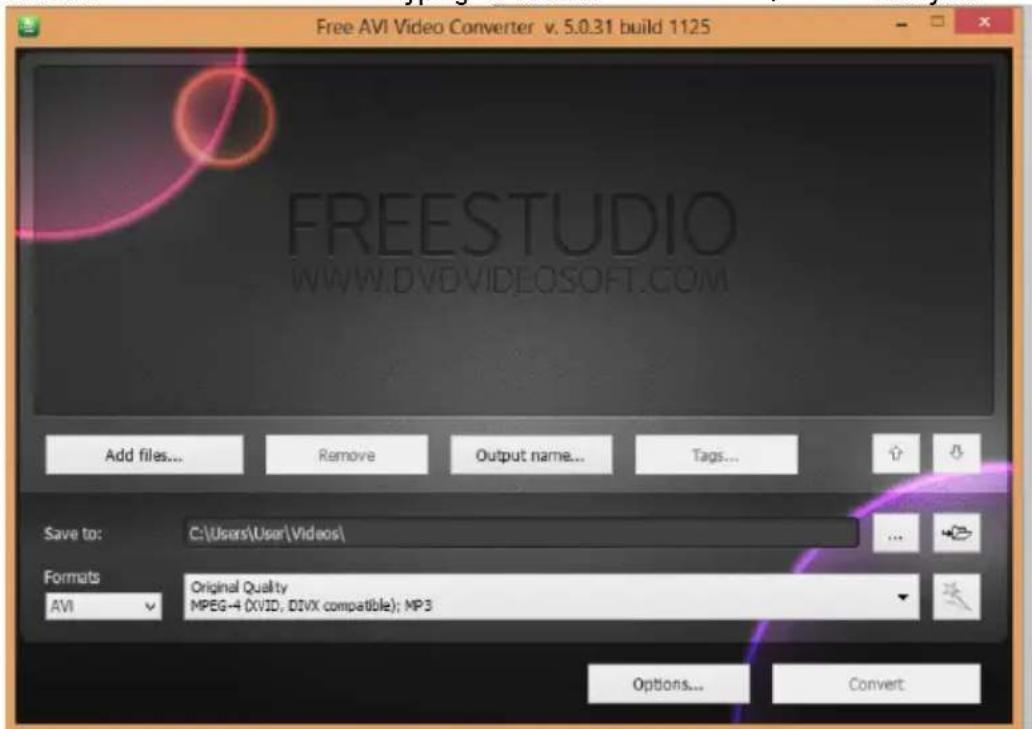
After the app downloads and installs, it's pretty simple to convert your files. Select the Add File button and browse your computer to find the alien file type you need to convert. The file info should appear at the top:
![Free AVI Video Converter v. 5.0.31 build 1125 D:\desktop\hi-res videos[480P MV]2NE1—Can't Nobody.mp4 00:03:33 FREESTUDIO](/content/2026/05/942166/images/c4a6761727adc6fb327ec10e67fa254dd6161c98eff9bd1337dbb37ef89aac60.jpg)
There are some optional choices after the file is selected, like changing the name to protect the innocent, or change the location the converted file is saved. If you feeling frisky go for it:

Video File Conversion 101
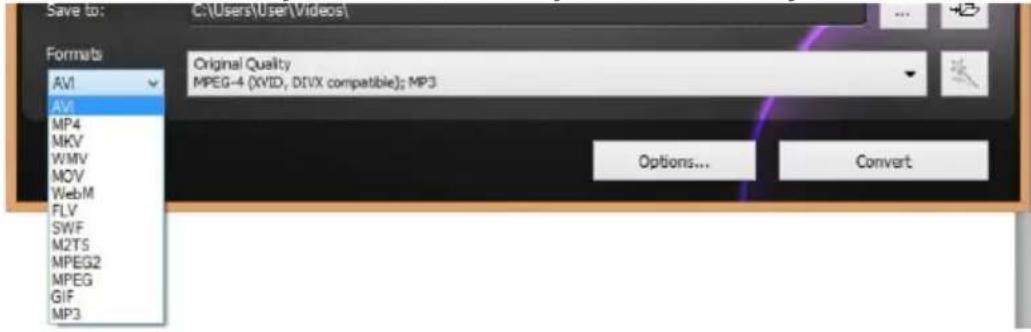
Otherwise, choose the file format you want to convert your movie to. May we recommend the AVI:
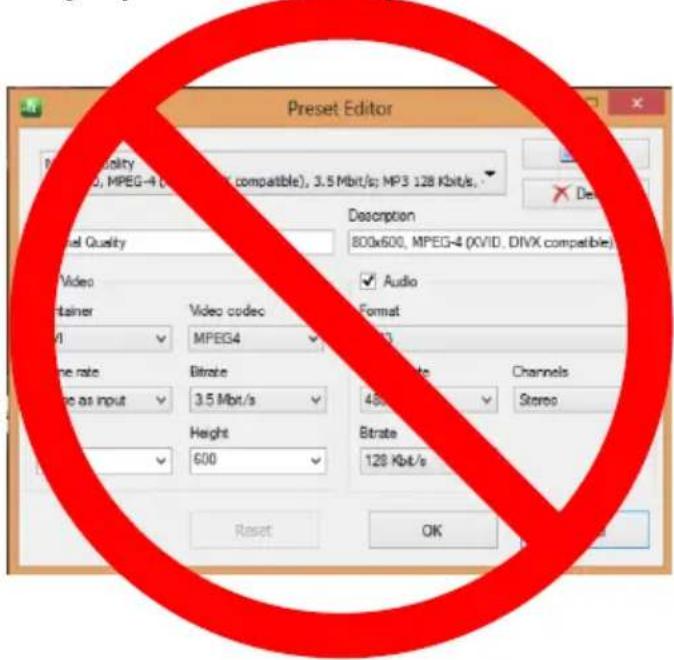
You can also choose the resolution for the screen size and type. If you 掺 econverting an original file that is super high quality resolution, you might consider the HD options, but most commonly you should choose Normal Quality or Original Quality.
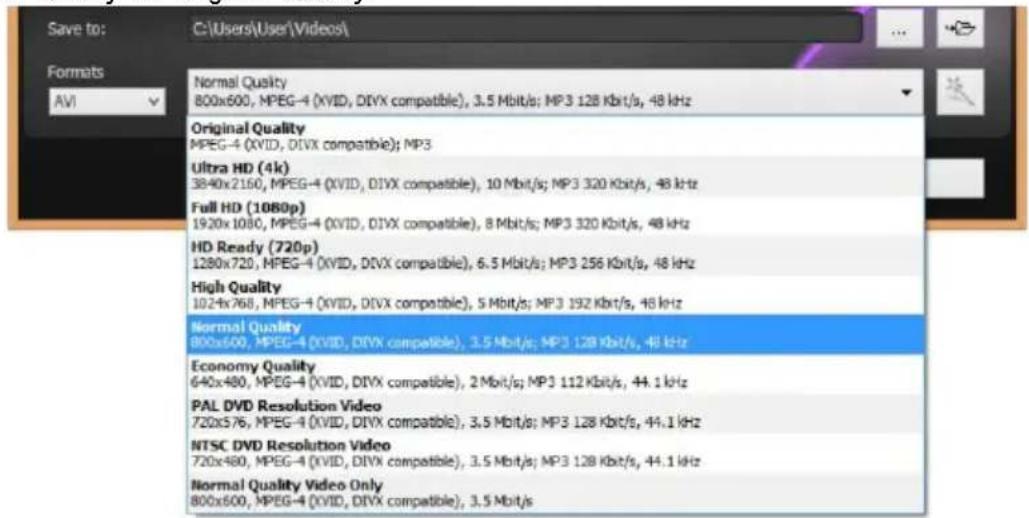
There are some fantastic options to change the standard codec, bit & frame rates, blood types, and so on, but we suggest keeping everything preset as the app recommends. Its these crazy variables that brought you here in the first place.
Finally, click convert and wait for the bell:
![[4SOP MV]2NE1—Can't Nobody.mp4 ✓ Process is completed Close](/content/2026/05/942166/images/57286d350914eca468cbe1e7f069ccfb5883bfee88a63121526f2337424908e9.jpg)
Support site
If you have any questions or for the latest support information on this product, please visit the web site below:
http://www.soundstream.com
If you have any questions/problems regarding this product, try the following:
1 Read Troubleshooting in these Operating Instructions.
2 Please contact (U.S.A. only); URL http://www.soundstream.com
- WARNING!
- OPERATION PRECAUTIONS
- Content
- INSTALLATION / UN-INSTALLATION
- Note
- INSTALLATION (Figure 1)
- UN-INSTALLATION
- Mounting Strap
- WIRING CONNECTIONS
- POWER CONNECTOR
- ASWC Connections
- Note:
- REMOTE CONTROL
- REMOVE BATTERY
- MAIN MENU
- Bottom Panel
- ICON Operation
- SETTING CONTROL
- GPS SCETION
- Navigation menu
- Startup screen: the Navigation menu
- Destination menu
- Navigating to an address
- Enter the street name:
- Enter the house number:
- Quick Find
- Navigating to a place of interest
- An example of navigating to a place of interest
- The Map screen
- More menu
- Setting menu
- BULETOOTH SCETION
- Pairing Mode
- Auto-connect – Disconnect
- DIAL BUTTON
- Bluetooth Phone Book
- Calling History
- Bluetooth- Music
- A2DP (Advanced Audio Distribution Profile) Music Player
- OTHER MODE
- OTHER FUNCTIONS
- Parking
- NOTES ON DISC
- Handing discs.
- Handing
- Storing discs
- Cleaning discs
- Irregular shaped discs
- TECHNICAL SPECIFICATIONS
- General
- TFT display
- FM Stereo Radio
- AM/MW Radio
- Audio specification
- !!ATTENTION INSTALLER!!
- Bluetooth Connection Instructions
- Video File Conversion 101
- Support site
Brand : Soundstream
Model : VRN-DD7HB
Category : Uncategorized