VRN-64HBL - Uncategorized Soundstream - Free user manual and instructions
Find the device manual for free VRN-64HBL Soundstream in PDF.


| Product Type | Car Multimedia Receiver (2-DIN) |
| Power Supply | DC 12V (negative ground) |
| Maximum Power Output | 80W x 4 |
| Speaker Impedance | 4 - 8 ohms |
| Disc Playback | DVD±R/RW, VCD, CD-R/RW, MP3, WMA, JPEG |
| Display | 6.2-inch TFT LCD, 800x480 pixels |
| Bluetooth | Version 4.2, range up to 5 meters |
| Radio Bands | AM 530-1710 kHz, FM 87.5-107.9 MHz |
| USB/SD Inputs | Front USB and Micro SD slot |
| AUX Input | 3.5mm jack |
| Camera Inputs | Front and rear camera (RCA) |
| Phone Link | Apple CarPlay (iOS) and Android Auto via USB |
| Steering Wheel Control | Compatible with wired remote (learning function) |
| Audio Output | 4V RMS preamp output, subwoofer output |
| Equalizer | Preset EQ modes (Classic, Rock, Pop, etc.) + Custom |
| Dimensions (approx) | 178 x 100 mm (standard 2-DIN) |
| Operating Temperature | -20°C to 60°C |
| Cleaning | Wipe with dry soft cloth; avoid solvents |
| Reset | Press reset button with a thin object to restore factory settings |
| Safety Features | Parking brake lock for video; reverse trigger for rear camera |
Frequently Asked Questions - VRN-64HBL Soundstream
User questions about VRN-64HBL Soundstream
0 question about this device. Answer the ones you know or ask your own.
Ask a new question about this device
Download the instructions for your Uncategorized in PDF format for free! Find your manual VRN-64HBL - Soundstream and take your electronic device back in hand. On this page are published all the documents necessary for the use of your device. VRN-64HBL by Soundstream.
USER MANUAL VRN-64HBL Soundstream
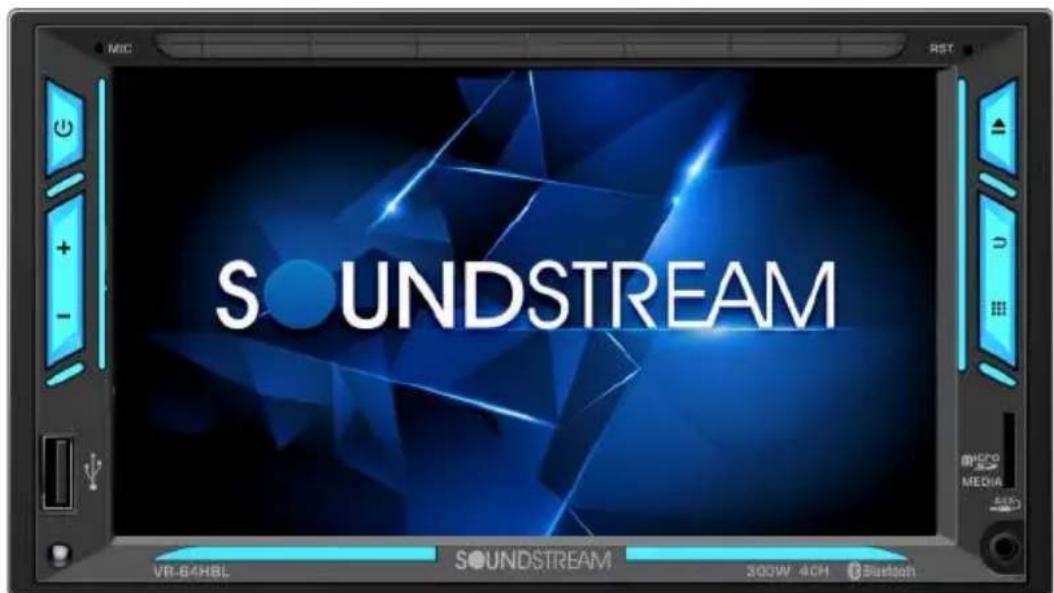
Support Android Phone Link
Support Bluetooth
Contents
Before use
Important notice & precaution 2
Protecting the monitor 2
Cleaning the unit 3
Caution 3
How to reset the unit 3
Installation
Installation 4
Parking wiring 4
Speaker Connection 4
Wiring 5
Basics
Panel Description 6
Remote Control 6
Operation
Main menu 9
Audio & Video setting 9
Settings menu 10
Radio operation 15
Disc/USB/SD operation 15
Bluetooth operation 17
APP operation 18
AUX IN operation 18
F-Camera operation 19
Phonelink operation 19
Specification 21
Trouble Shooting 22
Before use
IMPORTANT NOTICE & PRECAUTIONS
- Thank you for using our company multi-media player! To operate the unit correctly, please read the operation manual carefully before using. Keep this operation manual for further reference. The unit is designed only for DC 12V negative ground operation system. Make sure your vehicle is connected to DC 12V negative ground electrical system. Do not connect it to 24V power supply in trucks or buses, or else it will be damaged. Be sure to connect the speaker (-) leads to the speaker (-) terminal. Never connect the left and right channel speaker wires together or to the vehicle body. The normal temperature for operation is between -20 and +60 degree Celsius. Do not work in extreme high or low temperature and block vents or radiator panels of the unit, blocking them will cause heat to build up inside the unit and may cause damage or fire.
- Do not put the device in a moist environment or water to avoid electric shock, damage and/or fire due to a short circuit.
• This unit can play the following discs (12 cm) and media files: DVD±R/RW / WMV / VCD / MP3 /WMA / CD-R/RW / JPEG. Please use genuine discs instead of incompatible discs, or it will damage the device and/or shorten the service life.
Protecting the monitor
- To protect the monitor from damage, do not operate the monitor using a ballpoint pen or similar tool with the sharp tip.
Installation
Note:
- Make sure the ignition is turned off, and disconnect the cable from the vehicle battery's negative (-) terminal.
You never want electricity running while you install this 2-DIN car receiver.
-
Before installation, disconnect the wire harness and the antenna.
-
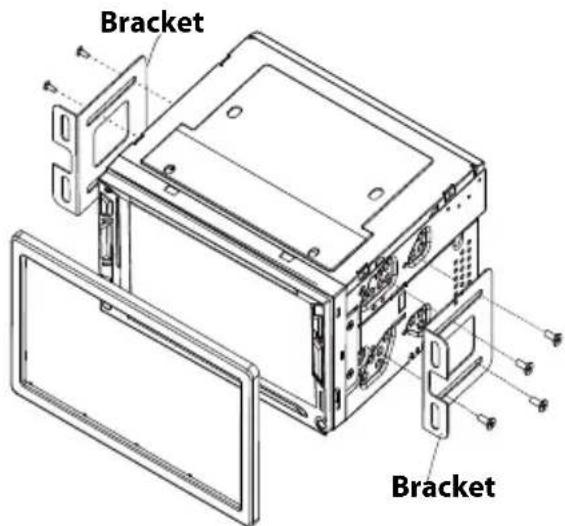
Attach the brackets on the both sides of the car receiver with screws as shown as the above figure.
-
Consult with your nearest dealer if installation requires the drilling of holes or other modification of the vehicle.
-
Install the car receiver in the dashboard.
-
Connect the wire harness & antenna to the car receiver being carefully not to pinch any wires or cables.
-
Install the plastic outer trim ring onto the car receiver.
-
Reconnect the battery and run through all of the options on this car receiver to ensure that everything is working correctly.
-
Particulars will vary widely depending upon the kind of your car and the car you intend to install it in. Please choose the correct installation method according to the actual situation of your car. Always contact the car dealer or manufacturer if you have any questions.
Parking Wire
Note: The parking wire is connected with brake signal; for safety, the programs can be seen on the monitor after braking the car.
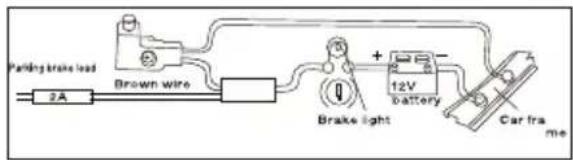
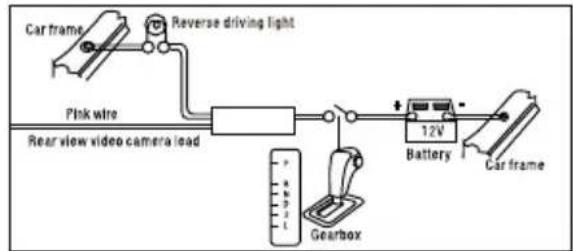
flowchart
graph LR
    A["Car frame"] --> B["Reverse driving light"]
    B --> C["Pink wire"]
    C --> D["Rear view video camera load"]
    D --> E["12V Battery"]
    E --> F["Battery"]
    F --> G["Car frame"]
    H["Gearbox"] --> I["Measurement scale"]
Installation
Connecting the revising line to taillight on the car.
After connection, when you start up the reverse gear, the unit will receive the picture from car rear view camera.
Speaker connection
Note:
- Only use groudless loudspeakers
2 Use only loudspeakers of munimum 40 Watt, using fewer watts may result in damaging your loudspeakers at higher volumes. - Use 4-8 ohm impendace loudspeakers only, suing higher or lesser inpendance may damage the unit.
- Do not use 3-cable loudspeakers and do not connect the loudspeakers mumis to the car. The unit is using a BTL circuit and each loudspeaker must be connected
with insulated cables according the diagram. - Loudspeaker cables and/or optional external power amplifiers must always be about 30 cm away from the antenna and/or antenna extension parts.
Connect the speakers accordind the following diagram, incorrect connections will damage the unit or your loudspeakers.
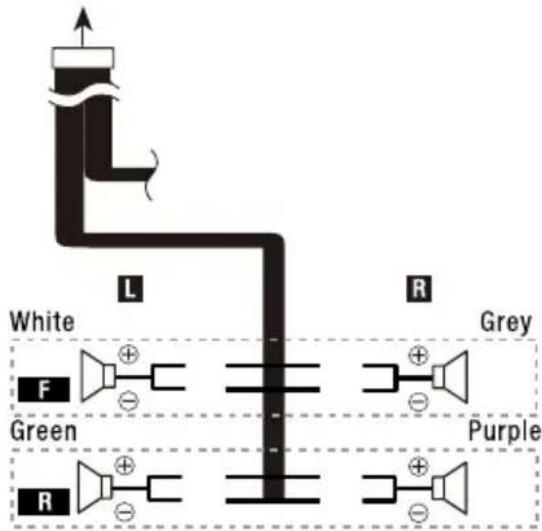
flowchart
graph TD
    A["White"] --> B["L"]
    B --> C["R"]
    C --> D["Grey"]
    D --> E["Green"]
    E --> F["Purple"]
    F --> G["R"]
    G --> H["Blue Light Source"]
    style A fill:#f9f,stroke:#333
    style B fill:#ccf,stroke:#333
    style C fill:#cfc,stroke:#333
    style D fill:#fcc,stroke:#333
    style E fill:#cff,stroke:#333
    style F fill:#ffc,stroke:#333
    style G fill:#fcc,stroke:#333
    style H fill:#fff,stroke:#333
Wiring Diagram
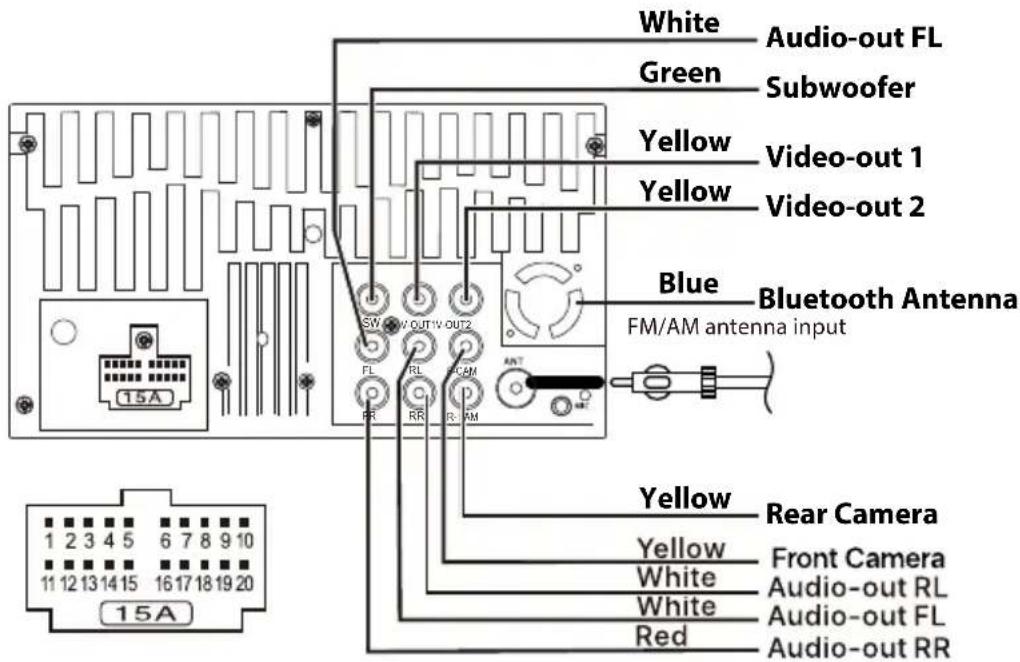
| 1. Brown : Brake Dectect | 11. Pink : Back Sight (B+) |
| 2. Green : Steering Wheel Control (2) | 12. Grey : Steering Wheel Control (1) |
| 3. Black : Steering Wheel Control (Ground) | 13. Pink/Black : Front Camera |
| 4. Orange : Headlamp Detection(Connect to on/off control of car headlamp) | 14. Blue : Amplifier Control |
| 5. Blue/White: Auto Antenna | 15. Yellow : Memory Back Up (B+) |
| 6. Red: Ignition Switch (ACC) | 16. Black: Ground |
| 7. White/Black: Front Left Speaker (-) | 17. Purple/Black : Rear Right Speaker (-) |
| 8. White : Front Left Speaker (+) | 18. Purple : Rear Right Speaker (+) |
| 9. Grey/Black: Front Right Speaker (-) | 19. Green/Black : Rear Left Speaker (-) |
| 10. Grey : Front Right Speaker (+) | 20. Green : Rear Left Speaker (+) |
Panel description Remote control
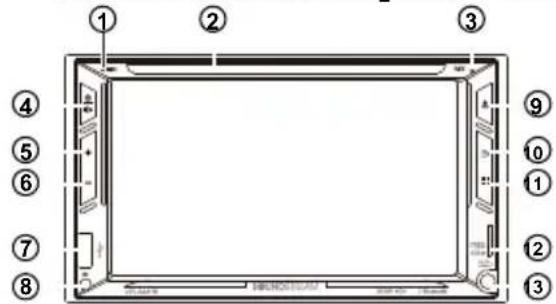
1 Microphone
• Built-in Microphone.
2 Disc slot
- Insert or eject the disc.
3 Reset
- If the unit or the connected unit fails to operate properly, the unit returns to factory settings when this button is pressed.
4 Power / Mute
- When the power off, press to power on.
- When the unit is working, short pressing for Mute, press again for un-mute.
- Pressing and hold to turn the source unit power off.
5 + (Volume)
- Press to increase the volume value.
6 - (Volume)
- Press to decrease the volume value.
7 USB
- USB slot.
8 Remote Sensor
• Receives the remote control signal.
9 Eject button
- Press to eject the disc.
10 ➕ Return button
- Press to back to previous menu.
11 Mode button
- Press to select the desired mode.
12 SD slot
- Micro SD slot for audio/video playback.
13 AUX
• AUX jack for AUX playback.
Remote control
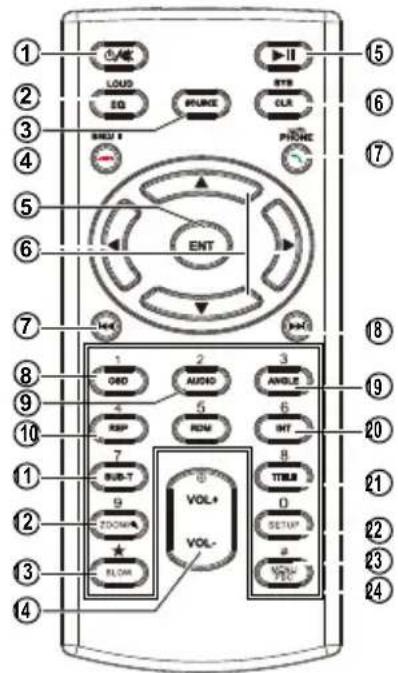
1 [ ⏻/※]
When the unit is turn off, press to turn on the unit. When the unit is turn on, press and hold to turn off. During unit working, press to mute or unmute.
2 EQ/LOUD ]
Press repeatedly to select desired equalizer mode. Long press to switch Loudness is ON or OFF.
3 SOURCE ]
Press repeatedly to select the desired mode for operation.
Before use
Cleaning the Unit
- If the front panel of this unit is stained, wipe it with a dry soft cloth such as a silicon cloth. If the front panel is stained badly, wipe the stain off with a cloth moistened with neutral cleaner, then wipe it again with a clean soft dry cloth.
CAUTION
- Applying spray cleaner directly to the unit may affect its mechanical parts. Wiping the front panel with a hard cloth or using a volatile liquid such as thinner or alcohol may scratch the surface or erase screened print.
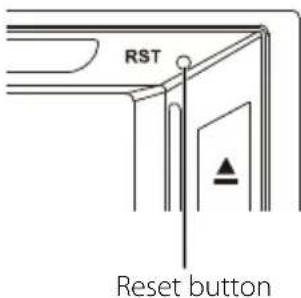
How to reset your unit
- If the unit or the connected unit fails to operate properly, reset the unit.
Supplied accessories
1 .Trim Ring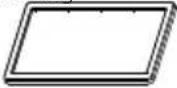 x1 x1 | 2 .Mounting Bracket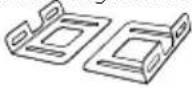 x2 x2 |
3 . Screws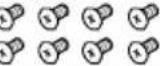 x8 x8 | 4 .Power Cable x1 x1 |
5 .Wrranty Card x1 x1 | 7 .Remote Control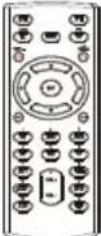 x1 x1 |
6 .User Manual x1 x1 |
Installation
Before installation of this unit, please note the following precautions.
WARNINGS
If you connect the ignition wire (red) and the battery wire (yellow) to the car chassis (ground), you may cause a short circuit, that in turn may start a fire.
Always connect those wires to the power source running through the fuse box.
Do not cut out the fuse from the ignition wire (red) and the battery wire (yellow). The power supply must be connected to the wires via the fuse.
1) To prevent a short circuit, remove the key from the ignition and disconnect the ⏻ terminal of the battery.
2) Make the proper input and output wire connections for each unit.
3) Connect the wire on the wiring harness.
Installation
- Put the 2 brackets to the left and right side of the headunit.
- Use screws to fix the brackets to the unit.
Remote control
4 [ BND/■ ]
[Phone], press to reject an incoming call; Hang-up the conversation call.
BND, press repeatedly to select the desired radio band for broadcasting.
[Video] press to stop playback.
[Music] press to stop playback and shift to folder / playlist menu for playback selection. Press again to stop playback and shift to tuner mode.
(BT Music)
[Music] Press to stop playback and will shift back to tuner operation mode.
5 [ENT]
[DVD/Folder/Play list] press ▲/▼/▶/◀ to select the desired setting/setup and press ENT to confirm/enter.
6 [ ▲/▼/▶/◀ ]
[DVD] At DVD menu/title display mode, press to select the desired setting/setup and press ENT to confirm/enter.
[Folder/Play list Menu Mode] During folder/playlist menu display at media playback mode, press ▶/◀ repeatedly to shift page up and down, press ▲/▼ repeatedly to select track/folder for playback. Once selected, press ENT to confirm.
[Photo] Press to rotate photo position or show up-down, left-right mirror image.
7 [◀]
(AM/FM), Press to tune the radio frequency downward and stop for broadcasting when a radio station received. Press & hold shortly to shift to manual tuning downward.
(USB/SD), press repeatedly to shift previous track. Press and hold to activate various speed of fast rewind. (Not available for photo playback).
(Bluetooth Music), press repeatedly to shift previous track.
8 Q[SD ]
(Video), press and hold to display the contents of the playback details on screen.
9 AUDIO ]
(Video), press and hold to display the contents of the playback details on screen.
10 [REPEAT]
(USB/SD), press repeatedly to shift repeat setting: REPEAT1>REPEAT ALL>REPEAT FOLDER>REPEAT OFF.
11 SUB-Title ]
(Video), press and hold to select different SUB-TITLES that recorded in the inpur devices of media files.
12 [ZOOM]
(Video/Photo), press to select various zoom in and zoom out of screen for viewing. [ Q ]
(AM/FM), press to start scanning all preset stations on memory and stop for a few seconds broadcasting.
Press and hold to start searching the frequency and storing the strongest signal stations into the preset memory stations number 1-6. After storing the satations, the unit starts scanning all the preset stations on memory and stop for a few seconds broadcasting.
13 [SLOW]
(Video), press repeatedly to select different speeds on slow motion playback.
14 [VOL+/VOL-]
Pess VOL+ to increase sound output level. Pess VOL- to decrease sound output level.
15 [▶]
(Music/Video/Photo/BT Music), press to pause, rusage or start playback.
Remote control
16 [CLR/SYSTEM]
In Bluetooth mode, press to delete the digit input by error.
17 [ ]
(Phone), press to answer an incoming call; Dial out after input a phone number; Redial lastest dial out number.
[ PHONE ]
(Phone), press and hold to shift conversation between headunit and mobile phone.
18 [▶]
(AM/FM), Press to tune the radio frequency upward and stop for broadcasting when a radio station received. Press & hold shortly to shift to manual tuning upward.
(USB/SD), press repeatedly to shift next track. Press and hold to activate various speed of fast forward. (Not available for photo playback).
(Bluetooth Music), press repeatedly to shift next track.
19 ANGLE ]
(Video), press and hold to view angle changes in sequential order. Note: Available on media files recorded with this features.
20INT ]
(Video/Music), press and hold to switch Intro Playback On or Off.
21 [TITLE ]
(Video), press and hold to display on screen the title for setting.
22 \$ETUP ]
During unit working, press and hold to activate SETUP menu for various settings. press again to return to previous working mode.
23 MENU ]
(Video), press and hold to display the menu for video playback.
[PBC] Only for VCD.
24 NUMBERS ]
[1-6] (AM/FM), press any one of the number key 1-6 to select a station that had been stored in the preset memory number key 1-6 for broadcasting.
[0-9] (USB/SD), press directly to input the number of track for playback.
[0-9,*,#] (Phone), press directly to input the number for dial out.
Operation
MAIN MENU OPERATION
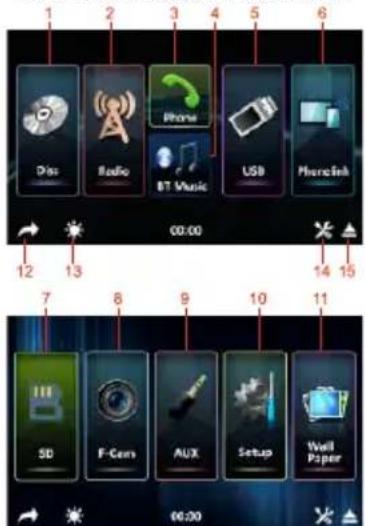
At MAIN MENU, touch the icon of the desired mode on screen and the unit will then enter into the mode that selected for operation.
At MAIN MENU, touch & hold on screen and slide to left or right will shift screen to second page operation selection.
- Touch to start disc input operation (when a disc inserted).
- Touch to start tuner operation (when the radio antenna connected).
- Touch to start phone (Bluetooth) operation (when a mobile phone connected).
- Touch to start Bluetooth streaming operation (when a mobile phone connected).
- Touch to start USB input operation (when an USB device inserted).
- Touch to start mobile phone mirror linking operation (when the mobile phone connected to the front USB port/
- Touch to start SD card input operation (when a micro SD card inserted).
- Touch to start camera input operation (when connected with front camera).
- Touch to start auxiliary input operation (when an external device has been connected).
- Touch to start various setup of the unit.
- Touch to select desired wallpaper.
-
Touch to shift back to previous operation mode.
-
Touch repeatedly to select brightness of screen or turn off the screen. When the screen is off, touch any portion of the screen to turn it on again. Below preset brightness modes can be selected.

- Touch to activate audio & visual setting. (Refer to AUDIO & VISUAL SETTINGS).
- Touch to EJECT the inserted disc from unit.
AUDIO & VISUAL SETTINGS.
Volume Control
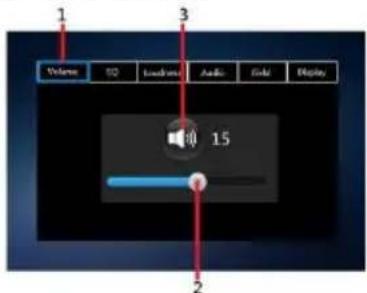
- Touch to shift to volume control menu.
- Hold & slide to adjust sound output level.
- Touch to MUTE or UNUNTE.
Preset Equalizer Control
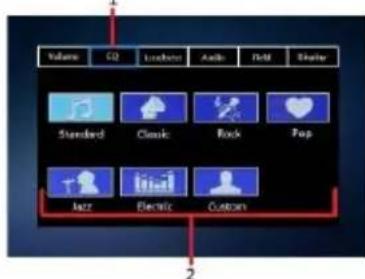
- Touch to shift to equalizer control menu.
- Touch to select the desired EQ mode.
Operation
LOUDNESS
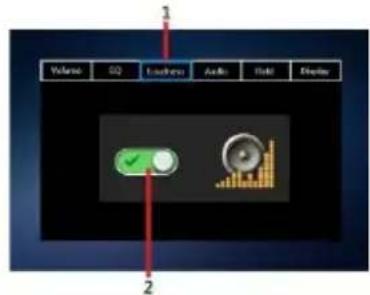
- Touch to shift to Loudness control.
- Touch to switch On or Off.
Audio Control
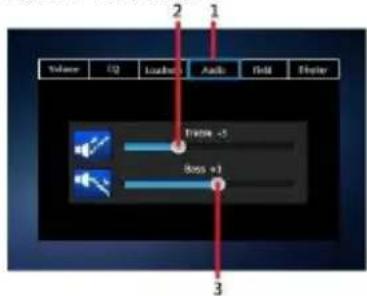
- Touch to shift to Audio control.
- Hold & slide to set for Treble.
- Hold & slide to set for Bass.
Field Control
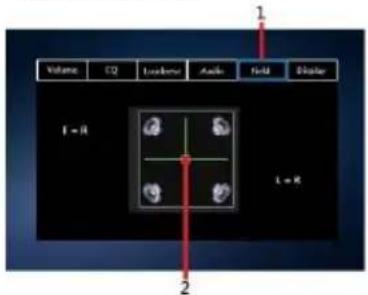
- Touch to shift to Field control.
- Hold & slide to set for the Fader and Balance.
Visual Control
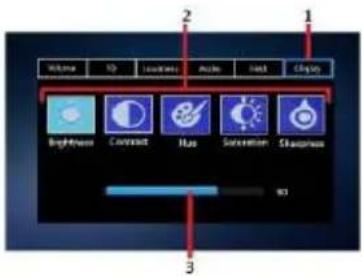
- Touch to shift to Display control.
- Touch to select the desired setting mode: Brightness.Contrast,Hue, Saturation, Sharpness.
- Hold & Slide to adjust the level.

At MAIN MENU, touch on screen and shift to SETTINGS MENU for various setup selection of the unit.
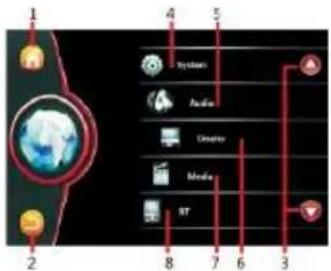
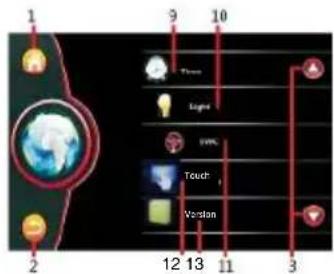
- Touch to shift to MAIN MENU for operation mode selection.
- Touch to back to previous setting menu.
- Touch to shift to previous /next SETTINGS MENU.
- Touch to shift to SYSTEM MENU for system setting.
- Touch to shift to AUDIO MENU for audio setting.
- Touch to shift to Display MENU for display setting.
- Touch to shift to MEDIA MENU for media setting.
- Touch to shift to Bluetooth MENU for bluetooth setting.
- Touch to shift to Time MENU for time setting.
- Touch to shift to Light MENU for illumination backlight setting.
- Touch to shift to SWC MENU for steering wheel control setting.
- Touch to shift to Calibration.
- Touch to show the VERSION informations.
Operation
SYSTEM SETUP AUDIO SETUP
flowchart
graph TD
    A["1"] --> B["2"]
    B --> C["3"]
    C --> D["4"]
    D --> E["5"]
    E --> F["6"]
    F --> G["7"]
    G --> H["8"]
    H --> I["9"]
    style A fill:#f9f,stroke:#333
    style B fill:#f9f,stroke:#333
    style C fill:#f9f,stroke:#333
    style D fill:#f9f,stroke:#333
    style E fill:#f9f,stroke:#333
    style F fill:#f9f,stroke:#333
    style G fill:#f9f,stroke:#333
    style H fill:#f9f,stroke:#333
    style I fill:#f9f,stroke:#333
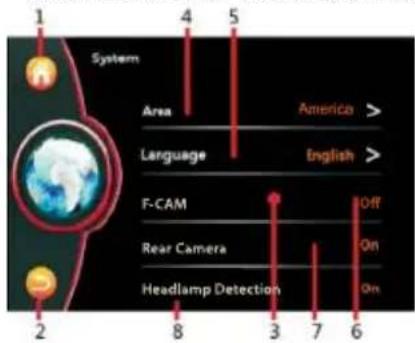
- Touch to shift to MAIN MENU for operation mode selection.
- Touch to back to previous setting menu.
- Hold & slide to show hidden setting items.
- Touch to select the radio frequency that suits the area located.
- Touch to select the desired language.
- Touch to shift Front Camera is On or Off.
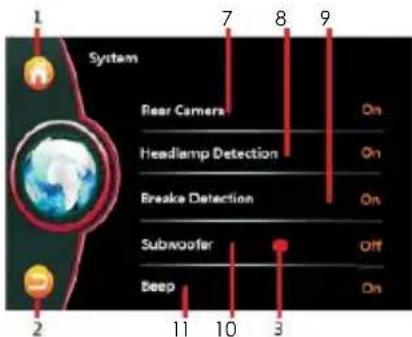
- Touch to shift Rear Camera is On or Off.
- Touch to shift shift Headlamp is On or Off.
ON: When the headlamp of the car is turned on, Brightness of screen will shift to the default setting by user. User can also adjust the brightness of screen at this mode.
OFF: When the headlamp of the car is turned on, Brightness of screen will not be affected. - Touch to shift to Brake Detection is On or Off.
- Touch to shift to Subwoofer is On or Off.
- Touch to shift to Beepis On or Off.
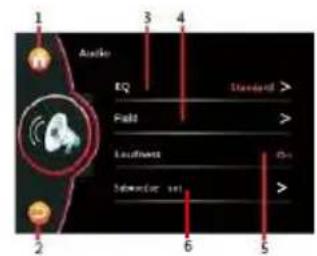
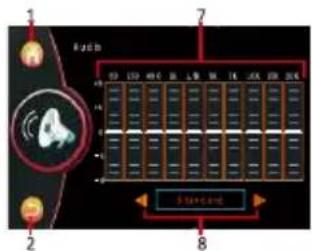
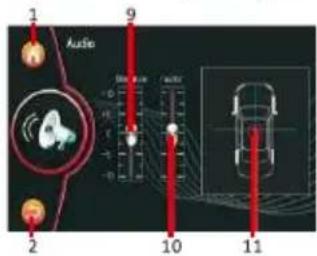
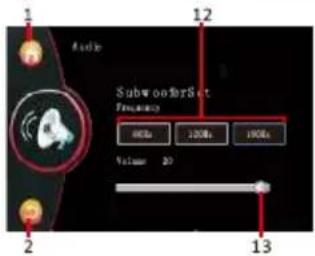
- Touch to shift to MAIN MENU for operation mode selection.
- Touch to back to previous setting menu.
- Touch to access to EQ MENU.
- Touch to access to FIELD MENU for sound output setting.
- Touch to shift LOUNDNESS is On or Off.
- Touch to access to Subwoofer for subwoofer setting.
- At custom control mode, hold and slide the cursor set to desired equalizer level.
- Touch repeatedly to select the desired preset equalizer mode.
- Hold and slide the cursor to set to desired Balance level (Left and right speakers).
- Hold and slide the cursor eo set to desired Fader level (front and rear speakers).
- Hold and slide to adjust the desired output level between left & right speaker as well ad front & rear speaker.
- Choose the different subwoofer frequency: 80Hz > 120Hz > 160Hz.
- Hold and slide to adjust output level.
Operation
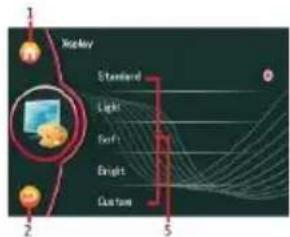
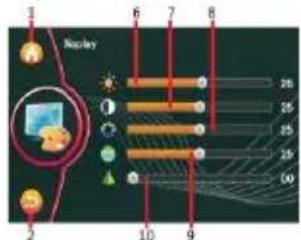
VISUAL SETUP
flowchart
graph TD
    A["Normal"] --> B["Light"]
    B --> C["Off"]
    C --> D["Bright"]
    D --> E["Custom"]
    style A fill:#f9f,stroke:#333
    style E fill:#bbf,stroke:#333
flowchart
graph TD
    A["Node 1"] --> B["Node 2"]
    B --> C["Node 3"]
    C --> D["Node 4"]
    D --> E["Node 5"]
    E --> F["Node 6"]
    F --> G["Node 7"]
    G --> H["Node 8"]
    H --> I["Node 9"]
    I --> J["Node 10"]
    J --> K["Node 1"]
    style A fill:#f9f,stroke:#333
    style B fill:#f9f,stroke:#333
    style C fill:#f9f,stroke:#333
    style D fill:#f9f,stroke:#333
    style E fill:#f9f,stroke:#333
    style F fill:#f9f,stroke:#333
    style G fill:#f9f,stroke:#333
    style H fill:#f9f,stroke:#333
    style I fill:#f9f,stroke:#333
    style J fill:#f9f,stroke:#333
    style K fill:#f9f,stroke:#333
- Touch to shift to MAIN MENU for operation mode selection.
- Touch to back to previous setting menu.
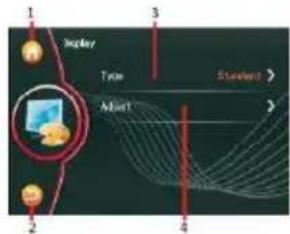
- Touch Type to access to PRESET VISUAL MENU.
- Touch Adjust to access to CUSTOM VISUAL MENU for visual settings.
- Touch to select desired preset visual mode of screen.
- Hold and slide the cursor to set to desired bright -ness level.
- Hold and slide the cursor to set to desired contrast level.
- Hold and slide the cursor to set to desired Hue level.
- Hold and slide the cursor to set to desired Saturation level.
- Hold and slide the cursor to set to desired Sharpness level.
MEDIA SETUP
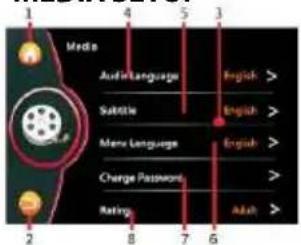
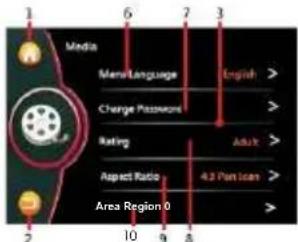
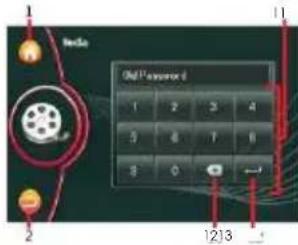
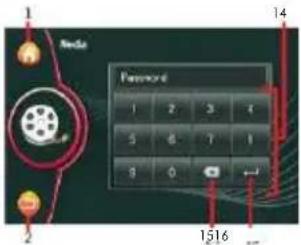
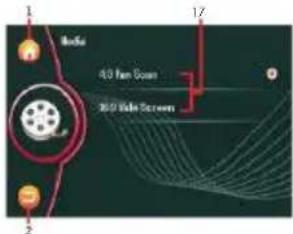
- Touch to shift to MAIN MENU for operation mode selection.
- Touch to back to previous setting menu.
- Hold & slide to show hidden setting items.
- Touch to select desired AUDIO LANGUAGE for DVD playback provided the DVD recorded with relative language.
- Touch to select desired Subtitle LANGUAGE for DVD playback provided the DVD recorded with relative language.
- Touch to select desired MENU LANGUAGE for DVD playback provided the DVD recorded with relative language.
- Touch to activate PASSWORD MEMU for changing.
- Touch to select desired Rating level of video playback.
- Touch to activate ASPECT Ratio Menu to select aspect ratio of screen for viewing.
- Touch to select DVD REGION.
- Input the old password, then allow to set new password.
- Touch to erase the digit that input be error.
- Touch to confirm the input number.
- Touch to input the desired number.
- Touch to erase the digit that input be error.
- Touch to confirm the input number.
- Touch to select aspect ratio of screen for viewing.
Operation
Note:
- During DVD plauback, new setting on "Audio Language", "Subtitle Language", "Menu Language", can not be activated. It is recommended to make relative setting before inserting a DVD for playback.
- Default password is "0000" or "8888".
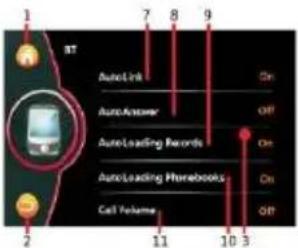
Bluetooth SETUP
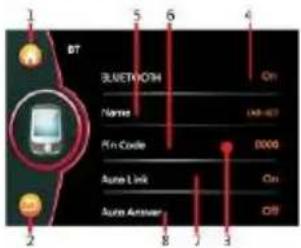
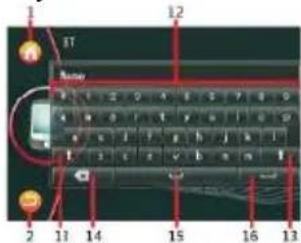
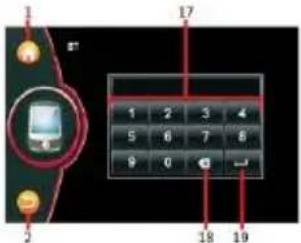
Keyboard Pin Code
- Touch to shift to MAIN MENU for operation mode selection.
- Touch to back to previous setting menu.
- Hold & slide to show hidden setting items.
- Touch to switch the Bluetooth is On / Off.
- Touch to activate KEYBOARD MENU for renaming the device. (Default name is "CAR-KIT").
- Touch to activate PIN CODE MENU for changing the pin code of the device. (Default code is "0000" or "8888").
- Touch to turn on or off of Auto Link with mobile phone.
(Note: When auto connect is turn on, the unit will connect to the linked-up mobile phone after ignition of the car)
-
Touch to turn on or off of auto answer when an incoming call received.
-
Touch to turn on or off of automatic
loading record of incoming calls / dial out/missing calls of the mobile phone to the car unit.
(Note: Loading of record will start automatically when the unit linked-up mobile phone and shift to BT RECORD MENU at first time.)
- Touch to turn on or off of auto loading phonebook once the unit linked-up with the mobile phone.
- Touch to turn on or off the default volume level during Bluetooth conversation.
ON Mode: Volume level at Bluetooth conversation is shifted to the default volume level.
OFF Mode: Volume level at Bluetooth conversation is same as current volume level.
(Note: Volume level can be adjusted at any time during Bluetooth conversation).
- Touch to input the new name of device.
- Touch to shift between caital letter or small letter.
- Touch to erase the digit or letter input by error.
- Touch for spacing.
- Touch to confirm.
- Touch to input the new pin code of the device.
- Touch to confirm.
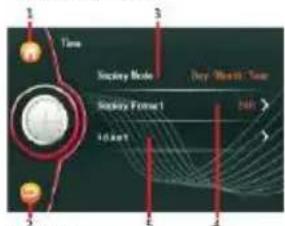
CALENDAR & CLOCL SETUP
CALENDAR
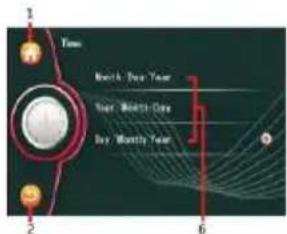
TIME
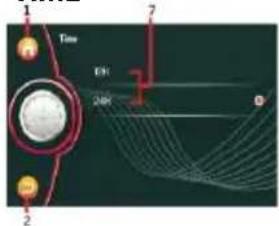
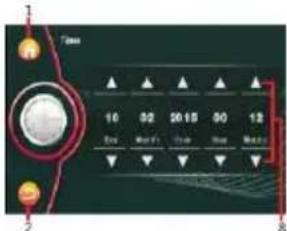
Operation
- Touch to shift to MAIN MENU for operation mode selection.
- Touch to back to previous setting menu.
- Touch to activate CALENDAR FORMAT MENU for date/ month/year format setting.
- Touch to activate CLOCK FORMAT MENU for 12H / 24H format setting.
- Touch to activate SETTING MENU for calendar & time setting.
- Touch to select calendar display format.
- Touch to select clock display format.
- Touch repeatedly to set for calendar & clock.
ILLUMINATION BACKLIGHT
AUTO PRIMARY
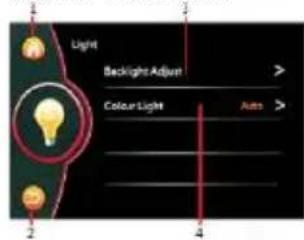
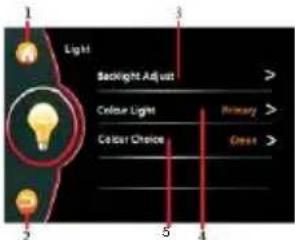
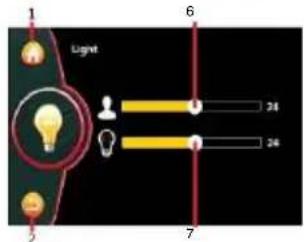
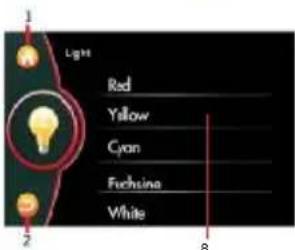
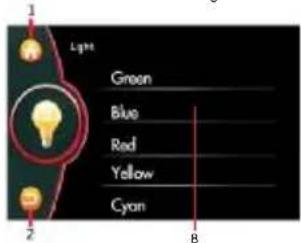
- Touch to shift to MAIN MENU for operation mode selection.
- Touch to back to previous setting menu.
-
Touch to activate Backlight Adjust Menu for operation.
-
Touch to select illumination mode:
AUTO or PRIMARY.
- Touch to select backlight color.
- Hold & slide to set brightness of screen when brightness of screen is set an USER Mode.
- Hold & slide to set rightness of screen when brightness of screen is set an USER SETTING MODE under headlamp detection at ON mode (refer to MAIN MENU OPERATION).
- In Primary mode-Color Choice, you can choose desired backlight color: Green>Blue>Red>Yellow>Cyan>Fuchsine>White
STEERING WHEEL CONTROL
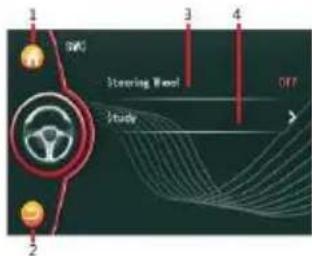
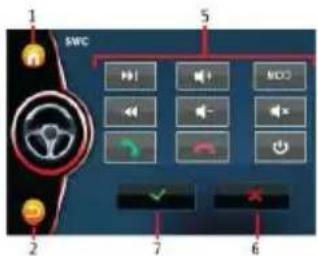
- Touch to shift to MAIN MENU for operation mode selection.
- Touch to back to previous setting menu.
- Touch to turn on or off SWC (when the steering wheel control wires - gray & green as well as the ground wire connected).
-
Touch to activate SWC STUDY MENU for steering wheel control learning & setting as below:
-
touch any control key "5" on screen.
- press and hold the respective control of the steering wheel of car.
- the unit starts learning and once completed, indicator appears on screen.
- follow the above stepes to set all other controls.
-
press "6" to cancel the setting.
-
Show the items available for setting.
- Touch to cancel settings.
- When study & setting completed, touch to confirm the setting.
Operation
- Touch to shift to MAIN MENU for operation mode selection.
- Touch to back to previous setting menu.
- Touch to calibration.
VERSION
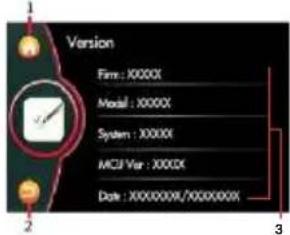
- Touch to shift to MAIN MENU for operation mode selection.
- Touch to back to previous setting menu. Brightness.Contrast,Hue, Saturation, Sharpness.
- Show the version information.
RADIO OPERATION

At MAIN MENU, touch on screen and shift to Radio for radio operation.
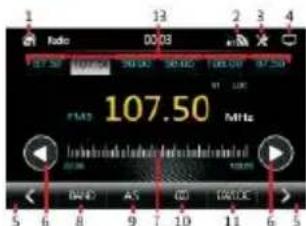
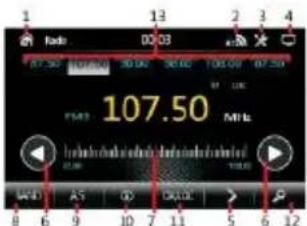
- Touch to shift to MAIN MENU for operation mode selection.
- Touch to access to Bluetooth page quickly.
- Touch access to Audio & Video settings quickly.
- Touch to turn off the screen.
-
Press repeatedly to fine tune the radio frequency upward or downward.
-
Touch to turn the radio frequency upward or downward and stop for broadcasting when a station received. Press & hold shortly to activate manual tuning mode. At this mode, press repeatedly to fine tune the radio frequency upward or downward.
- Touch, hold & slide the desired frequency, release for broadcasting.
- Touch repeatedly to select radio band for broadcasting.
- Touch to start searching the radio frequency & storing the strongest signal station into memory. After one cycle searched, the unit starts intro broadcasting of the preset memory stations for a few seconds.
- Touch to select Stereo (ST) or MONO at FM radio. When stereo signal received, stereo indicator will be appeared on screen and this is no indicator for mono mode.
- Touch to select Local(LOC) setting for reception of strong signal stations and a distant(DX) setting for reception of weak stations at FM radio band. When Local setting is selected, LOC will be appeared on screen and this is no indication for DX.
- Touch to start into broadcasting of preset memory stations for a few seconds. Touch again to stop this intro broadcasting.
- This shows the preset memory station. Touch any one of the preset station to have broadcasting of relative station. Touch & hold shortly on any one of the preset station, the current broadcasting station / frequency will be stored in the respective preset memory station.
At MAIN MENU, touch on screen and shift to disc / USB / SD input mode for media playback. At media playback mode and depends on the input device and playback media recorded, touch on screen to show various PLAYBACK MENUS for operation.
Note:
Due to the law of some countries and areas, watching video is not allowed during driving. To allow video playback, parking brake must be engaged (light green wire - parking brake input must be connected).
Operation
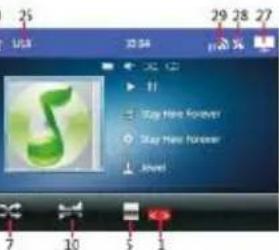
MUSIC PLAYBACK MENU
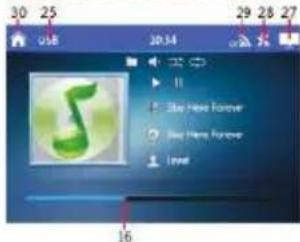
PHOTO PLAYBACK MENU
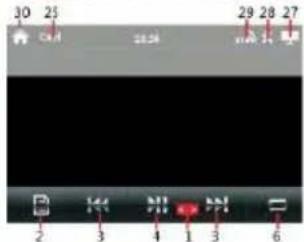
PHOTO PLAYBACK MENU
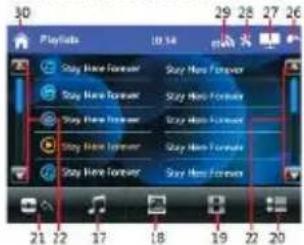
FOLDER PLAYLIST
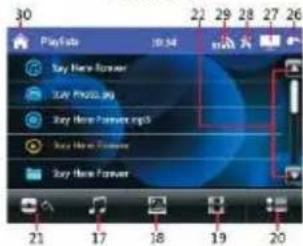
PLAYLIST
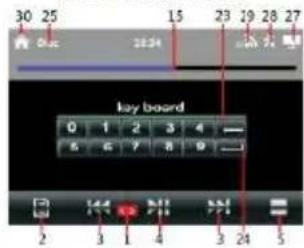
KEYBOARD MENU
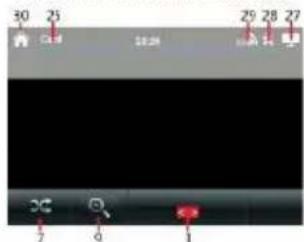
- Hold and slide to show the hidden operation icons for operation.
- DVD Mode
Touch to display on screen the menu of the disc & playback will resume after a while.
Video / Music / Photo Mode
Touch to shift to FOLDER / PLAYLIST MENU for playback selection. Touch once or twice (as the case may be) on the selected folder / track for playback.
- Touch to shift to next or previous track for playback. At DVD / VCD / video / music playback mode, touch & hold shortly to activate fast forward or fast rewind mode. At this mode, touch repeatedly to select various speed on fast forward or fast rewind.
- Touch to start, pause or resume playback.
- At video playback mode under disc input, touch to stop playback.
At music / photo playback mode under disc input and playback mode under USB/SD card input, touch to stop playback temporary and will shift to playlist for playback selection. Touch twice on the selected track for playback or normal playback will resume after a while.
- Touch repeatedly to select various repeat playback modes of the input device.
- Touch to turn on or off of random playback mode of the input device.
- Touch repeatedly to view the angle changes in sequential order (available for DVD recorded with multi-angle senses).
- Touch repeatedly to zoom in and zoom out of screen for viewing.
- Touch repeatedly to select the audio output channels that recorded in the playback device.
- Touch repeatedly to select different sub-titles that recorded in the playback device.
Operation
- At video playback mode, touch repeatedly to select different speeds of slow motion playback.
- DVD Mode, touch to display on screen the menu of the disc.
VCD mode, touch to turn on or off of PBC mode. At PCB on mode, playback will start at the beginning in sequence order.
- Touch to activate KEYBOARD INTERFACE to input track number directly for playback
15.Hold & slide to select the position (time) for playback. - Hold & slide to select the position (time) for playback. (for music).
- Touch to select music playback mode.
- Touch to select photo playback mode.
- Touch to select video playback mode.
- Touch to shift to FOLDER PLAYLIST or PLAYLIST to select desired folder or file for playback.
To start playback, touch twice on the selected track.
-
Touch to shift to previous FOLDER / PLAYLIST MENU.
-
Touch to shift page up or down.
- Touch to erase the digital input by error.
- Touch to confirm the playback after inputting the track number.
- Show current playback device (DISC/USB/SD).
- Touch to shift back to PLAYBACK MENU.
- Touch to turn off the screen. When the screen is off, touch any portion of screen to turn on the screen.
- Touch to activate AUDIO & VISUAL MENU for various audio & visual settings.
- This Bluetooth icon will light up if the unit has connected to a mobile phone.
Touch to access Bluetooth operation.
- Touch to shifr screen to MAIN MENU.
BLUETOOTH OPERATION

At MAIN MENU, touch on screen and shift to PHONE (KEYPAD) MENU for Bluetooth Operation.

At MAIN MENU, touch on screen and shift to BT MUSIC for Bluetooth music operation.
LINK UP WITH MOBILE PHONE
To linkup Bluetooth connection with the mobile phone, take your phone and follow the steps:
- set the mobile phone to Bluetooth state
- start to search new device
- after searched, new device (model number of this unit) searched out, confirm the search
- in case of need, input default code "0000" or "8888" in the mobile phone
- at the same time, Bluetooth icon light up on screen
- connection succeeded and you can start using Bluetooth function.
(NO CONNECTION)
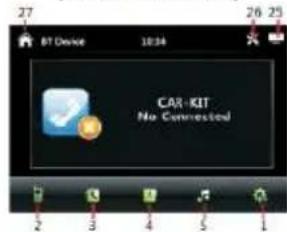
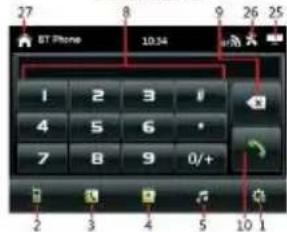
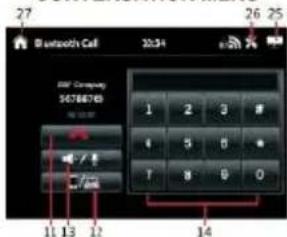
DIAL MENU
(CONNECTED)
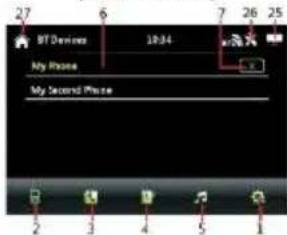
INCOMING CALL MENU
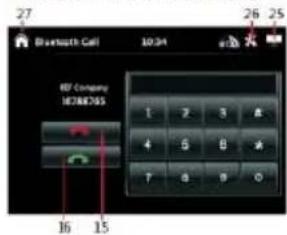
CONVERSATION MENU
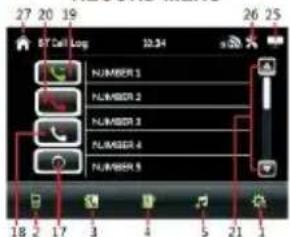
RECORD MENU
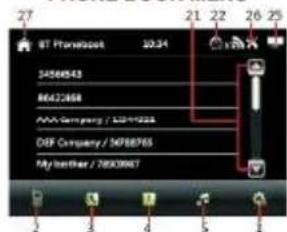
PHONE BOOK MENU
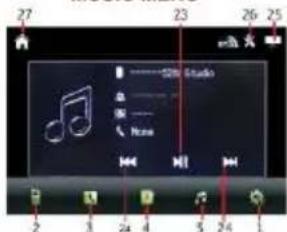
MUSIC MENU
Operation
-
Touch to shift to BT DEVICE MENU to show the current status on connection.
-
Touch to shift to PHONE (KEYPAD) MENU for dial out.
-
Touch to shift to PHONE (PHONEBOOK) MENU to show the phone book of the connected mobile phone.
-
Touch to shift to PHONE (RECENT) MENU to show the record on incoming / outgoing / missing calls.
-
Touch to shift to BT MUSIC for transmission of music playback from the connected phone.
-
Touch to select the linked uo device.
-
Touch to delete the linked up device.
-
Touch to input the phone number for dial out.
-
Touch to erase the digit input by error.
-
Touch to dial out after input the phone number or redial the last call number when no phone number input.
-
Touch to hang up or refuse an incoming call.
-
Touch to shift conversation from Bluetooth of the unit to the mobile phone.
-
Touch to turn on or off of sound muting of the microphone of the unit.
-
Touch to input the data.
-
Touch to hang up or refuse an incoming call.
-
Touch to pick-up an incoming call.
-
Touch to start downloading / updating the call history of the linked-up phone to the unit.
-
Touch to show the missing call history.
-
Touch to show the incoming call history.
-
Touch to show the outgoing call history.
-
Touch to shift page up or down.
-
Touch to start downloading / updating the call history of the linked-up phone to the unit.
-
Touch to start / pause / resume playback transmitted from the mobile phone.
-
Touch to shift to previous or next track for playback.
-
Touch to turn off the screen. When the screen is off, touch any portion of screen to turn on the screen.
-
Touch to activate AUDIO & VISUAL MENU for various audio & visual settings.
-
Touch to shifr screen to MAIN MENU.
APPLICATION TO CONTROL THE UNIT VIA BLUETOOTH OF MOBILE PHONE (Android support only)
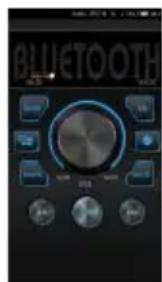
User can download the following APP to the mobile phone in order to have control of the headunit by mobile phone via Bluetooth. Take you phone and follow the steps:
- for Android device, search "iCon" from Google Store and download & install,
-After installation, open the application:

- The following menu appeared in the mobile phone and you can start control the headunit with this menu (Bluetooth must be connected):
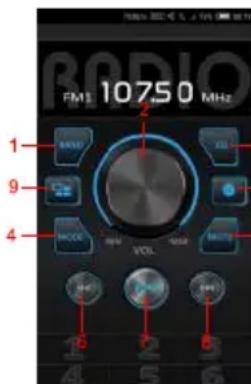
- The following shows the control option:
-
Radio band selection
-
Adjust the volume up or down
-
Adjust the EQ selection
-
Select the desired mode
-
Mute or Unmute
-
Upward operation
-
Play/Pause control
-
Downward operation
-
Back to homepage
-
Settings
Remarks: The operation under this application is limited to some modes and controls only>
Operation
At MAIN MENU, touch on screen to shift to AUX IN MENU for audio input operation (provided an AV device had been connected).
During AUX input operation, touch any portion on screen to activate AUX IN operation.
AUX MODE
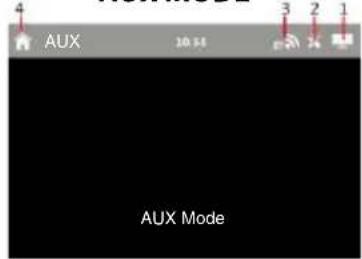
- Touch to turn off the screen. When the screen is off, touch any portion of screen to turn on the screen.
- Touch to activate AUDIO & VISUAL MENU for various audio & visual settings.
- This Bluetooth icon will light up if the unit has connected to a mobile phone. Touch to access Bluetooth operation.
- Touch to shifr screen to MAIN MENU.
Front Camera OPERATION Front Camera OPERATION

At MAIN MENU, touch on screen to shift to front camera viewing (provided front camera and the pink/black wire connected).
At Front camera viewing mode, touch any portion on screen to activate FRONT CAMERA INPUT MENU for operation.
natural_image
Black image with a small icon labeled 'C-CAM' at the top left corner (no other text or symbols)- Touch to shifr screen to MAIN MENU.
At MAIN MENU, touch to select the desired wallpaper of the headunit.
At MAIN MENU, touch on screen to start mobile phone linking (mirror linking) of the connected mobile phone operation. Follow the instruction as shown on screen for the first time connection.
For ISO devices, mobile phone linking operation will start automatically without any setting. Mirror linking appeared on screen and mobile operation can be controlled by touching screen of the headunit.
For Android devices, when the phone is connected at the first time, SETUP MENU appeared on screen.
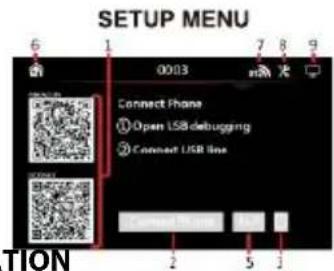
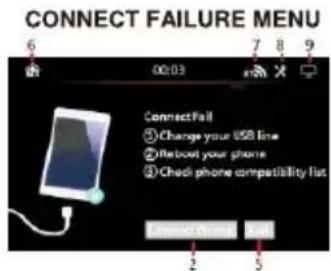
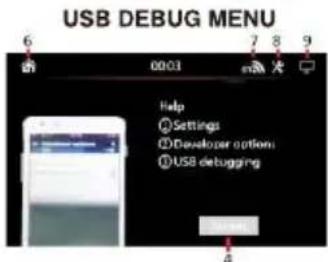
- Scan the QR code by using the connected android phone.
Follow the instruction of the connected phone & download "AUTOLINK" application from Google Play Store or Amazon site.
Open "AUTOLINK" application after download, mirror linking appeared on screen and mobile phone operation can be started and controlled by touching screen of the headunit.
Operation
- Touch to connect with the mobile phone.
- Touch to shift to USB DEBUG MENU and follow the information to have USB debug on the mobile phone before connecting again.
- Touch to return to SETUP MENU.
- Touch to exit mobile phone linking operation and shift to previous operation mode.
- Touch to shifr screen to MAIN MENU.
- This Bluetooth icon will light up if the unit has connected to a mobile phone. Touch to access Bluetooth operaion.
- Touch to activate AUDIO & VISUAL MENU for various audio & visual settings.
- Touch to activate AUDIO & VISUAL MENU for various audio & visual settings.
Important notice on mobile phone linking operation on Android mobile phone:
- This head unit supports Android phone 6.0 or above with USB mirror linking function.
- USB cable should be used to connect the phone to the front USB slot of the head unit.
- In case connection failed, SETUP MENU will remain on screen.
- Phone set up may be varied from different phones and USB debug may be necessary. Refer to the operation method of the mobile phone for details (usually at setting mode >developer options >USB debugging).
- Depends on the connected smart phone, operation & setting may varied.
At PHONELINK operation and when this floating dock icon appeared on screen, touch to activate FLOATING DOCK MENU on screen for various functions and controls of the unit.
This menu will be closed when no operation for a while.
Touch any blank portion on screen will also close this menu.
FLOATING DOCK FLOATING DOCK
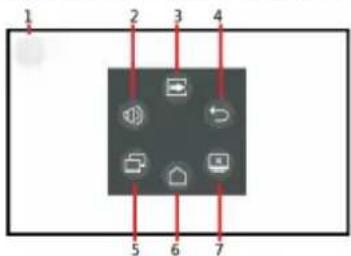
- Touch to activate FLOATING DOCK MENU on screen for various functions and controls of the unit. Hold & slide can move this icon to other desired position on the screen.
- Touch to activate volume & sound mute control of the car unit.
- Touch to shift screen to the MAIN MENU of the car unit.
- Touch to shift screen to previous page of the connected phone.
- Touch to shift horizontal / vertical viewing of the connected phone.
- Touch to shift screen to the main menu of the connected phone.
- Touch to turn off the screen. When the screen turned off, touch any portion of the screen to turn the screen on.
the main menu of the
een. When the screen portion of the screen to
Specification
GENERAL
Power Requirement:
Load Impedance:
Maximum Power Output:
AM RADIO SECTION
Frequency Range
FM RADIO SECTION
Frequency Range
DISC SECTION
Disc & media Play:
Mounting Angle:
Aspect Ratio:
VIDEO SECTION
Video System:
TFT Screen:
BLUETOOTH SECTION
Communication type:
Maximum Distance:
AUDIO SECTION
Maximum Output Level:
Frequency Response:
Signal to Noise Ratio:
Channel Separation:
DC 12 Volts, negative ground
4 Ohms
80 watts x 4
530 - 1710 KHz (America)
522 - 1620 KHz (Europe)
87.5 - 107.9 MHz (America)
87.5 - 108 MHz (Europe)
DVD / VCD / MP3 / CD / JPEG
+/- 30 degree
16:9 / 4:3
PAL / NTSC
800*480 pixel
V4.2
5 meters
4 Vrms (+/-3 dB)
20 Hz to 20 KHz
85 dB
80 dB
Note: Specification and design; functions and features; unit illumination; color and display segment are subject to change without prior notice. Photos and drawings on gift box or operation manual might be varied from the exact unit. Depends on the input devices, operation might be varied or not available from the operation manual described.
SIMPLE TROUBLE SHOOTING
PROBLEMS, CAUSES & SOLUTIONS
No power
- Check and make sure the connecting wires are connected correctly
- Check whether the fuse is blown. Replace with the proper value fuse if necessary.
No sound
- Check and make sure the speaker wires are connected correctly.
No picture
- Check whether the video wire is connected to the video device.
Unit hang-up
- Press the RESET button to reset the unit to its default stage.
No function when pressing the buttons or TFT screen
- Press the RESET button to reset the unit to its default stage.
Poor effect or unable to receive radio
- Check whether the radio antenna is inserted or properly connected.
- Antenna may not be the proper length. Make sure the antenna is fully extended.
- Antenna may be poorly grounded. Check and make sure the antenna is properly grounded.
Stereo cannot be received under radio mode
- Tune the radio frequency accurately.
- The broadcasting signal is too weak, set the mode to MONO & DX modes.
Disc inserted but cannot play
- Check whether the disc inserted upside down.
- Check whether the disc is dirty or badly cracked.
- Lens is dirty. Clean lens by using the lens clean disc.
Abnormal moving, skipping or sound during playback
- The disc is dirty or damaged. Wipe the disc with a dry soft cloth or replace a new disc.
Remote handset does not work
- Replace new battery of the remote handset.
- Point the remote handset directly at the remote sensor of the main unit. s
- Clean the surface of the remote sensor.
Bluetooth not operated
- check the devices are linked up correctly.
Note
After the above efforts, if the unit still cannot be worked normally, consult your service dealer. Never attempt to disassemble the unit by yourself. No service part inside the unit.
- Contents
- Before use
- Installation
- Basics
- Operation
- IMPORTANT NOTICE & PRECAUTIONS
- Protecting the monitor
- Note:
- Parking Wire
- Speaker connection
- Wiring Diagram
- Panel description Remote control
- Microphone
- Disc slot
- Reset
- Power / Mute
- + (Volume)
- - (Volume)
- USB
- Remote Sensor
- Eject button
- ➕ Return button
- Mode button
- SD slot
- AUX
- Remote control
- [ ⏻/※]
- EQ/LOUD ]
- SOURCE ]
- Cleaning the Unit
- CAUTION
- How to reset your unit
- Supplied accessories
- Before installation of this unit, please note the following precautions.
- WARNINGS
- [ BND/■ ]
- (BT Music)
- [ENT]
- [ ▲/▼/▶/◀ ]
- [◀]
- Q[SD ]
- AUDIO ]
- [REPEAT]
- SUB-Title ]
- [ZOOM]
- [SLOW]
- [VOL+/VOL-]
- [▶]
- [CLR/SYSTEM]
- [ ]
- [ PHONE ]
- [▶]
- ANGLE ]
- 20INT ]
- [TITLE ]
- \$ETUP ]
- MENU ]
- NUMBERS ]
- Visual Control
- AUTO or PRIMARY.
- BLUETOOTH OPERATION
- LINK UP WITH MOBILE PHONE
- APPLICATION TO CONTROL THE UNIT VIA BLUETOOTH OF MOBILE PHONE (Android support only)
- Front Camera OPERATION Front Camera OPERATION
- Important notice on mobile phone linking operation on Android mobile phone:
- Specification
- GENERAL
- AM RADIO SECTION
- FM RADIO SECTION
- DISC SECTION
- VIDEO SECTION
- BLUETOOTH SECTION
- AUDIO SECTION
- SIMPLE TROUBLE SHOOTING
- PROBLEMS, CAUSES & SOLUTIONS
- No power
- No sound
- No picture
- Unit hang-up
- No function when pressing the buttons or TFT screen
- Poor effect or unable to receive radio
- Stereo cannot be received under radio mode
- Disc inserted but cannot play
- Abnormal moving, skipping or sound during playback
- Remote handset does not work
- Bluetooth not operated
- Note
Brand : Soundstream
Model : VRN-64HBL
Category : Uncategorized