
B-Safe Gen2 - Car seat BRITAX - Free user manual and instructions
Find the device manual for free B-Safe Gen2 BRITAX in PDF.


| Product Type | Infant Car Seat and Base |
| Brand | Britax |
| Model | B-Safe Gen2 |
| Weight Range | 4–35 lbs (1.8–15.8 kg) |
| Height Limit | Up to 32 inches (81.3 cm) |
| Orientation | Rear-facing only |
| Certification | FMVSS 213; Certified for aircraft use |
| Installation Methods | With base: lower anchors, lap-shoulder belt, lap belt; Without base: lap-shoulder belt, lap belt |
| Harness Type | 5-point harness with adjustable height |
| Harness Adjustment | Two loop positions: inner loop for <11 lbs, outer loop for ≥11 lbs; harness slots at or below shoulders |
| Recline Adjustment | Base: recline adjustment foot with level indicator; Without base: level line on shell must be level to ground |
| Handle Positions | 4 locked positions; Position 1 for carrying |
| Accessories Included | Canopy, head pad, comfort pads, chest clip, belly pad, stroller adapters |
| Stroller Compatibility | Compatible with Britax strollers (requires adapters) |
| Cover Care | Machine washable (check care label); do not bleach or iron |
| Shell Care | Sponge clean with warm water and mild soap; towel dry |
| Harness Care | Sponge clean with warm water and mild soap; towel dry; do not machine wash or dry |
| Buckle Care | Rinse with warm water only; test for click; do not use soap or lubricants |
| Warranty | 1 year limited warranty from date of original purchase |
| Lifespan | 6 years from date of manufacture; replace after moderate or severe crash |
Frequently Asked Questions - B-Safe Gen2 BRITAX
User questions about B-Safe Gen2 BRITAX
0 question about this device. Answer the ones you know or ask your own.
Ask a new question about this device
Download the instructions for your Car seat in PDF format for free! Find your manual B-Safe Gen2 - BRITAX and take your electronic device back in hand. On this page are published all the documents necessary for the use of your device. B-Safe Gen2 by BRITAX.
USER MANUAL B-Safe Gen2 BRITAX
natural_image
Illustration of a baby car seat with a red ribbon at the base (no text or symbols)B-SAFE® GEN2
User Guide
Guía del usuario
Contents
Features......2
Safety Information......4
Important Notes 6
Certification 7
Registration 8
Child Fit Information....9
Using With the Base....10
Overhang....10
Adjusting the Recline Angle 10
Lower Anchor Installation....12
Lap-Shoulder Belt Installation 14
Lap Belt Installation....16
Attaching the Infant Car Seat....18
Removing the Infant Car Seat....18
Uninstalling the Base 19
Using Without the Base 20
Adjusting the Recline Angle 20
Lap-Shoulder Belt Installation....22
Lap Belt Installation....24
Securing Your Child....26
Child Seat Functions ....30
Adjusting the Harness....30
Adjusting the Buckle 31
Handle Position....33
BRITAX Strollers 34
Using the Lower Anchors....35
Using the Lower Connectors 36
Vehicle Compatibility....37
Care and Maintenance....39
Warranty 44
BRITAX® and B-SAFE® are trademarks owned by Britax and registered in the U.S.A. and other countries. All rights reserved. ©2021 Britax Child Safety, Inc. This product and its components are subject to change without notice. P13118600_A:01.21
BRITAX Child Safety, Inc.
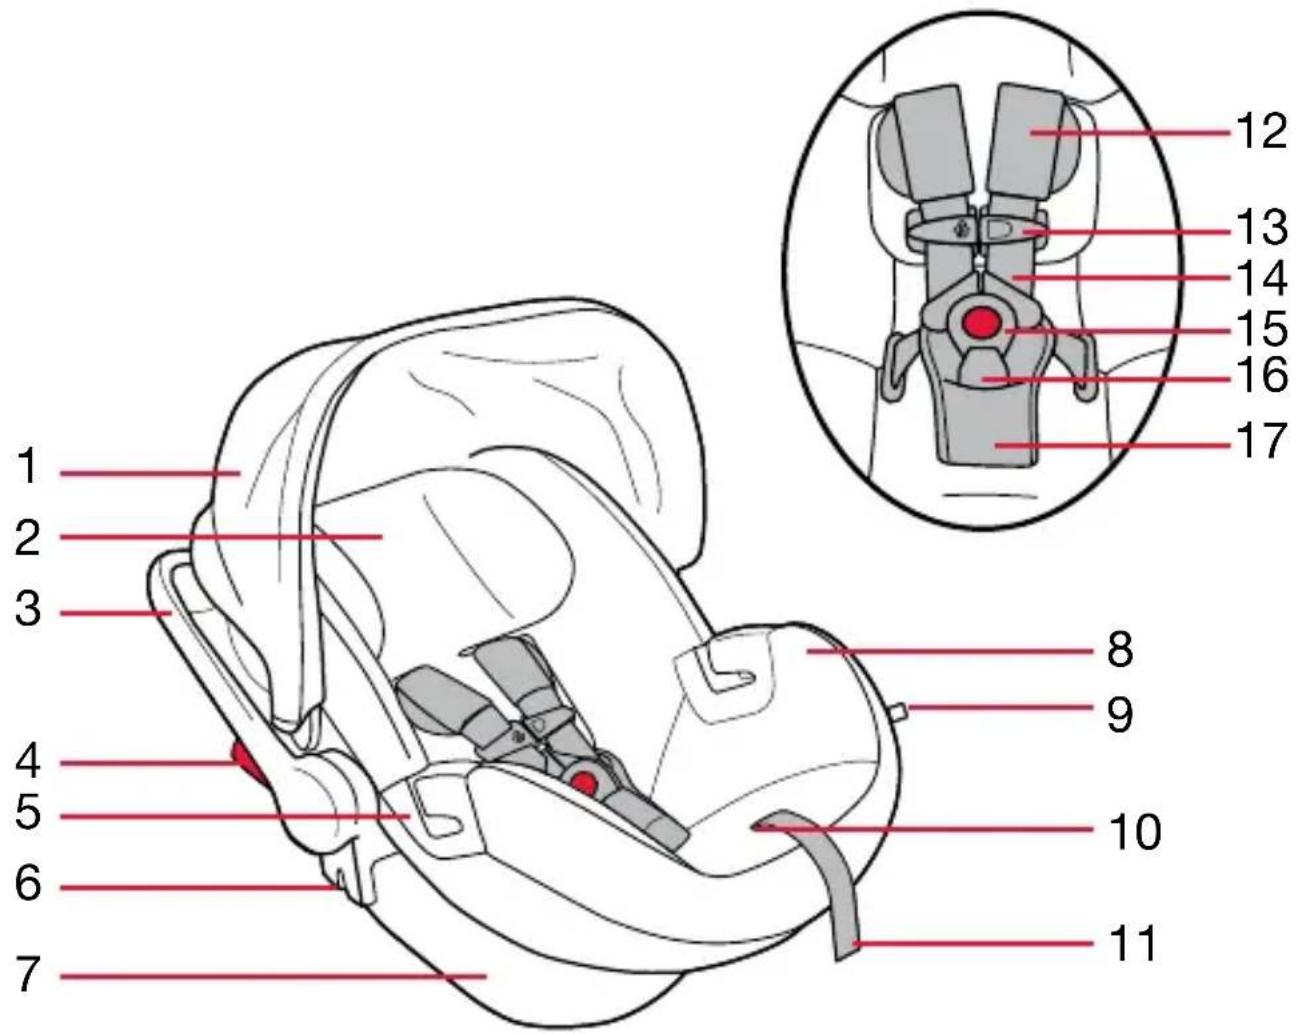
Features
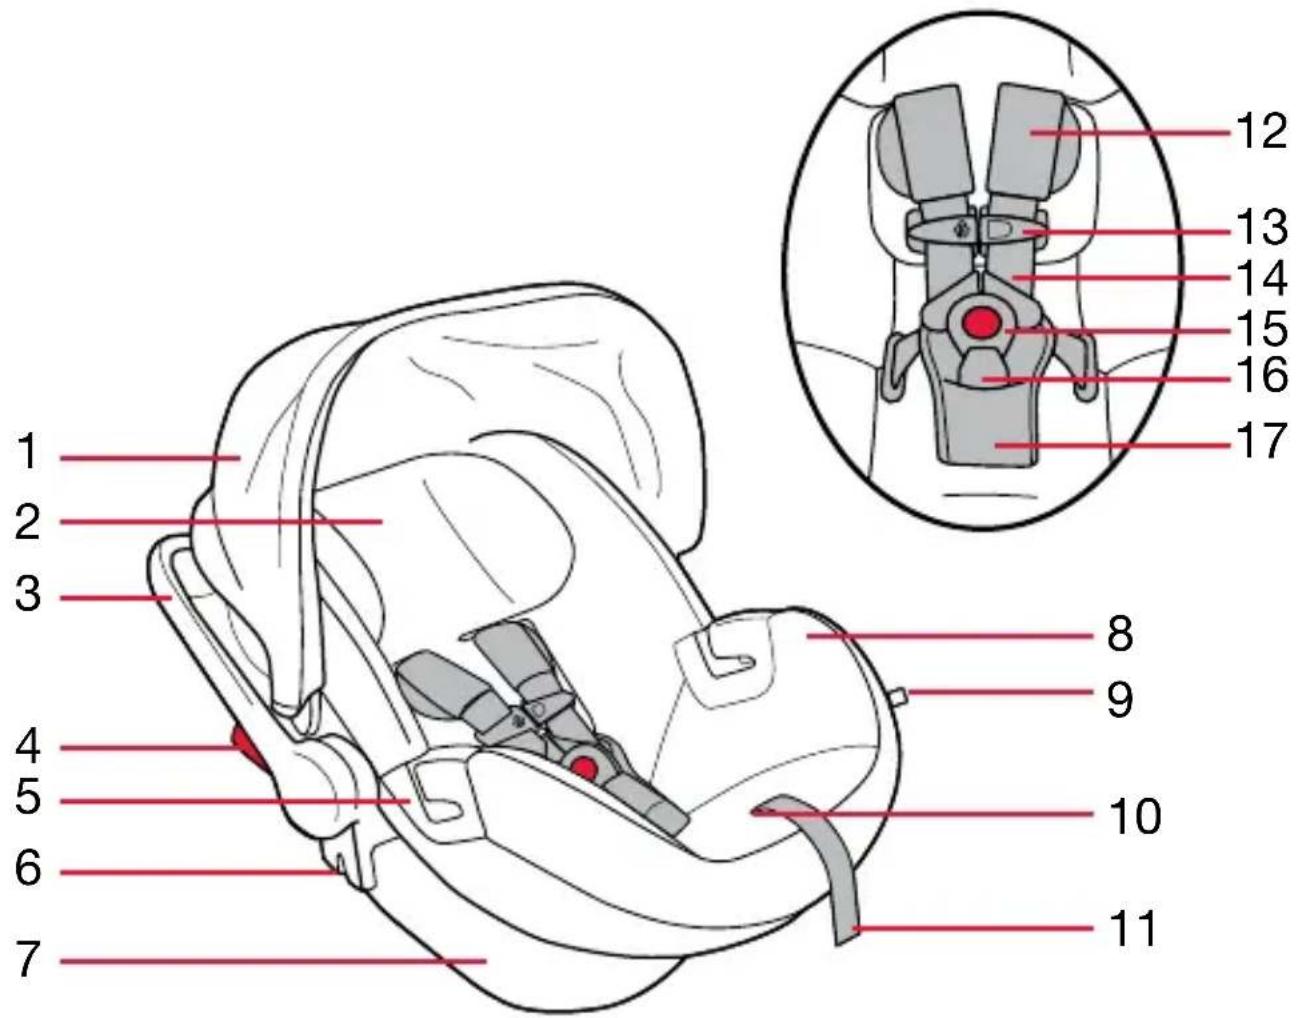
- Canopy
- Head Pad (optional)
- Carry Handle
- Carry Handle Adjuster
- Carrier Only Belt Guide/Harness Holder
- Stroller Adapter
- Shell
-
Cover
-
Easy Remove Cover Tab
- Harness Adjuster Lever (under cover)
- Harness Adjuster Strap
- Comfort Pads (optional)
- Chest Clip
- Harness Straps
- Harness Buckle
- Buckle Strap
- Belly Pad
B-SAFE GEN2 User Guide
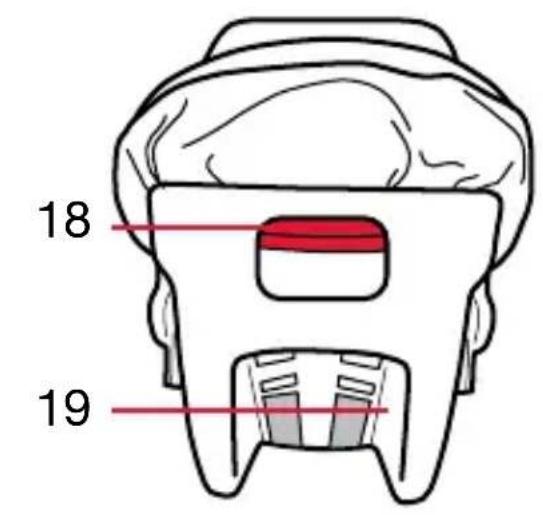
- Release Lever from Base and Stroller
- Serial Number & Manufacture Date Label
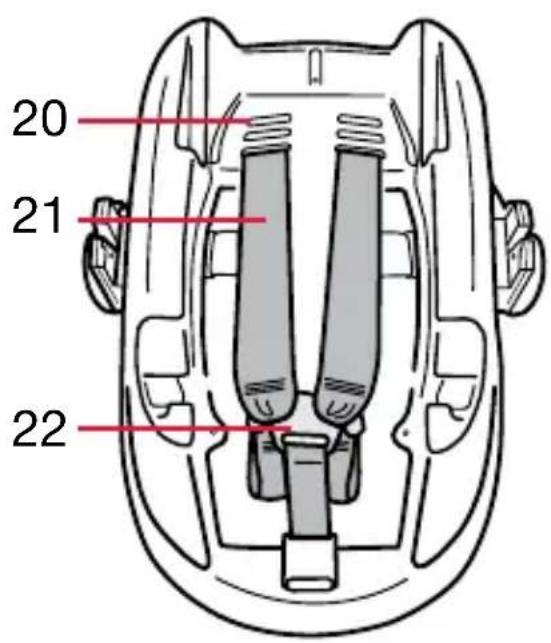
- Harness Slots
- Harness Straps
-
Harness Yoke
-
Recline Angle Indicators
- User Guide Storage
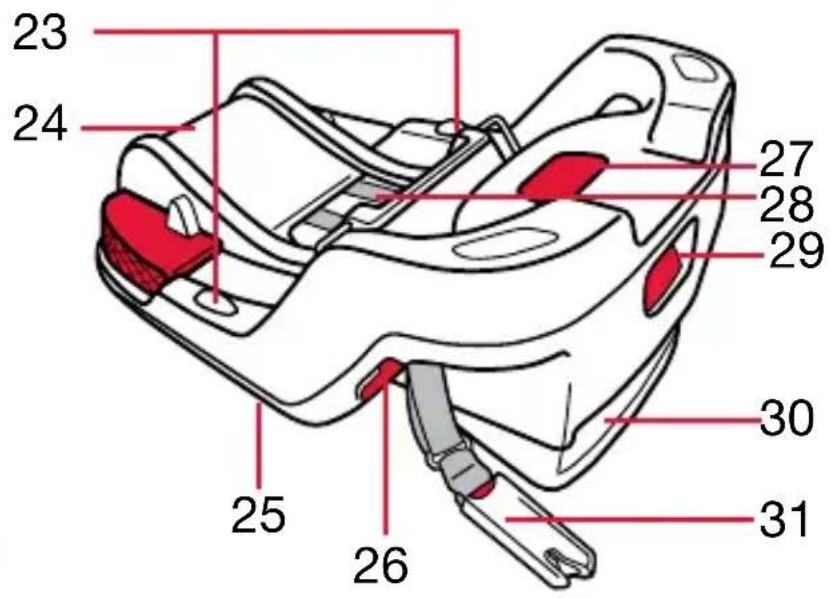
- Base Serial Number and Manufacture Date Label (Underside of the Base)
- Shoulder Belt Lock-Off
- Lower Connector Release Button
- Lower Connector Strap
- Recline Adjustment Lever
- Recline Adjustment Foot
- Lower Connector
BRITAX Child Safety, Inc.
Safety Information
WARNING!
Failure to follow all warnings and instructions could result in SERIOUS INJURY or DEATH.
Read all instructions before use of the infant carrier.
- Use only in a rear-facing position when using it in a vehicle.
- Use only with children who weigh between 4 and 35 pounds (1.8 and 15.8 kg) and whose height is 32 inches (81.3 cm) or less.
- Snugly adjust the belts provided with this child restraint around your child.
- Secure this child restraint with the vehicle’s child restraint anchorage system if available or with a vehicle belt. Using both methods is not approved and may cause the child seat not to perform as intended.
- Follow all instructions on this child restraint and in the written instructions located in the base storage compartment. Keep the instructions with the restraint for future use.
- Register your child restraint with the manufacturer.
- In a vehicle with rear designated seating positions, vehicle owners should be alerted that, according to accident statistics, children are safer when properly restrained in the rear seating positions than in the front seating positions. To ensure your child’s safety, please study Vehicle Seating Positions on page 37 and consult your vehicle owner’s manual.
- This infant car seat must not be used in boats or other non-certified applications.
- NEVER leave child unattended.
B-SAFE GEN2 User Guide
- The use of non-BRITAX covers, inserts, toys, accessories, or tightening devices is not approved by BRITAX. Their use could cause this child seat not to perform as intended in a crash.
- ALWAYS check the back seat upon leaving your vehicle to prevent leaving a child restrained in the infant car seat alone in the vehicle.
- Suffocation Hazard: Infant carrier can roll over on soft surfaces and suffocate child. NEVER place carrier on beds, sofas, or other soft surfaces.
- Fall Hazard: Child's activity can move carrier. NEVER place carrier on counter tops, tables, or any other elevated surface.
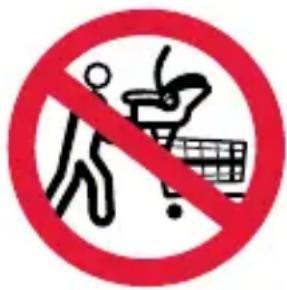
- Fall Hazard: The carrier can fall from the shopping cart. DO NOT use on shopping carts.
- Strangulation Hazard: Children have STRANGLED in loose or partially buckled harness straps. Fully restrain the child even when carrier is used outside the vehicle.
- ALWAYS lift infant car seat by handle after installation in base to verify that it is secure.
- DO NOT use the infant carrier if it is damaged or broken.
- To prevent injury due to deterioration or hidden damage, DO NOT use this infant car seat and base if it is older than six (6) years or has been in a moderate or severe crash. See date of manufacture located on the infant car seat and base.
- Always make sure the child restraint system is secured to the vehicle, even when unoccupied, since in a crash an unsecured child restraint system may injure occupants.
BRITAX Child Safety, Inc.
- The primary protection for occupants of a vehicle in a collision is the body of the vehicle itself; a child seat will not protect a child when a vehicle is seriously impacted. However, correctly installed, a child seat will substantially improve chances for survival in most crashes. Make sure all users fully understand the correct ways to use this child seat in a vehicle.
Important Notes
- Discontinue use of this child seat if it has been in a moderate or severe crash. It is not necessary to replace a car seat after a minor crash defined by the U.S. National Highway Traffic Safety Administration (NHTSA) as:
a. The vehicle is driveable from the crash site; and
b. The vehicle door nearest the child seat was not damaged; and
c. No vehicle occupants were injured; and
d. There is no visible damage to the child seat; and
e. The airbags (if present) did not deploy.
- Verify that the child restraint and child restraint belts or straps do not interfere with the opening and closing of the vehicle door.
- Consult vehicle user guide to ensure child restraint installation does not interfere with function of vehicle seats.
- Snugly adjust the belts provided with the child restraint around your child. A snug strap should not allow any slack. You should not be able to pinch excess.
- Ensure the lower harness (waist) straps are firmly adjusted in a position so that the child’s pelvic area is secure.
B-SAFE GEN2 User Guide
- Ensure the upper harness (shoulder) straps are firmly adjusted so that the child is secure.
- Do not, except as described in this booklet, attempt to disassemble any part of the child seat or change the way the harness or vehicle's seat belts are used.
- Do not allow children to play with this child seat.
- Do not use anything to raise the child seat off vehicle seat except as described in these instructions. In a crash, this could cause the child seat not to perform as intended.
- Never use the adjuster strap to lift or carry this infant car seat. Doing so could cause damage to the harness adjuster and webbing. Always carry an infant car seat by the handle or shell.
- Store the infant car seat in a safe, dry place when it will not be used for an extended period of time. Do not place heavy objects on top of it.
- Third party recommendations are subject to change, so we recommend you visit their websites for the most up to date recommendations.
Certification

Certified for Aircraft Travel
This Restraint is Certified For Use in Motor Vehicles and Aircraft.
Motor Vehicles
This child seat system conforms to all applicable Federal Motor Vehicle Safety Standards (FMVSS 213).
BRITAX Child Safety, Inc.
Aircraft
* Install your child seat in a window seat to avoid blocking the aisle. For aircraft installation, see Lap Belt Installation instructions without base on pages 24 - 25. DO NOT use the base on aircraft.
* If the aircraft lap belt is too short, ask a flight attendant for a belt extender.
* Inflatable aircraft lap belts are NOT compatible with this child seat.
Registration
Child restraints could be recalled for safety reasons. You must register this restraint to be reached in a recall. Send your name, address, e-mail address if available and the restraint's model number and manufacturing date to Britax Child Safety, Inc. P.O. Box 91167 Allentown, PA 18109-9925, or call 1-888-427-4829, or register online at us.britax.com/registration. For recall information, call the U.S. Government's Vehicle Safety Hotline at 1-888-327-4236 (TTY 1-800-424-9153), or go to http://www.NHTSA.gov.
For your convenience, record all the information about your child seat below. Refer to the Serial Number & Manufactured Date Label for all information, see page 2.
Model Name and Number: ____
Serial Number: ____
Batch Number: ____
Date of Manufacture: ____
Child Fit Information
Rear-Facing Only 4 - 35 lbs (1.8 - 15.8 kg)
Use rear-facing only with children:
• who weigh between 4 and 35 lbs (1.8 and 15.8 kg) and
• who are 32 inches (81.3 cm) in height or less and
- when the top of the head is 1in (2.5 cm) or more below the top of the child seat shell and
- when the harness straps are located in the closest harness slot at or below the child's shoulders.
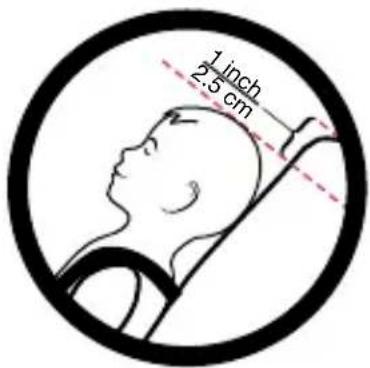
IMPORTANT: See Adjusting the Harness on page 30.
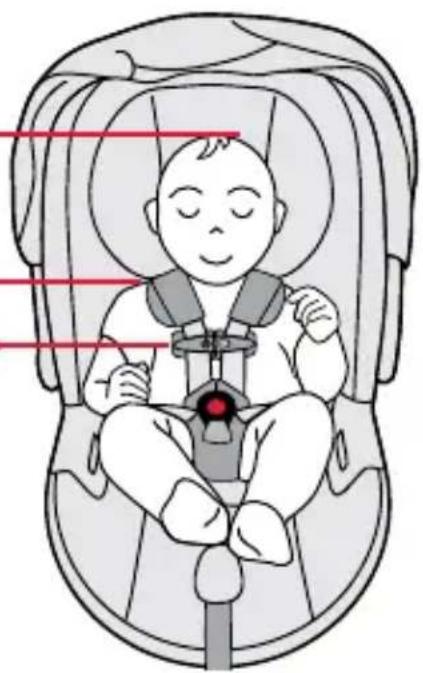
Top of child's head at least 1" (2.5 cm) below top of shell
Harness in closest position at or below shoulder level
Chest clip at armpit level
natural_image
Illustration of a baby wearing a car seatbelt, no text or symbols presentBRITAX Child Safety, Inc.
Using With the Base
Before installing the infant car seat:
- Check that your vehicle seat belt is compatible with the infant car seat by referring to your vehicle owner's manual and page 38 in this user guide.
Overhang
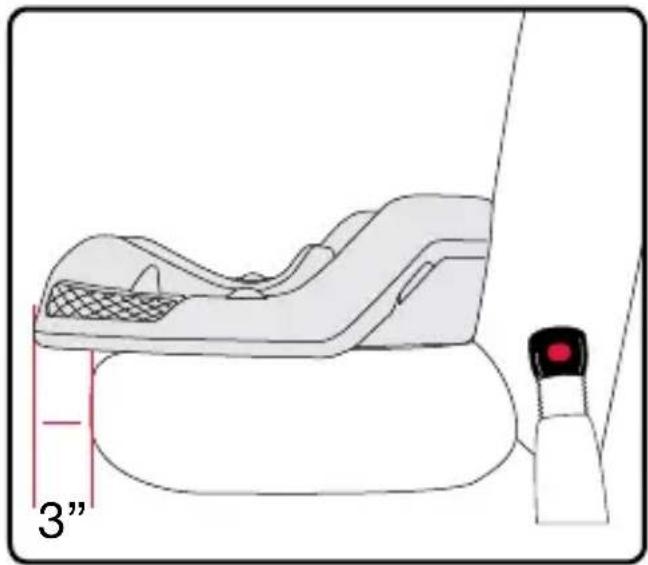
It is important that the base of the child seat rests completely flat on the vehicle seat with no side overhang. It is permissible to allow up to 3 in. (7.6 cm) of the base to hang over the edge of the vehicle seat. Some vehicle seats do not allow enough of the child seat base to contact the vehicle seat. If this is the case, choose another seating position. Not doing so could cause the child seat to not perform as intended.
Adjusting the Recline Angle
IMPORTANT: Vehicle must be parked on a level surface.
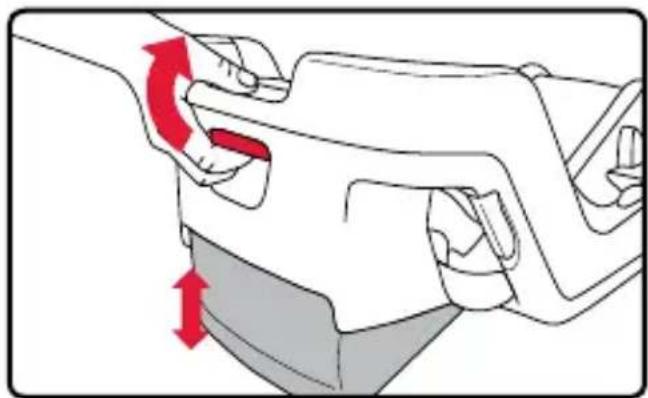
- Pull up on the recline adjustment lever.
natural_image
Diagram of a mechanical component with red directional arrows indicating motion or force (no text or symbols)B-SAFE GEN2 User Guide
- Move the base up or down until the entire red marker is completely visible between the two lines on the recline angle indicators while on the vehicle seat.
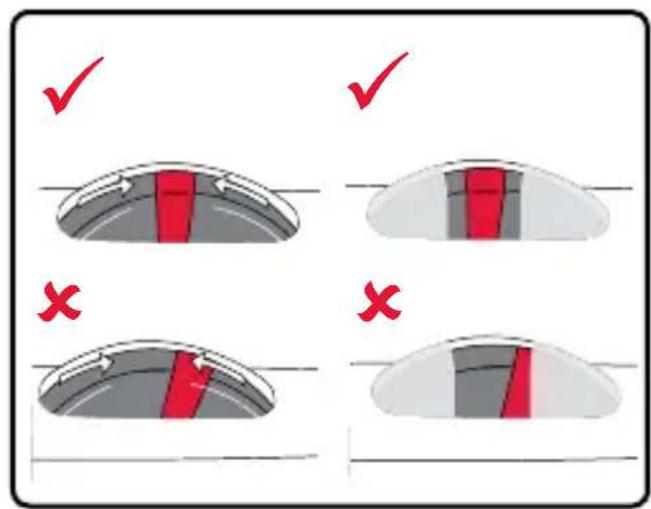
If there is difficulty achieving the proper recline angle after installing, try another approved seating position in your vehicle or:
a. Uninstall the base and lower the recline angle adjustment foot to the lowest position.
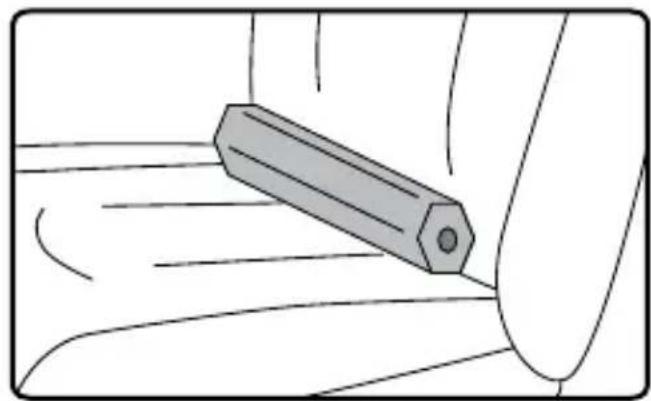
b. Remove the base from the vehicle and place a rolled towel or pool noodle in the vehicle seat bight.
c. Place the base against the towel or pool noodle to level the shell and install.
natural_image
Illustration of a hand holding a pen, with motion lines indicating movement (no text or symbols)NOTE: If a towel or pool noodle is needed for the recline angle, the recline angle adjustment foot on the base should remain in its lowest position.
IMPORTANT: After the child is secured in the infant car seat and the car seat is attached to the base, ensure that the entire red marker is completely visible between the two lines on the recline angle indicator.
BRITAX Child Safety, Inc.
Lower Anchor Installation
-
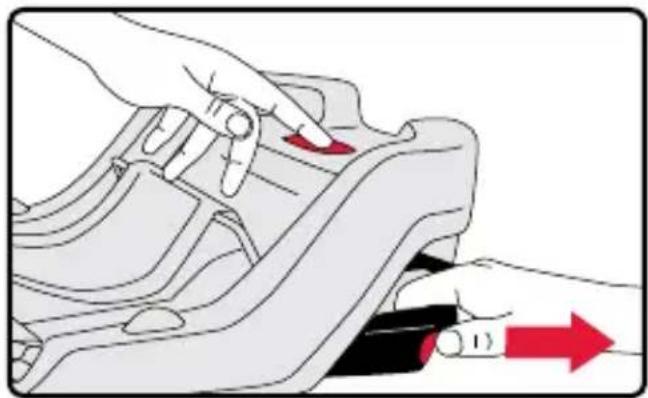
Press and hold lower connector release button and pull lower connectors firmly to remove from their storage in the base.
-
Lengthen lower connector straps.
NOTE: When lengthening the strap be careful not to twist prior to connecting to adjacent vehicle lower anchor.
- Place the base on the vehicle seat and press the lower connectors onto their adjacent vehicle lower anchors until a click is heard.
NOTE: Pull the lower connectors to verify they are secure.
- While pressing the center of the base into the seat, pull up on the lower connector straps to tighten.
natural_image
Illustration of a hand pressing down on a car seatbelt with a red directional arrow (no text or symbols)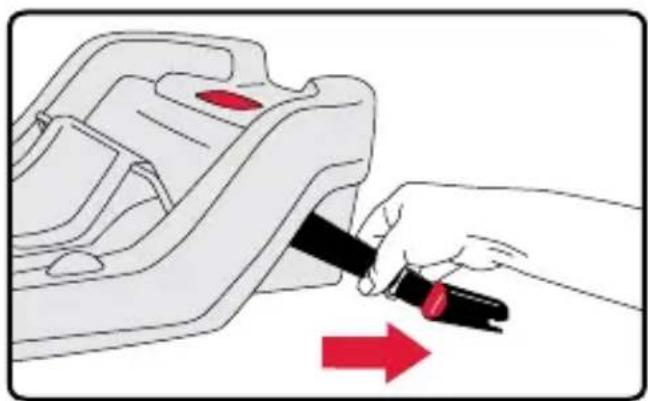
natural_image
Illustration of a hand using a black belt to adjust a car seatbelt, with a red arrow indicating the direction (no text or symbols present)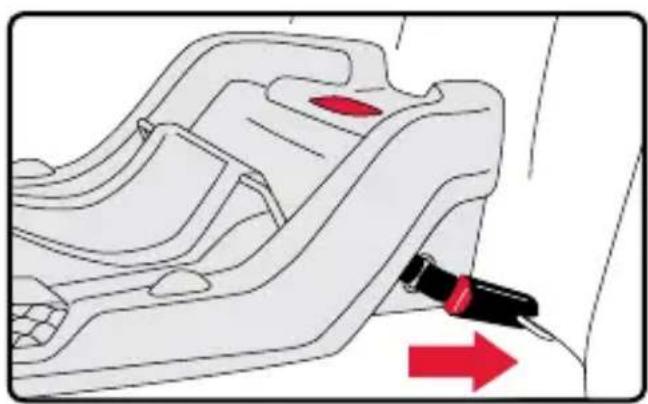
natural_image
Diagram of a car seatbelt buckle with a red arrow indicating the angle (no text or symbols present)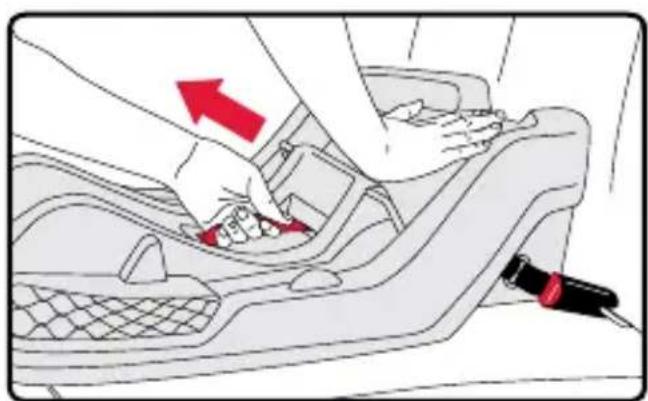
natural_image
Illustration of a car seatbelt being inserted into the seat, with a red arrow indicating the direction (no text or symbols present)B-SAFE GEN2 User Guide
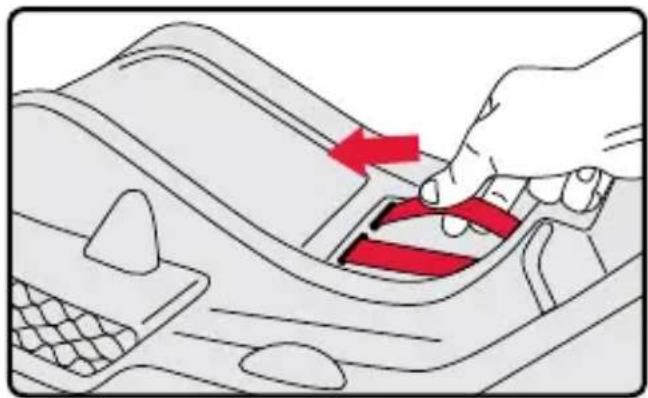
- Feed excess webbing back into base and ensure that lower connector straps are flush with the base.
natural_image
Illustration of a hand pressing down on a car intake manifold with a red arrow indicating the direction (no text or symbols present)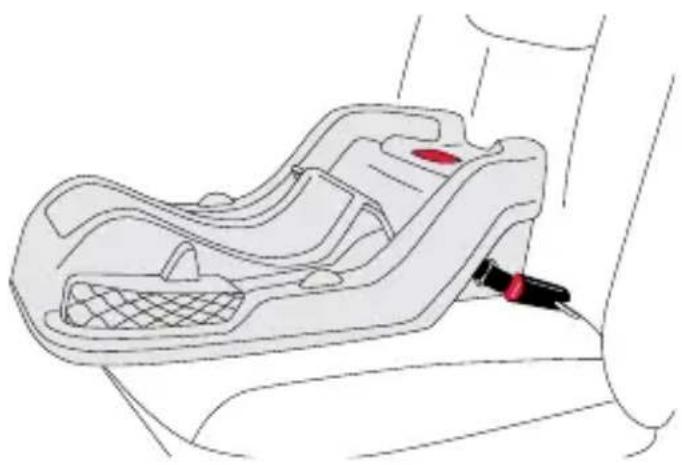
natural_image
Line drawing of a car seatbelt with a red clip attached to the seat (no text or symbols)Base Installation with Lower Anchors
√ CHECKLIST
√ Lower connector strap is tight, not twisted, and that the base is secure.
√ The base is secure when it moves less than 1 inch (2.5 cm) front-to-back or side-to-side at the vehicle belt path.
√ Recline angle is correct and confirm that the entire red marker is completely visible between the two lines on the recline angle indicators.
BRITAX Child Safety, Inc.
Lap-Shoulder Belt Installation
- Place the base on the vehicle seat and then pass the vehicle belt through the belt route.
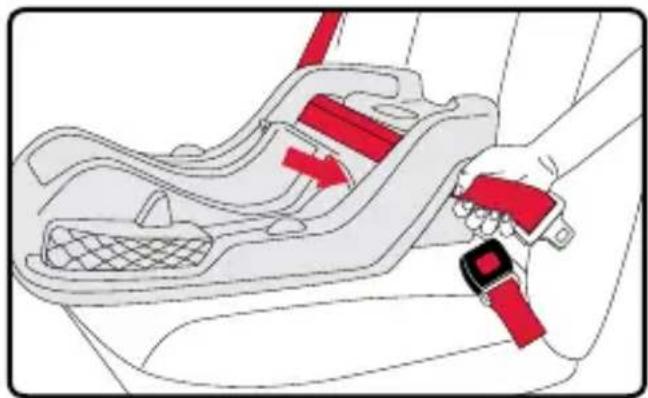
natural_image
Illustration of a car seatbelt buckle being adjusted for a red belt, showing the seat and seat area (no text or symbols)- Ensure that the vehicle seat belt is not twisted and buckle.
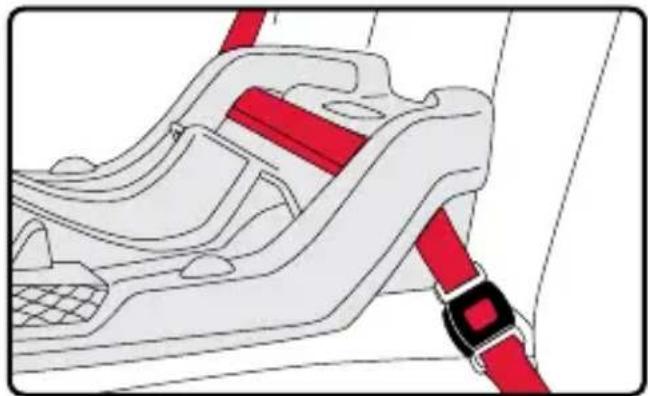
natural_image
Diagram of a car seatbelt buckle with red belt (no text or symbols)- Press the base firmly into the vehicle seat while removing all slack first from the lap portion and then from the shoulder portion of the vehicle seat belt.
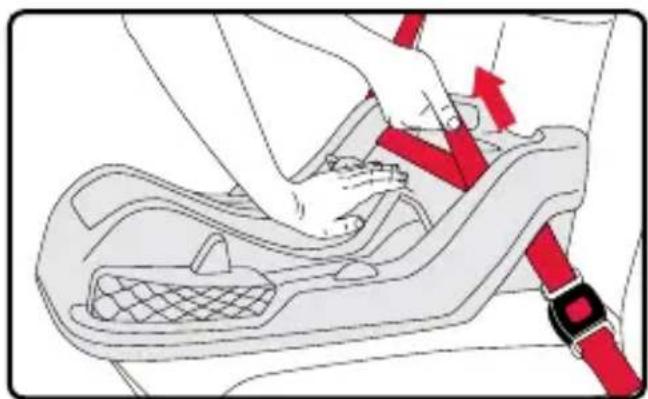
natural_image
Illustration of a person's foot and seat being adjusted for a car seatbelt, showing red arrows indicating movement (no text or symbols present)B-SAFE GEN2 User Guide
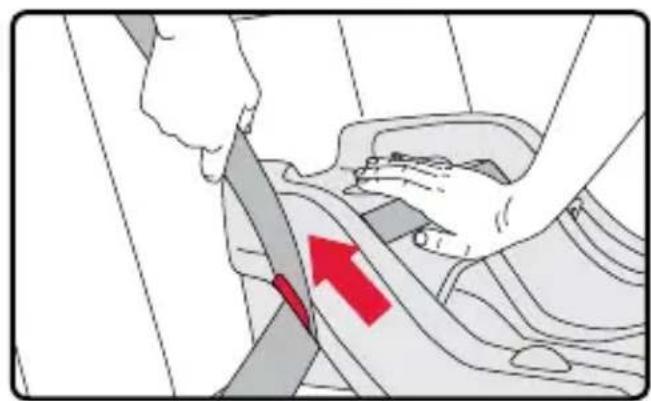
- Hold the vehicle shoulder belt tightly and slide firmly under the lock-off on the side of the base opposite the buckle.
natural_image
Diagram showing a hand using a cable to lift a car seatbelt, with a red arrow indicating the down force (no text or symbols present)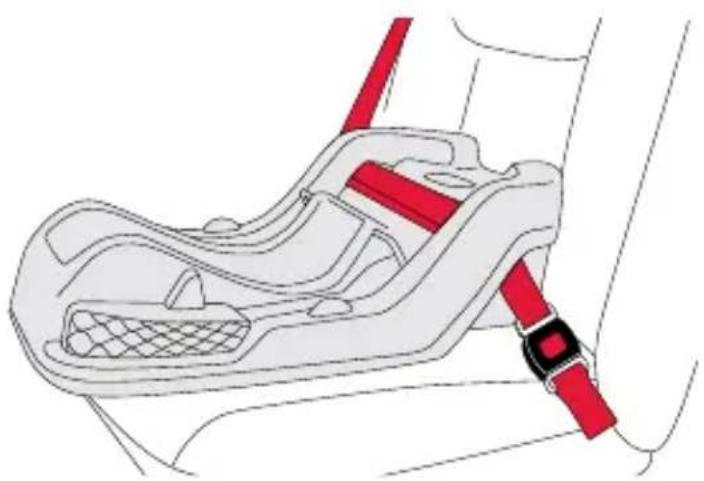
natural_image
Diagram of a car seatbelt buckle with red belt and mesh grip (no text or symbols)Base Installation with Lap-Shoulder Belt
√ CHECKLIST
√ Vehicle belt is tight, not twisted, and that the base is secure.
√ The base is secure when it moves less than 1 inch (2.5 cm) front-to-back or side-to-side at the vehicle belt path.
√ Recline angle is correct and confirm that the entire red marker is completely visible between the two lines on the recline angle indicators.
BRITAX Child Safety, Inc.
Lap Belt Installation
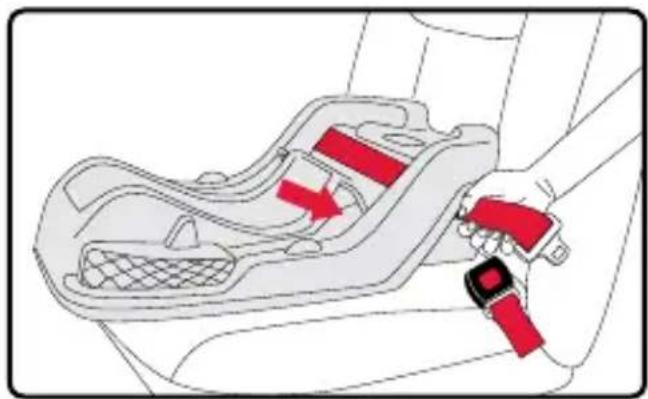
IMPORTANT: The lock-off does NOT secure this type of vehicle belt. Vehicle belt MUST be locked according to your vehicle owner's manual.
- Place the base on the vehicle seat and then pass the vehicle belt through the belt route.
natural_image
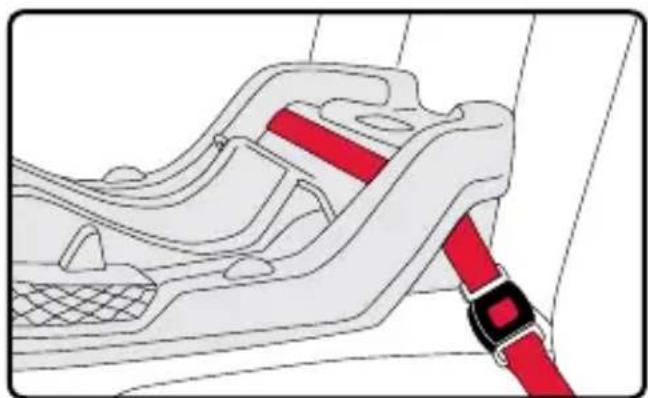
Diagram of a car seatbelt buckle being adjusted for a red belt, showing no text or symbols- Ensure that the vehicle seat belt is not twisted and buckle.
natural_image
Diagram of a car seatbelt buckle with red belt (no text or symbols)B-SAFE GEN2 User Guide
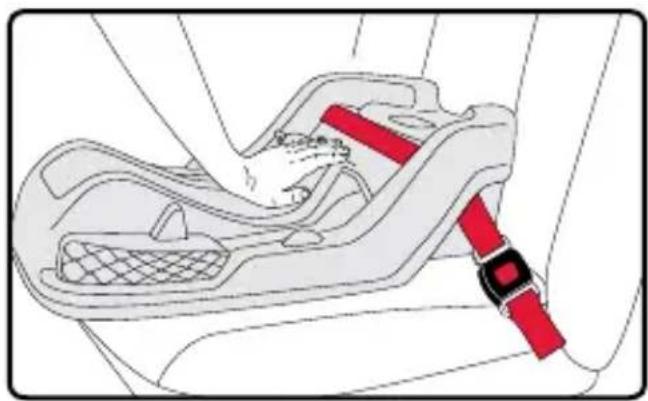
- Press the base firmly into the vehicle seat while removing all slack from the vehicle seat belt.
natural_image
Diagram of a car seatbelt buckle with red belt and mesh grip (no text or symbols)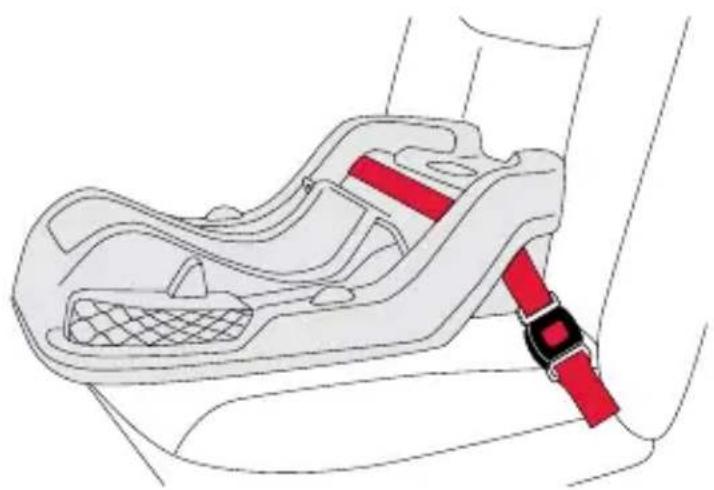
natural_image
Line drawing of a car seatbelt buckle with red belt (no text or symbols)Base Installation with Lap Belt
√ CHECKLIST
√ Vehicle belt is tight, not twisted, and that the base is secure.
√ The base is secure when it moves less than 1 inch (2.5 cm) front-to-back or side-to-side at the vehicle belt path.
√ Recline angle is correct and confirm that the entire red marker is completely visible between the two lines on the recline angle indicators.
BRITAX Child Safety, Inc.
Attaching the Infant Car Seat
- Ensure that the base is securely installed.
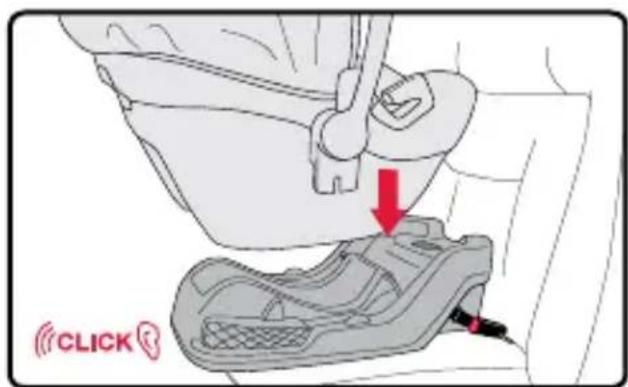
- Place the infant car seat into the base and press down until a click is heard.
- Pull up on both sides of the infant car seat to verify attachment.
- Ensure that the carry handle is in one of the four locked positions and check that the recline angle is still correct.
natural_image
Mechanical assembly diagram showing a foot and seat with a red arrow indicating a specific component (no text or symbols present)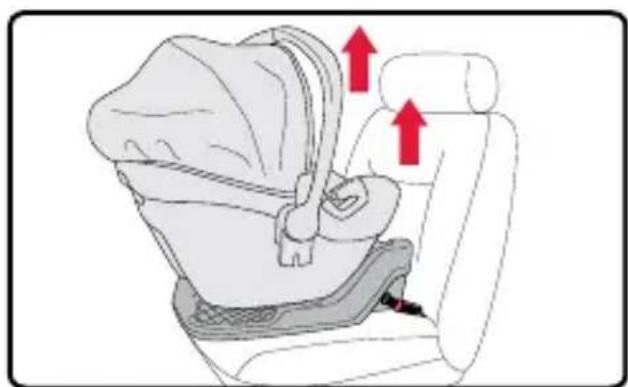
natural_image
Diagram of a car seatbelt with two red arrows indicating upward movement (no text or symbols present)Removing the Infant Car Seat
- Pull and hold the release lever on the back of the infant car seat.
- Lift the infant car seat up from the base.
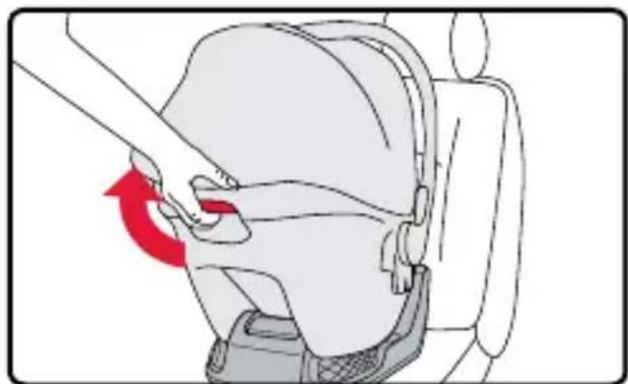
natural_image
Line drawing of a car seatbelt with a red arrow indicating the grip point (no text or symbols present)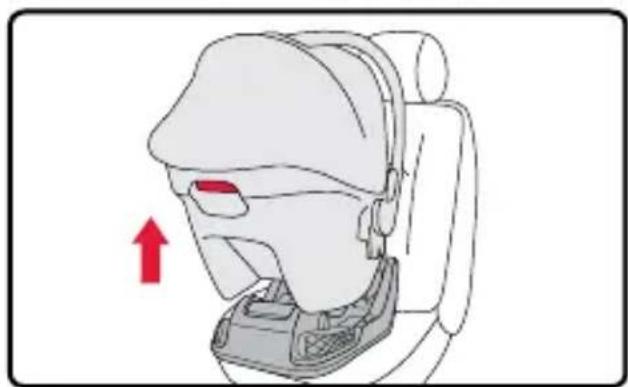
natural_image
Diagram of a car seat with a red arrow indicating direction, showing no text or symbolsUninstalling the Base
Lower Connector Installation
-
Press the lower connector release button on the top of the base to loosen the straps.
-
Press each of the red release buttons on the lower connectors and release vehicle anchors.
-
Store the lower connectors in the storage slots in the base until reinstalling. Pull on the lower connector straps in center of base to remove slack.
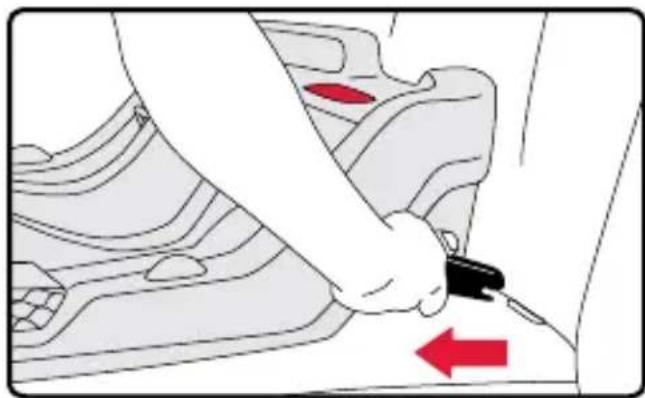
natural_image
Illustration of a hand adjusting a car seatbelt with a red arrow indicating left motion (no text or symbols)Lap-Shoulder Belt Installation
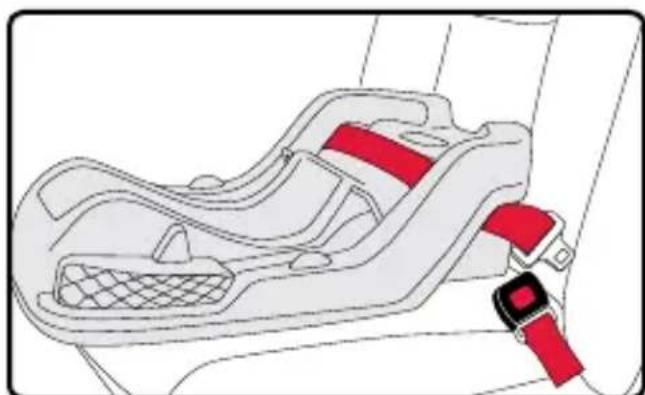
- Unbuckle the vehicle belt and remove from the lock-off. Pull the belt from the base belt routes.
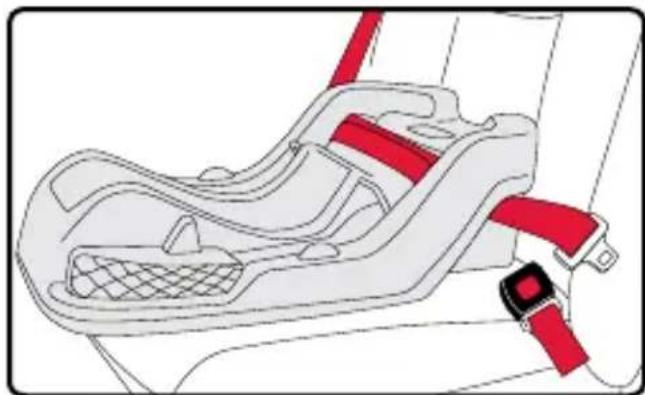
natural_image
Illustration of a car seatbelt with red belt and mesh grip (no text or symbols)Lap Belt Installation
- Unbuckle the vehicle belt and pull the belt from the base belt routes.
natural_image
Line drawing of a car seatbelt with red belt and mesh cushion (no text or symbols)BRITAX Child Safety, Inc.
Using Without the Base
Before installing the Infant Car Seat:
- Secure the child in the infant car seat before installing the car seat in the vehicle.
- Check that your vehicle seat belt is compatible with the infant car seat by referring to your vehicle owner's manual and page 38 in this user guide.
- Check your vehicle owner's manual to determine how to lock your vehicle belt system.
Adjusting the Recline Angle
IMPORTANT: Vehicle must be parked on a level surface.
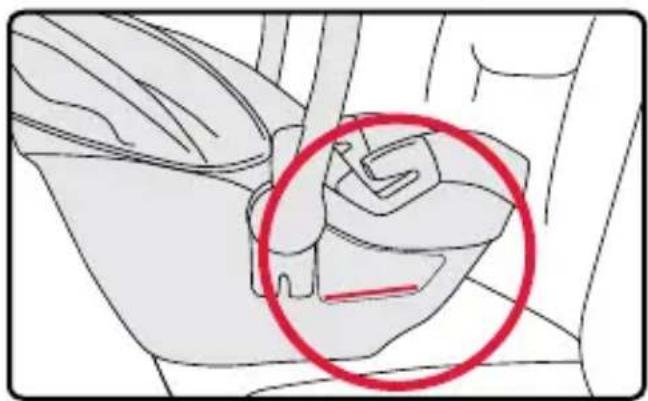
- When installed, the level line on the shell of the infant car seat should be level to the ground.
natural_image
Diagram of a car seatbelt mechanism with a red circle highlighting the component (no text or labels present)B-SAFE GEN2 User Guide
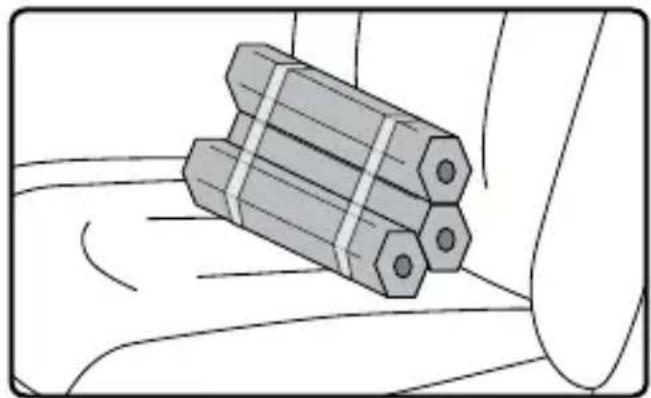
If there is a problem achieving the proper recline angle after installing, try another approved seating position in your vehicle or:
a. Uninstall the car seat and remove it from the vehicle seat.
b. Place one or more rolled towels or pool noodles in the vehicle seat bight.
c. Place the car seat against the towel(s) or pool noodle(s) to level the shell and install.
natural_image
Illustration of a mechanical component with hexagonal pins, resting on a curved surface (no text or symbols)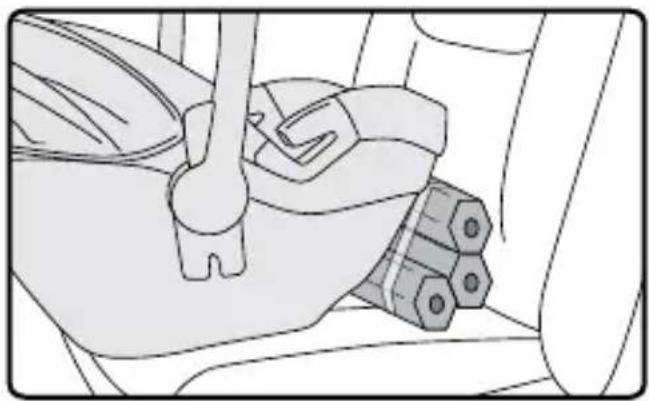
natural_image
Mechanical assembly diagram showing a lever and gear mechanism (no text or labels)BRITAX Child Safety, Inc.
Lap-Shoulder Belt Installation
IMPORTANT: Check your vehicle owner's manual to determine how to lock your vehicle belt system.
* If you cannot lock your vehicle seat belt you must use a locking clip. Locking clips are available from BRITAX at 1-888-427-4829 or 1-704-409-1699.
- Secure your child in the infant car seat before installing the car seat in the vehicle.
- Place the infant car seat rear facing on the vehicle seat.
- Pull the vehicle belt out and only route the lap portion through the carrier only belt guides.
- Verify that the vehicle belt is not twisted and buckle. Lock your vehicle seat belt system as instructed by your vehicle owner's manual.
natural_image
Illustration of a child wearing a car seatbelt, sitting cross-legged (no text or symbols)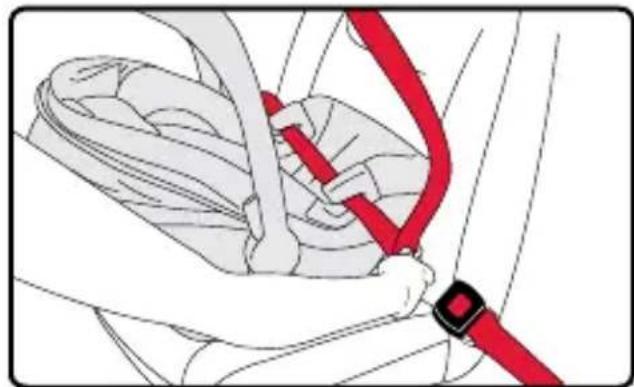
natural_image
Illustration of a person's seatbelt being adjusted using a red belt (no text or symbols)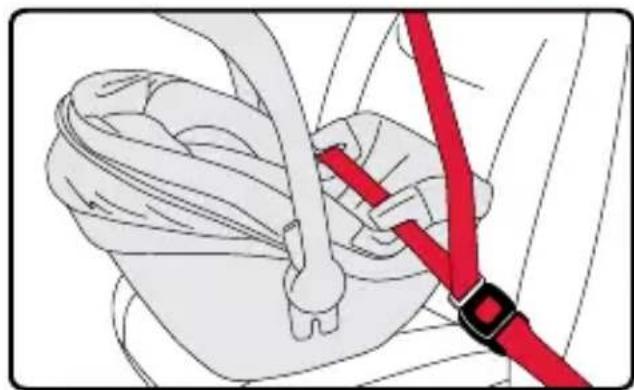
natural_image
Illustration of a red belt buckle securing a small object, no text or symbols presentB-SAFE GEN2 User Guide
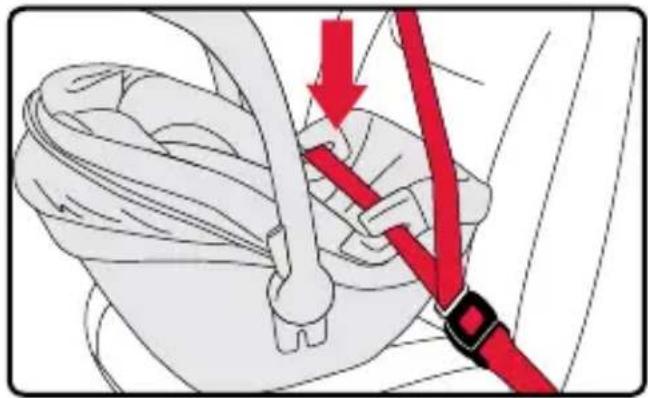
- Push the infant car seat firmly into the vehicle seat while removing all slack from the lap portion and then the shoulder portion of the vehicle belt.
natural_image
Illustration of a car seatbelt buckle being lifted, with red arrows indicating the mechanism (no text or symbols present)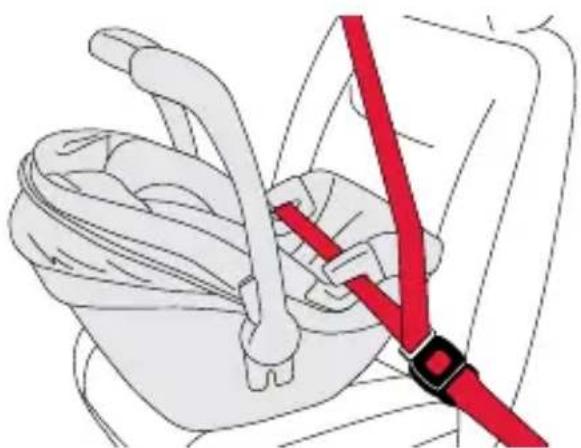
natural_image
Illustration of a red belt buckle securing a seatbelt (no text or symbols)Carrier Only Installation with Lap-Shoulder Belt
√ CHECKLIST
√ The vehicle belt is tight, not twisted, and that the infant car seat is secure.
√ The infant car seat is secure when it moves less than 1 inch (2.5 cm) front-to-back or side-to-side at the vehicle belt path.
√ Recline angle is correct. The proper recline angle is achieved when the level line on the shell is level to the ground.
√ The infant car seat handle is rotated into any locked position.
BRITAX Child Safety, Inc.
Lap Belt Installation
IMPORTANT: Vehicle belt MUST be locked according to your vehicle owner's manual.
-
Secure your child in the infant car seat before installing the car seat in the vehicle.
-
Place the infant car seat rear facing on the vehicle seat.
-
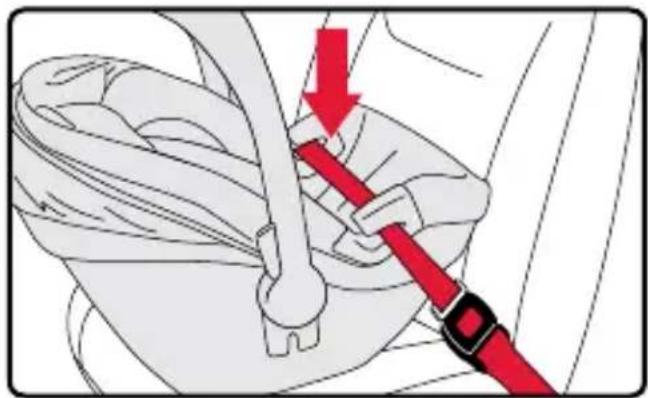
Pull the vehicle belt out and route it through the carrier only belt guides.
-
Verify that the vehicle belt is not twisted and then buckle. Lock your vehicle seat belt system as instructed by your vehicle owner's manual.
natural_image
Illustration of a baby wearing a car seatbelt, sitting inside a car cab (no text or symbols)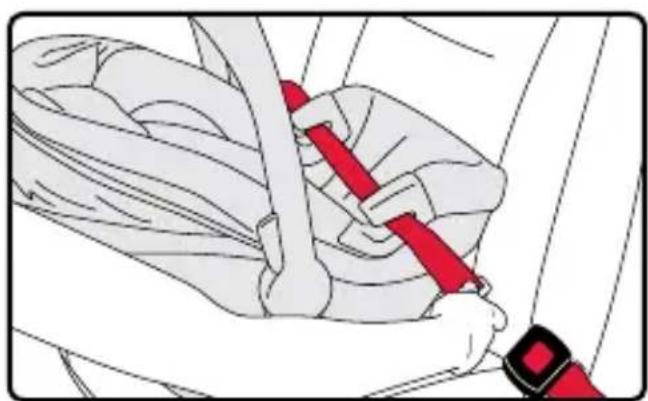
natural_image
Illustration of a person using a red belt switch to lift a car seatbelt (no text or symbols present)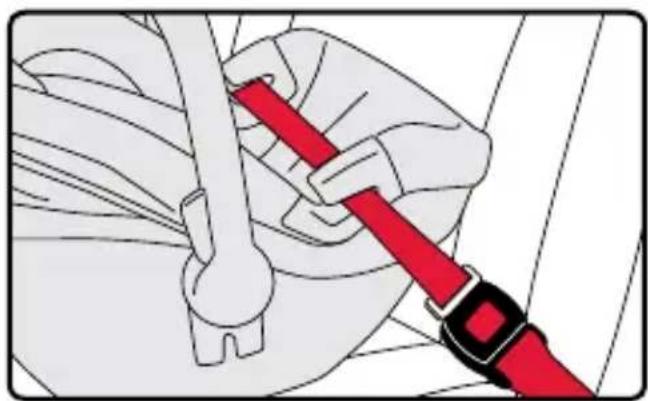
natural_image
Illustration of a hand using a red belt switch to adjust a mechanical component (no text or symbols visible)B-SAFE GEN2 User Guide
- Push the infant car seat firmly into the vehicle seat while removing all slack from the vehicle belt.
natural_image
Mechanical assembly diagram showing a red belt buckle securing a car seat (no text or symbols)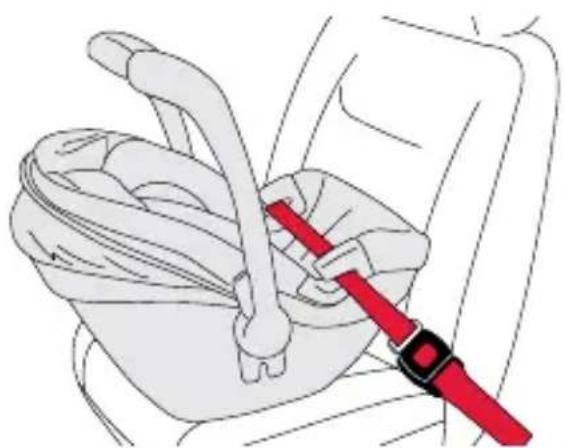
natural_image
Line drawing of a car seatbelt with a red belt buckle (no text or symbols)Carrier Only Installation with Lap Belt
√ CHECKLIST
√ The vehicle belt is tight, not twisted, and that the infant car seat is secure.
√ The infant car seat is secure when it moves less than 1 inch (2.5 cm) front-to-back or side-to-side at the vehicle belt path.
√ Recline angle is correct. The proper recline angle is achieved when the level line on the shell is level to the ground.
√ The infant car seat handle is rotated into any locked position.
BRITAX Child Safety, Inc.
Securing Your Child
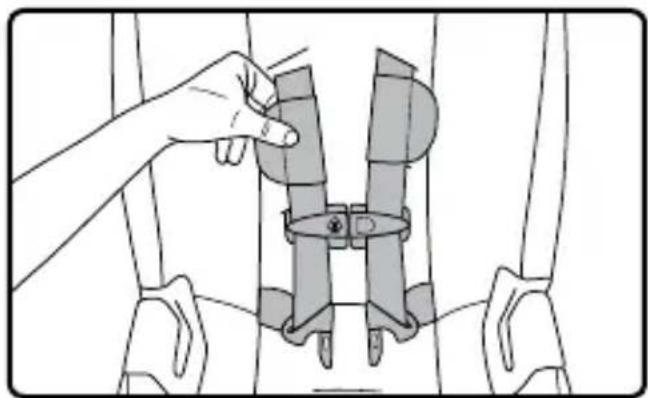
- Ensure that you have followed all instructions for adjustment of the harness and buckle into the correct position for your child. See page 30.
natural_image
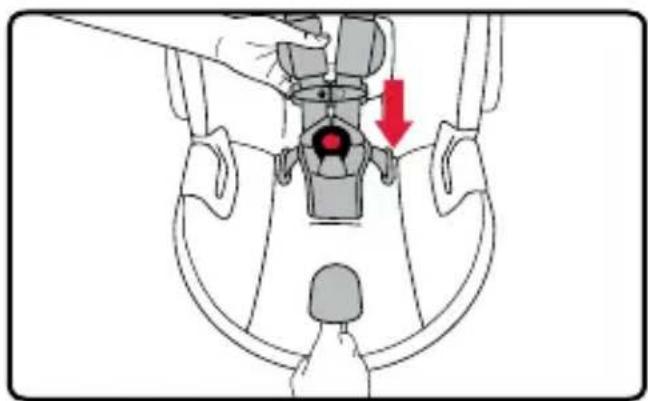
Illustration of a hand adjusting a mechanical component with a circular head and belt (no text or symbols)- Loosen the harness by pressing down the harness adjuster lever while pulling both harness straps forward.
natural_image
Anatomical illustration of pelvic anatomy with a hand holding a knob, showing a red arrow indicating a specific area (no text or labels present)- Press the tab and pull apart the two halves to release the chest clip.
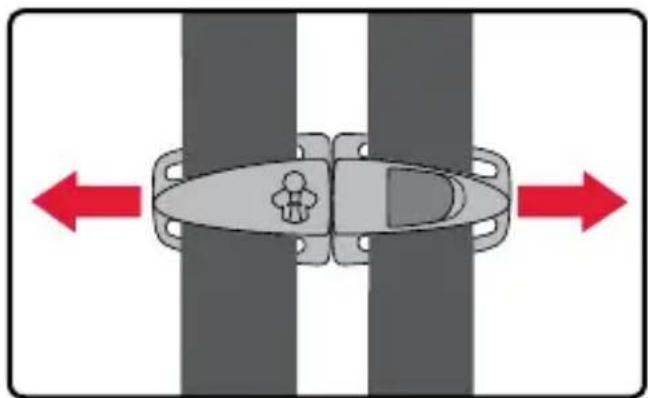
natural_image
Top-down diagram of a car inside a vehicle with directional arrows indicating flow or movement (no text or symbols)- Release the buckle and attach the harness straps to the harness holders.
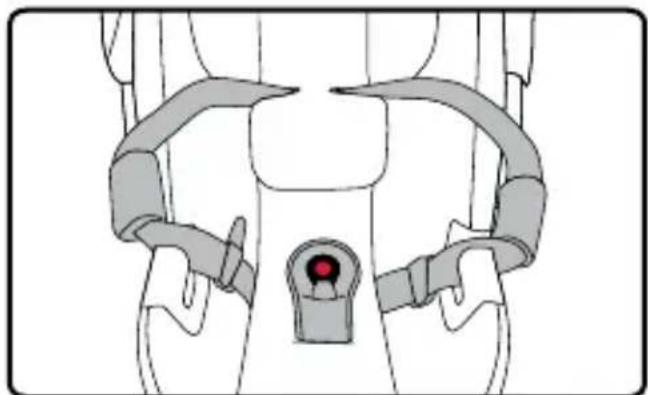
natural_image
Diagram of a human pelvic device with attached straps and a central button (no text or symbols)B-SAFE GEN2 User Guide
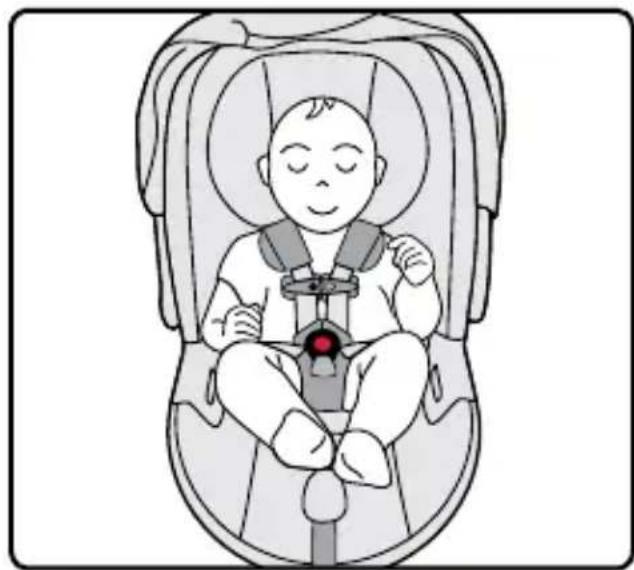
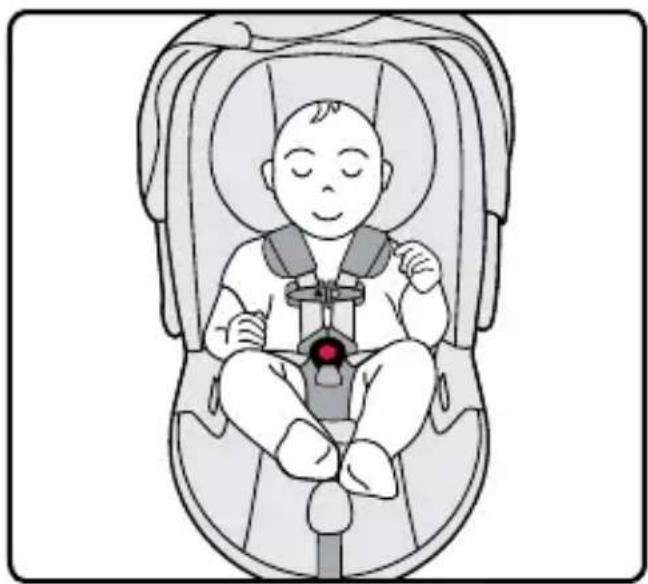
- Place the child in the infant car seat as shown. Ensure the child is positioned upright in the infant car seat and not slouching. Their bottom and back must rest flat against the infant car seat.
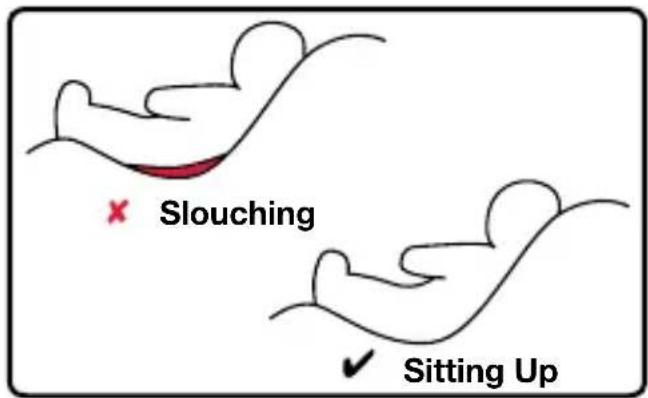
- Position the harness straps around the child. See page 30.
IMPORTANT: Remove bulky coats, jackets and/or bulky sports equipment before putting the child in the child seat.
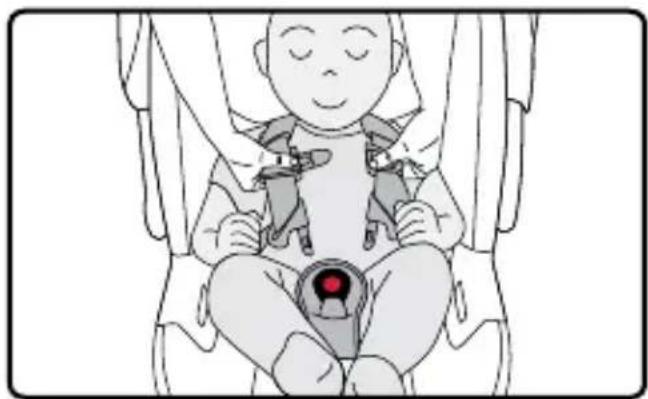
natural_image
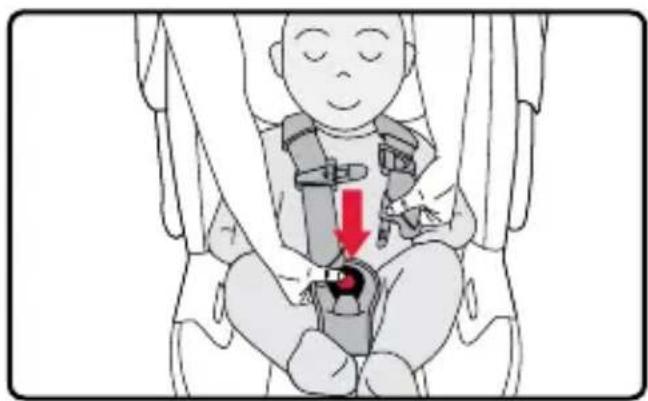
Illustration of a child wearing a seatbelt and holding a small object, enclosed in a car seat (no text or symbols)- Buckle the harness.
NOTE: After inserting each buckle tongue, a click helps confirm the connection is secure.
NOTE: Always pull on the buckle to ensure it is properly connected.
natural_image
Illustration of a baby wearing a seatbelt with a red arrow indicating a specific anatomical feature (no text or symbols present)BRITAX Child Safety, Inc.
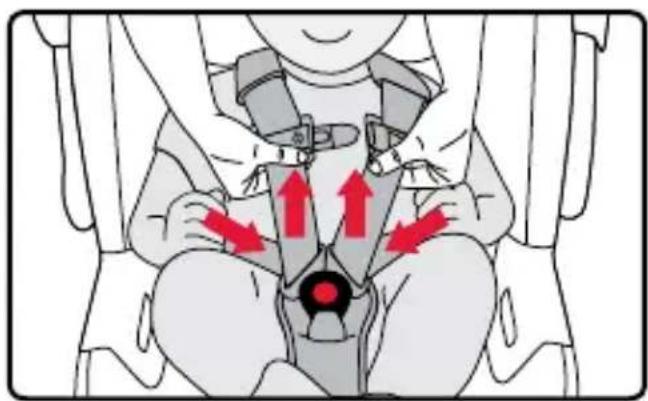
- Check for proper harness height and pull any excess slack up to the child's shoulder area before tightening.
natural_image
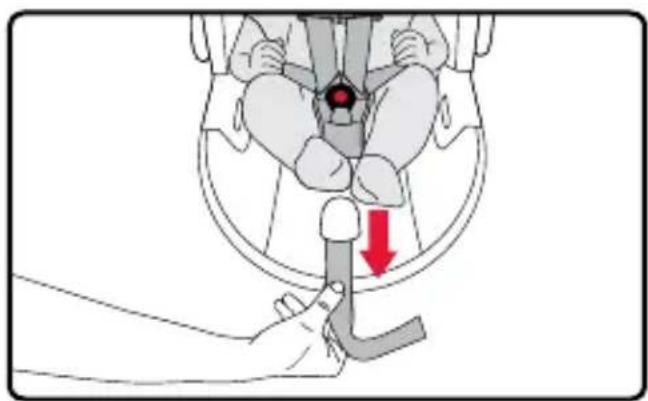
Illustration of a child wearing a seatbelt with red arrows indicating pressure points (no text or symbols)- Slowly pull the adjuster strap to tighten the harness around the child.
NOTE: Snugly adjust the belts provided with this child restraint around your child. A snug strap should not allow any slack. It lies in a relatively straight line without sagging. It does not press on the child's flesh or push the child's body into an unnatural position. You should not be able to pinch excess.
natural_image
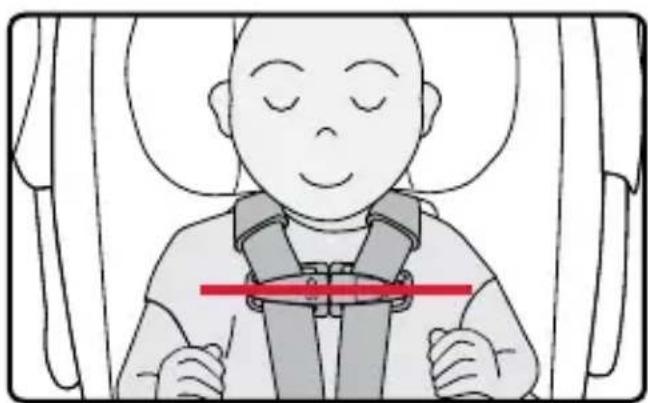
Medical illustration showing a hand holding a catheter with a red arrow indicating a point of interest (no text or symbols present)- Fasten the chest clip and place at armpit level.
natural_image
Illustration of a person wearing a seatbelt and holding a red belt, seated inside a vehicle (no text or symbols)B-SAFE GEN2 User Guide
√ CHECKLIST
Before traveling, verify that the:
√ Recline angle is correct and confirm that the entire red marker is completely visible between the two lines on the recline angle indicators after the child is secured.
√ Harness straps are not twisted.
√ Harness is snug.
√ Buckle is fastened.
√ Chest clip is at the child’s armpit level.
BRITAX Child Safety, Inc.
Child Seat Functions
Adjusting the Harness
The infant car seat is assembled with the harness in the inner loop.
• Inner Loop: For infants weighing less than 11 lbs (5 kg).
• Outer Loop: For infants weighing over 11 lbs (5 kg).
IMPORTANT: The harness straps should be located in the closest harness height position at or below the child's shoulders.
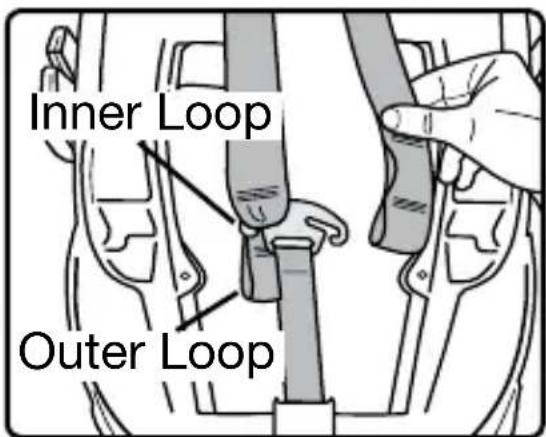
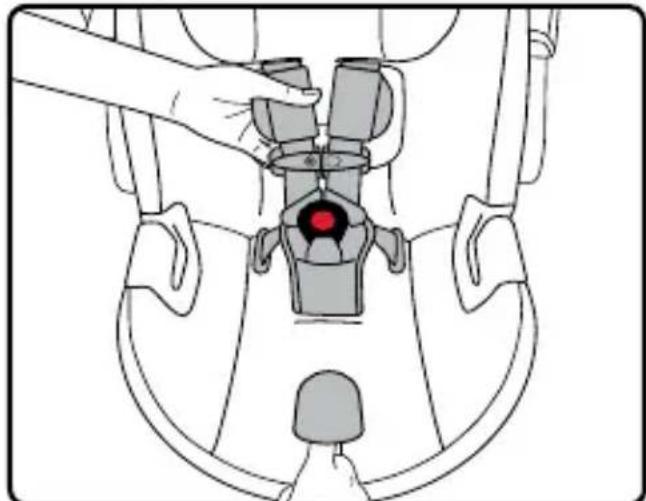
IMPORTANT: Ensure the harness straps are fully secured on the harness yoke.
-
Loosen the infant car seat harness by pressing the harness adjuster release lever and pulling both harness straps forward.
-
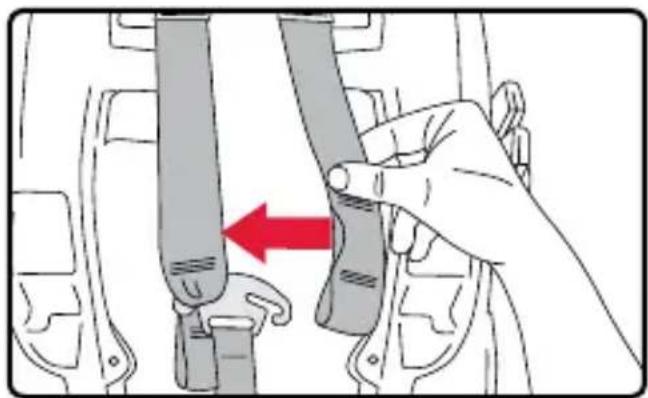
Locate the harness yoke on the back of the infant car seat and slide one harness strap off of the yoke.
natural_image
Diagram of a human pelvic device with hand placement and highlighted central component (no text or symbols)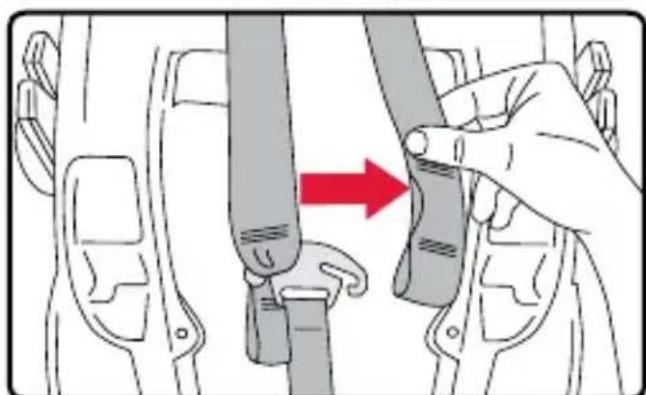
natural_image
Illustration of a hand adjusting a belt buckle with a red arrow indicating the motion (no text or symbols present)B-SAFE GEN2 User Guide
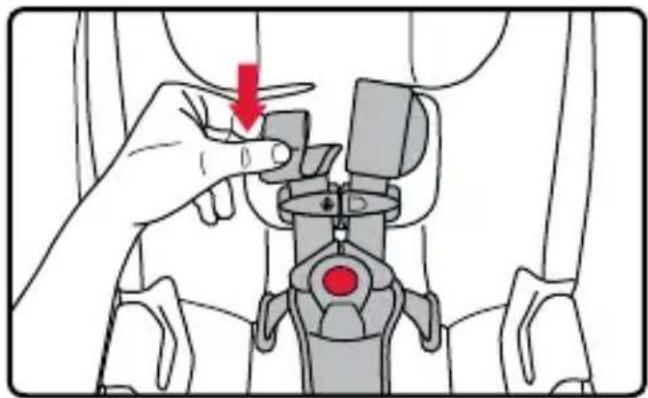
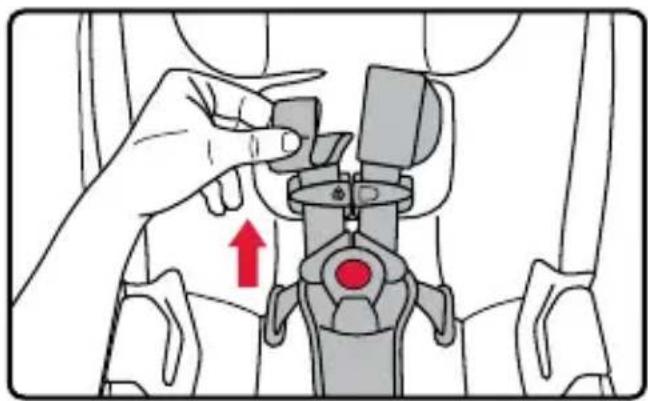
- From the front of the seat, pull the harness strap through the cover and head pad.
NOTE: Do not remove the comfort pad or chest clip.
natural_image
Illustration of a hand adjusting a seatbelt mechanism with a red arrow indicating the motion (no text or symbols present)- Ensure that the harness strap is not twisted and rethread the harness strap through the head pad and then through the appropriate harness height slot in the cover and shell.
natural_image
Illustration of a hand adjusting a seatbelt mechanism with a red arrow indicating the direction (no text or symbols present)- From the back of the seat, reattach the harness straps to the harness yoke.
natural_image
Illustration of a hand adjusting a seatbelt with a red arrow indicating the process (no text or symbols present)- Repeat these steps with the second harness strap and ensure they are at the same slot height.
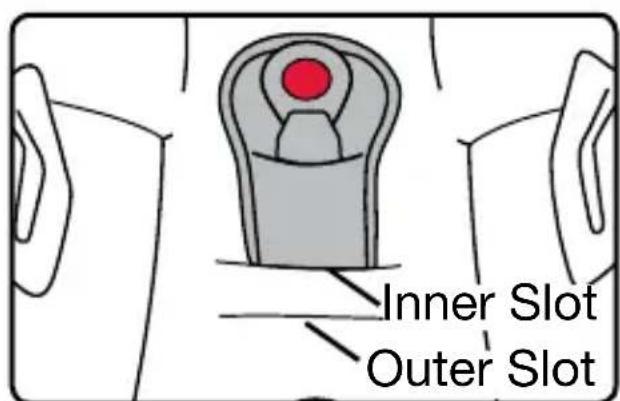
Adjusting the Buckle
- Inner Slot: For infants weighing less than 11 lbs (5 kg).
- Outer Slot: For infants weighing over 11 lbs (5 kg).
BRITAX Child Safety, Inc.
IMPORTANT: If your child eats and drinks while in the child seat, you will need to check the buckle periodically and rinse out any accumulated debris (see page 43).
-
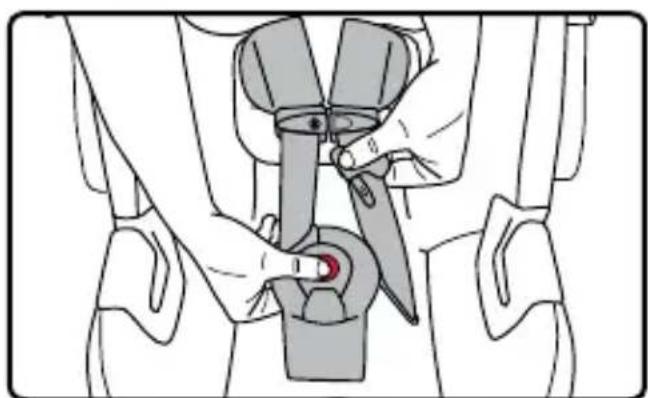
Unbuckle the harness by pressing the red button in the center of the buckle and sliding both harness tongues out of the buckle.
-
Locate the buckle strap retainer on the bottom of the infant car seat and pull away from the seat to loosen.
-
Turn the buckle strap retainer so that the short side will go through the slot in the infant car seat shell and cover.
-
Pull the buckle and belly pad out of the slots in the shell and cover.
natural_image
Line drawing of a person's seatbelt with a belt buckle and seatbelt (no text or symbols)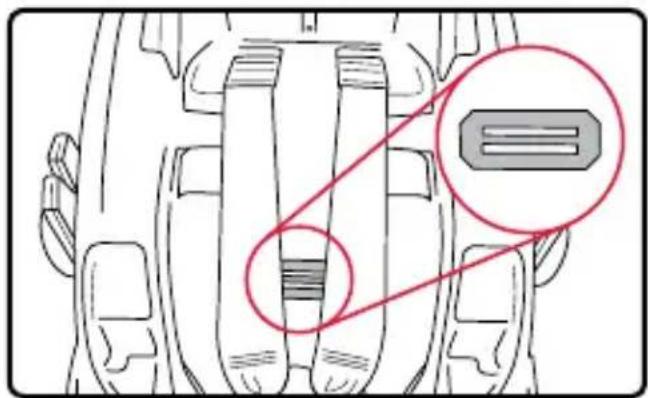
natural_image
Technical line drawing of a mechanical component with two highlighted circular regions (no text or symbols)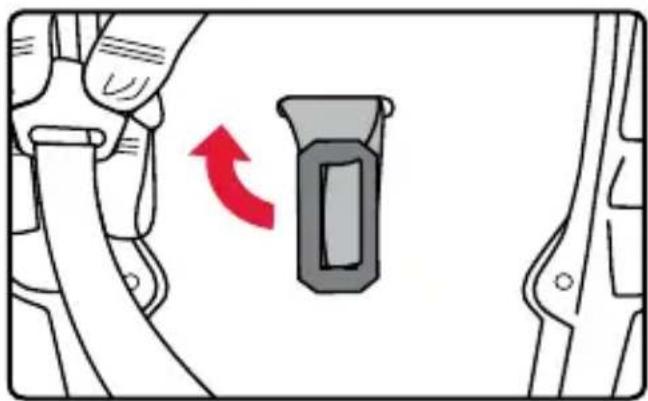
natural_image
Diagram showing a hand pressing a button on a vehicle side panel, with a red curved arrow indicating rotation (no text or symbols present)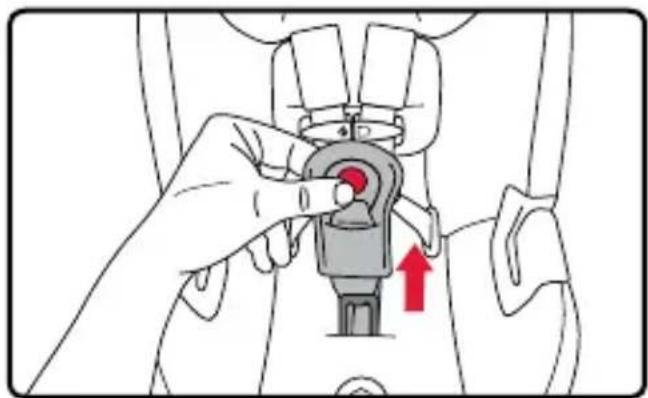
natural_image
Illustration of a hand adjusting a seatbelt component with a red arrow indicating direction (no text or symbols present)B-SAFE GEN2 User Guide
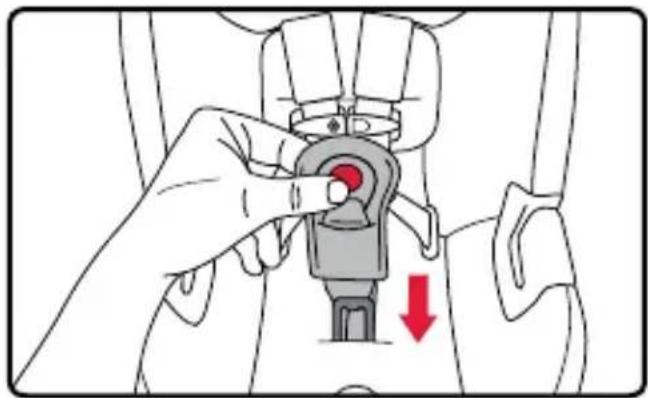
- Push the retainer through the slot in the cover and shell for the appropriate buckle position.
natural_image
Illustration of a hand adjusting a seatbelt component with a red arrow indicating downward motion (no text or symbols present)- Pull up on the buckle to ensure that the buckle strap retainer is properly seated.
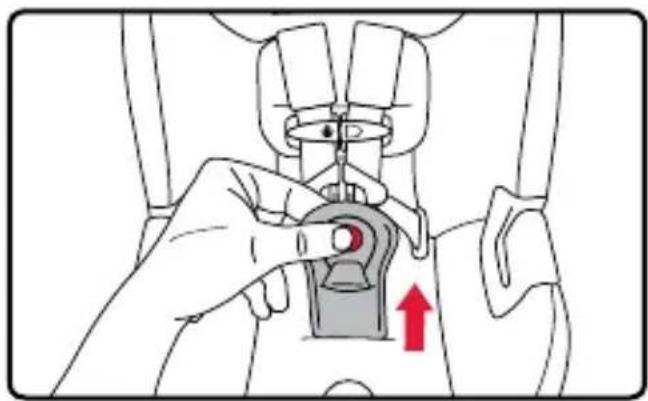
natural_image
Illustration of a hand adjusting a mechanical component with a red arrow indicating upward motion (no text or symbols)Handle Position
The car seat handle must be adjusted to one of the four locked positions for use in a vehicle.
Always use position 1 to carry the car seat.
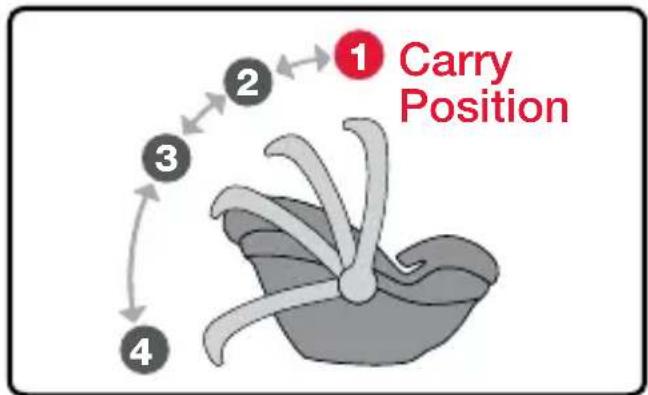
flowchart
graph TD
    A["1 Carry Position"] --> B["2"]
    B --> C["3"]
    C --> D["4"]
To adjust, press and hold both carry handle adjusters and rotate the handle to the chosen position.
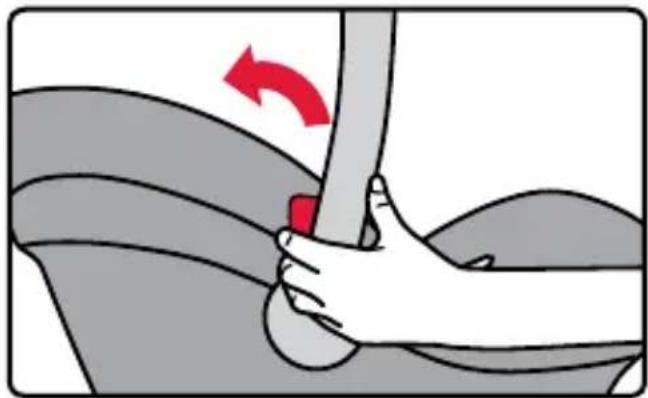
natural_image
Illustration of a hand holding a seatbelt with a red arrow indicating clockwise motion (no text or symbols)BRITAX Child Safety, Inc.
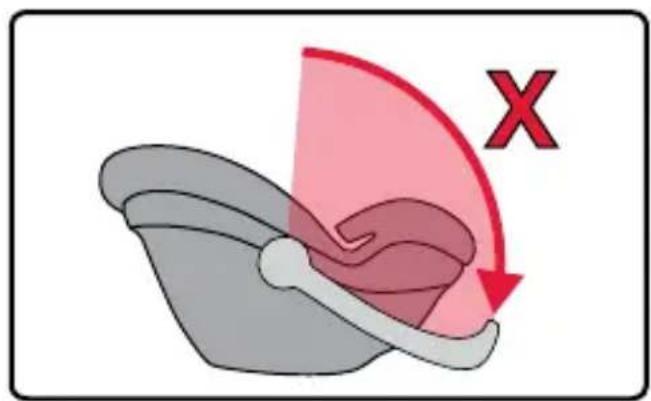
IMPORTANT: Do not force the carry handle past the upright carry position toward the child's feet. Doing so may cause damage to the carry handle.
BRITAX Strollers
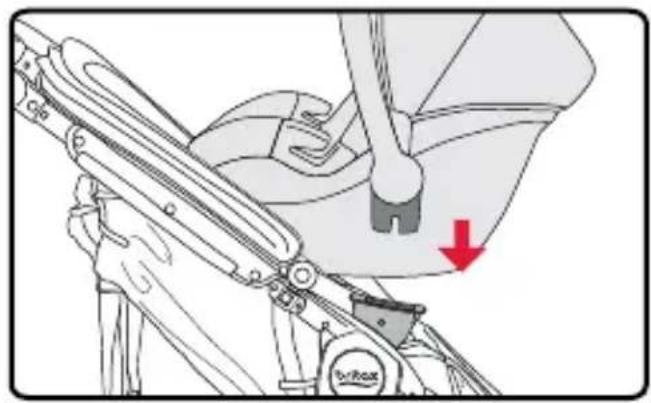
Attaching the Car Seat to the Stroller
- Set the parking brake.
- Align the stroller adapters on the side of the infant car seat with the receivers on the BRITAX stroller and push down until the car seat locks into place.
- Pull up on both sides of the infant car seat to verify attachment.
natural_image
Mechanical assembly diagram showing a lever mechanism with a red arrow indicating motion direction (no text or symbols present)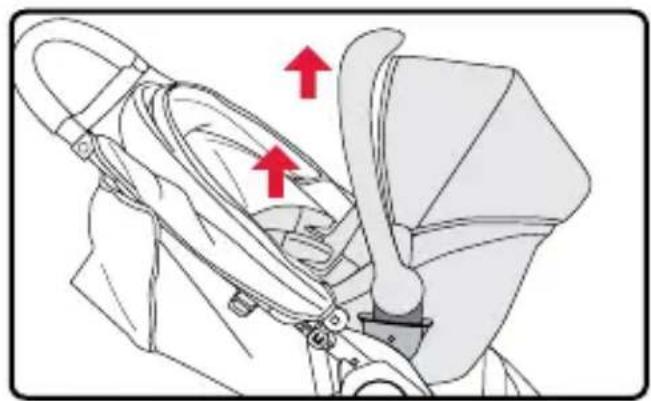
natural_image
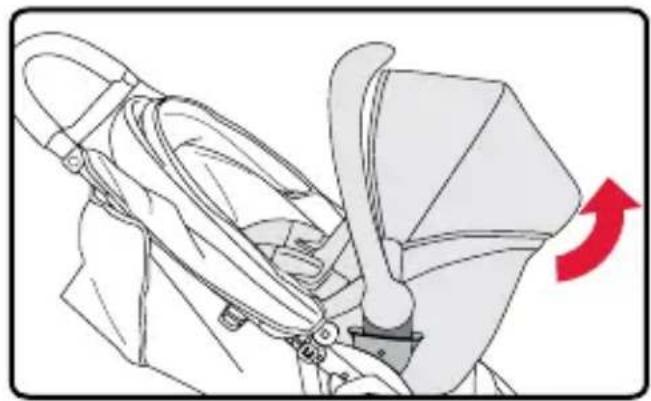
Technical illustration of a mechanical device with red arrows indicating directional components (no text or symbols)Removing the Car Seat from the Stroller
- Pull and hold the release lever on the back of the car seat and lift up to remove from stroller.
natural_image
Illustration of a person wearing a stroller with a belt, showing a red directional arrow (no text or symbols)Using the Lower Anchors
The Lower Anchors offer an alternative to vehicle seat belt installation methods. The figure below shows typical locations for lower anchors in a vehicle. See page 2 for lower anchor components on this child seat.
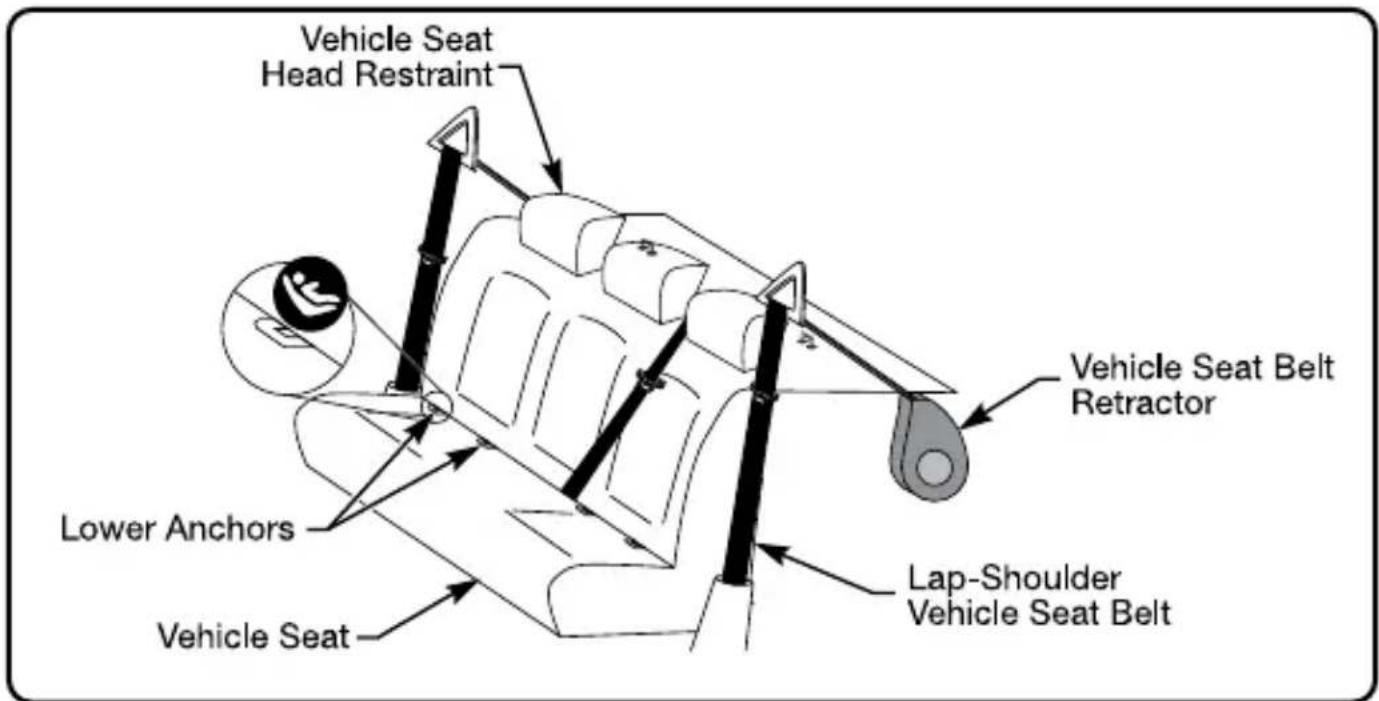
Check your vehicle owner's manual to learn if it is equipped with lower anchors, the maximum weight rating and information on the lower anchor locations and designated seating positions available for use with this child seat.
BRITAX Child Safety, Inc.
Using the Lower Connectors
The lower connectors are located in the back of the base of the child seat. Store the connectors in the slots when not in use.
Attaching the lower connector to the lower anchor:
- Firmly push the lower connector onto the lower anchor until a click is heard.
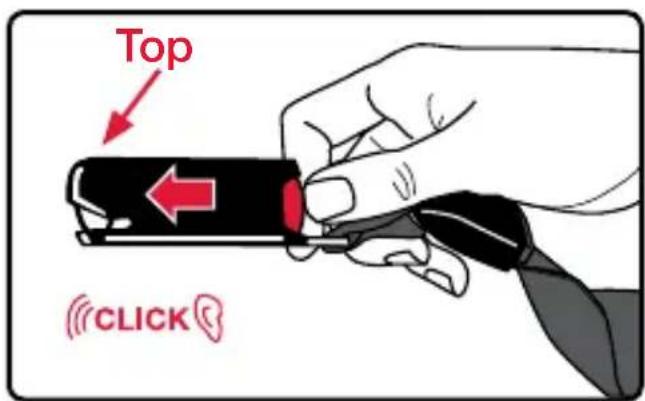
Removing the lower connector from the lower anchor:
- Press and hold the red release button.
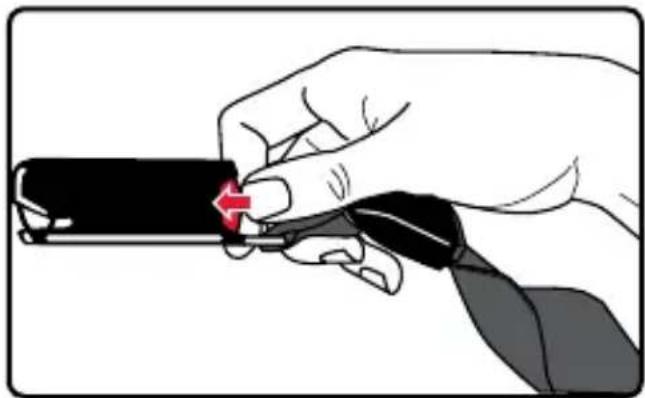
natural_image
Illustration of a hand holding a black object with a red arrow pointing to it, no text or symbols present- Pull the lower connector from the lower anchor.
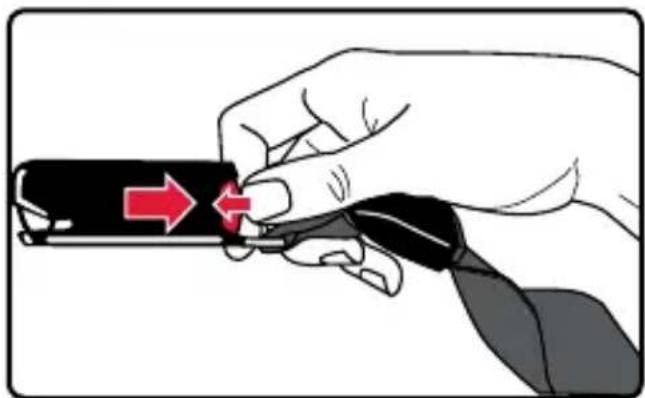
natural_image
Illustration of a hand holding a device with a red arrow pointing to the left side (no text or symbols present)Vehicle Compatibility
Vehicle Seating Positions
WARNING!
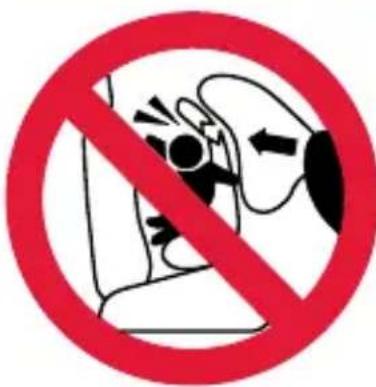
DO NOT place child seat rear-facing in the front seat of a vehicle with a passenger air bag. DEATH or SERIOUS INJURY can occur. Owners of vehicles with front passenger side airbags should refer to their owner's manual for child restraint installation instructions. The back seat is the safest place for children 12 and under.
Some vehicles have no seating positions which are compatible with this child seat. If in doubt, contact the vehicle manufacturer for assistance.
Forward-facing vehicle seats MUST be used with this child seat. Side-facing or rear-facing seats CANNOT be used. See the diagram below.
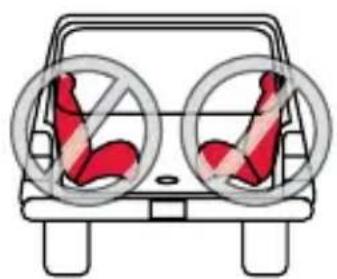
natural_image
Diagram of a car with two circular warning signs showing crossed-out red objects (no text or symbols present)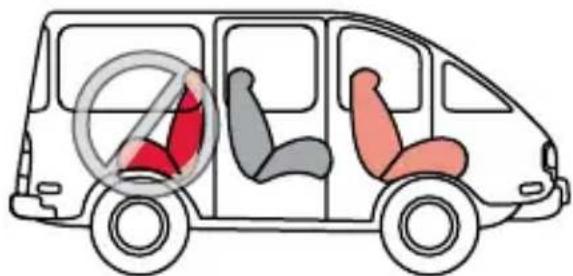
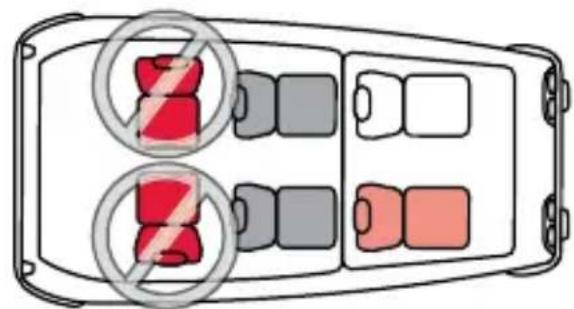
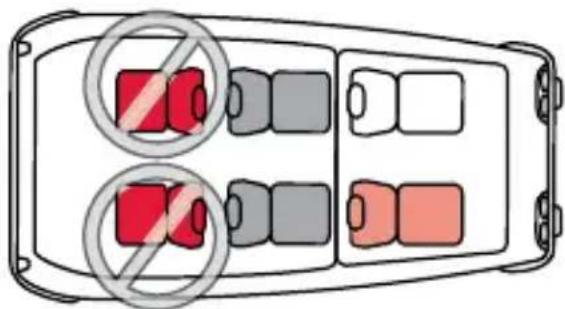
BRITAX Child Safety, Inc.
Incompatible Vehicle Seat Belts
Vehicle seats and seat belts differ from vehicle to vehicle. Refer to your vehicle owner's manual for specific information about your vehicle seat belts and their use with child seats.
WARNING!
The following types of vehicle seat belts are NOT compatible with this child seat. If any of the belt types listed below are in the chosen seating position, choose another vehicle seating position or check your vehicle owner's manual for information on installing a car seat in your vehicle.
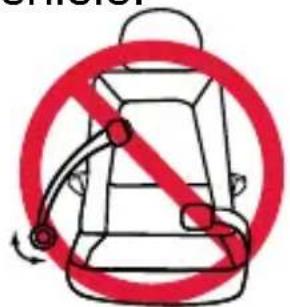
Lap belts with a sewn-in latch plate that have a retractor that locks only in case of a sudden stop.
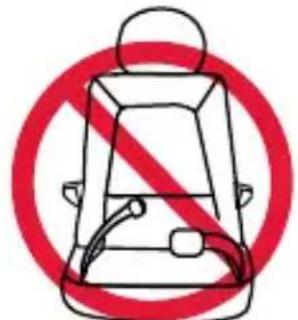
Lap belts forward of the vehicle seat bight.
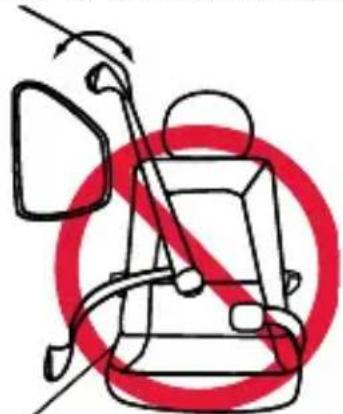
Lap-shoulder belts with top or bottom anchor points on the vehicle door.
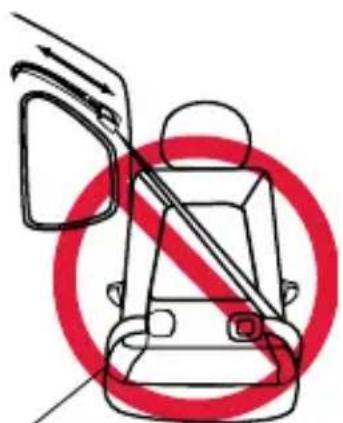
Motorized, automatic vehicle seat belts.
NOTE: This BRITAX car seat may not be compatible with every inflatable lap-shoulder belt. See FAQs in the support section of the BRITAX website (us.britax.com/faqs) for additional instructions.
Care and Maintenance
IMPORTANT: Before each use, check this car seat and its components to make sure they are in good condition and good working order.
Removing the Cover
- Remove the canopy.
a. Unhook the elastic, and push the button. b. Lift up the canopy from both sides.
-
From the back of the infant car seat remove both harness straps from the harness yoke.
-
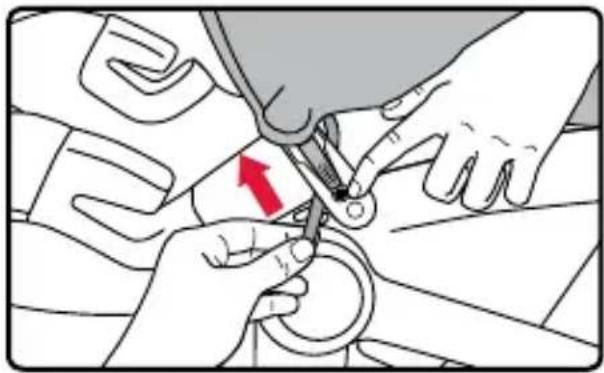
From the front of the infant car seat pull both harness straps out of the shell, cover and head pad. Remove head pad and comfort pads.
-
Unbuckle the harness and chest clip then remove the belly pad and buckle. See page 32.
natural_image
Illustration of hands using a tool to adjust or install a circular component, with a red arrow indicating the motion (no text or symbols present)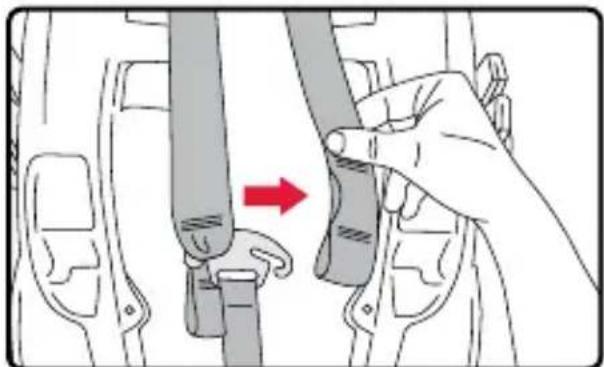
natural_image
Illustration of a hand adjusting a seatbelt with a red arrow indicating the adjustment (no text or symbols present)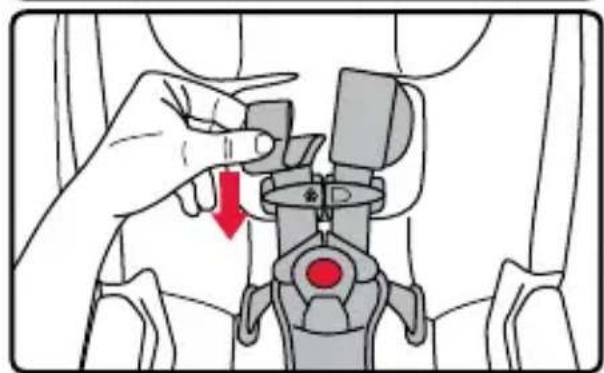
natural_image
Illustration of a hand adjusting a seatbelt with a red arrow indicating the adjustment (no text or symbols present)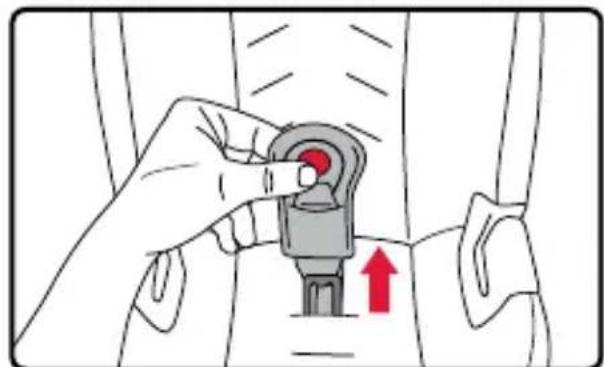
natural_image
Illustration of a hand adjusting a car seatbelt with a red arrow indicating upward motion (no text or symbols)BRITAX Child Safety, Inc.
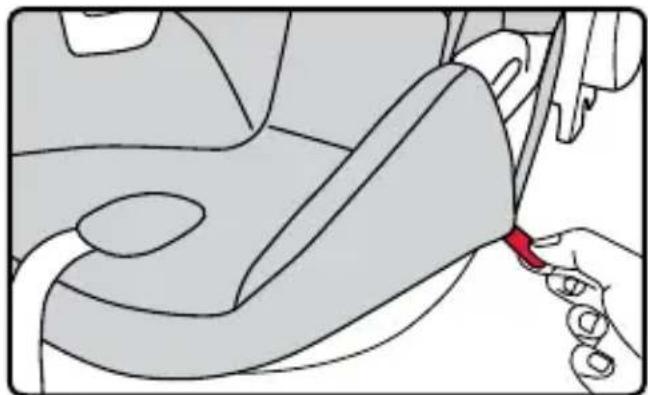
- Pull the easy remove cover tab to loosen the seat cover.
natural_image
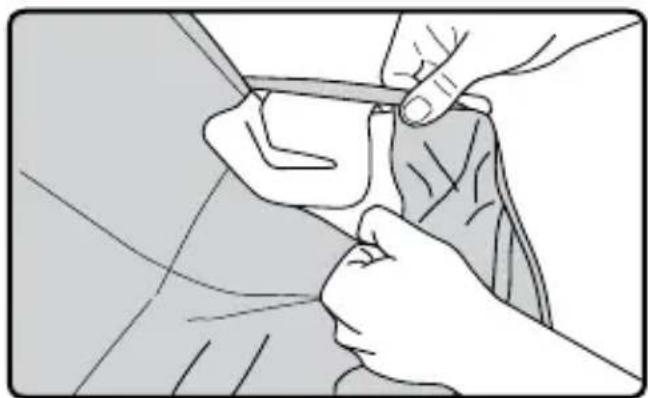
Illustration of a car seatbelt being inserted into a seatbelt, showing the handle and seat area (no text or symbols)- Pull the elastic bands around the carrier only belt guides.
natural_image
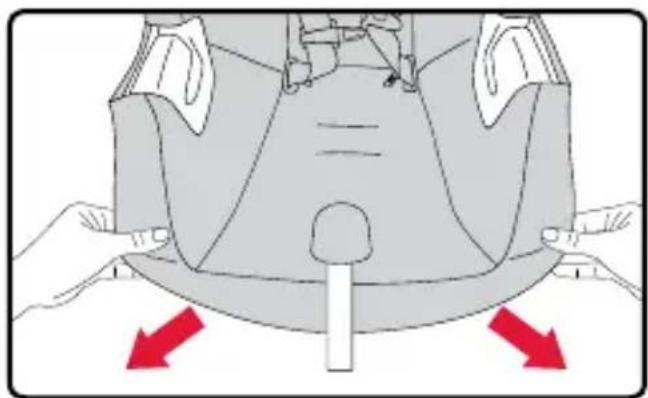
Illustration of hands adjusting a garment with a measuring tape (no text or symbols)- Pull the seat cover and lift away from the seat shell.
natural_image
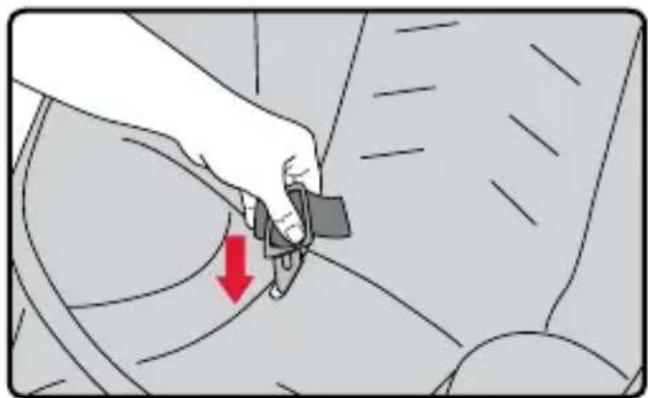
Diagram of a mechanical component with red arrows indicating downward motion (no text or symbols)- Slide each side of the harness, with the buckle tongue and chest clip, through the cover and pull the cover off of the shell.
natural_image
Illustration of a hand using a belt switch to adjust a car seatbelt, with a red arrow indicating the down limit (no text or symbols present)Replacing the Cover
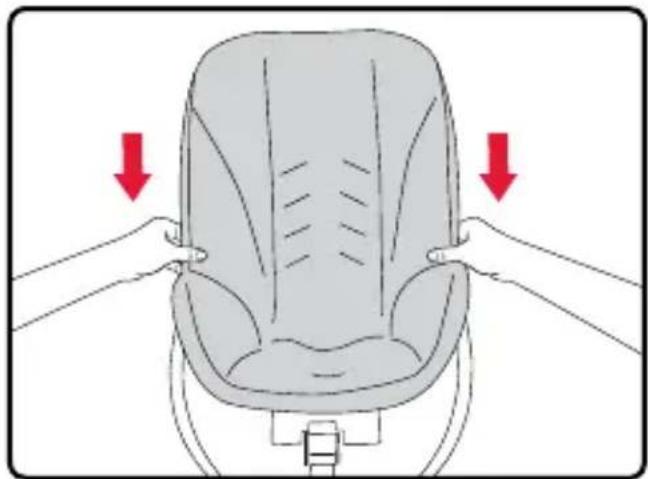
- Fit the cover onto the top of seat shell and tuck into the channel around the infant car seat.
- Pull the harness straps up through the slots in the seat cover.
- Pull the harness adjuster strap through cover.
- Pull the elastic bands around carrier only belt guides.
natural_image
Illustration of a baby car seat with two hands adjusting the seat (no text or symbols)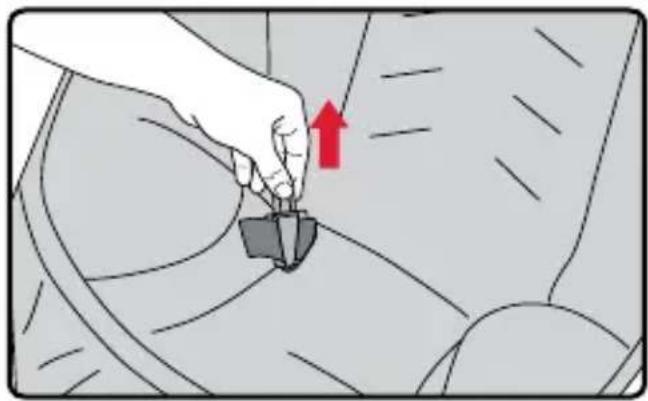
natural_image
Illustration of a hand adjusting a car seatbelt with a red upward arrow (no text or symbols)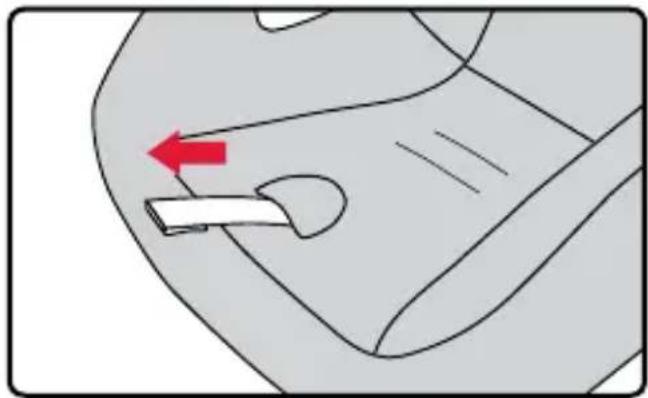
natural_image
Diagram of a car interior showing a white tool interacting with a red arrow indicating direction (no text or symbols present)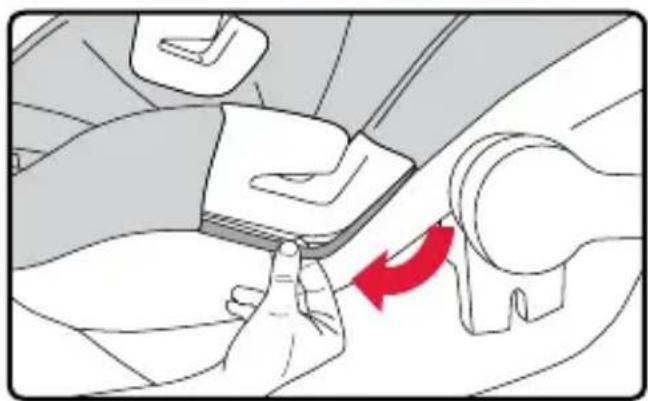
natural_image
Illustration of a hand pressing a small object on a car seatbelt, with a red arrow indicating motion (no text or symbols present)BRITAX Child Safety, Inc.
- Ensure that the harness straps are not twisted and route through the comfort pads, head pad, and appropriate slots in the cover and shell.
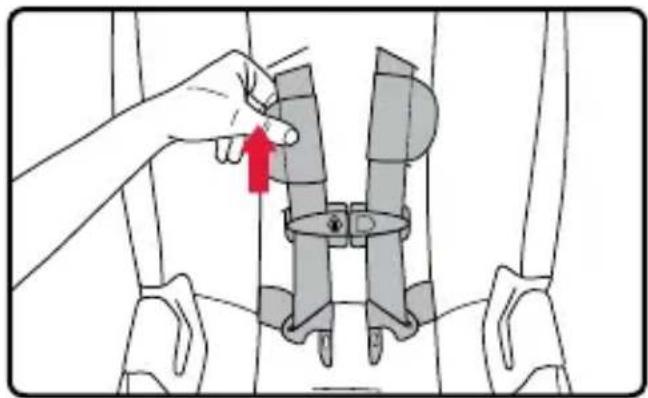
natural_image
Illustration of a hand adjusting a mechanical component with a red arrow indicating direction (no text or symbols present)- From the back of the infant car seat, slide the harness straps completely onto the harness yoke. Ensure that the adjuster strap is not twisted.
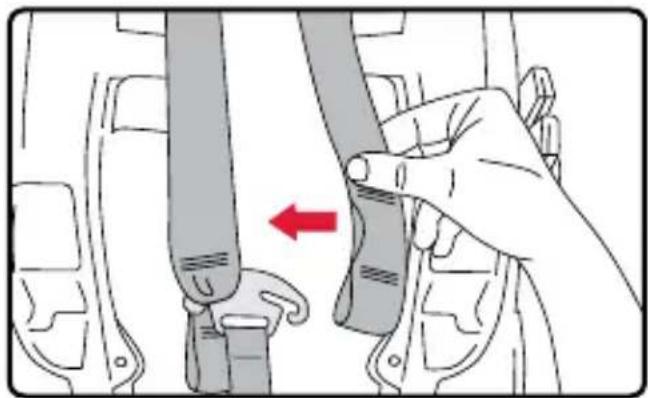
natural_image
Illustration of a hand adjusting a seatbelt with a red arrow indicating the adjustment (no text or symbols present)- Replace buckle and belly pad. See pages 31 - 33.
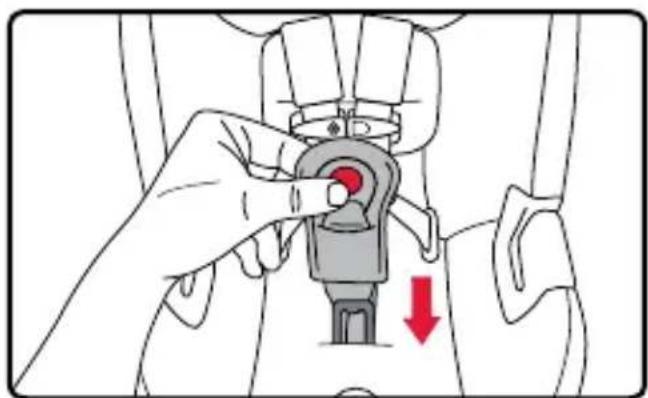
natural_image
Illustration of a hand adjusting a mechanical component with a red arrow indicating downward motion (no text or symbols present)- Replace canopy.
a. Slide the canopy into the slot and hook the elastic to the child seat shell.
b. Insert elastic at back of canopy into channel on seat shell.
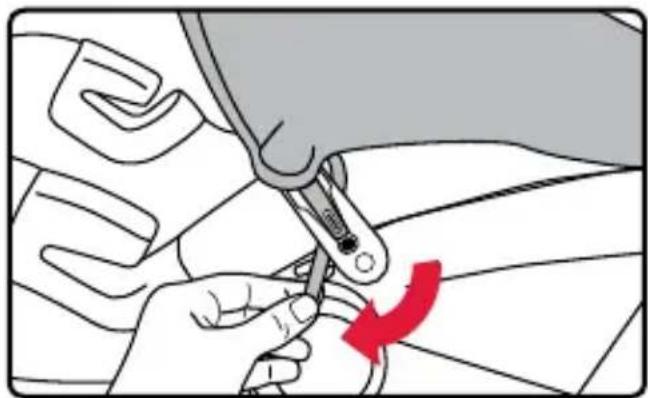
natural_image
Illustration of a hand using a tool to adjust or install a component, with a red arrow indicating the motion direction (no text or symbols present)B-SAFE GEN2 User Guide
Cleaning
| Cover/ Canopy | Refer to product care label for wash instructionsIf care label indicates machine washable, always refer to us.britax.com/faqs for important care information. | DO NOTBleachIron |
| Shell • Sponge clean using warm water and mild soap.Towel dry | DO NOTUse abrasive cleaners. | |
| Harness • Sponge clean the harness using warm water and mild soap.Towel dry | DO NOTDisassemble the harnessBleachMachine WashMachine DryIron | |
| Buckle • Thoroughly rinse the buckle using warm water.Test the buckle by fastening and unfastening until a click is heard after inserting each buckle tongue. If clicks are not heard, repeat the cleaning procedure.Towel dry | DO NOTSoakLubricateUse solventsUse soap or household detergents | |
BRITAX Child Safety, Inc.
Warranty
This child seat was manufactured by Britax Child Safety, Inc. (“Britax”). To the extent allowed by law, Britax warrants this product to the original retail purchaser as follows:
LIMITED ONE-YEAR WARRANTY
This product is warranted against defective materials or work man ship for one year from the date of original purchase. Proof of purchase is required. Your exclusive remedy for this warranty is that Britax will, at its option, provide repair or replacement components for this product. Britax reserves the right to discontinue or change fabrics, parts, models or products, or to make substitutions. Britax products purchased from unauthorized retailers, online auction sites, or as second hand items are not covered under warranty.
To make a claim under this warranty, you must contact Britax Consumer Services at 1-888-427-4829 or 1-704-409-1699, or write to us using the address on the back cover of this booklet.
PLEASE COMPLETE AND MAIL THE OWNER REGISTRATION CARD WITHIN (30) DAYS OF PURCHASE
You may also register online at us.britax.com/registration.
WARRANTY LIMITATIONS
This warranty does not include damages which arise from negligence, misuse or use not in accordance with the product instruction.
The use of non-Britax covers, inserts, toys, accessories, or tightening devices is not approved by Britax. Their use could cause this child seat to fail Federal Motor Vehicle Safety Standards or not perform as intended in a crash. Their use may void the Britax warranty.
LIMITATION OF DAMAGES
The warranty and remedies as set forth above are exclusive and in lieu of all others, oral or written, express or implied. In no event will Britax, or the retailer selling this product, be liable to you for any damages, including incidental or consequential damages, arising out of the use or inability to use this product.
LIMITATIONS OF WARRANTIES AND OTHER WARRANTY TERMS AND STATE LAWS
Any implied warranties, including implied warranties of merchantability and fitness for a particular purpose, shall be limited to the duration and terms of the express written warranty. Some states do not allow certain exclusions or limitations on warranties, so the above may not apply to you. This warranty gives you specific legal rights, and you may have other rights, which vary from state to state. Neither Britax, nor the retailer selling this product, authorizes any person to create for it any other warranty, obligation, or liability in connection with this product.
B-SAFE GEN2 User Guide
Notes
BRITAX Child Safety, Inc.
Notes
Índice
BRITAX Child Safety, Inc.
Características
BRITAX Child Safety, Inc.
BRITAX Child Safety, Inc.
BRITAX Child Safety, Inc.
Aviones
natural_image
Illustration of a baby wearing a car seatbelt, no text or symbols presentBRITAX Child Safety, Inc.
Usando con la base
natural_image
Diagram of a mechanical component with red directional arrows indicating movement or force (no text or symbols)natural_image
Illustration of a hand holding a pen or pencil, with motion lines indicating movement (no text or symbols)BRITAX Child Safety, Inc.
natural_image
Illustration of a hand pressing down on a car seat component with a red arrow indicating motion (no text or symbols)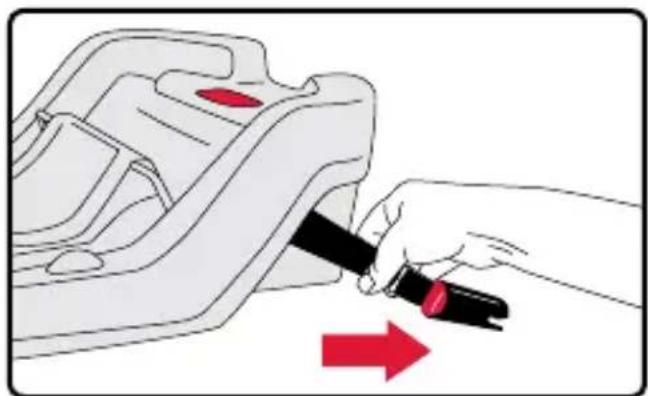
natural_image
Illustration of a hand using a black belt to adjust a car seatbelt, with a red arrow indicating the motion (no text or symbols present)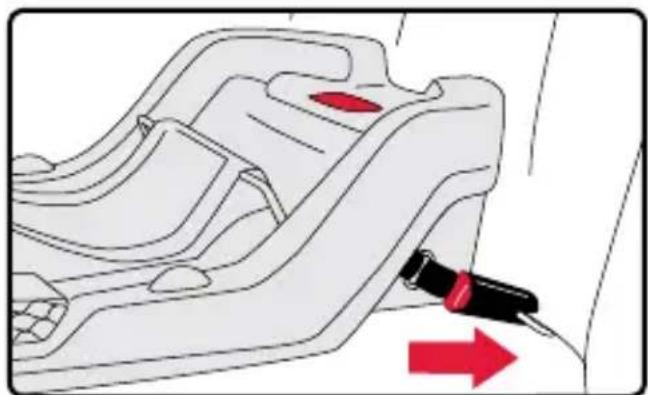
natural_image
Diagram of a car seatbelt buckle with a red arrow indicating the cable attachment (no text or symbols present)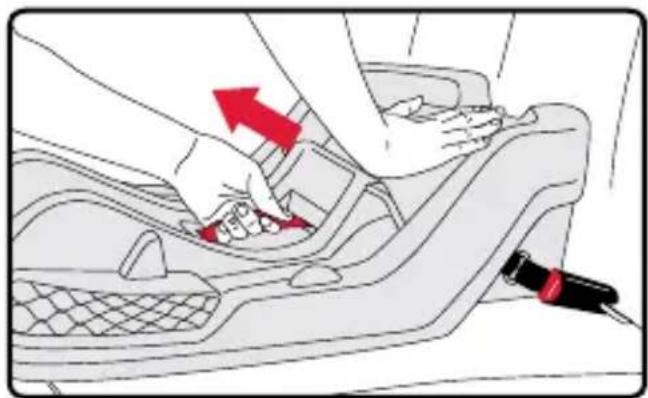
natural_image
Illustration of a person using a car seatbelt to adjust the seat area (no text or symbols visible)natural_image
Illustration of a hand pressing down on a car intake manifold with a red arrow indicating the direction (no text or symbols present)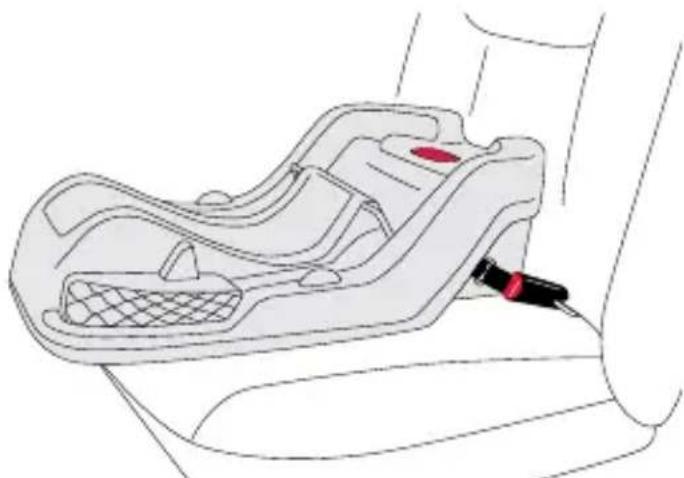
natural_image
Line drawing of a car seatbelt with a red belt securing the seat (no text or symbols)BRITAX Child Safety, Inc.
natural_image
Illustration of a car seatbelt buckle being adjusted for a red belt, showing no text or symbols.natural_image
Diagram of a car seatbelt buckle with red belt and mesh pattern (no text or symbols)natural_image
Illustration of a car seatbelt buckle being adjusted for a hand, with red arrows indicating the mechanism (no text or symbols present)natural_image
Illustration of a car seatbelt being adjusted for a hand, with a red arrow indicating the angle (no text or symbols present)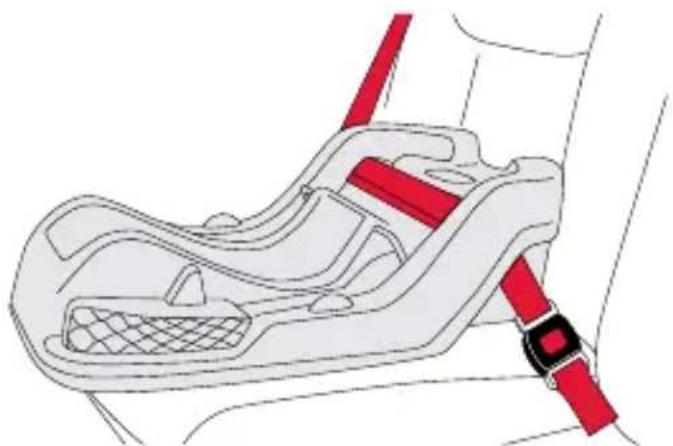
natural_image
Diagram of a car seatbelt mechanism with red belt and mesh component (no text or symbols)BRITAX Child Safety, Inc.
natural_image
Diagram of a car seatbelt buckle being adjusted for a red belt, showing no text or symbolsnatural_image
Diagram of a car seatbelt buckle with red belt (no text or symbols)natural_image
Diagram of a car seatbelt buckle with red belt (no text or symbols)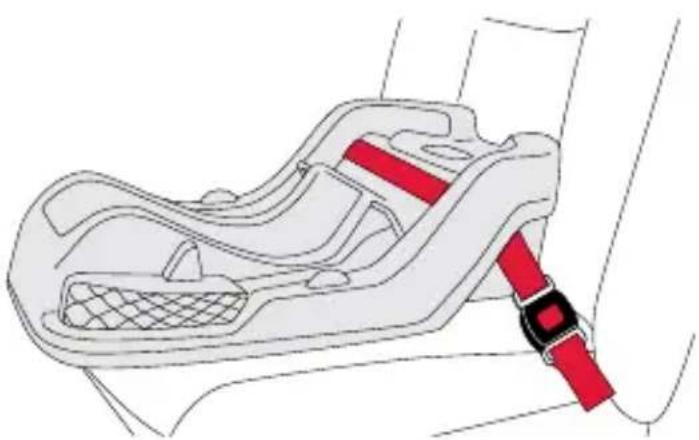
natural_image
Line drawing of a car seatbelt buckle with red belt (no text or symbols)BRITAX Child Safety, Inc.
natural_image
Diagram of a car seatbelt with two red arrows indicating upward movement (no text or symbols present)natural_image
Illustration of a car seatbelt with a red arrow indicating the grip (no text or symbols present)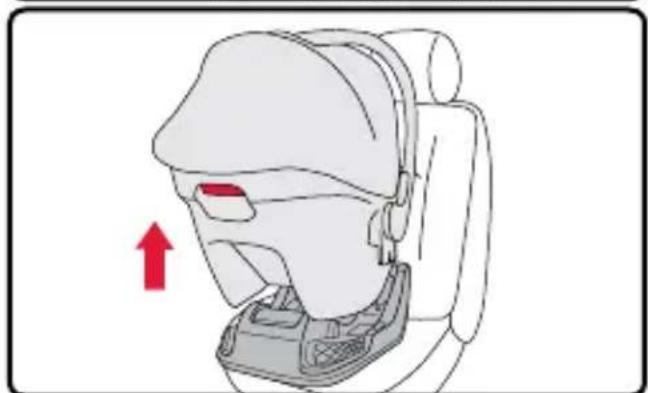
natural_image
Line drawing of a car seat with a red arrow indicating upward motion (no text or symbols)natural_image
Person using a car seatbelt to adjust the seat area (no text or symbols visible)natural_image
Illustration of a car seatbelt with red belt and mesh grip (no text or symbols)natural_image
Diagram of a car seatbelt buckle with red belt and gasket (no text or symbols)BRITAX Child Safety, Inc.
Usando sin la base
natural_image
Line drawing of a car seatbelt with a red circle highlighting the seat area (no text or symbols)natural_image
Illustration of a mechanical component with hexagonal pins and a curved surface (no text or symbols)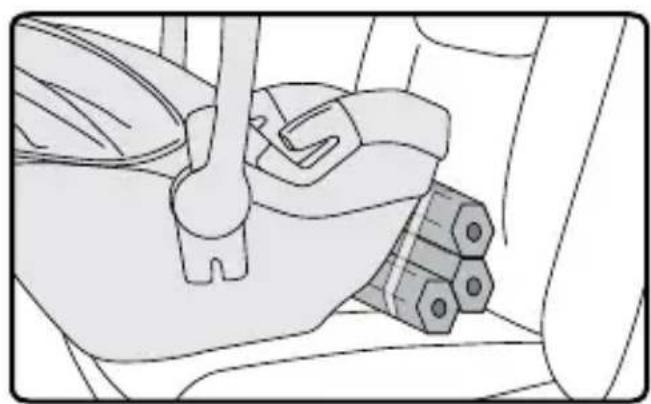
natural_image
Mechanical assembly diagram showing a lever and gear mechanism (no text or labels)BRITAX Child Safety, Inc.
natural_image
Illustration of a child wearing a car seatbelt, sitting in a two-part seat (no text or symbols)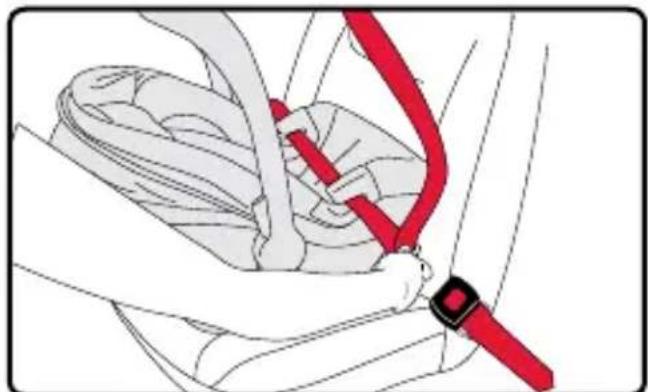
natural_image
Illustration of a car seatbelt buckle being lifted by a red belt (no text or symbols)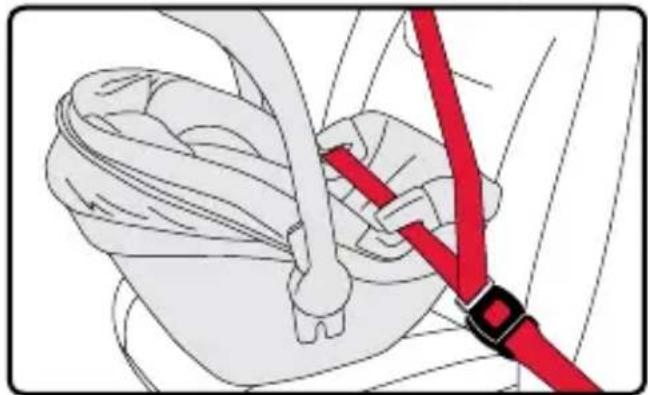
natural_image
Illustration of a red belt buckle securing a white seatbelt (no text or symbols)natural_image
Illustration of a car seatbelt buckle being adjusted, showing red belt and cable (no text or symbols)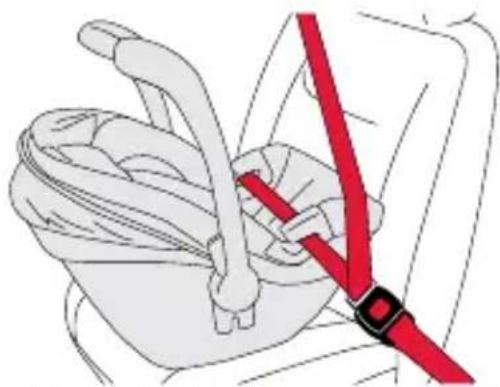
natural_image
Illustration of a car seatbelt with red belt (no text or symbols)BRITAX Child Safety, Inc.
natural_image
Illustration of a baby wearing a car seatbelt, sitting inside a car cab (no text or symbols)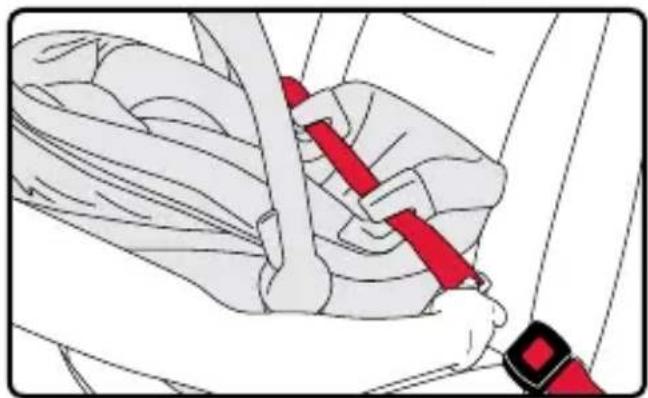
natural_image
Illustration of a person wearing a red belt buckle, holding a white object (no text or symbols visible)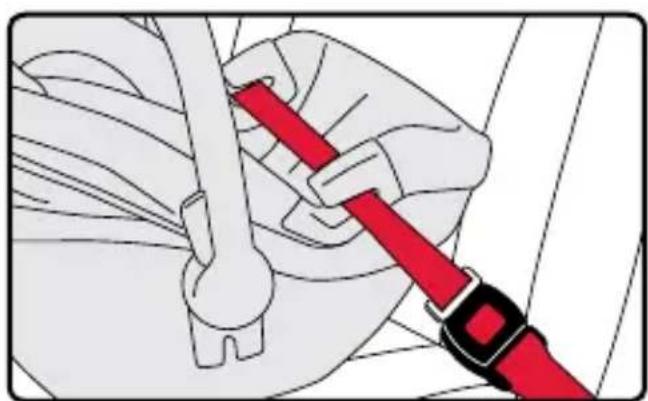
natural_image
Illustration of a hand using a red belt to adjust a mechanical component (no text or symbols visible)natural_image
Mechanical diagram showing a red belt buckle securing a car seatbelt, with no text or symbols present.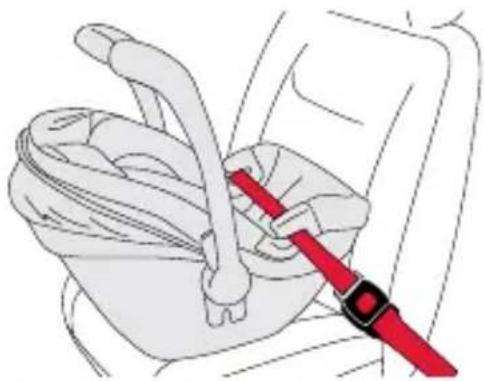
natural_image
Illustration of a car seatbelt with a red belt buckle (no text or symbols)BRITAX Child Safety, Inc.
Sujeción del bebé
natural_image
Illustration of a hand adjusting a mechanical component with a belt (no text or symbols)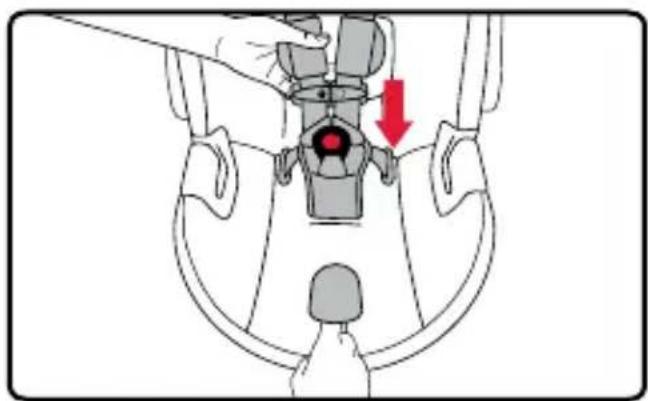
natural_image
Anatomical illustration of a pelvic region with a hand holding a knob, showing a red arrow indicating a specific area (no text or labels present)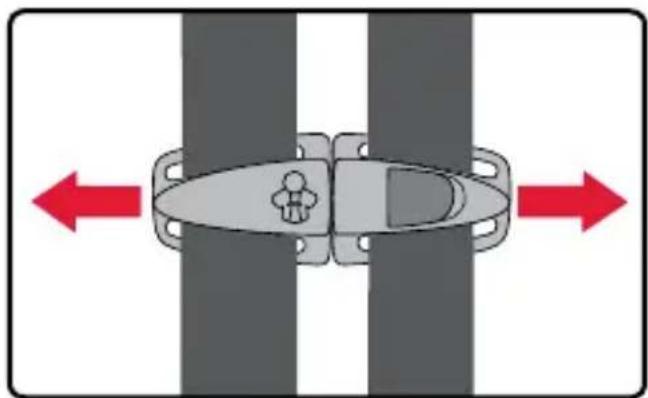
natural_image
Top-down diagram of a car inside a vehicle with two red arrows indicating left and right motion directions (no text or symbols)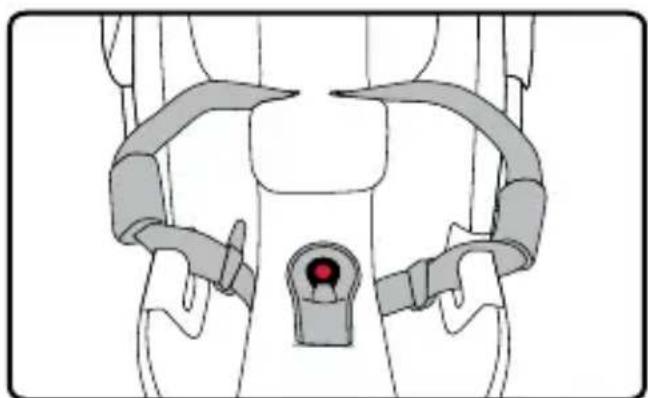
natural_image
Line drawing of a human torso with pelvic hardware and a red button on the chest (no text or symbols)natural_image
Line drawing of a child wearing a seatbelt, sitting inside a car seat (no text or symbols)natural_image
Illustration of a baby wearing a seatbelt with a red arrow indicating a specific anatomical feature (no text or symbols present)BRITAX Child Safety, Inc.
natural_image
Illustration of a person seated in a seat with red arrows indicating upward and downward motion (no text or symbols)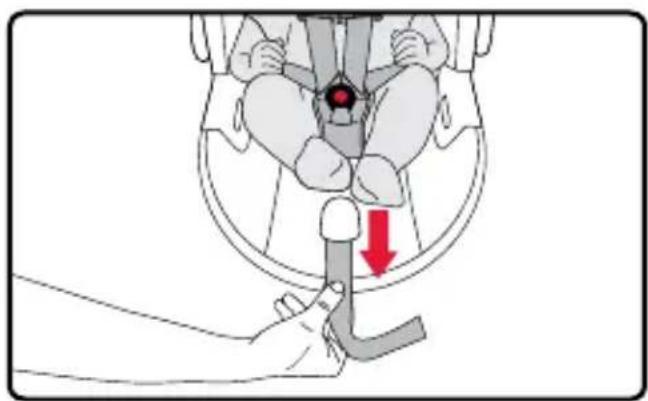
natural_image
Medical illustration showing a hand holding a catheter with a red arrow indicating a point of interest (no text or symbols present)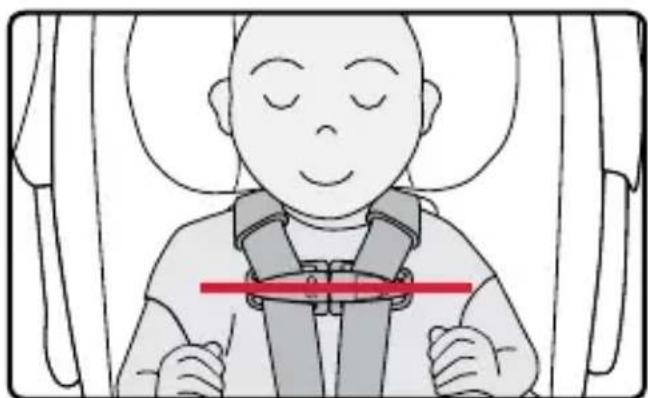
natural_image
Illustration of a person wearing a seatbelt and harness, seated with hands clasped (no text or symbols)BRITAX Child Safety, Inc.
natural_image
Diagram of a hand operating a seatbelt mechanism with a red circular component (no text or symbols)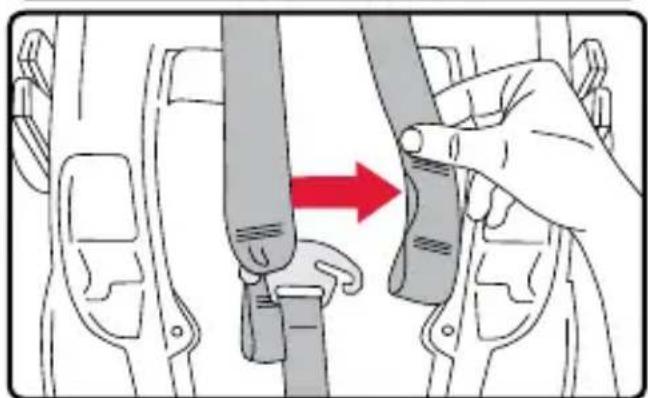
natural_image
Illustration of a hand adjusting a seatbelt buckle with a red arrow indicating the motion (no text or symbols present)natural_image
Illustration of a hand adjusting a mechanical component with a red arrow indicating motion (no text or symbols present)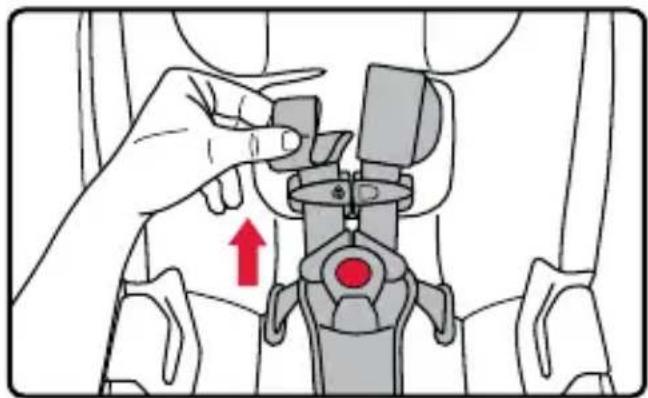
natural_image
Illustration of a hand adjusting a vehicle seatbelt mechanism with a red arrow indicating the direction (no text or symbols present)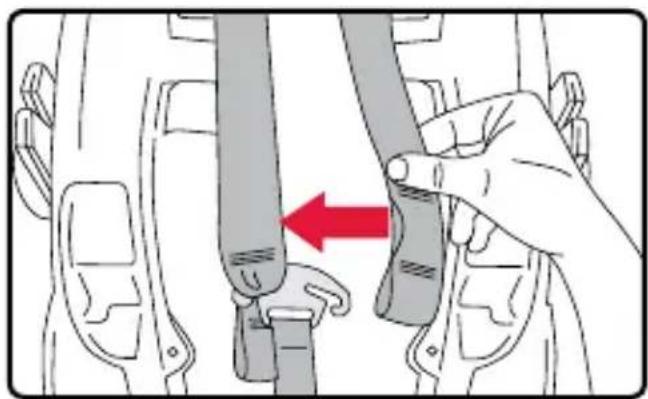
natural_image
Illustration of a hand adjusting a belt buckle with a red arrow indicating the motion (no text or symbols present)Ajuste la hebilla
BRITAX Child Safety, Inc.
natural_image
Line drawing of a person's seatbelt buckle being adjusted, showing hands and a red circular mark (no text or symbols)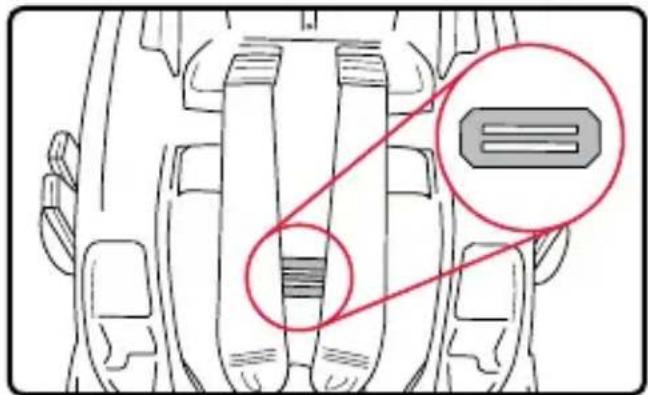
natural_image
Technical line drawing of a mechanical component with highlighted features (no text or symbols)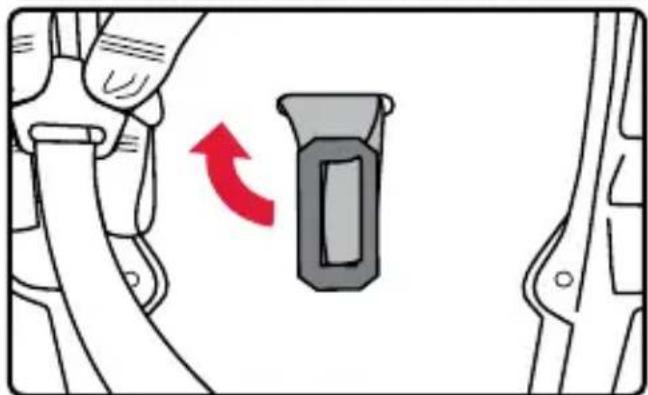
natural_image
Diagram showing a hand pressing a button with a red curved arrow indicating rotation (no text or symbols)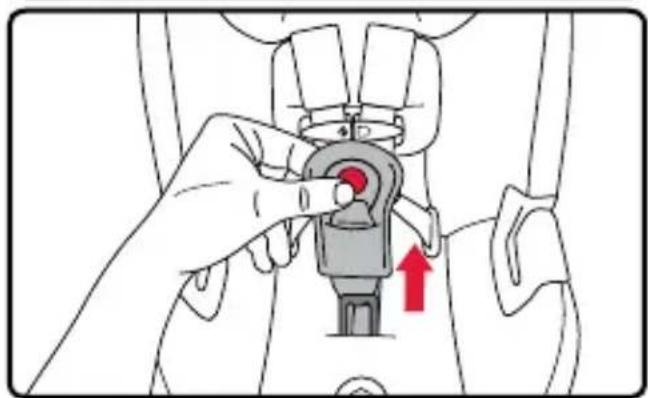
natural_image
Illustration of a hand adjusting a car seatbelt component with a red arrow indicating the adjustment (no text or symbols present)natural_image
Illustration of a hand adjusting a car seatbelt with a red arrow indicating downward motion (no text or symbols)natural_image
Illustration of a hand adjusting a mechanical component with a red arrow indicating upward motion (no text or symbols present)natural_image
Illustration of a hand holding a cable with a red arrow indicating clockwise motion (no text or symbols)BRITAX Child Safety, Inc.
Cochecitos BRITAX
natural_image
Mechanical assembly diagram showing a lever mechanism with a red arrow indicating motion direction (no text or symbols present)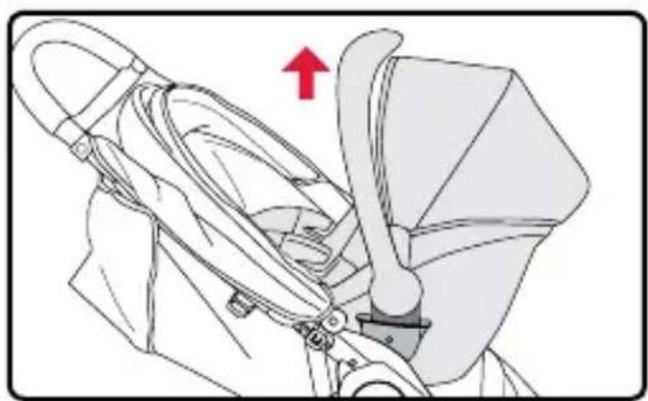
natural_image
Illustration of a baby stroller with a red arrow pointing to the seat (no text or symbols present)natural_image
Illustration of a person wearing a stroller with a belt, showing a red upward arrow (no text or symbols)BRITAX Child Safety, Inc.
BRITAX Child Safety, Inc.
natural_image
Diagram of a car with a red prohibition sign overlaid, no text or symbols presentnatural_image
Diagram of a car with a diagonal line crossing through it, enclosed in a red circle (no text or symbols)natural_image
Illustration of hands using a tool to adjust or install a car component, with a red arrow indicating the process (no text or symbols present)natural_image
Illustration of a hand adjusting a car seatbelt with a red arrow indicating the adjustment (no text or symbols present)BRITAX Child Safety, Inc.
natural_image
Illustration of a hand adjusting a vehicle seatbelt with a red downward arrow indicating the mechanism (no text or symbols present)natural_image
Illustration of a hand adjusting a car seatbelt with a red arrow indicating upward motion (no text or symbols)natural_image
Illustration of a car seatbelt being inserted into a seatbelt, showing the handle and seat area (no text or symbols)natural_image
Illustration of hands adjusting a small object with a ruler, no text or symbols presentnatural_image
Diagram of a mechanical component with red arrows indicating downward motion (no text or symbols)natural_image
Illustration of a hand adjusting a car seatbelt with a red arrow indicating the cable (no text or symbols present)BRITAX Child Safety, Inc.
natural_image
Illustration of a baby seat with two hands adjusting the seat, showing red arrows indicating downward motion (no text or symbols)natural_image
Illustration of a hand adjusting a car seatbelt with a red upward arrow (no text or symbols)natural_image
Diagram of a car interior showing a white object with a red arrow indicating direction (no text or symbols)natural_image
Illustration of a person's seatbelt being adjusted to a car's seatbelt, with a red arrow indicating the adjustment (no text or symbols present)natural_image
Illustration of a hand adjusting a mechanical component with a red upward arrow (no text or symbols)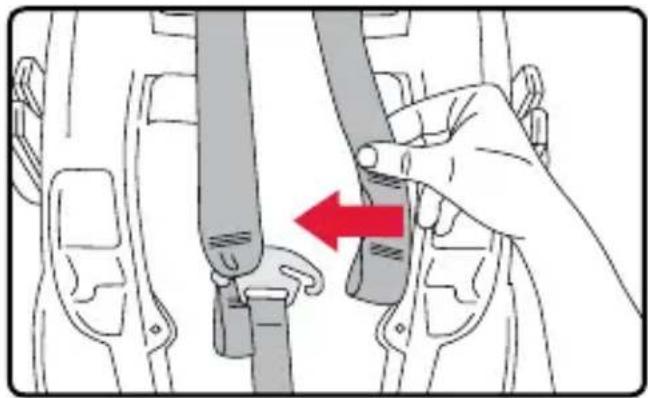
natural_image
Illustration of a hand adjusting a belt buckle with a red arrow indicating the change (no text or symbols present)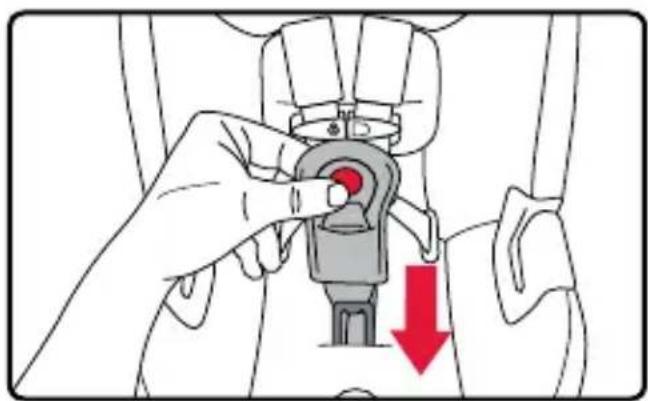
natural_image
Illustration of a hand adjusting a seatbelt with a red downward arrow indicating a decrease (no text or symbols present)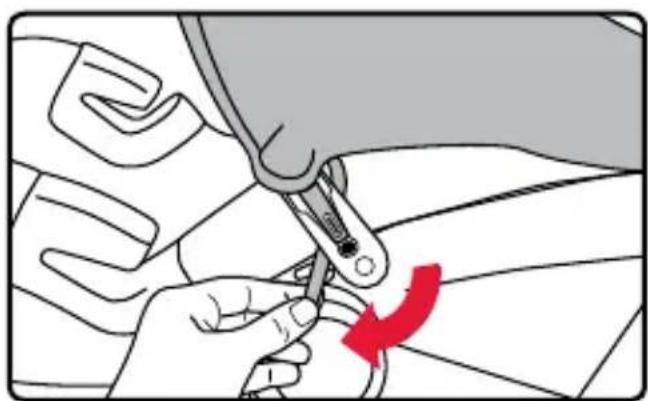
natural_image
Illustration of a hand using a tool to adjust or install a component, with a red arrow indicating the motion (no text or symbols present)BRITAX Child Safety, Inc.
BRITAX Child Safety, Inc.
LIMITACIONES DE LA GARANTÍA Y OTROS TÉRMINOS RELACIONADOS CON LA GARANTÍA Y LEYES ESTATALES
natural_image
Abstract wavy red and gray curved lines on white background (no text or symbols)Britax Child Safety, Inc.
4140 Pleasant Road
Fort Mill, SC 29708
USA
A Britax Childcare company
Tel.: 1-888-427-4829
Tel.: 1-704-409-1699
- B-SAFE® GEN2
- Contents
- Features......2
- Safety Information......4
- Using With the Base....10
- Using Without the Base 20
- Securing Your Child....26
- Child Seat Functions ....30
- Vehicle Compatibility....37
- Care and Maintenance....39
- Warranty 44
- BRITAX Child Safety, Inc.
- Features
- B-SAFE GEN2 User Guide
- Safety Information
- WARNING!
- Read all instructions before use of the infant carrier.
- Important Notes
- Certification
- Motor Vehicles
- Aircraft
- Registration
- Child Fit Information
- Rear-Facing Only 4 - 35 lbs (1.8 - 15.8 kg)
- Using With the Base
- Before installing the infant car seat:
- Overhang
- Adjusting the Recline Angle
- Lower Anchor Installation
- √ CHECKLIST
- Lap-Shoulder Belt Installation
- Lap Belt Installation
- Attaching the Infant Car Seat
- Removing the Infant Car Seat
- Uninstalling the Base
- Lower Connector Installation
- Using Without the Base
- Securing Your Child
- Before traveling, verify that the:
- Child Seat Functions
- Adjusting the Harness
- Adjusting the Buckle
- Handle Position
- BRITAX Strollers
- Attaching the Car Seat to the Stroller
- Removing the Car Seat from the Stroller
- Using the Lower Anchors
- Using the Lower Connectors
- Attaching the lower connector to the lower anchor:
- Removing the lower connector from the lower anchor:
- Vehicle Compatibility
- Incompatible Vehicle Seat Belts
- Care and Maintenance
- Removing the Cover
- Replacing the Cover
- Warranty
- LIMITED ONE-YEAR WARRANTY
- PLEASE COMPLETE AND MAIL THE OWNER REGISTRATION CARD WITHIN (30) DAYS OF PURCHASE
- WARRANTY LIMITATIONS
- LIMITATION OF DAMAGES
- LIMITATIONS OF WARRANTIES AND OTHER WARRANTY TERMS AND STATE LAWS
- Notes
- Índice
- Características
- Aviones
- Usando con la base
- Usando sin la base
- Sujeción del bebé
- Ajuste la hebilla
- Cochecitos BRITAX
- LIMITACIONES DE LA GARANTÍA Y OTROS TÉRMINOS RELACIONADOS CON LA GARANTÍA Y LEYES ESTATALES
Brand : BRITAX
Model : B-Safe Gen2
Category : Car seat