
PCGN1616C - Lighting Quoizel - Free user manual and instructions
Find the device manual for free PCGN1616C Quoizel in PDF.


User questions about PCGN1616C Quoizel
0 question about this device. Answer the ones you know or ask your own.
Ask a new question about this device
Download the instructions for your Lighting in PDF format for free! Find your manual PCGN1616C - Quoizel and take your electronic device back in hand. On this page are published all the documents necessary for the use of your device. PCGN1616C by Quoizel.
USER MANUAL PCGN1616C Quoizel
Tools Required: Flathead screwdriver, Phillips screwdriver, pliers, wire cutters, wire strippers, electrical tape, safety glasses.
LightSource: (5)G9BaseClearG9XenonBulbs40WMaximum(supplied).
EstimatedAssemblyTime: 20-30minutes
Preparation: Identifyandinspectallpartsbeforebeginninginstallation.Checkpackagecontentlistanddiagramsbelowtobesureallpartsare present. If any parts are missing or damaged, do not attempt to assemble, install, or operate the fixture. Contact customer service for replacement parts.

Warnings and Cautions
Turn off electricity at circuit breaker or main fuse box before installation. Consult a licensed electrician if in doubt.
These instructions are provided for your safety. It is very important you read them completely before installing the fixture. We strongly recommend that a licensed, professional electrician perform the installation.
Disconnect fixture from power source before replacing bulbs. Make sure bulbs are given sufficient time to cool before removal.
Do not touch the bulb with bare hands use a cloth or glove.
Package Contents


Crossbar Assembly
x 1

natural_image
Simple line drawing of a horizontal beam with three vertical supports (no text or symbols)
Fixture Body x 1

Clear G9
C Xenon Bulb
x 5

STEP 1 Install Crossbar Assembly—
A. Pass the supply wires with ground wire through the Crossbar Assembly (A). Attach the Crossbar Assembly (A) to Outlet Box with the head of Green Ground Screw facing you. Secure it with Outlet Box Screws (not included). Tighten until snug.

Figure 1
STEP 2 - Test Fit the Ceiling Canopy to the Crossbar Assembly
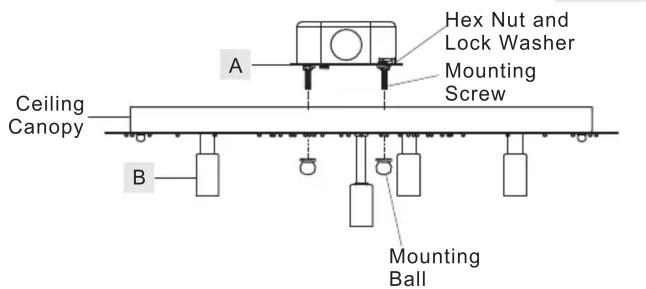
A. Remove the mounting balls from the Crossbar Assembly (A). Place the ceiling canopy and the Fixture Body (B) onto the Crossbar Assembly (A) and secure with mounting balls. Note: The ceiling canopy and the Fixture Body (B) should be snug against the ceiling and held tight with the mounting balls. If it is not, adjust the length of the mounting screws on the Crossbar Assembly (A) by unscrewing
(Step 2 Continued)
the preassembled hex nut and lock washer and then screwing the mounting screws in or out of the crossbar until the correct length is achieved. Once the Fixture Body (B) is secure, remove the mounting ball and Fixture Body (B) and proceed to Step 3.
Figure 2
STEP 3 - Wire Connections
A. Use standard wire connectors (not included) to make all wire connections. Twist connectors until wires are tightly joined together. Wrap each connection with approved electrical tape and carefully stuff all the connected wires into the Outlet Box.

Figure 3
Thank you for purchasing a Quoizel product.
Need assistance with parts or assembly? Call Quoizel customer service at 1-800-645-3184
or visit us on-line at www.quoizel.com
ReleasedDate:2017-04-01
STEP 4 Install the Fixture-
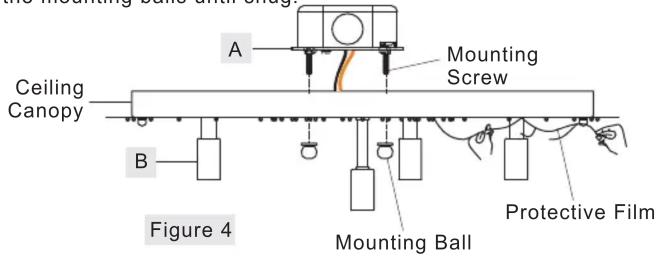
A. Remove Protective Film from Ceiling Canopy. Position the ceiling canopy and Fixture Body (B) onto the Crossbar Assembly (A). Place the holes in the ceiling canopy over the mounting screws. Secure the Fixture Body (B) by using the mounting balls and hand tighten the mounting balls until snug.
STEP 5-Install Bulbs and Crystal Strings
A. Insert bulbs (C) into sockets and push snugly into place.
IMPORTANT: Do not touch the bulb with bare hands use a cloth or glove.
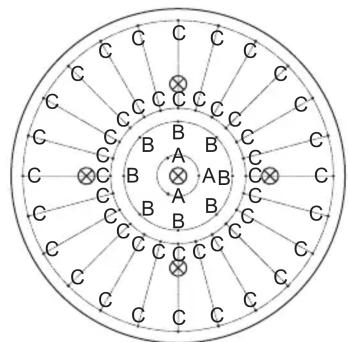
(Refer to CRYSTAL STRINGS DISTRIBUTION)
B. Attach Crystal Strings A to locations "A" on the Fixture Body (B) first. And then attach Crystal Strings B to locations "B" on the Fixture Body (B).
C. Attach the beads end of the Crystal Strings C to inner locations "C" on the Fixture Body (B) first. And then attach the crystal end of the Crystal String C to outer locations "C" on the Fixture Body (B).
Your fixture is now assembled and ready to use. Enjoy!

Figure 5
chemical
Diagram of a circular molecular structure with labeled atoms and bonds, likely representing a crystal or atomic arrangement.CRYSTAL STRINGS DISTRIBUTIONS
CAUTION FOR BULB REPLACING
A. When replace bulb, turn off power and allow lamp to cool. For safety purpose, wear gloves and eye protection.
B. If bulb is scratched or cracked, DO NOT use the lamp to avoid breakage during use or installation.
C. Use only in fixtures rated for lamps wattage and voltage.
D. Prevent the bulb from contacting liquid or combustible materials.
PCGN1616C
FINISH: POLISHED CHROME

natural_image
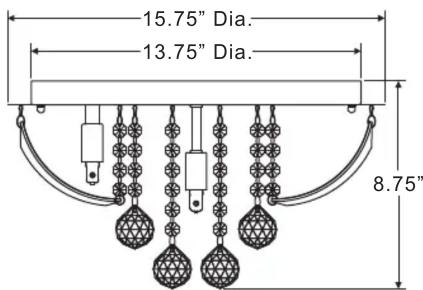
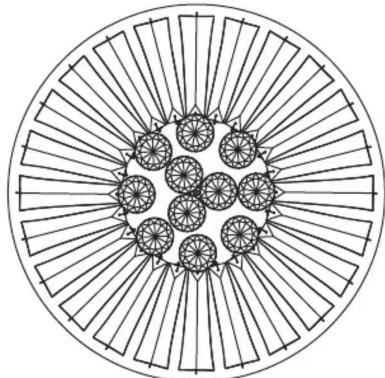
Circular diagram with radial lines and circular elements, no text or symbols presentNOTE: ALL DIMENSIONS ARE ROUNDED UP TO THE NEAREST 1/4"
Thank you for purchasing a Quoizel product.
Need assistance with parts or assembly? Call Quoizel customer service at 1-800-645-3184
or visit us on-line at www.quoizel.com
ReleasedDate:2017-04-17

Brand : Quoizel
Model : PCGN1616C
Category : Lighting