EI502 - Iron Khind - Free user manual and instructions
Find the device manual for free EI502 Khind in PDF.


| Product Type | Electric Steam Iron |
| Brand | Khind |
| Model | EI502 |
| Voltage | 220-240V ~ 50/60Hz |
| Power Consumption | 1300-1500W |
| Power Cord Length | 1.8 m |
| Steam Rate | 10 g/min (continuous) |
| Water Tank Capacity | 220 ml |
| Net Weight | 0.7 kg |
| Product Dimensions (LxWxH) | 240 x 100 x 121 mm |
| Soleplate Type | Non-stick coated (typical for model) |
| Temperature Settings | Low (Rayon, Acrylic), Medium (Silk, Wool), High (Cotton, Linen) |
| Functions | Steam ironing, power steam burst, spray, dry ironing, self-cleaning |
| Spray Function | Yes, via spray button |
| Power Steam Burst | Yes, vertical steam for hanging clothes |
| Self-Cleaning Function | Yes, recommended every 2 weeks with hard water |
| Temperature Pilot Light | Indicates when set temperature is reached |
| Swivelling Cord Protector | Yes |
| Safety Features | Automatic shut-off when placed upright (steam stops), cool-down before cleaning |
| Maintenance | Empty water tank after use, clean soleplate with damp cloth, use distilled water to prevent scaling |
| Included Accessories | User manual |
Frequently Asked Questions - EI502 Khind
User questions about EI502 Khind
0 question about this device. Answer the ones you know or ask your own.
Ask a new question about this device
Download the instructions for your Iron in PDF format for free! Find your manual EI502 - Khind and take your electronic device back in hand. On this page are published all the documents necessary for the use of your device. EI502 by Khind.
USER MANUAL EI502 Khind
USER MANUAL
KHIND®
Experience More
ELECTRIC STEAM IRON
EI502
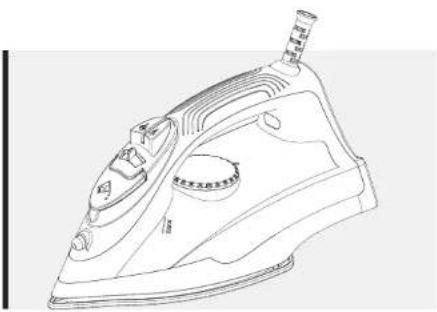
natural_image
Line drawing of a steam iron with handle and spout (no text or symbols)KHIND CARE Mobile App

Mobile App

Download to register for
E-wormally & enjoy hussie-free after-sales services
1-800-88-0032
khind.com.my
IMPORTANT
Please read this manual carefully before operating this product. Keep this manual handy for further reference.
P/N: 405165200

Safety Precaution Information
Safety & Warning Information
- Read the instruction manual carefully and follow the instruction closely.
- This appliance is not intended for use by persons (including children) with reduced physical, sensory or mental capabilities, or lack of experience and knowledge, unless they have been given supervision or instruction concerning use of the appliance by a person responsible for their safety.
Children should be supervised to ensure that they do not play with the appliance. - Use this appliance with specified voltage as stated on the rating label. Before connecting the appliance to AC mains, made sure the voltage specified corresponds to the AC supply to your house.
- This appliance is intended for household use only; commercial use will void warranty.
- Do not handle the plug and the appliance with wet hands.
- Do not pull, lift, or carry the appliance by its power cord. Do not excessively bend, stretch, twist, haul and tramp the power cord or place heavy objects on it.
-
If the power cord is damaged, it must be replaced by the manufacturer, its service agent or similarly qualified persons in order to avoid a hazard.
-
With any indication of damage or malfunction, please stop using the appliance immediately to avoid hazards. Take it to the authorized service centre for repair. Do not attempt to repair or change any parts by yourself.
-
Always take the appliance by its handle and warn against possible hazards. Eg: scalding or burns
-
The power cord should not touch the soleplate when it is hot.
-
Do not touch the soleplate when the iron is operating or after operation.
-
Never immerse the appliance in water to protect against electrical shock hazard.
-
Keep the soleplate smooth; avoid contact with hard objects.
-
Do not leave the appliance unallended while it is connected to the main power outlet.
-
Do not iron over zippers, buttons or any form of metal ornaments found on clothes as they may scratch the soleplate.
-
Do not bend the power cord or wind it round the appliance.
-
Never drop the appliance. If the appliance was dropped, do not use the appliance; If there are visible signs of damages or if it is leaking, please deliver to service centre for servicing.
-
Always disconnect the appliance from electrical outlet when not in use or before cleaning or before filling the water tank with water.
-
The appliance must be used and rested on a flat stable surface.
-
Only fill in water but no other liquids or additives.
-
Never put the appliance down on its sole plate during use. When placing the appliance on its stand, ensure that the surface on which the stand is placed is stable.
Cleaning & Maintenance
- Make sure the appliance has cooled down and unplugged from power supply before cleaning.
- Starch and other residue may be easily removed from the soleplate with damp cloth.
- Do not use abrasive, steel wool or metal implements to clean the soleplate.
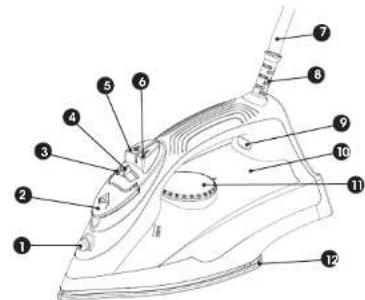
Parts Identification
- Spray Nozzle
- Water Inlet
- Self-Clean Button
- Steam Control
- Power Steam Button
- Spray Button
- Power Cord
- Swivelling Cord Protector
- Temperature Pilot Light
10.WaterTank
11.TemperatureControl
- Soleplate
*Pictures are for illustration purposes only.
Specifications
| Model | EI502 |
| Voltage | 220-240V - 50/60Hz |
| Power | 1300-1500W |
| Power Cord Length | 1.8m |
| Steam Rate | 10g/min |
| Water Tank Capacity | 220ml |
| Net Weight | 0.7kg |
| Product Dimension (LxWxH) | 240 x 100 x 121mm |
*Specifications are subject to change without prior notice.
3 How to Use
Operation
A. Before First Use
Peel off the protective foil from the soleplate and wipe the soleplate with a soft cloth.
B. Filling the Water Tank
Warning! Make sure the appliance is not connected to the power supply before filling the tank with water.
- In order to avoid early furring up, we recommend to use distilled water only.
- Make sure the Steam Control set to "0" (Steam off)
- Open the Water Inlet
- Fill in water (no additives) up to the maximum filling mark indicated on the water tank.
- Close the Water Inlet.
Note: Empty the Water Tank after use.
C. Connection to the Power Supply
- After connecting to power supply, the Temperature Pilot Light will light up while the appliance heating up.
- It goes off as soon as the appliance reaches pre-set temperature and you may now start ironing.
- During ironing, the Temperature Pilot Light automatically turn on and off as the appliance heats up / reaches to the pre-set temperature.
D. Setting the Temperature
Set the Temperature Control according to the international textile protection symbols (located on the Temperature control and washing label of the garment)
Rayon, Acrylic - Low Temperature
Silk, Wool - Medium Temperature
Cotton, Linen - High Temperature
E. Steam Ironing
Note: The appliance works at a constant steam volume, i.e., the steam pressure stays same regardless of the filling level in the Water Tank.
- Adjust the Temperature Control to the desired setting.
- Set the steam on using the Steam Control.
- If steam escapes from the Soleplate when the appliance is held horizontally, it is ready for stream ironing.
- To steam iron delicate synthetics, set the Temperature Control to a medium temperature level. Once the Temperature Pilot Light has gone out, set the Steam Control to the steam setting. Hold the appliance horizontally first to see whether steam is produced. Then start ironing (check the setting at a hidden area of the garment). As the steam produces a kind of barrier between the soleplate and cloth, most textiles are suitable for steam ironing.
F. Power Steam
- Press the Power Steam Button to generate a power burst of steam that can penetrate the fabrics and smoolthen the most difficult and tough creases. Wait for a few seconds before pressing again.
- It is also possible to use the power steam for straightening hanging clothes (vertical shot of steam). Press the Power Steam Button in intervals then.
Note: If water drips from the Soleplate, its temperature might be too low. Either increase the temperature or wait for a few seconds before pressing the button again to let the Soleplate heat up.
G. Spray
Use the spray function to iron out stubborn creases at any temperature. Simply press the Spray Button when required. Make sure there is enough water in the Water Tank.
H. Dry Ironing
For dry ironing, set the Steam Control to 0 (Steam off).
you put down the iron in an upright position, steam production stops as well.
I. Self-Cleaning
Regularly clean the steam iron depending on the frequency of use and the local water quality. In case of rather hard water self-cleaning is recommended at least every 2 weeks.
- Set the Steam Control to '0' (steam off).
- Set the Temperature Control to the highest level.
- Open the Water Inlet and fill water up to the maximum filling mark into the Water Tank. Close the Water Inlet.
- Connect the power plug of the appliance to the wall socket.
- Let the appliance heat up until the Temperature Pilot Light goes out.
- Disconnect the power plug.
- Hold the appliance horizontally across a sink.
- Push the Steam Control to Self-Clean. Boiling hot water and steam come out of the Soleplate washing out any limescale. Sway the iron to and fro during this.
- Set the Steam Control to "0" (steam off).
- Wipe the Soleplate on a (preferably) old piece of cloth. Connect the power plug to the wall socket again and let it heat up. Any residual water now evaporates through the Soleplate.
- Unplug the appliance and let it cool down before stowing it away.
J. Storage
- Unplug the appliance and let it cool down.
- Set the Temperature Control to the lowest level.
- Empty the Water Tank.
-
- Set the Steam Control to "0" (steam off).
- If necessary, wipe the appliance with a damp cloth.
- Store the appliance out of the reach of children and in a clean and dry place.
K. Useful Tips / Advice
- When the appliance is used for the first time, some smoke may be generated. This is quite normal and stops shortly after having started ironing.
- Damp clothes are easier to iron than fully dry clothes.
- Before the first use or when the appliance has not been used for some time, hold it horizontally and let steam escape for approx. 1 minute by pressing the Power Steam Button several times.
- When using spray starch, we recommend wiping the Soleplate from time to time to avoid the build-up of any residues.

安全注意事项
安全和警告信息
Spesifikasi
| Model | EI502 |
| Voltan | 220-240V ~ 50/60Hz |
| Kuasa | 1300-1500W |
| Panjang Tallkod Kuasa | 1.8m |
| Kadar Slim | 10g/min |
| Kapasiti Tangki Air | 220ml |
| Beral Bersih | 0.7kg |
| Dimensi produk (PxLxT) | 240 x 100 x 121mm |
| TITLEJOB NO.MATERIALPREPARED BY | EI502 Electric Steam Iron User Manual | CHECKED BY: | APPROVED BY: | ||||
| KM-123-922 | DATESCALECOLOUR | 02/11/2022, 09/11/2022 | DESIGNERCREATIVE HEADTSD / QA | Pelly | T. MANAGERP. MANAGERG. MANAGER | ||
| - | 1:1 | ||||||
| Pelly | 1 Colour Printing Black | ||||||
| *THE DESIGN AND CONCEPT OF THIS DRAWING IS PROPERTY OF KHIND-MISTRAL (M) SDN BHD. (442421-A). ALL RIGHTS RESERVED, NO PART OF THIS DRAWING MAY BE COPIED, REPRODUCED.STORED IN RETRIEVAL SYSTEM OR TRANSMITTED IN ANY FORM OR BY ANY MEANS OR OTHERWISE, WITHOUT PRIOR EXPRESSED PERMISSION FROM KHIND-MISTRAL (M) SDN BHD. | * Artwork is as per Job Brief issued to the Creative Dept. You are advised to check the artwork ACCURATELY before approving. The dept shall not be held responsible for any errors or mistakes that occur after approval. | ||||||
- ELECTRIC STEAM IRON
- IMPORTANT
- Safety Precaution Information
- Safety & Warning Information
- Cleaning & Maintenance
- Parts Identification
- How to Use
- Operation
- Before First Use
- Filling the Water Tank
- Note: Empty the Water Tank after use.
- Connection to the Power Supply
- Setting the Temperature
- Steam Ironing
- Power Steam
- Spray
- Dry Ironing
- Self-Cleaning
- Storage
- Useful Tips / Advice
- 安全注意事项
- 安全和警告信息
Brand : Khind
Model : EI502
Category : Iron