
RP-140 B - Radio Orava - Free user manual and instructions
Find the device manual for free RP-140 B Orava in PDF.


| Product Type | Portable Radio |
| Brand | Orava |
| Model | RP-140 B |
| Dimensions (W x H x D) | 200 mm x 130 mm x 70 mm |
| Weight | 0.5 kg |
| Power Supply | 2x AA batteries (1.5V) or AC adapter (optional) |
| Battery Life | Approximately 30 hours with alkaline batteries |
| Radio Bands | AM (MW) and FM (VHF) |
| Tuning Type | Analog wheel |
| Speaker | Built-in 3-inch dynamic speaker |
| Headphone Jack | 3.5 mm stereo output |
| Antenna | Telescopic rod antenna for FM, ferrite bar for AM |
| Display | Analog frequency dial |
| Controls | Volume knob, tuning wheel, band selector, power switch |
| Material | Plastic casing |
| Color | Black |
| Cleaning Instructions | Wipe with a soft, dry cloth. Do not use harsh chemicals. |
| Safety Precautions | Do not expose to water or extreme temperatures. Keep away from children under 3 years. |
| Spare Parts Availability | Contact Orava customer service for replacement parts. |
| Repairability | Basic repairs possible by qualified technician; user-replaceable batteries. |
Frequently Asked Questions - RP-140 B Orava
User questions about RP-140 B Orava
0 question about this device. Answer the ones you know or ask your own.
Ask a new question about this device
Download the instructions for your Radio in PDF format for free! Find your manual RP-140 B - Orava and take your electronic device back in hand. On this page are published all the documents necessary for the use of your device. RP-140 B by Orava.
USER MANUAL RP-140 B Orava
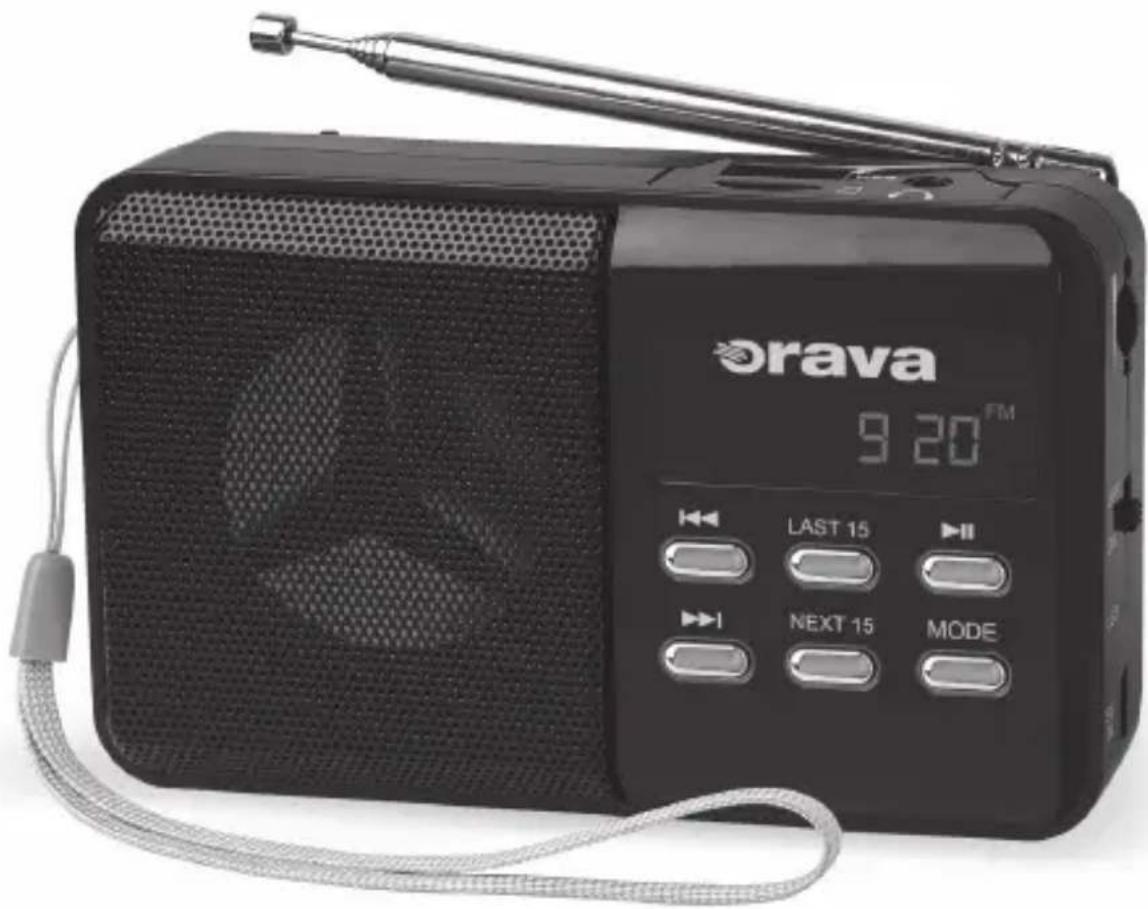
Portable FM radio receiver with USB/SD/microSD

Instruction manual
EN
Safety instructions Safety
- If any object enters the device, disconnect the device from the power supply and have the device checked by an authorized service center before using it again.
- The unit is live when the AC adapter (not supplied) is plugged into an electrical socket, even if the unit itself is turned off.
- This device is intended for use by children 8 years of age and older if they are supervised or instructed in the safe use of the device and if they understand the dangers involved. Children must not perform cleaning and user maintenance unless they are older than 8 years under supervision. Keep the device and the cord out of the reach of children if they are under 8 years old.
- This device may be operated by persons with reduced physical, sensory or mental capabilities, or lack of experience, provided they have been given supervision or instruction concerning use of the device in a safe manner and by understanding the hazards involved. Children must not play with the device.
Location
- Do not place the device in an enclosed space, such as a bookcase or built-in cabinet.
- Make sure there is enough space around the air circulation device to prevent the device from overheating.
- Do not place the device on a soft surface (blanket, tarpaulin, etc.) or near materials (curtains, draperies) that could impede air circulation by blocking the ventilation holes.
- Do not place the unit near heat sources such as radiators, or in a place subject to direct sunlight, excessive dust, mechanical vibration or shock.
- Do not place the device on an inclined surface. The device is designed for operation in a horizontal position.
- Do not place the device near devices with strong magnets, such as microwave ovens or large speakers.
- Do not place heavy objects on the device.
- If the unit is brought directly from a cold to a warm location, moisture may condense inside the unit and cause damage to the optical mechanism. When switching on the device for the first time or after moving the device from a cold environment to a warm one, wait approx. 30 minutes before operating the device again until the moisture generated in the device has evaporated.
Power supplies
Power supply
1 Connect a suitable 5 V/500 mA adapter cable (not supplied) to the 5 V DC (mini USB) jack on the unit, then plug the AC adapter into an electrical socket.
2 Use the ON/OFF switch to turn on the unit and select the desired audio source.
Warning!
Use only a suitable AC adapter with the specified parameters, a suitable terminal and a 5 V DC output voltage.
The device is powered on while the AC adapter is plugged in, even if the device itself is turned off.
Battery powered
The device is powered by the supplied battery (3.7 V - 800 mA) and we recommend using this power supply.
1 Open the battery cover on the back of the device.
2 Insert the supplied battery pack according to the correct polarity + and -.
3 Close the battery cover.
4 If the battery is empty, charge it by connecting the device with the supplied USB charging cable to the USB connector on the PC, or connect a suitable AC adapter (not supplied).
Powering/charging the battery from a PC
The device can be powered (charged by its battery) from a switched on PC via the supplied USB charging cable.
If necessary, connect the large USB connector to the USB connector on the turned on PC and the other connector to the DC 5 V connector on the device.
The battery charges for about 2-3 hours and the device can operate on the battery for about 3-5 hours.
Notes
- Do not insert any other objects into the battery compartment.
- If you will not be using the device for a long time, remove the battery.
Control elements
Elements on the device
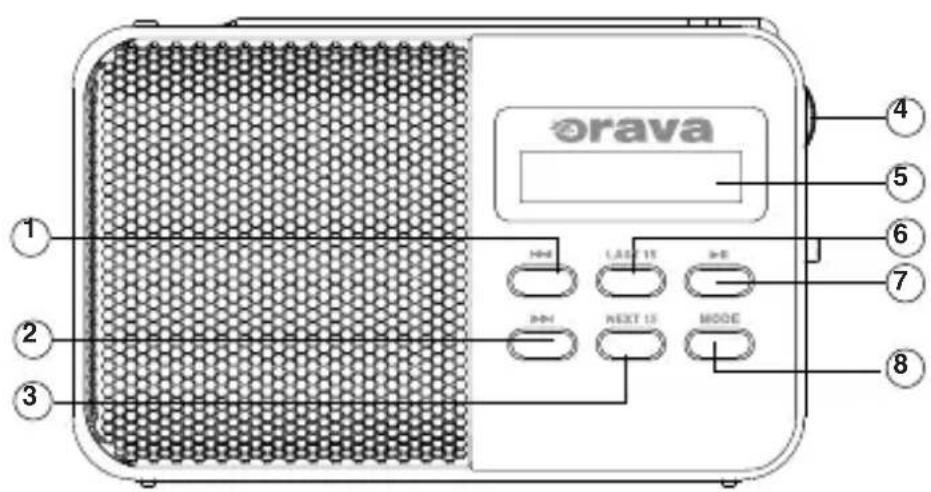

1 <button
(rewind/fast reverse/previous frequency)
2 ▶▶▶I button
(track forward/fast forward/next frequency)
3 NEXT 15 button
(switching 15 tracks forward/searching for the next frequency)
4 Volume control
5 Display
6 LAST 15 button
(rewind 15 tracks/previous frequency search)
7 ▶II (play/pause)/FM SCAN (tune) button
8 MODE button (audio source switching)
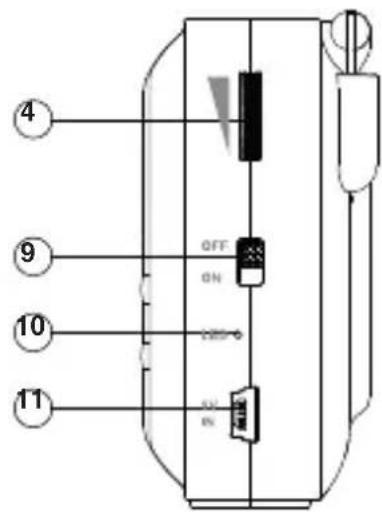
9 ON/OFF switch
10 Charging LED
11 DC 5 V power/charging connector
12 Headphone output mini connector (headphone connection)
13 USB connector (connecting a USB memory device, USB device, etc.)
14 MicroSD memory card slot
15 Telescopic FM antenna
16 Device carrying cord
17 Battery compartment cover
General operations
Display
The display shows track numbers, station frequency, audio source and playback status.
Sound settings
1 Turn switch 9 to ON.
2 Turn the volume knob 4 to adjust the volume.
Radio control
Basic operations
1 Turn switch 9 to ON.
2 Switch the audio source to radio by pressing MODE so that the display shows FM and frequency.
3 Press and hold ▶II.
Automatic tuning and storing of all available FM stations starts.
4 After tuning and storing, the first tuned station is activated.
Use the ◀◀◀/▶▶▶ buttons to switch stations (presets).
5 Turn the volume knob 4 to adjust the desired volume.
6 Press 6 briefly to search for the previous radio station.
Briefly press button 3 to search for the next radio station.
7 Briefly press the ▶II button (7) to switch off the radio sound, press it again to switch on the sound.
8 Turn switch 9 to the OFF position to turn off the machine.
Listening to the radio
Extend the TELESCOPIC ANTENNA 15 to the maximum length and adjust its angle and direction for the best reception.
Note
When you switch the device off and on again, the last station you listened to is tuned in when you turn on the radio.
Basic playback operations
Playback
Press ▶II to start playback from the USB device from the first track. The playback character ▶ appears on the display.
Suspension
During playback, press the ▶II button. Playback pauses and appears on the display
II pause sign.
While paused, press the ▶■ button again. Playback resumes.
Fast rewind (◀◀)
Move to the beginning of the previous song (s). Pressing and holding the button rewinds the currently playing song.
Fast forward (▶▶▶)
Skip to the next song (s). Press and hold to fast forward the currently playing song.
Fast forward 15 tracks (3)
Fast-forward 15 tracks (single press or repeat)
Rewind 15 tracks (6)
Rewind 15 tracks (single press or repeat)
Playback from USB device
Play MP3 files
The player allows you to play MP3 format in audio quality comparable to a CD. You can play files from a USB device.
You can play files using the buttons on the device.
1 Turn switch 9 to ON.
2 Connect a USB device to the USB connector.
3 Playback starts automatically or switch the audio source to USB by pressing MODE so that USB appears on the display.
4 If playback does not start automatically, briefly press ▶II to start playback from the USB device from the first track. Press and hold ▶II to switch ONE (single track) loop playback. Press and hold ▶II again to switch to FOLD (playback from the address book). Press and hold ▶II again to switch to ALL (play all tracks).
5 If playback does not start automatically, press ▶II to start playback from the USB device from the first track.
6 Press 3 briefly to skip 15 tracks forward. Briefly press button 6 to skip backward 15 tracks.
7 Turn the volume knob 4 to adjust the desired volume.
8 When playback is finished, set switch 9 to OFF to turn off the unit.
MicroSD card playback
Play MP3 files
The player allows you to play MP3 format in audio quality comparable to a CD. You can play files from the microSD card.
You can play files using the buttons on the device.
1 Turn switch 9 to ON.
2 Insert a microSD card into the microSD card slot.
3 Playback starts automatically or switch the audio source to SD by pressing MODE so that SD appears on the display.
4 If playback does not start automatically, briefly press ▶II to start playback from the SD device from the first track. Press and hold ▶II to switch ONE (single track) loop playback. Press and hold ▶II again to switch to FOLD (directory playback). Press and hold ▶II again to switch to ALL (play all tracks).
5 If playback does not start automatically, press ▶II to start playback from the SD device from the first track.
6 Press 3 briefly to skip 15 tracks forward. Briefly press button 6 to skip backward 15 tracks.
7 Turn the volume knob 4 to adjust the desired volume.
8 When playback is finished, set switch 9 to OFF to turn off the unit.
Play audio through headphones
1 Turn switch 9 to ON.
2 Select the desired audio source and start playing it.
3 Connect suitable headphones with a 3.5 mm mini-connector (not supplied) to the headphone mini-connector 12.
The playback sound (device speaker) will be turned off automatically and the sound will be output from the headphones.
4 Turn the volume knob 4 to adjust the desired volume.
When you disconnect the headphones, the sound will be reproduced from the device speaker again.
5 When playback is finished, set switch 9 to OFF to turn off the unit.
PC connection
1 Turn switch 9 to ON.
2 Connect the device to the PC with a USB cable, the display shows PC.
3 You can transfer music (songs) between your computer and device if a microSD card or USB device is inserted.
5 When you have finished recording/transferring songs, turn the switch 9 to OFF to turn off the unit.
Maintenance
Cleaning the surface of the device
Use a soft cloth slightly moistened with a mild cleaning solution to clean the surface, panel, and controls. Do not use any type of abrasive pad, scouring powder, or solvent, such as thinner, petrol, or alcohol.
Technical specifications
Radio
Tuning range: FM: 70 - 108 MHz
Antenna: Telescopic retractable FM antenna
Generally
Audio output power: 1 x 3 W
Connectors - input: DC 5V mini USB (power supply)/500 mAh
USB
microSD card slot
Connectors - output: mini connector for headphones (audio output)
Power supply: battery: 3.7 V/800 mAh (supplied)
DC: 5 V from a suitable AC adapter, 5 V, 500 mA
(not supplied)
DC: from the USB connector on the PC via the
supplied USB charging cable
Dimensions: 11,6 x 7,2 x 3,4 cm (W x H x D)
Weight: 213 g
Supplied accessories: Instruction manual (1 pc)
USB power cable (1 pc)
Rechargeable battery 3.7 V/800 mAh (1 pc)
We reserve the right to make changes!
Producer:
ORAVA retail 1, a.s.
Seberíniho 2
821 03 Bratislava
Slovenská republika
Importer:
ORAVA retail 1, a.s.
Seberíniho 2
821 03 Bratislava
Slovenská republika
ORAVA distribution CZ, s.r.o.
Ostravská 494
739 25 Sviadnov
Česká republika
INSTRUCTIONS AND INFORMATION REGARDING THE DISPOSAL OF USED PACKAGING
Dispose of used packaging material at a municipal waste disposal site.
DISPOSAL OF USED ELECTRICAL AND ELECTRONIC EQUIPMENT
This symbol on the products or in the accompanying documents means that used electrical and electronic products should not be mixed with general household waste. For proper disposal, recovery and recycling, please return these products to designated collection points. Alternatively, in some countries of the European Union or other European countries, you may return your products to your local retailer when purchasing an equivalent new product. By ensuring this product is disposed of correctly, you will help prevent potential negative consequences for the environment natural resources and help prevent potential negative effects on environment and human health, which could be the consequences of improper disposal waste. Contact your local authority or nearest office for more details collection point. Improper disposal of this type of waste may result in penalties in accordance with national regulations.
For business entities in the countries of the European Union
If you wish to discard electrical and electronic equipment, please request the necessary information from your seller or supplier.
Disposal in other countries outside the European Union
This symbol is valid in the European Union. If you wish to discard this product, please request obtain the necessary information on the correct method of disposal from the local authorities or from the your supplier.

This product complies with all the essential requirements of the EU directives that apply to it.
DECLARATION OF CONFORMITY
Short text Declaration of Conformity:
ORAVA retail 1, a.s. hereby declares that the RP-140B complies with the essential requirements and other relevant conditions of Directive 2014/53/EU of the European Parliament and of the Council.
The full text of the Declaration of Conformity is available at: www.orava.eu


- PORTABLE FM RADIO RECEIVER WITH USB/SD/MICROSD
- INSTRUCTION MANUAL
- SAFETY INSTRUCTIONS SAFETY
- LOCATION
- POWER SUPPLIES
- POWER SUPPLY
- WARNING
- BATTERY POWERED
- POWERING/CHARGING THE BATTERY FROM A PC
- NOTES
- CONTROL ELEMENTS
- ELEMENTS ON THE DEVICE
- GENERAL OPERATIONS
- DISPLAY
- SOUND SETTINGS
- RADIO CONTROL
- BASIC OPERATIONS
- LISTENING TO THE RADIO
- NOTE
- BASIC PLAYBACK OPERATIONS
- PLAYBACK
- SUSPENSION
- PLAYBACK FROM USB DEVICE
- PLAY MP3 FILES
- MICROSD CARD PLAYBACK
- PLAY AUDIO THROUGH HEADPHONES
- PC CONNECTION
- MAINTENANCE
- CLEANING THE SURFACE OF THE DEVICE
- TECHNICAL SPECIFICATIONS
- RADIO
- GENERALLY
- PRODUCER
- IMPORTER
- INSTRUCTIONS AND INFORMATION REGARDING THE DISPOSAL OF USED PACKAGING
- DISPOSAL OF USED ELECTRICAL AND ELECTRONIC EQUIPMENT
- FOR BUSINESS ENTITIES IN THE COUNTRIES OF THE EUROPEAN UNION
- DISPOSAL IN OTHER COUNTRIES OUTSIDE THE EUROPEAN UNION
- DECLARATION OF CONFORMITY
Brand : Orava
Model : RP-140 B
Category : Radio