
RR-71 - Radio Orava - Free user manual and instructions
Find the device manual for free RR-71 Orava in PDF.


| Product Type | Radio with CD/MP3 player, USB, Bluetooth, FM/AM tuner, AUX input |
| Brand | Orava |
| Model | RR-71 |
| Dimensions (W x H x D) | 30.5 x 21.5 x 22.5 cm |
| Weight | Approx. 3.5 kg |
| Power Supply | AC adapter 230 V ~ 50 Hz; device DC 5 V, 1 A |
| Power Consumption | 8 W |
| Output Power | 2 x 2.2 W |
| Tuner Bands | FM 87.5 – 108 MHz; AM 522 – 1620 kHz |
| Disc Compatibility | Audio CD, CD-R, CD-RW (audio/MP3) |
| USB Supported Formats | MP3, WMA, WAV, APE, FLAC (up to 32 GB, FAT) |
| Bluetooth Version/Profile | Standard Bluetooth, supports A2DP, AVRCP; range up to 10 m |
| Connectivity | AUX IN (3.5 mm), PHONES (3.5 mm), USB Type-A, FM wire antenna |
| Display | LCD display with time, track info, etc. |
| Remote Control Battery | 1 x CR2025 (3 V) |
| Alarm Functions | Dual alarm (ON/OFF time), source selectable (CD, USB, FM, buzzer), sleep timer |
| CD Play Modes | Repeat 1/all, random, normal; for MP3: repeat track/folder/all, random |
| Safety Certifications | CE, RoHS; protection class IP20 |
| Cleaning Instructions | Use soft cloth with mild detergent; clean discs from center to edge; no solvents |
| Repairability / Spare Parts | Contact authorized service center; AC adapter and remote control replaceable |
| General Information | For indoor household use; operating temperature +5 to +40 °C; humidity 5–85% |
Frequently Asked Questions - RR-71 Orava
User questions about RR-71 Orava
0 question about this device. Answer the ones you know or ask your own.
Ask a new question about this device
Download the instructions for your Radio in PDF format for free! Find your manual RR-71 - Orava and take your electronic device back in hand. On this page are published all the documents necessary for the use of your device. RR-71 by Orava.
USER MANUAL RR-71 Orava
Intended use of the device
The device is designed exclusively for the playback of audio signals from external sources and equipment and for the reception and reproduction of radio broadcasts, to the extent specified by technical and operational parameters and functions, safety and user instructions and external influences of the operating environment.
Orava electrical appliances are manufactured in accordance with the state of the art and recognized safety regulations. Nevertheless, incorrect and unprofessional use or use contrary to the intended purpose may create a risk of injury or endanger the life of the user or a third party, resp. damage to equipment and other property.
1.GENERAL SAFETY INSTRUCTIONS AND WARNINGS
- This document contains important safety instructions and warnings for safe, correct and economical operation of the electrical equipment. Its compliance helps the user avoid risks, increase reliability and product life.
- In this document, the generic term product is used in text parts such as: electrical equipment - any device used for the production, conversion, transmission, distribution or use of electricity.
- From the point of view of the purpose of using electricity, the concept of electrical equipment in the strict sense of the word will include the following categories:
- household electric appliances,
- information and communication equipment,
- consumer electronics,
- lighting equipment,
- electrical and electronic tools,
- toys and equipment for sporting and recreational
1.1 General safety instructions
- Before commissioning the unit, we recommend that you carefully read the operating instructions and operate the equipment in accordance with the instructions!
- The safety instructions and warnings in this manual do not cover all the possible conditions and situations that may arise when using the device. The user must understand that a factor that can not be incorporated into any of the products is responsibility and caution. These factors must therefore be ensured by users / users who use and operate this device.
- Failure to follow the safety instructions and warnings is forbidden by the manufacturer for any damage to health or property!
- Make sure that the appliance is complete and shows no signs of damage before using the appliance for the first time. If the product is defective or if it has any visible damage, do not use the product.
- Keep the operating instructions as close to the device as possible throughout its service life. Always keep the operating instructions together with the appliance for future use and use by new users.
- Use the appliance only for the purpose for which it is intended and in the manner specified by the manufacturer.
- The appliance is intended for home and similar indoor use, with no special focus.
- It is not a professional device for commercial use.
- Do not change the technical parameters and features of the device by unauthorized modification or modification of any part of the device.
- The manufacturer is not responsible for damages caused during transportation, misuse, damage or destruction of the equipment due to adverse weather conditions.
1.2 Safety of the operating environment
- Do not use the device in an industrial environment or outside environment.
• Always keep the operating environment clean and well lit. - Do not place the device on an unstable surface. Overriding or dropping the device may result in personal injury or damage to the device.
- Do not expose the unit to direct sunlight or excessive heat sources.
- Do not use an electric appliance in areas with flammable liquids, gases or dust. The appliance may be the source of scaling, which can result in the ignition of dust or vapors.
Features of the operating environment
- Ambient temperature: +5 ÷ +40 °C
- Humidity: 5 ÷ 85%
- Altitude: ≤ 2 000 m
- Occurrence of water: intermittent condensation of water or occurrence of water vapor
- Occurrence of foreign bodies: amount and type of dust are not significant Protection class: IP20
- Other characteristics of the operating environment (mechanical stress
- shocks and vibrations, occurrence of plant, animals, weather effects) are negligible in terms of effect on the correct and safe use of electrical equipment.
1.3 Electrical safety
- Before connecting the appliance to the power supply for the first time, make sure that the voltage on the appliance label corresponds to that of the household electrical outlet.
- The electrical appliance is designed for mains supply 230 V \~.
The electrical safety of the appliance is guaranteed only if it is properly connected to the electricity grid.
- Only use a power cord with a plug (mains lead) that came with the device and compatible with a wall outlet. Using another cable may result in fire or electric shock.
- Always connect an electrical appliance to an easily accessible power outlet. In the event of an operating fault, the appliance must be switched off as soon as possible and disconnected from mains supply.
- Do not pull the power cord / power cord by pulling on the cord / cord. Disconnect the power cord by pulling the plug behind the power cord / power cord plug.
- If you use an extension cord, check that the total rated (ampere) power of all devices connected to the extension cord does not exceed the maximum current rating of the extension cable.
- If you need to use an extension cord or power supply block, make sure that the extension cord or power pack is plugged into a power outlet, and not to another extension cord or power supply. Extension power cord or power supply block must be designed for grounded plugs and plugged into a grounded outlet.
- The power plug of the appliance must be compatible with the mains socket. Never use any adapters or modify the socket in any other way. Do not use inappropriate or damaged sockets.
- To avoid electrical shock, plug the power cables into properly grounded electrical outlets. If the device is equipped with a 3-pin power supply cord, do not use adapters that do not have a grounding element or remove the grounding element from the plug or adapter.
-
Do not bend, crush or otherwise expose the power cord / power cord of the appliance to mechanical stress or external heat sources. Damage to the power cord may result in electric shock.
-
If the power cord is damaged, disconnect the appliance from the mains and do not use it again. If the power cord / power cord is damaged, it must be replaced by the manufacturer, its service department, or a qualified person to avoid the risk of electric shock.
- Regularly check and maintain the electrical appliance as well as the power cable. Disconnect the power plug regularly and clean it if necessary. Pollution by dust or other substances may cause disruption of the insulating state and consequently fire.
- Do not expose the appliance to water or moisture. The ingress of water into the appliance increases the risk of electric shock. If the power cord is wet or the appliance gets water, disconnect it immediately from the mains. If the appliance is plugged into a mains socket and if possible, turn off the power supply before attempting to disconnect the power supply. If you are pulling wet wires from a live power source, be very careful.
- If the electrical equipment is installed (connecting) the protective covers are dismantled, the electrical parts must not be accessible to the user when the installation is finished.
1.4 Safety of persons
- This appliance is intended for use by persons without an electrotechnical qualification (layperson) according to the instructions specified by the manufacturer.
- Device operation includes activities such as switching on and off, user manipulation and setting of operating parameters, visual or auditory inspection of the equipment, and user cleaning and maintenance.
- This appliance can be used by children 8 years of age and older and persons with reduced physical, sensory or mental abilities or lack of experience and knowledge only when under the supervision or guidance of the responsible person have been instructed to use the appliance in a safe way and understand the potential hazards.
- Cleaning and user maintenance can be carried out by children 8 years of age and older only under the supervision of the responsible person.
• Children may not play with the appliance. - Always keep the appliance out of reach of children during use and operation. Be sure to download the appliance even for a freely accessible power cord.
- Always be careful when operating the electric appliance. Do not use an electric appliance if you are overly tired, under the influence of medication or narcotic drugs that reduce attention and focus. Inattention during operation may result in serious injury.
1.5 Cleaning, maintenance and repairs
- Observe the normal user cleaning and maintenance of the appliance in the recommended way. Do not use solvents or harsh cleaners for cleaning. Pollution and visible stains from finger contact, respectively. The hands can be cleaned using detergent detergents specially designed to clean household appliances.
- If you do not use the appliance, clean it or disconnect the appliance from the power supply when the appliance is faulty.
- Do not disassemble the appliance. The appliance works with a dangerous voltage. For this reason, always switch off the appliance and disconnect it from the power supply. In the event of a fault, please have the repair serviced by an authorized service center.
- Only guarantee qualified and qualified personnel to repair and repair the electrical appliance.
2. Special safety instructions. Read carefully!
The electrical equipment is designed and manufactured in such a way as to allow safe operation and use by persons without professional qualifications. Despite all the measures taken by the manufacturer for safe use, operation and use carry certain residual risks and the possible dangers associated with them. The following symbols and their meanings have been used on the device and in the accompanying documentation to warn of possible dangers:
This symbol alerts users to the fact that the device operates on hazardous electrical voltage. Do not remove the protective covers on the device. Failure to observe the safety instructions for the operation and use of the device may result in:
Danger of electric shock!
Danger of serious injury or death!

This symbol alerts users to the risk of failure to observe the safety instructions when operating and using the device:
Danger of serious injury or death! Danger of equipment damage or other property damage!

- When transporting and using e.g. trolley take care to avoid tipping the device over.
- Only transport / carry the device after a thorough inspection of the area and the route, which must be unobstructed.
- Never carry the device while it is in operation. Do not carry the device while it is connected to the mains.
- Carry the device by firmly grasping the lower edge of the stand or solid parts of your body with both hands.
- When carrying, make sure that your hands and the device are not wet or slippery. Danger of serious injury or death!
There is a risk of damaging the device
Unpacking/Packaging
- Unpack the device (and accessories, if any) before putting it into operation and dispose of all parts of the packaging materials, labels and tags. Keep packaging materials in a safe place, especially out of the reach of children and incompetent persons, or dispose of them safely.
- Before commissioning, clean the device according to the instructions in the section „Commissioning“, resp. „Cleaning and maintenance“.
- Never clean the unit (and the remote control, if equipped) and the power cord with plug in a way that could cause cleaning fluid to enter the unit.
- Clean these parts only with a slightly damp cloth and wipe dry or allow them to dry.
- Only clean the device when the device is switched off and unplugged.
There is a risk of electric shock!
Danger of electrical short circuit!
Inspection/Commissioning
- We recommend performing initial and subsequent regular inspections of the device.
- Never use the device if it is incomplete, damaged or any part of it has been damaged during use.
- Do not use non-original and incomplete parts of the device and its accessories. Danger of serious injuries!
There is a risk of damage to the device or other property damage!
- If the device has been transported and stored at low temperatures (e.g. in winter) or excessive humidity, first leave it for about 1 - 2 hours
„Acclimatize“ at room temperature to remove any moisture in the electrical / electronic components that occurs when the ambient temperature changes.
- Do not turn the device on or off by plugging or unplugging the power cord.
- In normal use, always connect the device to the mains first and then switch it on with the main switch.
- After use, turn off the device with the main power switch, and then unplug the power cord from the AC socket.
- Do not use the device if the main power switch does not work on the device.
- The device is under dangerous voltage when the mains supply is connected.
There is a risk of electric shock!
Location/Installation
- Only place the device on:
- flat, firm and stable supports - for tables and coffee tables and on furniture parts suitable for placing audio / video equipment.
- Always make sure that the place where you want to place the device has sufficient space, mechanical strength and load-bearing capacity.
- Do not install the device in areas (e.g., closed bookcases, built-in cabinets and cabinets, etc.) where there is insufficient space and ventilation.
- Leave enough free space around the device to ensure the required air circulation. It is recommended to leave min. 10 cm on all sides.
- Do not partially cover the device. Do not place any objects and / or decorative and other fabrics on the device, do not insert or allow foreign bodies to enter the ventilation openings and the openings of the device covers.
- Do not cover the air vents of the covers. Air ventilation ensures reliable and safe operation of the device.
There is a risk of electric shock!
There is a risk of fire!
Warning!
- Do not expose the audio device (and the remote control, if equipped) to:
- direct sunlight, heat-producing devices,
- vibration and mechanical stress,
- excessive dust,
- water and excessive humidity,
- insects,
- an aggressive external environment.
- Do not place the audio device (and the remote control, if equipped):
- to places where medical devices are used. Their function may be impaired;
- on unstable carts, stands or tables;
- on uneven, unstable and dirty surfaces;
- on the tight edge of tables, tables or parts of furniture;
- near containers with water or other liquids.
- Do not place containers of water or other liquids on the shelves that are located above the device.
- Do not place any objects, especially open flames, on the device or on shelves that are located above the device.
Warning!
- Place the device in a place where children cannot reach freely.
- Do not allow children to handle the device. The appliance can tip over children and cause serious injuries.
- Mechanical damage (e.g. cracking of the plastic covers) of the device can cause serious injuries.
Danger of serious injuries!
There is a risk of damage to the device or other property damage!
- Do not place or use the device near containers containing water. Do not remove the device if it falls into the water! First pull the mains plug out of the mains socket and only then remove the device from the water. In such cases, take the device to a specialist garage for verification that it is safe and working properly.
There is a risk of electric shock! Danger of electrical short circuit!
- Do not subject the device and its accessories to strong vibrations and / or shocks. Do not drop or hit any objects on the device.
Danger of serious injuries!
There is a risk of damage to the device or other property damage!
- Do not use the device in potentially explosive atmospheres in the presence of flammable substances and their vapors, mists or dusts and in atmospheric conditions in which flue gases spread easily after ignition.
- Do not use the device near sources of excessive heat and open flame.
Danger of explosion and / or fire!
Operation/Supervision
- Keep the device under supervision during use and operation!
- Make sure that all electrical cable connections are securely and correctly connected. If the power cord is not securely connected to the device, be careful not to disconnect it from the device while the plug is connected to the power socket. The free end of the power cord is under dangerous voltage. Do not insert any conductive objects into the terminal.
- During a severe storm, do not touch the device, the power cord, or antenna system. You could be struck by an electric current from an atmospheric shock. Unplug this apparatus during lightning storms or when unused for long periods of time.
- Unplug the device if children or incompetent persons are left unattended near the device. Danger of serious injuries!
There is a risk of electric shock!
There is a risk of fire!
- Do not tie the power cord and signal cables together. Do not wind the cables together. The mains cord must remain accessible for safe disconnection of the device from the mains.
- Do not subject the power cord and signal cables to mechanical stress or damage.
- Do not let the power cord and signal cables hang freely and allow them to be freely accessible and accessible to children. Danger of serious injuries!
There is a risk of electric shock!
- The device contains parts of covers (e.g. ventilation grilles), which can become hot during normal operation. Do not touch these parts of the device.
- Never leave the device freely accessible and do not store with a freely accessible power cord. Children could pull the device by the power cord.
Danger of serious injuries!
- If the device is also used to reproduce an audio signal using headphones:
Do not use headphones set at extreme sound pressure levels.
There is a risk of serious damage or loss of hearing!
- If you are not going to use the unit for a long time, unplug the power cord from the AC socket.
Dust deposition and ambient humidity can damage the electrical insulation.
There is a risk of electric shock!
There is a risk of fire!
- Do not store the device with the power cord wrapped around its body. Loosely „fold“ the power cord in the way it was folded in the original packaging from the manufacturer.
- Never overload the device above the limits set by the technical parameters!
- If you notice any abnormalities (sounds, odors, smoke ...) while using the device, turn off the device immediately and disconnect it from the mains. Have the device checked by a specialist garage.
Discs that can be played on this unit
Disk format
Audio CD Marked with the Audio CD logo
CD-R/CD-RW Discs with audio CD, MP3 files.
Some CD-Rs or CD-RWs cannot be played on this system depending on the recording quality and condition of the disc itself, or the characteristics of the device on which the recording was made, even though it is in one of the supported formats.
Also, the disc will not play if it is not closed properly. This is not a malfunction of the unit.
For details, refer to the operating instructions of the recording device.
Notes on discs
Disk handling
- Hold the disc by the edges only to avoid soiling the surface of the disc. Do not touch the surface of the disc.
- Do not stick anything on the surface of the disc.
- Do not expose the disc to direct sunlight or heat sources such as air conditioners, or leave the disc in a parked car in the sun, as the temperature inside may rise considerably.
- When playback is complete, place the disc in its case in its case.
Cleaning
- Before playing, clean the disc with a cleaning cloth. Clean the disc from the center to the edges.
- Do not use solvents such as petrol, thinner, commercially available cleaners, or antistatic spray intended for vinyl LPs.
Supplied accessories
Make sure you have the following accessories with your device.
Instructions for use (1)
Equipment (1)
AC adapter (1)
Remote control (1)
Opening and closing the disc cover
Opening
Open the cover by lifting it all the way up to secure the cover support.
Closing
To close the cover, fi rst gently lift it up and gently pull the cover support towards you with your fi nger so that it comes loose. Only then slowly fold the cover down and close it.
Warning
Never forcibly close the cover by flipping it down immediately. If you do not release the support first by gently lifting the cover up and pulling it, both the support and the cover may be damaged.

Index of parts and controls
Front side
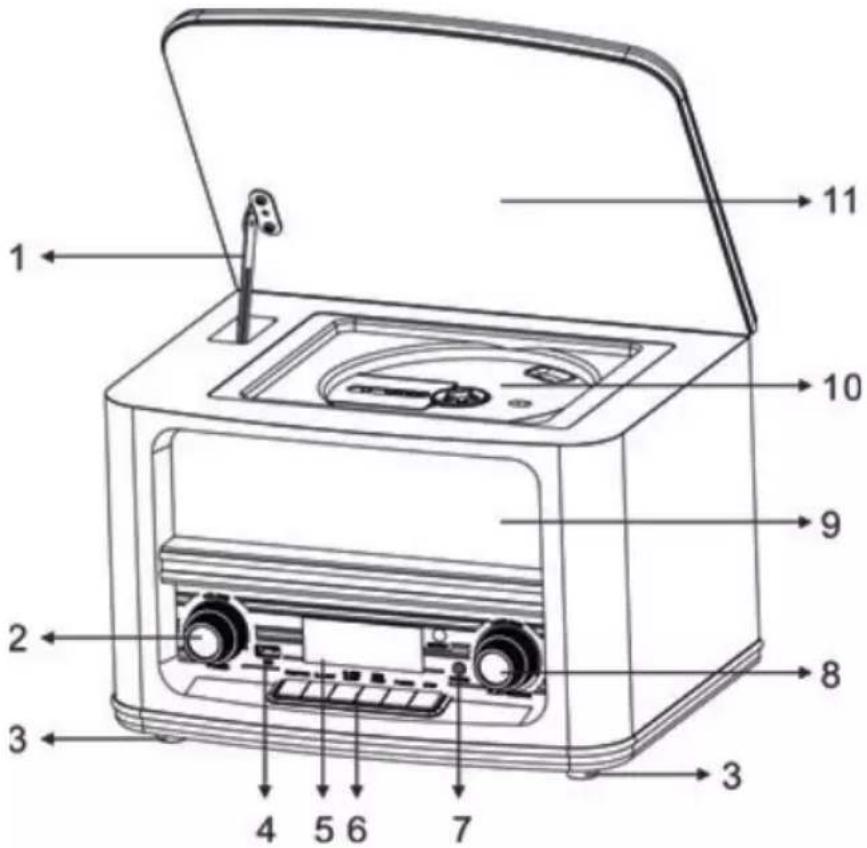
1 Disc compartment cover support
2 VOLUME +/- (STANDBY button)
Volume control/Power switch to/from standby mode
3 Rubber legs
4 USB connector
MP3 player/USB storage device connection
5 LCD display
Information display
6 Various function buttons (FUNCTION/CLK/MEM/PRESET/ALBUM (▼/▲) / SCAN (▶II)/BAND (■))
Control of various functions

7 PHONES connector
3.5 mm mini plug for connecting headphones
8 TUNING/SKIP control (TIMER/SLEEP button)
Tuning to radio stations/switching tracks and stations/setting the timer, etc.
9 Speakers
10 Disc tray
Inserting a disc
11 Disc compartment cover
Rear panel
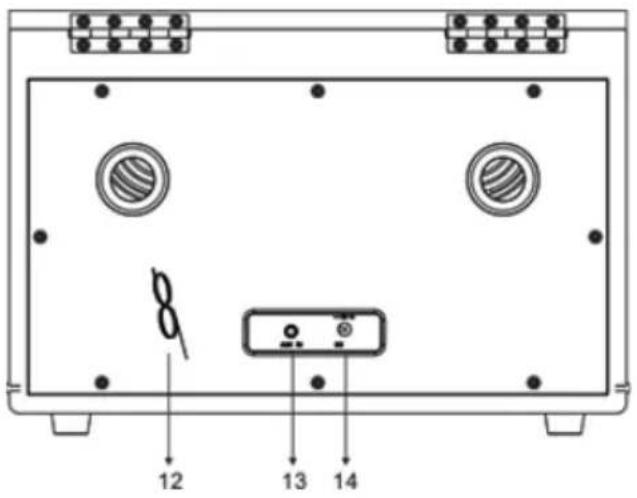
12 FM wire antenna
13 AUX IN connector
3.5 mm mini-connector for connecting an external audio device for signal input from a connected audio device
14 DC IN
Connect the AC adapter to connect power from an electrical socket.
Remote control
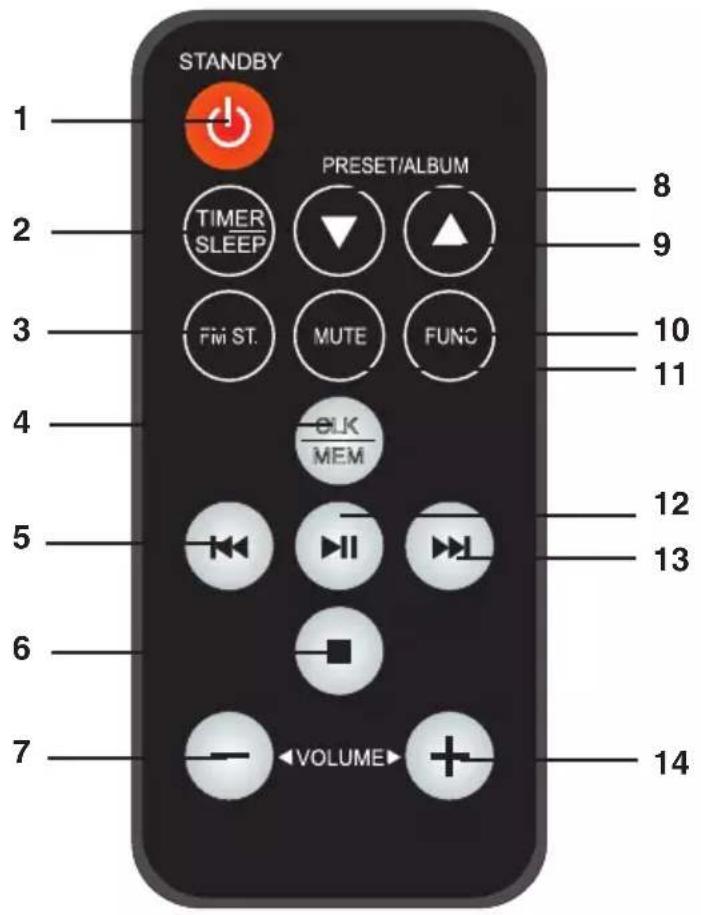
1 STANDBY ⏻ button
Switch to/from standby mode
2 TIMER/SLEEP button
Timer/sleep timer setting
3 FM ST button.
Switches mono/stereo mode for FM broadcasts and poor reception
4 CLK/MEM button
Time/memory setting
5 ◀◀ button
Track backward/FM: Tune backward
6 ■ button
Stop playback/FM: band switching
7 VOLUME button -
Decrease the volume
8 ▼ button
Switching down
9 ▲ button
Switching up
10 FUNC
CD/USB/AUX/BT/TUNER audio source switching.
11 MUTE button
Mute/unmute the sound
12 ▶II button
Play/Pause/FM: start automatic tuning and storing stations
13 ▶▶▶ button
Track tracks forward/FM: Tune forward
14 VOLUME + button
Increasing the volume
Inserting the battery into the remote control
The system can be operated with the supplied remote control. Slide out the battery holder on the bottom of the remote control.
Insert one 3V battery (type CR2025) into the battery holder according to the correct polarity + and -. Push the battery holder back into the remote control.
When using the remote control, point it at the sensor to receive signals from the remote control on the system.
Notes
- Do not leave the remote control in very hot or humid places.
- Do not use a new battery with an old one.
- Make sure that no object enters the remote control, especially when replacing the batteries.
- Do not place the device so that the remote sensor is exposed to direct sunlight or light from lamps. Otherwise, it may occur to malfunctions when controlled by remote control.
- If you will not be using the remote control for a long time, remove the batteries to prevent possible battery leakage and subsequent corrosion.
- After unpacking the remote control, pull out the battery lock clastic.
Basic operations
1 Carefully unpack the device and remove all packing material.
2 Unwind the AC adapter cable and extend it to its full length.
3 Unwind the FM antenna cable and stretch it to its full length.
4 Place the device on a stable, level surface, near an electrical socket, out of direct sunlight, and away from sources of excessive heat, dust, moisture, humidity, or strong magnetic fields.
5 Connect the supplied AC power cord cable to the DC IN connector (14) on the back of the device and the AC adapter itself (5 V, 1 A) to an electrical socket. When the power is turned on, the default clock will be displayed on the LCD and the time will be 0:00.
6Press and hold ⏻ STANDBY (1) on the remote control or press VOLUME +/- (STANDBY) (2) on the unit to turn on the unit from standby mode.
An unset time indicates 0:00. The alarm is set to 0:00 by default and turned off.
7 You can then select the desired audio source (AM/FM/USB/CD/BLUETOOTH/AUX IN ...) by briefly pressing the FUNC button (10) on the remote control or FUNCTION on the device (6).
8 Turn VOLUME +/- (2) on the unit or VOLUME + and - (7, 14) on the remote control to adjust the volume. You can mute and unmute the sound by pressing MUTE (11) on the remote control.
Using headphones (not supplied)
When you connect headphones to the PHONES headphone jack on the front panel, the sound from the speakers is muted and reproduced by the headphones.
Settings
Adjust the FM antenna for good radio listening.
Notes
- Keep the device away from other components to avoid noise.
- Extend the FM wire antenna (aerial) to the maximum.
- After straightening the FM wire antenna (aerial), place it in the maximum horizontal position.
Time setting
1 In standby mode (unset clock indicates 0:00, alarm is set to 0:00 and off by default), press and hold CLK/MEM (4) on the remote control or device (6) to activate time setting mode. In this time setting mode, by briefly pressing CLK/MEM (4) you switch the set items in the order 12/24H mode - Hours - Minutes - Off mode. The currently selected item flashes.
2 When the 12/24-hour mode setting is selected (12H flashes), press the button I◀◀ or ▶▶▶ (5, 13) on the remote control or by turning the TUNING/SKIP control (8) Set the device to 24/12-hour time display mode. Press the CLK/MEM button (4) to confirm the setting.
3Press the button ◀◀◀ or ▶▶▶ (5, 13) on the remote control or turn the TUNING/SKIP control (8) on the unit to set the clock.
Press the CLK/MEM button (4) to confirm the setting.
4 Press the button ◀◀◀ or ▶▶▶ (5, 13) on the remote control or turn the TUNING/SKIP control (8) on the unit to set the minutes.
Press the CLK/MEM button (4) to confirm the setting.
The time setting mode turns off and the clock is running.
Alarm settings
1 Press and hold ⏻ STANDBY (1) on the remote control or press VOLUME +/- (STANDBY) (2) on the unit to switch off the unit to standby mode.
2In standby mode, press and hold the TIMER/SLEEP button (2) on the remote control or the TUNING/SKIP (TIMER/SLEEP) control (8) on the unit to activate the alarm time setting mode and activate it. "ON TIME" appears on the display. So you will set the time to turn on the device.
In this setting mode, then briefly press TIMER/SLEEP to switch the setting items in the order Hours - Minutes.
The currently selected item flashes.
3 When the alarm clock setting is selected, press the button I◀◀ or ▶▶▶ (5, 13) on the remote control or set the alarm clock by turning the TUNING/SKIP knob (8) on the unit.
Press TIMER/SLEEP to confirm the setting.
4 Press the button ◀◀◀ or ▶▶▶ (5, 13) on the remote control or turn the TUNING/SKIP control (8) on the unit to set the alarm minutes.
Press TIMER/SLEEP to confirm the setting.
“OFF TIME” appears on the display. You will then set the time for the device to switch off. Set the time exactly as described for setting the “ON TIME”.
5 After setting the "OFF TIME", press the button I◀◀ or ▶▶▶ (5, 13) on the remote control or turn the TUNING/SKIP knob (8) on the device to set the alarm sound source ("CD" will flash first, you can also select USB, radio (TUNER) or buzzer (BUZZER)). After setting the sound source, adjust the alarm volume to "VOLUME".
Press TIMER/SLEEP to confirm the setting.
The time setting mode is switched off and the alarm is activated. After successful setting, the alarm symbol will appear on the LCD display.
When the set alarm time comes, the sound from the CD (CD must be inserted), USB (USB drive must be connected), FM radio, or buzzer sound will sound, depending on what you have set as the alarm source.
6 When the alarm sounds, you can turn it off with the button on the remote control ⏻
STANDBY (1) or the STANDBY button (2) on the unit.
Otherwise, the alarm will turn off at the set OFF TIME.
7 To deactivate the alarm, press TIMER/SLEEP on the remote control or device until the alarm symbol disappears from the display
Sleep timer (sleep mode)
1 In any mode with the unit turned on, press the TIMER/SLEEP button (2) on the remote control or the unit's remote control (8) to activate the SLEEP mode. SLEEP mode is OFF by default.
2Press TIMER/SLEEP repeatedly to set the sleep timer to 90>80>70...>10 minutes> or to turn it OFF. The set time for the "sleep timer" is saved automatically.
After successful setting, the SLEEP symbol will appear on the LCD display. After the set time has elapsed, the device switches off automatically.
Switch off the device
Switch off the device by briefly pressing the ⏻ STANDBY (1) on the remote control or by pressing the VOLUME +/- (STANDBY) control (2) on the device.
The device switches off to STANDBY MODE. The time, alarm and other settings are retained.
If you turn off the device by unplugging it (disconnecting it from the mains), you will then need to make the settings again (for example, time).
Connect line audio output from another audio device
Use a suitable cable with a 3.5 mm mini-connector to connect the audio output connectors on another device (eg PC) to the AUX IN connector (13) on the rear panel.
You will then be able to reproduce sound from another device through the speakers of that device.
1 Press ⏻ STANDBY (1) on the remote control briefly or press VOLUME +/- (STANDBY) (2) on the unit to turn on the unit.
2Press FUNC (10) on the remote control or FUNCTION (6) on the unit briefly to select the AUX IN audio source.
3 Adjust the appropriate volume level on the connected device, then turn VOLUME +/- (2) on the device or press VOLUME + and - (7, 14) on the remote control to adjust the volume. You can mute and unmute the sound by pressing MUTE on the remote control
Notes:
• Audio cable is not supplied.
- Refer to the operating instructions of the connected device for playback.
Connecting headphones
You can connect headphones (not supplied) to the PHONES jack (7) on the front panel.
You will then be able to reproduce the sound through the headphones.
The speakers will turn off automatically when the headphones are connected.
Tuner (FM/AM radio)
You can tune in stations in the FM radio band. Turn down the volume to the minimum level before tuning.
Up to 30 FM presets can be stored in the unit's memory.
Tuning to radio stations
1 Press ⏻ STANDBY (1) on the remote control or press the remote control VOLUME +/- (STANDBY) (2) on the unit, turn on the unit.
2Press FUNC (10) on the remote control or FUNCTION (6) on the unit briefly to select the FM audio source.
3 Press and hold▶II on the unit or on the remote control or unit.
All available FM radio stations are automatically tuned in and stored in the device memory.
4 Press ■ on the unit or remote control to switch between FM and AM bands.
5 Rotate the VOLUME +/- knob (2) on the unit or press the VOLUME buttons + and - (7, 14) adjust the volume on the remote control. You can mute and unmute the sound by pressing MUTE on the remote control
Manual tuning and preset storage
In radio mode, press and hold ◀◀◀ or ▶▶▶ (5, 13) on the remote control or turn the TUNING/SKIP control (8) on the unit.
The frequency starts to change (tunes in) and the next station in the appropriate direction (down/up) is tuned in.
After tuning in a station, tuning will stop and that station will play.
To store the tuned station in memory, press the CLK/MEM button (4) on the remote control or on the unit (6) to activate the station storage function.
"MEM" will appear on the LCD and "xx" will flash.
Press ▲ or ▼ (9, 8 on the remote control to select the desired preset number under which you want to store the tuned station (P01-30).
Press the CLK/MEM button to store the station under the selected preset number. In total, up to 30 stations can be stored in the FM band and 30 in the AM band.
Warning:
If a station is already stored under the selected preset number, the new stored station will overwrite the previously stored station.
Listening to a stored preset
To listen to a preset, scroll through the presets by pressing ▲ or ▼ (9, 8) on the remote control or ▲/▼ (6) on the unit and select the preset you want to listen to.
Notes
- When the FM mode is turned off and on again, the last station listened to is tuned in.
- To get the best reception, extend the FM wire antenna as far as possible for the FM band.
- To get the best reception, rotate the entire device for AM to get the best reception.
CD player
1 Press ⏻ STANDBY (1) on the remote control or press VOLUME +/- (STANDBY) (2)
Turn on the device on the device.
2 Open the large disc cover on the unit (top).
3 Briefly press the FUNC (10) button on the remote control or the FUNCTION (6) button on the device to select the CD audio source.
4 The CD display lights up.
5 Lift open the small disc cover and place the disc on the tray (label side up).
6 Close the disc cover. The CD player reads the disc and playback starts automatically.
7 If playback does not start automatically, press ▶II (play/pause) on the remote control or device to start playback.
8 Turn VOLUME +/- (2) on the unit or press VOLUME + and - (7, 14) adjust the volume on the remote control.
9 To pause playback, press ▶II (play/pause) on the remote control or device. To resume playback, press the button again.
10 To stop playback, press ■ (stop) on the remote control or device.
11 By pressing the button I◀◀ (Rewind) /▶▶I (Fast forward) on the remote or turn the TUNING/SKIP control on the unit to skip to the previous / next track.
Note:
- If the disc space is empty or the disc cannot be loaded (incompatible format), the number of tracks will not be displayed.
- Do not leave the disc compartment open. Dust and dirt will settle on the laser optical mechanism.
- Do not store CDs in dusty, hot environments.
- You can play CD/CD-R/CD-RW discs. Depending on the disc, some discs may not be playable.
Switch play modes
Pressing the CLK/MEM button (4) on the remote control or on the unit (6) during playback switches the playback mode in the following order:
1 (current) track repeat - Plays the entire disc repeatedly - Playing tracks on the disc in random order. - Normal playback
MP3 playback
The player allows you to play MP3 format in audio quality comparable to a CD. You can play up to 600 minutes of music or 150 songs on one disc.
You can play MP3 files as well as tracks on a CD.
1 Press ⏻ STANDBY (1 on the remote control or press VOLUME +/- (STANDBY) (2) Turn on the device on the device.
2 Open the large disc cover on the unit (top).
3 Briefly press the FUNC (10) button on the remote control or the FUNCTION (6) button on the device to select the CD audio source.
4 The CD display lights up.
5 Lift open the small disc cover and place the disc on the tray (label side up).
6 Close the disc cover. The CD player reads the disc and playback starts automatically and the MP3 CD appears on the display.
7 If playback does not start automatically, press ▶II (play/pause) on the remote control or device to start playback.
8 Turn VOLUME +/- (2) on the unit or press VOLUME + and - (7, 14) adjust the volume on the remote control.
9 To pause playback, press u (play/pause) on the remote control or device. To resume playback, press the button again.
10 To stop playback, press ■ (stop) on the remote control or device.
11 By pressing the button ◀◀◀ (Rewind) /▶▶▶ I (Fast forward) on the remote or turn the TUNING/SKIP control on the unit to skip to the previous/next track.
Switch albums/folders
Press v or V (9, 8) on the remote control or v / V (6) on the unit to switch to the previous or next folder.
Switch play modes
Pressing the CLK/MEM button (4) on the remote control or on the unit (6) during playback switches the playback mode in the following order:
1 (current) track is played repeatedly - the current folder is played repeatedly - the entire disc is played repeatedly - the tracks on the disc are played in random order - Normal play
Playing files from USB storage devices (players)
The device can play MP3/WMA/WAV/APE/FLAC format in audio quality comparable to a CD.
You can play files from both USB devices and USB HDDs. The device only supports USB drives up to 32 GB. At higher capacities, the device may not read the contents of the device.
You can play the files using the buttons on the device.
1 Connect a USB memory device to the USB connector. The device must contain audio files.
2Press ⏻ STANDBY (1) on the remote control or press VOLUME +/- (STANDBY) (2) Turn on the unit on the unit.
3 Briefly press the FUNC (10) button on the remote control or the FUNCTION (6) button on the device to select the USB audio source.
4 The USB display lights up and the device reads the contents of the USB drive.
5 If playback does not start automatically, press ▶II (play/pause) on the remote control or device to start playback.
6 Turn VOLUME +/- (2) on the unit or press VOLUME + and - (7, 14) adjust the volume on the remote control.
7 To pause playback, press ▶II (play/pause) on the remote control or device.
To resume playback, press the button again.
8 To stop playback, press ■ (stop) on the remote control or device.
9 By pressing the button ◀◀◀ (Rewind) /▶▶▶I (Fast forward) on the remote or turn the TUNING/SKIP control on the unit to skip to the previous/next track.
Switch albums/folders
Press ▲ or ▼ (9, 8) on the remote control or ▲/▼ (6) on the unit to switch to the previous or next folder.
Switch play modes
Pressing the CLK/MEM button (4) on the remote control or on the unit (6) during playback switches the playback mode in the following order:
Repeat play of 1 (current) track - Repeat play of the current folder - Repeat play of the entire contents of the USB drive - Play tracks on the USB drive in random order - Normal play
Bluetooth
1 1Turn on the Bluetooth interface on your Bluetooth device (phone, tablet, etc.). For details, refer to the operating instructions of the device.
2 Press 1 STANDBY (1) on the remote control or press the remote control VOLUME +/- (STANDBY) (2) on the unit, turn on the device.
3 Briefly press the FUNC (10) button on the remote control or the FUNCTION (6) button on the device to select the BT audio source.
4 The device turns on in Bluetooth mode, beeps, and is ready for pairing.
5 On the Bluetooth device (phone, etc.), search for available Bluetooth devices. For details, refer to the operating instructions of the device.
When RR-71 appears on the display of your Bluetooth device, select it and wait until the confirmation message with the RR-71 appears on the display of your Bluetooth device. A confirmation beep sounds on this unit. The devices are paired.
6 After pairing, you can start playback on your Bluetooth device and set the appropriate volume on it.
For details on playback controls, refer to the operating instructions of the device. The sound from the paired device will be reproduced by this device.
Playback operations Playback
Press ▶II to start playback.
Suspension
During playback, press the ▶■ button. Playback pauses.
While paused, press ▶II again. Playback resumes.
Rewind: ◀◀◀ on remote control or TUNING/SKIP control on the unit Switches to the beginning of the current or previous tracks (short press / rotate).
Fast forward: ▶▶▶ on the remote control or TUNING/SKIP control on the unit Switch to the next track (s) (short press/rotate).
For playback control to work, the connected device must support the AVRCP Bluetooth profile.
7 Rotate the knob VOLUME +/- (2)) on the unit or press the VOLUME buttons + and - (7, 14) adjust the volume on the remote control. You can mute and unmute the sound by pressing MUTE on the remote control.
8 After playback ends, turn off the Bluetooth source on this unit, stop playback on your Bluetooth device, and turn off the Bluetooth interface on it.
Note
It is no longer necessary to pair again after pairing the devices. The devices will reconnect automatically when you turn on the Bluetooth audio source on this device and turn on the Bluetooth interface on your Bluetooth device.
Warning
There may be sound when playing via Bluetooth.
These outages are caused by interference, greater distances, obstacles, etc. This is not a malfunction of the unit.
More details
Wireless BLUETOOTH technology
BLUETOOTH wireless technology is a short-range technology that enables wireless data communication between digital devices such as PC and digital camera. Wireless BLUETOOTH technology works within a range of about 10 m.
The two devices are connected to each other, but some devices can be connected to more than one device at a time.
No cable is required for the connection, nor is it necessary to place the devices opposite each other as with infrared technology. For example, you can use the device even if it is in a backpack or pocket.
The BLUETOOTH standard is an international standard supported and used by many companies around the world.
Maximum communication range
The maximum communication range may be shorter in the following conditions.
There are obstacles such as people, metal or a wall between this system and the BLUETOOTH device.
A LAN device is used near this system. A microwave oven is used near this system.
Electromagnetic radiation generating equipment is used near this system.
Interference from other devices
BLUETOOTH and wireless LAN (IEEE802.11b / g) devices use the same frequency, so if you use this system near a wireless LAN device, microwave interference may occur, which may result in poor communication speed, noise, or poor connection. In this case, do the following.
Use this system at least 10 m from a wireless LAN device.
If you use this system less than 10 m away from the wireless LAN device, turn off the wireless LAN device.
Interference from other devices
Microwaves emitted by BLUETOOTH devices may affect the operation of electronic medical devices. Turn off both the system and the BLUETOOTH device in the following places, as there is a risk of danger.
Near flammable gases, in hospitals, trains, planes or petrol stations.
Near automatic doors or fire alarms.
Notes
- In order to use the BLUETOOTH function, the connected BLUETOOTH device must have the same profile as this system.
- Even if the profiles are the same, the devices may work differently depending on their specifications.
- Due to the characteristics of wireless BLUETOOTH technology, the sound reproduced by this system is slightly delayed compared to the sound from the BLUETOOTH playback device during a telephone call or listening to music.
- This system supports security standards that comply with BLUETOOTH standards to ensure a secure connection when using BLUETOOTH wireless technology. However, depending on your settings, security may not be enough. Be careful when communicating using BLUETOOTH wireless technology.
- We are not responsible for information leakage during BLUETOOTH communication.
- A device with BLUETOOTH function is required to ensure compliance with BLUETOOTH standards specified by the Bluetooth SIG standard and authentication. Even if the connected device complies with the above BLUETOOTH standards, some devices may not be able to be connected or may not work properly depending on the functions or technical specifications of the device.
- Depending on the BLUETOOTH device connected to this system, the communication environment, or the operating environment, noise or sound dropouts may occur.
Maintenance
Use a soft cloth slightly moistened with a mild cleaning solution to clean the surface, panel, and controls. Do not use any type of abrasive pad, scouring powder, or solvent, such as thinner, petrol, or alcohol.
CD cleaning
- Before playing, clean the disc with a cleaning cloth. Clean the disc from the center to the edges.
- Do not use solvents such as petrol, thinner, commercially available cleaners, or antistatic spray intended for vinyl LPs.
Laser lens cleaning
Use a commercially available camera lens cleaner to clean the laser lens. Check with your dealer.
Troubleshooting
If a problem occurs during system operation, try to resolve it using the report below before requesting a repair.
If any problem persists, contact your nearest dealer.
Power supply
The device does not switch on.
→ Check that the AC adapter is properly connected to the wall socket (wall socket) and its connector to this device.
Sound
There is no sound.
→ The connecting cable from the external device is not connected securely.
→ The connecting cable from the external device is damaged.
→ The system is switched to pause mode.
Press ▶II to resume normal playback.
→ The volume is set to minimum.
With the VOLUME +/- control (2) on the device or by pressing the VOLUME + and - buttons (7, 14) Turn up the volume on the remote control.
→ Check that the correct audio source is selected.
The sound is not good (noise).
→ Check that the connecting cable from the external device is not near a transformer or motor and that they are at least 3 meters away from the TV.
→ Move the TV away from audio equipment.
→ The cable end of the external device and the connectors are dirty.
Clean them with a cloth slightly moistened with alcohol.
CD player
The disc does not play.
→ There is no disc inside.
→ The disc is the other way around.
Insert the disc correctly, with the playback side facing down.
→ The disc is deformed or damaged.
→ Moisture has condensed inside the device. Remove the disc and leave the device turned on for about half an hour. Turn on the device again before playing the disc.
FM radio
Stations cannot be tuned in.
→ Check that the antenna is set correctly.
Extend the FM wire antenna.
→ The station signal is too weak.
Tune to a station with a stronger signal.
Bluetooth
Bluetooth connection problems
The Bluetooth signal is interrupted:
→ The effective distance between this system and the unit is up to 10 m.
The signal will be interrupted if the distance between the Bluetooth device and this system is more than 10 m.
→ The Bluetooth device will find several other Bluetooth devices during the search: Wait for the search to complete and select "RR-71" to pair. Do not hold the mobile device too close to the speaker when using the phone to avoid echo (feedback).
Technical specifications
CD/MP3 player
Channels: 2 audio channels (STEREO)
Frequency range: 20 - 20,000 Hz (+/- 3 dB)
Signal-to-noise ratio: 80 dB
Distortion: Below measurable limit
Sampling frequency: 32/44.1/48 kHz, 16/22.05/24 kHz, 8/11.025/12 kHz
Quantization: 16 bit - linear/channel
Data rate: 8 - 384 Kbps
Formats: ISO 9660, Joliet, Romeo
Scanning device: Semiconductor laser
Wavelength: 790 nm
Laser emission: Continuous, max. 0.6 mW
USB player
Data rate: 8-384 Kbps
Formats: MP3/WMA/WAV/APE/FLAC
Supported capacity: Max. 32 GB (FAT)
Tuner (Radio)
Tuning range: FM: 87.5 - 108 MHz
AM: 522 - 1620 KHz
Antenna: FM wire antenna
Built-in ferrite AM antenna
Amplifier
Channels: 2 audio channels
Output power: 2 x 2.2 W
Frequency range: 100-16,000 Hz
Generally
Connectors: 3.5 mm AUX IN mini connector (line input)
3.5 mm PHONES mini connector (headphone output)
USB connector (USB drive connection)
DC IN power connector
Power supply: AC adapter, AC voltage 230 V, 50 Hz
Device: DC voltage 5 V, 1 A from the supplied AC adapter
Power consumption: 8 W
Dimensions: 30.5 x 21.5 x 22.5 cm (W x H x D)
Weight (approx.): 3.5 kg
We reserve the right to make changes!
Producer:
ORAVA retail 1, a.s.
Seberíniho 2
821 03 Bratislava
Slovenská republika
Importer:
ORAVA retail 1, a.s.
Seberíniho 2
821 03 Bratislava
Slovenská republika
ORAVA distribution CZ, s.r.o.
Ostravská 494
739 25 Sviadnov
Česká republika
INSTRUCTIONS AND INFORMATION REGARDING THE DISPOSAL OF USED PACKAGING
Dispose of used packaging material at a municipal waste disposal site.
DISPOSAL OF USED ELECTRICAL AND ELECTRONIC EQUIPMENT


This symbol on the products or in the accompanying documents means that used electrical and electronic products should not be mixed with general household waste. For proper disposal, recovery and recycling, please return these products to designated collection points. Alternatively, in some countries of the European Union or other European countries, you may return your products to your local retailer when purchasing an equivalent new product. By ensuring this product is disposed of correctly, you will help prevent potential negative consequences for the environment natural resources and help prevent potential negative effects on environment and human health, which could be the consequences of improper disposal waste. Contact your local authority or nearest office for more detailscollection point. Improper disposal of this type of waste may result in penalties in accordance with national regulations.
For business entities in the countries of the European Union
If you wish to discard electrical and electronic equipment, please request the necessary information from your seller or supplier.
Disposal in other countries outside the European Union
This symbol is valid in the European Union. If you wish to discard this product, please request obtain the necessary information on the correct method of disposal from the local authorities or from the your supplier.

This product meets all the essential requirements of the EU directives that apply to it.
DECLARATION OF CONFORMITY
Short text Declaration of Conformity:
ORAVA retail 1, a.s. hereby declares that the RR-71 complies with the essential requirements and other relevant conditions of Directive 2014/53/ EU of the European Parliament and of the Council.
The full text of the Declaration of Conformity is available at: www.orava.eu


- INTENDED USE OF THE DEVICE
- 1.GENERAL SAFETY INSTRUCTIONS AND WARNINGS
- 1.1 GENERAL SAFETY INSTRUCTIONS
- 1.2 SAFETY OF THE OPERATING ENVIRONMENT
- 1.3 ELECTRICAL SAFETY
- 1.4 SAFETY OF PERSONS
- 1.5 CLEANING, MAINTENANCE AND REPAIRS
- SPECIAL SAFETY INSTRUCTIONS. READ CAREFULLY
- UNPACKING/PACKAGING
- INSPECTION/COMMISSIONING
- LOCATION/INSTALLATION
- WARNING
- OPERATION/SUPERVISION
- DISCS THAT CAN BE PLAYED ON THIS UNIT
- DISK FORMAT
- NOTES ON DISCS
- DISK HANDLING
- CLEANING
- SUPPLIED ACCESSORIES
- OPENING AND CLOSING THE DISC COVER
- OPENING
- CLOSING
- INDEX OF PARTS AND CONTROLS
- FRONT SIDE
- REAR PANEL
- 12 FM WIRE ANTENNA
- 13 AUX IN CONNECTOR
- 14 DC IN
- REMOTE CONTROL
- INSERTING THE BATTERY INTO THE REMOTE CONTROL
- NOTES
- BASIC OPERATIONS
- USING HEADPHONES (NOT SUPPLIED)
- SETTINGS
- TIME SETTING
- ALARM SETTINGS
- SLEEP TIMER (SLEEP MODE)
- SWITCH OFF THE DEVICE
- CONNECT LINE AUDIO OUTPUT FROM ANOTHER AUDIO DEVICE
- CONNECTING HEADPHONES
- TUNER (FM/AM RADIO)
- TUNING TO RADIO STATIONS
- MANUAL TUNING AND PRESET STORAGE
- LISTENING TO A STORED PRESET
- CD PLAYER
- NOTE
- SWITCH PLAY MODES
- MP3 PLAYBACK
- SWITCH ALBUMS/FOLDERS
- PLAYING FILES FROM USB STORAGE DEVICES (PLAYERS)
- BLUETOOTH
- PLAYBACK OPERATIONS PLAYBACK
- SUSPENSION
- MORE DETAILS
- WIRELESS BLUETOOTH TECHNOLOGY
- MAXIMUM COMMUNICATION RANGE
- INTERFERENCE FROM OTHER DEVICES
- MAINTENANCE
- CD CLEANING
- LASER LENS CLEANING
- TROUBLESHOOTING
- POWER SUPPLY
- THE DEVICE DOES NOT SWITCH ON
- SOUND
- THERE IS NO SOUND
- THE SOUND IS NOT GOOD (NOISE)
- THE DISC DOES NOT PLAY
- FM RADIO
- STATIONS CANNOT BE TUNED IN
- BLUETOOTH CONNECTION PROBLEMS
- THE BLUETOOTH SIGNAL IS INTERRUPTED
- TECHNICAL SPECIFICATIONS
- CD/MP3 PLAYER
- USB PLAYER
- TUNER (RADIO)
- AMPLIFIER
- GENERALLY
- PRODUCER
- IMPORTER
- INSTRUCTIONS AND INFORMATION REGARDING THE DISPOSAL OF USED PACKAGING
- DISPOSAL OF USED ELECTRICAL AND ELECTRONIC EQUIPMENT
- FOR BUSINESS ENTITIES IN THE COUNTRIES OF THE EUROPEAN UNION
- DISPOSAL IN OTHER COUNTRIES OUTSIDE THE EUROPEAN UNION
- DECLARATION OF CONFORMITY
Brand : Orava
Model : RR-71
Category : Radio