Bostitch P50 - Hammer STANLEY - Free user manual and instructions
Find the device manual for free Bostitch P50 STANLEY in PDF.

User questions about Bostitch P50 STANLEY
0 question about this device. Answer the ones you know or ask your own.
Ask a new question about this device
Download the instructions for your Hammer in PDF format for free! Find your manual Bostitch P50 - STANLEY and take your electronic device back in hand. On this page are published all the documents necessary for the use of your device. Bostitch P50 by STANLEY.
USER MANUAL Bostitch P50 STANLEY
INSTRUCTIONS FOR ASSEMBLY, INSTALLATION AND OPERATION OF REMOTE CONTROL KIT WITH FOOT VALVE AND CLINCHER
ASSEMBLY:
- Apply "O" ring lube to all "O" rings.
- Apply a light coat of "O" ring lube to cylinder walls in valve barrel.
- Assemble "O" ring to piston.
- Insert piston in valve barrel.
- Insert internal "O" ring in end of valve barrel.
CAUTION: do not assemble "O" ring of valve plug as it may be damaged during assembly in valve barrel by sharp edges of retaining ring groove. - Insert valve plug in valve barrel.
- Push valve plug to squeeze internal "O" ring, and assemble retaining ring.
-
Screw hose fitting into valve barrel and tighten.
-
Assemble external "O" rings on valve barrel.
INSTALLATION:
NOTE: Refer to Model P50 Series Air Drive Plier
-
Disconnect air supply.
-
Remove trigger.
-
Drive out valve barrel roll pin, and remove valve barrel and stem.
CAUTION: Do not mar outside diameter of valve stem. Valve unit can be removed by applying 20 PSI from air supply.
- The valve stem and roll pin are required for use with remote control parts. All other parts removed are not required when spare parts are installed.
NOTE: If plier is to be fixtured and clincher blade will not be required, it should be removed at this point.
-
Remove magazine.
-
Insert valve stem in remote control valve barrel.
-
Insert remote control valve barrel in frame with hose fitting facing rear.
-
Reassemble roll pin locking valve barrel in place.
-
Reassemble magazine.
-
Attach 1/4 O.D. plastic tubing to remote control valve fitting and connect other end to half union assembled on the outlet ("CYL") port of the three way normally closed foot valve.
NOTE: A 1/4" three way normally closed valve will operate several pliers. Increase size of valve will operate several pliers. Increase size of valve to suit number of pliers to be controlled.
- Attach 1/4" MPT tee to the back of the frame (main air supply). Attached half union to the tee and attach 1/4 O.D. plastic tubing between half union in the tee to the half union on the inlet ("IN") port of the three way normally closed foot valve.
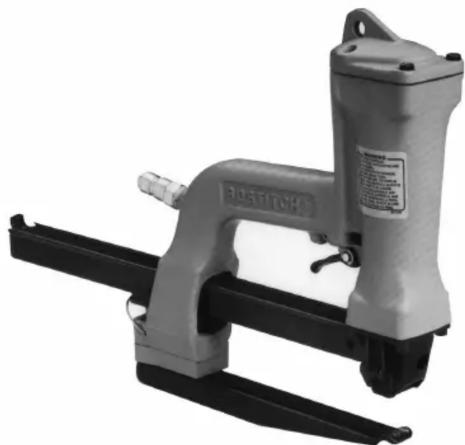
natural_image
Exterior view of a gray 30STITCH hoist tool with black handle and mounting bracket (no visible text or symbols)-
If plier is to be mounted in fixture, assemble at this point.
-
If clincher blade has been removed, assemble clincher provided in kit to fixture. The 5/16-18 UNC thread shaft should fit snug in a straight clearance hole. Secure with lock washer and hex nut provided.
INSTALLATION OF ADDITIONAL TOOL TO THIS UNIT:
- The air supply to the plier or additional pliers must have sufficient air flow to operate all pliers. Each plier in a multiple mount must have an individual pig tail in an air supply or reservoir to prevent the starving of the pliers for air driving operation.
- To install additional pliers to the original unit will require a P50181 Remote Control Kit for each plier.
- Also to install additional pliers will require a 1/4" PL x 1/4" PL x 1/4" PL tee to insert in plastic tubing between the remote control valve and the outlet ("CYL") port of the three way normally closed foot valve.
- Additional plastic tubing 85334-10 (1/4" O.D.) may be required to connect pliers and can be ordered from Bostitch.
OPERATION:
- Connect air supply to plier.
- Air pressure must be identical for plier and remote control valve.
- Actuation of remote control valve will operate plier and drive staple.
- Release of remote control valve will return driver piston.
CAUTION: Do not attempt to operate plier without material over clincher to avoid damage to driver tip.
WARNING:

WARNING:
WARNING:
WARNING:
EYE PROTECTION which conforms to ANSI specifications and provides protection against flying particles both from the FRONT and SIDE should ALWAYS be worn by the operator and others in the work area when connecting to air supply, loading, operating or servicing this tool. Eye protection is required to guard against flying fasteners and debris, which could cause severe eye injury.
The employer and/or user must ensure that proper eye protection is worn. Eye protection equipment must conform to the requirements of the American National Standards Institute, ANSI Z87.1, CAN/CSA Z94.4 and provide both frontal and side protection. NOTE: Non-side shielded spectacles and face shields alone do not provide adequate protection.
Always disconnect air supply: 1.) Before making adjustments; 2.) When servicing the tool; 3.) When clearing a jam; 4.) When tool is not in use; 5.) When moving to a different work area, as accidental actuation may occur, possibly causing injury.
Do not use gasoline or similar highly flammable liquids to clean the nailer. Vapor in the nailer could be ignited by a spark causing the tool to explode.
When working on air tools, note the warnings and cautions in this guide and in the Operation and Maintenance Manual covering the specific tool. USE EXTRA CARE WHEN EVALUATING PROBLEM TOOLS.