50iPlay6200-U - Television Allview - Free user manual and instructions
Find the device manual for free 50iPlay6200-U Allview in PDF.


User questions about 50iPlay6200-U Allview
0 question about this device. Answer the ones you know or ask your own.
Ask a new question about this device
Download the instructions for your Television in PDF format for free! Find your manual 50iPlay6200-U - Allview and take your electronic device back in hand. On this page are published all the documents necessary for the use of your device. 50iPlay6200-U by Allview.
USER MANUAL 50iPlay6200-U Allview
IMPORTANT / IMPORTANT / FONTOS / WAŻNE
Please read this manual carefully before installing and operating the TV. Keep this manual handy for further reference.
Important Safety Precautions 1
TV Buttons And Terminal Interface 2
External device connection diagram 2
TV Install And Connect.... 3
TV Stand Installation Instructions 3
OSD 4
First Time Installation....4
HOME 5
INPUT 5
Initial Setup....6
System 9
Media 11
Help....13
Remote Control 14
Safety Information

The exclamation point within an equilateral triangle is intended to alert the user to the presence of important operating in the literature accompanying the appliance.

Warning The lightning flash with arrowhead symbol within an equilateral triangle, is intended to alert the user to the presence of uninsulated dangerous voltage within the products enclosure that may be of sufficient magnitude to constitute a risk of electric shock to persons.
CAUTION
RISK OF ELECTRIC SHOCK DO NOT OPEN
High voltages are used in the operation of this product. to reduce the risk of electric shock, do not remove cover of the cabinet, refer servicing to qualified service personal
If the TV any changes or coarse adjustment, electric shocks to be hurt, do not attempt to open a machine-maintenance, customer contact centres needed overhaul.
Important Safety Precautions
1) Read these instructions. 2) Keep these instructions. 3) Heed all warnings. 4) Follow all instructions.
5) Do not use this apparatus near water. 6) Clean only with dry cloth.
7) Do not block any ventilation openings. Install in accordance with the manufacturer's instructions.
8) Do not install near any heat sources such as radiators, heat registers, stoves, or other apparatus (including amplifiers) that produce heat.
9) Do not defeat the safety purpose of the polarized or grounding-type plug. A polarized plug has two blades with one wider than the other. A grounding type plug has two blades and a third grounding prong. The wide blade or the third prong are provided for your safety, If the provided plug does not fit into your outlet, consult an electrician for replacement of the obsolete outlet.
10) Protect the power cord from being walked on or pinched particularly at Plugs, convenience receptacles, and the point where they exit from the apparatus.
11) Only use attachments /accessories specified by the manufacturer.
12) Use only with the cart, stand, tripod, bracket, or table specified by the manufacturer, or sold with the apparatus. When a cart is used caution when moving the cart/apparatus combination to avoid injury tip-over.

13) Unplug this apparatus during lightning storms or when unused for long periods of time.
Caution:
14) To reduce the risk of fire or electric shock, do not expose this apparatus to rain or moisture.
15) The mains plug is used as disconnect device, the disconnect device shall remain readily operable.
16) The socket-out shall be installed near the equipment and shall be easily accessible.
17) This product should never be placed in a built-in installation such as a bookcase or rack unless proper ventilation is provided or the manufacture's instructions have been adhered to.
18) The apparatus shall not be exposed to dripping or splashing and that no objects filled with liquid, such as vases, shall be placed on the apparatus.
19) Do not place any sources of danger on the apparatus (e.g. liquid filled objects, lighted candles).
20) Wall or Ceiling Mounting - The appliance should be mounted to a wall or ceiling only as recommended by the manufacturer.
21)

Never place the TV, remote control or batteries near naked flames or other heat sources, including direct sunlight. To prevent the spread of fire, keep candles or other flames away from the TV, remote control and batteries at all times.
22) The USB terminal should be loaded with 0.5 A under normal operation.
These servicing instructions are for use by qualified service personnel only. To reduce the risk of electric shock do not perform any servicing other than that contained in the operating instructions, unless you are qualified to do so.
23) The battery shall not be exposed to excessive heat such as sunshine, fire or the like.
24) This equipment is a Class II or double insulated electrical appliance. It has been designed in such a way that it does not require a safety connection to electrical earth
25) The maximum using environment temperature is 40 degrees. The Maximum using altitude is 2000 meters
TV Buttons And Terminal Interface
TV Buttons
Note: The following is only functional schematic, And the actual position and arrangement of different models may be different.
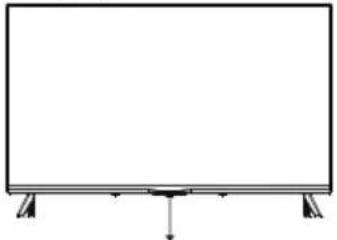
One key:
natural_image
Simple line drawing of a flat-screen monitor with stand legs and a central button (no text or symbols)Press this button in standby mode to turn on / off the TV.
Seven keys:
| ↓ | Turn ON/OFF Power. |
| SOURCE/→ | External Signal Input Selection. |
| MENU/OK | Display Main MENU And Confirm MENU Item Selection. |
| CH+/- | Selecting Channel. |
| VOL+/- | Adjusting Volume. |
Terminal Interface
Note: The following are the various terminal interface, the actual position and arrangement, the number of different models may be different.
 | AV inputExternal AV Signal Input |  | USB inputConnect a USB device here to play its media files. |
 | CI SLOTThe card reader input CI(common interface) this requires CAM (conditional access module) used for pay TV. |  | OPTICAL outputConnect the SPDIF receiver. |
 | HDMI inputDigital signal input from HDMI video connector. |  | RJ45Connect the Internet. |
 | ANT 75Connect the antennal/cadle tv input (75/VHF/UHF) |  | EARPHONE outputWhen earphones are plugged in, speakers are disabled |

*Do not touch or be close to the HDMI, USB terminals, and prevent electrostatic discharge to disturb these terminals while in USB operation mode, or it will cause the TV to stop working or abnormal status.
External device connection diagram
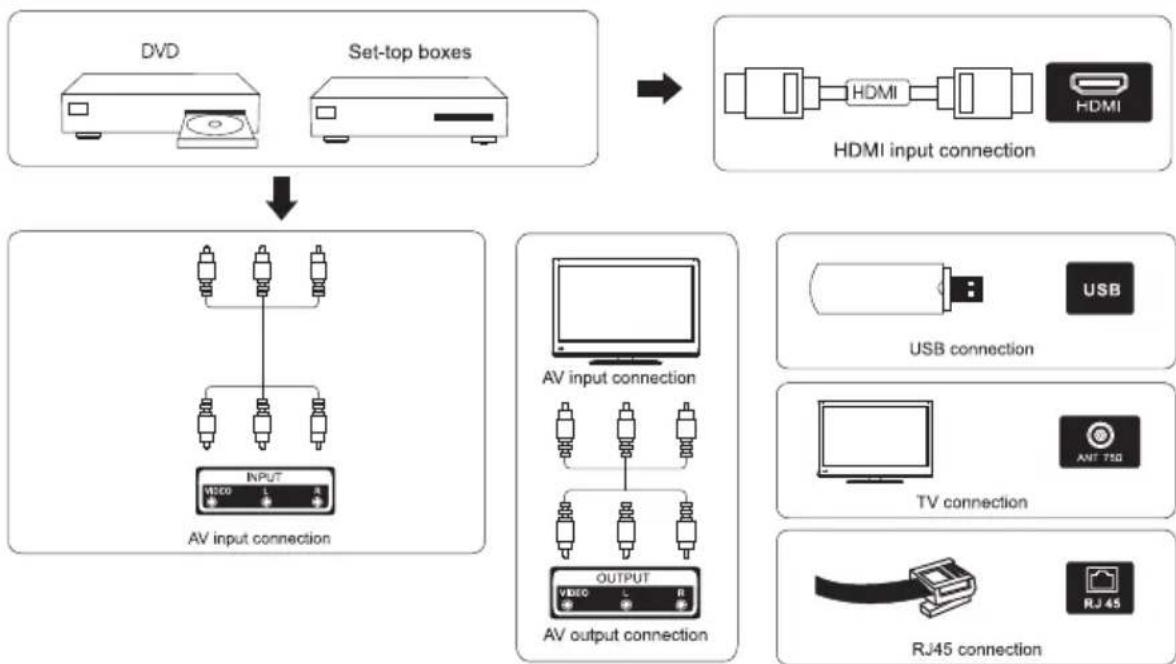
flowchart
graph TD
    A["DVD"] --> C["AV input connection"]
    B["Set-top boxes"] --> C
    C --> D["AV output connection"]
    D --> E["AV input connection"]
    E --> F["AV output connection"]
    F --> G["AV input connection"]
    G --> H["AV output connection"]
    H --> I["AV input connection"]
    I --> J["AV output connection"]
    J --> K["AV input connection"]
    K --> L["AV output connection"]
    L --> M["AV input connection"]
    M --> N["AV output connection"]
    N --> O["AV input connection"]
    O --> P["AV output connection"]
    P --> Q["AV input connection"]
    Q --> R["AV output connection"]
    R --> S["AV input connection"]
    S --> T["AV output connection"]
    T --> U["AV input connection"]
    U --> V["AV output connection"]
    V --> W["AV input connection"]
    W --> X["AV output connection"]
    X --> Y["AV input connection"]
    Y --> Z["AV output connection"]
    Z --> AA["AV input connection"]
    AA --> AB["AV output connection"]
    AB --> AC["AV input connection"]
    AC --> AD["AV output connection"]
    AD --> AE["AV input connection"]
    AE --> AF["AV output connection"]
    AF --> AG["AV input connection"]
    AG --> AH["AV output connection"]
    AH --> AI["AV input connection"]
    AI --> AJ["AV output connection"]
    AJ --> AK["AV input connection"]
    AK --> AL["AV output connection"]
    AL --> AM["AV input connection"]
    AM --> AN["AV output connection"]
    AN --> AO["AV input connection"]
    AO --> AP["AV output connection"]
    AP --> AQ["AV input connection"]
    AQ --> AR["AV output connection"]
    AR --> AS["AV input connection"]
    AS --> AT["AV output connection"]
    AT --> AU["AV input connection"]
    AU --> AV["AV output connection"]
    AV --> AW["AV input connection"]
    AW --> AX["AV output connection"]
    AX --> AY["AV input connection"]
    AY --> AZ["AV output connection"]
    AZ --> BA["AV input connection"]
    BA --> BB["AV output connection"]
    BB --> BC["AV input connection"]
    BC --> BD["AV output connection"]
    BD --> BE["AV input connection"]
    BE --> BF["AV output connection"]
    BF --> BG["AV input connection"]
    BG --> BH["AV output connection"]
    BH --> BI["AV input connection"]
    BI --> BJ["AV output connection"]
    BJ --> BK["AV input connection"]
    BK --> BL["AV output connection"]
    BL --> BM["AV input connection"]
    BM --> BN["AV output connection"]
    BN --> BO["AV input connection"]
    BO --> BP["AV output connection"]
    BP --> BQ["AV input connection"]
    BQ --> BR["AV output connection"]
    BR --> BS["AV input connection"]
    BS --> BT["AV output connection"]
    BT --> BU["AV input connection"]
    BU --> BV["AV output connection"]
    BV --> BW["AV input connection"]
    BW --> BX["AV output connection"]
TV Install And Connect
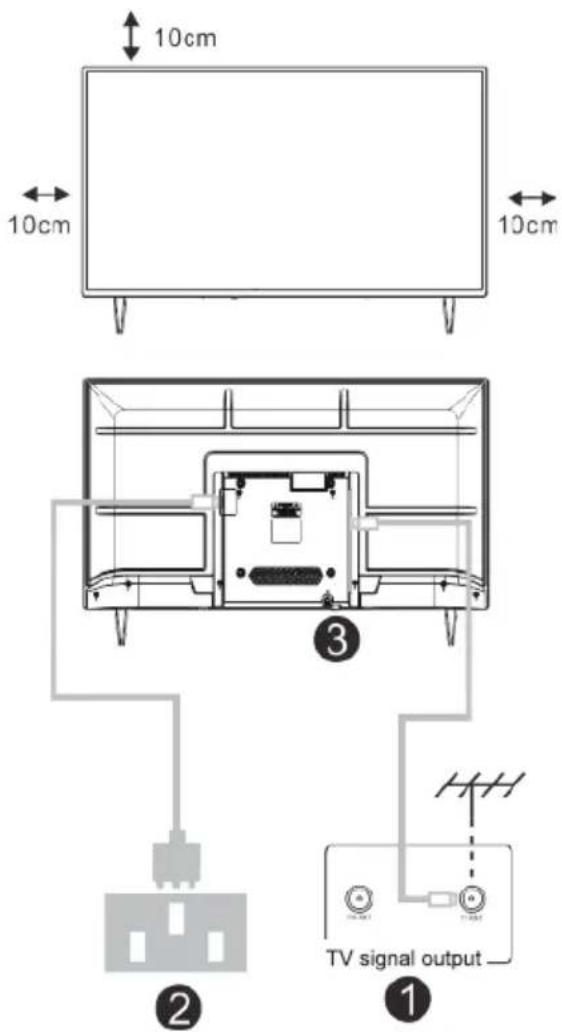
Set your TV
To put your TV on a firm place which can bear the weight of the TV.
To avoid danger, please don't positions the TV near water or heating place (such as light, candle, heating machine), do not block the ventilation at the back of TV.
Connect antenna and power
- Connect the antenna cable to the antenna socket on the back of the TV.
- To plug the power cord of TV (AC 100-240V\~50/60Hz).
Turn on TV
- Connect the power supply, enter the standby mode (red light), press the power button of the TV or the power button on the remote control to turn on the TV
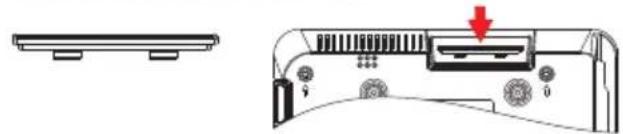
Note: If the model has a CI card slot on its top, a silicone plug for the CI card slot can be found in the accessory bag (for models without CI card slot, there is no such silicone plug), please insert the silicone plug into the slot when the CI card is not in use.
natural_image
Diagram showing a device rear panel with a red arrow pointing to a component, alongside an exploded view of the front panel (no text or symbols present)Note: Picture for reference purposes only.
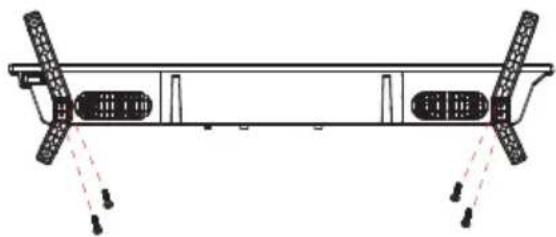
TV Stand Installation Instructions
1.Open the carton and remove the TV
and scattered accessories and base
(some models without base).
2. In order to avoid damaging the TV, please cover it with soft mattress, put it on the table, face down on the soft material and screw the neck of the base to the TV.
3.screw the base and connected to the TV.
4. the installation is complete.
natural_image
Technical line drawing of a mechanical assembly with two vertical supports and a central shaft, showing alignment guides (no text or symbols)Note:
Picture for reference purposes only.
Please prevail in kind
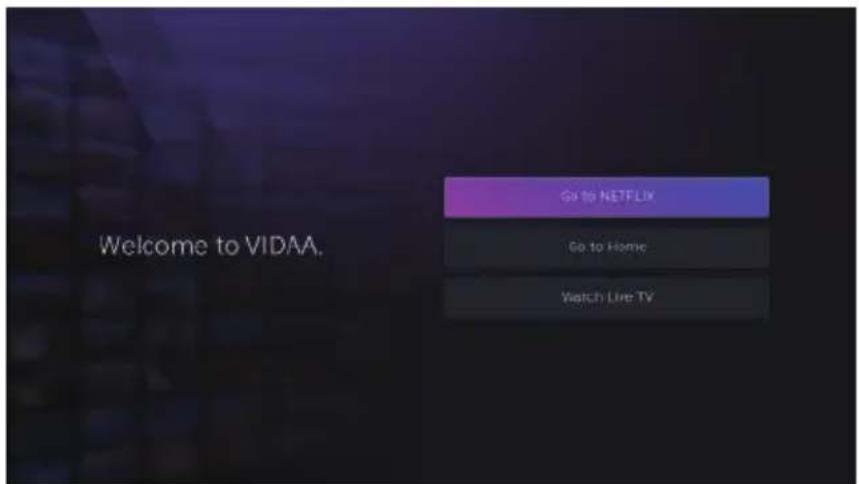
First Time Installation
First Time Installation
Please according to the Text Tip to First Time Setup.
Please make sure the device has connected,
then press [▼] / [▲] / [◀] / [▶] button to select the primary input source
HOME
Press button, you can enter HOME screen.
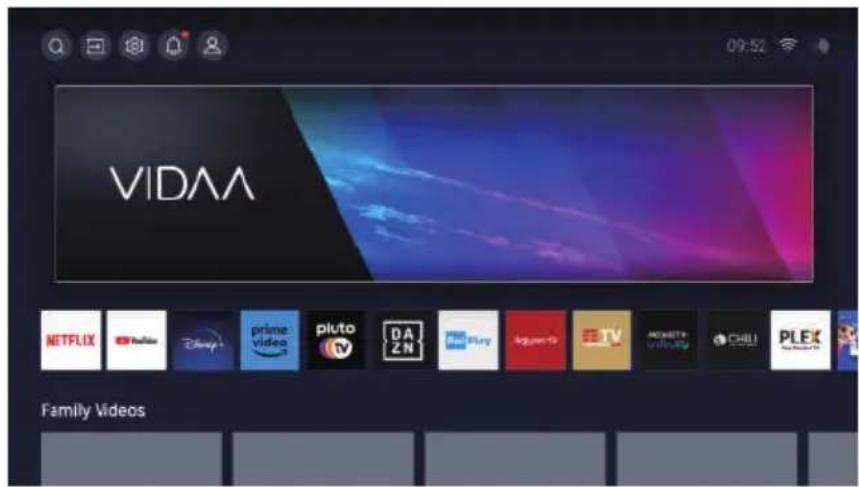
- You can always view the current time at the top of the Home screen.
- If your TV is connected to the Internet through a wireless connection or an Ethernet cable, then the icon 📞/☐ will be displayed at the top corner of the screen.
- Manage apps
- Select the item you want to move, then press the button to manage.
INPUT
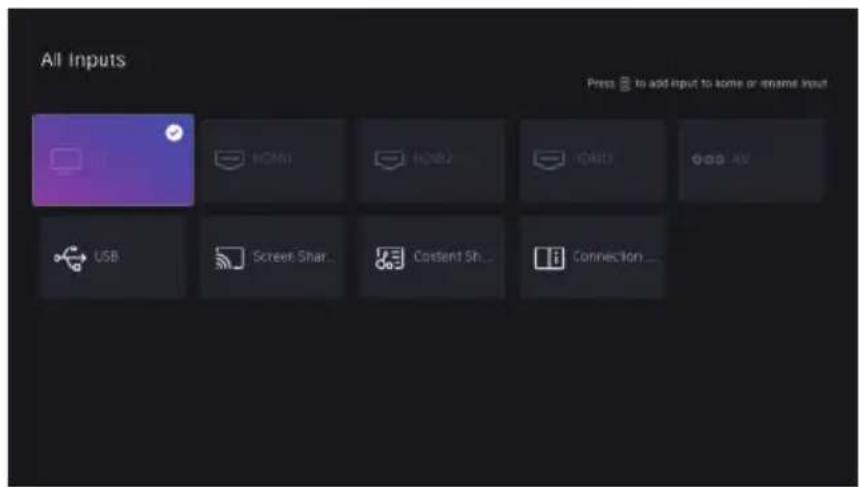
Input
Press [▼] / [▲] button to select Inputs menu.
Press [▼] / [▲] / [◀] / [▶] button to select.
Press ENTER to select input.
Initial Setup
Picture
Press [MENU] to enter the main menu, press [▼] / [▲] to select picture menu.
- Press [▼] / [▲] button to select the option that you want to adjust in the PICTURE menu.
- Press Enter button to adjust.
- After finishing your adjustment, Press Enter button to save and return to the previous menu
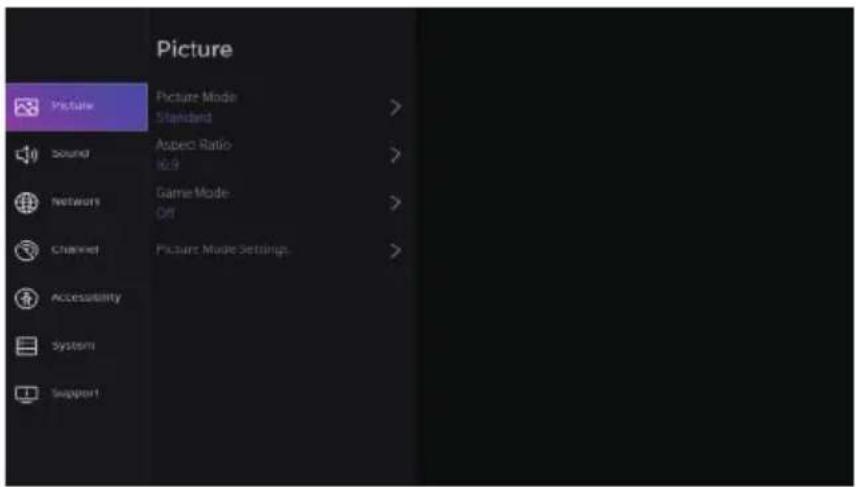
Picture Mode
Press [▼] / [▲] button to select Picture Mode, then press [▼] / [▲] & Enter button to select.
(Optional: Standard/Cinema day/Cinema night/Dynamic/Sports).
Aspect Ratio
Adjust the Aspect Ratio to stretch or zoom in on your picture.
Press ▼ / ▲ button to select Aspect Ratio.
Press ◀ / ▶ button to select Automatic/16:9/4:3/Panoramic/Movie Zoom/Direct.
Game Mode
Press [▼] / [▲] to select, and press [◀] / [▶] to select On/Off.
Picture Mode Settings
Press [▼] / [▲] to select, and press [▶] & ENTER to enter.
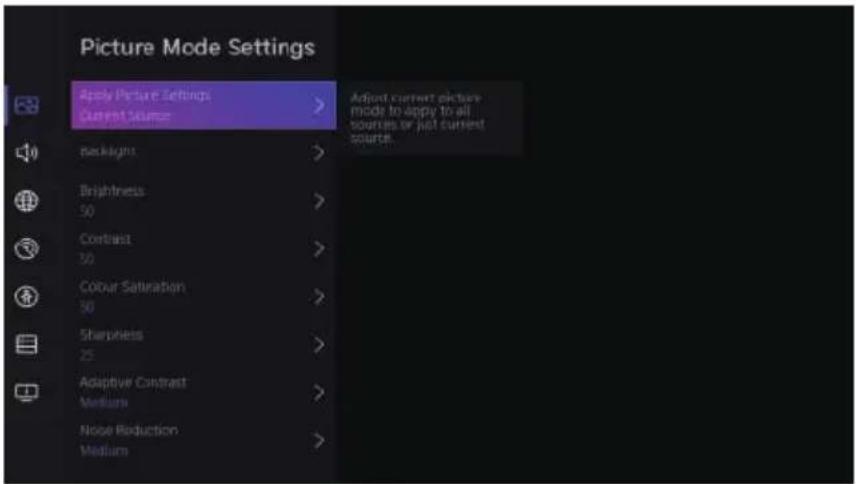
Initial Setup
Sound
Press MENU button to display the main menu. Press 【▼】/【▲】 button to select SOUND in the main menu,
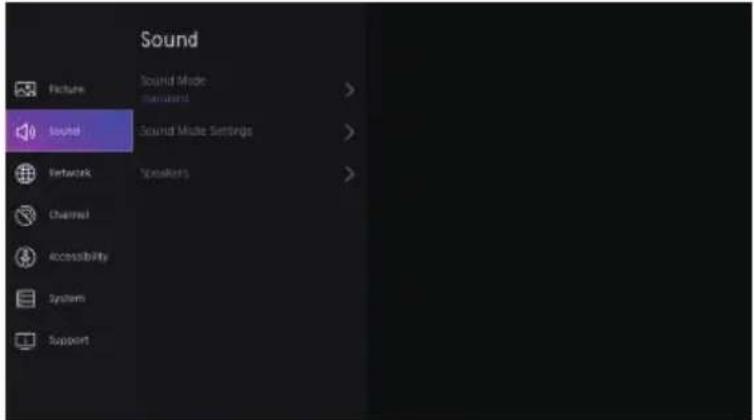
- Press 【▼】/【▲】 button to select the option that you want to adjust in the SOUND menu.
- Press Enter button to adjust.
- After finishing your adjustment, Press Enter button to save and return to the previous menu.
Speakers
Press [▼] / [▲] button to select Speakers.
Press ENTER/【▶】button to enter sub-menu
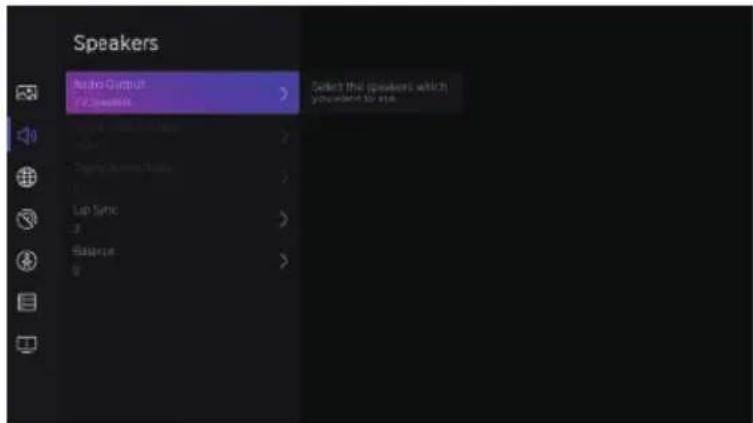
Audio Output
Press [▼] / [▲] button to select Speakers and enter, then press [▼] / [▲] button to select BT Sound Bar/ARC/TV Speaker/SPDIF Only
Network
Press MENU button to display the main menu. Press [▼] / [▲] button to select Network in the main menu
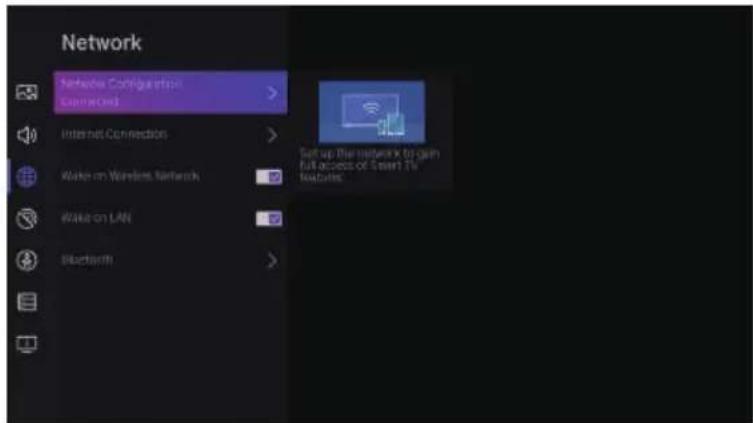
Initial Setup
Press [▼] / [▲] button to select :Network Configuration/Internet Connection/Bluetooth/ Wake on Wireless Network/Wake on LAN.
Channel
Press MENU button to display the main menu. Press [◀] / [▶] button to select Channel.
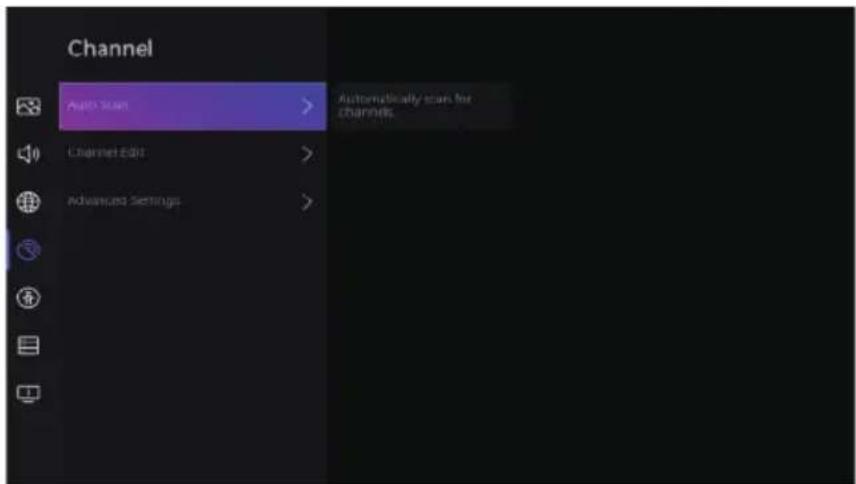
- Press 【▼】 / 【▲】 button to select the option that you want to adjust in the Channel menu
- Press Enter button to adjust.
- After finishing your adjustment, Press Enter button to save and return to the previous menu.
Accessibility
Press MENU button to display the main menu.
Press [◀] / [▶] button to select Accessibility in the main menu.
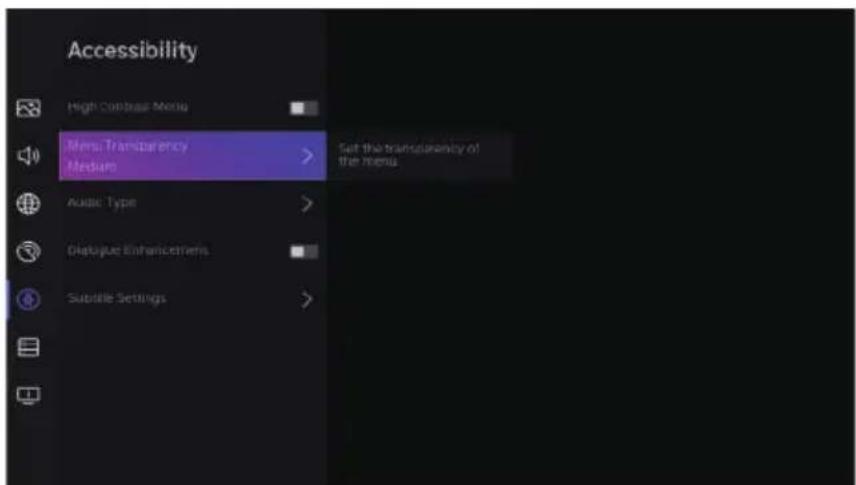
System
System
Press MENU button to display the main menu.
Press [◀] / [▶] button to select System in the main menu
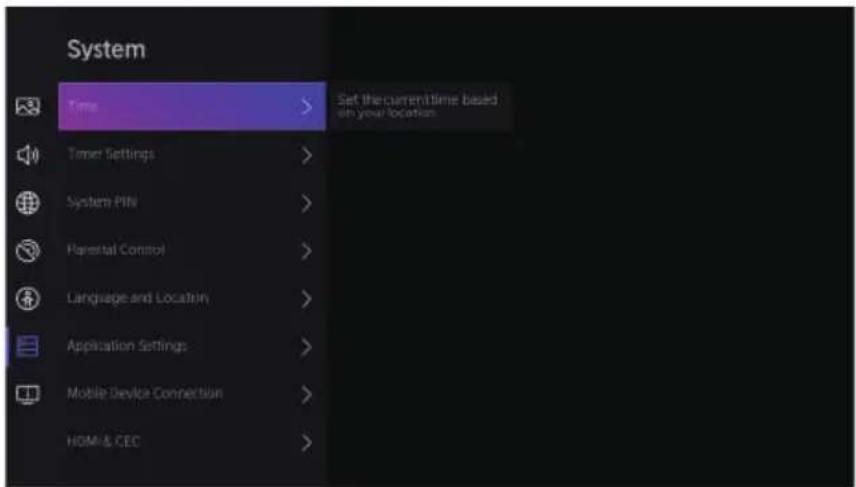
- Press [▼] / [▲] button to select the option that you want to adjust in the System menu.
- Press Enter button to adjust.
- Afterfinishing your adjustment, Press Enter button to save and return to the previous menu.
Application Settings
Press [▼] / [▲] button to select Application Settings
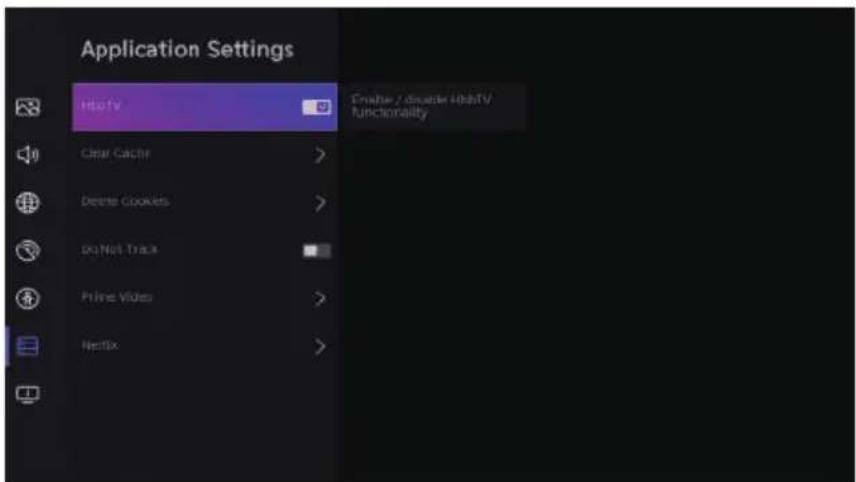
System
HDMI/CEC Funtion
Press 【▼】 / 【▲】 button to select CEC Funtion, then press Enter button to enter sub-menu to select.
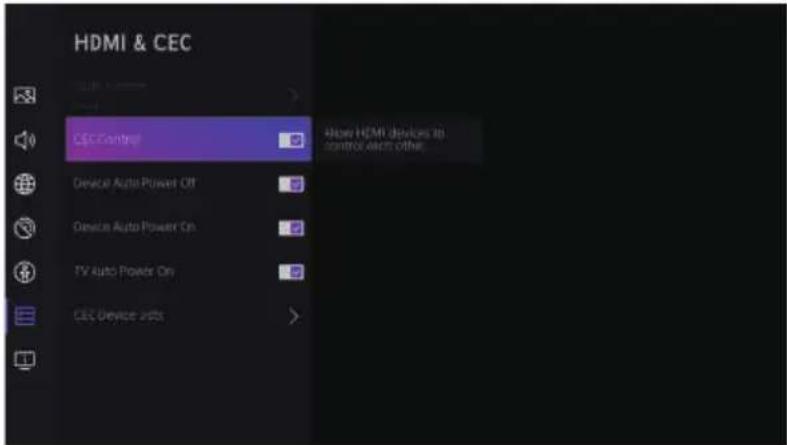
Press ▼ / ▲ button to select CEC Control/Device Auto Power On/Device Auto Power Off/
TV Auto Power On/CEC Device Lists.
Note: All the Options are available only when the CEC Control select On.
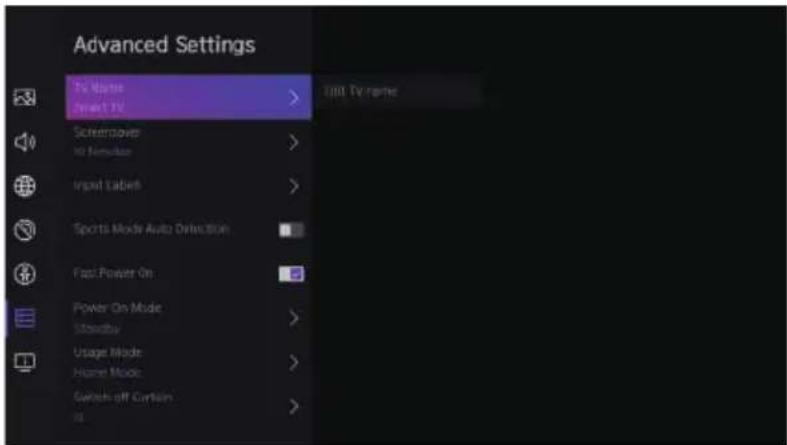
Advanced Settings
Press [▼] / [▲] button to select Advanced Settings, then press ENTER / [▶ button to enter
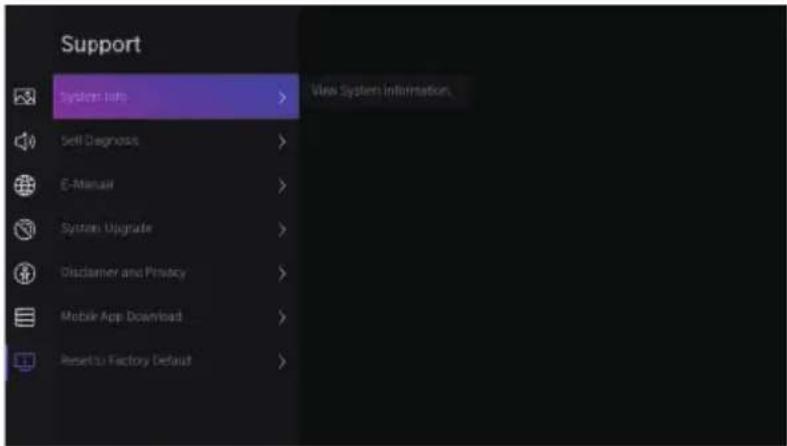
Support
Press [▼] / [▲] button to select Support, then press ENTER [▶] button to enter
EN
System
Media
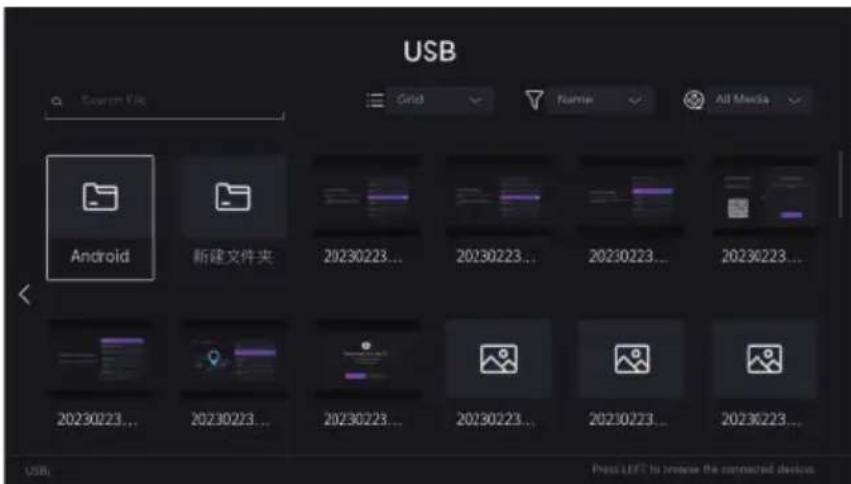
Media
Press [▼] / [▲] / [◀] / [▶] button to select Media on the Home page or press MEDIA button on the remote, and press OK button to enter the Media Center.
EN
Media
Video
Audio
| No power | ·Check if the AC cord of TV is plugged in or not. If there's still no power, please disconnect the plug, and reconnect to the socket after 60 seconds. Turn the power back on. |
| Signal not received properly | ·Double or phantom images may appear on your TV if there are high buildings or mountains close to where you are. You can adjust the image thru manual operation: consult instruction of vernier regulation, or adjust the direction of the external antenna.·If you use an indoor antenna, signal reception may be more difficult under certain circumstances. Adjust the direction of the antenna for optimum reception. If this does not improve reception, you may have to switch to an external antenna. |
| No picture | ·Check if the antenna at the back of the TV is connected properly.·View other channels to see if the problem still occurs. |
| Video appears with no audio | ·Try increasing the volume.·Check if the TV's sound is on mute or not. |
| Audio is present, but video does not appear or is discolored | ·Try adjusting the contrast and brightness. |
| Static noise affects video and audio quality | ·Check if the antenna at the back of the TV is connected properly. |
| Broken lines on screen | ·Electrical appliances such as hair dryers or vacuums etc. may be interfering with your TV set. Switch these appliances off. |
| Remote doesn't work | ·Make sure the plastic bag which came with the remote control is removed. Try using the remote in a shorter distance from the TV. Check if the placement of the batteries is correct, or try using new batteries with the remote control.·The TV will go into Standby mode if it receives no response in a few minutes. |
| No video (PC mode) | ·Please check if the cable is connected to the HDMI port correctly, or if the cable is bent in some places. |
| Screen is too bright or dark (PC Mode) | ·Adjust the brightness or contrast in the main menu. |
| No response from the PC | ·Check if the PC's display resolution is set to a compatible resolution for the TV. |
| Lines appearing when a device is connected to the RCA port | ·Make sure you are using a cable in good quality. |
| Problems are unresolved | ·Unplug the power cable and wait for 30 seconds, then reconnect to the socket. If problems still persist, do not attempt to repair the TV by yourself. Kindly contact the service center. |
Do not leave your TV displaying a static image, whether it is from a paused video, menu screen, etc. for an extended period of time, doing so will damage the display and may cause image burn-in.
Remote control
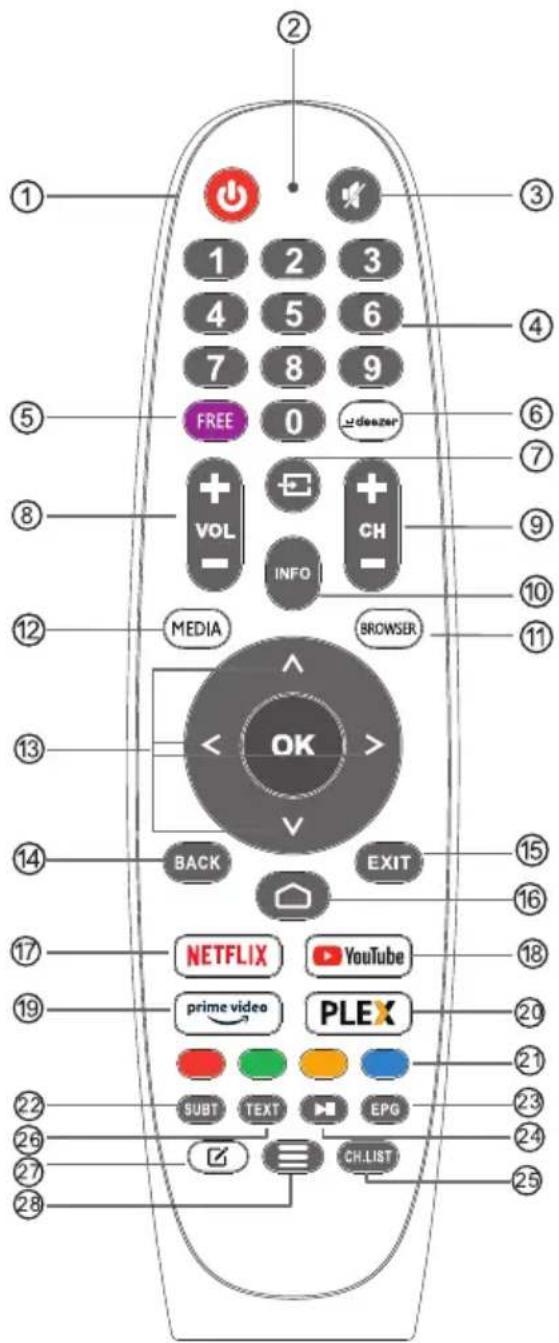
① POWER: Switches the TV between on and standby mode.
② No effect.
③ MUTE: Mute or restore your TV sound.
④ 0-9: Figures "0-9" are used to directly input channel number.
⑤ FREE: Connects to FREE.
⑥ deezer: Connects to deezer.
⑦ Inputs: Display/Select signal source options.
⑧ VOL+/-:Press to increase / decrease the sound level.
⑨ CH+/-:Press to scan through channels.
⑩ INFO: Displays the present channel information such as the current time and channel name.
⑪ BROWSER: Connects to BROWSER.
⑫ MEDIA: Connects to MEDIA
⑬ Navigation buttons: Cursor UP/LEFT/RIGHT/DOWN.
⑭ BACK: Press to move back through menus.
⑮ EXIT: Exit the OSD menu.
⑯ HOME: Displays the home screen.
⑰ NETFLIX: Connects to NETFLIX for viewing online TV shows and films (internet connection required).
⑱ YouTube: Connects to YouTube (internet connection required).
⑲ Prime video :
Connects to Prime video (internet connection required).
⑳ PLEX: Connects to PLEX.
②1 COLOR BUTTONS: There are related functions under EPG.
②2 SUBT : SUBT.
②3 EPG : EPG menu.
24 Media control: Play / Pause
②5 CH.LIST:Channel list
②6 TXT: Press to enter Teletext when play the program.
②7 App customization:App customization (long press under the home page)
②B Menu: Displays the OSD (On Screen Display) menu.
Cuprins
natural_image
Simple line drawing of a blank rectangular frame with three legs and a vertical arrow at the bottom (no text or symbols)natural_image
Technical line drawing of a computer monitor rear panel with a red arrow indicating a component (no text or symbols present)natural_image
Technical line drawing of a mechanical support structure with two vertical supports and a central horizontal beam (no text or symbols)Notă:
PAGINA PRINCIPALĂ
PAGINA PRINCIPALĂ
Ieşire audio
Sistem
Sistem
Sistem
Funcția HDMI/CEC
Sprijin
RO
Sistem
Media
Media
Audio
Ajutor
natural_image
Technical line drawing of a device rear panel with a red arrow pointing to a component (no text or symbols present)natural_image
Diagram of a mechanical assembly with two vertical supports and a horizontal beam, showing alignment lines without any text or symbols.Figyelem:
HOME
HOME
Kép mód
Kezdeti beállítás
Hang
Hang kimenet
Kezdeti beállítás
Rendszer
Rendszer
Rendszer
HDMI/CEC Funkció
HU
Rendszer
Media
Media
natural_image
Simple line drawing of a flat-screen monitor with stand legs (no text or symbols)natural_image
Diagram of a computer monitor rear panel with indicator lights and a red arrow pointing to the screen (no text or symbols present)natural_image
Technical line drawing of a mechanical support structure with no visible text or symbolsUwaga:
DOM
Tryb obrazu
Wyjście audio
System
System
System
Funkcja HDMI/CEC
System
Multimedialna
multimedialna
Audio
Never place a television set in an unstable location. A television set may fall, causing serious personal injury or death.
Many injuries, particularly to children, can be avoided by taking simple precautions such as:
- Using cabinets or stands recommended by the manufacturer of the television set.
- Only using furniture that can safely support the television set.
- Ensuring the television set is not overhanging the edge of the supporting furniture.
- Not placing the television set on tall furniture (for example, cupboards or bookcases) without anchoring both the furniture and the television set to a suitable support.
- Not placing the television set on cloth or other materials that may be located between the television set and supporting furniture,
- Educating children about the dangers of climbing on furniture to reach the television set or its controls.
If your existing television set is being retained and relocated, the same considerations as above should be applied.
Note: Do not hang at an angle to avoid the risk of falling off.
EU DECLARATION OF CONFORMITY
No. 1691
We, S.C. Visual Fan S.A., with the headquarters in Brasov, 61, Brazilor Street, 500313, Romania, registered at the Trade Commerce Brasov under no. J08/818/2002, CUI RO14724950, as the manufacturer, assure, guarantee and declare on our own responsibility, according to the provisions from Dir 2001/95/CE, regarding the regime of the products and services, which can be harmful for life and health, that the product 50iPlay6200-U from ALLVIEW, does not jeopardize the life, health and labor protection, does not produce a negative impact over the environment and is in accordance with:
- Directive (EU) 2015/863 of 31 March 2015 amending Annex II to Directive 2011/65/EU of the European Parliament and of the Council as regards the usage restrictions of certain dangerous substances in electric and electronic equipment;
- Directive regarding the radio equipment RED 2014/53/EU;
- Directive regarding the electromagnetic compatibility EMC 2014/30/EU;
- The safety requests of the European Directive 2014/53/EU and the EN 62368-1:2014+A11:2017 standards, regarding the level of decibels emitted by the sold appliances.
The product has been assessed according to the following standards:
- Health and safety: EN 62368-1:2014+A11:2017
; EN IEC 62311: 2020; EN 50665: 2017; - EMC EN 55032: 2015+A11: 2020, EN 55035: 2017+A11: 2020; EN IEC 61000-3-2: 2019+A1: 2021, EN 61000-3-3:2013/A2:2021; ETSI EN 301 489-1 V2.2.3: 2019, ETSI EN 301 489-17 V3.2.4: 2020
- Radio spectrum: ETSI EN 300328 V2.2.2: 2019; ETSI EN 303 340 V1.1.2: 2016; ETSI EN 303 372-2 V 1.2.1: 2021
The evaluation procedure of the conformity was made according to Directive 2014/53/EU, the documentation being stored at S.C. Visual Fan S.A., Brasov, 61, Brazilor Street, 500313, Romania and will be offered at request.
The product has the CE mark on it. The declaration of conformity is available at www.allviewmobile.com
DECLARATIE UE DE CONFORMITATE
Nr. 1691
DEKLARACJA ZGODNOŚCI UE
No. 1691
- IMPORTANT / IMPORTANT / FONTOS / WAŻNE
- Safety Information
- CAUTION
- Important Safety Precautions
- TV Buttons And Terminal Interface
- TV Buttons
- Terminal Interface
- External device connection diagram
- TV Install And Connect
- Set your TV
- Connect antenna and power
- Turn on TV
- TV Stand Installation Instructions
- First Time Installation
- HOME
- INPUT
- Initial Setup
- Picture
- Picture Mode
- Aspect Ratio
- Game Mode
- Picture Mode Settings
- Sound
- Speakers
- Audio Output
- Network
- Channel
- Accessibility
- System
- Application Settings
- HDMI/CEC Funtion
- Advanced Settings
- Support
- EN
- Media
- Video
- Audio
- Remote control
- Cuprins
- Notă:
- PAGINA PRINCIPALĂ
- Ieşire audio
- Sistem
- Funcția HDMI/CEC
- Sprijin
- RO
- Ajutor
- Figyelem:
- Kép mód
- Kezdeti beállítás
- Hang
- Hang kimenet
- Rendszer
- HDMI/CEC Funkció
- HU
- Uwaga:
- DOM
- Wyjście audio
- Funkcja HDMI/CEC
- Multimedialna
- EU DECLARATION OF CONFORMITY
- No. 1691
- DECLARATIE UE DE CONFORMITATE
- Nr. 1691
- DEKLARACJA ZGODNOŚCI UE
Brand : Allview
Model : 50iPlay6200-U
Category : Television