
HSP5300 - Intercom PHILIPS - Free user manual and instructions
Find the device manual for free HSP5300 PHILIPS in PDF.


User questions about HSP5300 PHILIPS
0 question about this device. Answer the ones you know or ask your own.
Ask a new question about this device
Download the instructions for your Intercom in PDF format for free! Find your manual HSP5300 - PHILIPS and take your electronic device back in hand. On this page are published all the documents necessary for the use of your device. HSP5300 by PHILIPS.
USER MANUAL HSP5300 PHILIPS
Thank you for purchasing a Philips Home Safety product.
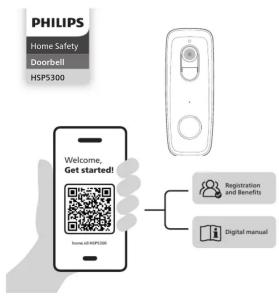
To get started, please download the Philips home safety app to set up and manage all your devices directly from your phone.
Simply connect to your home Wi-Fi and enjoy total control.
- Important information
- Do not handle adapters, plugs or the mains cord with wet hands.
• Make sure the wall is solid enough to supp
- Only use certified adapters. (not CAUTION E.V(2 A/1 E A DC ONLY)
- CAUTION 3 V 2 A6 T 5 A DC ONLY. - If the doorbell housing is damaged in any way, do not use
• After setting up the doorbell, maintain an operating distance of at least
20 cm between the device and user.
• The doorbell has a Wi-Fi module, 2.4 GHz 802.11 b/g/n, with a
maximum power output of 68 mW EIRP.
- What's in the box

- Getting started
- Please have your Wi-Fi network name and password at hand.
• Make sure your mobile device is running IOS 15 or higher or Android 8
or higher.
- Only connected supported)
Download and open the app:
• Search for
"Philips Home Safety" in the
app store or scan the QR code
- Download and install the app.
- For the first-time download and usage, please click the
and usage, please click the "register" button to create an
account. If you already have
an account, click the "Login" button.
Light indications:
• Power-on: White light - Steady on for about 7s
- Pairing: White light - Slow flashing
• Connected: White light - Steady on
- Connecting Failure: White light - Fast flashing
- Standby: Lights off
- Wake Up (Except Ring): White light - Steady on throughout the wake-
up phase
- Wake Up (Ring): White light - Flashing twice with sound effect
• Charging: Amber light - Steady
- Charging Finished: Lights off
- Charging Failure: Amber light - Fast flashing - SD Card Failure: White light - Fast flashing
• Software/Firmware Upgrade: Lights off with
-
Setting up
-
Setting up Step 1: Open the back rubber lid by hand, where you can find the
Step 11 Open the b charging entrance
Step 2: Plug in the USB cable to charge
Step 3: Pair the doorbell with app by pressing the Reset button next to the
charging entrance. Press for 5 seconds and wait for the audio feedback.
Step 4: (Optional) Open the side rubber lid by hand, and insert the Micro
SD car
• Operating temperature in discharge mode: -20°C to +50°C (charging
mode not included)
- Battery charging temperature: 0^ to +45^ (charging will stop if
exceeded to protect the doorbell)
• Make sure you have a strong Wi-Fi signal of at least -50 dBm.

Basic operations


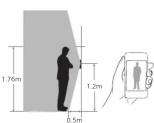
- Where to place it
Step 1: Check if you can reu
existing holes and anchors.
Step 2: When drilling new
holes, mount the doorbell ar
a recommended height of 48 inches (1.2 meters) from the
48 inches (1.2 meters) from the ground.
- How to place it
Wireless installation with charging the doorbell beforehand:
Step 1: Fully charge the doorbell. You can see the battery status in the live
feed in the app.
Step 2: If you still have an existing doorbell, turn off power at the breaker
and confirm by toggling
Step 3: Uninstall the existing doorbell from the wall. Step 4: Check if the view
step 4. Check if the view is correct or if you need to
install the angle bracket as
well, as shown in the image
Step5: Mount your brack
on the wall with mountir
screws and the mounting
plate, as shown in the image.
Step 6: Mount the doorbell
on the bracket. Align the
doorbell on bottom and
then push up, than snap it on the top.
on the top.
Wired installation with existing doorbell wires and chime:
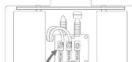
Step 1: Turn off power at the breaker
and confirm by toggling home lights.
Step 2: Use the provided jumperable to support both terminals i
cable to connect both terminals in your doorbell's chime, one cable and
your doorbell's crime, one cable to 'Front' and the other to 'Trans


Step 3: Uninstall the existing doorbell from the wall, carefully pull
out the wires, and straighten the wire ends if needed.
Step 4: (Optional) Install wall anchors
- For hard surfaces (concrete, stucco, or brick), drill two holes and push in the provided anchor.
- push in the provided and - For wood, skin this step
- For Wood, Skip this step. Step 5: Check if the view

Step 7: Connect the wires to the doorbell using the small terminal screws.
Option 1: Screw in the small terminal screws halfway. Form a small circle with the wire ends and loop them around the screws. Finally, tighten the small terminal screws to securely fasten the Option 2: For short doorbell wires, use extensions. Attach them to your existing wires, twist together, and secure with gray screw tops. Connect the V-shaped end to the doorbell and screw in terminal screws halfway. Join the V-shaped ends and tighten screws for a secure connection.
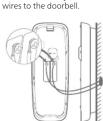
Step 8: Mount the doorbell on the bracket. Align the doorbell on bottom and then push up, than snap it on the top.


- How to remove it
If you want to recharge or reset the doorbell, remove
the doorbell from the bracket.


- How to use it with the chime
A separately sold compatible chime can be inserted into
any power outlet in your home, allowing you to place it
wherever you pret
- Electromagnetic fields (EMF)
This appliance complies with the applicable standards
and regulations regarding exposure to electromagnetic fields.
- Recycling
• This symbol means that electrical products and batteries shall
not be disposed of with normal household waste.
- Follow your country's rules for the separate collection of
electrical products and batteries.
Removal of built-in rechargeable battery
- The built-in rechargeable battery must only be removed by a qualified
professional when the appliance is discarded. Before removing the
battery, make sure that the appliance is disconnected from the wall
med
te II
van
[Non-Text]
[Non-Text]
EN Home safety
السلامة المتزالية
[Non-Text]
EM Welcome
E.N. Registration and Benefits
السجيل والمرativa
EN Doorbell
أر جرس الباب
广力云智慧零售收银系统
[Non-Text]
[Non-Text]
广力云智慧零售收银系统
EN Digital
AR بدوي
广力云智慧零售收银系统
[Non-Text]
[Non-Text]
[Non-Text]
[Non-Text]
[Non-Text]
[Non-Text]
[Non-Text]
[Non-Text]
[Non-Text]
em are register
V. and are used
[Non-Text]
ed by and is solk
V., and Versuni
roduct.
[Non-Text]
。

一
1.
11
|
[Non-Text]
[Non-Text]
[Non-Text]
[Non-Text]
[Non-Text]
[Non-Text]
[Non-Text]
[Non-Text]
[Non-Text]
[Non-Text]
[Non-Text]
[Non-Text]
[Non-Text]
[Non-Text]
[Non-Text]
[Non-Text]
[Non-Text]
[Non-Text]
[Non-Text]
[Non-Text]
[Non-Text]
[Non-Text]
[Non-Text]
[Non-Text]
[Non-Text]
[Non-Text]
[Non-Text]
[Non-Text]
[Non-Text]
[Non-Text]
[Non-Text]
[Non-Text]
[Non-Text]
[Non-Text]
[Non-Text]
[Non-Text]
[Non-Text]
[Non-Text]
[Non-Text]
[Non-Text]
[Non-Text]
[Non-Text]
[Non-Text]
[Non-Text]
[Non-Text]
[Non-Text]
[Non-Text]
[Non-Text]
[Non-Text]
[Non-Text]
[Non-Text]
[Non-Text]
[Non-Text]
[Non-Text]
[Non-Text]
[Non-Text]
[Non-Text]
[Non-Text]
[Non-Text]
[Non-Text]
[Non-Text]
[Non-Text]
[Non-Text]
[Non-Text]
[Non-Text]
[Non-Text]
[Non-Text]
[Non-Text]
[Non-Text]
[Non-Text]
[Non-Text]
[Non-Text]
[Non-Text]
[Non-Text]
[Non-Text]
[Non-Text]
[Non-Text]
[Non-Text]
[Non-Text]
[Non-Text]
[Non-Text]
[Non-Text]
[Non-Text]
[Non-Text]
[Non-Text]
[Non-Text]
[Non-Text]
[Non-Text]
[Non-Text]
[Non-Text]
- What's in the box

- Getting started
- Please have your Wi-Fi network name and password at hand.
• Make sure your mobile device is running IOS 15 or higher or Android 8
or higher.
- Only connected supported)
Download and open the app:
- Search for
"Philips Home Safety" in the
app store or scan the QR code
• Download
Take any necessary safety precautions when you handle tools to open the appliance and when you dispose of the rechargeable battery. When you handle batteries, make sure that your hands, the product and the batteries are dry. To avoid accidental short-circuiting of batteries after removal, do not let battery terminals come into contact with metal objects (e.g. coins, hairpins, rings). Do not wrap batteries in aluminum foil. Tape battery terminals or put batteries in a plastic bag before you discard them.
11. Technical specifications
Storage Supports up to 128G Micro SD card (not included)
Wi-Fi IEEE 802.11 b/g/n, support 2.4GHz
Operating humidity 10% to 95%, no condensation
RF output power 17.5 dBm
General power 8–24 V AC, 50/60 HZ, 200 mA or 5 V DC, 1.5 A
12. Warranty and support
Versuni offers a two-year warranty after purchase on this product. This warranty is not valid if a defect is due to incorrect use or poor maintenance. Our warranty does not affect your rights under law as a consumer. For more information or for invoking the warranty, please visit our website home.id/HSP5300.
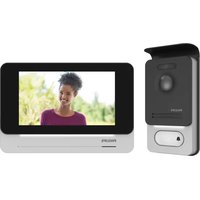
Brand : PHILIPS
Model : HSP5300
Category : Intercom