
3.5qt Stand Mixer - Food processor Beautiful - Free user manual and instructions
Find the device manual for free 3.5qt Stand Mixer Beautiful in PDF.


| Product Type | Stand Mixer / Food Processor |
| Brand | Beautiful |
| Model | 3.5qt Stand Mixer |
| Bowl Capacity | 3.5 quarts |
| Bowl Material | Stainless steel |
| Body Material | Die-cast metal with plastic casing |
| Dimensions (H x W x D) | Approximately 14 x 12 x 14 inches |
| Weight | Approximately 18 lbs |
| Power Rating | 400 watts |
| Voltage / Frequency | 120V / 60Hz |
| Speed Settings | 10 variable speeds |
| Mixing Functions | Mix, knead, whip, beat |
| Tilt-Head Design | Yes, for easy bowl access |
| Included Attachments | Flat beater, dough hook, wire whisk |
| Bowl Handle | Yes, ergonomic handle |
| Pouring Shield | Included (optional) |
| Safety Lock | Bowl and head lock for operation |
| Overheat Protection | Auto shut-off if motor overheats |
| Non-Slip Feet | Yes, silicone suction feet |
| Cleaning Instructions | Hand wash bowl and attachments; wipe body with damp cloth |
| Dishwasher Safe Parts | Bowl and metal attachments are dishwasher safe (top rack) |
| Replacement Parts Available | Bowl, attachments, and some internal parts can be replaced |
| Warranty | 1-year limited warranty |
Frequently Asked Questions - 3.5qt Stand Mixer Beautiful
User questions about 3.5qt Stand Mixer Beautiful
0 question about this device. Answer the ones you know or ask your own.
Ask a new question about this device
Download the instructions for your Food processor in PDF format for free! Find your manual 3.5qt Stand Mixer - Beautiful and take your electronic device back in hand. On this page are published all the documents necessary for the use of your device. 3.5qt Stand Mixer by Beautiful.
USER MANUAL 3.5qt Stand Mixer Beautiful
3.5qt Stand Mixer
The kitchen is my family's happy place. It's where we cook and eat and bake and laugh and share our most beautiful moments together. That's what inspired the creation of Beautiful, my new collection of easy-to-use kitchenware that you'll want to keep out on your kitchen counter. So whether your kitchen has flour all over the place from a kid's baking session or you're throwing an adult dinner party, I hope every step will be simple, delicious and beautiful!

www.beautifulbydrew.com
Table of Contents
Section 1: Safety
Important Safeguards 4-6
Additional Important Safeguards....6-7
Notes on the Plug 7
Notes on the Cord 8
Plasticizer Warning 8
Electric Power 9
Manual Thermal Protector....9
Section 2: Instructions
Getting to Know Your Beautiful 5.3 Qt. Stand Mixer....11
Before Using for the First Time....12
Operation 12-13
Beautiful Mixing Guide....14
Beautiful Mixing Tips 15
Beater Tips 16
Balloon Whisk Tips....16
Dough Hook Tips 17
User Maintenance Instructions 17
Care & Cleaning Instructions....17
Storing Instructions 18
Troubleshooting 18-19
Warranty 20-21
Índice
When using electrical appliances, basic safety precautions should always be followed to reduce the risk of fire, electric shock, and/or injury to persons, including the following:
- READ ALL INSTRUCTIONS.
- This appliance is not intended for use by persons with reduced physical, sensory, or mental capabilities, or lack of experience and knowledge, unless they are closely supervised and instructed concerning use of the appliance by a person responsible for their safety.
- This appliance shall not be used by children. Keep the appliance and its cord out of reach of children.
- Close supervision is necessary when any appliance is used near children. Children should be supervised to ensure that they do not play with the appliance.
- To protect against risk of electrical shock, do not put cord, plug, or Stand Mixer body in water or other liquid.
-
To disconnect, turn the speed control dial counterclockwise to the (0) OFF position; then remove plug from wall outlet. Always make sure the Stand Mixer is OFF before putting on or taking off parts, before cleaning and when not in use. To unplug, grasp the plug and pull from the outlet. Never pull from the power cord.
-
Check to be sure the speed control dial is in the (0) OFF position before plugging cord into wall outlet.
- Avoid contacting moving parts. Keep hands, hair, and clothing, as well as spatulas and other utensils, away from attachments during operation to reduce risk of injury to persons and/or damage to Stand Mixer. Do not attempt to defeat any safety interlock mechanisms.
- Remove all attachments from the Stand Mixer before cleaning.
- Do not let cord hang over edge of table or counter or touch hot surfaces, including the stove.
- Do not place on or near a hot gas or electric burner, or in a heated oven.
- Do not operate any appliance with a damaged cord or plug or after the appliance malfunctions, or has been damaged in any manner. Contact Consumer Service.
NOTE: DO NOT ATTEMPT TO REPAIR THE UNIT YOURSELF. THIS WILL VOID THE WARRANTY.
- The use of attachments not recommended or sold by the appliance manufacturer for use with this Stand Mixer may cause fire, electric shock, or injury.
IMPORTANT: Use ONLY the mixing bowl included with this Stand Mixer. The use of any other non-fitting bowl may cause spills or damage to property or damage to the appliance.
- Do not use outdoors.
- Do not use appliance for other than intended purpose.
WARNING: Do not overfill the mixing bowl. Do not fill more than half full. Maximum bowl capacity is 7 cups.
- Container must be properly in place before operating appliance.
- Remove beaters from mixer before washing.
SAVE THESE INSTRUCTIONS
ADDITIONAL IMPORTANT SAFEGUARDS
- All users of this appliance must read and understand this instruction manual before operating or cleaning this appliance.
-
The cord to this appliance should be plugged into a 120V AC electrical outlet only.
-
If this appliance begins to malfunction during use, immediately turn the speed control dial counterclockwise to the (0) OFF position and unplug the cord. Do not use or attempt to repair the malfunctioning appliance.
- If this appliance falls or accidentally becomes immersed in water, unplug it immediately. Do not reach into the water!
- Do not use this appliance after it has fallen into or becomes immersed in water.
- To reduce the risk of injury to persons or property, never use this Stand Mixer in an unstable position
WARNING: To avoid spills, make sure the stainless steel bowl is properly locked in place on the base and the splash shield is centered over the bowl before turning the speed control dial.
NOTES ON THE PLUG
This appliance has a polarized plug (one blade is wider than the other). To reduce the risk of electric shock, this plug will fit in a polarized outlet only one way. If the plug does not fit fully into the outlet, reverse the plug. If it still does not fit, contact a qualified electrician. Do not modify the plug in any way.
NOTES ON THE CORD
a) A short power-supply cord (or detachable power-supply cord) is to be provided to reduce risks resulting from becoming entangled in or tripping over a longer cord.
b) Longer detachable power-supply cords or extension cords are available and may be used if care is exercised in their use.
c) If a long detachable power-supply cord or extension cord is used:
1) The marked electrical rating of the detachable power-supply cord or extension cord should be at least as great as the electrical rating of the appliance;
2) If the appliance is of the grounded type, the extension cord should be a grounding-type 3-wire cord; and
3) The longer cord should be arranged so that it will not drape over the countertop or table top where it can be pulled on by children or tripped over.
PLASTICIZER WARNING
CAUTION: To prevent Plasticizers from migrating from the finish of the counter upper or table upper or other furniture, place NON-PLASTIC coasters or place mats between the appliance and the finish of the counter upper or table upper. Failure to do so may cause the finish to darken; permanent blemishes may occur, or stains can appear.
ELECTRIC POWER
If the electrical circuit is overloaded with other appliances, your appliance may not operate properly. It should be operated on a separate electrical circuit from other appliances.
MANUAL THERMAL PROTECTOR
This product is equipped with a Manual Resettable Thermal protector to protect the motor. If the motor shuts down, turn the Speed Control Dial to the (0) OFF position, and then unplug the stand mixer. Let the unit rest for approximately half an hour. Once the resetting period has elapsed, plug the power cord back into the outlet and turn the Speed Control Knob to the desired setting to continue.
Section 2
Instructions
Getting to Know Your Beautiful 3.5 Qt. Stand Mixer


- Stand Mixer Head
- Splash Shield with Filler Hole
- 3.5 Qt. Stainless Steel Mixing Bowl
- Mixing Bowl Base
- Motor Base
- Non-Skid Feet
- Speed Control Dial with (0) OFF, Speeds 1-12
- Head Tilt Button
- Polarized Plug (not shown)
Attachments
- Beater
- Balloon Whisk
- Dough Hook
Before Using for the First Time
- Always unplug Stand Mixer and check to make sure the speed control dial is in the (0) OFF position before inserting or removing attachments.
- Wash mixing bowl and attachments in warm, sudsy water, rinse and dry.
- Raise the mixer head. Firmly press the head tilt button to release and lift the Stand Mixer head. (Fig. 1)
- Lock mixing bowl onto the base. Insert the base of the mixing bowl into the bowl rest and turn clockwise until it is locked securely in place. (Fig. 2)
- Add ingredients to the mixing bowl. (Fig. 3)
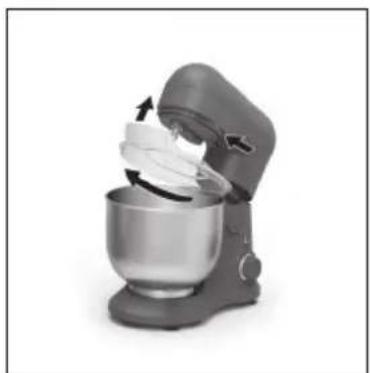
- Attach the splash shield. Grasp the splash shield (use the filler hole as a handle) and fit the opening over the locking pin on the mixer head. Turn the splash shield clockwise until it locks into place. (Fig. 4)
- Lock attachment onto the attachment shaft. Push attachment up onto attachment shaft and turn counter-clockwise until securely locked. (Fig. 5)
- Lock mixer head down into working position. Press the head tilt button while pressing the Stand Mixer head down into the bowl until it locks securely into working position. (Fig. 6)
- Your Beautiful Stand Mixer is now ready for use.
CAUTION: Hazard. To avoid injury, do not place fingers in hinge area.
Operation
- Make sure the speed control dial is in the (0) OFF position; with the mixing bowl, selected attachment (see Mixing Guide) and splash shield locked into position.
- Plug the cord into a 120V AC electrical outlet.
- Turn the speed control dial from 0 to 1 to 4 to begin mixing at low speeds. Gradually turn the speed control dial to higher speeds as needed.
- When mixing is complete, turn the speed control dial to (0) OFF.
-
Unplug the Stand Mixer when not in use and before cleaning.
-
Firmly press the head tilt button to raise Stand Mixer head.
- To remove any attachment, push the attachment shaft up into the mixer head, then turn the attachment clockwise to unlock and release. Pull the attachment straight down and off the shaft.
- To remove the splash shield, firmly grasp and turn the shield counter-clockwise to unlock and remove from the motor head.
Figure 1 Figure 2 Figure 3

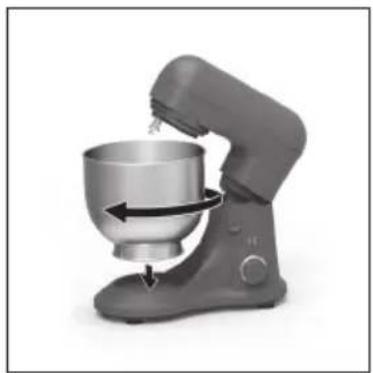

Figure 4 Figure 5 Figure 6
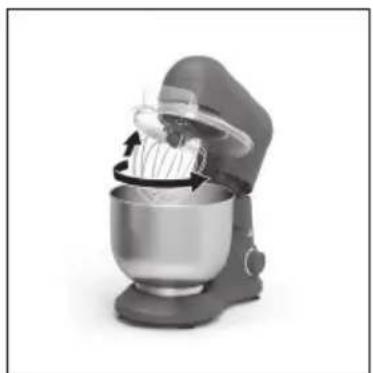

Beautiful Mixing Guide
The following mixing guide is a suggestion for selecting attachments and mixing speeds. Begin mixing on Speed 1 and increase to desired speed, depending on the desired consistency.
| Attachment Speed Operation Food | |||
| Beater 1 - 6 Stir Instant Pudding, | Mousse | ||
| 1 - 8 Fold Cakes (boxed mixes or scratch) | |||
| 1 - 12 Mix Dough (medium weight dough), Pancake Batter | |||
| Balloon Whisk 8 - 12 Cream Frosting | |||
| 8 - 12 Beat Whipped Cream, Eggs (whole, yolks, whites) | |||
| 8 - 12 Whip Egg Whites | |||
| Dough Hook 1 - 3 Knead Bread, | Short Crust | Pastry, Pasta | |
Beautiful Mixing Tips
- When mixing most batters, especially cake and cookie batters, add:
1/3 dry ingredients
1/2 liquid ingredients
1/3 dry ingredients
1/2 liquid ingredients
1/3 dry ingredients
Use slow stirring speeds until ingredients are blended. Gradually increase speeds until the desired consistency is achieved.
- When using add-in's (chips, chunks, nuts, raisins) fold in during the last stages of mixing. Check to be sure the batter is thick enough to prevent fruits and nuts from sinking to the bottom of the bake pan.
- Dust sticky fruits or fresh fruits in flour or confectioner's sugar for better distribution in the batter.
• Always begin mixing using the lower speeds until the ingredients are thoroughly combined. - Use the filler hole in the splash shield to add liquid or smaller ingredients while the Stand Mixer is in operation.
- Mixtures containing large amounts of liquid ingredients should be mixed at lower speeds to avoid splashing. Increase speed only after the mixture has thickened.
- When mixing thin batters, use medium speeds.
- Stop the Stand Mixer periodically to scrape down the sides of the mixing bowl with a spatula.
Beater Tips
Use the Beater for normal to heavy mixtures.
• Cakes & Cookies
- Biscuits
- Creamed Frostings
- Mashed Potatoes
- Pie Pastry
- When preparing thick batters, butter or margarine should be at room temperature.
- Add ingredients one at a time, thoroughly mixing after each addition.
- Add flour one cup at a time.
- If the Stand Mixer seems to struggle, increase the speed setting.
Balloon Whisk Tips
Use the Balloon Whisk to incorporate air.
- Sponge Cakes
- Egg Whites
- Mayonnaise
- Heavy Cream
- Boiled Frostings
- Do not use the whisk for mixing thick mixtures, such as dough, fudge, or mashed potatoes.
- Your Stand Mixer is designed to whisk a minimum of 3 large eggs, 6 large egg whites or yolks and a maximum of 10 large eggs, 10 large egg whites or yolks.
Dough Hook Tips
Use the Dough Hook to mix & knead yeast doughs.
- Breads & Rolls
- Pizza Dough
- Pastry
- Pasta
- Stop the Stand Mixer periodically to scrape down the sides of the mixing bowl with a spatula.
- Add flour one cup at a time.
- For making dough (bread, pizza), maximum 4 cups flour.
User Maintenance Instructions
This appliance requires little maintenance. It contains no user serviceable parts. Do not try to repair it yourself. Contact a qualified appliance repair technician if the product requires servicing.
Care & Cleaning Instructions
CAUTION: Never immerse the motor base, plug or cord in water or any other liquid.
- Before cleaning, turn the speed control dial to (0) OFF, then unplug from outlet
- The Stand Mixer mixing bowl, splash shield, beater, balloon whisk and dough hook are top rack dishwasher-safe.
- Wipe the mixer head, motor base and body of the Stand Mixer with a damp cloth or sponge and dry thoroughly.
CAUTION: To avoid surface damage, never use rough scouring pads or abrasive cleansers on any plastic or metal parts.
WARNING: DO NOT IMMERSE THE MOTOR BASE IN WATER.
Storing Instructions
- Unplug and clean unit.
- Store in original box or in a clean, dry place.
- Never store the Stand Mixer while it is hot or plugged in.
- Never wrap cord tightly around the appliance. Never place any stress on cord, especially where the cord enters the motor base, as this could cause the cord to fray and break.
Troubleshooting
A utensil is accidentally caught in an attachment.
- Quickly turn the speed control dial to (0) OFF, then unplug from outlet.
- Clear the obstruction
- Allow the motor to cool for 5 minutes before continuing.
The Stand Mixer motor stalls.
- Quickly turn the speed control dial to (0) OFF, then unplug from outlet.
- Reduce the amount of mixture in the bowl
- Allow the motor to cool for 5 minutes before continuing.
Food is not mixed.
- Place liquid ingredients into the mixing bowl before adding dry ingredients.
- Stop the Stand Mixer periodically to scrape down the sides of the mixing bowl with a spatula.
- Increase speed.
Food splatters during mixing.
- Mixtures containing large amounts of liquid ingredients should be mixed at lower speeds to avoid splashing. Increase speed only after the mixture has thickened.
- Splash shield is not in place. Make sure splash shield is properly attached before turning the speed control dial.
Stand Mixer travels on the counter top during mixing.
- Reduce mixing speed.
- Reduce quantity of ingredients in the mixing bowl.
• Make sure countertop is clean to allow the non-skid feet to grip the countertop and reduce or eliminate any Stand Mixer movement.
The Stand Mixer stop working during mixing.
- Turn the Speed Control Dial to the (0) OFF position, and then unplug the stand mixer
- Let the unit rest for approximately half an hour
- plug the power cord back into the outlet and turn the Speed Control Knob to the desired setting to continue
Limited Two-Year Warranty
Sensio Inc. dba Made by Gather™ hereby warrants that for a period of TWO YEARS from the date of purchase, this product will be free from mechanical defects in material and workmanship, and for 90 days in respect to non-mechanical parts. At its sole discretion, Sensio Inc. dba Made by Gather™ will either repair or replace the product found to be defective, or issue a refund on the product during the warranty period.
The warranty is only valid for the original retail purchaser from the date of initial retail purchase and is not transferable. Keep the original sales receipt, as proof of purchase is required to obtain warranty validation. Retail stores selling this product do not have the right to alter, modify, or in any way revise the terms and conditions of the warranty.
Exclusions:
The warranty does not cover normal wear of parts or damage resulting from any of the following: negligent use of the product, use of improper voltage or current, improper routine maintenance, use contrary to the operating instructions, disassembly, repair, or alteration by anyone other than qualified Sensio Inc. dba Made by Gather™ personnel. Also, the warranty does not cover Acts of God such as fire, floods, hurricanes, or tornadoes.
Sensio Inc. dba Made by Gather™ shall not be liable for any incidental or consequential damages caused by the breach of any express or implied
warranty. Apart from the extent prohibited by applicable law, any implied warranty of merchantability or fitness for a particular purpose is limited in time to the duration of the warranty. Some states, provinces or jurisdictions do not allow the exclusion or limitation of incidental or consequential damages, or limitations on how long an implied warranty lasts, and therefore, the above exclusions or limitations may not apply to you. The warranty covers specific legal rights which may vary by state, province and/or jurisdiction.
How To Obtain Warranty Service:
You must contact Customer Service at our toll-free number: 1-877-775-3564. A Customer Service Representative will attempt to resolve warranty issues over the phone. If the Customer Service Representative is unable to resolve the problem, you will be provided with a case number and asked to return the product to Made by Gather Attach a tag to the product that includes: your name, address, daytime contact telephone number, case number, and description of the problem.
Also, include a copy of the original sales receipt. Carefully package the tagged product with the sales receipt, and send it (with shipping and insurance prepaid) to SENSIO Inc.'s address. Made by Gather shall bear no responsibility or liability for the returned product while in transit to SENSIO Inc.'s Customer Service Center.
Beautiful®
Kitchenware
Sección 1
Seguridad
PROTECTOR TÉRMICO MANUAL


Figura 4 Figura 5 Figura 6


Guía para usar la batidora Beautiful
www.beautifulbydrew.com
For customer service questions or comments

- TABLE OF CONTENTS
- SECTION 1: SAFETY
- SECTION 2: INSTRUCTIONS
- ÍNDICE
- NOTE: DO NOT ATTEMPT TO REPAIR THE UNIT YOURSELF. THIS WILL VOID THE WARRANTY
- SAVE THESE INSTRUCTIONS
- ADDITIONAL IMPORTANT SAFEGUARDS
- NOTES ON THE PLUG
- NOTES ON THE CORD
- PLASTICIZER WARNING
- ELECTRIC POWER
- MANUAL THERMAL PROTECTOR
- SECTION 2
- INSTRUCTIONS
- GETTING TO KNOW YOUR BEAUTIFUL 3.5 QT. STAND MIXER
- ATTACHMENTS
- BEFORE USING FOR THE FIRST TIME
- OPERATION
- BEAUTIFUL MIXING GUIDE
- BEAUTIFUL MIXING TIPS
- BEATER TIPS
- BALLOON WHISK TIPS
- DOUGH HOOK TIPS
- USER MAINTENANCE INSTRUCTIONS
- CARE & CLEANING INSTRUCTIONS
- STORING INSTRUCTIONS
- TROUBLESHOOTING
- A UTENSIL IS ACCIDENTALLY CAUGHT IN AN ATTACHMENT
- THE STAND MIXER MOTOR STALLS
- FOOD IS NOT MIXED
- FOOD SPLATTERS DURING MIXING
- STAND MIXER TRAVELS ON THE COUNTER TOP DURING MIXING
- THE STAND MIXER STOP WORKING DURING MIXING
- LIMITED TWO-YEAR WARRANTY
- EXCLUSIONS
- HOW TO OBTAIN WARRANTY SERVICE
- SECCIÓN 1
- SEGURIDAD
- PROTECTOR TÉRMICO MANUAL
- GUÍA PARA USAR LA BATIDORA BEAUTIFUL
Brand : Beautiful
Model : 3.5qt Stand Mixer
Category : Food processor