STR-VD8W - Tumble dryer Stirling - Free user manual and instructions
Find the device manual for free STR-VD8W Stirling in PDF.


| Product Type | Tumble Dryer |
| Brand | Stirling |
| Model | STR-VD8W |
| Capacity | 8 kg |
| Dimensions (W x D x H) | 598 x 555 x 845 mm |
| Net Weight | 28 kg |
| Power Consumption | 2000 W |
| Voltage / Frequency | 220-240 V~, 50 Hz |
| Drying Type | Vented |
| Control Type | Electronic with rotary dial and buttons |
| Number of Programs | 12 (Cotton, Synthetic, Special, Timed) |
| Lint Filter | Clean after each use |
| Child Lock | Yes |
| Anti-Crease Function | Yes (10 minutes after cycle) |
| Overheat Protection | Yes (safety cut-out) |
| Warranty | 3-year in-home warranty (Australia) |
| IP Rating | IPX4 |
| Timer Options | 30, 50, 70, 90 minutes |
| Reverse Tumble Action | Yes (Cotton Standard program) |
| Installation Type | Freestanding, minimum clearance 100 mm |
| Leveling Feet | Adjustable |
Frequently Asked Questions - STR-VD8W Stirling
User questions about STR-VD8W Stirling
0 question about this device. Answer the ones you know or ask your own.
Ask a new question about this device
Download the instructions for your Tumble dryer in PDF format for free! Find your manual STR-VD8W - Stirling and take your electronic device back in hand. On this page are published all the documents necessary for the use of your device. STR-VD8W by Stirling.
USER MANUAL STR-VD8W Stirling
natural_image
Abstract black and white spiral pattern inside a circle (no text or symbols)STIRLING®

natural_image
Front view of a white washing machine with a circular vent and control panel (no visible text or symbols)8 kg Vented Dryer
Model Number STR-VD8W
INSTRUCTION MANUAL
Welcome
Congratulations on choosing to buy a STIRLING ^® product.
All products brought to you by STIRLING ^® are manufactured to the highest standards of performance and safety and, as part of our philosophy of customer service and satisfaction, are backed by our comprehensive 3 Year in home Warranty. We hope you will enjoy using your purchase for many years to come.
Contents
02 Welcome
04 Warranty Details
05 General Safety Instructions
09 Unpacking
10 Product Overview
12 Installation
15 Instructions
20 FAQs and Troubleshooting Guide
22 Other Useful Information
27 Repair and Refurbished Goods or Parts Notice


STIRLING®
8 kg Vented Dryer
Warranty Details
REGISTER YOUR PURCHASE AT www.aldi.com.au/en/about-aldi/product-registration/ TO KEEP UP-TO-DATE WITH IMPORTANT PRODUCT INFORMATION
The product is guaranteed to be free from defects in workmanship and parts for a period of 36 months from the date of purchase. Defects that occur within this warranty period, under normal use and care, will be repaired, replaced or refunded at our discretion. The benefits conferred by this warranty are in addition to all rights and remedies in respect of the product that the consumer has under the Competition and Consumer Act 2010 and similar state and territory laws.
Our goods come with guarantees that cannot be excluded under the Australian Consumer Law. You are entitled to a replacement or refund for a major failure and to compensation for any other reasonably foreseeable loss or damage. You are also entitled to have the goods repaired or replaced if the goods fail to be of acceptable quality and the failure does not amount to a major failure.
3
YEAR IN HOME WARRANTY
General Safety Instructions
IMPORTANT SAFETY INSTRUCTIONS
READ CAREFULLY AND KEEP FOR FUTURE REFERENCE
Read this manual thoroughly before first use, the safety precautions enclosed herein reduce the risk of fire, electric shock and injury when correctly adhered to. Keep the manual in a safe place for future reference, along with the completed warranty card and purchase receipt. If applicable, pass these instructions on to the next owner.
Always follow basic safety precautions and accident prevention measures when using an electrical appliance, including the following:
Electrical safety and cord handling
- Voltage: Make sure your outlet voltage and circuit frequency correspond to the voltage indicated on the appliance rating label and your outlet socket is properly earthed. If this is not the case, do not use the dryer.
- Separate circuit: We strongly recommend you connect the appliance to a separate circuit serving only this appliance. This provides the best performance and prevents overloading the house wiring circuits that could cause a fire hazard from overheating.
• Electrical hazard: Do not insert any objects into the appliance. - No extension cord: Do not use this appliance with a power adaptor or extension cord. CAUTION: If such a device must be used, the cord or outlet device must be positioned so that it is not subject to splashing or ingress of moisture.
- Protect the power cord. Do not kink or damage the power cord. Position the cord out of the way so no one steps on or places anything on the cord or against it. Do not run the cord under floor coverings. Arrange the cord away from traffic areas where it will not become a trip hazard.
- Winding the cord: If winding the power cord, avoid tight bends as this could damage the cord.
- Damage: Do not operate the appliance after it malfunctions or has been dropped or damaged. In case of damage, contact our after sales support centre for advice.
- Damaged cord: If the power supply cord is damaged, do not attempt to change it yourself. A damaged cord or plug must be replaced by the manufacturer or a qualified person in order to avoid a hazard.
- Disconnect: Unplug the clothes dryer from the power supply after use, before cleaning, servicing or moving the appliance. To disconnect, turn the appliance off, switch off the power outlet and remove the plug from the power outlet. Grip the plug when disconnecting; do not pull on the cord. After disconnection, wait at least two minutes before turning the appliance back on again.
- RCD: Unless your home is already fitted with a residual current device (safety switch), we recommend installing an RCD with a rated residual operating current not exceeding 30 mA to provide additional safety protection when using electrical appliances. See your electrician for professional advice.
General Safety Instructions (Cont.)
Usage conditions and restrictions
- Domestic use only: This appliance is intended for household use only. It is not suitable for commercial, industrial or trade use. Do not use it for anything other than its intended purpose (drying domestic quantities of washing), and only use it as described in this manual.
- Indoor use only: Do not use the appliance outdoors.
- Usage restriction: The appliance is not intended for use by persons (including children) with reduced physical, sensory or mental capabilities, or lack of experience and knowledge, unless they have been given supervision or instruction concerning use of the appliance by a person responsible for their safety.
• Children: Supervise children to ensure they do not play with the dryer. Close supervision is necessary when any appliance is used by or near children.
- Installation requirements: Do not install the appliance in a tight fitting cabinet. Do not install it near heat sources such as radiators, heaters, air ducts or direct sunlight. Place the clothes dryer on a flat, firm, dry and stable floor in a well ventilated area. Do not place it on any soft material such as foam or plastic.
- Ventilation: The dryer has ventilation openings in the base. Ensure that vents are not blocked or covered by newspapers, tablecloths, curtains, carpet, etc.
- Before use: Make sure to remove transport packaging at the rear of the dryer. WARNING: Before loading the dryer, always ensure no pet or young child has climbed into it. Do not overload the clothes dryer.
- Suitability for tumble drying: Only load suitable items into the clothes dryer. See the box on the opposite page for which items and materials are unsuitable for the clothes dryer and may present a fire risk.
- Preparation: Make sure all pockets of clothing to be dried are empty. Hard, sharp objects such as coins, safety pins, bra wires, nails, screws, lighters or matches must be removed as they can cause extensive damage to the dryer.
WARNING: Any damage or malfunction resulting from foreign objects is not covered by your warranty and may lead to expensive repairs.
- No open flames: Do not place open flame sources such as candles on the dryer.
- Hot surface: Parts of the appliance may be hot after a long drying cycle. Always ensure children are kept away from the machine. Do not store plastic, paper or clothing that may burn or melt on top of the dryer during operation.
- Cool down: The final part of a clothes dryer cycle occurs without heat (cool down cycle) to ensure that the items are left at a temperature that will not damage them. WARNING: Never stop the clothes dryer before the end of the drying cycle unless all items are removed quickly and spread out so the heat is dissipated.
- Subsequent cycles: After turning off the power supply to the clothes dryer, wait at least two minutes before turning it back on again.
- Lint filter: WARNING! The lint filter must be in place when drying. It must be cleaned before or after each use.
General Safety Instructions (Cont.)
- Service/repair: Except for the filters that require cleaning, this appliance contains no user-serviceable parts inside. Do not attempt to open, disassemble or repair it yourself; only have it serviced by qualified personnel, call our after sales support centre. The appliance should not be tilted or turned sideways during use or maintenance.
- WARNING: This appliance must not be supplied through an external switching device, such as a timer, or connected to a circuit that is regularly switched on and off by a utility.
- CAUTION: Do not overload the dryer: the maximum amount of dry textile material that can be dried in one load is 8.0 kg.
- Misuse: Improper use or installation may result in the risk of fire, electric shock and/or injury. We accept no liability for any eventual damages or injury caused by improper use or handling, or by any other noncompliance with the instructions in this manual.
CAUTION!
The items listed below are UNSUITABLE for clothes drying. They can cause fire in the dryer or extensive damage. DO NOT place them in the clothes dryer.
☒ Items containing foam rubber (also known as latex foam) or similarly textured rubber-like materials — when heated, these materials can spontaneously combust and cause a fire.
☒ Items that have been spotted or soaked with cooking oil, or with highly flammable substances — these substances constitute a fire hazard. Highly flammable substances used in domestic environments include acetone, alcohol, petrol, kerosene, some stain removers, dry-cleaning solvents, turpentine, waxes, wax removers and some hair care products. (This also includes items that have previously been cleaned or spotted with dry-cleaning solvents or other flammable or explosive substances.)
If it is unavoidable that fabrics that contain vegetable or cooking oil, or that have been contaminated by hair care products, be placed in a tumble dryer, they should first be washed in hot water with extra detergent — this will reduce, but not eliminate, the hazard. The ‘cool down’ cycle of a clothes dryer should be used to reduce the temperature of the items. They should not be removed from the clothes dryer or piled or stacked while hot.
Undergarments that contain metal reinforcements (such as underwire bras), which can come loose during drying and damage the clothes dryer.
☒ Plastic articles such as shower caps or waterproof baby bibs.
Rubber-backed articles, clothes fitted with foam rubber pads, pillows, galoshes and rubber coated tennis shoes.
Fabric softeners or similar products, unless specifically recommended by the product manufacturer for use in a clothes dryer to eliminate the effects of static electricity.
General Safety Instructions (Cont.)
CAUTION!
- Do not use the tumble dryer if industrial chemicals have been used for cleaning.
- Do not dry unwashed items in the tumble dryer.
- Do not allow lint to accumulate around the tumble dryer. Clean the filter after every use.
- Adequate ventilation has to be provided to avoid the backflow of gases into the room from appliances burning other fuels, including open fires.
- Do not hang clothes or put weight on the dryer door while it is open.

This symbol alerts you to take care as oil-affected items can ignite spontaneously, especially when exposed to heat, such as in a clothes dryer. The items become warm, causing an oxidation reaction in the oil. Oxidation creates heat. If the heat cannot escape, the items can become hot enough to catch fire. Piling, stacking or storing oil-affected items can prevent heat from escaping and so create a fire hazard.

CAUTION: HOT SURFACES!
Parts of the appliance can become hot during use and retain heat for some time after turning off. Do not touch hot surfaces!
To avoid scalding and creating a fire risk, do not stop the dryer before the end of the drying cycle, as parts of it may get hot during use. If you must remove items during the drying cycle, open the door, remove them quickly, and spread them out so that the heat is dissipated.
The door window may be hot after a long drying cycle. Please ensure children are kept away from the machine.
Do not use any combustible substances (for example, spray cans) close to the dryer while it is in operation. If gas has escaped from the can, do not touch the plug or start/pause the appliance.
Important safety advice regarding installation
• Install the dryer in a dry, well ventilated area, away from heat and direct sunlight.
• Do NOT install the appliance:
☑ Behind a lockable door, sliding door or a door with a hinge on the opposite side of the dryer, in such a way that a full opening of the tumble dryer door is restricted.
In a tight fitting cabinet
☒ In an area where it will be exposed to water or weather, which could cause permanent damage
☒ In an area where gas or flammable substances are used
Directly on top of a washing machine.
- All electrical connections must be made by qualified personnel and all instructions in this manual as well as local safety regulations are observed.
- Exhaust air must not be discharged into a flue which is used for exhausting fumes from appliances burning gas or other fuels.
Unpacking
Unpacking the clothes dryer
CAUTION: EXTREMELY HEAVY!
A team lift or mechanical aid is required when moving this appliance. Keep the appliance as upright as possible during transportation.
- This product has been packaged to protect it against transportation damage. Remove all packaging materials from around the appliance and inside the drum, including the foam base.
- Keep the original packaging carton and materials in a safe place. It will help prevent any damage if the product needs to be transported in the future, and you can use it to store the appliance when it is not in use. In the event that the packaging materials are to be disposed of, please recycle them where possible.
- Plastic wrapping can be a suffocation hazard for babies and young children, so ensure all packaging materials are out of their reach and disposed of safely.
- Remove any tapes securing the power supply cord and vent hose and all accessory parts from the drum.
Checking the package contents
- Check all parts of the package against the scope of delivery list on the following pages and ensure you have received all items.
- Check the clothes dryer for any damage from transportation. Unwind the power cord to its full length and inspect it for damage. Do not use the appliance if the appliance or its cord has been damaged or is not working properly. In case of damage, or if anything is missing, please contact our after sales support centre for advice on examination, repair or return of the damaged product.
- Read this manual to familiarise yourself with all the parts and operating principles of the machine. Pay particular attention to the safety instructions on the previous pages.
CAUTION!
Do not overload the dryer: The maximum amount of dry textile material that can be dried in one load is 8.0 kg.
Do not hang clothes or put weight on the dryer door while it is open.
WARNING
Fill steam generators only with liquids specified by the manufacturer.
Product Overview
Scope of delivery

Clothes dryer
1 Control panel
2 Viewing window
3 Front housing
4 Lint filter (inside door)
5 Door lock (inside)
6 Tumbling drum (inside)
7 Vent
NOTE: Due to continued product improvement, images and illustrations in this manual may vary slightly from the product purchased. All images in this manual are for reference purposes only. Parts are not necessarily pictured to scale.
Product Overview (Cont.)
Scope of delivery (cont.)
Rear view
8 Thermostat reset button
Documentation (not shown)
Quick Start Guide
Instruction Manual
Warranty Certificate

Installation
Freestanding, floor level installation
- Make sure the floor surface is firm, flat, dry and stable, and there is an appropriate wall outlet nearby. Do not place the appliance on soft material such as foam, plastic or carpet, as this may block the air intake.
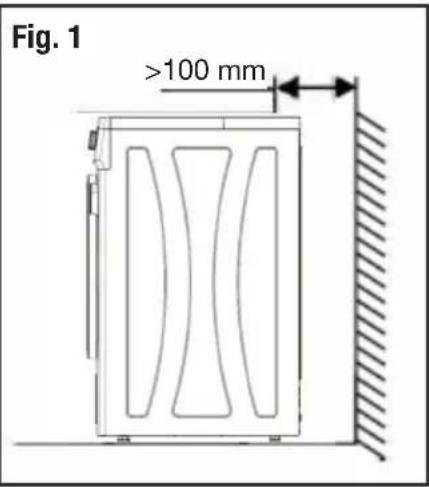
- Carefully stand the dryer upright and slide it into position, leaving a space of at least 100 mm between the dryer and any wall (Fig. 1).
- If placed in a room such as a bathroom, make sure the room is well ventilated. Also ensure there are no obstacles that obstruct the door of the dryer.
Levelling the machine
WARNING!
It is very important to level the dryer carefully, especially if your floor is uneven. Failure to do so may result in the machine shaking and moving, or out-of-balance problems.
Place the machine on solid, dry and level ground. The machine must stand perfectly level on all four feet to ensure safe and proper operation. Incorrect installation may cause vibrations and noise and may cause the machine to move about.
To determine whether levelling is necessary, place a spirit level on top of the dryer and hold it upright against the housing to identify any inclinations. If the machine needs levelling, proceed as follows (Fig. 2):
- Loosen the nut with a spanner, turning it anticlockwise to loosen.
- Adjust the foot by hand until it makes close contact with the floor. Turn it clockwise to lower the foot or anti-clockwise to raise it.

Installation (Cont.)
Ventilation
Whilst drying, the tumble dryer is expected to vent a large amount of warm, moist air, which should be removed from the room as quickly as possible to prevent condensation. Place the dryer in an extremely well-ventilated room, or close to an open window, to allow the moist air to exit freely.
WARNING!
The hot air emitted from the tumble dryer can reach temperatures of up to 60^ C. The appliance must not be installed on floors — or placed near surfaces — that are not resistant to high temperatures.
Electrical connection
This is a Class I electrical product, which has a power cord and plug with three pins, including an earth pin.
- Once the clothes dryer is properly installed, plug the electrical cord into an appropriately earthed three-pin wall socket, switch on the power at the socket and try the machine according to the instructions below.
First Use
In order to remove any dust and grease, which may be in the drum from the manufacture and transportation process, we recommend you run the dryer with some clean, damp rags before using it for the first time with your laundry.
- Remove the polystyrene block and any materials from the drum.
- Make sure the dryer is properly connected and power is switched on at the outlet.
- Put some clean, damp rags into the drum.
- Select the “Standard” then by pressing the “Timing” button, chose 30 minutes.
- Press the START/PAUSE button and let the program run to the end.
- Remove the rags and clean the lint filter (see page 22).
WARNING! This appliance must be earthed.
In the event of a malfunction or breakdown, earthing will reduce the risk of an electric shock by providing a path of least resistance for the electric current.
This appliance is equipped with a cord having an equipment-earthing conductor and an earthing plug. The plug must be plugged into an appropriate outlet that is installed and earthed in accordance with all local standards and requirements.
Do not modify the plug under any circumstances. If the plug does not fit your outlet, consult a licensed electrician and have the outlet changed.
Installation (Cont.)
CAUTION!
Make sure you read all safety precautions in this manual and are aware of the items (listed on page 7) that may NOT be placed in a clothes dryer as they cause a hazard.
Preparing the load
- Prior to loading the dryer, check that none of the items have the following symbols on them, which indicate that items are UNSUITABLE for clothes drying (Fig. 3).
Fig. 3

Dry flat

Dry in the shade
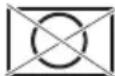
Do not tumble dry

Hang to dry

Drip dry
- The clothes dryer is intended only for drying textile material that has been washed in water and well spin-dried. Dripping water may cause an electrical hazard. Thoroughly spin the laundry in your washing machine on a high spin speed, which can reduce the drying time and save energy consumption.
- As the dryer heat may permanently set stains, ensure you check prior to drying.
- For uniform drying results, sort the laundry according to fabric type and drying program. Separate dark and light coloured items as you would do when washing.
- Ensure that the items to be dried do not have combustible materials or foreign objects (such as lighters, hair pins, coins) inside pockets.
- Turn items with zippers inside out, close zippers, hooks and eyelets, fasten buckles and tie fabric belts. This will also help reduce impact noise when the items hit against the turning drum.
Loading the dryer
• Make sure the lint filter is clean and properly in place. It must be cleaned regularly.
- To avoid items getting tangled up in the dryer, which results in uneven drying, we recommend placing items into the dryer one at a time.
- Place small, delicate items in a mesh bag, but do not add too many to one bag. (It is not recommended to dry underwire bras in a clothes dryer.)
- When drying delicate items or a very small load (<1.5 kg), add a few lint-free cloths to aid even drying.
- When drying large items such as blankets or sheets, include a few small items to help balance the load. You may also need to open the dryer door and shake out the item from time to time, then place it back in the drum to ensure even drying.
- When closing the dryer door prior to starting the unit, ensure that items are not jammed in the door.
• To avoid creasing or static cling, do not over-dry your clothes.
Instructions
- CAUTION: Do not overload the dryer: the maximum amount of dry textile material that can be dried in one load is 8.0 ~kg (see the table below for some reference weights). Keep in mind, though, that drying requires space for the clothes to circulate. So for faster results, we recommend you only add fill the dryer to half to two-thirds of its capacity.
Reference weights of dry textiles (Fig. 4)
Fig. 4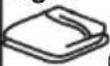 | Single bedsheet (about 600 g cotton) |  | Jeans (about 800 g) |  | Sleepwear (about 200 g) |  | Long sleeve shirt (about 300 g cotton) |
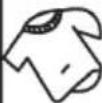 | Short sleeve shirt (about 180 g cotton) |  | Short pants (about 70 g cotton) |  | Socks (about 50 g mixed-weave) |  | Jacket (about 800 g cotton) |
Instructions (Cont.)

Step-by-step guide to using the dryer
- Program: Decide on a program according to the texture and weight of your drying load (please refer to the table on page 18 for details about the drying programs). If the "Start/Pause" button is not selected after 1 minute, the machine will go in to a sleep state. Turn the knob again to reselct program.
- Time: Press this button to select 30, 50, 70 or 90 minute drying time.
- Anti-Crease: When Anti-Crease is selected, at the end of the drying cycle, the drum will periodically spin to stop the clothing from wrinkling.
- Start/Pause: Once your settings have been configured, press the "Start/Pause" button to begin the cycle. Pause at any time by pressing this button again.
- Filter: When this icon illuminates, it's time to clean the lint filter. This should be done at the end of each use, or before starting the next use.
- Anti-Crease: This icon will illuminate when the Anti-Crease function has been selected.
- Child Lock: The child lock icon will illuminate when the lock has been set. Press and hold the anti-crease and time buttons to activate or deactivate.
Instructions (Cont.)
Program Options
Automatically Controlled Drying
This appliance can automatically detect the moisture in the load, and adjust the drying time for optimal drying. Simply select the program according to the textiles being dried.
Time Controlled Drying
To operate time controlled drying, turn the dial to the most suitable program for your clothing type, then press the time button to override time to 30, 50, 70 or 90 minutes of drying.
Child Lock
Press and hold the Time and Anti-Crease buttons for 2 seconds to activate the child lock. To turn off the child lock, repeat the same process.
Anti-Crease
When selected, the anti-crease program will operate for 10 minutes after the end of the drying cycle. The machine will cycle for 10 seconds, each minute, up to 10 minutes.
Reverse Tumble Action
This is exclusive to the Cotton Standard program. Stage 1 of the Cotton Standard program runs for 130 mins, if your clothes are still wet the program will automatically enter stage 2 where the reverse tumble action starts. During this stage, it will rotate in one direction for around 8 minutes, followed by a brief pause of approximately 3 seconds, then switch direction for another 8 minutes. This cycle repeats, with each direction change preceded by a short pause of approximately 3 seconds. This stage of the program should run until your clothes are dry.
Instructions (Cont.)
Drying programs
| Program | Default Drying Time (min) | Type of Textiles |
| Cotton Quick 100 | Suitable for a small load of everyday clothing and other items made of cotton fabric. | |
| Cotton Standard (A) 130 | Everyday clothing and other items made of cotton fabric. | |
| Cotton Super Dry 140 | Everyday clothing and other items made of cotton fabric. This setting will ensure a more thorough dry. | |
| Synthetic Standard 65 | Everyday clothing and other items made of mixed/blended fabrics. | |
| Synthetic Super Dry 70 | Everyday clothing and other items made of mixed/blended fabrics. This setting will ensure a more thorough dry. | |
| Special Baby Care 60 | Baby clothes | |
| Special Heavy 160 | Larger, bulkier items (bedsheets, quilt covers, etc.) | |
| Special Denim 70 | Denim jeans or leisure clothes that have been spun at high speed in the washing machine | |
| Special Underwear * 60 | Underwear | |
| Special Delicate 110 | Suits clothing that require a more delicate dry. | |
| Special Intensive 130 | This setting will achieve a much higher heat, which will kill off mites and other nasties. |
NOTES:
* Undergarments that contain metal reinforcements (such as underwire bras) are unsuitable for clothes drying, as these metal pieces can come loose during drying and damage the appliance.
(A) This program was used for energy efficiency testing to the standard. It is the most suitable program for drying a normal cotton load at the rated load capacity. This mode allows for the reverse tumble action
Instructions (Cont.)
At the end of the program
- At the end of each program, the appliance enters a cool-down phase during which cold air is circulated around the drum. This will ensure items are left at a temperature that will not damage them.
- A buzzer sounds (6 beeps) and the work END will show on the display at the end of the program to remind you to unload the dryer. After 3 minutes, the machine will enter sleep mode.
- If the laundry is not removed at the end of the cycle, the dryer performs an anti-creasing phase for a maximum of 10 minutes when this option is selected.
- If you do not remove the laundry, the dryer will stop automatically at the end of the anti-creasing phase, and enter standby mode. The display light "Filter" will light up, as a reminder to clean the lint filter.
- Once the laundry has been removed, set the program selector dial to "OFF" to switch off the machine.
• Unplug the machine after each use.
Resetting the thermostat
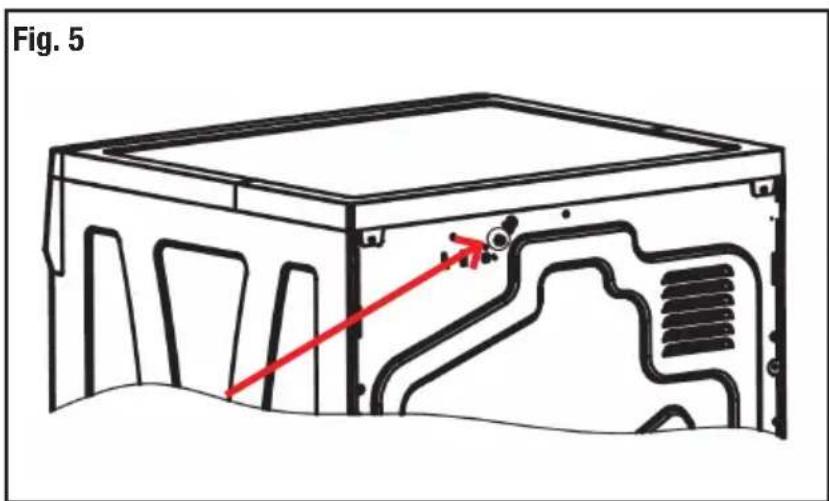
When the dryer does not heat, try resetting the unit by pressing the RESET button at the back of the unit (Fig. 5). This will activate the thermostat in order to reheat the element.
FAQs and Troubleshooting Guide
Troubleshooting guide
If your clothes dryer has a fault, is not working properly, or you think it should work better, please use the list below to identify and solve any problems.
If you cannot solve the problem, switch off the dryer and unplug it from the power supply. Then contact our after sales support centre for advice. Do not attempt to dismantle or repair the dryer yourself.
| Problem Possible cause Solution | ||
| The dryer does not start. | Is the power plug inserted firmly?Is the door closed?Is the power switched on at the wall socket?Have you pressed the POWER and START/PAUSE buttons? | Insert the power plug firmly.Close the door securely.Switch on power at the wall socket.Press the POWER and START/ PAUSE button. |
| Dryer does not heat. | The thermostat needs to be reset. | Press the reset button at the back of the appliance. |
| Dryer emits excessive heat. | The lint filter requires cleaning.The air intake or outlet passage is obstructed. | Clean the lint filter.Check and ensure that both the air intake and outlet passage is free of obstructions. |
| Clothes shrink. | Are the clothes are unsuitable for drying in the clothes dryer?Have the clothes been dried at too high heat? | Check the clothes labels and hang dry, if recommended.If the clothes may be tumble dried, choose a lower drying temperature more suitable for the fabric. |
| The washing is not thoroughly dried. | Is the filter clogged?Is the air inlet dirty?Was an inappropriate program chosen?Is there too much washing in the dryer?Has the washing been twisted while drying? | Check and clean the lint filter.Check and clean the air inlet.Choose a program with a higher drying intensity.Reduce the amount of washing in the dryer.Untwist the items and dry them for a little longer. |
| Lint balls on clothing. | Synthetic fibres rubbing against each other may cause lint. | Try using fabric softener to overcome this problem. |
| There are some strange noises. | Heavy, wet clothes tumbling in the drum can cause bumping noises when the drum is turning. | These noises are normal. Make sure your drying load is properly spin dried to limit the noises. |
FAQs and Troubleshooting Guide (Cont.)
| Problem Possible cause Solution | ||
| Drying process stops soon after starting; the “End” light is illuminated. | Is there not enough laundry in the dryer?Is the washing too dry for the selected program? | Wait until a fuller load can be added to the dryer.Select a higher drying level. |
| Drying takes an unusually long time. | Is there too much laundry in the dryer? | Reduce the load volume. |
| Display shows DOP. | Door is open.Door lock failure, | Shut the door.Contact customer service for repair. |
| E1 - Abnormal Temperature. | Wiring terminal is not plugged in or wiring harness is faulty.Computer board failure.Temperature sensor failure. | Contact customer service to arrange a repair. |
| E2 - Heating Wire Failure | Wiring terminal is not plugged in or wiring harness is faulty.Computer board failure.Heating wire failure. | Contact customer service to arrange a repair. |
Overheat protection
The dryer has a safety cut-out switch, which shuts down the power supply to the unit if the temperature inside the unit is too high. Should you notice that this has happened, proceed as follows:
- Switch off and unplug the dryer and let it cool down for 10 minutes.
- Check and ensure that the filter is clean and that nothing is obstructing the air inlet and ventilation grilles (see “Prevent overheating”, below).
- Plug in the dryer, switch it on and restart it.
If the dryer still does not work properly, or the problem occurs repeatedly, please contact our after sales support centre, or a qualified service technician.
Prevent overheating
- The most common reason for the dryer to overheat is a blocked lint filter. Check the filter and ensure nothing is blocking it – for example, a lightweight item such as a handkerchief might have been sucked over the filter. Clean the filter after each drying load. Cleaning instructions follow on the next page.
- Also ensure that the air intake filter and any ventilation openings are clean and free of obstructions. Use a cloth, soft brush or the brush attachment of a vacuum cleaner to clean the openings.
- Other reasons for the dryer to overheat include poor ventilation in the laundry – make sure you have a window or door open when you are using the clothes dryer.
Other Useful Information
Cleaning and maintenance
Keeping your clothes dryer in good, clean condition will prolong its service life.
WARNING!
- Before cleaning or maintaining any part of the dryer, make sure it has cooled down and is unplugged from the power supply.
- The lint filter must be in place when drying. It must be cleaned before/after each use.
Accumulated dust, fibres and lint will affect the air circulation inside the dryer and cause longer drying times. To ensure proper and efficient operation of the dryer, make sure to clean the lint filter and the inside of the drum after each use.
Cleaning the lint filter
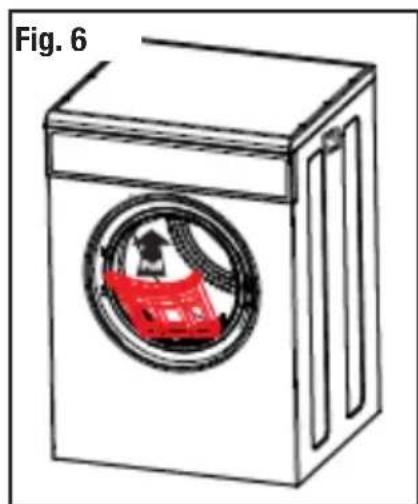
- The lint filter is located in the door opening (Fig. 6). To remove the filter, grip it by its sides and gently pull it off the door opening.
- Wipe the filter down with a damp cloth or soft brush.
- Wait until the filter has dried completely before refitting it into the door opening. Position the filter in its space and press firmly until it clicks into place.
natural_image
Line drawing of a washing machine with a red plastic bag inside, labeled 'Fig. 6' (no text on the device itself)Other Useful Information (Cont.)
Cleaning the cabinet and drum
- Use a soft, dry or damp cloth to wipe the dryer cabinet and/or the drum.
- If using a damp cloth, make sure it is not too wet. Leave the appliance door open after cleaning to ensure the drum can air-dry completely.
- Do not use any type of spray cleaner when cleaning the interior. If the dryer drum becomes stained, clean the drum with a damp cloth. If cleaning the drum has left any residue on the drum, make sure to remove it before drying the next load of washing.
- Use a dry cloth or soft brush, or the soft brush attachment of a vacuum cleaner, to clean the areas around the air outlet at the back/side of the appliance and the air intake grille at the base. It is important that they are kept clean and free from lint, dust and dirt. Any obstructions around the openings might reduce the airflow, and/or lead to overheating of the appliance.
WARNING!
- Never wash the exterior or interior of the appliance directly with water.
- Do not use solvents, thinner, alcohol based or harsh or abrasive cleaners on any of the dryer surfaces.
Storage
If you are not going to use the appliance for an extended period of time, unplug it and store it upright in the original packaging to protect it from dust. Store the unit in a dry place, out of children's reach.
Service, repair and spare parts
If the appliance is damaged, do not attempt to repair it yourself. Contact our after sales support centre to arrange for examination or repair of the product. Our after sales support centre stocks spare feet and filter front and back covers for the appliance. To purchase a part, call the centre on 1300 886 649 or contact us online via tempo.org/support.
This page has been left blank intentionally
This page has been left blank intentionally
Other Useful Information (Cont.)
Technical specifications
| Product 8 kg Vented Dryer | |
| Model Number STR-VD8W | |
| Rated capacity 8 kg | |
| Voltage & Frequency 220-240 V~ 50 Hz | |
| Rated Power 2000 W | |
| Ingress Protection IPX4 | |
| Dimensions (approx.) 598 (W) x 555 (D) x 845 (H) mm | |
| Net Weight (approx.) 28 kg | |
Compliance
This product has been fully tested and meets all requirements as set out by standards AS/NZS 60335.1 and AS/NZS 60335.2.11.

The RCM Mark (Regulatory Compliance Mark) indicates that the product complies with the relevant guidelines of the ACMA as well as corresponding government requirements for the safety of electrical devices.
Responsible disposal


Packaging materials are recyclable. Please dispose of them responsibly for recycling.
At the end of its working life, do not throw this appliance out with your household waste. Electrical and electronic products contain substances that can have a detrimental effect on the environment and human health if disposed of inappropriately. Observe any local regulations regarding the disposal of electrical consumer goods and dispose of it appropriately for recycling.
Contact your local authorities for advice on recycling facilities in your area. Or find recycling scheme services listed on Planet Ark's website at www.recyclingnearyou.com.au, or call Planet Ark on 1300 733 712.


STIRLING®
8 kg Vented Dryer
Repair and Refurbished Goods or Parts Notice
Unfortunately, from time to time, faulty products are manufactured which need to be returned to the supplier for repair.
Please be aware that if your product is capable of retaining user-generated data (such as files stored on a computer hard drive, telephone numbers stored on a mobile telephone, songs stored on a portable media player, games saved on a games console or files stored on a USB memory stick) during the process of repair, some or all of your stored data may be lost. We recommend you save this data elsewhere prior to sending the product for repair.
You should also be aware that rather than repairing goods, we may replace them with refurbished goods of the same type or use refurbished parts in the repair process.
Please be assured though, refurbished parts or replacements are only used where they meet ALDI's stringent quality specifications.
If at any time you feel your repair is being handled unsatisfactorily, you may escalate your complaint. Please telephone us on 1300 112 534 or write to us at:
Tempo (Aust) Pty Ltd (ABN 70 106 100 252)
PO BOX 132, Frenchs Forest NSW 1640, Australia
Web Support: tempo.org/support
Tempo Help Desk: 1300 112 534 (Aust)
(Operating Hours: Mon-Sat 09:00 am to 06:00 pm AEST)


natural_image
Icon showing a person reading a document with an exclamation mark symbol (no text or numbers present)Please read the manual
It will help you get the best out of your product.
Still have questions?
Call after sales support 1300 112 534
Or visit www.tempo.org
Warranty returns
Should you for any reason need to return this product for a warranty claim, make sure to include all accessories with the product.
Product does not work?
If you encounter problems with this product, or if it fails to perform to your expectations, make sure to contact our After Sales Support Centre on 1300 112 534.
For an electronic copy of this manual, please contact our after sales support centre.
Instruction Manual Revision Index
Version No Issue Date Description
V1.0 28 December 2023 Original (2024) release
V1.1 14 March 2024 Minor updates
V1.2 20 March 2024 Minor update
V1.3 05 June 2024 Minor update


- STIRLING®
- Welcome
- Contents
- Warranty Details
- General Safety Instructions
- IMPORTANT SAFETY INSTRUCTIONS
- READ CAREFULLY AND KEEP FOR FUTURE REFERENCE
- Electrical safety and cord handling
- General Safety Instructions (Cont.)
- Usage conditions and restrictions
- CAUTION!
- CAUTION: HOT SURFACES!
- Important safety advice regarding installation
- Unpacking
- Unpacking the clothes dryer
- CAUTION: EXTREMELY HEAVY!
- Checking the package contents
- WARNING
- Product Overview
- Scope of delivery
- Clothes dryer
- Product Overview (Cont.)
- Rear view
- Documentation (not shown)
- Installation
- Freestanding, floor level installation
- Levelling the machine
- WARNING!
- Installation (Cont.)
- Ventilation
- Electrical connection
- First Use
- WARNING! This appliance must be earthed.
- Preparing the load
- Loading the dryer
- Instructions
- Reference weights of dry textiles (Fig. 4)
- Instructions (Cont.)
- Step-by-step guide to using the dryer
- Program Options
- Automatically Controlled Drying
- Time Controlled Drying
- Child Lock
- Anti-Crease
- Reverse Tumble Action
- NOTES:
- At the end of the program
- Resetting the thermostat
- FAQs and Troubleshooting Guide
- Troubleshooting guide
- FAQs and Troubleshooting Guide (Cont.)
- Overheat protection
- Prevent overheating
- Other Useful Information
- Cleaning and maintenance
- Cleaning the lint filter
- Other Useful Information (Cont.)
- Cleaning the cabinet and drum
- Storage
- Service, repair and spare parts
- Compliance
- Responsible disposal
- Repair and Refurbished Goods or Parts Notice
- Please read the manual
- Still have questions?
- Warranty returns
- Product does not work?
Brand : Stirling
Model : STR-VD8W
Category : Tumble dryer