
MHAT90S - Range hood MIDEA - Free user manual and instructions
Find the device manual for free MHAT90S MIDEA in PDF.


| Product Type | Range Hood (Cooker Hood) |
| Brand | Midea |
| Model | MHAT90S |
| Dimensions (L x W x H) | 896 x 534 x 692 mm |
| Net Weight | 29 kg |
| Material | Stainless Steel |
| Power Supply | 220-240 V ~ 50 Hz |
| Motor Power | 260 W |
| Rated Power | 1600 W |
| Lighting Power | 12 V = 1.5 W x 2 |
| Standby Power | ≤ 2.0 W |
| Maximum Airflow | 19 m³/min |
| Boost Airflow | 21 m³/min |
| Noise Level (Sound Power Level) | ≤ 55 dB(A) (SPL) / 69 dB(A) (APL) |
| Maximum Static Pressure | 380 Pa |
| Oil Separation Efficiency | ≥ 85% |
| Odor Reduction | ≥ 96% |
| Energy Efficiency Level | Level 1 |
| Duct Diameter | φ 190 mm |
| Number of Fans | Single |
| Control Type | Electronic touch controls with display |
| Special Functions | Steam washing, boost mode, timer, light adjustment |
| Installation Height (above gas stove) | At least 650 mm |
| Included Accessories | Exhaust pipe, check valve, decorative cover, oil cup, filters, installation kit |
Frequently Asked Questions - MHAT90S MIDEA
User questions about MHAT90S MIDEA
0 question about this device. Answer the ones you know or ask your own.
Ask a new question about this device
Download the instructions for your Range hood in PDF format for free! Find your manual MHAT90S - MIDEA and take your electronic device back in hand. On this page are published all the documents necessary for the use of your device. MHAT90S by MIDEA.
USER MANUAL MHAT90S MIDEA
natural_image
Exterior view of a stainless steel kitchen range hood with control buttons (no text or symbols visible)
SAVE THESE INSTRUCTIONS CAREFULLY
Read these instructions carefully before using your cooker hood, and keep it carefully. If you follow the instructions, your cooker hood will provide you with many years of good service.
Contents
Important information 2
Safety warning 2
Product structure schematic 3
The attachment list 3
Outline dimensions 4
Control panel and function comments 4
Precautions 5
Daily maintenance 6
Product parameters 8
The installation guide 9
Installation instructions 11
Electrical schematic diagram 12
Clean and maintain 12
- All packaging materials are environment-friendly and recyclable. Please dispose these packaging materials in an environmentally friendly manner so as to maintain a good environment.
- Please do not allow children to play with plastic film and packing boxes, which may cause asphyxiation. Please keep the children away from the packaging materials. The packaging materials are not children's toys.
- When the old smoking machine can no longer be used, it should be abandoned. Remove power cord plug and cut power cord.
- The old cooker hood contains reusable useful materials. Please assist in the proper handling or recycling of environmental protection.
- This product is for household use only. Please do not use it in special environment (e.g. outdoor); It must not be used to discharge hazardous or explosive materials or gases;
- The gas emitted from the cooker hood should not be discharged into the hot flue gas used to discharge the smoke from burning gas or other fuels.
- In order to ensure that you can use the smoke absorber correctly and safely, please read the instruction manual of the cooker you purchased at the same time.
- Please contact the local distributor or company's customer service department immediately if there is any obvious damage to the oil absorption machine.
- Only through professional training, and have qualified personnel, to installation and debugging and maintenance of the oil absorption, other staff without permission, shall not be carried out on the oil absorption without installation or dismantling machine maintenance, so as to avoid serious consequences.
- Please read this manual carefully before installation, and strictly follow this instruction to properly install and use. We are not responsible for any damage caused by improper installation or use.
Safety warning
- Prohibit the fire to directly bake the cooker hood.
- The room must be well ventilated when using a cooker hood in a well-sealed building.
- If it is not cleaned according to the instruction manual, there is a risk of fire.
- It is forbidden to modify this product, and the power cord shall not be replaced or modified by itself.
- If the power cord is damaged, it must be replaced by the manufacturer, its maintenance department or similar professional staff in order to avoid danger.
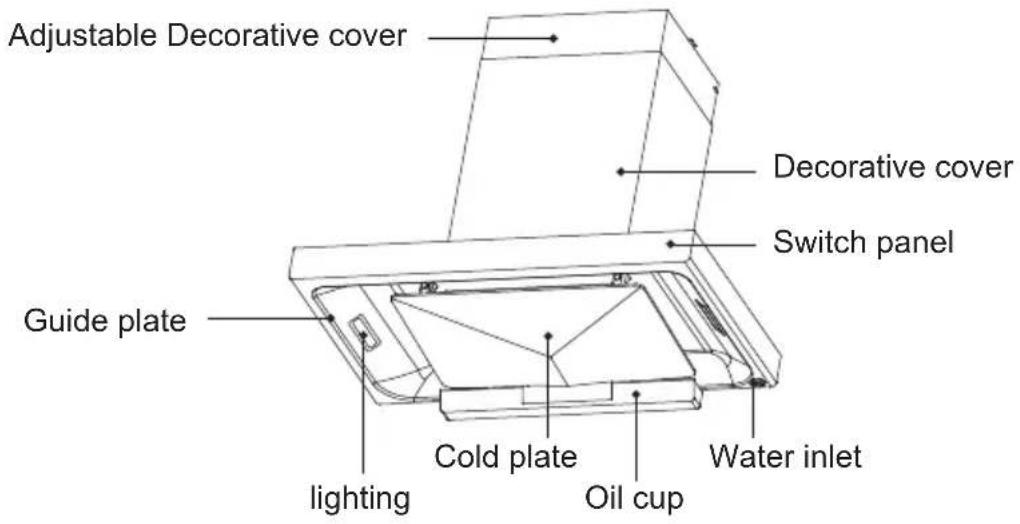
Product structure schematic
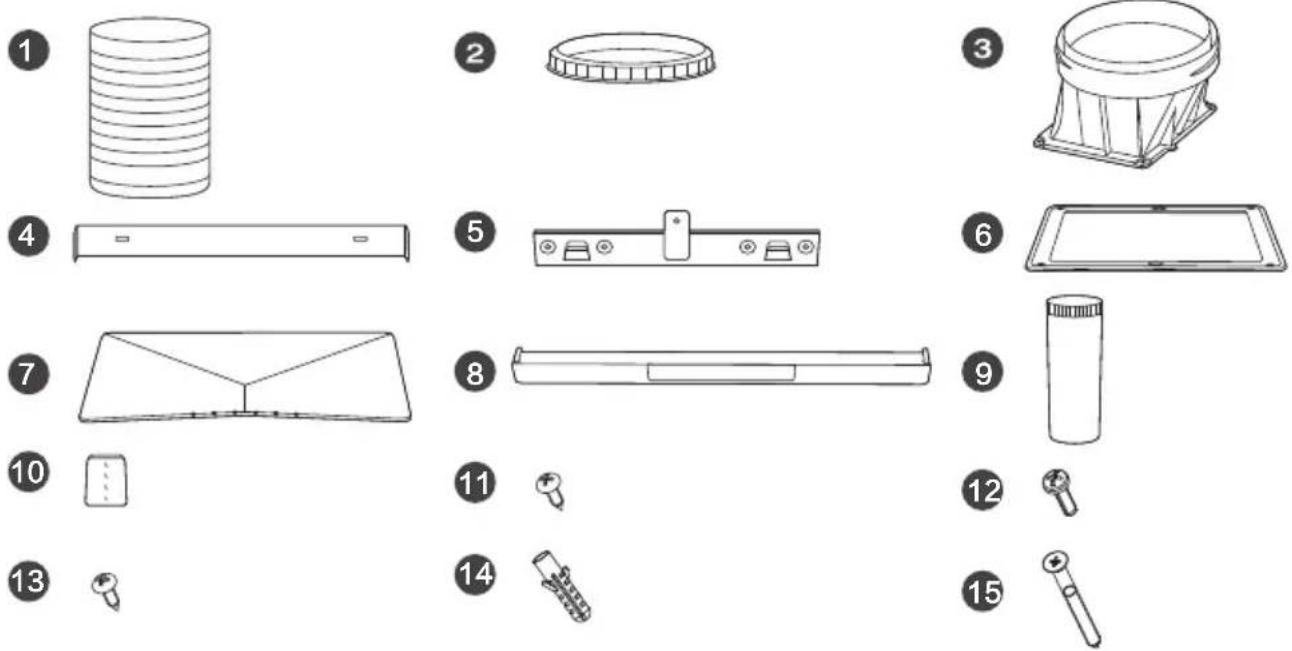
The attachment list
| Ref. | Qty. | Product Components |
| 1 | 1 | Exhaust pipe |
| 2 | 1 | Exhaust pipe fixed ring |
| 3 | 1 | Check valve |
| 4 | 1 | Decorative cover plate |
| 5 | 1 | Installatinon plate |
| 6 | 1 | Check valve sealing gasket |
| 7 | 1 | Cold plate |
| 8 | 1 | Oil cup |
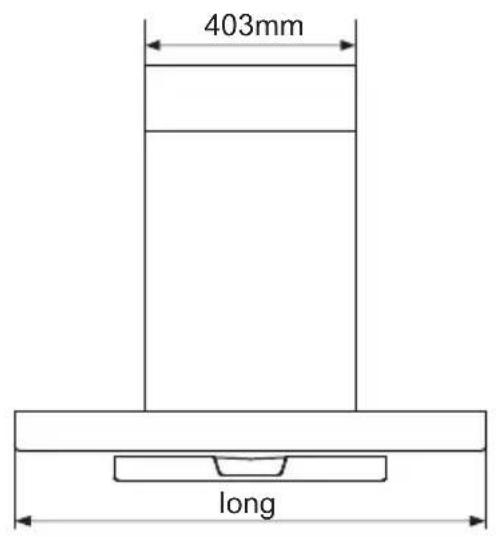
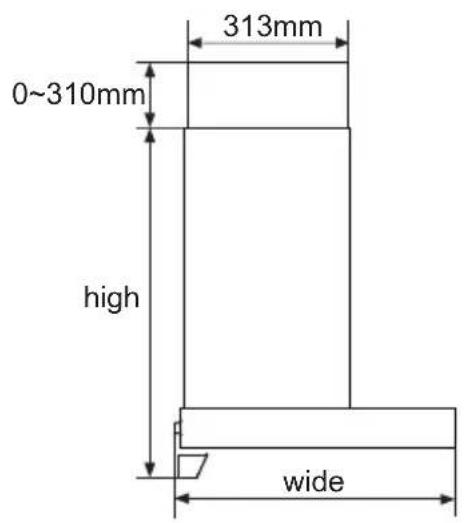
See page 8 specification for long and wide dimensions
Control panel and function comments
| It can be used after power supply | Short press:0.5 second | Long press:2~3 seconds | ||||
 |  |  |  |  |  |  |
 | Light | Short press:Turn on the light; Long press:Adjust the light. | ||||
 | Time | Short press time: Hour key flashing, Short press speed: adjust hour; Short press time: minute key flashing, Short press speed:adjust minute; Short press time:confirm save. | ||||
| [3TT6] | Time+power | Open/close clock show | ||||
 | Steam washing | Long press:Start; Long press and twice short press:Cancel the indicator light reminder. | ||||
 | Boost | Long press:Start; Long press and twice short press:Cancel the indicator light reminder. | ||||
 | Speed | Short press:Adjust speed(As clock flash,adjust clock). | ||||
 | Power | 1^st Short press:Startup(3 speed); 2^nd Short press:Delay 3 min; 3^rd Short press:OFF immediately. | ||||

When the indicator light is on for 3 hours, the indicator light will be lit.
After the indicator light is lit, the steam washing icon will flash 10 times
next time, reminding the user to clean the cigarette machine.
Precautions
- Please note that the power supply voltage and frequency should be consistent with the voltage and frequency required by the product.
- Please make sure that the oil cup has been properly installed.
- In the cooking process, please keep the kitchen environment well ventilated or open the cigarette smoking function.
- In the process of use, if abnormal conditions (abnormal noise, odor, smoke, fever), the power should be shut off immediately, unplug the plug.
- Do not plug the power cord with wet hand.
- Do not pull the power cord to pull out the power cord plug.
- If you do not use the cooker hood for a long time, please unplug the power cord.
- When the cooker hood is working, it is forbidden to put the hand into the fan operation area.
Daily maintenance
Surface cleaning
- Always clean the surface and screen of the cooker hood. Do not use clean ball, brush or coarse cloth to avoid scratching the surface of the machine.
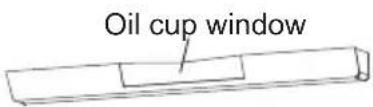
- When the oil cup window can be seen in the oil, please timely dump, otherwise it may spill out of the stove.
- Cleaning screen method: according to the removal guide of the condenser plate and the filter screen (see page 7), remove the condensation plate and filter screen, and put the filter net into the warm water with neutral detergent, and then use the soft brush to clean it.
Steam washing (machine internal cleaning)
1 Indicator light flashing The instructions require steam washing.
2 ① remove oil cup ② Pour out the product oil ③ Put back into the oil cup
3 Water cup is filled with pure water to live distilled water.
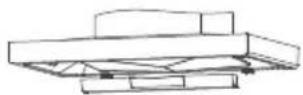

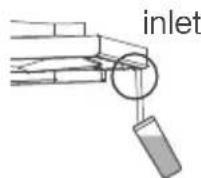
4 5 Insert the water cup aqueduct into the inlet.
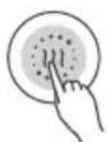
Long press the steam washing button to start the steam washing for 3 seconds.
6 12 minutes steam washing and 3 minutes air drying

washing drying
7 ① Remove oil cup ② Pour out the product water ③ Put back into the oil cup
Steam washing process
start → washing → drying → over
- Cancel the steam washing reminder (not washing):
Long press 3 seconds + short press twice 📄 to fast forward to the end. - Fast forward or end in advance (during washing):
Short press 📄 again to fast forward to the next step.

CAUTION
During steam washing, do not touch the surface of glass panels or deflector to avoid scalding.
Internal clean
Cleaning impeller and volute should be completed by professionals.
1 2 First, unplug the power plug, remove the machine and place it in a reliable position, remove the decorative cover and set screw.
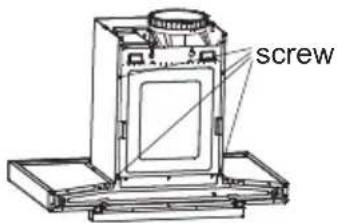
Remove the decorative cover
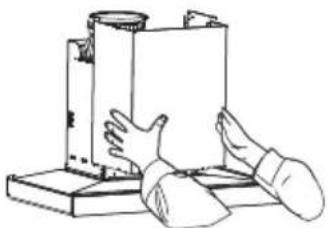
natural_image
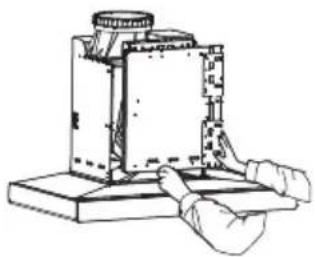
Line drawing of hands handling a large cylindrical object on a base (no text or symbols)3 Remove the screws on the frame cover and remove the frame cover.
natural_image
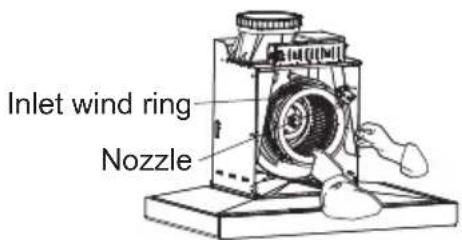
Line drawing of hands operating a mechanical device with no visible text or symbols4 Remove the screw from the volute and the nozzle, and remove the inlet wind ring.
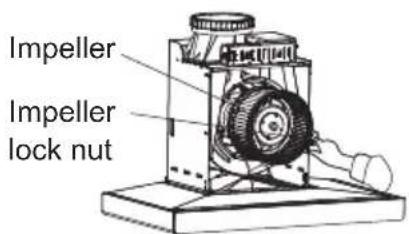
5 Turn the lock nut and remove the impeller in the direction of the motor shaft.
6 Clean the impeller and volute inside and outside with a soft brush with neutral detergent, and then install it in reverse order.
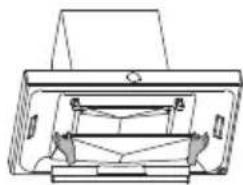
Guide for disassembly of condensates and filters
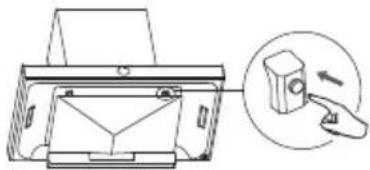
Remove the condenser plate to indicate
natural_image
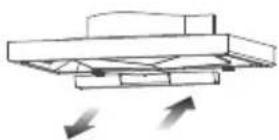
Technical line drawing of a printer with a magnified inset showing the base and handle (no text or symbols)- Hold the condenser with both hands, and press the left and right sides to open the condenser.

natural_image
Technical line drawing of a mechanical device with internal components (no text or symbols)- After the condenser is opened, hold the condenser with both hands and remove it horizontally.
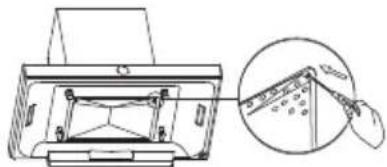
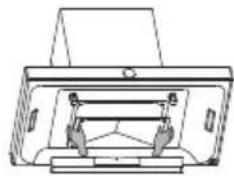
Remove the filter screen to indicate
natural_image
Technical line drawing of a printer with an inset showing a magnified view of the internal structure (no text or symbols)- Hold the mesh by hand, use the cross screwdriver to top the filter to the left and right sides of the filter, open the screen.

natural_image
Technical line drawing of a mechanical device with two hands operating a component (no text or symbols)- After the filter is opened, both hands shall be taken out of the filter screen along the horizontal direction.
Product parameters
| Voltage Noisea | 220-240V/50Hz | ≤55 /69dB (A) (SPL/APL)*Sound Power Level/Acoustc Power Level | |
| Diameter of air tube (mm) | φ190 | The level of energy efficiency | Level 1 |
| Motor power (W) | 260 | Turn off the power (W) | N/A |
| Maximum lighting power (W) | 12V=/1.5W×2 | Total pressure efficiency (%) | ≥23 |
| Rated power (W) | 1600 | Standby power (W) | ≤2.0 |
| The fan number | Single | Odor reduction (%) | ≥96 |
| Air flow | 19m3/min(Boost: 21 m3/min) | Oil separation (%) | ≥85 |
| 280 | Net weight (kg) | 29Wind pressure (Pa) | |
| Maximum static pressure (Pa) | 380 | Size (mm)Length × width × height | 896x534x692 |
- Noise: for the sound power level of A, the average sound pressure level noise is 55dB (A).
- Wind volume, maximum static pressure: the measured value and the express value should not exceed the value of -10%.
- Net weight: refers to the machine's own weight plus the installation and use of light accessories, including hanging board, check valve, exhaust pipe, screw, etc.
- Stir-fried function: when running function for a while, air volume for 20 ~m^3 / min .
The installation guide
1 To determine the location (unit: mm)
The range hood machine should be installed horizontally and above the cooker. The installation diagram is as follows:
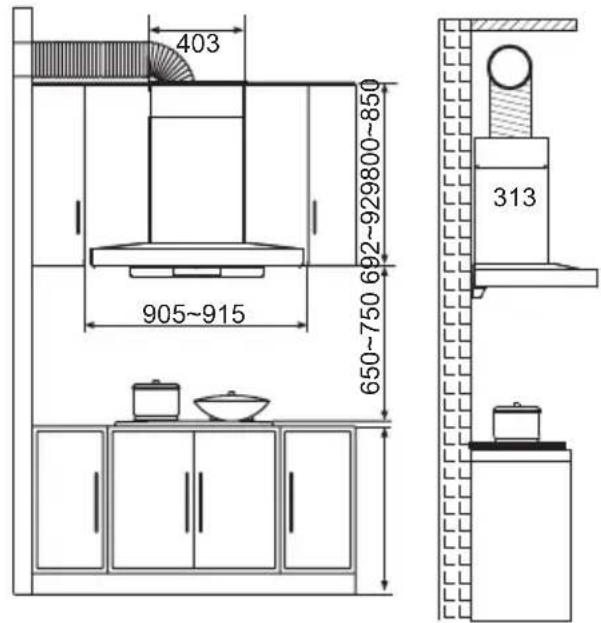
Schematic diagram of opening size of exhaust pipe at the ceiling
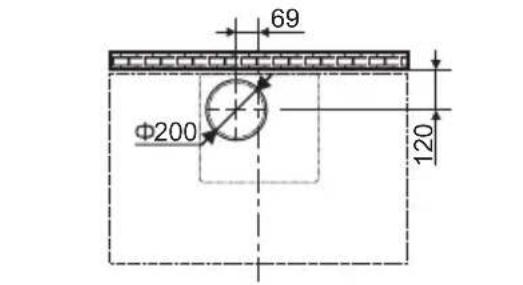
The center line of range hood machine
Exhaust pipe to the cabinet installation diagram
Installation precautions
• After installation of the cooker hood, the left and right level should be maintained.
- Should avoid excessive Windows and air convection in the vicinity of the cooker hood, otherwise it will affect the efficiency of the cooker hood.
• Exhaust pipe requirements.
- The exit of the exhaust pipe should not be too long.
2 The installation (unit: mm)
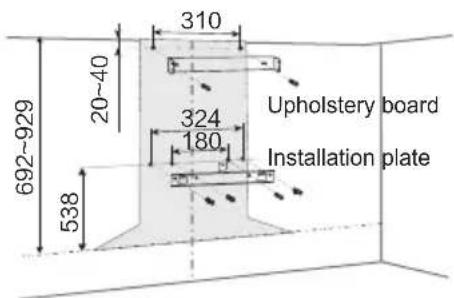
As shown in the picture on the right in the out of the wall of 4 to 8 mm diameter, depth of 50 \~ 60 mm hole, plastic expansion pipe pressure inside the manhole, provided with M5 * 50 countersunk head wood screws to fix the body panels and reliable.
3 Install check valve
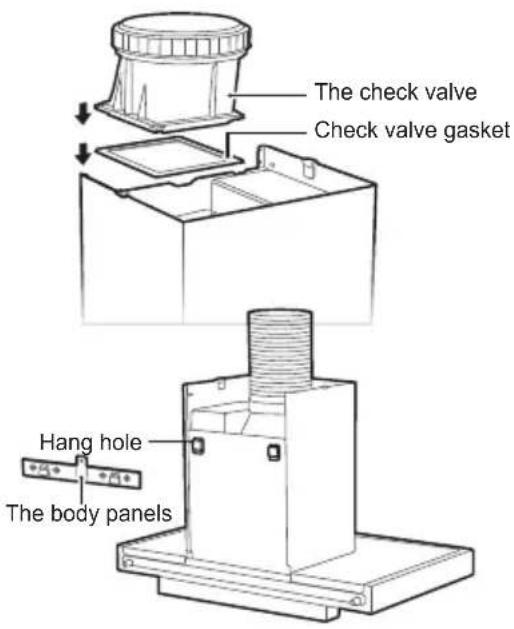
Install the check valve components together with the check valve seal pad in the position of the rack outlet, tighten with 4 ST4.2 x 16 screws at random, check and make sure that the disc is rotating flexibly.
4 Install the machine
Align the hole in the rear of the body to the hanger of the body plate, and hang it from the top down; After hanging the cooker hood, confirm the installation level of the machine, and then use the randomly equipped M5 x 16 self-tapping lock screw to load the screw hole in the top of the body plate to prevent the machine from falling off accidentally.
5 The install exhaust pipe
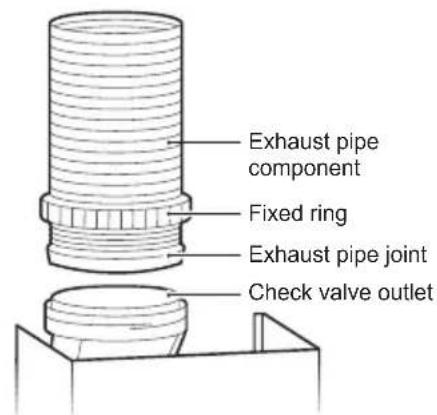
Will exhaust pipe fixed ring on the exhaust pipe component, one end of the exhaust pipe components installed with loaded check valve outlet, then exhaust pipe fixed ring threaded on the check valve, pressure exhaust pipe joint. At the end of the exhaust pipe, the other end of the pipe is directed to the indoor or public flue. If the exhaust pipe does not match with the public exhaust pipe, it can be converted to the after-sales department to purchase the pipe reducer. If the pipe is too long, please adjust the long pipe to the contraction state and fix it with adhesive tape to prevent the pipe from swinging during the working process.
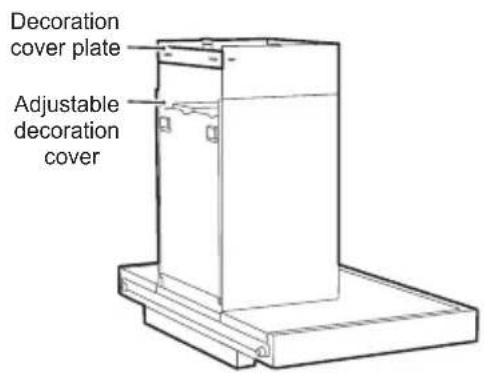
6 Install adjustable decorative cover
According to the installation height, adjustable decoration to cover the required in the out of the wall two phi 8 mm diameter, depth of 50 mm hole, the expansion pipe pressure inside the manhole, provided with two M5 x50 cross slots countersunk head wood screw will cover decoration hangs Taiwan reliable fixation. Adjustable decorative cover to the corresponding height, and use the 2 ST4.2 x 9.5 cross flat head self-tapping screw with random equipment on the wall.
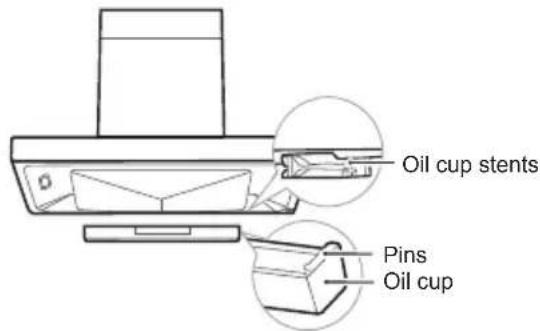
7 Install check valve
Hold the bottom end of the oil cup with both hands and place the oil cup horizontally. Insert the oil cup into the holder of the oil cup holder and push the oil cup back to the county seat.
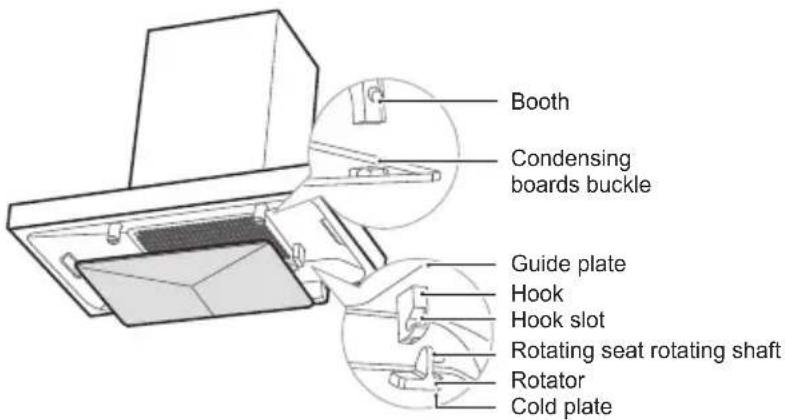
8 Install cold plate
The hands hold the cold plate, cold plate rotation of a shaft insertion on the guide plate hook slot, turn up, insert the condensation plate card buckle on the guide plate in the booth, fixed can.
Daily maintenance
- This range hood machine is an external exhaust type cooker hood machine, and the gas discharged from the cooker hood machine should not be discharged into the hot flue gas used for the discharge of smoke burning gas or other fuel.
- If the range hood is installed above the gas stove, the distance from the bottom of the body to the focal plane is at least 650mm, which should be considered if the installation instructions of gas-fired stoves provide a larger installation distance.
- It is strictly forbidden to modify the product without authorization, and the power cord shall not be replaced or modified by itself.
- Please do not install the cooker hood machine on the wall of flammable material.
- Do not install the cooker hood machine on the top of the stove with solid fuel.
- When drilling holes in the wall, avoid electrical wires embedded in the wall to avoid electric shock hazard.
- A special power supply socket shall be used for the cooker hood machine, and the special power outlet should be reliably grounded (the product must use 10A, 220\~v or above).
- The wall shall have sufficient supporting strength for the installation of the cooker hood machine. The hollow core of the hollow wall shall be greater than 30mm, and the concrete wall can be directly punched and installed. The machine must be securely mounted on the wall.
- The cooker hood machine may have very sharp edges. Please wear protective gloves when you install or clean the cooker hood machine.
- If your kitchen is under a state of decoration, do not use cooker hood exposed, for building materials, dust, paint, coatings and their volatile gas cooker hood surface causes corrosion and lose luster, please install cooker hood in after the decoration.
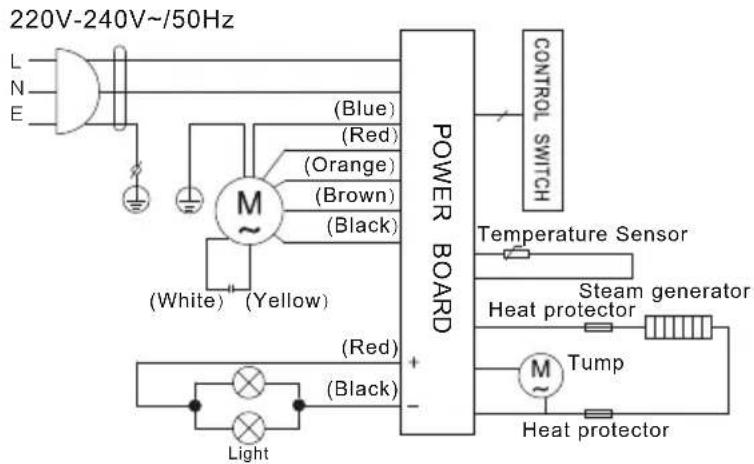
flowchart
graph TD
    A["220V-240V~/50Hz"] --> B["POWER BOARD"]
    B --> C["CONTROL SWITCH"]
    B --> D["Temperature Sensor"]
    B --> E["Steam generator"]
    B --> F["Heat protector"]
    B --> G["Tump"]
    B --> H["Heat protector"]
    B --> I["Light"]
    B --> J["(Red)"]
    B --> K["(Blue)"]
    B --> L["(Orange)"]
    B --> M["(Brown)"]
    B --> N["(Black)"]
    B --> O["(White)"]
    B --> P["(Yellow)"]
Clean and maintain
Before cleaning, please note that when you need to clean the condenser and screen, cut off the power and unplug the power.
- It is recommended to maintain and maintain the washing machine regularly. It is recommended to use dry cloth after cooking or to occupy the inner and outer surface of the wet cloth cleaning machine with neutral detergent. Do not use gasoline, acid, benzene, this solvent or any other chemical to clean the cooker hood.
- When the oil cup in the oil cup is filled with oil cup clean line, please clean the oil cup in time. The oil cup disassembly is as follows: hold the lower part of the oil cup with both hands, and remove the oil cup horizontally; After cleaning, install the oil cup in reverse order.(the oil cup is longer, please keep the level when the oil cup is removed so as not to overflow the oil.)
- Regularly replace the filter cotton. The attachment is equipped with 5 filter cotton for replacement. In order to ensure better steam cleaning effect, a replacement can be made every two years. Replace the filter cotton: open an Angle according to the direction on the lid of the water cup, then take out the water cup cover along the vertical direction. Remove the filter cotton at the filter junction.
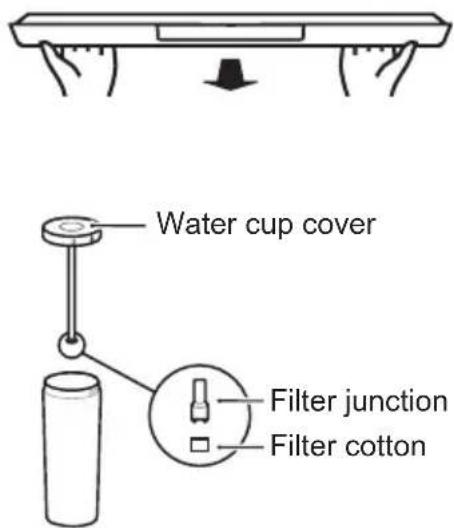
- When the lighting is needed (by professionals), please remove the power plug first. Insert a small screwdriver into the gap between the lamp and the guide plate and gently pry open and remove the lamp. Replace the new lamps with the same specifications and install them in the mounting holes of the guide plate.
- SAVE THESE INSTRUCTIONS CAREFULLY
- Contents
- Safety warning
- Product structure schematic
- The attachment list
- Precautions
- Daily maintenance
- Surface cleaning
- Steam washing (machine internal cleaning)
- Steam washing process
- Internal clean
- Guide for disassembly of condensates and filters
- Remove the condenser plate to indicate
- Remove the filter screen to indicate
- Product parameters
- To determine the location (unit: mm)
- Installation precautions
- The installation (unit: mm)
- Install check valve
- Install the machine
- The install exhaust pipe
- Install adjustable decorative cover
- Install check valve
- Install cold plate
- Clean and maintain
Brand : MIDEA
Model : MHAT90S
Category : Range hood