Longbow Wireless - Subwoofer REL Acoustics - Free user manual and instructions
Find the device manual for free Longbow Wireless REL Acoustics in PDF.


User questions about Longbow Wireless REL Acoustics
0 question about this device. Answer the ones you know or ask your own.
Ask a new question about this device
Download the instructions for your Subwoofer in PDF format for free! Find your manual Longbow Wireless - REL Acoustics and take your electronic device back in hand. On this page are published all the documents necessary for the use of your device. Longbow Wireless by REL Acoustics.
USER MANUAL Longbow Wireless REL Acoustics
natural_image
Black square box with a small metallic square top on top, set against a solid blue background (no text or symbols visible)REL


REL Acoustics Limited
North Road, Bridgend industrial Estate. Bridgend, CF31 3TP. United Kingdom
Telephone: +44 (0)1 656 768 777 . Fax: +44 (0) 1 656 766 093
Web: www.rel.net
Longbore_Veral_03-41ee 2-207874 S42P9


Wireless REL Longbow Panel Connection Legend
Once our team achieved the requisite high standards for performance we demand of all REL subwoofers, we turned our attention to connectivity methods. We asked consumers and industry professionals for input, and almost universally, the feedback was a request for wireless connectivity that matched the sonic performance of REL sub bass systems.
In order to achieve high quality wireless, the REL team found a new chipset remarkable for its speed and lack of delay. Building on this foundation our engineering team took to the task of creating Longbow™, REL's latest delivery method. Longbow™'s wireless system uses a proprietary security codec that ensures exceptional protection of the signal, while using zero digital compression—the bane of conventional wireless systems. This results in a dynamic, ultra wide bandwidth sound with almost zero delay. Practically speaking, a REL sub bass system equipped with Longbow™ can be connected to very high end hard-wired systems with none of the delay issues that plague garden variety wireless systems. Additionally, the REL team was able to maintain all of the HIGH-LEVEL and reference theater connectivity via wireless protocol. Yet another breakthrough for REL!
FCC STATEMENT
This device complies with Part 15 of the FCC Rules. Operation is subject to the following two conditions:
(1) This device may not cause harmful interference, and
(2) This device must accept any interference received, including interference that may cause undesired operation.
NOTE: This equipment has been tested and found to comply with the limits for a Class B digital Device, pursuant to Part 15 of the FCC Rules. These limits are designed to provide reasonable protection against harmful interference in a residential installation.
This equipment generates, uses and can radiate radio frequency energy and, if not installed and used in accordance with the instructions, may cause harmful interference to radio communications. However, there is no guarantee that the interference will not occur in a particular installation. If this equipment does cause harmful interference to radio or television reception, which can be determined by turning the equipment off and on, the user is encouraged to try and correct the interference by one or more of the following measures:
Also, we can choose the receiving universe.
increase the separation between the equipment and receiver.
Connect the equipment into all blocks on a circuit element from that to which the receiver is connected. Consult the dealer or an experienced radio/TV technician for help.
REL Longbow ^™ Transmitter
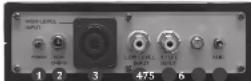
1 Power Switch: Used to turn on and off REL Longbow™ transmitter.
2 Power Adapter Socket: DC input socket that accepts a detachable power adapter.
3 HIGH-LEVEL INPUT (Neutrik® Speakon® Socket): Use to connect HIGH-LEVEL to the main front amplifier speaker terminals.
4 LOW-LEVEL INPUT: Used to connect LOW-LEVEL to the output of a preamplifier, integrated amplifier or receiver ONLY when HIGH-LEVEL INPUT cannot be properly connected. (For home cinema, use.1/LFE INPUT).
5 .1/LFE INPUT: Used to connect to the .1/LFE OUTPUT from a 5.1 amplifier of processor. Should be used in conjunction with REL HIGH-LEVEL connection for the ultimate theater experience.
6 Antenna Socket: Connection for wireless antenna.
7 Pair Switch: Used to pair REL Longbow™ transmitter with REL cabinet.
Connecting Up
The REL Longbow™ transmitter is intended to be used with the REL Serie S subwoofer cabinet. The transmitter will require power from a AC wall plug using the power adapter cable supplied.
Two antennas are supplied. One should be screwed onto the SMA connection on the control panel of the REL Longbow™ transmitter and the other onto the SMA connection on the top left of the Serie S back panel.
It is not possible to use the Longbow™ wireless connection and a direct connection simultaneously. Using both wired and wireless connections simultaneously could result in damage and voids all warranties.
Always switch your system off before disconnecting any wires.


ALWAYS connect using the REL HIGH-LEVEL INPUT, unless your system simply cannot accommodate this. While rare, a few systems, such as those that deliver a pure digital signal to active speakers, preclude the use of HIGH-LEVEL INPUT. To increase the versatility of connecting up, the REL Longbow ^™ transmitter has three separate inputs: A Neutrik Speakon socket and two phono sockets. This is to facilitate use with both two-channel stereo systems and AV surround sound systems.
The HIGH-LEVEL, unbalanced, dual-channel (stereo) input is via a Neutrik Speakon connector which is connected to the power amplifier's left and right channel speaker terminals. This has the advantage of ensuring that the REL receives exactly the same signal as the main speakers. This means that the character of the bass from the main system is carried forward into the sub-bass. This is a very important point and ensures far superior system integration of the sub-bass with the main system.
The LOW-LEVEL INPUT is via a phono jack that connects to either the .1/LFE OUTPUT of a home cinema amplifier/processor or to the output of a stereo preamplifier. The rear panel wired connection on Serie S allows for stereo LOW-LEVEL INPUT, the wireless connection is not stereo.
HIGH-LEVEL and .1/LFE inputs on the Longbow™ can be used simultaneously. The benefits are two-fold when used with a home cinema system. The .1 INPUT reproduces the .1/LFE channel and the HIGH-LEVEL connection underpins the main front speakers. The main front speakers should be set to the "large" option on the processor. See "Home Cinema Applications" for more information.
Connecting to the Power Amplifier Using the Speakon HIGH-LEVEL INPUT
To engage the Neutrik Speaker plug, insert fully into socket and rotate clockwise until locked.
To remove the Neutrik Speakon plug, grip body of plug, place thumb on chrome lever, move lever backwards, rotate plug anticlockwise quarter turn and withdraw.
The HIGH-LEVEL INPUT is designed to accept the stereo (two-channel) signals from the speaker terminals of your receiver, integrated amplifier or basic amplifier. This has the advantage of ensuring that your subwoofer receives exactly the same signal as the main speakers, which means that the character of the bass from the main system is carried forward into the Sub-Bass System. This is a very important point and together with REL's Natural RollOff™ circuitry, ensures far superior system integration of the Sub-Bass System with the main system.
HIGH-LEVEL INPUT: Connections should be made to the same binding post on main amplifier as the main speakers. Red to amplifier main right speaker red terminal, yellow to amplifier main left speaker red terminal and black to amplifier main speaker black terminal, right or left but not both. Plug the Neutrik Speakon plug into the HIGH-LEVEL Speakon socket.
Note: This connection does not draw power from the power amplifier and, yes, your REL is a powered sub bass system. However, by deriving its signal from the main power amplifier, better sound quality is achieved.
.1/LFE INPUT: This requires a phono-to-phono cable and is a dedicated true .1 channel. This circuit therefore eliminates the normal Natural RollOff™ Crossover and passes the .1 LOW-LEVEL signal through with only the required 120Hz fourth-order filter.
LOW-LEVEL INPUT: This single channel phono input allows for conventional connection to a preamplifier and should be used in the rare event that a HIGH-LEVEL connection proves incompatible. Plug one end of a single phono-phono cable into the LOW-LEVEL INPUT jack of the REL and the other end into either the left or right channel output of your preamplifier. Because much sub-50Hz bass information is mono, there is little need to connect both left and right channels. Should your system require this style of connection – HIGH-LEVEL is preferred – additional performance is available by purchasing a second, matching REL and running each as separate stereo subs.
These connections can be made on the Series through the REL Longbow™ transmitter, or direct to the back panel of the cabinet. In the case of connecting directly, only the subwoofer cabinet will need power. Using input connections to both the REL Longbow™ transmitter and direct to the Series 5 back panel are not permitted.
PHASE SWITCH - Used to set phase
Position 0 / HIGH-LEVEL, LOW-LEVEL or LFE: 0 degrees phase
Position 180 / HIGH-LEVEL, LOW-LEVEL or LFE: 180 degrees phase
PHASE SELECTION AFFECTS BOTH HIGH- AND LOW-LEVEL INPUTS: Crossover is always engaged for HIGH-LEVEL INPUT. The .1/LFE signal does not pass through the crossover circuit.



Making Connections
It is helpful to know that you will almost always connect the REL to the input on the rear panel labeled "HIGH-LEVEL INPUT." This connection is made to the REL Longbow ^™ transmitter using the supplied 6' 6" (2 meter) cable, the bare leads of which connect to the speaker output terminals of the power amplifier. The easy and foolproof connection at the REL is done with a Neutrik Speaker connector. The purpose of connecting to the speaker output terminals is one of the unique secrets of REL's success. By connecting to the high-level input on the REL from the amplifier, you build forward the sonic signature of your main system, including the tonal balance and timing cues of the entire electronics chain. In this way, the REL is fed the exact signal that is fed to the main speakers
Connecting
HIGH-LEVEL connection, using the enclosed cable with the Neutrik Speakon connector, is always the first choice. This connection can be made without affecting the performance of the amplifier because the REL's amplifier input impedance is 150,000 ohms, in effect not producing any additional demand whatsoever on the rest of your system.
- The standard HIGH-LEVEL hook up procedure is: attach the red wire to the amplifier's right positive speaker output terminal; attach the yellow wire to the amplifier's left positive speaker output terminal; attach the black wire to whichever of the amplifier's ground output terminals is convenient; plug the Speakon connector into the Longbow™ wireless transmitter's HIGH-LEVEL INPUT. Use the Longbow™ for wireless connection.
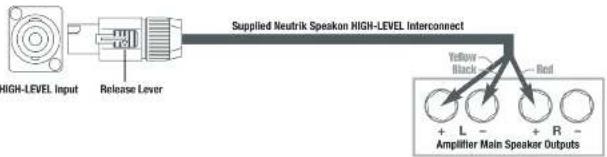
- For differential (i.e. fully balanced) amplifiers using one REL, simply use the standard connecting scheme with the exception of connecting the black wire to chassis ground (i.e. a metal bolt or screw, preferably not painted or anodized, on the chassis of the power amp or receiver), not to a negative speaker terminal, and then connecting into the HIGH-LEVEL INPUT on the Longbow™ wireless transmitter. Please contact your dealer should there be any questions concerning this or any other hookup procedure.
Supplied Neutrik Speakon HIGH-LEVEL Interconnect
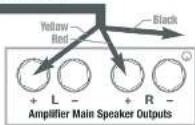
NOTE: The REL Longbow transmitter is equipped with internal circuitry to allow seamless connection to Class-D (digital) main amplifiers. If connecting to a Class-D amplifier, follow the above connection procedure for differential amplifiers.
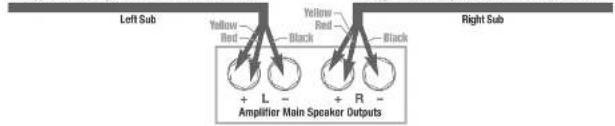
- If connecting two RELs in a dual mono configuration, connect the black wire of each REL to the negative speaker terminal of the corresponding amplifier channel; twist together the red and yellow wires of each REL separately and connect each pair to the positive speaker terminal of the corresponding amplifier channel.
Supplied Neutrik Speakon HIGH-LEVEL Interconnect
Supplied Neutrik Speakon HIGH-LEVEL Interconnect


Lorplano_Vansl_03-4122 3/201814 S42795

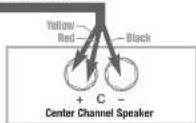
- If connecting a single REL as a dedicated center channel sub, connect the black wire of the REL to the negative center channel speaker terminal; twist together the red and yellow wires and connect this pair to the positive center channel speaker terminal.
Supplied Neutrik Speakon HIGH-LEVEL Interconnect
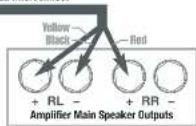
- If connecting a REL as a dedicated rear channel sub, connect the black wire of the REL to either the left rear or right rear negative speaker terminal; connect the yellow wire to the left rear positive speaker terminal; connect the red wire to the right rear positive speaker terminal.
Supplied Neutrik Speakon HIGH-LEVEL Interconnect
LOW-LEVEL connection (via phono connector) is always an option if HIGH-LEVEL connection is not possible. When connecting to the LOW-LEVEL INPUTS in a system in which HIGH-LEVEL connection is not possible, such as if using internally-amplified speakers, connect a single phono cable between the LOW-LEVEL INPUT jack of the Longbow™ wireless transmitter and either the left or right channel output of your preamplifier. Because virtually all sub-50Hz bass information is mono, there is no need to connect both left and right channels.
6
Lorplone_Westal_03-14 mice 15-11 B/274 3.42 PM
When connecting to a home cinema system where a .1/LFE channel output is present, connect a single phone cable between the sub output of the processor/receiver and the .1/LFE INPUT jack on the Longbow™ wireless transmitter.
REL Theater Reference™ Home Cinema Applications
For Dolby Digital AC3 or other 5.1 theater systems, once the standard set-up for two-channel outlined above is complete, the LFE OUTPUT from the processor or receiver should be connected to the .1/LFE INPUT and appropriate volume adjustments made using the .1/LFE LEVEL CONTROL. For this configuration, you must set the processor to the "large" or "full range" setting for the left and right speakers in order for the REL to receive the bass signal via the HIGH-LEVEL cable. In this configuration, the REL provides support for both the left and right speakers for two-channel listening, and support for the LFE when movies are playing. Most processors will allow you to defeat the subwoofer output when listening in the two-channel mode. The effect of this set-up is one of greatly increased dynamics in the mid-bass range, no bass bloat, and a greater degree of space and timing from the special audio effects.
Pairing
Now that the Longbow™ wireless transmitter is connected to your amplifier (ideally using the HIGH-LEVEL cable), the unit will need to be paired to the REL subwoofer or subwoofers.
1 Check that the wireless antennas are connected and fully engaged on both the transmitter and sub woofer.
2 Make sure that the transmitter AC to DC wall plug supply is connected to an AC outlet, and that the barrel connector is connected to the transmitter. A blue LED on the front of the transmitter will indicate the unit is on by blinking in the standby pattern which is one flash per second.
3. Turn the transmitter power switch on and a white LED on the front of the transmitter will indicate the unit is on by blinking in the standby pattern which is one flash per second.
4 Make sure that the sub is plugged into an AC outlet using the supplied AC cable and that the sub is turned on. Power switch is located on the rear panel.
5 Exercise the momentary "Pair" switch on the transmitter located on its rear control face. This will make the transmitter look for a new sub. Note that the LED flash pattern will change to two blinks per second.
7


6 Next exercise the momentary "Pair" switch on the sub located on the rear control panel.
7 At this point the sub and transmitter should find each other and pair together. This will be indicated by the "Pair" LEDs on both the transmitter and control panel staying lit (no flashing).
The REL Longbow™ transmitter can pair up to four subwoofers using one transmitter. To pair more than one sub to a single transmitter, follow the instructions above and repeat for each subwoofer added.
When using two or more transmitters with two or more audio channels in proximity to each other (this applies to setting up REL 3D systems, dual mono subwoofers, or multiple independent systems within the same house):
1 Follow the pairing instructions above for the first system.
2 Turn off the first (or first and second) transmitter by unplugging it.
3 Follow the pairing instructions above for the second (or third) system.
4. Turn the transmitter back on for the first (and second) system.
| Status LED Indicator | |
| Paired | Continuously on |
| Searching | Blinks twice per second |
| Standby | Transmitter blinks once per second |
| Standby | Serie 5 rear panel does not blink |
Technical
The Longbow™ transmitter provides true REL Theater Reference™ connectivity, permitting both HIGH-LEVEL and LFE channels to be wirelessly fed to Serie S. This occurs with virtually zero delay and a complete absence of compression.
Care and Polishing
The cabinets are best maintained by using a light automotive spray-on wax and a micro fiber cloth. (We use a spray-on made by a company called Griot's Garage ^™ ). While this may not be available in all markets, you can use a similar product). Take care not to spray the aluminum badge. Do not place objects, such as drinks on top of your REL Longbow transmitter. Never use a dry cloth on this finish.
Specifications
Longbow™ Transmitter
Input Connectors: HIGH-LEVEL Neutrik Speakon, LOW-LEVEL single phono, LFE single phono
Input Impedance: HIGH-LEVEL - 150k, LOW-LEVEL - 10k, .1/LFE - 10k ohms
Wireless output power: 11dBm
Wireless effective distance: 50 ft (15.2 meters) with clear line of site 30 ft (9.1 meters) with single stud wall between transmitter and receiver
Mains Input Voltage: 9V DC, 5.5mm circular connector, positive center
Power consumption: 600 mWatts
Dimensions (WHO): 6 x 2 x 6.5 in., (152.4 x 50.8 x 165 mm)
Finish: Gloss Piano Black
Supplied Accessories: Power adapter
High Level Cable - 2 meter in length
RF Antenna - 2, one for transmitter and one for receiver
in the internal of product improvement, REL Acoustics limited reserves the right to alter these specifications without notice.






Brand : REL Acoustics
Model : Longbow Wireless
Category : Subwoofer