Credo - Uncategorized Trijicon - Free user manual and instructions
Find the device manual for free Credo Trijicon in PDF.


| Product Type | Variable power riflescope with illuminated reticle |
| Magnification Range | 1-15x (varies by model) |
| Objective Lens Size | 24-56 mm (varies by model) |
| Reticle Illumination | Electronically illuminated, CR2032 battery powered |
| Brightness Settings | 10 settings with 'off' between each |
| Adjustment Type | 1/4 MOA or 0.1 MRAD per click |
| Total Adjustment Range (Windage) | 50-100 MOA / 14.5-29.1 MRAD (varies by model) |
| Total Adjustment Range (Elevation) | 50-100 MOA / 14.5-29.1 MRAD (varies by model) |
| Eye Relief | 2.6-4.0 in (66-102 mm) depending on model |
| Exit Pupil | 0.14-0.69 in (3.5-17.5 mm) depending on model |
| Field of View | 1.31°-21.4° depending on model and magnification |
| Tube Diameter | 30 mm or 34 mm (varies); 1 in on some models |
| Dimensions (L x W x H) | 10.5-14.7 in x 2.5-3.3 in x 1.9-2.9 in (varies by model) |
| Weight | 17-27 oz (482-765 g) depending on model |
| Housing Material | Aircraft-grade aluminum, hard anodized |
| Lens Coatings | Fully multi-coated broadband anti-reflective with scratch resistance |
| Waterproof | To 10 ft (3 m) |
| Fog Proof | Dry-nitrogen filled to prevent internal fogging |
| Warranty | Limited lifetime warranty (optical and mechanical); 5 years for electronics |
| Temperature Tested | -20°F to 140°F |
| Recoil Rated | Tested to withstand 5,000 consecutive rounds |
Frequently Asked Questions - Credo Trijicon
User questions about Credo Trijicon
0 question about this device. Answer the ones you know or ask your own.
Ask a new question about this device
Download the instructions for your Uncategorized in PDF format for free! Find your manual Credo - Trijicon and take your electronic device back in hand. On this page are published all the documents necessary for the use of your device. Credo by Trijicon.
USER MANUAL Credo Trijicon
General Information Introduction
> WARNING
Before installing the optic on a firearm, ensure the firearm is UNLOADED.
> WARNING
This Trijicon® product is shipped with a new lithium battery. Lithium batteries or lithium button cells pose the risk of fire. The battery can explode or leak and cause injury if installed backwards, disassembled, charged, crushed or exposed to fire or high temperature. Keep out of reach of children. Check local municipality for proper disposal. California Only: Perchlorate Material – special handling may apply.
> CAUTION
When mounting this Trijicoft product onto the rail of a firearm, do not tighten the mount screws beyond the recommended torque setting provided by the mount manufacturer. Damage may occur to the optic and/or zero retention may be negatively affected.
> CAUTION
DO NOT allow harsh organic chemicals such as acetone, trichloroethane, or other cleaning solvents to come in contact with this Trijicon® product. They will affect the appearance, but not the performance.
The Trijicon Credo® / Credo® HX is a versatile, variable powered riflescope with an electronically illuminated reticle. Featuring a high quality lens system with full multi-layer coatings, the Credo/ Credo HX provides an incredibly clear sight picture. The reticle illumination is powered by a single CR2032 lithium battery and has an easy-to-operate brightness adjustment dial with ten brightness settings and an "off" feature between each setting. The Credo / Credo HX features a hard anodized aluminum body that protects against corrosion and is waterproof to a depth of ten feet (3m). With a generous adjustment range for windage and elevation, precise adjustment increments, and a resettable zero, the Credo / Credo HX riflescope delivers the features required for pinpoint accuracy.
Each model features:
- Fully multi-coated broadband anti-reflective lenses with enhanced scratch resistance
- CR2032 battery illumination
- 10 brightness settings with "off" between each setting
- Precise, crisp adjusters
• Highly durable, lightweight aircraft-grade aluminum housing - Waterproof to 10 ft.
• Dry-nitrogen filled to prevent internal fogging
Characteristics
| 1-4x24CR424 SeriesCRHX424 Series | 1-6x24CR624 SeriesCRHX624 Series | |
| Magnification Range 1 - 4x 1 - 6x | ||
| Objective Lens Size 24mm 24mm | ||
| Eye Relief | 2.6 - 3.9 in.85 - 98mm | 3.5 - 3.9 in.85 - 100mm |
| Exit Pupil | .69 - .2 in.17.5 - 5.1mm | .47 - .16 in.12 - 4.1mm |
| Field of View (degree) | 18° - 4.8° 21.4° | 3.58° |
| Field of View (83 - 100 x d) (83 - 100m) | 95 - 24.2 ft.31.7 - 8.1m | 113.4 - 18.8 ft.37.8 - 6.3m |
| Adjustments | 1/4 MOA per click0.1 MRAD per click | 1/4 MOA per click0.1 MRAD per click |
| Total Adjustment Range Windage | 100 MOA29 MRAD | 100 MOA29 MRAD |
| Total Adjustment Range Elevation | 100 MOA29 MRAD | 100 MOA29 MRAD |
| Return to Zero | No | No |
| Focal Plane | Second | First / Second |
| Dimensions d × W × ft | 10.5 x 2.7 x 1.9 in. | 10.9 x 2.8 x 2.0in. |
| Weight 17.1 - 17.2 oz. | 18.2 - 18.9 oz. | |
| Tube Diameter 30mm 30mm | ||
| 1-8x28CR828 SeriesCRHX828 Series | 2-10x36CR1036 Series | |
| Magnification Range 1 - 8x 2 - 10x | ||
| Objective Lens Size 28mm 36mm | ||
| Eye Relief | 3.0 - 4.0 in.76 - 101 mm | 3.4 - 3.9 in.87 - 98mm |
| Exit Pupil | .46 - .14 in.11.7 - 3.5mm | .41 - .13 in.10.5 - 3.4 |
| Field of View (Degree) | 20° - 2.53° 9.53° | -1.92° |
| Field of View (8" 100 sq.) (8" 100 sq.) | 105.8 - 13.2 ft.35.3 - 4.4m | 50.0 - 10.1 ft.16.7 - 3.4m |
| Adjustments | 1/4 MOA per click0.1 MRAD per click | 1/4 MOA per click0.1 MRAD per click |
| Total AdjustmentRange Windage | 100 MOA29.1 MRAD | 90 MOA26.2 MRAD |
| Total AdjustmentRange Elevation | 100 MOA29.1 MRAD | 90 MOA26.2 MRAD |
| Return to Zero | No | Yes |
| Focal Plane | First | First |
| Dimensions g × W × ft | 10.8 x 3.2 x 2.6 in. | 13.1 x 3.24 x 2.6 in. |
| Weight 25.6 - 25.7 oz. 23 oz. | ||
| Tube Diameter 34mm 30mm | ||
| 2.5-10x56CR1056 SeriesCRHX1056 Series | 2.5-15x42CR1542 SeriesCRHX1542 Series | |
| Magnification Range 2.5 - 10x 2.5 - 15x | ||
| Objective Lens Size 56mm 42mm | ||
| Eye Relief | 2.8 - 4.0 in.72 - 102mm | 3.4 - 3.9 in.85 - 100mm |
| Exit Pupil | .64 - .21 in.16.2 - 5.4mm | .42 - .11 in.10.7 - 2.8mm |
| Field of View (Ground) | 7.3° - 1.94° 7.86° - 1.31° | |
| Field of View (80 100 x) (80 kft) | 38.3 - 10.2 ft12.8 - 3.4m | 41.2 - 6.9 ft13.7 - 2.3m |
| Adjustments | 1/4 MOA per click0.1 MRAD per click | 1/4 MOA per click0.1 MRAD per click |
| Total AdjustmentRange Windage | 50 MOA14.5 MRAD | 80 MOA23.3 MRAD |
| Total AdjustmentRange Elevation | 50 MOA14.5 MRAD | 100 MOA29.1 MRAD |
| Return to Zero | No | Yes |
| Focal Plane | Sound | Sound |
| Dimensions L × W × H | 13.8 x 2.7 - 2.9 x 2.62.8 in. | 13.9 x 3.3 x 2.6 in. |
| Weight 25.3 - 25.4 oz. 22.9 oz. | ||
| Tube Diameter 30mm 30mm | ||
Characteristics
| 2.5-15x56CR1956 SeriesCRHX1556 Series | 3-9x40CR940 Series | |
| Magnification Range 2.5 - 15x 3 - 9x | ||
| Objective Lens Size 56mm 40mm | ||
| Eye Relief | 3.3 - 3.9 In.85 - 90mm | 3.5 - 3.7 In.90 - 93mm |
| Exit Pupil | .46 - .15 In11.8 - 3.7mm | .52 - .17 In.13.3 - 4.4mm |
| Field of View(Dsquare) | 8.22° - 1.42° 6.75° | 2.25° |
| Field of View(65 100 sq)(65 100m) | 43.1 - 7.4 ft.14.4 - 2.5m | 35.5 - 11.8 ft.11.8 - 3.9m |
| Adjustments | 1/4 MOA per click0.1 MRAD per click | 1/4 MOA per click0.1 MRAD per click |
| Total AdjustmentRange Windage | 60 MOA17.4 MRAD | 60 MOA17.8 MRAD |
| Total AdjustmentRange Elevation | 60 MOA17.4 MRAD | 60 MOA17.8 MRAD |
| Return to Zero | Yes | No |
| Focal Plane | Second | Second |
| Dimensions d × W × t | 14.7 x 3.2 - 3.3 x 2.8- 2.9 in. | 12.3 x 2.5 x 2.2 in. |
| Weight 27 oz. 17.02 oz. | ||
| Tube Diameter 30mm 1 in. | ||
| 4-16x50CR1050 SeriesCRHX1050 Series | |
| Magnification Range 4 - 16x | |
| Objective Lens Size 50mm | |
| Eye Relief | 3.1 - 3.8 in.78 - 96mm |
| Ext Pupil | .33 - .12 in8.5 - 3.1mm |
| Field of View Desert | 5.43° - 1.36° |
| Field of View (no 100 yd) (no 100m) | 28.5 - 7.1 ft.9.5 - 2.4m |
| Adjustments | 1/4 MOA per click0.1 MRAD per click |
| Total Adjustment Range Windage | 70 MOA20.4 MRAD |
| Total Adjustment Range Elevation | 100 (F) / 70 (C) MOA29.1 (E) / 20.4 (C) MRAD |
| Return to Zero | Yes* |
| Focal Plane | Second |
| Dimensions ± x W x H | 14.5 x 3.1 - 3.3 x 2.1 - 2.4 in. |
| Weight 24.7 - 25.5 oz | |
| Tube Diameter 30mm | |
Some Models
(1) - External Adjusters
(C) - Gapped
Preparation for Use
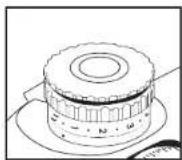
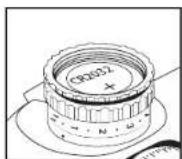
To unscrew the battery cap, hold the Brightness Adjustment Dial in place and turn the top cap counter-clockwise. Install the CR2032 battery into the battery compartment, positive side up. Inserting the battery Improperly will keep the optic from illuminating.
Adjustment Procedures
ZEROING THE RIFLESCOPE
There are two different types of adjusters in the Credo family. Capped adjusters are located under the removable turret cap. External adjusters allow you to adjust point of impact by rotating the exposed elevation and the external windage turret in some models. Other models have external adjusters that lock, lift to unlock and rotate.
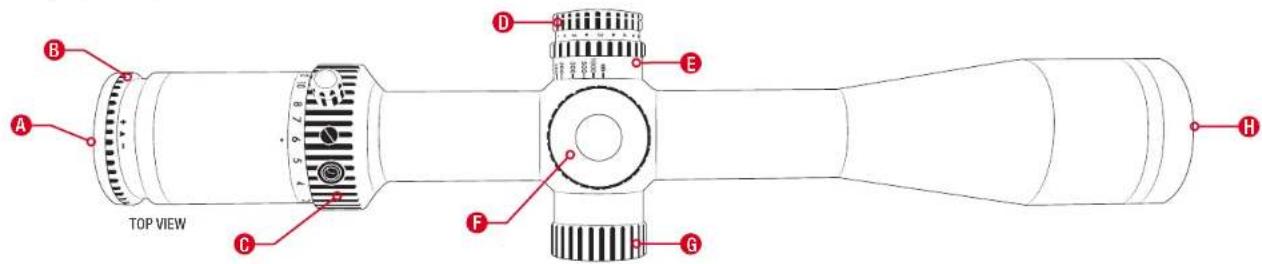
The riflescope is zeroed using either the adjusters located under the adjuster caps (F / G) or by rotating the external adjuster if equipped.
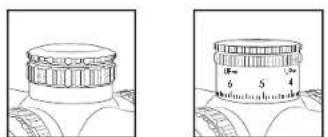
Dapped Adjusters External Adjusters
There are two adjusters, one for windage (right side of scope) and one for elevation (top). The arrows on the adjusters indicate direction to turn the adjusters in order to change bullet impact.
For example, using the 1/4 MOA per click adjuster, if the point of impact is two MOA to the left of the aiming point, the windage adjuster should be moved eight clicks in the direction marked R (Right). This will move the bullet impact two MOA to the right and onto the point of aim. Similarly, if the bullet impact is striking low on the target, move the elevation adjuster in the Up direction. Once the optic's elevation and windage is zeroed, reset the adjuster to zero.
A: Eyepiece Lens
B: Diopter Adjuster
C: Magnification Dial
D: Illumination Dial and Battery Cap
E: Parallax Adjuster (if equipped)
F: Elevation Adjuster
G: Windage Adjuster
H: Objective Lens
CAPPED ADJUSTERS
With the adjuster cap removed, pull the adjustment dial cut and it will spin freely, push down at the zero position. For adjustment dials with threaded top cap, remove top cap by holding main body and rotating top cap counter-clockwise. Once top cap removed, lift adjuster body off, set to zero and religion top cap.
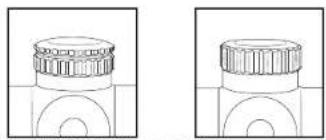
natural_image
Two identical line drawings of a cylindrical object with a flanged top and side supports, shown from different angles (no text or symbols)Adjuster Cap Style 1 Adjuster Cap Style 2
Adjustment Procedures
EXTERNAL ADJUSTERS / RETURN TO ZERO
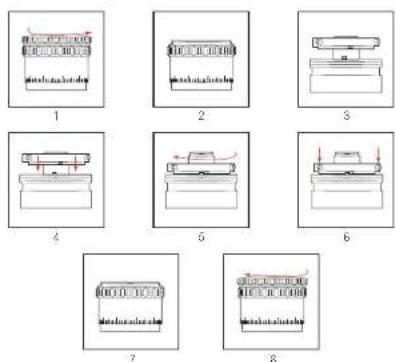
Once the rifle's elevation is zeroed, remove the adjuster turret by turning the thropped top cap counter clockwise (1). Remove the top cap (2), remove the adjuster body (turret) (3), then loosen the three hex screws around the Return to Zero disk with the provided 1.5mm hex wrench. After loosening the hex screws, let the Return to Zero disc drop to the adjuster housing (4) and rotate clockwise (5) until the Return to Zero disk stops. Once the Return to Zero is set to the desired position, tighten the three hex screws to 5 in. oz. or finger light using the 1.5mm hex wrench (6). To complete the Return to Zero adjustment, reinstall the adjuster body at the zero position (7), and reinstall the top cap (8).
LOCKING EXTERNAL ADJUSTERS (1-8x28)
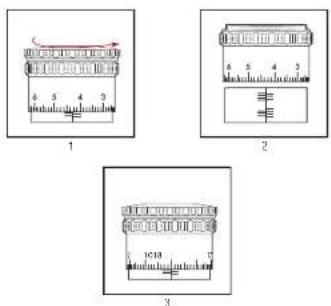
Zero the rifle as described previously and lock the adjuster's by pushing down. Once locked, remove the adjuster body by turning the threaded top cap counter-clockwise (1). Once removed, fill the adjuster body and rotate to zero (2). Press the adjuster body back down and reinstall the threaded cap (3).
DIOPTER ADJUSTER (EASY FOCUS EYEPIECE)
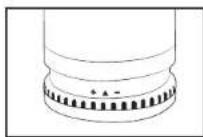
The Diopter Adjuster (B) allows the user to quickly match the user's prescription. Adjustments are made by simply turning the Diopter Adjuster in the direction which brings the reticle into focus. An indicator (+ / -) is a useful reference point for returning the focus to your customized position.
The Brightness Adjustment Dial is located on the left side of the housing and is equipped with an "OFF" setting between each of the brightness settings. This enables the user to be able to easily switch the unit on or off and return to the last brightness setting. The brightness adjustment for the optic has ten settings, (1) being the dimmest and (10) the brightest. If a dual color offering there will be ten settings, live of each color, with (1) being the dimmest and (5) brightest for each color. Turn the Brightness Adjustment Dial to the preferred brightness setting based on conditions.
Adjustment Procedures
MAGNIFICATION DIAL
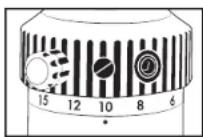
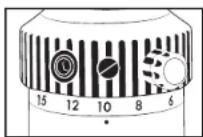
Trijicon Credo riflescopes are available in various ranges of magnification. Magnification is selected by rotating the Magnification Dial (C), aligning the white indicator marking with the number on the riflescope housing. Some models are equipped with a 2-position repositionable magnification lever. This lever is threaded in and can be moved to the other position by removing the filler screw with the supplied 3mm Allen key, lighten lever into place, and reinstall filler screw in vacant screw hole.
SIDE PARALLAX ADJUSTMENT (IF EQUIPPED)
Parallax is the perceptible movement of the reticle on the target as the shooter moves their head up and down, or side to side. Parallax adjustment can improve accuracy. Adjustment is recommended at all distances to improve accuracy.
Checking parallax is done by slightly lifting your head off of the stock and moving your head left and right and up and down while looking though the scope. Does the reticle appear to move while it is placed on the target? If so, rotate the side Parallax Adjustment knob until parallax or reticle movement is minimized. There are yardage indicators on the Parallax Adjustment knob that serve as approximations. For example, if target is 300 yards away, rotate Parallax Adjustment to the 300 mark and make fine tuning adjustments by viewing through scope.
You may notice your Field of View (FOV) is more focused when making parallax adjustment. The key point is to make sure the reticle is not moving instead of concentrating on how sharp your image is. If your reticle parallax is correct your target should be sharp and in focus.
Science of Brilliant ^®

ALASKA-TO-AFRICA TEMPERATURE TESTED
To ensure each family of riflescopes is ready for whatever our users put them through, we perform "Alaska to Africa" temperature shock tests with temps from -20°F to 140°F.

IMMERSION TESTED
Each model is immersion tested, and every riflescope is dry-nitrogen filled to eliminate internal fogging.

SOLID ZERO TESTED
Every model is subjected to 5,000 consecutive rounds, confirming no reticle shift has occurred.

All models are tested to withstand recoil and vibrational stresses without malfunction, so it can take a beating before, during and after use.

DROP TESTED
We don't believe every drop should be followed by a warranty claim, so we drop test each riflescope design to check durability.
Maintenance
This Trilicon® product requires very little maintenance. If the lenses become dirty, wash using fresh water and a soft clean cloth. Remove all foreign matter from the lens surface fully before wiping them with a soft cloth. The outside lenses may log over in cold weather. Remove fog by using a dry, clean soft cloth. Anti-fog solutions can be applied if desired.
Troubleshooting
For additional information, product downloads, or answers to Frequently Asked Questions (FAQ) visit trijicon.com. Please contact our Customer Service Department for other product service inquiries at 1-800-336-0563 or email us at info@trijicon.com.
Limited Lifetime Warranty
The original owner of the Trijicon® product registered with the warranty card is entitled to repair or replacement (at our option) of the registered item if it should fail due to defects in material or workmanship during normal use. This warranty specially applies to the optical systems and metal structure of the product and does not apply to the illumination system. Electronics are warranted to be free of defects in material and workmanship during normal use for a period of 5 years from the date of manufacture. If repair is necessary, please contact our Service and Repair Department for return instructions. This warranty does not apply to defects caused by anything which is deemed abnormal, abusive, or improper including any fault resulting from an accident or improper service. Please note that the manufacturer's warranty will be void and the product cannot be serviced if it is exported from the United States in violation of U.S. Export Control Laws and Regulations. Any attempt at disassembly or repair will annul this warranty. This warranty gives you specific legal rights, and you may also have other rights which vary from state to state.

Trijicon.com/Credo
Trijicon.com/CredoHX
© 2021 Trijocan, Inc. | Printed in USA
Specifications subject to change without notice. | PML6013 Rev(2) 0121
- General Information Introduction
- > WARNING
- > CAUTION
- Each model features:
- Preparation for Use
- Adjustment Procedures
- ZEROING THE RIFLESCOPE
- CAPPED ADJUSTERS
- EXTERNAL ADJUSTERS / RETURN TO ZERO
- LOCKING EXTERNAL ADJUSTERS (1-8x28)
- DIOPTER ADJUSTER (EASY FOCUS EYEPIECE)
- MAGNIFICATION DIAL
- SIDE PARALLAX ADJUSTMENT (IF EQUIPPED)
- Science of Brilliant ®
- ALASKA-TO-AFRICA TEMPERATURE TESTED
- IMMERSION TESTED
- SOLID ZERO TESTED
- DROP TESTED
- Maintenance
- Troubleshooting
- Limited Lifetime Warranty
Brand : Trijicon
Model : Credo
Category : Uncategorized