
AFP6000BK - Deep fryer SUNBEAM - Free user manual and instructions
Find the device manual for free AFP6000BK SUNBEAM in PDF.


| Product Type | Deep Fryer |
| Brand | Sunbeam |
| Model | AFP6000BK |
| Dimensions (Approx) | 12.2 x 9.8 x 7.9 inches (31 x 25 x 20 cm) |
| Weight (Approx) | 6.6 lbs (3 kg) |
| Power Rating | 1500 W |
| Voltage / Frequency | 120 V / 60 Hz |
| Oil Capacity | 2.5 liters (10.6 cups) |
| Food Basket Capacity | Approx 1 kg (2.2 lbs) |
| Temperature Range | 160°C - 190°C (320°F - 374°F) |
| Temperature Control | Adjustable thermostat with dial |
| Timer | Up to 30 minutes with bell |
| Safety Features | Automatic shut-off, overheat protection, cool-touch handle |
| Construction Material | Plastic housing, stainless steel interior |
| Dishwasher Safe Parts | Removable basket and lid |
| Cord Length | 3.3 ft (1 m) |
| Cleaning | Wipe exterior with damp cloth; wash basket and lid with warm soapy water |
| Spare Parts Availability | Basket, lid, and thermostat replacement available via Sunbeam customer service |
Frequently Asked Questions - AFP6000BK SUNBEAM
User questions about AFP6000BK SUNBEAM
0 question about this device. Answer the ones you know or ask your own.
Ask a new question about this device
Download the instructions for your Deep fryer in PDF format for free! Find your manual AFP6000BK - SUNBEAM and take your electronic device back in hand. On this page are published all the documents necessary for the use of your device. AFP6000BK by SUNBEAM.
USER MANUAL AFP6000BK SUNBEAM
Sunbeam's Safety Precautions 1
Features of your Sunbeam Multi Zone Air Fryer Oven 2
Control Panel 3
Temperature Settings Guide 4
Before First Use 5
Usage Instructions 5
Cooking Functions and Presets 9
Care and Cleaning 10
Cooking Guide 11
Troubleshooting
13
Important instructions – retain for future use.
Sunbeam's Safety Precautions
SAFETY PRECAUTIONS FOR YOUR MULTI ZONE AIR FRYER OVEN
- Use your air fryer oven at least 200mm away from walls and curtains, and do not use in confined spaces.
- Do not operate the air fryer oven when placed directly onto a bench top. Place a heat proof mat or chopping board underneath to protect the surface.
- Avoid placing your air fryer oven on top of stone/stone polymer composite benchtops as this type of benchtop can be susceptible to cracking under heat.
- Do not operate the unit on an inclined surface.
-
Do not move or cover the unit whilst in operation.
-
Do not immerse the base of the unit in water or any other liquid.
- Do not touch any metal surface of the unit whilst in use as it will be hot.
- Use oven mitts when supporting the base of the basket during basket removal when hot.
- Use only the supplied baskets and tray accessories inside the unit.
- Do not place food or liquid inside the unit. Only place on or inside the supplied accessories.
- Do not operate the unit without food or liquid in the supplied accessories.
- Do not use the accessories on the stovetop, inside a microwave oven or inside an oven.
Sunbeam is very safety conscious when designing and manufacturing consumer products, but it is essential that the product user also exercise care when using an electrical appliance. Listed below are precautions which are essential for the safe use of an electrical appliance:
- Read carefully and save all the instructions provided with an appliance.
- Always turn the power off at the power outlet before you insert or remove a plug. Remove by grasping the plug - do not pull on the cord.
- Turn the power off and remove the plug when the appliance is not in use and before cleaning.
- Do not use your appliance with an extension cord unless this cord has been checked and tested by a qualified technician or service person.
- Always use your appliance from a power outlet of the voltage (A.C. only) marked on the appliance.
- This appliance is not intended for use by persons (including children) with reduced physical, sensory or mental capabilities, or lack of experience and knowledge, unless they have been given supervision or instruction concerning use of the appliance by a person responsible for their safety.
- Children should be supervised to ensure that they do not play with the appliance.
- The temperature of accessible surfaces may be high when the appliance is operating.
- Never leave an appliance unattended while in use.
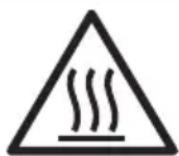
Hot Surface Do Not Touch
This symbol indicates, temperature of accessible surfaces may be high when the appliance is operating and for some time after use.
- Do not use an appliance for any purpose other than its intended use.
- Do not place an appliance on or near a hot gas flame, electric element or on a heated oven.
- Do not place on top of any other appliance.
- Do not let the power cord of an appliance hang over the edge of a table or bench top or touch any hot surface.
- Do not operate any electrical appliance with a damaged cord or after the appliance has been damaged in any manner. If damage is suspected, return the appliance to the nearest Sunbeam Appointed Service Centre for examination, repair or adjustment.
- For additional protection, Sunbeam recommend the use of a residual current device (RCD) with a tripping current not exceeding 30mA in the electrical circuit supplying power to your appliances.
- Do not immerse the appliance in water or any other liquid unless recommended.
- Appliances are not intended to be operated by means of an external timer or separate remote control system.
- This appliance is intended to be used in household and similar applications such as: staff kitchen areas in shops, offices and other working environments; farm houses; by clients in hotels, motels and other residential type environments; bed and breakfast type environments.
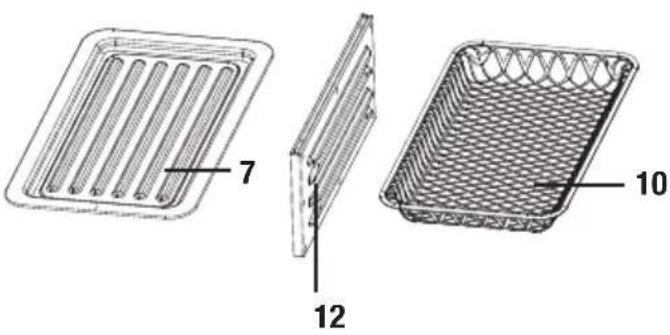
Features of your Sunbeam Multi Zone Air Fryer Oven
natural_image
Technical line drawings of three different plastic grates or trays with labeled parts (7, 12, 10), no text or symbols present.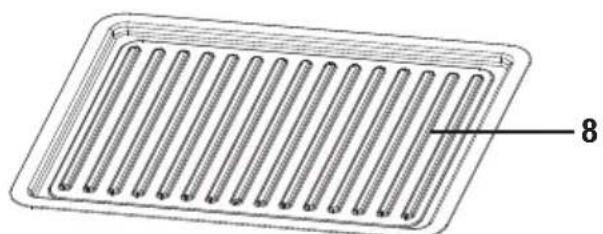
natural_image
Diagram of a rectangular grid-like structure with parallel lines and a labeled section '8' (no text or symbols beyond the number)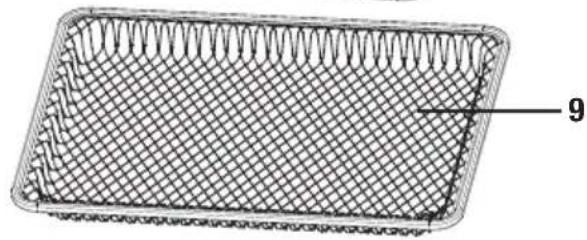
natural_image
3D wireframe model of a rectangular tray with grid pattern and label '9' (no text or symbols on the tray itself)Parts
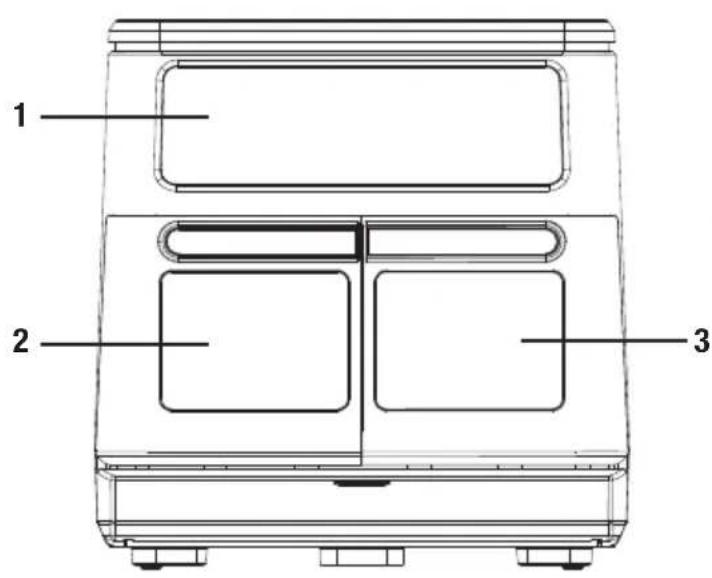
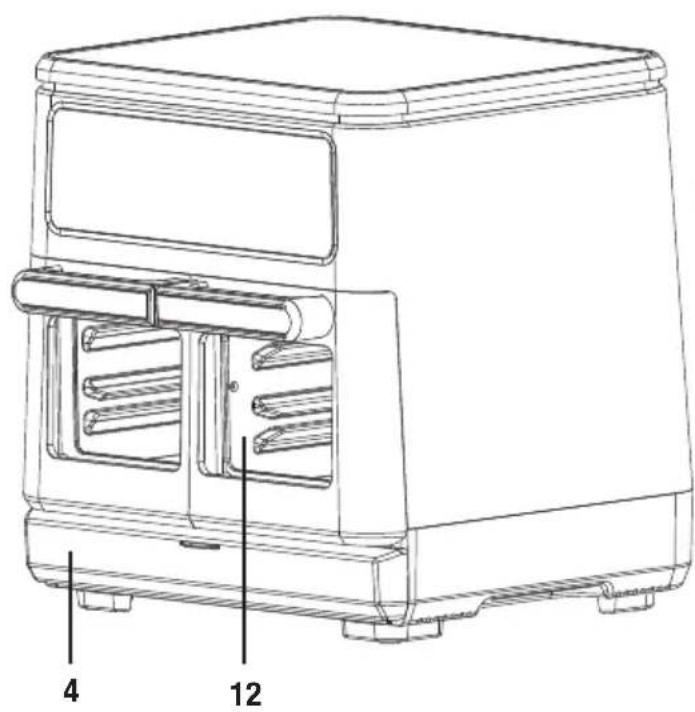
- Control Panel
- Cooking Compartment 1
- Cooking Compartment 2
- Storage Drawer
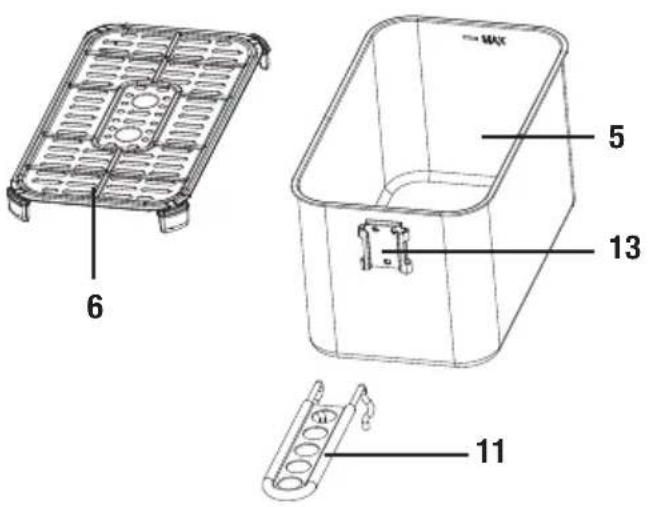
- Basket x2
- Air Flow tray x2
- Small roasting tray x2
-
Large roasting tray x1
-
Large air fry tray x1
- Small mesh tray x2
- Removable basket handle
- Middle partition (removable)
- Clasp
Control Panel
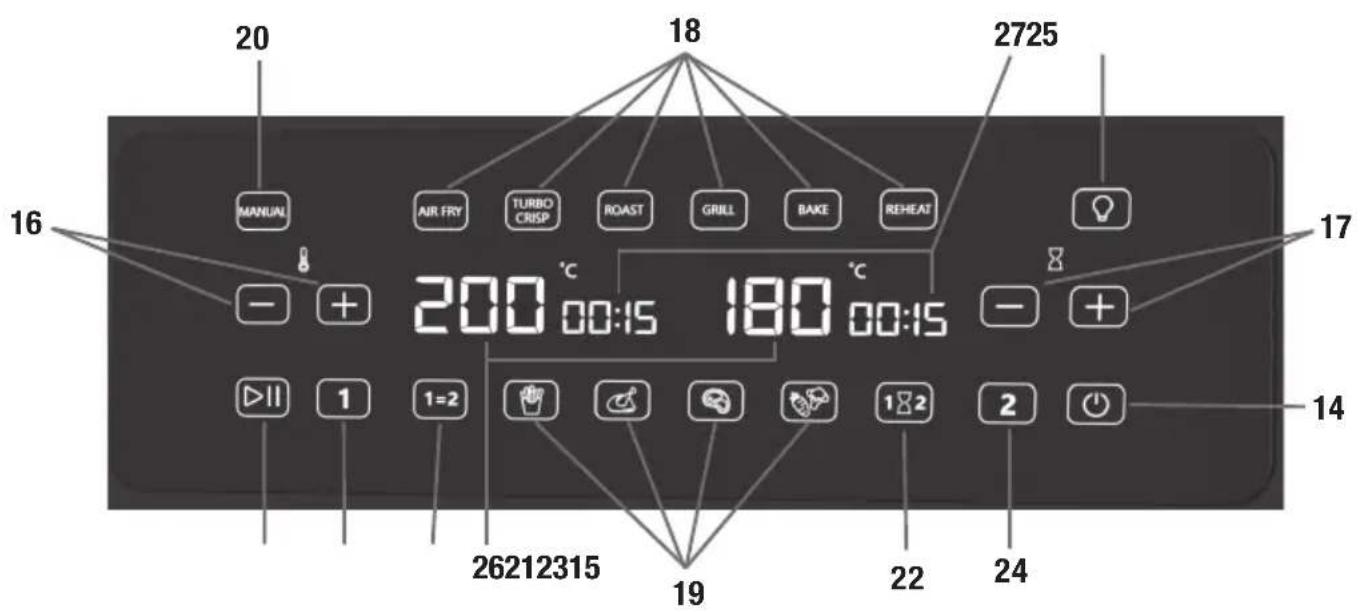
- Power
- Start / Pause
- Temperature adjustment
- Timer adjustment
- Cooking functions: air fry, turbo crisp, roast, grill, bake, reheat,
-
Presets: fries, chicken, meat and vegetables
-
Manual cooking function
- Match Function
- Sync Function
- Cooking Compartment 1
- Cooking Compartment 2
- Light
- Temperature
- Time
Temperature Settings Guide
These tables provide the default time and temperature for each Cooking Function and Preset. These can be adjusted using the Temperature and Timer Setting buttons.
Cooking Function Chart
| Functions Temp Time | ||
| Air Fryer 180°C 15 mins | ||
| Turbo Crisp 240°C 10 mins | ||
| Roast 180°C 60 mins | ||
| Grill 230°C 15 mins | ||
| Bake 160°C 30 mins | ||
| Reheat 120°C 10 mins | ||
| Manual 200°C 15 mins |
Preset Chart
| Functions Temp Time | ||
| Fries 200°C | 20 mins | |
| Chicken | 170°C | 60 mins |
| Meat | 230°C | 15 mins |
| Veg | 170°C | 15 mins |
Please note that due to the variations in thickness and size of foods being cooked, cooking results may vary. Always ensure that the food is thoroughly cooked before consuming.
Before First Use
Before using your Air Fryer Oven for the first time, unpack the appliance and remove all packaging, promotional materials and stickers from the product. Remove any plastic or cardboard from inside the cooking compartment. Remove all printed documents.
Clean the Air Fryer Oven and all accessories with a damp cloth, using only milk, soapy water.
Preparing Your Air Fryer Oven
- Place on a flat, level, heat-resistant surface.
- Plug the cord into 230-240V power outlet and turn Power (☐) on. All available functions will illuminate.
- Select the Match function (1=2) then Air Fry, then press Start/Pause (▶) The Air Fryer Oven will run for 15 minutes to eliminate any remaining manufacture residue.
Usage Instructions
Configuring Your Air Fryer Oven
- The Air Fryer Oven can be used as two separate cooking compartments where each side can be programmed with different functions, times and temperatures, or as one large 11L cooking compartment by removing the Middle Partition.
- After deciding on your configuration place the Air Fryer Oven on a flat surface and plug in.
Removing the Middle Partition
- Ensure the Air Fryer Oven is cool. DO NOT remove the Middle Partition while the Air Fryer Oven is hot.
- Open both compartment doors.
- Pull the Middle Partition towards you to slide it out of the Air Fryer Oven.
- The Large Roasting Tray or Air Fry Tray can be used when the partition is removed.
- All functions and presets can be used when cooking in the large cooking compartment, however '1', '2', 'Sync' (1) and 'Match' (1=2) are not relevant to the large cooking compartment and so will not be available to select.
Usage Instructions
Re-inserting the Middle Partition
- Ensure the Air Fryer Oven is cool. DO NOT insert the partition whilst the Air Fryer Oven is hot.
- Fully open both compartment doors.
- There is no ‘wrong way’ when re-inserting the Middle Partition. Align into the slots at the top and bottom of the cooking compartment and push gently until it touches the back wall. Once in place the Air Fryer Oven will register it has been inserted and the user interface will allow you to set the program for the cooking compartments separately.
NOTE: If the doors will not close properly the Middle Partition has not been inserted into the cooking compartment correctly.
Choosing Your Accessories
- When using the Air Fry Tray place the Roasting Tray on the rail below or on the bottom of the cooking compartment to collect any oil or crumbs.
- For best results when using the Roasting Trays and Air Fry Trays together in the same compartment, the Roasting Tray should be placed on lower rail only, with the Air Fry Tray positioned above. This allows for better airflow and evenly cooked food.
- When using the Baskets ensure the air flow trays are fully inserted until the rubber feet are on the bottom of the basket.
- When cooking frozen food using all 4 trays at once, we recommend increasing your cooking time by 3-4 minutes.
NOTE: When using the Roasting Tray on the highest shelf position, food with a high fat content can create more smoke, due to the proximity of the heating element.
- For best results and when baking larger cakes, bread and cookies, we advise baking with the Middle Partition removed and the Large Roasting Tray placed on the bottom of the oven, with the basket or your own bakeware placed on the roasting tray. This allows better airflow around your chosen bakeware.
Usage Instructions
Program – one side or large compartment only
- Add food to your chosen accessory and place inside the cooking compartment, then close the door.
- Press the power button (☐)
- Press the compartment button '1' or '2' according to where you've placed the food (not required when the Middle Partition is removed).
- Choose the desired Function or Preset, or Manual.
- If necessary, adjust the time (☒ or temperature (☐) using the (+) and (-) buttons.
- Press Start ( )
Program – both sides with the same settings (MATCH available)
- Add food to your chosen accessories and place inside the cooking compartments, then close the doors.
- Press the power button (☐)
- Press the Match button (1=2). The digital displays over both sides will be on during programming because these settings will apply to both sides (so you don't have to program each side separately).
- Choose the desired Function or Preset, or Manual.
- If necessary, adjust the time (☒) or temperature (☐) using the (+) and (-) buttons.
- Press Start ( )
Program – both sides with different settings (SYNC available)
- Add food to your chosen accessories and place inside the cooking compartments, then close the doors.
- Press the power button (①)
- Press the Button '1' to program that compartment.
- Choose the desired Function or Preset, or Manual.
- If necessary, adjust the time (☒ or temperature (☐) using the (+) and (-) buttons.
- Press the Button '2' to program that compartment and repeat steps 4 and 5. You can even choose the same function or preset but with a different time or temperature if you wish.
- If each side has different cooking times but you wish both to finish together, press the SYNC button (1)2
NOTE: to ensure optimum cooking there is a maximum holding time difference allowed between each side. If you require a greater time difference than the unit will allow then delay adding your food to that side by that extra amount of time.
- Press Start (▶)
Usage Instructions
Cooking
- After pressing Start (The cooking compartment light will illuminate, the heat and fan will switch on and the time display will count down.
- The light button (♀) can be pressed during cooking if you need to check your food with the door closed. It will automatically switch off after 30 seconds.
- Press the Start/Pause button ( ) at any time to pause cooking, which suspends the time and switches off the heat. Repress the button to continue cooking.
- Opening the door during cooking will pause the program, suspend the timer and switch off the heat. Closing the door will automatically restart the program and continue cooking.
- An audible alert will sound (5 times) and display 'FLIP' halfway through your programmed time as a reminder to turn your food or shake the Basket for even cooking (see Cooking Guide for more details).
NOTE: If your food does not require turning you can ignore the beep. The audible alert will not sound when the bake or roast function are in use because foods cooking under these settings are unlikely to require turning.
- Both compartment lights will illuminate 1 minute before the end to alert you that cooking is almost finished.
- When cooking is finished an audible alert will sound (3 times) and the compartment lights will illuminate for 10 seconds before the Air Fryer Oven automatically turns itself off.
- Press the Power button (☐) at any time to cancel cooking or to re-program.
Additional Functions
- Turbo Crisp: If your food needs a final crisping, you can use the Turbo Crisp function for an additional 10 minutes of cooking: when normal cooking has finished press this button (it defaults to 10 minutes) and press Start (▶)
- SYNC ( )Automatically syncs both cooking compartments to finish cooking at the same time even if they have different cooking times. The compartment with the longest cook time will start first, then the shorter cook time will begin, allowing both compartments to finish at the same time. This is ideal for cooking fast food style items, whether frozen or chilled. The maximum time difference between each side is pre-set to a maximum 45 minutes, to allow the finished food quality of both compartments to be at their optimum. If a time difference greater than 45 minutes is set the display will flash and bot timers will return to zero, and the air fryer will not start. Simply re-program the timers to be within a maximum difference of 45 minutes, press Sync, then Start.
- MATCH (1=2): The match button automatically sets both cooking compartments to the same time and temperature. This function can be used if you are cooking a large amount of the same food or different foods with the same cook time and temperature.
NOTE: When using the Sync or Match function both cooking compartments will pause cooking if only one door is opened. This is to allow the food to finish cooking at the same time. Once both doors are closed cooking will continue.
Cooking Functions and Presets
Cooking Functions
This product has 6 cooking functions that can be selected.
- Choose the desired cooking function - Air Fry, Turbo Crisp, Roast, Grill, Bake and Reheat.
- Adjust the temperature or time if required and then press Start/Pause button (D) to start.
Food Presets
This product has 4 preset food programs that can be selected.
- Choose from the 4 food presets: Fries, Chicken, Meat or Vegetables. Temperature and time will automatically appear.
- Adjust the temperature or time if required and then press Start/Pause button (D) to start.
Helpful Tips
- During cooking, if the door is left open for 5 minutes or more the Air Fryer Oven will go to sleep. Press the Power (💡) button to wake.
- To remove the Baskets from the Air Fryer Oven use the Removable Handle. Squeeze the Handle to insert into the clasp on the Basket and use the same action to remove the Handle.
CAUTION: Do not remove hot Baskets without the handle.
- Use thick kitchen towel or oven proof gloves to remove Trays from warm cooking compartment.
- After cooking remove food with a heat safe cooking utensil. Do not put hot Baskets, Trays or food onto a non-heatproof surface. Use caution when tipping the Baskets to remove food to avoid spilling oil or hot liquids.
- When not in use, the large and small Roasting Trays and large Air Fry Tray will nest together and store in the Storage Drawer.
- The Baskets and small Air Fry Trays will store in the Cooking Compartments when not in use.
- If one side is already cooking and you wish to add food to the other side, press Start/Pause (▶) then program the other side as per instructions "Program - one side or large compartment only". Add food and press Start/Pause (▶) Both sides will now cook together.
- Do not use metal utensils in combination with the accessories. Silicone based utensils are recommended.
- When baking, we recommend placing bakeware on top of the Roasting Trays. This allows air flow underneath the bakeware. The Baskets, with Airflow Trays removed, are also suitable for baking.
Care and Cleaning
To clean after use
Caution: Always unplug your air fryer oven and allow it to cool completely before cleaning it. NEVER immerse the oven, power cord or plug in water or any other liquid.
The air fryer oven interior can be wiped with a damp cloth using warm, soapy water.
CAUTION: Do not immerse in water.
Using abrasive cleaners, scrubbing brushes and chemical cleaners will damage the unit.
Empty the Baskets and Trays frequently to avoid accumulation of crumbs.
Baskets, Trays, Removable Divider and Handle are all dishwasher safe.
Cooking Guide
Guide to cooking popular foods in your air fryer oven
The table on the next page provides basic cooking guidelines for popular foods that can be cooked using the food functions and presets:
Functions: Air Fry, Turbo Crisp, Roast, Grill, Bake, Reheat.
Presets: Fries, Chicken, Meat, Vegetables.
Please note that due to the variations in thickness and size of the foods being cooked some experimentation may be required for the best cooking results. Always ensure that the food is thoroughly cooked to food-safe temperature throughout before consuming.
When cooking fresh fries, keep oil quantities as low as possible for the healthiest results. However, if you feel the fries are a little pale and require further browning, increase the quantity of oil slightly.
Note: For crispier results, it is recommended to shake the basket 2-4 times throughout the cooking cycle.
For larger quantities, (1kg) increase cooking times and toss food more frequently.
Cooking Guide
| Food Weight | Function/ Preset | Time Temperature | Shake/Turn half way through cooking | Oil | ||
| POTATOES | ||||||
| Hand Cut Fries 700g - 800g Fries | 30 – 35 mins 200°C Yes 1 tbsp | |||||
| Hand Cut Fries 250g Fries 15 – 20 mins 200°C Yes 12 tbsp | ||||||
| Frozen Fries, (Thick Cut) 500g – 700g Fries 20 – 25 mins 200°C Yes No | ||||||
| Frozen Fries, (Thick Cut) 250g Fries 13 – 15 mins 200°C Yes No | ||||||
| Frozen Fries, (Thin Cut) 500g – 700g Fries 18 – 20 mins 200°C Yes No | ||||||
| Frozen Fries, (Thin Cut) 250g Fries 10 – 12 mins 200°C Yes No | ||||||
| Frozen Sweet Potato fries 500g Fries 15 – 18 mins 200°C Yes No | ||||||
| Frozen Hash Browns 600g Fries 18 – 20 mins 200°C Yes No | ||||||
| Fresh Jacket Potatoes | 1kg (4) | Air Fry | 60 mins | 180°C | No | No |
| MEAT/POULTRY/FISH | ||||||
| Steak | 250g (1) Steak | 10 – 15 mins 200°C Yes 1 tsp | ||||
| Pork Chops | 600g (3) Steak | 15 – 20 mins 180°C Yes 1 tbsp | ||||
| Beef Burgers | 340g (2) Steak | 16 – 18 mins 180°C Yes No | ||||
| Leg of Lamb | 2.0kg – 2.5kg | Roast | 105 – 120 mins | 170°C | No | No |
| Whole Roast Chicken | 1.8kg – 2.2kg | Chicken | 80 – 90 mins | 170°C | No | No |
| Whole Roast Chicken | 1.3kg – 1.6kg | Chicken | 60 – 70 mins | 170°C | No | No |
| Chicken Wings | 1 kg | Chicken | 30 – 35 mins | 180°C | Yes | No |
| Salmon Fillet | 480g (2) | Air Fry | 12 – 15 mins | 180°C | No | No |
| FROZEN FOODS | ||||||
| Frozen Battered Fish 400g (2) Air Fry 12 – 15 mins 180°C Yes No | ||||||
| Frozen Chicken Nuggets | 400g | Air Fry | 12 – 15 mins | 180°C | Yes | No |
| Frozen Vegetable Burgers | 450g (4) | Air Fry | 15 – 20 mins | 200°C | Yes | No |
| Frozen garlic bread slices | 6 slices | Air Fry | 6 – 8mins | 180°C | Yes | No |
| VEGETABLES | ||||||
| Frozen Onion Rings | 400g | Air Fry | 10 – 12 mins | 180°C | Yes | No |
| Fresh Roasting Vegetables | 800g | Veg | 15 – 20 mins | 170°C | Yes | 1 tbsp |
Troubleshooting
| PROBLEM POTENTIAL CAUSE SOLUTION | ||
| Overcooked / Undercooked Foods | Incorrect temperature or time setting | You may have to adjust the time and temperature to desired taste. |
| Because your Air Fryer Oven is smaller than your regular oven, it will heat up faster and generally cook in shorter periods of time. | ||
| Burning Smell | Food build-up inside fryerCooking compartments | Refer to “Cleaning Your Air Fryer Oven” Section. |
| Touch panel interface is non-responsive | Panel is dirty or greasyExcess moisture on panelController is malfunctioning | Ensure panel is clean and free of debris before using.Ensure panel is clean and dry, and use dry hands to operate.Unplug unit and let it rest for 60 seconds before plugging in again. If the error persists contact aftersales support. |
| Touch panel right hand side is non responsive | The middle partition is not in placeThe middle partition has not been inserted correctly | Ensure the middle partition has been inserted as per the instructions. |
| Air Fryer will not start after programming | Door is openTime difference between sides in SYNC mode is too much | Close the door.Reduce the time difference. |
This Sunbeam product is covered by a 12 month replacement or repair warranty, which is in addition to your rights under the Australian Consumer Law (if your product was purchased in Australia) or New Zealand Consumer Guarantees Act (if your product was purchased in New Zealand).
Should you experience any difficulties with your product during the warranty period, please contact our customer service line for advice on 1300 881 861 in Australia, or 0800 786 232 in New Zealand.
Australia
www.sunbeam.com.au 1300 881 861
New Zealand
www.sunbeam.co.nz 0800 786 232
Upon receipt of your claim, Sunbeam will seek to resolve your difficulties or, if the product is defective, advise you on how to obtain a replacement or refund.
To assist us in managing warranty claims, we recommend you register your product as soon as practicable after purchase, on our Sunbeam website and uploading a copy of your original receipt. View the Support section of the Sunbeam website.
In order to make a claim under our warranty, you must have the original proof of purchase documentation for the product and present it when requested (if not already uploaded to our website).
Should your product develop any defect within 12 months of purchase because of faulty materials or workmanship, we will replace or repair it, at our discretion, free of charge. A product presented for repair may be replaced by a refurbished product of the same type rather than being repaired. Refurbished parts may be used to repair the product.
Our replacement or repair warranty only applies where a defect arises as a result of faulty material or workmanship during the warranty period. Your warranty does not cover misuse or negligent handling (including damage caused by failing to use the product in accordance with this instruction booklet), accidental damage, or normal wear and tear.
Your warranty does not:
• cover freight or any other costs incurred in making a claim, consumable items, accessories that by their nature and limited lifespan require periodic renewal (such as filters and seals) or any consequential loss or damage; or
• cover damage caused by:
- power surges, power dips, voltage supply problems, or use of the product on incorrect voltage;
- servicing or modification of the product other than by Sunbeam or an authorised Sunbeam service centre;
- use of the product with other accessories, attachments, product supplies, parts or devices that do not conform to Sunbeam specifications; or
- exposure of the product to abnormally corrosive conditions; or
- extend beyond 3 months if the product is used in commercial, industrial, educational or rental applications.
The benefits given to you by our warranty are in addition to other rights and remedies under law in relation to the product.
In Australia our goods come with guarantees that cannot be excluded under the Australian Consumer Law. You are entitled to a replacement or refund for a major failure and for compensation for any other foreseeable loss or damage. You are also entitled to have the goods repaired or replaced if the goods fail to be of acceptable quality and the failure does not amount to a major failure.
Our goods also come with guarantees that cannot be excluded under the New Zealand Consumer Guarantees Act.
If your warranty claim is not accepted, we will inform you and if requested to do so by you, repair the product provided you pay the usual charges for such repair. You will also be responsible for all freight and other costs.
Should your product require repair or service after the warranty period, contact your nearest Sunbeam service centre. For a complete list of Sunbeam's service centres, visit our website or call our customer service line for advice on 1300 881 861 in Australia, or 0800 786 232 in New Zealand.
Need help with your appliance?
Contact our customer service team or visit our website for information and tips on getting the most from your appliance.
Australia
| visit
www.sunbeam.com.au
phone
1300 881 861
New Zealand
visit
www.sunbeam.co.nz
phone
0800 786 232
NEWELL AUSTRALIA PTY LTD. ABN 68 075 071 233
Sunbeam is a registered trade mark.
Made in China to Sunbeam's specification.
Due to minor changes in design or otherwise,
the product you buy may differ slightly from the one shown here.
Approved by the appropriate electrical regulatory authorities.
© Copyright Sunbeam 2024.
12/23
- Important instructions – retain for future use.
- Sunbeam's Safety Precautions
- SAFETY PRECAUTIONS FOR YOUR MULTI ZONE AIR FRYER OVEN
- Sunbeam is very safety conscious when designing and manufacturing consumer products, but it is essential that the product user also exercise care when using an electrical appliance. Listed below are precautions which are essential for the safe use of an electrical appliance:
- Hot Surface Do Not Touch
- Features of your Sunbeam Multi Zone Air Fryer Oven
- Parts
- Control Panel
- Temperature Settings Guide
- Before First Use
- Preparing Your Air Fryer Oven
- Usage Instructions
- Configuring Your Air Fryer Oven
- Removing the Middle Partition
- Re-inserting the Middle Partition
- Choosing Your Accessories
- Program – one side or large compartment only
- Program – both sides with the same settings (MATCH available)
- Program – both sides with different settings (SYNC available)
- Cooking
- Additional Functions
- Cooking Functions and Presets
- Cooking Functions
- Food Presets
- Helpful Tips
- Care and Cleaning
- To clean after use
- Cooking Guide
- Guide to cooking popular foods in your air fryer oven
- Troubleshooting
- This Sunbeam product is covered by a 12 month replacement or repair warranty, which is in addition to your rights under the Australian Consumer Law (if your product was purchased in Australia) or New Zealand Consumer Guarantees Act (if your product was purchased in New Zealand).
- Australia
- New Zealand
- Your warranty does not:
- • cover damage caused by:
- Need help with your appliance?
- Contact our customer service team or visit our website for information and tips on getting the most from your appliance.
Brand : SUNBEAM
Model : AFP6000BK
Category : Deep fryer