IKBC - Refrigerator InAlto - Free user manual and instructions
Find the device manual for free IKBC InAlto in PDF.


User questions about IKBC InAlto
0 question about this device. Answer the ones you know or ask your own.
Ask a new question about this device
Download the instructions for your Refrigerator in PDF format for free! Find your manual IKBC - InAlto and take your electronic device back in hand. On this page are published all the documents necessary for the use of your device. IKBC by InAlto.
USER MANUAL IKBC InAlto
Beverage Centre 188L
MODEL CODE
IKBC
WWW.INALTO.HOUSE


Residentia Group Pty Ltd
Head Office
165 Barkly Avenue, Burnley
Victoria Australia 3066
Postage
PO Box 5177, Burnley
Victoria Australia 3121
ACN.
600 546 656
Online
residentia.group
Congratulations on purchasing your new appliance.
The InAlto brand is proudly distributed within Australia by Residentia Group Pty Ltd.
Please refer to the warranty card at the rear of this manual for information regarding your product's parts and labour warranty, or visit us online at www.residentia.group
At Residential Group, we are customer obsessed and our Support Team are there to ensure you get the most out of your appliance. Should you want to learn more about the various features of your appliance, and importantly taking care of it when cleaning, our Support Team are here to help. You can use our online Support Centre at anytime by visiting: http://support.residentiagroup.com.au
You can contact us via calling us on 1300 11 HELP (4357)
Or email us at: support@residentiagroup.com.au
It is important that you read through the following use and care manual thoroughly to familiarise yourself with the installation and operation requirements of your appliance to ensure optimum performance.
Again, thank you for choosing an InAlto appliance and we look forward to being of service to you.
Kind Regards,
The Residentia Team
Troubleshooting
There are many common issues you may experience with your kegerator that can be solved very easily, without the need of a service call. Try the tips below to troubleshoot your unit should you experience any problems:
| PROBLEM | POSSIBLE CAUSE |
| Kegerator does not operate | Not plugged in or the appliance is turned offThe circuit breaker tripped or a fuse has blown out |
| Kegerator is not cold enough | Check the temperature control settingExternal environment may require a higher settingThe door is opened too oftenThe door is not closed completelyThe door gasket is not sealing properly |
| Kegerator is turning on and off frequently | The room temperature is hotter than normal.The door is opened too often.The door is not closed completely.The temperature control is not set correctly.The door gasket does not seal properly. |
| The light does not work | Not plugged in.The circuit breaker tripped or a fuse has blown.The light bulb has burned out.The light button is "OFF". |
| Vibrations | Check to assure that the kegerator is on a level surface. |
| The kegerator seems to make too much noise | A faint humming noise may come from the flow of the refrigerant, which is normal.As each cycle ends, you may hear gurgling sounds caused by the flow of refrigerant in your kegerator.Contraction and expansion of the inside walls may cause popping and crackling noises.During the defrosting process you may hear a water flowing sound caused by water flowing into the drain trough.The kegerator is not on a level surface. |
| The door will not close properly | The kegerator is not on a level surface.The gasket is dirty.The shelves are out of position. |
| Smell/odor | Check for spills and for food or drink that is out of date or incorrectly packaged |
| Outer surface of appliance is wet | Condensation has formed and can be wiped dry |
| External surface is warm | Compressor is working to transfer heat from inside the cabinet |

RESIDENTIA
GROUP
Care and Maintenance
Cleaning your kegerator:
• Turn off the power, unplug the appliance, and remove all items including the dispense kit.
- Wash the inside surfaces with warm water and baking soda solution. The solution should be about 2 tablespoons of baking soda to a quart of water.
- Wring excess water out of the sponge or cloth when cleaning area of the controls, or any electrical parts.
- Wash the outside cabinet with warm water and mild liquid detergent. Rinse and wipe dry with a clean soft cloth.
- Do not use steel wool or a steel brush on the stainless steel. These will contaminate the stainless steel with steel particles and rusting may occur.
- Dust the front grill and back of the unit twice yearly. Make sure the power is off before cleaning.
• It is recommended to clean the unit completely inside and out yearly to maximize the longevity of the product.
Moving your kegerator:
• The provided casters will allow you to roll the appliance from one location to another in your home easily.
• For transportation, remove the keg, the dispense kit and any other items you may have inside the unit.
- Securely tape down all loose items inside your appliance and tape the door shut.
- Be sure the appliance stays secure in the upright position during transportation.
- Protect the outside of the appliance with a blanket or similar item.
Energy Saving Tips
• Place the unit in the coolest area of the room, away from heat-producing appliances and out of direct sunlight
• Let heated items and beverages cool to room temperature before placing them into the appliance
- Do not overload the beer dispenser as it forces the compressor to run longer
- Wrap items properly and wipe containers dry before placing them in the unit to cut down on frost build-up
- Do not line shelves with aluminum foil, wax paper, or paper towels, as liners can interfere with cold air circulation, reducing cooling efficiency
- Position items so that air can circulate freely around them
• Do not leave door open for longer than required
• Make sure items do not touch the back of the storage compartment
• Do not set the thermostat to exceedingly cold temperatures
IMPORTANT SAFEGUARDS
Before using this appliance, it must be properly positioned and installed as described in this manual, so please read the manual carefully. To reduce the risk of fire, electrical shock or injury when using the appliance, follow these basic precautions. Failure to heed these safety requirements may result in severe personal injury or death.
! DANGER !
- Plug into a grounded 3-prong outlet. Do not under any circumstances cut or remove the third ground prong from the power cord supplied, do not use an adapter, and do not use an extension cord.
- It is recommended that a separate circuit, serving only your appliance be used. Do not use outlets that can be turned off by a switch or pull chain.
- Never clean appliance parts with flammable fluids and do not store or use gasoline or other flammable vapors and liquids in the vicinity of this or any other appliance. The fumes can create a fire hazard or explosion.
- Unplug the appliance or disconnect power before cleaning or servicing. Failure to do so can result in electrical shock or death.
- Do not attempt to repair or replace any part of your appliance unless it is specifically recommended in this manual. All other servicing should be referred to a qualified technician.
- This appliance is CFC- and HFC-free and contains small quantities of Isobutane (R600a) which is environmentally friendly, but flammable. It does not damage the ozone layer, nor does it increase the greenhouse effect. Care must be taken during transportation and setting up of the appliance that no parts of the cooling system are damaged. Leaking coolant can ignite and may damage the eyes.
In the event of any damage:
- Avoid open flames and anything that creates a spark.
- Disconnect from the electrical power line.
- Air the room in which the appliance is located for several minutes, and
-
Contact the Service Department for advice.
-
The more coolant there is in an appliance, the larger the room it should be installed in. In the event of a leakage, if the appliance is in a small room, there is the danger of combustible gases building up. For every ounce of coolant at least 325 cubic feet of room space is required. It is hazardous for anyone other than an Authorized Service Person to carry out servicing or repairs to this appliance.
- Take serious care when handling, moving, and using the appliance to avoid either damaging the refrigerant tubing or increasing the risk of a leak.
- Replacing component parts and servicing shall be done by factory authorized service personnel so as to minimize the risk of possible ignition due to incorrect parts or improper service.
! WARNING !
• Use two or more people to move and install appliance. Failure to do so can result in back or other injury.
- To ensure proper ventilation for your appliance, the front of the unit must be completely unobstructed. Choose a well-ventilated area with temperatures above 50°F (10°C) and below 109.4°F (43°C). Do not install in a location where the unit will be exposed to direct sun exposure as this may result in unsatisfactory performance.
• The appliance should not be located next to ovens, grills or other high heat sources or in areas of extreme cold.
- The appliance must be installed in accordance with state and local codes. A standard electrical supply (220-240V AC only, 50 Hz), properly grounded in accordance with the National Electrical Code and local ordinances is required.
- Do not kink or pinch the power supply cord of appliance.
• It is important for the appliance to be leveled in order to work properly.
• DANGER! Risk of child entrapment!
- Never allow children to operate, play with or crawl inside the appliance. Child entrapment and suffocation are not just problems of the past, junked or abandoned appliances are still dangerous. When no longer using your old appliance, take off the door and leave the shelves in place so that children may not climb inside easily.
- Do not use solvent-based cleansers or abrasives on the interior as they may damage or discolor the interior.
- Because of potential safety hazards under certain conditions, it is strongly recommended that you do not use an extension cord with this appliance. However, if you must use an extension cord, it is absolutely necessary that it be a UL/CUL-Listed, 3-wire grounding type appliance extension cord having a grounding type plug and outlet and that the electrical rating of the cord be 220-240 volts.
- If the appliance is going to be used in an area that is prone to power surges/outages, it is suggested that you use a power surge protector. The surge protector that you select must have a surge block high enough to protect the appliance it is connected to. Damages due to power surges are not considered a manufacturer covered defect and will void your product warranty.
- The cord should be secured behind the appliance and not left exposed or dangling to prevent accidental injury. Never unplug the appliance by pulling the power cord. Always grip the plug firmly and pull straight out from the receptacle. Repair or replace immediately all power cords that have become frayed or otherwise damaged. Do not use a cord with cracks or abrasion damage along its length or at either end. When moving the appliance, be careful not to damage the power cord.
• Do not use this apparatus for other than its intended purpose. - IEC standard: This appliance is not intended for use by persons (including children) with reduced physical, sensory or mental capabilities, or lack of experience and knowledge, unless they have been given supervision or instruction concerning use of the appliance by a person responsible for their safety.
• Children should be supervised to ensure that they do not play with the appliance. - EN standard: This appliance can be used by children aged from 8 years and above and persons with reduced physical, sensory or mental capabilities or lack of experience and knowledge if they have been given supervision or instruction concerning use of the appliance in a safe way and understand the hazards involved.
- Children shall not play with the appliance. Cleaning and user maintenance shall not be made by children without supervision.
• To avoid a hazard due to instability of the appliance, it must be fixed in accordance with the instructions. - Keep ventilation openings, in the appliance enclosure or in the built-in structure, clear of obstruction.
- Do not use mechanical devices or other means to accelerate the defrosting process, other than those recommended by the manufacturer.
• Do not damage the refrigerant circuit. - Do not use electrical appliances inside the food storage compartments of the appliance, unless they are of the type recommended by the manufacturer.
- Do not store explosive substances such as aerosol cans with a flammable propellant in this appliance.
- This appliance is intended to be used in household and similar applications such as staff kitchen areas in shops, offices and other working environments; farm houses and by clients in hotels, motels and other residential type environments; bed and breakfast type environments; catering and similar non-retail applications.
- Please according to local regulations regarding disposal of the appliance for its flammable refrigerant and blowing gas.
• The lamp must be replaced by the manufacturer, its service agent or similarly qualified persons.
SAVE THESE INSTRUCTIONS.
Installation Instructions
BEFORE USE:
- Remove the exterior and interior packaging, but do not remove any foam insulation surrounding the pipes at the back.
- Before connecting the unit to the power source, let it stand upright for approximately 24 hours. This will reduce the possibility of a malfunction in the cooling system from handling during transportation.
- Clean the interior surface with lukewarm water using a soft cloth.
- Place the unit on a flat, solid floor that is strong enough to support it when it is fully loaded. To level the appliance, adjust the rolling casters at the bottom of the unit.
- When moving your refrigerator, please do not incline it more than 45 degrees.
- Locate the appliance away from direct sunlight and sources of heat (stove, heater, radiator, etc.). Direct sunlight may affect the acrylic coating and heat sources may increase electrical consumption. Extreme cold ambient temperatures may also cause the unit to perform improperly. The optimal ambient temperature range is 50°F – 109.4°F. Do not mount the draft tower remotely, as the exposed beer line will not be refrigerated, causing foam.
- Avoid locating the unit in damp areas.
• Unwind the power cord to its full length and inspect for damage before plugging into the outlet. - Plug the refrigerator into an exclusive, properly installed and grounded wall outlet. Do not under any circumstances cut or remove the third (ground) prong from the power cord. Any questions concerning power and/or electrical grounding should be directed to a certified electrician or authorized products service center.
- After plugging the appliance into a wall outlet, allow the unit to cool down for 3 to 4 hours before installing a keg in the appliance.
Step 4 – Connect CO₂ hose to Sanke D Keg Coupler
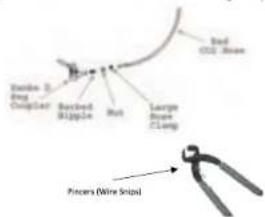
Step 5 – Connect the Red CO₂ Hose to Regulator
- Place hose clamp on Red CO₂ Hose. Install Red CO₂ Hose onto the Barbed Nipple on Regulator. Then squeeze hose clamp with pincers or wire snips shown above.
*NOTE: if you find it leaking after step 8 then tighten with a wrench. Do not over tighten.
Step 6 – Install Regulator
- With a charged/fill CO₂ cylinder (only use beverage/ food grade CO₂) install Regulator to CO₂ cylinder; before tightening make sure the Regulator gauges are in the upright position, so they can be read properly.
* NOTE: Then tighten with Large Adjustable Wrench until snug.
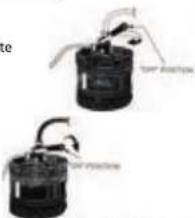
ep 7 - Tapping the Keg
- Align Sanke D Keg coupler with lugs on keg and rotate clockwise until coupler is in locked position.
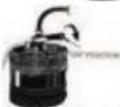
- Pull plastic handle out and push down to switch to the on position (this will lock in position)
- Align Sanke D Keg coupler with lugs on keg and rotate clockwise until coupler is in locked position.
- Pull plastic handle out and push down to switch to the on position (this will lock in position)
Step 8 - Turning on the CO_2
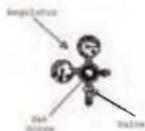
- Make sure the valve on the Regulator is in the on position to charge the keg (Parallel with CO₂ line)
• Turn knob on CO _2 tank counter clockwise to turn tank on. - Use the set screw located in the center of the regulator to begin pushing CO_2 into your keg. Slowly turn set screw clockwise until the top gauge reads "5PSI".
NOTE: Test for leaks at each fitting, with soap and water mixture for CO₂ leaks.
Once you have determined there are no leaks in the CO_2 and Beer lines you are now ready to pour.
Kegerator Assembly
Identifying your parts, this system contains 7 basic parts
1) Kegerator Tower
6) Spanner Wrench
2) Faucet
7) 4 Hose Clamps (2 Extra)
3) Regulator
8) Red Co2 Hose
4) Sanke D Keg Coupler
5) Co2 Cylinder
Tools Needed
1) Large Adjustable wrench
2) Pincers or straight handled wire snips
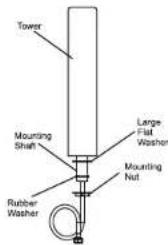
Step 1 – Installing Kegerator Tower
- Remove the large flat washer, rubber washer, and the mounting nut from the tower. Put your hose and tower mounting shaft through the hole on the top of the Kegerator. Attach from the inside of the unit: the large flat washer, rubber washer, and mounting nut.
• Hand tighten your mounting nut. - With a Large Adjustable Wrench gently tighten mounting nut. *should not be more than a quarter of a turn. *
*NOTE: Tower should be firm against the kegerator with no movement.
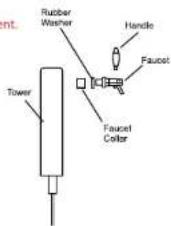
Step 2 – Installing the Faucet
- Place the faucet collar onto the faucet
*With Wrench Spanner provided, make sure faucet is tight to threaded shank. *
- Screw faucet into tower by hand until faucet head is straight.
• Hand tighten faucet handle onto faucet
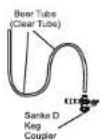
Step 3 – Connect Beer Line to Sanke D Keg Coupler with filling
- Hand tighten tower hose onto fitting. Then connect the fitting with Sanke D Keg Coupler
*NOTE: if you find it leaking after step 8 then you can tighten with a wrench. Do not over tighten.
Operation Instructions
The Kegerator is able to maintain the proper dispensing temperature for beer, provided it is installed correctly in the proper environment. For best results, mount the draft tower as close to the top of the kegerator as possible and seal any openings to prevent heat transfer. Avoid opening and closing the door of the kegerator too often to ensure a consistent temperature inside the unit. Factory preset temperature is 34 degrees Fahrenheit.
The kegerator should be placed in an area where the ambient temperature range is between 50-109.4 degrees Fahrenheit (10-43 degrees Celsius). If the ambient temperature is above or below this range, the performance of the unit may be affected. For example, placing your unit in extreme cold or hot conditions may cause interior temperatures to fluctuate. Please be aware that the desired temperatures may fluctuate depending on the ambient temperature and the orientation of the keg.
INSTALLING THE HANDLE
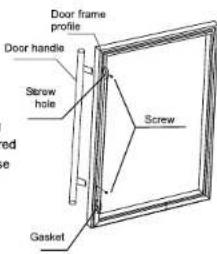
This appliance includes a stainless-steel handle that is not required to operate this unit.
To install the handle please follow the below instructions:
- Pull away the door gasket in the area where the handle is to be installed as shown in Illustration. The gasket is easily displaced by hand, no tools are necessary.
- Locate the screws included in the bag with the user's guide. Insert the screws into the holes as shown.
- Align the handle with the screws installed. Tighten the screws using a Phillips head screwdriver until the handle sets both flush and secured tightly against the door frame. (DO NOT over tighten as this will cause damage to the handle assembly).
- Replace the door gasket to its original position.
OPERATING YOUR APPLIANCE
It is recommended that you install the appliance in a place where the ambient temperature is between 10°C and -43°C. If the ambient temperature is above or below recommended temperatures, the performance of the unit may be affected. For example, placing your unit in extremely cold or hot conditions may cause interior temperature s to fluctuate. The operating temperature range may not be reached.
CONTROL PANEL
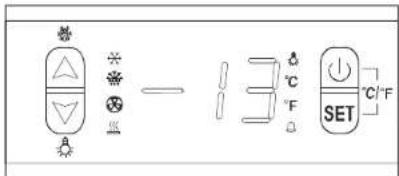
ON/OFF Power
To turn the appliance ON or OFF, press and hold the POWER key ⏻ for 5 seconds.
UP and DOWN
Press first, then press or button to increase(warm) or decrease(cool) the set temperature by 1°C.
Press 📂 again, the temperature is selected and shows the actual temperature. If no other further operation in 6 seconds, display will show actual temperature in the cooler.
°C/F Selector
Selects the temperature display setting in Fahrenheit or Celsius degrees. To change the temperature from Fahrenheit to Celsius or from Celsius to Fahrenheit, press ☐ and ☑ at the same time, then hold for 6 seconds.
Setting the Temperature Control
The temperature you are setting will increase by one degree each time you press the △ key, and will decrease by one degree each time you press the ▽ key. The range of the temperature control is from 0°C to 10°C.
To view the set temperature at any time, press the ☑ key. The set temperature will flash in the display window for 6 seconds. After 6 seconds, the temperature inside the unit will reappear in the display window.
Additional Information
Installation
The Kegerator is designed for built-in or free-standing installation and is suitable for indoor and outdoor use.
For freestanding installation, 5" (127mm) of space at the back and sides of the unit and 4" (102mm) at the top are suggested, which allows the proper air circulation to cool the compressor and condenser for energy saving. Even for built-in installation, it is a must to keep at least 3/16" (5mm) of space on each side, 2" (50mm) at the back and 1/16" (1.6mm) at the top to ensure proper service access and ventilation. And the air vent at the front of the appliance must never be covered or blocked in any way.
Defrosting
The Kegerator defrosts automatically under normal operating conditions. Condensate collects in the drainage channel behind the rear wall of the unit, and flows through a drainage hole into the drip tray near the compressor where it evaporates. However, frost may accumulate on the evaporator if the unit is repeatedly opened in a high heat or high humidity location. If this frost pattern does not clear within 24 hours, the appliance will require manual defrosting.
Interior light
The unit has an inside light that switches on when the door is opened and goes off automatically when the door is closed.
Internal fan
The Kegerator is equipped with an internal fan that circulates the air inside to help maintain a constant temperature from top to bottom.
Alarms
-
Door alarm: A buzzing sound will alert you that the door has been left open for longer than a minute. Touch any button to silence the buzzer, or just close the door.
-
High/low temperature alarm: This alarm will alert you if the interior cabinet temperature goes above 30°C or below -15°C. Touch any button to turn off the alarm.
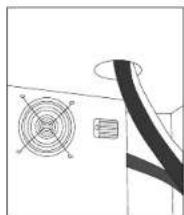
Black Plastic Tube
This tube directs cold air into the beer tower, as shown in the illustration below.
natural_image
Pure technical diagram showing a circular component with concentric rings and a rectangular inset, without any text or symbols.NOTE:
If the unit is unplugged, or power is lost or turned off, you must wait 3 to 5 minutes before restarting the unit. If you attempt to restart before this time delay, the unit will not start.
- Beverage Centre 188L
- Residentia Group Pty Ltd
- Head Office
- Postage
- ACN.
- Online
- Troubleshooting
- Care and Maintenance
- Energy Saving Tips
- IMPORTANT SAFEGUARDS
- ! DANGER !
- ! WARNING !
- SAVE THESE INSTRUCTIONS.
- Installation Instructions
- Step 6 – Install Regulator
- Step 8 - Turning on the CO_2
- Kegerator Assembly
- Operation Instructions
- INSTALLING THE HANDLE
- OPERATING YOUR APPLIANCE
- CONTROL PANEL
- ON/OFF Power
- UP and DOWN
- °C/F Selector
- Setting the Temperature Control
- Additional Information
- Installation
- Defrosting
- Interior light
- Internal fan
- Alarms
- Black Plastic Tube
- NOTE:
Brand : InAlto
Model : IKBC
Category : Refrigerator