GGSRCB900BS - Range hood Sôlt - Free user manual and instructions
Find the device manual for free GGSRCB900BS Sôlt in PDF.


| Type | 90cm Box Canopy Range Hood |
| Brand | Sôlt |
| Model | GGSRCB900BS |
| Finish | Stainless Steel with Black Glass Fascia |
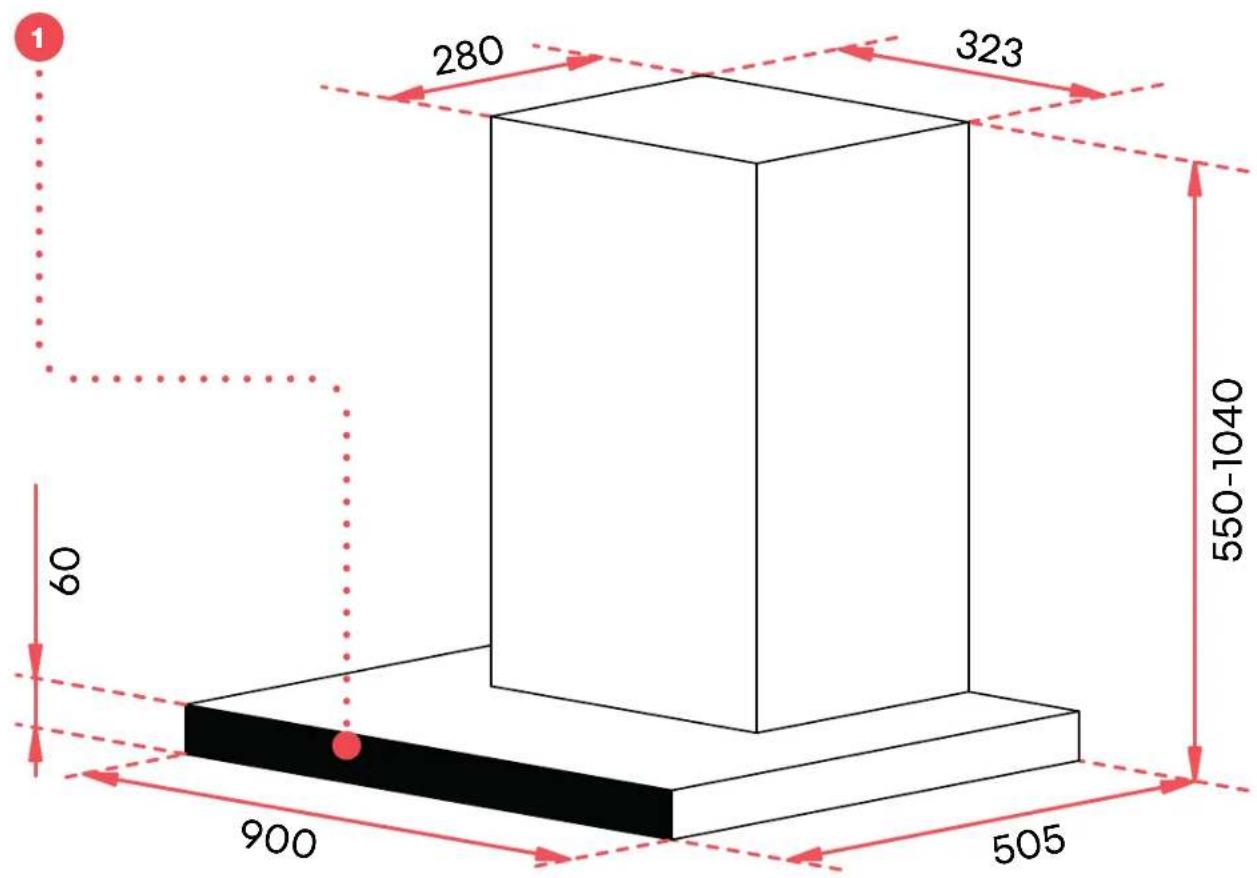
| Dimensions (W × D × H) | 900 × 505 × 550-1040 mm |
| Weight | 16.78 kg |
| Power Supply | 220-240V~, 50-60Hz |
| Extraction Rate | 1000 m³/hr |
| Speed Settings | 4 (Low, Medium, High, Boost) |
| Noise Rating | Max 70 dB(A) |
| Lighting | 2 × 1.5W LED |
| Grease Filters | 3 × Aluminium Baffle Filters (dishwasher safe) |
| Carbon Filters | Optional accessory, replace every 2-3 months |
| Ducting Diameter | 150 mm (expandable pipe included) |
| Installation Type | Ducted or recirculation (with optional carbon filters) |
| Control Type | Electronic buttons with digital display |
| Delayed Power Off | Yes, 5 minutes |
| Minimum Distance from Cooktop | 650 mm (gas/electric); up to 760 mm depending on gas output |
| Maximum Distance from Cooktop | 800 mm |
| Warranty | 2 years (5 years with registration) |
Frequently Asked Questions - GGSRCB900BS Sôlt
User questions about GGSRCB900BS Sôlt
0 question about this device. Answer the ones you know or ask your own.
Ask a new question about this device
Download the instructions for your Range hood in PDF format for free! Find your manual GGSRCB900BS - Sôlt and take your electronic device back in hand. On this page are published all the documents necessary for the use of your device. GGSRCB900BS by Sôlt.
USER MANUAL GGSRCB900BS Sôlt
Congratulations on purchasing your new 90cm Box Canopy Rangehood. Sôlt is proudly distributed within Australia by Residentia Group Pty Ltd.
Please refer to the warranty card at the rear of this manual for information regarding your product's parts and labour warranty, or visit us online at: → www.residentiagroup.com.au
At Residentia Group, we are customer obsessed and our Support Team are there to ensure you get the most out of your appliance. Should you want to learn more about your unit or how to take care of it, our Support Team are here to help.
You can use our online Support Centre at any time by visiting: → http://support.residentiagroup.com.au
Or you can contact us via phone by dialling: 1300 11 HELP (4357).
It is important that you read through the following use and care manual thoroughly to familiarise yourself with the installation and operation requirements of your appliance to ensure optimum performance.
Again, thank you for choosing an Sôlt appliance and we look forward to being of service to you.
Kind Regards,
The Residentia Team
Contents
| Safety Information | 04 | |
| Your Rangehood | 06 | |
| Operating Instructions | 07 | |
| Installation Instructions | 08 | |
| Cleaning & Maintenance 12 | ||
| Troubleshooting | 14 | |
| Technical Specifications | 15 | |
| Purchase Details | 16 | |
| Warranty Information | 18 | |
Customer Care
Sôlt recommends the use of original spare parts.
When contacting our customer service team by calling 1300 11 4357, or by e-mailing support@residentiagroup.com.au, please ensure that you have the following information at hand, which can be found on your appliances' rating plate:
- Model Number
- Serial Number
Safety Information
Conditions of Use
This appliance is intended to be used in household and similar applications such as farm houses or by customers in serviced apartments, holiday apartments and other residential type of environments.
Before Installation & Maintenance
- Read these instructions carefully before installing or using this appliance. Ensure that you keep this manual on hand for future use. In the event that you misplace this manual, a digital version can be found by visiting our website at www.solt.house
- Please make this information available to the person responsible for installing the appliance as it could reduce your installation costs.
- In order to avoid a hazard, this appliance must be installed according to these instructions for installation.
- This appliance is to be properly installed and earthed only by a suitably qualified person.
- Connection to a good earth wiring system is essential and mandatory.
- Disconnect the appliance from the electricity supply before carrying out any work or maintenance on it.
- Means for disconnection must be incorporated in the fixed wiring in accordance with the wiring rules.
- Alterations to the domestic wiring system must only be made by a qualified electrician. Failure to follow this advice may result in electrical shock or death.
- The use of attachments is not recommended by the manufacturer and distributor as they may be hazardous.
- Failure to use caution could result in injury or cuts.
- This rangehood is a domestic appliance which has been manufactured and tested to comply with Australian and New Zealand Standard AS/NZS 60335.2.31.
- IMPORTANT: Check for any damage or marks. If you find the appliance is damaged or marked, you must report it within 7 days if you wish to claim for damage or marks under the manufacturer's warranty. This does not affect your statutory rights.
- Failure to install the appliance correctly could invalidate any warranty or liability claims.
- For further information regarding installation including a step-by-step guide, please refer to pages 08–10.
Operation & Maintenance
- WARNING: Follow these instructions carefully to avoid injury, electric shock or fire.
- Ensure the rangehood is switched off before carrying out maintenance, to avoid any possibility of electric shock.
- Under no circumstances should children play with the appliance. Cleaning and user maintenance should never be undertaken by children without supervision.
- This appliance has not been designed to be used by persons (including children) with reduced physical, sensory or mental capabilities, or a lack of experience and knowledge, unless they have been given adequate supervision or instruction concerning the use of the appliance by a person responsible for their safety.
- Do not operate more than 4 cooktop burners at the same time. Never flambé under the rangehood.
- This rangehood is not suitable for use over barbecues, and cannot be installed for external use; only indoors.
- The rangehood and filters must be cleaned regularly to keep in good working order.
- The exhaust from the rangehood must not be discharged into any heating flue, which may carry combustion products from other sources.
- Exhaust air must not be discharged into a wall cavity, unless the cavity is designed for such a purpose. Regulations concerning the discharge of air must be met.
- There must be adequate ventilation of the room when the rangehood is used at the same time as appliances burning gas or other fuels.
- Your new rangehood is guaranteed against electrical or mechanical defects, subject to certain exclusions that are noted in the Warranty Terms and Conditions (at the rear of this user manual). The foregoing does not affect your statutory rights.
- Always cover lit gas burners with pots or pans when rangehood is in use. Ensure that gas burners are powered off before removing pots or pans.
- CAUTION: Never leave lit gas burners unattended or exposed due to the risk of fire. Regardless of whether cooking for long or short periods, the cooking process must be supervised continuously.
- For further information regarding operating instructions, please refer to page 07.
Exhaust Ducting Installation
- The following rules must be strictly followed to obtain optimal air extraction.
- Keep exhaust ducting short and straight.
- Do not reduce the size or restrict exhaust duct.
- Keep bends in the exhaust duct to a minimum; the more bends the lower the extraction performance.
- When using flexible ducting always install duct with helix pulled taut to minimise pressure loss.
- Connect the extractor to the exhaust duct through a pipe of minimum diameter 120mm
- Failure to observe these basic instructions will drastically reduce the performance and increase the noise levels of the rangehood.
- Exhaust air must not be discharged into a wall cavity, unless the cavity is designed for that purpose. The exhaust from the rangehood must not be discharged into any heating flue, which may carry combustion products from other sources.
- NOTE: Some installations may require the expandable/telescopic ducting to be cut to length. Cut with sharp tin snips or a fine-tooth hack saw blade, taking care not to distort or dent the exhaust cover. Where using expandable ducting, it's important to have the ducting fully taught to maximise efficiency of the airflow.
- Important notice regarding the extraction mode.
- WARNING: Risk of poisoning from exhaust gases sucked back. Never operate the device in extraction mode simultaneously with an open flue appliance when there is not adequate airflow guaranteed.
- Open duct combustion equipment (for example, gas, oil, wood or coal-fired heaters, tankless water heaters, water heaters) pulls combustion air from the room and runs it through an exhaust pipe or chimney to the outside. In the extraction mode, indoor air is removed from the kitchen and the adjacent rooms — without sufficient air intake this creates a vacuum. Toxic gases from the chimney or extraction duct can thereby be sucked back into the living spaces.
- Always ensure that a sufficient supply of fresh air is guaranteed and that the air can circulate.
-
An air supply / extractor box alone does not ensure compliance with the limit value.
-
Safe operation is only possible when the negative pressure in the room where the appliance is located does not exceed 4 Pa (0.04 mbar). This can be achieved when the air required for combustion can flow through openings that are not closable, for example in doors, windows, in conjunction with an air supply / extractor box or through other technical measures. In any case, consult a qualified chimney sweep who can assess the entire ventilation of your house and propose appropriate measures for adequate ventilation.
- If the rangehood is used exclusively in the recirculation mode, unrestricted operation is possible.
- During transportation, protective packaging was used to protect the appliance against any damage. After unpacking, please dispose of all elements of packaging in a way that will not cause damage to the environment.
Disposal
- This appliance is labeled in compliance with European directive 2012/19/EC for Waste Electrical and Electronic Equipment (WEEE). By ensuring that this appliance is disposed of correctly, you will help prevent any possible damage to the environment and to human health, which might otherwise be caused if it were disposed of in the wrong way.

- The symbol on the product indicates that it may not be treated as normal household waste. It should be taken to a collection point for the recycling of electrical and electronic goods.
- This appliance requires specialist waste disposal. For further information regarding the treatment, recover and recycling of this product please contact your local council, your household waste disposal service, or the shop where you purchased it.
- For more detailed information about treatment, recovery and recycling of this product, please contact your local city office, your household waste disposal service or the shop where you purchased the product.
- To disassemble your rangehood, perform the installation instructions in reverse order. Always perform disassembly with two people to avoid injuries.
- All materials used for packaging the appliance are environmentally friendly; they are 100% recyclable and are marked with the appropriate symbol.
Your Rangehood
GGSRCB900BS
Rangehood Key
1. Control Panel
Included Accessories
- 1 × Rangehood, User Manual & Quick Start Guide
- 1 × Expandable ∅ 150mm Pipe
- 1 × One-Way Valve (2 pieces)
• 1 × Packet of Screws & Wall Plugs - 2 × Flue Pieces (Upper & Lower)
• Wall, Inside & Outside Chimney Brackets
Tools Required for Installation
- Ducting relevant to your installation requirements, including any rigid bends, vents or adapters
- Duct Tape or Cable Ties
- Drill and Screwdriver
• Spirit Level and Tape Measure
• Jigsaw, Ladder and Pencil
Operating Instructions
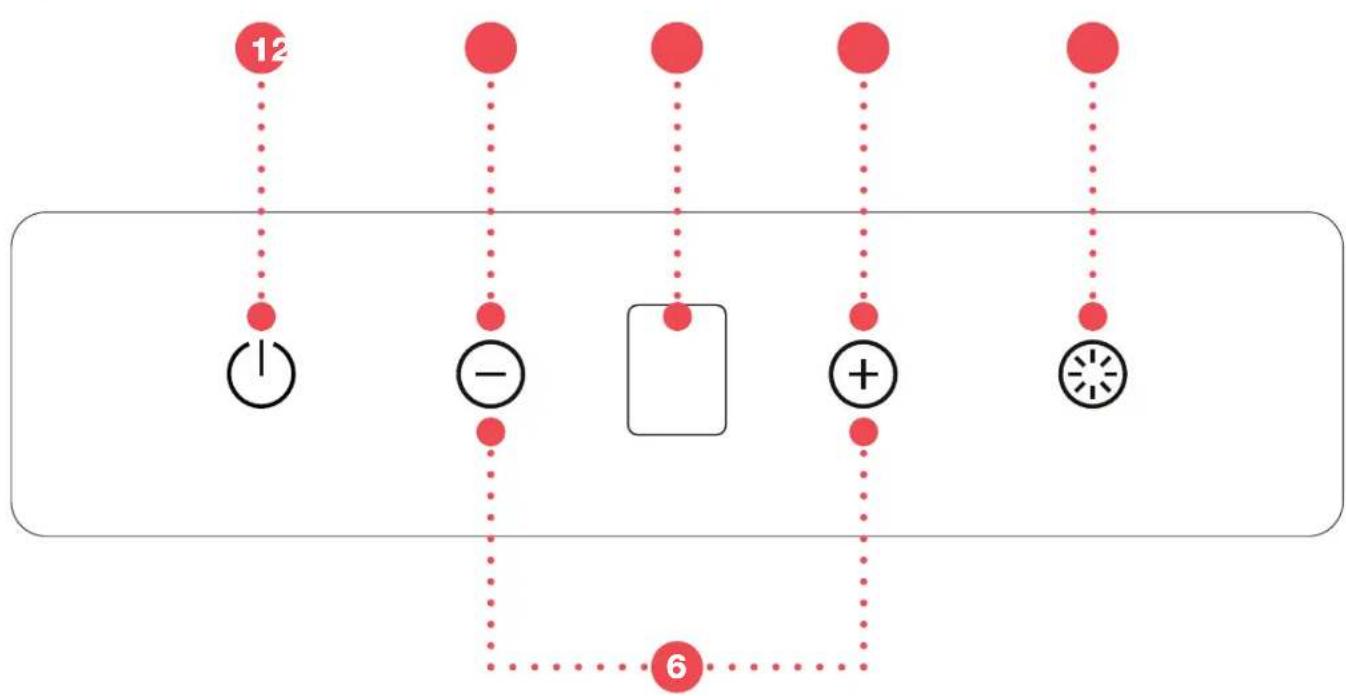
Control Panel
flowchart
graph TD
    A["12"] --> B["1"]
    C["-"] --> D["6"]
    E["6"] --> F[" "]
    G["+"] --> H["+"]
    I["+"] --> J["★"]
Control Panel Key
1. Power
Press this button to turn the rangehood on and off.
2. Decrease Speed
Press this button to decrease the extraction speed by one power level.
NOTE: When operating on power level 1, the decrease button will not change any speed settings as it is already on the lowest extraction speed.
3. Digital Display
1 = Low Extraction
2 = Medium Extraction
3 = High Extraction
B = Boosted Extraction
NOTE: When the rangehood has been powered off, the display will also be off.
4. Increase Speed
Press this button to increase the extraction speed.
NOTE: When operating on power level 3, the increase button will not change any speed settings as it is already on the highest extraction speed.
5. Light
Press this button to turn the lights on and off.
Caution: Do not touch the light for 30 minutes after using the appliance as it can be hot. Do not cover the globe with thermal insulation or other materials.
6. Delayed Power Off
Pressing the Decrease and Increase buttons together allows the rangehood to automatically power off after 5 minutes. After activating this function, the display will flash 1, 2 then 3, and the countdown will begin.
To cancel the Delayed Power Off setting, long press the Decrease & Increase buttons for 1 second again.
Installation Instructions
Installation Safety
- WARNING: Before starting the installation, please refer to the Safety Information section.
- Always switch the power off to the rangehood prior to beginning installation or maintenance.
- The exterior surfaces can be easily damaged during installation. Wherever possible, protect the rangehood with a cardboard box, plastic or a towel.
- A power point must be located within 1.5m of the power cord exit from the rangehood, and it should be always accessible to allow isolation from power during cleaning or maintenance.
- All ducting must comply with building codes and local statutory requirements.
- If you are re-circulating the air as opposed to ducting, please ensure that the outlet grilles are not obstructed in any way, as this will affect the efficiency of the rangehood's extraction.
- Ensure that the rangehood is mounted in a level position, both horizontally and vertically. This is essential to ensure the rangehood operates correctly, preventing lopsided grease build up at either end.
- IMPORTANT: Never use a silicone around your rangehood or flue pieces. Never install the rangehood or flue pieces into the plaster ceiling which prevents easy access to the rangehood for servicing requirements.
- IMPORTANT: Before installing your rangehood, please record the details of your rangehood's rating label (located within the rangehood, behind the aluminium grease filters) into the form on page 15. This will be helpful should you need to contact our service team in the future.
Electrical Connection
- Always check that the method of installation complies with the standards of local building, gas and electrical authorities. Before connecting your rangehood to the mains supply, ensure that the mains voltage corresponds to the voltage on the rating plate inside the rangehood.
- Always wear proper protection during installation and maintenance. All work must be carried out by a qualified technician or similarly qualified person.
- IMPORTANT: Failure to install the appliance correctly could invalidate any warranty or liability claims.
Ducted Installation
For maximum performance we recommend installing with rigid or semi rigid ducting. Use cable ties or suitable duct tape to secure the flexible pipe or ducting to the rangehood duct outlet.
WARNING: All ducting must be fire retardant.
Depending on your situation, there are multiple options for ducting your rangehood, as follows:
- Straight up through your tiled or metal roof, using a roof cowl (not supplied with the rangehood).
- Into your ceiling cavity (where compliant with local and national building regulations/codes. It may be necessary to seek approval from the relevant authority or building inspector where necessary.
- Into your ceiling cavity, and then vented through to the atmosphere through your eaves, using no more than 2 × 90^ bends within the ducting run.
- Through your wall.
IMPORTANT: Ducting can have a major effect on your rangehoods performance. The following tips outline how to correctly duct your rangehood.
- Always use the correct size ducting, and ensure that it is non-flammable ducting. For maximum performance Sôlt recommends semi rigid or rigid ducting.
- This rangehood is designed to use ∅ 150mm ducting to achieve optimum airflow performance and minimal noise during operation.
- To install a ∅ 150mm air exhaust connection, insert the reducer flange on the hood body outlet. Fix the pipe in position using sufficient pipe clamps (not supplied).
- Always duct to the outside atmosphere, unless your local building codes and regulations permit otherwise.
- Where using flexible ducting, always install the ducting pulled taut to minimize pressure loss, and cut any excess ducting off.
- Sôlt recommends you keep your total length of ducting to the shortest length possible. Where possible, avoid using 90^ bends and in their place use multiple 45^ bends. Ensure there are no kinks in your ducting.
- For maximum performance Sôlt recommends using cylindrical ducting whenever possible.
Positioning the Rangehood
NOTE: When the rangehood and appliance supplied with energy other than electricity are simultaneously in operation, the negative pressure in the room must be not exceed 4 Pa ( 4 × 10^-5 Bar).
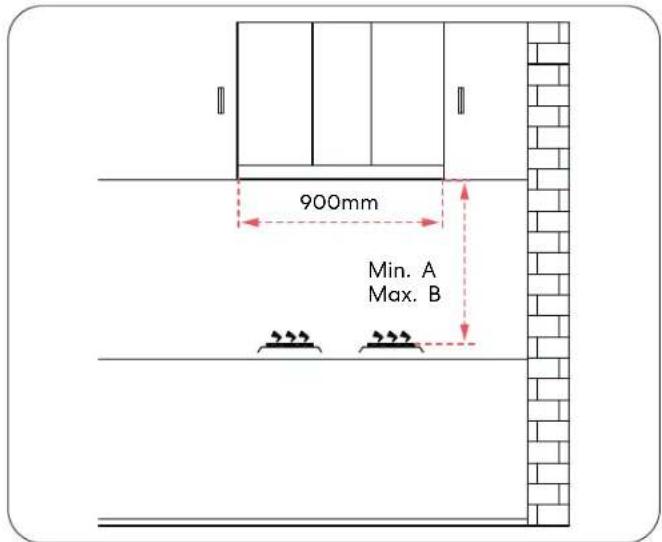
IMPORTANT: The height of the rangehood underside must be a minimum of 650mm to a maximum 850mm from the top of your cooktop surface (for gas cooktops this is the top of the gas burner).
*If the installation instructions for your cooktop specify a greater distance than the minimum, then that shall be the minimum height for installation.
| Cooktop Fuel Type Min* A Max B | ||
| Gas (multiple burners with maximum 45.4 MJ/h total output and no single burner exceeding 16.2 MJ/h output) | 650mm 800mm | |
| Gas (multiple burners with maximum 45.4 MJ/h total output and no single burner exceeding 17.3 MJ/h output) | 760mm 800mm | |
| Gas (single burner not exceeding 21.6 MJ/h output) | 650mm 800mm | |
| Gas (single burner with an output greater than 21.6 MJ/h but not exceeding 29.2 MJ/h output) | 760mm 800mm | |
| Electric 650mm 800mm |
Wall Mounting Preparation
- IMPORTANT: Do not connect the power cable until the installation is complete! Sôlt recommends installing in a team of at least two people to avoid any accidents.
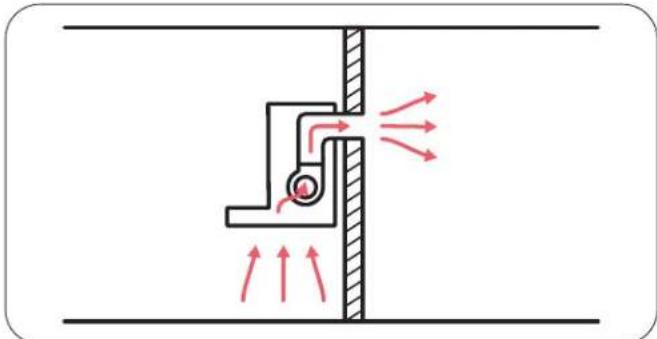
- If you have an outlet to the outside, your rangehood can be connected as shown below by means of a ∅ 150mm extraction duct.
natural_image
Diagram of a mechanical joint or bracket with red arrows indicating airflow or force direction (no text or symbols)- Before installation, ensure that the unit is both turned off and is unplugged.
- The rangehood should adhere to the minimum and maximum distances from the rangehood base to the cooktop surface (as per the positioning table).
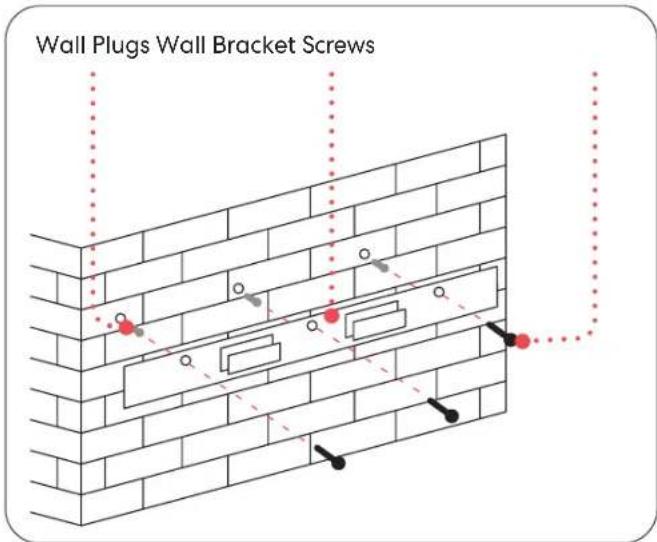
- Determine the position of the three holes on the wall.
- Drill the three holes in the wall with an 8mm drill-bit.
- Gently insert three wall plugs.
- Carefully attach the wall bracket to the wall plugs with three ST4 × 30mm screws.
Installation Instructions (continued)
Safety Holes
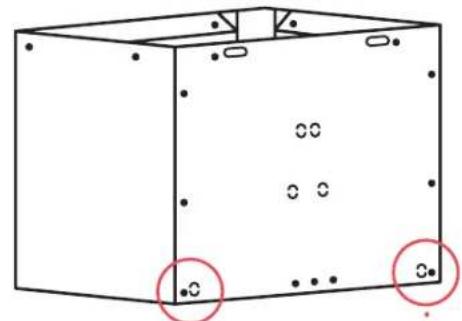
- Set the positions of the two safety holes on the wall.
natural_image
Simple line drawing of a 3D rectangular box with two red circles highlighting one corner (no text or symbols)Safety Holes
- Drill the two safety holes in the wall with an 8mm drill-bit.
- Gently insert two wall plugs.
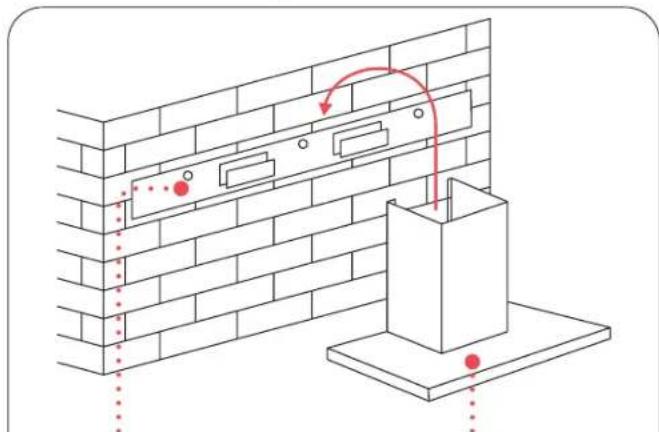
- Carefully lift up the rangehood and hang it onto the wall bracket hook. Securing with two ST4 × 30mm screws.
natural_image
Diagram of a brick wall with a structural support and a red curved arrow indicating motion (no text or symbols)Wall Bracket Rangehood
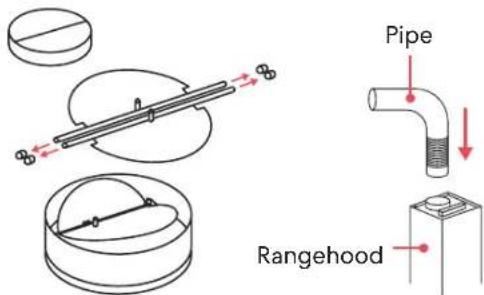
- Fix the one-way-valve to the air outlet of the rangehood. Then attach the exhaust pipe onto the one-way-valve.
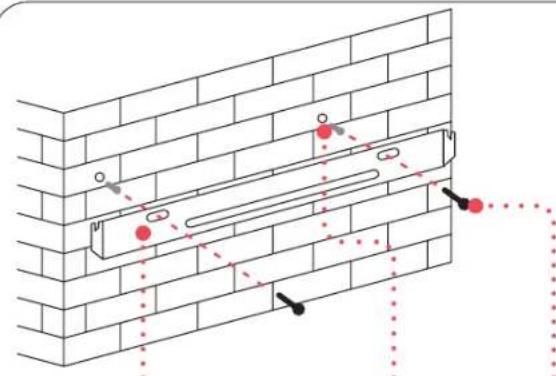
Lower Chimney Bracket Installation
- Set the positions of the two chimney bracket holes.
- Drill the two holes into the wall using an 8mm drill-bit.
- Gently insert two wall plugs.
- Carefully attach the lower chimney bracket to the wall plugs using two ST4 × 30mm screws.
natural_image
Diagram of a brick wall with embedded structural elements and red markers, showing alignment or positioning (no text or symbols)Lower Chimney Bracket Wall Plugs Screws
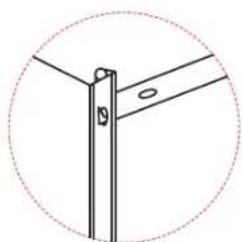
- Attach the upper chimney into lower chimney, then hang the fixing hole to the upper chimney bracket's hooks.
natural_image
Pure technical line drawing of a vertical support structure without any text or symbols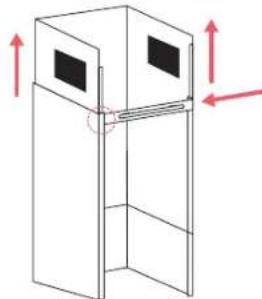
natural_image
Diagram of a cabinet with two doors and red arrows indicating upward and downward motion (no text or symbols)- Pull the upper chimney upwards, adjusting the chimney height as required.
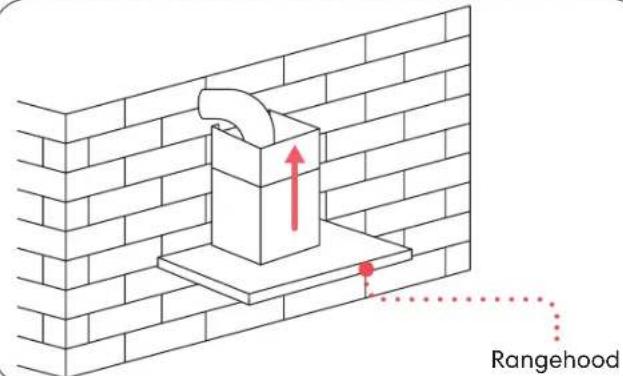
Upper Chimney Bracket Installation
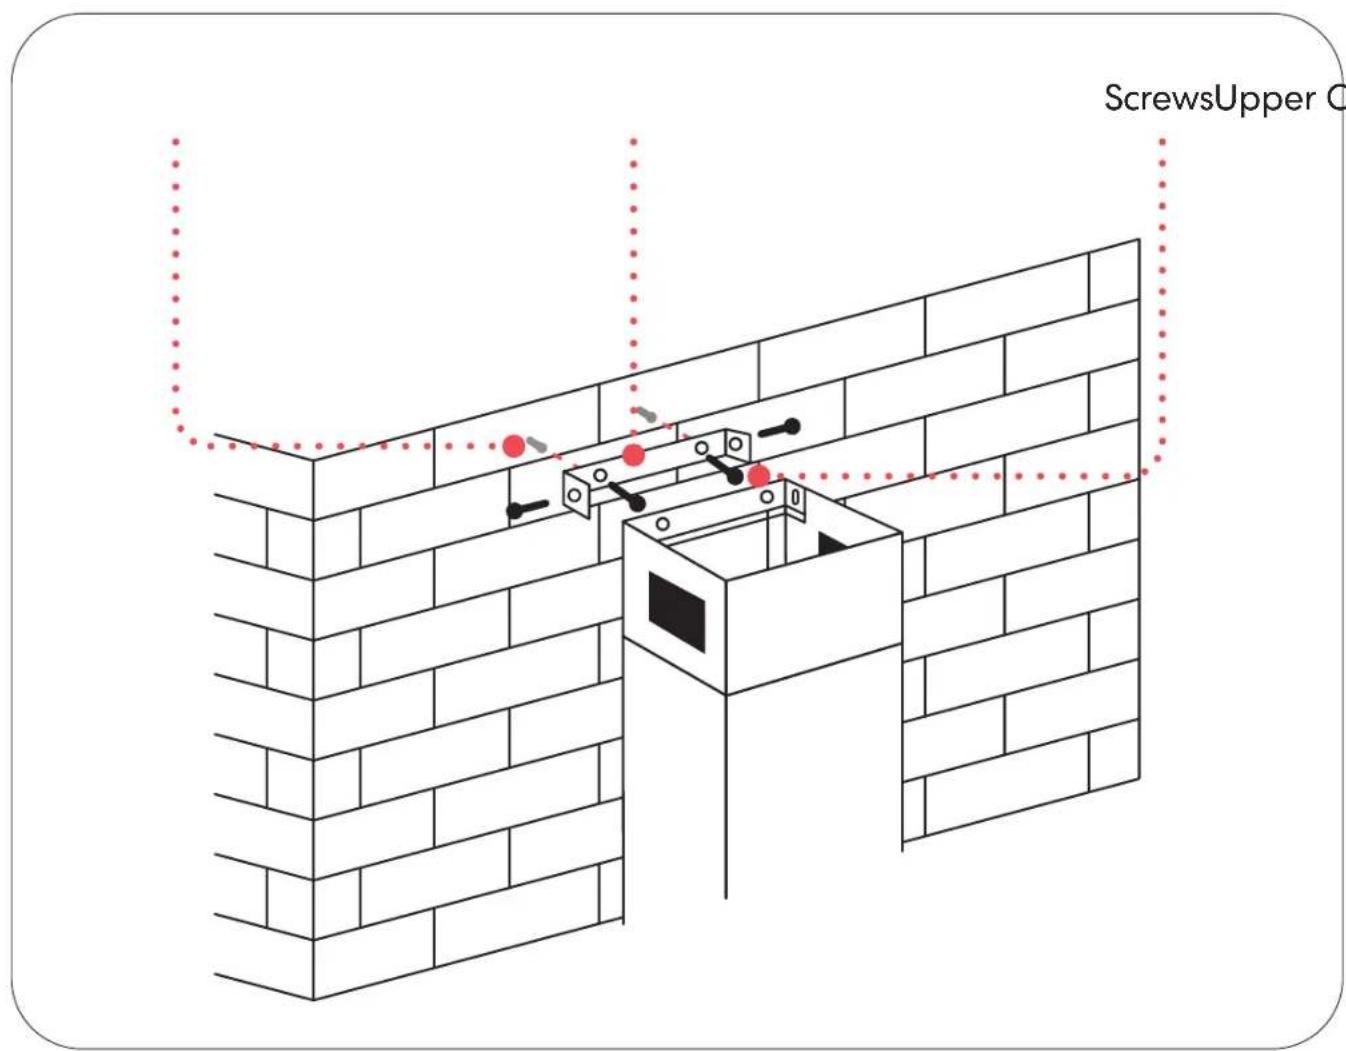
- Set the position of the two chimney bracket holes.
- Drill the two holes into the wall using an 8mm drill-bit.
- Gently insert two wall plugs.
- Attach the upper chimney bracket to the wall plugs using the two ST4 × 30mm screws.
- Assemble the chimney onto the unit and fix it in place using two ST4 × 8mm screws as shown below.
Need Help? You can speak to our Support Team by calling 1300 11 4357, or simply reach out by emailing us at support@residentiagroup.com.au
Cleaning & Maintenance
Cleaning Your Rangehood
| Task Frequency | |
| Clean the Exterior Surface: with a soft cloth lightly dampened in lukewarm water, thoroughly wrung. A compatible cleaning solution may also be used.NOTE: To prevent any scratches, ensure that you use a soft cloth when cleaning the surface. | WeeklyEnsure the rangehood is powered off before commencing cleaning. |
| Clean the Controls: with a clean, soft cloth and a cotton swab. A compatible cleaning solution may also be used, with care. | WeeklyEnsure the rangehood is powered off before commencing cleaning. |
| Clean the Grease Filters.For more information please read ‘Cleaning Your Grease Filters’, page 12. | MonthlyEnsure the rangehood is powered off before commencing cleaning. |
| Replace the Carbon Filters.For more information see ‘Installing & Replacing the Carbon Filters’, page 12. | 2–3 MonthsEnsure the rangehood is powered off before commencing cleaning. |
Cleaning Safety
- Maintenance and inspection should be undertaken on a frequent basis. If there is any visible damage, a strong odour or excessive overheating of components, stop using the appliance and contact our After Sales Support Team by calling 1300 11 4357 or by emailing support@residentiagroup.com.au for assistance.
- Always ensure that the rangehood is powered off and the plug has been removed before any cleaning or maintenance is performed.
-
Avoid trying to clean any electrical or electronic parts, as this may damage the rangehood or present a risk of electric shock.
• Always let the rangehood and its components cool down before cleaning them. -
When cleaning the rangehood, do not use any acrid or corrosive detergents, or use abrasive wipes, chemicals or alcohol as these could damage the surface. Avoid using any abrasive detergents or any alkaline dishwasher detergents as these could also damage the surface.
- CAUTION: DO NOT under any circumstances use a steam cleaner when cleaning your rangehood.
- Always clean and maintain the appliance in accordance with the instructions found in this user manual. Failure to do so may compromise your warranty or result in a risk of fire or electric shock.
- Water must not enter into electrical parts such as the motor, control switch, etc. as this presents a high risk of electric shock.
Cleaning the Grease Filters
- Soak the filter in your kitchen sink for approximately 3 minutes in max 30^ water with a mild, non-corrosive grease-removing detergent.
Alternatively:
Place the filter in the dishwasher and run a program with a mild non-corrosive grease-removing detergent. Note that it is not advisable to use rinse aids. Ensure that the program does not exceed 30^ C.
• Always wash the filter separately from crockery and kitchen utensils.
- Brush the filter gently with a soft brush. Do not apply too much pressure to avoid damaging the filter.
- Over time, fading and discolouration may happen. This is normal and is not considered a warranty issue.
- Leave the filter to dry naturally out of direct sunlight.
- Once dry, gently fit the filter back into position.
Replacing the Light Bulb
Please contact our After Sales Support Team to arrange a qualified electrician or an authorised service agent so that they may safely replace the globes.
WARNING: Only a qualified electrician or authorised service agent may replace the globe. Always let the globe cool down before replacing it as it may be hot.
Installing and Replacing the Carbon Filters
The carbon filters are an optional spare part available to purchase by contacting our After Sales Support Team.
WARNING: DO NOT clean or wash your carbon filters. If carbon filters are used, Sôlt recommends replacing the carbon filters every 2 to 3 months.
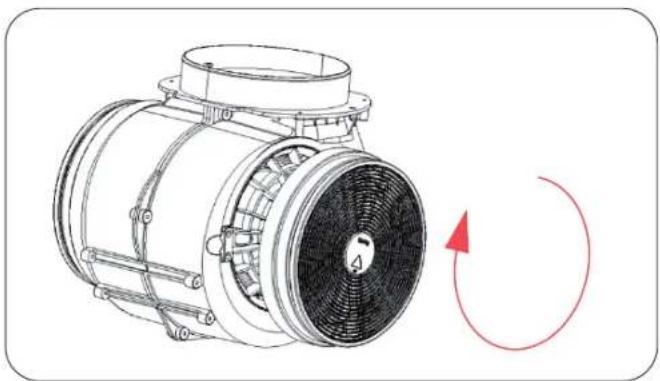
- Disconnect the power supply from the wall socket and carefully remove both grease filters.
- Install or replace a carbon filter by gently slotting the filter in, and turning it clockwise to secure.
- Place both grease filters back into position, and then reconnect the power supply to the wall socket.
NOTE: When a carbon filter is attached, the extraction power of your rangehood will be lowered.
natural_image
Technical line drawing of a mechanical fan or motor assembly with a red circular arrow indicating rotational motion (no text or symbols present)Need Help? You can speak to our Support Team by calling 1300 11 4357, or simply reach out by emailing us at support@residentiagroup.com.au
Troubleshooting
For Minor Faults
| Problem Possible Cause Solution | ||
| The lights can be turned on, however the motor does not. | The fan switch, the motor or the capacitor may be damaged. | Call our After Sales Support Team for further guidance. |
| The blades may be blocked. Call our After Sales Support Team. | ||
| Both the light and motor do not work properly. | The fuse or light may be damaged. Reset or replace the fuse or light. | |
| The power supply cord may be loose or disconnected. | Reconnect the power supply to the wall socket. | |
| The light is not working. The light globes may be damaged or may have blown. | Call our After Sales Support Team for further guidance. | |
| The is insufficient suction power or air is not extracted adequately. | The distance between the rangehood and the cooktop may be too great. | Re-adjust the installation position, ensuring that the minimum distances are observed as per page 09. |
| Ducting may be loose, kinked, be too long or have too many bends. | Check that your rangehood has been ducted correctly and in accordance with the installation instructions. | |
| The rangehood is vibrating against the wall or cabinetry. | The rangehood body may not be fixed in place correctly. | Fix the body tightly and ensure that all installation steps are done correctly. |
| The motor may not be tightly hung. Lock in the motor tightly. | ||
| The fan blade may be damaged. Call our After Sales Support Team. | ||
| Oil is leaking from the rangehood. Outlet and the air ventilation entrance are not tightly sealed. | Carefully take down the outlet and re-seal with glue. | |
| Leakage from the connection of U-shaped section and cover. Take U-shaped section down and seal with soap or paint. | ||
| The rangehood inclines. The fixing / hanging screws are loose. Tighten the fixing or hanging screws. | ||
For Serious Faults
- Some minor faults can be fixed by referring to the table above, however if an emergency or serious fault occurs, immediately disconnect the rangehood from your electricity supply and contact After Sales Support.
-
If a serious fault occurs, DO NOT attempt to repair the rangehood yourself, instead wait for an authorised service agent or similarly qualified person to do so.
-
For assistance or to organize an authorised service agent contact our After Sales Support by calling 1300 11 4357, or by emailing support@residentiagroup.com.au.
- Please note that if a service agent is asked to attend whilst the product is under warranty and finds that the problem is not the result of an appliance fault, then you may be liable for the cost of the call out charge.
Technical Specifications
Product Specifications
| Model GGSRCB900BS | |
| Finish Stainless Steel w. Black Glass Fascia | |
| Extraction 1000m3/hr | |
| Speed Settings 4 (Low, Medium, High, Boost) | |
| Aluminium Filter 3 × Aluminium Baffle Filters | |
| Carbon Filters | Optional accessory, for purchasing details please email parts@residentiagroup.com.au to learn more |
| Lighting 2 × 1.5W LED | |
| Max. Noise Rating 70 dB(A) | |
| Power Supply 220-240V~, 50-60Hz | |
| Product Dimensions (W × D × H) 900 × 505 × 550-1040mm | |
| Product Weight 16.78kg |
Purchase Details
For future reference, please record the following information which can be found on the rating plate and the date of purchase which can be found on your sales invoice.
STORE DETAILS
STORE NAME |
ADDRESS |
TELEPHONE | PURCHASE DATE |
PRODUCT DETAILS
MODEL NO.
SERIAL NO.*
Attach Your Receipt Here

Notes
Warranty Information
WARRANTY TERMS AND CONDITIONS RANGEHOODS
This document sets out the terms and conditions of the product warranties for Residentia Group Appliances. It is an important document. Please keep it with your proof of purchase documents in a safe place for future reference should you require service for your Appliance.
1. IN THIS WARRANTY
(a) 'acceptable quality' as referred to in clause 10 of this warranty has the same meaning referred to in the ACL;
(b) 'ACL' means Trade Practices Amendment (Australian Consumer Law) Act (No.2) 2010;
(c) 'Appliance' means any Residential Group product purchased by you accompanied by this document;
(d) 'ASR' means Residentia Group authorised service representative;
(e) 'Residentia Group' means Residentia Group Pty Ltd of 165 Barkly Ave, Burnley VIC 3121, ACN 600 546 656 in respect of Appliances purchased in Australia;
(f) ‘major failure’ as referred to in clause 10 of this warranty has the same meaning referred to in the ACL and includes a situation when an Appliance cannot be repaired or it is uneconomic for Residentia Group, at its discretion, to repair an Appliance during the Warranty Period;
(g) 'Warranty Period' means:
(i) where the Appliance is used for personal, domestic or household use (i.e. normal single family use) as set out in the instruction manual, the Appliance is warranted against manufacturing defects for 24 months (or 60 months where a valid extended warranty registration has occurred), following the date of original purchase of the Appliance;
(h) 'you' means the purchaser of the Appliance not having purchased the Appliance for re-sale, and 'your' has a corresponding meaning.
-
This warranty only applies to Appliances purchased and used in Australia and is in addition to (and does not exclude, restrict, or modify in any way) any non-excludable statutory warranties in Australia.
-
During the Warranty Period Residentia Group or its ASR will, at no extra charge if your Appliance is readily accessible for service, without special equipment and subject to these terms and conditions, repair or replace any parts which it considers to be defective. Residentia Group or its ASR may use remanufactured parts to repair your Appliance. You agree that any replaced Appliances or parts become the property of Residentia Group. This warranty does not apply to light globes, batteries, seals, filters or similar perishable parts.
-
Parts and Appliances not supplied by Residential Group are not covered by this warranty.
-
You will bear the cost of transportation, travel and delivery of the Appliance to and from Residentia Group or its ASR. If you reside outside of the service area, you will bear the cost of:
(a) travel of an authorised representative;
(b) transportation and delivery of the Appliance to and from Residentia Group or its ASR, in all instances, unless the Appliance is transported by Residentia Group or its ASR, the Appliance is transported at the owner's cost and risk while in transit to and from Residentia Group or its ASR.
-
Proof of purchase is required before you can make a claim under this warranty.
-
You may not make a claim under this warranty unless the defect claimed is due to faulty or defective parts or workmanship. Residentia Group is not liable in the following situations (which are not exhaustive):
(a) the Appliance is damaged by:
(i) accident
(ii) misuse or abuse, including failure to properly maintain or service
(iii) normal wear and tear
(iv) power surges, electrical storm damage or incorrect power supply
(v) incomplete or improper installation
(vi) incorrect, improper or inappropriate operation
(vii) insect or vermin infestation
(viii) failure to comply with any additional instructions supplied with the Appliance;
(b) the Appliance is modified without authority from Residential Group in writing;
(c) the Appliance's serial number or warranty seal has been removed or defaced;
(d) the Appliance was serviced or repaired by anyone other than Residentia Group, an authorised repairer or ASR.
-
This warranty, the contract to which it relates and the relationship between you and Residentia Group are governed by the law applicable where the Appliance was purchased.
-
To the extent permitted by law, Residentia Group excludes all warranties and liabilities (other than as contained in this document) including liability for any loss or damage whether direct or indirect arising from your purchase, use or non use of the Appliance.
-
For Appliances and services provided by Residentia Group in Australia, the Appliances come with a guarantee by Residentia Group that cannot be excluded under the Australian Consumer Law. You are entitled to a replacement or refund for a major failure and for compensation for any other reasonably foreseeable loss or damage. You are also entitled to have the Appliance repaired or replaced if the Appliance fails to be of acceptable quality and the failure does not amount to a major failure. The benefits to you given by this warranty are in addition to your other rights and remedies under a law in relation to the Appliances or services to which the warranty relates.
- At all times during the Warranty Period, Residentia Group shall, at its discretion, determine whether repair, replacement or refund will apply if an Appliance has a valid warranty claim applicable to it.
- Missing parts are not covered by warranty. Residentia Group reserves the right to assess each request for missing parts in a case by case basis. Any parts that are not reported missing in the first week after purchase will not provide free of charge.
- To enquire about claiming under this warranty, please follow these steps:
(a) carefully check the operating instructions, user manual and the terms of this warranty;
(b) have the model and serial number of the Appliance both available;
(c) have the proof of purchase (e.g. an invoice) available;
(d) telephone the numbers shown below. - You accept that if you make a warranty claim, Residentia Group and its ASR may exchange information in relation to you to enable Residentia Group to meet its obligations under this warranty.
IMPORTANT
Before calling for service, please ensure that the steps in point 13 have been followed.
CONTACT SERVICE
→ 1300 11 HELP (4357)
→ support@residentiagroup.com.au
→ support.residentiagroup.com.au
T. 1300 11 4357
E. support@residentiagroup.com.au
www.solt.house
- Contents
- Customer Care
- Safety Information
- Conditions of Use
- Before Installation & Maintenance
- Operation & Maintenance
- Exhaust Ducting Installation
- Disposal
- Your Rangehood
- GGSRCB900BS
- Included Accessories
- Tools Required for Installation
- Operating Instructions
- Control Panel Key
- Power
- Decrease Speed
- Digital Display
- Increase Speed
- Light
- Delayed Power Off
- Installation Instructions
- Installation Safety
- Electrical Connection
- Ducted Installation
- Positioning the Rangehood
- Wall Mounting Preparation
- Installation Instructions (continued)
- Safety Holes
- Lower Chimney Bracket Installation
- Upper Chimney Bracket Installation
- Cleaning & Maintenance
- Cleaning Safety
- Cleaning the Grease Filters
- Alternatively:
- Replacing the Light Bulb
- Installing and Replacing the Carbon Filters
- Troubleshooting
- For Serious Faults
- Technical Specifications
- Purchase Details
- STORE DETAILS
- PRODUCT DETAILS
- Attach Your Receipt Here
- Notes
- Warranty Information
- WARRANTY TERMS AND CONDITIONS RANGEHOODS
- IN THIS WARRANTY
- IMPORTANT
- CONTACT SERVICE
Brand : Sôlt
Model : GGSRCB900BS
Category : Range hood