
EH623B - Heating Gasmate - Free user manual and instructions
Find the device manual for free EH623B Gasmate in PDF.


| Product Type | Gas Space Heater |
| Brand | Gasmate |
| Model | EH623B |
| Fuel Type | Propane or Natural Gas (check model variant) |
| Heat Output (approx.) | 15,000 – 30,000 BTU/h (varies by configuration) |
| Heating Area (approx.) | Up to 800 sq. ft. |
| Dimensions (H x W x D) | 24 x 18 x 12 inches |
| Weight | 12 lbs (approx.) |
| Ignition Type | Piezo electric or electronic ignition |
| Safety Features | Oxygen depletion sensor (ODS), tip-over shut-off, overheat protection |
| Control Type | Manual valve or thermostat (model dependent) |
| Venting Required | Vent-free (indoor use) with proper ventilation |
| Certifications | ANSI Z21.11.2 (if applicable) |
| Installation | Freestanding or wall-mounted (check manual) |
| Maintenance | Clean burner and pilot area; check for gas leaks annually |
| Spare Parts | Thermocouple, igniter, burner assembly, ODS sensor |
| Warranty | Limited 1-3 years (depending on region) |
| User Manual Included | Yes (digital download available) |
Frequently Asked Questions - EH623B Gasmate
User questions about EH623B Gasmate
0 question about this device. Answer the ones you know or ask your own.
Ask a new question about this device
Download the instructions for your Heating in PDF format for free! Find your manual EH623B - Gasmate and take your electronic device back in hand. On this page are published all the documents necessary for the use of your device. EH623B by Gasmate.
USER MANUAL EH623B Gasmate
natural_image
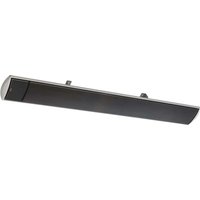
Black rectangular metal rod or banner with a small mounting bracket, isolated on white background (no text or symbols)FEATURES
• Metal radiant heater with non glowing element
- Adjustable wall and ceiling bracket
- Black anodised aluminium
• 1.5m long power cord
- Designed for indoor and outdoor use
- Ideal for use in alfresco areas, verandahs and garages
- EH633 + EH633R - requires 15A power point to be installed by qualified electrician
Gasmate® is a registered trademark of: Sitro Group Australia Pty Ltd www.gasmate.com.au Aber – Hamilton, N.Z. www.gasmate.co.nz
Important: Retain these instructions for future use.
For any queries or assistance call

Customer Service Australia Only
1300 174 876
Hours of operation:
Monday to Friday 8.30am - 5.30pm EST
Do not return to place of purchase.
Keep your purchase receipt, this will be required to make any claims under the 12 month warranty.
INSTALLATION, OPERATION AND MAINTENANCE INSTRUCTIONS
Safety
Before attempting to operate this heater, the following basic safety precautions should be taken to reduce the risk of fire, electric shock and personal injury. It is important to read the instruction manual and to understand its applications, limitations and potential hazards associated with this heater. This heater is not intended for use by persons (including children) with reduced physical, sensory or mental capabilities, or lack of experience and knowledge, unless they have been given supervision or instruction concerning the use of the appliance by a person responsible for their safety. This heater is not designed for use within 1m or above a water source. It is important that you read, understand and follow these instructions very carefully. They are designed for the safety of yourself and others ensuring a long and trouble free service life from your heater. This electric heater complies with Australian and International standards and safety requirements. Repairs should only be carried out by qualified persons using original spare parts. Failure to do so may result in considerable danger to the operator.
Safe Operation
Beware of Children and Pets
Children should not be allowed to touch or operate heaters or touch extension cords, if used. All heaters should be kept out of reach of children, preferably stored or locked in a secure cabinet or room when not in use.
Do Not Abuse the Power Cord
Never yank or pull on the power cord to disconnect it from the mains supply socket. Never carry your heater by its' power cord. Keep the power cord away from heat, oil, solvents and sharp edges. Check the power cord regularly for any damage and if the power cord becomes damaged have it replaced by an authorised service facility.
Extension Cords and Reels
This heater is NOT designed to run off an extension cord. If you require an additional power point please have one installed by a qualified electrician.
The use of extension cords may cause power voltage loss which will result in damage to the appliance this will NOT be covered under warranty.
Installation
Always ensure you select the correct fi xing accessories which suit the particular wall/ceiling material you are attaching to, if in doubt please discuss with your local retailer or local hardware store. This heater is not designed for use within 1m or above a water source. All installations must meet the requirements of Australia Standard
AS/NZS 3000:2007.
Ensure that the heater is not positioned directly above, below or in front of a power point or switch.
This heater is not designed to be used with 3rd party timer or programmable system.

FOR YOUR SAFETY
WARNING: Fire risk exists if this heater is covered by or positioned close to curtains or other combustible materials.
NOTE: If using this heater outside ensure that it is connected directly to an outdoor power point.
The electrical system of this heater must be connected with an automatic 30mA circuit breaker and/or residual current device (RCD). If uncertain have a qualified electrician check your electrical system before installation and/or use.
All electrical connections are made in a dry area.
Outdoor power points must be weatherproof and installed by a qualified electrician.
Sitro Group Australia Pty Ltd is not responsible for incorrectly chosen fi xing accessories or any damage which may be caused by an incorrectly fi tted wall heater.
If required 15AMP power points must be installed by a qualified electrician.
Specific Safety Instructions

WARNINGS
Do not use the heater in areas where there is a risk of explosion or fire from
fl ammable gases. Ensure that the heating area is kept clear of combustible materials. Do not use the heater in damp areas, without suitable ventilation. This heater is not designed for use within 1m or above a water source. Do not place within one metre (1m) of any water source. Do not place directly in front of, below or above any power points or switches.
Fire risk exists if this heater is covered by or positioned close to curtains or other combustible materials.
- This heater is intended for domestic/household use only.
- Always ensure that this heater is installed as per the requirements noted in Australian Standard AS/NZS 3000:2007.
• Always keep heater at least one metre (1m) from combustible materials. - DO NOT locate this heater directly below, above or in front of the power supply socket or switch.
- DO NOT use this heater within 1 metre or above any water source.
- DO NOT use this heater in either the bathroom or ensuite without suitable ventilation.
- DO NOT use a 3rd party timer, or programmable system with this heater.
- DO NOT clean the heater while the heater is on or plugged into the mains power supply.
-
DO NOT touch any part of the heater while on, hot surfaces may burn.
• DO NOT use the wall heater as a dryer. -
DO NOT attempt to modify the heater, power cord, power plug or the supplied accessories in any way.
- DO NOT expose the heater to rain, water, or use in damp wet conditions.
• NEVER cover this heater. - NEVER carry the heater by its power supply cord.
- NEVER use with the power cord coiled, bundled up or tied up. Always extend fully before use.
- NEVER use the heater if any part of it is damaged.
- Ensure that the heater is disconnected from the mains supply when installing, cleaning or removing/installing.
- Ensure this heater is not left on when unattended.
- Ensure the heater is not used in areas where flammable gases are present, e.g. paint, petrol etc.
- Always turn the heater OFF at the unit switch and the power point switch when not in use for extended periods of time.
• Always allow the heater to cool, about one (1) hour after the heater has been turned off, before cleaning the heater. - Always ensure that the power cord is fully extended and NOT in contact with any part of the heater.
• Always ensure that the heater is kept clean and free from dust. - Only use this heater when securely attached to the wall/ceiling.
Electrical Data
IMPORTANT
This product is fitted with a sealed electrical connection plug that is compatible with the heater, the mains supply for Australia and meets the requirements of international standards. This heater must be connected to a supply voltage that is equal to that stated on the rating label. If the mains connection plug or power cord becomes damaged it must be replaced with a complete assembly that is identical to the original, and this must be replaced by an authorised service centre. Always follow the Australian requirements for connection to the mains supply. If in doubt always consult a qualified electrician.
Note: EH633 + EH633R (3200W) requires installation of a 15AMP socket by a qualified electrician before use.
Technical Specification
| MODEL EH613/ EH61 | 3R EH623/ EH623R EH63 | 3/ EH633R | |
| Remote Control No / Yes No / Yes No / Yes | |||
| Voltage 220-240V AC ~ 50Hz 220-240V AC ~ 50Hz | |||
| Input Wattage 1800W 2400W 3200W (15AMP) | |||
| Unit Weight 6.8Kg/7.5Kg 7.5Kg/8.2Kg 9.0Kg/9.7Kg | |||
| IP Rating IPx4 | IPx4 | IPx4 | |
Heater specifications can be found on the data label.
Assembly
HEATER HEAD
Attach the heater rear bracket (B) to the heater body (A) using bolts, washers and nuts. You can either mount side or lengthways depending on the mounting surface.
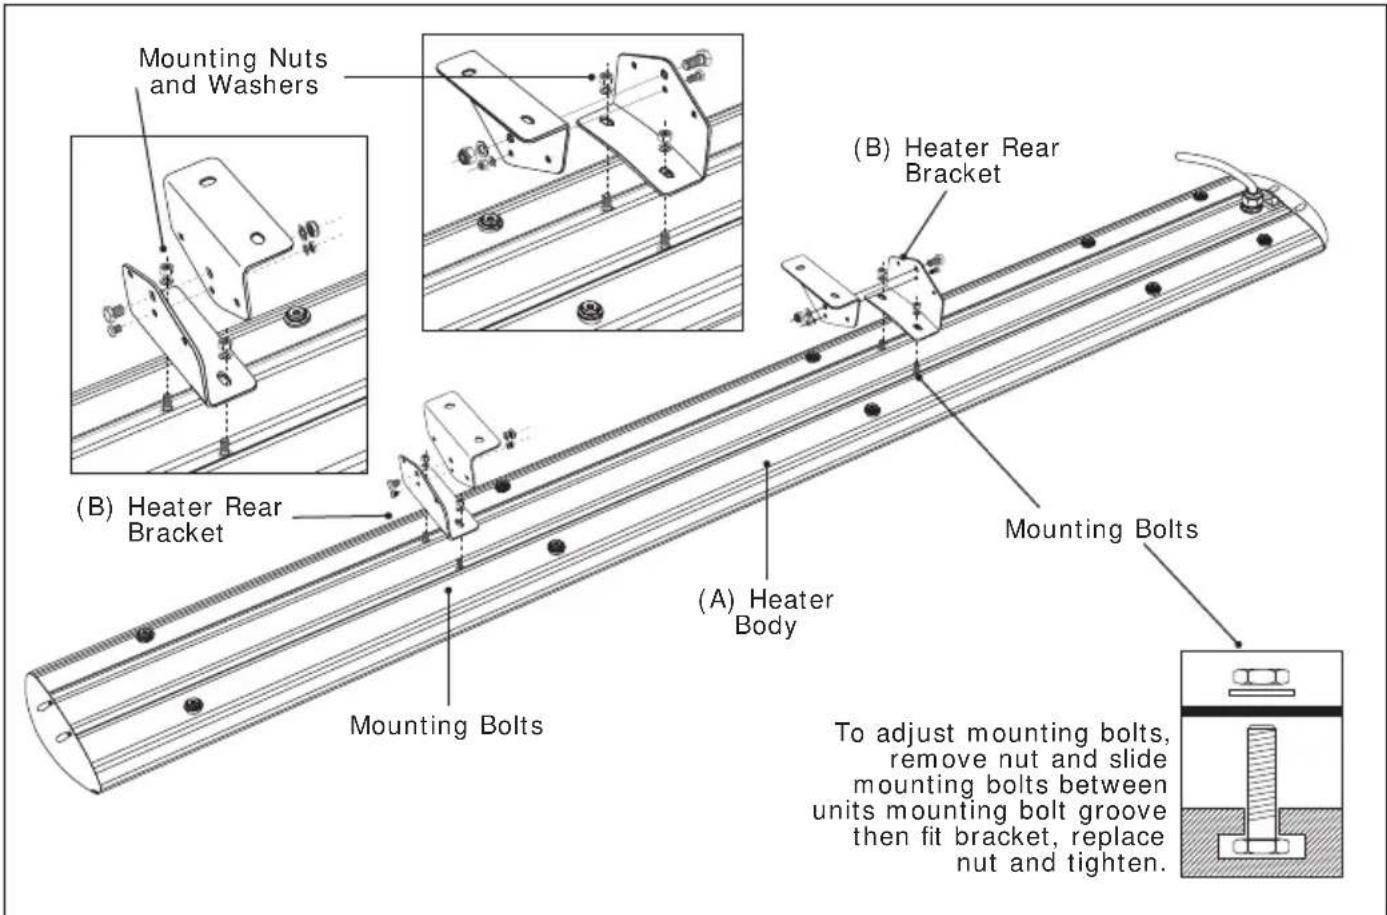
Mounting Heater
General Mounting Suggestions
If unsure please discuss with your local hardware store.
- Ensure the fixing screws are at least suitable for 10Kg each.
- If fitting to a stud wall or ceiling ensure all fixing screws are into timber. Plasterboard IS NOT suitable by itself.
- If no timber stud/joists are available we would suggest installing a timber batten to attach to.
Wall/ Ceiling Bracket Assembly
- The bottom of the heater body should be 1.8m above the floor, see page 6.
- Do not position the heater directly above or below a power point or switch. Do not position heater in front of a power point.
- Mark and drill 2 mounting holes for bracket (C).
- Using 2 suitable screws (not supplied) attach the bracket to the wall or ceiling. Note: If unsure what screws to use please discuss with your local hardware store.
- Using the nuts and bolts join the bracket (C) to the heater bracket (B) and tighten fully.
- Heater is now mounted and ready for use. Check the safety distance between the heater body and fl ammable surface when wall or corner mounted (see page 6). Do not mount the heater in the ceiling, always mount to the ceiling (see page 6).
NOTE: To adjust bracket position, see bottom page 4

Ceiling Mount with Chain
Only use this mounting option if your ceiling is too high.
- Attach the bracket (C) as noted below.
- Cut chain (D), not supplied, to desired length.
- Using nut and bolt attach chain to bracket (C) and bracket (B).
- Heater is now mounted and ready for use.

To Tilt Head
Note: Always ensure that the heater is switched off, disconnected from the mains power supply and is cold to touch. If heater has been recently used, please leave the wall heater one (1) hour to cool before tilting head.
- Loosen the locking bolt and remove.
- Loosen the head tilt bolt, do not remove.
- Head can be tilted through 30^ .
- Tighten the head tilt bolt when the desired angle is achieved.
- Insert and tighten the locking bolt if possible to stop any unintentional movement of the heater. Note: If locking bolt can not be fitted ensure the head tilt bolt is very tight.

Heater Positioning
- Position heater at least 200mm from the eave lining or ceiling or wall at 90° to heater.
- Position heater at least 1.8m above the floor.
- Never position in front, above or below a power point.
- If heater is facing another vertical surface, example - wall, the gap must be at least 1 metre.
- Never mount heater within 1 metre of a water source, example - tap.
NOTE! Never mount heater into the wall or ceiling. Only mount to the surface.

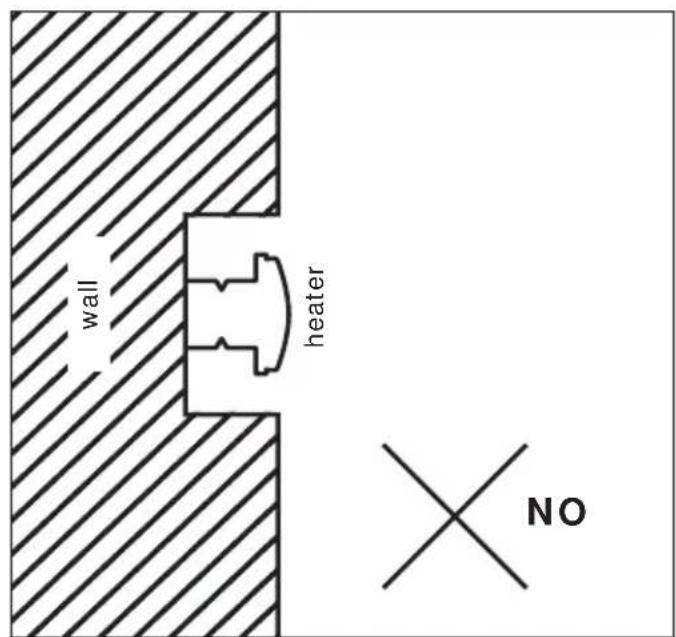
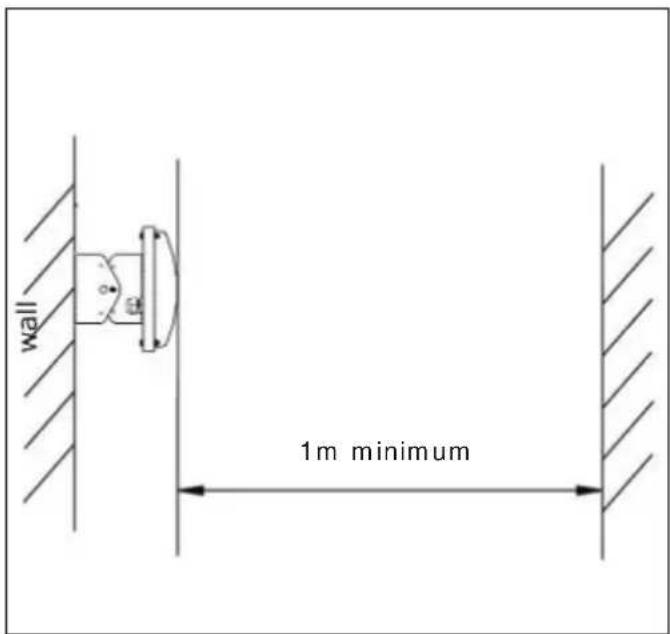


To Operate
- Plug into 240V AC wall socket.
- To turn on - switch the wall socket on.
- Turn off - switch the wall socket off.
- Unplug lead from wall socket when not in use.
Note: The heater EH633 + EH633R (3200W) is a 15AMP electric heater. This requires a special 15AMP power socket to be installed by a qualified electrician before being able to use.
TO OPERATE USING REMOTE CONTROL, WHERE FITTED.
NOTE: REMOTE CONTROL WILL ONLY OPERATE FROM THE STANDBY MODE.
TURN ON:
1 Plug into 240V AC wall socket.
2 Switch the wall socket on.
3 Turn the unit switch on - it will glow Red - Standby Function On -
4 Using the remote press "ON", the heater will come on and a small blue LED will glow
TURN OFF
1 Using the remote, press "OFF", the heater will turn off and the small LED light will go out.
2 Turn the unit switch off, the red LED will go out.
3 Switch the wall socket off.
4 Unplug the lead from the wall socket when not in use
Cleaning
Always ensure that the wall heater has been left for one (1) hour to cool before cleaning.
- Turn off and disconnect from mains power, allow to cool.
- Wipe unit over with a damp clean soft lint free cloth.
- For stubborn marks you can use a mild dish washing solution on a damp clean soft lint free cloth.
NEVER allow water or a mild dish washing solution to enter or drip onto the wall heater.
NEVER use solvents, e.g. Petrol, Toluene, Methylated Spirits etc to clean the floor heater, as these will damage the surface finish and may cause a fire when unit is next used.
Do not return to place of purchase. For any queries or assistance call

Customer Service
(Australia Only)
1300 174 876
Hours of operation: Monday to Friday 8.30am - 5.30pm EST
Keep your purchase receipt, this will be required to make any claims under the 12 month warranty.
Gasmate® is a registered trademark of: Sitro Group Australia Pty Ltd www.gasmate.com.au Aber Ltd - Hamilton, N.Z www.gasmate.co.nz
- FEATURES
- For any queries or assistance call
- Customer Service Australia Only
- Do not return to place of purchase.
- INSTALLATION, OPERATION AND MAINTENANCE INSTRUCTIONS
- Safety
- Safe Operation
- Beware of Children and Pets
- Do Not Abuse the Power Cord
- Extension Cords and Reels
- Installation
- FOR YOUR SAFETY
- Specific Safety Instructions
- WARNINGS
- Electrical Data
- IMPORTANT
- Assembly
- HEATER HEAD
- Mounting Heater
- General Mounting Suggestions
- Wall/ Ceiling Bracket Assembly
- Ceiling Mount with Chain
- To Tilt Head
- Heater Positioning
- To Operate
- TO OPERATE USING REMOTE CONTROL, WHERE FITTED.
- TURN OFF
- Cleaning
- Do not return to place of purchase. For any queries or assistance call
- Customer Service
- 174 876
Brand : Gasmate
Model : EH623B
Category : Heating