
HSNRQ35B - Air conditioner Rinnai - Free user manual and instructions
Find the device manual for free HSNRQ35B Rinnai in PDF.


| Product Type | Split Air Conditioner (Wall-mounted indoor unit + Outdoor unit) |
| Model | Rinnai HSNRQ35B |
| Cooling Capacity | 3.5 kW (12,000 BTU/h) |
| Heating Capacity | 3.6 kW (12,300 BTU/h) (Reverse cycle) |
| Power Supply | 220-240V ~ 50Hz, Single Phase |
| Indoor Unit Dimensions (W x H x D) | 795 x 290 x 205 mm |
| Outdoor Unit Dimensions (W x H x D) | 780 x 550 x 290 mm |
| Indoor Unit Weight | 9.5 kg |
| Outdoor Unit Weight | 31 kg |
| Refrigerant | R32 |
| Energy Efficiency Ratio (EER) | 3.25 (Cooling) |
| Noise Level (Indoor) | 22 - 41 dB(A) |
| Noise Level (Outdoor) | 52 dB(A) |
| Air Flow (High) | 540 m³/h |
| Main Functions | Cool, Heat, Dry, Fan, Auto, Sleep, Timer, Turbo |
| Filter Type | Washable Pre-Filter + Anti-Bacterial Filter |
| Maintenance | Clean filters every 2 weeks; outdoor unit coil annually |
| Safety Features | Overload protection, Auto restart, Child lock (remote) |
| Spare Parts | Remote control, filters, drain pan, fan motor |
| Warranty | 5 years (compressor), 2 years (parts) |
Frequently Asked Questions - HSNRQ35B Rinnai
User questions about HSNRQ35B Rinnai
0 question about this device. Answer the ones you know or ask your own.
Ask a new question about this device
Download the instructions for your Air conditioner in PDF format for free! Find your manual HSNRQ35B - Rinnai and take your electronic device back in hand. On this page are published all the documents necessary for the use of your device. HSNRQ35B by Rinnai.
USER MANUAL HSNRQ35B Rinnai
Split Type Wall Mounted Air Conditioner
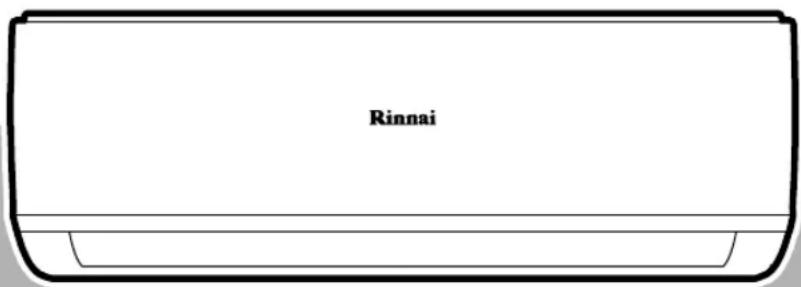
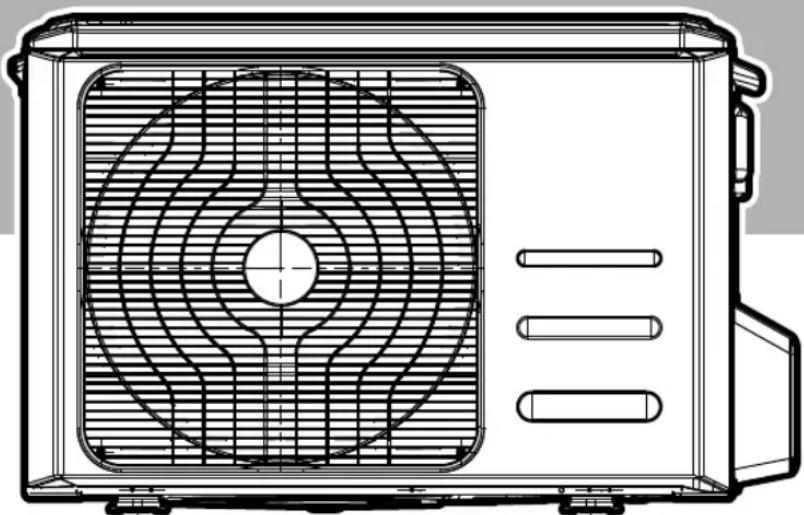
natural_image
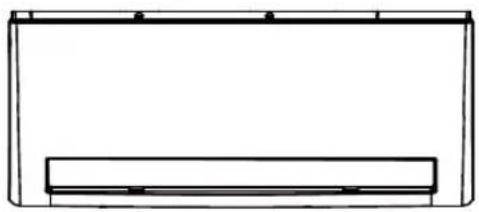
Technical line drawing of a front-mounted air conditioner unit with fan and vent slots (no text or symbols)Rinnai System Models
| IndoorSystem Outdoor | ||
| HSNRA26 | HINRA26M | HONRA26 |
| HSNRA35 | HINRA35M | HONRA35 |
| HSNRA50 | HINRA50M | HONRA50 |
| HSNRA70 | HINRA70M | HONRA70 |
| HSNRA80 | HINRA80 | HONRA80 |
| HINRA20MReference | Only Matching Multi System Only | |
This appliance shall be installed in accordance with:
• Manufacturer's Installation Instructions
• Current AS/NZS 3000
- Local Regulations and Municipal Building Codes including local OH&S requirements This appliance must be installed, maintained and removed by an Authorised Person.
For continued safety of this appliance it must be installed and maintained in accordance with the manufacturer's instructions.
N10378
Table of Contents
Installation Manual
0 Safety Precautions 4
1 Accessories 6
2 Installation Summary - Indoor Unit ...... 8
3 Unit Parts 10
natural_image
Line drawing of a hard hat with visible ribs and side clips (no text or symbols)4 Indoor Unit Installation ..... 11
natural_image
Simple line drawing of a rectangular frame with a horizontal base and two corner handles (no text or symbols)- Select installation location .... 11
- Attach mounting plate to wall ..... 12
- Drill wall hole for connective piping ..... 12
- Prepare refrigerant piping .... 14
- Connect drain hose 15
- Connect signal cable 17
- Wrap piping and cables 18
- Connect indoor power wire ..... 18
- Mount indoor unit 18
5 Outdoor Unit Installation .. 20
- Select installation location ..... 20
- Install drain joint 21
- Anchor outdoor unit 22
- Connect signal and power cables .. 23
natural_image
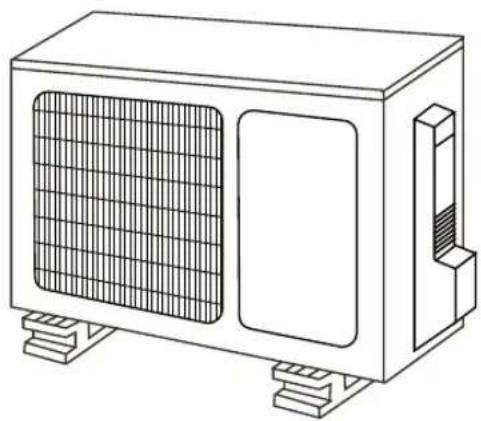
Line drawing of a rectangular industrial air conditioning unit with mesh grille and side panel (no text or symbols)All pictures for illustrative purposes
6 Refrigerant Piping Connection ..... 25
A. Note on Pipe Length 25
B. Connection Instructions –Refrigerant Piping ..... 25
-
Cut pipe 25
-
Remove burrs 26
-
Flare pipe ends 26
-
Connect pipes 27
natural_image
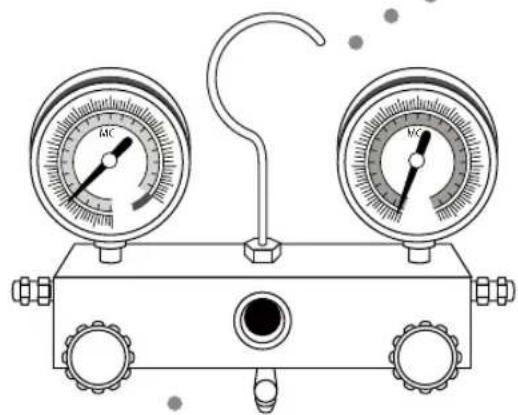
Line drawing of a dual-gauge pressure regulator device with no text or symbols7 Air Evacuation 29
- Evacuation Instructions ..... 29
- Note on Adding Refrigerant 30
8 Electrical and Gas Leak Checks ...... 31
9 Test Run 32
10 Disposal Guidelines 34
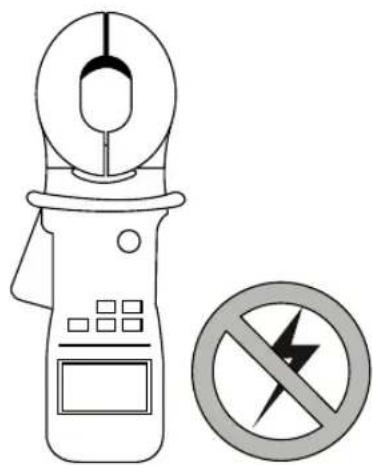
Safety Precautions
READ ALL INSTRUCTIONS BEFORE USING THE APPLIANCE
Always comply with the following precautions to avoid dangerous situations and to ensure optimum performance. Failure to carefully read and follow all instructions in this manual can result in equipment malfunction, property damage, personal injury and/or death.

WARNINGS: WHEN IGNORED, CAN RESULT IN SERIOUS INJURY OR DEATH.

CAUTIONS: WHEN IGNORED, CAN RESULT IN MINOR INJURY OR RODUCT DAMAGE.

THIS SYMBOL INDICATES THAT YOU MUST NEVER PERFORM THE ACTION INDICATED.

REGULATORY / INSTALLATION
This appliance shall be installed in accordance with:
Manufacturer's Installation Instructions.
Current AS/NZS 3000.
Local Regulations and Municipal Building Codes including local OH&S requirements.
This appliance must be installed, maintained and removed by an Authorised Person.
For continued safety of this appliance it must be installed and maintained in accordance with the manufacturers instructions.
This appliance uses R410A refrigerant.
This appliance is heavy, use 2 people or mechanical lifting device. Improper lifting may result in serious injury.
Take care when opening or unpacking this appliance. Failure to do so may result in serious injury or product failure.
DO NOT modify the electrical wiring of this appliance. If the control power wiring is damaged or deteriorated then it must be replaced by an authorised person. Failure to do so may result in electric shock, fire, serious injury or product failure.
DO NOT install the air conditioner on an unstable or non level surface or where there may be a danger of it falling. It may result in death, serious injury, or product failure.
DO NOT install the outdoor unit where noise may cause nuisance.
DO NOT install the outdoor unit where it will be exposed to sea wind (salt spray) as this will reduce durability.
This manual applies to a 1:1 wall mounted system application.
Several indoor units covered in this manual have an "M" suffix in their Model Number. These units can also be used on selected Rinnai Multi Split systems applications.
For more information on compatibility, please refer to the Installation Manual accompanying the Rinnai Multi Split Outdoor Unit.

WARNING
DO NOT modify the length of the power cord or use an extension cord to power the unit.
DO NOT share the electrical outlet with other appliances. Improper or insufficient power supply can cause fire or electrical shock
This appliance is NOT intended for use by persons (including children) with reduced physical, sensory or mental capabilities, or lack of experience and knowledge unless they have been given supervision or instruction concerning use of the appliance by a person responsible for their safety. Children should be supervised to ensure that they DO NOT play with the appliance.

Warning
- Installation MUST BE performed by an authorised dealer or specialist. Defective installation can cause water leakage, electrical shock or fire.
- Installation MUST BE performed according to the installation instructions. Improper installation can cause water leakage, electrical shock or fire.
- Contact an authorised service technician for repair or maintenance of this unit.
- Only use the included accessories, parts, and specified parts for installation. Using non-standard parts can cause water leakage, electrical shock or fire, and cause the unit to fail.
- Install the unit in a firm location that can support the units weight. If the chosen location cannot support the units weight, or the installation is not done properly, the unit may drop and cause serious injury or damage.
- For all electrical work, follow all local and national wiring standards, regulations, and the installation manual. You MUST use an independent circuit and single outlet to supply power. DO NOT connect other appliances to the same outlet. Insufficient electrical capacity or defects in electrical work can cause electrical shock or fire.
- For all electrical work, use the specified cables. Connect cables tightly, and clamp them securely to prevent external forces from damaging the terminal. Improper electrical connections can overheat and cause fire, and may also cause shock.
- All wiring MUST BE properly arranged to ensure that the control board cover can close properly. If the control board cover is not closed properly, it can lead to corrosion and cause the connection points on the terminal to heat up, catch fire, or cause electrical shock.
- In certain functional environments, such as kitchens, server rooms, etc., the use of specially designed air-conditioning units is highly recommended.
- If the supply cord is damaged, it MUST BE replaced by the manufacturer, its service agent or similarly qualified persons in order to avoid a hazard.

CAUTION
For units that have an auxiliary electric heater, do not install the unit within 1 meter (3 feet) of any combustible materials.
DO NOT install the unit in a location that may be exposed to combustible gas leaks. If combustible gas accumulates around the unit, it may cause fire.
DO NOT operate your air conditioner in a wet room such as a bathroom or laundry room. Too much exposure to water can cause electrical components to short circuit.
- The product must be properly earthed at the time of installation, or electrical shock may occur.
- Install drainage piping according to the instructions in this manual. Improper drainage may cause water damage to your home and property.
OPERATION RANGE LIMITATIONS
The table below indicates the temperature ranges the air conditioner can be operated within.
| COOL Mode HEAT | Mode DRY Mode | ||
| Room Temperature 0°C ~30°C | 10°C~32°C | ||
| Outdoor Temperature -15°C ~ | 30°C-15°C ~ 50°C 0°C ~ 50°C |
Accessories
The air conditioning system comes with the following accessories. Use all of the installation parts and accessories to install the air conditioner. Improper installation may result in water leakage, electrical shock and fire, or cause the equipment to fail.
| Name | Shape Quantity | ||
| Mounting plate | 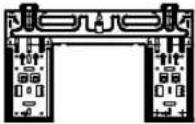 | 1 | |
| Clip anchor | 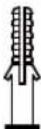 | 5 | |
| Mounting plate fixing screw ST3.9 X 25 | [488T] | 5 | |
| Remote controller | 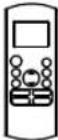 | 1 | |
| Fixing screw for remote controller holder ST2.9 x 10 |  | 2 | Optional Parts |
| Remote controller holder | 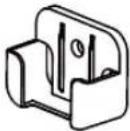 | 1 | |
| Dry battery AAA |  | 2 | |
| Seal |  | 1(for cooling & heating models only) | |
| Drain joint | 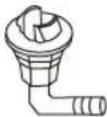 | ||
| Owner's manual |  | 1 | |
| Installation manual |  | 1 | |
| Remote controller manual |  | 1 | |
Refrigerant Piping Summary (Field Supplied)
| System | HSNRA26 H | HSNRA35 HSNRA | A50 HSNRA70 | HSNRA80 | ||
| Pipe Size: Liquid / Gas | mm | 6.35 / 9.52 | 6.35 / 12.7 | 6.35 / 12.7 | 9.52 / 15.9 | 9.52 / 15.9 |
| Maximum Pipe Length | m | 25 25 30 | 50 50 | |||
| Chargeless Length | m | 5 | 5 | 5 | 5 | 5 |
| Extra Charge for Lengths >5m | g/m | 15 15 15 | 30 30 | |||
| Maximum Vertical Separation | m | 10 10 20 | 25 25 | |||
Installation Summary - Indoor Unit
2
1
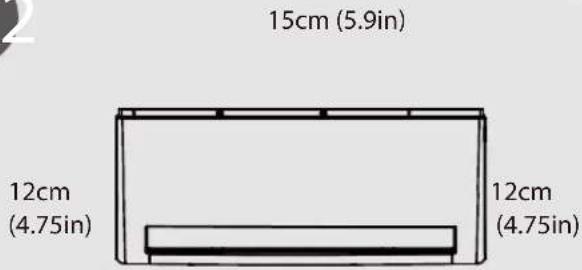
Select Installation Location
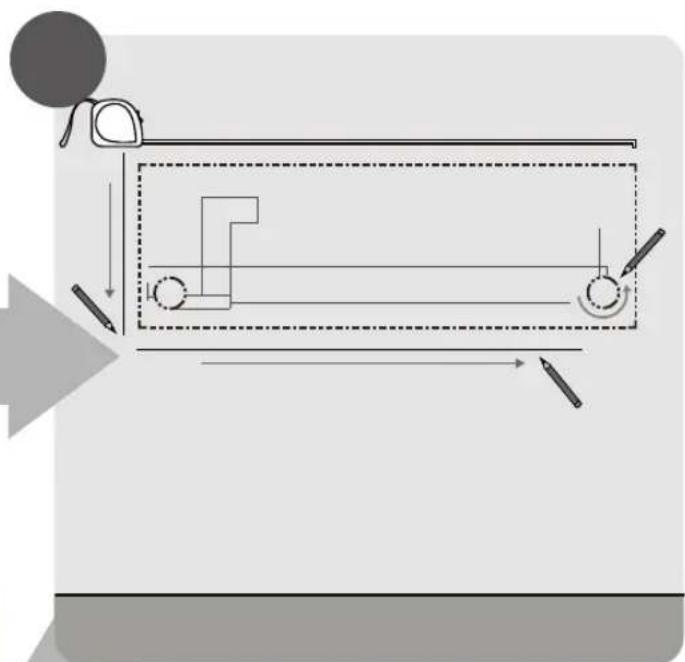
natural_image
Diagram showing a hand operating a tool with a rectangular frame and directional arrows, no text or symbols present.Determine Wall Hole Position
3
natural_image
Technical diagram of a dual-chamber electronic device with ports and wiring (no text or labels)Attach Mounting Plate Drill Wall Hole
Connect Piping Connect Wiring Prepare Drain Hose
natural_image
Diagram of cable assembly with a rolled paper and coiled wires, no text or symbols presentWrap Piping and Cable
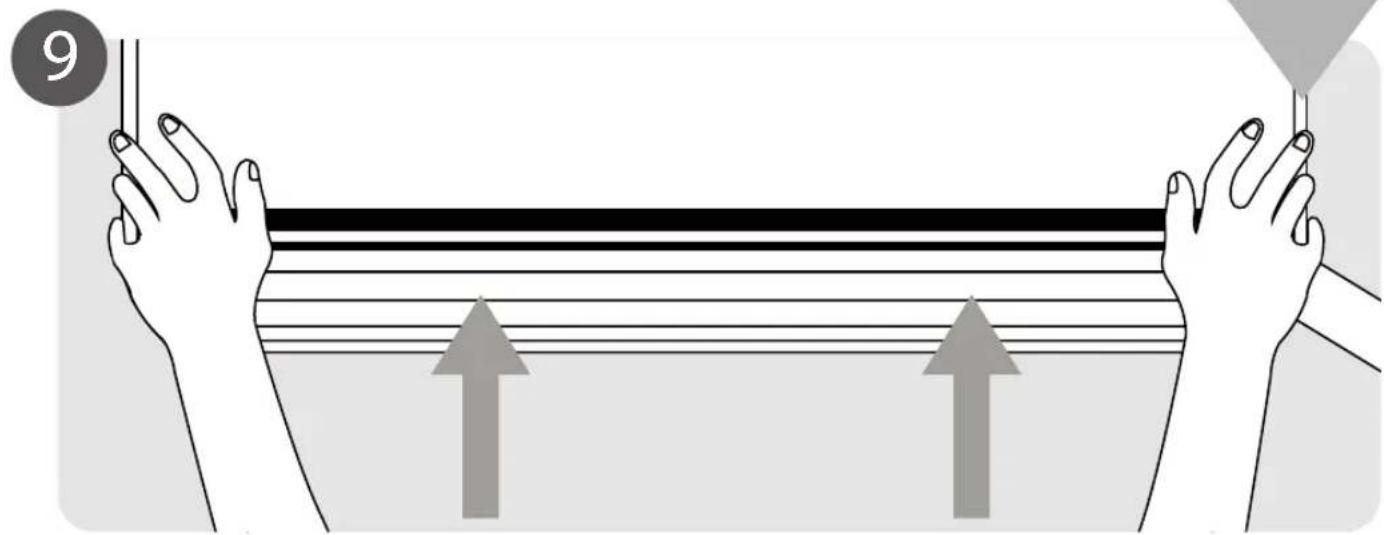
natural_image
Illustration of two hands holding a container with horizontal lines and upward arrows, no text or symbols presentMount Indoor Unit
Unit Parts
3
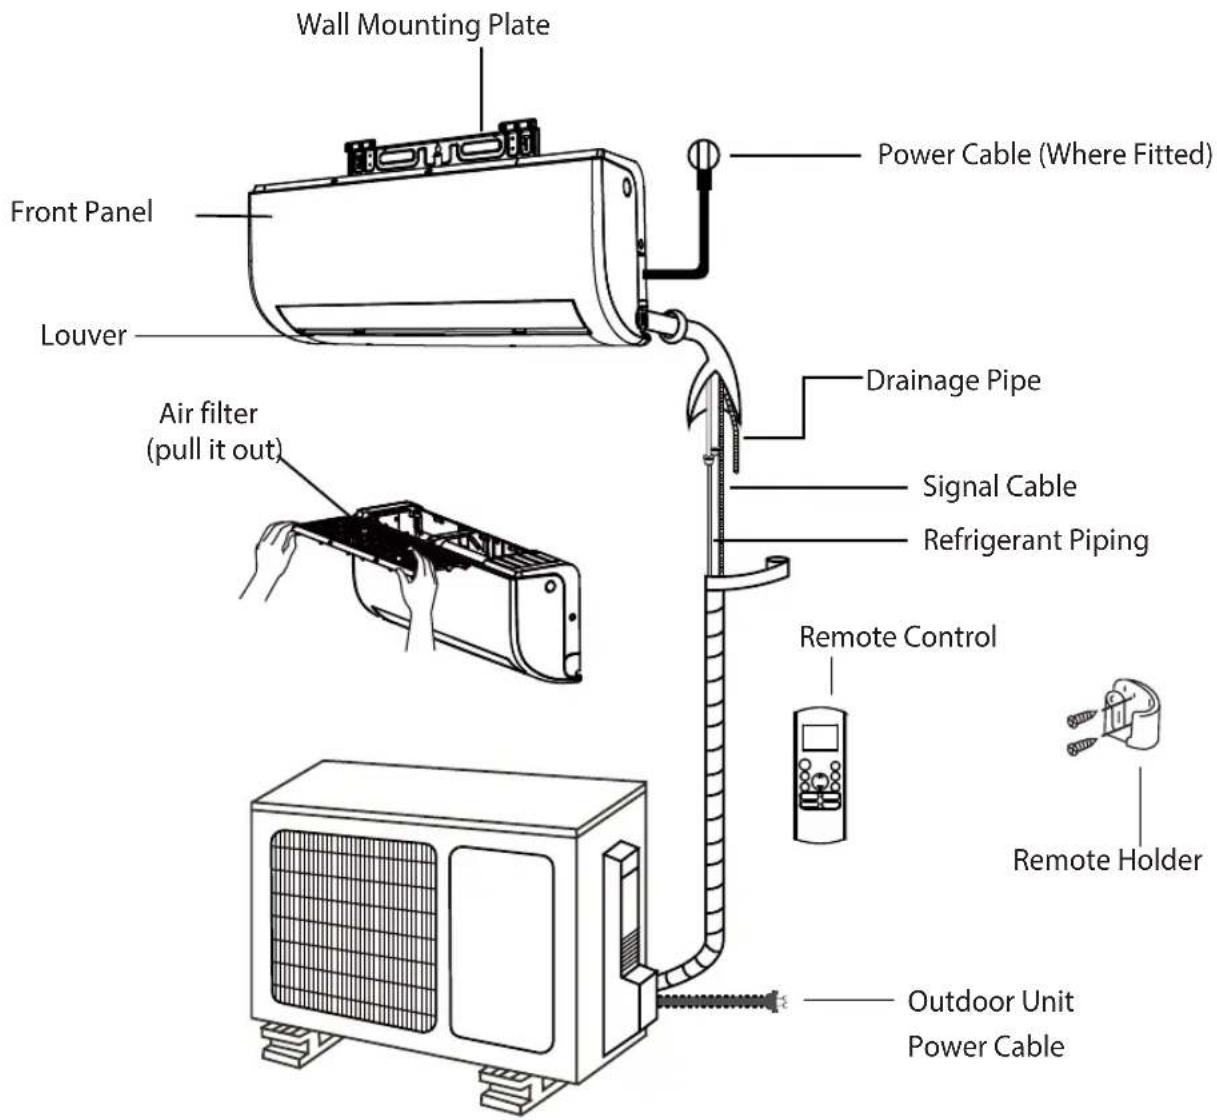
Fig.3.1
NOTE ON ILLUSTRATIONS
Illustrations in this manual are for explanatory purposes. The actual shape of your indoor unit may be slightly different.
Indoor Unit Installation
4
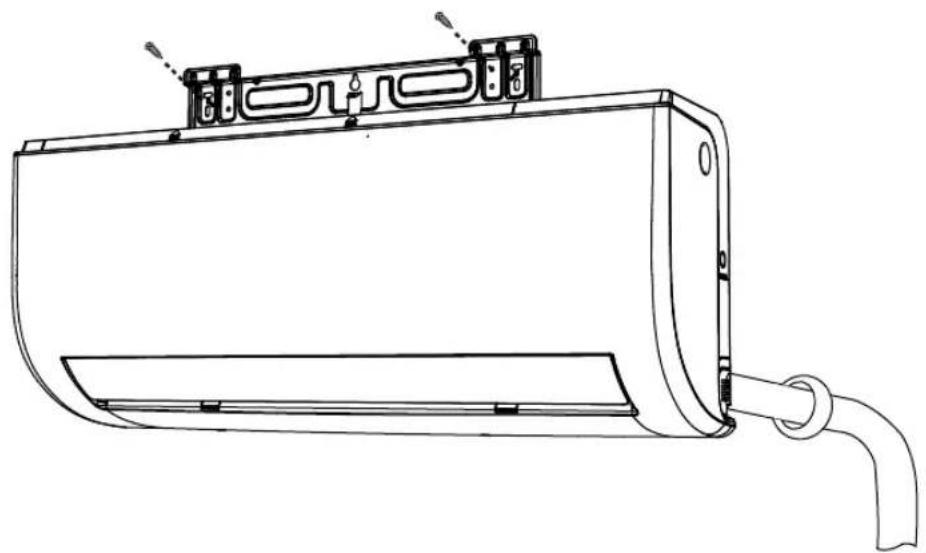
natural_image
Line drawing of a rectangular electronic device with attached components and a pipe (no text or symbols)Installation Instructions – Indoor Unit
PRIOR TO INSTALLATION
Before installing the indoor unit, refer to the label on the product box to make sure that the model number of the indoor unit matches the model number of the outdoor unit.
Step 1: Select installation location
Before installing the indoor unit, you must choose an appropriate location. The following are standards that will help you choose an appropriate location for the unit.
Proper installation locations meet the following standards:
Good air circulation
√ Convenient drainage
√ Noise from the unit will not disturb other people
√ Firm and solid—the location will not vibrate
√ Strong enough to support the weight of the unit
A location at least one meter from all other electrical devices (e.g., TV, radio, computer)
DO NOT install unit in the following locations:
∅ Near any source of heat, steam, or combustible gas
∅ Near flammable items such as curtains or clothing
∅ Near any obstacle that might block air circulation
⊗ Near the doorway
∅ In a location subject to direct sunlight
NOTE ABOUT WALL HOLE:
If there is no fixed refrigerant piping:
While choosing a location, be aware that you should leave ample room for a wall hole (see Drill wall hole for connective piping step) for the signal cable and refrigerant piping that connect the indoor and outdoor units. The default position for all piping is the right side of the indoor unit (while facing the unit). However, the unit can accommodate piping to both the left and right.
Refer to the following diagram to ensure proper distance from walls and ceiling:
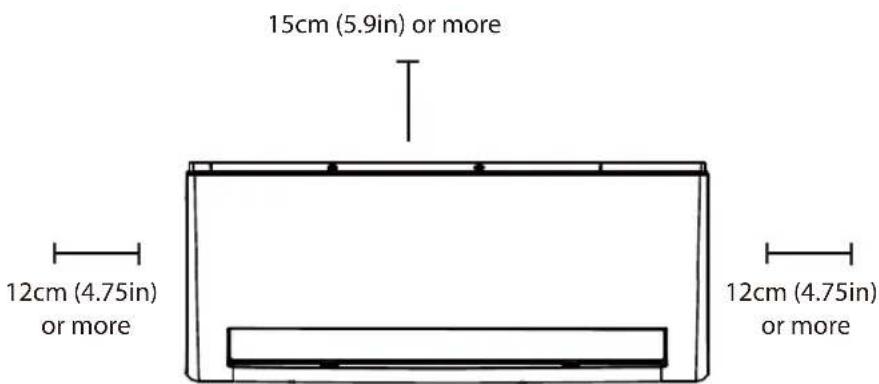
Fig. 4.1
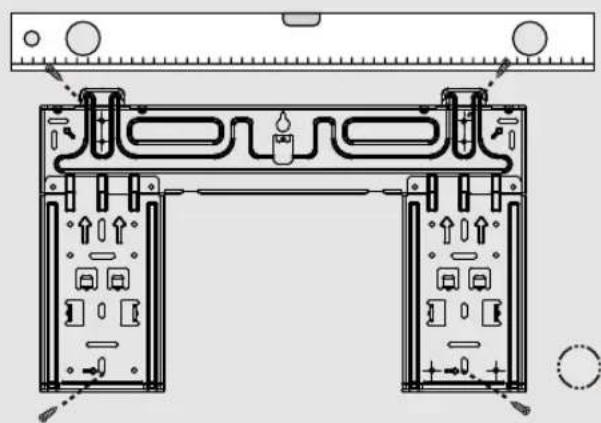
Step 2: Attach mounting plate to wall
The mounting plate is the device on which you will mount the indoor unit.
- Remove the screw that attaches the mounting plate to the back of the indoor unit.
- Place the mounting plate against the wall in a location that meets the standards in the Select Installation Location step. (See Mounting Plate Dimensions for detailed information on mounting plate sizes.)
- Drill holes for mounting screws in places that:
• have studs and can support the weight of the unit
• correspond to screw holes in the mounting plate
-
Secure the mounting plate to the wall with the screws provided.
-
Make sure that mounting plate is flat against the wall.
NOTE FOR CONCRETE OR BRICK WALLS:
If the wall is made of brick, concrete, or similar material, drill 5mm-diameter (0.2in-diameter) holes in the wall and insert the sleeve anchors provided. Then secure the mounting plate to the wall by tightening the screws directly into the clip anchors.
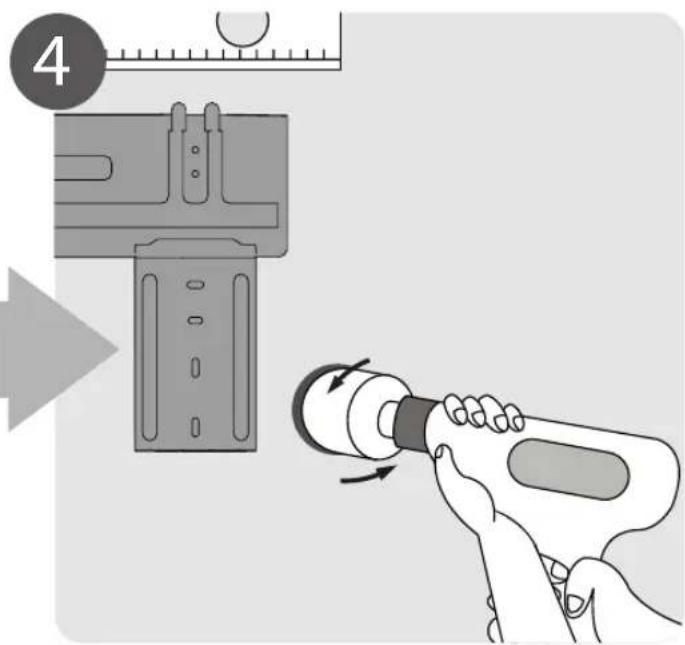
Step 3: Drill wall hole for connective piping
You must drill a hole in the wall for refrigerant piping, the drainage pipe, and the signal cable that will connect the indoor and outdoor units.
- Determine the location of the wall hole based on the position of the mounting plate. Refer to Mounting Plate Dimensions on the next page to help you determine the optimal position. The wall hole should have a 65mm (2.5in) diameter at least, and at a slightly lower angle to facilitate drainage.
- Using a 65 mm (2.5in) core drill, drill a hole in the wall. Make sure that the hole is drilled at a slight downward angle, so that the outdoor end of the hole is lower than the indoor end by about 5mm to 7mm (0.2-0.275in). This will ensure proper water drainage. (See Fig. 4.2)
- Place protective wall cuff in the hole. This protects the edges of the hole and will help seal it when you finish the installation process.
CAUTION
When drilling the wall hole, make sure to avoid wires, plumbing, and other sensitive components.
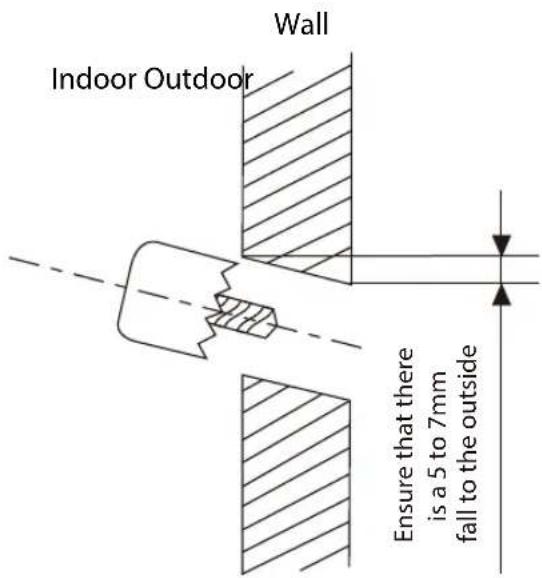
Fig. 4.2
MOUNTING PLATE DIMENSIONS
Different models have different mounting plates. In order to ensure that you have ample room to mount the indoor unit, the diagrams to the right show different types of mounting plates along with the following dimensions:
- Width of mounting plate
• Height of mounting plate - Width of indoor unit relative to plate
- Height of indoor unit relative to plate
- Recommended position of wall hole (both to the left and right of mounting plate)
• Relative distances between screw holes
Correct orientation of Mounting Plate
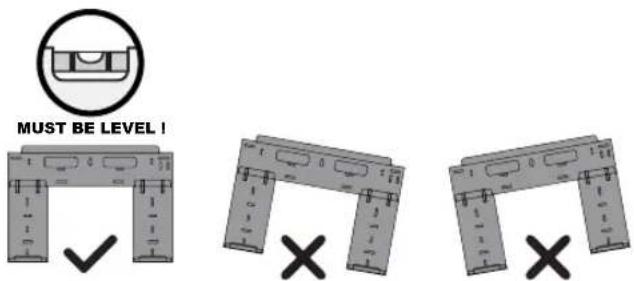
Ensure that Mounting Plate is installed level.
| Refer Fig. 4.3 | HINRA20M | HINRA26M | HINRA35MHINRA50M | HINRA70MHINRA80 |
| A 80 | 964717 | 1106 | ||
| B 30 | 2325302 | 342 | ||
| C 45 | 3481408 | 599 | ||
| D 40 | 6439318 | 558 | ||
| E 25 | 0262249 | 320 | ||
| F 10 | 2219102 | 174 | ||
| G 15 | 3132153 | 263 | ||
| H 39 | N/A39 | N/A | ||
| I N/A | 71N/A | 55 | ||
| J ∅ | 65 ∅65 ∅65 | ∅90 |
All dimensions in mm
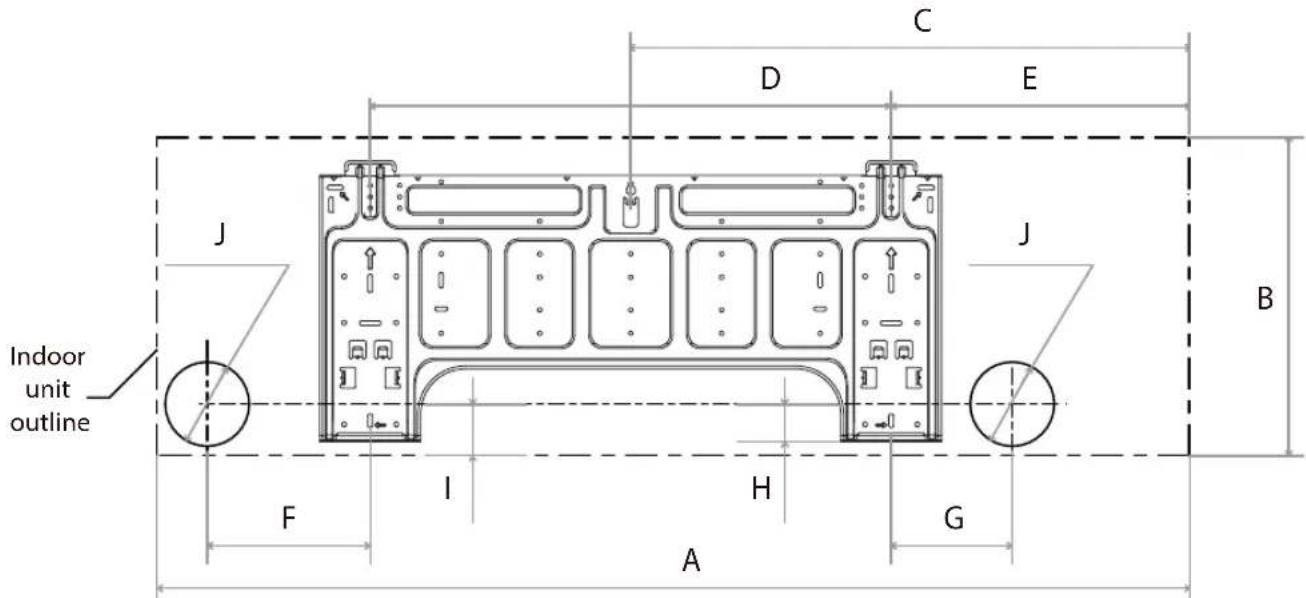
Fig. 4.3
Step 4: Prepare refrigerant piping
The refrigerant piping is inside an insulating sleeve attached to the back of the unit. You must prepare the piping before passing it through the hole in the wall. Refer to the Refrigerant Piping Connection section of this manual for detailed instructions on pipe flaring and flare torque requirements, technique, etc.
NOTE ON PIPING ANGLE
Refrigerant piping can exit the indoor unit from four different angles:
- Left-hand side
- Left rear
- Right-hand side
- Right rear
Refer to Fig. 4.4 for details.
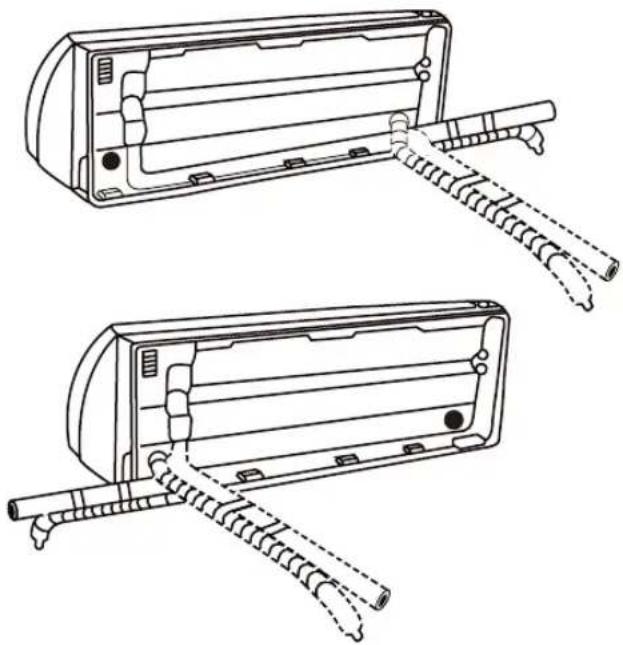
natural_image
Technical line drawing of two views of a device with coiled cable and connectors (no text or symbols)Fig. 4.4

CAUTION
Be extremely careful not to dent or damage the piping while bending them away from the unit. Any dents in the piping will affect the unit's performance.
If refrigerant piping is already embedded in the wall, do the following:
Hook the indoor unit on the mounting plate:
Keep in mind that the hooks on the mounting plate are smaller than the holes on the back of the unit. If you find that you don't have ample room to connect embedded pipes to the indoor unit, the unit can be adjusted left or right by about 30-50mm (1.25-1.95in), depending on the model. (See Fig.4.5)
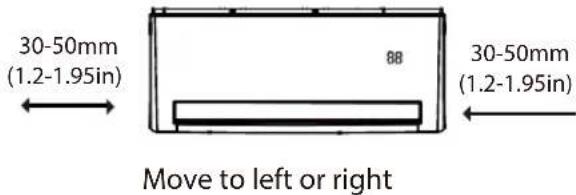
Fig. 4.5
Prepare refrigerant piping:
- Disassemble the louver:
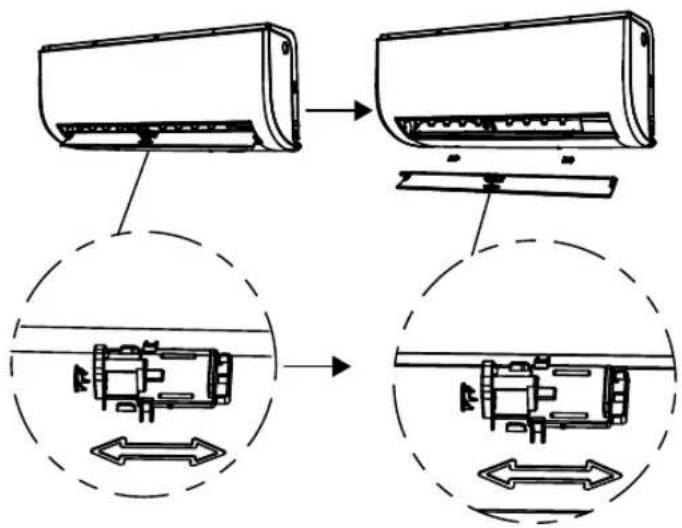
Fig. 4.6
- Open and fix the position of the panel Firstly, unscrew the two screws showed in the picture below, then open the panel, and fix the position of the panel by the latch (see Fig.4.7).
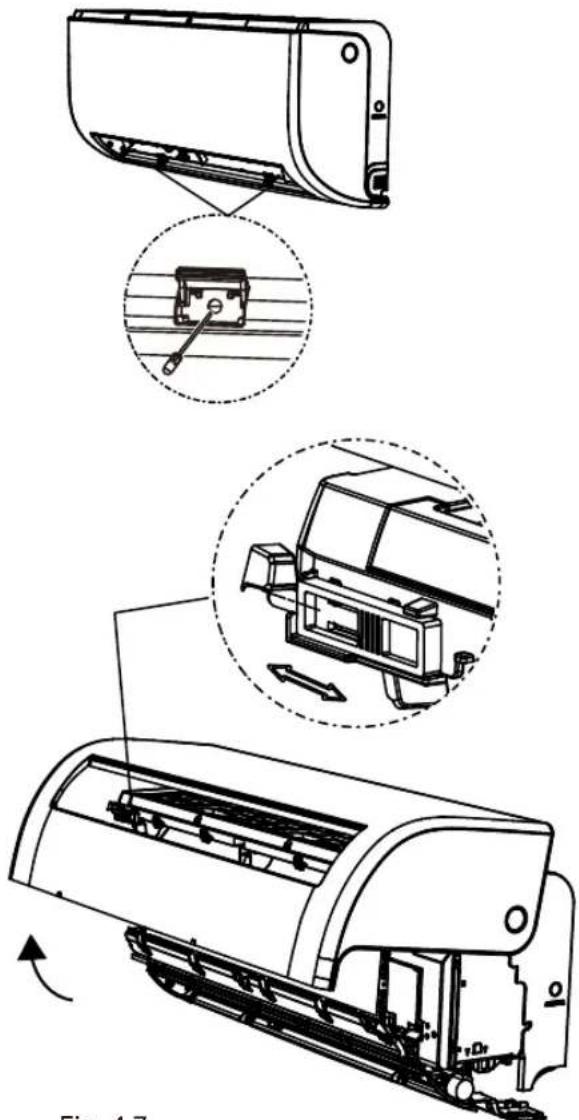
natural_image
Technical line drawing of a car air conditioner unit showing internal components and assembly (no text or symbols)Fig. 4.7
- Use the holder in the mounting plate to prop up the unit, giving you enough room to connect the refrigerant piping, signal cable, and drain hose.
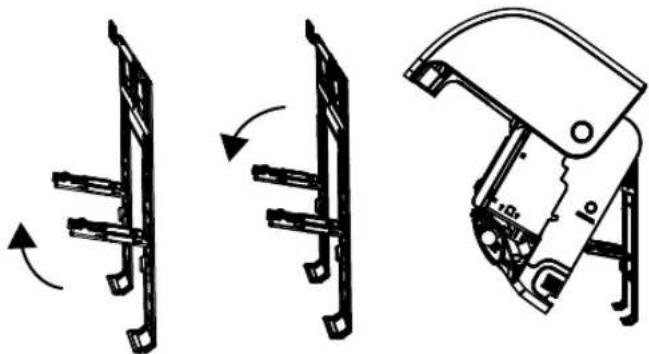
natural_image
Technical line drawings of mechanical components, showing three sequential assembly steps with no visible text or symbols.Fig. 4.8
- Connect drain hose and refrigerant piping (refer to Refrigerant Piping Connection section of this manual for instructions).
- Keep pipe connection point exposed to perform the leak test (refer to Electrical Checks and Leak Checks section of this manual).
- After the leak test, wrap the connection point with insulation tape.
- Remove the bracket or wedge that is propping with insulation tape.
- Using even pressure, push down on the bottom half of the unit. Keep pushing down until the unit snaps onto the hooks along the bottom of the mounting plate.
If there is no refrigerant piping embedded in the wall, do the following:
- Based on the position of the wall hole relative to the mounting plate, choose the side from which the piping will exit the unit.
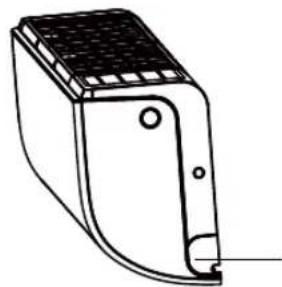
- If the wall hole is behind the unit, keep the knock-out panel in place. If the wall hole is to the side of the indoor unit, remove the plastic knock-out panel from that side of the unit. (See Fig. 4.9). This will create a slot through which your piping can exit the unit. Use needle nose pliers if the plastic panel is too difficult to remove by hand.
natural_image
Technical line drawing of a mechanical component with no visible text or symbolsFig. 4.9
Knock-out Panel
- Use scissors to cut down the length of the insulating sleeve to reveal about 40mm (1.57in) of the refrigerant piping. This serves two purposes:
• To facilitate the Refrigerant Piping Connection process
• To facilitate Gas Leak Checks and enable you to check for dents
- Connect the indoor unit's refrigerant piping to the connective piping that will join the indoor and outdoor units. Refer to the Refrigerant Piping Connection section of this manual for detailed instructions.
- Based on the position of the wall hole relative to the mounting plate, determine the necessary angle of your piping.
- Grip the refrigerant piping at the base of the bend.
- Slowly, with even pressure, bend the piping towards the hole. DO NOT dent or damage the piping during the process.
Step 5: Connect drain hose
By default, the drain hose is attached to the left-hand side of unit (when you're facing the back of the unit). However, it can also be attached to the right-hand side.
- To ensure proper drainage, attach the drain hose on the same side that your refrigerant piping exits the unit.
- Attach drain hose extension (purchased separately) to the end of drain hose.
- Wrap the connection point firmly with Teflon tape to ensure a good seal and to prevent leaks.
- For the portion of the drain hose that will remain indoors, wrap it with foam pipe insulation to prevent condensation.
- Remove the air filter and pour a small amount of water into the drain pan to make sure that water flows from the unit smoothly.

NOTE ON DRAIN HOSE PLACEMENT
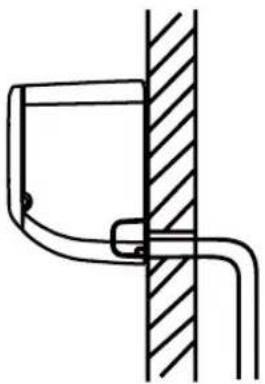
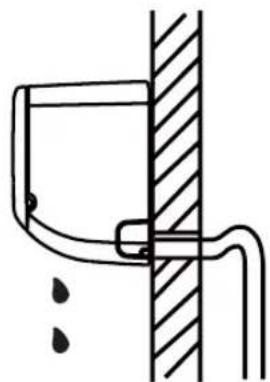
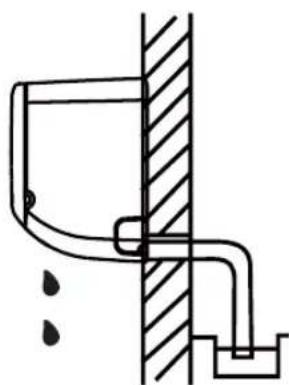
Make sure to arrange the drain hose according to Fig. 4.10.
DO NOT kink the drain hose.
DO NOT create a water trap.
DO NOT put the end of drain hose in water or a container that will collect water.
PLUG THE UNUSED DRAIN HOLE
To prevent unwanted leaks you must plug the unused drain hole with the rubber plug provided.
natural_image
Pure technical line drawing of a mechanical joint or bracket (no text or symbols)Fig. 4.10
CORRECT
Make sure there are no kinks or dent in drain hose to ensure proper drainage.
NOT CORRECT
Kinks in the drain hose will create water traps.
natural_image
Simple line drawing of a pipe connection with a wall and ground, no text or symbols presentFig. 4.11
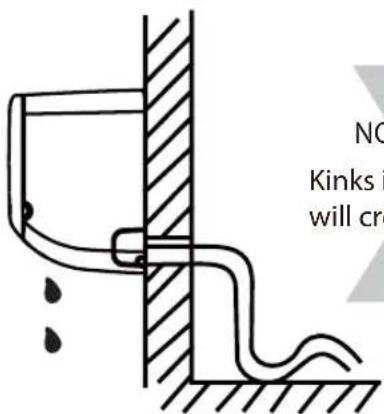
Fig. 4.12
NOT CORRECT
Kinks in the drain hose will create water traps.
NOT CORRECT
Do not place the end of the drain hose in water or in containers that collect water. This will prevent proper drainage.
natural_image
Pure technical line drawing of a mechanical assembly without any text, numbers, or symbolsFig. 4.13

BEFORE PERFORMING ELECTRICAL WORK, READ THESE REGULATIONS
- All wiring must comply with local and national electrical codes, and must be installed by a licensed electrician.
- All electrical connections must be made according to the Electrical Connection Diagram located on the panels of the indoor and outdoor units.
- If there is a serious safety issue with the power supply, stop work immediately. Explain your reasoning to the client, and refuse to install the unit until the safety issue is properly resolved.
- Power voltage should be within 90-100% of rated voltage. Insufficient power supply can cause malfunction, electrical shock, or fire.
- If connecting power to fixed wiring, install a surge protector and main power switch with a capacity of 1.5 times the maximum current of the unit.
- If connecting power to fixed wiring, a switch or circuit breaker that disconnects all poles and has a contact separation of at least 1/8in (3mm) must be incorporated in the fixed wiring. The qualified technician must use an approved circuit breaker.
- Only connect the unit to an individual branch circuit outlet. DO NOT connect another appliance to that outlet.
- Make sure to properly ground the air conditioner.
- Every wire must be firmly connected. Loose wiring can cause the terminal to overheat, resulting in product malfunction and possible fire.
- Do not let wires touch or rest against refrigerant tubing, the compressor, or any moving parts within the unit.
- If the unit has an auxiliary electric heater, it must be installed at least 1 meter (40in) away from any combustible materials.

WARNING
BEFORE PERFORMING ANY ELECTRICAL OR WIRING WORK, TURN OFF THE MAINS POWER TO THE SYSTEM
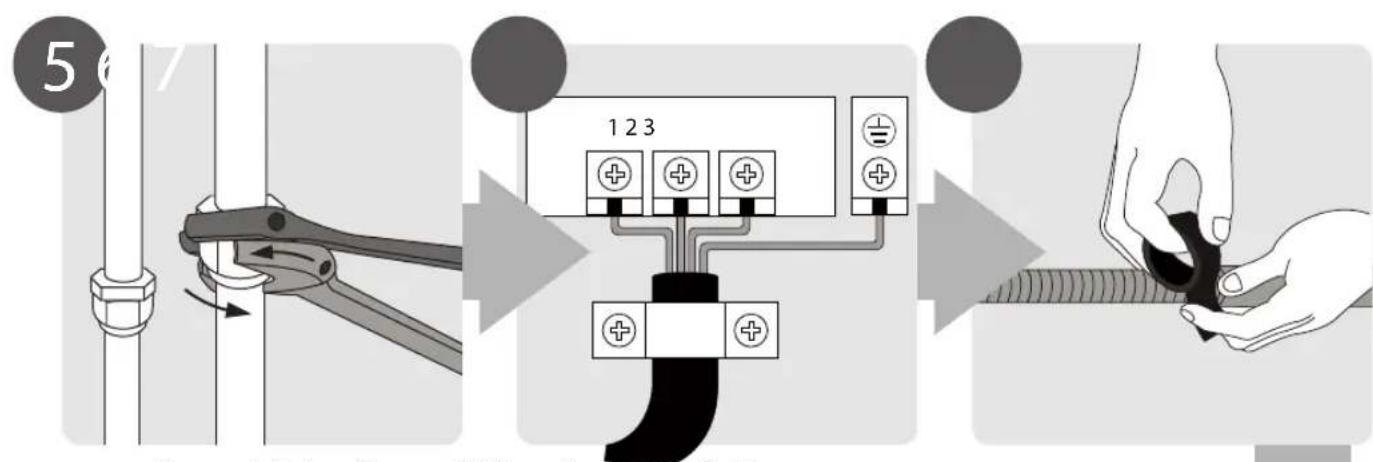
Step 6: Connect signal cable
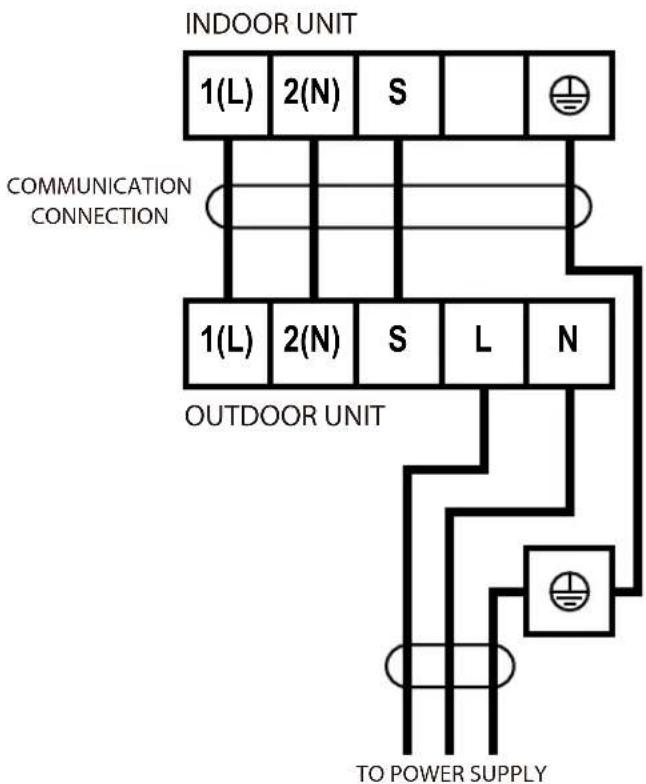
The signal cable enables communication between the indoor and outdoor units. You must first choose the right cable size before preparing it for connection.
Minimum Cross-Sectional Area of Power and Signal Cables
| Rated Current of Appliance (A) | Nominal Cross-Sectional Area ( mm^2 ) |
| >10 and ≤ 16 1.5 | |
| >16 and ≤ 25 2.5 | |
| >25 and ≤ 32 4 | |
| >32 and ≤ 40 6 |
CHOOSE THE RIGHT CABLE SIZE
The size of the power supply cable, signal cable, fuse, and switch needed is determined by the maximum current of the unit. The maximum current is indicated on the nameplate located on the side panel of the unit. Refer to this nameplate to choose the right cable, fuse, or switch.
| System Model | Maximum Input Current (A) |
| HSNRA26 6.5 | |
| HSNRA35 6.5 | |
| HSNRA50 8.5 | |
| HSNRA70 13.5 | |
| HSNRA80 13.5 |
TAKE NOTE OF FUSE SPECIFICATIONS
The air conditioner's circuit board (PCB) is designed with a fuse to provide overcurrent protection. The specifications of the fuse are printed on the circuit board, such as: T3.15A/250VAC, T5A/250VAC, etc.
- Prepare the cable for connection:
a. Using wire strippers, strip the rubber jacket from both ends of signal cable to reveal about 40mm (1.57in) of the wires inside.
b. Strip the insulation from the ends of the wires.
c. Using wire crimper, crimp u-type lugs on the ends of the wires.
PAY ATTENTION TO LIVE WIRE
While crimping wires, make sure you clearly distinguish the Live ("L") Wire from other wires.
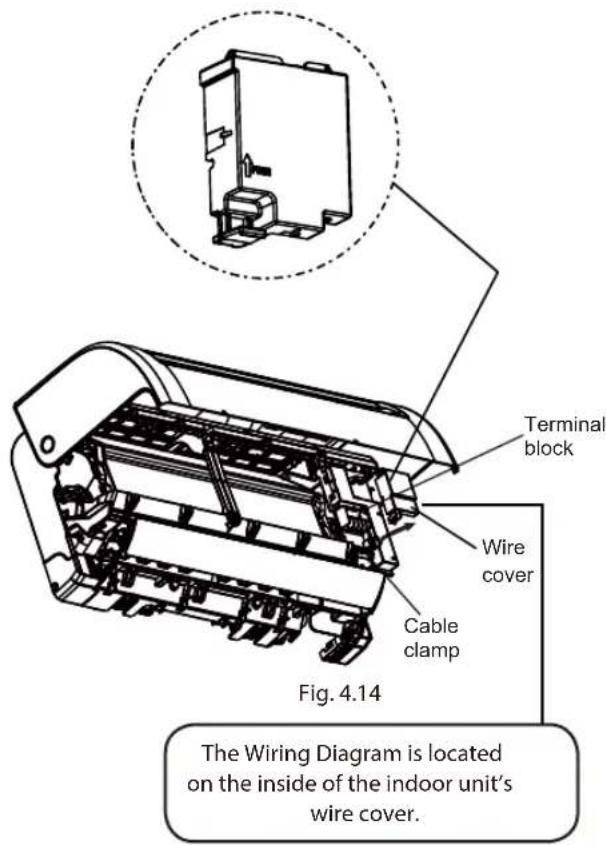
- Open front panel of the indoor unit by loosen the screws according to Fig.4.7, which provide big space for wiring connection.
- Open the wire box cover to connect the cable.

WARNING
ALL WIRING MUST PERFORMED STRICTLY IN ACCORDANCE WITH THE WIRING DIAGRAM LOCATED ON THE INSIDE OF THE INDOOR UNIT S'WIRE COVER.
- Unscrew the cable clamp below the terminal block and place it to the side.
- Facing the back of the unit, remove the plastic panel on the bottom left-hand side.
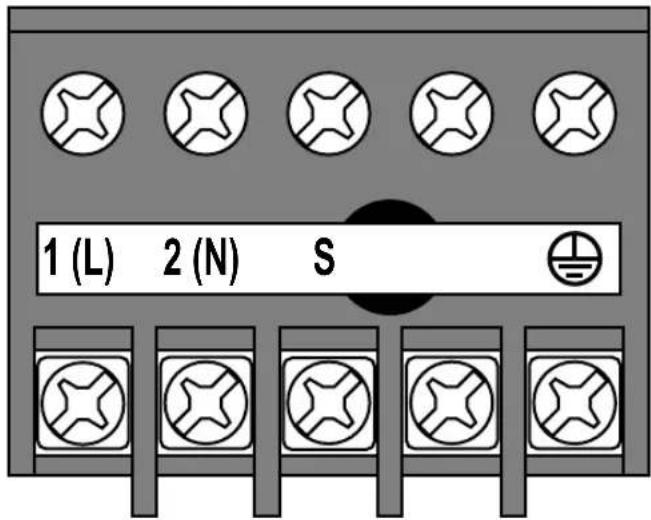
Indoor unit signal and power connection terminals
flowchart
graph TD
    A["INDOOR UNIT"] --> B["1(L) 2(N) S"]
    A --> C["1(L) 2(N) S L N"]
    D["COMMUNICATION CONNECTION"] --> B
    D --> C
    E["OUTDOOR UNIT"] --> F["TO POWER SUPPLY"]
    G["Power Supply Symbol"] --> H["Switch symbol"]
WIRING SCHEMATIC
- Feed the signal wire through this slot, from the back of the unit to the front.
- Facing the front of the unit, match the wire colors with the labels on the terminal block, connect the u-lug and and firmly screw each wire to its corresponding terminal.

CAUTION
DO NOT MIX UP LIVE AND NEUTRAL WIRES
This is dangerous, and can cause the air conditioning unit to malfunction.
- After checking to make sure every connection is secure, use the cable clamp to fasten the signal cable to the unit. Screw the cable clamp down tightly.
- Replace the wire cover on the front of the unit, and the plastic panel on the back.

NOTE ABOUT WIRING
THE WIRING CONNECTION PROCESS MAY DIFFER SLIGHTLY BETWEEN UNITS.
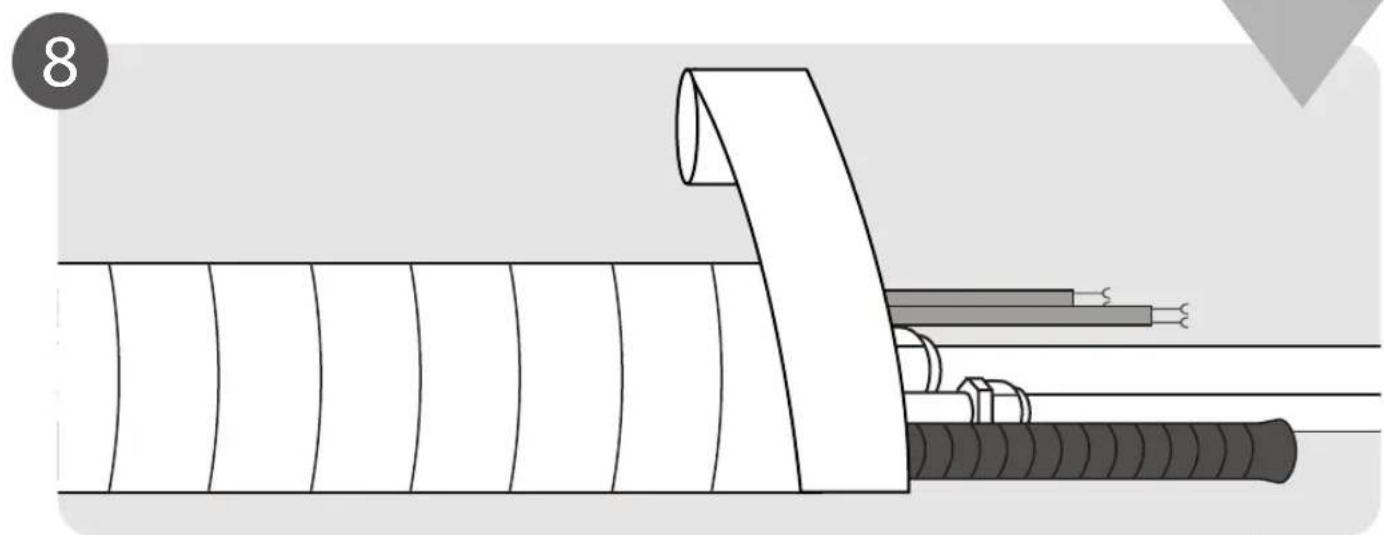
Step 7: Wrap piping and cables
Before passing the piping, drain hose, and the signal cable through the wall hole, you must bundle them together to save space, protect them, and insulate them.
- Bundle the drain hose, refrigerant pipes, and signal cable according to Fig. 4.15.
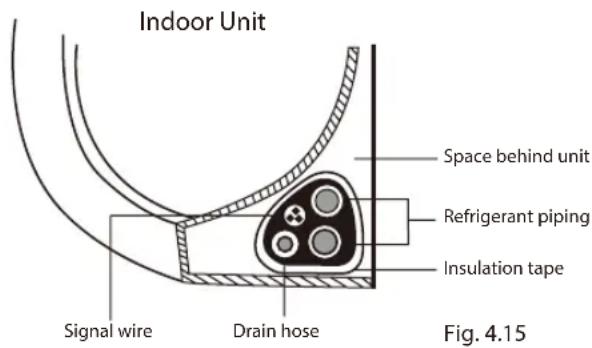
DRAIN HOSE MUST BE ON BOTTOM
Make sure that the drain hose is at the bottom of the bundle. Putting the drain hose at the top of the bundle can cause the drain pan to overflow, which can lead to fire or water damage.
DO NOT INTERTWINE SIGNAL CABLE WITH OTHER WIRES
While bundling these items together, do not intertwine or cross the signal cable with any other wiring.
- Using adhesive vinyl tape, attach the drain hose to the underside of the refrigerant pipes.
- Using insulation tape, wrap the signal wire, refrigerant pipes, and drain hose tightly together. Double-check that all items are bundled in accordance with Fig. 4.15.
DO NOT WRAP ENDS OF PIPING
When wrapping the bundle, keep the ends of the piping unwrapped. You need to access them to test for leaks at the end of the installation process (refer to Electrical Checks and Leak Checks section of this manual).
Step 8: Mount indoor unit
If you installed new connective piping to the outdoor unit, do the following:
- If you have already passed the refrigerant piping through the hole in the wall, proceed to 4. below.
- Otherwise, double-check that the ends of the refrigerant pipes are sealed to prevent dirt or foreign materials from entering the pipes.
- Slowly pass the wrapped bundle of refrigerant pipes, drain hose, and signal wire through the hole in the wall.
- Hook the top of the indoor unit on the upper hook of the mounting plate.
- Check that unit is hooked firmly on mounting by applying slight pressure to the left and right-hand sides of the unit. The unit should not jiggle or shift.
- Using even pressure, push down on the bottom half of the unit. Keep pushing down until the unit snaps onto the hooks along the bottom of the mounting plate.
- Again, check that the unit is firmly mounted by applying slight pressure to the left and the right-hand sides of the unit.
Outdoor Unit Installation
5
natural_image
Line drawing of a rectangular industrial machine with ventilation grilles and mounting base (no text or symbols)Installation Instructions – Outdoor Unit
Step 1: Select installation location
Before installing the outdoor unit, you must choose an appropriate location. The following are standards that will help you choose an appropriate location for the unit.
Proper installation locations meet the following standards:
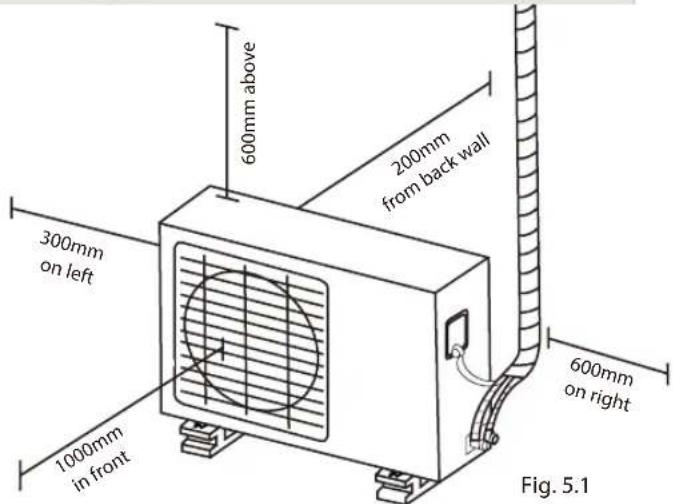
√ Meets all spatial requirements shown in Installation Space Requirements (Fig. 5.1)
√ Good air circulation and ventilation
√ Firm and solid—the location can support the unit and will not vibrate
☑ Noise from the unit will not disturb others
√ Protected from prolonged periods of direct sunlight or rain
DO NOT install unit in the following locations:
∅ Near an obstacle that will block air inlets and outlets
Near a public street, crowded areas, or where noise from the unit will disturb others
Near animals or plants that will be harmed by hot air discharge
∅ Near any source of combustible gas
∅ In a location that is exposed to large amounts of dust
∅ In a location exposed to a excessive amounts of salty air
If the unit is exposed to heavy wind:
Install unit so that air outlet fan is at a 90^ angle to the direction of the wind. If needed, build a barrier in front of the unit to protect it from extremely heavy winds.
See Fig. 5.2 and Fig. 5.3 below.
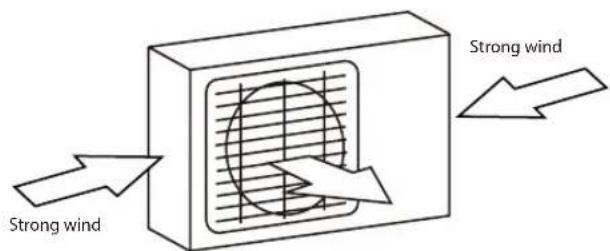
Fig. 5.2
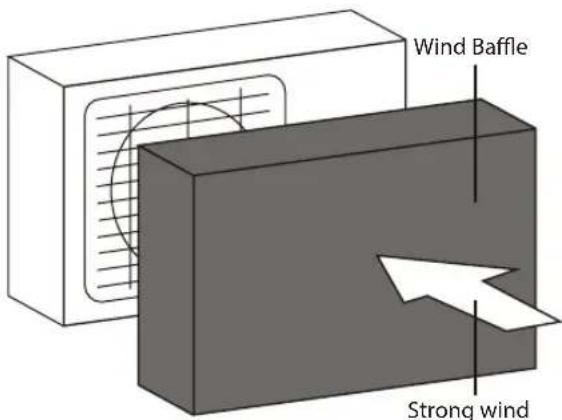
Fig. 5.3
If the unit is frequently exposed to heavy rain or snow:
Build a shelter above the unit it to protect it from the rain or snow. Be careful not to obstruct air flow around the unit.
If the unit is frequently exposed to salty air (seaside): Use outdoor unit that is specially designed to resist corrosion.
Step 2: Install drain joint
Heat pump units require a drain joint. Before bolting the outdoor unit in place, you must install the drain joint at the bottom of the unit. Note that there are two different types of drain joints depending on the type of outdoor unit.
If the drain joint comes with a rubber seal (see Fig. 5.4 A), do the following:
- Fit the rubber seal on the end of the drain joint that will connect to the outdoor unit.
- Insert the drain joint into the hole in the base pan of the unit.
- Rotate the drain joint 90° until it clicks in place facing the front of the unit.
- Connect a drain hose extension (not included) to the drain joint to redirect water from the unit during heating mode.
If the drain joint doesn't come with a rubber seal (see Fig. 5.4 B), do the following:
- Insert the drain joint into the hole in the base pan of the unit. The drain joint will click in place.
- Connect a drain hose extension (not included) to the drain joint to redirect water from the unit during heating mode.
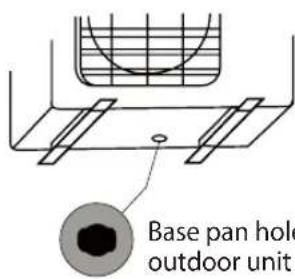
Base pan hole of outdoor unit
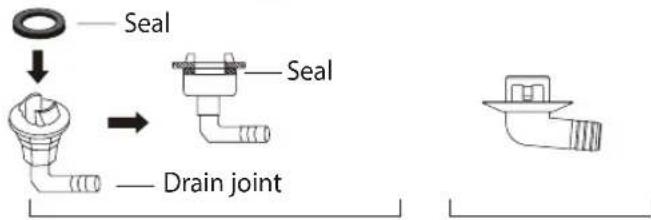
(A) (B)
Fig. 5.4

IN COLD CLIMATES
In cold climates, make sure that the drain hose is as vertical as possible to ensure swift water drainage. If water drains too slowly, it can freeze in the hose and flood the unit.
Step 3: Anchor outdoor unit
The outdoor unit can be anchored to the ground or to a wall-mounted bracket.
UNIT MOUNTING DIMENSIONS
The following is a list of different outdoor unit sizes and the distance between their mounting feet. Prepare the installation base of the unit according to the dimensions below.
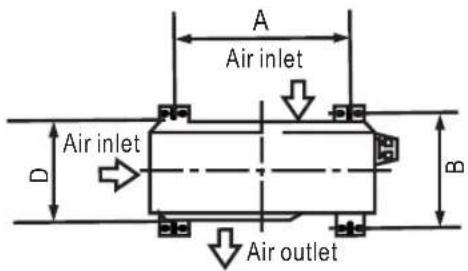
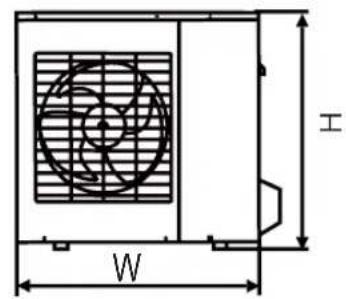
Fig. 5.5
| Model | Outdoor Unit Dimensions (mm)W x H x D | Mounting Dimensions | |
| A (mm) | B (mm) | ||
| HONRA26 / HONRA35 | 800 x 554 x 333 | 514 | 340 |
| HONRA50 | 845 x 702 x 363 | 540 | 350 |
| HONRA70 / HONRA80 | 946 x 810 x 410 | 673 | 403 |
If you install the unit on the ground or on a concrete mounting platform, do the following:
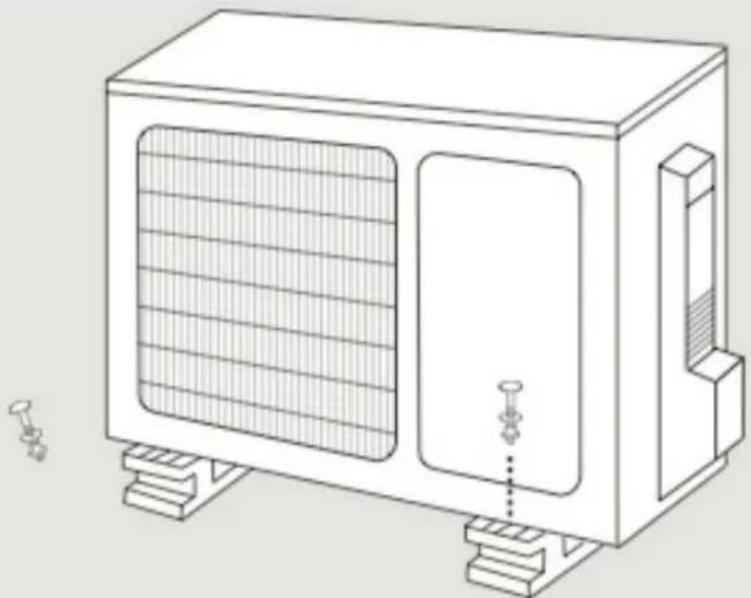
- Mark the positions for four expansion bolts based on dimensions in the Unit Mounting Dimensions chart.
- Pre-drill holes for expansion bolts.
- Clean concrete dust away from holes.
- Place a nut on the end of each expansion bolt.
-
Hammer expansion bolts into the pre-drilled holes.
-
Remove the nuts from expansion bolts, and place outdoor unit on bolts.
- Put washer on each expansion bolt, then replace the nuts.
- Using a wrench, tighten each nut until snug.

WARNING
WHEN DRILLING INTO CONCRETE, EYE PROTECTION IS RECOMMENDED AT ALL TIMES.
If you install the unit on a wall-mounted bracket, do the following:

CAUTION
Before installing a wall-mounted unit, make sure that the wall is made of solid brick, concrete, or of similarly strong material. The wall must be able to support at least four times the weight of the unit.
- Mark the position of bracket holes based on dimensions in the Unit Mounting Dimensions chart.
- Pre-drill the holes for the expansion bolts.
- Clean dust and debris away from holes.
- Place a washer and nut on the end of each expansion bolt.
- Thread expansion bolts through holes in mounting brackets, put mounting brackets in position, and hammer expansion bolts into the wall.
- Check that the mounting brackets are level.
- Carefully lift unit and place its mounting feet on brackets.
- Bolt the unit firmly to the brackets.
TO REDUCE VIBRATIONS OF WALL-MOUNTED UNIT
Install the wall-mounted unit with rubber gaskets to reduce vibrations and noise.
Step 4: Connect signal and power cables
The outside unit's terminal block is protected by an electrical wiring cover on the side of the unit. A comprehensive wiring diagram is printed on the inside of the wiring cover.

BEFORE PERFORMING ELECTRICAL WORK, READ THESE REGULATIONS
- All wiring must comply with local and national electrical codes, and must be installed by a licensed electrician.
- All electrical connections must be made according to the Electrical Connection Diagram located on the side panels of the indoor and outdoor units.
- If there is a serious safety issue with the power supply, stop work immediately. Explain your reasoning to the client, and refuse to install the unit until the safety issue is properly resolved.
- Power voltage should be within 90-100% of rated voltage. Insufficient power supply can cause electrical shock or fire.
- If connecting power to fixed wiring, install a surge protector and main power switch with a capacity of 1.5 times the maximum current of the unit.
- If connecting power to fixed wiring, a switch or circuit breaker that disconnects all poles and has a contact separation of at least 1/8in (3mm) must be incorporated in the fixed wiring. The qualified technician must use an approved circuit breaker or switch.
- Only connect the unit to an individual branch circuit outlet. Do not connect another appliance to that outlet.
- Make sure to properly ground the air conditioner.
- Every wire must be firmly connected. Loose wiring can cause the terminal to overheat, resulting in product malfunction and possible fire.
- Do not let wires touch or rest against refrigerant tubing, the compressor, or any moving parts within the unit.
- If the unit has an auxiliary electric heater, it must be installed at least 1 meter (40in) away from any combustible materials.

WARNING
BEFORE PERFORMING ANY ELECTRICAL OR WIRING WORK, TURN OFF THE MAINS POWER TO THE SYSTEM.
- Prepare the cable for connection:
USE THE RIGHT CABLE
- Indoor Power Cable (if applicable): H05VV-F or H05V2V2-F
• Outdoor Power Cable: H07RN-F
• Signal Cable: H07RN-F
Minimum Cross-Sectional Area of Power and Signal Cables
| Rated Current of Appliance (A) | Nominal Cross-Sectional Area ( mm^2 ) |
| >3 and ≤6 0.75 | |
| >6 and ≤10 1 | |
| >10 and ≤16 | 1.5 |
| >16 and ≤25 | 2.5 |
| >25 and ≤32 | 4 |
| >32 and ≤40 | 6 |
a. Using wire strippers, strip the rubber jacket from both ends of cable to reveal about 40mm (1.57in) of the wires inside.
b. Strip the insulation from the ends of the wires.
c. Using a wire crimper, crimp u-lugs on the ends of the wires.
| System Model | Maximum Input Current (A) |
| HSNRA26 | 6.5 |
| HSNRA35 | 6.5 |
| HSNRA50 | 8.5 |
| HSNRA70 13.5 | |
| HSNRA80 13.5 |
PAY ATTENTION TO LIVE WIRE
While crimping wires, make sure you clearly distinguish the Live ("L") Wire from other wires.

WARNING
ALL WIRING MUST PERFORMED STRICTLY IN ACCORDANCE WITH THE WIRING DIRGRAM LOCATED INSIDE THE OUTDOOR UNIT S WIRE COVER.
- Unscrew the electrical wiring cover and remove it.
- Unscrew the cable clamp below the terminal block and place it to the side.
- Match the wire colors/labels with the labels on the terminal block, and firmly screw the u-lug of each wire to its corresponding terminal.
- After checking to make sure every connection is secure, loop the wires around to prevent rain water from flowing into the terminal.
- Using the cable clamp, fasten the cable to the unit. Screw the cable clamp down tightly.
- Insulate unused wires with PVC electrical tape. Arrange them so that they do not touch any electrical or metal parts.
- Replace the wire cover on the side of the unit, and screw it in place.
Outdoor unit signal and power connection terminals
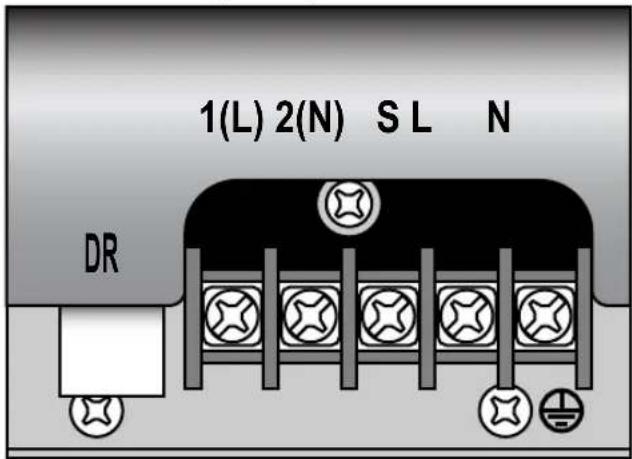
The outdoor unit wiring diagram is located on the inside of the access cover for the signal and power connections of the outdoor unit.
Fig. 5.6
Refrigerant Piping Connection
6
natural_image
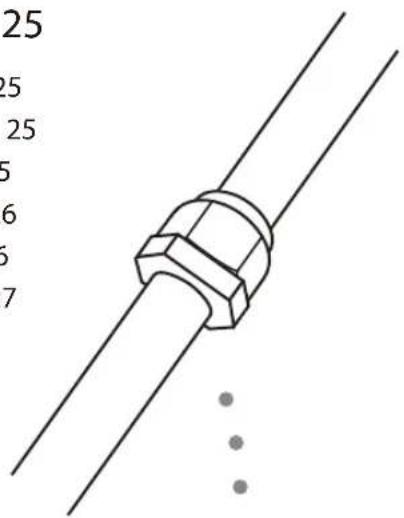
Technical illustration of a mechanical connector assembly showing two stages: before and after assembly, with no visible text or symbols.Note on Pipe Length
The length of refrigerant piping will affect the performance and energy efficiency of the unit. Nominal efficiency is tested on units with a pipe length of 5 meters (16.5ft).
Refer to the table below for specifications on the maximum length and drop height of piping.
Maximum Length and Drop Height of Refrigerant Piping per Unit Model
Model Capacity (kW) Max. Length (m) Max. Drop Height (m)
| HONRA26 / HONRA35 | < 4.4 25 10 | ||
| HONRA50 | ≥ 4.4 and < 7.0 30 20 | ||
| HONRA70 / HONRA80 50 25 | ≥ 7.0 and < 10.5 |
Connection Instructions –
Refrigerant Piping
Step 1: Cut pipes
When preparing refrigerant pipes, take extra care to cut and flare them properly. This will ensure efficient operation and minimize the need for future maintenance.
-
Measure the distance between the indoor and outdoor units.
-
Using a pipe cutter, cut the pipe a little longer than the measured distance.
- Make sure that the pipe is cut at a perfect 90^ angle. Refer to Fig. 6.1 for bad cut examples.
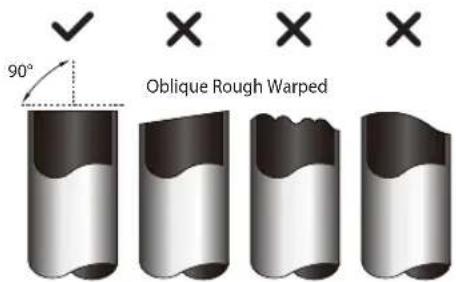
Fig. 6.1

DO NOT DEFORM PIPE
WHILE CUTTING
Be extra careful not to damage, dent, or deform the pipe while cutting. This will drastically reduce the heating efficiency of the unit.
Step 2: Remove burrs
Burrs can affect the air-tight seal of refrigerant piping connection. They must be completely removed.
- Hold the pipe at a downward angle to prevent burrs from falling into the pipe.
- Using a reamer or deburring tool, remove all burrs from the cut section of the pipe.
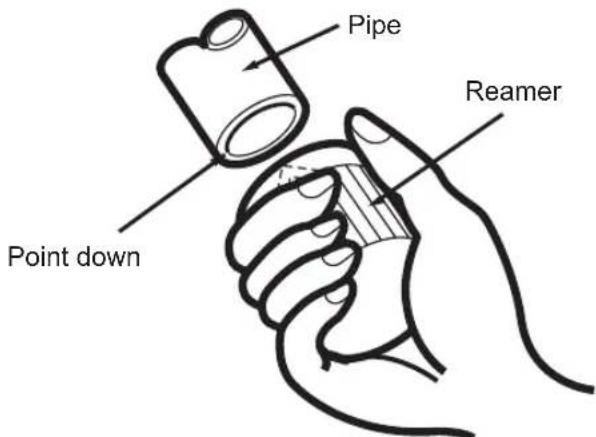
Fig. 6.2
Step 3: Flare pipe ends
Proper flaring is essential to achieve an airtight seal.
- After removing burrs from cut pipe, seal the ends with PVC tape to prevent foreign materials from entering the pipe.
- Sheath the pipe with insulating material.
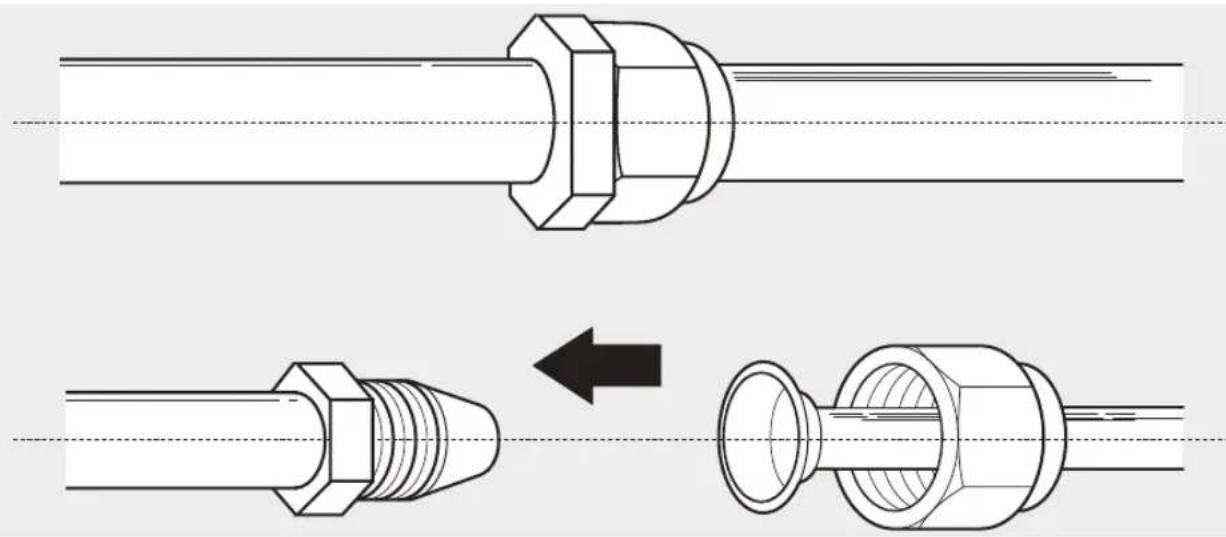
- Place flare nuts on both ends of pipe. Make sure they are facing in the right direction, because you can't put them on or change their direction after flaring. See Fig. 6.3.
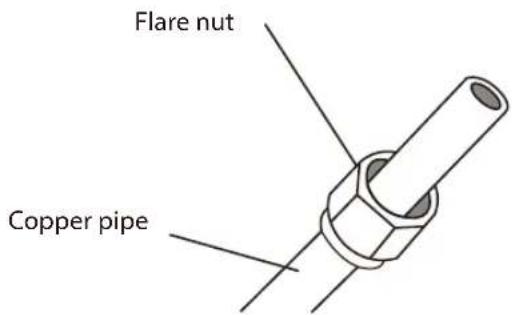
Fig. 6.3
- Remove PVC tape from ends of pipe when ready to perform flaring work.
- Clamp flare form on the end of the pipe. The end of the pipe must extend beyond the edge of the flare form in accordance with the dimensions shown in the table below.
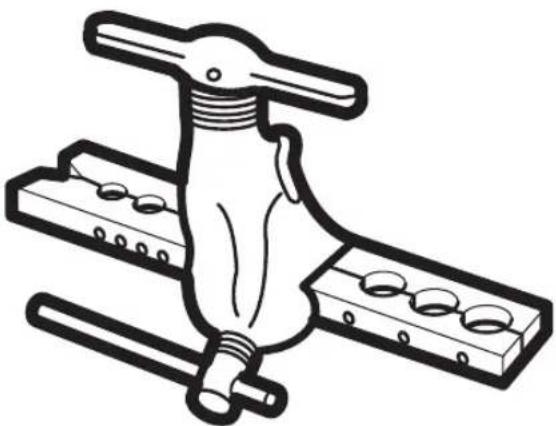
natural_image
Technical line drawing of a mechanical clamp or fixture with two plates and a handle (no text or symbols)Fig. 6.4
PIPING EXTENSION BEYOND FLARE FORM
| Outer Diameter of Pipe (mm) | A (mm) | |
| Min. Max. | ||
| ∅ 6.35 (∅ 0.25") 0.7 (0.0275") 1.3 (0.05") | ||
| ∅ 9.52 (∅ 0.375") 1.0 (0.04") 1.6 (0.063") | ||
| ∅ 12.7 (∅ 0.5") 1.0 (0.04") 1.8 (0.07") | ||
| ∅ 16 (∅ 0.63") | 2.0 (0.078") | 2.2 (0.086") |
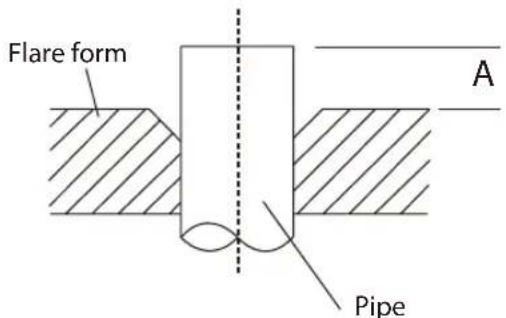
Fig. 6.5
- Place flaring tool onto the form.
- Turn the handle of the flaring tool clockwise until the pipe is fully flared.
- Remove the flaring tool and flare form, then inspect the end of the pipe for cracks and even flaring.
Step 4: Connect pipes
When connecting refrigerant pipes, be careful not to use excessive torque or to deform the piping in any way. You should first connect the low-pressure pipe, then the high-pressure pipe.
MINIMUM BEND RADIUS
When bending connective refrigerant piping, the minimum bending radius is 10cm. See Fig 6.6.
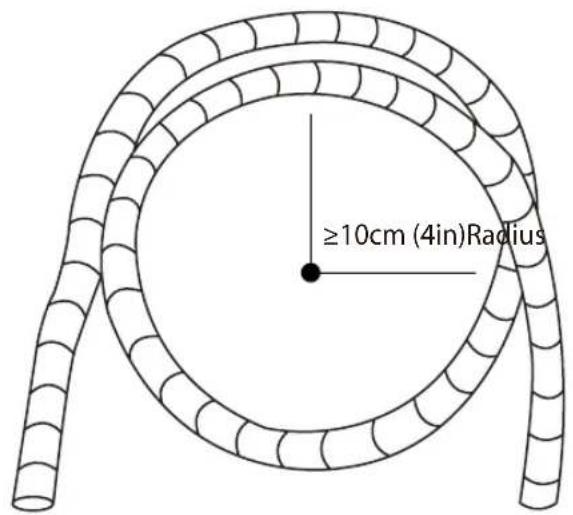
Fig. 6.6
Instructions for Connecting Piping to Indoor Unit
- Align the center of the two pipes that you will connect. See Fig. 6.7.
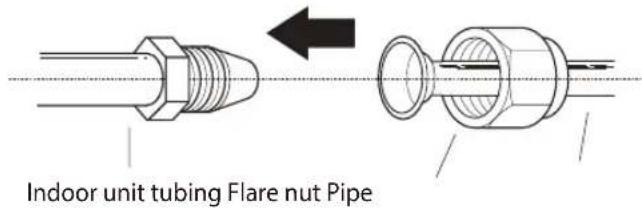
Fig. 6.7
- Tighten the flare nut as tightly as possible by hand.
- Using a spanner, grip the nut on the unit tubing.
- While firmly gripping the nut on the unit tubing, use a torque wrench to tighten the flare nut according to the torque values in the Torque Requirements table below. Loosen the flaring nut slightly, then tighten again.
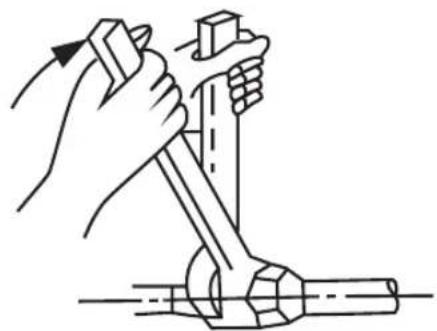
natural_image
Line drawing of hands using a tool to lift a mechanical component (no text or symbols)Fig. 6.8
TORQUE REQUIREMENTS
| Outer Diameter of Pipe mm (inches) | Tightening Torque (Nm) |
| 6.35 (1/4") 15 - 16 | |
| 9.52 (3/8") 25 - 26 | |
| 12.7 (1/2") 35 - 37 | |
| 16 (5/8") 45 -47 |
! DO NOT USE EXCESSIVE TORQUE
Excessive force can break the nut or damage the refrigerant piping. You must not exceed torque requirements shown in the table above.
Instructions for Connecting Piping to Outdoor Unit
- Unscrew the cover from the packed valve on the side of the outdoor unit. (See Fig. 6.9)
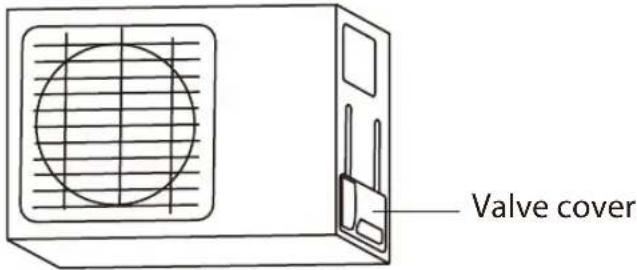
Fig. 6.9
- Remove protective caps from ends of valves.
- Align flared pipe end with each valve, and tighten the flare nut as tightly as possible by hand.
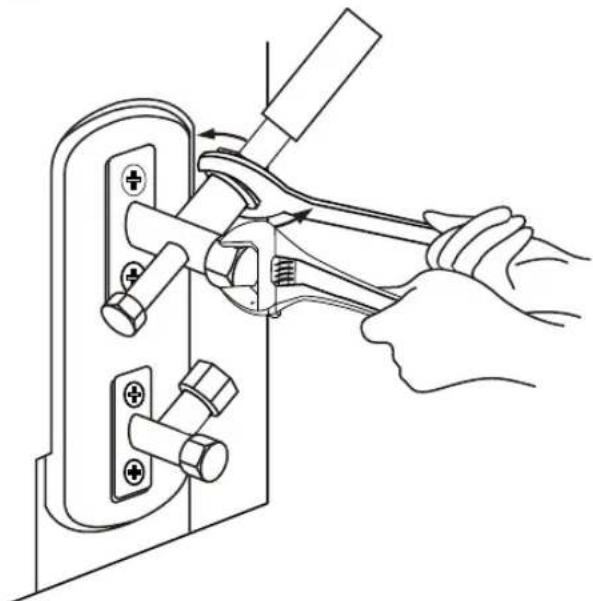
- Using a spanner, grip the body of the valve. Do not grip the nut that seals the service valve. (See Fig. 6.10)

USE SPANNER TO GRIP MAIN BODY OF VALVE
Torque from tightening the flare nut can snap off other parts of valve.
natural_image
Line drawing of a hand using a pliers to adjust or install a mechanical component (no text or symbols present)Fig. 6.10
- While firmly gripping the body of the valve, use a torque wrench to tighten the flare nut according to the correct torque values.
- Loosen the flaring nut slightly, then tighten again.
- Repeat Steps 3 to 6 for the remaining pipe.
Air Evacuation
7
natural_image
Line drawing of a dual-gauge pressure regulator with two gauges and a central valve (no text or symbols)Preparations and Precautions
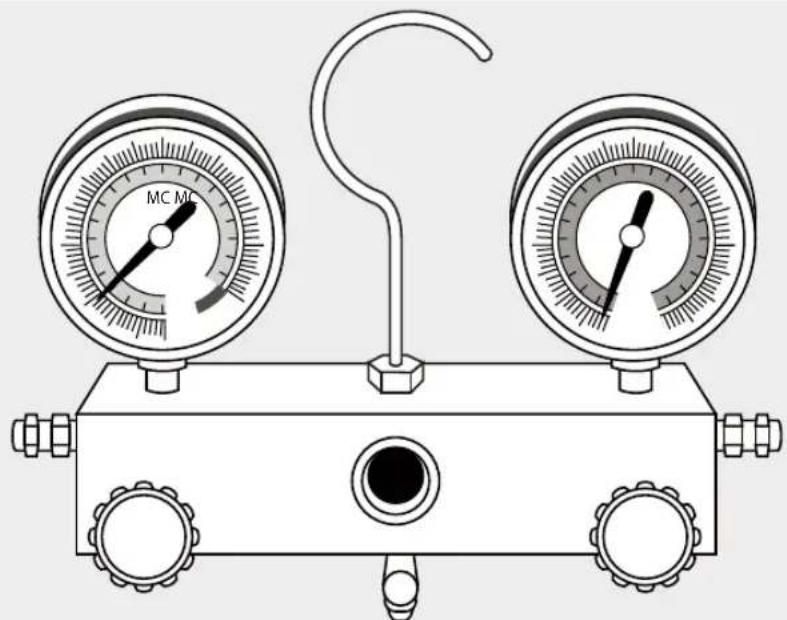
Air and foreign matter in the refrigerant circuit can cause abnormal rises in pressure, which can damage the air conditioner, reduce its efficiency, and cause injury. Use a vacuum pump and manifold gauge to evacuate the refrigerant circuit, removing any non-condensable gas and moisture from the system.
Evacuation should be performed upon initial installation and when unit is relocated.
BEFORE PERFORMING EVACUATION
☑ Check to make sure that both high-pressure and low-pressure pipes between the indoor and outdoor units are connected properly in accordance with the Refrigerant Piping Connection section of this manual.
√ Check to make sure all wiring is connected properly.
Evacuation Instructions
Before using the manifold gauge and vacuum pump, read their operation manuals to familiarize yourself with how to use them properly.
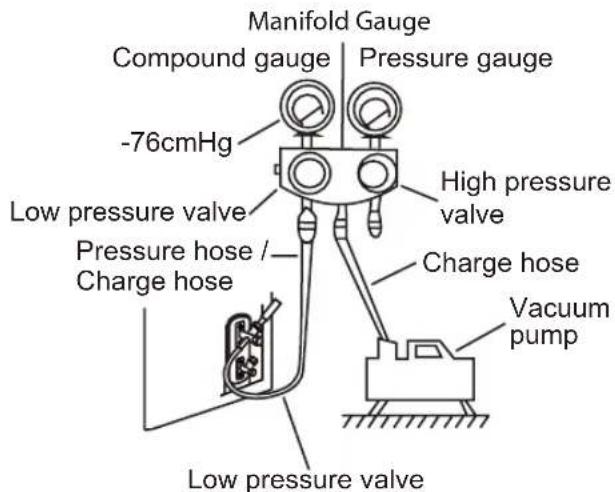
Fig. 7.1
-
Connect the charge hose of the manifold gauge to service port on the outdoor unit's low pressure valve.
-
Connect another charge hose from the manifold gauge to the vacuum pump.
-
Open the Low Pressure side of the manifold gauge. Keep the High Pressure side closed.
-
Turn on the vacuum pump to evacuate the system.
-
Run the vacuum for at least 15 minutes, or until the Compound Meter reads -76cmHG (-10 ^5 Pa).
-
Close the Low Pressure side of the manifold gauge, and turn off the vacuum pump.
-
Wait for 5 minutes, then check that there has been no change in system pressure.
-
If there is a change in system pressure, refer to Gas Leak Check section for information on how to check for leaks. If there is no change in system pressure, unscrew the cap from the packed valve (high pressure valve).
-
Insert hexagonal wrench into the packed valve (high pressure valve) and open the valve by turning the wrench in a 1/4 counterclockwise turn. Listen for gas to exit the system, then close the valve after 5 seconds.
-
Watch the Pressure Gauge for one minute to make sure that there is no change in pressure. The Pressure Gauge should read slightly higher than atmospheric pressure.
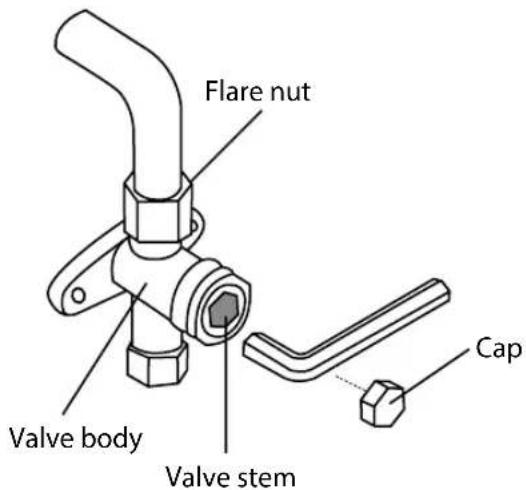
Fig. 7.2
-
Remove the charge hose from the service port.
-
Using hexagonal wrench, fully open both the high pressure and low pressure valves.
-
Tighten valve caps on all three valves (service port, high pressure, low pressure) by hand. You may tighten it further using a torque wrench if needed.
OPEN VALVE STEMS GENTLY
When opening valve stems, turn the hexagonal wrench until it hits against the stopper. Do not try to force the valve to open further.
Note on Adding Refrigerant
Units are charged for up to 5m, the standard pipe length. There is no need to adjust the charge for lengths of up to 5m. The minimum recommended pipe length should be no less than 2m.
For lengths greater than 5m, additional refrigerant is to be added and can be calculated from the table below.
ADDITIONAL REFRIGERANT PER PIPE LENGTH
| Connective Pipe Length (m) | Air Purging Method | Additional Refrigerant | |
| < 5m pipe length | Vacuum Pump N/A | ||
| >5m pipe length Vacuum Pump | Liquid Side:∅ 6.35mm (1/4") | Liquid Side:∅ 9.52mm (3/8") | |
| 15g/m for length >5m | 30g/m for length >5m | ||
CAUTION
DO NOT mix refrigerant types.
Electrical and Gas Leak Checks
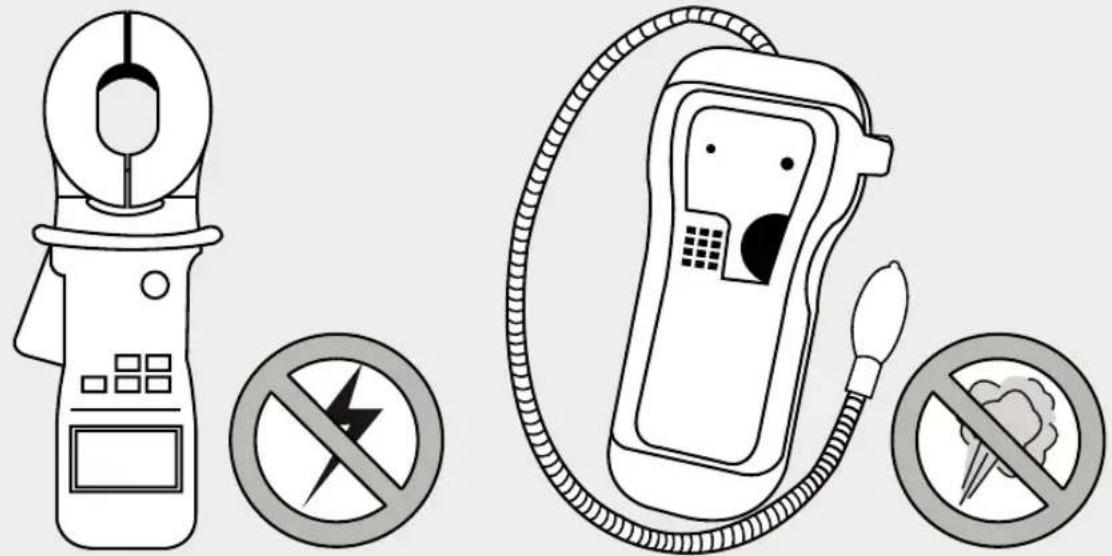
Electrical Safety Checks
After installation, confirm that all electrical wiring is installed in accordance with local and national regulations, and according to the Installation Manual.
BEFORE TEST RUN
Check Grounding Work
Measure grounding resistance by visual detection and with grounding resistance tester. Grounding resistance must be less than 4 Ω.
DURING TEST RUN
Check for Electrical Leakage
During the Test Run, use an electroprobe and multimeter to perform a comprehensive electrical leakage test.
If electrical leakage is detected, turn off the unit immediately and call a licensed electrician to find and resolve the cause of the leakage.
WARNING – RISK OF ELECTRIC SHOCK
ALL WIRING MUST COMPLY WITH LOCAL AND NATIONAL ELECTRICAL CODES, AND MUST BE INSTALLED BY A LICENSED ELECTRICIAN.
Gas Leak Checks
There are two different methods to check for gas leaks.
Soap and Water Method
Using a soft brush, apply soapy water or liquid detergent to all pipe connection points on the indoor unit and outdoor unit. The presence of bubbles indicates a leak.
Leak Detector Method
If using leak detector, refer to the device's operation manual for proper usage instructions.
AFTER PERFORMING GAS LEAK CHECKS
After confirming that the all pipe connection points DO NOT leak, replace the valve cover on the outside unit.
Test Run
9
Before Test Run
Only perform test run after you have completed the following steps:
- Electrical Safety Checks – Confirm that the unit's electrical system is safe and operating properly
- Gas Leak Checks – Check all flare nut connections and confirm that the system is not leaking
- Confirm that gas and liquid (high and low pressure) valves are fully open
Test Run Instructions
You should perform the Test Run for at least 30 minutes.
- Connect power to the unit.
- Press the ON/OFF button on the remote controller to turn it on.
- Press the MODE button to scroll through the following functions, one at a time:
• COOL – Select lowest possible temperature
• HEAT – Select highest possible temperature
- Let each function run for 5 minutes, and perform the following checks:
List of Checks to Perform PASS/FAIL
| No electrical leakage | ||
| Unit is properly grounded | ||
| All electrical terminals properly covered | ||
| Indoor and outdoor units are solidly installed | ||
| 2 outdoor pipe connections points do not leak | ||
| 2 indoor pipe connections points do not leak | ||
| Water drains properly from drain hose | ||
| All piping is properly insulated | ||
| Unit performs COOL function properly | ||
| Unit performs HEAT function properly | ||
| Indoor unit louvers rotate properly | ||
| Indoor unit responds to remote controller |
DOUBLE-CHECK PIPE CONNECTIONS
During operation, the pressure of the refrigerant circuit will increase. This may reveal leaks that were not present during your initial leak check. Take time during the Test Run to double-check that all refrigerant pipe connection points do not have leaks. Refer to Gas Leak Check section for instructions.
- After the Test Run is successfully complete, and you confirm that all checks points in List of Checks to Perform have PASSED, do the following:
a. Using remote control, return unit to normal operating temperature.
b. Using insulation tape, wrap the indoor refrigerant pipe connections that you left uncovered during the indoor unit installation process.
IF AMBIENT TEMPERATURE IS BELOW 17°C (63°F)
You can't use the remote controller to turn on the COOL function when the room temperature is below 17^ . In this instance, you can use the MANUAL CONTROL button to test the COOL function.
- Locate the MANUAL CONTROL button on the right-hand side panel of the unit. See Fig.8.1.
- Press the MANUAL CONTROL button one time to activate FORCED AUTO mode.
- Press the MANUAL CONTROL again to activate FORCED COOLING mode.
- Perform Test Run as normal.
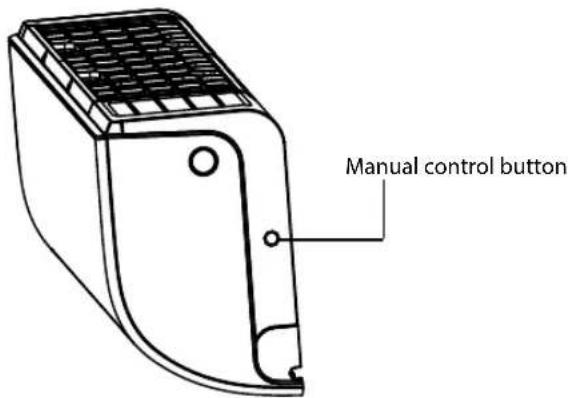
Fig. 8.1
Disposal Guidelines
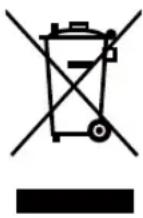
This appliance contains refrigerant and other potentially hazardous materials. When disposing of this appliance, the law requires special collection and treatment. Do not dispose of this product as household waste or unsorted municipal waste.
Special notice
Disposing of this appliance in the forest or other natural surroundings endangers your health and is bad for the environment. Hazardous substances may leak into the ground water and enter the food chain.
This page intentionally blank
Rinnai
Rinnai Australia Pty. Ltd. ABN 74 005 138 769
Head Office
100 Atlantic Drive,
Keysborough VIC 3173
P.O. Box 460
Braeside, Victoria 3195
Rinnai has a Service and Spare Parts network with personnel who are fully trained and equipped to give the best service on your Rinnai appliance. If your appliance requires service, please call our National Help Line. Rinnai recommends that this appliance be serviced once a year.
Product Sales and Service - National
Phone: 1300 555 545* Fax: 1300 555 655*
Technical Helpline and Spare Parts
National (Mon-Fri 8am - 5.30pm EST)
Phone: 1300 555 545* Fax: 1300 300 141*
*Cost of a local call higher from mobile or public phones.
E-mail: enquiry@rinnai.com.au
For further information visit: www.rinnai.com.au
Part Number: B063805
December 2016
EQPL38586755
Issue B

- Split Type Wall Mounted Air Conditioner
- This appliance shall be installed in accordance with:
- Table of Contents
- Installation Manual
- Refrigerant Piping Connection ..... 25
- Air Evacuation 29
- Safety Precautions
- REGULATORY / INSTALLATION
- WARNING
- CAUTION
- OPERATION RANGE LIMITATIONS
- Accessories
- Installation Summary - Indoor Unit
- 2
- Unit Parts
- 3
- NOTE ON ILLUSTRATIONS
- Indoor Unit Installation
- 4
- Installation Instructions – Indoor Unit
- PRIOR TO INSTALLATION
- Step 1: Select installation location
- NOTE ABOUT WALL HOLE:
- Step 2: Attach mounting plate to wall
- NOTE FOR CONCRETE OR BRICK WALLS:
- Step 3: Drill wall hole for connective piping
- MOUNTING PLATE DIMENSIONS
- Step 4: Prepare refrigerant piping
- NOTE ON PIPING ANGLE
- If refrigerant piping is already embedded in the wall, do the following:
- Prepare refrigerant piping:
- If there is no refrigerant piping embedded in the wall, do the following:
- Step 5: Connect drain hose
- NOTE ON DRAIN HOSE PLACEMENT
- PLUG THE UNUSED DRAIN HOLE
- CORRECT
- NOT CORRECT
- BEFORE PERFORMING ELECTRICAL WORK, READ THESE REGULATIONS
- Step 6: Connect signal cable
- CHOOSE THE RIGHT CABLE SIZE
- TAKE NOTE OF FUSE SPECIFICATIONS
- PAY ATTENTION TO LIVE WIRE
- NOTE ABOUT WIRING
- Step 7: Wrap piping and cables
- DRAIN HOSE MUST BE ON BOTTOM
- DO NOT INTERTWINE SIGNAL CABLE WITH OTHER WIRES
- DO NOT WRAP ENDS OF PIPING
- Step 8: Mount indoor unit
- Outdoor Unit Installation
- 5
- Step 2: Install drain joint
- IN COLD CLIMATES
- Step 3: Anchor outdoor unit
- UNIT MOUNTING DIMENSIONS
- TO REDUCE VIBRATIONS OF WALL-MOUNTED UNIT
- Step 4: Connect signal and power cables
- USE THE RIGHT CABLE
- Refrigerant Piping Connection
- Note on Pipe Length
- Connection Instructions –
- Refrigerant Piping
- Step 1: Cut pipes
- DO NOT DEFORM PIPE
- WHILE CUTTING
- Step 2: Remove burrs
- Step 3: Flare pipe ends
- Step 4: Connect pipes
- MINIMUM BEND RADIUS
- Instructions for Connecting Piping to Indoor Unit
- ! DO NOT USE EXCESSIVE TORQUE
- Instructions for Connecting Piping to Outdoor Unit
- USE SPANNER TO GRIP MAIN BODY OF VALVE
- Air Evacuation
- Preparations and Precautions
- BEFORE PERFORMING EVACUATION
- Evacuation Instructions
- OPEN VALVE STEMS GENTLY
- Note on Adding Refrigerant
- Electrical and Gas Leak Checks
- Electrical Safety Checks
- BEFORE TEST RUN
- DURING TEST RUN
- WARNING – RISK OF ELECTRIC SHOCK
- Gas Leak Checks
- AFTER PERFORMING GAS LEAK CHECKS
- Test Run
- 9
- Test Run Instructions
- DOUBLE-CHECK PIPE CONNECTIONS
- IF AMBIENT TEMPERATURE IS BELOW 17°C (63°F)
- Disposal Guidelines
- Special notice
- Rinnai
Brand : Rinnai
Model : HSNRQ35B
Category : Air conditioner