
RPC35WA - Air conditioner Rinnai - Free user manual and instructions
Find the device manual for free RPC35WA Rinnai in PDF.


| Product Type | Portable Air Conditioner |
| Brand | Rinnai |
| Model | RPC35WA |
| Cooling Capacity | 3.55 kW |
| Power Consumption (Cooling) | 1.34 kW |
| Rated Power (Max) | 1600 W |
| Voltage / Frequency | 220-240 V ~ 50 Hz |
| Dimensions (H x W x D) | 795 x 480 x 400 mm |
| Weight | 33 kg |
| Refrigerant / Quantity | R410A / 520 g |
| Operating Modes | Cool, Dry (Dehumidifying), Fan |
| Fan Speeds | Low, Medium, High |
| Temperature Range | 16°C – 32°C |
| Remote Control | Yes, with LCD display (range 15 m) |
| Timer Functions | On Timer, Off Timer |
| Sleep Function | Yes (10-hour automatic temperature adjustment) |
| Swing Function | Yes (adjustable louvre direction) |
| Air Filters | Two washable mesh filters (room air intake and lower air intake) |
| Filter Cleaning Frequency | Weekly during heavy use; every 2–3 weeks for intermittent use |
| Exhaust Duct Length (Max) | 1.8 m |
| Power Cord Length | 1.2 m |
| Condensate Drainage | Internal tank (capacity not specified) or optional drain hose |
| Installation Options | Window or semi-permanent wall (requires authorized person) |
| Safety Features | Overheat protection, auto shut-off on P1 error, 3-minute restart delay |
| Warranty | 2 years parts (Australia) |
Frequently Asked Questions - RPC35WA Rinnai
User questions about RPC35WA Rinnai
0 question about this device. Answer the ones you know or ask your own.
Ask a new question about this device
Download the instructions for your Air conditioner in PDF format for free! Find your manual RPC35WA - Rinnai and take your electronic device back in hand. On this page are published all the documents necessary for the use of your device. RPC35WA by Rinnai.
USER MANUAL RPC35WA Rinnai
natural_image
3D rendering of a white industrial air conditioner unit with control panel and buttons (no visible text or symbols)This appliance shall be installed in accordance with:
• Manufacturer's Installation Instructions
- Current AS/NZS 3000
- Local Regulations and Municipal Building Codes including local OH&S requirements
This appliance must be installed, maintained and removed by an Authorised Person.
For continued safety of this appliance it must be installed and maintained in accordance with the manufacturers instructions.

N10378
BEFORE PROCEEDING WITH THE OPERATION OF YOUR NEW RINNAI PORTABLE ROOM AIR CONDITIONER PLEASE READ THIS MANUAL THOROUGHLY AND GAIN A FULL UNDERSTANDING OF THE REQUIREMENTS, FEATURES AND OPERATION OF YOUR NEW APPLIANCE.
TABLE OF CONTENTS
Safety & Important Points 4
Warranty & Specifications 5
Unpacking The Appliance 5
Warranty 5
Specifications 5
Air Conditioner Basics 6
Appliance Components 6
Control Panel and Remote Control Layout 7
Remote Control Cradle 7
Operation 8
Basic operation 8
Basic operation Control Panel 8
COOL 8
DRY (Dehumidifying) 8
FAN 8
Basic operation Remote Control 8
COOL 8
DRY (Dehumidifying) 9
FAN 9
Advanced Functions 9
Setting the Clock 9
Advanced Functions Remote Control 9
On Timer 9
OFF Timer 10
SLEEP Function 10
SWING Function 10
Care & Maintenance 11
General Maintenance 11
Cleaning the air filter 11
Save A Service Call 12
When to Call for Service 12
Installation 13
Location 13
Duct assembly 13
Installation 14
Exhaust Ducting Options 14
Window Installations 14
Installation 15
Semi-Permanent Wall Installation 15
Condensate Drainage 15
Internal Condensate Tank 15
Fixed Condensate Drainage Hose 15
Contacts 16
SAFETY & IMPORTANT POINTS

READ ALL INSTRUCTIONS BEFORE USING THE APPLIANCE.
Always comply with the following precautions to avoid dangerous situations and performance.
to ensi
Failure to carefully read and follow all instructions in this manual can result in equipment malfunction, property damage, personal injury and/or death.
WARNINGS: WHEN IGNORED, CAN RESULT IN SERIOUS INJURY OR DEATH.
CAUTIONS: WHEN IGNORED, CAN RESULT IN MINOR INJURY OR PRODUCT DAMAGE.

The appliance is fitted with an Australian flexible cord and 2 pin plug intended Australian 10 Amp socket outlet. It is not suitable for connection in other countries or alternative power supplies. Ensure that the voltage and frequency of the power supply correspond to the ratings on the dataplate of the appliance.
for c
This appliance is not intended for use by persons (including children) with reduced physical, sensory or mental capabilities, or lack of experience and knowledge, unless they have been given supervision or instruction concerning use of the appliance by a person responsible for their safety.
Young children should be supervised to ensure they do not play with the appliance.
DO NOT allow children or persons with reduced physical, sensory or mental capabilities to sleep directly in front of this appliance.
DO NOT allow children to ‘post articles’ into the louvres of the appliance.
DO NOT use power boards or double adaptors with this appliance.
DO NOT coil or bundle the electric cord to reduce it's length as overheating of the cord may occur which could result in a fire hazard.
The flexible cord and plug must not be modified. If the cord or plug are damaged, they must be replaced by Rinnai or a Rinnai appointed service agent.
DO NOT cover or place articles on or against any parts of this appliance, to avoid overheating.
DO NOT sit on this appliance
DO NOT use this appliance in the immediate surroundings of a bath, a shower or a swimming pool.
DO NOT move this appliance whilst it is turned on.
DO NOT unplug the appliance by pulling on the flexible cord.
DO NOT handle any parts of this appliance, including the plug and flexible cord, with wet or damp hands.
DO NOT immerse the appliance, flexible cord and plug in water or any other liquid.
DO NOT place containers of any liquid or wax on top of this appliance.
Turn off the appliance and unplug from the power socket outlet when not in use.
DO NOT use in areas where flammable liquids are stored.
This appliance is suitable for indoor use only.
Never dismantle the appliance. Tampering with electrical connections and components is dangerous and may cause appliance malfunction, property damage, personal injury and/or death.
WARRANTY & SPECIFICATIONS
UNPACKING THE APPLIANCE
If any damage is evident DO NOT INSTALL or OPERATE and contact your supplier for advice.
WARRANTY
The benefits to the consumer given by this warranty are in addition to all other rights and remedies of the consumer under a law in relation to the goods or services to which the warranty relates.
Our goods come with guarantees that cannot be excluded under the Australian Consumer Law. You are entitled to a replacement or refund for a major failure and for compensation for any other loss or damage. You are also entitled to have the goods repaired or replaced if the goods fail to be of acceptable quality and the failure does not amount to a major failure.
This appliance has a 2 year parts warranty from date of purchase. If the product fails within this 2 year period return it to the supplier with proof of purchase for repair or replacement.
Supplier warranty claims for Rinnai products or services must be made by contacting Rinnai Australia. Contact details are on the back of this document.
The following exclusions may cause the warranty to become void and may result in a service charge and costs of parts (if required):
- Accidental damage and acts of God.
- Failure due to abuse or misuse, improper maintenance, failure to maintain or improper storage.
- Failure due to incorrect or unauthorised installations or outdoors use.
- Failure or damage caused by alterations, service or repair work carried out by persons other than Rinnai service persons or service agents.
- Where it is found that there is no fault with the appliance and the issue is related to the installation or is due to the failure of electricity supply.
SPECIFICATIONS
| MODEL RPC35WA RPC41WA | |||
| Rated Power 1600W 2000W | |||
| Rated Voltage 220-240V 50Hz | |||
| Dimensions | Height 795mm | ||
| Width 480mm | |||
| Depth 400mm | |||
| Weight | 33kg | ||
| Rated Cooling | 3.55kW | 4.10kW | |
| Rated Cooling Current | 5.95A | 7.89A | |
| Rated Cooling Input | 1.34kW | 1.78kW | |
| Refrigerant / Quantity | R410A / 520g | ||
AIR CONDITIONER BASICS
APPLIANCE COMPONENTS
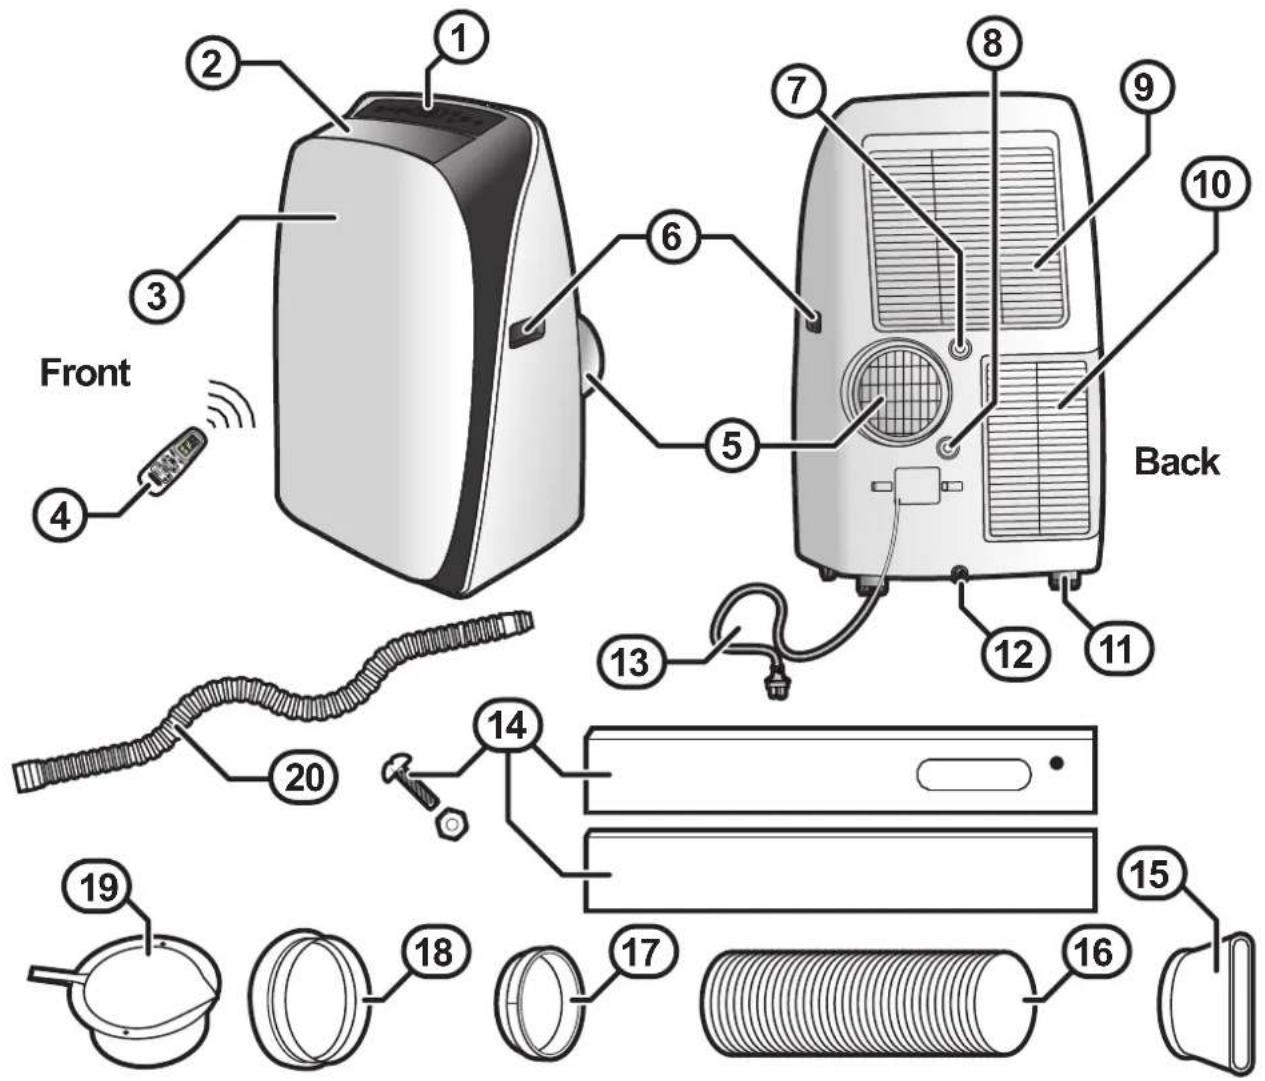
| 1. Control panel 2. Cool air outlet | |
| 3. Receiver window 4. Remote control and cradle | |
| 5. Exhaust outlet 6. Carry handles | |
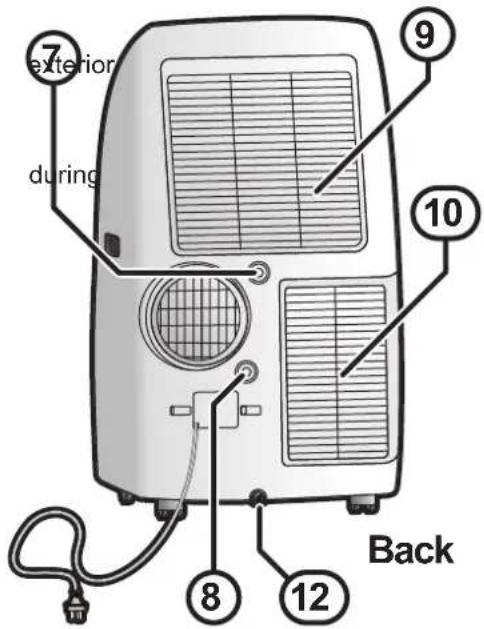
| 7. Drain outlet 1 8. Drain outlet 2 (not used on this model) | |
| 9. Room air intake (filter located behind grill) | 10. Lower air intake (filter located behind grill) |
| 11. Swivel casters (x4) 12. Drain tray outlet | |
| 13. 1.2m flexible 2 pin cord 220-240V 50Hz 10A | 14. Adjustable window slide kit |
| 15. Window exhaust duct window adapter. | 16. Exhaust duct (extends to 1.8M) |
| 17. Duct to appliance adaptor 18. Wall exhaust adaptor | |
| 19. Wall exhaust terminal 20. Condensate drain hose |
CONTROL PANEL AND REMOTE CONTROL LAYOUT
flowchart
graph TD
    A["21 HIGH"] --> B["22 MID"]
    B --> C["23 COOL"]
    C --> D["24 DRY"]
    D --> E["25 FAN"]
    E --> F["26 +"]
    F --> G["27 TIMER"]
    F --> H["28 SLEEP"]
    F --> I["28 SWING"]
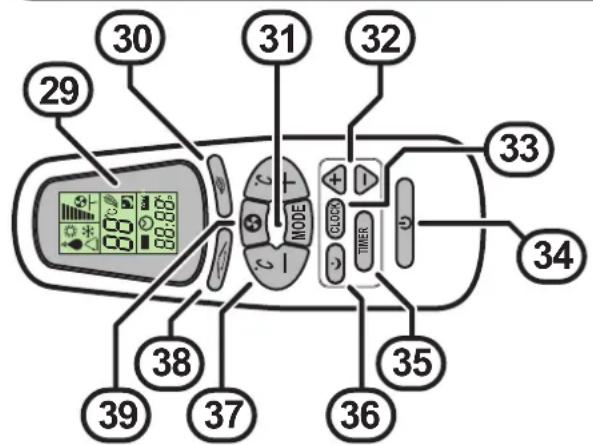
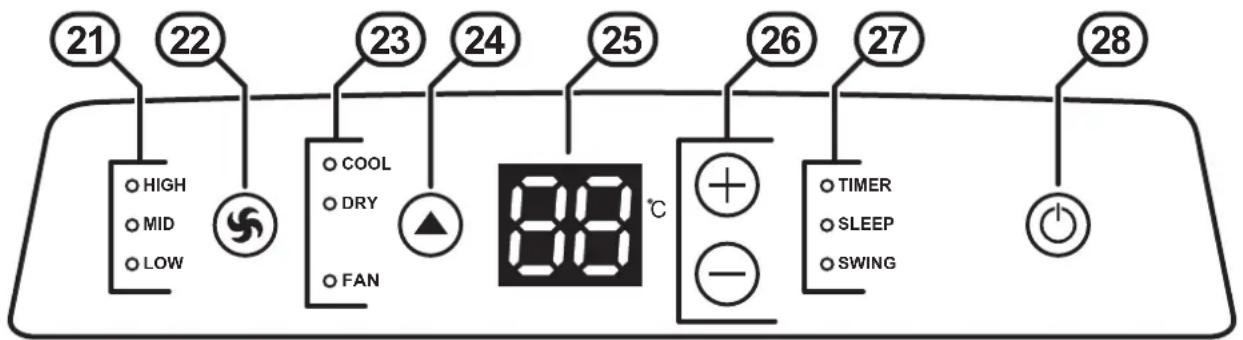
| 21. Fan Speed Indicators 22. Fan speed button | |
| 23. Mode indicators 24. Mode selection button | |
| 25. Temperature Display 26. Temperature buttons | |
| 27. Function indicators 28. On / Off button | |
| 29. LCD display 30. Button not in use for this appliance? | |
| 31. Mode selection button 32. Timer / clock adjustment buttons | |
| 33. Clock set button 34. On / Off button | |
| 35. Timer function button 36. Sleep function button | |
| 37. Temperature buttons 38. Swing function button | |
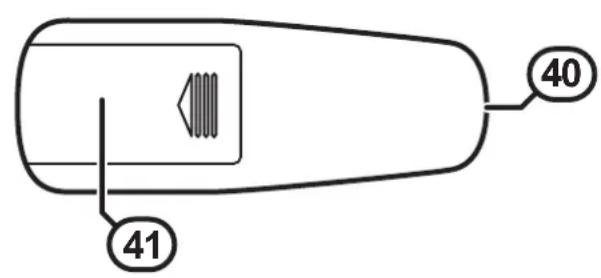
| 39. Fan speed button 40. IR transmitter | |
| 41. Battery compartment |
REMOTE CONTROL BATTERIES
Insert batteries before using the remote control. The battery type used are 2x AAA (1.5 V).

If the LCD screen of the remote control starts to fade or fails to transmit, replace the batteries.
When changing batteries ensure that the + and - terminals of the batteries are installed correctly.
REMOTE CONTROL CRADLE
For convenience a slide-in cradle is provided for fixing the remote control to a wall.

To Install: Choose a safe and easily-accessible place. DO NOT mount the cradle in direct sunlight as this may damage the controller.
Fix the cradle to the wall using the holes provided using 2 screws.

Before operating this appliance ensure that the location, installation and condensation requirements have been met, refer to installation instructions starting on page 13 for details.
For the best cooling results ensure that the filters are clean, refer page 11 for details.
When the appliance is plugged and the power point is turned on a single beep will be heard and the cool air outlet louvre will cycle open and closed once, this is normal.
BASIC OPERATION
There are three basic operational modes available, these are COOL (chilled air operation), DRY (chilled and dehumidified operation) and FAN (fan only operation).
- Press the On / Off button (28).
- Press the mode button (24) until the COOL mode indicator is illuminated.
- Use temperature buttons (26) to select the desired temperature (16°C to 32°C)
- Use fan speed button (22) to select the desired fan speed (LOW, MED or HIGH).
- Press the On / Off button (28) to stop operation.
DRY (DEHUMIDIFYING)
- Press the On / Off button (28).
- Press the mode button (24) until the DRY mode indicator is illuminated.
- Use temperature buttons (26) to select the desired temperature (16°C to 32°C)
- Press the On / Off button (28)
FAN
- Press the On / Off button (28).
- Press the mode button (24) until the FAN mode indicator is illuminated.
- Use fan speed buttons (22) to select the desired fan speed (LOW, MED or HIGH).
- Press the On / Off button (28)

The most recent basic operational settings are stored in the appliances memory.
If the appliance is not disconnected from the mains power supply then these setting will be available the next time the appliance is turned on via the On / Off button (28).
The remote controls allows for convenient operation of the appliance within a 15 metre range. Note that a confirmation beep sounds to confirm that a successful controller input has been received by the appliance
COOL
- Press the On / Off button (34).
- Press the mode button (31) until the COOL mode indicator is illuminated.
- Use temperature buttons (37) to select the desired temperature (16°C to 32°C)
- Use fan speed buttons (39) to select the desired fan speed (LOW, MED or HIGH).
- Press the On / Off button (34) to stop operation.
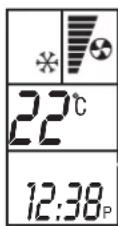
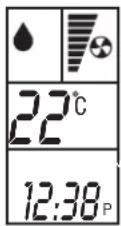
DRY (DEHUMIDIFYING)
- Press the On / Off button (34).
- Press the mode button (31) until the DRY mode indicator is illuminated.
- Use temperature button (37) to select the desired temperature (16°C to 32°C)
- Press the On / Off button (34)
FAN
- Press the On / Off button (34).
- Press the mode button (31) until the FAN mode indicator is illuminated.
- Use fan speed buttons (39) to select the desired fan speed (LOW, MED or HIGH).
- Press the On / Off button (34)
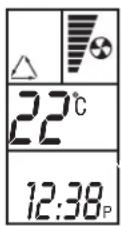

The remote control may operate other electronic devices if pointed towards them. Make sure to point the remote control towards the signal receiver of the air conditioner.
For proper operation, use a soft cloth to clean the signal transmitter LED and the receiver window.
ADVANCED FUNCTIONS
Through the use of the remote control there are also three advanced functional modes available, these are TIMER (On / Off timer operation), SLEEP (automatic comfort operation) and SWING (louvre controlled air movement).
Before the TIMER or SLEEP functions can be used the clock must be set.
SETTING THE CLOCK
- Press and hold the CLOCK button (33) for five seconds (the clock digits will begin to flash)
- Use the timer / clock adjustment buttons to set the current time.
- When the desired time is reached press the CLOCK button (33) to lock in the time.

Holding down a button for approximately five seconds will increase the speed at which the time changes.
If no buttons are pressed for 10 seconds, clock setting will be cancelled and no change will be made.
ADVANCED FUNCTIONS REMOTE CONTROL
ON TIMER
- With the appliance OFF, press the TIMER button (35), the Clock symbol and a flashing ON timer icon will be displayed.
- Use the timer / clock adjustment buttons to select the desired start time.
- Press the TIMER button (35) to lock in the time.
- Set the desired operational modes and temperature.
- Press the TIMER button (35) to begin timer based operation, when the set ON time is reached the appliance will turn ON.
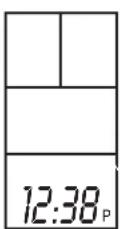
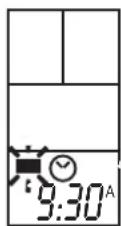
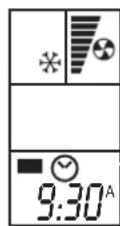
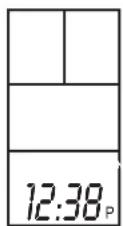

If no buttons are pressed for 10 seconds, clock setting will be cancelled and no change will be made.
OFF TIMER
- With the appliance ON, press the TIMER button (35), the Clock symbol and a flashing OFF timer icon will be displayed.
- Use the timer / clock adjustment buttons to select the desired stop time.
- Press the TIMER button (35) to lock in the time.
- Set the desired operational modes and temperature.
- Press the TIMER button (35) to begin timer based operation, when the set OFF time is reached the appliance will turn OFF.
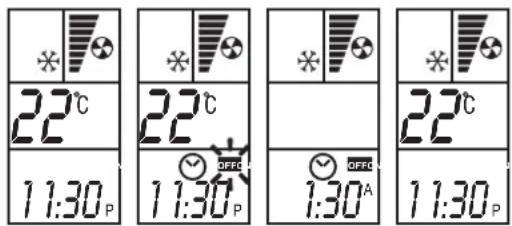

If no buttons are pressed for 10 seconds, clock setting will be cancelled and no change will be made.
SLEEP FUNCTION
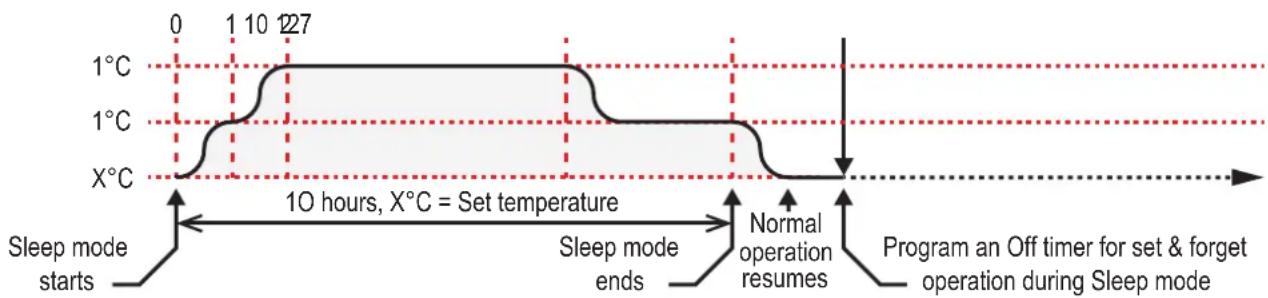
The SLEEP function allows the set temperature to increase and decrease over a 10 hour period at pre-set time intervals to maintain your comfort while saving energy after the 10 hours has passed the appliance will resume normal operation (see graph below)..
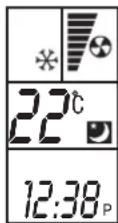
- With the appliance ON, press the SLEEP button (36), the SLEEP icon will be displayed and the 10 hour sleep cycle will begin.

If a 10 hour period is too long or if you desire the appliance to turn OFF at a specific time, then the use of a set OFF timer will allow the SLEEP timer to be overridden and the appliance will turned OFF.
- Press the SLEEP button (36) at any time to cancel the SLEEP function operation.
- Press the On / Off button (34) to stop operation.
SWING FUNCTION
The swing function allows adjustment of the air flow by controlling the cool air outlet louvre in either a cyclic or fixed direction.
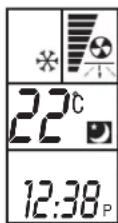
- With the appliance ON, press the SWING button (38), an animated SWING icon will be displayed and the air outlet louvre will begin to cycle.
- Pressing the SWING button (38) will the stop cyclic motion at a fixed direction and the SWING icon will go out.
Each consecutive press of the SWING button (38) will stop and start the cyclic motion.
- To return the cool air outlet louvre to the default operational position press the On / Off button (34) twice (this will reset the appliance).
CARE & MAINTENANCE
GENERAL MAINTENANCE
It is recommended that after each cooling season the panels and display of the appliance are cleaned with a soft damp cloth.
Air filters should be checked and cleaned every week periods of heavy use. For intermittent use this can be extended to 2 to 3 weeks.
If storing the appliance for a prolong period remove the plugs and hoses from the drain outlets (7), (8) and (12).

ALWAYS turn off the power before you perform any maintenance.
DO NOT use solvents, alcohol or harsh cleaners on this appliance or the filters.
NEVER use water that is hotter than 40^ C when you clean the filters. It may cause deformation or discolouration.
CLEANING THE AIR FILTER
There are two air filters in this appliance, there is one filter each fitted to the inside of the Room Air Intake Grill (9), and the Lower Air Intake (10).
Before removing the grills, ensure the power cord is disconnected from the power supply.
- Remove the grills:
To remove the Room Air Intake Grill (9) pull down on the top tab and un-clip the grill.
To remove the Lower Air Intake Grill (10) use a Philips head screw driver to remove the securing screw and un-clip the grill.
-
Un-clip the filters from each of the grills. Clean the filters with a vacuum cleaner or with warm water. If dirt is difficult to remove, wash the filter in lukewarm water with a mild detergent.
-
Ensuring that the filters are dry before replacing, then clip the filters back into the grill covers.
-
Re-attach the grills:
To re-attach the Room Air Intake Grill (9) ensure that all the tabs are properly seated and that the grill is securely clipped back into place.
To re-attach the Lower Air Intake Grill (10) ensure that all the tabs are properly seated and that the grill is securely clipped back into place and that the securing screw is replaced.
The power may now be reconnected.

Failure to clean the filters regularly can cause excessive condensation to form and reduce the appliances efficiency.
If you need replacement filters, please contact Rinnai.
SAVE A SERVICE CALL
| SYMPTOM POSSIBLE CAUSES POSSIBLE SOLUTIONS | ||
| Appliance will not operate. Not plugged | into power. Plug into power. | |
| Power switch OFF. Switch power ON. | ||
| Timer Function set. Wait or reset timer function. | ||
| Power to Appliance but it will not start. | After switching off the appliance there may be a 3 minute delay before it may be re-started. | Wait 3 minutes. |
| Room temperature is lower than the set temperature. | Adjust the set temperature to be lower than the room temperature. | |
| P1 appears on the display. Drain the water from the drain outlets. | ||
| The air conditioner does not generate enough cool air. | The air intake filters are blocked | Clean air filters. |
| The set temperature is too high. | to Adjust the set temperature to a lower temperature. | |
| Drafts from open windows and doors. | Close windows and doors in the area you want to be cooled. | |
| Other heat sources in the room. | Remove or turn off heat sources. | |
| Cooling space too big. Operate the appliance within the required cooling capacity. | ||
| Too noisy or vibrating. | Operating surface not level | Move the appliance to level a operating surface. |
| Splashing sound. | High level of condensate being generated. | This is normal. This appliance has a pump that evaporates some condensate through the exhaust duct. |
WHEN TO CALL FOR SERVICE
| SYMPTOM CAUSE | |
| There is a burning smell and a strange sound coming from the unit.When operated if a circuit breaker (safety, ground) is thrown or a fuse is blown. | Turn off the air conditioner, and contact Rinnai. |
LOCATION
This portable air conditioner must be installed on a flat and dry surface. A minimum clearance of 500mm from other appliances is required as well as easy a power point (GPO).
The air outlets and the ducting system must not be obstructed.
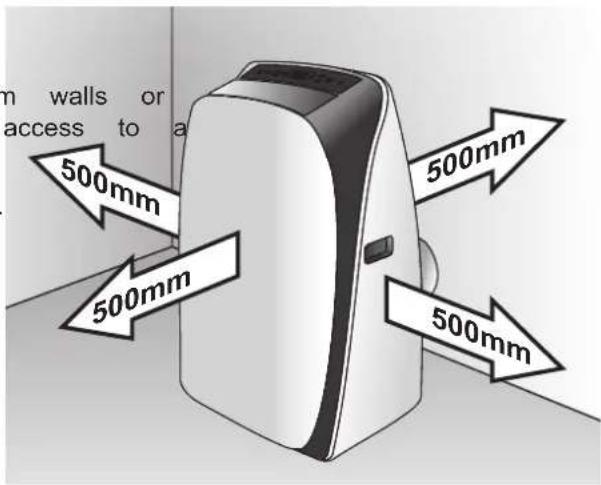

The appliance is fitted with a 1.2m flexible 2 pin cord 220-240V 50Hz 10A.
The maximum duct extension is 1.8m in total.
Both factors are to be taken into account when determining the location that the appliance will be operated in.
DUCT ASSEMBLY
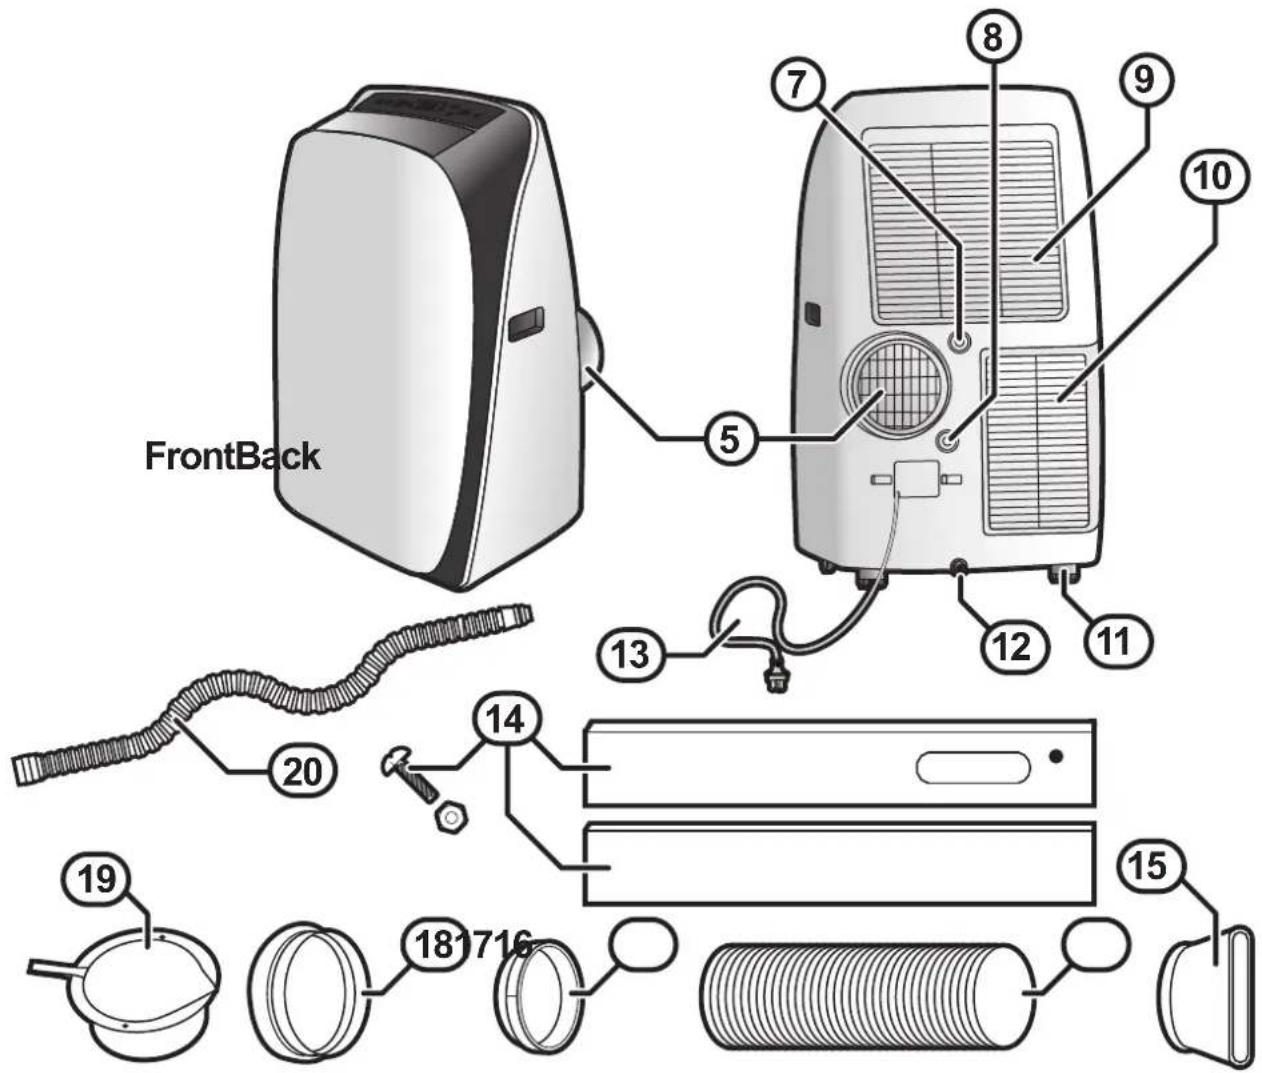
- Place the Duct to Unit Adaptor (17) over the Exhaust Outlet (5), push it downwards to ensure it engages the Exhaust Outlet tabs.
- Screw one end of the Exhaust Duct (16) into the Duct to Unit Adaptor (17).
- On the other end of the Exhaust Duct (16) fix either the Window Exhaust Duct Adaptor (15) or the Wall Exhaust Adaptor (18).
EXHAUST DUCTING OPTIONS
There are two ducting options available for this appliance, these are a Window installation or an optional Semi-permanent wall installation.

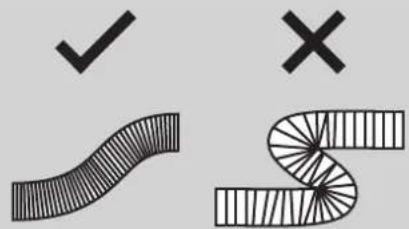
DO NOT over extend the exhaust duct.
Over extension of the exhaust duct can lead to kinking.
Kinked ducting causes air flow restrictions and lowers the efficiency of the appliance.
Keeping the exhaust duct as short as possible avoids this issue.
WINDOW INSTALLATIONS
The window kit has been designed to fit most standard vertical and horizontal window applications. There may be some cases where you may need to modify some aspects of this installation procedure for certain window types.
Minimum and maximum horizontal / vertical window opening dimensions:
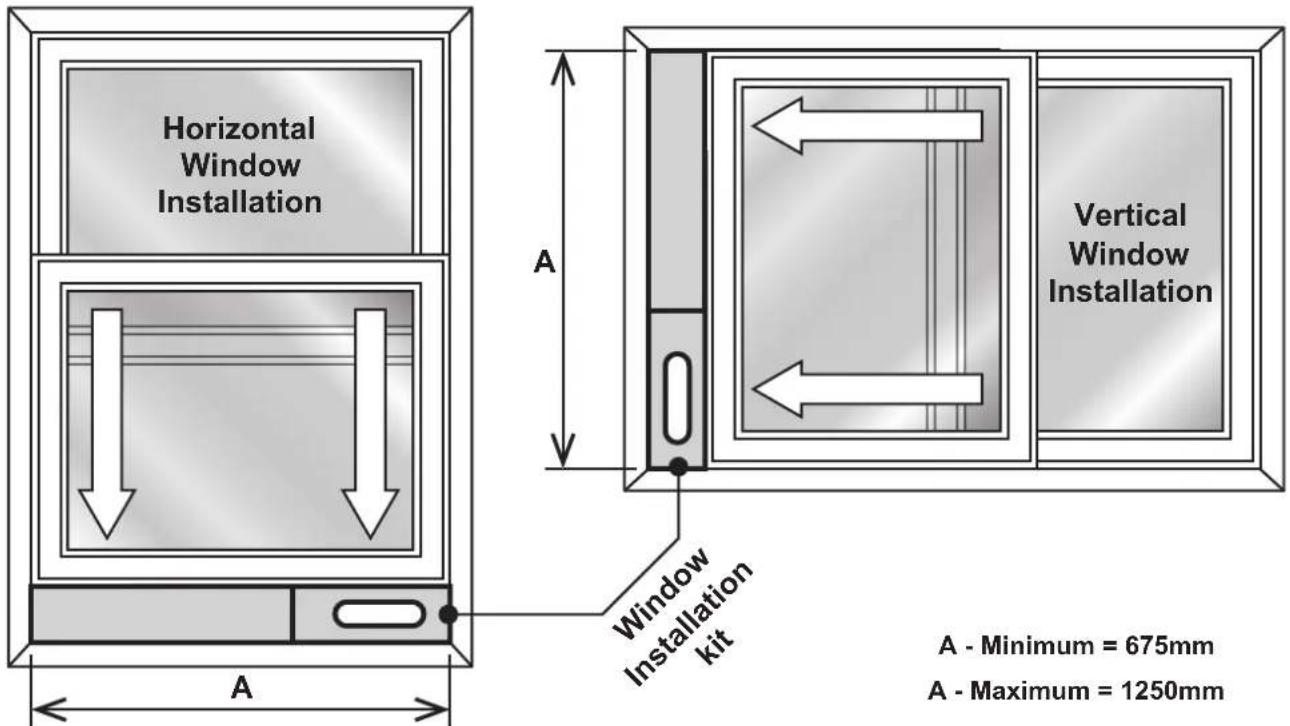
- Once a suitable window has been chosen, fit the Adjustable Slider Kit (14) into the window areas and fix the length of the kit using the supplied slide lock nut and bolt.
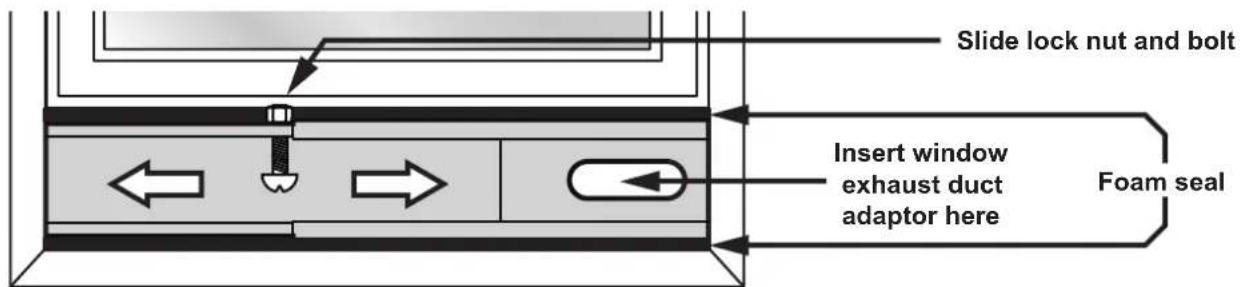

It is recommended to place a length of foam draft sealing strip along the top and bottom edges of the kit or the inside the window opening to form a seal.
- Connect the Window Exhaust Duct Adaptor (15) to the Adjustable Slider Kit (14).
SEMI-PERMANENT WALL INSTALLATION
In some cases a window opening might not be assessable; therefore this appliance is supplied with semi-permanent wall flange kit that can be connected the Exhaust Duct.

The positioning and installation of the wall flange should be completed by an authorised person and must comply with all municipal building codes and OH&S guidelines.
CONDENSATE DRAINAGE

Condensate produced by this appliance is NOT potable, dispose of via waste outlet or allow to evaporate.
INTERNAL CONDENSATE TANK
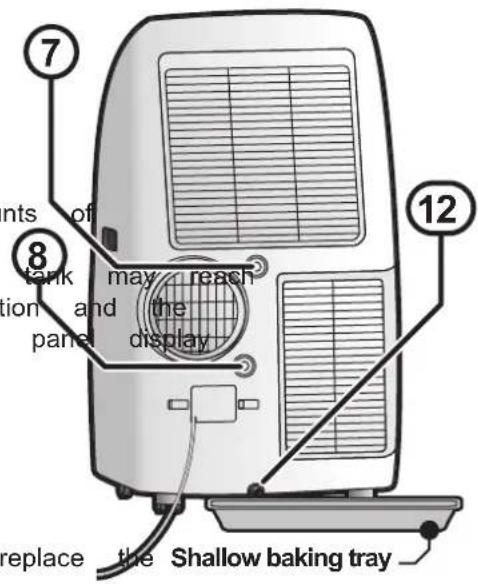
During operation the appliance may produce small amount condensate. The appliance has an inbuilt condensate tank. If all three drain outlets (7), (8) and (12) are plugged, then this capacity. If this happens, the appliance will stop operation condensate full code "P1" will be shown on the control and the condensate tank will need to be drained before operation can be resumed. To do this:
- Place shallow tray such as an oven baking tray or similar (with at least a 1 litre volume) under Drain Tray Outlet (12).
- Remove the plug from Drain Tray Outlet (12) and drain out the condensate water, once the condensate is drained plug, the appliance will now be able to then resume operation.
FIXED CONDENSATE DRAINAGE HOSE
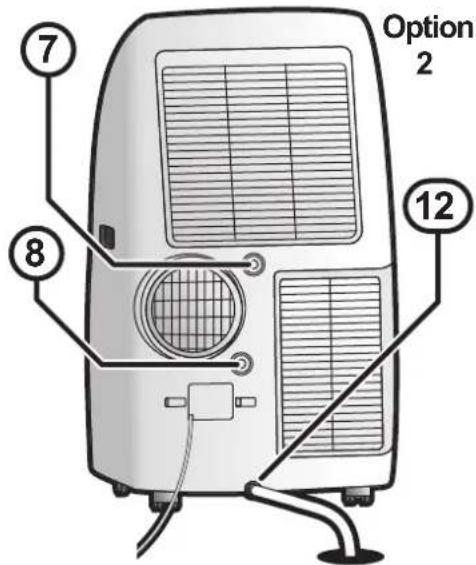
As an alternative to using the appliances internal condensate tank, a condensate drain hose (20) may be fitted.
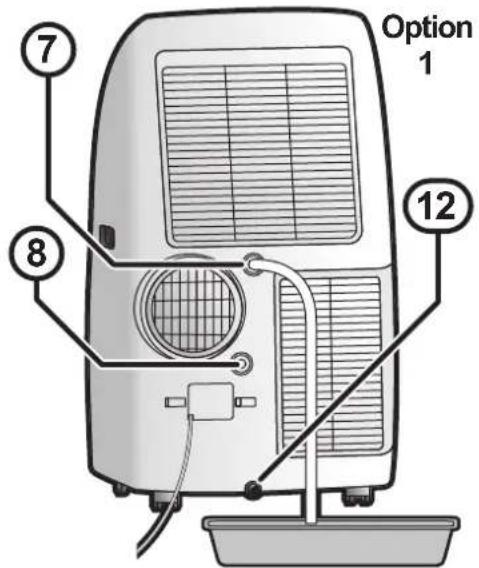
Option 1 - External Drain Tray: with drain outlets (8) and (12) plugged, fit the condensate drain hose (20) to drain outlet (7) and drain the condensate into a drain tray.
Option 2 - Existing Waste Outlet: with drain outlets (7) and (8) plugged, fit the condensate drain hose (20) to drain outlet (12) and drain the condensate into a drain tray or waste outlet.

The point to which the condensate is to be drained MUST BE lower than the drainage outlet point. When using a drain tray option, ensure that the capacity of the tray is greater than that of the condensate being produced.
Rinnai
Rinnai Australia Pty. Ltd. ABN 74 005 138 769
Head Office
100 Atlantic Drive,
Keysborough VIC 3173
P.O. Box 460
Braeside, Victoria 3195
Rinnai has a Service and Spare Parts network with personnel who are fully trained and equipped to give the best service on your Rinnai appliance. If your appliance requires service, please call our National Help Line. Rinnai recommends that this appliance be serviced every 1 years.
Product Sales and Service - National
Phone: 1300 555 545* Fax: 1300 555 655*
Technical Helpline and Spare Parts
National (Mon-Fri 8am - 5.30pm EST)
Phone: 1300 555 545* Fax: 1300 300 141*
*Cost of a local call higher from mobile or public phones.
E-mail: enquiry@rinnai.com.au
For further information visit: www.rinnai.com.au

- This appliance shall be installed in accordance with:
- TABLE OF CONTENTS
- Safety & Important Points 4
- Warranty & Specifications 5
- Air Conditioner Basics 6
- Operation 8
- Care & Maintenance 11
- Installation 13
- Installation 14
- Installation 15
- Contacts 16
- SAFETY & IMPORTANT POINTS
- READ ALL INSTRUCTIONS BEFORE USING THE APPLIANCE.
- WARRANTY & SPECIFICATIONS
- UNPACKING THE APPLIANCE
- WARRANTY
- AIR CONDITIONER BASICS
- REMOTE CONTROL BATTERIES
- REMOTE CONTROL CRADLE
- BASIC OPERATION
- DRY (DEHUMIDIFYING)
- FAN
- COOL
- ADVANCED FUNCTIONS
- SETTING THE CLOCK
- ADVANCED FUNCTIONS REMOTE CONTROL
- ON TIMER
- OFF TIMER
- SLEEP FUNCTION
- SWING FUNCTION
- CARE & MAINTENANCE
- GENERAL MAINTENANCE
- CLEANING THE AIR FILTER
- LOCATION
- EXHAUST DUCTING OPTIONS
- WINDOW INSTALLATIONS
- SEMI-PERMANENT WALL INSTALLATION
- CONDENSATE DRAINAGE
- INTERNAL CONDENSATE TANK
- FIXED CONDENSATE DRAINAGE HOSE
- Rinnai
Brand : Rinnai
Model : RPC35WA
Category : Air conditioner