
MMC-B18 - DVD player Laser - Free user manual and instructions
Find the device manual for free MMC-B18 Laser in PDF.


| Type | Android Media Player / DVD Player |
| Model | MMC-B18 |
| Dimensions | 150 x 98 x 36 mm |
| Power Supply | 5V 2A |
| Video Outputs | HDMI, Composite AV (RCA) |
| Audio Support | Dolby Digital Plus, DTS, FLAC up to 7.1 |
| Connectivity | Wi-Fi (802.11 b/g/n), Ethernet LAN (100 Mbps) |
| USB Ports | 3x USB 2.0 |
| Micro SD Card Slot | Yes |
| Smart Platform | Android OS with Google Play Store |
| Streaming Apps | Netflix, YouTube, ABC iView, Plus7, SBS on Demand, Tenplay, Quickflix |
| Screen Mirroring | Miracast |
| Media Playback | Kodi (XBMC), DLNA, USB storage, Micro SD |
| Remote Control | IR remote with air mouse function |
| Cleaning | Use a water-dampened soft cloth only |
| Safety | Keep away from liquids, heat, dust; no user-serviceable parts |
| Warranty | 12 months against defects (Australia) |
Frequently Asked Questions - MMC-B18 Laser
User questions about MMC-B18 Laser
0 question about this device. Answer the ones you know or ask your own.
Ask a new question about this device
Download the instructions for your DVD player in PDF format for free! Find your manual MMC-B18 - Laser and take your electronic device back in hand. On this page are published all the documents necessary for the use of your device. MMC-B18 by Laser.
USER MANUAL MMC-B18 Laser
natural_image
Black electronic device with two ports and a separate external device (no visible text or symbols)dlna ^®

KODI
Miracast™

DOLBY®
DIGITAL PLUS

QUICK USER MANUAL
MMC-B18
Index
The Remote control 3
The Player Outputs 4
Connecting to TV 5
Connection to Internet 6
The Home Screen 9
The Apps Centre 10
Smart Apps 11
Settings 12
Operating Live TV 14
Feature Overview 19
FAQ 20
Specifications 21
IMPORTANT SAFETY INSTRUCTIONS AND PRECAUTIONS
- Read all instructions carefully before use.
- Retain manuals for future reference.
- Use this product only in the manner described.
- Only use a water-dampened soft-cloth to clean the surface of this product.
- The following will damage this product: any liquid such as water or moisture, extreme heat; cold; humidity, dusty or sandy environments.
- Only place this device on stable surfaces and ensure that any attached cables are secure and will not cause the device to fall.
- If charging is required, it is recommended to thoroughly charge electronic devices for the first time overnight. Subsequent charges can be as needed. During charging, or extended use, the product may become warm.
- There are no user serviceable parts in this product.
- Un-authorized attempts to dismantle or repair this product will void product warranty
- Using this device near other electronic devices may cause interference.
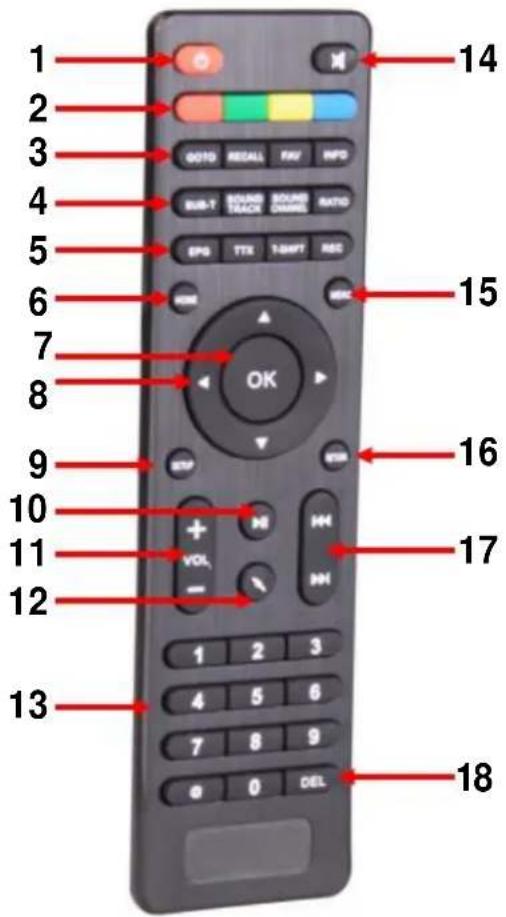
THE REMOTE CONTROL

natural_image
Close-up of a computer mouse with silver and black casing (no visible text or symbols)Note. Some subscription based Apps may require a WIRED mouse or keyboard for setup and operation. (This mouse is not included with this product)
| 1 Power On / Off 9 Setup | |||
| 2 | (Red button) Picture size*WHILE WATCHING TV | 10 Play / Pause | |
| (Green button) Channel information*WHILE WATCHING TV | 11 Volume Up / Down | ||
| (Blue button) Multi-function 12 Turn Air Mouse On / Off | |||
| (Yellow button) Multi-function | |||
| 3 Goto, Recall, Fav, Info 13 Numeric buttons | |||
| 4 | Sub-title, Sound Track, Sound Channel, Ratio | 14 | Mute/Un-mute sound |
| 5 | EPG, TTX, T-Shift, REC | 15 | Menu |
| 6 | Home | 16 | Return (back a screen) |
| 7 | OK | 17 | Next / previous file |
| 8 | Move up and down inside menu options | 18 | Delete / Backspace numeral |
THE PLAYER OUTPUTS
SIDE PANEL

REAR PANEL

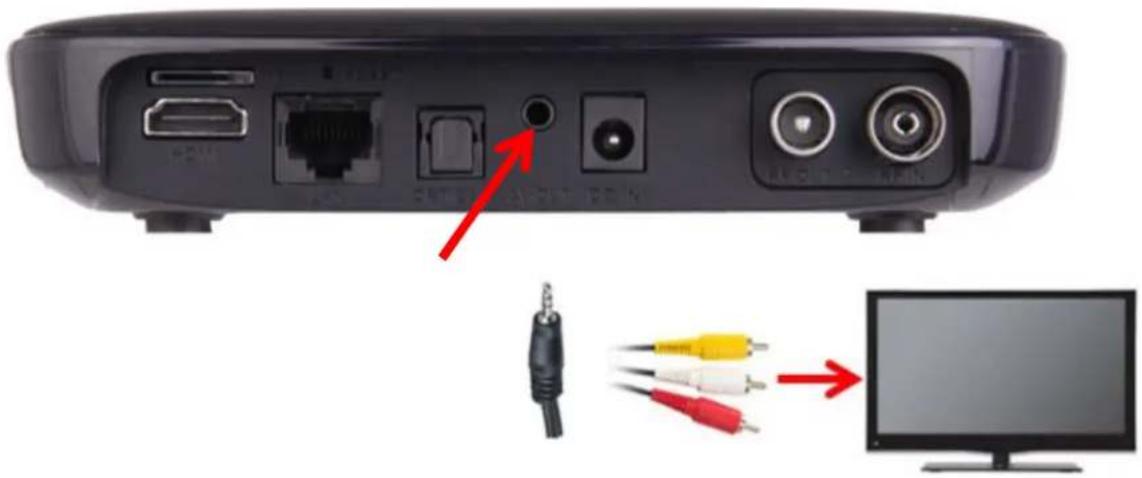
CONNECTING TO TV
GOOD – via RCA Cables
natural_image
Back view of a black network router with ports and connectors, showing cable and audio connection to a monitor (no text or symbols visible)Note: RCA A/V Cable not supplied
BEST – via HDMI Cable

natural_image
Back panel of a network device showing ports, connectors, and a monitor (no text or symbols visible)Note: HDMI A/V Cable not supplied
CONNECTION TO INTERNET
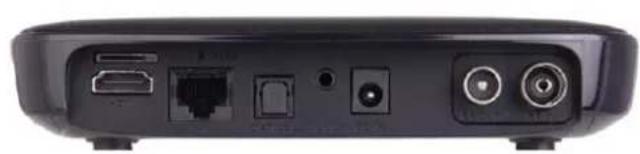
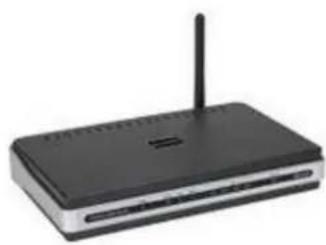
GOOD – Wi-Fi
natural_image
Back view of a black electronic device rear panel showing ports and connectors (no visible text or symbols)
natural_image
Black and silver wireless router device with antenna (no visible text or labels)WIRELESS MODEM
Note: See page 7 for Wi-Fi setup.
BEST – Direct Connection (to a Modem/Router)

natural_image
Back view of a black electronic device showing ports, cables, and connectors with a blue cable attached to the right (no text or symbols visible)

natural_image
Exterior view of a black and silver electronic device (no visible text or symbols)Note: Network cables not supplied
Note: An Ethernet cable internet connection is recommended for streaming HD and FHD video.
Cable connection to the internet using a Modem/Router
- Connect the network cable to the Media Player and your Modem/Router.
- In most cases your Modem/Router will automatically assign network settings to your media player and display the screen below. Then click OK. If not, you may have to:
-Turn on and login into your Modem/Router to ensure an IP address can be automatically assigned to your Media Player (DHCP (Dynamic Host Configuration Protocol must be enabled) - After connection has been successful the below screen will be displayed, showing IP, Netmask, Gateway and DNS. Then click OK.

Wi-Fi connection to the internet using a Modem/Router
- Go into the "Settings" at the home screen, select "Wi-Fi" option.
- A list of available Wi-Fi connections will be displayed. See the example screen below. Note: The Ethernet cable musts be unplugged.

Note: If the wireless network is not encrypted, you can connect to it directly. If the network is encrypted, select the Wi-Fi name to pop up the window for password, press OK on the remote control and call out the soft keypad on the screen, enter the password, select “Next” on the keypad or press the Return key on the remote control to hide the keypad, and then select “Connect” to connect to it. (Note: to hide the keypad on the TV box, press the Return key on the remote control.)

- To forget a WIFI connection, select it and press the Right button on the remote control. Then the interface shows up as below picture. Choose Forget button to forget this WIFI information.

APP OVERVIEW
The Home screen


natural_image
Close-up of a computer mouse with silver and black casing (no visible text or symbols)Note: Quickflix, Netflix, Skype and other subscription based Apps may require a WIRED mouse or keyboard for setup and operation.
 | Live TV play and view Live TV (Antenna connection required) |  | YouTube Stream Youtube Videos |
 | Music Player Play Music through the device |  | Media Center Connect to DLNA Server to play Media |
 | Photo Viewer View photos on the device | Netflix Stream | Movies and TV for a Monthly price.(Account is required)Please note: A mouse may be required for use with this app. |
The Apps Centre

 | File BrowserBrowse your files |  | My APPs Viewapp the installed apps |
 | Media PlayerPlay Mediathrough the device |  | + Add apps tothe Apps Centre screen |
Smart Apps
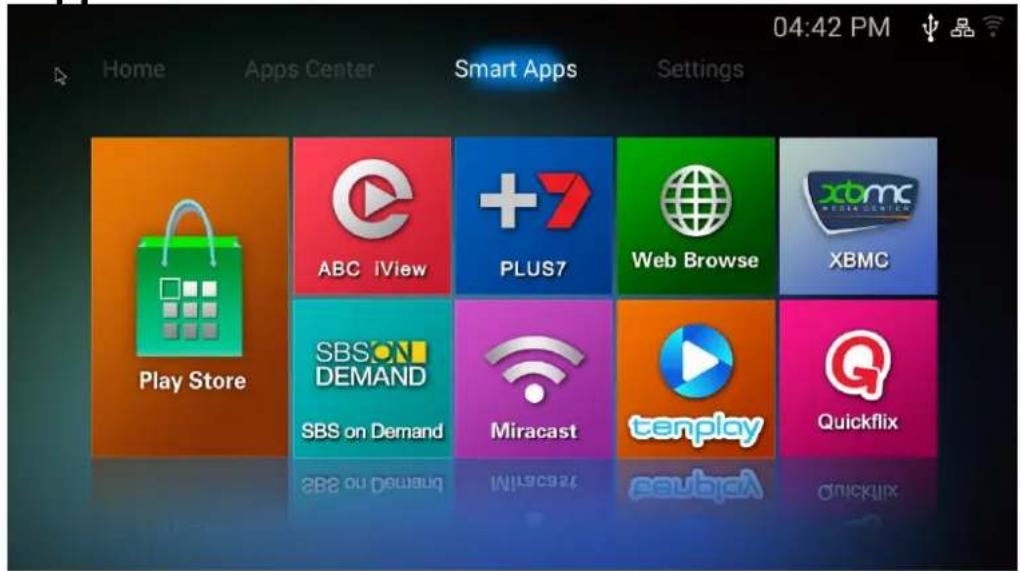
 | Play Store Access the Google Play Store. Purchase and Download apps, music, movies and more |  | ABC iView Let's you catch up on the best of ABC TV Please note: A mouse may be required for use with this app |
 | Plus7 Lets you catch up on the best of Seven TV Please note: A mouse may be required for use with this app |  | Web Browse Browse the Web |
 | SBS on Demand let's you catch up on the best of SBS TV Please note: A mouse may be required for use with this app |  | Miracast Wirelessly display that allows you to Mirror your Smartphone or tablet |
 | Tenplay let's you catch up on the best of Ten TV Please note: A mouse may be required for use with this app |  | XBMC (Kodi) is a free and open-source media player software. Play and view most videos, music, such as podcasts from the internet, and common digital media files. For more information please visit: kodi.wiki/view/Quick_start_guide |
 | Quickflix Stream Movies and TV for a Monthly price. (Account is required) | ||

 | EthernetCheck the Ethernet Settings and IP information |  | Wi-FiSetup a Wi-Fi connection |
 | HDMIChange the screen resolution |  | Screen ScaleAdjust the screen scale to fit on screen properly |
 | System UpgradeUpgrade the System either via Storage or OTA (Over the Air) |  | LanguageChange Language |
 | Network SpeedCheck the current Network Speed |  | AutoRunAllow apps to auto run |
 | Sound OutputChange the sound output (Note: Select PCM for use with the DTV App) |  | Device InfoView the device information. Note: Conduct factory resets or “Force Stop” Apps using this menu feature. |
SETTINGS – SELECTING THE HDMI RESOLUTION
Before operating for the first time, please adjust the screen resolution to achieve the optimal display: (Enter the Settings MENU and select HDMI)

Note: This option is for HDMI outputs only. When the selected resolution is not supported by TV-Set, the system will automatically return to a recommended resolution. As a shortcut you can use the “RES” button on the remote control.
SETTINGS – SELECTING THE SCREEN SCALE
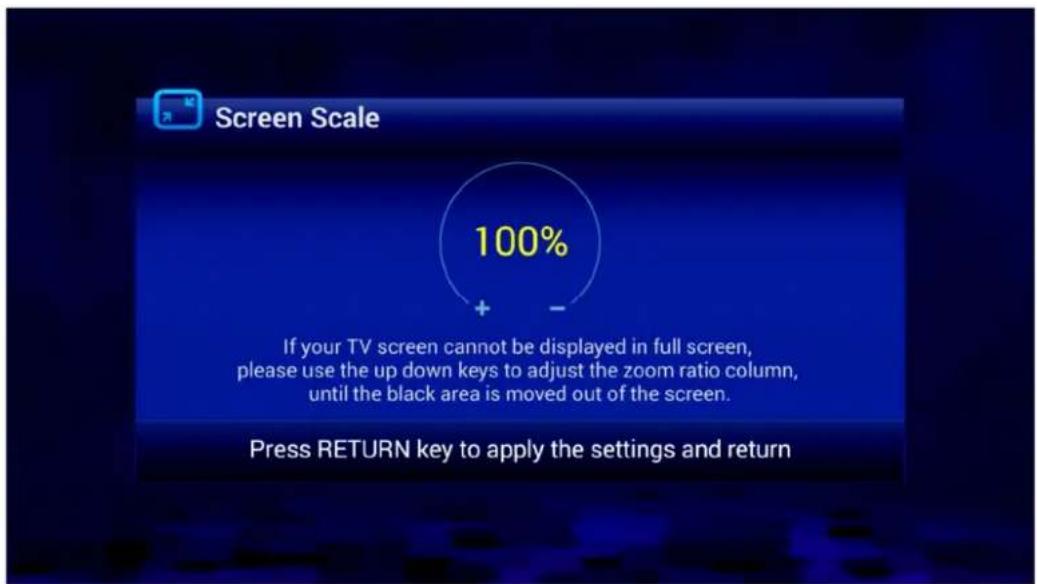
If you see a black band around your TV picture, you will need to adjust the screen scale. Do this by selecting the SCREEN SCALE menu option and using the UP & DOWN keys to adjust the zoom, until the black area disappears from screen.
Note: Press the RETURN key to return to the main Settings menu. The smallest scale is 80%.
OPERATING LIVE TV (APP)
Select the Live TV from the Home Screen

Note: Visit the LASER web site and click the VIDEO tab on the PRODUCT PAGE or click http://www.laserco.com.au/media-player/MMC-B18
to see other helpful information on setting up the DTV App such as:
1) How to Schedule (view or record) live TV
2) How to use the time shift feature
3) How to use the EPG
First time setup
For the first timer use, the system will not be detected any pre-saved channels, so you will be prompted with the window below.

Select YES to start a new scan for local TV channels.
You then have the option to select between 3 different scans. These are Auto Scan (Recommended), Manual Scan or NIT Scan (Not available on this model).

Wait for the scan to be complete.
Note: Please wait 5-10 minutes for a complete auto scan.

When finished, press the return button to exit the setup menu and start watching TV.
Edit Channel Menu
Which viewing TV, press the MENU button to access the setup menu.
Press "Left" and "up/down" to select other Menus, such as Edit Channel Menu

In the Edit Channel menu you can edit the following:
TV Channel List
Radio Channel List
Favourite Channel List
EPG
Time Shifting
Delete List

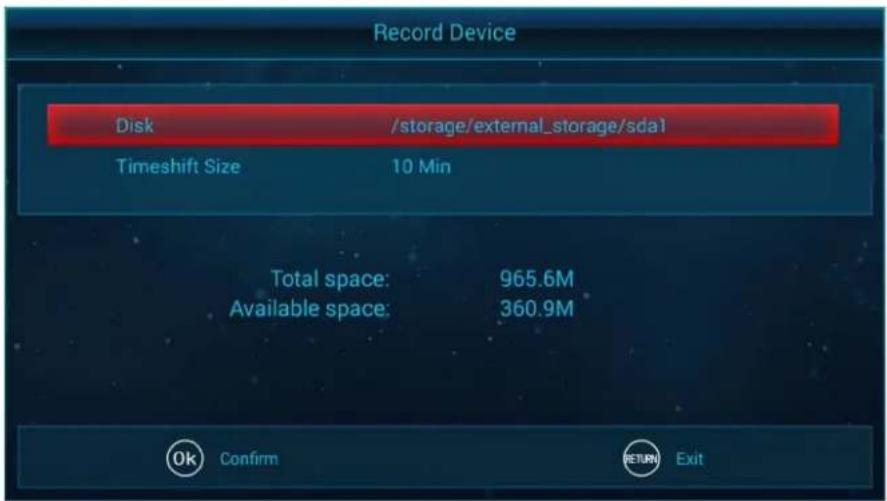
Access PVR Configure – Configure and manage storage for PVR to be recorded.
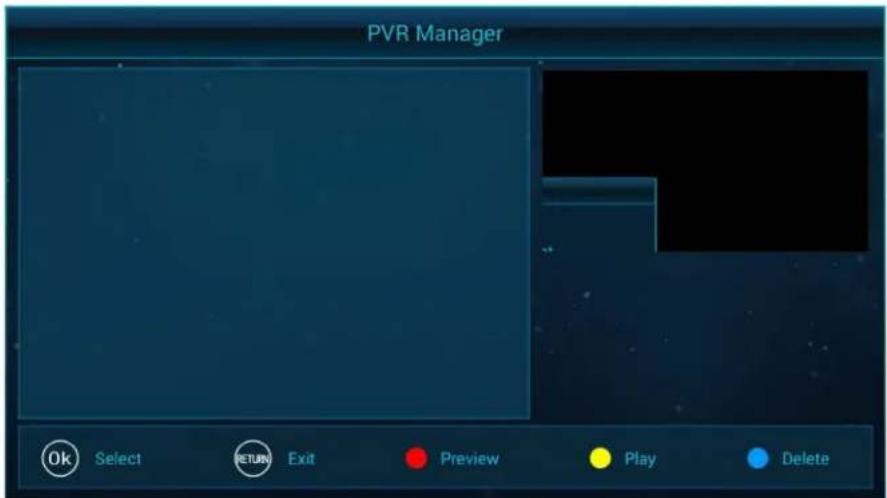
PVR Manager – preview, play and delete recordings.
Tools Menu

Change the following:
Subtitle Language
Audio Language
Blackout Policy
Information Show Time
System Setup Menu

Edit and change the following: System Language, TV System, Local Time Setting, Recall List, Subtitle Switch, Factory data reset, Set Password, Parental rating age, TTX Region
FEATURE OVERVIEW
 DOLBY®DIGITAL PLUSDigital Surround SoundAll sound formats from 2 channel stereo to 7.1 Dolby and DTS. Also Flac lossless HD audio is supported. DOLBY®DIGITAL PLUSDigital Surround SoundAll sound formats from 2 channel stereo to 7.1 Dolby and DTS. Also Flac lossless HD audio is supported. |  Miracast readyShare your tablet or smartphone screen onto your TV for everyone to see. (it's like HDMI only wireless) Miracast readyShare your tablet or smartphone screen onto your TV for everyone to see. (it's like HDMI only wireless) | |
| Android OS SmartsAndroid opens a world of possibilities through the Google Play store. Games, video players, apps, utilities and lots more. |  | HDMI or Analogue AV outputConnect to older TV's via  CompositeHIGH DEFINITION MULTIMEDIA INTERFACEvideo and L/R stereo (cable included) or connect to new TV's with HDMI for the ultimate in sound and vision. CompositeHIGH DEFINITION MULTIMEDIA INTERFACEvideo and L/R stereo (cable included) or connect to new TV's with HDMI for the ultimate in sound and vision. |
| High Speed LANWith up to 100MB lan fast data transfer, wait times for movie buffering are a thing of the past |  | Play it all -Multi source, Multi Format readyWhether it's movies from Netflix®, Youtube®videos online or  from your home network or USB storage drive, with KODI and other media players file playback is assured* from your home network or USB storage drive, with KODI and other media players file playback is assured* |
  USB Ports & Micro SD inputConnect USB flash drives, hard drives or input devices like mice, keyboards or web cams or read content from a Micro SD card. USB Ports & Micro SD inputConnect USB flash drives, hard drives or input devices like mice, keyboards or web cams or read content from a Micro SD card. | ||
Note: Although this android Media Player can support all the above features, you must have the correct hardware and compatible video files.
QUICK USER MANUAL
MMC-B18
FAQ
| Some apps I downloaded are not working properly. Why? | They may have not installed correctly. Please uninstall the apps and reinstall them again. |
| Some apps not working properly with the remote. Why? | Some apps are not designed to be used with a remote. I Suggest using a mouse instead. |
| My remote control is not working. Why? Make sure the batteries are installed correctly. Try a different set of batteries. Please note: Some apps will not work correctly with a remote. A mouse may be required for use. | |
| Why is google play not responding? The most common cause is that your time and Date settings have not synced. To do this simple go to the Settings>Device Info>Advanced Settings menu. Select Date and Time; untick Automatic date and time, untick automatic time zone, then, manually set the date and time. If the problem persists, go to the “Device Info” menu setting and “force Stop” the Google Play app. | |
| How do I “Force Stop” an app, like Google Play Store? | Goto the Settings>Device Info>Advanced Settings>Apps>Running menu option and select your App. In this case, Google Play Store. Then select, force stop. This will allow the app to restart, after you have inputted your time and date settings in manually, as per the previous step. |
| How do I do a factory reset? Goto the Settings>Device Info> Advanced Settings>Factory reset menu option. | |
SPECIFICATIONS
| Interface | Composite AV Out (Jack to RCA) |
| HDMI | |
| USB x 3 | |
| LAN | |
| Micro SD Card | |
| Power Supply 5V 2A | |
| Dimensions 150 x 98 x 36mm |
Warranty Against Defects
Laser Corporation Pty Ltd ("Laser") warrants your new product to be free from defects in materials and workmanship for 12 months, from the date of purchase, provided that the product is used in accordance with accompanying recommendations or instructions where provided. The benefit of this warranty is in addition to your rights under the Australian Consumer Law and to other rights and remedies of the consumer under a law in relation to the goods or services to which the warranty relates.
Through a network of retailers and resellers, Laser will provide you with your choice of a repair, exchange (where possible) or refund (within Dead on Arrival period) for this product if it becomes defective within the warranty period.
This warranty will no longer apply where the defect is a result of alteration, accident, misuse, abuse, normal wear and tear, neglect or improper storage. Please retain your receipt as proof of purchase
How to make a product warranty claim:
Step 1: Find your receipt which proves the date of purchase. Where the date of purchase cannot be verified, your place of purchase or Laser will make an assessment based on the date of manufacture, the condition of the Laser Product and the type of defect.
Step 2a): Contact your place of purchase. They will assess the nature of the fault and repair, replace or fund the product as per their store refund or warranty policy.
Step 2b): If your place of purchase cannot be contacted, then you can contact Laser. Customer Service with details of your defective Laser Product: Phone: (02) 9870 3388; or Email: support@laserco.com.au or online www.laserco.com.au/warranty (click on "Consumers (End Users)"). Our business address is at 1/6-8 Byfield Street, North Ryde, NSW 2113
Step 3: Laser will issue you with a Return Authorisation (RA) number within 48 hours. When requested, send us the defective Product and a copy of your receipt. Laser will cover the cost of the return delivery.
Step 4: Wait for us to contact you. Once we have received your defective Laser Product for inspection, we will inform you of our assessment of your claim within 7 days. When we contact you, we will firstly let you know whether you have a valid claim under this Warranty, and if so, we will inform you whether your defective Laser Product will be replaced or repaired, together with the number of days you can expect to wait to receive your replaced or repaired Laser Product.
Step 5: For further details on warranty cover and returns, please check Terms and Conditions for Warranty Returns section on http://www.laserco.com.au/warranty
Our goods come with guarantees that cannot be excluded under the Australian Consumer Law. You are entitled to a replacement or refund for a major failure and compensation for any other reasonably foreseeable loss or damage. You are also entitled to have the goods repaired or replaced if the goods fail to be of acceptable quality and the failure does not amount to a major failure.

NAVIG[8]R
PRECISION gaming accessories
CONNECT
naum8 GPS ESSENTIALS
iRange!

- QUICK USER MANUAL
- MMC-B18
- Index
- IMPORTANT SAFETY INSTRUCTIONS AND PRECAUTIONS
- THE PLAYER OUTPUTS
- SIDE PANEL
- CONNECTING TO TV
- CONNECTION TO INTERNET
- Cable connection to the internet using a Modem/Router
- Wi-Fi connection to the internet using a Modem/Router
- APP OVERVIEW
- SETTINGS – SELECTING THE HDMI RESOLUTION
- SETTINGS – SELECTING THE SCREEN SCALE
- OPERATING LIVE TV (APP)
- First time setup
- Edit Channel Menu
- Tools Menu
- System Setup Menu
- Warranty Against Defects
Brand : Laser
Model : MMC-B18
Category : DVD player