
DVD-HD012 - DVD player Laser - Free user manual and instructions
Find the device manual for free DVD-HD012 Laser in PDF.


| Product Type | DVD Player |
| Brand | Laser |
| Model | DVD-HD012 |
| Dimensions (W x D x H) | 22.5 x 18.8 x 4.5 cm |
| Weight | 730 g |
| Power Supply | AC 110-240V, 50/60 Hz |
| Power Consumption | < 15 W |
| Video Outputs | HDMI, Component (YPbPr), Composite (CVBS) |
| Audio Outputs | HDMI, Composite (L/R), Coaxial (digital) |
| Supported Disc Types | DVD, CD |
| USB Port | Yes (front panel) |
| Supported File Formats (USB/Disc) | Video: AVI (Xvid), VOB; Audio: MP3; Image: JPG |
| Remote Control | Included (IR) |
| Playback Features | Pause, slow motion, step, zoom, A-B repeat, program play, subtitle/audio selection |
| Video Output Resolution (HDMI) | Off, 720p, 1080i, 1080p |
| TV System | NTSC, PAL, PAL60, Auto (default PAL) |
| Audio Settings | Downmix (Stereo/LT-RT), Dynamic range, Dual mono |
| Parental Control | Password-protected rating lock |
| Operating Temperature | 0°C to 40°C |
| Operating Condition | Level surface |
| Warranty | 12 months (Australia) |
Frequently Asked Questions - DVD-HD012 Laser
User questions about DVD-HD012 Laser
0 question about this device. Answer the ones you know or ask your own.
Ask a new question about this device
Download the instructions for your DVD player in PDF format for free! Find your manual DVD-HD012 - Laser and take your electronic device back in hand. On this page are published all the documents necessary for the use of your device. DVD-HD012 by Laser.
USER MANUAL DVD-HD012 Laser
natural_image
Black DVD remote control unit with control panel and digital display (no text or symbols on device body)
HIGH-DEFINITION MULTIMEDIA INTERFACE











THE FRONT PANEL

1:DISC TRAY
2:USB PORT
3:REMOTE CONTROL SENSOR
4:OPEN/CLOSE BUTTON
5:PLAY/PAUSE BUTTON
6:STOP BUTTON
7:POWER BUTTON
THE REAR PANEL

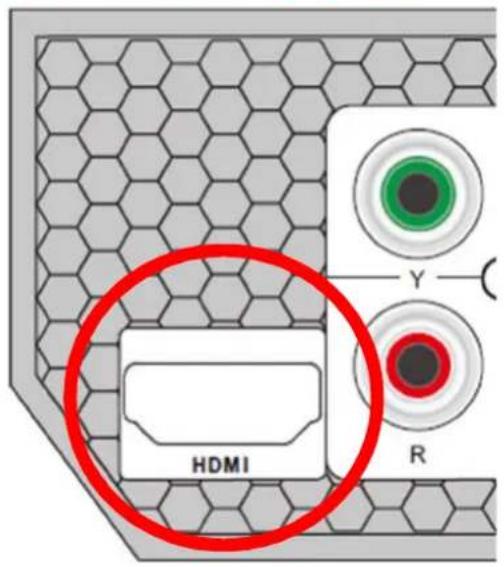
1: HDMI OUT
2: COMPONENT OUT (GREEN)
3: COMPOSITE OUT (RED)
4: COMPONENT OUT (BLUE)
5: COMPOSITE OUT (WHITE)
6: COMPONENT OUT (RED)
7: COMPOSITE OUT (YELLOW)
8: MAINS POWER INPUT
Instruction Manual
REMOTE CONTROL
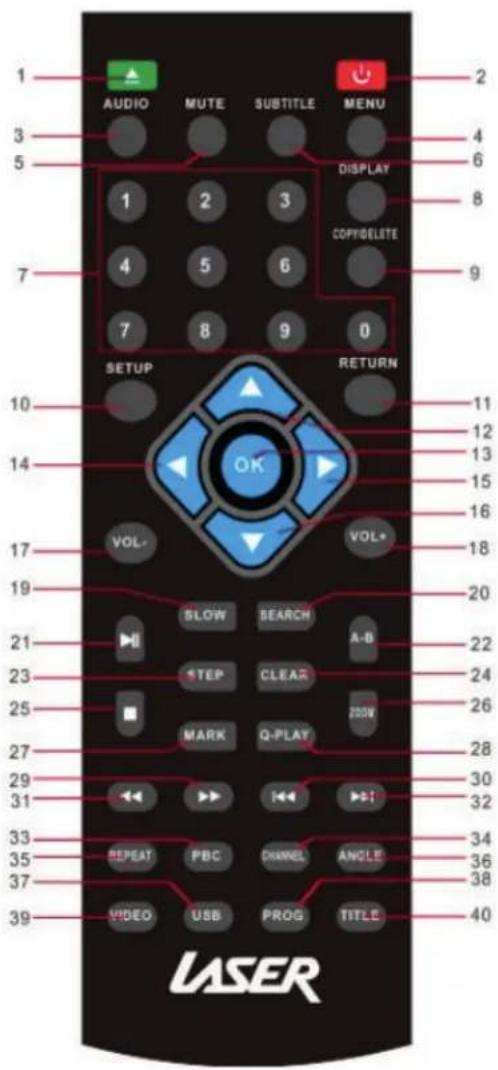
| 1. | OPEN/CLOSE | Open and close disc tray |
| 2. POWER Turn player ON or OFF | ||
| 3. | AUDIO | Select a different language |
| 4. | MENU | Enter MENU settings screen |
| 5. MUTE Turn sound ON/OFF | ||
| 6. SUBTITLE | Turn ON/OFF subtitles as supported by your file or disc | |
| 7. [NUMBER KEYS] | Select files and chapters of videos | |
| 8. DISPLAY | Turn ON/OFF time, title and chapter information | |
| 9. | COPY/DELETE | Use to manage USB files |
| 10. SETUP Enter menu settings | ||
| 11. | RETURN | Go to the DISC menu screen |
| 12/16. | [NO FUNCTION] | [NO FUNCTION] |
| 12/14/15/16. | DIRECTION KEY | Used to move cursor around screen |
| 13. ENTER | Use to select on option or feature | |
| 17/18. | VOLUME | Increase or decrease volume |
| 19. SLOW | Reduce the speed of video playback | |
| 20. SEARCH | Search by video chapter and time (Some options different for USB/DVD) | |
| 21. | PLAY/PAUSE | Press to pause and again to play |
| 22. A-B | Select segment of video or music for reply | |
| 23. STEP | View playback one frame at a time | |
| 24. CLEAR | Clear previously selected data and search information | |
| 25. | STOP | Stop playback of files |
| 26. | ZOOM | Zoom IN/OUT from an image |
| 27. | MARK | Create playback point |
| 28. Q-PLAY | Quick play/Direct Play (Go direct to movie and bypass previews) | |
| 29. | FAST FORWARD | Fast-forward video or music |
| 30/32. | PREVIOUS/NEXT | Skip forwards/backwards |
| 31. | REWIND | Rewind video or music |
| 33. | PBC | (not available on this model) |
| 34. CHANNEL | Switch between 2.1 and 5.1 sound output | |
| 35. | REPEAT | Repeat the current track |
| 36. | ANGLE | (not available on this model) |
| 37. USB | Switch between USB and disc playback | |
| 38. PROG | Program the Title and Chapter order of playback | |
| 39. | VIDEO | Select video output mode |
| 40. | TITLE | Return to title screen |
SUGGESTED CONNECTIONS

CONNECTING THE HDMI CABLE TO A HOME THEATRE SYSTEM
- Plug the first HDMI cable into the HDMI OUTPUT on the player and into the HDMI input on the Home Theatre System.
- Plug the second HDMI cable into the HDMI OUTPUT on the Home Theatre System and into the HDMI input on the television.
OTHER CONNECTION EXAMPLES

flowchart
graph TD
    A["For HDMI device"] --> B["Analog TV"]
    B --> C["Digital TV"]
    C --> D["Sound Bar"]
    A --> E["Home Theatre System"]
    E --> F["HD Receiver"]
    F --> G["Composites or Component device"]
    G --> H["Analog TV"]
CONNECTING THE PLAYER
- HDMI can transmit both audio and video signals over a single cable. If you have an HDMI capable receiver that can support HDMI audio, you can simply run an HDMI cable from the player to your receiver and enable HDMI audio on the receiver (see your receiver's owners' manual for more information). The receiver usually has an HDMI output that you can connect to your TV to pass the video signal.
- HDMI is a wonderful thing. A single cable can transport both audio AND video from your player to your display. Be aware, however, that HDMI is an evolving standard, and there could be compatibility issues. A receiver that supports audio input over HDMI is required.
- Some receivers offer HDMI ports solely for video switching. If your receiver does not have audio input capability, please read the following sections regarding other connection methods.
- In order to play multi-channel audio for all formats, the receiver must support HDMI v1.1 or later. A receiver that supports HDMI v1.3 with decoding capability for Dolby TrueHD and DTS-HD Master Audio is preferred. Please check the specifications of your receiver to ensure that it meets the requirements.
- Due to bandwidth limitations, high resolution audio formats such as Dolby Digital Plus, Dolby TrueHD, DTS-HD High Resolution and DTS-HD Master Audio cannot be sent through the coaxial digital audio output. A reduced resolution version of the same audio track will be output instead. To listen to high resolution audio formats in their best quality, please use the HDMI connection if you have a receiver that handles HDMI audio.
MENU OPERATION
Based on your TV hardware, select one of the following options: NTSC, PAL60, PAL or AUTO. Default is PAL.

Resume
If this option is set to "ON" and the power is turned off, the player will remember where it stopped and when the power is resumed, it will continue to play from that point.

Resolution
On HDMI, select one of the following video output resolutions: OFF, 720P, 1080i, 1080P.

TV Type
Use this submenu to select the aspect ratio.

NOTE:
Here are some examples of how the Aspect Ratio setting will change the picture based on how the video content was recorded and your TV type.
| TV Screen/Film Format | 4/3 | 16:9 | ||
| Normal | Full View | Mailbox | Wide Screen | |
4:3 |  |  |  |  |
| 16:9 | ||||
Password
Use the numerical keys to set your personal 4-digit password. The default password is "0000".

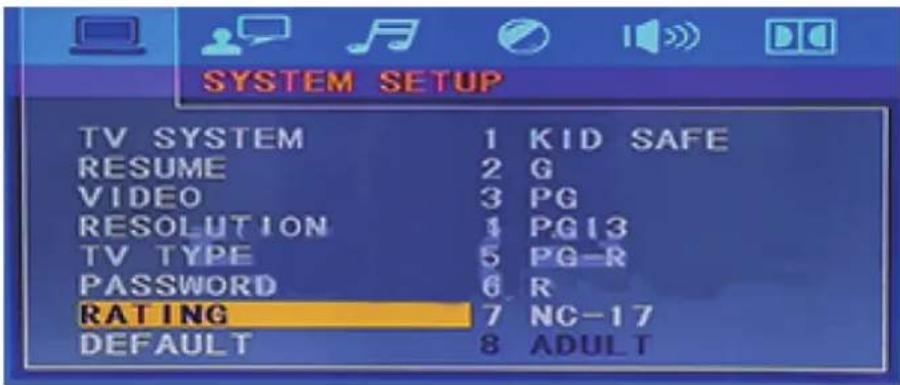
Parental Control
Use this option to set an appropriate rating to restrict viewing for children. The options available correspond to the film ratings on the disc.
Default
Use this option to restore the default factory settings.

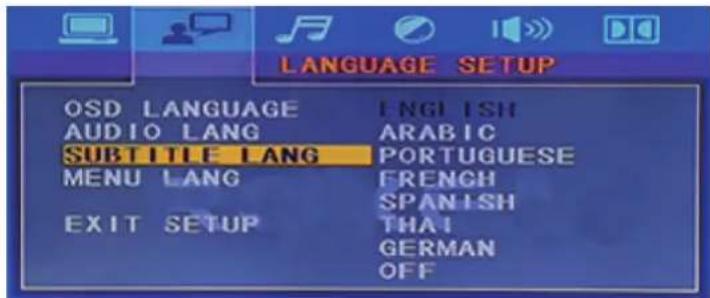
Language setup
Select options for your on-screen menu language and subtitles.
OSD language
Select a language to be used on on-screen display and setup

Audio language
Use this option to set the audio (dubbing) language.
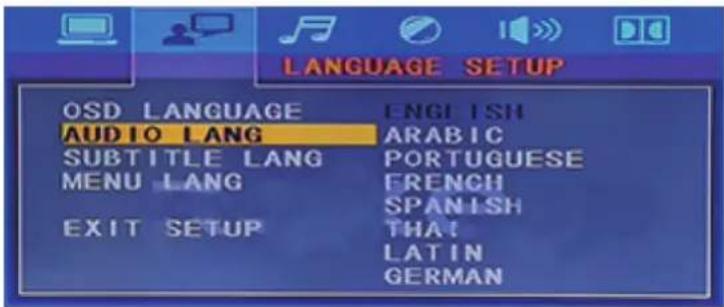
Subtitle language
Use this option to set the subtitle language, or choose 'off' to hide the subtitles.
Instruction Manual
Menu language
Use this option to set the film's menu language.

Audio setup
Audio out
Use this menu to select your audio output.

Key
Use UP/DOWN arrows to adjust the key.

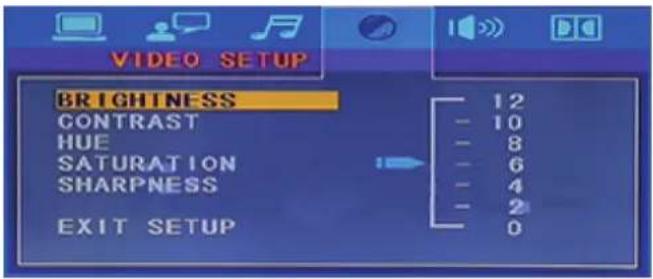
Video setup
Under this menu you can select options for your image output.
Brightness
Use UP/DOWN arrows to adjust the brightness.
Contrast
Use UP/DOWN arrows to adjust the contrast.

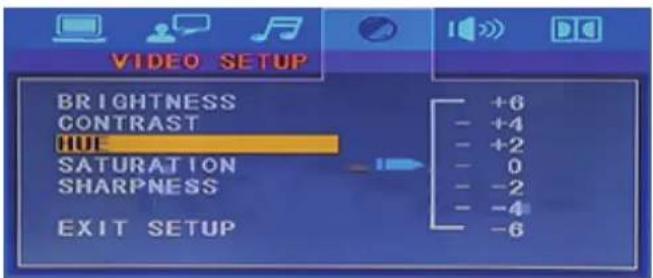
Hue
Use UP/DOWN arrows to adjust the hue.
Instruction Manual
DVD-HD012
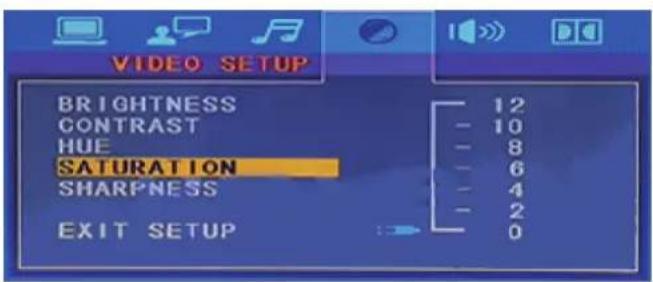
Saturation
Use UP/DOWN arrows to adjust the saturation.
Sharpness
Use UP/DOWN arrows to adjust the sharpness.

Speaker setup
Select options including downmix, subwoofer, center delay, rear delay and size of front, center and rear speakers.

Downmix
This setting is for Home Theater. If two channels are required, select Stereo
Digital setup
Use this menu to select digital setup options including OP, dynamic range and dual/mono.
OP mode
For nighttime playing, select LINE OUT to set volume at a lower level. For daytime playing, select RF REMOD to set volume at a higher level.

Dynamic range
When LINE OUT is selected, use this setting to adjust the line out ratio for a different effect.
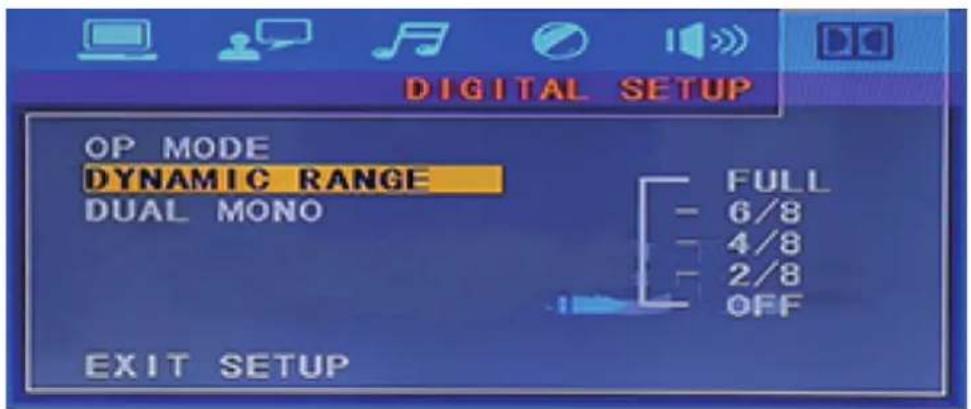
Dual mono
Choose this option to set up the left (L) and right (R) mono output; there are four modes in this option.

File Playback from Disc or USB
The files supported for playback are: Video - AVI (Xvid), VOB, Music - MP3, Image - JPG. Insert your disc or connect your USB thumb drive and press the USB button.
Instruction Manual
FAQS
No Video displayed on TV
• Make sure TV is turned on.
- Check the cable connections.
- Check the input selection on the TV is correct. Eg. HDMI1, HDMI2, AV1 or AV2 etc
Player does not respond to remote
- Clear any obstacle between the remote and the player.
- Try moving closer or reduce the angle to the player
- Check the condition of the batteries and replace if necessary.
- Clean the sensor panel on the player.
No audio during DVD/file
- Check the audio output of the player is set correctly.
- If using external amplifier/speakers, ensure connections are correct and amp is turned on.
- Check input on TV/Monitor.
- Check files audio track is supported by this player.
Disc playback is jerky
- Check the condition of the disc. If surface is damaged or scratched repair or replace if necessary.
Video file playback is jerky and stops
- Check the file is compatible with player.
- Check resolution of file. High Definition files may cause intermittent playback issues. Reduce resolution and bit rate of file to improve playback.
Abnormal Player operations
- Turn the player off and unplug the player from wall. Wait for 1 or 2 minutes and plug back in. Player should now function normally.
Disc is locked in player
- If the player will not eject disc. Turn the power OFF and then ON again. Immediately press the OPEN/CLOSE button (32) to open the tray.
Some files do not play back. What files are supported?
The supported files are; Video-AVI (Xvid), VOB; Audio-MP3 and Image-JPG
SPECIFICATIONS
| Video Guide Line | Video OutputVp-p(V) 1.0 ± 0.2 (75Ω)Level Definition(TV-line) | >450 |
| Audio Guide Line | Audio Output (Vrms)S/N Ratio(db)Audio Dynamic Range | 1.8 ± 0.2 (10KΩ)>80dB>80dB |
| Audio Frequency Response | DVD AudioCD Audio | Fs 48KHz PCM 4Hz-22KHz Fs96KHz PCM 4Hz-22KHz Fs 44.1KHz PCM 4Hz-20KHZ |
| Power Supply | AC Input(V)Frequency(Hz) | ~110-240V50Hz/60Hz |
| Power Consumption | <15W | |
| Temperature Condition | 0°C-40°C | |
| Operating Condition | Level Surface | |
| Dimension | 22.5 x 18.8 x 4.5cm | |
| Weight | 730g | |
| Supported Files | Video: AVI (Xvid), VOBAudio: MP3Image: JPG | |
For further product information and instructions please visit our product web page at www.laserco.com.au or www.daserco.com.au/support
Please note: As continuous improvements are made to this product, slight operational differences may occur. For the most up-to-date user manual, please visit our web site.
WARRANTY AGAINST DEFECTS
Laser warrants your new product to be free from defects in materials and workmanship for 12 months, from the date of purchase, provided that the product is used in accordance with accompanying recommendations or instructions where provided. The benefit of this warranty is in addition to your rights under the Australian
Consumer Law and to other rights and remedies of the consumer under a law in relation to the goods or services to which the warranty relates.
Through a network of retailers and resellers, Laser will provide you with your choice of a refund, repair, or exchange (where possible) for this product if it becomes defective within the warranty period. This warranty will no longer apply where the defect is a result of alteration, accident, misuse, abuse, normal wear and tear, neglect, or improper storage. Please retain your receipt as proof of purchase.
How to make a product warranty claim:
- Find your receipt with date of purchase. If this is not available, Laser will make an assessment based on the date of manufacture, condition of the product and type of defect.
- Please contact your original place of purchase. They will assess the nature of the fault and refund or replace the product as per their store refund or warranty policy.
- If your original place of purchase cannot be contacted, please contact Laser with a description of the fault. To assist our team in providing you with a quick resolution, please include any photos and/or a short video demonstrating the fault with your product.
• Phone: (02) 9870 3355
- Email: support@laserco.com.au
• Online: www.laserco.net/support/warranty and follow the website instructions
• Business Address: U1 6-8 Byfield Street, Macquarie Park, 2113, NSW, Australia
- Laser will review your claim and in the first instance, attempt to troubleshoot and resolve the issue for you without the need to return the product.
- If it is determined via troubleshooting that your product may be faulty, our team will provide instructions to have the product returned for assessment. If the product does need to be returned within the warranty period, Laser will arrange return shipping at no cost to you.
- Once we receive the product, our experienced technicians will assess it and determine how best to resolve the issue.
Our goods come with guarantees that cannot be excluded under the Australian Consumer Law. You are entitled to a replacement or refund for a major failure and compensation for any other reasonably foreseeable loss or damage. You are also entitled to have the goods repaired or replaced if the goods fail to be of acceptable quality and the failure does not amount to a major failure.

- Instruction Manual
- REMOTE CONTROL
- CONNECTING THE PLAYER
- MENU OPERATION
- Resume
- Resolution
- TV Type
- NOTE:
- Password
- Parental Control
- Default
- Language setup
- OSD language
- Audio language
- Subtitle language
- Menu language
- Audio setup
- Audio out
- Key
- Video setup
- Brightness
- Contrast
- Hue
- Saturation
- Sharpness
- Speaker setup
- Downmix
- Digital setup
- OP mode
- Dynamic range
- Dual mono
- File Playback from Disc or USB
- FAQS
- No Video displayed on TV
- Player does not respond to remote
- No audio during DVD/file
- Disc playback is jerky
- Video file playback is jerky and stops
- Abnormal Player operations
- Disc is locked in player
- Some files do not play back. What files are supported?
- SPECIFICATIONS
- WARRANTY AGAINST DEFECTS
- How to make a product warranty claim:
Brand : Laser
Model : DVD-HD012
Category : DVD player