40SF3 - Television FFalcon - Free user manual and instructions
Find the device manual for free 40SF3 FFalcon in PDF.


| Product type | Television |
| Brand | FFalcon |
| Model | 40SF3 |
| Screen size | 40 inches (102 cm) |
| Resolution | 1920 x 1080 (Full HD) |
| Refresh rate | 60 Hz |
| Backlight type | LED |
| Dimensions (without stand) | 905 x 525 x 85 mm |
| Dimensions (with stand) | 905 x 570 x 215 mm |
| Weight (without stand) | 6.3 kg |
| Weight (with stand) | 6.8 kg |
| Power consumption (typical) | 55 W |
| Power consumption (standby) | < 0.5 W |
| Voltage | AC 100-240 V, 50/60 Hz |
| Connectivity | 2 x HDMI, 1 x USB 2.0, 1 x AV in, 1 x VGA, 1 x RF, 1 x Ethernet, Wi-Fi |
| Sound output | 2 x 8 W |
| Smart platform | Android TV (proprietary) |
| Remote control | IR remote included |
| Wall mount standard | VESA 200 x 200 mm |
| Operating temperature | 0°C to 40°C |
| Cleaning instructions | Wipe with soft dry cloth; do not use liquid cleaners |
| Safety features | Over-voltage protection, auto power-off after idle |
| Repairability | Modular design; replaceable power board, main board, panel |
| Spare parts availability | Through authorized service centers |
Frequently Asked Questions - 40SF3 FFalcon
User questions about 40SF3 FFalcon
0 question about this device. Answer the ones you know or ask your own.
Ask a new question about this device
Download the instructions for your Television in PDF format for free! Find your manual 40SF3 - FFalcon and take your electronic device back in hand. On this page are published all the documents necessary for the use of your device. 40SF3 by FFalcon.
USER MANUAL 40SF3 FFalcon
natural_image
Abstract geometric logo with three white chevron shapes on a dark blue background (no text or symbols)FFALCON
androidtv
OPERATION MANUAL
SF3 SERIES
Figures and illustrations in this User Manual are provided for reference only and may differ from actual product appearance. Product design and specifications may be changed without notice.
Chapter 1: Safety Information
Precautions ....3
Warning 3
Product 3
Power and Plug ....3
Power Cord and Signal Cable 3
Use Environment ....3
Cleaning 3
Chapter 2: Connections and Setup
TV Buttons ....4
Initial Setup ....4
Sockets ....5
Remote Control Functions ....6
Network Connection ....7
Switching On 8
Switching Off 8
Chapter 3: Basic TV Operations
Accessing Channels 9
Watching Connected Devices 9
Adjusting Volume 9
Accessing Smart TV Homepage 9
Accessing Google Play 9
Using Advanced System Settings Menu ....10
Using Quick Start Function ....10
Using TV Settings Menu ....10
Chapter 4: Using more of your TV
Installing Channels ....11
Using Subtitles ....11
Turning On/Off Subtitles 11
Enabling Subtitle Languages on Digital TV
Channels ....11
Selecting a Subtitle Type on Digital TV Channels ...11
Using Teletext ....11
Selecting Decoding Page Language .....11
Digital Teletext Language 11
Network Wake Up ....11
Consumer Electronic Control (CEC) ......12
Enabling or Disabling CEC 12
Using Auto Power On 12
Using Auto Standby 12
HbbTV 12
HbbTV Access 12
HbbTV Deactivation 12
Google Cast 12
Using EPG (Electronic Program Guide) ......12
Bluetooth Function ......13
Freeview ....13
Netflix Settings ......12
HDR Playback 13
Password in Parental Controls ....13
Reset Shop 13
Chapter 5: Other Information
Problems & Solutions ....14
Troubleshooting ....15
Legal Statement ......16
Precautions
Read all of the instructions before operating the set. Keep these instructions well for future use.
Warning
A television set may fall, causing serious personal injury or death. Many injuries, particularly to children, can be avoided by taking simple precautions such as:
- ALWAYS use cabinets or stands or mounting methods recommended by the manufacturer of the television set.
- ALWAYS use furniture that can safely support the television set.
- ALWAYS ensure the television set is not overhanging the edge of the supporting furniture.
- ALWAYS educate children about the dangers of climbing on furniture to reach the television setor its controls.
- ALWAYS route cords and cables connected to your television so they cannot be tripped over, pulled or grabbed.
- NEVER place a television set in an unstable location.
- NEVER place the television set on tall furniture (for example, cupboards or bookcases) without anchoring both the furniture and the television set to a suitable support.
- NEVER place the television set on cloth or other materials that may be located between the television set and supporting furniture.
- NEVER place items that might tempt children to climb, such as toys and remote controls, on the top of the television or furniture on which the television is placed.
If the existing television set is being retained and relocated, the same considerations as above should be applied.

This symbol indicates that high voltage is present inside. It is dangerous to make any kind of contact with any internal part of this product.

This symbol indicates that the fuse may be in the neutral, and that the mains shall be disconnected to deenergize the phase conductors.
If an outside antenna or cable system is connected to the product, be sure the antenna or cable system is grounded by a skilled person so as to provide some protection against voltage surges and built-up static charges.
Product
- Do not block or cover the ventilation openings on the back cover.
- Do not push objects of any kind into this unit through the cabinet slots as they could touch the current carrying parts or short-circuit parts, resulting in fire, electric shock, or damage to the unit.
-
Do not attempt to open the cabinet as this may cause damage. There are no parts inside you can service by yourself. Refer all servicing to qualified personnel.
-
Do not touch the screen surface with fingers as this may scratch or mar the TV screen.
- Do not impact the TV screen with hard pressure as this may damage the TV screen severely.
- This appliance is not intended for use by young children or infirm persons without supervision. Young children should be supervised to ensure that they do not play with the appliance.
Power and Plug
- Unplug the set under the following conditions:
- If the set will not be used for a long period of time.
- If the power cord or the power outlet/plug is damaged.
- Follow the instructions to install and adjust the product. Adjust those controls that are covered in these operating instructions as improper adjustment of other controls may result in damage. If this happens, unplug the set and refer to the service personnel.
- If the set is subject to impact or has been dropped and the cabinet has been damaged.
- Where the mains plug or an appliance coupler is used as disconnect device, the disconnect device shall remain readily operable.
Power Cord and Signal Cable
- Do not allow anything to rest on or roll over the power cord and the signal cable.
- Protect the power cord and the signal cable from being trampled.
- Do not overload the power cord or the power outlet.
- Do not expose the power cord and the signal cable to moisture.
Use Environment
- Do not place the set on an unstable cart, stand, or table.
- Place the set on a place that allows good ventilation.
- Do not use the set near damp, and cold areas.
- Do not expose the set to excessive heat such as direct sunlight, fire, or the like and no naked flame sources, such as lighted candles, should be placed on the apparatus.
- Do not expose the set to dripping or splashing and no objects filled with liquids, such as vases, shall be placed on the apparatus.
- Do not use the set in dusty environments.
- Operating Temperature: 5°C to 35°C (41°F to 95°F) Operating Humidity: 20% to 80%, non-condensing Storage Temperature: -15°C to 45°C (5°F to 113°F) Storage Humidity: 10% to 90%, non-condensing
Cleaning
- Dust the set by wiping the screen and the cabinet with a soft, clean cloth or some special liquid cleaner.
- Do not apply excessive force to the screen when cleaning.
- Do not use water or other chemical cleaner to clean the screen as this may damage the surface of the TV screen.
All other safety instructions about our TV sets are also applicable here. Wall mount bracket not included.
(Note: Certain TV models are not designed to be mounted to the wall.)
TV Buttons
- Power button
If the batteries in your remote control are run down, you can use the button on your TV set.
The model has only one button. It may work just as Standby/Quit standby button, or as a multi-function controller.
You can turn on the TV by pressing the ⏻ button at the bottom left of the TV back case.
While the TV is on, press the ⏻ button to display the multi-function menu. For more information about how to use the multi-function menu, please refer to the figure below.

- Press to move the highlight to the next function selection
- Press and hold the button for more than 2 seconds to confirm your selection.
Note:
You can follow the on-screen guide to operate. Figures and illustrations are provided for reference only and may vary depending on the model.
Initial Setup
The first time you switch the set on, the Welcome wizard appears, which guides you through the initial setup process. Follow the on-screen instructions to finish the initial setup process such as selecting the language, connecting to the network, and more. During each step, either make a choice or skip the step. If you skip a step, you can perform the setup later from the settings menu.
Sockets
Note: The location and names of the sockets on the TV may vary according to TV model, and not all sockets are available on all models.
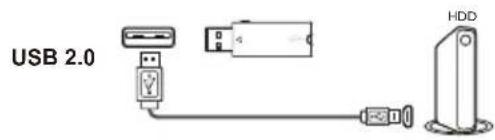
USB2.0 socket (input)
This socket can be used to connect a USB device.
Note: The number of USB sockets on the TV may vary according to TV model.
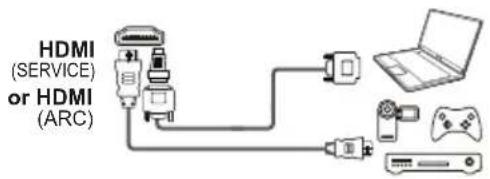
HDMI(SERVICE) or HDMI(ARC) socket (input)
The HDMI (High-Definition Multimedia Interface) socket can be used to connect a Blu-ray player, PC with a compatible video card installed, certain DVD players or a high-definition compatible digital satellite decoder. This socket provides an uncompressed digital connection that carries both video and audio data by way of an integrated mini-plug cable.
flowchart
graph LR
    A["AV IN adapter"] --> B["1"]
    A --> C["2"]
    A --> D["3"]
    A --> E["4"]
    A --> F["5"]
    B --> G["1"]
    C --> H["2"]
    D --> I["3"]
    E --> J["4"]
    F --> K["5"]
AV IN adapter socket
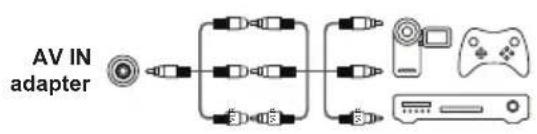
The AV IN adapter socket can be used to connect the attached AV adapter cable with VIDEO and AUDIO L & R IN sockets. The AV IN sockets can be used to connect a range of equipment, including video recorders, camcorders, decoders, satellite receivers, DVD players, or games consoles. The VIDEO IN socket provides composite video connection.
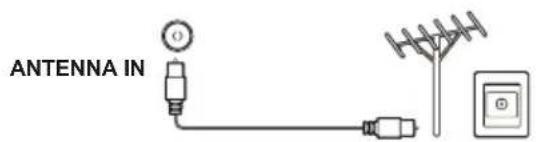
ANTENNA IN socket (input)
This socket can be used to connect an outside aerial.
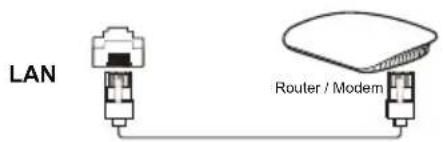
LAN
RJ45 plug for connecting to external modem or network access equipment.
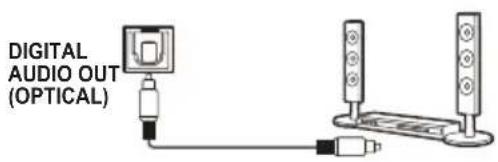
DIGITAL AUDIO OUT (OPTICAL) socket (output)
This socket can be used to connect a compatible digital audio receiver.

Headphone socket (output)
This socket can be used to connect headphones or stereo earphones.
Warning: Excessive sound pressure from earphones and headphones can cause hearing loss.
Remote Control Functions
Most of your television's functions are available via the menus that appear on the screen. The remote control supplied with your set can be used to navigate through the menus and to configure all the general settings.
Note: Figures and illustrations in this operation manual are provided for reference only and may differ from actual product appearance.

Google and Android TV are trademarks of Google LLC.
| A | To switch the sound off and back on. |
| O | Standby / quit standby. |
| Numeric buttons | To enter channel numbers or a digit. |
| T | To access TCL Channel. |
| LIST | To display the channel list. |
| +/- | To control the volume. |
| i | To display program information, if available. |
| # | To display the TV settings menu. |
| P✓✓ | To change channels. |
| O | To access the Smart TV homepage. |
| ≡ | To display the Option menu. |
| ▲/▼/◄/► | Navigation direction buttons. |
| OK | To confirm an entry or selection. |
| ← | To return to the previous menu or quit an app. |
| → | To select input source. |
| EXIT | To exit the Settings menu. |
| ○LANG | To select an audio language available for selected digital TV program. |
| GUIDE | To toggle the Electronic Program Guide on or off . (only available for digital channels.) |
| TEXT | To toggle Teletext on or off. |
| SUBT. | To select a subtitle language available for selected digital TV program. |
| Colour buttons | To select tasks or Teletext pages; to be used for HbbTV function. |
| ◀◀ | To start fast reverse. |
| II | To pause playback. |
| ▶▶ | To start fast forward. |
| ZOOM | To select the screen mode. |
| ▶ | To start playback. |
| ■ | To stop playback. |
| NETFLIX | To access Netflix. |
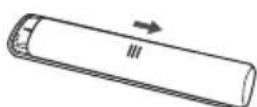
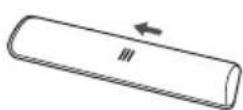
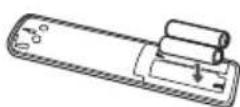
Installing Batteries
- Push to open the back cover as illustrated.
- Insert two AAA batteries according to the polarities marked on the battery case.
- Replace the back cover as illustrated.
1
3
2
Network Connection

Your TV will require an internet connection to operate all functions. Data usage charges may apply. Please refer to your Internet Service Provider (ISP) for additional information.
To access the internet, you must subscribe to high speed broadband internet service from your internet service provider.
Your TV can be connected to your home network in two ways:
- Wired, using the RJ45 (LAN) connector on the back panel.
- Wireless, using the internal wireless or external wireless USB adapter and your home wireless network.
Note: The following instructions are just the usual ways to connect your TV to the wired or wireless network. The connection method may be different depending on your actual network configuration. If you have any questions about your home network, please refer to your ISP(Internet Service Provider).
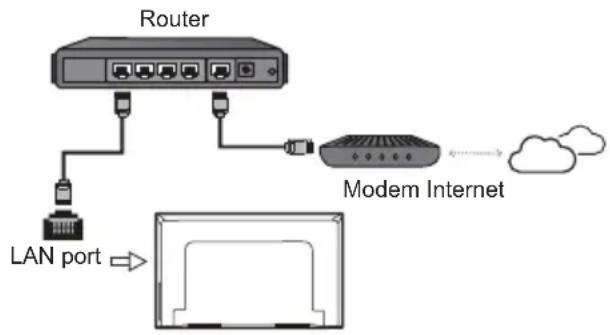
Connecting to a wired Network
To connect to a wired network:
-
Ensure you have:
-
An Ethernet cable long enough to reach your TV
-
A router or modem with an available Ethernet port
• A high-speed internet connection
• An Ethernet (LAN) port on the back of the TV -
Connect your Ethernet cable to the router and to the Ethernet port on the back of the TV.
-
Use the Network & Internet menu to configure the TV.
flowchart
graph TD
    A["Router"] --> B["Modem Internet"]
    B --> C["LAN port"]
    C --> D["Computer"]
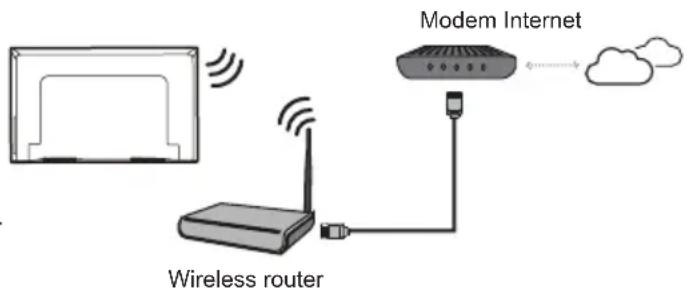
Connecting to a Wireless Network
To connect to a wireless network
-
Ensure you have:
-
A router broadcasting a high-speed wireless signal
• A high-speed internet connection -
Use the Network & Internet menu to configure the TV.
Note: Please follow below steps to enter the Network & Internet menu.
- Press on the remote control to display the Smart TV homepage.
- Press ▲/◀/▶ to move the cursor to ⚙(Settings) on the right top of the screen and press OK to enter.
- Press ▲/▼ to select Network & Internet then press OK to enter the submenu and follow the on-screen guidance to set up your network.
Switching On
Follow the instructions on this page on how to switch on your TV set and the remote control before going on to following pages describing how to use the channel set-up procedure.
- Insert two AAA batteries in the remote control.
Precautions on using batteries:
- Only use the battery types specified.
- Make sure you use the correct polarity.
- Do not mix new and used batteries.
- Do not use rechargeable batteries.
- Do not expose batteries to excessive heat such as sunshine, fire or the like, throw them in a fire, recharge them or try to open them, as this could cause them to leak or explode.
- Remove the batteries from the remote control if you are not using it for a long period of time.
-
Attention should be drawn to the environmental aspects of battery disposal.
-
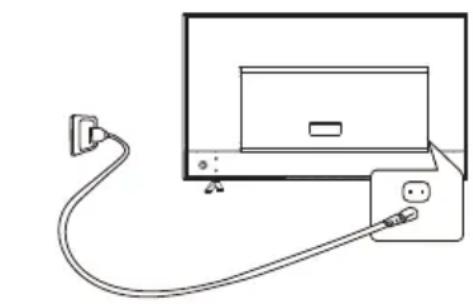
Connect the power cable FIRST to the television, THEN to a mains socket. (Note: If the power cable is connected to the television, please only connect the power cable to the mains socket.)
Your TV set should only be connected to an AC supply. It must not be connected to a DC supply. If the plug is detached from the cable, do not, under any circumstances, connect it to a mains socket, as there is a risk of electric shock.
Note: The figures are for representation only, the location of power socket of the television might differ depending on the model.
- Connect an outside aerial to the ANTENNA IN socket at the back of the TV set.
The aerial socket (75 OHM - VHF / UHF / cable) can be used for connecting an external aerial or other equipment fitted.
Note: If you want to receive the signal from your cable or cable box, please connect a coaxial cable to the ANTENNA IN socket at the back of the TV set.
- When powered on, the TV will be turned on directly or be in standby mode.
If the power indicator lights up, the TV set is in standby mode. Press the button on the remote control or on the TV set to turn on the TV.
Switching Off
To put the TV set into standby mode, press the ⏻ button on the remote control. The TV set remains powered up, but with low energy consumption.
To switch off the TV set, unplug the mains socket from the mains outlet.
natural_image
Line drawing of a cable being inserted into a laptop (no text or symbols)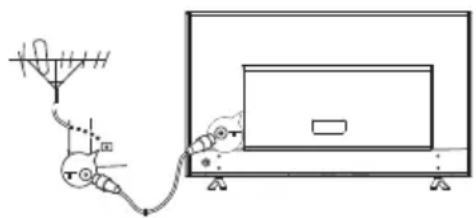
natural_image
Diagram of a satellite dish connected to a TV screen, showing signal path and antenna (no text or labels)Accessing Channels
Using the numeric buttons: press the corresponding numeric buttons on the remote control to access the channels.
Using the P/N buttons: press the P/N buttons on the remote control to scroll through the channels.
Using the LIST button: press the LIST button to display the channel list and press ▲/▼/◄/► and OK to select channels.
Watching Connected Devices
Press ☑ on the remote control to display the source list. Press ▲/▼ to select TV or other input sources and press OK to confirm.
You can also press on the remote control to display the homepage, press ▲/◀/▶ to move the cursor to the ▶(Inputs) area on the right top of the screen, and press OK to enter. Then press ▲/▼ and OK to select the input source.
Adjusting Volume
Volume control: press the ⏻/— buttons on the remote control or the corresponding buttons on the TV set to increase or decrease the volume.
Sound mute: press the button to temporarily mute the sound. Press this button again or the button to restore the sound.
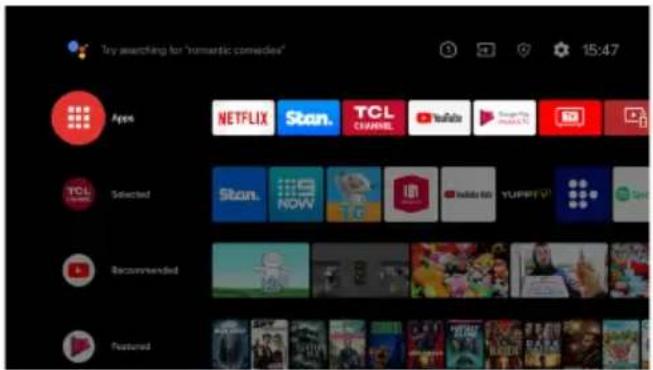
Accessing Smart TV Homepage
Allows you to enjoy Internet Applications (Apps) and specially adapted Internet websites, and perform system settings for your TV. You can make controlling with the TV remote control.
WARNING:
- Configure the network settings before using Smart TV applications.
- Slow responses and/or interruptions may occur, depending on your network conditions.
-
If you experience a problem using an application, please contact the content provider.
-
According to circumstances of the content provider, an application's updates or the application itself may be discontinued.
- Depending on your country's regulations, some applications may have limited service or not be supported.
-
Changes in application content may be made without prior notice by the service provider.
-
Press on the remote control to display the Smart TV homepage.
-
Press ▲/▼/◄/► and OK to enter the desired apps, functions or settings.
-
Press to return to the homepage.
-
To exit the homepage, press ▲/◀/▶ to move the cursor to the ▶(Inputs) area on the right top of the screen, press OK to enter and then press ▲/▼ and OK to select your desired input source.
Note: Since the connection with Internet takes time, it's recommended that you wait a few minutes to use the Smart TV feature after activation of TV from standby.
Accessing Google Play
Google Play is your entertainment unbound. It brings together all of the entertainment you love and helps you explore it in new ways, anytime, anywhere. We've brought the magic of Google to music, movies, TV, books, magazines, apps and games, so you get more from your content every day.
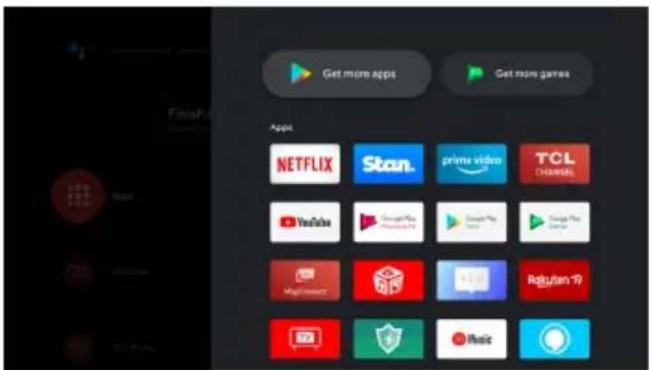
- Press on the remote control to display the Smart TV homepage.
- Press ▲/▼/◄/► to select the Apps, and press OK to enter. Then press ▲/▼/◄/► and OK to enter the desired apps.
- Press ← to return to the homepage.
Using Advanced System Settings Menu
Allows you to not only adjust device settings, such as Network & Internet, Accounts & Sign-In and Apps, etc., but also set preferences.
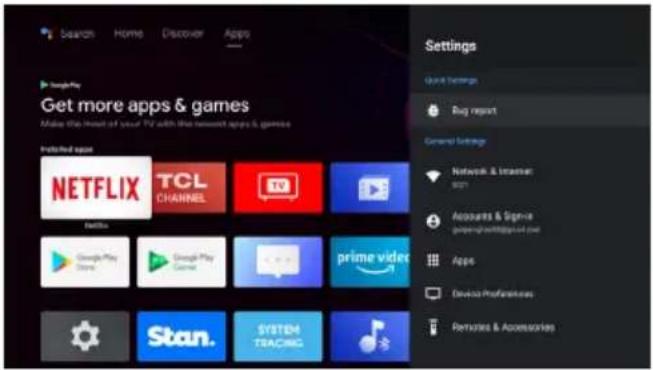
- Press on the remote control to display the Smart TV homepage.
- Press ▲/◀/▶ to move the cursor to ⚙(Settings) on the right top of the screen and press OK to enter the system settings.
- Press ▲/▼ to choose the items and press OK to enter.
- Press to return to previous interface.
Using Quick Start Function
It enables you to turn on your TV faster from standby mode than turning this function off, but it will also increase standby power consumption.
-
Press on the remote control to display the homepage, Press ▲/◄/► to select ⚙(Settings) > Device Preferences > Quick start > Enable quick start and press OK to toggle between on and off.
-
Press to return to previous interface.
Using TV Settings Menu
Allows you to adjust TV settings, such as picture and sound.
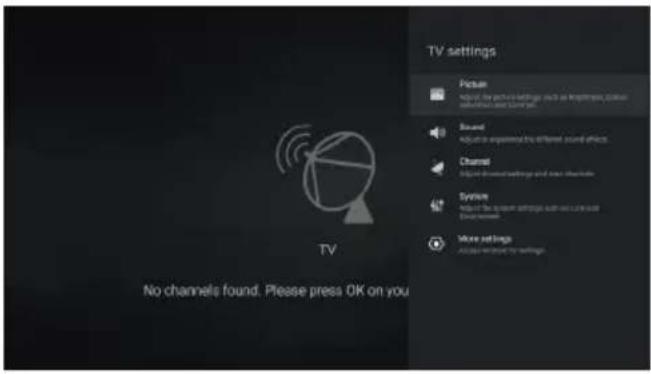
- Press ⚙️ on the remote control to display the TV settings menu.
- Press ▲/▼ to select the desired item, then press OK/▶ to enter the corresponding submenu.
- In submenus, press ▲/▼ to select menu options, then press OK/▶ to enter the option list or the corresponding submenu, or press OK to toggle on or off, or press ◀/▶ to adjust the setting.
- Press ← to return to the previous menu.
- Press EXIT to close the menu.
Note: You can also press≡O n the remote control, select TV settings (if available) and press OK to enter the TV settings menu. Some options may not be available for certain signal sources.
Installing Channels
This section describes how to search and store channels automatically. This may be done in either of the cases below:
- you are prompted that there are no channels in TV mode;
-
you want to update your channels.
-
In TV mode, press 📍 on the remote control and select Channels > Channel Scan. Press OK/▶ to enter.
- The TV installs and arranges channels according to your country or region. Press ▲/▼ to select Country/Region and press OK/▶ to enter. Enter the default password 1234 or your own password in case you have changed the password in the System > Parental Controls menu. Press ▲/▼ to select your country or region and press OK to confirm.
- Press ▲/▼ to select Scan Automatically and press OK/▶ to enter.
- Press ▲/▼ to select Channel Type and press ◀/▶ to select Digital, Analog or Digital & Analog.
- After configuration is completed, press ▼ to select Search and press OK to start scanning channels.
- The channel search may take a few minutes. After the automatic search, channels are arranged in a preset order. If you wish to hide or move channels, press 📋 on the remote control, select Channels > Channel Organizer and press OK/▶ to enter.
Note: If the channel search retrieved only the analogue channels it could be caused by poor broadcasting and therefore is not covered by manufacturer warranty. Manufacturers cannot be held responsible for lack of or poor broadcasting in some areas.
Using Subtitles
You can enable subtitles for each TV channel. Subtitles are broadcast via Teletext or DVB-T digital broadcasts. With digital broadcasts, you have the additional option of selecting a preferred subtitle language.
Note: Some options are available only when Subtitle is set to on.
Turning On/Off Subtitles
- Press ⚙️ on the remote control, select Channels > Subtitle and press OK/▶ to enter.
- Select the Subtitle option, and press OK to toggle between on or off.
- Press ← to return to previous interface.
Enabling Subtitle Languages on Digital TV Channels
- Press ⚙️ on the remote control, select Channels > Subtitle > Digital Subtitle Language 1st and press OK/▶ to enter.
- Press ▲/▼ to select a subtitle language as your preferred language and press OK to confirm.
-
Press ▲/▼ to select Digital Subtitle Language 2nd and press OK/▶ to enter.
-
Press ▲/▼ to select a secondary subtitle language and press OK to confirm.
-
Press <to return to previous interface.
Shortcut operation: Press SUBT. on the remote control to directly select a subtitle language available for the selected digital TV program.
Selecting a Subtitle Type on Digital TV Channels
- Press ⚙️ on the remote control, select Channels > Subtitle > Subtitle Type and press OK/▶ to enter.
- Press ▲/▼ to select a subtitle type and press OK to confirm. You can select Hearing Impaired to display the hearing impaired subtitles with your selected language.
- Press to return to previous interface.
Using Teletext
Selecting Decoding Page Language
- Press ⚙️ on the remote control, select Channels > Teletext > Decoding Page Language and press OK/▶ to enter.
- Press ▲/▼ to select a proper type of language in which Teletext will display and press OK to confirm.
- Press ← to return to previous interface.
Digital Teletext Language
On digital TV channels, depending on the broadcaster, you may be able to enjoy a service with multiple initial Teletext pages in different languages. This function allows you to select an available language as primary language, which relates to different initial Teletext pages.
- Press ☑ on the remote control, select Channels > Teletext > Digital Teletext Language and press OK/▶ to enter.
- Press ▲/▼ to select a language and press OK to confirm.
- Press ← to return to previous interface.
Network Wake Up
This function allows you to turn on your TV from standby mode via a network. To use this function, please make sure:
- Your TV is connected to an effective home network;
- The desired controller, such as a smartphone, is connected to the same network as your TV;
- An app which supports network waking up function, such as YouTube, has been installed into the controller;
- Networked standby is set to on in the Network & Internet menu under homepage. Press □ on the remote control, select ⚙Settings) > Network & Internet, use ▼ to select Networked standby and press OK to activate it.
When the TV is in networked standby mode, you can use the app to wake up the TV remotely.
Notes:
- This feature is disabled if you press and hold the button on the remote control and confirm to shut the TV down
- Before using the feature of network wake up, make sure (Settings) > Device Preferences > Quick start > Enable quick start is set to on.
Consumer Electronic Control (CEC)
Use this function to search for CEC devices connected to the HDMI sockets in your TV and enable auto power on and auto standby between the TV and CEC devices.
Enabling or Disabling CEC
- Press ☑ on the remote control, select System > Control Other Devices (CEC) and press OK/▶ to enter.
- Select the HDMI Control option, and press OK to toggle between on or off.
- Press <to return to previous interface.
Using Auto Power On
Enables the TV to automatically power on when you power on a CEC device (e.g. DVD) with the device's remote. Press OK to turn it on to enable this function.
Using Auto Standby
Enables all CEC devices to automatically go to the standby mode when you turn off the TV with the TV remote. Press OK to turn it on to enable this function.
Note: The CEC functions depend on the devices connected and it is possible that some devices may not interoperate correctly when connected to this TV. The user manual or the manufacturer of the problematic devices should be consulted for further information.
HbbTV
HbbTV (Hybrid broadcast broadband TV) is a service offered by certain broadcasters and available only on some digital TV channels. HbbTV delivers interactive television over broadband Internet. These interactive features are added to and enrich the normal digital programs, and include services such as digital teletext, electronic program guide, games, voting, specific information related to the current program, interactive advertising, information magazines, catch-up TV, etc. To use HbbTV, please ensure your TV is connected to Internet and HbbTV is switched on.
Notes:
- HbbTV services are broadcast- or country-dependent and may be unavailable in your area.
- You cannot download files to your TV with HbbTV function.
- Application provider or broadcasting related conditions may cause an HbbTV application to be unavailable momentarily.
- To access HbbTV applications, you must connect your TV to the Internet via a broadband link. HbbTV applications may not work correctly in case of network related issues.
HbbTV Access
- Press 📍 on the remote control, select System > HbbTV Settings and press OK/▶ to enter.
- Press OK to turn it on.
- When you tune to a digital TV channel that offers HbbTV, this will be signaled to you by an on-screen indication (generally a red button, but other colour buttons may also be used). Press the indicated colour button to open the interactive pages.
- Use ▲/▼/◄/► and the colour buttons to navigate through the HbbTV pages and press OK to confirm.
HbbTV Deactivation
To avoid disturbances that may be caused by HbbTV broadcasting tests, you can turn off the HbbTV function:
-
Press 📍 on the remote control, select System > HbbTV Settings and press OK/▶ to enter.
-
Press OK to turn it off to disable it.
Google Cast
Google Cast™ lets you cast your favorite videos, games, and apps from your mobile device, in full quality, to your TV. Just one tap of the Cast button on your Android or iOS screen is all you need to supersize the things you love. Cast your content then continue browsing on your phone or tablet.
Using EPG (Electronic Program Guide)
EPG is an on-screen guide that displays scheduled digital TV programs. You can navigate, select and view programs.
Note: The DTV EPG does not require an internet connection. To use the DTV EPG, HbbTV must be set to off. When HbbTV is set to on, then it will enter the HbbTV EPG directly. Please refer to "HbbTV" part of this manual for assistance to set HbbTV to on or off.
- Press ⚙️ on the remote control, select Channels > EPG and press OK/▶ to enter, or press GUIDE directly (if available) on the remote control, the Program Guide menu will appear, which allows you to get information about the current or next program playing on each channel. Navigate through the different programs using the ▲/▼/◀/▶ buttons on the remote control.
- Use the related buttons shown at the bottom of the screen to view EPG.
- FilterProgram guide filter for digital TV programs.
- Press to display the type list of the program.
- Navigate through the different types using the Up/Down buttons on the remote control.
- Select one or more types, which you want to highlight from the type list, press OK to select or deselect. A checkmark will appear to the right of the type when selected.
- Custom Schedule: Press Up/Down to select a program, then press the RED button to set the schedule, press OK to enter Schedule reminder.
- Select Date: Press the GREEN button to select date.
-
Reminders: Press the YELLOW button to view your schedule list.
-
Press to exit EPG.
Bluetooth Function
Bluetooth ^® is a wireless technology standard for exchanging data over short distance between Bluetooth devices. You can connect Bluetooth audio device, mouse or keyboard via the TV.
- Press ☐ on the remote control to display the homepage, Press ▲/◀/▶ to select ⚙(Settings) > Remotes & Accessories and press OK to enter.
- Select Add Accessory and press OK to enter. The TV will search nearby Bluetooth devices automatically.
- Select an available device, press OK and follow the guides on the screen to connect it.
Note: Bluetooth technology (if available in your TV) uses 2.4GHz frequency thus close proximity to WiFi access points, routers or microwave ovens might interfere with Bluetooth audio streaming. If you face interruptions in audio reception, you should restart your Bluetooth device to find frequency with less interferences and if you continue to face issues you should move closer to TV or increase space between TV and source of interferences.
The Bluetooth ^® word mark and logos are registered trademarks owned by Bluetooth SIG, Inc. and any use of such marks by TTE Corporation is under license. FFALCON is a subsidiary of TTE Corporation. Other trademarks and trade names are those of their respective owners.
Freeview
Never miss a thing with freeview!
Find out what's on now, next or over the next 7 days with the easy to use TV guide.
Looking for your favourite show? Use Search for quick access to all your favourite on demand from ABC iview, SBS On Demand, 7+, 9Now and 10 Play.
All in one place, all for free.
Netflix Settings
Netflix provides on-demand movies and TV shows delivered via the Internet. Netflix is available in certain countries. Unlimited membership is required. More information can be found at www.netflix.com http://www.netflix.com/.
Note: You can directly access Netflix via clicking the
Netflix button on the remote control.
HDR Playback
Your TV supports HDR (High Dynamic Range) up to a resolution of 1920 x 1080. HDR can be experienced with streaming content like Netflix or via USB playback with supported video files. HDR will work on 1920 x 1080 resolution via USB and streaming, and with compatible HDMI 1.4b devices.
Password in Parental Controls
- The default password is 1234. You can change it to a new one.
- The super password is 0423. If you forget your code, enter the super password to override any existing codes.
Reset Shop
Allows you to reset the TV to factory default settings.
- Press on the remote control to display the homepage, Press ▲/◀/▶ to select Ⓧ(Settings) > Device Preferences > Reset and press OK to enter.
- Press ▲/▼ to select Factory Reset and press OK to enter. Then select Erase Everything and press OK to confirm.
- Enter 1234 or the PIN according to the on-screen prompt.
- Select OK and press OK to confirm.
- The Initial setup wizard appears. Follow the instructions in the section Initial setup.
Problems & Solutions
Note: Problems & solutions 1 to 2 are for the TV models which have network functions, so users of non-connected TV models can disregard them.
1. Fail to link to the network.
- Check if your TV is connected with the network;
- Reboot your TV;
- Consult your internet service provider, to confirm if access of your router is supported. Refer to the operation manual of your router, and activate its DHCP function after linking the network to your TV.
- Make sure your TV is connected to a router, and make sure your router is powered on. Check that your router/modem has an internet connection, and that your Ethernet cables/wireless connection is OK. Test your connection with a computer to make sure it is OK. Should the problem persist, contact customer service.
- Check if TV system time is correct or not. Sometimes TV system time is synchronized to the wrong time from abnormal broadcast signal. In this case, please set system time manually.
2. The video could not be played smoothly.
- Videos from your USB flash drive --- It may be caused by abnormal data transmission, or its code rate is far beyond the supported formats of this TV set.
- Videos downloaded from internet, or online videos.
a. It may be caused by the lower bandwidth of your network. A high network speed is required to handle online videos.
b. Peak internet usage times may affect the bandwidth.
c. Check if any other computers on the same network are also operating, as they may be using up bandwidth. Especially if they are downloading or playing online videos.
d. The video may not be smooth itself, it is not the problem of your TV or network.
3. When two portable hard drives are connected with the TV at the same time, they will not be recognized sometimes.
- All portable hard drives consume a lot of power, which may result in power supply problems. We recommend inserting only one hard drive, or a low power consumption portable hard drive.
4. The video from a portable hard drive (USB) is playing with no sound.
- The audio format of the video in your portable hard drive is not supported by the TV player.
5. Some videos fail to play.
- The formats of the videos may not be supported by the TV, especially videos shot by certain kinds of cameras, generally with their private protocol of
formats, which are not compatible with your TV.
6. Video stops playing midway.
- Mistakes may occur when videos are copied or compressed, so they may automatically stop playing during playback.
7. What should I pay attention to, when I do software updating?
- No power cuts when software updating;
- Avoid any operations with your remote control when software updating;
- Depending on your internet connection speed, the software updating process may take some time.
8. There are no distinct changes of TV interface after software updating.
- Under certain conditions, software updating may not only update or add new functions but also improve the performance of the TV set, without distinct changes of interface. Also, there may be no changes to the user interface at all.
9. What should I do when software updating process stops due to a sudden power-off?
- If you do software updating by USB, do not pluck the USB drive from your TV, and restart your TV to continue software updating; If you do software updating by Network, also restart your TV and check if it is functioning correctly.
10. With a USB device being inserted into the TV in advance, I am prompted that no USB devices are detected after I access Media, why?
- There may be something wrong with your portable hard drive(s), damaged or with low voltage. It's recommended to provide an additional power supply to the hard drive(s).
11. External device cannot be recognized.
- Some external devices (e.g. webcam, smart phone, tablet, game handle, and external wireless adapter) may not be compatible with the TV and cannot be supported for certain functions (wireless display, gesture control, face recognition, if any). Please try a similar device. If it does not work, contact your local dealer.
Troubleshooting
Most problems you encounter with your TV can be corrected by consulting the following troubleshooting list.
No picture, no sound
- Check if the fuse or circuit breaker is working.
- Plug another electrical device into the outlet to make sure it is working or turned on.
- Power plug is in a bad contact with the outlet.
- Check the signal source.
No colour
- Change the colour system.
- Adjust the saturation.
- Try another channel. Black-white program may be received.
Remote control does not work
- Change the batteries.
- Batteries are not installed correctly.
- Main power is not connected.
No picture, normal sound
- Adjust the brightness and contrast.
- Broadcasting failure may happen.
Normal picture, no sound
- Press the VOLUME UP button to increase volume.
- Volume is set to mute, press the Mute button to restore sound.
- Change the sound system.
- Broadcasting failure may happen.
Unorderly ripples on the picture
It is usually caused by local interference, such as cars, daylight lamps and hair driers. Adjust the antenna to minimize the interference.
Snowy dots and interference
If the antenna is located in the fringe area of a television signal where the signal is weak, the picture may be marred by dots. When the signal is extremely weak, it may be necessary to install a special antenna to improve the reception.
- Adjust the position and orientation of the indoor/outdoor antenna.
-
Check the connection of antenna.
-
Fine tune the channel.
- Try another channel. Broadcasting failure may happen.
Ignition
Black spots or horizontal streaks appear, or the picture flutters or drifts. This is usually caused by interference from car ignition system, neon lamps, electric drills, or other electrical appliance.
Ghost
Ghosts are caused by the television signal following two paths. One is the direct path, the other is reflected from tall buildings, hills, or other objects. Changing the direction or position of the antenna may improve the reception.
Radio frequency interference
This interference produces moving ripples or diagonal streaks, and in some case, loss of contrast in the picture. Find out and remove the radio interference source.
*To bring you better visual experience, please remove all labels, if any, from TV front panel and screen before use.
*Figures and illustrations in this User Manual are provided for reference only and may differ from actual product appearance. Product design and specifications may be changed without notice.
Legal Statement
[Legal Statement] of manufacturer of this TV set
Due to the various capabilities of products featuring the SmartTV - Services, as well as limitations in the available content, certain features, applications, and services may not be available on all devices or in all territories. Some features on SmartTV may also require additional peripheral devices or membership fees that are sold separately. Please visit our website for more information on specific device information and content availability. The services and availability of content through SmartTV are subject to change from time to time without prior notice.
All content and services accessible through this device belong to third parties and are protected by copyright, patent, trademark and/or other intellectual property laws. Such content and services are provided solely for your personal noncommercial use. You may not use any content or services in a manner that has not been authorized by the content owner or service provider. Without limiting the foregoing, unless expressly authorized by the applicable content owner or service provider, you may not modify, copy, republish, upload, post, transmit, translate, sell, create derivative works, exploit, or distribute in any manner or medium any content or services displayed through this device.
You expressly acknowledge and agree that use of the device is at your sole risk and that the entire risk as to satisfactory quality, performance and accuracy is with you. The device and all third party content and services are provided “as is” without warranty of any kind, either express or implied. Manufacturer expressly disclaims all warranties and conditions with respect to the device and any content and services, either express or, implied, including but not limited to, warranties of merchantability, of satisfactory quality, fitness for a particular purpose, of accuracy, of quiet enjoyment, and non-infringement of third party rights. Manufacturer does not guarantee the accuracy, validity, timeliness, legality, or completeness of any content or service made available through this device and does not warrant that the device, content or services will meet your requirements, or that operation of the device or services will be uninterrupted or error-free. Under no circumstances, including negligence, shall manufacturer be liable, whether in contract or tort, for any direct, indirect, incidental, special or consequential damages, attorney fees, expenses, or any other damages arising out of, or in connection with, any information contained in, or as a result of the use of the device, or any content or service accessed by you or any third party, even if advised of the possibility of such damages.
Third party services may be changed, suspended, removed, terminated or interrupted, or access may be disabled at any time, without notice, and manufacturer makes no representation or warranty that any content or service will remain available for any period of time. Content and services are transmitted by third parties by means of networks and transmission facilities over which manufacturer has no control. Without limiting the generality of this disclaimer, manufacturer expressly disclaims any responsibility or liability for any change, interruption, disabling, removal of or suspension of any content or service made available through this device. Manufacturer may impose limits on the use of or access to certain services or content, in any case and without notice or liability. Manufacturer is neither responsible nor liable for customer service related to the content and services. Any question or request for service relating to the content or services should be made directly to the respective content and service providers.

The terms HDMI, HDMI High-Definition Multimedia Interface, and the HDMI Logo are trademarks or registered trademarks of HDMI Licensing Administrator, Inc.
Dolby Audio
Manufactured under license from Dolby Laboratories. Dolby, Dolby Audio, and the double-D symbol are trademarks of Dolby Laboratories Licensing Corporation.

The Bluetooth ^® word mark and logos are registered trademarks owned by Bluetooth SIG, Inc. and any use of such marks by TTE Corporation is under license. FFALCON is a subsidiary of TTE Corporation. Other trademarks and trade names are those of their respective owners.

Freeview uses HbbTV technology which combines broadcast and broadband. An internet connection is required. Data usage and conditions apply.

natural_image
Abstract geometric pattern of three dark blue chevron shapes arranged in a triangular formation (no text or symbols)FFALCON
Incredible Smart Life
www.ffalcon.com.au
Customer Support:1300 170 540

- FFALCON
- androidtv
- OPERATION MANUAL
- Chapter 1: Safety Information
- Chapter 2: Connections and Setup
- Chapter 3: Basic TV Operations
- Chapter 4: Using more of your TV
- Chapter 5: Other Information
- Precautions
- Warning
- Product
- Power and Plug
- Power Cord and Signal Cable
- Use Environment
- Cleaning
- TV Buttons
- - Power button
- Note:
- Initial Setup
- Sockets
- USB2.0 socket (input)
- HDMI(SERVICE) or HDMI(ARC) socket (input)
- AV IN adapter socket
- ANTENNA IN socket (input)
- LAN
- DIGITAL AUDIO OUT (OPTICAL) socket (output)
- Headphone socket (output)
- Remote Control Functions
- Installing Batteries
- Network Connection
- Connecting to a wired Network
- Connecting to a Wireless Network
- Switching On
- Switching Off
- Accessing Channels
- Watching Connected Devices
- Adjusting Volume
- Accessing Smart TV Homepage
- WARNING:
- Accessing Google Play
- Using Advanced System Settings Menu
- Using Quick Start Function
- Using TV Settings Menu
- Installing Channels
- Using Subtitles
- Turning On/Off Subtitles
- Enabling Subtitle Languages on Digital TV Channels
- Selecting a Subtitle Type on Digital TV Channels
- Using Teletext
- Selecting Decoding Page Language
- Digital Teletext Language
- Network Wake Up
- Notes:
- Consumer Electronic Control (CEC)
- Enabling or Disabling CEC
- Using Auto Power On
- Using Auto Standby
- HbbTV
- HbbTV Access
- HbbTV Deactivation
- Google Cast
- Using EPG (Electronic Program Guide)
- Bluetooth Function
- Freeview
- Netflix Settings
- HDR Playback
- Password in Parental Controls
- Reset Shop
- Problems & Solutions
- Fail to link to the network.
- The video could not be played smoothly.
- When two portable hard drives are connected with the TV at the same time, they will not be recognized sometimes.
- The video from a portable hard drive (USB) is playing with no sound.
- Some videos fail to play.
- Video stops playing midway.
- What should I pay attention to, when I do software updating?
- There are no distinct changes of TV interface after software updating.
- What should I do when software updating process stops due to a sudden power-off?
- With a USB device being inserted into the TV in advance, I am prompted that no USB devices are detected after I access Media, why?
- External device cannot be recognized.
- Troubleshooting
- No picture, no sound
- No colour
- Remote control does not work
- No picture, normal sound
- Normal picture, no sound
- Unorderly ripples on the picture
- Snowy dots and interference
- Ignition
- Ghost
- Radio frequency interference
- Legal Statement
- Dolby Audio
- Incredible Smart Life
Brand : FFalcon
Model : 40SF3
Category : Television