
MX-SS40 - Blender PANASONIC - Free user manual and instructions
Find the device manual for free MX-SS40 PANASONIC in PDF.


| Product Type | Hand Blender (Household Use) |
| Brand | Panasonic |
| Model | MX-SS40 |
| Power Consumption | 600 W |
| Power Supply | 220 - 240 V ~ 50 - 60 Hz |
| Speed Control | Variable speed control |
| Blender Dimensions (W x D x H) | Approx. 6.4 x 7.0 x 39.7 cm |
| Chopper Dimensions (W x D x H) | Approx. 14.7 x 14.7 x 36.9 cm |
| Whisk Dimensions (W x D x H) | Approx. 6.0 x 6.8 x 45.7 cm |
| Blender Weight (motor + attachment) | Approx. 1.0 kg |
| Chopper Weight (motor + attachment) | Approx. 1.2 kg |
| Whisk Weight (motor + attachment) | Approx. 1.0 kg |
| Power Cord Length | Approx. 1.3 m |
| Blender/Chopper Operation Rating | 2 cycles of 1 min ON / 3 min OFF |
| Whisk Operation Rating | 2 cycles of 2 min ON / 3 min OFF |
| Attachments Included | Blender, Chopper (blade + disk), Whisk |
| Accessories | Beaker with base/lid, Wall bracket, Food pusher |
| Dishwasher Safe Parts | Beaker, blender attachment, chopper bowl, whisk |
| Replacement Parts | Beaker (AMD02-236), Chopper bowl (AMD01-236) |
| Safety Features | Automatic shut-off not specified; requires manual unplug; safety precautions for operation |
Frequently Asked Questions - MX-SS40 PANASONIC
User questions about MX-SS40 PANASONIC
0 question about this device. Answer the ones you know or ask your own.
Ask a new question about this device
Download the instructions for your Blender in PDF format for free! Find your manual MX-SS40 - PANASONIC and take your electronic device back in hand. On this page are published all the documents necessary for the use of your device. MX-SS40 by PANASONIC.
USER MANUAL MX-SS40 PANASONIC
Operating Instructions
Instruction Manual
Operating Instructions
Hand Blender (Household Use)
Hand Blender (Household Use)
English
Traditional Chinese
Malay
Persian
Arabic




Contents
Page
Safety Precautions EN3
Important Information EN8
Parts Names and Handling Instructions EN9
Storage/Fixing the wall bracket EN11
How to Use
• Using the blender attachment EN12 - Using the chopper attachment with chopper blade EN14 - Using the chopper attachment with disk blade EN16 • Using the whisk attachment EN18
How to Clean EN20
Troubleshooting EN22
Replacement Parts EN23
Specifications EN23
Thank you for purchasing the Panasonic product.
• This product is intended for household use only. - Please read these instructions carefully to use the product correctly and safely. - Before using this product please give your special attention to “Safety Precautions” (Page EN3–EN7). - Please keep this Operating Instructions for future use.
Safety Precautions
Please make sure to follow these instructions.
In order to prevent accidents or injuries to the user, other people, and damage to property, please follow the instructions below.
■ The following charts indicate the degree of damage caused by wrong operation.

WARNING:
Indicates serious injury or death.

CAUTION:
Indicates risk of injury or property damage.
■ The symbols are classified and explained as follows.

This symbol indicates prohibition.

This symbol indicates requirement that must be followed.

WARNING

●Do not damage the power cord or power plug.
The following actions are strictly prohibited: modifying, touching or placing near heating elements, bending, twisting, pulling, pulling over sharp edges, putting heavy objects on top, bundling the power cord, and carrying the appliance by the power cord. (This may cause electric shock or fire due to short circuit.)

- Do not use the appliance if the power cord or power plug is damaged or if the power plug is loosely connected to the outlet.
(This may cause electric shock or fire due to short circuit.)
→ If the power cord is damaged, it must be replaced by the manufacturer, its service agent, or similarly qualified persons in order to avoid a hazard.
●Do not plug or unplug the power plug with wet hands.
(This may cause electric shock.)
- Always ensure that hands are dry before handling the power plug or switching on the appliance.
Safety Precautions
Please make sure to follow these instructions.

WARNING

● Make sure the voltage indicated on the label of the appliance is the same as your local supply.
(It may cause electric shock or fire.)
- Also avoid plugging other devices into the same outlet to prevent electric over heating. However, if you are connecting a number of power plugs, make sure the total wattage does not exceed the rated wattage of the outlet.
- Insert the power plug firmly.
(Otherwise it may cause electric shock and fire due to heat that may be generated around the power plug.)
● Clean the power plug regularly.
(Dust and moisture build-up on the power plug may cause insufficient insulation, which may cause a fire.)
→ Unplug the power plug, and wipe with a dry cloth.
- Keep the power cord out of reach of children. Do not let the power cord hang over the edge of the table or worktop.
(It may cause burns, injury or electric shock.)

- Do not immerse the appliance in water or splash it with water.
(It may cause electric shock, or fire due to short circuit.)
● Do not disassemble, repair or modify this appliance.
(It may cause fire, electric shock or injury.)
→ Please contact the service centre for the repair.

● This appliance is not intended for use by persons (including children) with reduced physical, sensory or mental capabilities, or lack of experience and knowledge, unless they have been given supervision or instruction concerning use of the appliance by a person responsible for their safety. Children should be supervised to ensure that they do not play with the appliance.
(It may cause burns, injury or electric shock.)

WARNING

●Always keep the children away from the appliance.
(It may cause burns or injury.)
- Children do not realize dangers that are likely to occur because of improper use of appliances.
● Discontinue using the appliance immediately and unplug in the unlikely event that this appliance stops working properly.
(It may cause smoking, fire, electric shock or burns.)
e.g. for abnormal or breaking down
- The power plug and the power cord become abnormally hot.
- The power cord is damaged or the appliance power fails.
- The main body is deformed, has visible damage or is abnormally hot.
- There is abnormal turning noise while in use.
- There is a crack on the beaker and chopper bowl.
- There is another abnormality or failure. → Please unplug the appliance immediately and contact the service centre for the check or the repair.

- Do not allow infants and children to play with packaging material.
(It may cause suffocation.)

CAUTION

- Do not use the appliance for any purpose other than those described in these instructions.
(It may cause burns or injury.)
- Panasonic will not accept any liability if the appliance is subject to improper use, or failure to comply with these instructions.
Safety Precautions
Please make sure to follow these instructions.

CAUTION

● Do not use the appliance on following places.
- On uneven surfaces, on carpet or table cloths etc. (It may cause fire or injury.)
- Place where it may be splashed with water or near a heat source. (It may cause electric shock or electrical leakage.)
- Near any open water such as bathtubs, sinks, or other containers. (It may cause electric shock or electrical leakage.)
- Near a wall or furniture. (It may cause discolouration or deformation.)
- Do not insert any object in the gaps.
(It may cause electric shock.)
- Especially metal objects such as pins or wires
- Do not place hot ingredients (over 60 °C) into the beaker and chopper bowl. (It may cause burns due to overflow or injury by broken containers.)
● Do not hold the appliance by the power cord. (It may cause electric shock or injury.)
● Do not continue operation for a long time. (It may cause burns.)
- Do not replace any parts of the appliance with the spare parts other than this appliance genuine parts. (It may cause fire, electric shock or injury.)
- Do not use the blender when the saucepan is on the heat source. (It may cause burns.)
- Do not put your fingers, spoon or fork close to the blade while the appliance is operating. (It may cause injury.)
- Do not put your fingers or utensils such as spoons, forks etc. into the feeding tube during operation. If food becomes clogged in the feeding tube, use the food pusher or another piece of fruit or vegetable to push it down. (It may cause injury.)

CAUTION

● Make sure to hold the power plug when unplugging the power plug. Never pull on the power cord. (Otherwise it may cause electric shock, or fire due to short circuit.)
● Place the appliance on a firm, dry, clean flat heatproof worktop. (It may cause injury.)
● Beware not to be tripped over or get caught in the power cord while in use. (Otherwise it may cause burns or injury.)
● Always disconnect the hand blender from the supply if it is left unattended and before assembling, disassembling or cleaning. Do not allow children to use the hand blender without supervision. (It may cause fire, electric shock or injury.)
- If the blade gets stuck, unplug the appliance before you remove the ingredients that block the blade.
- Switch off the appliance and disconnect from supply before changing attachment or approaching parts that move in use. (It may cause injury.)
● Care shall be taken when handling and cleaning the blades. (It may cause injury.)
● Never use the chopper blade or disk blade without setting them on appliance correctly. (It may cause injury.)
Important Information
- Do not place the beaker and chopper bowl on any heat sources or in a microwave.
- Do not drop the appliance to avoid damaging the appliance.
- Do not use the appliance outdoors.
- Do not wrap the power cord around the motor housing. • Make sure attachments are set firmly. • Make sure to clean the appliance after every use.
- Do not move the chopper by holding the feeding tube, clamps or motor housing.
- Do not idle the appliance. (It may cause malfunction.)
Parts Names and Handling Instructions
■ Wash all the detachable parts before using the appliance for the first time or when you have not used it for a while. (P. EN20)

Accessories
Beaker Base (Also use as lid.)
Wall bracket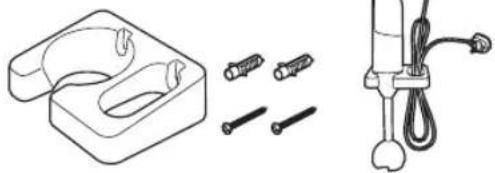
- To fix the wall bracket, refer to page EN11.
Parts Names and Handling Instructions
Chopper attachment![graph TD A["Chopper attachment"] --> B["Food pusher (Also use as measuring cup)"] B --> C["Clamp (Both side)"] C --> D["Feeding tube"] C --> E["Chopper lid"] C --> F["Chopper bowl"] C --> G["Blade shaft"] C --> H["Packing"] C --> I["Disk blade (Slicing/Shredding)"] I --> J["Disk shaft"]](/content/2026/05/938354/images/c6a18150528d320dc1baed56bf1867041a90496d58eb79373056b725a78a51fa.jpg)
To attach
① Insert the chopper blade or disk blade into the blade shaft. - Attach the disk blade and disk shaft for using the disk blade.

• To slicing, this side is upper position.

• To shred, this side is upper position.
② Match the groove inside of the chopper lid and top of the chopper blade or disk shaft. Insert the tab on the chopper lid into the trimmed parts of the chopper bowl. Then pull the clamps sideway and release to close the chopper lid. If it is hard to close the lid, turn the top of the blade a little and close the chopper lid again.
③ Align the ▼ and ▲ on the motor housing and chopper lid. ④ Twist the motor housing to align the ▼ and ▪ to lock. (You hear the "click" sound.)

Whisk attachment
To attach
① Insert the whisk into the whisk adapter. (You hear the "click" sound.) ② Align the ▼ and ▲ on the motor housing and whisk attachment. ③ Turn the whisk attachment to align the ▼ and ■ to lock.
(You hear the "click" sound.)

- Reverse the steps to detach the whisk attachment.
Storage/Fixing the wall bracket
![graph TD A["Wall bracket"] --> B["Place the chopper blade and disk shaft sideways."] B --> C["Disk blade"] C --> D["Attached the whisk and whisk adapter on the chopper lid. (Align triangle and rectangle marks)."]](/content/2026/05/938354/images/b18d8edb827bbd12c3c014d0b6ac7e67423a822e8f32ea794faf0ba5cb9fdc95.jpg)

- Fix the wall bracket on a firm wall properly. If it is fixed on a fragile surface such as sheet-rock, it may loosen easily and cause the blender to fall or damage the wall.
① Drill two holes (depth of the plastic tube's length) in the wall. (Refer to the illustration for dimensions.) ② Hammer two plastic tubes into the holes. ③ Secure the wall bracket on the wall with two screws.

EN11
How to Use Using the blender attachment
■ Using the blender attachment for sauces, dips, soup, fruit, milk shakes, cooked vegetables, baby food, or making mayonnaise, etc. ■ You can use another container such as a deep bowl instead of the beaker.
Note
- Do not exceed the quantity of ingredients higher than the connection of the blender housing and shaft.
- Do not insert or remove the appliance from the bowl while the power button is pressed.
- Avoid scratching the pan or bowl when blending ingredients by hitting.
- The mixture may overflow from the beaker depending on ingredients, its quantity, and/or movement of the blender. In that case, reduce the quantity of the mixture.
Prohibition Ingredients
Do not use hard ingredients as they may damage the blade.
- Hard ingredients such as:
- coffee beans
- fish
- meat
- frozen food
- ice cube
- soy beans
- turmeric etc.
- Sticky ingredients
- Hard dough such as bread dough.
Preparations
- Pre-cut ingredients into approx. 2 cm cubes or sticks.
1 Attach the blender attachment to the motor housing. (P. EN9) Then plug in.

- Make sure blender attachment is attached firmly.
2 Insert the blender into the beaker and hold the power button down to start.

- Do not operate the blender continuously for more than 1 minute. Rest over 3 minutes after 1 minute operation at two consecutive cycles.
- Adjust speed by turning the speed control.
- The blender lightly touch the bottom of beaker and start blending.
- While operating, hold the beaker steadily.
When blending is complete, release power button before removing the appliance from the mixture.

Unplug immediately after use and remove the blender attachment.
How to Use Using the chopper attachment with chopper blade
■ Using chopper attachment with chopper blade to chop food such as vegetables, nuts, cheese, herbs, crackers, bread and meat.
Note
- The mixture may overflow from the chopper bowl depend on ingredients, its quantity, too much liquid and/or mixing speed. In that case reduce the quantity of the mixture.
Prohibition Ingredients
Do not use the hard ingredients as they may damage the blade.
- Hard ingredients such as:
- coffee beans
- frozen food
- ice cube
- soy beans
- turmeric etc.
- Sticky ingredients
- Hard dough such as bread dough.
Preparations
- Pre-cut ingredients into approx. 2 cm cubes or sticks.
- Un-shell nuts.
- Remove bones, tendons and gristle from meat.
1 Insert the chopper blade into the chopper bowl and place cut ingredients into the chopper bowl.

- Do not exceed the quantity of ingredients higher than MAX line.
2 Close the chopper lid and attach the motor housing onto the chopper attachment. (P. EN10) Then plug in.

● Make sure the chopper lid and chopper bowl are attached firmly. Otherwise, it may cause malfunction.
34 Hold the power button down to start.

- Do not operate the chopper continuously for more than 1 minute. Rest over 3 minutes after 1 minute operation at two consecutive cycles.
- Adjust speed by turning the speed control.
- While operating, hold the chopper lid steadily. (It may lose it up by vibration during operating.)
- During the operation, do not open the chopper lid.
When chopping is complete, release the power button before removing the motor housing.

Unplug immediately after use and remove the motor housing.
Reference for quantity and time
| Ingredients Max. | quantity | Operating time (approx.) | Speed |
| Onion | 500 g | 15 sec. |  |
| Carrot | 30 sec. |  | |
| Meat | |||
| Parmesan cheese | 50 sec. | ||
| Nuts 400 | g | ||
| Dry bread 160 | g | 30 sec. |
- If amount of the ingredient is too little, the chopper blade cannot be contacting with them and result of the quality is unsatisfactory.
- If amount of the ingredient is too much or operating time is not enough, result of chopping will not be even.
- Depending on meat types, meat may be hard to chop or get stuck in the feeding tube. In that case, decrease the food quantity or loosen lumps with a spatula or similar utensil and resume process.
How to Use Using the chopper attachment with disk blade
■ Using the chopper attachment with disk blade to slice or shred vegetables, fruit, cheese etc.
Note
- Remove the food when sliced or shredded ingredients accumulate close to the disk blade.
- Discard the remaining un-sliced food when it accumulates on the disk blade.
Prohibited Ingredients
Small or hard ingredients which may damage the blade.
- Hard vegetables such as raw pumpkin
- Hard cheese
- Frozen food
- Ice cubes
- Beans
- Turmeric, etc.
- Sticky ingredients
Soft or high-fiber ingredients, or leafy vegetables may result in unsatisfactory quality.
- Tomato
- Peach
- Ginger
- lettuce
- green onion etc.
Preparations
- Pre-cut ingredients to fit in the feeding tube.
- Remove the core and/or seed from ingredients.
1 Attach the disk blade and disk shaft and insert it into the blade shaft of the chopper bowl. Then close the chopper lid. (P.EN10)
![graph TD A["Raw Material"] --> B["Add Cover"] B --> C["Close Cover"] C --> D["Product with Top Cover"]](/content/2026/05/938354/images/182f5606ee91b01c9f51579e11d57b393fd6bf8ce790a85f24aabc60e938d252.jpg)
- Make sure the chopper lid and bowl are attached firmly.
2 Attach the motor housing onto the chopper attachment. (P.EN10) Then plug in.

3 Insert the ingredients into the feeding tube.
Hold the power button down to start and push the ingredients slowly with the food pusher.

- Do not operate the chopper continuously for more than 1 minute. Rest over 3 minutes after 1 minute operation at two consecutive cycles.
- Adjust speed by turning the speed control.
- During the operation, do not open the chopper lid.
- Do not push in ingredients by fingers or utensils. Only use the pusher.
- For slim ingredients, it is better to place against the whisk holder side of feeding tube wall as illustrated for better shredding result.

4 When slicing or shredding is complete, release the power button before removing the motor housing.

Unplug immediately after use and remove the motor housing.
How to Use Using the whisk attachment
■ Using whisk attachment to whip cream or beat egg whites. ■ Use the deeper bowl to avoid splashing ingredients.
Note
- Avoid scratching the pan or bowl when blending ingredients by hitting.
- When whip eggs, do not exceed 4 eggs whites.
Prohibition Ingredients
- Hard dough such as bread dough.
Preparations
- Chilled cream before whipping it.
1 Attach the whisk attachment into the motor housing. (P.EN11) Then plug in.

- Make sure the whisk attachment is attached firmly.
2 Insert the whisk into the bow and hold the power button down to start.

- Do not operate the whisk continuously for more than 2 minutes. Rest over 3 minutes after 2 minutes operation at two consecutive cycles.
- Hold the whisk vertically when whipping ingredients.
- Adjust speed by turning the speed control.
- The whisk lightly touches the bottom of the bowl and starts whisking.
- While operating, hold the bowl steadily.
- When the ingredients are of small quantity, whisk well by tilting the bowl.
When whisking is complete, release the power button before removing the whisk.

Unplug immediately after use and remove the whisk attachment.
How to Clean
■ Clean the appliance after every use. ■ Unplug before cleaning.
Note
- Do not use benzine, thinner, alcohol, bleach, polishing powder, metal brush or nylon brush, otherwise the surface will be damaged.
- Do not wash the motor housing, chopper lid and whisk adapter in a dishwasher.
- Do not clean the appliance with pointed object such as a toothpick or pin.

![graph TD A["Chopper lid/Food pusher*"] --> B["Wash with diluted dish soap (neutral) and a soft sponge."] B --> C["Note: Do not soak the chopper lid in water."] D["Chopper blade/Disk blade"] --> E["Wash with diluted dish soap (neutral) and a brush with handle."] E --> F["Note: Care shall be taken whe…](/content/2026/05/938354/images/60b75d33da091d893ceb672c2c1b9c644b82c615331e79b9722a5571698b22c9.jpg)
![graph TD A["Whisk adapter"] --> B["Wipe with a well-wrun cloth."] C["Whisk*"] --> D["Wash with diluted dish soap (neutral) and a soft sponge."] B --> E["Box with lid"] D --> E](/content/2026/05/938354/images/f98ddbd5b37b29cf0f79165d592162610be8dc1b06a2e1e516b22c7aa61a8f70.jpg)
* Dishwasher safe
Troubleshooting
Please check the following points before arranging for service.
| Problem | Cause and Action |
| The appliance does not turn on. | · The power plug is not in the outlet.→ Plug in firmly. |
| · When you are making action below, unplug. | |
| The ingredients are not blending. | · The quantity of the ingredients are too much.→ Reduce the quantity of the ingredients.· The ingredients are too large.→ Cut them into smaller pieces.· Using hard ingredients.→ Remove the hard ingredients.· Using improper speed.→ Adjust speed by turning the speed control.· The blade may be damaged.→ Contact the service centre. |
| Abnormal noise occur. | · Using hard ingredients.→ Remove the hard ingredients.· The motor housing may not be securely attached.→ Re-attach the motor housing.(P. EN9-11)· The chopper lid is not close firmly.(P. EN10)→ Re-close the chopper lid. |
| Abnormal vibration occur. | · The quantity of the ingredients are too much.→ Reduce the quantity of the ingredients.· The ingredients are too large.→ Cut them into smaller pieces.· Using hard ingredients→ Remove the hard ingredients. |
| The attachment is not able to attach. | · The attachment is not attached properly.→ Re-attach it. (P. EN9-11)If it is still not able to be attached, contact service centre. |
Replacement Parts
| Part name Part number | |
| Beaker AMD02-236 | |
| Chopper bowl AMD01-236 |
Specifications
| MX-SS40 | ||
| Power supply 220 - 240 V ~ 50 - 60 Hz | ||
| Power consumption 600 W | ||
| Speed control Variable speed control | ||
| Operation rating | Blender 2 | consecutive cycles of 1 min. ON, then 3 min. OFF |
| Chopper 2 | consecutive cycles of 1 min. ON, then 3 min. OFF | |
| Whisk 2 | consecutive cycles of 2 min. ON, then 3 min. OFF | |
| Dimensions (Motor housing + attachment) (W × D × H) (approx.) | Blender 6 | 4 × 7.0 × 39.7 cm |
| Chopper 14 | 4.7 × 14.7 × 36.9 cm | |
| Whisk | 6.0 × 6.8 × 45.7 cm | |
| Mass (Motor housing + attachment) (approx.) | Blender 1 | .0 kg |
| Chopper 1.2 kg | ||
| Whisk 1.0 kg | g | |
| Length of the power cord (approx.) | .3 m | |


Effective Foreign Statement
You can identify the date of manufacturing by production number which is marked on connection part of the motor housing.

In case of failure or damage
Do not operate any appliance with a damaged cord or plug or after the appliance malfunctions, or is dropped or damaged in any manner. Return appliance to the nearest authorized service facility for examination, repair or electrical or mechanical adjustment.

Panasonic Taiwan Co., Ltd.
Web Site : http://panasonic.net/
© Panasonic Taiwan Co., Ltd. 2014
MZ50J236
F1013S0
Printed in China
TZ·SN·SM·SK·SD·SP


- OPERATING INSTRUCTIONS
- INSTRUCTION MANUAL
- CONTENTS
- SAFETY PRECAUTIONS
- WARNING
- CAUTION
- ●ALWAYS KEEP THE CHILDREN AWAY FROM THE APPLIANCE
- ● DISCONTINUE USING THE APPLIANCE IMMEDIATELY AND UNPLUG IN THE UNLIKELY EVENT THAT THIS APPLIANCE STOPS WORKING PROPERLY
- DO NOT ALLOW INFANTS AND CHILDREN TO PLAY WITH PACKAGING MATERIAL
- DO NOT USE THE APPLIANCE FOR ANY PURPOSE OTHER THAN THOSE DESCRIBED IN THESE INSTRUCTIONS
- IMPORTANT INFORMATION
- PARTS NAMES AND HANDLING INSTRUCTIONS
- TO ATTACH
- STORAGE/FIXING THE WALL BRACKET
- HOW TO USE USING THE BLENDER ATTACHMENT
- NOTE
- PROHIBITION INGREDIENTS
- PREPARATIONS
- ATTACH THE BLENDER ATTACHMENT TO THE MOTOR HOUSING. (P. EN9) THEN PLUG IN
- INSERT THE BLENDER INTO THE BEAKER AND HOLD THE POWER BUTTON DOWN TO START
- HOW TO USE USING THE CHOPPER ATTACHMENT WITH CHOPPER BLADE
- HOLD THE POWER BUTTON DOWN TO START
- HOW TO USE USING THE CHOPPER ATTACHMENT WITH DISK BLADE
- PROHIBITED INGREDIENTS
- INSERT THE INGREDIENTS INTO THE FEEDING TUBE
- WHEN SLICING OR SHREDDING IS COMPLETE, RELEASE THE POWER BUTTON BEFORE REMOVING THE MOTOR HOUSING
- HOW TO USE USING THE WHISK ATTACHMENT
- INSERT THE WHISK INTO THE BOW AND HOLD THE POWER BUTTON DOWN TO START
- HOW TO CLEAN
- TROUBLESHOOTING
- REPLACEMENT PARTS
- SPECIFICATIONS
- IN CASE OF FAILURE OR DAMAGE
- PANASONIC TAIWAN CO., LTD
Brand : PANASONIC
Model : MX-SS40
Category : Blender