
FlexiFry AFP5100BL - Deep fryer SUNBEAM - Free user manual and instructions
Find the device manual for free FlexiFry AFP5100BL SUNBEAM in PDF.


| Product Type | Air Fryer Oven |
| Brand | Sunbeam |
| Model | FlexiFry AFP5100BL |
| Category | Deep Fryer (Air Fryer Oven) |
| Functions | Air Fry, Bake, Dehydrate |
| Presets | Fries, Poultry, Veggies, Meat |
| Temperature Range | 50°C – 200°C |
| Timer | Up to 5 hours (Dehydrate) / Up to 40 minutes (others) |
| Air Fry Rack Positions | 3 (top, middle, bottom) |
| Accessories | 3 Air Fry Racks, Removable Drip Tray, Removable Door |
| Control Panel | Touch panel with temperature and time adjustment, presets, and manual modes |
| Safety Features | Automatic shut-off when door opens; cool-touch exterior; overheat protection |
| Cleaning | Air Fry Racks dishwasher safe; interior wipe with damp cloth; door removable for cleaning |
| Warranty | 12-month replacement or repair |
| Power Cord Length | Approximately 80 cm |
| Voltage | 220–240 V AC, 50/60 Hz |
| Material | Stainless steel and plastic body |
| Weight | Approximately 5.5 kg |
| Dimensions | Approximately 35 x 30 x 30 cm (W x D x H) |
Frequently Asked Questions - FlexiFry AFP5100BL SUNBEAM
User questions about FlexiFry AFP5100BL SUNBEAM
0 question about this device. Answer the ones you know or ask your own.
Ask a new question about this device
Download the instructions for your Deep fryer in PDF format for free! Find your manual FlexiFry AFP5100BL - SUNBEAM and take your electronic device back in hand. On this page are published all the documents necessary for the use of your device. FlexiFry AFP5100BL by SUNBEAM.
USER MANUAL FlexiFry AFP5100BL SUNBEAM
Sunbeam's Safety Precautions 1
Features of your Sunbeam FlexiFry Air Fryer Oven 2
Control Panel 3
Parts & Accessories 3
Usage Instructions 4
Care & Cleaning 5
Air Fryer Oven Cooking Chart 6
Recipes 7
Troubleshooting 9
Important instructions – retain for future use.
Sunbeam's Safety Precautions
Sunbeam is very safety conscious when designing and manufacturing consumer products, but it is essential that the product user also exercise care when using an electrical appliance. Listed below are precautions which are essential for the safe use of an electrical appliance:
- Read carefully and save all the instructions provided with the appliance.
- Always turn the power off at the power outlet before you insert or remove a plug. Remove by grasping the plug - do not pull on the cord.
- Turn the power off and remove the plug when the appliance is not in use and before cleaning.
- Do not use your appliance with an extension cord unless this cord has been checked and tested by a qualified technician or service person.
- Always use your appliance from a power outlet of the voltage (A.C. only) marked on the appliance.
- Children should be supervised to ensure that they do not play with the appliance.
- Use well away from walls and curtains.
- Do not block or cover the air vents on the top (back/sides) of the oven.
- Do not use in confined spaces.
- Never leave an appliance unattended while in use.
- Do not use an appliance for any purpose other than its intended use.
- Do not place an appliance on or near a hot gas flame, electric element or on a heated oven.
- Do not place on top of any other appliance.
Hot Surface Do Not Touch
This symbol indicates, temperature of accessible surfaces may be high when the appliance is operating and for some time after use.
- Do not let the power cord of an appliance hang over the edge of a table or bench top or touch any hot surface.
- Do not operate any electrical appliance with a damaged cord or after the appliance has been damaged in any manner. If damage is suspected, return the appliance to the nearest Sunbeam Appointed Service Centre for examination, repair or adjustment.
- For additional protection, Sunbeam recommend the use of a residual current device (RCD) with a tripping current not exceeding 30mA in the electrical circuit supplying power to your appliances.
- Do not immerse the appliance in water or any other liquid unless recommended.
- Appliances are not intended to be operated by means of an external timer or separate remote control system.
- This appliance is intended to be used in household and similar applications such as: staff kitchen areas in shops, offices and other working environments; farm houses; by clients in hotels, motels and other residential type environments; bed and breakfast type environments.
- Refer to "Care and Cleaning" section for details concerning precautions during use maintenance.
- Cleaning and user maintenance shall not be made by children unless they are older than 8 and supervised.
- Keep the appliance and its cord out of reach of children less than 8 years old.
- This appliance is not intended for use by persons (including children) with reduced physical, sensory or mental capabilities, or lack of experience and knowledge, unless they have been given supervision or instruction concerning use of the appliance by a person responsible for their safety.
Features of your Sunbeam FlexiFry Air Fryer Oven
natural_image
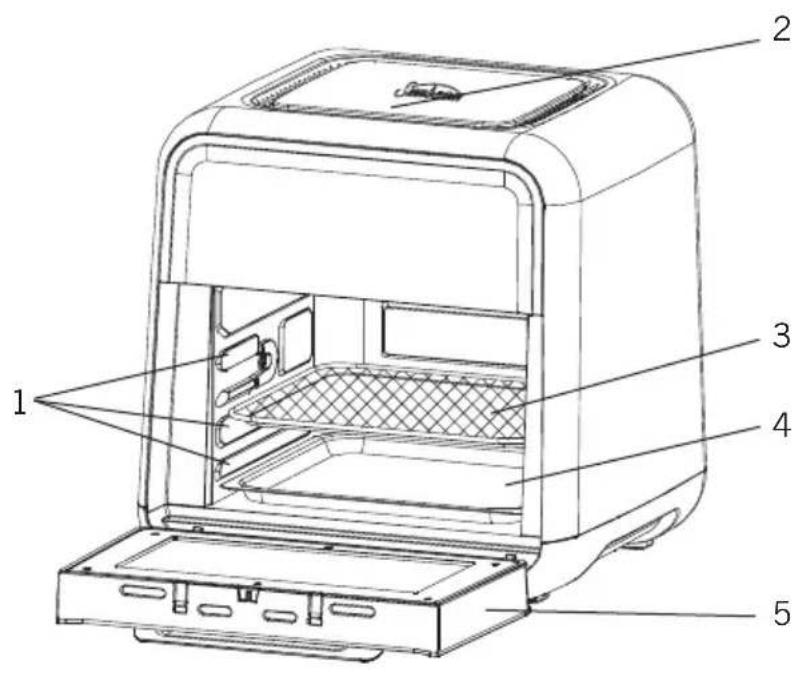
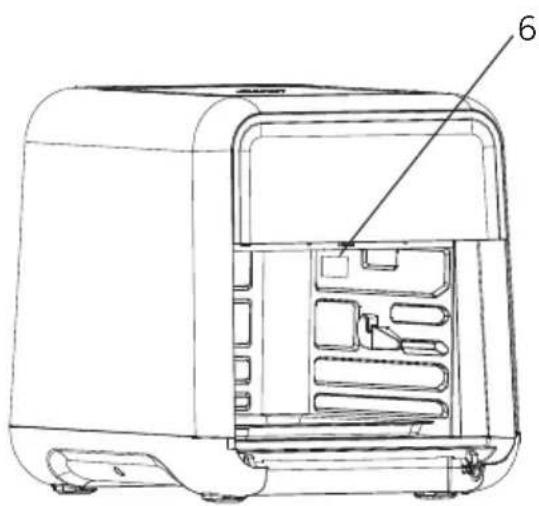
Technical line drawing of a device interior showing internal compartments and housing (no text or symbols)- Three Air Fry Rack Positions
- Air Flow Vent
- Air Fry Rack
-
Removable Drip Tray
-
Removable Door
- Light
Control Panel
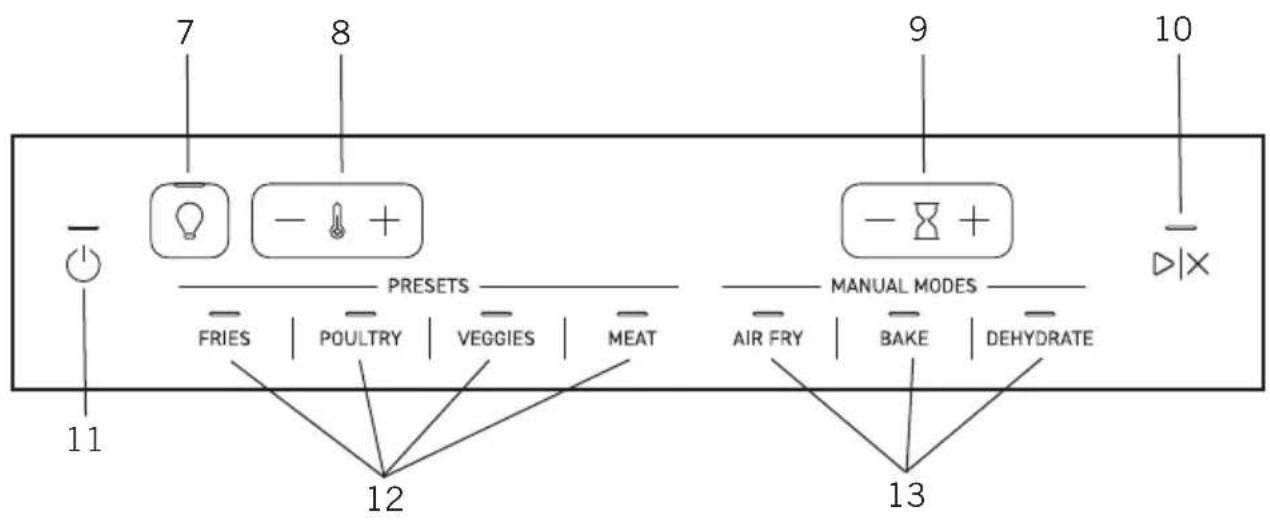
- Oven Light
- Temperature Setting
- Timer Setting
- Start/Stop
-
Power
-
Presets: Fries, Poultry, Vegetables and Meat
- Manual Modes: Air Fry, Bake and Dehydrate
Parts & Accessories
Air Fry Racks (3)
- Ideal for cooking a variety of foods, such as chicken breast, fish or steak.
- Best accessory to use for dehydrating.
- If using one Air Fry Rack place it on the top slot for more crisp results.
-
If using more than one Air Fry Rack switch the position of the racks throughout the cooking cycle for a more even crisp.
-
When using the Air Fry Racks with high sugar content food, you may find that lining each rack with a sheet of baking paper helpful.
- Do not place Air Fry Rack in between top and middle rack position. This is not a usable rack position.
Usage Instructions
Preparing Your Air Fryer Oven
- Remove all packaging materials, stickers and labels in and on the unit.
- Wash all accessories and wipe the inside of the unit with a damp cloth.
- Place unit on a flat surface.
- Plug the air fryer oven into an electrical outlet.
- Press and hold the Power button until the unit turns on.
Manual Mode
- Choose the desired manual mode – Air Fry, Bake or Dehydrate.
- To set temperature and time use the plus and minus signs next to the temperature (☐) and time (☐ symbol then press Start/Stop for the air fryer oven to preheat.
- Once preheat is complete an audible alert will sound and (i) will appear on the display. Open the oven door and place food inside then close the door.
Note: The timer will start to count down when oven has reached set temperature and audible alert sounds.
- Audible alert will sound once timer is done. Carefully remove the food with a heat safe cooking utensil.
Note: To pause cooking cycle open the door. To stop cooking cycle press Start/Stop.
Preset Mode
- Choose the desired Preset – Fries, Poultry, Veggies or Steak. Temperature and time will automatically appear.
- Press Start/Stop for Air Fryer Oven to preheat.
- Once preheat is complete an audible alert will sound and (i) will appear on the display. Open the oven door and place food inside then close the door.
Note: The timer will start to count down when oven has reached set temperature and audible alert sounds. - Audible alert will sound once timer is done. Carefully remove the food with a heat safe cooking utensil.
Note: To pause cooking cycle open the door. To stop cooking cycle press Start/Stop.
Presets
Fries
Best for frozen French fries. If using fresh, hand cut potatoes, see cooking chart (pg. 6).
Poultry
Best for natural/raw chicken wings or drumsticks.
Veggies
Best for thicker veggies, such as broccoli, carrots, cauliflower, green beans and asparagus, rather than leafy vegetables like spinach, kale and collard greens.
Meat
This preset cooks meat such as steak to medium - light pink middle. Best for steaks 2cm thick.
Care And Cleaning
Always unplug your Air Fryer Oven and allow it to cool completely before cleaning it. NEVER immerse the MAIN body, power cord or plug in water or any other liquid. To prevent damage to the appliance do not use alkaline cleaning agents when cleaning, use a soft cloth and a mild detergent.
- Clean the Air Fryer Oven after each use.
- Before cleaning your Air Fryer Oven, unplug it and allow it to cool.
- To clean interior, wipe with a damp cloth using only mild, soapy water. DO NOT IMMERSE IN WATER. Abrasive cleaners, scrubbing brushes and chemical cleaners will damage the unit.
- Empty Drip Tray frequently to avoid accumulation of crumbs.
- Air Fry Racks are dishwasher safe.
- The door is removable for easy cleaning.
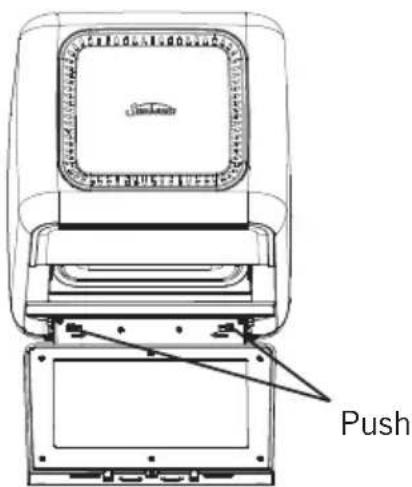
To Remove Door:
- Open the door then push the tabs at the inner bottom of the door to release.
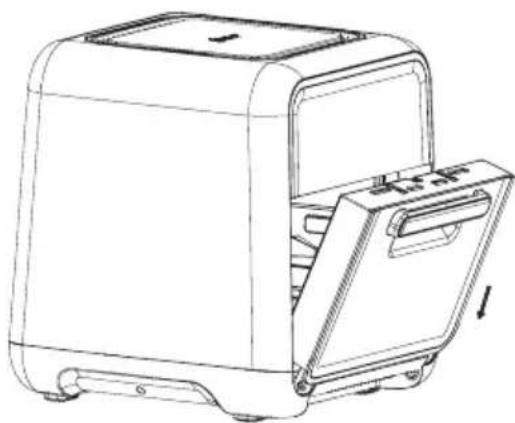
To Reassemble Door:
- Keep door at an angle while aligning the bottom of door to the unit then push the door in for it to lock in place.
natural_image
Line drawing of a toaster oven with lid removed, showing internal compartments and base (no text or symbols)- Store the Air Fryer Oven in a dry location such as on a table or countertop or cabinet shelf.
This appliance has no user serviceable parts. Any servicing beyond that described in the Cleaning Section should be performed by an Authorised Service Representative only. See Warranty Section.
Air Fryer Oven Cooking Chart
| Food Weight Function A | Accessory Time Temperature Oil | |||||
| Potatoes | ||||||
| Hand-Cut Fries 500 - 700g | Fries Air Fry Racks 35-40 mins 200°C 1 tbsp | |||||
| Hand-Cut Sweet Potato Fries | 500 - 600g | Fries Air Fry Racks 30-35 mins 200°C 1 tbsp | ||||
| Frozen Fries, (Thick Cut) 500 | -700g Fries | Air Fry Racks 25-30 mins 200°C No | ||||
| Frozen Fries, (Thin Cut) 500 | -700g Fries | Air Fry Racks 20 -25 mins 200°C No | ||||
| Frozen Hash Browns | 600g | Fries | Air Fry Racks | 18-20 mins | 200°C | No |
| Meat/Poultry/Fish | ||||||
| Chicken Wings | 1kg | Poultry | Air Fry Racks | 35 mins | 180°C | No |
| Steak | 250g (1) | Meat | Air Fry Racks | 10 -15 mins | 200°C | No |
| Pork Chops | 600g (3) | Meat | Air Fry Racks | 15-20 mins | 180°C | 1 tbsp |
| Beef Burgers | 340g (2) | Meat | Air Fry Racks | 16-18 mins | 180°C | No |
| Breaded Chicken Breast | 340g (2) | Air Fry | Air Fry Racks | 30 - 35 mins | 200°C | No |
| Breaded Fish | 350g (2) | Bake | Air Fry Racks | 20 - 25 mins | 180°C | No |
| Bacon | 225g | Air Fry | Air Fry Racks | 10 - 12 mins | 200°C | No |
| Frozen Chicken Nuggets | 400g | Air Fry | Air Fry Racks | 12-15 mins | 180°C | No |
| Vegetables | ||||||
| Frozen Onion Rings | 400g | Air Fry | Air Fry racks | 12-15 mins | 200°C | No |
| Fresh Roasting Vegetables | 400g | Veggies | Air Fry Racks | 15-20 mins | 180°C | No |
| Dehydrate | ||||||
| Apples | 150g | Dehydrate | Air Fry Racks | 4 - 5 hours | 50°C | No |
| Strawberries | 350g | Dehydrate | Air Fry Racks | 5 hours | 50°C | No |
| Beetroots | 200g | Dehydrate | Air Fry Racks | 8 - 12 hours | 65°C | 1 tbsp |
| Beef Jerky | 350g | Dehydrate | Air Fry Racks | 4 hours | 80°C | No |
Takeaway Style Salt and Pepper Chicken Wings
Serves 3-4 Prep Time 20 minutes Cook Time 45 minutes
1 kg fresh Chicken Wings
1 tsp Chinese 5 spice
1 tbsp vegetable oil
1 medium onion, diced
1 green pepper, thinly sliced
2 red chillies, thinly sliced
2 green chillies, thinly sliced
1 tsp dried chilli flakes
1 bunch spring onions, trimmed and sliced
4 garlic cloves, finely chopped
1 tbsp sesame oil
For the salt and pepper seasoning
2 tbsp salt
14 tsp freshly ground pepper
1 tbsp sugar
^1/_2 tbsp Chinese 5 spice
- Place the chicken wings in a large bowl, sprinkle over 1 generous tsp of Chinese 5 spice and rub well in, coating each wing with some of the seasoning.
- Turn on the oven and select the Poultry setting, adjust the temperature to 200^ C, time 40 minutes and allow the oven to preheat.
- Spread the chicken wings out, on 2 of the Air Fry Racks, inserting these into the hot oven in the top and middle position (swap over 15 minutes into the cooking time).
- Whist these are cooking combine the salt and pepper seasoning ingredients into small bowl.
- Heat a suitable sized frying pan over a medium heat, add the oil, onion and green pepper and stir fry for approx. 3-5 minutes until softened.
- Add the chillies, chilli flakes, spring onions and garlic and continue cooking for a further minute, remove from the heat.
- Once the chicken wings have cooked for 30 minutes, remove the trays from the oven and sprinkle the hot wings generously with the salt and pepper seasoning.
- Spoon over the cooked onion and pepper mixture and return to the hot oven to finish cooking for the remaining 10 minutes.
- Remove the wings from the trays and drizzle with a little sesame oil.
- Serve immediately with a bowl of prawn crackers.
Moroccan Cous Cous with Roasted Vegetables
Serves 4-6 Prep Time 25 minutes Cook Time 15-20 minutes
1 red pepper, deseeded and cut into quarters
1 yellow pepper,
deseeded and cut
into quarters
1 large courgette, sliced
1 red onion, cut into chunks
4 tbsp olive oil
Zest and juice of 1 large lemon
1 large clove of garlic, finely chopped
1 tsp cumin
1 tsp ground coriander
12 tsp ground cinnamon
250g dried cous cous
400ml boiling water
1 tsp turmeric
400g tin chickpeas, drained and rinsed
75g raisins
15g roughly chopped
coriander leaves
Small handful of mint leaves, shredded
- Line one of the Air Fry Racks with some foil. Place the peppers, courgette and red onion onto the foil and drizzle with 1 tbsp of olive oil. Using your hands, mix the vegetables and oil together ensuring all the pieces are coated.
- Preheat the oven on the Veggies setting, temp 200^ C, time 15 minutes. Place the vegetables into the hot oven, turning half way through cooking to ensure even browning.
- Whilst the vegetables are cooking, mix the remaining olive oil, lemon zest and juice, garlic, cumin, coriander and cinnamon in a small bowl and set aside.
- Place the cous cous into a heatproof bowl, add the boiling water and turmeric, mix well and cover for approx. 5 minutes.
- Remove the vegetables from the oven and allow to cool.
- Once cool enough to handle cut into bite sized pieces.
- Stir the lemony oil into the cous cous, along with the remaining ingredients, add the cooked vegetables, mix well and adjust the seasoning.
Recipes
Steak with Chimichurri Dressing
Serves 2 Prep Time 15 minutes Cook Time 10 minutes, medium rare.
For this recipe you will need a small food processor or mini chopper to prepare the chimichurri.
2 sirloin steaks approx. 225-250g weight per steak
Freshly ground black pepper
1 tsp vegetable oil
Dressing
Small bunch parsley leaves picked
2½ tbsp extra virgin olive oil
2 garlic cloves, peeled
Juice of 12 lemon
1 shallot, quartered
2 tsp red wine vinegar
12 tsp chilli flakes
- Remove your steak from its packaging and allow to sit at room temperature for approx. 30 minutes to 1 hour before cooking.
- Preheat your oven on the Meat setting, 200^ C, time 10 minutes.
- Brush the steak both sides with the oil and add a dusting of freshly ground black pepper.
- Place both steaks onto one of the Air Fry Racks, ensuring the drip tray at the bottom of the oven is in place to catch any drips.
- Insert the tray into the top position of the oven and allow to cook for 10 minutes.
- Place all the dressing ingredients into your mini food processor and blend until the parsley is chopped.
- Remove the steak from the oven, place onto a warm plate and allow to rest for approx. 5 minutes.
- Carve the steak on the diagonal, serving the chimichurri on the side.
Asian Pork Rashers
Serves 4 Prep Time 1 hour Cook Time 30 minutes
1 kg pork rashers cut into fours
2 Tbsp honey
2 tsp sesame oil
12 cup hoisin sauce
2 Tbsp soy sauce
Garnishes:
1 red chilli, finely chopped
2 spring onions, finely chopped
- In a large bowl combine hoisin, soy sauce, honey and sesame oil. Add pork and mix. Cover with aluminium foil and keep in refrigerator for 1 to 24 hours.
- Line the three Air Flow Racks with alfoil.
- Place the Drip Tray at the bottom of the oven.
- Press POWER. Press AIR FRY. Adjust temperature to 200°C. Adjust time to 20 minutes. Press START/STOP. Allow oven to pre heat. Oven will 'beep' when preheated.
- Place the pork in a single layer on each of the three Air Flow Racks. Close the door.
- Cook ribs for 5 minutes on each side, then swap racks around. Cook for 5 minutes, on each side.
Troubleshooting
| Problem Potential | Cause Solution | |
| Overcooked / Undercooked Foods | Incorrect temperature or time setting | You may have to adjust the time and temperature to desired taste. |
| Because your Air Fryer Oven is smaller than your regular oven, it will heat up faster and generally cook in shorter periods of time. | ||
| Rack placement Refer to | “Positioning Air Fry Racks” Section, Page 5. Rack may need to be adjusted to accommodate food type. | |
| Burning Smell | Food build-up inside oven, on heating elements or in crumb tray | Refer to “Cleaning Your Air Fryer Oven” Section, Page 9. |
| Heating elements do not stay ON | Heating elements will cycle ON and OFF to maintain proper heatYou may not see elements glowing | Allow oven to reach set temperature prior to inserting food. Oven will indicate when preheat is complete. |
| Touch panel interface is non-responsive | Panel is dirty or greasyExcess moisture on panelController is malfunctioning | Ensure panel is clean and free of debris before using.Ensure panel is clean and dry, and use dry hands to operate.Unplug unit and let it rest for 60 seconds before plugging in. |
| Small water drips from door during cooking | Water released from food during the cooking cycle | This is not a concern and is part of the normal cooking cycle. Please mop up drips with a soft cloth. |
| Oven light is not on during cooking | Oven light has not been selected from the control panel | Oven light is default set to off. To turn on press the oven light button on the control panel.If door is opened the light will default turn off upon closing. |
Notes
12
Month
Replacement Guarantee
This Sunbeam product is covered by a 12 month replacement or repair warranty, which is in addition to your rights under the Australian Consumer Law (if your product was purchased in Australia) or New Zealand Consumer Guarantees Act (if your product was purchased in New Zealand).
Should you experience any difficulties with your product during the warranty period, please contact our customer service line for advice on 1300 881 861 in Australia, or 0800 786 232 in New Zealand.
Australia
www.sunbeam.com.au 1300 881 861
New Zealand
www.sunbeam.co.nz 0800 786 232
Upon receipt of your claim, Sunbeam will seek to resolve your difficulties or, if the product is defective, advise you on how to obtain a replacement or refund.
To assist us in managing warranty claims, we recommend you register your product as soon as practicable after purchase, on our Sunbeam website and uploading a copy of your original receipt. View the Support section of the Sunbeam website.
In order to make a claim under our warranty, you must have the original proof of purchase documentation for the product and present it when requested (if not already uploaded to our website).
Should your product develop any defect within 12 months of purchase because of faulty materials or workmanship, we will replace or repair it, at our discretion, free of charge. A product presented for repair may be replaced by a refurbished product of the same type rather than being repaired. Refurbished parts may be used to repair the product.
Our replacement or repair warranty only applies where a defect arises as a result of faulty material or workmanship during the warranty period. Your warranty does not cover misuse or negligent handling (including damage caused by failing to use the product in accordance with this instruction booklet), accidental damage, or normal wear and tear.
Your warranty does not:
• cover freight or any other costs incurred in making a claim, consumable items, accessories that by their nature and limited lifespan require periodic renewal (such as filters and seals) or any consequential loss or damage; or
• cover damage caused by: - power surges, power dips, voltage supply problems, or use of the product on incorrect voltage;
- servicing or modification of the product other than by Sunbeam or an authorised Sunbeam service centre;
- use of the product with other accessories, attachments, product supplies, parts or devices that do not conform to Sunbeam specifications; or
- exposure of the product to abnormally corrosive conditions; or
- extend beyond 3 months if the product is used in commercial, industrial, educational or rental applications.
The benefits given to you by our warranty are in addition to other rights and remedies under law in relation to the product.
In Australia our goods come with guarantees that cannot be excluded under the Australian Consumer Law. You are entitled to a replacement or refund for a major failure and for compensation for any other foreseeable loss or damage. You are also entitled to have the goods repaired or replaced if the goods fail to be of acceptable quality and the failure does not amount to a major failure.
Our goods also come with guarantees that cannot be excluded under the New Zealand Consumer Guarantees Act.
If your warranty claim is not accepted, we will inform you and if requested to do so by you, repair the product provided you pay the usual charges for such repair. You will also be responsible for all freight and other costs.
Should your product require repair or service after the warranty period, contact your nearest Sunbeam service centre. For a complete list of Sunbeam's service centres, visit our website or call our customer service line for advice on 1300 881 861 in Australia, or 0800 786 232 in New Zealand.
Need help with your appliance?
Contact our customer service team or visit our website for information and tips on getting the most from your appliance.
Australia I visit www.sunbeam.com.au phone 1300 881 861
New Zealand | visit www.sunbeam.co.nz phone 0800 786 232
Newell Australia Pty Ltd I ABN 68 075 071 233
Sunbeam is a registered trade mark.
Made in China to Sunbeam's specification.
Due to minor changes in design or otherwise,
the product you buy may differ slightly from the one shown here.
Approved by the appropriate electrical regulatory authorities.
©Copyright Sunbeam 2023.
05/23
- Important instructions – retain for future use.
- Sunbeam's Safety Precautions
- Hot Surface Do Not Touch
- Features of your Sunbeam FlexiFry Air Fryer Oven
- Control Panel
- Parts & Accessories
- Air Fry Racks (3)
- Usage Instructions
- Preparing Your Air Fryer Oven
- Manual Mode
- Preset Mode
- Presets
- Fries
- Poultry
- Veggies
- Meat
- Care And Cleaning
- Air Fryer Oven Cooking Chart
- Takeaway Style Salt and Pepper Chicken Wings
- For the salt and pepper seasoning
- Moroccan Cous Cous with Roasted Vegetables
- Recipes
- Steak with Chimichurri Dressing
- For this recipe you will need a small food processor or mini chopper to prepare the chimichurri.
- Dressing
- Asian Pork Rashers
- Garnishes:
- Troubleshooting
- Notes
- 12
- Month
- Replacement Guarantee
- Australia
- New Zealand
- Your warranty does not:
- Need help with your appliance?
Brand : SUNBEAM
Model : FlexiFry AFP5100BL
Category : Deep fryer