
Convection Bake & Grill COM3500SS - Oven SUNBEAM - Free user manual and instructions
Find the device manual for free Convection Bake & Grill COM3500SS SUNBEAM in PDF.


| Brand | Sunbeam |
| Model | Convection Bake & Grill COM3500SS |
| Product Type | Compact Convection Oven |
| Oven Capacity | 18 Liters |
| Power Supply | 230-240V AC |
| Number of Rack Positions | 3 |
| Functions | Warm, Grill, Bake, Toast, Turbo Convection |
| Temperature Range | 120°C to 230°C (approximately) |
| Timer | 60-minute mechanical timer with bell signal |
| Oven Door | Tempered glass door |
| Included Accessories | Baking tray, pizza tray, 2 removable wire racks, crumb tray |
| Heating Elements | Top and bottom elements (all 4 for Bake/Toast/Turbo, top 2 for Grill) |
| Convection Fan | Yes (for Turbo setting) |
| Safety Features | Automatic shut-off with timer; hot surface warning; safety precautions in manual |
| Care and Cleaning | Wipe exterior with damp cloth; wash removable parts in warm soapy water; do not immerse; do not use dishwasher |
| Warranty | 12-month replacement or repair warranty (Australia/NZ) |
| Country of Origin | Made in China to Sunbeam specifications |
| Certifications | Approved by appropriate electrical regulatory authorities |
| Recommended Use | Household and similar applications (e.g., staff kitchens, farm houses, hotels, B&B) |
| Maximum Toast Shades | Light to Dark (adjustable via timer knob) |
Frequently Asked Questions - Convection Bake & Grill COM3500SS SUNBEAM
User questions about Convection Bake & Grill COM3500SS SUNBEAM
0 question about this device. Answer the ones you know or ask your own.
Ask a new question about this device
Download the instructions for your Oven in PDF format for free! Find your manual Convection Bake & Grill COM3500SS - SUNBEAM and take your electronic device back in hand. On this page are published all the documents necessary for the use of your device. Convection Bake & Grill COM3500SS by SUNBEAM.
USER MANUAL Convection Bake & Grill COM3500SS SUNBEAM
Convection Bake & Grill
18L Compact Oven
User Guide

natural_image
Exterior view of a Sunbeam 10-inch toaster oven with open lid and control knobs (no visible text or symbols on the device itself)Contents
Sunbeam's Safety Precautions 1
Features of your Convection Bake & Grill 2
Using your Convection Bake & Grill 5
Cooking guide 7
Roasting guide 7
Grilling guide 8
Roasting tips for vegetables 9
Care and cleaning 9
Recipes
10
Important instructions – retain for future use.
Sunbeam's Safety Precautions
SAFETY PRECAUTIONS FOR YOUR SUNBEAM CONVECTION BAKE & GRILL.
• Always operate on a flat surface.
- Avoid contact with oven surfaces, including oven door, during and after use, as they will be hot.
- Use well away from walls and curtains.
- Do not place items on top of the oven whilst in use.
- Do not block or cover the air vents on the top, back or side of the oven.
- Do not use in confined spaces.
- Do not immerse the unit in water.
Sunbeam is very safety conscious when designing and manufacturing consumer products, but it is essential that the product user also exercise care when using an electrical appliance. Listed below are precautions which are essential for the safe use of an electrical appliance:
- Read carefully and save all the instructions provided with an appliance.
- Always turn the power off at the power outlet before you insert or remove a plug. Remove by grasping the plug - do not pull on the cord.
- Turn the power off and remove the plug when the appliance is not in use and before cleaning.
- Do not use your appliance with an extension cord unless this cord has been checked and tested by a qualified technician or service person.
- Always use your appliance from a power outlet of the voltage (A.C. only) marked on the appliance.
- This appliance is not intended for use by persons (including children) with reduced physical, sensory or mental capabilities, or lack of experience and knowledge, unless they have been given supervision or instruction concerning use of the appliance by a person responsible for their safety.
- Children should be supervised to ensure that they do not play with the appliance.
- The temperature of accessible surfaces may be high when the appliance is operating.
-
Never leave an appliance unattended while in use.
-
Do not use an appliance for any purpose other than its intended use.
- Do not place an appliance on or near a hot gas flame, electric element or on a heated oven.
- Do not place on top of any other appliance.
- Do not let the power cord of an appliance hang over the edge of a table or bench top or touch any hot surface.
- Do not operate any electrical appliance with a damaged cord or after the appliance has been damaged in any manner. If damage is suspected, return the appliance to the nearest Sunbeam Appointed Service Centre for examination, repair or adjustment.
- For additional protection, Sunbeam recommend the use of a residual current device (RCD) with a tripping current not exceeding 30mA in the electrical circuit supplying power to your appliances.
- Do not immerse the appliance in water or any other liquid unless recommended.
- Appliances are not intended to be operated by means of an external timer or separate remote control system.
- This appliance is intended to be used in household and similar applications such as: staff kitchen areas in shops, offices and other working environments; farm houses; by clients in hotels, motels and other residential type environments; bed and breakfast type environments.
- Use well away from walls and curtains.
Features of your Convection Bake & Grill
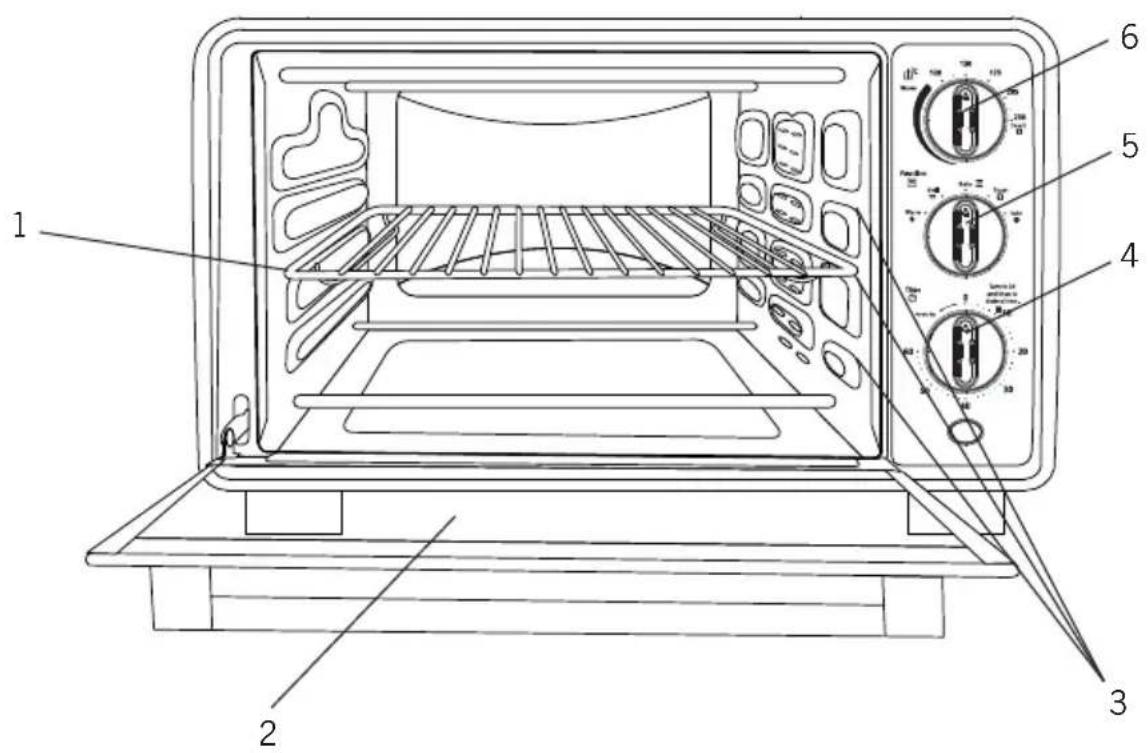
- Removable Wire/Grill Rack
- Tempered Glass Door
- Three rack positions
- Timer Control Knob with Bell Signal
- Function Selector Knob
- Temperature Control Knob
Accessories

natural_image
Line drawing of a rectangular tray with horizontal slats (no text or symbols)Baking Tray

natural_image
Simple line drawing of an oval-shaped object with no text or symbolsPizza Tray

natural_image
Line drawing of a rectangular metal grate or rack structure with evenly spaced vertical slats (no text or symbols)2x Removable Wire Racks

natural_image
Simple line drawing of a diamond-shaped frame with rounded corners (no text or symbols)Crumb Tray
Control Panel
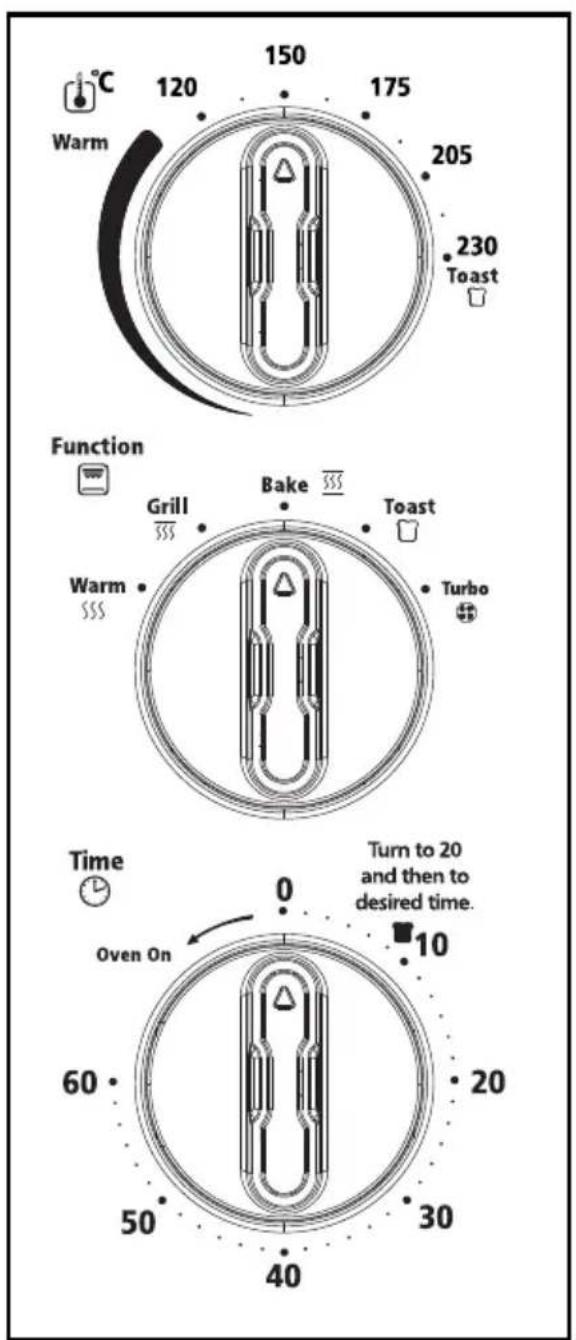
Oven Settings
Select from Warm, Grill, Bake, Toast & Turbo Convection.
Warm: Use the WARM setting to pre-heat your oven or keep your food warm after grilling, baking, or toasting.
Grill: Use the GRILL setting for grilling open sandwiches, sausages and vegetables.
Bake: Suitable for roasting baked dinners as well as baking homemade biscuits, cakes and muffins.
Toast: Using the TOAST setting allows maximum heat for fast, quick cooking of pizzas and toast. For toast, use this setting in combination with the timer.
Turbo: Use the TURBO setting to enable fan-forced cooking. This means that the fan, upper and lower heating elements are turned on and hot air is circulated evenly. Suitable for roasting or evenly browning your food.
Usage Instructions
Position the oven on a dry, level surface, ensuring that the ventilation slots on the side and top of the appliance are not obstructed. It is recommended to place the rear surface of the oven against a wall. Plug the power cord into a 230-240 volt power outlet and turn the power on.
Note: When turned on for the first time, your Convection Bake & Grill may give off vapours for up to 10 minutes. This is due to the initial heating of the materials used. It is safe, not detrimental to the performance of the oven and will not re occur.
Important: Do not force open the oven door beyond its limit or let the door drop open as this will distort the door and hinder the oven's ability to maintain a proper seal.
For pizza
The top two and bottom two elements will heat when the 'TOAST' setting has been selected.
- Place the wire rack in the middle shelf.
- Place the pizza tray on the shelf.
- Turn the oven setting to 'TOAST'.
- Set the temperature to 230irc C and allow tray to preheat for 5-10 minutes before using.
To toast
The top two and bottom two elements will heat when the ‘TOAST’ setting has been selected.
- Place the wire rack into the middle rack support guide.
- Arrange bread on the wire rack.
- Turn the oven setting to 'TOAST'.
-
Set the temperature control to the maximum 230irc C.
-
To set the time first turn the dial fully clockwise to 60 minutes, then turn it ant-clockwise to the toast icons to start the timer. This ensures accurate timing. Light Toast represents the lightest toast shade and Black Toast represents the darkest shade.
- A bell will sound when the selected toast cycle has ended.
Note: Toasting times will vary depending on the type of bread used. Sweet and fruit breads generally take less time than white or wholemeal breads.
To grill
The top two elements will heat when the 'GRILL' setting has been selected.
- Place the wire rack, into the highest rack support guide.
- Position the food on the baking tray then place the baking tray on the wire rack.
- Turn the oven setting to 'GRILL'.
- Set the temperature control to maximum 230irc C.
Note: For best results, allow the oven to preheat for 5 -10 minutes or as per recipe instructions.
-
To turn the grill on, turn the timer control clockwise to the desired time. Alternatively, for continuous operation, turn the timer control to the ON position.
-
When finished grilling, the oven will switch off automatically and a bell will sound if the timer was selected. Alternatively, turn the timer control to OFF position if the continuous mode was selected.
To bake or roast
The top two and bottom two elements will heat when the ‘BAKE’ setting has been selected.
- Place the wire rack into the desired rack support guide.
- Place the food to be baked on the wire rack, using the appropriate pan, tray etc.
- Position the food on the baking tray then place the baking tray on the wire rack.
- Turn the oven setting to 'BAKE'.
- Select the desired temperature on the temperature control.
Note: For best results, allow the oven to preheat for 5 -10 minutes or as per recipe instructions.
Important: If baking cakes, biscuits etc, using recipes other than those provided with this instruction booklet, it is recommended that oven temperatures for the 'BAKE' setting be reduced by approximately 20-30°C. The recipes in the back of this book have already been adjusted.
- To turn the oven on, turn the timer control clockwise to the desired time. Alternatively, for continuous operation, turn the timer control to the ON position.
- When finished baking, the oven will switch off automatically and a bell will sound if the timer was selected. Alternatively, turn the timer control to OFF position if the continuous mode was selected.

Hot Surfaces Do Not Touch
This symbol indicates, temperature of accessible surfaces may be high when the appliance is operating and for some time after use.
Cooking guide
| TEMPERATURE SETTING °C O | VEN TEMPERATURE DESCRIPTION | FUNCTION/FOOD |
| 120 Warm Shortbread | ||
| 150 Warm Cakes, reheating | ||
| 175 Moderate Roasts, biscuits | quiche | |
| 205 Moderately Hot Pizza, frittata | ||
| 230 Hot Scones |
Roasting guide
For best results cook all beef, lamb, veal or pork at 200irc C for 15 minutes, then reduce to 180irc C and use the remaining cooking times from the chart below:
| MEAT Approximate time per 500g | cooked at 180°C (after initial 15mins @ 205°C) |
| Beef – Rare 15 minutes | |
| Beef – Medium 20 minutes | |
| Beef – Well done 25 minutes | |
| Lamb – Medium 20 minutes | |
| Lamb – Well done 25 minutes | |
| Veal – Well done 30 minutes | |
| Pork – Well done 35 minutes | |
| POULTRY | Approximate time per 500g cooked at 175°C |
| Chicken 25-30 minutes |
Note: Chicken is cooked when the juices run clear after piercing with a skewer or knife.
Grilling guide
Preheat compact oven to maximum heat for 5 minutes. Oven rack should be positioned in the highest rack support guide depending on the height of your meat.
Place meat on baking tray.
| Food Type Approximate Cooking Times | |
| Thin Sausages – up to 10 sausages 11 minutes, turning occasionally | |
| Thick sausages – up to 8 sausages 18 minutes, turning occasionally | |
| Lamb Chops – up to 9 small chops 10-12 minutes, turning once | |
| Steaks – 2-4 steaks, depending on size 5-10 minutes, turning once. | |
Note: Cooking time will vary depending on thickness of food and individual preferences.
Roasting tips for vegetables
Grilled Capsicum
- Preheat oven to maximum heat using the GRILL setting. Place rack in the top shelf.
- Cut capsicum in half and remove seeds and membrane. Spray with vegetable oil spray.
- Bake for 30 minutes or until skin blackens and blisters.
- Remove from oven, and cover with plastic until cool enough to handle
- Peel off skin and cut into strips.
Caramelised Onion
- Preheat oven to 205°C using the BAKE setting. Place rack in the middle shelf.
- Line baking tray with aluminium foil; spray with vegetable oil spray.
- Peel and thinly slice one large onion (red is preferable).
- Mix through 1 tablespoon of olive oil and spread over baking tray.
- Bake 30 - 40 minutes, turning tray half way or until onion is soft and browned.
Roasted Sweet Potato or Potatoes
- Preheat oven to 175°C using the BAKE setting. Place rack in the middle shelf.
- Grease baking tray with vegetable oil spray.
- Peel and chop sweet potato or potato into 1-2 cm pieces, place on baking tray and spray generously with vegetable cooking spray. Season with sea salt and freshly ground black pepper.
- Bake for 30 minutes or until potato is cooked.
Note: If a cooking spray is not available, lightly apply oil using a brush.
Care and cleaning
- Always turn the power off and remove the plug from power outlet after use and before cleaning. Allow the oven to cool before cleaning.
- It is recommended that you clean the oven after each use to prevent a build up of grease and to avoid unpleasant odours.
Note: Do not clean any part of the oven in the dishwasher.
- The wire rack, baking tray, pizza tray and crumb tray, may be washed in warm soapy water and rinsed.
Note: Never immerse the oven in water.
- The interior walls and ceiling of the compact oven can be wiped with a mild detergent and a damp cloth.
- To clean the exterior of the compact oven, wipe the walls with a cloth dampened with mild detergent. Polish with a soft dry cloth.
- To clean the glass door, wipe with a damp sponge and dry.
Recipes
All the recipes have been specifically created and tested by the Sunbeam Test Kitchen. We hope you enjoy using your oven.
Roast Chicken Serves: 4
1.8 kg whole chicken
Sea salt and freshly cracked pepper
Stuffing
1 small onion, finely chopped
2 tsp olive oil
2 cups bread, crusts removed and chopped
30g butter, softened
1 tsp lemon, finely grated
2 Tbs fresh sage, finely chopped
-
Preheat oven to 210irc C.
-
Wash and clean chicken thoroughly, pat dry with paper towel.
-
To make stuffing: In a fry pan on medium heat, preheat oil and saute onion, until softened. Add the remaining stuffing ingredients and mix well.
-
Place the stuffing inside the chicken cavity. Tuck wings back, and secure base of the chicken with cooking string so that the legs are crossed securely.
-
Brush the chicken with oil and season with sea salt and freshly cracked pepper.
-
Place the chicken onto the baking tray and place baking tray on the below shelf. Reduce the heat to 180irc C and cook for 1 hour.
Soya Sauce Chicken Wings Serves 12
6 chicken wings, cut at wing joints and discard tips
2 Tbs honey
14 cup soy sauce, salt reduced
1 tsp Chinese cooking wine
1 garlic glove, crushed
2 tsp fresh ginger, grated
-
Preheat oven to 210irc C. Place wire rack on the lower shelf.
-
Combine all ingredients into a bowl and coat chicken
-
Place wings on the tray and pour remaining sauce over the chicken
-
Bake wings for 30 - 35 mins.
Recipes (continued)
Supreme Pizza Makes: 2
2 individual pizza bases
1/3 cup pizza sauce
12 onion, finely chopped
1/4 green capsicum, finely chopped
12 cabanossi, sliced
50g ham, chopped
2 button mushrooms, sliced
4 olives, sliced
12 cup pizza cheese
-
Preheat compact oven to 210irc C.
-
Place wire on the lower shelf.
-
Spread pizza over bases. Arrange remaining ingredients except cheese over the sauce. Top with cheese.
-
Bake pizza(s) for 15 mins.
Chocolate Chip Cookies Makes: 36
125g butter, softened
12 cup brown sugar
12 cup caster sugar
1 tsp vanilla extract
1 egg
1 34 cup Self raising flour
200g choc chips
-
Preheat oven to 180irc C. Place wire rack on the lower shelf.
-
Line bake tray with baking paper
-
Beat butter, sugars and vanilla with an electric mixer until light and creamy.
-
Add egg and mix. until combined. Add flour and mix well.
-
Fold through chocolate chips. Roll tablespoon amounts into balls and place 6 onto the tray. Press down lightly. Ensure the cookies are well spaced to allow spreading.
-
Bake in oven for 10 – 12 mins. Repeat with remaining dough.
Cuban Open Toastie Serves: 4
4 slices Sourdough bread
1 Tbs butter
1 Tbs Dijon mustard
8 slices Sliced ham
250g Pulled pork
4 slices marinated red capsicum
4 slices Swiss cheese
- Preheat 230°C. Position the shelf in raised position on middle shelf.
- Place 2 slices of bread on top and cook for 5 mins.
- Remove and top bread with butter, Dijon mustard, ham, pork, capsicum and cheese
- Return to oven and cook for 5 mins, until cheese is melted.
Garlic Toasts Serves: 3
These are great accompaniments with salads / soups.
1/3 cup olive oil
3 cloves garlic, crushed
1 loaf sour dough bread, sliced
Salt and freshly ground black pepper, to taste
-
Preheat oven to 205irc C using the TOAST setting. Place rack in the middle shelf.
-
Combine the oil and garlic. Season with salt and pepper.
-
Brush the oil mixture over both sides of the bread. Place on rack and grill for 3-4 minutes or until golden brown. These toasts can be served hot or cold.
Roast Chicken Stuffed with Herbs Serves: 4
1.5kg whole chicken
1 bunch fresh parsley
1 bunch fresh sage
5-6 sprigs fresh thyme
1 lemon, quartered
4 cloves garlic, chopped
50g butter, softened
Kitchen twine
Salt and freshly ground black pepper, to taste
- Preheat oven to 175irc C using the BAKE setting. Place rack in the middle shelf.
- Rinse chicken under cold water, remove giblets. Pat dry.
-
Place parsley, sage, thyme, lemon and half of the garlic in the chicken cavity.
-
In a small bowl combine butter and remaining garlic. Season with salt and pepper. Spread the butter mixture underneath the skin of the chicken. Tie together chicken legs with kitchen twine.
-
Place on baking tray and cook for 1 hour and 20 minutes or until juices run clear. Allow chicken to rest for 10-15 minutes before serving.
TIP: Soak the kitchen twine in water for 1 hour before tying the chicken. This will prevent the string from burning.
This Sunbeam product is covered by a 12 month replacement or repair warranty, which is in addition to your rights under the Australian Consumer Law (if your product was purchased in Australia) or New Zealand Consumer Guarantees Act (if your product was purchased in New Zealand).
Should you experience any difficulties with your product during the warranty period, please contact our customer service line for advice on 1300 881 861 in Australia, or 0800 786 232 in New Zealand.
Australia
www.sunbeam.com.au 1300 881 861
Suite 1, Level 1, 13 Lord Street,
Botany NSW 2019
Australia
New Zealand
www.sunbeam.co.nz 0800 786 232
Level 6, Building 5, Central Park,
660-670 Great South Road, Greenlane, Auckland
New Zealand
Upon receipt of your claim, Sunbeam will seek to resolve your difficulties or, if the product is defective, advise you on how to obtain a replacement or refund.
To assist us in managing warranty claims, we recommend you register your product as soon as practicable after purchase by creating a MySunbeam account on our website and uploading a copy of your original receipt.
In order to make a claim under our warranty, you must have the original proof of purchase documentation for the product and present it when requested (if not already uploaded to our website).
Should your product develop any defect within 12 months of purchase because of faulty materials or workmanship, we will replace or repair it, at our discretion, free of charge. A product presented for repair may be replaced by a refurbished product of the same type rather than being repaired. Refurbished parts may be used to repair the product.
Our replacement or repair warranty only applies where a defect arises as a result of faulty material or workmanship during the warranty period. Your warranty does not cover misuse or negligent handling (including damage caused by failing to use the product in accordance with this instruction booklet), accidental damage, or normal wear and tear.
Your warranty does not:
• cover freight or any other costs incurred in making a claim, consumable items, accessories that by their nature and limited lifespan require periodic renewal (such as filters and seals) or any consequential loss or damage; or
• cover damage caused by:
- power surges, power dips, voltage supply problems, or use of the product on incorrect voltage;
- servicing or modification of the product other than by Sunbeam or an authorised Sunbeam service centre;
- use of the product with other accessories, attachments, product supplies, parts or devices that do not conform to Sunbeam specifications; or
- exposure of the product to abnormally corrosive conditions; or
- extend beyond 3 months if the product is used in commercial, industrial, educational or rental applications.
The benefits given to you by our warranty are in addition to other rights and remedies under law in relation to the product.
In Australia our goods come with guarantees that cannot be excluded under the Australian Consumer Law. You are entitled to a replacement or refund for a major failure and for compensation for any other foreseeable loss or damage. You are also entitled to have the goods repaired or replaced if the goods fail to be of acceptable quality and the failure does not amount to a major failure.
Our goods also come with guarantees that cannot be excluded under the New Zealand Consumer Guarantees Act.
If your warranty claim is not accepted, we will inform you and if requested to do so by you, repair the product provided you pay the usual charges for such repair. You will also be responsible for all freight and other costs.
Should your product require repair or service after the warranty period, contact your nearest Sunbeam service centre. For a complete list of Sunbeam's service centres, visit our website or call our customer service line for advice on 1300 881 861 in Australia, or 0800 786 232 in New Zealand.
Need help with your appliance?
Contact our customer service team or visit our website for information and tips on getting the most from your appliance.
Australia I visit www.sunbeam.com.au
phone 1300 881 861
mail Suite 1, Level 1, 13 Lord Street, Botany NSW 2019 Australia.
New Zealand I visit www.sunbeam.co.nz
phone 0800 786 232
mail Level 6, Building 5, Central Park, 660–670 Great South Road, Greenlane, Auckland.
NEWELL AUSTRALIA PTY LTD. ABN 68 075 071 233
Sunbeam is a registered trade mark.
Made in China to Sunbeam's specification.
Due to minor changes in design or otherwise,
the product you buy may differ slightly from the one shown here. Approved by the appropriate electrical regulatory authorities.
©Copyright Sunbeam 2023.
10/23


- Convection Bake & Grill
- Contents
- Important instructions – retain for future use.
- Sunbeam's Safety Precautions
- SAFETY PRECAUTIONS FOR YOUR SUNBEAM CONVECTION BAKE & GRILL.
- Sunbeam is very safety conscious when designing and manufacturing consumer products, but it is essential that the product user also exercise care when using an electrical appliance. Listed below are precautions which are essential for the safe use of an electrical appliance:
- Features of your Convection Bake & Grill
- Accessories
- Control Panel
- Oven Settings
- Usage Instructions
- For pizza
- To toast
- To grill
- To bake or roast
- Hot Surfaces Do Not Touch
- Cooking guide
- Roasting guide
- Grilling guide
- Roasting tips for vegetables
- Grilled Capsicum
- Caramelised Onion
- Roasted Sweet Potato or Potatoes
- Care and cleaning
- Recipes
- Roast Chicken Serves: 4
- Soya Sauce Chicken Wings Serves 12
- Recipes (continued)
- Supreme Pizza Makes: 2
- Chocolate Chip Cookies Makes: 36
- Cuban Open Toastie Serves: 4
- Garlic Toasts Serves: 3
- Roast Chicken Stuffed with Herbs Serves: 4
- This Sunbeam product is covered by a 12 month replacement or repair warranty, which is in addition to your rights under the Australian Consumer Law (if your product was purchased in Australia) or New Zealand Consumer Guarantees Act (if your product was purchased in New Zealand).
- Australia
- New Zealand
- Your warranty does not:
- • cover damage caused by:
- Need help with your appliance?
Brand : SUNBEAM
Model : Convection Bake & Grill COM3500SS
Category : Oven