
DWS-472 - Security Camera FIRST ALERT - Free user manual and instructions
Find the device manual for free DWS-472 FIRST ALERT in PDF.


| Product Type | Wireless Security Camera System |
| Brand | First Alert |
| Model | DWS-472 |
| Number of Cameras | 2 |
| Display | 7-inch 16:9 LCD Screen (800 x 480 resolution) |
| Video Compression | MPEG-4 |
| Wireless Technology | 2.4 GHz FHSS (Frequency Hopping Spread Spectrum) with 24 channels |
| Recording Modes | Manual, Motion Detection, Scheduled |
| Recording Resolution | VGA@25fps (single camera) or QVGA@25fps/ch (multi-camera) |
| Night Vision | Up to 60 ft (18 m) with 25 IR LEDs, automatic IR cut filter |
| Weather Resistance | IP66 (cameras) |
| Memory Card | 4GB Micro SD included; supports up to 32GB SDHC |
| Battery (Receiver) | Rechargeable 3.7V 2000mAh Li-Ion, up to 3 hours (power saving off) |
| Audio | Built-in microphone, one-way audio surveillance |
| Digital Zoom | 2X |
| Power Supply | DC 5V / 1A for both receiver and cameras |
| Operating Temperature | 14°F to 122°F (-10°C to 50°C) |
| Dimensions (Receiver) | 7.9" x 4.8" x 1" (200 x 122 x 25 mm) |
| Dimensions (Camera with Stand) | 6.2" x 2.75" x 8.5" (157 x 70 x 216 mm) |
| Interface Controls | Navigation ring, Menu, ESC, REC/DEL, Zoom, Alarm buttons |
| TV Out | AV output (NTSC/PAL selectable) |
| PC Playback Software | Sec24 Media Player (included on CD) |
| Warranty | 1 year limited |
| Maintenance | Clean with dry cloth; avoid liquids and harsh chemicals. |
| Safety | FCC compliant; do not disassemble; avoid high temperatures. |
Frequently Asked Questions - DWS-472 FIRST ALERT
User questions about DWS-472 FIRST ALERT
0 question about this device. Answer the ones you know or ask your own.
Ask a new question about this device
Download the instructions for your Security Camera in PDF format for free! Find your manual DWS-472 - FIRST ALERT and take your electronic device back in hand. On this page are published all the documents necessary for the use of your device. DWS-472 by FIRST ALERT.
USER MANUAL DWS-472 FIRST ALERT
DWS-471 1 Camera Included
DWS-472 2 Cameras Included


natural_image
Black surveillance camera with visible signal lights and antenna, mounted on a stand (no text or symbols)MPEG-4
VIDEO
COMPRESSION

7" LCD
SCREEN

MICRO SD
CARD INCLUDED

AUDIO
SURVEILLANCE

INDOOR/OUTDOOR
CAMERAS

NIGHT
VISION
WELCOME
Thank you for choosing First Alert for your security needs!
For more than half a century, First Alert has made the home-safety and security products that make your job easier. Our products are built to the highest standard which has earned us a leadership role in the home-safety and security product categories. We are committed to serving our customers, from the professionals who install our products, to the families and businesses who count on them. First Alert has been helping families and businesses stay safe for over 50 years. By having a First Alert Security System, you're taking the first step in protecting your home or business from damage or theft. We're watching, even when you're not.
This manual is written for the DWS-471 and DWS-472 Wireless DVR systems. It was accurate at the time it was completed. However, because of our ongoing effort to constantly improve our products, additional features and functions may have been added since that time and on-screen displays may change. We encourage you to visit our website at www.brkelectronics.com to check for the latest manuals (English and Spanish), firmware updates, downloads, other security camera products and announcements. You'll find this product line under Products >> Security Cameras >> Wireless Cameras.
MAIN DESCRIPTION
Four channel MPEG-4 wireless digital video recorder with 7" 16:9 LCD Screen suitable for applications such as high-end residential - new or remodel, light commercial, small business/retail, small warehouse or small grocery.
PRODUCT FEATURES
• 7" 16:9 LCD Screen
• 2.4 GHz Digital Frequency Hopping Spread Spectrum (FHSS) Technology
- MPEG-4 Compression
• Supports real-time AV preview and recording up to VGA@25 FPS(Single Camera Mode) or QVGA@25fps/CH (Multiple camera mode)
• 4GB Micro SD Card Included. Supports a maximum of 32GB SDHC memory card.
• Simultaneously preview & record from all 4 wireless cameras
- Independent motion-detect recording with adjustable mask zone on any of 4 cameras
• Multiple recording mode selectable (Manual/ Motion-detect/Scheduling)
- User-friendly interface: true color, semi-transparent GUI with notes for selected menu items
- 2X digital zoom
- 2000mAh/3.7V Lithium Ion-Polymer Rechargeable Battery with 3 hour battery life (Power Saving Off)
• Audio surveillance cameras
• 24/7 Scheduled Recording
• CMOS Color cameras with 25 IR LED's for up to 60' night vision
• Camera has built-in IR cut filter for truer color representation
• IP66 weather rating
| SECTION DESCRIPTION CONTENTS PAGE NUMBER | ||
| 1 | Introduction 2-4 | |
| 2 | Safety 5 | |
| 3 | Product Overview 6-8 | |
| What is in the Box 6 | ||
| DVR Controls | ||
| Front Panel 7 | ||
| Side Panel & Display Indicators 8 | ||
| 4 | Installation 9 | |
| Installing Cameras & Setting up the Wireless Receiver 9 | ||
| 5 | System Operation 10-24 | |
| Main Menu Screens 10 | ||
| Camera Setup 11-12 | ||
| Camera Pairing 11 | ||
| Camera Brightness Adjustment 12 | ||
| Camera Activation 12 | ||
| Recorder Setup Menu 13-18 | ||
| Record Schedule | 13-14 | |
| Motion Detection Sensitivity | 15 | |
| Format Memory Card | 15 | |
| Setup Mask Area | 16 | |
| Record Time | 16 | |
| Playback | 17-18 | |
| System Setup | 19-22 | |
| Date and Time Setup | 19 | |
| Power Saving | 20 | |
| Multi-channel Idle Display | 21 | |
| TV Out Setup (NTSC/PAL) | 22 | |
| Default | 22 | |
| Alarm Buzzer | 23 | |
| Zoom | 23 | |
| Scan Activated Channels | 24 | |
| Memory Card Overwrite | 24 | |
| 6 | PC Playback Software and Installation | 25-27 |
| 7 | Appendix | 28-31 |
| Troubleshooting | 28 | |
| System Map | 29 | |
| Specifications | 30 | |
| Warranty | 31 | |
SAFETY PRECAUTIONS
- Do not drop, puncture, or disassemble the cameras or DVR.
- Do not tug on the power adapter. Use the plug to remove it from the wall.
- Do not expose the cameras or DVR to high temperatures.
• For your own safety, avoid using the DVR when there is a storm or lightning in your area.
• Use the cameras and DVR with care. Avoid pressing hard on the cameras or DVR body.
• Do not crush or damage the power cable
FCC COMPLIANCE
FCC Compliance Class C Intentional Radiator
This equipment has been tested and found to comply with the limits for a Class C Intentional Radiator, pursuant to Part 15 of the FCC rules. These limits are designed to provide reasonable protection against harmful interference in a residential installation. This equipment generates, uses and can radiate radio frequency energy and, if not installed and used in accordance with the instructions, may cause harmful interference to radio communications.
However, there is no guarantee that the interference will not occur in a particular installation. If this equipment does cause harmful interference to radio or television reception, which can be determined by turning the equipment off and on, the user is encouraged to try to correct the interference by one or more of the following measures:
• Reorient or relocate the receiving antenna.
- Increase the separation between the equipment and receiver.
- Connect the equipment into an outlet on a circuit different from that of the receiver.
- Consult the dealer or an experienced radio or TV technician for help.
Notice: Only peripherals complying with FCC limits may be attached to this equipment. Operation with non-compliant peripherals or peripherals not recommended by First Alert / BRK Brands, Inc. is likely to result in interference to radio and TV reception. Changes or modifications to the product, not expressly approved by First Alert / BRK Brands, Inc., could void the user's authority to operate the equipment.
We, First Alert / BRK Brands, Inc. declare under our sole responsibility that the device to which this declaration relates: Complies with Part 15 of the FCC Rules. Operation is subject to the following two conditions: (1) this device may not cause harmful interference, and (2) this device must accept any interference received, including interference that may cause undesired operation.
FCC Certification
This device contains a radio transmitter. Accordingly, it has been certified as compliant with 47 CFR Part 15 of the FCC Rules for intentional radiators. Products that contain a radio transmitter are labeled with an FCC ID.
DISPOSAL

This symbol indicates that it is prohibited to dispose of these batteries in the household waste. Take spent batteries that can no longer be charged to the designated collection points in your community.
3
PRODUCT OVERVIEW
PACKAGE CONTENTS
WHAT'S IN THE BOX
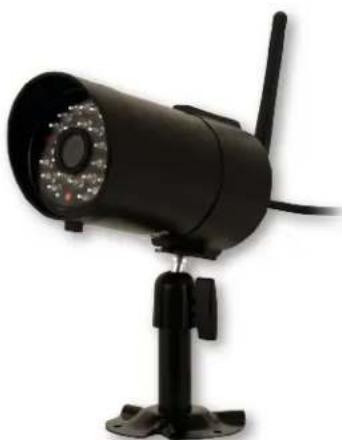
Digital Wireless Receiver with 7" LCD Screen

natural_image
Black surveillance camera with antenna and mounted base (no visible text or symbols)Digital Wireless Camera,
Antenna and Stand
DWS-471: 1 Camera
DWS-472: 2 Cameras

WARNING
THESE PREMISES ARE UNDER 24 HOUR VIDEO SURVEILLANCE
PROTECTED BY
First Alert
2 Window
Warning Decals

User's Manual

natural_image
Close-up of a CD or DVD disc with visible rainbow iridescence (no text or symbols)SEC24 Media Playback Software and Manuals
natural_image
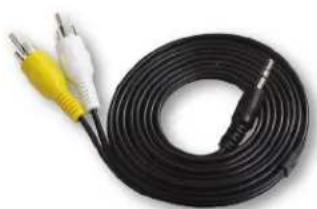
Black and white cord with two connectors (yellow and white) against a plain background, no text or symbols visible.AV Cable

natural_image
Black electronic device with attached cables and connectors (no visible text or symbols)Power Supplies for DVR and Cameras
2 - DWS-471
3 - DWS-472

Mounting Hardware (3 screws and 3 plastic anchors per Camera)

4GB Micro SD Memory Card with Adaptor (Brand may vary)
FRONT PANEL

| ITEM FUNCTION DESCRIPTION | CONTROLS | ||
| 1 | Power/Mute Button (Top) | Power unit On and Off or enable “Mute” Feature. Hold button for several seconds to turn unit On or Off. Briefly press button to toggle “Mute” On or Off. | |
| 2 | Link & Power Indicators Shows status of signal strength, Battery and Power On/Off | ||
| 3 | Menu Center Button brings up Main Menu. In menus, press to confirm selections | ||
| 4 | Navigation Ring | △ | Display: Switch ChannelMenu: Cursor UpPlayback: Fast Forward |
 | ▽ | Display: Switch ChannelMenu: Cursor DownPlayback: Fast Reverse | |
| ▷ | Display: Volume UpMenu: Cursor RightPlayback: Volume Up, Switch Display Channel | ||
| ◀ | Display: Volume DownMenu: Cursor LeftPlayback: Volume Down, Switch Display Channel | ||
| 5 | ESC | Display & Menu: Exit or previous screenPlayback: Previous | |
| 6 | REC/DEL Playback: Next Record, REC Mode: Stops Recording | ||
| 7 | ZOOM Zooms 2X | ||
| 8 | ALARM Turns alarm On and Off | ||
3
PRODUCT OVERVIEW
CONNECTIONS & INDICATORS
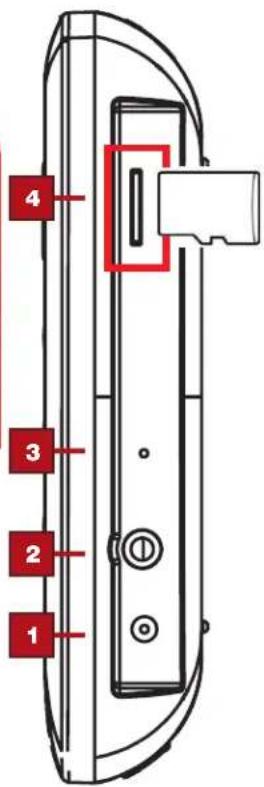
SIDE PANEL
| ITEM FUNCTION DESCRIPTION | CONNECTIONS | |
| 1 DC 5V /1A Power Port Connect Power Adaptor. | ||
| 2 AV Out Connect to a Monitor or TV through RCA inputs | ||
| 3 Reset Powers unit off | ||
| 4 Memory Card Slot | Insert 2GB to 32GB Micro SD Memory Card (4GB Micro SD Card w/adaptor included) | |
DISPLAY INDICATORS

| ITEM | INDICATOR NAME | ICON | DESCRIPTION | INDICATORS |
| 1 | Channel Indicator | 1 | Shows camera channel being viewed | |
| 2 | Audio Indicator | Shows whether Audio is turned On/Off for system 100% | ||
| 3 | Signal Indicator | Shows status of signal strength | ||
| 4 | Battery Indicator | Shows battery strength (See Chart) | ||
| 5 | Display Mode | Shows Quad, Scan or Single Display mode | ||
| 1 | ||||
| 6 | Volume Indicator | Audio volume 1 through 7 | ||
| 7 | System Date & Time | 01 - 01 - 20:2 AM 12 : 01:5V | System Date and Time | |
| 8 | Zoom | 1X | ZOOM | Indicates Zoom 1X or 2X |
| 9 | Recording Indicator | Shows recording is in progress | ||
| 10 | Mute Indicator | Indicates recording mute feature is enabled | ||
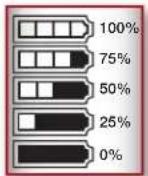
Battery Strength Chart
INSTALLING CAMERAS
-
Select the position for the camera and secure the camera stand. (Screws and anchors are supplied. Use an appropriate screw type for the mounting surface.)
-
Screw the camera onto the bracket.

natural_image
Technical line drawing of a mechanical assembly with a vertical wall and connected components (no text or symbols)- Adjust camera to the proper view angle Make sure the lens is upright relative to your subject. Tighten the thumb bolt.
- Screw the antenna into place on the rear of the camera. Adjust the antenna to an upright position.
- Connect the power cable to the DC IN of the camera.
- Plug the power supply into the electrical outlet.
- Once the camera is connected, see Camera Setup, Camera Pairing to link the camera(s) to the receiver.

natural_image
Technical diagram of a mechanical device with screw and lever components (no text or labels)

Camera Orientation
It's important the camera is mounted correctly to ensure the image is not upside down as the camera lens can only be positioned one way.
SETTING UP THE WIRELESS RECEIVER
- Connect the power cable to the DC IN of the receiver.
- Plug the power supply into the electrical outlet.
- Once the receiver is connected, see Camera Setup, Pairing (Operating Menus) to link the camera(s) to the receiver.
OPTIONAL: VIEW ON TELEVISION OR OTHER MONITOR
- If connecting to another monitor such as a TV: Connect the AV cable into the AV OUT of the receiver.
- Connect the two RCA jacks to the TV AV IN. Yellow = Video; White = Audio
- Press POWER button to turn on the receiver.


Rechargeable Battery
Caution: The 7" monitor is fitted a 3.7V 2000mAh (LI-ON) rechargeable battery pack. At the end of life, it should not be disposed of with household waste. Please recycle where the facilities exist.
Check with your local authority or retailer for recycling advise.
5
SYSTEM OPERATION
MAIN MENU
MAIN MENU
The Main Menu screen is used to control the various functions of the DVR system. It contains the following sub menu icons: Camera Setup, Record Setup, Event List, System Setup, Alarm Buzzer, Zoom, Scan Activated Cameras and Memory Card Overwrite.

Camera Setup-Main Menu

Record Setup-Main Menu

Event List-Main Menu

System Setup-Main Menu

Alarm Buzzer-Main Menu
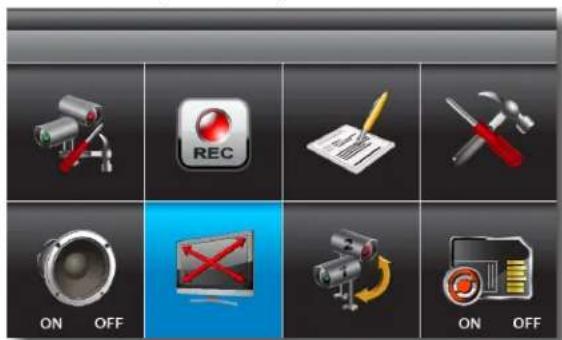
Zoom-Main Menu

Scan Activated Cameras-Main Menu

Memory Card Overwrite-Main Menu
CAMERA SETUP MENU
Select CAMERA SETUP, press MENU key once to enter sub-menu.

Camera Setup-Main Menu
CAMERA PAIRING
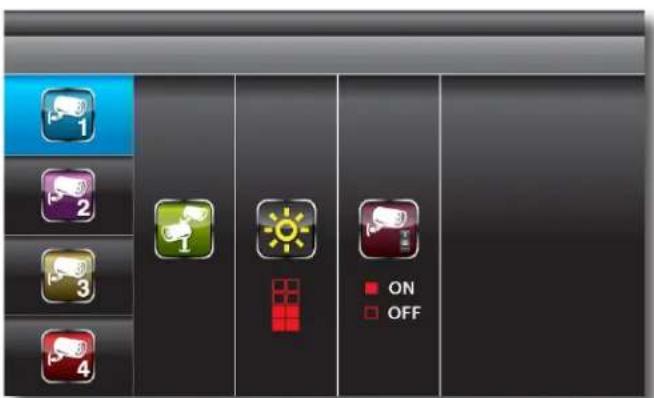
Camera Setup-Sub Menu
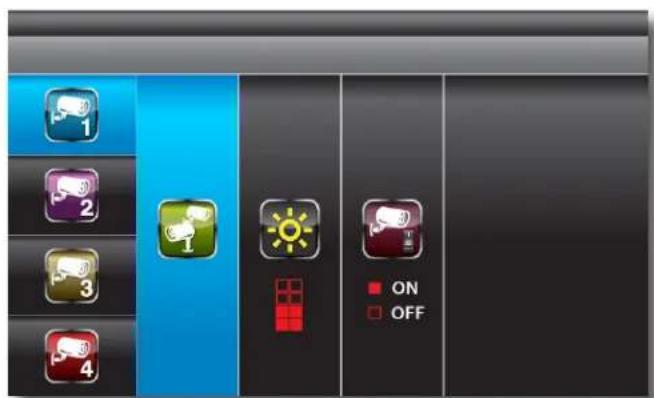
Camera Setup-Pairing
Use △ to select the camera to set up (1-4).
Use to select PAIRING, BRIGHTNESS and CAMERA ON/OFF settings.
With PAIRING section highlighted, press MENU key once to begin camera pairing. Press Pairing Key button on Camera cord. Pairing LED on camera will blink once then will begin blinking continuously indicating data transmission is in process.
System will confirm pairing process is successful with "PAIRED" displaying on screen. System will indicate pairing process failed with "PAIRING FAIL" displaying on screen.
Press ESC to return to main menu.

5
SYSTEM OPERATION
CAMERA SETUP
CAMERA BRIGHTNESS ADJUSTMENT
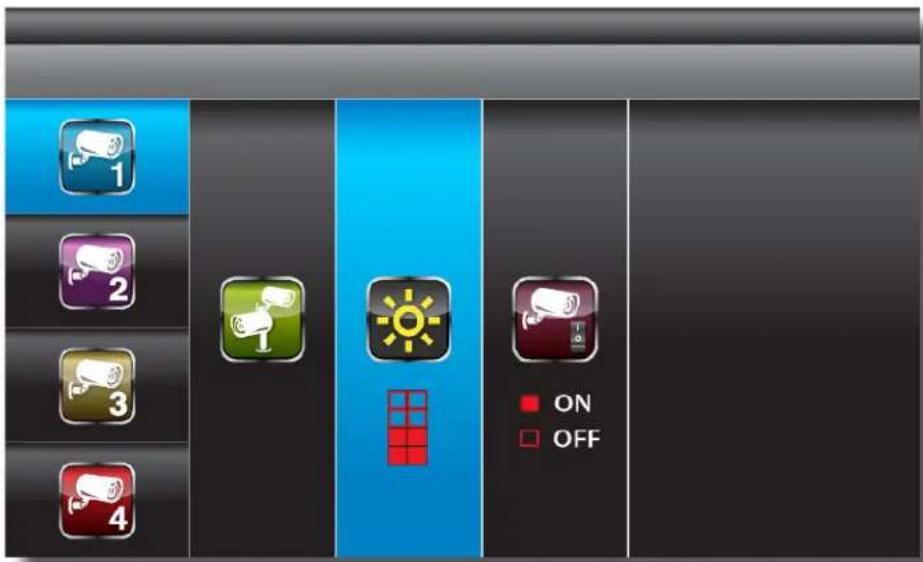
Camera Setup-Adjust Brightness
With BRIGHTNESS section highlighted, use △ to ▽ to adjust camera brightness.
CAMERA ACTIVATION

Camera Setup-Camera Activation
With ACTIVATION section highlighted, use △ to enable or disable camera. Press ESC to return to main menu.
NOTE: Ensure the cameras are paired to the receiver for SCAN or QUAD to function properly camera "ON" can only be selected when camera has been paired to system.
RECORDER SETUP MENU
Select RECORDER SETUP, press MENU key once to enter sub-menu.

Record Setup-Main Menu
RECORD SCHEDULE
| AM12:00 | AM01:00 | AM02:00 | AM03:00 | |
| AM04:00 | AM05:00 | AM06:00 | AM07:00 | |
| AM08:00 | AM09:00 | AM10:00 | AM11:00 | |
| PM12:00 | PM01:00 | PM02:00 | PM03:00 | |
| PM04:00 | PM05:00 | PM06:00 | PM07:00 | |
| PM08:00 | PM09:00 | PM10:00 | PM11:00 |
Record Schedule Setup Menu
Use △ to select time block.
RECORD SCHEDULE - CONTINUED
| RECORD SCHEDULE M: MOTION S:SCHEDULE X: MANUAL | ||||
| MAM1 2:00 | X AM0 1:00 | SAM0 2:00 | AM0 3:00 | |
| AM0 4:00 | AM0 5:00 | AM0 6:00 | AM0 7:00 | |
| AM0 8:00 | AM0 9:00 | AM1 0:00 | AM1 1:00 | |
| PM1 2:00 | PM0 1:00 | PM0 2:00 | PM0 3:00 | |
| PM0 4:00 | PM0 5:00 | PM0 6:00 | PM0 7:00 | |
| PM0 8:00 | PM0 9:00 | PM1 0:00 | PM1 1:00 | |
Recorder Schedule Setup - Options Set
There are three different recording options available to chose from. Press MENU key to switch between different recording mode.
M: MOTION (REC only when motion detected)
S: SCHEDULE (record between selected times for each day)
X: MANUAL (manual REC)
The system will record video from all 4 channels simultaneously with MOTION, SCHEDULE and MANUAL record modes. One of the four channels will have audio available. Note: To toggle between recording and not recording sound with the video image press the "Power" button once briefly. The icon will show on the screen when the sound is muted. See Audio/Video Recording Caution Statement below. The time slot boxes in the diagram above each represent hourly slots, e.g., selecting AM 10:00 means recording will occur from 10:00 am to 11:00 am. Also if for example, boxes AM 10:00 and AM 11:00 are set to "S" (Schedule) recording, please note that a continuous 2 hour video file will not be recorded but separate files depending on the recording time for each file setup, i.e., if set to 2 minutes then 60 clips will be recorded in a 2 hour schedule recording slot.
While the system is performing MOTION recording, audio will automatically switch to the channel triggering by motion. Recording cannot be stopped until 30 seconds after recording has started. This mandatory system operation is designed to prolong the overall life of memory card. To stop recording, press REC/DEL once. To remove the memory card, please power off the system first.
If SCHEDULE recording mode is set, the system will automatically resume recording 60 seconds after recording is stopped manually. If MOTION record mode is set, the system will resume motion detection function 60 seconds after recording is stopped manually.
Recording must be stopped before entering the system main menu and the system will resume the mode selected in the IDLE DISPLAY SETUP.
NOTE: Recording will not work if there is no memory card inserted into the DVR.

Audio/Video Recording
Caution: Audio surveillance in some states is illegal or requires permission from one or both parties to record someone's voice. Laws are also different from residential vs. commercial applications. Some federal, state, and local laws prohibit certain surveillance activities and/or the use or distribution of the information obtained from such activities. Prior to using this system, you should become familiar with the per-
tinent laws to ensure compliance with those applicable to surveillance activities.
MOTION DETECTION SENSITIVITY

Recorder Setup-Motion Detection Sensitivity
Use to select MOTION DETECTION SENSITIVITY section. Use to highlight camera for setup. Use to adjust sensitivity level: OFF / LV1 / LV2 / LV3 (LV3 is most sensitive). Press ESC to save and exit.
FORMAT MEMORY CARD

Recorder Setup-Format Memory Card
Use △ to select FORMAT STORAGE, press
MENU to enter. Press MENU again to confirm and begin formatting memory card. Press ESC to exit. NOTE: If a new memory card is used then it must be formatted first here before use.

Formatting the Memory Card
When you install a new memory card, you must format it before it can be used. Clicking the FORMAT STORAGE button will begin the formatting process. WARNING! Formatting an existing SD
Card erases all data. This step cannot be undone.
5
SYSTEM OPERATION
RECORDER SETUP
SETUP MASKING AREA

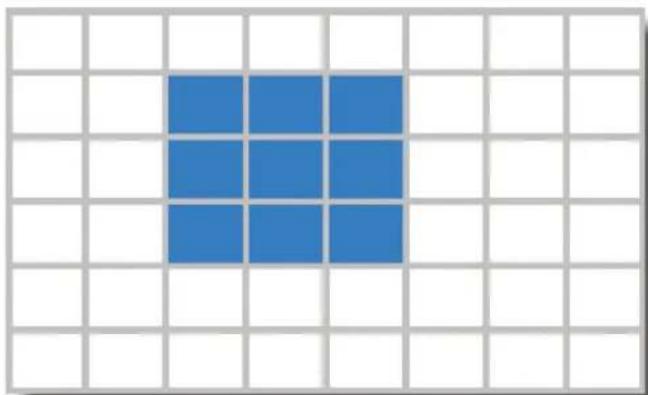
Masking Area Setup Menu
natural_image
Grid pattern with a central blue square filled with four smaller squares (no text or symbols)Masking Area Setup Grid
This screen allows you to setup areas where you do not want motion to be detected. Use ▲ to select MASKING AREA SETUP menu. Use ▲ to highlight camera (1-4) for setup. Use ▲ to navigate to the grid where no motion detection is desired. Press ▲ MENU key to toggle between mask/unmask grid(s). Movements taking place inside masked area will be ignored. Continue selecting another grid for setup or press ESC to save and exit.
RECORD TIME

Recorder Setup-Record Time
Use this menu to set the amount of time you want to record after motion is detected. Use to highlight recording period: 2 Min / 5 Min / 10 MIN, press MENU to confirm. Press ESC to save and exit.
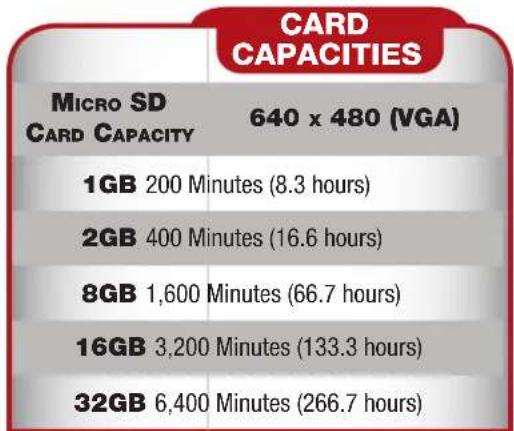
Note: All numbers are approximate and are for estimating only. Many factors influence actual storage capacities including size of data, quality, aspect ratio and compression used.
PLAYBACK

Playback-Date Folder Menu
This screen allows you to playback recorded video. Use to select the Date folder you want to view. Press MENU to confirm selection and enter selected folder.
| EVENT LIST | |||
| 12-12-2012 | |||
| AM 1 2 : 0 0 AM 0 1 : 0 0 | AM 0 2 : 0 0 AM 0 3 : 0 0 | AM 0 4 : 0 0 AM 0 5 : 0 0 | AM 0 6 : 0 0 AM 0 7 : 0 0 |
| AM 0 8 : 0 0 AM 0 9 : 0 0 | AM 1 0 : 0 0 AM 1 1 : 0 0 | PM 1 2 : 0 0 PM 0 1 : 0 0 | PM 0 2 : 0 0 PM 0 3 : 0 0 |
| PM 0 4 : 0 0 PM 0 5 : 0 0 | PM 0 6 : 0 0 PM 0 7 : 0 0 | PM 0 8 : 0 0 PM 0 9 : 0 0 | PM 1 0 : 0 0 PM 1 1 : 0 0 |
| AM 1 2 : 0 0 AM 0 1 : 0 0 | AM 0 2 : 0 0 AM 0 3 : 0 0 | AM 0 4 : 0 0 AM 0 5 : 0 0 | AM 0 6 : 0 0 AM 0 7 : 0 0 |
| AM 0 8 : 0 AM 0 9 : 0 | AM1.0: . . . . . . . . . . . . . . . . . . . . . . . . . . . . . . . . . . . . . . . . . . . . . . . . . . . . . . . . . . . . . . . . . . . . . . . . . . . . . . . . . . PMO4: , , , , , , , , , , , , , , , , , , , , , , , , , , , , , , , , , , , , , , , , , , , , , , , , , , , , , , , , , , , , , , , , , , , , , , , , , , , , , , , , , , , , , , , | PMO4: ,, PMO5:, PMO6:, PMO7:, PMO8:, PMO9:, PMO1:, PMO1:, PMO2:, PMO3:, PMO4:, PMO5:, PMO6:, PMO7:, PMO8:, PMO9:, PMO1:, PMO1:, PMO2:, PMO3:, PMO4:, PMO5:, PMO6:, PMO7:, PMO8:, PMO9:, PMO1:, PMO1:, PMO2:, PMO3:, PMO4; | PMO4: | PMO5: | PMO6: | PMO7: | PMO8: | PMO9: | PMO1: | PMO1: | PMO2: | PMO3: | PMO4: | PMO5: | PMO6: | PMO7: | PMO8: | PMO9: | PMO1: | PMO1: | PMO2: | PMO3: | PMO4: | PMO5: | PMO6: | PMO7: | PMO8: | PMO9: | PMO1: | PMO1: | PMO2: | PMO3 | ||
Playback-Time Grid Menu
Use to select Hour (each block represent one hour time), Press MENU to confirm selection and enter selected folder. NOTE: Each RECORDED FILE folder is indicated with file start / end time and type of file recorded.
5
SYSTEM OPERATION
PLAYBACK
PLAYBACK - CONTINUED


Channel Record Indicators
NOTE: The channel indicator
1, 2, 3, 4 in a SOLID square indicates recording type for that channel only. (See 1 at left). The channel indicator 1, 2, 3, 4 all in Hollow squares indicate recording type effects all four channels. (See 2 at left)
Playback-Date Detail Events
The type of recorded file (Schedule / Motion / Manual) is indicated by:
S - SCHEDULE Recording: channel selected by user.
M - MOTION channel triggered.
X - CONTINUOUS (Manual) Recording: channel selected by user.
To playback recorded file, use to highlight the RECORDED FILE. It will turn to red type. Press MENU to confirm selection and playback selected file. NOTE: By default, playback display will be QUAD (displaying images of all cameras paired).
■1 □2 □3 □4 = All channel playback
For single camera display, press MENU once after playback has started to PAUSE. Then use to select from channel to channel. The channel indicator (bottom left screen) will show the channel number selected. (See 1 below)
□1 □2 □3 □4 = Channel 1 playback in full screen
□1 □2 □3 □4 = Channel 2 playback in full screen
□1 □2 ■3 □4 = Channel 3 playback in full screen
□1 □2 □3 ■4 = Channel 4 playback in full screen
Video progress indicator (See 2 at right) is shown by a series of arrows that turn from blue to red during playback. Pressing
the MENU will pause playback, The red arrow will turn to the pause symbol II. For other control functions available during playback mode, please refer to Section 3 - DVR CONTROLS - Front Face (p.7). Software is included on the CD provided for playing back the recorded file(s) from the memory card on a PC.

SYSTEM SETUP

System Setup Menu
DATE & TIME SETUP
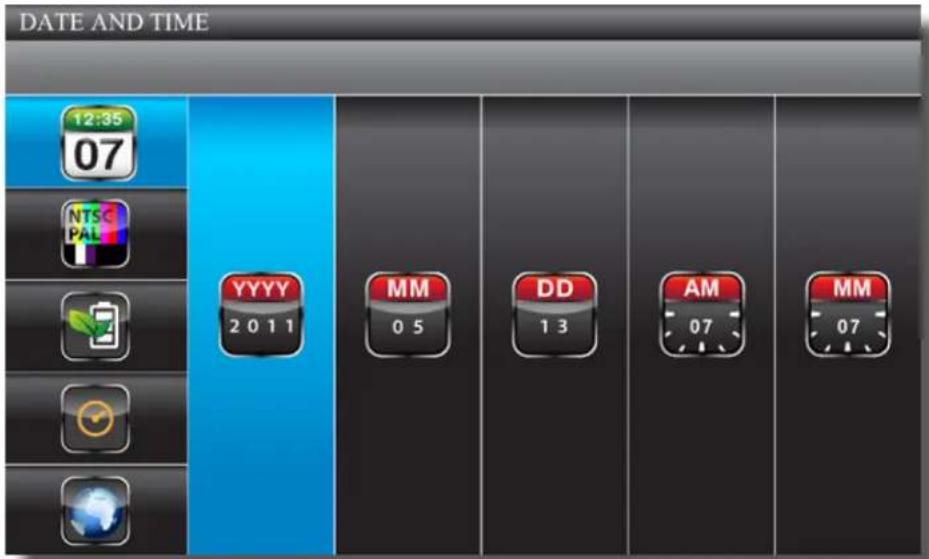
Date and Time Setup Menu
Select SYSTEM SETUP and press MENU to enter sub-menu. Use to highlight and adjust: YEAR / MONTH / DATE / HOUR / MINUTE. Use adjust each section and press MENU to confirm adjustment. Press ESC to save and exit.

Why Set a Date & Time?
It's important to set the proper date and time before continuing so that you can easily locate recorded events. Inaccurate dates and times on files may affect their admissibility as evidence in court. In addition, when changing current time settings, to avoid possible confusion with the time stamps on recorded and currently recording files, stop all ongoing recording processes before altering the system time and restart recording using the new settings.
5
SYSTEM OPERATION
POWER SAVING
POWER SAVING

Power Saving Setup Menu
Select SYSTEM SETUP, press MENU to enter. Use to select POWER SAVING.
Use to highlight SCREEN OFF AFTER 5 MINUTES IDLE / SCREEN OFF AFTER
10 MINUTES IDEL / SCREEN ALWAYS ON. Press MENU to confirm selection. Press ESC to save and exit.


Power Saving - 5 Minutes Power Saving - 10 Minutes

Power Saving - Always On
SYSTEM OPERATION
MULTI CHANNELS IDLE DISPLAY SETUP
5
MULTI CHANNELS IDLE DISPLAY SETUP

Select SYSTEM SETUP, press MENU to enter. Use to select MULTI CHANNELS IDLE DISPLAY. Use to highlight DISPLAY QUAD DURING IDLE / AT 5 SEC INTERVALS / AT 10 SEC INTERVALS / AT 15 SEC INTERVALS. Press MENU to confirm selection. Press ESC to save and exit. NOTE: (1) Camera ON/OFF setting in CAMERA SETUP section will affect which camera(s) can be displayed during IDLE DISPLAY. (2) Audio (single channel at anytime) will be available during QUAD mode (by default on channel 1 or the next available channel with camera paired to system), single FULL screen mode (auto switch to channel viewing at the time), or channel triggered by motion. (3) Audio channel will stay connected until channel switched. (4) If set to 5/10/15 sec. interval then select SCAN ACTIVATED CAMERAS to achieve this display mode.


Idle Display - QUAD Idle Display - 5 Seconds

Idle Display - 10 Seconds

Idle Display - 15 Seconds
5
SYSTEM OPERATION
TV OUT & LANGUAGE SETUP
TV OUT SETUP (NTSC OR PAL)
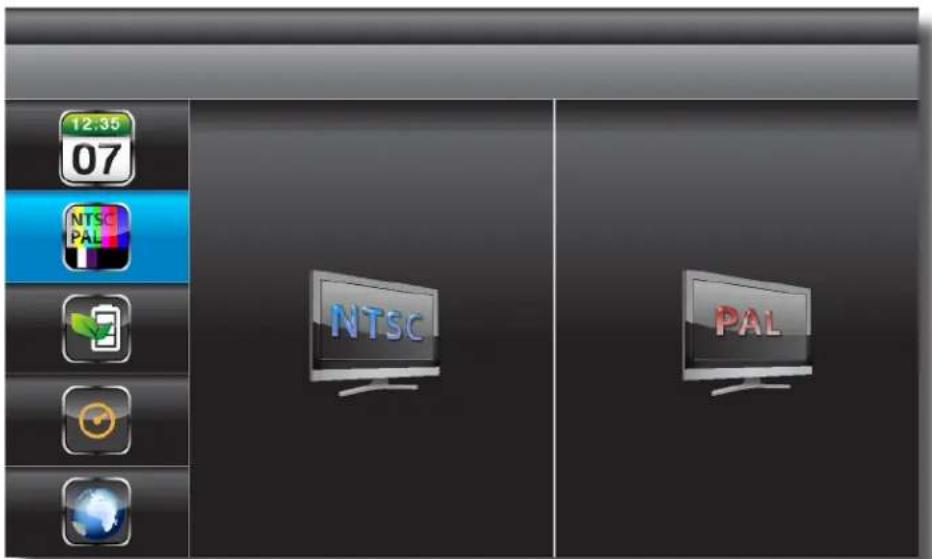
TV Out Setup Menu
Select SYSTEM SETUP, press MENU to enter. Use to select TV OUTPUT.
Use to highlight NTSC or PAL. Press MEND to confirm selection. Press ESC to save and exit. NOTE: Changing the TV system may affect display image scale.
LANGUAGE
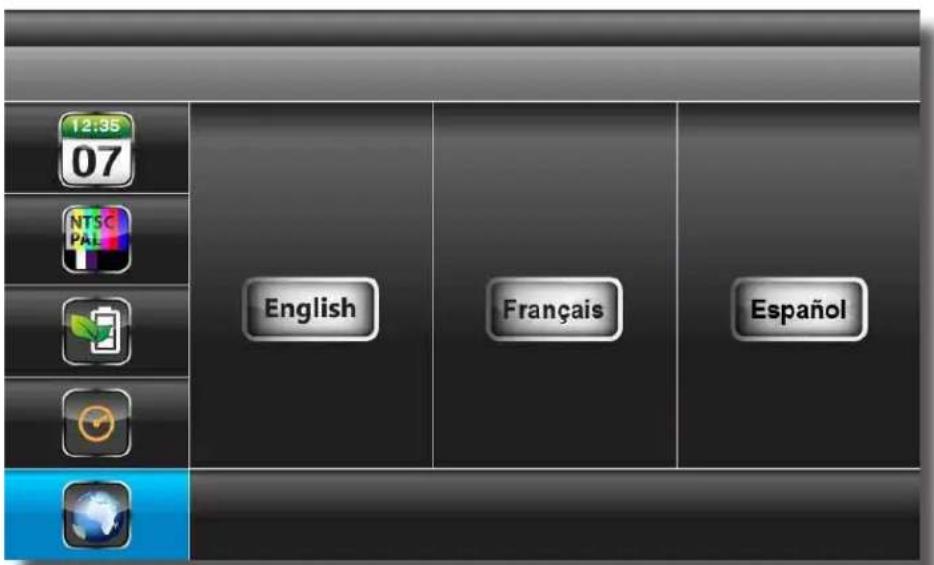
Default Menu
Select SYSTEM SETUP, press MENU to enter. Use to select DEFAULT.
Use to select the system language for SYSTEM RESTORE, press MENU to confirm selection and system will restore to factory default. Press ESC to save and exit. NOTE: While SYSTEM RESTORE icon is highlighted, the system firmware version will be displayed (example: VER:11.06.11-21:13:09)
SYSTEM OPERATION
ALARM BUZZER & ZOOM SETUP
5
ALARM BUZZER
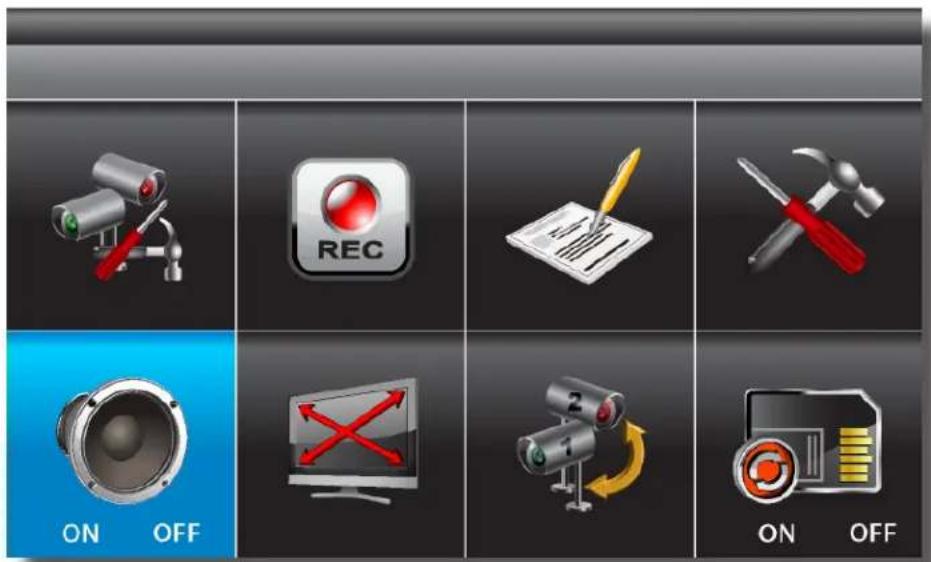
Alarm Buzzer Menu
Select ALARM BUZZER, press MENU to toggle buzzer ON or OFF. When motion is detected by a camera, then a buzzer sound will be triggered by the monitor.
ZOOM

Zoom Menu
Select ZOOM, press MENU to enter ZOOM Mode. Press MENU again to zoom in 2X. When zooming in use to select various views. Press MENU to zoom out. In zoom out (1X), use to change available channel. Press ESC to exit ZOOM.
5
SYSTEM OPERATION
SCAN ACTIVATED CAMERAS & MEMORY CARD OVERWRITE
SCAN ACTIVATED CAMERAS

Scan Activated Cameras
Select SCAN ACTIVATED CAMERAS, press MENU to begin camera scan mode. NOTE: (1) Camera ON/OFF setting in CAMERA SETUP section will affect which camera(s) can be displayed during IDLE DISPLAY. See p.25 for the display interval setup. (2) The system will automatically activate QUAD display if recording function is activated.
MEMORY CARD OVERWRITE

Memory Card Overwrite
Select MEMORY CARD OVERWRITE, press MENU to activate overwrite function and press MENU again to de-activate. NOTE: (1) One of the following examples will appear on display screen a) 1.89GB - space available on memory card. b) ERROR - either memory card is missing, locked or damaged. (2) When memory card is full, the system will display “MEMORY FULL PLEASE FORMAT” on the preview screen if overwrite is not enabled.
PC PLAYBACK SOFTWARE
The Sec24 Media Player is specifically designed to playback on your PC recorded files from the Micro SD card. You must install the software provided on the CD that is included with your DVR Kit. The following is an overview of the software.

PC Playback Software - Sec24 Media Player
| ITEM | INDICATOR NAME | DESCRIPTION | INDICATORS |
| 1 | Channel Playback Screen Shows camera channel being viewed | ||
| 2 | Playback Progress Bar Shows progress of playback file | ||
| 3 | Play Shows status of signal strength | ||
| 4 | Pause Shows battery strength | ||
| 5 | Stop Shows Quad, Scan or Single Display mode | ||
| 6 | Fast Forward & Rewind Naviagate through recorded file | ||
| 7 | Load | Load Recorded Files | |
| 8 | Replay | Replay the last file viewed | |
| 9 | Channel Select | Enable/Disable channels and audio on playback | |
PLAYBACK SOFTWARE - INSTALLATION
Insert the CD into the CD-ROM of your PC. Click on MY COMPUTER, double click on the drive where the CD-ROM is assigned by the PC (for example: E:). In this drive you will find the following icon.

20111027_Sec24 Media Player_v1.0.9.44
If Windows 7 is running on your PC, please right click on icon "20111027_Sec24 Media Player_v1.0.9.44" and select "Run as administrator" option first to begin installation. Other Windows version will be similar.

Windows 7 - Run as Administrator Dialog Box
The following error message will appear if you did not select "Run as administrator" option first before starting the installation. Please repeat instructions above then double click the icon to start the installation process.

Error Dialog Box
Follow the screens as shown below to complete the installation process.


The following icon should have been placed on your desktop. Double click the Sec24 Media Player icon on the desktop to start the software.

Click on "Load" to import and playback previous recorded files (SNX files) already stored on your PC.
NOTE: You will first need to save the files from the Micro SD card to the PC. Your PC will need to have a Micro SD card reader. If your PC only has a SD card reader you will need to use a Micro SD to SD memory card adaptor.
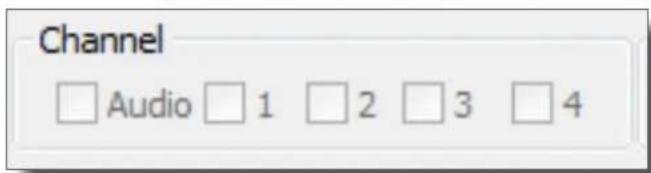
During playback, all four channels will playback at once. For privacy, the user is able to manually disable audio on all channels and/or video on one or more channels via the CHANNEL section of the playback software screen.

TROUBLESHOOTING
| ERROR | POSSIBLE CAUSE | SOLUTIONS | TROUBLESHOOTING |
| System is not receiving power or is not powering up | Cable from power adapter is loose or is unplugged. No power at electrical outlet. | Confirm that all cables are connected correctly.Confirm that the power adapter is securely connected to the back of the unit.Confirm power is on at electrical outlet. | |
| SD Card is not detected by the system | SD Card is not formatted • Format SD card per instructions. | ||
| There is no picture on selected channels/camera picture is not being displayed | Camera out of range • Locate camera closer to receiver. | ||
| Camera not “Paired” • Connect camera through Camera Pairing menu. | |||
| Signal is blocked | If possible, remove major obstacles in between the camera and the receiver.Or, relocate the camera to another location. | ||
| The power supply for the camera is not plugged in | Confirm camera power supply is connected correctly. | ||
| No power being received at the electrical outlet | Confirm power is on at electrical outlet | ||
| At night, only white appears on the screen | The camera's infra-red LEDs shine invisible light that reflects of surfaces such as glass causing white light | Place the camera on the other side of windows to try to improve the night vision or place in a well lit area. | |
| A black and white image appears at night | This is normal operation for night vision • No action required. | ||
| The system will not record under SCHEDULE/MOTION detection setting | System not set up correctly or memory card is missing | Ensure correct DATE AND TIME has been set and the Record Schedule setup correctly.Ensure the memory card is inserted into DVR and formatted | |
| SD Card is full (0% remaining) and the unit is no longer recording. “MEMORY FULL PLEASE FORMAT” is on the screen. | Overwrite is not enabled | Enable Memory Card Overwrite orRe-format memory card. | |
| The recording on the DVR appears but does not have sound | Mute is on | Turn Mute off. This feature is used to record images without sound for legal purposes. See page 14 for audio recording caution statement and details. | |
| Channel(s) disappear during auto or manual scan | Channel(s) has been turned OFF • Turn Camera (s) ON in Camera Setup menu. | ||
| Poor image quality Interference | Place the camera and/or receiver antenna at a new angle or readjust its position to make an improvement.Remove obstacles between the camera and receiver that might affect the signal (e.g., furniture, cabinets, and walls.)Relocate the camera closer to the receiver. | ||
| Low or unstable signal | Antenna direction is limited • Adjust the camera antenna and receiver position | ||
| Signal has been blocked | If possible, remove major obstacles in between the camera and receiver. Or, relocate the camera to another location. | ||
| Strong radio signal nearby • Keep WIFI router away from the camera and/or receiver. | |||
| Strong electromagnetic interference nearby | Keep active appliances such as hair dryers, heat fans, air conditioners, water pumps, or microwave ovens away from the camera and/or receiver. | ||
| Audio Feedback Camera and receiver are too close | The camera has a high sensitivity microphone. Keep the camera at least 10 feet away from the receiver. If the camera must be within 10 feet of the receiver, keep the volume down. | ||
SYSTEM MAP

TECHNICAL SPECIFICATIONS
| ITEM | DEVICE PARAMETER | SPECIFICATION | SPECIFICATIONS |
| Receiver | Channels 4 | ||
| Screen Type 7" LCD 16:9 | |||
| Monitor Resolution 800 x 480 | |||
| Video Format NTSC (default)/PAL | |||
| Wireless Parameters | 2.4 GHz secure digital wireless with 24 transmission channels using Frequency Hopping Spread Spectrum (FHSS) technology | ||
| Compression Format MPEG-4 | |||
| Recording Resolution 320 x 240 | |||
| Communication Range Approximately 500 feet (150 meters) open space line of sight | |||
| Recording Modes Manual/Schedule/Motion Detection | |||
| Output | Supports real-time AV preview and recording up to VGA @ 25 FPS(Single Camera Mode) or QVGA @ 25fps/CH (Multiple camera mode) | ||
| Language English, Spanish, French | |||
| Zoom 2X Digital Zoom | |||
| Memory Card 4GB Micro SD card included. Supports max. to 32GB micro SDHC memory card. | |||
| Motion Block Mask | 48 (8 x 6 grid) zones to block motion detection | ||
| Operating Temperature | 14 °F to 122 °F (-10 °C to 50°C) | ||
| Operating Voltage | DC 5V / 1A | ||
| Current Consumption 860mA (max) | |||
| Battery | Rechargeable 3.7V 2000mAh (LI-ON); Life: 3 hours (Power Saving Off) | ||
| Dimensions | 7.9" (200mm) x 4.8" (122mm) x 1" (25mm) | ||
| Camera | Camera Resolution | 640 x 480 | |
| IR LED's | 25 | ||
| IR Cut Filter | Automatic for daytime true color | ||
| Weather Resistant Rating | IP-66 | ||
| Night Vision | 60' (18m) | ||
| Operating Temperature | 14 °F to 122 °F (-10 °C to 50°C) | ||
| Operating Voltage | DC 5V / 1A | ||
| Current Consumption 860mA (max) | |||
| Dimensions | 4.8"D (123mm) x 2.6"W (65mm) x 2.6"H (65mm) camera barrel only6.2"D (157mm) x 2.75"W (70mm) x 8.5"H (216mm) w/stand and antenna | ||
WARRANTY
PRODUCT LIMITED WARRANTY
BRK Brands, Inc., ("BRK") the maker of First Alert® brand products warrants that for a period of one year from the date of purchase (the "Warranty Period"), this product will be free from defects in material and workmanship. BRK, at its sole option, will repair or replace this product or any component of the product found to be defective during the Warranty Period. Replacement or repair will be made with a new or remanufactured product or component. If the product is no longer available, replacement may be made with a similar product of equal or greater value. This is your exclusive warranty.
This warranty is valid for the original retail purchaser only from the date of initial retail purchase and is not transferable. In order to obtain warranty service, you must keep the original sales receipt and proof of purchase in the form of the UPC code from the package. BRK dealers, service centers, or retail stores selling BRK products do not have the right to alter, modify or any way change the terms and conditions of this warranty.
WARRANTY EXCLUSIONS
Parts and Labor: 1 year limited (warranted parts do not include bulbs, LEDs, and batteries)
This warranty does not apply to bulbs, LEDs, and batteries supplied with or forming part of the product.
This warranty is invalidated if non- BRK accessories are or have been used in or in connection with the product or in any modification or repair is made to the product.
This warranty does not apply to defects or damages arising by use of the product in other than normal (including normal atmospheric, moisture and humidity) conditions or by installation or use of the product other than in strict accordance with the instructions contained in the product owner's manual.
This warranty does not apply to defects in or damages to the product caused by (i) negligent use of the product, (ii) misuse, abuse, neglect, alteration, repair or improper installation of the product, (iii) electrical short circuits or transients, (iv) usage not in accordance with product installation, (v) use of replacement parts not supplied by BRK, (vi) improper product maintenance, or (vii) accident, fire, flood or other Acts of God.
This warranty does not cover the performance or functionality of any computer software included in the package with the product. BRK makes no warranty that the software provided with the product will function without interruption or otherwise be free of anomalies, errors, or "Bugs." This warranty does not cover any costs relating to removal or replacement of any product or software installed on your computer.
BRK reserves the right to make changes in design or to make additions to or improvements in its products without incurring any obligations to modify any product which has already been manufactured. BRK will make every effort to provide updates and fixes to its software via its website. This warranty does not cover any alteration or damage to any other software that may be or may become resident on the users system as a result of installing the software provided. This warranty is in lieu of other warranties, expressed or implied, and BRK neither assumes nor authorizes any person to assume for it any other obligation or liability in connection with the sale or service of the product. In no event shall BRK be liable for any special or consequential damages arising from the use of the product or arising from the malfunctioning or non-functioning of the product, or for any delay in the performance of this warranty due to any cause beyond its control.
BRK does not make any claims or warranties of any kind whatsoever regarding the product's potential, ability, or effectiveness to prevent, minimize, or in any way affect personal or property damage or injury. BRK is not responsible for any personal damage, loss, or theft related to the product or to its use for any harm, whether physical or mental related thereto. Any and all claims or statements, whether written or verbal, by salespeople, retailers, dealers, or distributors to the contrary are not authorized by BRK, and do not affect this provision of this warranty.
BRK's responsibility under this, or any other warranty, implied or expressed, is limited to repair, replacement or refund, as set forth above. These remedies are the sole and exclusive remedies for any breach of warranty. BRK is not responsible for direct, special, incidental, or consequential damages resulting from any breach of warranty or under any other legal theory including but not limited to, loss profits, downtime, goodwill, damage to or replacement of equipment and property and any costs of recovering, reprogramming or reproducing any program or data stored in or used with a system containing the product accompanying software. BRK does not warrant the software will operate with any other software except that which is indicated. BRK cannot be responsible for characteristics of their party hardware or software which may effect the operation of the software included.
Except to the extent prohibited by applicable law, any implied warranty of merchantability or fitness for a particular purpose is limited in duration to the duration of the above Warranty Period. Some states, provinces, or jurisdictions do not allow the exclusion or limitation of incidental or consequential damages or limitations on how long an implied warranty lasts, so the above limitations or exclusion may not apply to you. This warranty gives you specific legal rights, and you may also have other rights that vary from state to state, or province to province, or jurisdiction to jurisdiction.
OBTAINING SERVICE
If service is required, do not return the product to your place of purchase. In order to obtain warranty service, contact the Consumer Affairs Division at 1-800-323-9005, 7:30 a.m. – 5:00 a.m. Central Standard Time, Monday through Friday. To assist us in serving you, please have the model number and date of purchase available when calling.
After contacting the Consumer Affairs Division and it is determined that the product should be returned for Warranty Service, please mail the product to: BRK Brands, Inc., 3901 Liberty Street Road, Aurora, IL 60504-8122.
First Alert®
©2012 BRK Brands, Inc.
a Jarden Corporation Company (NYSE:JAH)
3901 Liberty Street Road, Aurora, IL 60504-8122
Phone: 630-851-7330 Tech Services: 800-323-9005
www.brkelectronics.com
M08-0425-002
- WELCOME
- Thank you for choosing First Alert for your security needs!
- MAIN DESCRIPTION
- PRODUCT FEATURES
- SAFETY PRECAUTIONS
- FCC COMPLIANCE
- FCC Compliance Class C Intentional Radiator
- FCC Certification
- DISPOSAL
- 3
- PRODUCT OVERVIEW
- PACKAGE CONTENTS
- WHAT'S IN THE BOX
- WARNING
- CONNECTIONS & INDICATORS
- SIDE PANEL
- DISPLAY INDICATORS
- INSTALLING CAMERAS
- Camera Orientation
- SETTING UP THE WIRELESS RECEIVER
- OPTIONAL: VIEW ON TELEVISION OR OTHER MONITOR
- Rechargeable Battery
- 5
- SYSTEM OPERATION
- MAIN MENU
- CAMERA SETUP MENU
- CAMERA PAIRING
- CAMERA SETUP
- RECORDER SETUP MENU
- RECORD SCHEDULE
- RECORD SCHEDULE - CONTINUED
- Audio/Video Recording
- MOTION DETECTION SENSITIVITY
- FORMAT MEMORY CARD
- Formatting the Memory Card
- RECORDER SETUP
- SETUP MASKING AREA
- RECORD TIME
- PLAYBACK
- SYSTEM SETUP
- DATE & TIME SETUP
- Why Set a Date & Time?
- POWER SAVING
- MULTI CHANNELS IDLE DISPLAY SETUP
- TV OUT & LANGUAGE SETUP
- ALARM BUZZER & ZOOM SETUP
- ALARM BUZZER
- ZOOM
- SCAN ACTIVATED CAMERAS & MEMORY CARD OVERWRITE
- SCAN ACTIVATED CAMERAS
- MEMORY CARD OVERWRITE
- PC PLAYBACK SOFTWARE
- PLAYBACK SOFTWARE - INSTALLATION
- TROUBLESHOOTING
- TECHNICAL SPECIFICATIONS
- WARRANTY
- PRODUCT LIMITED WARRANTY
- WARRANTY EXCLUSIONS
- OBTAINING SERVICE
- First Alert®
Brand : FIRST ALERT
Model : DWS-472
Category : Security Camera