
IME49U3S-IS - Ice Maker Avanti - Free user manual and instructions
Find the device manual for free IME49U3S-IS Avanti in PDF.


| Product Type | Under-Counter Ice Maker |
| Brand | Avanti |
| Model | IME49U3S-IS |
| Ice Production Capacity | Approximately 50 lbs per day (dependent on ambient conditions) |
| Ice Storage Capacity | Approximately 25 lbs |
| Cycle Time | Approximately 20 minutes per batch |
| Water Supply | Continuous, requires cold water line (minimum 15 psig, maximum 80 psig) |
| Drain Type | Pump-out drain system, can pump up to 1.5m (59") rise |
| Electrical Requirements | 115 V, 60 Hz, 15 A circuit, grounded 3-prong outlet |
| Dimensions (Approximate) | Width 15", Depth 13", Height 33" (may vary) |
| Weight (Approximate) | 70 lbs |
| Control Panel Features | ICE (green), HARVEST (yellow), BIN FULL (red) indicators; Mode and Adjust buttons |
| Ice Size Selection | Adjustable via Adjust button: small, medium, large |
| Self-Cleaning Cycle | Yes, with Nickel-Safe Ice Maker Cleaner |
| Reversible Door Swing | Yes, instructions included |
| Condenser Location | Front accessible via removable louver panel |
| Warranty | 1 year limited parts and labor, 2nd-5th year compressor only |
| Included Accessories | Ice scoop, water supply hose (6 ft), drain hose (5 ft), instruction manual |
| Required Installation Clearance | 2" rear, 1/4" each side, 1/4" top |
Frequently Asked Questions - IME49U3S-IS Avanti
User questions about IME49U3S-IS Avanti
0 question about this device. Answer the ones you know or ask your own.
Ask a new question about this device
Download the instructions for your Ice Maker in PDF format for free! Find your manual IME49U3S-IS - Avanti and take your electronic device back in hand. On this page are published all the documents necessary for the use of your device. IME49U3S-IS by Avanti.
USER MANUAL IME49U3S-IS Avanti
natural_image
Line drawing of a simple rectangular cabinet or enclosure with lid, vent, and side grilles (no text or symbols)BEFORE USE, PLEASE READ AND FOLLOW ALL SAFETY RULES AND OPERATING INSTRUCTIONS.
Avanti has a policy of continuous improvement on its products and re the right to change materials and specifications without notice.
Avanti Products LLC
3265 Meridian Pkwy Ste. 114
Weston, FL 33331 USA
www.avantiproducts.com
TABLE OF CONTENTS
| Appliance Safety | 3 |
| Important Safeguides | 4 |
| Electrical Connection | 5 |
| Help Us Help You | 6 |
| Parts and Features | 7 |
| Important Safety Instructions | 8 |
| Installation Instructions | 8 |
| Before Using Your Appliance | 8 |
| Installation of Your Appliance | 9 -14 |
| Operating Your Appliance | 15 – 17 |
| How Your Appliance Makes Ice | 18 |
| Care and Maintenance | 19 – 22 |
| Troubleshooting Guide | 23 – 24 |
| Service for Your Appliance | 25 |
| Wiring Diagram | 25 |
| Your Avanti Products Warranty | 26 |
| Registration Information and Registration Card Last page |
APPLIANCE SAFETY
Your safety and the safety of others are very important.
We have provided many important safety messages in this manual and on appliance. Always read and obey all safety messages.

This is the Safety Alert Symbol. Th symbol alerts you to potential hazards that can kill or injure you and others.
All safety messages will follow the Safety Alert Symbol and either the wards" DANGER", "WARNING" or "CAUTION".

DANGER


WARNING

CAUTION
Danger means that failure to heed this safety statement may result in severe personal injury or death.
Warning means that failure to heed this safety statement may result in extensive product damage, serious personal injury, or death.
Caution means that failure to heed this safety statement may result in minor or moderate personal injury, or property or equipment damage.
All safety messages will alert you to what the potential hazard is, tell you reduce the chance of injury, and let you know what can happen if the in are not followed.

PROP. 65 WARNING FOR CALIFORNIA RESIDENTS
WARNING:
Cancer And Reproductive Harm
www.p65warnings.ca.gov
IMPORTANT SAFEGUARDS

Before the beverage cooler is used, it must be properly positioned and as described in this manual, so read the manual carefully. To reduce fire, electrical shock or injury when using the beverage cooler, follow b precautions, including the following:
! DANGER !
- Plug into a grounded 3-prong outlet, do not remove grounding prong, do not use an adapter, and do not use an extension cord
- Replace all panels before operating
- It is recommended that a separate circuit, serving only your beverage cooler, be provide receptacles that cannot be turned off by a switch or pull chain
- Never clean appliance parts with flammable fluids. These fumes can create a fire hazard explosion. And do not store or use gasoline or other flammable vapors and liquids in the this or any other appliance. The fumes can create a fire hazard or explosion.
- Before proceeding with cleaning and maintenance operations, make sure the power line is disconnected.
- Do not connect or disconnect the electric plug when your hands are wet
- Unplug the appliance or disconnect the power before cleaning or servicing. Failure to do result in electrical shock or death.
- Do not attempt to repair or replace any part of your appliance unless it is specifically in this material. All other servicing should be referred to a qualified technician.
WARNING
- Use two or more people to move and install the appliance. Failure to do so can result other injury.
- To ensure proper ventilation for your appliance, the unit must be completely unobstructed well-ventilated area with temperatures above ^8 F 5(13C) and below ^90 (32°C). This unit must be installed in an area protected from the elements, such as wind, rain, water spray or
- The appliance should not be located next to ovens, grills or other sources of high heat
- The appliance must be installed with all electrical, water and drain connections in accord state and local codes. A standard electrical supply (115 V AC only, 60 Hz), properly gr accordance with the National Electrical Code and local codes and ordinances is required.
- Do not kink or pinch the power supply cord of the appliance.
- The fuse (or circuit breaker) size should be 15 amperes.
- It is important for the appliance to be leveled in order to work properly. You may need several adjustments to level it.
- All installation must be in accordance with local plumbing code requirements.
- Make certain that the pipes are not pinched or kinked or damaged during installation.
- Check for leaks after connection.
- Never allow children to operate, play with or crawl inside the appliance
- Do not use solvent-based cleaning agents or abrasives on the interior. These cleaners or discolor the interior.
- Do not use this apparatus for other than its intended purpose.
Electrical Connection
Warning
Improper use of the grounded plug can result in the risk of electrical shock. If it is damaged, have it replaced by an authorized Avanti Products service center.
This appliance should be properly grounded for your safety. The power cor appliance is equipped with a three-prong plug which mates with standard the prong wall outlets to minimize the possibility of electrical shock.
Do not under any circumstances cut or remove the third ground prong from power cord supplied.
This appliance requires a standard 115Volts\~/60Hz electrical outlet with three ground.
The cord should be secured behind the appliance and not left exposed or prevent accidental injury.
Never unplug the appliance by pulling the power cord. Always grip the plu and pull straight out from the receptacle.
Do not use an extension cord with this appliance. If the power cord is to a qualified electrician or service technician install an outlet near the appliar
EXTENSION CORD
Because of potential safety hazards under certain conditions, it is strongly recommended that you do not use an extension cord with this unit. However, must use an extension cord it is absolutely necessary that it be a UL/CUI wire grounding type appliance extension cord having a grounding type plug outlet and that the electrical rating of the cord be 115 volts and at least
SURGE PROTECTOR
Most electrical appliances use a series of electric control boards to operate boards are very susceptible to power surges and could be damaged or de
If the appliance is going to be used in an area or if your city / country power surges / outages; it is suggested that you use a power surge protected electrical devices / appliances you use. The surge protector that you select have a surge block high enough to protect the appliance it is connected to have any questions regarding the type and size of surge protector needed licensed electrician in your area.
Damages due to power surges are not considered a manufacturer covered and will void your product warranty.
HELP US HELP YOU...
Read this guide carefully.
It is intended to help you operate and maintain your new appliance properly.
Keep it handy to answer your questions. If you don't understand something or you need more help, please call:
Avanti Customer Service 800-220-5570
Keep proof of original purchase date (such your sales slip) with this guide to establish warranty period.
Write down the model and serial numbers.
You'll find them on a plate located on the rear outside wall of the appliance.
Please write these numbers here:
Date of Purchase
Model Number
Serial Number
CAUTION:
THIS APPLIANCE IS NOT DESIGNED FOR THE STORAGE OF MEDICINE OR OTHER MEDICAL PRODUCTS.
Use these numbers in any correspondence or service calls concerning your appliance.
If you received a damaged appliance, immediate contact the dealer (or builder) that sold you the appliance.
Save time and money. Before you call for service check the Troubleshooting Guide. It lists causes minor operating problems that you can correct yourself.
IF YOU NEED SERVICE
We're proud of our service and want you be pleased. If for some reason you are happy with the service you receive, here some steps to follow for further assistance FIRST, contact the people who serviced by appliance. Explain why you are not pleased. In most cases, this will solve the problem
NEXT, if you are still not pleased, write all the including your telephone number, and send it to
Avanti Products LLC
3265 Meridian Pkwy Ste. 114
Weston, FL 33331 USA
PARTS AND FEATURES
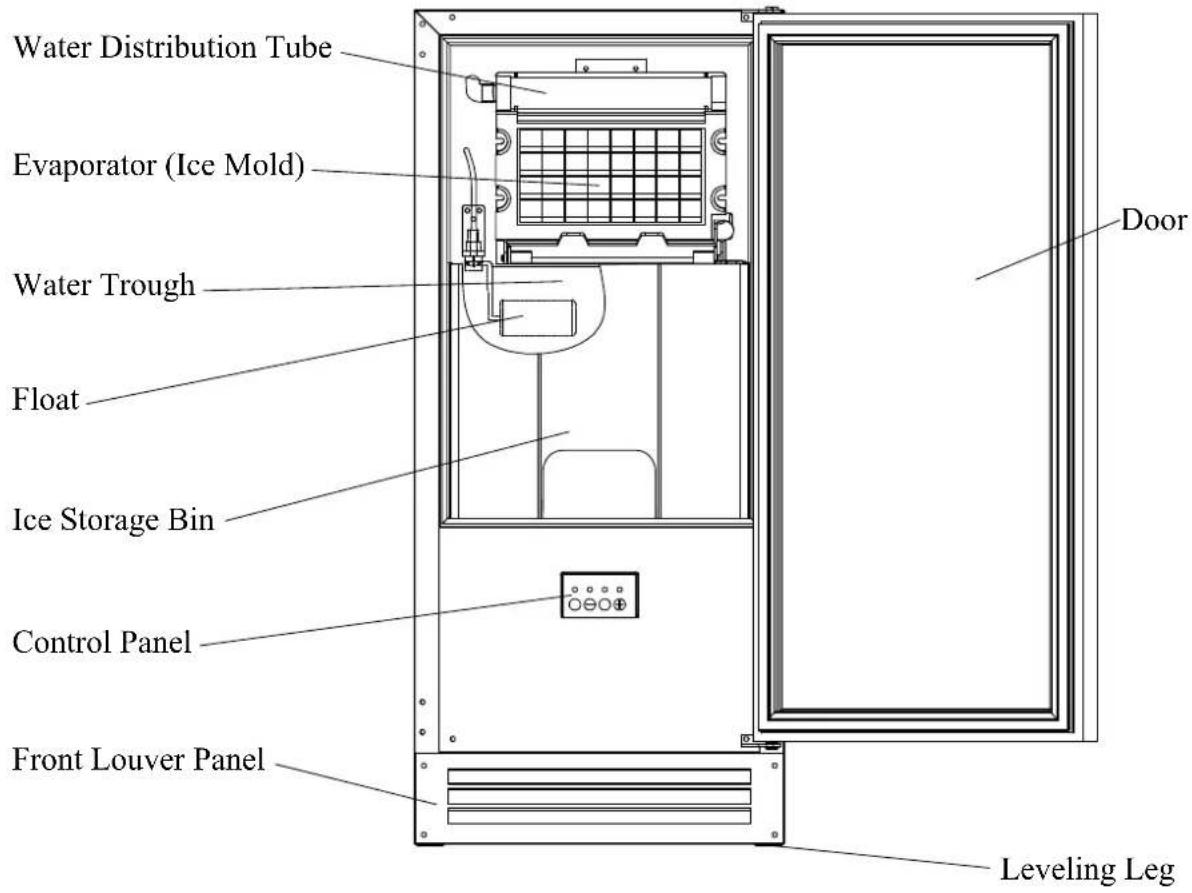
IMPORTANT SAFETY INSTRUCTIONS
| WARNING | To reduce the risk of fire, electrical shock injury when using your icemaker, follow th basic precautions: |
This Unit Is For Indoor Use Only
- SAVE THESE INSTRUCTIONS -
- Read all instructions before using the icemaker.
- DANGER or WARNING: Risk of child entrapment. Child entrapment and suffocation are not problems of the past. Junked or abandoned icemakers are still dangerous . . . even if they will “just sit in the garage a few days”.
- Before you throw away your old icemaker: take off the doors. Leave the shelves in place so that children may not easily climb inside.
- Never allow children to operate, play with, or crawl inside the icemaker.
- Never clean icemaker parts with flammable fluids. The fumes can create a fire hazard or explosion.
- Do not store or use gasoline or any other flammable vapors and liquids in the vicinity of this or any other icemaker. The fumes can create a fire hazard or explosion.
INSTALLATION INSTRUCTIONS
Before Using Your Icemaker
- Remove the exterior and interior packing.
- Check to be sure you have all of the following parts:
o 1 Ice Scoop
- 1 Water Supply Hose
- 1 Water Drain Hose
- Instruction Manual
- Before connecting the unit to the power source, let it stand upright for approximately 2 hours. This will reduce the possibility of a malfunction in the cooling system from handling during transportation.
- Clean the interior surface with lukewarm water using a soft cloth.

WARNING

EXCESSIVE WEIGHT HAZARD
USE TWO OR MORE PEOPLE TO MOVE AND INSTALL THE ICEMAKER
FAILURE TO DO SO CAN RESULT IN BACK OR OTHER INJURY
INSTALLATION OF YOUR ICEMAKER
- THIS ICEMAKER SHOULD BE PROPERLY INSTALLED BY A QUALIFIED PROFESSIONAL This icemaker MUST be installed with electrical and water connections in accordance with all state and local codes.
- When installing the ice maker under a counter, follow the recommended spacing dimensions shown. Allow at least 2" (50.8 mm) of clearance at rear, and 14 " (6.35 mm) at sides for proper air circulation. The installation should allow the ice maker to be pulled forward for servicing if necessary.
- Place your icemaker on a floor that is strong enough to support the icemaker when it is fully loaded. To level your icemaker, adjust the legs at the front of the icemaker.
- Locate the icemaker away from direct sunlight and sources of heat (stove, heater, radiator, etc.). Direct sunlight may affect the acrylic coating and heat sources may increase electrical consumption. Extreme cold ambient temperatures may also cause the icemaker not to perform properly.
- Choose a well ventilated area with temperatures above 50^ F ( 10^ C) and below 100^ F ( 38^ C). This unit MUST be installed in an area protected from the elements.
- Avoid locating the icemaker in moist areas. Too much moisture in the air will cause frost to form quickly on the evaporator requiring more frequent defrosting of the icemaker.
INSTALLATION CLEARANCES:
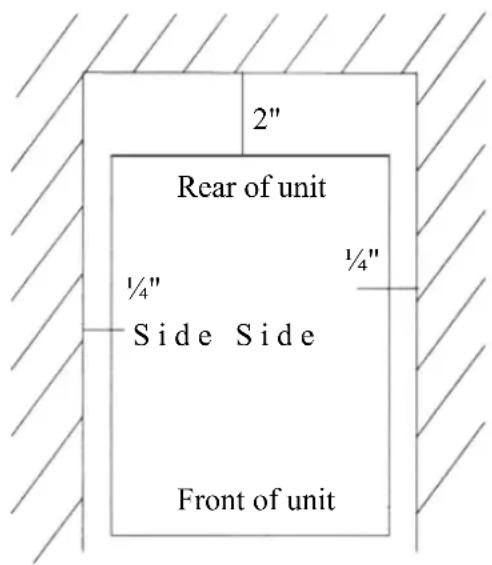
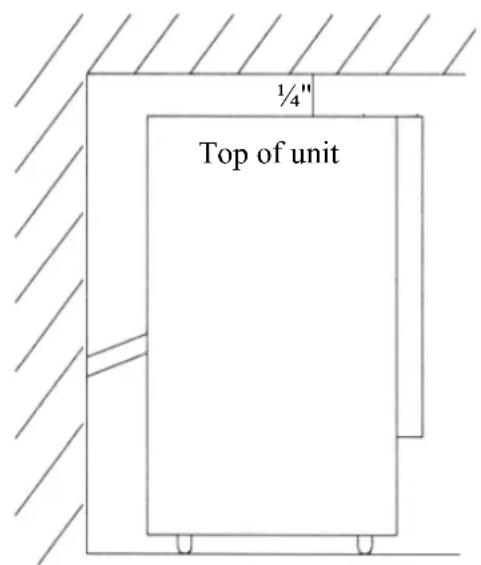
- The installation of this icemaker requires a cold water supply inlet of 14 (6.35mm) soft copper tubing with a shut off valve.
- The icemaker requires a continuous water supply with a minimum pressure of 15 psig and a static pressure not to exceed 80 psig. The temperature of the water supply into the icemaker should be between 41^ (5°C) and 90^ (32°C) for proper operation.
- It is strongly recommended that a water filter be used. A filter, if it is of the proper type, can reme taste and odors as well as particles. Some water is very hard, and softened water may result in white, mushy cubes that stick together. De-lonized water is NOT recommended.
| Warning | Operation of the icemaker for extended periods outside of the normal temperature ranges as described above may affect product performance |
Installing the stainless steel handle
This appliance includes a stainless steel handle. To install the handle please follow the below instructions:
- Pull away the door gasket in the area where the handle is to be installed on the left side as shown below in Illustration # 1. The gasket is easily displaced by hand, no tools are necessary.
- Align the handle with the screws installed. Tighten the screws using a Phillips head screwdriver until the handle sets both flush and secured tightly against the door frame. (DO NOT over tighten as this will cause damage to the handle assembly).
- Replace the door gasket to its original position.
- If you choose not to use the handle supplied, simply follow step 1 to access the installation screws and remove them and then place the two decorative plugs into the two holes separately. Continue on to step 3 to replace the door gasket to its original position.
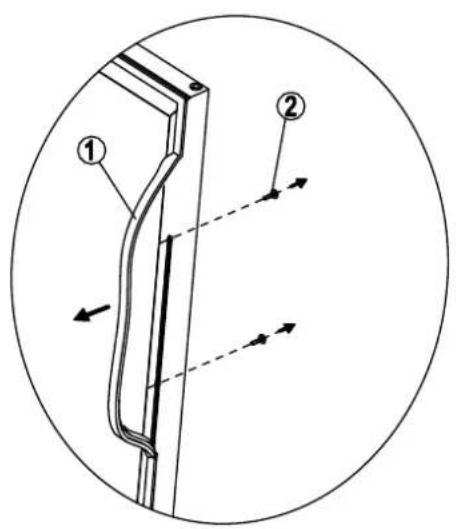
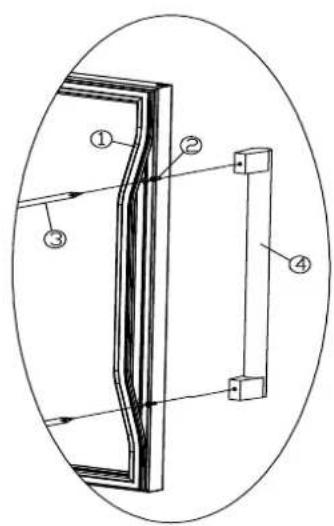
Illustration # 1 Illustration # 2
-
Gasket
-
Phillips Head Screw Driver
-
Phillips Head Screw
-
Handle
Leveling the ice maker
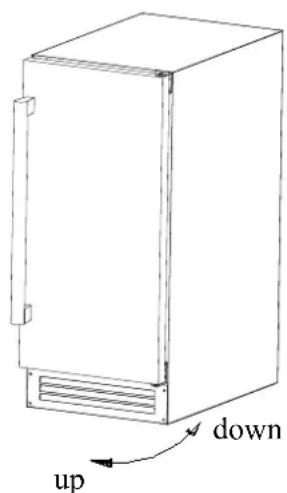
It is important for the icemaker to be leveled in order to work properly. It can be raised or lowered by rotating the plastic sheaths around each of the four feet on the bottom of the machine. If you find that the surface is not level, rotate the feet until the ice maker becomes level. You may need to make several adjustments to level it. We recommend using a carpenter's level to check the machine.
natural_image
Line drawing of a rectangular cabinet with labeled dimensions (up and down) and directional arrows, no text or symbols present.- Place a carpenter's level on top of the product to see if the ice maker is level from front to back and side to side.
- Adjust the height of the feet as follows: up Turn the leveling feet to the right to lower that side of the ice maker. Turn the leveling feet to the left to raise that side of the ice maker.
IMPORTANT: Once you are ready to install it in a cabinet or directly on the floor, you must adjust the feet to level the ice maker. If the floor is level, just revolve the two front feet to touch the floor.
Reversing the door swing
Tools needed: Flat head screwdriver, Phillips screwdriver
IMPORTANT: Before you begin, unplug the ice maker or disconnect power.
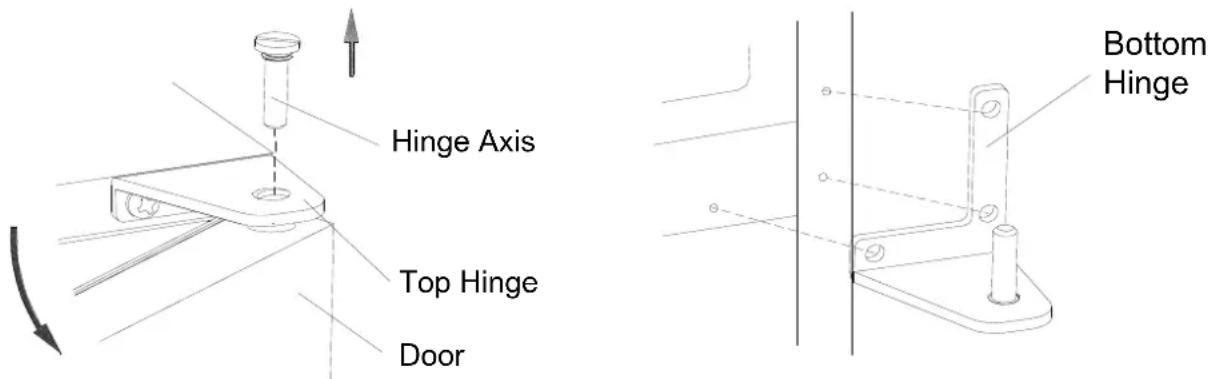
To remove door from hinges:
- Remove top hinge cover by pushing it toward the back of the unit, then lifting it off.
- Using a Phillips screwdriver, remove the screws, then remove the top hinge mat and top hinge. Keep the parts together and set them aside.
- Lift the door off of the bottom hinge and set the door aside.
- Using a flathead screwdriver, separate the hinge axis from top hinge.
- Remove the three screws securing the top hinge to the cabinet. Remove the plug buttons opposite the top hinge. Place hinge, screws, plug buttons and hinge axis safely aside.
- Open the door about 20 degrees, then lift the door off the bottom hinge 2 and set the door aside.
- Remove the three screws securing the bottom hinge to the cabinet and the plugs opposite.
- Rotate the door 180 degrees from its original position. The handle should be opposite the door hinges.
- Replace the original top hinge on the opposite side at the bottom and the original bottom hinge on the opposite side at the top.
- Install the hinge axis back through the bottom hinge. Gently place the door on the bottom hinge and open it approximately 20 degrees.
- Install the top hinge axis and tighten firmly. Replace all plug buttons.
Water Supply
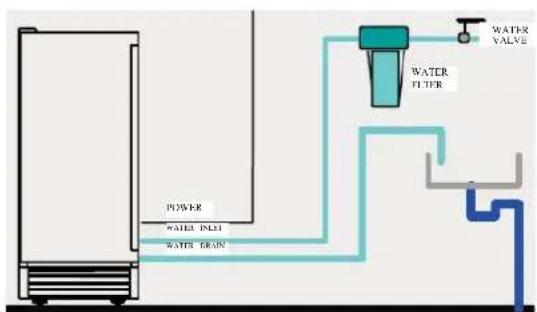
The water supply should be ready at the point of installation. The water supply pressure should be a minimum of 15 psig with a static pressure not more than 80 psig. (A wall outlet directly behind the machine will make installation easier.)
IMPORTANT:
- All installations must be in accordance with local plumbing code requirements. Professional installation is recommended.
- Make certain the hoses are not pinched or kinked or damaged during installation.
- Check for leaks after connection.
Tools required: 12 -in. open-end wrench, Phillips screwdriver
Connecting the water line:
- Turn off main water supply. Turn on the nearest faucet long enough to clear line of water.
- Find a 12 -in. to 34 -in. vertical cold water pipe near the installation location. The distance should be less than 6 feet. The water supply hose provided with the ice maker is approximately 6 feet long.
- A shut-off valve must be installed to the main water supply. If the water pipe has a plain piece of copper tubing, attach a 14 " O.D. compression union to the tubing and install the valve.
- Connect the nut of the water supply hose to the tap, and connect the other end with the water inlet. Tighten firmly by hand, then one-half turn with wrench.
- Turn on main water supply and tap. Check for water supply connection leaks. Tighten every connection (including connection at the water inlet).
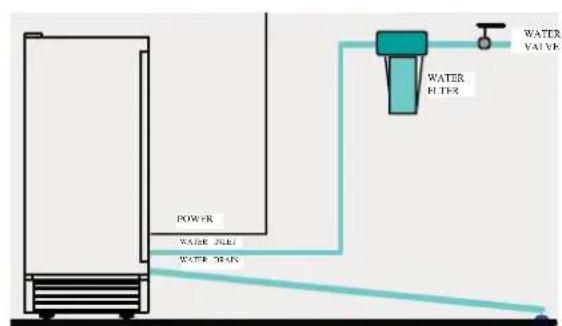
IMPORTANT: When you connect the water supply hose and the drain hose, pay attention to the indications of "Water inlet" and "Drain outlet" on the machine.
Drain
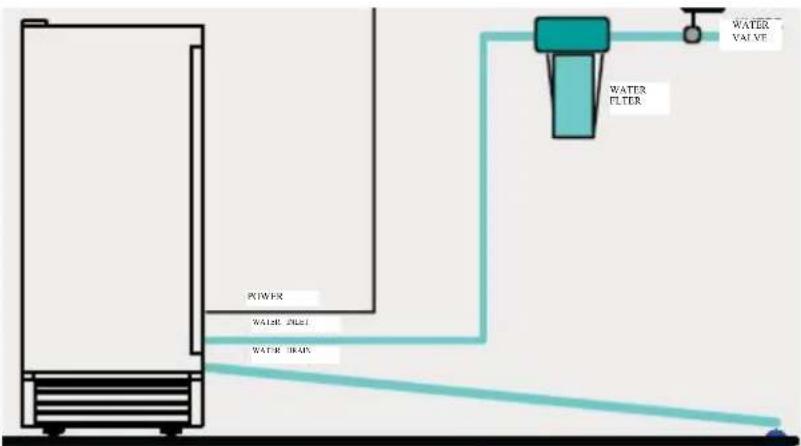
You must connect the drain line before using the ice maker. Follow the steps outlined below. There are two types of ice machine modes, one that drains by gravity and one that has an internal drain pump.
This unit can pump out water up to a rise of 1.5m (59") or over a length of 1.5m (59").
flowchart
graph TD
    A["Power"] --> B["WATER DRAIN"]
    B --> C["Water Filter"]
    C --> D["WATER VALVE"]
Vertical Drain
Horizontal Drain
Connecting the drain line:
NOTE: If there is a drain line near the ice maker, the best choice is to drain water to the drain line through the drain water hose provided with ice maker.
- Locate the floor drain near the ice maker. The distance should be less than 5 feet since the length of the long drain water hose provided with the ice maker is abo 5 feet.
- Find the drain outlet on the back of ice maker. Connect the drain outlet to the water draining hose, and insert the other end of the hose into the drain line.
- All horizontal runs of drain lines must have a fall of 14 " per foot. An air gap will likely be required between the ice maker drain tube and the drain/waste receptacle. A standpipe with a trap below it would be acceptable for the drain/waste receptacle. A floor drain is also acceptable. If this is not possible, the use of a condensate pump is recommended.
- Pour 1 gallon of water into the ice storage bin to check for leaks in the drainage system. Tighten any connections that leak.
IMPORTANT: This ice maker is not a free-frequent drainage will cause a high rate of melting in the ice storage bin. How the drain system operates when water is pumped out
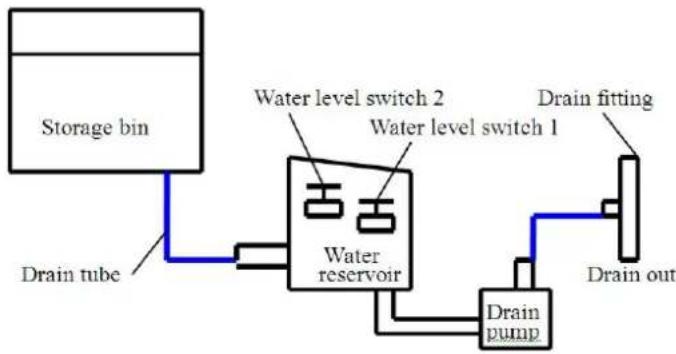
The components of the Pump-Out Water Drain System are
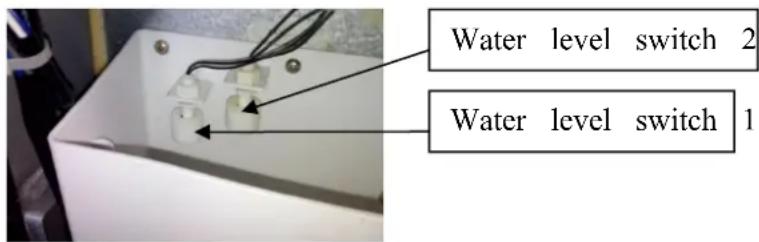
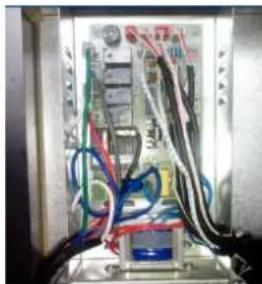
• Water reservoir PC Board & Water level switch 1, 2
• Water Drain Pump
OPERATION
- All water coming from the overflow and the melted ice is collected in the water reservoir.
- As soon as the water in the reservoir reaches the maximum level, the water level switch closes, transmitting a low voltage current to the PC Board.
- The PC board activates the water drain pump for 20 pumping out most of the water contained in the water
• The water can be pumped out up a rise of to 1.5m
natural_image
Interior view of an electrical control panel with visible wiring and components (no readable text or symbols)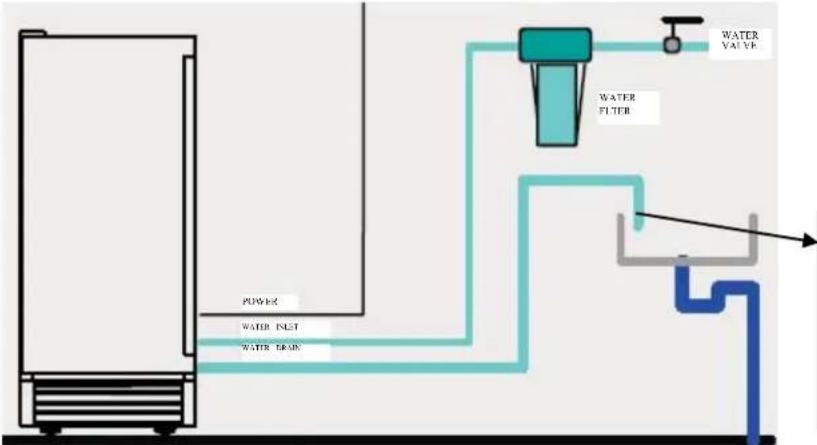
flowchart
graph TD
    A["Power"] --> B["Water inlet"]
    B --> C["Water drain"]
    C --> D["Water filter"]
    D --> E["Water valve"]
NOTE:
The outlet of the drain hos must be raised higher than the water surface to prevent the drained water from flowing back into the water reservoir.
over a on horizontal length of 1.5m (59").
flowchart
graph TD
    A["Water Filter"] --> B["Water Valve"]
    B --> C["Water Drain"]
    C --> D["Ground"]
WARNING!
If alarm buzzer sounds, turn off the ice maker and the water supply, remove all ice from storage bin, and wipe up any water that may have overflowed. Check if there is any water in water trough back of unit; if no water drainage pump may not be receiving the proper amount of power. Check power source. If the problem can corrected, turn on the unit again. Also check that none of the water lines are kinke If the problem remains, contact Customer Service.
- If water level switch 2 closes, transmitting a low-voltage current to the PC board, the PC board activates the buzzer alarm, informing you that the drain pump, water level switch or drain tube may be malfunctioning.
Schematic Diagram
flowchart
graph LR
    A["Storage bin"] --> B["Water reservoir"]
    B --> C["Water level switch 1"]
    B --> D["Water level switch 2"]
    B --> E["Drain fitting"]
    B --> F["Drain tube"]
    B --> G["Drain pump"]
    G --> H["Drain out"]
Control Panel: Description of buttons and indicator lights:
Indicator Lights:
- BIN FULL (RED): Bin is full
When this light is illuminated, the ice storage bin is full of ice or there is something blocking the bin full sensor. The unit will stop the ice making process until the level of ice has reduced or the object blocking the sensor is removed.
When ice-cubes are removed and the bin full sensor is cleared; the bin-full indicator light will blink for 3 minutes, then the unit will restart and return to the ice-making process.
- ICE (Green): Ice making process.
When this light is illuminated, the unit is working in the ice-making process which is controlled by a temperature sensor on the evaporator. When the indicator light flashes green, the unit is working to produce ice and is based on a fixed timer.
- HARVEST (Yellow): Ice Harvest process.
When this light is illuminated, the unit is in the process of harvesting the ice that was produced. The machine will continue to make and harvest ice until the bin-full sensor notes that the bin is full or until the unit is turned off or the system mode is changed by touching the "MODE" button.
-
Mode button: This button is used primarily for the quick start of the Ice making process or for service / repair issues. You can “quick start” the system by pressing the “MODE” button when first plugged in, power has been lost or if the unit has been turned off for a period of time.
-
Adjust button: This button is used primarily for service and or to select the size of the ice-cubes. To select the ice cubes, press and hold the button for approximately 3 seconds, the "HARVEST" (Yellow) indicator light will illuminate and the system will enter the Ice Size Selection mode. Release the button once the Harvest light (yellow) blinks and simply press the (+) or (-) to select larger or smaller cubes, the unit is shipped from the factory set to the normal sized cube
natural_image
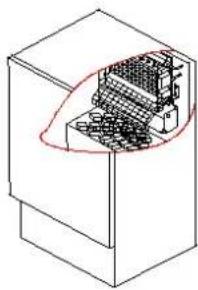
Isometric technical drawing of a mechanical housing or enclosure with internal components (no text or symbols)Ice making stage
natural_image
Isometric line drawing of a mechanical component with internal grid structure (no text or symbols)Ice harvest stage
natural_image
Isometric line drawing of a mechanical assembly with internal components (no text or symbols)Bin full stage
-
Turn on the water tap.
-
Press the ON/OFF button.
-
After 3 minutes, the machine will automatically go to the ice-making stage, and the sound of water flowing will be heard. (The ICE indicator light (GREEN) will blink during this process.)
-
Press the MODE button to quick start the Ice-Making process and allow the water trough to begin to fill automatically. (The ICE indicator light (GREEN) will blink during this process.)
-
When the batch of ice has been fully formed, the ice will automatically be harvested and drop to the ice storage bin. (The HARVEST indicator light (YELLOW) will blink during this process.)
-
When the ice storage bin is full, the sheet of cubes will not fall completely and will hold the bin-f sensor open. The machine will stop making ice automatically. (The BIN-Full indicator light (RED) will blink to indicate the bin is full or the sensor is being blocked.)
-
The unit will start making ice again after ice cubes are removed or when the bin-full sensor swing back to operating position. (The BIN-Full indicator light (RED) will continue to blink for approximately 3 minutes, then the system will automatically begin the ice-making process again.)
IMPORTANT:
- Although the unit has been tested and cleaned at the factory, due to long-term transit and storage, the first batch of cubes must be discarded.
- Never turn the water supply tap off when the ice maker is working.
- Never touch the evaporator when unit is running!
- To prevent ice from melting and to ensure proper ice formation, keep the door closed except when removing ice from the bin.
Ice Size Adjustment Guide:
-
Press and hold the "Adjust" button for approximately 3 seconds. The unit will enter the Ice Size Adjustment mode. The "HARVEST" LED (yellow) will be blinking continuously while the ice size is being selected. Release the button when the LED blinks continuously to adjust the ice size.
-
While in the Ice Size Selection mode, press the "Clean" (-) button or the "Mode" (+) button for the desired ice size.
Smaller ice setting:
By pressing the "Clean" (-) button, you can select the SMALL size of the ice cubes. The "ICE" LED (GREEN) will flash as you select the smaller ice size.
Larger ice setting:
By pressing the "Mode" (+) button, you can select the large size of the ice cubes. The "BIN FULL" LED (RED) will flash as you select the larger ice size.
After 10 seconds without any operation, the unit will return to the previous mode.
NOTE:
- If during the ice size adjustment mode the "BIN FULL", "ICE" and "HARVEST" LEDS blink all at once; this indicates that the unit is in the regular (middle) setting of the ice size.
- When the machine is in the cleaning stage or ice full stage, the ice size adjustment mode cannot be accessed
HOW THE ICE MAKER PRODUCES ICE
Set the ON/OFF button to the ON position.
The machine will automatically go in to the ice making stage.
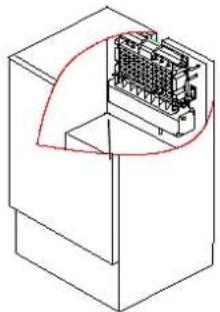
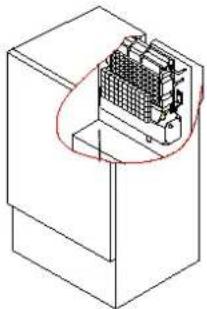
The unit will go through two distinct cycles during the production of your ice. The first cycle is the “freeze” where the ice is actually produced and the second is the “harvest” where the ice is dropped into the ice-bin.
The freeze cycle happens when water flows to the evaporator surface. The harvest cycle is when the ice is released and water enters the machine. A complete cycle takes about 20 minutes, but it depends on temperature and operating conditions.
Freeze: During the freeze cycle the compressor is pumping refrigerant, the fan motor is blowing air, and the water pump is circulating water. When the batch of ice has been fully formed, the ice maker stops the freeze cycle and the harvest cycle will begin.
Harvest: During the harvest cycle the compressor is still operating, but the water pump has stopped.
The hot gas valve opens, diverting hot refrigerant gas into the evaporator. The hot refrigerant gas warms the evaporator, causing the cubes to slide as a unit off the evaporator and into the storage bit. The freeze cycle will restart when all the cubes have been harvested.
How the machine uses the water
The ice maker begins with a fixed charge of water which is contained in the water trough. As the water flows to the freezing evaporator surface, the portion of water that does not contain mineral impurities freezes and sticks to the ice cube molds. The water containing impurities falls back into the water trough. During the ice making process, fresh water enters into the water trough continuously as the water in the trough freezes continuously in the evaporator.
Normal sounds
Your new ice maker may make sounds that are not familiar to you. Most of the new sounds are normal. Hard surfaces like the floor and walls can make the sounds louder than they actually are. The following list describes the sounds that might be new to you and what may be causing them.
- Rattling noises may come from the flow of the refrigerant or the water line. Items stored on top of the ice maker can also make noises due to vibration.
- The high efficiency compressor may make a pulsating or high-pitched sound.
- Running water may make a splashing sound.
- You may hear air being forced over the condenser by the condenser fan.
- During the harvest cycle, you may hear the sound of ice cubes falling into the ice storage bin.
CARE AND MAINTENANCE
Cleaning The Icemaker
CAUTION
If the ice maker is left unused for a long time, before the next be thoroughly cleaned. Follow carefully any instructions provided for cleaning or use of sanitizing solutions. Do not leave any solution the ice maker after cleaning.
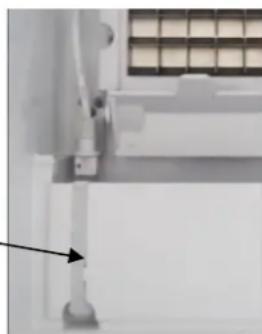
Periodic cleaning and proper maintenance will ensure efficiency, top performance, and long life. The maintenance intervals listed are based on normal conditions. You may want to shorten the intervals if you have pets, or there are other special considerations.
Important Note:
Never keep anything in the ice storage bin that is not ice: objects like wine and be bottles are not only unsanitary, but the labels may slip off and plug up the drain.
! WARNING
Before proceeding with cleaning and maintenance operations, make s power line of the unit is disconnected and the water line is shut o
Cleaning the exterior
The door and cabinet may be cleaned with a mild detergent and warm water solution such as 1 oz. dishwashing liquid mixed with 2 gallons of warm water. Do not use solvent-based or abrasive cleaners. Use a soft sponge and rinse with clean water. Wipe with a soft clean towel to prevent water spotting.
If the door panel is stainless steel, it may discolor when exposed to chlorine gas and moisture. Clean stainless steel with a mild detergent and warm water solution and a damp cloth. Never use an abrasive cleaning agent.
Cleaning the interior
The ice storage bin should be sanitized occasionally. Clean the water trough before the ice maker is used first time and reused after stopping for an extended period of time. It is usually convenient to sanitize the trough after the ice making system has been cleaned, and the ice storage bin is empty.
- Disconnect the power to the unit.
-
Open the door and take out the removable ice storage bin. With a clean cloth, wipe down the interior of unit and ice bin with a sanitizing solution made of 1 ounce of household bleach or chlorine and 2 gallons of hot (95°F - 115°F) water.
-
Pull off the drain hose of the water trough to drain off all w
-
Rinse thoroughly with clear water.
-
After draining off all water, put back the drain hose of the w through to the original location. Right location of the
-
Put the ice storage bin inside the unit.
-
Reconnect power to the unit.
The ice scoop should be washed regularly. Wash it just like any container.
natural_image
Close-up of a mechanical component with a black arrow pointing to a small part, no visible text or symbols.Condenser cleaning
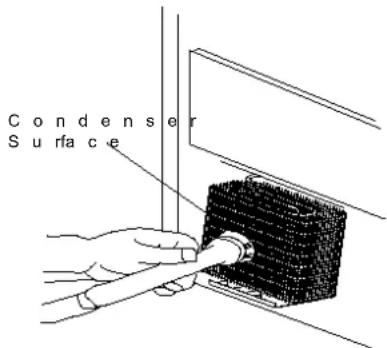
A dirty or clogged condenser prevents proper airflow, reduces ice making capacity, and causes higher than recommended operating temperatures that may lead to component failure. Have the condenser cleaned at least once every six months.
- Unplug the ice maker or disconnect power.
- Gently pull off the lower front louver.
- Remove dirt and lint from the condenser and the unit compartment with the brush attachment of a vacuum cleaner
- Reassemble the lower front louver.
- Plug in the ice maker or reconnect power.
Cleaning the water distribution tube
When you find the ice cubes are incompletely formed or the output is low, the water distribution tube may be blocked. Turn off the power button, gently take out the water distribution tube, locate the hole in the distribution tube and use a pointed object such as a toothpick to dredge the holes. Then put t water distribution tube back to its original position. If the tube is badly blocked, clean it as follows:
- Shut off the water supply
- Disconnect the water hose from the distribution tube.
- Gently take out the distribution tube.
- With a brush, clean the tube with a dilute solution of warm water and a mild detergent such as dishwashing liquid. After removing the dirt and lint from the surface, rinse the tube with clean water.
- Replace the distribution tube.
- Reconnect the water supply.
The ice machine cleaner contains acids.
DO NOT use or mix with any other solvent-based cleaner products.
Use rubber gloves to protect hands. Carefully read the material safety in on the container of the ice machine cleaner.
Discard the first batch of ice produced after cleaning.
Minerals that are removed from the water during the freezing cycle will eventually form a hard, scaly deposit in the water system. Cleaning the system regularly helps remove the mineral scale buildup. How often to clean the system depends upon how hard your water is or how effective your filtration may be. With hard water of 15 to 20 grains/gal. (4 to 5 grains/ liter), you may need to clean the sy as often as once every 6 months.
- Make sure that all the ice is off the evaporator. If ice is being formed, wait until the cycle is completed, then press the machine's ON/OFF button on the control panel.
- Remove all ice from the storage bin.
- Keep the ice maker connected to the water supply. Pour 8 oz. of Nickel-Safe Ice Maker Cleaner Solution into the water trough. Then press the ON/OFF button and the CLEAN button, initiating the wash cycle. The machine will run in the Automatic Clean Mode.
- Allow 30 minutes for proper cleaning. After cleaning, press the ON/OFF button again. Use a drain hose on the front of the water trough to drain off the waste water to a convenient container.
NOTE: Don't drain off the waste water to the inside of the cabinet.
-
Repeat steps 3 and 4 (without Ice Maker Cleaning Solution) three times to rinse the ice making system thoroughly.
-
Prepare a sanitizing solution made of 1 ounce of household bleach and 2 gallons of hot water (95°F to 115°F). Wipe the entire bin inside and outside, covering the entire surface of the walls.
-
Fill a spray bottle with the sanitizing solution and spray all corners and edges, making sure to cover all surfaces with the solution.
-
Allow the solution to be in contact for at least 3 minutes, and then dry.
-
Repeat step 5 to rinse the ice making system one more time.
-
Press the ON/OFF button again. The machine will return to the regular ice making mode.
-
Discard the first batch of ice.
Power Failure
Most power failures are corrected within a few hours and should not affect the temperature of your icemaker if you minimize the number of times the door is opened. If the power is going to be off for longer period of time, you need to take the proper steps to protect your food.
Vacation Time
Short vacations: Leave the unit operating during vacations of less than three weeks.
Long vacations: If the icemaker will not be used for several months, remove all of the ice and unplug the power cord. Clean and dry the interior thoroughly. To prevent odor and mold growth, leave the door open slightly: blocking it open if necessary
Moving Your Icemaker
- Remove all the food.
- Securely tape down all loose items inside your unit.
- Turn the leveling screws up to the base to avoid damage.
- Tape the doors shut.
- Be sure the unit stays in the upright position during transportation.
Preparing the ice maker for long term storage
If the ice maker will not be used for a long time, or is to be moved to another place, it will be necessary to drain the system of water.
- Shut off the water supply at the main water source.
- Disconnect the water supply line from the water inlet.
- Shut off the electric supply at the main electrical power source.
- Take out the ice storage bin to remove any remaining ice and water. Dry the bin.
- Pull off the drainage tube of the water trough to drain off all water.
- Leave the door open to allow for circulation and to prevent mold and mildew.
- Leave water supply line and power cord disconnected until ready to reuse.
IMPORTANT:
- Do not touch the power plug when your hands are wet.
- Never unplug the unit by pulling on the cord. Grasp the plug and pull out firmly.
Energy Saving Tips
- The unit should be located in the coolest area of the room, away from heat producing appliances or heating ducts, and out of direct sunlight.
TROUBLESHOOTING
Before Calling for Service
If the unit appears to be malfunctioning, read through the OPERATION section of this manual first. If the problem persists, check the Troubleshooting Guide on the following pages. Some of the problems mentioned in the Guide can be solved easily without a service call.
| Problem | Possible Cause | Probable Correction |
| The machine doesn't operate. | The ice maker is unplugged. | Plug the ice maker in. |
| The fuse is blown. | Replace fuse. If it happens again, call for service to check for a short circuit in the u | |
| The ice maker power button set at OFF. | Switch the ice maker power button to ON. | |
| The ice storage bin is full of | Remove some ice cubes. Be sure the ice-f probe is free of ice. | |
| The water doesn't feed in after the machine starts. | The water supply tap is turne off. | Turn on the water supply tap. |
| The water supply pipe is not properly connected. | Reconnect the water supply pipe. | |
| Machine makes ice, but bin does not fi up with ice. | The condenser may be dirty. | Clean the condenser. |
| The air flow to the ice make may be obstructed. | Check the installation. | |
| The ambient temperature and water temperature are high, c unit is near some heat sourc | Check the installation. | |
| Water is leaking ou of the unit. | Some water falls to the floor when you open the door to remove ice from storage bin. | Normal condensation on the door or some together with ice. Take care when you take ice. |
| Water supply connection is leaking. | Tighten fitting. See Connecting the water lin | |
| Drain pipe higher than drain outlet. | Lower drain pipe. | |
| Cubes are partially formed or are white on the bottom. | Not enough water in the wat trough. | Check if the water supply pressure is below psig. |
| Check water supply or filter may be restrict | ||
| Check for a water leak at the water trough | ||
| Noise during operation | The feet are not leveled and locked. | Level and lock the feet. See Leveling the Maker. |
| Certain sounds are normal. | See Normal Sounds. | |
| The ice maker stop suddenly while making ice. | The electricity is off. | Reconnect the power supply line. |
| The room temperature is out the stated range. | Cut off the electricity and leave the ice ma disconnected until the temperature returns to within the stated range. | |
| The ice storage bin is full of | Remove some ice cubes; make sure the ic probe is free of ice. | |
| The body of the ic maker is electrified | The ground line isn't in the socket. | Use a socket meeting the grounding requirements. |
| Scaling occurs frequently inside the machine. | The hardness level of the wa is too high. | Install a water-softening device in front of t water inlet. |
| Water leaks from the ice storage bin | The drain hole below the ice storage bin is blocked. | Remove the ice storage bin and clean the hole. |
| The drain hose is kinked or improperly placed higher than the floor of the ice storage b | Check the drain hose to be sure water ca drained out unhindered. | |
| SERVICE FOR YOUR APPLIANCE | ||
| We are proud of our customer service organization and the network of professional service technicians that provide service on your Avanti appliances. With the purchase of your Ava appliance, you can have the confidence that if you ever need additional information or as Avanti Products Customer Service team will be here for you. Just call us toll-free. | ||
| AVANTI PRODUCTS CUSTOMER SERVICES | ||
| Product Information800-323 5029 | Whatever your questions are about our produ help is available. | |
| Part Orders800-220 5570 | You may order parts and accessories that w delivered directly to your home.You may order these items by personal che money order, Master Card, or Visa. | |
| In-Home Repair Service800-220 5570 | An Avanti Products authorized service center provide expert repair service, scheduled at a that is convenient for you. Our trained servic know your appliance inside and out. | |
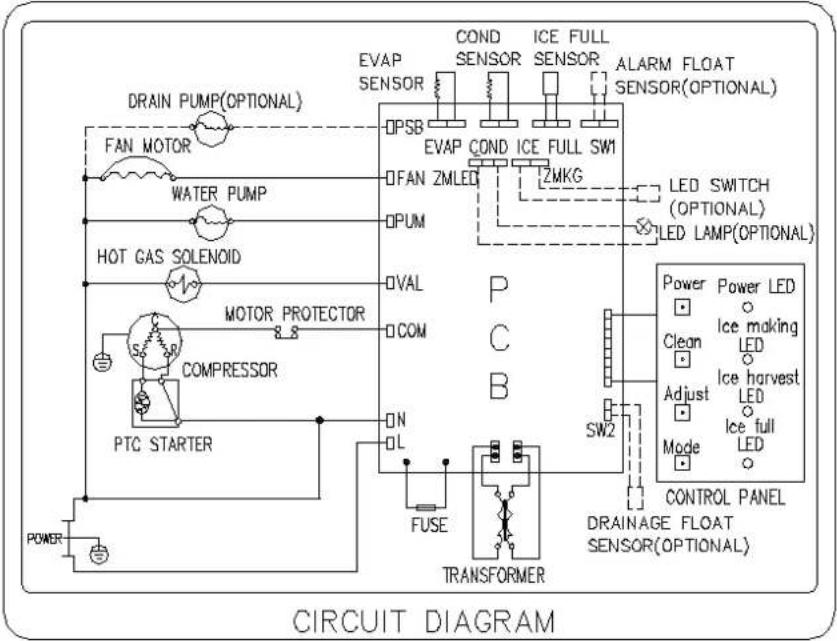
| WIRING DIAGRAM | ||
 | ||
| YOUR AVANTI PRODUCTS WARRANTY | Staple your sales receipt here. Proof original purchase date is needed to obtain service under warranty. | |
| WHAT IS COVERED - LIMITED ONE-YEAR WARRANTYAvanti Products warrants that the product is free from defects in materials and/or workmanship for twelve (12) months from the date of purchase by the original owner. The foregoing timeline begins the date of purchase, and shall not be stalled, tolled, extended, or suspended for any reason what described in detail in the warranty document. For one year from the date of purchase by the origin Avanti products will, at its option, repair or replace any part of the product which proves to be de material or workmanship under normal use. Avanti Products will provide you with a reasonably similar that is either new or factory refurbished. During this period Avanti Products will provide all parts an necessary to correct such defects free of charge, so long as the product has been installed and o accordance with the written instructions in this manual. In rental or commercial use, the warranty pe days. All Avanti appliances of 4.4 cubic feet capacity or less must be brought/sent to the appliance center for repair. | ||
| LIMITED SECOND THROUGH FIFTH YEAR WARRANTYFor the second through the fifth year from the date of original purchase, Avanti Products will provide replacement compressor free of charge due to a failure. You are responsible for the service labor charges. In rental or commercial use, the limited compressor warranty is one year and nine months involved to move the product to the service center and back to the user's home, as maybe require user's responsibility. | ||
| WARRANTY EXCLUSIONS / WHAT IS NOT COVERED:The warranty coverage described herein excludes all defects or damage that are not the direct fault Products, including without limitation, one or more of the following: | ||
| A failure to comply with any applicable state, local, city, or county electrical, plumbing and/or building codes, regulations, or laws, including failure to install the product in strict conformity with local fire and t and regulations.Any external, elemental and/or environmental forces and factors, including without limitation, rain, wind, sand, floods, fires, mud slides, freezing temperatures, excessive moisture or extended exposure to humid lightning, power surges, structural failures surrounding the appliance, and acts of God. | ||
| Content losses of food or other content due to spoilage.Incidental or consequential damagesParts and labor costs for the following will not considered as warranty:Evaporator doors, door springs, and/or framesInner door panels, door shelves, door rails, and/or door supports.Light bulbs and/or plastic housing.Plastic cabinet liners.Punctured evaporator that voids the warranty the complete sealed system. | Shipping and handling costs associated with the replacement of the unit.Repairs performed by unauthorized servicers.Service calls that are related to external problem such as abuse, misuse, inadequate electrical power, accidents, fire, floods, or any other acts God.Failure of the product if it is used for other intended purpose.The warranty does not apply outside the Continental USA.Surcharges including but not limited to, any after hour, weekend, or holiday service calls, tolls, trip charges, or mileage expense for service car remote areas. | |
| In no event shall Avanti Products have any liability or responsibility whatsoever for damage to surro property, including cabinetry, floors, ceilings, and other structures and/or objects around the product. excluded from this warranty are scratches, nicks, minor dents, and other cosmetic damages on exte and exposed parts; Products on which the serial numbers have been altered, defaced or removed; for customer education, or visits where there is nothing wrong with the product; correction of installa (you are solely responsible for any structure and setting for the product, including all electrical, plun other connecting facilities, for proper foundation/flooring, and for any alterations including without limita cabinetry, walls, floors, shelving etc., as well as the resetting of breakers or fuses. | ||
| OUT OF WARRANTY PRODUCTAvanti Products is under no obligation, at law or otherwise, to provide you with any concessions, in repairs, pro-rates, or product replacement, once this warranty has expired.WARRANTY - REFRIGERATION - COMPRESSO | ||
Registration Information
Thank you for purchasing this fine Avanti product. Please fill out this form and return it to the following address within 100 days from the date of purchase and receive these important benefits:
Avanti Products LLC
3265 Meridian Pkwy Ste. 114 Weston, FL 33331 USA
Protect your product:
We will keep the model number and date of purchase of your new Avanti product on file to help you refer to this information in the event of an insurance claim such as fire or theft.
▶ Promote better products:
We value your input. Your responses will help us develop products designed to best meet your future needs.
-(detach here)-
Avanti Registration Card
Name Model # Serial #
Address Date Purchased Store / Dealer Name
City State Zip E-mail Address
Area Code Phone Number
Did You Purchase An Additional Warranty
□ Extended
□ None
Reason for Choosing This Avanti Product: Please indicate the most important factors That influenced your decision to purchase this product:
□ Price
□ Product Features
□ Avanti Reputation
□ Product Quality
□ Salesperson Recommendation
□ Friend / Relative Recommendation
□ Warranty
□ Other:
Comments:
Occupation
As your Primary Residence, Do You:
□ Own □ Rent
Your Age:
□ under 18 □ 18-25 □ 26-30
□ 31-35 □ 36-50 □ over 50
Marital Status:
□ Married □ Single
Is This Product Used In The:
□ Home □ Business
How Did You Learn About This Product:
□ Advertising
□ In-Store Demo
□ Personal Demo
| IME49U3S-IS 07/05/2022 | PRINTED IN CHINA |
- APPLIANCE SAFETY
- DANGER
- WARNING
- CAUTION
- WARNING:
- IMPORTANT SAFEGUARDS
- ! DANGER !
- Electrical Connection
- EXTENSION CORD
- SURGE PROTECTOR
- HELP US HELP YOU...
- Read this guide carefully.
- Avanti Customer Service 800-220-5570
- Write down the model and serial numbers.
- CAUTION:
- IF YOU NEED SERVICE
- PARTS AND FEATURES
- IMPORTANT SAFETY INSTRUCTIONS
- This Unit Is For Indoor Use Only
- - SAVE THESE INSTRUCTIONS -
- INSTALLATION INSTRUCTIONS
- Before Using Your Icemaker
- INSTALLATION OF YOUR ICEMAKER
- Installing the stainless steel handle
- Illustration # 1 Illustration # 2
- Leveling the ice maker
- Reversing the door swing
- To remove door from hinges:
- Water Supply
- IMPORTANT:
- Connecting the water line:
- Drain
- IMPORTANT: This ice maker is not a free-frequent drainage will cause a high rate of melting in the ice storage bin. How the drain system operates when water is pumped out
- OPERATION
- NOTE:
- WARNING!
- Indicator Lights:
- Ice Size Adjustment Guide:
- Smaller ice setting:
- Larger ice setting:
- HOW THE ICE MAKER PRODUCES ICE
- How the machine uses the water
- Normal sounds
- CARE AND MAINTENANCE
- Important Note:
- ! WARNING
- Cleaning the exterior
- Cleaning the interior
- Condenser cleaning
- Cleaning the water distribution tube
- Power Failure
- Vacation Time
- Moving Your Icemaker
- Preparing the ice maker for long term storage
- Energy Saving Tips
- TROUBLESHOOTING
- Before Calling for Service
- Registration Information
- Avanti Products LLC
- Meridian Pkwy Ste. 114 Weston, FL 33331 USA
- Protect your product:
- ▶ Promote better products:
- Avanti Registration Card
Brand : Avanti
Model : IME49U3S-IS
Category : Ice Maker