OT-1500S - Heating Ravanson - Free user manual and instructions
Find the device manual for free OT-1500S Ravanson in PDF.


| Type de produit | Chauffage de terrasse extérieur |
| Marque | Ravanson |
| Modèle | OT-1500S |
| Puissance | 1500 W (deux niveaux : 750 W / 1500 W) |
| Tension | AC 220-240 V |
| Fréquence | 50/60 Hz |
| Indice de protection | IPX4 (résistant aux éclaboussures) |
| Utilisation | Extérieur uniquement |
| Type d'élément chauffant | Infrarouge avec réflecteur |
| Réglages de chaleur | 2 (bas/haut via interrupteur à cordon) |
| Assemblage requis | Oui, plusieurs tubes et socle |
| Entretien | Nettoyer le réflecteur et le filament tous les mois |
| Cordon d'alimentation | Amovible, ne pas couvrir |
| Sécurité | Ne jamais laisser sans surveillance, ne pas couvrir |
| Température de surface | Très chaud – risque de brûlure |
| Âge minimal d'utilisation | 8 ans avec supervision |
| Poids | Non spécifié |
| Dimensions | Non spécifié |
Frequently Asked Questions - OT-1500S Ravanson
User questions about OT-1500S Ravanson
0 question about this device. Answer the ones you know or ask your own.
Ask a new question about this device
Download the instructions for your Heating in PDF format for free! Find your manual OT-1500S - Ravanson and take your electronic device back in hand. On this page are published all the documents necessary for the use of your device. OT-1500S by Ravanson.
USER MANUAL OT-1500S Ravanson
EN Original instructions
Ogrzewacz tarasowy
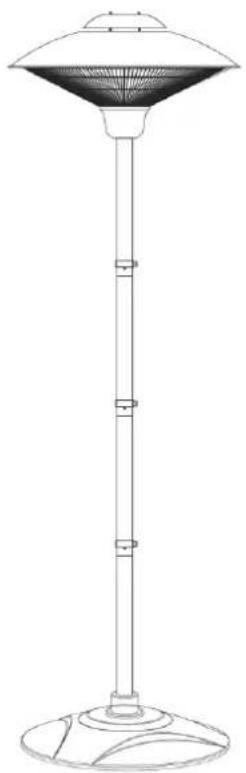
Patio Heater
natural_image
Line drawing of a standard outdoor patio lamp with a conical shade and vertical support structure (no text or symbols)MODEL: OT-1500S
Producent:
Ravanson®
Ravanson Ltd.
natural_image
Technical line drawing of a circular mechanical component with concentric rings and mounting holes (no text or symbols)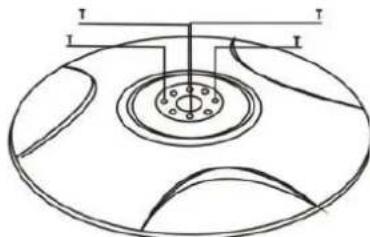
natural_image
Technical line drawing of concentric circular components with mounting holes and vertical supports (no text or symbols)natural_image
Simple line drawing of an oval shape with internal curved lines and a central circular feature (no text or symbols)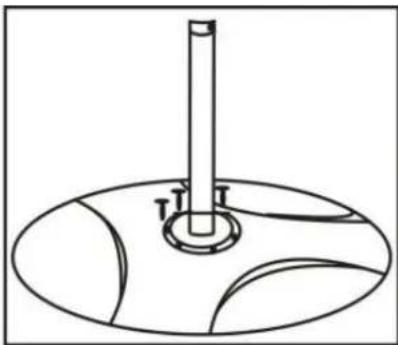
natural_image
Simple line drawing of a cylindrical object mounted on an oval base with curved surfaces (no text or symbols)natural_image
Line drawing of a vertical cylindrical device with base and top components, no text or symbols present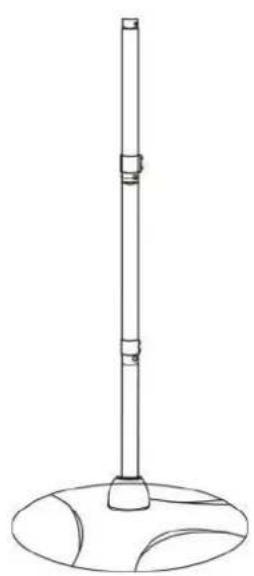
natural_image
Line drawing of a vertical cylindrical object mounted on a circular base (no text or symbols)natural_image
Technical line drawing of a vertical cylindrical device with base and mounting features (no text or symbols)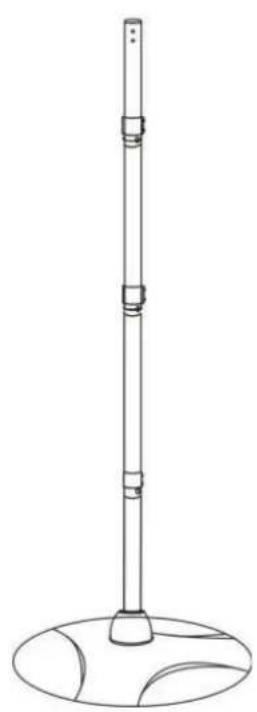
natural_image
Line drawing of a vertical cylindrical device with a base, showing internal components and no text or symbols.natural_image
Line drawing of a traditional-style street lamp with a conical canopy and vertical support structure (no text or symbols)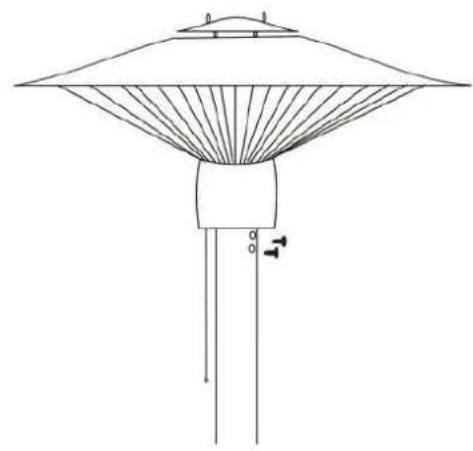
natural_image
Line drawing of a traditional Japanese umbrella with spout and support structure (no text or symbols)OBSŁUGA
Before first use, always read the safety instructions and warnings included in this guide.

Failure to observe the below mentioned safety warnings and safety guidelines for may cause to electric shock, fire and/or serious injuries

Keep safety instructions and warnings at hand for future reference

The device must be installed in accordance with the applicable law and USED ONLY OUTSIDE

ATENTION! FOR OUTDOOR USE ONLY!
SAFETY INSTRUCTIONS
- Please follow all the safety precautions listed below for safety and to reduce the risk of injury or electrical shock.
- Read this Instruction Manual carefully to maximise this appliance's performance and keep for future reference.
- Always ensure that your power supply voltage matches
this appliance's rating label.
-
Never leave the appliance unattended while in operation. Always unplug the appliance when not in use.
-
This heater is hot when in use. To avoid burns, do not let bare skin touch hot surfaces.
Caution: Some parts of this product can become very hot and cause burns. Particular attention has to be given when children and vulnerable people are present.
-
Always use the handle when moving the heater (if available) or hold on the sides if not available (make sure the unit is turned off). Do not move the unit when in use. Wait until the heater is completely cool before moving and check that it has been unplugged from the power supply.
-
Position the unit at least 1m away from highly combustible materials such as trees, leaves, dry grass and bushes, furnitures, pillows, and curtains
-
The heater must not face with the heating element pointing upwards towards a ceiling. The heater element must be facing the area it is to heat.
Warning: In order to avoid overheating do not cover the heater.
- This appliance can be used by children aged from 8 years
and above and persons with reduced physical, sensory or mental capabilities or lack of experience and knowledge if they have been given supervision or instruction concerning use of the appliance in a safe way and understand the hazards involved.
-
Children shall not play with the appliance. Cleaning and user maintenance shall not be made by children without supervision.
-
Do not use the product if there are any visible signs of damage to the appliance.
-
Do not attempt to repair or adjust any electrical or mechanical functions on this unit. The unit does not contain any user serviceable parts. Only a qualified electrician should perform servicing or repairs. Attempting to repair the unit yourself will void your warranty.
-
If the mains cable is damaged it must be replaced by the manufacturer, its service agent, or similarly qualified persons in order to avoid a hazard.
-
Do not handle the element with bare hands. If it is inadvertently touched, remove finger marks with a soft cloth and methylated spirits or alcohol, otherwise the
marks will burn into the element causing premature heater failure.
- Do not replace or attempt to replace the element in this product.
- This product is suitable for outdoor use. Do not operate the appliance in direct sunlight, near heat sources, humid environments or in places near water or other liquids such as bathrooms, shower or swimming pool.
- This product must not be left outdoors exposed to the elements for long periods of time.
- Do not operate with wet hands or spill water or other liquids on to the appliance the mains cable or plug.
- Do not run the power cable under carpeting. Do not cover the power cable with rugs, runner, or similar coverings. Arrange the power cable away from foot traffic and where it will not be tripped over.
- Do not wind the power cable around the unit.
- Do not insert or allow foreign objects to enter any ventilation or opening on the heater, as this may result in electric shock, fire, or damage to the heater.
- To prevent a possible fire, do not block the air vents.
- Do not use the appliance in areas where petrol, paints
or other flammable substances are used or stored.
-
Always position the appliance with the mains plug in an accessible position and avoid the use of an extension cables as they may overheat and create a potential fire risk.
-
Always ensure the heater is plugged into a suitable socket, one that is tested for outdoor use.
-
To disconnect heater, turn controls to OFF, then remove plug from socket. Do not unplug by pulling on the power cable.
-
Always unplug the unit and ensure the unit is completely cold before moving, cleaning or storing.
-
This heater is intended for domestic use only and should not be used commercially for contract purposes.
Any alternative use, not recommended by the manufacturer, may result in fire, electric shock, or injury to persons.
- The use of attachments on the heater is not recommended. Do not use this heater with a programmer, timer, separate remote control system or any other device that switches the heater on automatically, since a fire risk exists if the heater is covered or positioned incorrectly.
Warning: This heater does not equipped with a device to control the room temperature. Do not use this heater in small rooms when occupied by persons not capable of leaving a room on their own, unless constant supervision is provided.
-
Children of less than 3 years should be kept away unless continuously supervised.
-
Children aged from 3 years and less than 8 years shall only switch on/off the appliance provided that it has been placed or installed in its intended normal operating position and they have been given supervision or instruction concerning use of the appliance in a safe way and understand the hazards involved. Children aged from 3 years and less than 8 years shall not plug in, regulate and clean the appliance or perform user maintenance.
-
CAUTION — Some parts of this product can become very hot and cause burns. Particular attention has to be given where children and vulnerable people are present.
-
The appliance shall, under no circumstances, be covered with insulating material or similar material.
-
National regulations concerning the discharge of air have
to be fulfilled.
-
CAUTION—Prevent the supply cord touch the enclosure of heater.
-
Check exterior walls for areas of damage before installing the heater.
-
Check exterior walls for communication and electrical cables and pipelines. Should any service lines be present in the immediate vicinity do not install your heater, find an alternative location to install this product.
-
Always use on a dry, suitably strong, stable, flat and level surface.
-
Do not position directly above or below an electrical socket.
-
Do not remove any of the warning stickers or signs from the product.
ASSEMBLY
Unpack the heater making sure that all the items present and there are no components left in the box and that the heater head is free from any packing material.
Using the detailed drawing follow the steps to assemble your heater.
Do not connect the heater to the power supply until all the assembly is complete.
Do not connect the heater to the power supply if any of the components or the power cable is damaged in any way. If in doubt contact your supplier.
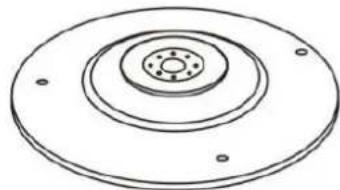
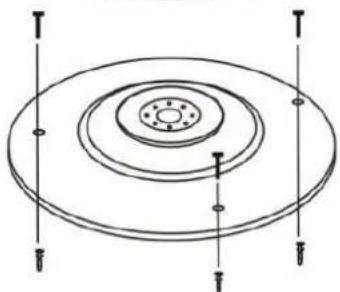
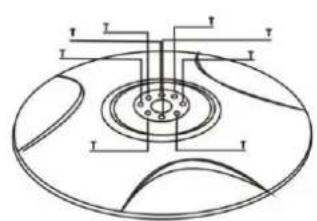
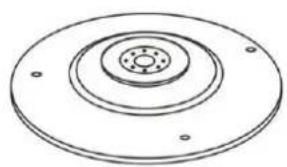
STEP 1
Screw out 8pcs M6*30mm in the cover and weight.
Fix the weight to the ground by 3pcs plastic anchors and 3pcs M4*50mm screws.
Fix the cover and weight by 4pcs M6*30mm screws.
natural_image
Technical line drawing of a circular mechanical component with concentric rings and mounting holes (no text or symbols)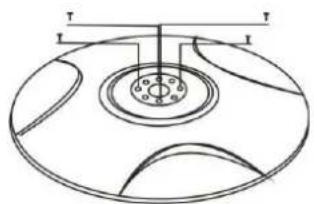
natural_image
Technical line drawing of a circular mechanical component with concentric rings and central holes (no text or symbols)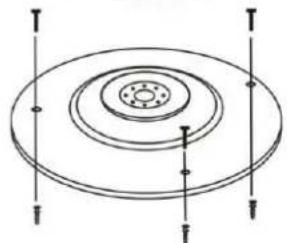
natural_image
Technical diagram of concentric circular components with vertical arrows indicating measurement or alignment (no text or symbols)STEP 2
Fix the bottom tube to the base by using 4pcs 6*35mm screws.
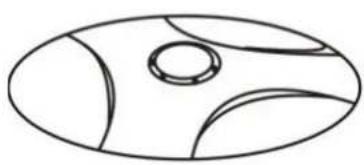
natural_image
Simple line drawing of an oval shape with internal curved lines and a central circular hole (no text or symbols)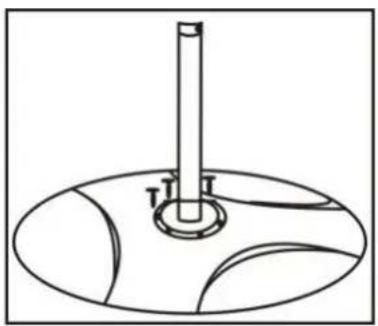
natural_image
Simple line drawing of a cylindrical object mounted on a circular base with curved surfaces (no text or symbols)STEP 3
Place the decoration cover onto the bottom Tube.
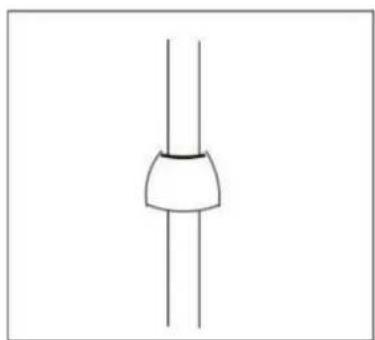
natural_image
Simple line drawing of a vertical cylindrical object with two horizontal lines extending outward (no text or symbols)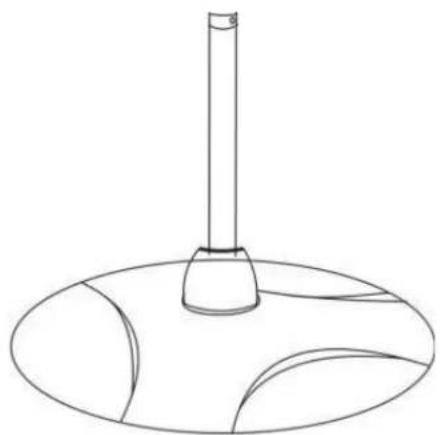
natural_image
Simple line drawing of a cylindrical object with a base, resembling a lamp or stand (no text or symbols)STEP 4
Fix the bottom tube and second tube by 3pcs 5*6mm screws and put first cord support onto the second tube
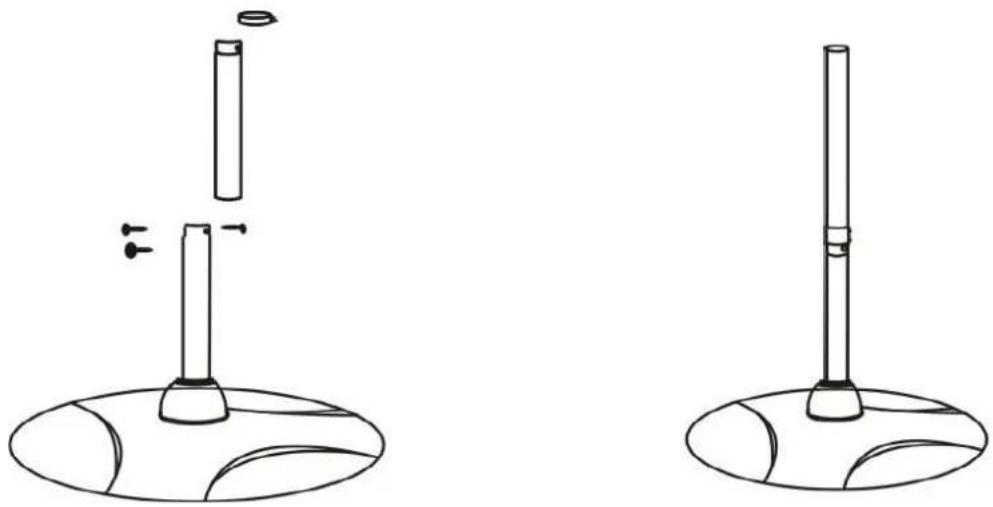
STEP 5
Use same method as step 3 to fix third tube and put second cord support onto the third tube
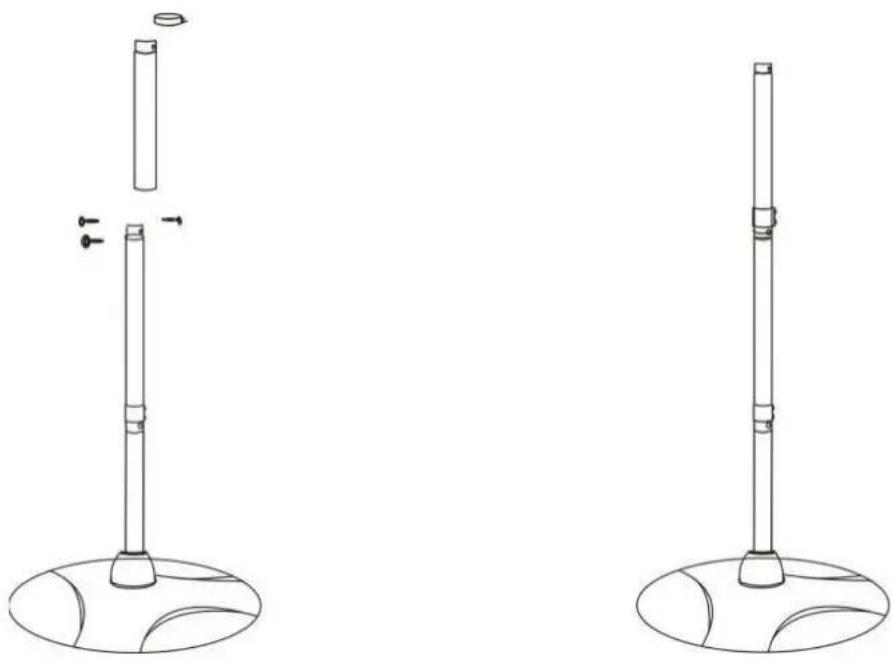
natural_image
Technical line drawing of two identical mechanical components mounted on circular bases, with no text or symbols present.STEP 6
Use same method as step 3 to fix top tube and put third cord support onto the top tube
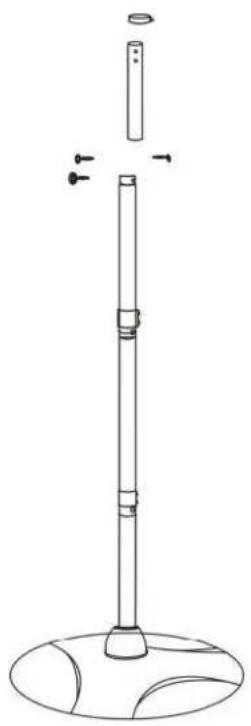
natural_image
Line drawing of a vertical cylindrical device with base and mounting base, showing internal components and mounting points (no text or symbols)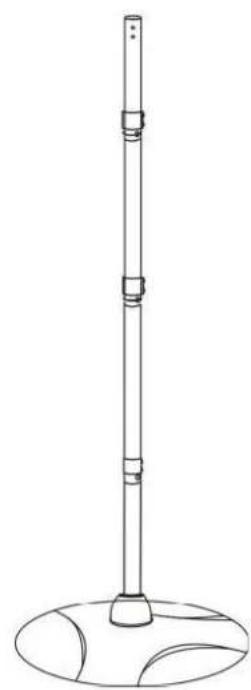
natural_image
Line drawing of a vertical pole with a base and circular base (no text or symbols)STEP 7
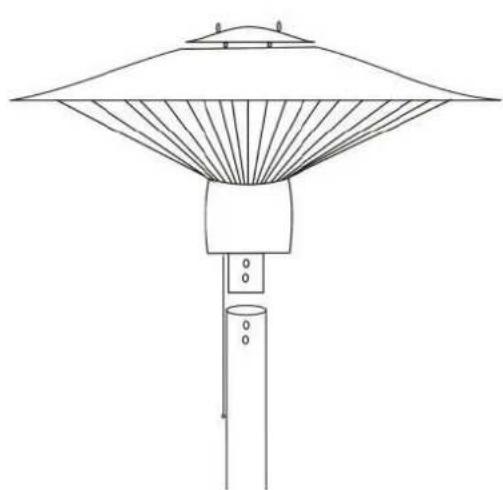
Fix the heater head with top tube by 2pcs 4*12mm screws
natural_image
Line drawing of a traditional-style street lamp with a conical canopy and vertical support structure (no text or symbols)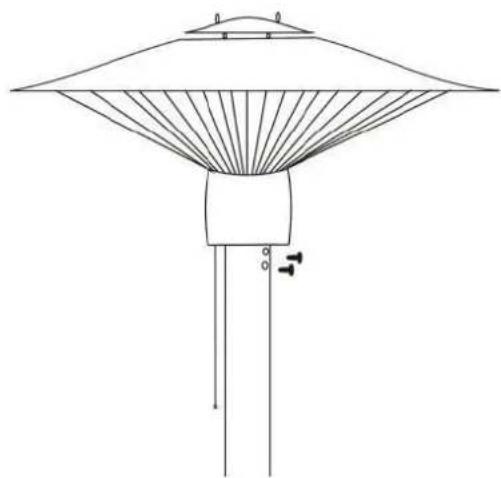
natural_image
Line drawing of a traditional Japanese-style umbrella with fan-shaped canopy and support structure (no text or symbols)OPERATION
- Connect the power cable to a power socket that is located in a safe, dry area.
- The heating power level can be set by pulling the power switch (pull line near the heating head): level 0, level 1 (750 W), level 2 (1500 W).
- Although the heater is shower proof, do not use when raining or in wet conditions.
- Always disconnect the power cable from the electrical supply, when the heater is not in use.
MAINTENANCE AND CLEANING
Attention! Careful and regular maintenance of Infrared Heater is required to attain a long and efficient operation of your appliance.
- Check the cleanliness of the Reflector and IR-Filament at least once a month. If necessary, apply cleaning and maintenance instructions.
- The number of checks may be increased considering the amount of dust in the environment.
- Check the deformation of the Reflector, Wire and Frame visually while cleaning the appliance. In case of any deformation, consult a qualified technician.
- Check the power cable and plug visually while cleaning the appliance. In case of any deformation, consult a qualified technician.
- It is recommended to change the reflector every 2 years for more efficient operation.
CLEANING
Attention! Always un-plug the heater from the outlet. Allow it to cool down before cleaning.
Clean the outside of the heater by wiping with a dry or slightly wet cloth and buff with a dry cloth.
Do not use any detergents or abrasives and do not allow any water to enter the heater.
Do not submerge in water!
Regular and careful cleaning helps your heater to operate efficiently for many years.
- Unplug your power cable for your safety before cleaning your appliance.
- Take out the front grid wire through the inlets on the frame using a slotted screwdriver.
- The reflector and filament must be cleaned with a soft cloth, a smooth brush or cool or dry air. The cloth may be damp but never too wet and the cleaner should not include any chemicals.
- Refrain from using cleaning materials likely to damage the reflector (cleanser etc.).
- Reinsert the wire grid using a slotted screwdriver.
FAILURES
If any damage is disclosed after purchase, contact the seller.
Follow the rules in this manual.
Do not modify the product.
When the device does not work, unplug it. Check if there is power in the socket the device is connected to.
If power was not disrupted, do not attempt to repair the device on your own. Contact manufacturer's authorized service centre.
TECHNICAL SERVICE
All devices undergo a thorough post production control. If you still find any fault, you can ask technical service for help.
Before you talk to technical service, check if:
• There is power in the wall socket.
- You followed this manual when turning the device on.
TRANSPORT AND STORAGE
- When the heater is not used for long periods of time, it should be protected from dust and stored in a clean, dry place.
- Store out of reach of children. Protect against dust, humidity, and mechanical damage.
- Transport in the original packaging. Protect against dust, humidity, and mechanical damage.
• Always let the device cool down prior to storage or transport.
NOTE!
The illustrations and descriptions may differ from reality depending on the product model. Manufacturer reserves the right to change the technical parameters of the device without notice.
TECHNICAL PARAMETERS
Model:OT-1500S
| Voltage | AC220-240V |
| Frequency | 50/60Hz |
| Electric Power | 1500W |
| International Protection Rating | IPX4 |
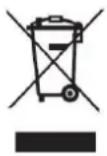
Such a marking informs that this equipment cannot be disposed of together with other household waste. The user is obliged to pass the device to a company authorized to dispose of electronic/ electric devices.
Both the person who deals with direct disposal, shops and other local units make a system enabling to dispose of the device. Proper procedures
concerning electric/electronic equipment disposal are intended to avoid any harmful impact to humans and environment resulting from dangerous components and improper storage or processing of the devices. Substances having negative environmental impact have been reduced to make the product safer after its disposal.
Brand : Ravanson
Model : OT-1500S
Category : Heating