LC-RB - Home trainer York Fitness - Free user manual and instructions
Find the device manual for free LC-RB York Fitness in PDF.


| Product Type | Recumbent Exercise Bike |
| Brand | York Fitness |
| Model | LC-RB (Item #YRK53105A) |
| Maximum User Weight | 180 kg (396 lbs) |
| Resistance System | Motorized magnetic resistance |
| Resistance Levels | Adjustable via console (0–350 Watts in Watt mode) |
| Console Display | LCD showing Time, Speed, Distance, Calories, Pulse, RPM, Watt |
| Programs | Manual, Beginner, Advance, Sporty, Cardio (Heart Rate Control), Watt, Body Fat |
| Heart Rate Monitoring | Hand pulse sensors; recovery test function |
| Power Supply | Plug-in adapter (mains powered); includes USB charging port |
| Bluetooth Connectivity | Yes (for use with iConsole app) |
| Dimensions (Approx.) | Length 150 cm × Width 65 cm × Height 120 cm |
| Product Weight (Approx.) | 55 kg (121 lbs) |
| Foldable | No |
| Transport Wheels | Yes (on front stabilizer) |
| Warranty | Lifetime frame, 12 months parts |
| Safety Standards | CLASS SB EN ISO20957 Part 1 & EN957 Part 5 |
| Assembly Required | Yes (full assembly with tools included) |
| Maintenance | Weekly inspection; tighten fasteners; wipe down after use |
| Intended Use | Home/domestic use only |
Frequently Asked Questions - LC-RB York Fitness
User questions about LC-RB York Fitness
0 question about this device. Answer the ones you know or ask your own.
Ask a new question about this device
Download the instructions for your Home trainer in PDF format for free! Find your manual LC-RB - York Fitness and take your electronic device back in hand. On this page are published all the documents necessary for the use of your device. LC-RB by York Fitness.
USER MANUAL LC-RB York Fitness
LC RB Recumbent Cycle
Item #YRK53105A
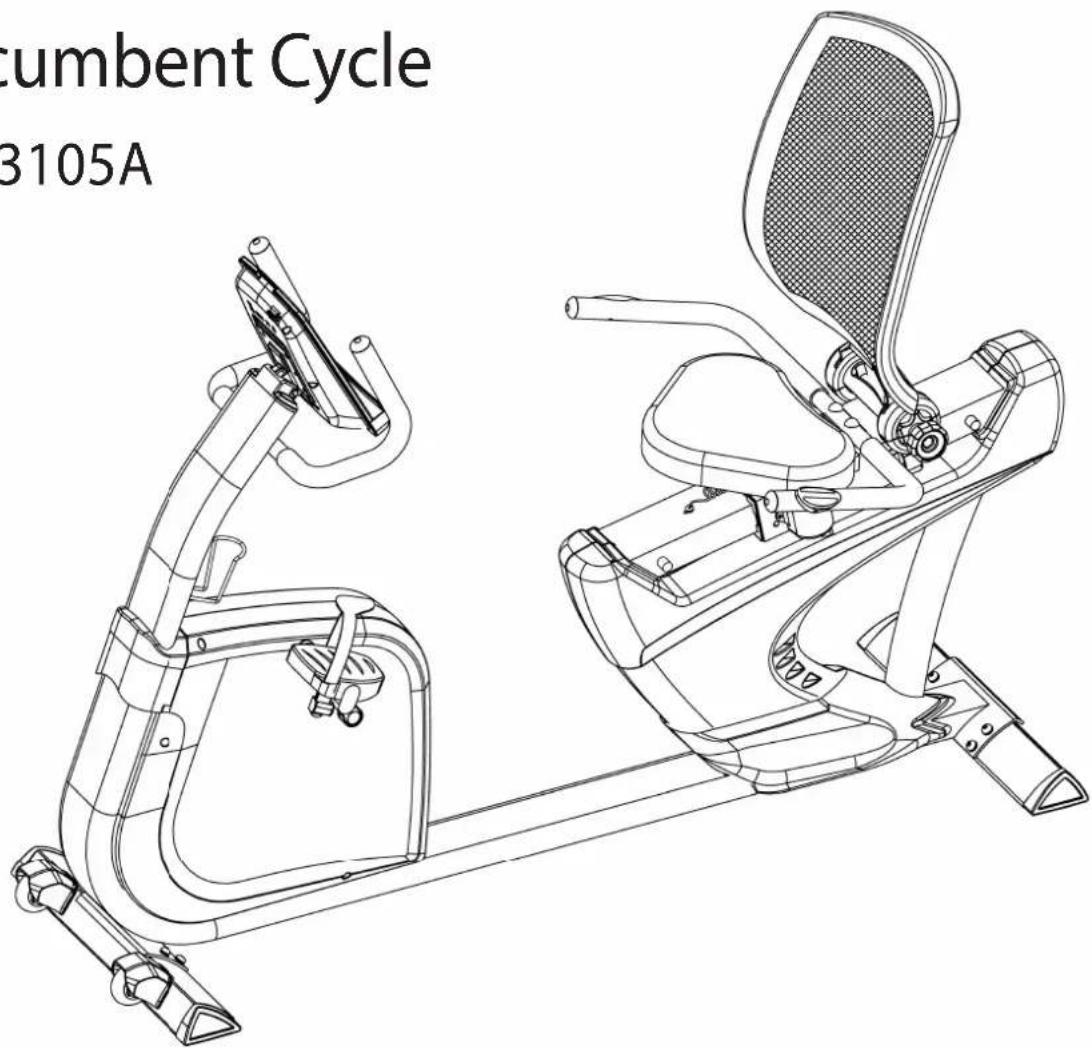
Table of Contents
Congratulations on purchasing your exercise equipment from

You have chosen a high quality, safe and innovative piece of equipment as your training partner and we are certain it will keep you motivated on the way to achieving your personal fitness goals.
Please take the time to read this owner's manual as it will help you to get the most out of your new exercise equipment.
For more information visit www.yorkfitness.com.au
CONTENTS
Safety information 03
Customer support 04
Assembly Instructions 05
Operational Instructions 11
Troubleshooting 15
Fitness Guide 16
Exploded Drawing 18
Part List 20
Protect the environment by not disposing of this product or batteries with household waste. Check your local authority for recycling advice and facilities.
YORK®
Safety Information
Please read this instruction manual before you begin assembly. Great care has been taken to design these instructions and following them will help you with quicker assembly and minimize the risk of injury.
It is important that you keep these instructions for future reference.
This list is not exhaustive - You are responsible for your own safety!
- Always assemble and operate the equipment on a level surface.
- Ensure the equipment is stable before use.
- Always ensure that the equipment has adequate space on each side.
- The safety level of this equipment can only be maintained if it is regularly examined for wear and tear.
- Replace defective components immediately and keep the equipment out of use until it is repaired.
- Use only the adjustment setting as described in the instructions. Always use the correct adjustment pin / fixing.
- Always check that any pins / fixings are tight and secure before use and after adjustment.
- Never leave any adjustment devices projecting from the equipment.
• Always consult your doctor before undertaking any exercise program.
• Always wear suitable clothing and footwear. (e.g. tracksuit / shorts / training shoes)
- Remove all personal jewelry before exercising.
- Ensure you warm-up well before using the equipment as this will help to prevent muscle strain.
• After eating, allow 1-2 hours before exercising as this will help to prevent muscle strain.
- Never overload the equipment. (See maximum user weight)
- Never use the equipment in any other manner other than the ways explained in these instructions and any wall-chart supplied.
- Injuries to health may result from incorrect or excessive training.
- Parents and others in charge of children should be aware of their responsibility, because the natural play instinct and the fondness of experimenting of children can lead to situations and behavior for which the training equipment is not intended.
- If children are allowed to use the equipment, their mental and physical development and above all their temperament should be taken into account. They should be controlled and instructed in the correct use of the equipment.
- The equipment is under no circumstances suitable as a children's toy.
- Children should not be allowed on or around the equipment, especially when it is not in use.
- This appliance is not intended for use by persons (including children) with reduced physical, sensory or mental capabilities, or lack of experience and knowledge, unless they have been given supervision or instruction concerning use of the appliance by a person responsible for their safety.
- This product is not suitable for therapeutic purposes.
- This product has been tested for use in a home environment and is warranted for In Home, personal, family or household use.
- Due to our continuous policy of product development, York Fitness reserves the right to change specifications without notice.
CAUTION! The instructions must be followed carefully in the assembly, use and maintenance of your equipment. The warranty does not cover damage due to negligence of the assembly, adjustment and maintenance instructions described herein.
Maximum user weight: 180kg
Safety Standards
This equipment meets the requirements of CLASS SB EN ISO20957 Part 1 & EN957 Part 5. Therefore the equipment carries the following marks:
Customer Support
Should you require any assistance regarding this product please gather the following information and then contact us using the details below:
- Serial No. - This can be found on the sticker below, located as indicated.
• Original purchase date - Place of purchase
• Information about the place and conditions of use - Precise description of the issue / defect
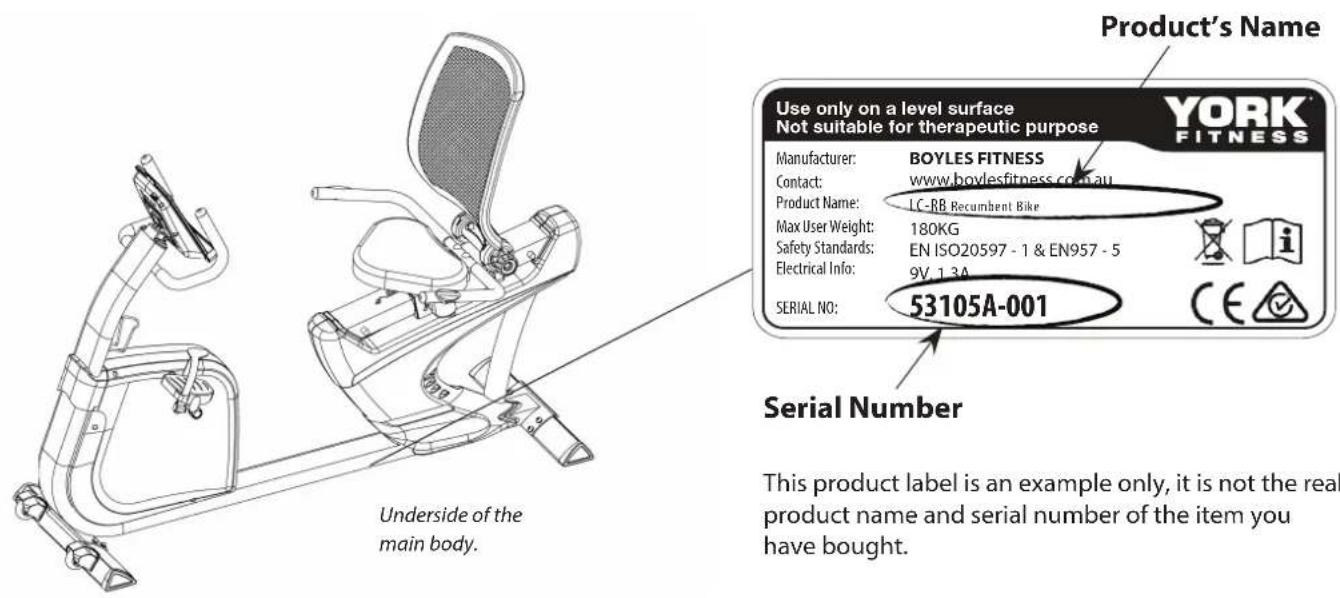
This product label is an example only, it is not the real product name and serial number of the item you have bought.
IMPORTANT!! - Please retain your sales receipt, York Fitness Customer Care may request proof of purchase to validate eligibility for warranty service. Warranty cover starts from the date shown on the proof of purchase.
AUSTRALIA
The best way to contact us is via the website: www.yorkfitness.com.au
York Fitness Australia
Unit 13 / 160 Hartley Road Smeaton Grange NSW 2567 Tel: 02 4648 0800
Assembly Instructions
PREPARE YOUR WORK AREA - It is important you assemble the product in a clean and uncluttered space.
WORK WITH A FRIEND - We recommend you have someone assist you with the assembly as some of the components are quite heavy.
OPEN THE CARTON - Check any warnings on the carton and make sure you have it the right way up.
UNPACK THE CARTON - Remove all the parts and lay them out on the floor.
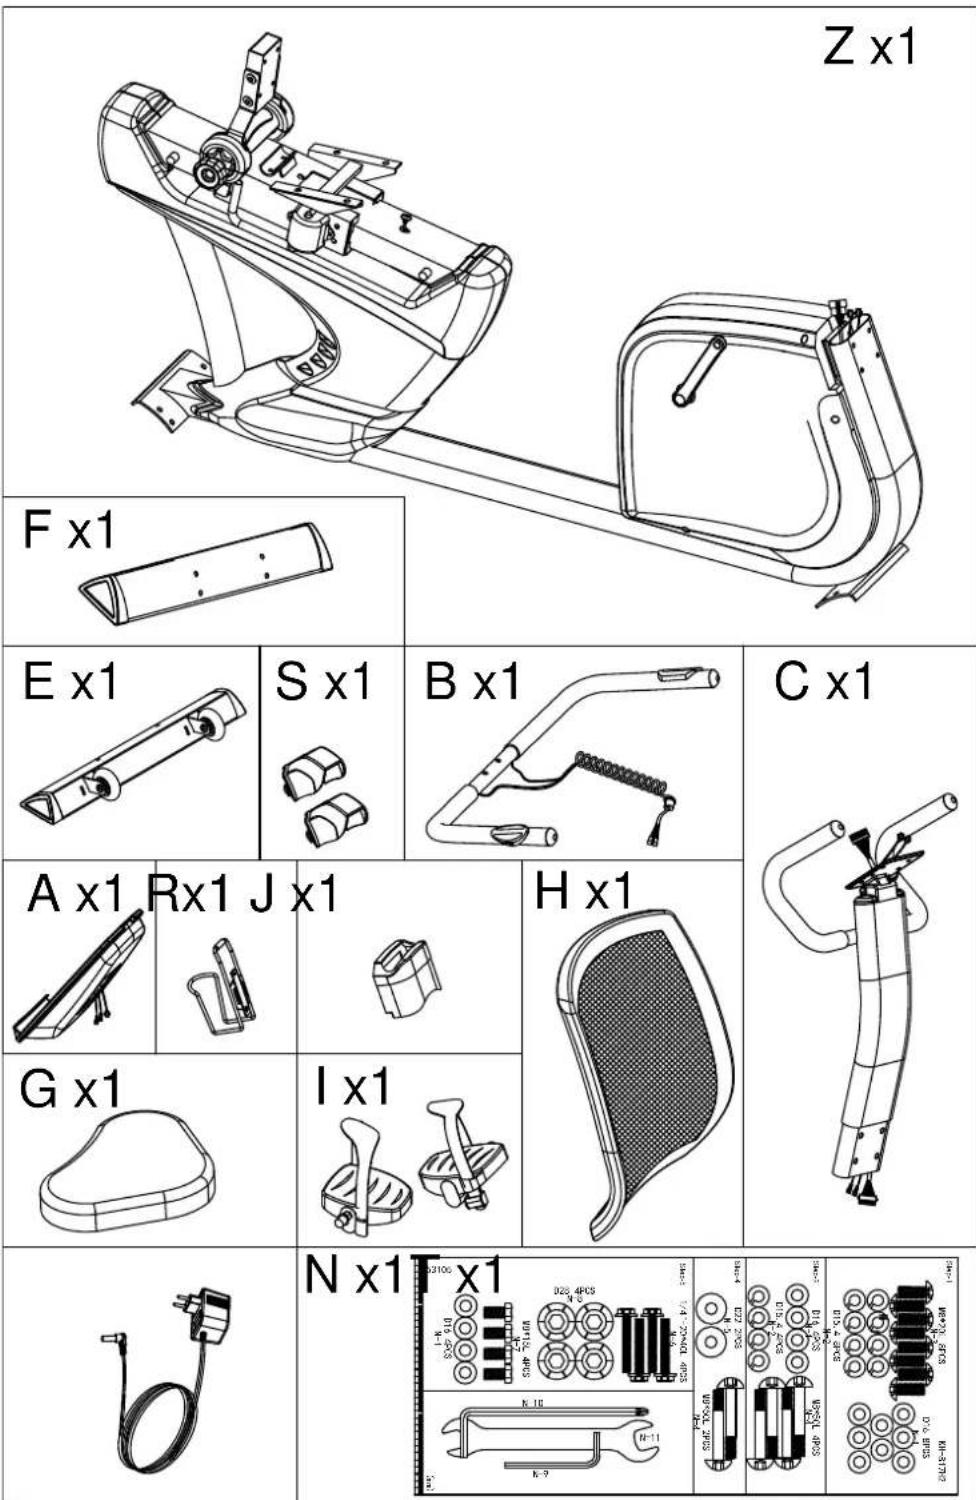
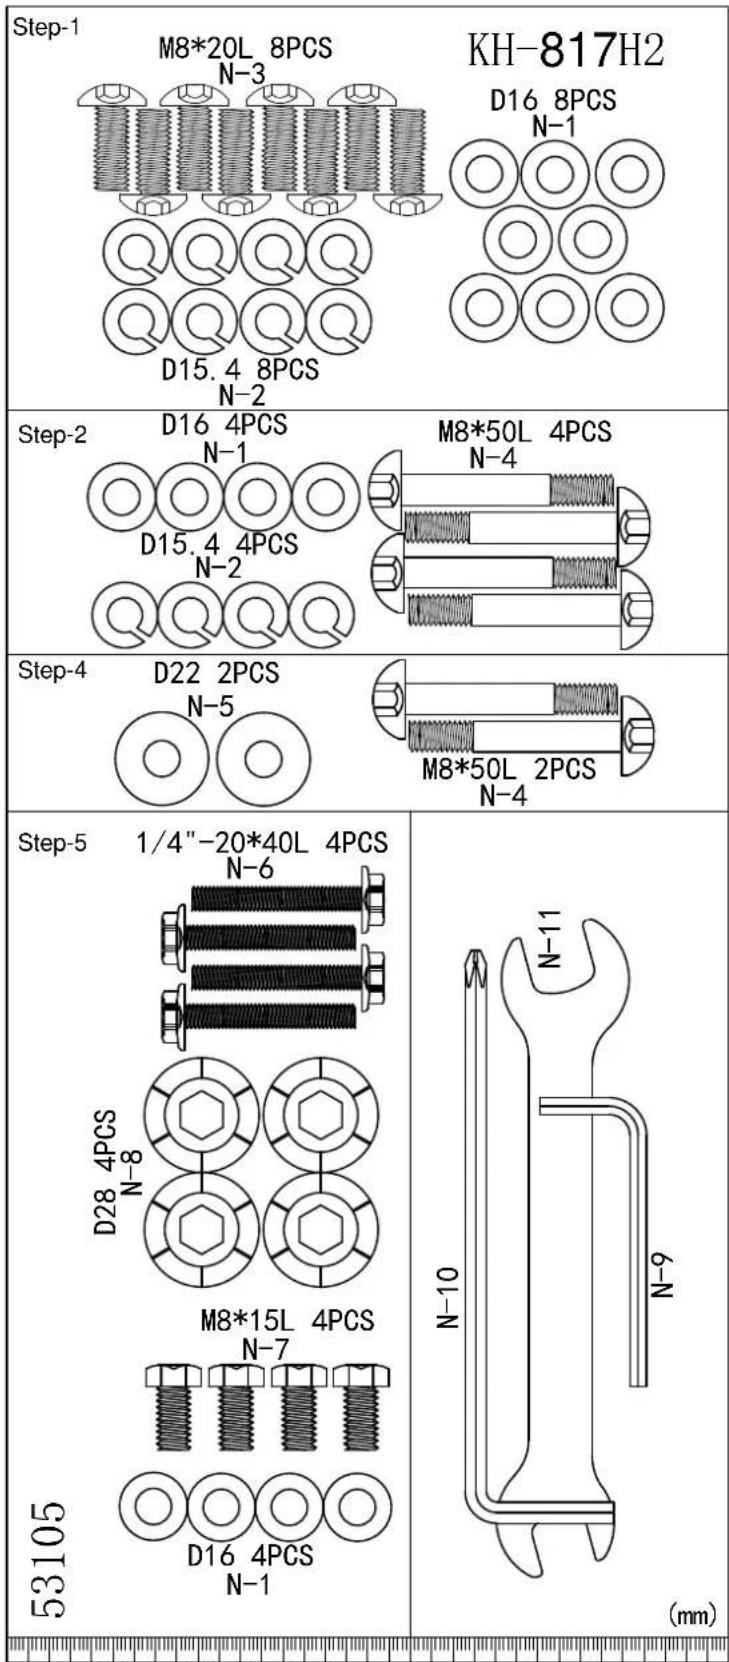
Make sure you have the following parts:
Assembly Instructions
170
390
Assembly Instructions
YORK®
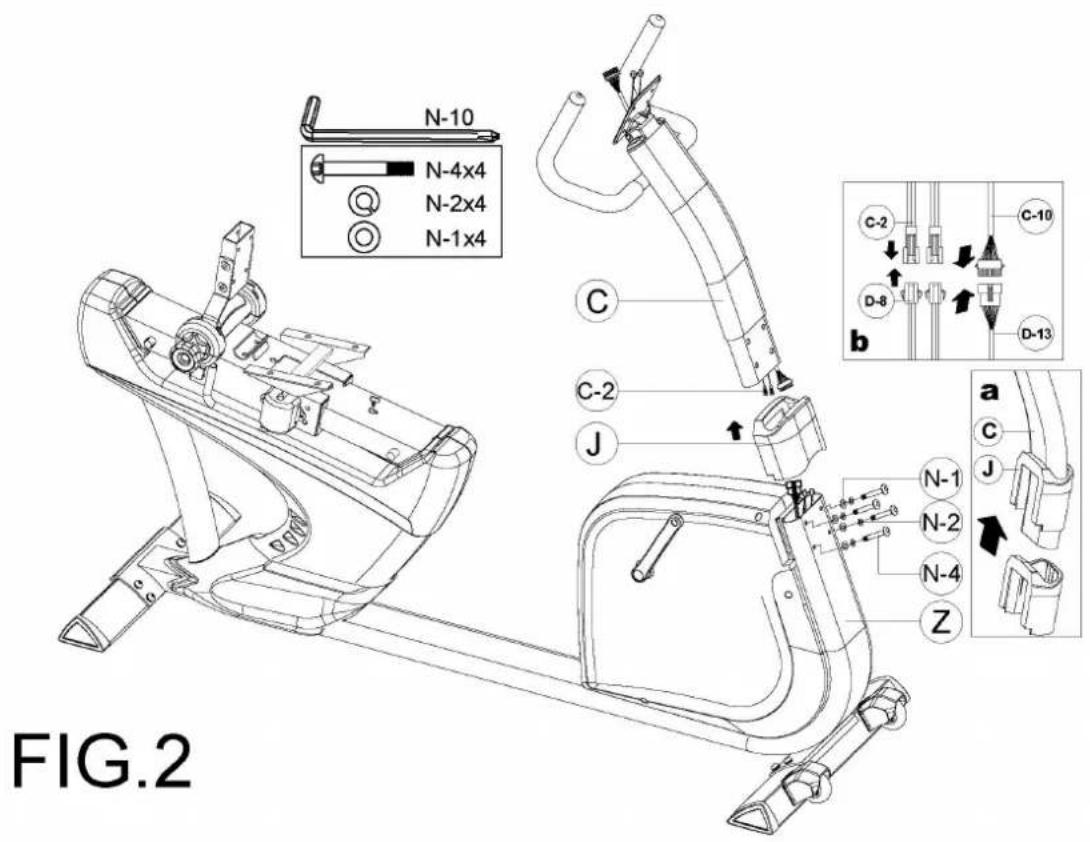
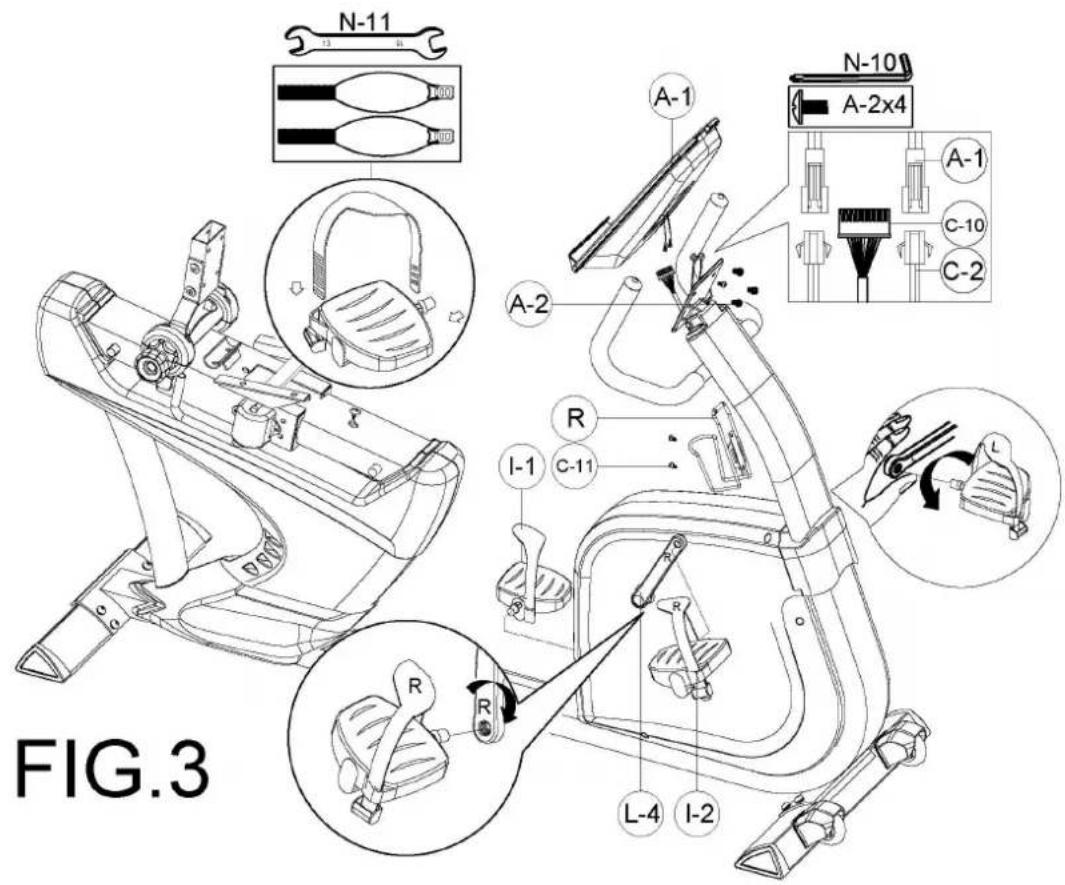
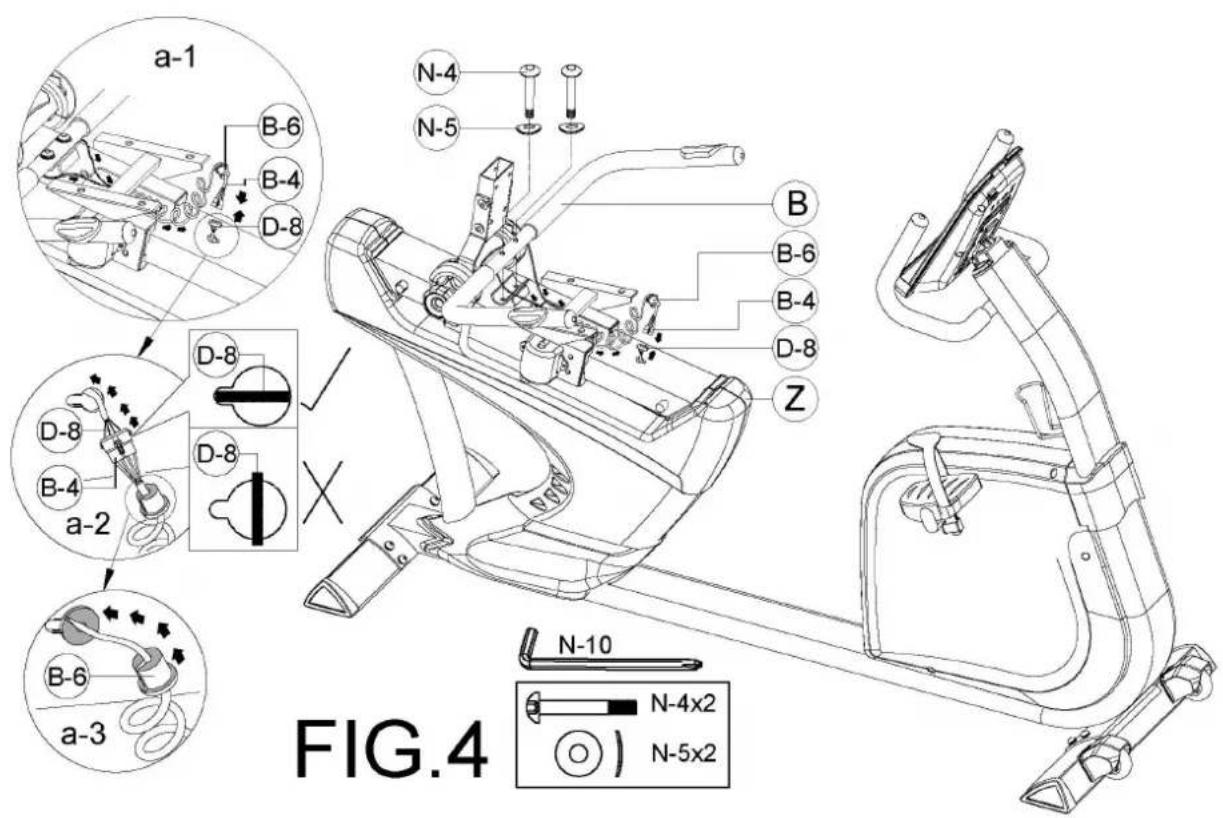
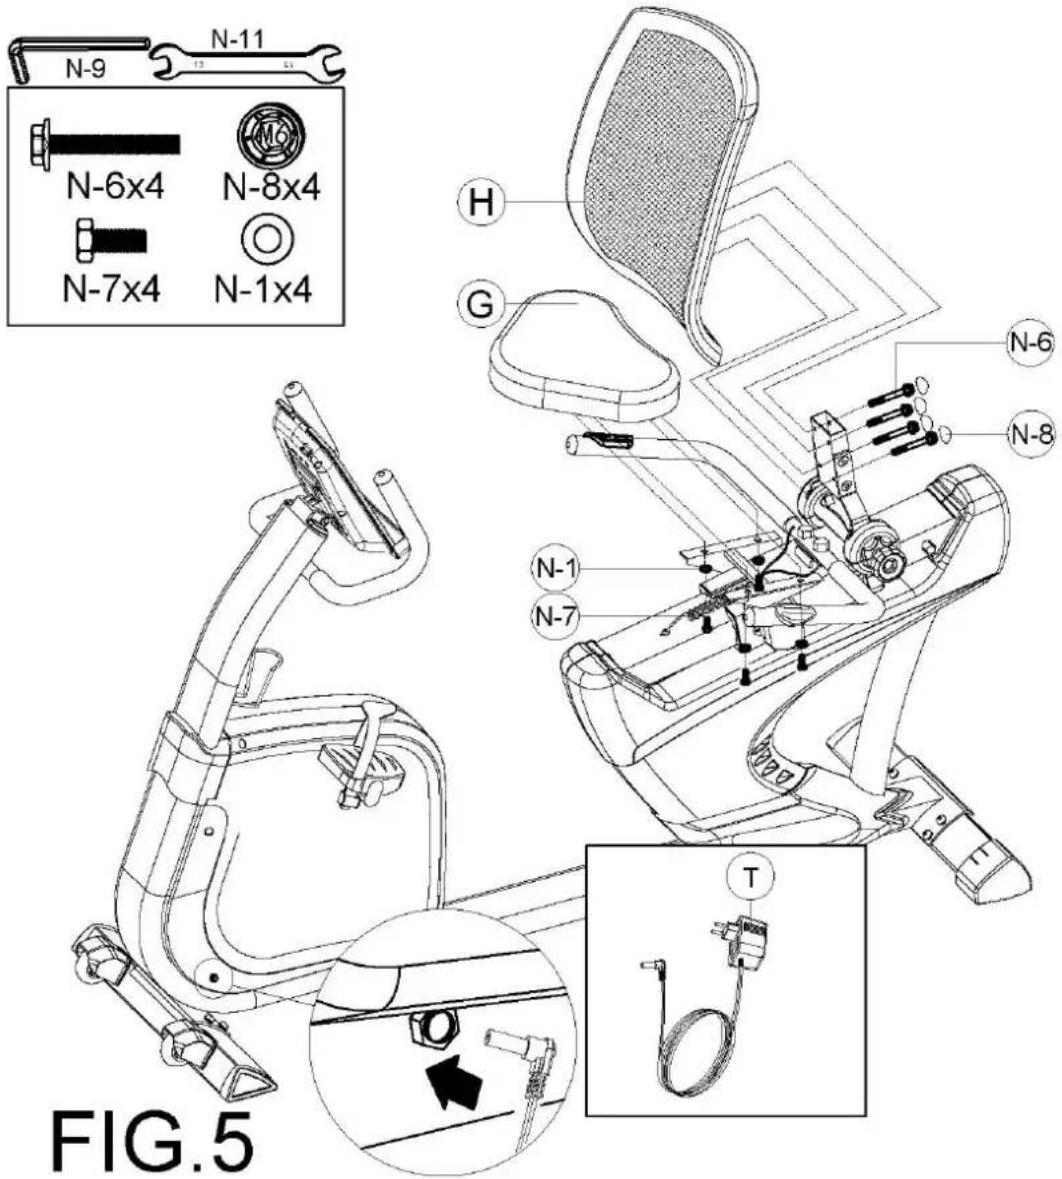
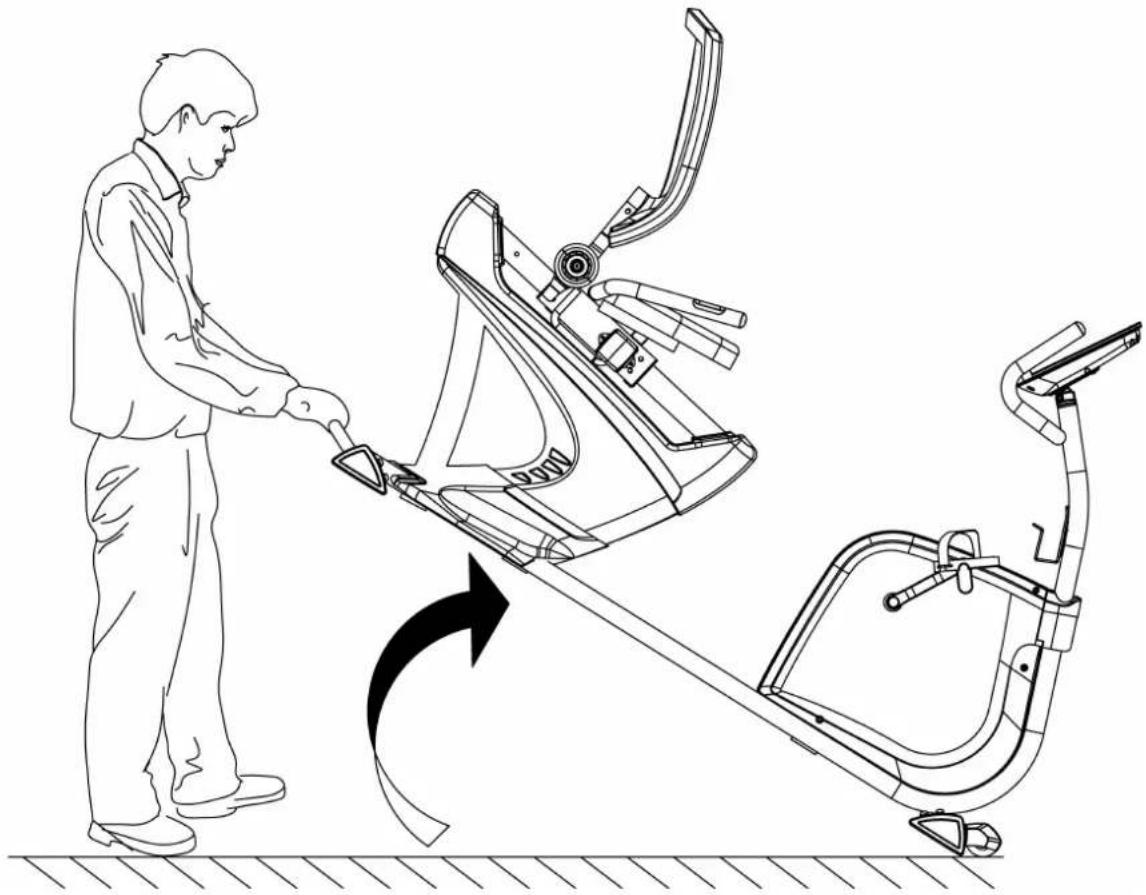
Assembly Instructions
natural_image
Line drawing of a person using an exercise bike to lift a stationary vehicle, showing motion and change (no text or symbols)Final Check
Your equipment is now assembled. Please make the following final checks:
• Make sure all screws / bolts are tightened.
• Make sure the equipment is on a flat, level surface.
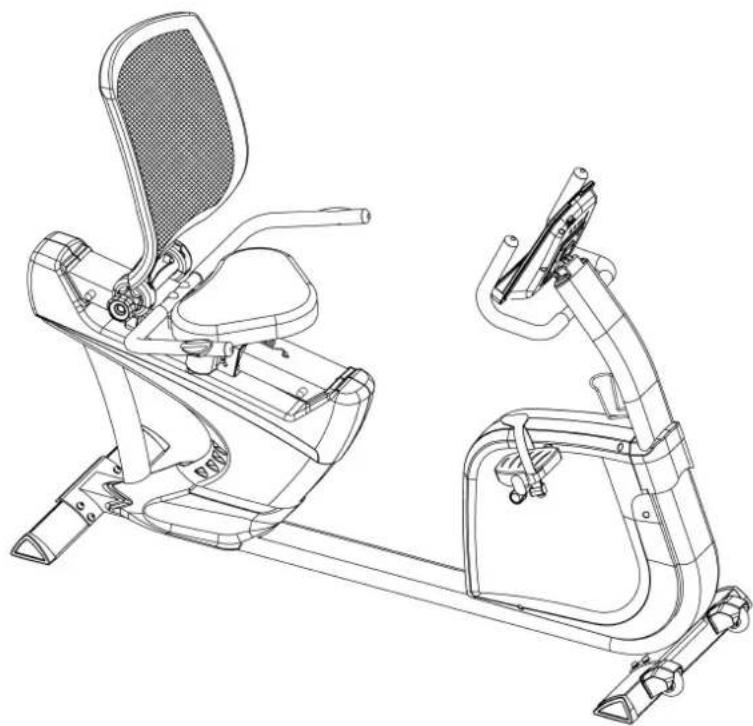
natural_image
Technical line drawing of a stationary exercise bike with seat, grip, and support components (no text or labels)Operational Instructions
Console:
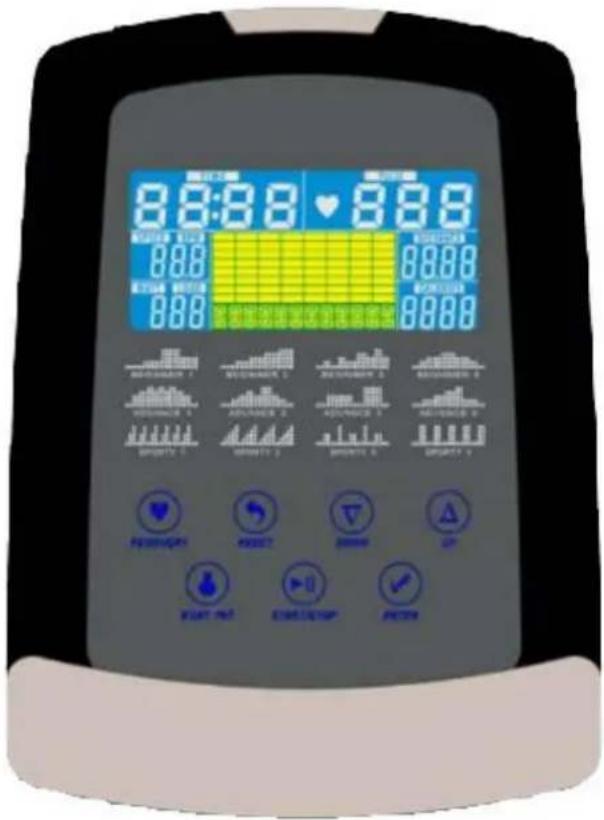
DISPLAY FUNCTIONS :
| ITEM DESCRIPTION | |
| TIME | .Workout time displayed during exercise.Range 0:00 ~ 99:59 |
| SPEED | .Workout speed displayed during exercise.Range 0.0 ~ 99.9 |
| DISTANCE | .Workout distance displayed during exercise.Range 0.0 ~ 99.9 |
| CALORIES | .Burned calories during workout display.Range 0 ~ 999 |
| PULSE | .Pulse bpm displayed during exercise.Pulse alarm when over preset target pulse. |
| RPM | .Rotation per minute.Range 0 ~ 999 |
| WATT | .Workout power consumption.In Watt Program mode, computer will remain preset watt value (setting range 0~350) |
| MANUAL | .Manual mode workout. |
| PROGRAM | .Beginner, Advance, and Sporty PROGRAM selection. |
| CARDIO .Target HR | training mode. |
KEY FUNCTION:
| ITEM DESCRIPTION | |
| Up | Increase resistance levelSetting selection. |
| Down | Decrease resistance levelSetting selection. |
| Mode | Confirm setting or selection. |
| Reset | Hold on pressing for 2 seconds, computer will reboot and start from user setting.Reverse to main menu during presetting workout value or stop mode. |
| Start/ Stop | Start or Stop workout. |
| Recovery | Test heart rate recovery status. |
| Body fat | Test body fat% and BMI. |
OPERATION:
POWER ON
Plug in power supply, computer will power on and display all segments on LCD for 2 seconds. After 4 minutes without pedaling or pulse input, console will enter into power saving mode.
Press any key may wake the console up.
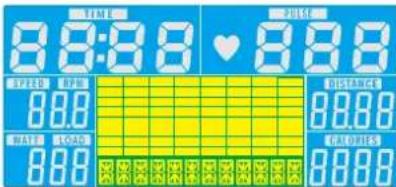
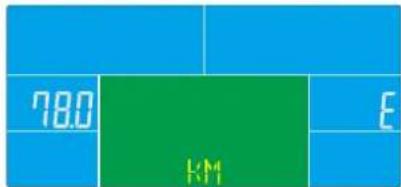
WORKOUT SELECTION
Press UP and Down to select workout Manual → Beginner → Advance → Sporty → Cardio → Watt.
Manual Mode
Press START in main menu may start workout in manual mode.
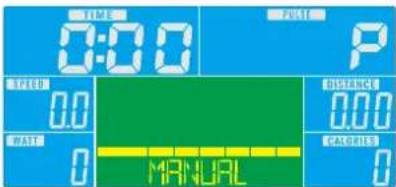
- Press UP or DOWN to select workout program, choose Manual and press Mode to enter.
- Press UP or DOWN to preset TIME, DISTANCE, CALORIES, PULSE and press MODE to confirm.
- Press START/STOP keys to start workout. Press UP or DOWN to adjust load level.
- Press START/STOP keys to pause workout. Press RESET to reverse to main menu.
Beginner Mode
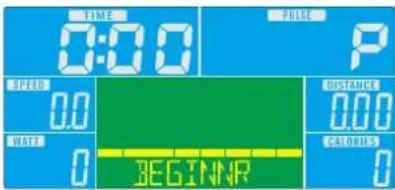
- Press UP or DOWN to select workout program, choose Beginner mode and press Mode to enter.
- Press UP or DOWN to preset TIME.
- Press START/STOP key to start workout. Press UP or DOWN to adjust load level.
- Press START/STOP key to pause workout. Press RESET to reverse to main menu.
Advance Mode
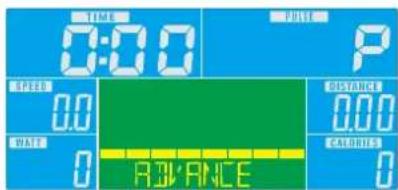
- Press UP or DOWN to select workout program, choose Advance mode and press Mode to enter.
- Press UP or DOWN to preset TIME.
- Press START/STOP key to start workout. Press UP or DOWN to adjust load level.
- Press START/STOP key to pause workout. Press RESET to reverse to main menu.
Sporty Mode
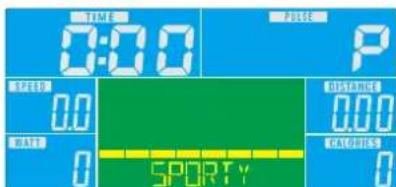
- Press UP or DOWN to select workout program, choose Sporty mode and press Mode to enter.
- Press UP or DOWN to preset TIME.
- Press START/STOP key to start workout. Press UP or DOWN to adjust load level.
- Press START/STOP key to pause workout. Press RESET to reverse to main menu.
Cardio Mode
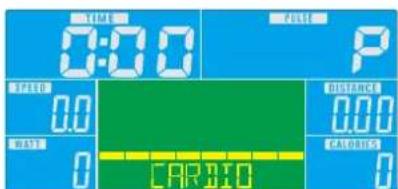
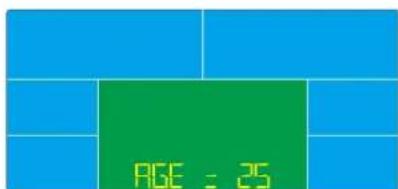
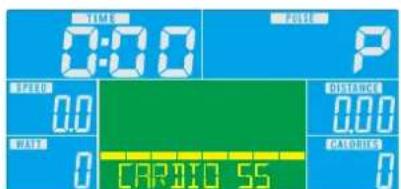
- Press UP or DOWN to select workout program, choose H.R.C. and press Mode to enter.
- Press UP or Down to select 55%.75%.90% or TAG (TARGET H.R.) (default: 100).
- Press UP or DOWN to preset workout TIME.
- Press START/STOP key to start or stop workout. Press RESET to reverse to main menu.
YORK®
Watt Mode
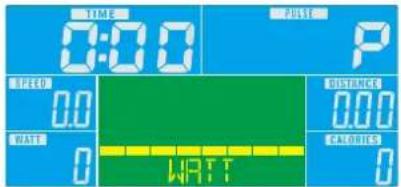
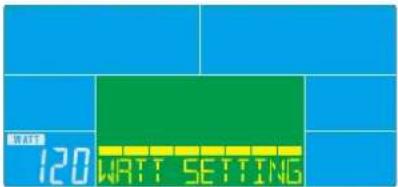
- Press UP or DOWN to select workout program, choose WATT and press Mode to enter.
- Press UP or DOWN to preset WATT target. (default: 120)
- Press UP or DOWN to preset TIME.
- Press START/STOP key to start workout. Press UP or DOWN to adjust Watt level.
- Press START/STOP key to pause workout. Press RESET to reverse to main menu.
Body Fat Mode
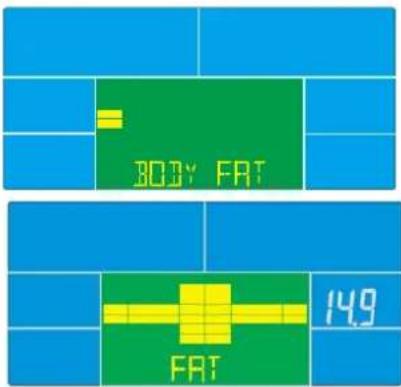
- In STOP mode, press BODY FAT button to start measurement.
- User need input SEX,HEIGHT,WEIGHT by UP/DOWN and press ENTER, then system start to measure. During measurement, both hands have to hold on hand grips.
- LCD will display “== =” for 8 seconds until console finish measuring. After measuring, LCD will display BODY FAT advice symbol, BODY FAT percentage, BMI for 30 seconds.
- Press BODY FAT key again reverse to main menu.
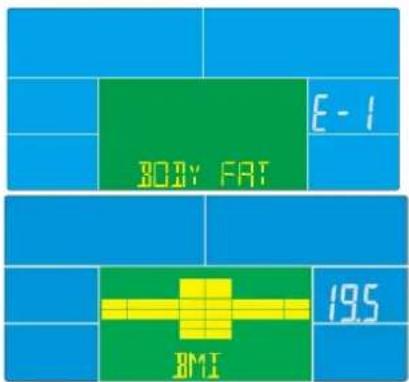
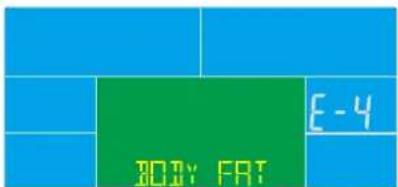
Error code explain:
"E-1"-Occurs when there is no heart rate signal input detected or user not hold hand grips correctly.
"E-4" – Occurs when FAT% exceed setting range (5.0%\~ 50%).
USB power charger
This console provides a USB charging outlet for your tablet or smart phone. User can plug the data cable into USB port for charging
APP:


NOTE:
- Once the console is connected to tablet via Bluetooth, the console will power off.
- To exit the iconsole app turn the device Bluetooth off and the console will power on again.
Troubleshooting
If you have a problem with your exercise equipment, before you do anything else please check that all the cables have been connected correctly. Loose cables are very common and many problems can be solved by making sure the cables are properly connected.
The following table details the most common problems and how to fix them. If you still have a problem after going through the troubleshooting guide please call your local YORK distributor for advice.
| PROBLEM CAUSE CORRECTION | ||
| NO DISPLAY ON CONSOLE | Power Adapter not plugged in Check the Bike Power Adapter is plugged into a power socket or power board and is turned on. Check that the Power Adapter is also plugged into the Bike correctly. | |
Care & Maintenance
- This equipment should not be placed outdoors, in a garage or an outbuilding. Keep the equipment in a dry place with as little temperature variation as possible.
• We recommend placing a mat beneath the equipment to protect both the equipment and your flooring.
• Always place the equipment in a dry environment. - Use a warm, damp cloth to keep the product clean.
- No wet cleaning of electrical components. Unplug before any care and maintenance.
• The safety level of the equipment can be maintained only if it is regularly examined for damage and wear. This includes any ropes, pulleys, nuts, bolts, moving parts, bushes, chains, wheels, bearings & connection points etc. - Ensure that you inspect the product regularly - at least once a week is recommended.
- Ensure that all fixings are tight before use.
- Always replace damaged / worn components with original parts from the manufacturer.
Fitness Guide
Starting and Finishing Your Workout
Begin and end each workout with a Warm Up / Down session - a few minutes of stretching to help prevent strains, pulls and cramps.
Correct Cycling Form
Sit on the cycle, with your feet on the pedals and inside the pedal straps.
Ensure that the seat height is adjusted correctly - you should be stable and balanced whilst on the saddle. The basic rule for getting the seat height right is that as the pedal reaches its lowest point, the leg is almost straight.
Try to ensure that your back is straight whilst exercising, especially for long periods.
Suggested Stretches
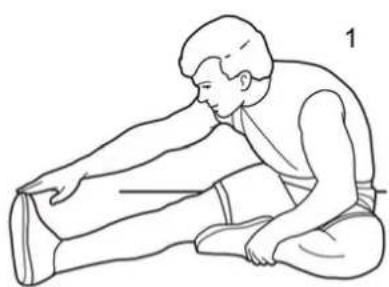
The correct form for several basic stretches is shown at the right. Move slowly as you stretch—never bounce.
1. Hamstring Stretch
Sit with one leg extended. Bring the sole of the opposite foot toward you and rest it against the inner thigh of your extended leg. Reach toward your toes as far as possible. Hold for 15 counts, then relax. Repeat 3 times for each leg. Stretches: Hamstrings, lower back and groin.
2. Calf/Achilles Stretch
With one leg in front of the other, reach forward and place your hands against a wall. Keep your back leg straight and your back foot flat on the floor. Bend your front leg, lean forward and move your hips toward the wall. Hold for 15 counts, then relax. Repeat 3 times for each leg. To cause further stretching of the achilles tendons, bend your back leg as well.
Stretches: Calves, achilles tendons and ankles.
3. Quadriceps Stretch
With one hand against a wall for balance, reach back and grasp one foot with your other hand. Bring your heel as close to your buttocks as possible. Hold for 15 counts, then relax. Repeat 3 times for each leg. Stretches: Quadriceps and hip muscles.
4. Inner Thigh Stretch
Sit with the soles of your feet together and your knees outward. Pull your feet toward your groin area as far as possible. Hold for 15 counts, then relax. Repeat 3 times. Stretches: Quadriceps and hip muscles.
natural_image
Line drawing of a person performing a seated stretch or exercise (no text or symbols)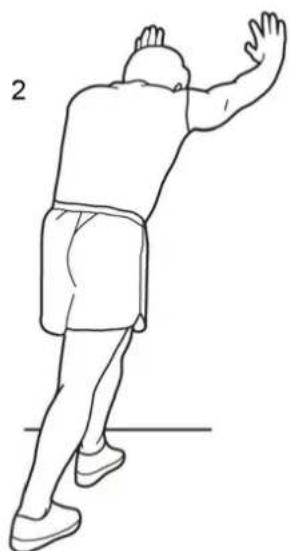
natural_image
Line drawing of a person in a dynamic pose, viewed from the side (no text or symbols)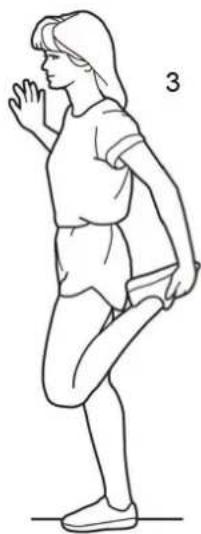
natural_image
Line drawing of a person in athletic attire performing a stretching or exercise pose (no text or symbols)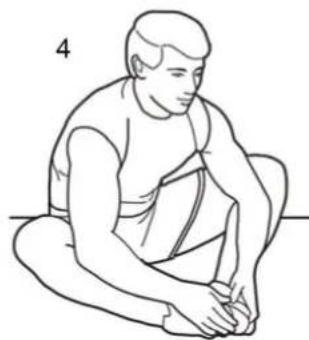
natural_image
Line drawing of a person sitting cross-legged, hands clasped (no text or symbols)How Long Should I Exercise For?
That really depends on your current level of fitness. If you're just starting out on a new exercise program, you should start gradually and build up - do not try to do too much too quickly. 30 minutes, 3 times a week should be enough.
Don't push yourself too hard - you should never feel exhausted during or following exercise.
Heart Rate Training
To get the most out of your new piece of fitness equipment and see the best results from your training you should exercise at the right level of effort, and that means listening to your heart! Working out to a target heart rate means you can direct your workout to achieve different goals:
Good health - For those wishing to improve quality of life and general well being. Your sessions will need to be done at an intensity of between 50 - 60% of your estimated maximum heart rate, should last about 30 minutes and can be done on most days of the week.
Weight loss - To see a significant reduction in body fat, your sessions must be a little more intense - between 60 and 70% of your estimated maximum heart rate. These sessions can also be performed on most days of the week for up to 30 minutes.
Improving fitness levels - These sessions should be performed at 70 - 80% of your estimated maximum heart rate and can also involve bouts of interval training that would have your heart rate peaking for short times near your maximum heart rate level. These are intense sessions and will require at least a 48 hour rest between sessions.
Calculating Your Target Heart Rate
First, you need to find your estimated maximum heart rate using the formula "220 minus your age in years". So, if you are 35 years old your estimated maximum heart rate is:
220 - 35 = 185 beats per minute (bpm)
Next, to calculate your target heart rate, simply multiply your estimated maximum heart rate (185bpm) by the applicable percentage. So, if your goal is better health:
185 x 60% = 111bpm
NOTE: The important issue to remember with all estimated calculations is that they are just estimates - if you don't feel comfortable exercising at your target then reduce it to a level you are comfortable with.
Heart rate training requires you to monitor your heart rate throughout the workout. For this we recommend using a chest strap (if your machine has a wireless receiver) or a heart rate monitor. For more information please get in touch using the Contact Us details.
Always consult your doctor before undertaking a new exercise regime. If you experience nausea, dizziness or other abnormal symptoms during exercise, stop at once and consult your doctor.
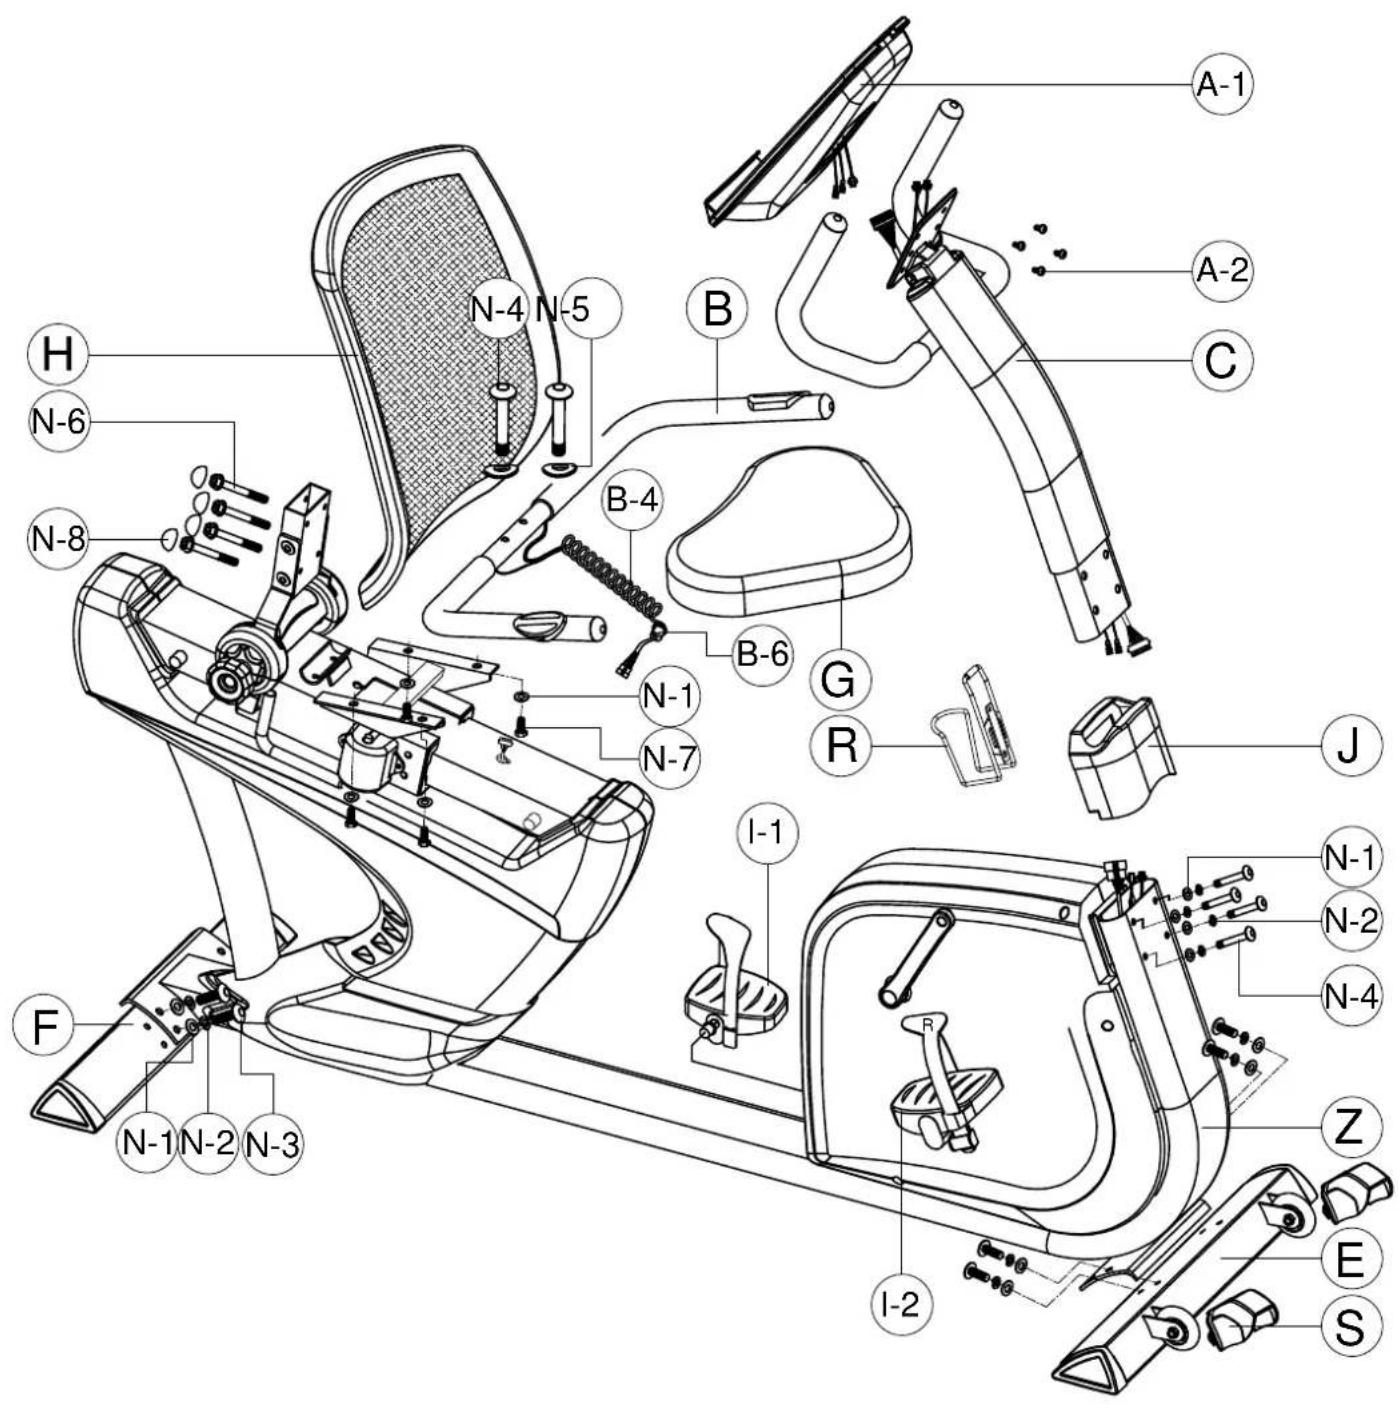
Exploded Drawing
YORK®
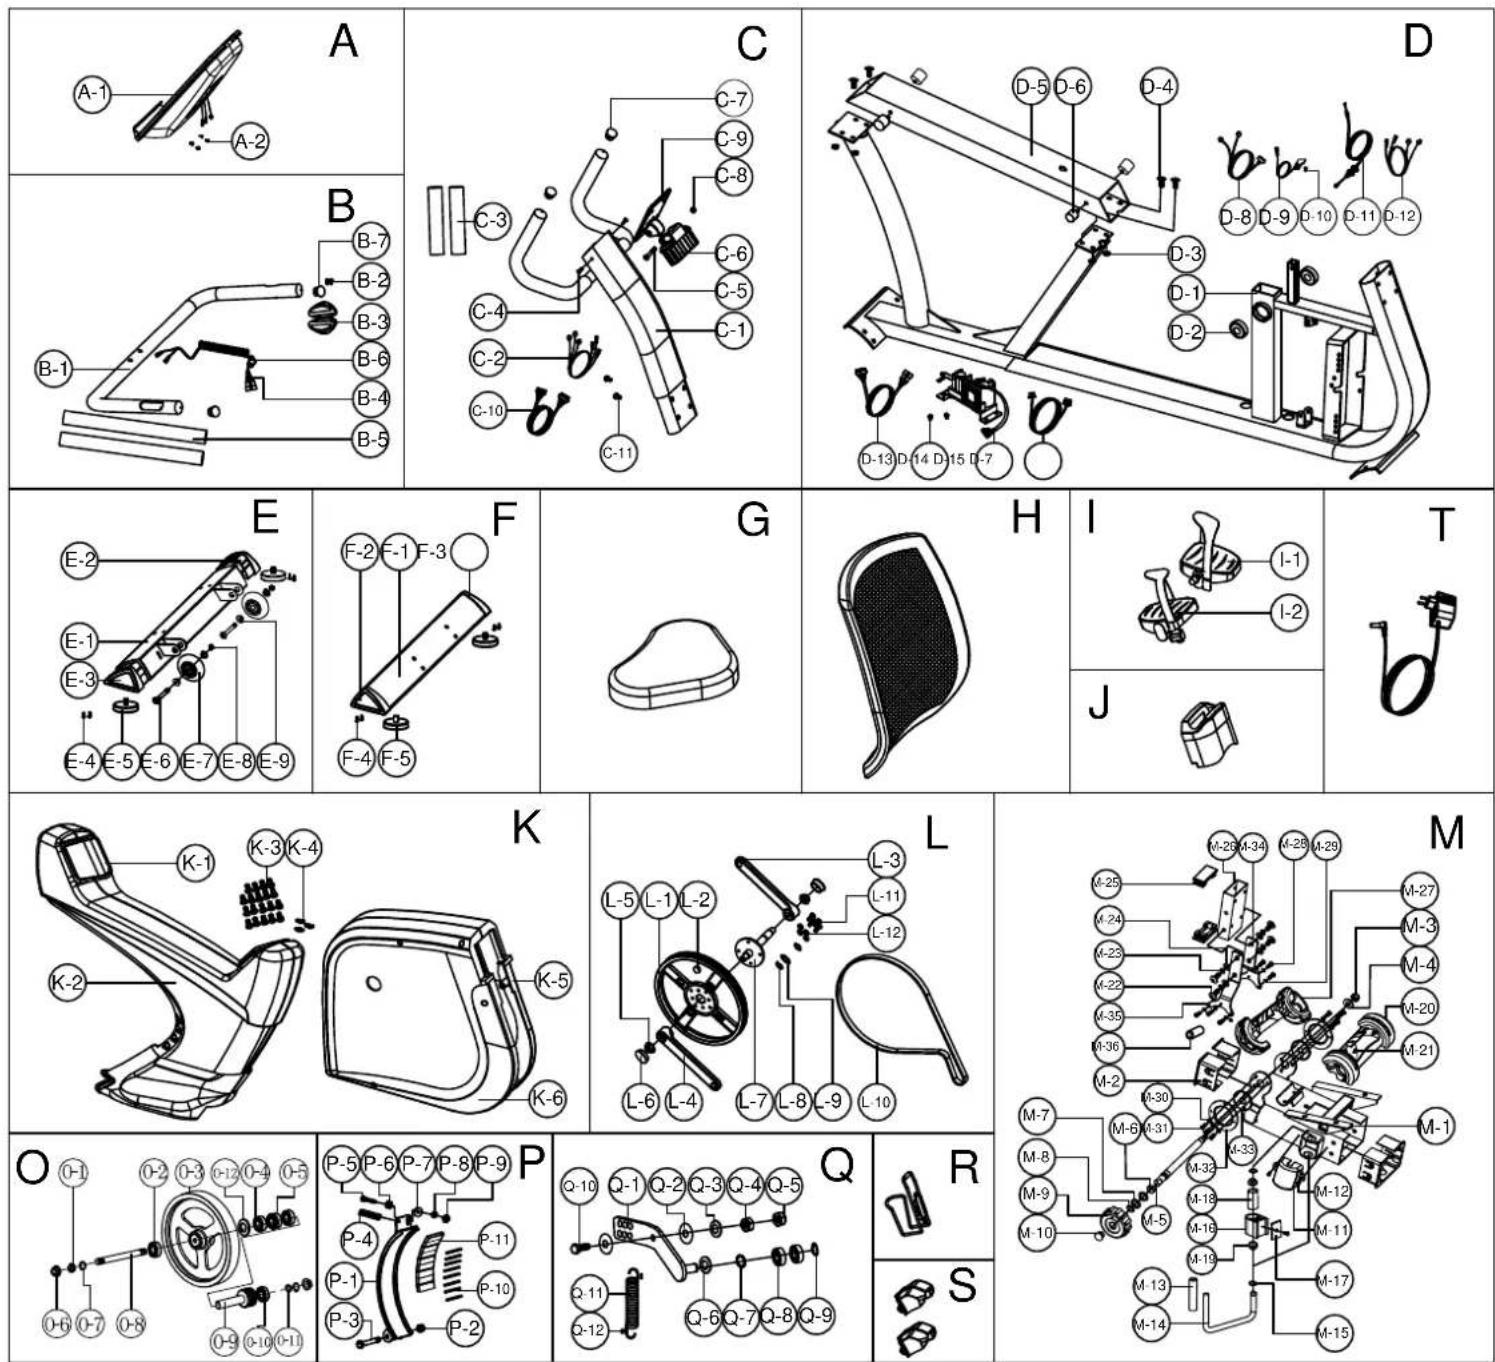
Part List
| Part No | Description Specification | on QTY | |
| A Computer set 1 | |||
| A-1 Computer SM-2570-31 1 | |||
| A-2 Cross Bolt M5x0.8x10L 4 | |||
| B Handlebar set 1 | |||
| B-1 Handlebar | 1 | ||
| B-2 | Cross screw | ST4*1.4L*25L | 2 |
| B-3 | Handle pulse sensor | 2 | |
| B-4 handle pulse cable | 1 | ||
| B-5 | Foam | 2 | |
| B-6 | Cable plug | 1 | |
| B-7 | Mushroom cap | 2 | |
| C | Handlebar post set | 1 | |
| C-1 | Handlebar post | 1 | |
| C-2 | Upper handle pulse cable | 2 | |
| C-3 | Foam | 2 | |
| C-4 | Cross screw | ST4.2x1.4x15L | 2 |
| C-5 | Allen bolt | M8*1.25*45L | 1 |
| C-6 | Computer bracket | 1 | |
| C-7 | Mushroom cap | 2 | |
| C-8 | Nylon nut | M8*1.25*8T | 1 |
| C-9 | Computer fixing bracket | 1 | |
| C-10 | Upper computer cable | 1 | |
| C-11 | Cross bolt | M5*0.8*15L | 2 |
| D | Frame set | 1 | |
| D-1 | Main frame | 1 | |
| D-2 | Bearing | #6004-2RS(C0) | 2 |
| D-3 | Nylon nut | M8*1.25*8T | 4 |
| D-4 | Allen bolt | M8x1.25x15L | 4 |
| D-5 Sliding rail | 1 | ||
| D-6 | Buffer | 4 | |
| D-7 | Power cable | 1 | |
| D-8 | Lower handle pulse cable | 1 | |
| D-9 | Sensor cable | 1 | |
| D-10 | Cross bolt | M5x0.8x12L | 1 |
| D-11 | Tension cable 1 | ||
| D-12 | Upper handle pulse cable | 2 | |
| D-13 | Lower computer cable | 1 | |
| D-14 | Cross bolt | ST4.2*1.4*15L | 2 |
| D-15 | Motor | 1 | |
| E | Front stabilizer set | 1 | |
| E-1 | Front stabilizer | 1 | |
| E-2 | Tri-angle end cap(left) | 1 | |
| E-3 | Tri-angle end cap(right) | 1 | |
| E-4 | Cross screw | ST4*1.41*12L | 4 |
| E-5 | Adjustable wheel | 2 | |
| E-6 | Allen bolt | M8*1.25*40L | 2 |
| E-7 | Round wheel | 2 | |
| E-8 | Nylon nut | 2 | |
| E-9 | Bushing | 4 | |
| F | Rear stabilizer set | 1 | |
| F-1 | Rear stabilizer | 1 | |
| F-2 | Tri-angle end cap(left) | 1 | |
| F-3 | Tri-angle end cap(right) | 1 | |
| F-4 | Cross screw | ST4*1.41*12L | 4 |
| F-5 | Adjustable round wheel | 2 | |
| G | Seat | 1 | |
| H | Backrest | 1 | |
| I-1 | Left pedal | 1 | |
| I-2 | Right pedal | 1 | |
| J Upper cover | 1 | ||
| K Chain cover set | 1 | ||
| K-1 | Rear left chain cover | 1 | |
| K-2 | Rear right chain cover | 1 | |
| K-3 | Cross screw | ST4.2x1.4x20L | 19 |
| K-4 | Pin | 3 | |
| K-5 | Left chain cover | 1 | |
| K-6 | Right chain cover | 1 | |
| L Crank set | 1 | ||
| L-1 | Belt wheel | 1 | |
| L-2 | Round magnet | M02 | 1 |
| L-3 | Left crank | 1 | |
| L-4 | Right crank | 1 | |
| L-5 | Anti-loosen nut | M10*1.25*10T | 2 |
| L-6 | Screw cap | D26*11L | 2 |
| L-7 | Crank axle | 1 | |
| L-8 | C-clip | D22.5*D18.5*1.2T | 2 |
| L-9 | Waved washer | D27*D20.3*0.5T | 1 |
| L-10 | Multi-groove belt | 1 | |
| L-11 | Hex bolt | M6x1.0x15L 4 | |
| L-12 | Nylon nut | M6x1.0x6T | 4 |
| N | Seat post set | 1 | |
| M-1 Seat post | 1 | ||
| M-2 | Bushing | 125*75*53 | 2 |
| M-3 | Anti-loosen nut | M10x1.5x10T | 1 |
| M-4 | Flat washer | D24*D13.5*2.5T | 1 |
| M-5 | Eccentricity axle | 1 | |
| M-6 Spacer D19*D13.1*4T 1 | |||
| M-7 | Flat washer | D24xD16x1.5T | 2 |
| M-8 | C-clip | S-16(1T) | 2 |
| M-9 | Knob | 1 | |
| M-10 | Round cap | 1 | |
| M-11 | Little cover | 1 | |
| M-12 | Cross bolt | M5x0.8x10L | 2 |
| M-13 Foam | 1 | ||
| M-14 | Adjustable rod | 1 | |
| M-15 | C-clip | S-12(1T) | 2 |
| M-16 | Block | 1 | |
| M-17 | Buffer | 1 | |
| M-18 | Eccentricity axle 1 | 1 | |
| M-19 | Bushing D29*D11.9*9T 2 | ||
| M-20 Decorative cover (rear) | 1 | ||
| M-21 | Cross screw | ST4x20L | 2 |
| M-22 | Allen bolt | M8x1.25x15L | 4 |
| M-23 | Spring washer | D15.4 XD8.2x2T | 4 |
| M-24 | Flat washer | D16*D8.5*1.2T | 4 |
| M-25 | Square cap | 2 | |
| M-26 Backrest supporting tube | 1 | ||
YORK®
| M-27 Decorative cover (front) | 1 | ||
| M-28 Allen screw M6*1*15L 6 | |||
| M-29 Flat washer D14*D6.5*0.8T 6 | |||
| M-30 Spring washer D10.5*D6.1*1.3T 6 | |||
| M-31 Allen screw M6*1*10L 6 | |||
| M-32 Outer fluted disc 2 | |||
| M-33 Inner fluted disc 2 | |||
| M-34 Left fixing plate 2 | 1 | ||
| M-35 Right fixing plate 2 | 1 | ||
| M-36 Spacer | 1 | ||
| N Screw bag | 1 | ||
| N-1 Flat washer D16xD8.5x1.2T 16 | |||
| N-2 Sparing washer D15.4xD8.2x2T 12 | |||
| N-3 Allen bolt M8x1.25x20L 8 | |||
| N-4 Allen bolt M8*1.25*50L 6 | |||
| N-5 Curved washer D22xD8.5x1.5T 2 | |||
| N-6 Allen screw 1/4"-20*40L 4 | |||
| N-7 Allen bolt M8x1.25x15L 4 | |||
| N-8 Screw cap D28*17(M6) 4 | |||
| N-9 Allen spanner M4*68L 1 | |||
| N-10 Allen spanner M6 1 | |||
| N-11 Spanner 155*30*5T 1 | |||
| O Flywheel set | 1 | ||
| O-1 Hex nut D9.5x8T(3/8"-26UNFx8T 1 | |||
| O-2 Bearing 6301-2RS 1 | |||
| O-3 Flywheel | 1 | ||
| O-4 One way bearing D35*16 1 | |||
| O-5 Bearing 6003-2RS 2 | |||
| O-6 Anti-loosen nut 3/8"-26UNFx6.5T 2 | |||
| O-7 C-clip D15.5*D10.8*1T 2 | |||
| O-8 Flywheel axle D12*120L 1 | |||
| O-9 Little flywheel D35*D17*62.9 1 | |||
| O-10 Bearing #6001-2RS 1 | |||
| O-11 Fixing ring D13*D10*1.9T 1 | |||
| O-12 Washer D36.8*D31.5*1T 1 | |||
| P Magnet fixing plate set | 1 | ||
| P-1 Magnet fixing plate | 1 | ||
| P-2 Nylon nut M8*1.25*8T 1 | |||
| P-3 Hex bolt M8*52L 1 | |||
| P-4 Spring D1.0*55L 1 | |||
| P-5 Hex bolt M6*60L 1 | |||
| P-6 Hex nut M6*1*6T 1 | |||
| P-7 Nylon washer D6*D19*1.5T 1 | |||
| P-8 Flat washer D13*D6.5*1.0T 1 | |||
| P-9 Nylon nut M6*1*6T 1 | |||
| P-10 Magnet cell | 8 | ||
| P-11 Magnet | 9 | ||
| Q idle wheel set | 1 | ||
| Q-1 Idle wheel fixing plate | 1 | ||
| Q-2 Plastic washer D10*D24*0.4T 2 | |||
| Q-3 Flat washer D21*D8.5*1.5T 1 | |||
| Q-4 Hex nut M8*1.25*6T 1 | |||
| Q-5 Nylon nut M8*1.25*8T 1 | |||
| Q-6 Flat washer D24*D16*1.5T 1 | |||
| Q-7 | Waved washer | D21xD16.2x0.3T | 1 |
| Q-8 | Bearing | #99502 | 2 |
| Q-9 | C-clip | S-16(1T) | 1 |
| Q-10 | Hex bolt | M8*25 | 1 |
| Q-11 | Spring | D2.2*D14*55L | 1 |
| Q-12 | Plastic cap | D3*30L | 2 |
| R | Bottle holder | 1 | |
| S | Wheel cover | 2 | |
| T | Adaptor | 1 |
YRK53105A - York LC-RB Recumbent Bike Warranty:
Lifetime Frame
12 Months Parts
- When purchased from an authorised BFE distributor the BFE warranty shall guarantee that all framework and components of your product are free from faulty manufacture. All faulty framework and components will be repaired or replaced as set out in this policy. All warranties in this policy apply to INDOOR HOME/DOMESTIC USE ONLY.
- These warranties do not apply to products used in commercial use applications.
- Warranty DOES NOT cover normal wear & tear and excludes faults due to misuse, abuse, incorrect assembly or lack of general maintenance.
- Warranty is applicable to products sold and placed within Australia only.
- IMPORTANT. Most of BFE products are pretested and we have inspectors checking all products prior to shipment. The number one reason for a fault is due to INCORRECT ASSEMBLY.
If you do have problems please go back to the start and double check your assembly and pay special attention to all WIRING connections. If you have accidentally cut or damaged the wiring please let us know and we will be happy to send you a new set at no-charge.
If you have done this and are confident you have double checked your assembly and are still having problems please email our service department at spares@boylesfitness.com.au including your best contact details, proof of purchase, serial number and a brief explanation of what is wrong.
Emailing is the quickest and most reliable way to get your service request processed. Once we have your details we will either call or email you back with the next steps. The quickest way, once we determine the problem and send you a replacement part, is that we can talk you through over the phone on how to fit it.
If it is deemed by our service tech that it is too difficult, we can arrange (where available) a service technician.
NOTE. If we arrange for a service technician (where applicable) and it is found that it is not a manufactures fault and found to be an assembly issue, normal wear and tear, transport damage or misuse then there will be a call out fee of \$140 depending on location. (Surcharge applies for non-metro areas)
WARRANTY TERMS- Warranty commences from the date of purchase from the retail store. Warranty only applies to the original purchaser and is NON transferable. Warranty is void if the serial number of the product has been removed or tampered with.
Warranty does not apply to defects, faults or failures due to:
(a) Defects caused during assembly or failure to assemble to the assembly manual provided. Assembly errors include but are not limited to damaged wiring harness, stripped crank arms and or pedals and bolts used in the wrong locations.
(b) Lack of general maintenance and or failure to service or maintain the equipment in accordance with the user manual specifications and recommendations.
(c) Power Surges. The computers, control boards and motors are very sensitive to power fluctuations. You must use a surge protector on all items that plug into your mains power otherwise your electronics will not be covered by this warranty. You can purchase these from numerous retailers or you can call us on 02 4648 0800 to get a price.
(d) User negligence, abnormal or excessive use, misuse, abuse or transport damage.
(e) Repairs, alterations or modifications by NON BFE authorised service technician.
(f) Accident, fire, flood or malicious damage by third person.
(g) Ordinary wear and tear.
(h) Failure to keep the product in a clean, dry environment causing rust. You should wipe off any sweat and moisture after each training session.
(i) Any products sold or placed in an application or the incorrect environment that is not recommended by BFE or as not stipulated in the owner's manual such as a commercial / rental environment will void the warranty set forth by BFE
(j) BFE recommends the use of a protective rubber floor mat. This reduces the incidence of dust and lint collection around the motor, reduces noise & protects your floor. You can purchase this from your retailer or contact BFE directly at sales@boylesfitness.com.au
BFE will have the option to repair or replace any product which requires attention under the warranty.
NOTE: Lifetime refers to the warranty coverage of the units expected service life. NOT the lifetime of the purchaser.
Servicing/Spare Parts- As with any mechanical equipment general maintenance should be performed on a regular basis by an authorised retailer or service technician. This will ensure longevity of the product and ensure that it is kept working in optimum condition. Failure to properly maintain your equipment may lead to safety issues and may also void the warranty.
You should only use genuine BFE replacement parts otherwise the warranty will be void.
Freight Costs:
The cost of freighting the replacement part under warranty to the customer shall be free of charge. Your requirement is to return the faulty part via the pre-paid postal service which we will supply.
Returned Goods:
The unauthorised return of parts or product shall be refused and placed in the hands of the carrier at the cost of the shipper. Return authorisations can be obtained from BFE head office only.
Additional Warranty
If you would like to extend your labour warranty by 1 year (\99), 2 years (\199), 3 years (\$299) please contact our office by emailing sales@boylesfitness.com.au (Not available in all areas)
Service Department hours: Monday to Friday between 9m and 4pm
Service Phone Number: 07 3272 7010 Email: spares@boylesfitness.com.au
PLEASE NOTE: that Authorised service technicians do not reside in all areas of this vast country. If you live beyond the reasonable service area of a metropolitan area, BFE may not be able to support the labour portion of the product warranty. Alternatively you can return (at your cost) your product to the closest BFE repair centre, where it will be fixed at no charge under the warranty period.
Metropolitan Area-defined as no more that 50km from G.P.O in all capital cities.
Disclaimer:
Our goods come with guarantees that cannot be excluded under the Australian Consumer Law. You are entitled to a replacement or refund for a 'Major failure' and for compensation for any other Reasonable foreseeable loss or damage.
You are also entitled to have goods repaired or replaced if the goods fail to be of an acceptable quality and the failure does not amount to a major failure.
BFE does not assume, nor authorise any representative or other person to make or assume for BFE, any warranties whatsoever, whether expressed or implied, in, in connection with the sale, service, or shipment of our products.
BFE reserve the right to make changes and improvements in our products and specifications without incurring any obligation to similarly alter products previously purchased.
This warranty operates in addition to other rights and remedies available to consumer's rights under the Australian Consumer Law.
Service Department hours: Monday to Friday between 9am and 4pm
Service Phone Number: 07 3272 7010 Email: spares@boylesfitness.com.au
YORK®
FITNESS
- Table of Contents
- CONTENTS
- YORK®
- Safety Information
- Maximum user weight: 180kg
- Safety Standards
- Customer Support
- AUSTRALIA
- York Fitness Australia
- Assembly Instructions
- Final Check
- Operational Instructions
- OPERATION:
- POWER ON
- WORKOUT SELECTION
- Manual Mode
- Watt Mode
- Body Fat Mode
- USB power charger
- APP:
- NOTE:
- Troubleshooting
- Care & Maintenance
- Fitness Guide
- Starting and Finishing Your Workout
- Correct Cycling Form
- Suggested Stretches
- Hamstring Stretch
- Calf/Achilles Stretch
- Quadriceps Stretch
- Inner Thigh Stretch
- How Long Should I Exercise For?
- Heart Rate Training
- Calculating Your Target Heart Rate
- Exploded Drawing
- YRK53105A - York LC-RB Recumbent Bike Warranty:
- Lifetime Frame
- Months Parts
- Freight Costs:
- Returned Goods:
- Additional Warranty
- Disclaimer:
Brand : York Fitness
Model : LC-RB
Category : Home trainer