HFSC-SME50SL - Cooker Heinner - Free user manual and instructions
Find the device manual for free HFSC-SME50SL Heinner in PDF.


| Product Type | Freestanding Cooker |
| Brand | Heinner |
| Model | HFSC-SME50SL |
| Width | 50 cm |
| Height | 85 cm (adjustable) |
| Depth | 60 cm |
| Weight | Approx. 45 kg |
| Power Supply | 220-240 V ~ 50/60 Hz |
| Hob Type | Gas (4 burners) |
| Oven Type | Electric fan oven |
| Oven Functions | Convection, grill, conventional baking |
| Oven Capacity | 65 litres |
| Energy Efficiency Class | A |
| Safety Features | Flame failure device on hob, triple-glazed oven door |
| Cleaning | Enamel oven interior, removable oven door |
| Spare Parts Availability | Heinner authorized service centers |
| Repairability Index | 7.5 / 10 |
| Included Accessories | Oven grid, baking tray |
Frequently Asked Questions - HFSC-SME50SL Heinner
User questions about HFSC-SME50SL Heinner
0 question about this device. Answer the ones you know or ask your own.
Ask a new question about this device
Download the instructions for your Cooker in PDF format for free! Find your manual HFSC-SME50SL - Heinner and take your electronic device back in hand. On this page are published all the documents necessary for the use of your device. HFSC-SME50SL by Heinner.
USER MANUAL HFSC-SME50SL Heinner
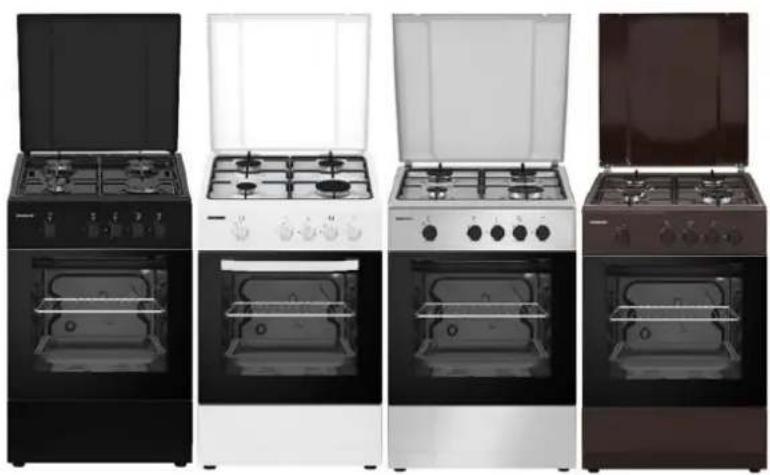
natural_image
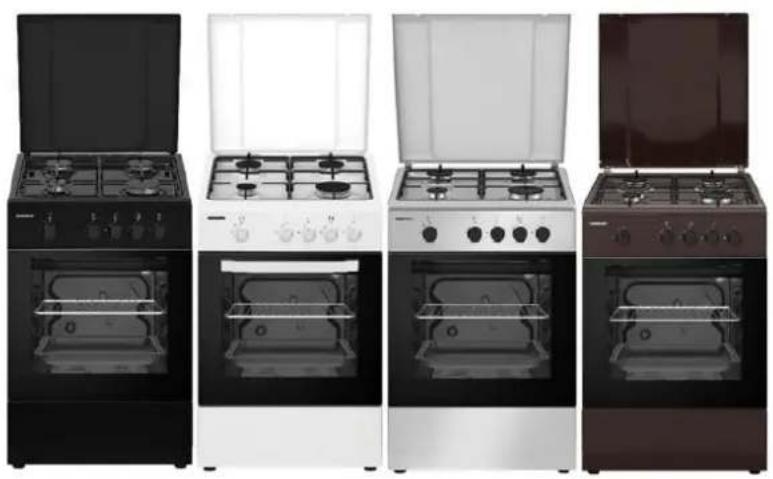
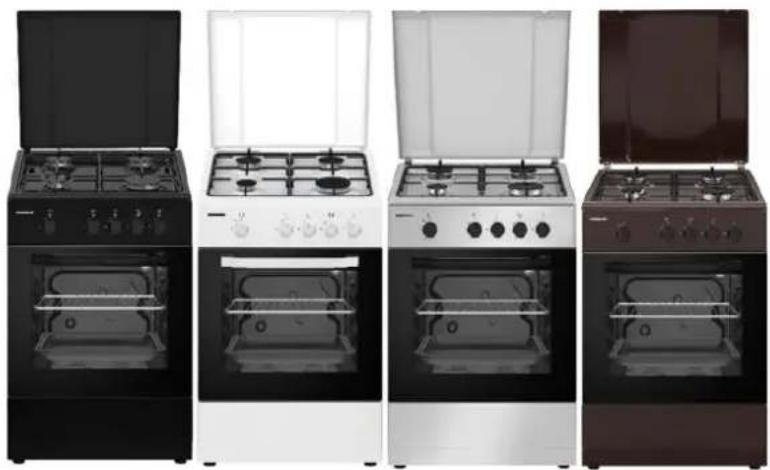
Four different kitchen appliances in open and closed, arranged in a row (no visible text or labels)Gas cooker, 4 burners
- 50 x 50 cm
I. INTRODUCTION
Before using the appliance, please read carefully this instruction manual and keep it for future reference.
This instruction manual is designed to provide you with all required instructions related to the installation, use and maintenance of the appliance.
In order to operate the unit correctly and safety, please read this instruction manual carefully before installation and usage.
II. CONTENT OF YOUR PACKAGE

Gas cooker
User manual
Warranty card
III. SAFETY PRECAUTIONS
- Installation and repair should always be performed by "AUTHORIZED SERVICE".
Manufacturer shall not be held responsible for operations performed by unauthorized persons.
-
Please read these operating instructions carefully. Only by this way you can use the appliance safely and in a correct manner.
-
The oven should be used according to operating instructions.
-
Keep children below the age of 8 and pets away when operating.
-
WARNING: The accessible parts may be hot while using the grill. Keep away from children.
-
WARNING: Fire hazard; do not store the materials on the cooking surface.
-
WARNING: The appliance and its accessible parts are hot during operation.
-
Setting conditions of this device are specified on the label. (Or on the data plate)
-
The accessible parts may be hot when the grill is used. Small children should be kept away.
-
WARNING: This appliance is intended for cooking. It should not be used for other purposes like heating a room.
-
To clean the appliance, do not use steam cleaners.
-
Ensure that the oven door is completely closed after putting food inside the oven.
-
NEVER try to put out the fire with water. Only shut down the device circuit and then cover the flame with a cover or a fire blanket.
-
Children under 8 years of age should be kept away if they cannot be monitored continuously.
-
Touching the heating elements should be avoided.
-
CAUTION: Cooking process shall be supervised. Cooking process shall always be supervised.
-
This device can be used by children over 8 years of age, people with physical, hearing or mental challenges or people with lack of experience or knowledge as long as control is ensured, or information is provided regarding the dangers.
-
This device has been designed for household use only.
-
Children must not play with the appliance. Cleaning or user maintenance of the appliance shall not be performed by children unless they are older than 8 years and supervised by adults. 20. Keep the appliance and its power cord away from children less than 8 years old.
-
Put curtains, tulles, paper or any flammable (ignitable) material away from the appliance before starting to use the appliance. Do not put ignitable or flammable materials on or in the appliance.
-
Keep the ventilation channels open.
-
The appliance is not suitable for use with an external timer or a separate remote-control system.
-
Do not heat closed cans and glass jars. The pressure may lead jars to explode.
-
Oven handle is not a towel drier. Do not hang towels, etc. on the oven handle.
-
Do not place the oven trays, plates or aluminium foils directly on the oven base. The accumulated heat may damage the base of the oven.
-
While placing food to or removing food from the oven, etc., always use heat resistant oven gloves.
-
Do not use the product in states like medicated and/or under influence of alcohol which may affect your ability of judgement.
-
Be careful when using alcohol in your foods. Alcohol will evaporate at high temperatures and may catch fire to cause a fire if it comes in contact with hot surfaces.
-
After each use, check if the unit is turned off.
-
If the appliance is faulty or has a visible damage, do not operate the appliance.
-
Do not touch the plug with wet hands. Do not pull the cord to plug off, always hold the plug.
-
Do not use the appliance with its front door glass removed or broken.
- Place the baking paper together with the food into a pre-heated oven by putting it inside a cooker or on an oven accessory (tray, wire grill etc.).
- Do not put objects that children may reach on the appliance.
- It is important to place the wire grill and tray properly on the wire racks and/or correctly placed the tray on the rack. Place the grill or tray between two rails and make sure it is balanced before putting food on it.
- Against the risk of touching the oven heater elements, remove excess parts of the baking paper that hang over from the accessory or container.
- Never use it at higher oven temperatures than the maximum usage temperature indicated on your baking paper. Do not place the baking paper on the base of the oven.
- When the door is open, do not place any heavy object on the door or allow children to sit on it. You may cause the oven to overturn or the door hinges to be damaged.
- The packaging materials are dangerous for children. Keep packaging materials away from the reach of children.
- Do not use abrasive cleaners or sharp metal scrapers to clean the glass as the scratches that may occur on the surface of the door glass may cause the glass to break.
- Do not place the appliance on a surface covered with carpets. Electric parts get overheated since there will be no ventilation from below. This will cause failure of the appliance.
- Do not hit glass surfaces of vitro-ceramic cookers with a hard metal, resistance can get damaged. It may cause an electric shock.
- User should not handle the oven by himself.
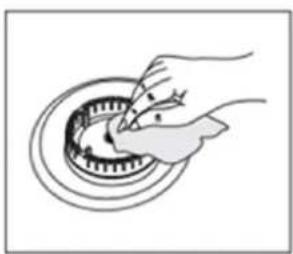
- Use shall be careful when cleaning gas burners. It may cause personal injuries.
- Food can spill when foot of oven is dismantled or gets broken, be careful. It may cause personal injuries.
- During usage, the internal and external surfaces of the oven get hot. As you open the oven door, step back to avoid the hot vapour coming out from the interior. There is risk of burning.
- Upper cover of the oven can be closed for a reason, then cookware can trip over. Step back to avoid the hot food coming on you. There is risk of burning.
- Do not place heavy objects when oven door is open, risk of toppling.
- User should not dislocate the resistance during cleaning. It may cause an electric shock.
- Do not remove ignition switches from the appliance. Otherwise, live electric cables can be accessed. It may cause an electric shock.
- Oven supply can be disconnected during any construction work at home. After completing the work, re-connecting the oven shall be done by authorized service.
- Do not place metal utensils such as knife, fork, spoon on the surface of the appliance since they will get hot.
- To prevent overheating, the appliance should not be installed behind of a decorative cover.
- Turn off the appliance before removing the safeguards. After cleaning, install the safeguards according to instructions.
- Cable fixing point shall be protected.
- WARNING: Don't use oven and grill burners at same time.
- Please don't cook the food directly on the tray / grid. Please put the food into or on appropriate tools before putting them in the oven.
- Hot surface, leave for cooling before closing the cover.
GAS SAFETY
- This appliance is not connected to burning products evacuation apparatus. This appliance must be connected and installed according to the installation regulations in force. Conditions regarding ventilation must be considered.
- When a gas cooking appliance is used; humidity, heat and burning products are generated in the room. First, make sure the kitchen is well ventilated when operating the appliance and maintain natural ventilation openings or install a mechanical ventilation equipment.
- After using the appliance heavily for an extended period, additional ventilation may be required. For example, open a window or adjust a higher speed for mechanical ventilation, if any
- This appliance must be used only in well-ventilated locations in accordance with the regulations in force. Please read the manual before installing or using this product.
- Before positioning the appliance, make sure local network conditions (gas type and gas pressure) meets appliance requirements.
- The mechanism cannot be run for longer than 15 seconds. If the burner is not on after 15 seconds, stop the mechanism and wait for at least one minute before trying to ignite the burner again.
- All kinds of operations to be performed on gas installation must be performed by authorized and competent people.
- This appliance is adjusted for natural gas (NG). If you must use your product with a different gas type, you have to apply to authorized service for the conversion.
- For proper operation, hood, gas pipe and clamp should be replaced periodically according to manufacturer recommendations and when required.
- Gas should burn well in gas products. Well burning gas can be understood from blue flame and continuous burning. If gas does not burn sufficiently, carbon monoxide (CO) can be generated. Carbon monoxide is a colourless, odourless, and very toxic gas; even small amounts have lethal effect.
- Ask your local gas supplies about the phone numbers for emergencies related to gas and the measures to be taken upon gas odour is detected.
What to do when gas odour is detected
- Do not use naked flame, and do not smoke.
- Do not operate any electrical switch. (For example: lamp switch or doorbell)
- Do not use telephone or mobile phone.
- Open the doors and windows.
- Close all valves on the appliances that utilize gas and the gas counters.
- Call fire brigade from a telephone outside the home.
- Check all hoses and their connections against leaks. If you still smell gas, leave the house and warn your neighbours.
- Do not enter the house until authorities clarify it is safe.
Intended Use
- This product is designed for home use. Commercial use of the appliance is not permitted.
- This appliance may only be used for cooking purposes. It shall not be used for other purposes like heating a room.
- This appliance shall not be used to heat plates under the grill, drying clothes or towels by hanging them on the handle or for heating purposes.
- The manufacturer assumes no responsibility for any damage due to misuse or mishandling. 5. Oven part of the unit may be used for thawing, roasting, frying and grilling food.
- Operational life of the product you have purchased is 10 years. This is the period for which the spare parts required for the operation of this product as defined is provided by the manufacturer.
IV. INSTALLATION
Gas Connection
WARNING: Before starting any work related with gas installation, turn off gas supply. Risk of explosion. Please operate your oven in dry atmosphere.
- Fit the clamp to the hose. Push one of the hoses until it goes to the end of the pipe.
- For the sealing control; ensure that the buttons in the control panel are closed, but the gas cylinder is open. Apply some soap bubbles to the connection. If there is gas leakage, there will be foaming in the soaped area.
- The oven should be using a well ventilation place and should be install on flat ground.
- Re-inspect the gas connection.
- When placing your oven to its location, ensure that it is at the counter level. Bring it to the counter level by adjusting the feet if necessary.
- Do not make gas hose and electrical cable of your oven go through the heated area: especially through the rear side of the oven. Do not move gas connected oven. Since the forcin shall loosen the hose, gas leakage may occur.
- Please use flexible hose for gas connection.
For LPG connection
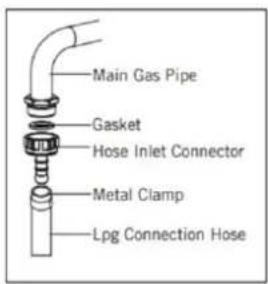
For LPG (cylinder) connection, affix metal clamp on the hose coming from LPG cylinder. Affix an edge of the hose-on-hose inlet connector behind the appliance by pushing to end through heating the hose in boiled water. Afterward, bring the clamp towards end section of the hose and tighten it with screwdriver. The gasket and hose inlet connector required for connection is as the picture shown below.
NOTE: The regulator to be affixed on LPG cylinder should have 300 mms feature.
For natural gas connection
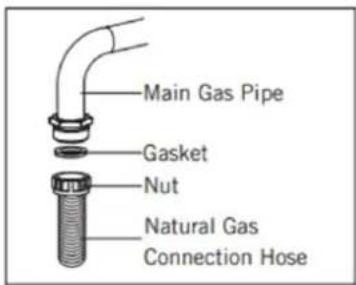
WARNING: Natural gas connection should be done by authorized service. For natural gas connection, place gasket in the nut at the edge of natural gas connection hose. To install the hose on main gas pipe, turn the nut. Complete the connection by making gas leakage control.
Gas hose passageway
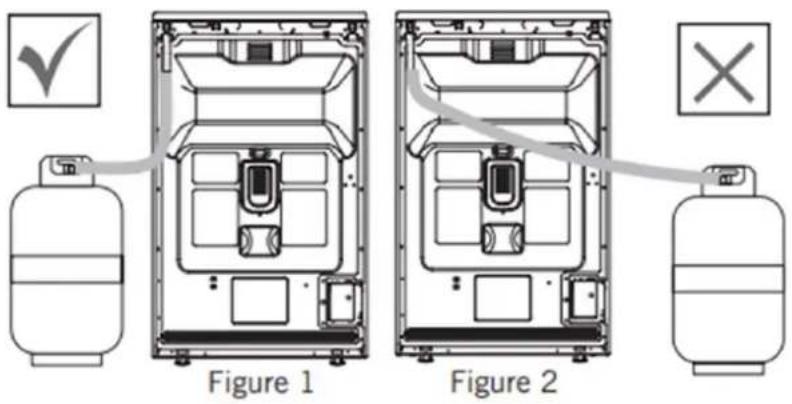
Connect the appliance to the gas piping tap in shortest possible route and in a way that ensure no gas leakage will occur. To carry on a tightness and sealing safety check ensure that the knob on the control panel are closed and the gas cylinder is open.
WARNING: While performing a gas leakage check, never use any kind of lighter, match, cigarette, or similar burning substance. Apply soap bubble on the connection points. If there is any kind of leakage, then it will cause bubbling. While inserting the appliance in place ensure that it is on the same level with the worktop. If required adjust the legs in order the make level with the worktop. Use the appliance on a level surface and in a well-ventilated environment.
WARNING: Before placing the appliance, check that the local distribution conditions (gas type and pressure) conform to the product settings.
Nozzle change operation.
- Please use driver with special head for removed and install nozzle as. (Figure 3)
- Please remove nozzle (figure 4) from burner with special nozzle driver and install new nozzle (Figure 5).
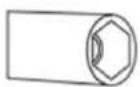
Figure 3
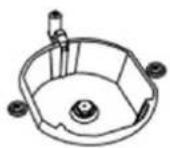
Figure 4
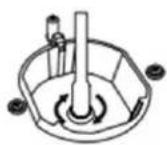
Figure 5
Ventilation of room
The air needed for burning is received from room air and the gases emitted are given directly in room. For safe operation of your product, good room ventilation is a precondition. If no window or room to be utilized for room ventilation is available, additional ventilation should be installed. However, room has a door opening outside, it is no needed to vent holes.
| Room size | Ventilating opening |
| Smaller than 5 m^3 | min. 100 cm^2 |
| Between 5 m^3 - 10 m^3 | min. 50 cm^2 |
| Bigger than 10 m^3 | no need |
| In basement or cellar | min. 65 cm^2 |
Reduced gas flow rate setting for hob taps.
- Ignite the burner that is to be adjustment and turn the knob to the reduced position.
- Remove the knob from the gas tap.
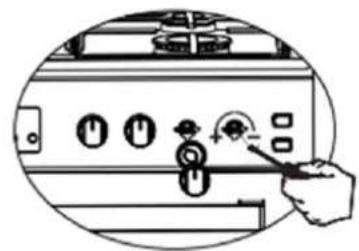
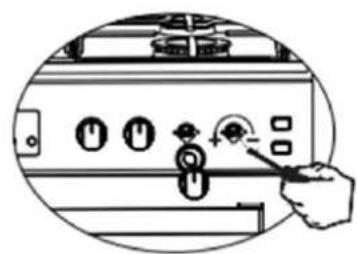
- Use an appropriately sized screwdriver to adjust the flow rate adjustment screw. For LPG (butane-pro pane) turn the screw clockwise. For the naturel gas, you should turn the screw counter-clockwise once. "The normal length of a straight flame in the reduced position should be 6-7 mm.
- If the flame is higher than the desired position, turn the screw clockwise. If it is smaller turn anticlockwise.
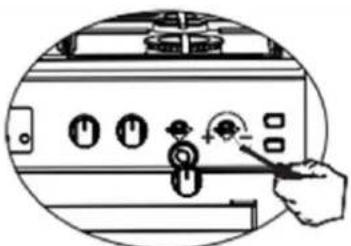
- For the last control, bring the burner both to high-flame and reduced positions and check whether the flame is on or off. Depending on the type of gas tap used in your appliance the adjustment screw position may vary. To adjust your oven acc. to the gas type, make the adjustment for reduced flame carefully by turning with a small screwdriver as shown below on the screw in the middle of the gas cocks as well as nozzle changes. (Figure 6 and 7)
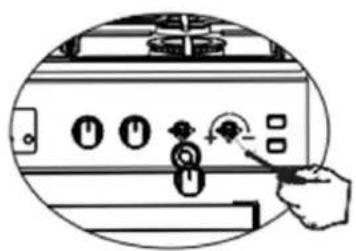
natural_image
Diagram of a kitchen control panel with a hand pointing to the button (no text or symbols visible)Figure 6
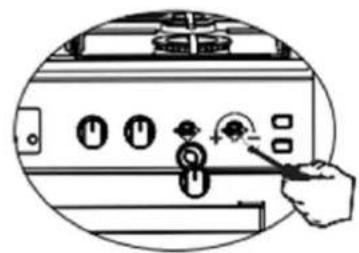
natural_image
Diagram of a control panel with buttons and a hand pointing to the right (no text or symbols)Figure 7
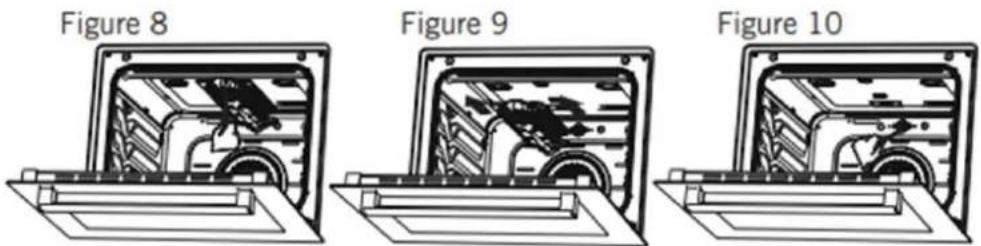
Removal of the lower and upper burner and installation of the injector to the gas oven
Removal of the upper burner:
With the help of a screwdriver, remove the screw as shown in figure 8.
As shown in figure 9, remove the burner from its place by pulling it to yourself.
As shown in figure 10, remove the injector in the bearing with a socket wrench.
To re-place the burner, apply the removal process reversely.
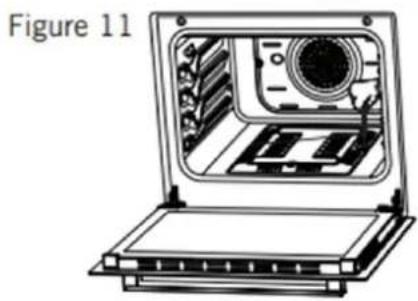
Removal of the lower burner:
The lower burner door has been fixed with two screws.
As shown in figure 11, remove it with the help of a screwdriver.
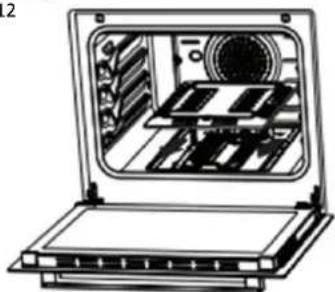
Remove the door by pulling upwards as shown in figure 12.
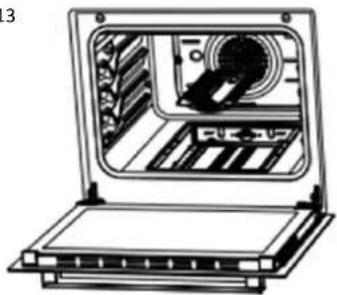
Remove the burner from its place by pulling it to yourself as shown in figure 13.
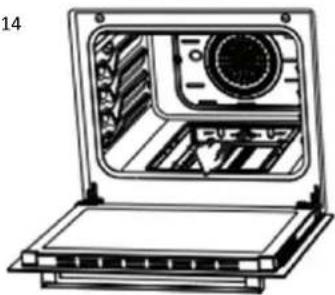
As shown in figure 14, remove the injector in the bearing with a socket wrench.
To replace the burner, apply the removal process reversely.
natural_image
Diagram of an open laptop with internal components and a labeled section 'Figure 11' (no text or symbols on the diagram itself)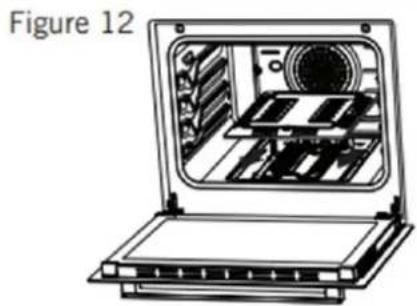
natural_image
Technical line drawing of an open laptop with internal components and a labeled section (Figure 12), no readable text or symbols beyond label.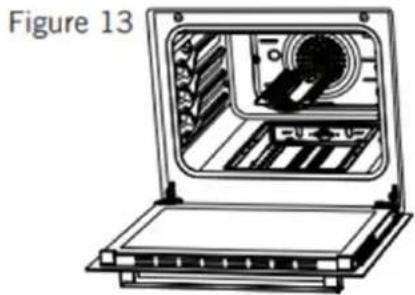
natural_image
Line drawing of a laptop with internal components and a circular inset showing a device (no text or symbols)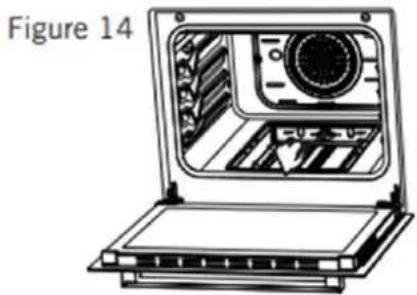
natural_image
Line drawing of a laptop with internal components, labeled 'Figure 14' (no text on diagram itself)INSTALLATION OF YOUR OVEN
Check if the electrical installation is proper to bring the appliance in operating condition. If electricity installation is not suitable, call an electrician and plumber to arrange the utilities as necessary. Manufacturer shall not be held responsible for damages caused by operations performed by unauthorized persons.
WARNING: It is customer's responsibility to prepare the location the product shall be placed on and to have the electrical installation prepared.
WARNING: The rules in local standards about electrical installations shall be followed during product installation.
WARNING: Check for any damage on the appliance before installing it. Do not have the product installed if it is damaged. Damaged products cause a risk for your safety.
Right place for installation and important warnings
Appliance feet should not stay on soft surfaces such as carpets. The kitchen floor shall be durable to carry the unit weight and any other kitchenware that may be used on the oven. Appliance should be used with a clearance of minimum 400 mm over the upper hob surfaces, and 6.5 mm from side surfaces inside a kitchen furniture.
The appliance is suitable for use on both side walls, without any support, or without being installed in a cabinet. If a hood or aspirator will be installed above the cooker, follow the instructions of the manufacturer for height of mounting. (min. 650 mm).
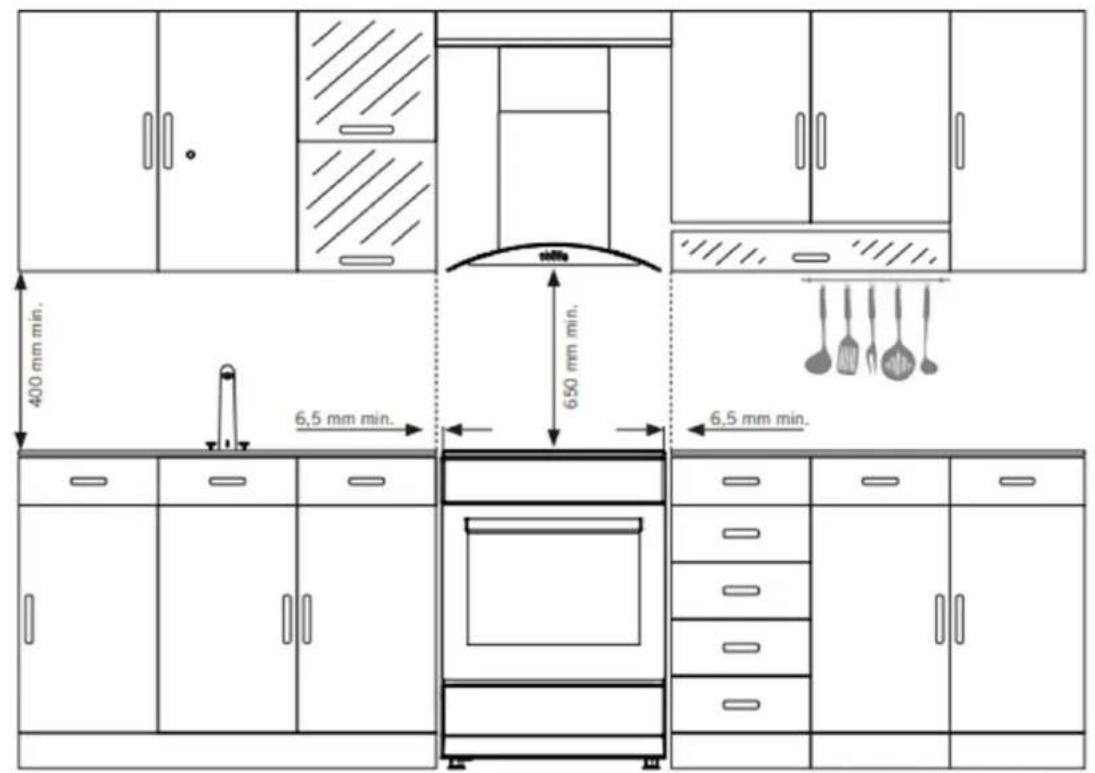
WARNING: The kitchen furniture near the appliance must be heat resistant.
WARNING: Do not install the appliance beside refrigerators or coolers. Heat radiated by the appliance increases the energy consumption of cooling devices.
WARNING: Do not use the door and/or handle to carry or move the appliance.
Chain lashing illustration.
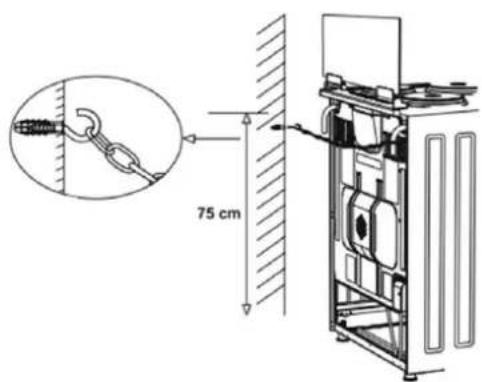
Before using the appliance, to ensure safe use, be sure to fix the appliance to the wall using the chain and hooked screw supplied. Ensure that the hook is screwed into the wall securely.
V. PRODUCT DESCRIPTION
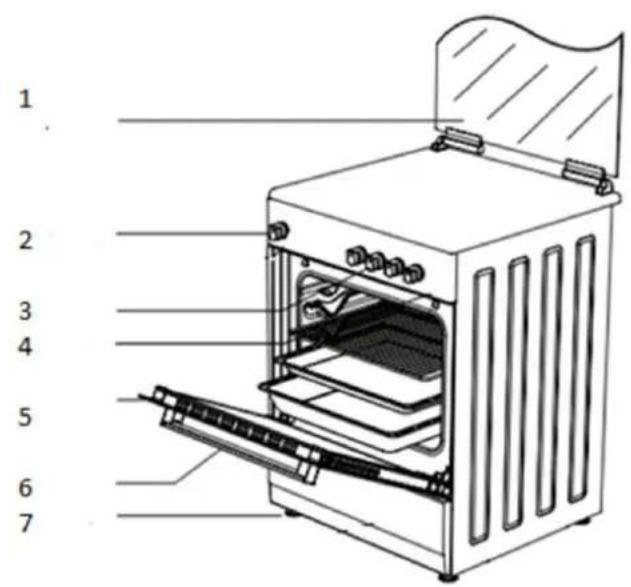
- Metal lid
- Oven setting
- Cooker section control Switches
- Oven
- Door
- Handle
- Plastic leg
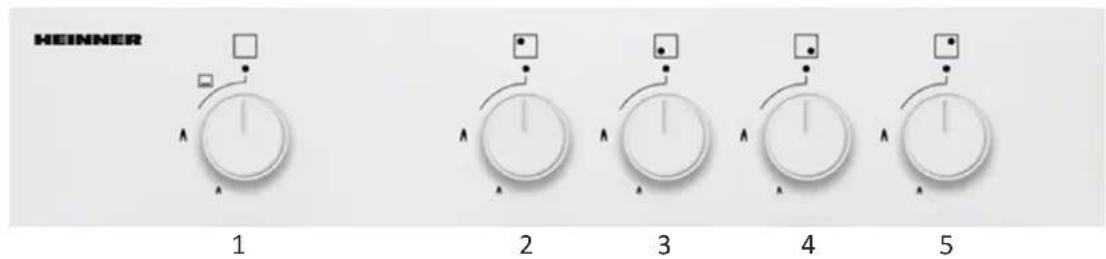
1- Oven burner
2- Rear left heater
3- Front left heater
4- Front right heater
5- Rear right heater
VI. USING THE PRODUCT
USING OVEN SECTION
Using Oven Burners
Push in the knob of the burner you wish to ignite and keep it pressed while turning it anticlockwise until the knob is in the 'maximum' position. Continue pressing the knob and hold a lit match, taper or other manual aid to the upper circumference of the burner. Move the ignition source away from the burner as soon as you see a stable flame.
Using Oven Heating Elements
- When your oven is operated first time, an odor will be spread out which will be sourced from using the heating elements. To get rid of this, operate it at 240 °C for 45-60 minutes while it is empty.
- Oven control knob should be positioned to desired value; otherwise, oven does not operate.
- Kinds of meals, cooking times and thermostat positions are given in cooking table. The values given in the cooking table are characteristic values and were obtained because of the tests performed in our laboratory. You can find different flavours suitable for your taste depending on your cooking and using habits.
- You can make chicken revolving in your oven by means of the accessories.
- Cooking times: The results may change according to the area voltage and material having different quality, amount and temperatures.
- During the time when cooking is being performed in the oven, the lid of the oven should not be opened frequently. Otherwise, circulation of the heat may be imbalanced and the results may change.
Using Cooker Section
Using gas burners
Flame cut-off safety device (FFD) - operates instantly when safety mechanism activates due to overflown liquid over upper hobs.
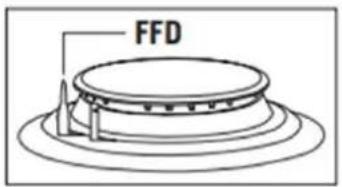
- The valves controlling the gas cookers have special security mechanism. In order to light the cooker always press on the switch forward and bring it to flame symbol by turning counter clockwise. All the lighters shall operate and the cooker you controlled shall light only. Keep the switch pressed until ignition i performed. Press on the lighter button and turn the knob counter clockwise.
- Do not continuously operate the igniter for more than 15 seconds. If the burner does not ignite, wait minimum one minute before try again.
-
In models with gas security system, when flame of the cooker is extinguished, control valve cuts off the gas automatically. For operate the burners with gas security system you must press the knob and turn counter clockwise. After the ignition you must wait nearly 5-10 second for gas security systems activation. If the burner is extinguished for of the any reason, close the gas control valve and wait a minimum of one minute before trying again.
-
Closed Fully open Half open
-
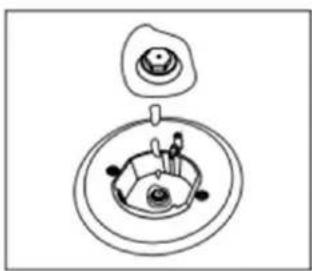
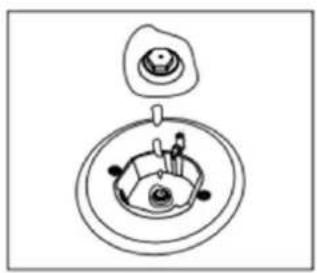
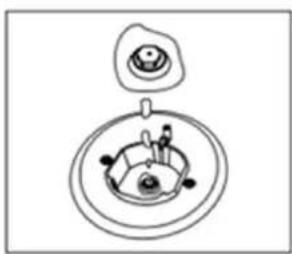
Before operating your hob please make sure that the burner caps are well positioned. The right placement of the burner caps is shown as below.
Figure 16
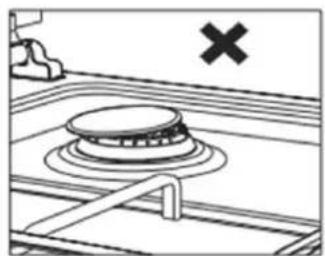
natural_image
Simple line drawing of a cooking pan with a handle and a cross mark, no text or symbols present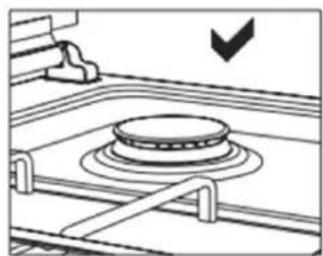
natural_image
Diagram of a kitchen appliance with a circular component and directional arrow (no text or symbols)Figure 17
Pot Sizes
| 50*50 cm | |
| Small burner | 12-18 cm |
| Normal burner | 18-20 cm |
| Big burner | 22-24 cm |
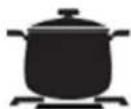
Incorrect
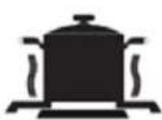
Incorrect
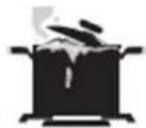
Incorrect
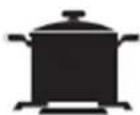
Correct
Technical Features of your Oven
WARNING: For the modification to be done by authorized service, this table should be considered. Manufacturer may not be held responsible for any problems rising because of any faulty modification.
WARNING: In order to increase the product quality, the technical specifications may be changed without prior notice.
WARNING: The values provided with the appliance or its accompanying documents are laboratory readings in accordance with the respective standards. These values may differ depending on the use and ambient conditions.
| Specification | 50x50 cm |
| Width | 498 mm |
| Depth | 500 mm |
| Height | 855 mm |
| Burner specifications | G20, 20 mbar | G30,28-30 mbar | ||||
| Natural gas | LPG | |||||
| Rapid burner | Injector | 1,15 | mm | Injector | 0,85 | mm |
| Gas flow | 0,276 | m3/h | Gas flow | 211 | g/ | |
| Power | 2,90 | kW | Power | 2,90 | kW | |
| Semi-rapid burner | Injector | 0,97 | mm | Injector | 0,65 | mm |
| Gas flow | 0,162 | m3/h | Gas flow | 124 | g/h | |
| Power | 1,7 | kW | Power | 1,70 | kW | |
| Auxiliary burner | Injector | 0,72 | mm | Injector | 0,50 | mm |
| Gas flow | 0,96 | m3/h | Gas flow | 69 | g/h | |
| Power | 0,95 | kW | Power | 0,95 | kW | |
| Oven burner | Injector | 1,10 | mm | Injector | 0,75 | mm |
| Gas flow | 0,235 | m3/h | Gas flow | 182 | g/h | |
| Power | 2,5 | kW | Power | 2,5 | kW | |
WARNING: Diameter values written on the injector are specified without a comma. For example, the diameter of 1,70 mm is specified as 170 on the injector
Accessories
| Standard tray | 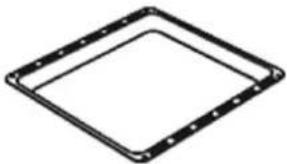 Used for pastry, big roasts, watery foods. It can also be used as oil collecting container if you roast directly on grill with cake, frozen foods and meat dishes. Used for pastry, big roasts, watery foods. It can also be used as oil collecting container if you roast directly on grill with cake, frozen foods and meat dishes. |
| Wire grill | 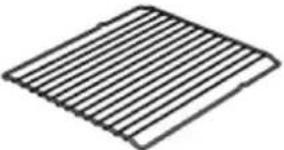 Used for roasting or placing foods to be baked, roasted and frozen into desired rack. Used for roasting or placing foods to be baked, roasted and frozen into desired rack. |
VII. MAINTENANCE AND CLEANING
- Disconnect the plug supplying electricity for the oven from the socket.
- While oven is operating or shortly after it starts operating, it is extremely hot. You must avoid touching from heating elements.
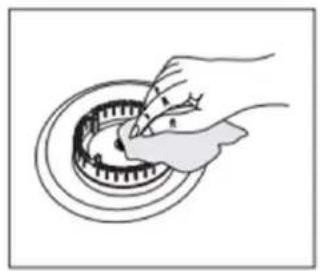
- Never clean the interior part, panel, lid, trays, and all other parts of the oven by the tools like hard brush, cleaning mesh or knife. Do not use abrasive, scratching agents and detergents.
- After cleaning the interior parts of the oven with a soapy cloth, rinse it and then dry thoroughly with a soft cloth.
- Clean the glass surfaces with special glass cleaning agents.
- Do not clean your oven with steam cleaners.
- Before opening the upper lid of the oven, clean spilled liquid off the lid. Also, before closing the lid, ensure that the cooker table is cooled enough.
- Never use inflammable agents like acid, thinner and gasoline when cleaning your oven. 9. Do not wash any part of your oven in dishwasher.
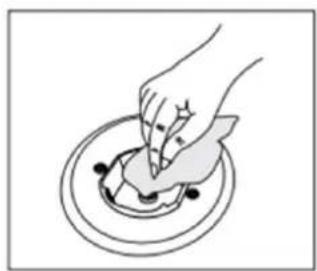
- In order to clean the front glass lid of the oven; remove the fixing screws fixing the handle by means of a screwdriver and remove the oven door. Then clean and rinse it thoroughly. After drying, place the oven glass properly and re-install the handle.
natural_image
Illustration of a hand placing a small object into a circular container (no text or symbols)Figure 18
natural_image
Simple line drawing of a biological cell or vesicle with internal structures and a top view (no text or labels)Figure 19
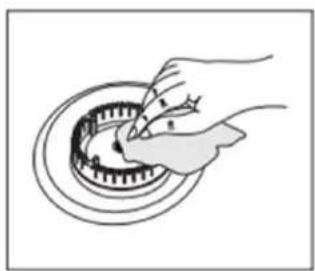
natural_image
Illustration of a hand using a tool to clean or inspect a circular mechanical component (no text or symbols visible)Figure 20
Installation of the oven door
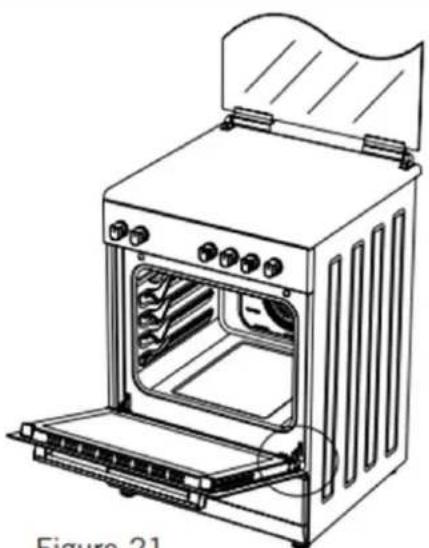
natural_image
Line drawing of an open oven with internal compartments and ventilation slots (no text or symbols)Figure 21
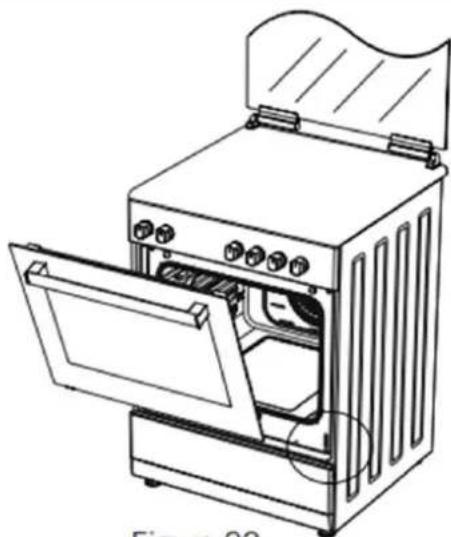
natural_image
Line drawing of an open oven with lid open, showing internal components and ventilation slots (no text or symbols)Figure 22
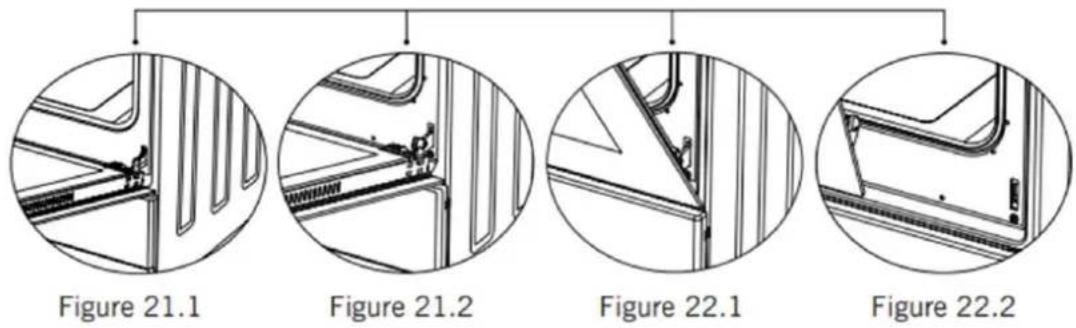
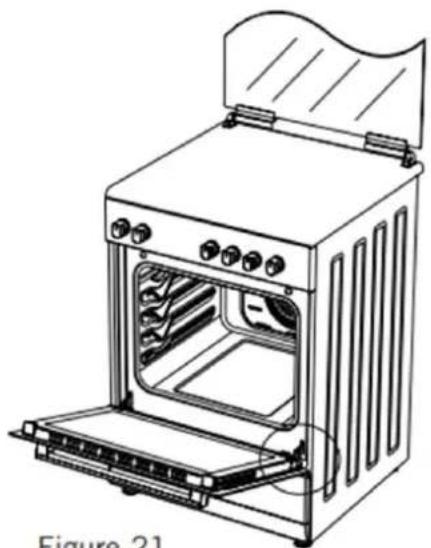
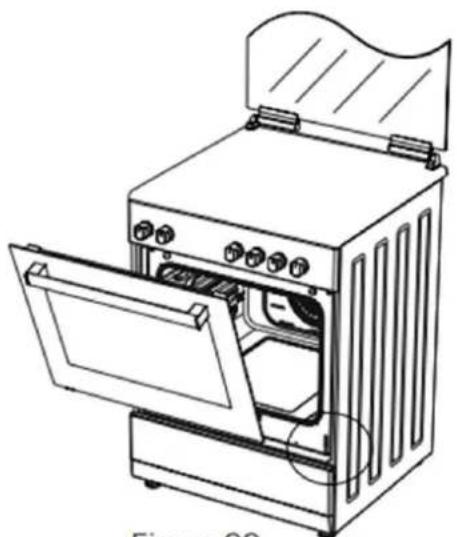
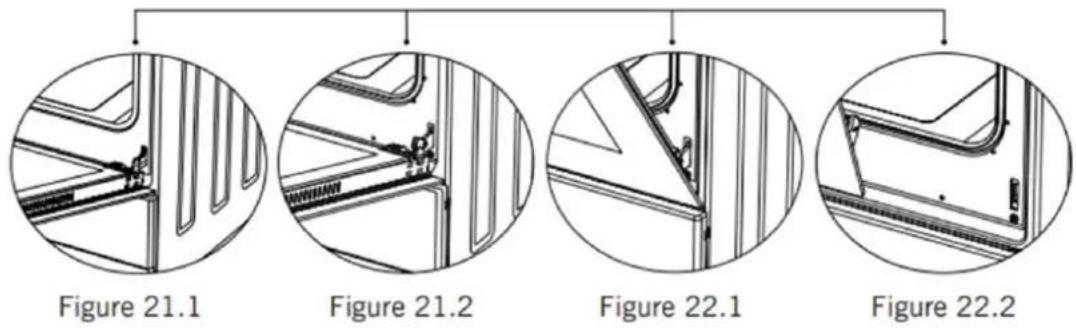
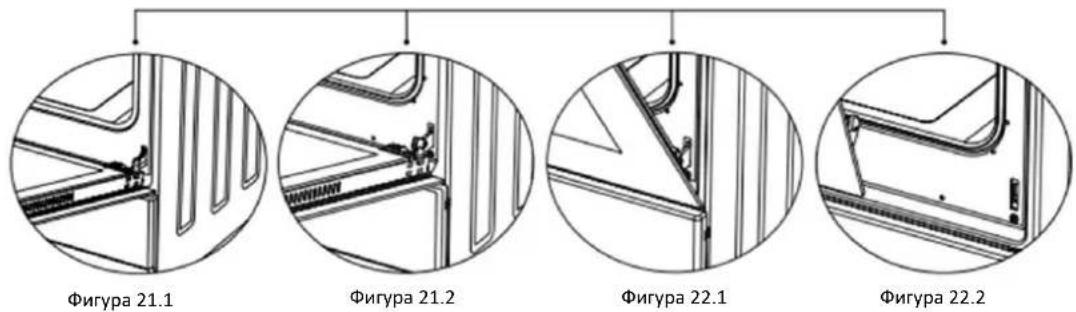
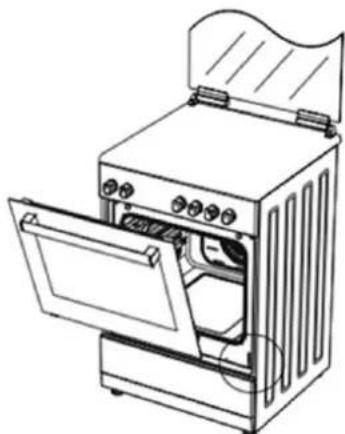
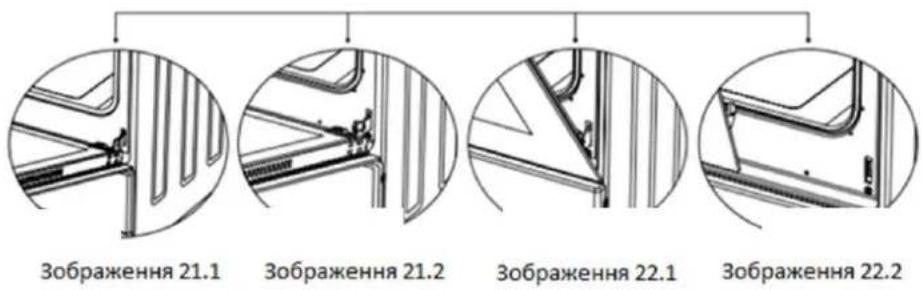
Completely open the oven door by pulling it to yourself. After wards, perform the unlocking process by pulling the hinge lock upwards with the help of a screwdriver as shown in figure 21.1.
Bring the hinge lock to the widest angle as shown in figure 21.2. Bring both hinges connecting the oven door to the oven to the same position.
Afterwards, close the oven door as to lean on the hinge lock as shown in figure 22.1.
To remove the oven door, pull it upwards by holding it with both hands when close to the closed position as shown in figure 22.2.
To re-place the oven door, perform the abovementioned steps in reverse.
Cleaning and maintenance of the oven's front door glass
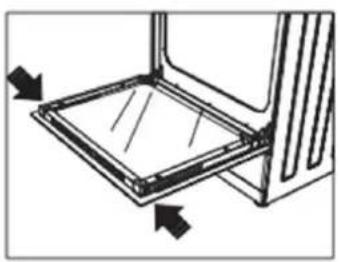
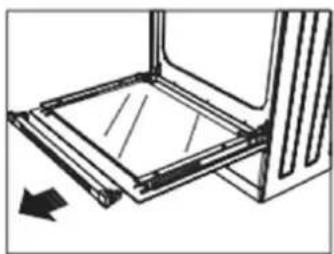
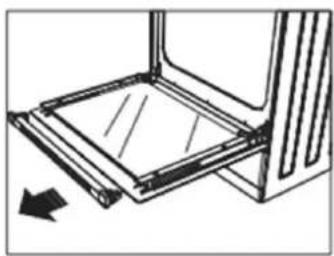
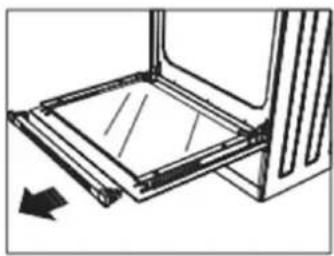
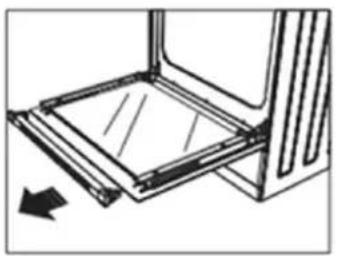
Remove the profile by pressing the plastic latches on both left and right sides as shown in figure 23 and pulling the profile towards yourself as shown in figure 24.
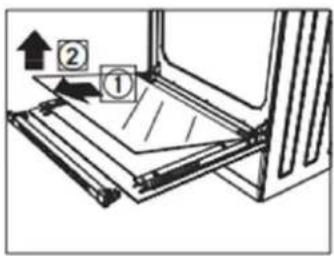
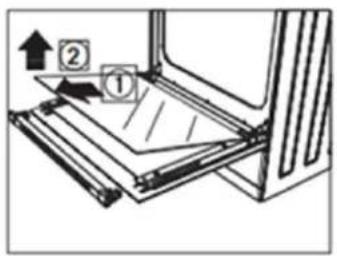
Then remove the inner glass as shown in figure 25.
If required, middle glass can be removed in the same way. After cleaning and maintenance are done, remount the glasses and the profile in reverse order. Make sure the profile is properly seated in its place.
natural_image
Technical line drawing of a mechanical assembly with arrows indicating direction (no text or symbols)Figure 23
natural_image
Technical line drawing of a mechanical assembly with a base plate and directional arrow (no text or symbols)Figure 24
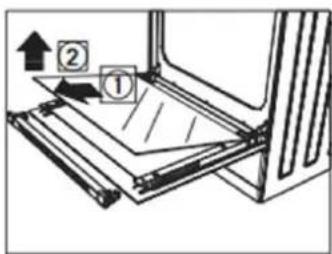
Figure 25
VIII. TROUBLESHOOTING
| Problem | Possible cause | What to do |
| Oven does not operate. | Gas supply not available | Check if main gas valve is open. |
| Check if gas pipe is bent or kinked. | ||
| Make sure gas hose is connected to the oven | ||
| Check if suitable gas valve is being used. | ||
| Oven door is not opening properly | Food residues jammed between the door and internal cavity. | Clean the oven well and try to reopen the doo |
| Lighter not operating. | Gas burner pipes are clogged. | Clean gas burner pipes. |
| Water dripping | Water or steam may generate under certain conditions depending on the food being cooked. This is not a fault of the appliance. | Let the oven cool down and then wipe dry with a dishcloth. |
| Steam coming out from a crack on oven door. | ||
| Water remaining inside the oven. | ||
| Oven does not heat. | Oven door is open. | Close the door and restart |
| Oven controls not correctly adjusted. | Read the section regarding operation of the oven and reset the oven. | |
| Smoke coming out during operation | When operating the oven for the first time. | Smoke comes out from the heaters. This is not a fault. After 2-3 cycles, there will be no more smoke |
| Food on heater | Let the oven to cool down and clean food residues from the heater. | |
| When operating the oven burnt or plastic odour coming out. | Plastic or other not heat resistant accessories are being used inside the oven. | At high temperatures, use suitable glassware accessories. |
| Oven does not cook well | Oven door is opened frequently during cooking. | Do not open oven door frequently, if the food you are cooking does not require turning. If you open the door frequently internal temperature drops and therefore cooking result will be influenced |
HANDLING RULES
- Do not use the door and/or handle to carry or move the appliance.
- Carry out the movement and transportation in the original packaging.
- Pay maximum attention to the appliance while loading/unloading and handling.
- Make sure that the packaging is securely closed during handling and transportation.
- Protect from external factors (such as humidity, water, etc.) that may damage the packaging.
- Be careful not to damage the appliance due to bumps, crashes, drops, etc. while handling and transporting and not to break or deform it during operation.
RECOMMENDATIONS FOR ENERGY SAVING
Following details will help you use your product ecologically and economically.
- Use dark coloured and enamel containers that conduct the heat better in the oven.
- As you cook your food, if the recipe or the user manual indicates that pre-heating is required, pre-heat the oven.
- Do not open the oven door frequently while cooking.
- Try not to cook multiple dishes simultaneously in the oven. You may cook at the same time by placing two cookers on the wire rack.
- Cook multiple dishes successively. The oven will not lose heat.
- Turn off the oven a few minutes before the expiration time of cooking. In this case, do not open the oven door.
- Defrost the frozen food before cooking.

Environment friendly disposal
You can help protect the environment!
Please remember to respect the local regulations: hand in the non-working electrical equipment's to an appropriate waste disposal center.

HEINNER is a registered trademark of Network One Distribution SRL. Other brands and product names are trademarks or registered trademarks of their respective holders.
No part of the specifications may be reproduced in any form or by any means or used to make any derivative such as translation, transformation, or adaptation without permission from NETWORK ONE DISTRIBUTION.
Copyright © 2013 Network One Distribution. All rights reserved.
www.heinner.com, http://www.nod.ro
http://www.heinner.com, http://www.nod.ro

This product is in conformity with norms and standards of European Community
Importer: Network One Distribution
Marcel Iancu Street, 3-5, Bucharest, Romania
Tel: +40 21 211 18 56, www.heinner.com, www.nod.ro
HEINNER
ARAGAZ GAZ
Model: HFSC-SME50BK/HFSC-SME50WH
HFSC-SME50SL/HFSC-SME50BRW
• Aragaz gaz, 4 arzatoare
- 50 x 50 cm
I. INTRODUCERE
natural_image
Illustration of a hand pressing down on a control panel with buttons and a knob (no text or symbols visible)Figure 6
natural_image
Diagram of a control panel with buttons and a hand pointing to the button (no text or symbols present)Figure 7
natural_image
Line drawing of an open laptop with internal components and a labeled section 'Figure 11' (no text or symbols on the diagram itself)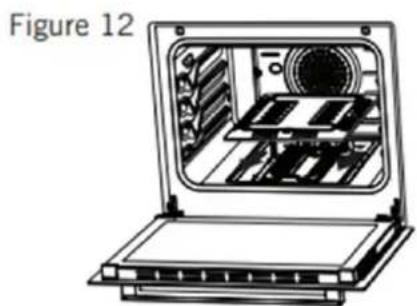
natural_image
Diagram of an open laptop with internal components and a labeled section 'Figure 12' (no text or symbols on the diagram itself)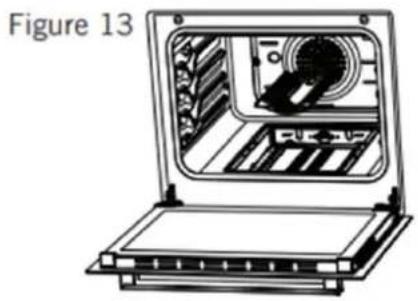
natural_image
Line drawing of a laptop with a closed lid and internal panel, labeled 'Figure 13' (no text or symbols on the diagram itself)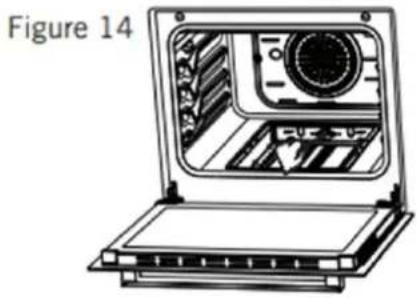
natural_image
Line drawing of a laptop with internal components and a labeled section 'Figure 14' (no text or symbols on the diagram itself)INSTALAREA ARAGAZULUI
natural_image
Simple line drawing of a cooking pan with a handle and a cross mark (no text or symbols)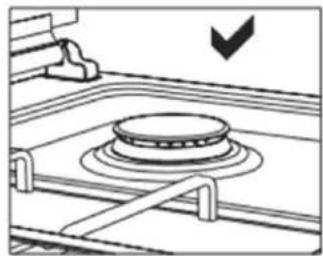
natural_image
Diagram of a mechanical component with concentric rings and a downward arrow, no text or symbols presentFigure 17
natural_image
Illustration of a hand pressing down on a circular object with small dots, no text or symbols presentFigure 18
natural_image
Simple line drawing of a mechanical or biological assembly with concentric circles and internal components (no text or symbols)Figure 19
natural_image
Illustration of a hand turning a circular mechanical component (no text or symbols)Figure 20
Montarea usii
natural_image
Line drawing of an oven with internal grilles and a side panel, labeled Figure 21 (no text or symbols on the diagram itself)Figure 21
natural_image
Line drawing of an open oven with control panel and door, no text or symbols presentFigure 22
natural_image
Diagram of a mechanical assembly with arrows indicating direction (no text or symbols)Figure 23
natural_image
Technical line drawing of a mechanical assembly with a base plate and directional arrow (no text or symbols)Figure 24
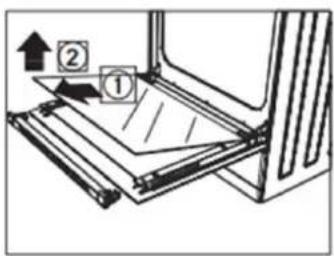
Figure 25
VIII. TROUBLESHOOTING
HFSC-SME50SL/HFSC-SME50BRW
natural_image
Four different kitchen appliances in open and closed, showing exterior and interior views (no text or symbols visible)• Готварска печка, 4 газови горелки
- 50 x 50 cm
I. ВЪВЕДЕНИЕ
natural_image
Diagram of a control panel with buttons and a hand pointing to the right (no text or symbols)Фигура 6
natural_image
Illustration of a hand pressing a button on a control panel (no text or symbols visible)Фигура 7
natural_image
Line drawing of a laptop with internal components and ventilation slots (no text or symbols)Фигура 12
natural_image
Illustration of an open laptop with internal components and ventilation slots (no text or symbols)Фигура 13
natural_image
Line drawing of an open laptop with internal components and a circular device on the screen (no text or symbols)Фигура 14
natural_image
Line drawing of an open laptop with internal components (no text or symbols)ИНСТАЛИРАНЕ НА ФУРНАТА
natural_image
Simple line drawing of a gas stove with a valve and a cross symbol (no text or labels)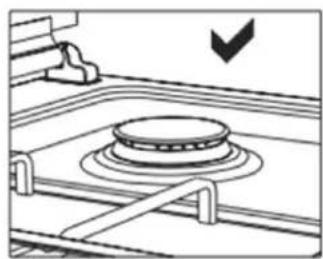
natural_image
Diagram of a mechanical component with concentric rings and a downward arrow, no text or symbols presentФигура 17
natural_image
Illustration of a hand pressing down on a circular object with black dots (no text or symbols)Фигура 18
natural_image
Simple line drawing of a circular basin with a small container and a small object above it (no text or symbols)Фигура 19
natural_image
Illustration of a hand using a tool to clean or inspect a mechanical component (no text or symbols visible)Фигура 20
natural_image
Line drawing of an open oven with ventilation grilles and a side panel, labeled 'Фигура 21' (no text on the diagram itself)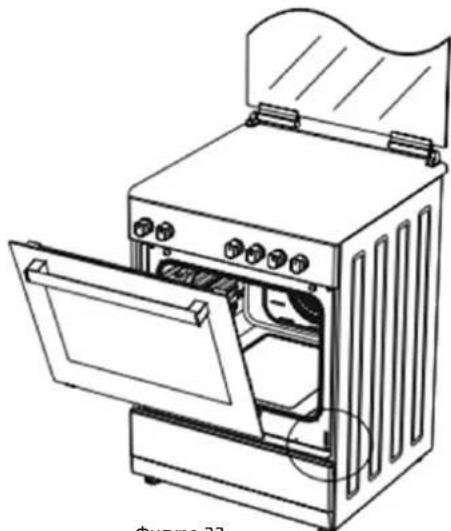
natural_image
Line drawing of an open oven with lid open, showing internal components and ventilation slots (no text or symbols)Фигура 22
natural_image
Technical diagram of a mechanical assembly with arrows indicating direction (no text or symbols)Фигура 23
natural_image
Technical line drawing of a mechanical assembly with a base plate and directional arrow (no text or symbols)Фигура 24
Фигура 25
VIII. ОТСТРАНЯВАНЕ НА ПРОБЛЕМИ
HFSC-SME50SL/HFSC-SME50BRW
natural_image
Four different kitchen appliances in open and closed, showing exterior and interior views (no text or symbols visible)natural_image
Diagram of a hand pressing a button on a device panel with control buttons (no text or symbols visible)Зображення 6
natural_image
Illustration of a hand pressing a button on an electronic control panel (no text or symbols visible)Зображення 7
natural_image
Illustration of a hand placing a small object into a circular container with dots (no text or symbols)Зображення 18
natural_image
Simple line drawing of a biological or chemical structure with layered components (no text or symbols)Зображення 19
natural_image
Illustration of a hand using a tool to clean or inspect a circular mechanical component (no text or symbols visible)Зображення 20
natural_image
Line drawing of an open oven with control panel and door, showing interior layout (no text or symbols)Зображення 21
natural_image
Line drawing of an open oven with lid open, showing internal components and ventilation slots (no text or symbols)Зображення 22
natural_image
Technical line drawing of a mechanical assembly with arrows indicating direction (no text or symbols)Зображення 23
natural_image
Technical line drawing of a mechanical assembly with an arrow indicating direction (no text or symbols)Зображення 24
Зображення 25
- INTRODUCTION
- CONTENT OF YOUR PACKAGE
- SAFETY PRECAUTIONS
- GAS SAFETY
- What to do when gas odour is detected
- Intended Use
- INSTALLATION
- Gas Connection
- For LPG connection
- For natural gas connection
- Gas hose passageway
- Nozzle change operation.
- Ventilation of room
- Reduced gas flow rate setting for hob taps.
- INSTALLATION OF YOUR OVEN
- Right place for installation and important warnings
- PRODUCT DESCRIPTION
- USING THE PRODUCT
- USING OVEN SECTION
- Using Oven Burners
- Using Oven Heating Elements
- Using Cooker Section
- Using gas burners
- Technical Features of your Oven
- MAINTENANCE AND CLEANING
- Cleaning and maintenance of the oven's front door glass
- TROUBLESHOOTING
- HANDLING RULES
- RECOMMENDATIONS FOR ENERGY SAVING
- Environment friendly disposal
- HEINNER
- ARAGAZ GAZ
- Model: HFSC-SME50BK/HFSC-SME50WH
- HFSC-SME50SL/HFSC-SME50BRW
- INTRODUCERE
- INSTALAREA ARAGAZULUI
- Montarea usii
- ВЪВЕДЕНИЕ
- ИНСТАЛИРАНЕ НА ФУРНАТА
- ОТСТРАНЯВАНЕ НА ПРОБЛЕМИ
Brand : Heinner
Model : HFSC-SME50SL
Category : Cooker