PXBPRS-018 - Milling machine Ozito - Free user manual and instructions
Find the device manual for free PXBPRS-018 Ozito in PDF.


| Product Type | Brushless Plunge Router |
| Model | PXBPRS-018 |
| Input Voltage | 18V (DC, compatible with Ozito PXC batteries) |
| No Load Speed | 10,000 - 30,000 /min |
| Collet Sizes | 6.35 mm (1/4 inch) and 8 mm |
| Max. Cutter Diameter | 28 mm |
| Dust Port Diameter | 35 mm |
| Weight | 2.8 kg (without battery) |
| Motor Type | Brushless, for longer life and efficiency |
| Plunge Action | Yes, with adjustable depth stop and micro-adjustment |
| Depth Adjustment Range | 0 - 28 mm (via turret stop and depth adjustor) |
| Lock-Off Switch | Yes, prevents accidental starts (auto-reactivates after 10 s) |
| LED Worklight | Yes, illuminates work area when lock-off is pressed |
| Spindle Lock | Yes, for easy bit changes |
| Included Accessories | Dust extraction adaptor, parallel guide, compass point, 8 mm collet, 2 spanners (22 & 13 mm) |
| Warranty | 5 years replacement (DIY use); battery & charger: 36 months |
| Maintenance | Clean ventilation slots with air; wipe housing with cloth; no solvents; store dry, frost-free |
| Safety Precautions | Wear hearing, eye & breathing protection; remove battery before adjustments; use both hands; avoid inverted/stationary use |
| Spare Parts Availability | Order from Bunnings Special Orders Desk or visit ozito.com.au |
| Compatibility | All Ozito PXC batteries and chargers (recommend ≥3.0 Ah for optimal performance) |
Frequently Asked Questions - PXBPRS-018 Ozito
User questions about PXBPRS-018 Ozito
0 question about this device. Answer the ones you know or ask your own.
Ask a new question about this device
Download the instructions for your Milling machine in PDF format for free! Find your manual PXBPRS-018 - Ozito and take your electronic device back in hand. On this page are published all the documents necessary for the use of your device. PXBPRS-018 by Ozito.
USER MANUAL PXBPRS-018 Ozito
18V BRUSHLESS
PLUNGE ROUTER
INSTRUCTION MANUAL
SPECIFICATIONS
| Input: | 18V |
| No Load Speed: | 10,000 - 30,000/min |
| Collet Size: | 6.35mm & 8mm |
| Max. Cutter Size: | 28mm |
| Dust Port Size: | ∅35mm |
| Weight: | 2.8kg |
ozito.com.au
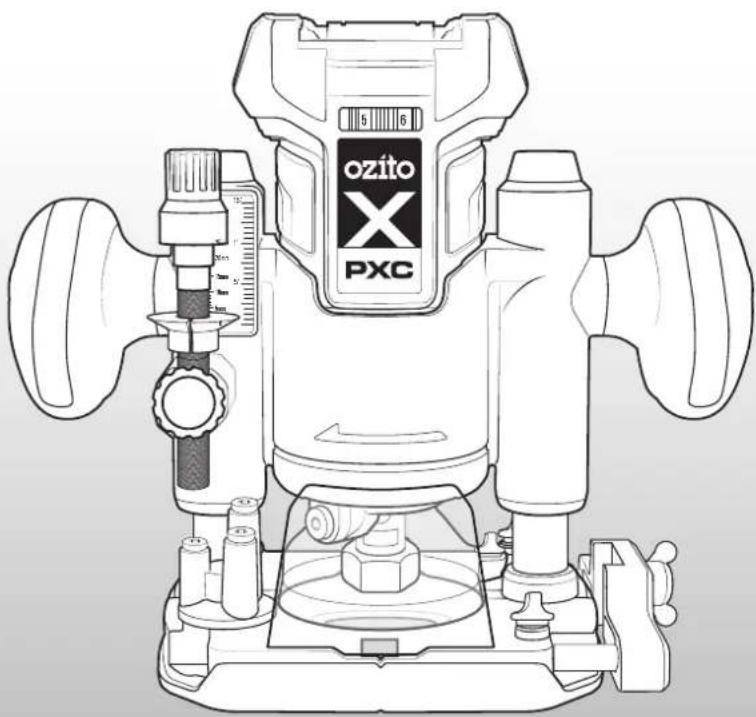
natural_image
Technical line drawing of a mechanical device with no visible text or symbolsSTANDARD EQUIPMENT
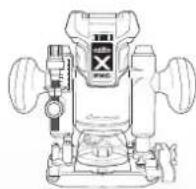
Brushless Plunge Router
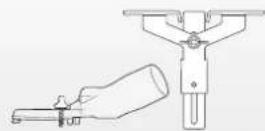
Dust Extraction Port & Parallel Guide
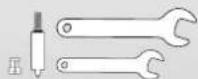
8mm Collet, Compass Point & 2 x Spanners (22 & 13mm)
5YEAR REPLACEMENT WARRANTY
PXBPRS-018
WARRANTY
IN ORDER TO MAKE A CLAIM UNDER THIS WARRANTY YOU MUST RETURN THE PRODUCT TO YOUR NEAREST BUNNINGS WAREHOUSE WITH YOUR BUNNINGS REGISTER RECEIPT. PRIOR TO RETURNING YOUR PRODUCT FOR WARRANTY PLEASE TELEPHONE OUR CUSTOMER SERVICE HELPLINE:
Australia 1800 069 486
New Zealand 0508 069 486
TO ENSURE A SPEEDY RESPONSE PLEASE HAVE THE MODEL NUMBER AND DATE OF PURCHASE AVAILABLE. A CUSTOMER SERVICE REPRESENTATIVE WILL TAKE YOUR CALL AND ANSWER ANY QUESTIONS YOU MAY HAVE RELATING TO THE WARRANTY POLICY OR PROCEDURE.
WARNING
The following actions will result in the warranty being void.
- If the tool has been operated on a supply voltage other than that specified on the tool.
- If the tool shows signs of damage or defects caused by or resulting from abuse, accidents or alterations.
- Failure to perform maintenance as set out within the instruction manual.
- If the tool is disassembled or tampered with in any way.
The benefits provided under this warranty are in addition to other rights and remedies which are available to you at law.
Our goods come with guarantees that cannot be excluded at law. You are entitled to a replacement or refund for a major failure and for compensation for any other reasonably foreseeable loss or damage. You are also entitled to have the goods repaired or replaced if the goods fail to be of acceptable quality and the failure does not amount to a major failure.
Generally you will be responsible for all costs associated with a claim under this warranty, however, where you have suffered any additional direct loss as a result of a defective product you may be able to claim such expenses by contacting our customer service helpline above.
5 YEAR REPLACEMENT WARRANTY
Your Product is guaranteed for a period of 60 months from the original date of purchase and is intended for DIY (Do It Yourself) use only. If a product is defective it will be replaced in accordance with the terms of this warranty. Lithium Ion batteries and chargers are covered by a 36 month warranty and are excluded from the warranty extension. Warranty excludes consumable parts.
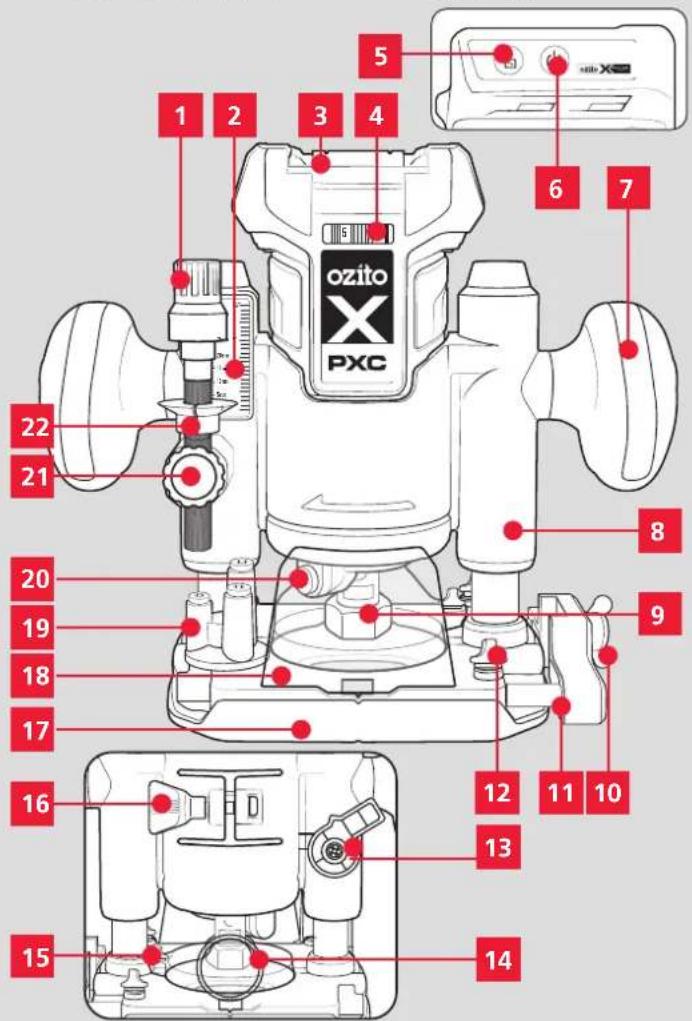
KNOW YOUR PRODUCT
BRUSHLESS PLUNGE ROUTER
- Depth Adjustor
- Depth Scale
- Battery Seating
- Speed Control Dial
- Lock Off Switch
- On/Off Switch
- Plunge Handles
- Plunge Router Base
- Collet Nut
- Guide Mount Screw
- Accessory Mounting Arm
- Mounting Arm Screw
- Plunge Lock
- Dust Extraction port
- Dust Extractor Screw
- Plunge Base Lock
- Baseplate
- Clear View Window
- Turrent
- Spindle Lock
- Depth Adjustor Lock Button
- Height Marker
BATTERY & CHARGER
This tool is compatible with all batteries & chargers from the Ozito PXC range.
For optimal performance, we recommend the use of a 3.0Ah battery or higher to operate this PXC Trim Router.
ONLINE MANUAL
Scan this QR Code with your mobile device to take you to the online manual.

SETUP & PREPARATION
1. ASSEMBLY

WARNING! ENSURE THE TOOL IS SWITCHED OFF AND THE BATTERY IS REMOVED BEFORE PERFORMING ANY OF THE FOLLOWING TASKS.

WARNING! WEAR GLOVES WHEN HANDLING ROUTER BITS AS THEY CAN BE SHARP AND/OR HOT TO THE TOUCH AFTER USE.

WARNING! ONLY USE THE ROUTER UNIT WITH A COMPATIBLE BASE. USING IT WITHOUT A BASE OR WITH AN INCOMPATIBLE BASE MAY RESULT IN SERIOUS INJURY.
Installing A Router Bit
When using the plunge router, only use router bits that:
• are suitable for cutting wood or plastic,
- has a suitable shank diameter for the collet mounted (collet size: 6.35mm & 8mm),
• has a maximum diameter of 28mm,
- are suitable for the router's speed (n _0 = 10,000-30,000/min).
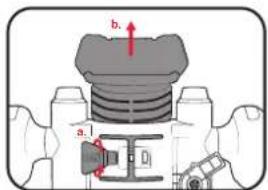
- Remove the plunge router base from the router unit.
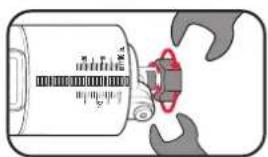
- Place the smaller supplied spanner on the spindle and use the large spanner to loosen the collet nut.
natural_image
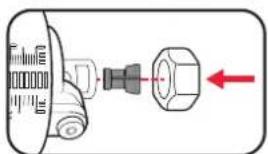
Illustration of a mechanical device with a red circular component inserted, no visible text or symbolsNote: If a different collet size is required, remove the collet nut entirely and replace the collet. Re-attach the collet nut but don't tighten it all the way.
natural_image
Diagram of a mechanical component with a bolt and nut, showing a red directional arrow (no text or symbols)- Fully insert the shaft of the router bit (not supplied) into the collet.
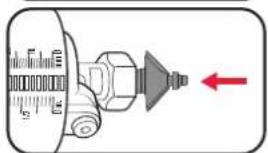
natural_image
Diagram of a mechanical component with a red arrow pointing to it, no text or symbols present.- Press and hold down the spindle lock while tightening the collet nut with your fingers.
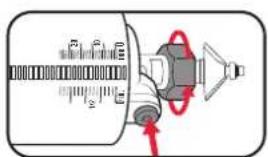
- Release the spindle lock and then use the 2 spanners to fully tighten the collet nut.
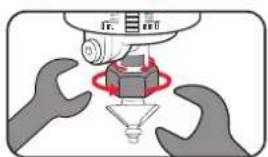
natural_image
Illustration of a robotic arm performing a press or stamping operation with wrench hands (no text or symbols)
WARNING: THE SPINDLE LOCK IS NOT ALLOWED TO BE USED FOR TIGHTENING WITH THE SPANNER. TIGHTEN THE CLAMP NUT USING THE TWO SPANNERS.
Attaching The Dust Extraction Adaptor
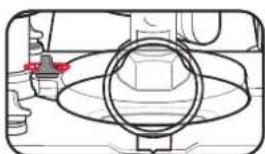
- Slide the tabs on the extraction adaptor ring into the slot on the baseplate.
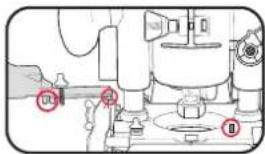
- Tighten the dust extractor screw to lock the adaptor in place.
natural_image
Technical line drawing of a mechanical component with a red arrow indicating a specific feature (no text or symbols present)- Connect a suitable vacuum or dust extraction system to the dust extraction adaptor for use with the router.
Attaching & Removing The Plunge Router Base
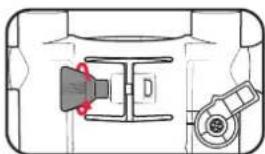
- Loosen the plunge base lock.
natural_image
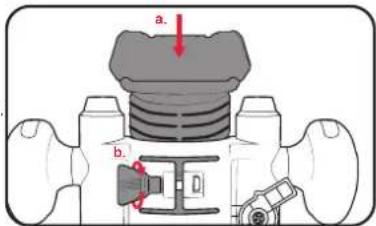
Pure mechanical diagram showing a lever and gear assembly without any text or symbols- Slide the router into the router base.
-
Tighten the plunge base lock.
-
To remove the base, loosen the plunge base lock and pull the base off the router.
Fitting A Battery
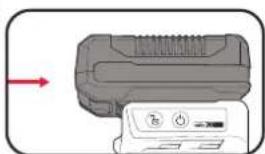
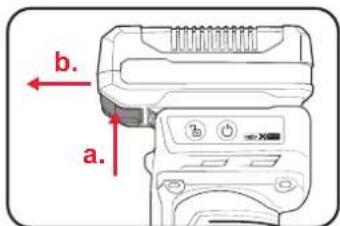
- Slide the battery into the tool base until it clicks into place.
natural_image
Diagram showing a printer with a red arrow pointing to it, next to a control panel with icons (no text or symbols)- Hold down the battery release button and then slide the battery out.
2. STRAIGHT CUTS
Attaching The Parallel Guide
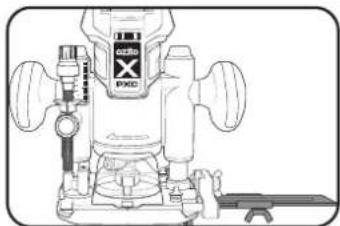
The parallel guide helps to maintain a straight path when chamfering or filleting edges and cutting slots or grooves.
natural_image
Technical line drawing of a mechanical tool with no visible text or symbols- Loosen the guide mount screw.
natural_image
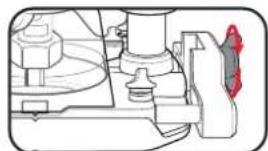
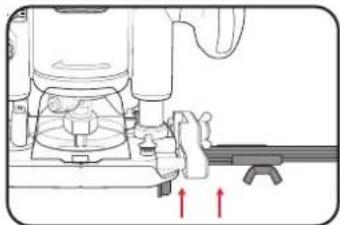
Mechanical assembly diagram showing components like gears and a valve (no text or labels)- Slide the parallel guide arm between the washer and router base. Push it all the way up until the straight edge is flush with the router base.
natural_image
Technical line drawing of a mechanical assembly with no visible text or symbols- Tighten the guide mount screw to lock the guide in place.
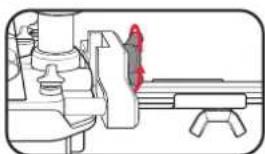
natural_image
Technical line drawing of a mechanical assembly with no visible text or symbolsAdjusting The Parallel Guide
- Loosen the fence locking wingnut.
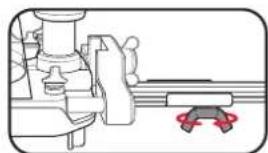
natural_image
Technical line drawing of a mechanical assembly with no visible text or symbols- Place the fence along the side of the workpiece.
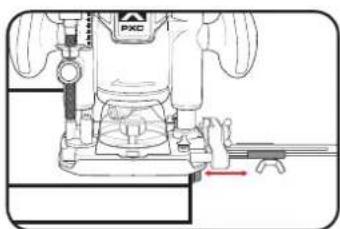
natural_image
Technical line drawing of a mechanical assembly with no visible text or symbols-
Set the cutting distance by sliding the plunge router to the desired cutting position.
-
Tighten the fence locking wingnut to set the distance in place.
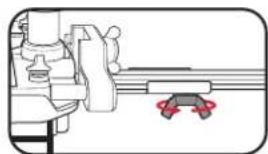
natural_image
Mechanical assembly diagram showing a lever and pivot point (no text or symbols)OPERATION
3. CUTTING CIRCLES 4. CONTROLS
Attaching The Compass Point
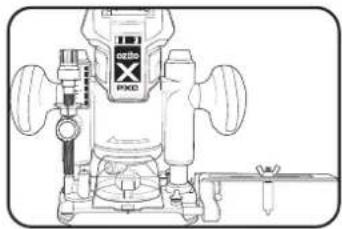
The compass point can be used to guide the router in a circular cut.
natural_image
Technical line drawing of a mechanical power tool with no visible text or symbols- Undo the fence locking wingnut and remove the straight edge from the parallel guide.
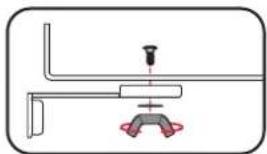
natural_image
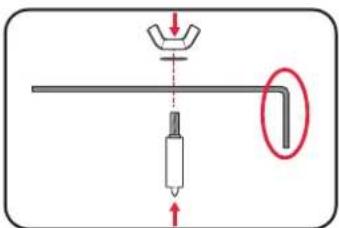
Pure mechanical diagram showing a lever and pivot point without any text, numbers, or symbols- Attach the compass point to the parallel guide with the washer and wingnut, ensuring the compass point is parallel to the short arm of the parallel guide.
-
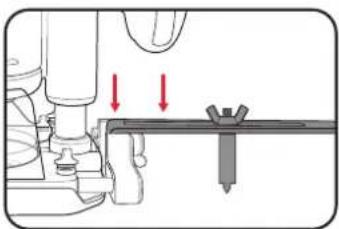
Loosen the guide mount screw on the plunge router base.
-
Slide the parallel guide arm between the washer and router base, ensuring that the compass point is facing downwards.
natural_image
Mechanical assembly diagram showing a tool interacting with a bracket and a screw (no text or symbols)- Tighten the guide mount screw to lock the guide in place.
Adjusting The Compass Point
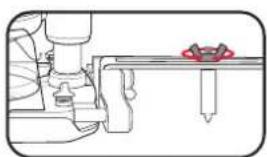
- Loosen the fence locking wingnut.
natural_image
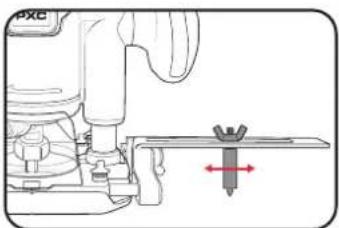
Technical line drawing of a mechanical assembly with a red component inserted (no text or symbols)- Move the compass point along the fence to the required radius from the cutter.
natural_image
Mechanical assembly diagram showing a tool interacting with a workpiece (no text or symbols visible)-
Tighten the wingnut to lock the compass point in place.
-
Place the compass point into the material at the centre of the circle you wish to cut.
Adjusting The Cutting Speed
The cutting speed needs to be adjusted based on the router bit profile and type of material being cut. Always test new settings on a piece of scrap before tackling your workpiece.
- Rotate the speed control dial to the desired setting.
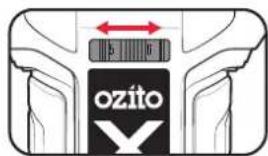
If the speed is too low, the router bit may overheat and burn the workpiece. If the speed is too high, you may damage the cutting edge on the router bit and cause rough, uneven cuts.
Switching The Tool On & Off
The router has a safety lock off function that needs to be disengaged before the tool can be started.
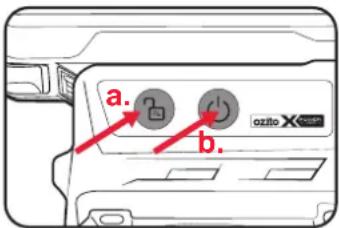
- Press the lock off switch to disengage the function. The LED worklight will switch on.
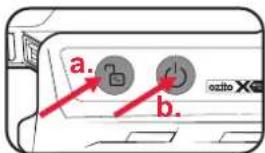
- Press the on/off switch to start the tool.
Note: The lock off function will automatically re-activate after 10 seconds to prevent accidental starting. The LED worklight will switch off when this happens.
- Press the on/off switch again to stop the tool.
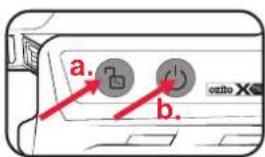

WARNING: ALLOW THE ROUTER BIT TO COME TO A STANDSTILL BEFORE REMOVING IT FROM THE WORKPIECE AND/OR PLACING THE ROUTER DOWN.
- Press the lock off switch to lock the tool.
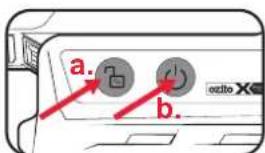

WARNING! TO PREVENT ACCIDENTAL START, LOCK THE TOOL BY PRESSING THE LOCK OFF SWITCH.
Adjusting The Routing Depth
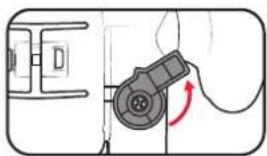
- Place the router on the workpiece and check that the plunge lock is released.
natural_image
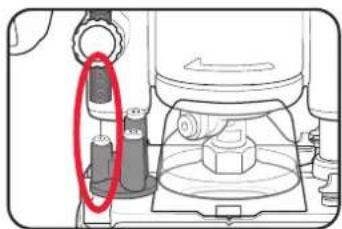
Diagram showing a device with a sensor or connector and a red arrow indicating rotation (no text or symbols present)- Rotate the current until the shortest end stop is below the depth adjustor.
natural_image
Mechanical assembly diagram showing a valve with a red oval highlighting a component (no text or labels)- Lower the plunge router until the router bit cutting edge touches the workpiece.
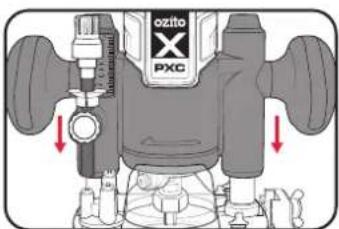
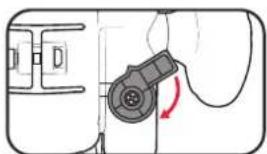
- Engage the plunge lock.
natural_image
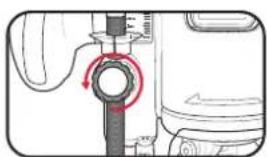
Diagram of a medical device with a rotary knob and arrow indicating rotation (no text or symbols)- Undo the depth adjustor lock ring.
natural_image
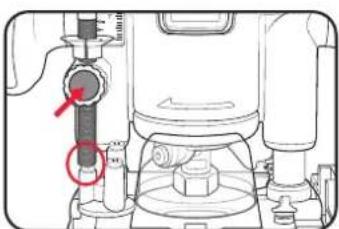
Mechanical assembly diagram showing a valve mechanism with a red circular component (no text or symbols)- Then press and hold the lock button. The depth adjustor should drop and touch the end stop. This is the 0 position for the router bit where no material is removed when the plunge router is lowered.
natural_image
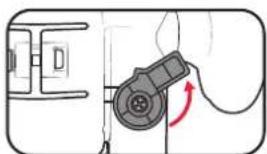
Technical diagram of a mechanical assembly with a red arrow pointing to a component (no text or symbols visible)- Release the plunge lock and slowly raise the plunge router.
natural_image
Diagram of a mechanical device with a lever and directional arrow (no text or symbols)- Lower the height indicator until the top lip is in line with the 0 mark on the scale.
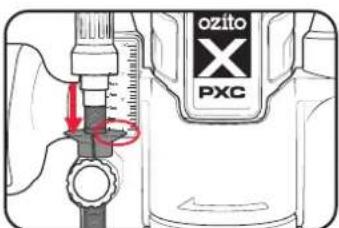
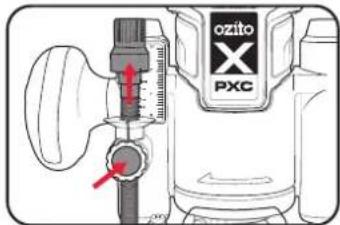
- Push in the depth adjustor lock button and raise depth adjustor to the desired cut depth.
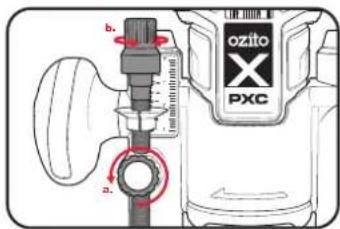
Note: The depth adjustor can be rotated for finer micro-adjustments.
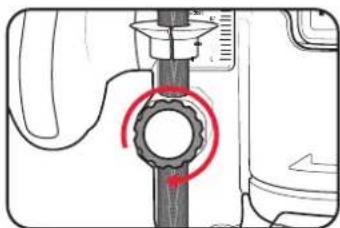
- Once the desired cut depth is set, release the lock button and tighten the lock ring. The router will now cut to the set depth when lowered into the workpiece.
natural_image
Mechanical assembly diagram showing a gear mechanism with a red circular arrow indicating rotation (no text or symbols present)Note: For deep cuts, removing material in multiple shallow passes results in a finer finish. Perform the first cut with the tallest end stop and then the mid height and subsequently the shortest end stop to achieve this.
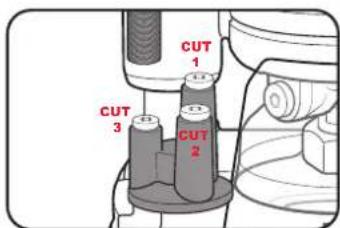
Note: Always test settings on a piece of scrap material after any adjustments are made.
- For micro adjustments to the cutting depth during use, loosen the lock ring and turn the depth adjustor. Each full turn of the depth adjustor changes the height by 1mm. Re-tighten the lock ring when done.
5. USAGE

WARNING! ALWAYS WEAR HEARING, EYE AND BREATHING PROTECTION DURING OPERATION.

WARNING! HOLD THE TOOL WITH BOTH HANDS DURING OPERATION AND KEEP FINGERS CLEAR OF THE ROUTER BIT AT ALL TIMES. INJURY MAY OCCUR IF YOU HOLD THE TRIMMER INCORRECTLY.
-
Perform the steps below before starting
-
Ensure that the correct router bit is installed.
- Ensure that the router base and router bit is secure and correctly installed.
- Check that the cut depth and speed are correctly set.
- Check that any accessories being used are securely and correctly attached.
- Connect a dust extraction unit, such as a vacuum cleaner, to the dust extraction port to create a cleaner work environment.
- Clamp or secure the workpiece so that it does not move during routing.
-
Check for and remove any metal parts (eg. nails, screws, staples etc.) that may come into contact with the router bit.
-
Press the lock-off button and then the on/off switch to start the tool.
- Hold both handles and allow the router bit to reach full speed before moving it into the workpiece.
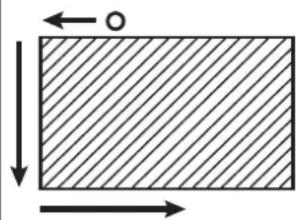
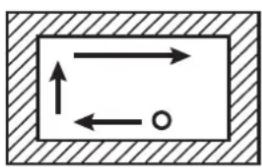
- Follow the guide below when cutting around your workpiece. This ensures that wood chips and debris are removed away from you as you cut.
Direction of the router travel
natural_image
Simple geometric diagram showing a rectangle with diagonal hatching and two arrows pointing outward (no text or symbols)When routing the outside of your workpiece
flowchart
graph TD
    A["↑"] --> B["←"]
    C["○"] --> D["←"]
When routing the inside of your workpiece
Note: For deeper cuts or harder timbers, making several shallow progressive cuts will allow for better control over the tool and a neater finish.
TROUBLESHOOTING
Router not cutting or removing material
The router bit may be blunt or damaged.
Try again with a new or sharpened router bit.
The speed setting may be too low, overheating and burning instead of cutting the material.
Increase the speed setting and try again.
The motor may be overloaded
Reduce excessive force on the trimmer and let the tool do the work of removing material.
Router cuts are rough or uneven
The router bit may be blunt or damaged. Try again with a new or sharpened route
The speed setting may be too high. Reduce the speed setting and try again.
Router is vibrating excessively
The router bit shaft may be bent.
Replace the router bit and try again.
MAINTENANCE DESCRIPTION OF SY

WARNING! BEFORE CLEANING OR CARRYING OUT ANY MAINTENANCE PROCEDURE, ENSURE THAT THE BATTERIES HAVE BEEN REMOVED.
Cleaning
- Keep the ventilation slots of the tool clean at all times to ensure efficient operation.
- After each use, blow air through the tool housing to ensure it is free from all dust, dirt, etc. Build up of dust or dirt particles may cause the tool to overheat and shorten the life of the tool.
- If the housing of the tool requires cleaning, do not use solvents. Use of a cloth only is recommended.
- Never allow any liquid to get inside the tool, never immerse any part of the tool into liquid.
Storage
When not in use, the tool should be stored in a dry, frost free location, keep out of children's reach.
Note: Ozito Industries will not be responsible for any damage or injuries caused by repair of the tool by an unauthorised person or by mishandling.
IBOLS
| V | Volts | mm | Millimetres | |
| /min | Revolutions per minute | n_0 | No load speed | |
| [0TYY] | Do not dispose in general waste | [A04D] | Direct current | |
 | Warning |  | Wear hearing, eye and breathing protection | |
| [2BHY] | [0084] | Read Instruction Manual |  | Regulatory Compliance Mark (RCM) |
CARING FOR THE ENVIRONMENT

Power tools that are no longer usable should not be disposed of with household waste but in an environmentally friendly way. Please recycle where facilities exist. Check with your local council authority for recycling advice.

Recycling packaging reduces the need for landfill and raw materials. Reuse of recycled material decreases pollution in the environment. Please recycle packaging where facilities exist. Check with your local council authority for recycling advice.
SPARE PARTS
Spare parts can be ordered from the Special Orders Desk at your local Bunnings Warehouse.
For further information, or any parts not listed here, visit www.ozito.com.au or contact Ozito Customer
Service:
Australia 1800 069 486
New Zealand 0508 069 486
E-mail: enquiries@ozito.com.au

ELECTRICAL SAFETY

WARNING! When using electric tools basic safety precautions should always be followed to reduce the risk of fire, electric shock and personal injury.
- Read the whole manual carefully and make sure you know how to switch the tool off in an emergency, before operating the tool. Save these instructions and other documents supplied with this tool for future reference.
- This appliance is not intended for use by persons (including children) with reduced physical, sensory or mental capabilities, or lack of experience and knowledge, unless they have been given supervision or instruction concerning use of the appliance by a person responsible for their safety. Children should be supervised to ensure that they do not play with the appliance.
This appliance is compatible and only to be used with all batteries & chargers from the Ozito PXC range. Refer to the PXC battery and charger manuals for information regarding charging, use and storage.
- WARNING! Always remove the battery from the tool:
- when the batteries are to be charged,
- when the tool is left unattended,
- when the tool is being checked, cleaned, or having maintenance work done,
- when the tool is to be stored,
- or if the tool vibrates abnormally.
- Do not combine different types of batteries or new and used batteries.
- Do not use modified or damaged batteries.

GENERAL POWER TOOL SAFETY WARNINGS

WARNING! Read all safety warnings, instructions, illustrations and specifications provided with this power tool. Failure to follow all instructions listed below may result in electric shock, fire and/or serious injury.
Save all warnings and instructions for future reference.
The term "power tool" in the warnings refers to your mains-operated [corded] power tool or battery-operated [cordless] power tool.
1) Work area safety
a) Keep work area clean and well lit. Cluttered or dark areas invite accidents.
b] Do not operate power tools in explosive atmospheres, such as in the presence of flammable liquids, gases or dust. Power tools create sparks which may ignite the dust or fumes.
c) Keep children and bystanders away while operating a power tool. Distractions can cause you to lose control.
2) Electrical safety
a) Power tool plugs must match the outlet. Never modify the plug in any way. Do not use any adapter plugs with earthed (grounded) power tools. Unmodified plugs and matching outlets will reduce risk of electric shock.
b) Avoid body contact with earthed or grounded surfaces, such as pipes, radiators, ranges and refrigerators. There is an increased risk of electric shock if your body is earthed or grounded.
c) Do not expose power tools to rain or wet conditions. Water entering a power tool will increase the risk of electric shock.
d) Do not abuse the cord. Never use the cord for carrying, pulling or unplugging the power tool. Keep cord away from heat, oil, sharp edges or moving parts. Damaged or entangled cords increase the risk of electric shock.
e) When operating a power tool outdoors, use an extension cord suitable for outdoor use. Use of a cord suitable for outdoor use reduces the risk of electric shock.
f) If operating a power tool in a damp location is unavoidable, use a residual current device (RCD) protected supply. Use of an RCD reduces the risk of electric shock.
3) Personal safety
a) Stay alert, watch what you are doing and use common sense when operating a power tool. Do not use a power tool while you are tired or under the influence of drugs, alcohol or medication. A moment of inattention while operating power tools may result in serious personal injury.
b) Use personal protective equipment. Always wear eye protection. Protective equipment such as a dust mask, non-skid safety shoes, hard hat or hearing protection used for appropriate conditions will reduce personal injuries.
c) Prevent unintentional starting. Ensure the switch is in the off-position before connecting to power source and/or battery pack, picking up or carrying the tool. Carrying power tools with your finger on the switch or energising power tools that have the switch on invites accidents.
d) Remove any adjusting key or wrench before turning the power tool on. A wrench or a key left attached to a rotating part of the power tool may result in personal injury.
e] Do not overreach. Keep proper footing and balance at all times. This enables better control of the power tool in unexpected situations.
f) Dress properly. Do not wear loose clothing or jewellery. Keep your hair and clothing away from moving parts. Loose clothes, jewellery or long hair can be caught in moving parts.
g] If devices are provided for the connection of dust extraction and collection facilities, ensure these are connected and properly used. Use of dust collection can reduce dust-related hazards.
h] Do not let familiarity gained from frequent use of tools allow you to become complacent and
ignore tool safety principles. A careless action can cause severe injury within a fraction of a second.
4) Power tool use and care
a) Do not force the power tool. Use the correct power tool for your application. The correct power tool will do the job better and safer at the rate for which it was designed.
b) Do not use the power tool if the switch does not turn it on and off. Any power tool that cannot be controlled with the switch is dangerous and must be repaired.
c) Disconnect the plug from the power source and/or remove the battery pack, if detachable, from the power tool before making any adjustments, changing accessories, or storing power tools. Such preventive safety measures reduce the risk of starting the power tool accidentally.
d) Store idle power tools out of the reach of children and do not allow persons unfamiliar with the power tool or these instructions to operate the power tool. Power tools are dangerous in the hands of untrained users.
e) Maintain power tools and accessories. Check for misalignment or binding of moving parts, breakage of parts and any other condition that may affect the power tool's operation. If damaged, have the power tool repaired before use. Many accidents are caused by poorly maintained power tools.
f) Keep cutting tools sharp and clean. Properly maintained cutting tools with sharp cutting edges are less likely to bind and are easier to control.
g) Use the power tool, accessories and tool bits etc. in accordance with these instructions, taking into account the working conditions and the work to be performed. Use of the power tool for operations different from those intended could result in a hazardous situation.
h) Keep handles and grasping surfaces dry, clean and free from oil and grease. Slippery handles and grasping surfaces do not allow for safe handling and control of the tool in unexpected situations.
5) Battery tool use and care
a) Recharge only with the charger specified by the manufacturer. A charger that is suitable for one type of battery pack may create a risk of fire when used with another battery pack.
b) Use power tools only with specifically designated battery packs. Use of any other battery packs may create a risk of injury and fire.
c) When battery pack is not in use, keep it away from other metal objects, like paper clips, coins, keys, nails, screws or other small metal objects, that can make a connection from one terminal to another. Shorting the battery terminals together may cause burns or a fire.
d) Under abusive conditions, liquid may be ejected from the battery; avoid contact. If contact accidentally occurs, flush with water. If liquid contacts eyes, additionally seek medical help. Liquid ejected from the battery may cause irritation or burns.
E) Do not use a battery pack or tool that is damaged or modified. Damaged or modified batteries may exhibit unpredictable behaviour resulting in fire, explosion or risk of injury.
f) Do not expose a battery pack or tool to fire or excessive temperature. Exposure to fire or temperature above 130 °C may cause explosion.
g) Follow all charging instructions and do not charge the battery pack or tool outside the temperature range specified in the instructions. Charging improperly or at temperatures outside the specified range may damage the battery and increase the risk of fire.
6) Service
a) Have your power tool serviced by a qualified repair person using only identical replacement parts. This will ensure that the safety of the power tool is maintained.
b) Never service damaged battery packs. Service of battery packs should only be performed by the manufacturer or authorized service providers.

ROUTER SAFETY WARNINGS

WARNING! The appliance is not to be used by persons (including children) with reduced physical, sensory or mental capabilities, or lack of experience and knowledge, unless they have been given supervision or instruction.
Young children should be supervised to ensure that they do not play with the appliance.
- Avoid using power tools and machines for long periods of time without breaks. Vibration from tools and machines can be transmitted into your hands and arms.
-
Use clamps or another practical way to secure and support the workpiece to a stable platform. Holding the work by your hand or against the body leaves it unstable and may lead to loss of control.
-
Do not point LED at eyes of persons or animals.
- Only use router bits with a shank diameter suitable for the size of the collet installed in the tool.
- Only use router bits suitable for the no-load speed of the tool.
- Do not use the tool in an inverted position.
- Do not attempt to use the tool in a stationary mode.
- Take special care when cutting MDF or surfaces coated with lead-based paint. Wear a dust mask specifically designed for protection against lead paint dust and fumes and ensure that persons within or entering the work area are also protected.
- 18V BRUSHLESS
- PLUNGE ROUTER
- INSTRUCTION MANUAL
- WARRANTY
- Australia 1800 069 486
- New Zealand 0508 069 486
- WARNING
- The following actions will result in the warranty being void.
- YEAR REPLACEMENT WARRANTY
- KNOW YOUR PRODUCT
- BRUSHLESS PLUNGE ROUTER
- SETUP & PREPARATION
- ASSEMBLY
- Installing A Router Bit
- Attaching The Dust Extraction Adaptor
- Attaching & Removing The Plunge Router Base
- Fitting A Battery
- STRAIGHT CUTS
- Attaching The Parallel Guide
- Adjusting The Parallel Guide
- OPERATION
- CUTTING CIRCLES 4. CONTROLS
- Attaching The Compass Point
- Adjusting The Compass Point
- Adjusting The Cutting Speed
- Switching The Tool On & Off
- Adjusting The Routing Depth
- USAGE
- TROUBLESHOOTING
- Router not cutting or removing material
- Router cuts are rough or uneven
- Router is vibrating excessively
- MAINTENANCE DESCRIPTION OF SY
- Cleaning
- Storage
- IBOLS
- CARING FOR THE ENVIRONMENT
- SPARE PARTS
- ELECTRICAL SAFETY
- GENERAL POWER TOOL SAFETY WARNINGS
- ROUTER SAFETY WARNINGS
Brand : Ozito
Model : PXBPRS-018
Category : Milling machine