
D-N150 - Hi-Fi System LUXMAN - Free user manual and instructions
Find the device manual for free D-N150 LUXMAN in PDF.


| Brand | Luxman |
| Model | D-N150 |
| Product Type | CD Player with USB DAC |
| Dimensions (W x H x D) | 440 mm x 100 mm x 350 mm |
| Weight | 7.0 kg |
| Power Supply | AC 230V, 50/60 Hz |
| Power Consumption | 20 W (standby: 0.5 W) |
| Playback Formats | CD, CD-R, CD-RW, MP3, WMA |
| USB Input | USB Type B for PC connection, supports up to 24-bit/192kHz |
| Analog Audio Outputs | 1 x RCA pair (unbalanced) |
| Digital Audio Outputs | 1 x Coaxial, 1 x Optical (TOSLINK) |
| Digital Audio Inputs | 1 x USB Type B |
| Headphone Output | 6.3 mm stereo jack, with volume control |
| Functions | CD playback, USB DAC, headphone amplifier, track skip, repeat, shuffle |
| Remote Control | Included (RA-16) |
| Display | Fluorescent dot matrix display |
| Cleaning and Maintenance | Wipe with a soft, dry cloth. Do not use solvents or abrasive cleaners. Clean lens with a CD lens cleaner if needed. |
| Safety | Operate in a well-ventilated area. Do not obstruct ventilation. Use only supplied power cord. No user-serviceable parts inside. |
| Spare Parts and Repairability | Contact Luxman authorized service center. Some parts may be available for self-repair under warranty restrictions. |
| General Information | High-quality CD player with built-in USB DAC and headphone amplifier. Designed for audiophile performance. |
Frequently Asked Questions - D-N150 LUXMAN
User questions about D-N150 LUXMAN
0 question about this device. Answer the ones you know or ask your own.
Ask a new question about this device
Download the instructions for your Hi-Fi System in PDF format for free! Find your manual D-N150 - LUXMAN and take your electronic device back in hand. On this page are published all the documents necessary for the use of your device. D-N150 by LUXMAN.
USER MANUAL D-N150 LUXMAN
Features of This Unit 3
About Discs This Unit Can Play Back.... 4
Before Use 5
Names and Functions....7
Connections 13
Disc playback/pause/stop 15
Skip/Fast-forward/Rewind 17
Direct search/repeat playback 19
Program Playback 21
Random playback/disc information/zoom 23
Detailed Settings 25
Block Diagram 29
Specifications 30
Before Asking for Repair Service.... 31
DO NOT move this unit during playback.
During playback, the disc is rotating at high speed. Do not try to lift or move this unit as the disc may be damaged.
When moving this unit
You must remove the disc and close the disc tray when moving this unit. Then, press the OPERATION switch, and after confirming that the power of the unit is off, unplug the power cable from the AC outlet. If the unit is moved with a disc remaining inside, this can cause a malfunction.
Installation place
Install this unit in a location where good ventilation and heat radiation are assured.
Especially, installation of this unit where direct sunlight is present, where the temperature rises excessively high such as close to a heater, or where it is humid or dusty may cause a malfunction even if heat is efficiently released.
Therefore, do not install this unit in such places.
Note:
For heat dispersal, do not install this equipment in a con-fined space such as a book shelf or similar unit.
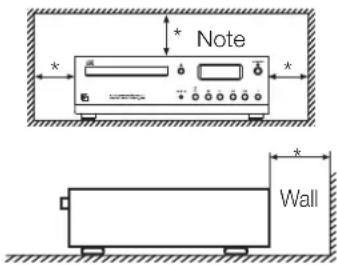
• Install the unit in a stable place such as in an audio rack.
- Do not install this unit near a television or color monitor. Keep this unit away from such devices as cassette decks that are subject to magnetism.
- Install this unit onto a level place when possible.
Avoid the following locations for installation
- Locations exposed to direct sunlight
- Places subject to humidity and with less ventilation
- Places where are extremely hot or cold
- Places subject to strong vibration
- Places subject to dust
- Places subject to oil, steam, and heat (such as kitchens)
Do not put articles.
Do not put articles on this unit.
To avoid heat emission
Do not place this unit on such device as an amplifier that may emit heat. If the unit is installed on a rack, install the unit below the rack where the amplifier is installed so as to avoid heat emission from the amplifier and other audio devices.
Turn off this unit when it is not used.
Depending on the condition of radio waves emitted during television broadcasting, interference fringes may appear on the television monitor, but that is not a malfunction. In such a case, turn off the unit. There may also be a case where noises are heard on the radio due to radio wave interference.
Notice when this unit is installed in a rack with glass doors
While the glass doors are closed, do not open the disc tray by pressing the open/close (▲ switch of the remote control.
Disc tray performance will be blocked, and that may result in a malfunction.
Dew condensation
In winter, be careful when carrying this unit from a cold place to a warm place or if the room temperature is suddenly raised by a heater or the like where this unit is installed. The unit interior (operating blocks and lens) will have dew condensation on it. In such a condition, this unit cannot work normally and playback is impossible. This depends on the state of dew condensation, but you will be able to enjoy the music if the unit is left untouched for one to two hours after it has been turned on and the temperature of this unit is maintained at room temperature until the condensation dries.
Even in summer, dew condensation can occur if this unit is directly exposed to cool air from an air conditioner. In such a case, the installation place should be changed.
Batteries
Warning: Batteries used for the remote control shall not be exposed to excessive heat such as sunshine, fire or the like.
How to handle discs
- Do not use any deficient disc (with cracks, warp, etc.).
- Do not damage the signal surface of the disc or make it dirty.
- Do not place paper or a sticker on the disc. Such awkward handling can warp the disc and playback may become impossible. In many cases, rental discs carry labels and paste may protrude from under the label. Before use, check that the disc is free from protruding paste or the like.
- Do not play with two discs in a stack.
- Some of discs with printable surface, so-called "printable CD-R", easily stick to the clamper (that holds a CD during playback). Please do not use such a disc. Otherwise, it may become impossible to take out the disc or it may become a cause of failure of the unit.
How to store discs
- Always put your discs in a case. Store them vertically where high temperature, high humidity, and direct exposure to sunlight are not prevalent. Places with extremely low temperature should also be avoided.
- Read the caution notes carefully that are attached to discs.
Disc cleaning
- If a disc is dirty from fingerprints or dusty, the sound quality may be lowered. Lightly wipe the disc with soft cloth, from the inside to outer periphery. (Don't wipe it along the circumference.)
- Do not use a volatile chemical such as benzine or thinner. Record spray, anti-static agents, and other such materials cannot be used either.
- Where the disc seems to be very dirty, dip soft cloth in water, wring it well, and remove contaminants. Lastly, remove the moisture with dry cloth.
Disc in a specific shape
This unit cannot accept discs in specific shapes (heart-shaped, hexagonal, etc.) for playback. Never use such discs as they can cause malfunctions.
Lens cleaning
If the lens is dusty, sound skips may take place. Do not use any cleaning discs available on the market because they may damage the lens.
Notice on handling optical digital cables
- Do not fold the cables. For storage, wind each cable to make a coil whose diameter is approx. 15 cm or larger.
- For connection, insert the cable connectors firmly into the terminals of this unit and the other device.
- Use the cables whose each length is 3 m or less.
- When the cable connectors get dusty, wipe the dust away with a dry soft cloth before inserting into the terminals.
Cleaning
- Usually, wipe the unit with a dry soft cloth. When the dirt is hard to remove, dip soft cloth in detergent diluted 5 or 6 times with water, wring it well, and remove contaminants. Then, remove the moisture with dry cloth.
- Do not use a solvent like alcohol, benzine, thinner, or pesticide because such a substance can damage the exterior. In addition, do not let this unit contact a rubber or plastic form for a long time. That may damage the cabinet surface of the unit.
- Before cleaning, unplug the power cable from the AC outlet.
Compact chassis design
A CD player and a D/A converter are housed in the A4 paper size chassis. (210 x 297 mm)
USB input supports 192 kHz / 32 bit
B-type USB input terminal makes it possible to input USB digital audio signal from a PC/Mac.
The sampling frequency of up to 192 kHz and 32-bit quantization are supported.
Digital input terminals
This unit is equipped with a coaxial input terminal and an optical input terminal.
S/PDIF format signals between 32 kHz and 192 kHz are supported.
Zoom function
When the ZOOM switch is pressed on the remote control, the track number and time information can be displayed enlarged.
4 playback modes
Playback mode can be selected from regular, programmed, playback, random, and repeat playback.
Dimmer function
The brightness of display can be switched over in 4 steps.
Last memory function
Built-in flash memory can memorize settings such as dimmer, digital input selection, etc.
Analog output terminals
18 mm pitch RCA terminals with gold plating support high-performance line cables with large plugs.
PCM5102A manufactured by Burr-Brown
For the DAC chip, this unit uses PCM5102A manufactured by Burr-Brown.
Original technologies
Our traditional non-angled circuitry, OFC internal wiring, and original custom-made parts are fully and luxuriously used.
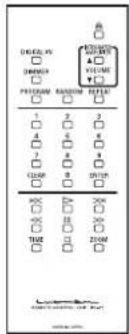
Remote control (RD-27)
The remote control is encased in aluminum. Tactile switches will satisfy users with light key touch.
Highly stable power supply
The highly stable power supply circuit that is combined of EI core type power transformer and customized 3,300 F x 2 capacitor blocks.
Schottky barrier diodes
By using Schottky barrier diodes, manufactured by KYOCERA Corporation (former Nihon Inter Electronics Corporation), this unit achieves higher DC conversion efficiency in the rectifier circuit and much less switching noise.
Original LUXMAN's OFC wiring
Our original OFC wires are used in the internal wiring to achieve smooth signal transmission utilizing to the non-plating process on the core wire.
*1 Mac and Mac OS are trademarks of Apple Inc., registered in the U.S. and other countries.
*2 Windows is a registered trademark of Microsoft Corporation in the United States and/or other countries.
*3 DSD is a trademark.
*4 The described company names and product names are trademarks or registered trademarks of each company.
Types of discs that can be played
The following marks are printed on disc labels, packages, or CD jackets.
| Marks for types of discs this unit can play back |
| Marks for types of discs this unit cannot play back |
This unit can play back 8 cm CDs without using an adapter. Do not use an adapter for 8 cm CDs.
- CD-R/CD-RW discs that have been written by a recorder or PC may not be played back (due to characteristics of discs, scratches, dirt on discs, dirt on the lens of the unit, dew condensation, etc.).
- Discs written by a PC may not be played back depending on the application settings or environment. Write the discs in a proper format. (Refer to the distributor of application for details.)
- Time information may not be displayed when an unfinalized CD-R/CD-RW disc is played back.
- Refer to the precautions for discs for details on how to handle CD-R/CD-R discs.
Check the accessories
After unpacking, check if the following accessories come with.
- Power cable
- Remote control (RD-27)
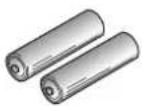
- "AAA" batteries (2 pieces)
- Safety cautions
- Owner's Manual (This document)
How to Use Remote Control
Insert batteries into the remote control
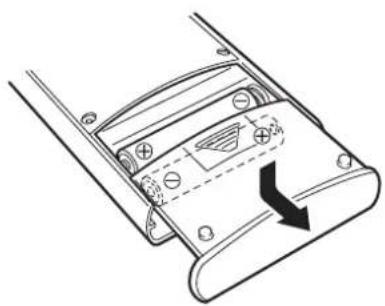
- Remove the battery cover on the rear of the remote control. Put your finger on the battery cover claw and slide the cover downward to remove the cover.
- Put 2 AAA batteries in the battery case as shown in the illustration on the battery case in consideration of the polarity and .
- In the reverse order of battery cover removal, put the battery cover back to the opening of the remote control and slide the cover upward until it clicks.
natural_image
Technical line drawing of a mechanical component with a directional arrow indicating rotation (no text or symbols)- Do not use a new battery and an old one together.
- There may be a case in which the voltages are different between two batteries even though their shapes are the same. Do not use the batteries of different types together.
- If the remote control is not used for a long time (more than 1 month), the batteries shall be removed from the case. If the battery liquid is leaking, wipe away the liquid from the case before inserting new batteries.
- To discard exhausted batteries, follow the instructions of each local authority.
Remote control's range
The remote control can be used by pointing at the remote control infrared receiver on the front panel of main unit. The effective distance is approx. 5 m from the main unit and 30° on both sides from the control infrared receiver.
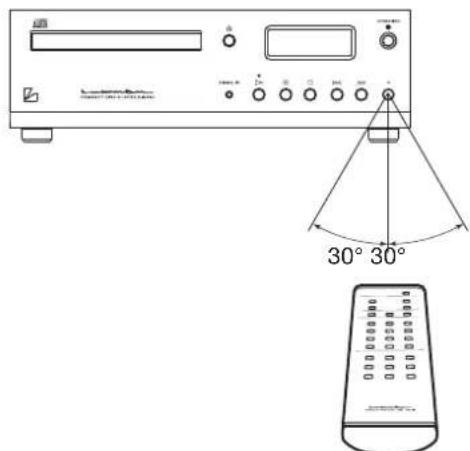
Effective distance: approx. 5 meters
Do not expose the remote control infrared receiver to direct sunlight or strong light sources. That may cause malfunction.
Names and Functions
Front panel
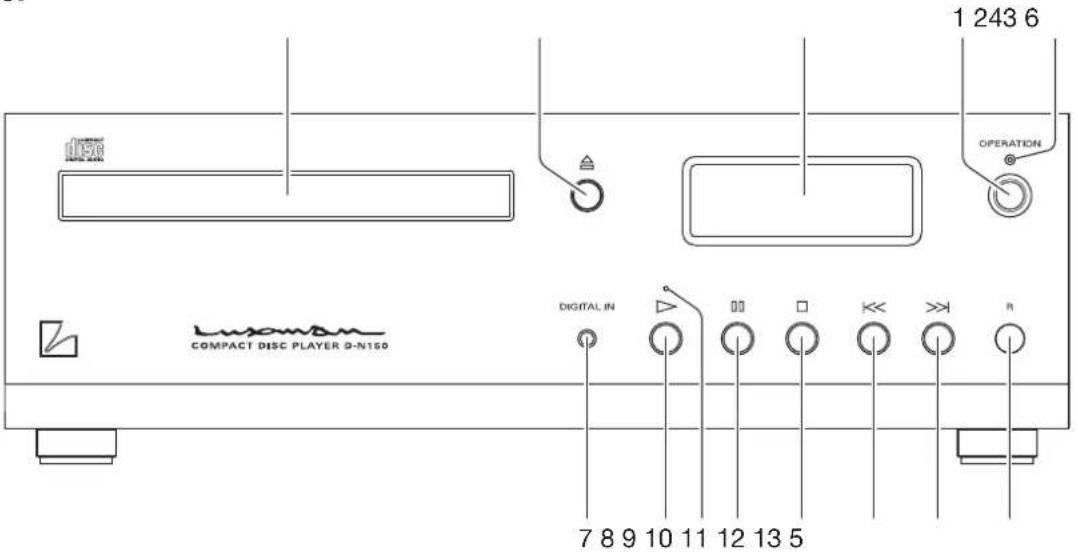
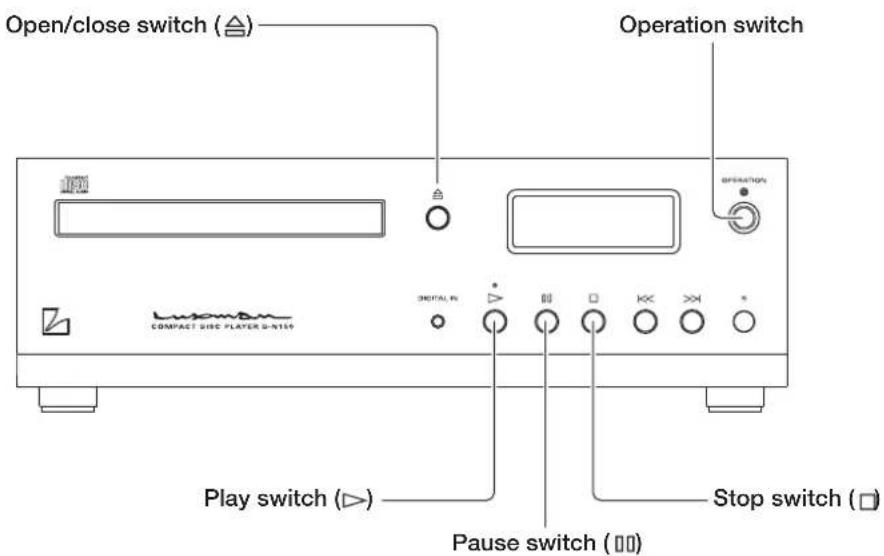
1. Operation switch (OPERATION)
Toggles the power on and off.
When wiring or connection is performed, be sure to turn off this switch.
2. Operation indicator
Blinks during warm-up when the operation switch is turned on and lights up when the operation state is activated afterward.
3. Disc tray
When inserting or removing a disc, this tray is opened or closed by pressing the open/close switch (盆
4. Open/close switch ( )
Opens or closes the disc tray.
5. Remote sensor (R)
Receives signals from the accessory remote control.
6. Display window
Displays the operation status of this unit with the FL display tube.
7. Digital input selection switch (DIGITAL IN)
This switch is pressed when using this unit as a D/A converter to select among coaxial, optical, USB, and CD player.
8. Play switch (▷)
Plays back a disc.
9. Play indicator
Lights up while a disc is being played back. Blinks while playback is being paused.
10. Pause switch (☐)
When this switch is pressed during playback, the playback stops. When this switch is pressed again, the playback starts again. During pause, the play indicator blinks.
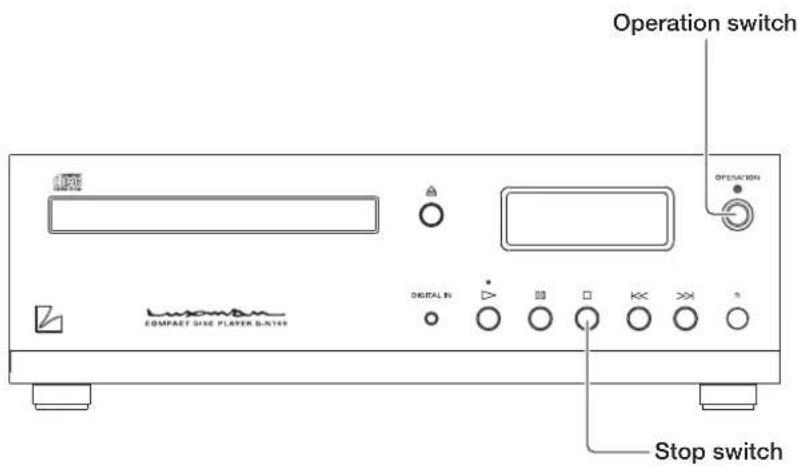
11. Stop switch (☐)
Stops playback.
12. Previous switch (K)
When this switch is pressed, the playback returns to the beginning of track. When this switch is pressed twice, the playback returns to the beginning of previous track.
13. Next switch (>)
When this switch is pressed, the playback jumps to the beginning of next track.
Display window
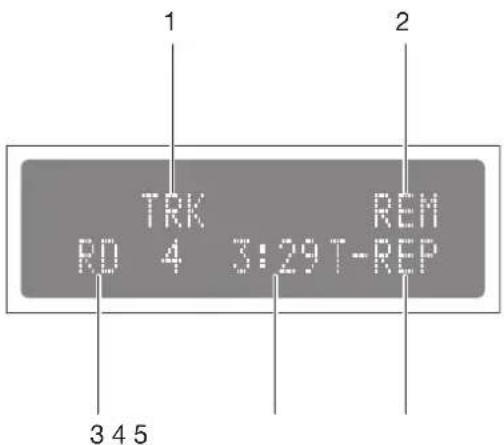
1. Track number (TRK)
"TRK" is indicated on the upper side, and the track number is indicated on the lower side when these display area shows the track number.
2. Time display mode
The display mode of time is displayed. "REM" is displayed when showing the remaining time of current track. "T-REM" is displayed when showing the total remaining time of disc. This display area does not light up when showing the elapsed time of track.
3. Playback mode
"RD" is displayed during random playback. "PG" is displayed during program playback. This display area does not light up during regular playback.
4. Time
Displays the elapsed time of current track, remaining time of current track, or remaining time of disc. Time display is switched over according to time display mode.
5. Repeat mode
Displays the mode for repeat playback. There are two types of repeat playback: track repeat (T-REP) and all repeat (A-REP).
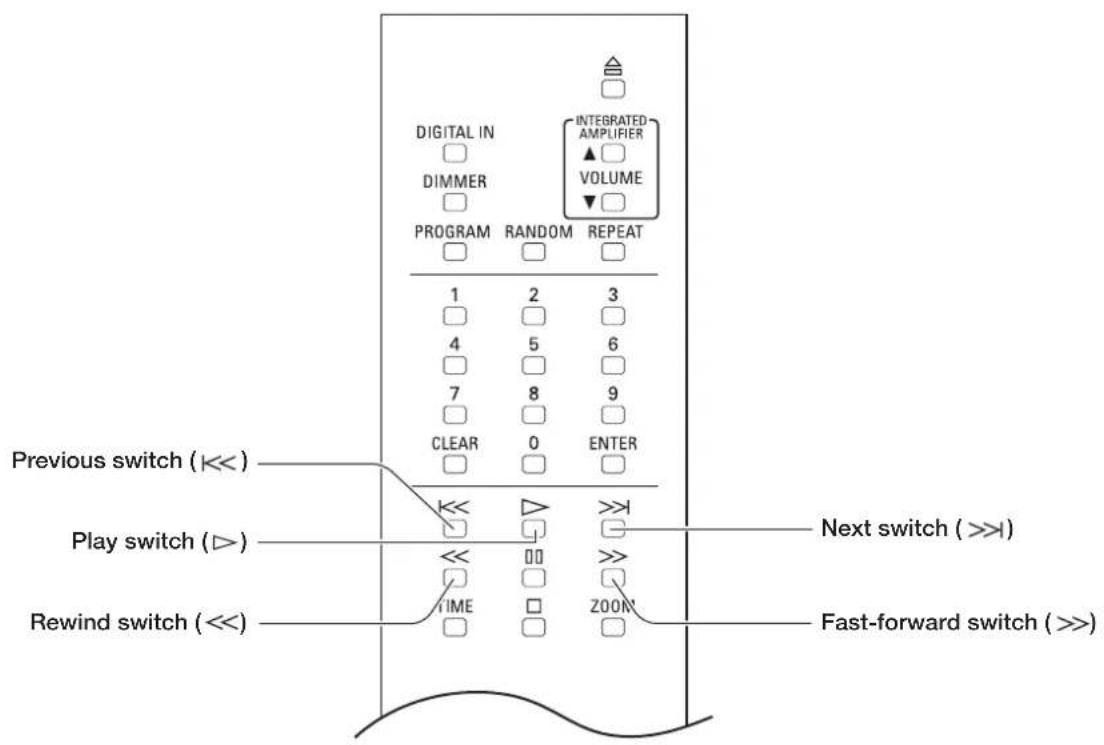
Remote control
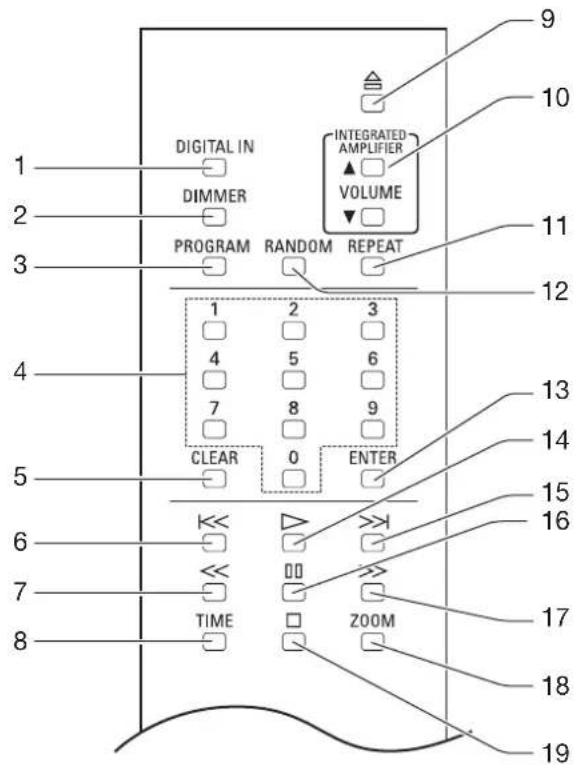
1. Digital input selection switch (DIGITAL IN)
This switch is pressed when using this unit as a D/A converter. Switchover is performed among coaxial, optical, USB, and CD player.
2. Dimmer switch (DIMMER)
Adjusts the brightness of the main unit display. The brightness can be adjusted in 4 steps from light off to normal.
3. Program switch (PROGRAM)
Programs the track numbers to play back in a desired order.
4. Numeric keys (1, 2, 3, 4, 5, 6, 7, 8, 9, 0)
These keys are pressed to specify the track numbers for direct search or program.
5. Clear switch (CLEAR)
Cancels the program settings.
6. Previous switch (<<
When this switch is pressed, the playback returns to the beginning of track. When this switch is pressed twice, the playback returns to the beginning of previous track.
7. Rewind switch (<<
When this switch is pressed during playback, audio is re-wound.
8. Time display switch (TIME)
Switches the time display. Switches the elapsed time of current track, remaining time of current track, or remaining time of disc.
9. Open/close switch ( )
Opens or closes the disc tray.
10. Volume control switches (VOLUME)
When a LUXMAN integrated amplifier is connected, volume control of the integrated amplifier is available.
Pressing ▲ increase the sound volume.
Pressing ▼ decrease the sound volume.
Supported integrated amplifier
Current integrated amplifiers between a range from SQ-N150, L-507s or models released later than them to L-509X.
11. Repeat switch (REPEAT)
This switch is pressed to perform repeat playback. There are two types of repeat playback: track repeat (T-REP) and all repeat (A-REP).
12. Random switch (RANDOM)
This switch is pressed to perform random playback.
13. Enter switch (ENTER)
Executes the set or selected items.
14. Play switch (☐)
Plays back a disc.
15. Next switch (>)
When this switch is pressed, the playback jumps to the beginning of next track.
16. Pause switch (☐)
When this switch is pressed during playback, the playback stops. When this switch is pressed again, the playback starts again. During pause, the play indicator blinks.
17. Fast-forward switch ( )
When this switch is pressed during playback, audio is fast-forwarded.
18. Zoom switch (ZOOM)
When this switch is pressed during playback, the track number and time are displayed in an enlarged manner.
19. Stop switch (☐)
Stops playback.
Rear panel
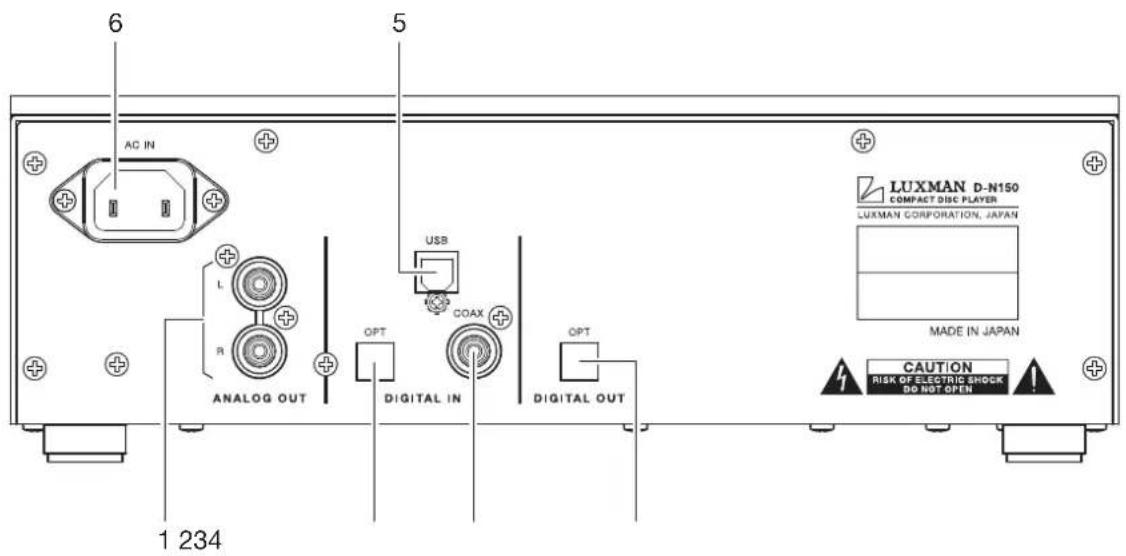
1. Analog unbalance output terminals (ANALOG OUT)
RCA terminals to output unbalanced playback signals from this unit.
Connect these terminals to an unbalanced input of such device as an integrated amplifier with a pin cable.
2. Optical digital output terminal (OPT)
Connect this terminal to a device such as a D/A converter or an amplifier that has a digital input terminal using an optical digital cable.
This terminal is a shutter-type. Direct the cable connector correctly when inserting the cable into the terminal. If the cable connector is inserted forcibly to the wrong direction, the terminal may be deformed, and the shutter may not be able to close even after cable disconnection.
3. Coaxial digital input terminal (COAX)
RCA input terminal used for the digital input signal from such device as a CD player equipped with digital output terminals using a coaxial digital cable.
The terminal supports the following data.
Sampling frequency : 32 kHz, 44.1 kHz,
48 kHz, 88.2 kHz, 96 kHz,
176.4 kHz, 192 kHz
Number of quantization bit : 16-bit, 20-bit, 24-bit
4. Optical digital input terminal (OPT)
TOS-LINK input terminal used for the digital input signals from such device as a CD player equipped with digital output terminals using an optical digital cable.
The terminal supports the following data.
Sampling frequency : 32 kHz, 44.1 kHz,
48 kHz, 88.2 kHz, 96 kHz,
176.4 kHz, 192 kHz
Number of quantization bit : 16-bit, 20-bit, 24-bit
5. USB digital input terminal (USB)
USB (B-type) input terminal used for the digital input signal from a PC/Mac to be connected with a USB cable.
The terminal supports the following PCM signals.
Sampling frequency : 32 kHz, 44.1 kHz,
48k Hz, 88.2 kHz, 96 kHz,
176.4 kHz, 192 kHz
Number of quantization bit : 16-bit, 24-bit, 32-bit
When the OS is Windows, the dedicated driver software needs to be downloaded from LUXMAN website and installed.
Refer to "Driver Installation Manual" on the LUXMAN website for detailed information.
With Mac, this unit is automatically recognized.
Caution:
Connection between a PC and this unit with use of a USB cable shall not be performed before the installation of this driver software is completed. Failure to observe this may cause malfunction.
6. Power cable terminal (AC IN)
Connect the accessory power cable to supply the power from the AC outlet on the wall.
Connections
flowchart
graph TD
    A["INTEGRATED AMP"] --> B["(D) L R"]
    C["D/A CONVERTER"] --> D["(E) LUXMAN CONVERTER"]
    B --> E["ANALOG OUT"]
    D --> F["CAUTION"]
    E --> G["DIGITA IN"]
    F --> H["LOGIC/PLC"]
    G --> I["OPT"]
    H --> J["COAX"]
    I --> K["Digital OUT"]
    J --> L["USB"]
    K --> M["Digital OUT"]
    L --> N["CD/SACD PLAYER"]
    M --> O["PC/Mac"]
    P["(C)"] --> Q["DVD PLAYER"]
    style A fill:#f9f,stroke:#333
    style C fill:#f9f,stroke:#333
    style P fill:#ccf,stroke:#333
    style Q fill:#cfc,stroke:#333
* When the OS is Windows, the dedicated driver software needs to be installed.
Before connecting
Before connecting other devices, connect the jack side of the accessory power cable to the AC inlet of this unit.
When connecting, turn off the power supply of this unit and the power supplies of auxiliary devices to prevent unexpected accidents that may be caused by noise.
How to connect power supply
Use the accessory power cable to insert the AC plug in an outlet on the wall in the listening room.
How to connect input devices
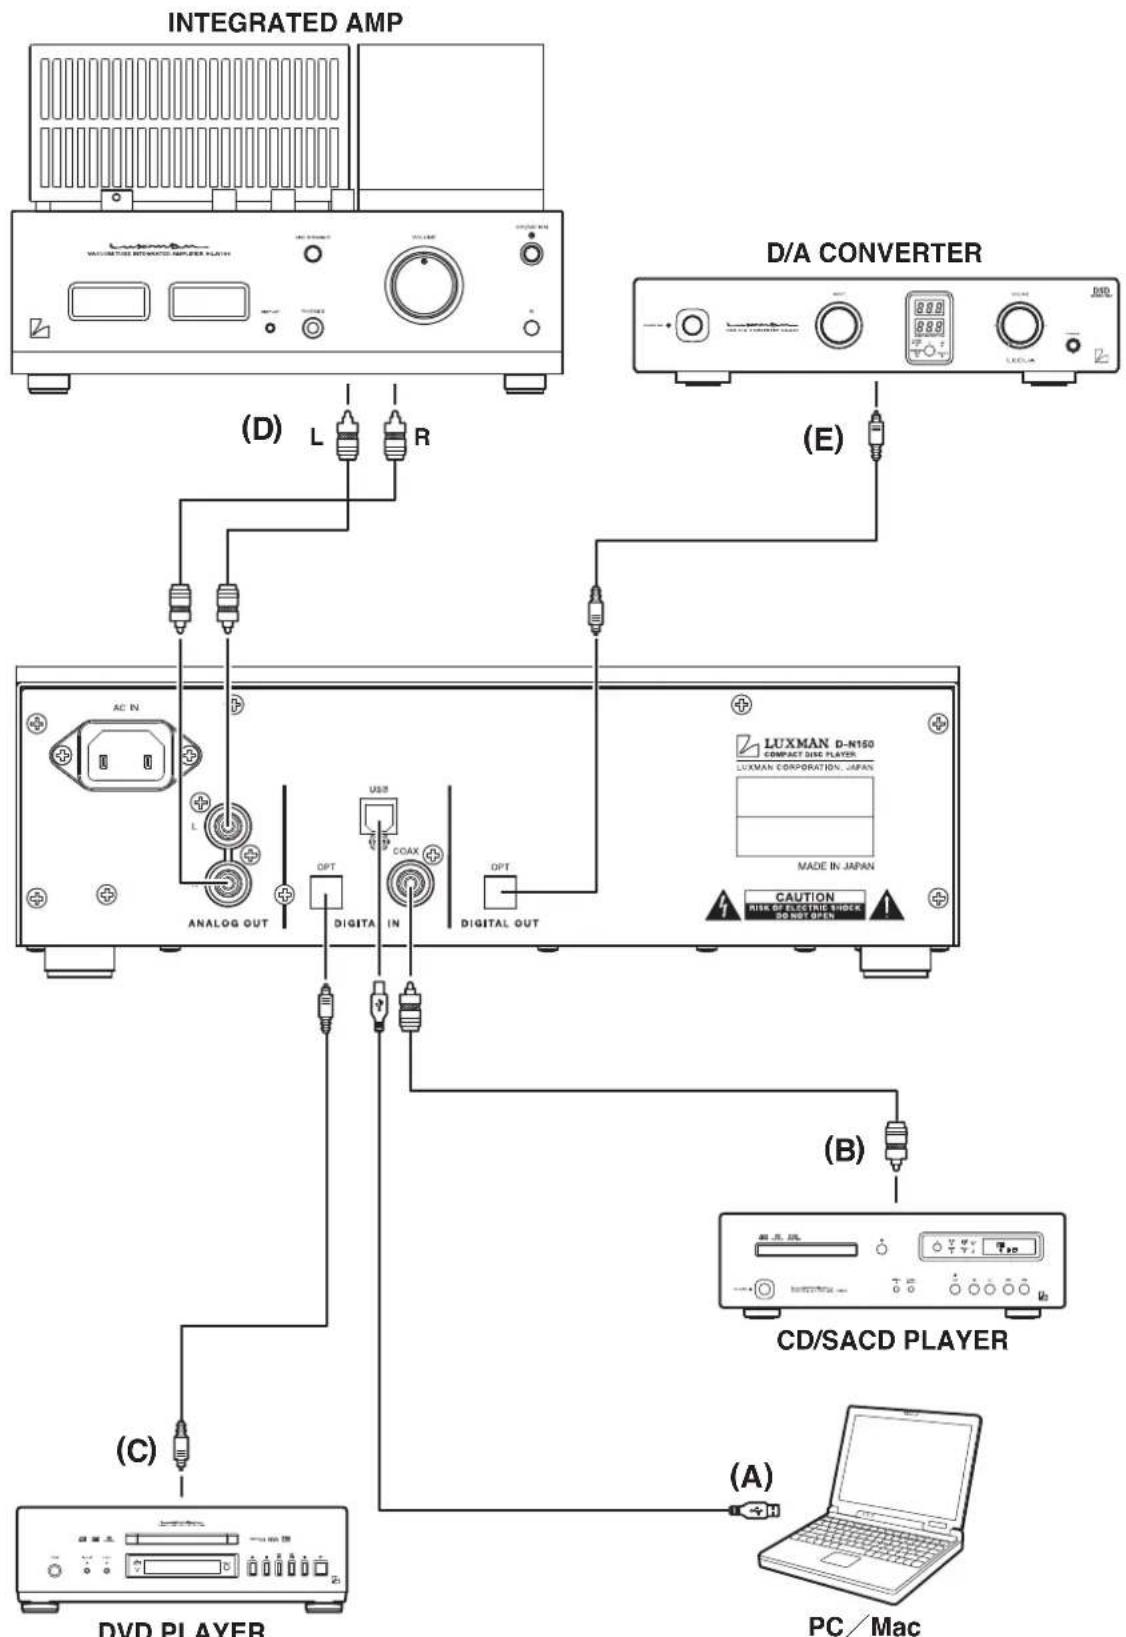
1. Digital connection from a PC/Mac (Refer to the connection diagram (A).)
Connect between the USB (A-type) terminal of the PC/Mac and the USB (B-type) terminal of this unit with a USB cable. When the OS is Windows, the dedicated driver software needs to be downloaded from LUXMAN website and installed.
Refer to "Driver Installation Manual" on the LUXMAN website for detailed information.
With Mac, this unit is automatically recognized.
Caution:
Connection between a PC and this unit with use of a USB cable shall not be performed before the installation of this driver software is completed. Failure to observe this may cause malfunction.
2. Digital connection from such device as a CD player (Refer to the connection diagrams (B) and (C).)
Connect between the (coaxial or optical) digital output terminal of a CD player, an SACD player, a DVD player, and other such devices and the digital input terminal (COAX/OPT) of this unit with a coaxial digital cable and an optical digital cable.
This terminal is a shutter-type. Direct the cable connector correctly when inserting the cable into the terminal. If the cable connector is inserted forcibly to the wrong direction, the terminal may be deformed, and the shutter may not be able to close even after cable disconnection.
Upper side
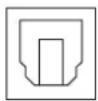
Lower side
The optical terminal is directed as illustrated.
How to connect output devices
1. Unbalanced connection with such device as an integrated amplifier (Refer to the connection diagram (D).)
Connect between the analog unbalanced output terminals (RCA) of this unit and the unbalanced input terminals of a sound-volume-adjustable device such as an integrated amplifier using two RCA pin-plug cables (L/R).
2. Digital output to such device as another D/A converter (Refer to the connection diagram (E).)
Connect between the digital output terminal (OPT) of this unit and such device as a D/A converter with an optical digital cable.
Disc playback/pause/stop
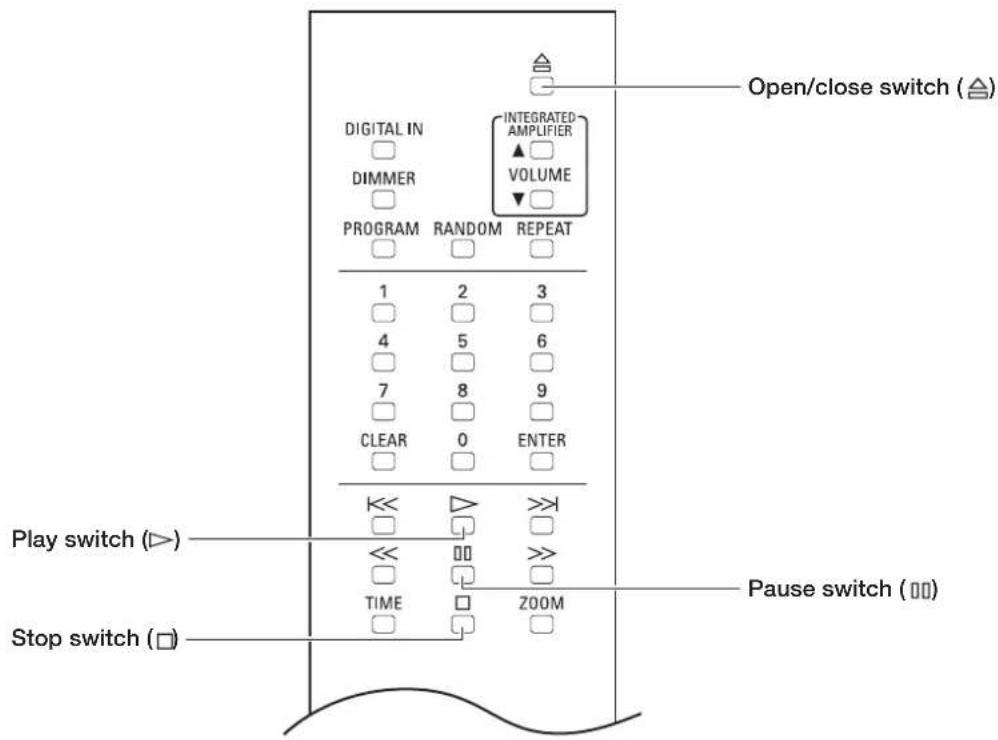
Playback a disc.
Remote control
• Main unit
- Press the operation switch on the main unit to turn it on.
"-OPERATION-" appears on the display for several seconds during the warm-up. When the indication disappears, the unit becomes operable.
- Press the open/close ( ) switch.
The disc tray opens.
-
Put the disc on the disc tray according to the guide on the tray.
-
Press the open/close ( ) switch.
The disc tray closes and the disc is loaded.
To start playback quickly, press the play (Switch without pressing the open/close (Switch.
Or select a track by pressing a numeric key without pressing the open/close (Switch, and press the ENTER switch or play (Switch.
Operation switches and numeric keys are not functional during the period from disc loading to displaying of disc type. Specifying the next operation, for example specifying the number of tracks beforehand, can shorten the time before playback start.
- Press the play (▷ switch.
Pause/stop the playback of the disc.
Remote control
• Main unit
How to pause playback
- Press the pause ( ) switch.
During pause, the play indicator blinks.
Resumes the regular playback.
- During pause, press the play (☐)or pause (☐)switch.
Stop the playback
During playback, press the stop ( ) □ switch.
Eject a disc
Press the open/close () switch.
The disc tray opens.
Turn off the power
Press the operation switch on the main unit to turn it off.
Skips to the desired track (cue function)
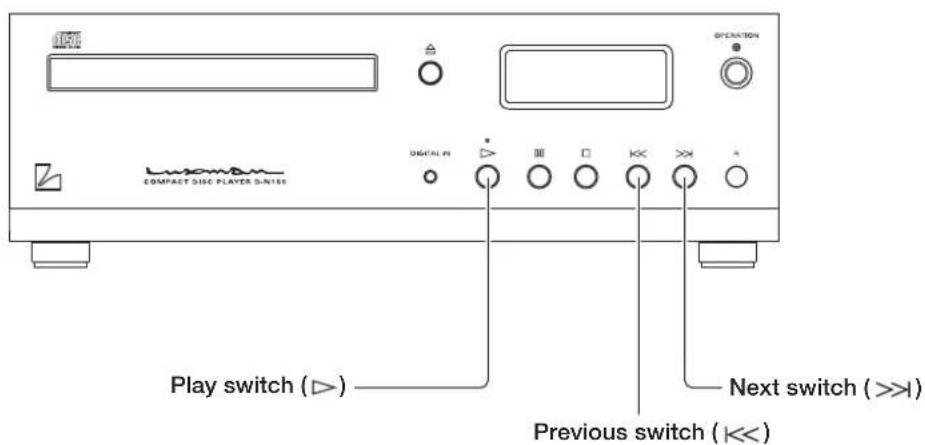
Skip playback
Skip to the track to play back.
To skip to the track to play back, press the next switch ( ) repeatedly until the desired track is displayed.
Go back to the track to play back.
To go back to the track to play back, press the previous switch (i) repeatedly until the desired track is displayed.
When this switch is pressed once, the playback returns to the beginning of current track. When this switch is pressed twice, the playback returns to the beginning of previous track.
Disc fast-forward/rewind playback (Scan)
Fast-forward the playback.
1. During playback, press the fast-forward ( ) switch.
Each time the switch is pressed, the rewind speed can be changed in 3 steps.
“>>1, >>2, >>3” appears on the display to indicate the fast-forward state and speed.
2. To resume the regular playback, press the play (▷switch.
Rewind the playback.
1. During playback, press the rewind (<< switch.
Each time the switch is pressed, the rewind speed can be changed in 3 steps.
“<<1, <<2, <<3” appears on the display to indicate the re-wind state and speed.
2. To resume the regular playback, press the play (▷switch
Direct search/repeat playback
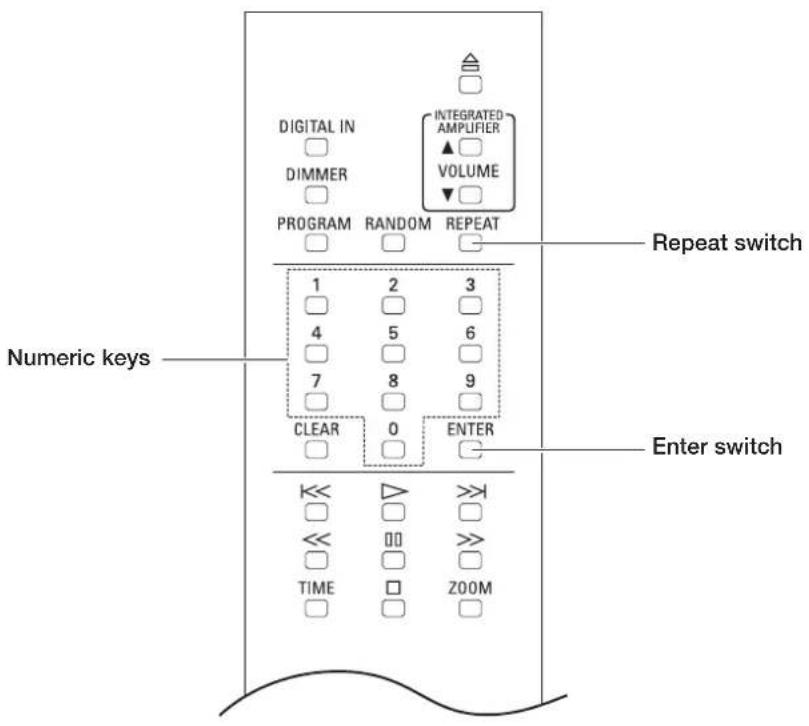
Specify the desired track for playback
Remote control
1. Enter a track number by pressing numeric keys.
For example, when selecting the 15th track, press the "1" key, and then "5".
2. Press the ENTER or play switch.
Playback is started automatically even without pressing the ENTER key after the elapse of approx. 3 seconds. The maximum number of tracks is 99 for a CD, and it may take longer time to enter a 2-digit track number. For this reason, approx 3 seconds are given to CDs before auto jump.
Repeat playback
Remote control
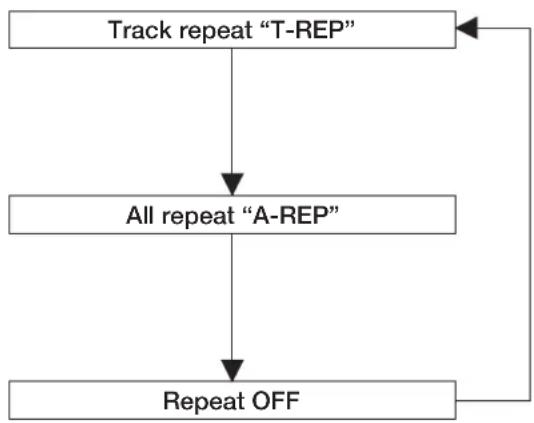
There are two types of repeat playback: track repeat (T-REP) and all repeat (A-REP).
Track repeat (T-REP)
- During playback, press the REPEAT switch once.
- "T-REP" appears on the display to indicate the track repeat.
- When this switch is pressed twice again, the track repeat is canceled.
Repeated playback is also canceled when the disc is stopped.
flowchart
graph TD
    A["Track repeat "T-REP""] --> B["All repeat "A-REP""]
    B --> C["Repeat OFF"]
    C --> A
All repeat (A-REP)
- During playback, press the REPEAT switch twice.
- "A-REP" appears on the display to indicate the all repeat.
- When this switch is pressed once again, the track repeat is canceled.
Repeated playback is also canceled when the disc is stopped.
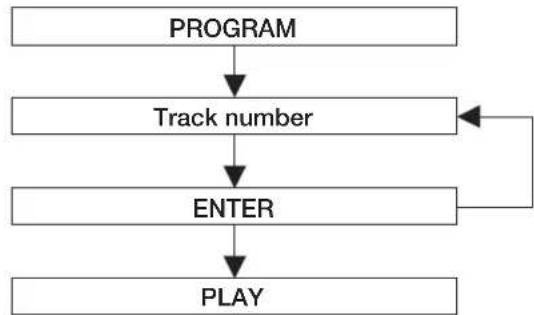
Playback of tracks in a programmed order (Program playback)
Remote control
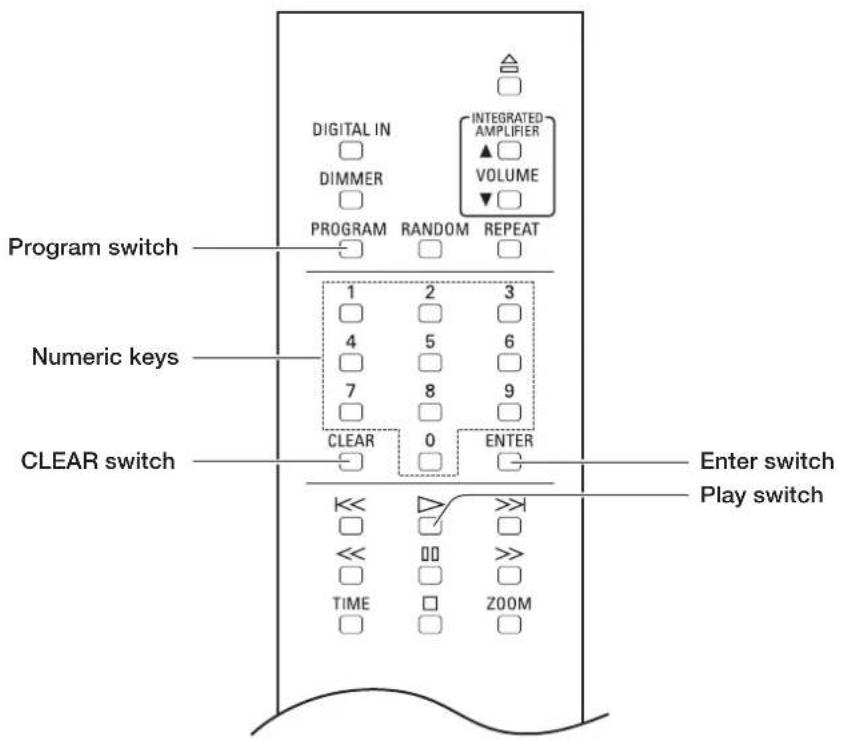
It is possible to program up to 24 tracks in the desired order.
- During stop, press the PROGRAM switch.
The following indication appears on the display.
| T-TIME | |
| PG 00 | 00:00 |
- Enter a desired track number by pressing numeric keys of the remote control.
For example, when selecting the 5th track, press the "5" key.
| PG 01 | 5 |
- Press the ENTER switch.
The order of the track is determined, and then track number and total time appear on the display.
| T-TIME | |
| PG 01 | 01:28 |
4. Enter the track number to program next.
For example, when selecting the 15th track, press the "1" key, and then "5".
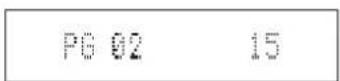
5. Press the ENTER switch.
The order of the track is determined, and then track number and total time appear on the display.
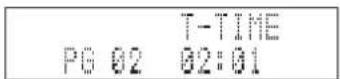
Program the desired tracks by repeating Step 2 and 3.
6. Press the play (▷ switch.
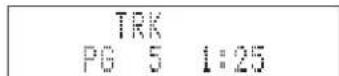
- When pressing the CLEAR switch during stop, all the program is deleted.
- When pressing the PROGRAM switch, and then the CLEAR switch during stop, the tracks will be deleted in the reverse order.
- It is impossible to program pause.
- When pressing the REPEAT switch during program playback, programmed all repeat is performed.
- Track repeat is not available during program playback.
- When pressing the next ⚡️ switch during program playback, the playback jumps to the track programmed next.
- To perform the program playback again, press the PROGRAM switch during stop, and then the play ( ) switch.
Procedure
flowchart
graph TD
    A["PROGRAM"] --> B["Track number"]
    B --> C["ENTER"]
    C --> D["PLAY"]
    C --> E["Feedback Loop"]
Random playback/disc information/zoom
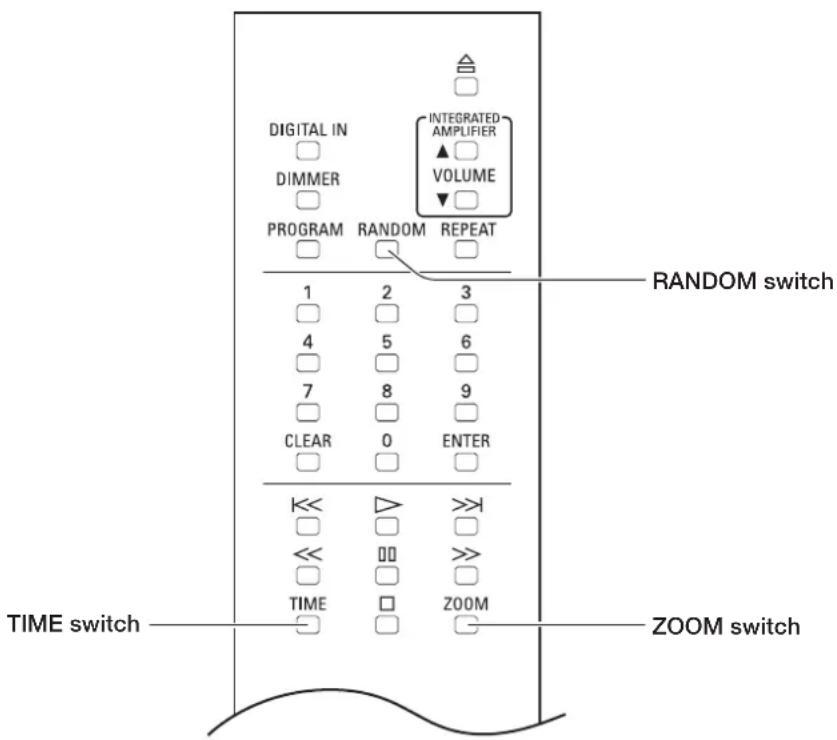
Playback of tracks in a random order (Random playback)
Remote control
Each track is selected from all the tracks and is played back once.
-
Press the RANDOM switch.
-
"RD" appears on the display to indicate the random playback. The playback stops automatically after all the tracks are played back.
Random playback stops when a disc is stopped or the RANDOM switch is pressed once again. When pressing the next (>) switch during random playback, the next track is randomly selected and played back. When pressing the previous (>) switch, the playback returns to the beginning of current track.
Disc information
Remote control
Switch the time display during playback.
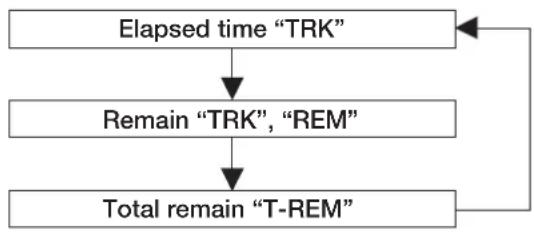
Each time the TIME switch is pressed during playback, the display changes as follows.
1. The current track number and the elapsed time of the track (In the default setting)
"TRK" will appear on the display.
2. The current track number and the remaining time of the track (Remain)
"TRK" and "REM" will appear on the display.
3. The total remaining time of the disc (Total remain)
"T-REM" will appear on the display window.
flowchart
graph TD
    A["Elapsed time "TRK""] --> B["Remain "TRK", "REM""]
    B --> C["Total remain "T-REM""]
    C --> A
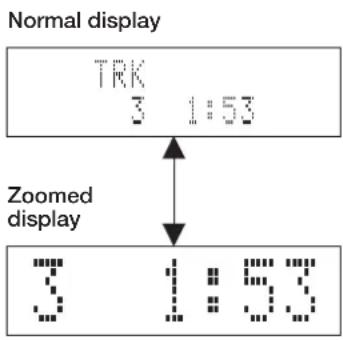
Zoomed display
Remote control
Enlargement of displayed characters
-
Pressing the ZOOM switch makes the displayed track number and time larger.
-
When pressing the ZOOM switch once again, the display returns to the normal state.
Detailed Settings
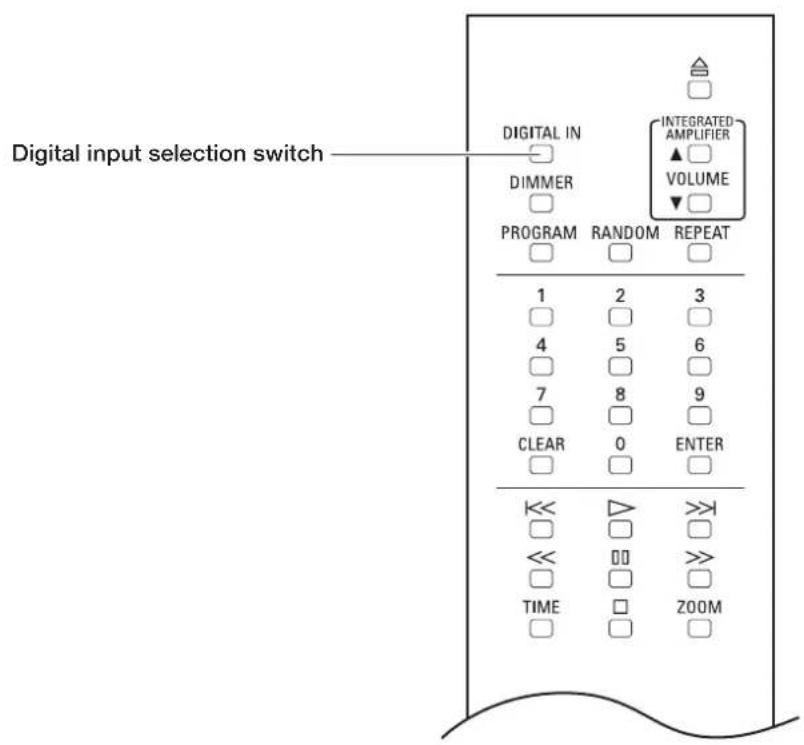
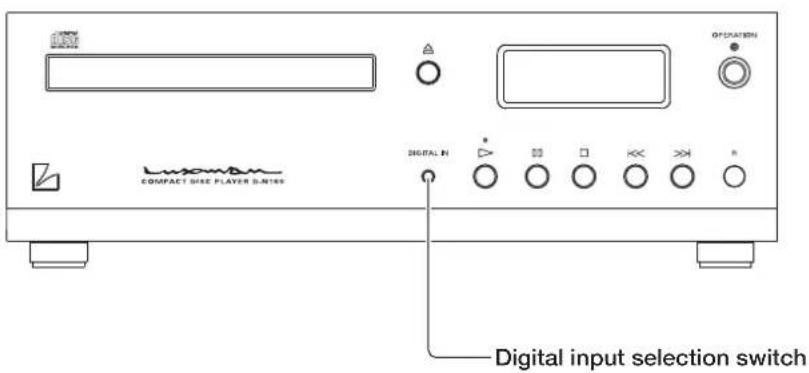
Digital input selection switch (DIGITAL IN)
Remote control
• Main unit
This switch is pressed when using this unit as a D/A converter.
1. Each time the DIGITAL IN switch is pressed, the display changes as follows. COAXIAL → OPTICAL → USB → CD
The coaxial and optical inputs support the following signals.
Sampling frequency : 32 kHz, 44.1 kHz, 48 kHz,
88.2 kHz, 96 kHz, 176.4 kHz, 192 kHz
Number of quantization bit : 16-bit, 20-bit, 24-bit
The USB input supports the following signals.
- PCM signal
Sampling frequency : 32 kHz, 44.1 kHz, 48 kHz,
88.2 kHz, 96 kHz, 176.4 kHz, 192 kHz
Number of quantization bit : 16-bit, 24-bit, 32-bit
When the OS is Windows, the dedicated driver software needs to be installed.
Refer to "Driver Installation Manual" on the LUXMAN website for detailed information.
With Mac, this unit is automatically recognized.
Caution:
Connection between a PC and this unit with use of a USB cable shall not be performed before the installation of this driver software is completed. Failure to observe this may cause malfunction.
2. The selected input type and sampling status are displayed on the main unit display window.
This sampling frequency and bit count of the digital signal are displayed, which is connected to the input terminal (COAX/OPT/USB) selected with the digital input selection switch. When one of COAX/OPTICAL/USB is selected using the digital input selection switch and the digital signal from each digital device and this unit are synchronized, the sampling frequency and bit count of the digital signal are displayed.
When a digital signal input is not provided or the signal is not synchronized even if the signal input is provided, "UNLOCK" is displayed.
When USB is selected, only the sampling frequency is displayed. The bit count is not displayed.
- The bit count (word length) indicates the contents of the word length data included in the channel status which is specified in IEC60958-3 (digital audio interface - Part 3: consumer applications).
Some output devices may provide channel status data (word length data) whose content is different from the actual word length. In such a case, the contents of the channel status data are indicated on the display instead of the actual bit count.
Alternatively, some devices or sources may provide the data that states "the word length is not specified". In such a case, the bit count is not displayed.
- There may be a case where the display indicates "LOCK" shortly, and then "UNLOCK". (The reverse case is also possible.) That is because the former state (LOCK/ UNLOCK) is indicated for approx. 0.5 seconds since an input signal is changed until the circuit gets stable.
Detailed Settings
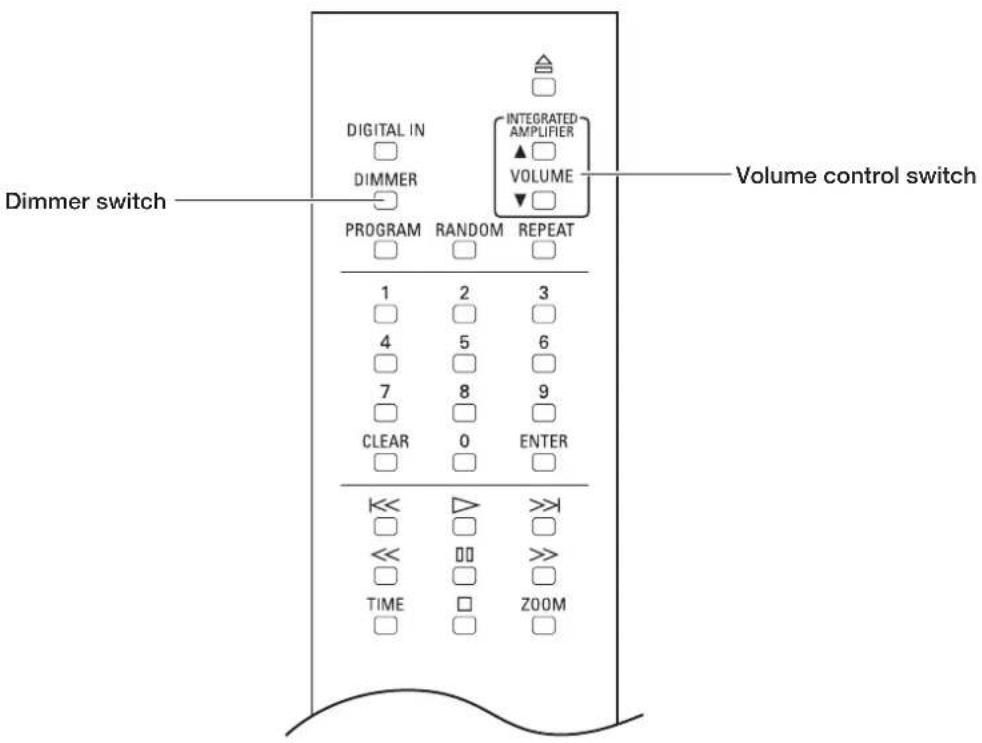
Dimmer switch (DIMMER)
Remote control
The brightness of the main unit display can be adjusted. The brightness can be adjusted in 4 steps from light off to normal.
Each time the DIMMER switch is pressed, the display changes as follows. Normal light → Dim → Very dim → No light → Normal light → ...
Selection of no light displays "DISPLAY OFF" for 2 second and the sign turns off.
It is impossible to change the brightness of LED.
Volume control switch (VOLUME)
Remote control
When a LUXMAN integrated amplifier is connected, volume control of the integrated amplifier is available.
Pressing ▲ increase the sound volume.
Pressing ▼ decrease the sound volume.
Supported integrated amplifier
Current integrated amplifiers between a range from SQ-N150,
L-507s or models released later than them to L-509X.
How to restore all the settings to the factory defaults
- Turn off the power of the main unit.
- Press the OPERATION switch while pressing the stop ☐ switch on the main unit.
All the settings are restored to the factory defaults.
| Item Default | |
| Digital input selection CD | |
| Dimmer adjustment Normal | |
| Zoomed display Normal |
Last memory function
The following are the setting items to be memorized on the flash memory.
When the power is turned off immediately after setting change, the setting data may not be successfully memorized.
| Item Default | |
| Digital input selection CD, CO | AX, OPT, USB |
| Dimmer adjustment | Normal, Dim, Very dim, Light off |
| Zoomed display Zoomed, Normal | |
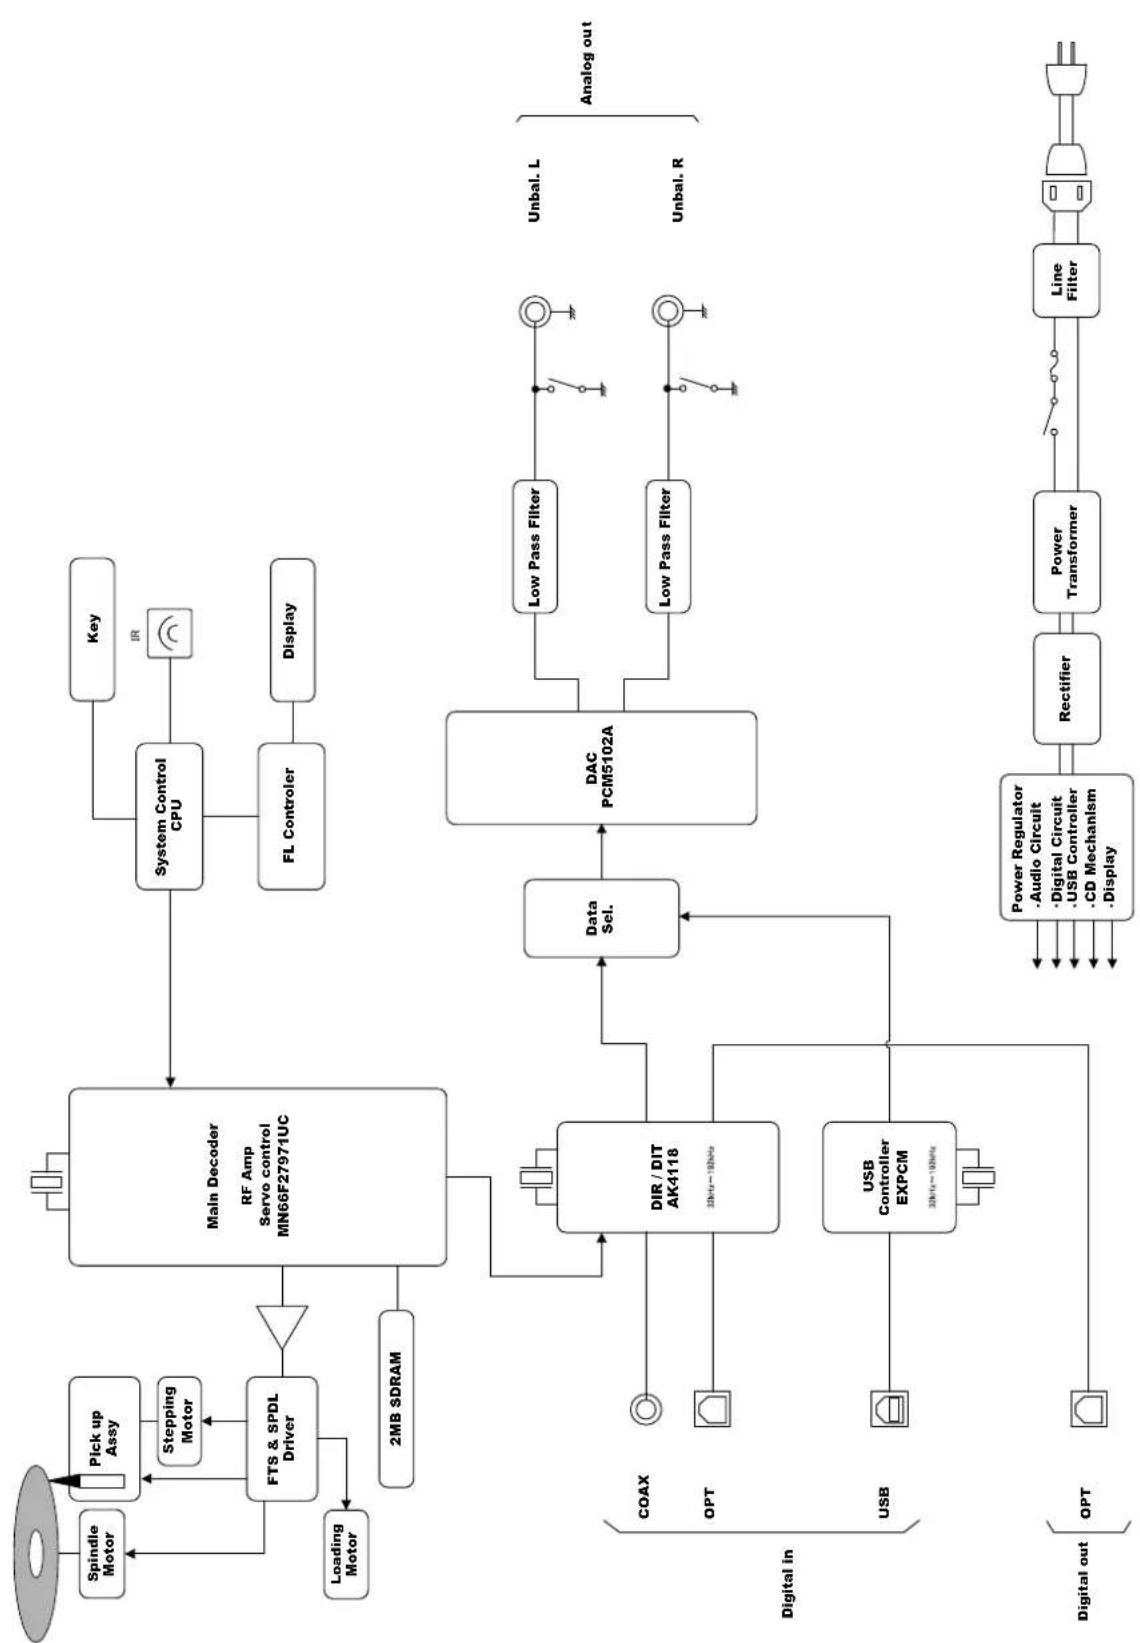
flowchart
graph TD
    A["Spindle Motor"] --> B["Pick up Assy"]
    B --> C["Stepping Motor"]
    C --> D["FTS & SPDL Driver"]
    D --> E["Main Decoder\nRF Amp Servo control\nMN66F27971UC"]
    E --> F["System Control CPU"]
    F --> G["Key"]
    F --> H["IR"]
    F --> I["FL Controller"]
    I --> J["Display"]
    K["Loading Motor"] --> L["2MB SDRAM"]
    L --> E
    M["Digital in"] --> N["COAX"]
    M --> O["OPT"]
    M --> P["USB"]
    M --> Q["Digital out"]
    R["Data Sel."] --> S["DAC PCM5102A"]
    T["Power Regulator\n·Audio Circuit"] --> U["Rectifier"]
    V["Digital Circuit\n·USB Controller"] --> W["Power Transformer"]
    X["CD Mechanism\n·Display"] --> Y["Line Filter"]
    Z["Unbal. L"] --> AA["Analog out"]
    AB["Unbal. R"] --> AC["Analog out"]
Format 2-channel CD player
| Power supply | 230 V ~ (50 Hz) | |
| Power consumption 13 W | ||
| Weight 5.0 kg (main unit) | ||
| Max. external dimensions 297 (W) x 98 (H) x 222 (D) mm(front side knob with 4 mm and rear side terminal with 8 mm included in depth) | ||
| Ambient operating temperature/Ambient operating humidity | +5 °C to +35 °C / 5 % to 85 % (non condensing) | |
| Audio output characteristics | Output voltage/Output impedance: | ANALOG OUT terminal (RCA terminal) 2.1 Vrms/300 Ω |
| Frequency response: CD 5 Hz to 20 kHz (+0, -0.5 dB)COAX/OPT/USB 5 Hz to 50 kHz (+0, -3 dB) | ||
| Total harmonic distortion: CD 0.005 %COAX/OPT/USB 0.005 % | ||
| S/N ratio: CD 110 dB | COAX/OPT/USB 110 dB | |
| Dynamic range: CD 98 dB | COAX/OPT/USB 109 dB | |
| Channel separation: CD 102 dB | COAX/OPT/USB 102 dB | |
| Digital input | Coaxial digital input: 0.2 to 0.5 Vp-p | |
| Optical digital input: -14.5 to -21 dBm | ||
| USB input: (Applicable OS) Microsoft Windows 7 or later, Mac OS X10.7 or later | ||
| Sampling frequency: | COAX/OPT input: 32 kHz, 44.1 kHz, 48 kHz, 88.2 kHz, 96 kHz, 176.4 kHz, 192 kHz(16 bits, 20 bits, 24 bits)USB input: 32 kHz, 44.1 kHz, 48 kHz, 88.2 kHz, 96 kHz, 176.4 kHz, 192 kHz(16 bits, 24 bits, 32 bits) | |
| Digital output | Optical digital output: | Optical digital terminal -15 to -21 dBm |
* Specifications and appearance are subject to change without notice.
Before Asking for Repair Service
While in use, this unit may display phenomena which may be confused as malfunctions. Before contacting your country's official LUXMAN distributor for repair services, please read the operating instructions and operating instructions for any connected input and through output devices and check the troubleshooting table below. If the cause of the malfunction cannot be identified, please contact your dealer. After LUXMAN's representatives have accepted your request for repair services, inspection fees and transportation expenses may be claimed, even though the unit may be found to be operating normally.
Besides, such personal computer as a PC/Mac connected to the unit and the software that operates on the PC/Mac (operations and settings included) are not supported.
Problem Cause/Solution Ref. page
| No power is supplied even though the operation switch is pressed. | Connect the power cable to the AC inlet and the AC outlet firmly. 14 | |
| The disc tray comes out even after the tray is closed. | Set the disc on the disc tray correctly. 16 | |
| Clean the disc to remove dirt. 2 | ||
| Playback cannot be performed. Clean the disc to remove dirt. 2 | ||
| No sound is generated. / Sound volume is too low. (Digital input) | Connect digital cables correctly. 13 - 14 | |
| If the USB is selected as an input source, select this unit (D-N150) as the output destination by configuring the sound setting of a PC/Mac. | Refer to the instruction manual of the PC/Mac or the software in use. | |
| If the unit (D-N150) cannot be selected even when trying the solution above, reconnect the USB cable. | ||
| If the USB is selected as an input source, adjust the sound volume by configuring the sound setting of a PC/Mac. | ||
| If the USB is selected as an input source, adjust the sound volume on a player software of a PC/Mac. | ||
| Ensure that this unit supports the sampling frequency and the number of quantization bits of the played back digital signals. | 11 - 12 | |
| Check to see whether “UNLOCK” of the digital input is displayed or not. (When the digital signal from the digital device is not synchronized with this unit, the source may not be played back.) | ||
| The remote control cannot be operated. | Operate the remote control within the specified operating range. 6 | |
| Replace the remote control battery with a new one. 5 | ||
| The remote control infrared receiver is exposed to direct sunlight or strong light sources (such as inverter fluorescent lights). Change the installation place or angle to avoid the exposure to light sources. | 6 | |
| An electronic device such as a television malfunctions. | Some devices equipped with a wireless remote control receiver may malfunction when the remote control of this unit is operated. Keep this unit away from such devices. | 6 |
Problem Cause/Solution Ref. page
| No sound is generated from the speakers, or sound is distorted. | · Confirm that the connections of audio cables are correct. 13 - 14 |
| · Clean the disc to remove dirt. 2 | |
| · When the output level of an amplifier, etc. is minimum, adjust the volume. | |
| · Confirm that the cable connectors are connected and firmly inserted into the terminals of the unit. | |
| · Clean the cable connectors and terminals by using a plain dry cloth or a cloth dipped in a small amount of dehydrated alcohol. | |
| Digital audio signals cannot be output digitally. | · When the PCM file of 32 kHz sampling frequency is played back, a digital audio output cannot be provided. |
This unit may not work normally when the unit is subject to external influence such as static electricity. In such a case, normal operation may resume by turning off the power once and turning on the power again after several tens of seconds or returning the unit to the factory setting. If the problem is not solved, please contact your dealer or our service center.
MEMO
MEMO
- DO NOT move this unit during playback.
- When moving this unit
- Installation place
- Note:
- Avoid the following locations for installation
- Do not put articles.
- To avoid heat emission
- Turn off this unit when it is not used.
- Notice when this unit is installed in a rack with glass doors
- Dew condensation
- Batteries
- How to handle discs
- How to store discs
- Disc cleaning
- Disc in a specific shape
- Lens cleaning
- Notice on handling optical digital cables
- Cleaning
- Compact chassis design
- USB input supports 192 kHz / 32 bit
- Digital input terminals
- Zoom function
- playback modes
- Dimmer function
- Last memory function
- Analog output terminals
- PCM5102A manufactured by Burr-Brown
- Original technologies
- Remote control (RD-27)
- Highly stable power supply
- Schottky barrier diodes
- Original LUXMAN's OFC wiring
- Types of discs that can be played
- Check the accessories
- How to Use Remote Control
- Insert batteries into the remote control
- Remote control's range
- Names and Functions
- Operation switch (OPERATION)
- Operation indicator
- Disc tray
- Open/close switch ( )
- Remote sensor (R)
- Display window
- Digital input selection switch (DIGITAL IN)
- Play switch (▷)
- Play indicator
- Pause switch (☐)
- Stop switch (☐)
- Previous switch (K)
- Next switch (>)
- Display window
- Track number (TRK)
- Time display mode
- Playback mode
- Time
- Repeat mode
- Remote control
- Digital input selection switch (DIGITAL IN)
- Dimmer switch (DIMMER)
- Program switch (PROGRAM)
- Numeric keys (1, 2, 3, 4, 5, 6, 7, 8, 9, 0)
- Clear switch (CLEAR)
- Previous switch (<<
- Rewind switch (<<
- Time display switch (TIME)
- Open/close switch ( )
- Volume control switches (VOLUME)
- Repeat switch (REPEAT)
- Random switch (RANDOM)
- Enter switch (ENTER)
- Play switch (☐)
- Next switch (>)
- Pause switch (☐)
- Fast-forward switch ( )
- Zoom switch (ZOOM)
- Stop switch (☐)
- Rear panel
- Analog unbalance output terminals (ANALOG OUT)
- Optical digital output terminal (OPT)
- Coaxial digital input terminal (COAX)
- Optical digital input terminal (OPT)
- USB digital input terminal (USB)
- Caution:
- Power cable terminal (AC IN)
- Connections
- Before connecting
- How to connect power supply
- How to connect input devices
- Digital connection from a PC/Mac (Refer to the connection diagram (A).)
- Digital connection from such device as a CD player (Refer to the connection diagrams (B) and (C).)
- Upper side
- How to connect output devices
- Unbalanced connection with such device as an integrated amplifier (Refer to the connection diagram (D).)
- Digital output to such device as another D/A converter (Refer to the connection diagram (E).)
- Disc playback/pause/stop
- Playback a disc.
- Pause/stop the playback of the disc.
- Skips to the desired track (cue function)
- Skip playback
- Skip to the track to play back.
- Go back to the track to play back.
- Disc fast-forward/rewind playback (Scan)
- Fast-forward the playback.
- During playback, press the fast-forward ( ) switch.
- To resume the regular playback, press the play (▷switch.
- Rewind the playback.
- During playback, press the rewind (<< switch.
- To resume the regular playback, press the play (▷switch
- Direct search/repeat playback
- Specify the desired track for playback
- Enter a track number by pressing numeric keys.
- Press the ENTER or play switch.
- Repeat playback
- Track repeat (T-REP)
- All repeat (A-REP)
- Enter the track number to program next.
- Press the ENTER switch.
- Press the play (▷ switch.
- Random playback/disc information/zoom
- Disc information
- Switch the time display during playback.
- The current track number and the elapsed time of the track (In the default setting)
- The current track number and the remaining time of the track (Remain)
- The total remaining time of the disc (Total remain)
- Zoomed display
- Enlargement of displayed characters
- Detailed Settings
- Digital input selection switch (DIGITAL IN)
- This switch is pressed when using this unit as a D/A converter.
- Each time the DIGITAL IN switch is pressed, the display changes as follows. COAXIAL → OPTICAL → USB → CD
- The selected input type and sampling status are displayed on the main unit display window.
- Dimmer switch (DIMMER)
- The brightness of the main unit display can be adjusted. The brightness can be adjusted in 4 steps from light off to normal.
- Volume control switch (VOLUME)
- When a LUXMAN integrated amplifier is connected, volume control of the integrated amplifier is available.
- How to restore all the settings to the factory defaults
- Before Asking for Repair Service
- MEMO
Brand : LUXMAN
Model : D-N150
Category : Hi-Fi System